SsangYong Rexton. Service manual - part 25


  Index      SsangYong     SsangYong Rexton - service and repair manual


Search            


Content   ..  23  24  25  26   ..


SsangYong Rexton. Service manual - part 25


DI01-54

CHANGED BY

EFFECTIVE DATE

AFFECTED VIN

ENGINE ASSEMBLY

DI ENG SM - 2004.4

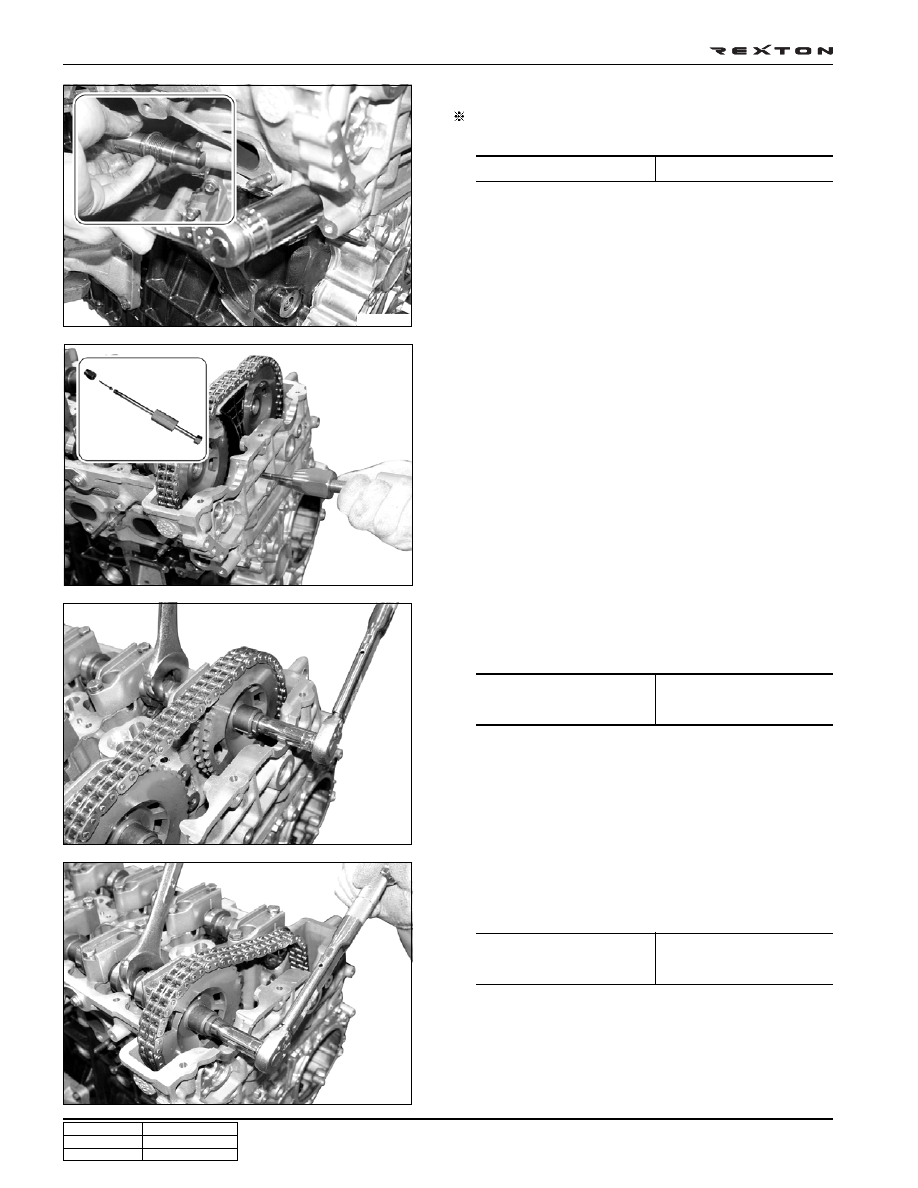
22. Pull out the lock pin and remove the upper chain guide

bracket.

23. Unscrew the bolt and remove the intake camshaft

sprocket.

Installation Notice

24. Unscrew the bolt and remove the exhaust camshaft

sprocket.

Installation Notice

21. Remove the chain tensioner.

Preceding works: removal of EGR pipe and oil dipstick
tube

Tightening torque

25 ± 2.5 Nm,

90° + 10°

Tightening torque

25 ± 2.5 Nm,

90° + 10°

Tightening torque

65 ± 5.0 Nm

Y220_01114

Y220_01113

Y220_01112

Y220_01119

DI01-55

CHANGED BY

EFFECTIVE DATE

AFFECTED VIN

ENGINE ASSEMBLY

DI ENG SM - 2004.4

25. Remove the camshaft bearing cap bolts so that the

tightening force can be relieved evenly.

• Intake: #1, #3, #6

• Exhaust: #7, #9, #12

* However, there is no specific removal sequence.

• Intake: #2, #4, #5

• Exhaust: #8, #10, #11

* Do not remove the bolts at a time completely. Remove

them step by step evenly or camshaft can be seriously
damaged.

Installation Notice

27. Remove the finger follower and the HLA device.

26. Remove the intake and exhaust camshafts from the

cylinder head.

Tightening torque

25 ± 2.5 Nm

Notice

• Avoid contact with hot metal parts when removing

the HLA device immediately after stopping the
engine.

• Be careful not to be contaminated by foreign

materials.

• To prevent the oil leaks, store the removed finger

follower and HLA device with standing up.

• If the HLA can be easily pressed in by hand, it

indicates the oil inside of HLA has been flown out.
In this case, replace it with new one.

Y220_01115

Exhaust

Y220_01118

Y220_01117

Y220_01116

Intake

DI01-56

CHANGED BY

EFFECTIVE DATE

AFFECTED VIN

ENGINE ASSEMBLY

DI ENG SM - 2004.4

29. Remove the cylinder head bolts according to the

numerical sequence.

Installation Notice

31. Remove the cylinder head.

30. Measure the length of cylinder head bolts.

• If the maximum length is exceeded by 2 mm, replace

the cylinder head bolt.

28. Pull out the pin and remove the timing chain guide from

the engine.

Tightening torque

M8 x 25: 2 EA

M8 x 50: 2 EA

M12 x 177: 11 EA

M12 x 158: 1 EA

(Vacuum pump side)

Nm

25 ± 2.5

25 ± 2.5

85 ± 5 Nm,

3 x 90° + 10°

Length when new

177 mm

158 mm

Maximum Limit

179 mm

160 mm

Notice

• Inspect the cylinder head surface.

• Store the removed injectors and glow plugs so that

they will not be damaged.

Y220_01120

Y220_01121

Y220_01122

Y220_01123

DI01-57

CHANGED BY

EFFECTIVE DATE

AFFECTED VIN

ENGINE ASSEMBLY

DI ENG SM - 2004.4

32. Measure the piston protrusion from the parting surface.

• Specified Value: 0.765 ~ 1.055 mm

33. Remove the cylinder head gasket.

Installation Notice

• Replace the cylinder head gasket with new one.

Make sure to place the “TOP” mark upward.

1. Put the steel gasket on the cylinder block and

position the cylinder head.

34. Turn over the engine and remove the baffle plate.

Installation Notice

Tightening torque

10 ± 1.0 Nm

Tightening torque

Step 1 20 ± 2.0 Nm

Step 2 85 ± 5.0 Nm

Step  3 90 ± (3 times) + 10°

• Apply the oil on the bolt thread when installing.

• Always insert new washer first.

• The bolts (12) at vacuum pump side are shorter

than others.

Y220_01124

Y220_01125

Y220_01127

Y220_01126

2. Tighten the cylinder head bolts to specified torque

and torque angle.


Content   ..  23  24  25  26   ..