SH-60B HELICOPTER. FLIGHT MANUAL (2008) - page 5
A1-H60BB-NFM-000
7.3.16 Cabin Inspection
1. M60D/M240D/GAU--16/A Gun--mount.
To facilitate cabin egress, all crew--served weapons and their support
equipment should be removed during missions not requiring weapons
installations.
CAUTION
Visually inspect quick release pin for excessive wear or damage and the
presence of proper plastic zip ties.
2.
HIFR connections/fittings.
3.
Rescue Station.
a. All switches — OFF/NORMAL.
b. Hoist shear switch — SHEARWIRED.
c. Hoist pendant.
d. Hover grip.
e. ICS cord.
4.
Fire extinguishers.
5.
First aid kits.
6.
Crash ax.
7.
APU accumulator pressure gauge — 2,650 psi minimum.
a. APU pump handle.
8.
Sonobuoy launcher — 900 psi minimum (with sonobuoys installed).
a. Sonobuoys loaded — VNT indication.
b. Valve safety lockout — AS REQUIRED.
9.
MAD AMP POWER supply switches — ON (Block I).
a. Mad AMP is located in the SO Rack Block 0.
10.
Litter tray — INSTALLED.
11.
Transmission oil filter impending bypass indicator.
ORIGINAL
7-10
A1-H60BB-NFM-000
12. RAST.
a. Ratchet with adapter.
b. Backup messenger assembly — INSTALLED.
13. Cabin door window — SHEARWIRED.
14. Cabin door HEELS battery/ADHEELS/IHEELS — TEST.
15. Mission avionics racks/panels.
a. ADS POWER — ON.
16. THP--1 and THP--2 — INSTALLED.
17. PDB.
a. Circuit breakers — IN.
b. HELLFIRE PWR switch — OFF.
18. Mobile Aircrew Restraint System (MARS), if applicable.
Only the modified crewmember’s aircraft safety belt, P/N MS16070--21/A,
will be used with the RMU--42/A retractor, mobile aircrew webbing. Use
of unmodified belts is unauthorized; use of MS16070--21, MS16070--3, or
MS16070--2 could result in serious injury in the event of a fall or aircraft
mishap.
CAUTION
Do not let go of an extended retractor strap. Slowly guide it back for
stowage so it does not slam into the retractor or cause personal injury.
a. Visually check the entire assembly for general condition.
b. Ensure ceiling retaining plate is flush against the cabin overhead soundproofing. Any movement of the
webbing strap assembly mounting bolt is not allowed. Webbing strap assembly shall rotate freely.
c. Place the control handle in the auto lock position.
d. Extend the strap approximately eight inches and jerk the strap until the retractor locks. There shall be no
further extension of the strap when it is pulled.
e. While still locked, release pull on the strap. The strap shall retract automatically. Cycle the control handle.
f. Extend the strap approximately eight inches; place the control handle in the manual lock position.
g. There shall be no further extension of the strap when pulled and the strap shall automatically retract when
guided back in.
7-11
ORIGINAL
A1-H60BB-NFM-000
19. Instructor/passenger seat/belts — Condition and security.
20. SO seat, inertial reel, and seat track — Condition and security.
a. Under seat area.
The area directly under each seat shall be clear of any stowed articles.
Failure to keep this area clear may preclude full vertical stroke of seat
bucket in a crash.
21.
SO station.
a. All switches — OFF/NORMAL.
b. ICS cords.
Note
Ensure the FLIR ICS cord is connected to either the SO or instructor ICS
station.
c. FLIR HCU.
d. FLIR VCR mounting plate — IF INSTALLED.
22.
SO window emergency release handle — SHEARWIRED.
23.
Lower SO console (ESP only).
a. All switches — OFF/NORMAL.
24.
Survival gear, loose equipment, cargo, internal stores — Properly stowed.
25.
Circuit breakers — VERIFY.
26.
NATOPS Manual — INSTALLED.
7.4
START CHECKLIST
Note
Daggered ( [ ) steps need not be accomplished on subsequent flights on the
same day.
7.4.1
Prestart Checks
CAUTION
D Moving flight controls without first or second--stage pressure on the
primary servos may cause damage to the flight controls.
D During high wind conditions (greater than 30 knots) and with AC power
supplied, the stabilator can automatically program. If the stabilator is
folded, damage may occur. Consideration should be given to disengaging
stabilator auto mode while the stabilator is folded.
ORIGINAL
7-12
A1-H60BB-NFM-000
1. Seats, belts, pedals, mirrors — ADJUSTED.
2. Cockpit window emergency release handles — AFT AND SHEARWIRED.
3. Left collective — EXTENDED AND LOCKED.
4. Circuit breakers and switches — CHECKED AND OFF.
Switches not having an OFF position should be checked as follows:
a. RDR, DATA LINK — STBY.
b. ATO ICS — NORM.
c. DATA LINK MODE — AUTO.
d. GUARD REC — ON.
e. COMM CONTR mode select — T/R.
f. GUST LOCK — NORM.
g. TAIL SERVO — NORM.
h. Pilot ICS — NORM.
i. CARGO HOOK ARMING — SAFE.
j. CARGO HOOK EMER RLSE — OPEN.
k. FIRE DET TEST — OPER.
l. DE--ICE MASTER — MANUAL.
m. MODE 4 AUDIO/LIGHT/OUT — AUDIO.
n. Transponder ANT — DIV.
o. COMP panel — SLAVED, LAT CHECKED.
p. FUEL MGT panel, MASTER/MODE switches — STOP FLOW/AUTO.
q. SERVO SHUTOFF SWITCH — CENTER.
5.
Parking brake — RESET.
6.
TAIL WHEEL — LOCK.
7.
Aircrewman Prestart Checklist — COMPLETE.
8.
Engine T--handles — FORWARD.
9.
APU T--handle — IN.
10.
Rotor brake — ON.
Do not release rotor brake if blades are folded unless secured in place by
blade crutches/clamps. Releasing the rotor brake with unsecured folded
blades may result in damage to aircraft injury to nearby personnel, and/or
all four blades rotating together, which may result in aircraft rollover.
11. BATT switch — ON (#1/#2 CONV, AC ESS BUS OFF, STABILATOR, and AFCS DEGRADED caution,
WOW and ROTOR BRAKE advisory — ILLUMINATE).
12. UHF backup — SET.
7-13
ORIGINAL
A1-H60BB-NFM-000
13. Fire detector system — TEST.
a. FIRE DET TEST knob — POSITION 1 (APU T--handle, engine T--handles, and master warning panel FIRE
lights illuminate).
b. FIRE DET TEST knob — POSITION 2 (engine T--handles and master warning panel FIRE lights
illuminate).
c. FIRE DET TEST knob — OPER (all fire warning lights extinguished).
14. Fire guard — POSTED, AREA CLEAR.
15. Internal/Exterior/NVD Lighting — AS REQUIRED.
16. APU — START.
a. ECS — OFF.
b. AIR SOURCE ECS/START switch — APU.
c. FUEL PUMP switch — APU BOOST.
d. APU CONTR switch — ON.
CAUTION
D APU exhaust flow may affect other aircraft equipment and cause possible
heat damage. Proper clearance should be checked prior to APU start.
D Only the RESERVE position of the FIRE EXTGH switch will operate
without AC power.
D To prevent an APU exhaust fire, wait at least 2 minutes after APU shutdown
to attempt a restart to allow residual fuel to vaporize.
Note
D Do not cycle the BATT switch or turn off the APU CONTROL switch if the
APU shuts down during start or after it is running. This removes the cause
of the shutdown from the APU BITE indicator.
D When mission avionics COMSEC gear is loaded with external power, use
of the APU generator may zeroize the codes.
17. APU GENERATOR switch — ON (as required).
18. ICS/RADIO — CHECK.
19. ECS — AS REQUIRED.
20. Blade/pylon spread — AS REQUIRED.
CAUTION
D Should the blade fold system stall during spread, cycling the BLADE
FOLDswitchtoFOLDshouldreturntherotorbladestothefoldedposition.
D ShutdowntheAPUimmediatelyifarotorbladeremainsstalledintheAPU
exhaust.
D When the ROTOR SPREAD light is not illuminated, pressing the AFCS
CONTROL panel RDR ALT pushbutton during blade fold system
operations may cause failure of the system. Press this pushbutton only if
flashing and after the blade spread evolution has been completed.
ORIGINAL
7-14
A1-H60BB-NFM-000
a. Area — CLEAR (wing walkers positioned as required).
b. CMPTR PWR/RESET pushbutton — ON.
c. BLADE FOLD MASTER switch — ON.
d. BLADE FOLD switch — SPREAD.
e. PYLON FLIGHT and ROTOR SPREAD lights — ILLUMINATED.
Illumination of the ROTOR SPREAD light may not be an accurate
indication of the blades being properly spread. Rotor engagement with
improperly spread blades may result in catastrophic rotor failure. A head
check shall be conducted any time the BLADE FOLD switch is moved from
the OFF position.
f. RDR ALT pushbutton — PRESS (if flashing).
Note
If RDR ALT pushbutton is flashing, pressing will update flight control
position to AFCS.
g. BLADE FOLD switch — OFF.
h. BLADE FOLD MASTER switch — OFF.
i. Proceed to step 22, Head Check.
[21. Lockpins status — CHECK.
a. BLADE FOLD MASTER switch — ON.
b. ROTOR SPREAD and PYLON FLIGHT lights — ILLUMINATED.
If the PYLON FLIGHT light is not illuminated, the pylon and stabilator
lockpins and the tail rotor indexer shall be visually inspected prior to flight.
Failure to do so may cause separation of the tail pylon.
CAUTION
Tail rotor damage may occur if indexer is not fully retracted.
c. If ROTOR SPREAD light not illuminated:
(1) CMPTR PWR/RESET pushbutton — OFF.
(2) BACKUP HYD PMP switch — OFF.
7-15
ORIGINAL
A1-H60BB-NFM-000
(3) BLADE FOLD switch — SPREAD (5--7 seconds).
Illumination of the ROTOR SPREAD light may not be an accurate
indication of the blades being properly spread. Rotor engagement with
improperly spread blades may result in catastrophic rotor failure.
CAUTION
D With a malfunctioning micro switch or blade fold logic module, keeping the
BLADE FOLD switch in SPREAD longer than 5--7 seconds may cause the
bladefoldlockpinstofullyretract,resultinginanuncommandedbladefold
and possible damage to the aircraft.
D If uncommanded blade fold occurs when the BLADE FOLD switch is
placed to SPREAD, the BLADE FOLD MASTER switch should be placed
in the OFF position. Do not secure electrical or hydraulic power until blades
are respread using blade fold test set.
d. If ROTOR SPREAD light remains off:
(1) BLADE FOLD switch — OFF.
(2) BLADE FOLD MASTER switch — OFF.
(3) Head check — PERFORM.
Note
D If the ROTOR SPREAD light remains off, there may or may not be a
SPREAD INCOMPLETE caution. The aircraft can be safely flown as long
as a proper head check is performed.
D If a documented discrepancy exists in the blade lockpin/microswitch
indicating system, the BLADE FOLD switch may be left in the OFF
position if the blade lockpins were visually checked on preflight.
e. If ROTOR SPREAD light illuminated:
(1) BLADE FOLD switch — OFF.
(2) SPREAD INCOMPLETE caution — DOES NOT APPEAR.
(3) BLADE FOLD MASTER switch — OFF.
[22.
Head check — AS REQUIRED.
a. Blade Lock Pins Engaged.
b. Pitch Lock Pins Retracted.
c. Gust Lock Disengaged.
Note
A head check shall be conducted any time the BLADE FOLD switch is
moved from the OFF position.
ORIGINAL
7-16
A1-H60BB-NFM-000
[23.
IGB/TGB Oil Level Check — AS REQUIRED (after Pylon Spread).
24.
CMPTR PWR/RESET pushbutton — CYCLE, ON.
25.
SAS/BOOST pushbutton — ON.
26.
BACKUP HYD PMP switch — ON.
Note
If electrical loads are introduced (e.g., backup hydraulic pump) while
operating from APU generator or external power, an AFCS power sever
may occur, indicated by appearance of the AFCS DEGRADED caution. To
restore AFCS computer power, press CMPTR PWR/RESET pushbutton on
AFCS CONTROL panel.
7.4.2
Systems Checks
[1.
DIGITS — ON; CDU and PDU — TEST.
a. CDU LAMP TEST button — PRESS AND HOLD. All lights and RTR OVERSPEED lights go on. CDU
digital displays read all 8’s. Release button, all lights go off and digital displays return to original reading.
b. PDU TEST buttons — PRESS AND HOLD. All display lights illuminate and torque reads 188. Release
buttons, all lights go off, and digits return to original reading.
2.
Fuel quantity and readouts — CHECK.
Note
The maximum difference between the fuel quantity indicators on the VIDS,
and total fuel digital readout shall not be more than 200 pounds.
a. Press and hold the FUEL TEST pushbutton. Indicators move to zero and digital display reads 0 -- 20. #1
and #2 FUEL LOW cautions lights, plus the MASTER CAUTION light, illuminate. Release pushbutton.
Indicators and digital readout return to previous quantity.
3.
Caution, advisory, warning lights — CHECK.
a. The following caution and advisory lights should be on:
(1)
#1 and #2 GEN.
(2)
#1 and #2 FUEL PRESS.
(3)
#1 and #2 ENGINE OIL PRESS.
(4)
#1 and #2 HYD PUMP.
(5) SAS.
(6) AFCS DEGRADED.
(7) MAIN XMSN OIL PRESS.
(8) WOW.
(9) ROTOR BRAKE.
(10) #1 and #2 ENG ANTI--ICE.
(11) APU ON.
(12) APU GEN ON.
(13) PRIME BOOST PUMP.
7-17
ORIGINAL
A1-H60BB-NFM-000
(14) BACK--UP PUMP ON.
(15) PARKING BRAKE ON.
b. BRT/DIM--TEST — TEST. All caution/advisory lights go on. All warning lights on master warning panels
go on and LOW ROTOR RPM lights flash. All pushbutton legends on AI/BDHI mode selector panels go
on. The AFCS CONTROL panel, STABILATOR, BLADE FOLD control panel, FMCP, and crew HOVER
TRIM engage panel lights illuminate.
c. BRT/DIM--TEST — RELEASE. MASTER CAUTION lights should flash 16 times. Note that no CHIP
cautions are on.
4.
RAD ALT, BAR ALT, clocks — SET.
5.
TACAN — REC.
6.
IFF MASTER — STBY.
[7.
Primary servos — CHECK.
a. SAS 1, SAS 2 pushbuttons — OFF.
b. SAS/BOOST and CMPTR PWR/RESET — Check ON.
c. Servo Interlock Check:
(1) Pilot’s SERVO switch — 1ST OFF. No allowable flight control movement. #1 PRI SERVO PRESS
caution and both MASTER CAUTION lights illuminate. Copilot’s SERVO switch 2ND OFF and back
to center. No change in lights.
(2) Pilot’s SERVO switch — 2ND OFF. No allowable flight control movement. #2 PRI SERVO PRESS
caution and MASTER CAUTION warnings on. Copilot’s SERVO switch 1ST OFF and back to center.
No change in lights.
(3) Pilot’s servo switch back to center. Repeat steps (1), and (2), beginning with copilot’s servo switches.
Note
During the Servo Interlock check, proper operation of the system will
prevent the #2 Primary servo from being shut off with the #1 PRI SERVO
PRESS caution on; and the #1 Primary servo from being shut off with the
#2 PRI SERVO PRESS caution on.
d. Pilot’s SERVO switch — 1ST OFF.
e. Pitch lockpin status — CHECK. While holding the collective fixed in the full up position and with the tail
rotor pedals neutral, the cyclic shall be moved in a square pattern. Any restriction to the full range of cyclic
motion may be indicative of an extended pitch lock.
f. Check for binds and restrictions while slowly moving cyclic and collective through full range.
g. Move collective full travel (up and down) in approximately 2 seconds. Ensure no longitudinal or lateral
cyclic control feedback is felt, and that the #2 PRI SERVO PRESS light does not illuminate while the
collective is in motion.
ORIGINAL
7-18
A1-H60BB-NFM-000
Note
D During control checks, the pilot’s or copilot’s cyclic may contact a portion
of the glare shield padding or instrument panel knobs which is usually
obtained with mid--collective, full left pedal, and full forward cyclic, which
is not a normal in--flight control combination.
D With the collective control in the full up position and the cyclic stick at the
forward left corner of its movement envelope, a ratcheting may be felt
throughthecycliccontrolandairframeandheardinthecockpitasthecyclic
control is moved to the right. This normal ratcheting of the swash plate
uniball bearing on the star guide assembly will occur at the specific flight
control orientation and movement listed above only. Ratcheting or binding
noted with the flight controls orientation at any other position or direction
of movement must be assumed to be an unassociated control problem or
deterioration of the Teflon coating on the uniball bearing.
h. Pilot’s SERVO switch — 2ND OFF.
i. Check for binds or restrictions while slowly moving cyclic and collective through full range.
j. Move collective full travel (up and down) in approximately 2 seconds. Ensure no longitudinal or lateral
cyclic control feedback is felt, and that the #1 PRI SERVO PRESS light does not illuminate while the
collective is in motion.
k. Pilot/copilot SERVO switches — CENTER. #1/#2 PRI SERVO PRESS caution lights OFF.
[8.
Boost servos — CHECK.
a. Collective and Pedals — MIDPOSITION and RIGHT PEDAL SLIGHTLY FORWARD OF NUTRAL.
Note
Slight pedal control deflection may be necessary to prevent excessive
collective movement.
b. SAS/BOOST pushbutton — OFF. BOOST SERVO OFF and AFCS DEGRADED cautions appear and
MASTER CAUTION lights illuminate.
c. Move flight controls through full range of travel. Note increase in control forces (except lateral).
d. Collective and Pedals — MIDPOSITION and RIGHT PEDAL SLIGHTLY FORWARD OF NEUTRAL.
e. SAS/BOOST pushbutton — ON. BOOST SERVO OFF and AFCS DEGRADED cautions disappear.
f. Collective — FULL DOWN.
[9.
Tail rotor servo — CHECK.
a. TAIL SERVO switch — BKUP. #1 TAIL RTR SERVO caution, #2 TAIL RTR SERVO ON advisory and
MASTER CAUTION lights illuminate. Check for binds and restrictions while moving tail rotor pedals
through full range.
b. TAIL SERVO switch — NORM. #1 TAIL RTR SERVO caution and #2 TAIL RTR SERVO ON advisory
disappear.
[10.
AFCS ground check.
a. SAS — CHECK.
(1) CMPTR PWR/RESET (2--minute warm--up) and SAS/BOOST pushbuttons — Check ON.
(2) TRIM and AUTO PLT pushbuttons — Check OFF.
(3) SAS 1 pushbutton — ON for at least 10 seconds, then OFF. SAS fail advisory lights and AFCS
DEGRADED caution should not appear during self--test.
7-19
ORIGINAL
A1-H60BB-NFM-000
(4) SAS 1 pushbutton — ON, then OFF. No movement should occur in either main rotor blades or flight
controls.
(5) Repeat step (4) for SAS 2.
b. Trim — CHECK.
Note
Do not depress trim release switches during gradient force checks.
(1) TRIM pushbutton — ON, then OFF. No movement should occur in flight controls.
(2) TRIM pushbutton — ON.
(3) Move cyclic fore, aft, and laterally checking for symmetrical gradient force increase with control and
pedal displacement.
(4) Center pedals and place collective at midposition. Check for gradient force increase with collective and
pedal displacement.
c. Autopilot — CHECK.
(1) SAS 1, SAS 2, and TRIM pushbuttons — ON.
(2) AUTO PLT pushbutton — ON and OFF. No movement should occur in flight controls.
(3) AUTO PLT pushbutton — ON.
(4) Move controls through full range. Check for restrictions, control feedback, and rotor blade chatter.
Note
If any restricting control feedback or rotor blade chatter is detected, repeat
step with SAS/Trim/Autopilot individually disengaged to determine the
channel and axis where the discrepancy exists.
(5) Pilot AFCS RELEASE switch — CHECK. SAS 1, SAS 2 and AUTO PLT lights off. SAS caution and
MASTER CAUTION warning on.
(6) SAS 1, SAS 2, TRIM and AUTO PLT pushbuttons ON.
(7) Repeat steps (5) and (6) for copilot.
11.
Stabilator — CHECK.
a. Indicator should read between 34° and 42° trailing edge down; STABILATOR caution should not appear.
STABILATOR AUTO CONTROL pushbutton ON.
Helicopter shall not be flown if any part of the stabilator check fails.
Note
Observe plane captain hand signals. If ground crew is unavailable, visually
check stabilator after each step.
b. PresstheSTABILATORcontrolpanelTESTbuttonuntilstabilatormovementstops.Indicatorshouldmove
5° to 12° less than in step a. STABILATOR caution appears and MASTER CAUTION warning illuminates.
A beeping warning tone sounds in pilot and ATO headsets.
ORIGINAL
7-20
A1-H60BB-NFM-000
c. STABILATOR AUTO CONTROL pushbutton — ON. Warning tone stops, the stabilator moves to between
34° and 42° trailing edge down and STABILATOR caution disappears.
d. Hold STABILATOR control panel MAN SLEW switch UP until stabilator stops. Stabilator position should
indicate between 5° and 10° trailing edge up in 4 to 8 seconds. STABILATOR caution appears, MASTER
CAUTION warning illuminates and a beeping warning tone sounds in pilot and copilot headsets. Silence
tone as required.
e. Hold MAN SLEW switch DOWN until indicator reads 0°.
f. STABILATOR AUTO CONTROL pushbutton — ON. Indicator moves to between 34° and 42° trailing
edge down. STABILATOR caution should not appear.
[12. Rescue Hoist Preoperational Check — AS REQUIRED (see paragraph 7.16.2.1).
[13. Cargo Hook Preoperational Check — AS REQUIRED (see paragraph 7.16.2.2).
7.4.3 Starting Engines and Rotor Engagement
1. High Points and Tail Tiedowns — VERIFY REMOVED.
CAUTION
Np shaft rub occurs when the engines are online and the rotor brake is
released. The Np shaft impacts the Ng shaft, which causes the compressor
blades to impact the compressor casing. Over time, this will cause the
engine to lose power and possibly catastrophically fail. The only way to
ensure Np shaft rub will not occur is to use the No Rotor Brake Start
Procedure. The No Rotor Brake Start Procedure shall be utilized for routine
engine start and rotor engagement ashore.
7.4.3.1 No Rotor Brake Start Procedure
1. Fireguard posted, area clear.
2. Doors, inertia reels — LOCK.
3. SAS 1, SAS 2, TRIM, and AUTO PLT pushbuttons — ON.
When AFCS computer power is cycled, trim is disengaged. An unguarded
cyclic will allow the rotor arc to dip as low as 4 feet above the ground,
without droop--stop pounding, prior to full control deflection.
4. Rotor brake — OFF. Check pressure 0 psi, and ROTOR BRAKE advisory out.
5. ENGINE IGNITION switch — NORM.
6. Fuel selectors — XFD.
7. Lights — AS REQUIRED.
8. Flight controls — POSITION AND HOLD.
a. Cyclic and pedals — CENTERED.
b. Collective — DOWN AND HOLD.
7-21
ORIGINAL W/IC 70
A1-H60BB-NFM-000
CAUTION
During engine start and runup, adjust the cyclic as required to maintain the
tip path plane in a neutral position, maintain the collective full down and
the pedals centered until Nr reaches 50 percent minimum to prevent damage
to anti flap assembly. If droop stop pounding occurs, an cyclic adjustment
alone does not alleviate the pounding, then raise collective to alleviate this
condition, but not to exceed 1/2 inch. Maintain the new collective position
until Nr reaches 50 percent minimum.
9. BACKUP HYD PMP switch — OFF.
10. Engines — START.
CAUTION
D If start is attempted with ENGINE IGNITION switch OFF, do not place
switch to NORM until the Abort--Start emergency procedure has been com-
pleted. If the ENGINE IGNITION switch is placed to NORM while start
is in progress, a hot start may occur.
D If ENG STARTER advisory disappears after advancing the PCL to IDLE,
do not reengage the starter due to a possible engine over--temperature.
Note
It is normal for an OIL FLTR BYPASS caution and/or high engine oil
pressure to appear when starting an engine below normal operating
temperatures because of the relatively high oil viscosity. When the engine
oil temperature reaches 38 °C, the caution should disappear.
a. Starter button — Press until Ng increases.
b. TGT — LESS THAN 80 °C.
Note
With certain DECU/VIDS SDC installations, prestart TGT may read a
constant 150 °C to 175 °C. This indication is a result of the --71 °C bias in
effect when the DECU is powered with 400Hz airframe power. When it is
knownthattheengineiscold,anormalstartmaybecontinued.TGTshould
indicate normally upon engine light off.
c. PCL — IDLE.
d. System indications — CHECK.
Abort start if any of the following indications occur:
(1) Ng does not reach 14 percent within 6 seconds after starter initiation.
(2) No oil pressure within 30 seconds after starter initiation (Do not motor engine).
(3) No light off within 30 seconds after moving PCL to IDLE.
(4) ENG STARTER advisory disappears prior to reaching 52 percent Ng.
ORIGINAL
7-22
A1-H60BB-NFM-000
(5) TGT reaches 851 °C before idle speed is attained.
CAUTION
If engine experiences a hot start and a subsequent start is attempted, motor
the engine for 60 seconds prior to advancing PCL to idle.
Note
If engine fails to start consideration should be given to executing Fuel
Priming Checklist (see paragraph 7.17.5).
e. Repeat steps a. through d. for other engine. If conducting crossbleed start (see paragraph 7.17.16.1).
11. Engine oil pressure — CHECK.
12. ENG STARTER advisories — OUT.
Note
Starter normally drops out at 52 percent to 65 percent Ng. If starter does not
drop out, perform ENGINE STARTER advisory emergency procedure.
13. Engine Idle Ngs — CHECK, 63 percent or greater and matched within 3 percent.
Ground idle Ng split greater than 3 percent is an indication of possible LDS
roll pin failure. Do not fly the helicopter until maintenance action is
performed.
14. Check #1 HYD PUMP and #2 HYD PUMP cautions — OUT.
15. XMSN oil pressure — CHECK.
16. Np/Nr — CHECK WITHIN LIMITS.
CAUTION
Loss of the collective boost servo through either intentional shutoff or loss
of NO. 2 hydraulic pressure will cause the collective to move rapidly from
the down position to the midposition if it is not held by hand. This
movement can be enough to cause the helicopter to become airborne.
During ground operations with engines operating, the flight controls shall
be guarded.
17. PCLs — PULL OUT OF IDLE DETENT AND SMOOTHLY ADVANCE TO FLY.
Do not move the PCLs rapidly when the tail wheel lockpin is not engaged.
7-23
ORIGINAL
A1-H60BB-NFM-000
18. Droop stops — OUT.
Note
If all droop stops are not out by 100 percent Nr, shut down and investigate.
19. PCLs — FLY.
20. Fuel selectors — DIR.
21. BACKUP HYD PMP switch — AUTO.
22. TRQs — MATCHED within 5 percent.
23. Np/Nr — 100 percent.
With rotors turning, all personnel shall enter and exit the rotor arc at the 3
and 9 o’clock positions. Personnel shall enter and exit only upon direction
from the plane captain/LSE after clearance is received from the PAC.
24. NO. 1 and NO. 2 GENERATOR switches — ON.
Power transfer from the APU generator or external power to the NO. 1
generator may cause disengagement of SAS 1, SAS 2, TRIM, AUTO PLT,
and Stabilator. An unguarded cyclic will allow the rotor arc to dip as low
as 4 feet above the ground.
25. APU GENERATOR switch — ON (as required).
26. External Power — OFF (as required).
7.4.3.2 Rotor Brake Start Procedures
1. Fireguard posted, area clear.
2. Doors, inertia reels — LOCK.
3. SAS 1, SAS 2, TRIM, and AUTO PLT pushbuttons — ON.
When AFCS computer power is cycled, trim is disengaged. An unguarded
cyclic will allow the rotor arc to dip as low as 4 feet above the ground,
without droop--stop pounding, prior to full control deflection.
4. Rotor brake — CHECK PRESSURE 450 PSI MIN.
5. ENGINE IGNITION switch — NORM.
6. Fuel selectors — XFD.
7. Lights — AS REQUIRED.
ORIGINAL
7-24
A1-H60BB-NFM-000
8. Flight controls — POSITION AND HOLD AS REQUIRED.
a. Cyclic and pedals — CENTERED.
b. Collective — DOWN AND HOLD.
CAUTION
Loss of the collective boost servo through either intentional shutoff or loss
of NO. 2 hydraulic pressure will cause the collective to move rapidly from
the down position to midposition if it is not held down by hand. This
movement can be enough to cause the helicopter to become airborne.
During ground operations with engines operating, the flight controls shall
be guarded.
9. Engines — START.
CAUTION
D If start is attempted with ENGINE IGNITION switch OFF, do not place
switch to NORM until the Abort Start emergency procedure has been com-
pleted. If the ENGINE IGNITION switch is placed to NORM while start
is in progress, a hot start may occur.
D If ENG STARTER advisory disappears after advancing the PCL to IDLE,
do not reengage the starter due to a possible engine over--temperature.
Note
D If the rotor head moves due to rotor brake slippage, the pilot may
immediately secure both engines, or if prebriefed, release the rotor brake.
D It is normal for an OIL FILTER BYPASS caution to appear and/or high
engine oil pressure when starting an engine below normal operating
temperatures because of the relatively high oil viscosity. When the engine
oil temperature reaches approximately 38 °C during warmup, the caution
should disappear.
a. Starter button — Press until Ng increases.
b. TGT — Less than 80 °C.
Note
With certain DECU/VIDS SDC installations, prestart TGT may read a
constant 150 °C to 175 °C. This indication is a result of the --71 °C bias in
effect when the DECU is powered with 400Hz airframe power. When it is
knownthattheengineiscold,anormalstartmaybecontinued.TGTshould
indicate normally upon engine lightoff.
c. PCL — IDLE.
d. System indications — CHECK.
Abort start if any of the following indications occur:
(1) Ng does not reach 14 percent within 6 seconds after starter initiation.
(2) No oil pressure within 30 seconds after starter initiation (Do not motor engine).
7-25
ORIGINAL
A1-H60BB-NFM-000
(3) No light off within 30 seconds after moving PCL to IDLE.
(4) ENG STARTER advisory disappears prior to reaching 52 percent Ng.
(5) TGT reaches 851 °C before idle speed is attained.
CAUTION
If engine experiences a hot start and a subsequent start is attempted, motor
the engine for 60 seconds prior to advancing PCL to idle.
Note
If engine fails to start consideration should be given to executing Fuel
Priming Checklist (paragraph 7.17.5).
e. Repeat steps a. through d. for other engine. If conducting crossbleed start (see paragraph 7.17.16.1).
10. Engine oil pressure — CHECK.
11. ENG STARTER advisories — OUT.
Note
Starter normally drops out at 52 percent to 65 percent Ng. If starter does not
drop out, perform ENGINE STARTER advisory emergency procedure.
12. Engine idle Ngs — CHECK, 63 percent or above and matched within 3 percent.
Ground idle Ng split greater than 3 percent is an indication of possible LDS
roll--pin failure. Do not fly the helicopter until maintenance action is
performed.
13. Area — CLEAR.
14. Lights — AS REQUIRED.
15. Rotor — ENGAGE.
a. Rotor brake — OFF. Check 0 psi, and ROTOR BRAKE advisory out.
b. PCLs — PULL OUT OF IDLE DETENT AND SMOOTHLY ADVANCE TO FLY.
Do not move the PCLs rapidly when the tail wheel lockpin is not engaged.
Note
Should conditions dictate, releasing the rotor brake and allowing Np/Nr to
stabilize before advancing the PCLs.
c. CHECK #1 HYD PUMP and #2 HYD PUMP cautions — OUT.
d. XMSN oil pressure — CHECK.
ORIGINAL
7-26
A1-H60BB-NFM-000
e. Droop stops — OUT.
Note
If all droop stops are not out by 100 percent Nr, shut down and investigate.
16. PCLs — FLY.
17. Fuel selectors — DIR.
18. BACKUP HYD PMP switch — AUTO.
19. TRQs — MATCHED WITHIN 5 PERCENT.
20. Np/Nr — 100 PERCENT.
With rotors turning, all personnel shall enter and exit the rotor arc at the 3
and 9 o’clock positions. Personnel shall enter and exit only upon direction
from the plane captain/LSE after clearance is received from the PAC.
21. NO. 1 and NO. 2 GENERATOR switches — ON.
Power transfer from the APU generator to the NO. 1 generator may cause
disengagement of SAS 1, SAS 2, TRIM, AUTO PLT, and Stabilator. An
unguarded cyclic will allow the rotor arc to dip as low as 4 feet above the
ground.
22. APU GENERATOR switch — ON (as required).
23. External Power — OFF (as required).
7.4.3.3 Post Engagement Checks
[1. Engine overspeed system and Auto--Ignition — CHECK.
Engine overspeed check shall not be performed in flight. Possibility of
flameout exists on the engine being checked. Additionally, a popped NO.
1 and/or NO. 2 ENG OVSP circuit breaker shall not be reset in flight.
Resetting the circuit breaker may initiate an engine overspeed signal and
result in engine flameout.
CAUTION
Engine TGT must be monitored during overspeed test. If TGT rises above
851 °C, shut engine down immediately to avoid over--temperature and
perform the Abort Start emergency procedure.
7-27
ORIGINAL
A1-H60BB-NFM-000
Note
D A failure while testing A or B individually will give the same indications
as a normal test of A and B simultaneously.
D When OVSP TEST A and B are pressed simultaneously, the overspeed
protection system is operating correctly if an Ng cut--back is noted.
D Failure of an engine to automatically relight when both OVSP TEST A and
B are pressed simultaneously is possible. The engine should be restarted
using normal procedures and the check should be performed again. If the
engine automatically relights on the second attempt, the engine is
acceptable. If the engine fails the test twice consecutively, maintenance
action is required.
D When pressing OVSP TEST Aand B simultaneously, do not press andhold
buttons continuously as this may result in a sub--idle relight and engine
overtemperature.
a. NO. 1
Ng — NOTE.
b. NO. 1
ENG OVSP TEST A — PRESS AND HOLD.
c. NO. 1
Ng — REMAINS CONSTANT.
d. NO. 1
ENG OVSP TEST A — RELEASE.
e. NO. 1
ENG OVSP TEST B — PRESS AND HOLD.
f.
NO. 1
Ng — REMAINS CONSTANT.
g. NO. 1
ENG OVSP TEST B — RELEASE.
h. NO. 1
ENG OVSP TEST A and B — PRESS SIMULTANEOUSLY AND IMMEDIATELY RELEASE.
(Note decrease in NO. 1 Ng).
i.
NO. 1 Ng returns to speed noted in step a.
j.
Repeat steps a. through i. for NO. 2 engine.
[2.
Contingency power — CHECK.
a. Pilot CONTGCY PWR switch — ON.
b. Confirm normal engine parameters; #1 and #2 ENG CONTGCY PWR ON advisories, ECS SHUTDOWN
caution (if ECS operating), and MASTER CAUTION lights appear.
c. Pilot CONTGCY PWR switch — OFF. Advisories and caution disappear.
Note
Upon selecting CONTGCY PWR, a rapid change in TGT may be indicative
of an engine control system malfunction.
d. Repeat steps a. through c. for copilot CONTGCY PWR switch.
[3.
Hydraulic leak test — CHECK.
a. Flight controls — LEFT PEDAL SLIGHTLY FORWARD OF NEUTRAL.
b. HYD LEAK TEST switch — TEST. #1 TAIL RTR SERVO, BOOST SERVO OFF, SAS, AFCS
DEGRADED, #1 RSVR LOW, #2 RSVR LOW, and BACK--UP RSVR LOW cautions appear and
MASTER CAUTION warning illuminates. BACK--UP PUMP ON and #2 TAIL RTR SERVO ON
advisories appear. During this check, it is normal for collective and tail rotor pedals to move slightly.
c. HYD LEAK TEST switch — RESET.
ORIGINAL
7-28
A1-H60BB-NFM-000
d. Associated cautions and advisories
— Disappear. BACKUP PUMP ON advisory remains for
approximately 90 seconds or until cycled OFF.
e. BACKUP HYD PMP switch — CYCLE, OFF THEN AUTO.
[4.
Backup tail rotor servo — CHECK.
a. Flight controls — LEFT PEDAL SLIGHTLY FORWARD OF NEUTRAL.
b. TAIL SERVO switch — BKUP. #1 TAIL RTR SERVO caution appears, #2 TAIL RTR SERVO ON and
BACK--UP PUMP ON advisories appear within 0.5 seconds.
c. TAIL SERVO switch — NORM. #1 TAIL RTR SERVO caution and #2 TAIL RTR SERVO ON advisory
disappear. BACK--UP PUMP ON advisory remains for approximately 90 seconds or until cycled OFF.
d. BACKUP HYD PMP switch — CYCLE, OFF THEN AUTO.
5.
Engine anti--ice check — AS REQUIRED (see paragraph 7.17.10).
6.
Blade de--ice systems check — AS REQUIRED (see paragraph 7.17.9).
7.
HIT check — AS REQUIRED (see paragraph 7.17.1).
8.
ENGINE ANTI--ICE, PITOT HEAT, BLADE DE--ICE, WINDSHIELD ANTI--ICE, DE--ICE MASTER
switches — AS REQUIRED.
9.
FMCP — AS REQUIRED.
10.
APU — SHUTDOWN.
a. AIR SOURCE ECS/START switch — ENG.
b. APU CONTR switch — OFF.
c. FUEL PUMP switch — OFF.
7.4.4
Mission/Weapons System Checklist
1.
MSN PWR — PRI.
2.
DPLR, RDR, DATA LINK — AS REQUIRED.
3.
ALQ--205 — AS REQUIRED.
4.
AAR 47 — AS REQUIRED (2--minute warm--up).
[5.
Mission systems — IPL and key.
a. SO — IPL.
b. ATO MPD — TEST.
c. Secure equipment — KEY.
d. ATO MPD — ON (after test pattern appears).
e. Secure communications — CHECK.
6.
Mode select panels, BDHI, AI — AS REQUIRED.
7.
BDHIs and AIs — CHECK.
[8.
TACAN/IFF — TEST, Set.
a. TACAN check:
(1) Ensure the TACAN has warmed up for 90 seconds.
(2) Select TCN on BDHI mode select panel.
(3) Adjust BDHI CRS control for a course of 180° or 000°.
7-29
ORIGINAL
A1-H60BB-NFM-000
(4) Set TACAN control mode selector to T/R.
Note
A partial test of the TACAN may be accomplished while the mode select
switch is in the REC position. However, the transmitter (DME) functions
are not fully tested.
(5) Momentarily press TACAN TEST button and observe BDHI and TEST indicator for the following:
(a) TEST indicator flashes momentarily indicating TEST indicator is operational.
(b) Distance shutter and NAV flag on BDHI come into view for approximately 15 seconds, if not already
in view.
(c) Distance shutter and NAV flag go out of view.
(d) Distance indication is 000.0 ±0.5 nm and bearing indication is 180 ±3°. A distance indication of
399.9 is equal to a negative 0.1 nm, and a distance indication of 399.5 is equal to negative 0.5 nm.
The 399.9 to 399.5 indications are not malfunctions, but an indication of negative distance.
(e) Course deviation indicator is centered within ±1/2 dot and TO/FROM indicator indicates TO (if a
course of 180° is selected) or FROM (if a course of 000° is selected).
(f) Distance shutter and NAV flag come into view until the system reacquires a usable signal.
(g) Observe TEST indicator. If indicator illuminates during test and remains illuminated, there is a
TACAN system malfunction and all information should be disregarded until repairs are made.
b. IFF check:
(1) MASTER — NORM.
(2) Individual mode switches — TEST; Verify steady green light.
(3) MASTER — STBY.
Note
D IFF Mode 4 may also be tested by placing the mode 4 TEST/ON/OUT
switch to the TEST position.
D IfMode3/AorModeCfails,IFRflightunderATCcontrolisnotpermitted.
(4) Codes — AS REQUIRED.
9.
AOP — INITIALIZE.
[10.
NAV — INITIALIZE.
If GPS is to be used as a the primary navigation mode:
a. GPS — KEY.
b. GPS — INIT/TEST (via equipment status table once GPS is available).
CAUTION
Options 1 (Get GPS PRESET) and 8 (Send Init Data) of the GPS Data Table
should not be performed when the aircraft NAV mode is GPS, as large and
unpredictable aircraft LAT/LONG errors may occur.
Note
Performance of INIT SYNC to initialize the GRP is strongly recommen-
ded. This will avoid problems such as uncapturable fly--to points. See
NTRP 3--22.2--SH60B for establishing a data link with the ship.
ORIGINAL
7-30
A1-H60BB-NFM-000
[11. Initialize FHS — AS REQUIRED.
a. FLIR EU PWR — ON.
When the FLIR EU PWR switch is ON, the FLIR Turret automatically
moves to the STOW position. Ensure personnel and equipment are clear of
the FLIR Turret area before applying power.
b. Hellfire PWR — ON (as required)
c. ACRT/FLIR/M299 — INIT/TEST (via equipment status table).
d. FLIR Turret — VERIFY OPERATION.
e. Hellfire Attack Menu — SELECT. Verify correct missile symbology.
If missile symbology incorrect:
f. RESET LAUNCHER — SELECT.
g. FLIR Turret — STOW.
h. Hellfire PWR — OFF.
12.
RAD ALTs — TEST. Press and hold the RAD ALT PUSH--TO--TEST (PTT) button.
Note
Note altitude indicator pointers indicate 100 ±10 feet, the green self--test
light illuminates, and aural radar altitude warning system (RAWS) tone
heard in pilot and ATO headsets. Release the PTT button and indicator
should return to zero.
13.
EMCON, as required:
a. Transponder -- Unnecessary modes — OFF (as required).
b. TACAN — AS REQUIRED.
c. Data link — AS REQUIRED.
d. Radar altimeter — AS REQUIRED.
14.
External power/Data link hardwire — DISCONNECT (as required).
15.
Ordnance pins/covers — REMOVE (as required).
a. ALE--39 external arming handles (ESP only) — AS REQUIRED.
b. AGM--114 Hellfire missile seeker head cover(s) — REMOVE.
c. Mk46 REXTORP/EXTORP nose cover, air stabilizer clamp, ballast safety strap — REMOVE.
d. Mk 46 WARSHOT nose cover, air stabilizer clamp — REMOVE.
e. Mk 50 nose cover — INSTALLED.
f. Mk 50 WARSHOT ARM/SAFE indicator — ARM.
Inadvertent launch of chaff/flares may occur from the ALE--39 when the
external arming handles are in the ARM position regardless of the position
of the SAFE/ARM switch on the arming control panel.
7-31
ORIGINAL
A1-H60BB-NFM-000
7.5
TAXI CHECKLIST
1. Crew — SET FOR TAXI.
2. Lights — AS REQUIRED.
3. Ordnance/Pins/Covers — ARM/REMOVE (as required).
4. Chocks — OUT.
With missiles uploaded, exercise extreme care when chocking and chaining
to avoid damage to missile seeker, fins, or injury to personnel.
5.
Brakes — RELEASE AND CHECK.
6.
TAIL WHEEL switch — UNLOCK.
7.
BDHI, standby compass, AIs, turn and slip — CHECK.
7.6
TAKEOFF CHECKLIST
1.
Lights — AS REQUIRED.
2.
AFCS — AS REQUIRED.
3.
STABILATOR AUTO CONTROL pushbutton — ON.
4.
CONTGCY PWR switch — AS REQUIRED.
5.
PCLs — FLY.
6.
Instruments, Caution/Advisories — CHECK.
7.
Communication and navigation — AS REQUIRED.
a. Transponder — AS REQUIRED.
b. TACAN — AS REQUIRED.
8.
FLIR turret — STOW, AS REQUIRED.
9.
TAIL WHEEL switch — LOCK.
10.
HARNESS — LOCKED.
11.
Aircrewman Pretakeoff Checklist — COMPLETE.
12.
Ordnance/Pins/Covers — ARM/Remove (as required).
13.
Chocks/Chains (Main, High Points, and Tail) — REMOVED.
With missiles uploaded, exercise extreme care when chocking and chaining
to avoid damage to missile seeker, fins, or injury to personnel.
14. Brakes — AS REQUIRED.
15. RDR/BAR ALT pushbutton — AS REQUIRED.
Note
Do not engage RDR ALT HOLD until clear of deck edge.
7-32
ORIGINAL W/IC 70
A1-H60BB-NFM-000
7.7
POST TAKEOFF CHECKLIST
1.
Instruments, Caution/Advisories — CHECK.
2.
RDR/BAR ALT pushbutton — AS REQUIRED.
3.
CONTGCY PWR switch — AS REQUIRED.
4.
Lights — AS REQUIRED.
5.
Aircrewman Post Takeoff Checklist — COMPLETE.
6.
COMP controllers — SLAVED and ALIGNED.
7.
Manual fuel transfer — CHECK (as required). (Short manual transfers from each auxiliary fuel tank should
be checked. Main fuel level shall be 3,700 pounds or less prior to each transfer.)
8.
HIT check — AS REQUIRED (see paragraph 7.17.1).
Note
At a minimum, the HIT check shall be performed on the first flight of the
day.
9.
Engine anti--ice check — AS REQUIRED (see paragraph 7.17.10).
10.
Power Available — CHECK (as required).
a. ECS/ANTI-ICE and CONTGCY PWR switches — OFF.
b. Stabilize aircraft at intended operating altitude, level the VSI, ball centered, 100 to 130 KIAS. Airspeed is
dependent on environmental conditions and gross weight.
c. Gradually increase collective until Np begins to droop on either engine or maximum dual--engine torque
limits are reached. Stabilize for 5 seconds and record indicated torque.
11.
Tactical/Combat Checklist — AS REQUIRED (see paragraph 7.8).
7.8
TACTICAL/COMBAT CHECKLIST
1.
Fuel — Check mission capable and bingo.
2.
CONTGCY PWR — AS REQUIRED.
3.
Fire power/weapons check.
a. Machine gun — RIG AND TEST FIRE (as required).
b. FLIR — AS REQUIRED.
c. Hellfire system — ON; check ACRT/SDC/missile status.
d. LASER — ENABLE (if required).
e. Torpedoes and missiles checklist — PERFORM (as required).
f. Sonobuoy inventory — CHECK.
7-33
ORIGINAL
A1-H60BB-NFM-000
4.
Emitters/EMCON.
a. Radar — AS REQUIRED.
b. IFF unnecessary modes — OFF.
c. TACAN — AS REQUIRED.
d. Data link — AS REQUIRED.
e. MAD — AS REQUIRED.
f. Doppler — AS REQUIRED.
g. Radar altimeter — AS REQUIRED, variable index as required.
h. BARALT HOLD — ENGAGE IF REQUIRED.
i. External lights — AS REQUIRED.
j. Internal lights — SELECT MINIMUM INTENSITY (as required).
5.
Navigation.
a. Sensor horizon RADAR or MAD — AS REQUIRED.
b. SO/ATO option controls — SET (as required).
6.
Communications — CHECK (as required).
7.
Electronic Countermeasures.
a. AAR--47 — Verify ON.
Note
Inadvertent firing of chaff/flares may occur if the ALE--39
is armed prior
to applying power to the AAR--47.
b. ALQ--205 — AS REQUIRED.
c. ALE--39 programmer — Check settings.
d. Chaff dispenser control panel — AS REQUIRED.
e. Countermeasure dispenser control panel — ON; check settings.
f. Arm control indicator unit — ARM.
Do not arm the ALE--39 system until clear of ship/takeoff environment.
Inadvertent firing of chaff/flares is a potential danger to ground personnel
and property.
g. ESM — Update library; set HTW.
ORIGINAL
7-34
A1-H60BB-NFM-000
7.9
RETURN TO FORCE CHECKS
1.
MASTER ARM — SAFE.
2.
LASER — DISABLE.
3.
HELLFIRE PWR — OFF.
4.
Machine gun — CLEAR, SAFE, AND STOW.
5.
AAR--47 — OFF.
6.
ALE--39 — SAFE.
7.
ALQ--205 — OFF.
8.
Transponder modes 1, 2, 3, 4, and C — ON (as required).
9.
External lights — ON (as required).
10.
Radar altimeter — ON.
11.
RADALT hold — AS REQUIRED.
12.
DPLR — ON.
13.
TACAN — T/R.
14.
Radar — AS REQUIRED.
15.
MAD — STOW.
7.10
LANDING CHECKLIST
1.
CONTGCY PWR switch — AS REQUIRED.
2.
Lights — AS REQUIRED.
3.
Brakes — AS REQUIRED.
4.
TAIL WHEEL switch — LOCK.
5.
Instruments, Caution/Advisories — CHECK.
6.
BAR ALT/RAD ALT — AS REQUIRED.
7.
HF Radio — OFF.
8.
Armament — SAFE.
9.
Harness — LOCKED.
10.
Aircrewman Landing Checklist — COMPLETE.
11.
FLIR — STOW.
12.
Return to Force Checks — AS REQUIRED.
7.11
POST LANDING CHECKLIST
1.
Lights — AS REQUIRED.
2.
Tail Wheel/Brakes — AS REQUIRED.
3.
CONTGCY PWR switch — OFF.
4.
Ordnance pins/covers — DE--ARM/SAFE/INSTALL (as required).
CAUTION
Install Hellfire missile seeker covers (if available) before all ground
operations and before all chock and chain operations.
7-35
ORIGINAL
A1-H60BB-NFM-000
5. ALE--39 External Arming handles — SAFE.
6. M299 launcher SAFE/ARM switch — SAFE.
7. Chocks and Chains — AS REQUIRED.
With missiles uploaded, exercise extreme care when chocking and chaining
to avoid damage to missile seeker or fins or injury to personnel.
8. Transponder — STBY.
9. ENG ANTI--ICE/PITOT HEAT/BLADE DE--ICE — OFF.
The pitot and static ports become extremely hot during operation. Care
should be taken to prevent ground personnel from touching these surfaces.
Failure to turn off pitot heat could burn personnel whenever external power
is applied.
7.11.1 Hot Refuel Checklist
1. RADIOS — MONITOR; transmit only for essential communications.
2. RADALT — OFF.
3. DOPPLER — OFF.
4. TACAN — RECEIVE.
5. HF — OFF.
6. IFF — STANDBY.
7. FMCP — AS REQUIRED.
8. PRE--CHECK switches — AS REQUIRED.
9. Fuel quantity — MONITOR.
At completion of fueling:
10. FMCP — AS REQUIRED.
11. RADALT, DOPPLER, TACAN, HF, IFF — AS REQUIRED.
7.12
SHUTDOWN
1. TAIL WHEEL switch — LOCK.
2. Parking brake — SET.
3. Chocks — IN.
4. APU — START.
a. ECS — OFF.
b. AIR SOURCE ECS/START switch — APU.
ORIGINAL
7-36
A1-H60BB-NFM-000
c. FUEL PUMP switch — APU BOOST.
d. APU CONTR switch — ON.
5.
APU GENERATOR switch — ON.
6.
IFF MODE 4 CODE — HOLD (as required).
7.
Avionics.
a. DOPPLER — OFF.
b. MPDs — OFF.
c. SAC POWER — OFF.
d. FLIR POWER — OFF.
e. MSN POWER — OFF.
f. RDR — STBY.
g. DATA LINK — STBY.
h. TACAN — OFF.
i. IFF MASTER — OFF.
j. RAD ALTs — OFF.
8.
BACKUP HYD PMP switch — ON.
9.
Flight controls — POSITION AND HOLD (as required).
10.
NO. 1 and NO. 2 GENERATOR switches — OFF.
Power transfer from Main Generators or External Power to the APU
generator may cause disengagement of SAS 1, SAS 2, TRIM, and
Stabilator. An unguarded cyclic will allow the rotor arc to dip as low as 4
feet above the ground.
11. ENGINE IGNITION switch — OFF.
12. Lights — AS REQUIRED.
13. PCLs — IDLE.
CAUTION
Enginesshould becooled for 2 minutesat an Ng of 90 percent or lessbefore
moving PCLs to OFF. If an engine is shut down without being cooled, it
should not be restarted for 4 hours unless restart is performed within 5
minutes.
14. NO. 2 PCL and fuel selector — OFF.
15. Droop stops — IN.
16. NO. 1 PCL and fuel selector — OFF.
17. Rotor brake — ON (between 30 percent and 50 percent Nr).
7-37
ORIGINAL
A1-H60BB-NFM-000
18. GT — MONITOR.
CAUTION
If TGT risesabove 540 °C, perform Post Shutdown Engine Fireemergency
procedure.
19. DECU codes — CHECK.
20. Engine cleaning — AS REQUIRED (see paragraph 7.17.12).
Note
If engine cleaning is required, proceed to step 14. of Engine Cleaning
Procedures.
21. Blade fold — AS REQUIRED.
CAUTION
D Should the blade fold system stall during fold, cycling the BLADE FOLD
switch to SPREAD should return the rotor blades to the spread position.
D ShutdowntheAPUimmediatelyifarotorbladeremainsstalledintheAPU
exhaust.
D When the ROTOR SPREAD light is not illuminated, pressing the RDR
ALT pushbutton during blade fold system operations may cause failure of
the automatic system. Do not press this pushbutton during blade fold
operations.
D Simultaneous folding of main rotor blades and tail pylon is prohibited.
Note
Failure to suppress the DECU numerical fault codes on the PDU will
prevent the automatic blade fold from operating due to the torque signal
being relayed to the AFCS computer. Codes can be suppressed by pressing
either OVSP TEST A or B buttons for the affected engine.
a. Area — CLEAR (wing walkers positioned, as required).
b. BACKUP HYD PMP switch — ON.
c. STABILATOR AUTO CONTROL pushbutton — OFF.
d. SAS 1 and SAS 2 pushbuttons — OFF, TRIM pushbutton — ON, AUTO PLT pushbutton — OFF.
e. SERVO switch — 1ST OFF or 2ND OFF.
f.
BLADE FOLD MASTER switch — ON.
g. BLADE FOLD switch — FOLD.
h. Rotor brake — OFF.
i.
ROTOR INDEXED light — ILLUMINATED.
ORIGINAL
7-38
A1-H60BB-NFM-000
Note
Blades may be manually indexed if the main rotor indexer gust lock fails.
Cycling the BLADE FOLD switch OFF, pulling the RTR HEAD INDEX
MOTOR circuit breaker (NO. 2 AC PRI, CABIN), and cycling the BLADE
FOLD switch to FOLD may disengage the indexer. Rotate the rotor system
until the INDEXED light illuminates, then continue with the Blade Fold
Checklist.
j.
Rotor brake — APPLY.
k. BAR ALT — FLASHING.
l.
Collective, cyclic, and pedals — FREE TO POSITION.
Note
If computer is unable to null after 30 seconds, the AFCS DEGRADED
caution will appear. To attempt another cycle, turn BLADE FOLD switch
OFF, press any FAIL ADVISORY MODE RESET pushbutton, and repeat
blade fold sequence.
m. BAR ALT pushbutton — PRESS.
Note
The following blade status panel light sequence indicates proper operation
of the fold cycle: TRIM light flashing (blades positioned for pitch lock
insertion) and PITCH LOCKED light illuminated (last pitch lock in).
Blades will begin folding following the illumination of the PITCH
LOCKED light. Should the INDEXED light flicker or extinguish during
folding (indicating a loss of index), the blade fold sequence will stall.
Cycling the BLADE FOLD switch to SPREAD should clear the stall. When
the SPREAD light illuminates, the rotor head may be re--indexed and
another fold cycle attempted.
n. ROTOR FOLDED light — ILLUMINATED.
o. BLADE FOLD switch — OFF.
p. BLADE FOLD MASTER switch — OFF.
q. SERVO switch — CENTER.
22.
BACKUP HYD PMP switch — OFF.
23.
ECS — OFF.
24.
Interior/Exterior/NVD lights — OFF.
25.
APU GENERATOR switch — OFF.
26.
APU — SHUTDOWN.
a. AIR SOURCE ECS/START switch — OFF.
b. APU CONTR switch — OFF.
c. FUEL PUMP switch — OFF.
27.
BATT switch — OFF.
7-39
ORIGINAL
A1-H60BB-NFM-000
7.13
POST FLIGHT CHECKS
1.
Interior equipment.
2.
Tires/struts.
3.
Leaks.
4.
Missing panels.
7.14
NVD LIGHTING CHECKLIST
1.
CDU, PDU, and master caution panel filters — Installed.
2.
RADALT — Green.
3.
Master warning panel — Down.
4.
AAR--47 indicator lights — Out.
5.
IFF test/no go catseye lights (red/green) — Closed.
6.
BLADE DE--ICE catseye lights (2 amber/1 green) — Closed.
Note
ALQ--205 must remain uncovered for 15 minutes to allow cooldown.
7.
Anticollision lights — As required (off for shipboard takeoff/landing).
8.
Position lights — As required.
9.
RAST lights — As required (on for FD/RA landings).
10.
Infrared searchlight — As required.
11.
Instrument panel secondary lights — ON.
12.
Lower console secondary lights — Bright.
13.
Utility lights — ON/green.
14.
AUX fuel totalizer — Covered.
15.
ASE status lights — Covered.
16.
CSCG status annunciators — Covered.
17.
Armament control panel switches (AN/ASQ--198) — Covered.
18.
Wet compass lighting — OFF.
19.
Nonflight instrument lights — OFF.
20.
Pilot/ATO flight instrument lights — OFF.
21.
Upper/lower console panel lights — OFF.
22.
Aided cockpit lighting evaluation — Conduct.
7.15
WHITE LIGHTING CHECKLIST
1.
CDU, PDU, and master caution panel filters — Removed.
2.
RADALT — Red.
3.
Master warning panel — Up.
4.
AAR--47 indicator lights — In.
5.
Wet compass — ON.
6.
IFF test/no go catseye lights (red/green) — Open.
7.
BLADE DE--ICE catseye lights (2 amber/1 green) — Open.
ORIGINAL
7-40
A1-H60BB-NFM-000
8. Anticollision lights — ON.
9. Position lights — ON.
10. RAST lights — As required (on for FD/RA landings).
11. Infrared searchlight — OFF.
12. Instrument panel secondary lights — As desired.
13. Upper/lower console panel lights — ON.
14. Lower console secondary lights — OFF.
15. Pilot/ATO flight instrument lights — ON.
16. Nonflight instrument lights — ON.
17. Utility lights — As desired.
18. AUX fuel totalizer — As desired.
19. ASE status lights — As desired.
20. CSCG status annunciators — Uncovered.
21. Armament control panel switches (AN/ASQ--198) — As desired.
7.16
AIRCREWMAN’S CHECKLISTS
7.16.1 Aircrewman Prestart Checklist
1.
CLOCK — WIND, SET.
2.
RADIO panel — SECURE.
a. Switches — AS DESIRED.
b. UHF 1 and 2 receivers — AS REQUIRED.
c. D/L — AS REQUIRED.
d. SONO — OFF.
e. TACAN — OFF.
f. HF — OFF.
3.
MAD detecting set control box — SECURE.
a. PWR — OFF.
b. UNIT 1 mechanical fault indicator — BLACK.
c. ALT COMP — OFF.
d. CAL — OFF.
e. BAND PASS — Low 0.04, high 0.6.
f. γ FS — TST
4.
MAD reeling machine control panel — SECURE.
a. POWER — OFF.
b. REEL — CENTERED.
c. REEL FAIL mechanical fault indicator — BLACK.
5.
System control panel — SECURE.
a. PANEL — OFF.
b. PROGRAM MODE — AOP.
7-41
ORIGINAL
A1-H60BB-NFM-000
c. SAC MODE — PRIME.
d. PROC INTRPT — OFF.
Note
To restart SACs, place SAC
1 and SAC 2
MASTER CLR in OFF position.
e. SAC 1 POWER — OFF.
f. MASTER CLR — ON.
g. SAC 2 POWER — OFF.
h. MASTER CLR — ON.
i. IPL THP — 1.
j. IPL SAC — 2.
k. IPL LOAD — OFF.
6.
RAST panel — SECURE.
a. MASTER — OFF.
7.
FLIR controls.
a. FLIR PWR — OFF.
b. LASER — DISABLE.
c. GIMBAL — DISABLE.
8.
RADAR/DISPLAY panel — SECURE.
a. MODE/SPEED — OFF.
b. EMISSION — HOLD.
c. RCVR GAIN — 1.
d. FORMAT — TEST.
e. STAB — N.
f. RANGE — 10.
g. PERSIST — OFF.
9.
MPD — OFF.
10.
PANEL INTENSITY — CCW.
11.
STATUS INTENSITY — CCW.
12.
Floodlights — OFF.
13.
Lower sensor operator console (applies to ESP--equipped aircraft only).
a. ALQ--205 control panel — SECURE.
(1) POWER — OFF.
b. CM select panel — SECURE.
(1) CM select — AS DESIRED.
c. AN/ALE--39 control panel — SECURE.
(1) POWER — OFF.
(2) Payloads remaining/mode select — AS DESIRED.
ORIGINAL
7-42
A1-H60BB-NFM-000
d. DISP ARM panel — SECURE.
(1) ARM/SAFE — SAFE.
e. AN/ALE--39 programmer — SECURE.
(1) Thumbwheels — AS DESIRED.
f. CM DIMMER CONT panel — SECURE.
(1) Control knob — AS DESIRED.
g. ECM control panel — Secure.
(1) POWER — OFF.
(2) PUSH FOR STANDBY STATUS — DEPRESSED.
(3) TEST FLARE — OFF/guard closed.
h. Countermeasures circuit breaker panel — SECURE.
(1) Circuit breakers — CHECK.
14. Seats and belts — ADJUSTED/LOCKED.
15. Prestart Checklist — COMPLETE (report when requested).
7.16.2 Aircrewman’s Utility Systems Checks
7.16.2.1 Rescue Hoist Preoperational Check
1. Rescue station ICS — ADJUST.
2. BACKUP PUMP — VERIFY ON.
3. RESCUE HOIST — ALL.
4. HOIST PWR light — VERIFY ON.
CAUTION
Tension should be maintained on the hoist cable to prevent possible
birdcaging.
5. Rescue hook — LOWER.
6. Rescue hook — Operational/rotates freely.
7. Bushing guide — Set screws/cotter pins (Breeze Eastern hoists only).
8. Bumper assembly — Grommet/cable beneath (Breeze Eastern hoists only).
9. Hoist cable — No kinks/broken strands.
10. Lower/raise hoist at all electrical stations. Select BACKUP — Check for light and ability to lower/raise hoist
— DESELECT.
11. Rescue hook — ELECTRICALLY STOW.
12. Report hoist status — “CHECKS GOOD/BAD ALL STATIONS”.
13. RESCUE HOIST — OFF.
7-43
ORIGINAL
A1-H60BB-NFM-000
14. HOIST PWR light — VERIFY OFF.
15. BACKUP HYD PUMP — AS REQUIRED.
Personnel hoisting shall not be attempted with a damaged cable.
7.16.2.2 Cargo Hook Preoperational Check
1. Cargo hook — OPERATIONAL POSITION.
2. CARGO HOOK ARMING switch — ARM.
3. CARGO HOOK EMERGENCY RELEASE switch — NORMAL.
4. CARGO HOOK CONTROL switch — ALL.
5. Report ready for cargo hook check.
6. Apply downward pressure to cargo hook jaw.
7. Pilot — Press CARGO RELEASE.
8. Hook open — Verify CARGO HOOK OPEN advisory light ON.
9. Close hook — Verify CARGO HOOK OPEN advisory light OFF.
10. Repeat steps 6. through 9. for ATO and crewman.
11. Cargo hook manual release — CHECK.
12. CARGO HOOK EMERGENCY RELEASE switch — OPEN.
13. CARGO HOOK ARMING switch — SAFE.
14. Cargo hook — STOWED.
15. Report cargo hook check — COMPLETE.
7.16.3 Aircrewman Pretakeoff Checklist
1. HELLFIRE PWR — VERIFY OFF.
2. STATUS INTENSITY — AS DESIRED.
3. PANEL INTENSITY — AS DESIRED.
4. MPD — TEST.
5. Initialize SYSTEM CONTR panel.
a. SYSTEM CONTR PANEL — LAMP TEST. Verify all status annunciators illuminated.
b. SYSTEM CONTR PANEL — RESET.
(1) Verify all status annunciators — OFF.
(2) Release switch.
(3) Verify SAC--1 and SAC--2 POWER FAULT annunciators illuminated.
6. SAC POWER.
a. SAC--2 POWER — ON.
b. SAC--1 POWER — ON.
7. MPD — ON; RASTER — ADJUSTED.
ORIGINAL
7-44
A1-H60BB-NFM-000
8.
Load SAC--2 — AS REQUIRED.
a. IPL LOAD — ON.
b. SAC--2 MASTER CLR — OFF.
c. Verify IPL IN PROG annunciator illuminates.
d. IPL LOAD — OFF.
9.
MAGNETIC DETECTING SET PWR — ON.
10.
MAD reeling machine POWER — ON.
a. VEHICLE TRAIL light — TEST.
b. CABLE LIMIT light — TEST.
c. MAD reeling machine POWER — OFF.
11.
Radar/display panel.
a. MODE/SPEED — AUTO.
12.
RAST.
a. Lamp TEST.
(1) RAST panel power — ON.
Note
Maintainpowertolightfor5minutestoproperlyenergizeluminescenthose
on messenger cable.
b. RAST MSGR LGHT — AS REQUIRED.
13.
HEELS — ARM.
Note
Steps 13. and 14. apply to HEELS--equipped aircraft only.
14.
HEELS TEST — NOT ILLUMINATED.
15.
Keyset — LAMP TEST.
16.
Verify SAC--2 LOAD — COMPLETE.
For aircraft equipped with 99-channel sonobuoy receivers:
a. If using THP 20 or previous, sonobuoy
receiver circuit breakers — Pull.
b. If using THP 21 or subsequent, sonobuoy
receiver circuit breakers — In.
17. Load SAC--1 — AS REQUIRED.
Note
SAC--2 IPL will occasionally fail if the spectrum analyzer (SA) is already
loaded. To avoid SAC IPL failure, cycle SA power or MSN PWR to SEC
and back to PRI before performing SAC IPL.
a. IPL SAC switch — 1.
b. IPL LOAD — ON.
7-45
ORIGINAL
A1-H60BB-NFM-000
c. SAC--1 MASTER CLR — OFF.
d. Verify IPL IN PROG annunciator illuminates.
e. IPL LOAD — OFF.
f. Verify SAC--1 LOAD — COMPLETE.
g. Verify all annunciators extinguished and report — “IPL COMPLETE”.
18. Data link — Verify KG--45 LOAD STATUS.
Note
Equipment status table D/L BIT status word 1 (word 2 for THP 21 and
subsequent) high order digit EVEN (XXXX) implies KG--45 passed BIT
and code was accepted. Devices shown on the Equipment Status Table that
are not in the aircraft (e.g., FLIR, RDP, MLA, GPS) should be I/O inhibited.
19. Initialize FHS — AS REQUIRED.
a. FLIR PWR — ON (if applicable).
When the FLIR PWR switch is ON, the FLIR turret automatically moves
to the STOW position. Ensure personnel and equipment are clear of the
FLIR turret area before applying power.
Note
After power on, an A/C 1553 FAIL alert is displayed. This is a normal
indication that the FLIR is conducting the BIT.
b. HELLFIRE PWR — ON (if applicable).
c. Initialize FLIR — AS REQUIRED.
d. LASER — DISABLE.
e. GIMBAL — ENABLE.
f.
Verify FLIR video displayed on MPD.
Note
FLIR video may take up to 10 minutes to be displayed on the MPD.
g. Slew FLIR turret to ensure turret gimbal is enabled.
h. Attack page — SELECT (if applicable).
i.
Launcher — RESET (if applicable).
j.
Launcher and missile status — VERIFY (if applicable).
k. HELLFIRE PWR — OFF.
l.
FLIR turret — STOW.
m. FLIR VCR POWER — ON (if applicable).
n. FLIR VCR — Set date and time.
ORIGINAL
7-46
A1-H60BB-NFM-000
o. FLIR VCR time set to 2 h or 6 h.
p. FLIR VCR tape — INSERT (as required).
20.
GPS Key — VERIFY LOAD STATUS/INIT TEST via EQUIPMENT STATUS TABLE.
21.
Device reinitialization — AS REQUIRED.
a. Monitor equipment status.
b. Select lines/options desired.
c. Repeat as necessary.
22.
SO ORT — PERFORM.
Note
D If it is necessary to transmit the antisubmarine warfare (ASW) ORT
acoustic data to the ship, the SO must ask the ATO to select Helo Control
ASW mode for data link.
D If it is necessary to transmit the RADAR/CMUX test results to the ship, the
SO must ask the ATO to select Helo Control ASST mode for the data link.
23.
SO table — UP/LOCKED.
24.
SONO launcher lockout pin — FREE.
25.
AAR--47 — ON (2--minute warmup).
26.
ALQ--205 — AS REQUIRED.
27.
Seat/harness — UP/LOCKED.
28.
Aircrewman Pretakeoff Checklist — “COMPLETE” (report when requested).
7.16.4 Aircrewman Post Takeoff Checks
1. MAIN PROBE — UP.
2. MSGR LGHT — OFF.
3. RAST panel power — OFF.
4. Aircrewman After--Takeoff Checklist — “COMPLETE” (report when requested).
7.16.5 Aircrewman Before Landing Checklist
1. FLIR — STOW.
2. LASER — DISABLE.
3. HELLFIRE PWR — OFF (if applicable).
4. Machine guns — CLEAR, SAFE AND STOW.
5. MAD — STOWED.
a. REEL switch — CENTERED.
b. MAD reeling machine power — OFF.
6. MAGNETIC DETECTING SET PWR — AS REQUIRED.
7. Radar display controls.
a. EMISSION — HOLD.
8. ALQ--205 — OFF.
7-47
ORIGINAL
A1-H60BB-NFM-000
9. ALE--39 — SAFE.
Note
To properly safe the ALE--39 system, ensure the Control Indicator
ARM/SAFE switch is set to SAFE and the countermeasures dispenser
control panel SALVO FLARE switch is set to OFF at the SO station.
10. AAR--47 — OFF.
11. RAST.
a. Panel power — AS REQUIRED.
Note
Energize the messenger light a minimum of 2 minutes prior to paying out
the messenger cable.
b. MSGR LIGHT power — AS REQUIRED.
12. MAIN PROBE — AS REQUIRED.
13. Seat/harness — UP/LOCKED.
14. SO table — UP/LOCKED.
15. Aircrewman Before Landing Checklist — “COMPLETE” (report when requested).
7.16.6 RAST Recovery Checklist
1. Messenger cable — Lower when directed.
2. Messenger cable — Stop lowering when directed.
Too much slack in the messenger cable may entangle flight deck personnel.
If a STOP LOWERING command is not received from the LSO after 20
seconds, stop lowering the messenger cable and verify the cable status.
3. Messenger cable — Raise when directed.
4. Report to pilot — “THREE GREEN”.
7.16.7 Aircrewman Post Landing Checks
1. Radar MODE/SPEED — OFF.
2. FLIR system.
a. FLIR PWR — OFF.
b. VCR TAPE — EJECT.
c. VCR PWR — OFF.
d. GIMBAL — DISABLE.
3. MPD — OFF.
4. RAST.
a. MSGR LGHT power — AS REQUIRED.
b. RAST panel — OFF when H’DOWN CABLE OUT light comes ON.
ORIGINAL
7-48
A1-H60BB-NFM-000
5. Sonobuoy launcher.
a. VNT indication.
b. Valve safety lockout — LOCK (FREE position if no sonobuoys installed).
6. ALE--39 arming handles — SAFE.
7. M299 launcher SAFE/ARM switch — SAFE (if applicable).
8. Ordnance pins/covers — On (if available).
With missiles uploaded, exercise extreme care when chocking and chaining
to avoid damage to missile seeker or fins or injury to personnel.
9. System control panel.
a. SAC--1 POWER — OFF.
b. SAC--2 POWER — OFF.
10. MAGNETIC DETECTING SET PWR — OFF.
11. HEELS — DISARM (if applicable).
12. RAST MASTER — ON.
13. MAIN PROBE — AS REQUIRED.
Note
ALQ--205 must remain uncovered for 15 minutes to allow cooldown.
14. Aircrewman Post Landing Checklist — “COMPLETE” (report when requested).
7.16.8 Aircrewman Post Flight Checklist
1. SO station.
a. All switches — OFF/normal.
b. DOME LIGHTS — OFF.
c. Utility light — OFF.
Note
The utility lights operate from the battery utility bus. A dead battery may
result from not placing the utility light switch in the OFF position.
2. Loose equipment — STOWED/SECURE.
3. FOD — REMOVED.
4. Discrepancies — NOTED/REPORTED.
5. Debrief — WHEN REQUIRED.
7-49
ORIGINAL
A1-H60BB-NFM-000
7.17
SPECIAL PROCEDURES
7.17.1 Health Indicator Test (HIT) Check
Note
D If icing conditions exist, consideration should be given to performing HIT
Check on deck.
D HIT Check shall be performed on the first flight of the day and recorded on
locally reproduced copies of Figure 10-3 for trends in engine performance.
1. ENG ANTI--ICE switches — OFF.
CAUTION
If icing conditions exist, do not keep engine anti ice off longer than
necessary to perform check.
2.
ECS — OFF.
3.
BAR ALT — SET TO 29.92.
4.
Nr — 100 PERCENT.
5.
PCL (Engine not being checked) — IDLE, if performing HIT check on ground.
6.
Collective — INCREASE TO MAINTAIN 60 PERCENT TRQ FOR AT LEAST 30 SECONDS.
7.
Record OAT, PA, and TGT.
8.
PCL (Engine not being checked) — FLY (as required).
9.
Repeat steps 5. to 8. for opposite engine.
10.
Determine table TGT from HIT TGT Reference Figure 7-2 for recorded OAT and PA.
Note
D When using HIT TGT Reference table, round up temperature to the nearest
value.
D Ensure HIT checks are calculated and recorded using the appropriate HIT
power check log (ground or flight).
D During operational checks, HIT TGT margin should be within upper and
lower limits or a VIDS/MAF shall be initiated.
ORIGINAL
7-50
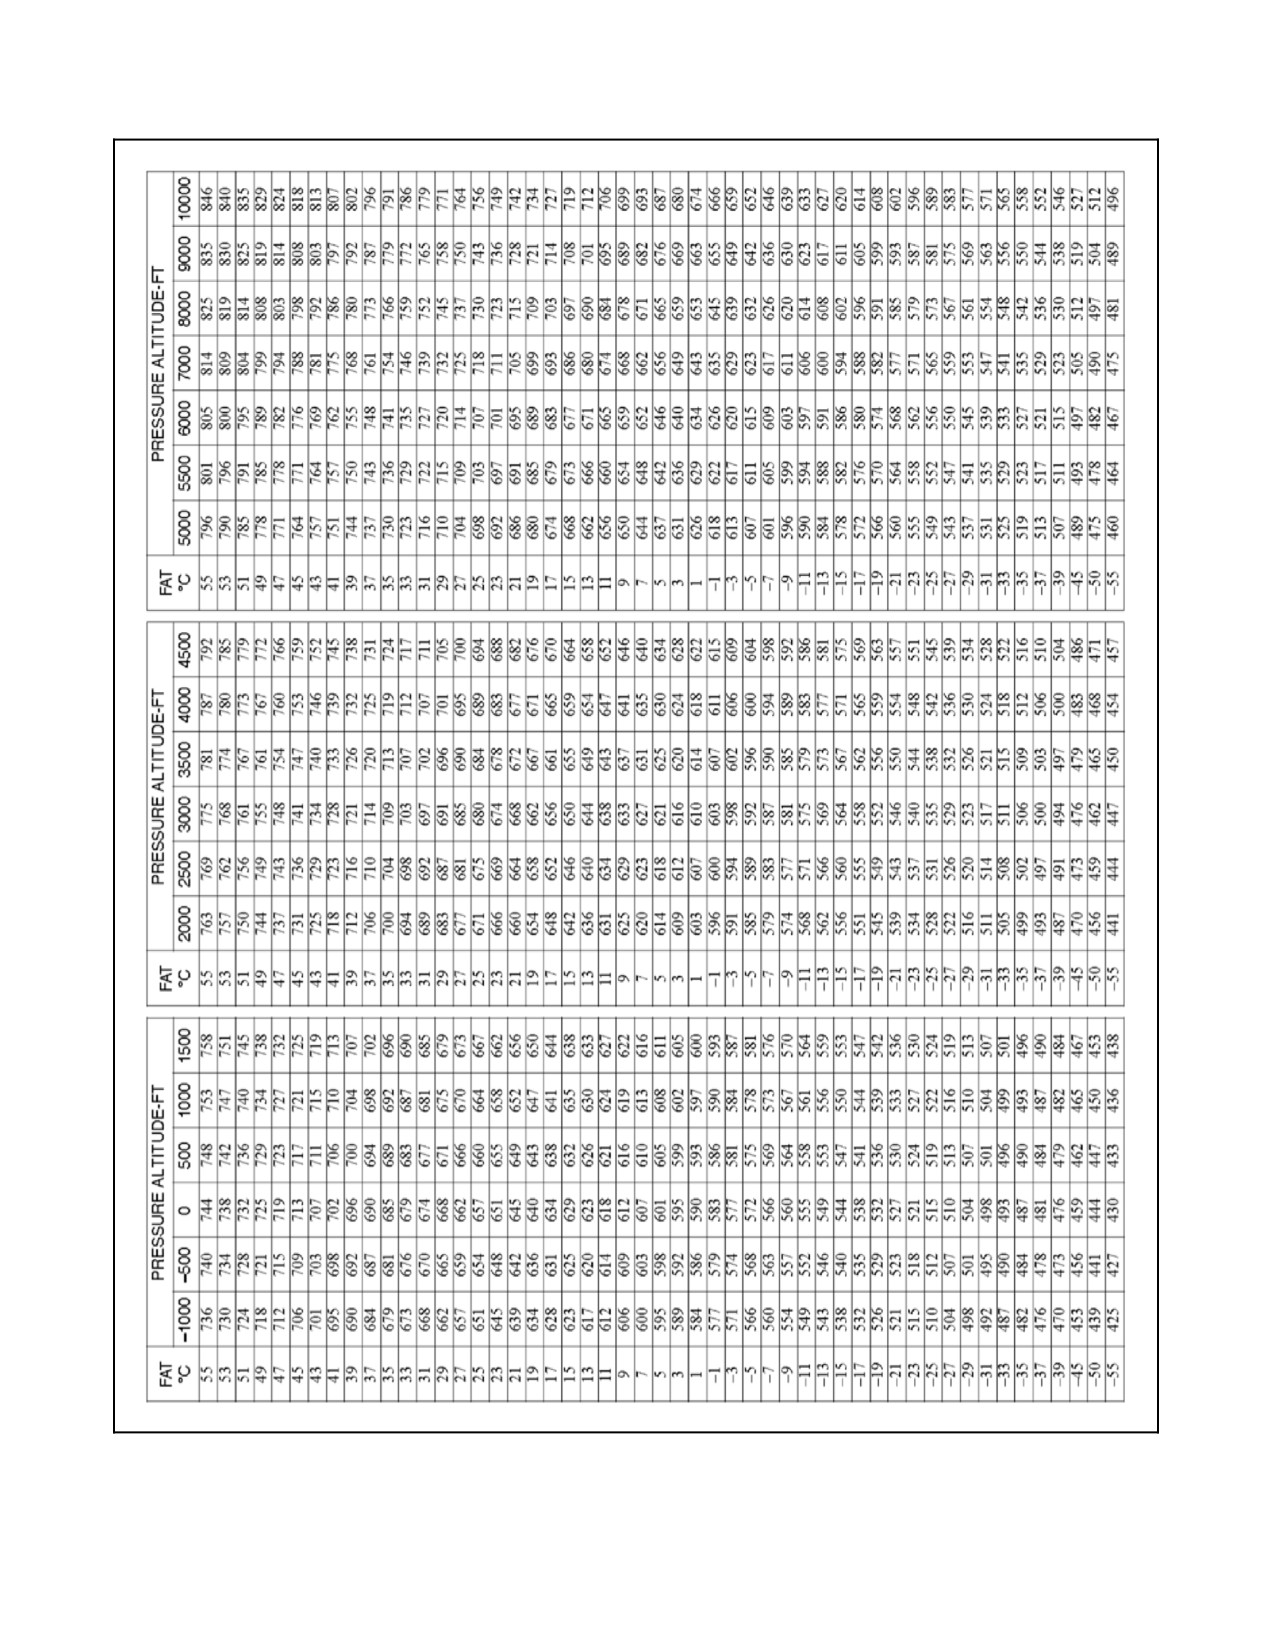
A1-H60BB-NFM-000
Figure 7-2. HIT TGT Reference
7-51
ORIGINAL
A1-H60BB-NFM-000
7.17.2 Automatic Approach Checklist
Aircrews of helicopters equipped with ALE--39 launchers shall ensure the
ARM/SAFE switch on the arming control panel is in the SAFE position
prior to commencing rescue approach.
Note
Approaches to or hovers in the vicinity of a Mk 25/58 MLM may cause the
AN/AAR--47 to sense a threat and command the AN/ALE--39
to fire.
1.
MAD — STOWED.
2.
APS--124 — STBY (as required).
3.
Rig for Rescue Checklist — AS REQUIRED.
4.
PITOT HEAT — ON.
5.
ALE--39 arming control panel — SAFE (as required).
6.
RDR ALT pushbutton — ON.
7.
RAD ALT/BAR ALT — MATCHED.
8.
Radar altimeter — SET DH.
9.
AFCS CONTROL panel:
a. HVR ALT rotary knob — SET.
b. LAT/LONG VEL rotary knobs — SET.
10.
CONTGCY PWR switch — ON.
11.
BACKUP HYD PMP — AS REQUIRED.
12.
Mode select panel — DPLR/HVR.
13.
DOP flag — CHECK.
14.
Wind direction and velocity — NOTE.
15.
TGT/torque — CHECK IN A HOVER.
7.17.3 Alert Launch Checklist
When the helicopter is to be placed in an alert condition, or started embarked or ashore with external power, the
following checklist should be used in place of the normal Start, Systems Check, Starting Engines, Rotor Engagement,
Pretaxi, and Taxi checklists:
1. Seats, belts, pedals, and mirrors — ADJUSTED.
2. Cockpit window emergency releases — AFT AND SHEARWIRED.
3. Left collective — EXTENDED AND LOCKED.
4. Circuit breakers and switches — CHECKED AND OFF.
ORIGINAL
7-52
A1-H60BB-NFM-000
Switches not having an OFF position should be checked as follows:
a. RDR, DATA LINK — STBY.
b. ATO ICS — NORM.
c. DATA LINK MODE — AUTO.
d. G REC — ON.
e. COMM CONTR mode select — T/R.
f. GUST LOCK — NORM.
g. TAIL SERVO — NORM.
h. Pilot ICS — NORM.
i. CARGO HOOK ARMING — SAFE.
j. CARGO HOOK EMER RLSE — OPEN.
k. FIRE DET TEST — OPER.
l. DE--ICE MASTER — MANUAL.
m. MODE 4 AUDIO/LIGHT/OUT — AUDIO.
n. Transponder ANT — DIV.
5.
Parking brake — RESET.
6.
TAIL WHEEL — LOCK.
7.
Aircrewman Prestart checklist — COMPLETE.
8.
Exterior/Interior/NVD lights — AS REQUIRED.
9.
ENG T--handles — FORWARD, APU T--handle — IN.
10.
ROTOR BRAKE — ON.
11.
BATT — ON.
[12.
UHF backup — SET.
13.
Fire detector system — TEST.
14.
EXT PWR — ON.
15.
ICS — CHECK.
[16.
Blade/pylon spread — AS REQUIRED.
CAUTION
D Should the blade fold system stall during spread, cycling the BLADE
FOLDswitchtoFOLDshouldreturntherotorbladestothefoldedposition.
D ShutdowntheAPUimmediatelyifarotorbladeremainsstalledintheAPU
exhaust.
D When the ROTOR SPREAD light is not illuminated, pressing the AFCS
CONTROL panel RDR ALT pushbutton during blade fold system
operations may cause failure of the system. Press this pushbutton only if
flashing and after the blade spread evolution has been completed.
7-53
ORIGINAL
A1-H60BB-NFM-000
a. Area — CLEAR (wing walkers positioned as required).
b. CMPTR PWR/RESET pushbutton — ON.
c. BLADE FOLD MASTER switch — ON.
d. BLADE FOLD switch — SPREAD.
e. PYLON FLIGHT and ROTOR SPREAD lights — ILLUMINATED.
Illumination of the ROTOR SPREAD light may not be an accurate
indication of the blades being properly spread. Rotor engagement with
improperly spread blades may result in catastrophic rotor failure. A head
check shall be conducted any time the BLADE FOLD switch is moved from
the OFF position.
f. RDR ALT pushbutton — PRESS (if flashing).
Note
If RDR ALT pushbutton is flashing, pressing will update flight control
position to AFCS.
g. BLADE FOLD switch — OFF.
h. BLADE FOLD MASTER switch — OFF.
i. Head check — PERFORM.
17. Lockpin status — CHECK.
a. BLADE FOLD MASTER — ON.
b. STATUS PYLON FLIGHT light — ON.
If STATUS PYLON FLIGHT light is not illuminated, pylon and stabilator
lockpins and the tail rotor index actuator shall be visually checked prior to
flight.
c. STATUS ROTOR SPREAD light — ON.
If ROTOR SPREAD light not ON:
d. CMPTR PWR/RESET — OFF.
e. BACKUP HYD PMP — OFF.
f. BLADE FOLD — SPREAD.
Blade lockpins may indicate engaged with blades not fully spread. If the
BLADE FOLD switch is placed in the spread position, a visual check shall
be performed prior to rotor engagement to ensure all rotor blade lockpins
are engaged and all pitchlock pins are retracted.
ORIGINAL
7-54
A1-H60BB-NFM-000
CAUTION
If uncommanded blade fold occurs when BLADE FOLD switch is placed
to SPREAD, the BLADE FOLD MASTER switch should be placed to the
OFF position. Do not secure electrical or hydraulic power until blades are
respread using BLADE FOLD test set.
Note
If a documented discrepancy exists in the blade lockpin/microswitch
indicating system, the BLADE FOLD switch may be left in the OFF
position if the blade lockpins were visually checked on preflight.
If ROTOR SPREAD light on:
g. BLADE FOLD — OFF.
h. BLADE FOLD MASTER — OFF.
18. CMPTR PWR/RESET — CYCLE/ON.
19. SAS/BOOST — ON.
20. BACKUP HYD PMP — ON.
21. MSN PWR — PRI.
22. DPLR, RDR, DATA LINK — RADIATE.
Note
With data link hardwire installed, difficulty may be experienced in loading
SAC--1 or SAC--2 if the ship is trying to uplink data. To alleviate this
problem, place the DATA LINK switch to STBY until SAC--1 and SAC--2
have completed their load.
23. SO — IPL.
24. Initialize FHS — AS REQUIRED.
When the FLIR PWR switch is ON, the FLIR turret automatically moves
to the STOW position. Ensure personnel and equipment are clear of the
FLIR turret area before applying power.
a. FLIR PWR — ON.
b. HELLFIRE PWR — ON.
25. ATO MPD — ON.
26. Secure equipment — KEY.
27. INIT NAV.
7-55
ORIGINAL
A1-H60BB-NFM-000
If GPS is to be used as the primary navigation mode:
a. GPS — KEY.
b. GPS — INIT/TEST (via equipment status table once GPS is available).
28. RAD ALT, BAR ALT, clocks — SET.
29. Secure communications — CHECK.
30. DIGITS — ON; CDU and PDU — TEST.
31. Fuel quantity and readout — Check (maximum differential of 200 pounds).
32. Caution, advisory, warning lights — CHECK.
33. TACAN/IFF — REC, STBY.
[34. Primary servos/pitch lockpin — CHECK.
[35. Boost servos — CHECK.
[36. Tail rotor servo — CHECK.
[37. AFCS — Check.
[38. STABILATOR — CHECK.
Helicopter shall not be flown if any part of stabilator check fails.
[39. Rescue Hoist Preoperational Check — AS REQUIRED.
[40. Cargo Hook Preoperational Check — AS REQUIRED.
If required, the aircraft may be secured indefinitely at this point by performing the following:
1. BACKUP HYD PMP — OFF.
2. SAC POWER — OFF.
3. FLIR PWR — OFF.
4. HELLFIRE PWR — OFF.
5. MSN PWR — OFF.
6. EXT PWR — OFF.
7. BATT — OFF.
Note
If mission power is secured for more than 2 minutes, the KG--45 will require
rekeying after mission power is reenergized.
ORIGINAL
7-56
A1-H60BB-NFM-000
When ready to launch, perform the following:
1. BATT — ON.
2. EXT PWR — ON.
3. BACKUP HYD PMP — ON.
4. SAS--1, SAS--2, TRIM, AUTO PLT — ON.
5. MSN PWR — PRI/SEC (as required).
6. FLIR PWR — ON.
7. KG--45 — KEY.
8. INIT NAV.
7.17.3.1 Starting APU and Engines
1.
High Points and Tail Tiedowns — VERIFY REMOVED.
2.
Fireguard posted, area clear.
3.
ECS — OFF.
4.
Lights — AS REQUIRED.
5.
AIR SOURCE ECS/START — APU.
6.
FUEL PUMP — APU BOOST.
7.
APU CONTROL — ON.
Note
When mission avionics COMSEC gear is loaded with external power, the
use of the APU generator may zeroize the codes.
8.
Doors, inertia reels — LOCKED.
9.
ECS — AS DESIRED.
10.
ROTOR BRAKE — 450 psi minimum.
11.
ENGINE IGNITION — NORM.
12.
Fuel selectors — XFD.
13.
Engines — START.
14.
Engine oil pressure — CHECK.
15.
Starter lights — OUT.
16.
ENGINE IDLE Ng — CHECK, 63 percent or greater and matched within 3 percent.
7.17.3.2 Engagement
1. Area — CLEAR.
2. Flight controls — POSITION (as required).
a. Cyclic/pedals — CENTERED.
b. Collective — DOWN AND HOLD.
3. Lights — AS REQUIRED.
Note
Operation other than transient in the 20 percent to 40 percent and 60 percent
to 75 percent Np range shall be avoided.
7-57
ORIGINAL W/IC 68
A1-H60BB-NFM-000
4.
Rotor — ENGAGE.
a. Rotor brake/advisory light — OUT.
b. ENG POWER CONT levers — Smoothly advance to FLY.
c. #1 and #2 HYD PUMP caution lights — OUT.
d. Droop stops — OUT.
Note
If all droop stops are not out by 100 percent Nr, shut down and investigate.
e. Transmission oil pressure — CHECK.
5.
ENG POWER CONT levers — FLY.
6.
Fuel selectors — DIR.
7.
BACKUP HYD PMP — AUTO.
8.
Torques — Matched within 5 percent.
9.
Engines — 100 percent Np/Nr.
10.
SAC POWER — OFF.
11.
NO. 1 and NO. 2 GENERATORS — ON.
12.
APU GENERATOR — ON.
13.
External power — OFF.
14.
Engine overspeed system and autoignition — CHECK.
15.
Hydraulic leak system — CHECK.
16.
Backup tail rotor servo — CHECK.
a. BACKUP HYD PMP — OFF, then AUTO.
b. TAIL SERVO — BKUP.
c. TAIL SERVO — NORM.
17.
SAC POWER — ON.
18.
ALQ--205 — AS REQUIRED.
19.
AAR--47 — ON (2--minute warmup).
20.
Mode select panel, BDHIs and AIs — CHECK.
21.
TACAN/IFF — TEST, set.
22.
BLADE DE--ICE — AS REQUIRED.
23.
ENG ANTI--ICE, PITOT HEAT, DE--ICE MASTER — AS REQUIRED.
24.
RAD ALT — TEST.
25.
External power and data link hardwire — DISCONNECT.
26.
HELLFIRE PWR — OFF.
27.
ALE--39 arming handles — AS REQUIRED.
ORIGINAL
7-58
A1-H60BB-NFM-000
D Inadvertent launch of chaff/flares may occur from the ALE--39 when the
external arming handles are in the ARM position regardless of the position
of the SAFE/ARM switch on the arming control panel.
D Ensure AAR--47 2--minute warmup period and BIT checks have concluded
before arming the ALE--39 arming handles.
Continue with the normal Takeoff Checklist.
7.17.4 Fuel Dump Checklist
D Fuel dumping should be manually terminated at no less than 600 pounds
totalfuel.Withlessthan600poundsoffuel,fuelstarvationmayoccurwhen
balanced flight is not maintained and/or pitch attitudes exceed 15° nose up
or nose down.
D Internal wear of the fuel dump switch guard may not move the switch to the
OFF position. Aircrew must verify switch position when completing
dumping procedures.
1. Determine the amount of fuel to be dumped.
2. BuNo 162349 and subsequent, FUEL MGMT panel — TRANSFER/MANUAL OVRD.
3. ALE--39 power — OFF.
4. FUEL DUMP switch — DUMP.
5. FMCP — FUEL DUMP light — Illuminated (as applicable).
After the desired quantity has been dumped:
6. FUEL DUMP switch — OFF.
7. Observe the fuel readout to ensure that dumping has ceased.
If fuel dumping continues:
8. FUEL DUMP circuit breakers — PULL.
a. FUEL DUMP NO. 1 (CENTER, NO. 1 AC PRI, ROW 1, CB 13).
b. FUEL DUMP PUMP (CORNER, NO. 2 AC PRI, ROW 1, CB 1).
c. FUEL DUMP CONTR (ATO OVHD, DC ESSNTL, ROW 3, CB 1).
9. FUEL DUMP switch — CYCLE.
10. Land as soon as practical.
7.17.5 Engine Fuel System Priming Checklist
Note
Helicopter prime/boost pump capacity is not sufficient to prime an engine
when the Opposite engine is running. Therefore, engines should be primed
individually with both engines OFF.
7-59
ORIGINAL
A1-H60BB-NFM-000
1. Fuel selector — DIR.
2. PCL — Hold in LOCKOUT.
3. FUEL PUMP switch — FUEL PRIME. Hold until plane captain reports steady flow of fuel coming from
overboard drain.
4. Repeat steps 2. and 3. with fuel selector in XFD.
5. FUEL PUMP switch — APU BOOST.
6. PCL — OFF.
7.17.6 Rig for Rescue Checklist
Radiation hazard exists to rescue swimmerand survivorfrom theAPS--124
radar. Ensure RADAR is set to STBY prior to swimmer deployment and/or
hoisting.
Note
Crewman shall utilize approved hoisting glove(s) during hoisting evolutions.
1.
SAC POWER — OFF.
2.
BACKUP HYD PMP — ON.
3.
SAC POWER — ON.
4.
Report — “UNSTRAPPING”.
5.
Safety Belt — DON.
6.
Rescue station ICS — ADJUST (as required).
7.
Cabin area — PREPARE.
8.
RAST MASTER, CARGO HOOK CONTROL, Magnetic Detecting Set — OFF, SAFE.
9.
Cabin door — OPEN (at or below 60 knots).
10.
RESCUE HOIST control — ALL.
11.
Rescue hoist NORMAL POWER light — VERIFY ON.
12.
Rescue hoist check — VERIFY, if required.
Personnel hoisting shall not be attempted with a damaged cable.
13. Report — “RIGGED FOR RESCUE”.
7.17.7 Litter Platform Setup Procedures
1. Break down the instructor seat and stow forward.
2. Slide the SO seat down and full forward.
ORIGINAL
7-60
A1-H60BB-NFM-000
3. Break out and unfold the platform, the end with the leg extension toward the cabin door.
4. Center the platform between the launcher and SO seat. Squarely position and hook the feet end over the left
SO seat track. Lower the platform so that the two edge tabs slide over the outboard edge of the right seat track
and extend the support leg.
5. Slide the litter all the way in against the left bulkhead.
6. Secure the litter/platform with the two straps that you have anchored to the cabin floor at the four attachment
points.
Note
Helicopters modified with the ALE--39 chaff and flare dispenser will no
longer accommodate the rescue/Stokes litter and allow for cabin door
closure. Modified helicopters should use a SAR MEDEVAC litter for
patient/crewman safety and comfort. When closing the cabin door with the
SAR MEDEVAC litter in the cabin and ALE--39 installed, it may be
necessary to slightly lift the head of the litter to allow the cabin door to pass.
7.17.8 VERTREP Operations Checklist
1. Landing Checklist — COMPLETE.
2. Crewman — RIG FOR CARGO OPERATIONS.
3. MAD reeling machine, RAST panel, and RESCUE HOIST POWER — OFF.
4. Cargo Hook Preoperational Checklist — COMPLETE.
5. CARGO HOOK CONTR — ARMED/ALL.
6. CARGO HOOK EMERG REL — NORM.
7. Radar Altimeter — SET DH.
After external cargo operations:
8. CARGO HOOK CONTR — SAFE.
9. CARGO HOOK EMERG REL switch — OPEN.
10. Cargo Hook — STOW, SECURE ACCESS PANEL.
7.17.9 Blade De--Ice System Check
Note
A TR DE--ICE FAIL caution may appear during the blade de--ice test while
in an electromagnetic environment.
1. BLADE DE--ICE TEST selector switch — NORM.
2. BLADE DE--ICE POWER switch — TEST.
CAUTION
Leaving the BLADE DE--ICE POWER switch in the TEST position may
cause blade damage.
3. PWR MAIN RTR and TAIL RTR lights — CHECK. PWR MAIN RTR light may illuminate for 2 to 4 seconds.
7-61
ORIGINAL
A1-H60BB-NFM-000
CAUTION
If PWR MAIN RTR or TAIL RTR lights remain on for more than 10
seconds, main rotor or tail rotor damage may result. Turn BLADE DE--ICE
POWER switch OFF. If either light remains illuminated, pull the
appropriate circuit breaker. If either light remains illuminated, secure
electrical power.
4.
TEST IN PROGRESS light — CHECK. The light should illuminate for 2 minutes. The ICE DETECTED
caution will appear for approximately 6 seconds. No other blade de--ice system cautions should appear. PWR
MAIN RTR and TAIL RTR lights should illuminate for 2 to 4 seconds near end of test. The TEST IN
PROGRESS light should then extinguish.
5.
BLADE DE--ICE POWER switch — OFF.
6.
BLADE DE--ICE TEST selector switch — SYNC 1.
7.
BLADE DE--ICE POWER switch — TEST. MR DE--ICE FAIL caution appears.
8.
BLADE DE--ICE POWER switch — OFF. MR DE--ICE FAIL caution disappears.
9.
BLADE DE--ICE TEST selector switch — SYNC 2.
10.
BLADE DE--ICE POWER switch — TEST. MR DE--ICE FAIL caution appears.
11.
BLADE DE--ICE POWER switch — OFF. MR DE--ICE FAIL caution disappears.
12.
BLADE DE--ICE TEST selector switch — OAT.
13.
BLADE DE--ICE POWER switch — TEST. MR DE--ICE FAIL and TR DE--ICE FAIL cautions appear.
14.
BLADE DE--ICE POWER switch — OFF. MR DE--ICE FAIL and TR DE--ICE FAIL cautions disappear.
CAUTION
EOT test should not be performed at ambient temperatures above 38 °C.
Between 22 °C and 38 °C, allow 5 minutes at 100 percent Nr before this test
is attempted. Between 10 °C and 22 °C, rotor must be turning at 100 percent.
Exceeding temperature parameters may cause blade damage.
15. BLADE DE--ICE TEST selector switch — EOT.
16. BLADE DE--ICE MODE selector switch — MANUAL (M).
17. BLADE DE--ICE POWER switch — ON. TR DE--ICE FAIL caution appears after approximately 15 to 30
seconds. MR DE--ICE FAIL caution appears after approximately 50 to 70 seconds. PWR MAIN RTR and/or
PWR TAIL RTR lights may flash.
18. BLADE DE--ICE POWER switch — OFF. TR DE--ICE FAIL and MR DE--ICE FAIL cautions disappear.
19. BLADE DE--ICE TEST selector switch — NORM.
20. BLADE DE--ICE POWER switch — OFF.
21. BLADE DE--ICE MODE selector switch — AUTO.
22. APU GENERATOR backup — CHECK.
a. NO. 1 or NO. 2 generator — OFF. Applicable GEN caution light should be on.
b. BLADE DE--ICE MODE SELECT — MANUAL (M).
ORIGINAL
7-62
A1-H60BB-NFM-000
c. APU GENERATOR — ON.
d. BLADE DE--ICE POWER — ON. Wait 30 seconds, no de--ice lights should be on.
e. Generator turned off in step a. — ON. (Applicable GEN caution light should go off.)
f. BLADE DE--ICE POWER — OFF.
g. BLADE DE--ICE MODE — AUTO.
7.17.10 Engine Anti--Ice Check
1. PCL (engine not being checked) — AS REQUIRED.
Failure of the ENG ANTI--ICE ON advisory to illuminate when the ENG
ANTI--ICE switch is selected to ON, or when the Ng is below approxim-
ately 88 percent regardless of the switch position; or constant illumination
of the ENG ANTI--ICE ON advisory with Ng greater than 90 percent (94
percent if OAT is 15 °C or greater ) and the ENG ANTI--ICE switch OFF
are indicative of a malfunctioning anti--ice/start bleed valve. This condition
may cause engine flameout during low power settings such as quick stops
and autorotative flight.
Note
D Engine Anti--ice Check should be performed into the wind on deck, in a
hover over a suitable landing pad, or in a stable, level--flight regime.
D On deck or in a hover, it may be necessary to retard the PCL on the engine
not being checked to prevent a vertical climb.
2. ENG ANTI--ICE switch (engine being checked) — OFF.
3. Collective — Raise to increase Ng of engine being checked to 90 percent or above (94 percent if OAT is above
15 °C).
4. ENG ANTI--ICE ON advisory (engine being checked) — Does not appear.
5. ENG ANTI--ICE switch (engine being checked) — ON.
Confirm:
a. ECS SHUTDOWN caution (if ECS on and AIR SOURCE ECS/START switch — ENG).
b. TGT increases 30° to 100 °C.
c. ENG ANTI--ICE ON advisory appears.
d. ENG INLET ANTI--ICE ON advisory:
(1) OAT above 13 °C — DOES NOT APPEAR.
(2) OAT above 4° up to 13 °C — MAY APPEAR.
(3) OAT 4 °C and below — APPEARS.
7-63
ORIGINAL
A1-H60BB-NFM-000
A TGT increase greater than 100 °C and/or appearance of either ENG
INLET ANTI--ICE ON advisory when OAT is above 13 °C may result in
a loss in available torque at intermediate power up to 49 percent when the
engine anti--ice system is activated. If any part of the engine anti--ice check
fails, maintenance action is required prior to flight into icing conditions.
6. ENG ANTI--ICE switch (engine being checked) — OFF.
Confirm:
a. TGT decreases.
b. ENG ANTI--ICE ON advisory — DISAPPEARS.
c. ECS — ON (if ECS on and AIR SOURCE ECS/START switch — ENG).
d. ENG INLET ANTI--ICE ON advisory — DISAPPEARS (after approximately 90 seconds).
7. PCL (engine not being checked) — FLY.
8. Repeat steps 1. to 7. for other engine.
7.17.11 Accelerometer Null Procedures
Accelerometers are normally nulled during AFCS maintenance ashore. Ship motions and accelerations will often
prevent the completion of a successful accelerometer null operation while deployed. The following procedure will
allow the flight crew to perform the accelerometer null operation in flight when an on--deck
null cannot be
successfully accomplished.
1. CMPTR PWR/RESET pushbutton — CYCLE.
2. SAS 1, SAS 2, TRIM and AUTO PLT pushbuttons — ON.
3. Wait at least 2 minutes.
4. Fly at 100 KIAS in straight and level, unaccelerated flight.
5. ACCEL NULL switch — NULL FOR 0.5 TO 2.0 SECONDS.
Note
Null will fail if ACCEL NULL switch is held for more than two seconds.
6. If the null is accepted TRIM and AUTO PLT pushbuttons will extinguish approximately
2
seconds after
ACCEL NULL switch is released.
7. Repeat steps 1. through 6. until a null is accepted.
7.17.12 Engine Cleaning Procedures
Note
The following engine cleaning procedures are to be performed when engine
cleaning is performed independent of the SHUTDOWN checklist. For
engine cleaning during the SHUTDOWN checklist, proceed to step 14.
1. Water wash connector — CONNECTED.
2. Circuit breakers and switches — CHECKED and OFF.
ORIGINAL
7-64
A1-H60BB-NFM-000
3. Rotor brake — ON.
Do not release rotor brake if blades are folded unless secured in place by
blade crutches/clamps. Releasing the rotor brake with unsecured folded
blades may result in damage to aircraft, injury to nearby personnel, and/or
all four blades rotating together, which may result in aircraft rollover.
4.
BATT — ON.
5.
Fire detector system — TEST.
6.
Fire guard — POSTED, AREA CLEAR.
7.
Interior/Exterior /NVD lighting — AS REQUIRED.
8.
APU — START.
a. ECS — OFF.
b. AIR SOURCE ECS/START — APU.
c. FUEL PUMP — APU BOOST.
d. APU CONTROL — ON.
9.
APU GENERATOR — ON.
10.
ECS — AS REQUIRED.
11.
Blade/pylon spread — AS REQUIRED (refer to Prestart Checks).
12.
Lockpins status — CHECK.
13.
BACKUP HYD PMP — ON.
14.
ENGINE IGNITION — OFF.
CAUTION
D Engine must be allowed to cool to a TGT of 80 °C or below, by motoring
engine starter (if necessary), before water or cleaning solution is sprayed
into engine.
D Engine PCL and ignition switch must be off while motoring engine.
D Do not exceed starter limits (Refer to Chapter 4, Operating Limits).
D If Ng decreases below 16 percent during engine cleaning, secure starter to
prevent engine damage.
Note
The T--700--GE--401C Performance Recovery Wash (60 hour) requires
both Compressor and Hot Section cleaning. Hot Section cleaning is
required following operation in sandy, dusty, and dirty environments. Hot
Section cleaning entails removing engine igniter plugs and injecting
cleaning solution through the igniter ports. Compressor cleaning entails
injecting cleaning solution through the water wash connector.
7-65
ORIGINAL
A1-H60BB-NFM-000
15. Hot Section cleaning procedure — AS REQUIRED.
To prevent electrical shock to maintenance personnel, ensure ENGINE
IGNITION switch is in the OFF position and both NO. 1 and NO. 2 engine
overspeed circuit breakers are pulled (open) during engine cleaning.
a. NO. 1 and NO. 2 ENG OVSP circuit breakers — PULL.
b. NO. 2 engine starter — ENGAGE. Motor to maximum starter speed.
c. TGT below 80 °C, dispense cleaner for 60 seconds.
d. NO. 2 engine starter — DISENGAGE.
e. Repeat steps b. through d. for NO. 1 engine.
If performing Hot Section cleaning only:
f. Allow cleaner to soak for 10 minutes and then proceed to Water Wash Procedures (step
17.).
If performing Performance Recovery Wash:
g. Proceed to Compressor cleaning (step 16.).
16. Compressor cleaning — AS REQUIRED.
a. NO. 2 engine starter — ENGAGE. Motor to maximum starter speed.
b. When TGT below 80 °C, dispense cleaner for 60 seconds.
c. NO. 2 engine starter — DISENGAGE.
d. Repeat steps a. through c. for NO. 1 engine.
e. Allow cleaner to soak for 10 minutes.
17. Water Wash procedure — PERFORM.
a. NO. 2 engine starter — ENGAGE. Motor to maximum starter speed.
b. When TGT below 80 °C, rinse engine for 60 seconds (90 seconds if cleaner used, observing starter duty
cycle, until clean water is observed coming out of engine exhaust).
c. NO. 2 engine starter — DISENGAGE.
d. Repeat steps a. through c. for NO. 1 engine.
CAUTION
Enginedry--outcyclewillbeperformedwiththerotorbrakeON. ThePCLs
should not be advanced above IDLE during engine dry--out. If ashore and
rotor engagement is required following engine dry--out cycle, the engines
should be shut down from IDLE and restarted with the rotor brake off.
Engine Dry--out:
18. Water Wash connector — REMOVE.
19. NO. 1 and NO. 2 ENG OVSP circuit breakers — RESET (as required).
ORIGINAL
7-66
A1-H60BB-NFM-000
20. Fireguard — POSTED, AREA CLEAR.
21. Doors, inertia reels — LOCKED.
22. SAS 1, SAS 2, TRIM, and AUTO PLT — ON.
23. Rotor brake — CHECK PRESSURE 450 PSI MINIMUM.
24. ENGINE IGNITION — NORM.
25. Fuel selectors — XFD.
CAUTION
Start the NO. 2 engine first to preclude exceeding NO. 1 engine starter
limitations.
26. Lights — AS REQUIRED.
27. Engines — START.
a. Starter — ENGAGE AT MAXIMUM STARTER SPEED FOR 30 SECONDS.
b. PCL — IDLE.
28. Engine oil pressures — CHECK.
29. ENG STARTER advisories — OUT.
30. Engines — RUN AT IDLE FOR 6 MINUTES.
After 5 minutes:
a. ENG ANTI--ICE — OFF.
b. AIR SOURCE ECS/START — ENG.
c. ECS — OFF.
Note
Leaving ECS ON may lead to APU failure.
After 1 minute:
d. ENGINE IGNITION — OFF.
31. PCLs and fuel selectors — OFF.
32. TGT — MONITOR.
33. Blade fold — AS REQUIRED (refer to Shutdown Checks).
34. BACKUP HYD PMP — OFF.
35. STABILATOR MAN SLEW — SLEW to 0° (as required).
36. ECS — OFF.
37. Interior/Exterior/NVD lighting — OFF.
38. APU GENERATOR — OFF.
39. APU — SHUTDOWN.
a. AIR SOURCE ECS/START — OFF.
b. APU CONTR — OFF.
c. FUEL PUMP — OFF.
7-67
ORIGINAL
A1-H60BB-NFM-000
40. BATT — OFF.
41. Utility Lights — OFF.
7.17.13 Sonobuoy Launching
7.17.13.1 Automatic Sonobuoy Launching
1. System circuit breakers — IN.
2. Sonobuoy ECU — Verify AU displayed.
3. WEAPONS SELECT (AN/ASQ-198) — AS REQUIRED.
4. MASTER ARM — ARM.
Note
D When using the AN/ASQ-165, sonobuoys may be launched with
TORPEDO SELECT in any position except OFF.
D When using the AN/ASQ-198, sonobuoys may be launched with
WEAPONS SELECT in any position.
5. TORPEDO SELECT (AN/ASQ-165) — AS REQUIRED.
CAUTION
D When using the AN/ASQ-165, failing to SELECT SAFE with the
TORPEDO SELECT switch may lead to unintended weapon or auxiliary
tank launch.
D When using the AN/ASQ-198, failing to select SONO ONLY with the
WEAPONS SELECT switch may lead to unintended weapon or auxiliary
tank launch.
6. SONO SELECT MODE — AUTO.
7. SONO LAUNCH MODE — AUTO.
8. Observe RDY INDICATION on SONO LAUNCH button.
Note
D Sonobuoy will be launched automatically when the fly-to-point (FTP) is
captured.
D A successful launch will be indicated by the SONO LAUNCH button
indicating AWAY for approximately 3 seconds. SONO LAUNCH RDY
will illuminate again if an additional FTP is active.
7.17.13.2 Manual Sonobuoy Launching
1. System circuit breakers — IN.
2. Sonobuoy ECU — Verify AU displayed.
ORIGINAL
7-68
A1-H60BB-NFM-000
3. WEAPONS SELECT (AN/ASQ-198) — AS REQUIRED.
4. MASTER ARM — ARM.
Note
D When using the AN/ASQ-165, sonobuoys may be launched with
TORPEDO select in any position except OFF.
D When using the AN/ASQ-198, sonobuoys may be launched with
WEAPONS select in any position.
5. TORPEDO SELECT (AN/ASQ-165) — AS REQUIRED.
CAUTION
D When using the AN/ASQ-165, failing to SELECT SAFE with the TOR-
PEDO SELECT switch may lead to unintended weapon or auxiliary tank
launch.
D When using the AN/ASQ-198, failing to select SONO ONLY with the
WEAPONS SELECT switch may lead to unintended weapon or auxiliary
tank launch.
6. SONO SELECT MODE — MAN.
7. SONO LAUNCH MODE — MAN.
8. TUBE SELECT — AS REQUIRED.
9. Observe READY or RDY INDICATION on SONO LAUNCH button.
10. Press SONO LAUNCH button to launch selected sonobuoy.
Note
A successful launch will be indicated by the SONO LAUNCH button going
to AWAY.
7.17.14 Torpedo Launching
7.17.14.1 Torpedo Launching (with AN/ASQ-165A) Except for Mk 46 MOD 5A (SW) SLEP Torpedo
Note
Refer to NTTP 3-22.5-ASW (ASW Tactical Pocket Guide) for torpedo
launch envelope and tactical employment.
1. System circuit breakers — IN.
2. SRCH DPTH — SELECT.
3. MODE/CEIL — SELECT.
4. COURSE — SELECT.
7-69
ORIGINAL
A1-H60BB-NFM-000
CAUTION
Any subsequent changes to the thumbwheel selectors should be done by
first returning MASTER ARM to SAFE. Verify MASTER ARM goes to
SAFE before resetting thumbwheel selectors to prevent possible presetting
malfunctions.
5. MASTER ARM — ARM.
6. TORPEDO SELECT — AS REQUIRED.
CAUTION
To prevent possible damage to the ASDC and improper torpedo presetting,
allow at least a 10-second interval between depressions of the TORPEDO
SELECT pushbutton.
7. TORPEDO ARMING — NS--TL.
8. STATUS READY light — CHECK ON.
9. READY INDICATION on TORPEDO LAUNCH — CHECK.
10. TORPEDO SELECT — AS REQUIRED.
CAUTION
To prevent possible damage to the ASDC and improper torpedo presetting,
allow at least a 10-second interval between depressions of the TORPEDO
SELECT pushbutton.
11. READY INDICATION on TORPEDO LAUNCH — CHECK.
Upon capture of weapon FTP:
12. TORPEDO LAUNCH — PRESS.
CAUTION
Subsequent actuation of the TORPEDO LAUNCH pushbutton after an
attempted launch will enable a secondary launch release regardless of time
between initial and subsequent actuation. This initiates a secondary launch
sequence resulting in the CAD firing. The BRU-14A bomb rack will be
damaged and require intermediate-level repair. Prevention of CAD firing
can only be achieved by setting the MASTER ARM switch to the SAFE
position prior to actuation of the TORPEDO LAUNCH pushbutton after an
attempted launch.
ORIGINAL
7-70
A1-H60BB-NFM-000
13. AWAY INDICATION on TORPEDO LAUNCH — CHECK.
Note
A successful launch will be indicated by the TORPEDO LAUNCH going
to AWAY for approximately 3 seconds. Visually confirm weapon is away.
14. TORPEDO SELECT — SAFE.
15. TORPEDO ARM — SAFE.
16. MASTER ARM — AS REQUIRED.
7.17.14.2 Torpedo Launching (with AN/ASQ-198) Except for Mk 46 MOD 5A (SW) SLEP Torpedo
CAUTION
Mk 54 MOD 0 torpedo can only be used with AN/ASQ-198 configured
aircraft.
Note
D Refer to NTTP 3--22.5--ASW (ASW Tactical Pocket Guide) for torpedo
launch envelope and tactical employment.
D Refer to Torpedo Programming Conversion Table (Figure 7-3) when
setting SRCH DPTH, MODE/CEIL, and COURSE thumbwheel selector
switches.
D Refer to NAWCD China Lake prepared preliminary checklists for the Mk
54 aircraft release and control, weapon inspection, and loading prior to any
Mk 54 MOD 0 mission.
1.
System circuit breakers — IN.
2.
SRCH DPTH — SELECT.
3.
MODE/CEIL — SELECT.
4.
COURSE — SELECT.
5.
Mk 50 heaters — ON or OFF (as required).
6.
WEAPONS SELECT — PORT AFT, PORT FWD, or STBD AFT (as required).
7.
MASTER ARM — ARM.
8.
Observe IFOBRL status indicator — UL.
Note
The in-flight operable bomb rack lock (IFOBRL) status indicator will
transition from LK (Lock) to UL (Unlock) within 5 seconds after pressing
MASTER ARM if the bomb rack is functioning properly. Transition time
greater than 5 seconds indicates a malfunctioning bomb rack.
7-71
ORIGINAL
A1-H60BB-NFM-000
SRCH DPTH SWITCH TRANSLATION
MODE/CEIL SWITCH TRANSLATION
COURSE SWITCH TRANSLATION
Mk 46
Mk 50
Mk 54
Mk 46
Mk 46
Mk 50
Mk 54
SWITCH
PRO-
PRO-
PRO-
SWITCH
PRO-
Mk 50
Mk 54
SWITCH
PRO-
PRO-
PRO-
LABEL
GRAM
GRAM
GRAM
LABEL
GRAM
PROGRAM
PROGRAM
LABEL
GRAM
GRAM
GRAM
1
125
12
60/SWT
1
A20
20
STD PDA ON
70L
P70
70L
P70
2
80
55
125
2
A50
60
STD PDA OFF
35L
P35
35L
P35
3
275
375
N375
3
HATS
HATS
HATS
0
0
0
0
4
500
D375
D375
4
P20
ST20
PDT
35R
S35
35R
S35
5
850
850
700
5
P50
D60
BOTTOM
70R
S70
70R
S70
6
1400
1600
1600
6
SNKE
SVTT
—
95R
S95
95R
S95
—
—
—
—
—
—
—
—
120R
S120
120R
S120
—
—
—
—
—
—
—
—
150R
S150
150R
S150
—
—
—
—
—
—
—
—
180
180
180
180
—
—
—
—
—
—
—
—
150L
P150
150L
P150
—
—
—
—
—
—
—
—
120L
P120
120L
P120
—
—
—
—
—
—
—
—
95L
P95
95L
P95
Figure 7-3. AN/ASQ-198 ACI Panel Torpedo Programming Conversion Table
Note
If operating with an armament adapter installed, the IFOBRL status
indicators will be inoperative; however, the bomb rack will function
normally.
9. TORPEDO STATUS TORP READY light — ON.
CAUTION
Any subsequent changes to the thumbwheel selectors should be done by
first returning MASTER ARM to SAFE. Verify MASTER ARM goes to
SAFE before resetting thumbwheel selectors to prevent possible presetting
malfunctions.
10. WEAPON LAUNCH RDY light — ON.
Upon capture of weapon FTP:
11. WEAPON LAUNCH — PRESS.
CAUTION
If WEAPON LAUNCH is pressed and the bomb rack is malfunctioning, a
secondary launch release is automatically enabled. The secondary launch
release initiates an emergency launch sequence resulting in CAD firing.
The BRU-14A bomb rack will be damaged and require intermediate-level
repair.
ORIGINAL
7-72
A1-H60BB-NFM-000
12. AWAY INDICATION on WEAPON LAUNCH — CHECK.
Note
A successful launch will be indicated by the WEAPON LAUNCH going
to AWAY for approximately 3 seconds. Visually confirm weapon is away.
13. WEAPONS SELECT — OFF.
Note
Selecting any new position with WEAPONS SELECT will cause
MASTER ARM to go SAFE.
14. MASTER ARM — AS REQUIRED.
7.17.14.3 Mk 46 MOD 5A (SW) SLEP Torpedo Launching (With AN/ASQ-165A)
Note
Refer to NTTP 3-22.5-ASW (ASW Tactical Pocket Guide) for torpedo
launch envelope and tactical employment.
1. System circuit breakers — IN.
2. Course thumbwheel — Set any position except P120.
CAUTION
Damage to presetter may occur if COURSE thumbwheel is in P120
position.
Note
The launching procedure shall be discontinued and restarted at step 1. If at
any time during the presetting process, MASTER ARM is placed to SAFE,
the other Weapons Station (PORT/STBD) is selected, electrical power is
lost, or any steps are performed out of order.
3. MASTER ARM — ARM.
4. TORPEDO SELECT — AS REQUIRED.
Once weapon station selection is made and the MASTER ARM pushbutton
is in ARM, the torpedo will be ready for armed release. Due care shall be
exercised to avoid inadvertent release.
CAUTION
To prevent damage to the ASDC and avoid improper torpedo presetting,
allow a
10-second interval between depressions of the TORPEDO
SELECT pushbutton.
7-73
ORIGINAL
A1-H60BB-NFM-000
5. STATUS READY light — CHECK ON.
6. RDY INDICATION on TORPEDO LAUNCH pushbutton — CHECK.
7. SRCH DPTH — 1,400.
Note
After 1,400 is selected, wait at least 1.2 seconds before continuing the
checklist while tactical floor presetting functions are enabled.
8. MODE/CEIL — HATS.
9. Tactical floor — Course wheel set.
CAUTION
Selecting or dialing through P120
may cause presetting
malfunctions/damage to presetter.
FOR TACTICAL FLOOR
SET COURSE WHEEL
125
P70
225
P35
325
0
425
S35
NO FLOOR
S70
10.
SRCH DPTH — Select in accordance with normal ACIP SELECTIONS.
Note
D Do not select a search depth below the tactical floor.
D Do not reselect or allow SRCH DPTH thumbwheel to pass through 1,400
or tactical floor setting will be erased.
11.
MODE/CEIL — Select in accordance with normal ACIP SELECTIONS.
12.
COURSE — Select in accordance with normal ACIP SELECTIONS.
CAUTION
Selecting or dialing through P120
may cause presetting
malfunctions/damage to presetter.
13. Torpedo arming — NS--TL.
Note
The launching procedure shall be discontinued and restarted at step 1. If at
any time during the presetting process, MASTER ARM is placed to SAFE,
the other Weapons Station (left/right) is selected, electrical power is lost,
or any steps are performed out of order.
ORIGINAL
7-74
A1-H60BB-NFM-000
Upon capture of weapon FTP:
14. TORPEDO LAUNCH — PRESS.
CAUTION
Unless the MASTER ARM pushbutton has been set to SAFE after the
TORPEDO LAUNCH pushbutton has been pressed, CAD firing and
damage to BRU-14A bomb rack will occur if the torpedo launch
pushbutton is again actuated when a READY INDICATION is present.
15. AWAY INDICATION on TORPEDO LAUNCH pushbutton — CHECK.
Note
AWAY will appear on the TORPEDO LAUNCH pushbutton in approxi-
mately 3 seconds, indicating a successful launch. Visually confirm weapon
is away.
16. TORPEDO SELECT — SAFE.
17. TORPEDO ARM — SAFE.
18. MASTER ARM — AS REQUIRED.
7.17.14.3.1 Mk 46 MOD 5A (SW) SLEP Torpedo Launching (With AN/ASQ-198)
Note
Refer to NTTP 3-22.5-ASW (ASW Tactical Pocket Guide) for torpedo
launch envelope and tactical employment.
1. System circuit breakers — IN.
2. Course thumbwheel — Set any position except 120L.
CAUTION
Damage to presetter may occur if course thumbwheel is in 120L position.
3. WEAPONS SELECT — PORT AFT, PORT FWD, or STBD AFT (as required).
Note
The launching procedure shall be discontinued and restarted at step 1. If at
any time during the presetting process, MASTER ARM is placed to SAFE,
WEAPONS SELECT knob is rotated out of current position, electrical
power is lost, or any steps are performed out of order.
4. MASTER ARM — ARM.
7-75
ORIGINAL
A1-H60BB-NFM-000
Once weapon station selection is made and the MASTER ARM pushbutton
is in ARM, the torpedo will be ready for armed release. Due care shall be
exercised to avoid inadvertent release.
5. Observe IFOBRL status indicator — UL.
6. TORPEDO STATUS TORP READY light — ON.
7. WEAPON LAUNCH READY light — ON.
8. SRCH DPTH — 6.
Note
After 6 is selected, wait at least 1.2 seconds before continuing checklist
while tactical floor presetting functions are enabled.
9. MODE/CEIL — 3.
10. Tactical floor — Course wheel set.
CAUTION
Selecting or dialing through 120L may cause presetting malfunctions/dam-
age to presetter.
FOR TACTICAL FLOOR
SET COURSE WHEEL
125
70L
225
35L
325
0
425
35R
NO FLOOR
70R
11.
SRCH DPTH — Select in accordance with normal ACIP SELECTIONS.
Note
Do not reselect or allow SRCH DPTH thumbwheel to pass through 6 or
tactical floor setting will be erased.
FOR SEARCH DEPTH
SET SEARCH DEPTH WHEEL
80
2
125
1
275
3
500
4
850
5
1400
6
Note
Do not select a search depth below the tactical floor.
ORIGINAL
7-76
A1-H60BB-NFM-000
12. MODE/CEIL — Select in accordance with normal ACIP SELECTIONS.
FOR MODE/CEILING
SET THUMBWHEEL
A20
1
A50
2
HATS
3
P20
4
P50
5
SNAKE
6
13. COURSE — Select in accordance with normal ACIP SELECTIONS (0 for circle search).
CAUTION
Selecting or dialing through
120L may cause presetting
malfunctions/damage to presetter.
Note
The launching procedure shall be discontinued and restarted at step 1. If
at any time during the presetting process, MASTER ARM is placed to
SAFE, WEAPONS SELECT knob is rotated out of current position,
electrical power is lost, or any steps are performed out of order.
Upon capture of weapon FTP:
14. WEAPON LAUNCH — PRESS.
15. AWAY INDICATION on WEAPON LAUNCH pushbutton — CHECK.
Note
AWAY will appear on the WEAPON LAUNCH pushbutton in approxi-
mately 3 seconds, indicating a successful launch. Visually confirm weapon
is away.
16. WEAPONS SELECT — OFF (as required).
17. MASTER ARM — AS REQUIRED.
7.17.14.4 AGM-114 Hellfire Missile Launch/Training Procedure
1. System circuit breakers — IN.
2. HELLFIRE PWR — ON.
3. ACRT — Clear equipment status table faults/test (after system on for 15 seconds).
Note
D Displayed ACRT faults on the equipment status table may cause erroneous
communication between AOP and the AHS, resulting in incorrect inhibits
and constraints while in remote launch mode.
D Ensure VERSN 2002 is displayed in the Equipment Status Table beside
ACRT/SDC prior to Hellfire launch operations. If VERSN 2002 is not
displayed, initiate AOP test of the ACRT/SDC.
7-77
ORIGINAL
A1-H60BB-NFM-000
4. LASER CODES — ENTER/SELECT.
5. VCR — ON (tape inserted) and recording.
6. Laser eye protection (LEP) — VISORS DOWN.
For remote launch:
7. Select tactical page.
a. Assign target.
b. Assign remote designator.
For remote or autonomous launch:
8.
FLIR main menu — SELECT.
a. Laser code — CONFIRM.
b. Laser select — AS REQUIRED.
9.
FLIR attack page — SELECT.
a. Launch mode —SELECT.
b. CIG — SELECT.
c. CCM — AS REQUIRED.
d. Launch mode — Select REMOTE or AUTONOMOUS (as required).
e. Priority missile/laser code — SELECT/VERIFY.
Note
D Occasionally, selection of a PIM code for an AGM-114K missile will result
in failed missile symbology and an AOP “M299 Keyword Error” alert. This
condition occurs when the keyword is corrupted during transmission to the
M299 and is normally cleared by resetting the launcher.
D PIM codes require an installed and properly operating ACRT. Selection of
a PIM code without an installed and operating ACRT will result in the LRD
designating at the rangefinding PRF and weapon guidance failure.
f. AUTO TRK mode — AS REQUIRED.
10.
AVT lock on target — AS REQUIRED.
11.
LASER ENABLE — AS REQUIRED.
12.
WEAPON SELECT — PORT FWD.
13.
MASTER ARM — ARM.
14.
AOP ARM LRD cue — AS REQUIRED.
15.
PWR/ARM — ON.
Note
M299 SAFE/ARM switch will move to arm position and CANNOT be
reset to safe in flight.
ORIGINAL
7-78
A1-H60BB-NFM-000
16. MODE/JETT — AUTO.
CAUTION
Do not select MISSILE MODE/JETT-MAN unless operator intends to
jettison M299 launcher.
17. Verify attack page alerts.
a. WPN ARM.
b. LASER ARMED — AS REQUIRED.
c. Priority missile — SELECTED AND READY.
18. Position reticle.
19. Range find — AS REQUIRED.
After weapon release authority is obtained:
Note
For LOBL engagements, designate target prior to weapon launch.
20. RELEASE CONSENT — DEPRESS.
21. Designate target — AS REQUIRED.
Ensure LASING alert disappears when laser trigger released. If the
LASING alert remains displayed, refer to Uncommanded Lasing
procedure.
Note
D The LASE NOW prompt will not appear if more than 10 seconds have
elapsed since last valid range.
D Next Hellfire missile is available within 2 to 3 seconds of previous launch.
Upon completion of lasing or engagement:
22. AN/ASQ-198 WEAPON SELECT switch — OFF.
23. MASTER ARM — VERIFY SAFE.
24. PWR/ARM — OFF.
25. LASER — DISABLE.
26. VCR — OFF (as required).
27. HELLFIRE PWR — OFF.
7.17.14.5 Remote Lasing Checklist
1. System circuit breakers — IN.
2. HELLFIRE PWR — ON (if a PIM code is required).
7-79
ORIGINAL