Military reference books and manuals (2009-2023, Volume 6) - page 19
(4) Crowd mood, intent, composition, and activity.
(5) Capabilities and readiness of control forces.
(6) Immediate and long-range benefits of control force action.
(7) Weather, terrain, and time of day.
b. Crowd Control Options. In today peace keeping and peace enforcement environment the use of firearms
may not he the viable solution when US military forces are face with separating two belligerent, hostile
ethnic groups or preventing the spread of civil unrest. Crowd control options are often combined.
Consideration of the variables listed above will show the control force commander the general nature of the
most suitable manner of controlling a particular crowd. Four crowd control options are available to the
commander, based on his objective with a particular crowd. These options are available to provide the
commander the flexibility of action. In order to advance this flexibility, there are numerous techniques
available from which the commander may select and employ in various combinations. The commander has
the capability of selectively tailoring his response for whatever crowd situation with which he is confronted.
A prime consideration in selecting an option or options will be the effect of the response on reducing the
strength of the existing situation. The four crowd control options are listed below.
(1) Monitoring. This option consists of watching the crowd's progress and development by control
force teams. Monitoring helps the commander to gauge the crowd's activity and intent in relation to the
larger civil disturbance and possibly to influence the crowd through persuasive means. Monitoring is a
continuous task that will last through out the duration of the demonstration, and can provide the
commander with vital information that would help defuse a situation and prevent it from escalating
beyond what it should have or cause a response to be inadequate based on the situation.
The commander may task observation team to monitor crowd activities to gather information.
They report on the size, location, mood, and developing situations. The observation team can consist of
a marksman, a radio operator, and an observer with binoculars. The team must provide timely
information back to the commander so he may influence the out come of a situations with simple
negations. Monitoring is particularly suitable for large, nonviolent demonstrations where more decisive
action is not possible because of crowd size or where the strength of the situation would increase. This
option is also suitable as a temporary measure pending the arrival of additional control forces.
Techniques for fulfilling this option include passive observation of the crowd and the communication of
interest and intent to leaders.
(2) Disperse. This option consists of action taken to fragment a crowd and is especially applicable to
small crowd situations in a congested urban environment. Its selection should include the consideration
that such dispersion may increase and spread lawlessness rather than reduce it. Therefore, the
commander should establish control over the routes of dispersal, and area or areas into which he plans to
disperse the crowd; provide security for those facilities which might become likely targets for small
groups; and be prepared to follow up the dispersal operation with the apprehension of small groups still
active in the area. Techniques for fulfilling this option would include the proclamation, show of force,
use of crowd control formations, and use of crowd control agents.
(3) Containing. This option consists of restraining a large number of persons within the area that they
are presently occupying, thereby containing any further aggressive activity. This option would be
suitable in a college campus situation, to prevent demonstrations from spreading out to surrounding
communities, and to prevent unauthorized personnel from entering the campus. Containment would
also be the suitable option where the systematic apprehension of crowd members is considered. Crowd
control formations, perimeter patrols, and barriers are effective methods to accomplish containment. In
all instances, caution must be used to avoid "fight-or-flight" syndrome common to people feeling
trapped with no escape.
Armored vehicles, armored security vehicles (ASVs), and up-armored HMMWVs are adaptable to
roadblock operations as they can serve as barriers, as well as protect Soldiers inside and outside the
manning of roadblocks, by giving the Soldiers something to crouch behind if object are thrown.
(4) Blocking. This option consists of the physical denial of a crowd's advance upon a facility or area
which is the potential or actual target of dissident activity. Crowd control formations, principally the
line and barricades, are the most appropriate techniques for this option. Barricades, such as vehicles,
concertina wire, and water-filled barrels can be erected to block or channelize the movement of the
crowd. These devices, when used in combination with Soldiers and other crowd control techniques, are
useful in accomplishing the options of containment or blocking.
c. Techniques for Crowd Control. There are numerous techniques designed to provide the commander
with flexibility of action in accomplishing crowd control. He must select a combination which will
produce the desired results within the framework of the selected crowd control option. The most common
techniques appropriate for military usage are discussed below.
(1) Observation. This consists of deployment of persons or teams to the periphery of a crowd for the
purpose of monitoring its activity. It includes gathering data on crowd size, location, mood, and
reporting on the developing situation. This technique includes posting persons on strategic rooftops and
other high terrain overlooking the crowd. This latter measure provides additional security to control
force personnel should they become committed to other crowd control operations. Such a team may be
composed of an expert marksman, a radio operator, and an observer equipped with binoculars. Care
must be taken to assure that committed control forces are aware of the locations of such teams to prevent
their being mistaken for sniper elements.
(2) Communication of Interest and Intent. In certain situations, effective communication with crowd
and mob leaders and participants may enable the commander to control the situation without resorting to
more severe actions. When planned and organized demonstrations, marches, or rallies within the
disturbed area are announced, the control force commander in coordination with local authorities should
meet with organizers of the activity in order to communicate the interest of the control forces. The
following matters, as appropriate, should be discussed.
(a) Parade or demonstration permits.
(b) Location of demonstration and routes of march.
(c) Time limits for the activity.
(d) Provision of marshals by activity organizers.
(e) Prevention of violence.
(f) Safety of all concerned.
(3) The task force commander and local authorities should also communicate to the activity organizers
their intent to cope with violence, unlawful actions, and violations of restrictions imposed on the
activity. It is intended that, by this communication between activity organizers and control force
personnel, the demonstration, rally, or parade will occur without incident through the mutual
cooperation of all concerned. The intentions of control forces will not be effective if delivered as an
ultimatum. A limited, begrudging dialogue with activity organizers reduces the opportunity for
authorities to learn the plans of the demonstrators. It must be remembered that if this communication is
not effected, the activity organizers might well hold the demonstration in defiance of local authorities,
thereby creating a potential for violence that might not have existed if this technique had been
employed.
d. Channelization. Pressure can be brought to bear on the dissident leadership to channel the crowd into an
area which will minimize the disruption when the following requirements are met:
(1) When communications have been established with the dissident leadership.
(2) When the intent and nature of the crowd activity is known.
e. Diversion. When communication exists with the dissident leadership, consideration may be given to
efforts to divert the leadership of the crowd itself from its stated or obvious objective. The diversion should
support the objectives of the control force either by reducing the strength of the crowd situation or
motivating the crowd to seek an area more easily controlled by the control force.
f. Cooperation. Decreasing the potential disruption of the crowd activity may be accomplished by an active
attempt on the part of the control force to obtain cooperation of the dissident leadership. Whenever there is
an attempt by the crowd leadership to seek permission and cooperation of the local government, every effort
should be made to maximize this cooperation by demonstrating an attitude of facilitation. This may be
accomplished by helping the leadership to organize a peaceful demonstration while establishing guidelines
which will minimize the impact of the demonstration on the community.
g. Selection of Force Options.
(1) The commitment of federal military forces must be viewed as a drastic last resort. Their role,
therefore, should never be greater than is absolutely necessary under the particular circumstances which
exist. This does not mean, however, that the number of Soldiers used should be minimized. The degree
of force required to control a disorder is often inversely proportionate to the number of available
personnel. Doubts concerning the number of Soldiers required should normally be resolved in favor of
large numbers since the presence of such large numbers may prevent the development of situations in
which the use of deadly force is necessary. A large reserve of Soldiers should be maintained during
civil disturbance operations. The knowledge that a large reserve force is available builds morale among
military and law enforcement personnel and helps to prevent overreaction to annoying acts by unruly
persons.
(2) In selecting an operational approach to a civil disturbance situation, the commander and his staff
must follow the "minimum necessary force" principle; for example, crowd control formations or crowd
control agents should not be used if the area filled with manpower would be sufficient.
(3) Every effort should be made to avoid appearing as an alien invading force and to present the image
of a restrained and well-disciplined force whose sole purpose is to help to restore law and order with a
minimum loss of life and property and due respect for those citizens whose involvement may be purely
accidental. Further, while crowd control personnel should be visible, tactical, or force concentrations
which might tend to excite rather than to calm should be avoided where possible.
(4) The normal reflex action of the well-trained combat Soldier to sniper fire is to respond with all
firepower available. In a civil disturbance, this tactic endangers innocent people more than snipers. The
preferred tactic is to allow a special reaction team (SRT) who is trained for this type of mission, to enter
the building from which sniper fire starts. Keeping with the controlling principle that the team must use
only the minimum force necessary to fulfill the mission, the commander may select any one of the
following options for arming his Soldiers:
(a) Riot Shield. In the hands of a well trained soldier, the riot shield can be utilized as both a
defensive and offensive weapon when contact is made with an aggressive crowd. The primary use
of the riot shield is for defense of the line. However, each riot shield holder must be proficient in
its retention. The Soldier holding the shield must be trained to react when a demonstrator grabs the
top of the shield by slapping with his strong hand and gives the following command" Get back",
"Get away" "Stop". If a rioter grabs the bottom of the shield the Soldier should be trained in
forcefully dropping to one knee and pinning the rioters' fingers to the ground.
(b) Baton. The baton is most effective in a crowd control operation and is considered the primary
weapon for crowd control operations. The baton is considered to be an offensive weapon with
reduced lethality and unlike the rifle, the loss of a baton to the crowd does not create a serious
threat. Soldier must be trained with the riot baton to the point its various techniques are automatic
to them. This training must also include the vulnerable points on the body so they can avoid areas
that may cause permanent injury or death when struck.
Currently there are two types of riot batons, wooden and expandable. The most common one is the 36 inch
hickory riot baton with thong. There is also the 24-inch to 36 inch expandable riot baton, which has been added
to the nonlethal capabilities set. Each Solder within the control force need to be proficiently trained in all
techniques for blocking and striking. Improper use of the riot baton by an untrained Soldier has the potential
for creating a greater problem than what already exist.
(c) Shotgun. The 12 gage shotgun is a pump action shotgun currently in the nonlethal capabilities
set (NLCS) inventory. The pump action shotgun is chambered to take up to 3-inch shells. The 3-
inch chamber allows for the use of M1012 and M1013 NL munitions. This shotgun also provides a
visually distinct alternative to the standard military issues weapon.
(d) Rifle. The rifle, if capable of automatic fire, must be modified to prevent automatic operation.
Keeping with the controlling principle of using only the minimum force necessary to fulfill the
mission. If the Soldier are equipped with their long weapons and are in the front lines of the
formation, the weapon should be carried across their back from left to right with the muzzle of the
weapon pointed down and the butt of the weapon pointed up. The weapon should be cleared and
the magazine in the proper ammunition pouch.
(e) Non lethal weapons and munitions. Nonlethal weapons and munitions are an additional asset
afforded to the commander in civil disturbance and are preferred over lethal force. The showing of
force with nonlethal weapons and munitions may assist in crowd dispersing, separate, or leave the
area with minimal causalities. This nonlethal capability set (NLCS) is a well-rounded, versatile
package of both equipment and munitions. NLCS are dived into four distinct categories: personnel
protection, personnel effectors, mission enhancers and training devices
(f) While each of the above options represents an escalation in the level of force, they are not
sequential in the sense that a commander must initially select the first option, or proceed from one
to another in any particular order. So long as the option selected is appropriate, considering the
existing threat, the minimum necessary force principle is not violated.
1. The rifle and rifle with bayonet attached have extremely limited offensive use as both may
constitute deadly force. The primary value of the rifle or the rifle with bayonet attached is the
psychological impact on the crowd. While the use of fixed bayonets can add considerably to
this effect, the danger of intentional or accidental injury to demonstrators or fellow control
force personnel prevents such use except with extremely violent crowds.
2. Fire by selected marksmen. Fire by selected marksmen may be necessary under certain
circumstances. Marksmen should be pre-selected, trained, and thoroughly instructed. They
may be placed on vehicles, in buildings, or elsewhere as required.
3. Full firepower. The most severe measure of force that can be applied by Soldiers is that of
available unit firepower with the intent of producing extensive casualties. This extreme
measure would be used as a last resort only after all other measures have failed or obviously
would be impractical, and the consequence of failure to completely subdue the crowd would be
an imminent overthrow of the government, continued mass casualties, or similar grievous
conditions.
4. Shotgun. The riot shotgun is an extremely versatile weapon; its appearance
and capability also produce a strong psychological effect on rioters. It is particularly suited to
certain applications in civil disturbance operations. When used with No. 00 buckshot
ammunition, it is an excellent point target weapon extremely effective at limited range. By
varying the nonlethal munitions' M1012 and M1013 the weapon can be employed with
considerably less possibility of serious injury or death. This provides the commander with a
desirable flexibility in selecting the ammunition most appropriate under the existing conditions
(g) The measures described in paragraphs 1 through 5 below, may be applied in any
order as deemed suitable by the responsible commander as long as his application is consonant with
prescribed confrontation management techniques outlined earlier.
(1) Proclamation. A public announcement is considered an excellent medium to make known to a
crowd the intentions of the control force commander. In some cases, such an announcement makes
further action unnecessary. An announcement puts the population on notice that the situation
demands extraordinary military measures, prepares the people to accept military presence, tends to
inspire respect from lawless elements and supports law-abiding elements, gives psychological aid
to the military forces trying to restore order, and shows to all concerned the gravity with which the
situation is viewed. In making a proclamation, a commander may consider imposing a time limit.
However, the situation may change, and not imposing a time limit may leave the commander other
options as he sees fit, as long as the proclamation is specific in its instruction.
(2) Show of Force. A show of force is effective in various situations in civil disorder control
operations. A show of force may as simple as Soldier dismounting from buses or trucks in plan
sight of the demonstrators, but must be far enough away to prevent a provoked attack of thrown
objects. When a crowd has gathered in a large area, show of force can take the form of marching a
well-equipped, highly disciplined control force into their midst. When persons are scattered
throughout the disturbance area in small groups, a show of force may take the form of motor
marches of Soldiers throughout the area, saturation patrolling, and the manning of static posts or
similar measures.
(3) Employment of Crowd Control Formations. Crowd control formations are used to contain,
disperse, block or break up a non conforming crowd; these crowd control formations are more
effective in urban areas than they are in open fields or parks. When this method is utilized in urban
areas, it is easy to disperse or split the crowd into small groups, isolate instigators, or funnel a
crowd into a desired area. The use of such formations is part of the show of force and has a strong
psychological effect on any crowd.
(4) Employment of Water. Water from a high pressure hose may be effective in moving small
groups on a narrow front such as a street or in defending a barricade or roadblock. Personnel
applying water should be protected by riflemen and in some cases by shields. In the use of water,
the factors discuss below should be considered.
(a) Water may be used as a flat trajectory weapon utilizing pressure, or as a high trajectory
weapon using water as a rainfall. The latter is highly effective during cold weather.
(b) The use of a large water tank (750 to 1,000 gallons) and a power water pump mounted on a
truck with a high pressure hose and nozzle capable of searching and traversing will enable
Soldiers to use water as they advance. By having at least two such water trucks, one can be
held in reserve for use when required.
(c) In using water, as with other measures of force, certain restraints must be applied. Using
water on innocent bystanders, such as women and children, should be avoided; ways to escape
must be provided; and the more severe use, flat trajectory application, should be used only
when absolutely necessary.
(d) Fire departments are normally associated with lifesaving practices rather than maintenance
of law and order. In order to maintain this image, fire department equipment will not be used
for riot control and crowd dispersal.
(e) Use of Crowd Control Agents. Crowd control agents are extremely useful in civil disorder
control operations because they offer a humane and effective method of reducing resistance and
lessen requirements for the application of more severe measures of force. Task force
commanders are authorized to delegate the authority to use crowd control agents and other
forms of non lethal force at their discretion.
2. Establish Area Control.
a. General. Acts of violence, such as looting, arson, and vandalism, are greatly reduced when the physical
and psychological influence of lawlessness is defeated. In establishing effective area control, commanders
must recognize the problem of widespread looting and arson that has accompanied most large urban
disorders. Performance of this task consists of reducing or eliminating those conditions which contribute to
the outbreak or continuation of lawlessness in the disturbed area.
(1) Looting. When dealing with persons involved in looting, extreme care and adherence to the
principle of minimum force must be observed. Looting may start at any time or place as an isolated
incident and spread quickly throughout the affected areas. Looting is not limited to any particular sex or
age group; it includes the very old, the very young, women, and children. For example, many children
may be looting without any idea of how serious their actions are. In the control of looting, unit leaders
must recognize that deadly force is not authorized.
(2) Anti-looting. Unit commanders must be familiar with anti-looting measures which can be taken by
civil authorities, such as boarding up broken or unbroken windows, covering windows with photo-
luminescent particles, and by the prompt posting of looting penalty proclamations. Anti-looting actions
that can be taken by military forces include the establishment of foot and motor patrols, the posting of
fixed guard posts, and the lighting of likely areas for looting. Guards at fixed posts will be briefed not to
leave their posts to pursue individual looters on foot, but to remain on post and prevent looters from
approaching their areas of responsibility. All guards must be briefed that looters will not be fired upon
nor will deadly force be used to catch looters.
(3) Protected or Sensitive Commercial Establishments. A main consideration in the conduct of civil
disturbance operations is to prevent liquor, drugs, weapons, and ammunition from falling into the hands
of rioters. Therefore, liquor stores, drug stores, sporting good shops, pawn shops, and hardware stores
are main targets for looters and must be kept under close observation by means of foot and motorized
patrols. Normally, businesses of this type must be identified in advance and included in emergency
plans.
(4) Arson. Arson is generally defined as a crime of purposely setting fire to a building or property.
Acts of setting fire to buildings, property, etc., often follow disturbances. Certain situations may arise in
controlling arson where the use of deadly force is authorized and necessary.
AREA CONTROL TECHNIQUES
SATURATION PATROLLING
MOTOR - FOOT - AIR - WATER
IMPOSE RESTRICTIONS
CURFEW - SALES
FIGURE 2-1 AREA CONTROL TECHNIQUES.
b. Area Control Techniques. The techniques (see figure 2-1) most suited to the task of area control include
the following:
(1) Saturation Patrolling. Alert, aggressive patrolling deters the assembly of crowds, provides data on
the developing situation, and creates a psychological impression that the control force is everywhere.
Patrols are particularly valuable in preventing overt arson and for prompt reporting of fires and other
violence. Whenever possible, patrols should be used with existing civil police patrols to concentrate
forces and provide for a military/civilian communication capability. This gives the Soldiers the
advantage of early area familiarity and provides civil police aid to the military patrol members. Patrol
routes for mounted and dismounted patrols should be varied, both as to patterns and times, to prevent
snipers, arsonists, and looters from being able to select a safe time to conduct their activities. Patrol
members must stick to proper standards of conduct and fair treatment of civilians at all times; they must
realize that they are performing an important community relations function as well as a control function.
Depending upon the nature and location of the civil disorder, several types of patrols can be used
effectively.
(a) Motor Patrols. Because of their speed and mobility, motor patrols are able to provide the
commander with timely ground reconnaissance, provide extended enforcement coverage, and respond
to calls for aid from other patrols and guard posts. Radio communication should be maintained with
the control force headquarters. Motor patrols may be used to make periodic contacts with foot patrols
and stationary posts which may lack communication means. All motor patrols should be equipped
with fire extinguishers with which they may put out small fires, thereby preventing larger fires and
reducing the necessity for calling the fire department. The vehicle should be modified with sandbags,
wire screens, or similar materials to protect against sniper fire or thrown objects. Motorized patrols
should consist of three vehicles with three personnel per vehicle.
(b) Foot Patrols. Depending upon the degree of violence and extent of activity in the patrolled area,
foot patrols may range from two- to four- or six-man elements or squad-size units. Foot patrols are
more useful in areas where the population movement is heavy and/or the area to be patrolled is small.
Foot patrols must be able to protect themselves and control a limited number of disorderly persons.
(c) Air Patrols. Air patrols can perform reconnaissance and surveillance missions over the disturbed
area. They are an excellent means of providing timely data on the actions of dissidents, extent of
damage, status of access routes, location and condition of road barriers, and other important data.
They can help the commander in the direction of the overall control effort within the disturbed area.
(d) Water Patrols. Water patrols can be used where the disturbed area contains or is bordered by
navigable water. Water patrols function in a similar manner to motor patrols.
(2) Imposed Restrictions. Except in the unlikely event of martial law, federal military forces will not
have the authority to impose restrictions such as a curfew on the civilian population. Certain
restrictions, however, may be imposed by civilian authorities to help in the control of lawlessness.
Military leaders should be prepared to recommend which restrictions are of substantial value in
comparison with the burden of enforcement. The most commonly used restrictions include:
Curfew. The curfew is a control measure which has proved highly effective in many civil disturbances. Its
purpose is to restrict the unauthorized movement of personnel on streets and public places during specified
periods of time, especially during the hours of darkness. Joint planning with civil authorities regarding the
imposition of a curfew should provide for:
(a) Coordination of the initiation, enforcement, and termination of a curfew.
(b) Public announcements of the beginning and ending of curfews. Civilian authorities make these
announcements through local mass media, pamphlets, and public address systems to ensure
maximum exposure.
(c) Curfew exemptions and guidance on who should receive them, including written authorization
or passes.
(d) Provision for the apprehension and disposition of curfew violators.
(3) Sales Restrictions. Restrictions on the sale, transfer, and possession of sensitive material such as
gasoline, firearms, ammunition, and explosives will help control forces in minimizing certain forms of
violence. Limiting the availability of weapons to the potential sniper or terrorist may reduce the
likelihood of such violence. The effective enforcement of these restrictions, however, requires extensive
planning and the commitment of adequate manpower to this effort.
PART B - Neutralization of Special Threats
1. General. Lessons learned from past civil disturbances show that control forces will be frequently exposed to
special threats which pose grave danger to both the control force and to the general community. Special threats
include such acts as bombing and sniping. Three general steps are required to neutralize all special threats.
a. Take immediate action. The first concern is the person or the control force unit or team encountering a
special threat, such as sniping, is personal safety and safety of others in immediate danger. Individual
soldiers and control force leaders should be trained and rehearsed on the immediate action to be taken upon
encountering sniping, a bomb threat, or an explosive device. The immediate action step specifically avoids
hastily attempted, disorganized, responses that will likely further danger the control force and the public.
b. Secure the area. Before the identified threat can be effectively neutralized, the danger area must be
secured. The control force unit or team on the scene or reinforcements should be used to isolate the area to
stop the escape of perpetrators and to prevent the influx of unauthorized personnel from the control force
and from the general public. In addition, the entire area may have to be cleared of persons endangered by
the threat. In the case of sniping, if evacuation of personnel from the danger area is not possible, warnings
to seek cover should be issued using public address communications.
c. Employ special teams. Poorly trained and equipped control force personnel should not try to destroy a
threat. Operations requiring the removal of a sniper from a barricaded position or the removal of an
explosive device should be performed by selected teams of specially trained, specially equipped personnel.
Explosive ordnance disposal (EOD) units should be used to destroy explosive devices.
2. Bombs. During civil disturbances, control forces should be trained to recognize fire bombs, pipe bombs, and
other devices. They should also be trained and rehearsed in the immediate action necessary when discovering
an explosive device. The actual destruction of the bomb should be accomplished by the EOD unit or civil
police bomb unit. Two specific steps (See Figure 2-2) are required when an explosive device is found:
IMMEDATE ACTION
Take Cover
Warn
Report
SECURE THE AREA
Isolate
Evaluate
Alert
Control
Utilities
FIGURE 2-2. STEPS TO TAKE WHEN AN EXPLOSIVE DEVICE IS ENCOUNTERED.
a. Immediate Action. The individual soldier or control force unit or team that discovers an explosive device
should:
(1) Take Cover. All personnel should immediately leave the area and seek cover wherever possible.
(2) Warn. Notify all personnel to clear the area.
(3) Report. Inform the appropriate personnel of the situation so that aid can be sent to the scene.
NOTE: DO NOT, AT ANY TIME, HANDLE THE DEVICE.
b. Secure the Area. After the individual soldier or control force unit or team has taken the immediate
action, steps should be taken to secure the area. If the control force unit or team is capable, they may be
used to secure the area. The senior member of the element responsible for securing the area should consider
the following:
(1) Isolate. Establish roadblocks or checkpoints as necessary to keep unauthorized personnel out of the
area.
(2) Evacuate. Ensure that all personnel are out of the danger area.
(3) Alert. Notify fire, local police bomb squad, (if not available notify the military EOD), and medical
personnel and direct them to a staging area for quick deployment.
(4) Control Utilities. The close down of all gas, electric, and water service to the affected area should
be accomplished by qualified personnel familiar with the utilities and the area.
c. After the area has been secured, the EOD unit or civil police bomb unit should be escorted to the location
of the device. The actual destruction and disposal of the explosive device should be accomplished by an
EOD unit or civil police bomb unit.
d. Bomb Threats. Bomb threats may increase during civil disturbances or during other times of tensions
and crises. Frequently, warning calls or notice have been given when an explosive device has been actually
planted to avoid loss of innocent lives. However, on occasion, cranks, deranged persons, or disgruntled
employee may make threats or give fake notice following an actual explosion to cause activity or business
to stop by forcing evacuation. If a prank call is successful in causing evacuation, more threats will follow.
Safety must always be resolved in favor of evacuation. Most bomb threats are received by telephone
operators in industry and educational facilities. It might also be expected that bomb threats will be received
at rumor centers, police headquarters, and joint operational facilities during civil disorders. If possible, each
facility should be provided with a telephone tracing capability. Telephone switchboard operators and others
likely to receive bomb threats should be trained to accomplish the following:
e. Activate the telephone tracer system.
f. The person receiving the phone call may be the only person to have a conversation with the person who
has knowledge of the explosive device. Therefore it is extremely important that the receiver of the call
records or writes down the conversation word for work so that no important information is forgotten or
missed. By writing down the exact wording or electronically recording the conversation, and utilizing FBI
Form 6-136 (Bomb Threat Checklist) the person receiving the call can ask specific questions from the caller
such as:
(1) Bomb location.
(2) Time of explosion.
(3) What will cause the bomb to explode?
(4) Type of device, to include physical description.
(5) Sex, approximate age, and attitude of caller.
(6) Strange speech, accent, etc.
(7) Distinguishing sounds or backg1round noises coming from the caller's location.
(8) Reason for the bomb placement.
NOTE: See Figures 2-3 for front and back of the FBI Bomb Data Sheet.
g. Inform the appropriate personnel of the threat (EOD or local police bomb unit).
h. Actions Upon Receipt of Bomb Threat. Upon receipt of a bomb threat, the responsible commander
should accomplish the following:
(1) Alert. Notify the necessary control force elements, civil law enforcement or military police, fire and
medical service personnel, utilities personnel (water, gas, and electricity), and civil police bomb squads
or military EOD units and direct them to report to a staging area near the threatened facility.
(2) Isolate. Establish roadblocks or checkpoints as necessary to keep unauthorized personnel out of the
area. Isolation should take place at a safe distance from the area to prevent danger from an explosion.
(3) Evacuate. The senior occupant of the building makes the decision to evacuate. Control forces may
only make a recommendation to evacuate. If the decision is made to leave, it should be done in an
orderly fashion using a bomb evacuating plan, a fire plan, or appropriate announcements and directions
to building occupants. Such a plan should name a building or area which provides shelter from the
elements. Care must be taken not to create panic. Before leaving the building, occupants should check
their immediate locations for any unusual or out-of-place objects or packages. Employees should be
advised to take their briefcases, overcoats, and like items with them as they leave.
(4) Organize Search Elements. Selected occupants of the building (familiar with its layout) and control
force personnel should be organized into search elements. They should not be equipped with hand held
radios, instead if they need to communicate with each other or personnel outside the danger area, they
should utilize on the of the following methods:
(a) Voice.
(b) Runners.
(c) Whistles.
(d) Field phones.
(e) Hand signals (if one point is visible by all)
CAUTION: THE USE OF RADIOS DURING THE SEARCH CAN BE DANGEROUS. THE RADIO
TRANSMISSION ENERGY CAN CAUSE AN EARLY EXPLOSION OF AN ELECTRIC INITIATOR
(BLASTING CAP).
(5) There are two types of searches that can be conducted, a supervisor search or a search team search.
(a) Supervisors Search: A supervisor search can be conducted by the supervisor and a few
volunteers that are familiar with the overall layout of the building and can be conducted without the
building being evacuated, by utilizing a quick-pace method to look for suspicious items. This
search can be useful only if the areas are well organized and not cluttered.
(b) Search Team Search: A search team search requires that the building be evacuated until after
the search has been completed. The team should consist of two personnel who volunteer and are
assigned to familiar with the area they are searching. It must be stressed that they know if an object
is supposed to be there or not. For this reason, law enforcement and EOD should not conduct the
initial search of the building.
(6) Searches should be made of public access areas such as utility areas, hallways, administrative areas,
mess areas, outside of buildings, shipping or loading areas, vehicles parked near the facility, supply
rooms, under stairwells, and accessible closets and storage areas. Suspicious objects or packages found
during the search should be reported. They should not be handled. Even when a bomb is located, the
search should continue since there may have been more than one bomb.
i. Whenever the bomb itself or a suspicious object or package is found, the EOD or civil police unit should
be notified and used to destroy the bomb or suspect package. Further guidance in this subject area will be
found in FM 19-10.
j. Arson is not usually the first of the special threats to happen. Arson itself is reasonably easy to handle
in that fires can be seen and their size is readily definable. The following measures will help the control
force in stopping arson, arresting arsonists, and limiting the damage resulting from both acts of arson and
accidental fires.
(1) Preventive measures include convincing local members of the importance of security. This consists
of selling them on the importance of creating a security atmosphere through the installation of lighting,
alarms, gates, and other measures. Once a disorder has started, increased surveillance, through
saturation patrolling, and stationary guard posts, and isolation of the affected area by the use of
barricades and roadblocks will help in controlling arson. Patrols are especially effective in preventing
overt arson, in giving notification of the location of fires and conducting spot checks of persons acting
in a suspicious manner or searching for materials and devices used to set fires. Roadblocks and
barricades reduce the movement of persons in the affected area and also provide an opportunity for
searches of suspicious persons for materials and devices needed for arson. Control force commanders
may find it helpful to develop lists of known and suspected arsonists from the files of civil law
enforcement agencies and distribute this data to all control force personnel. Consideration should be
given to forming specially trained teams or arson experts such as specialists from police, fire and
insurance agencies to investigate promptly all acts of suspected arson and attempted arson and to help
control forces at the scene of arson incidents.
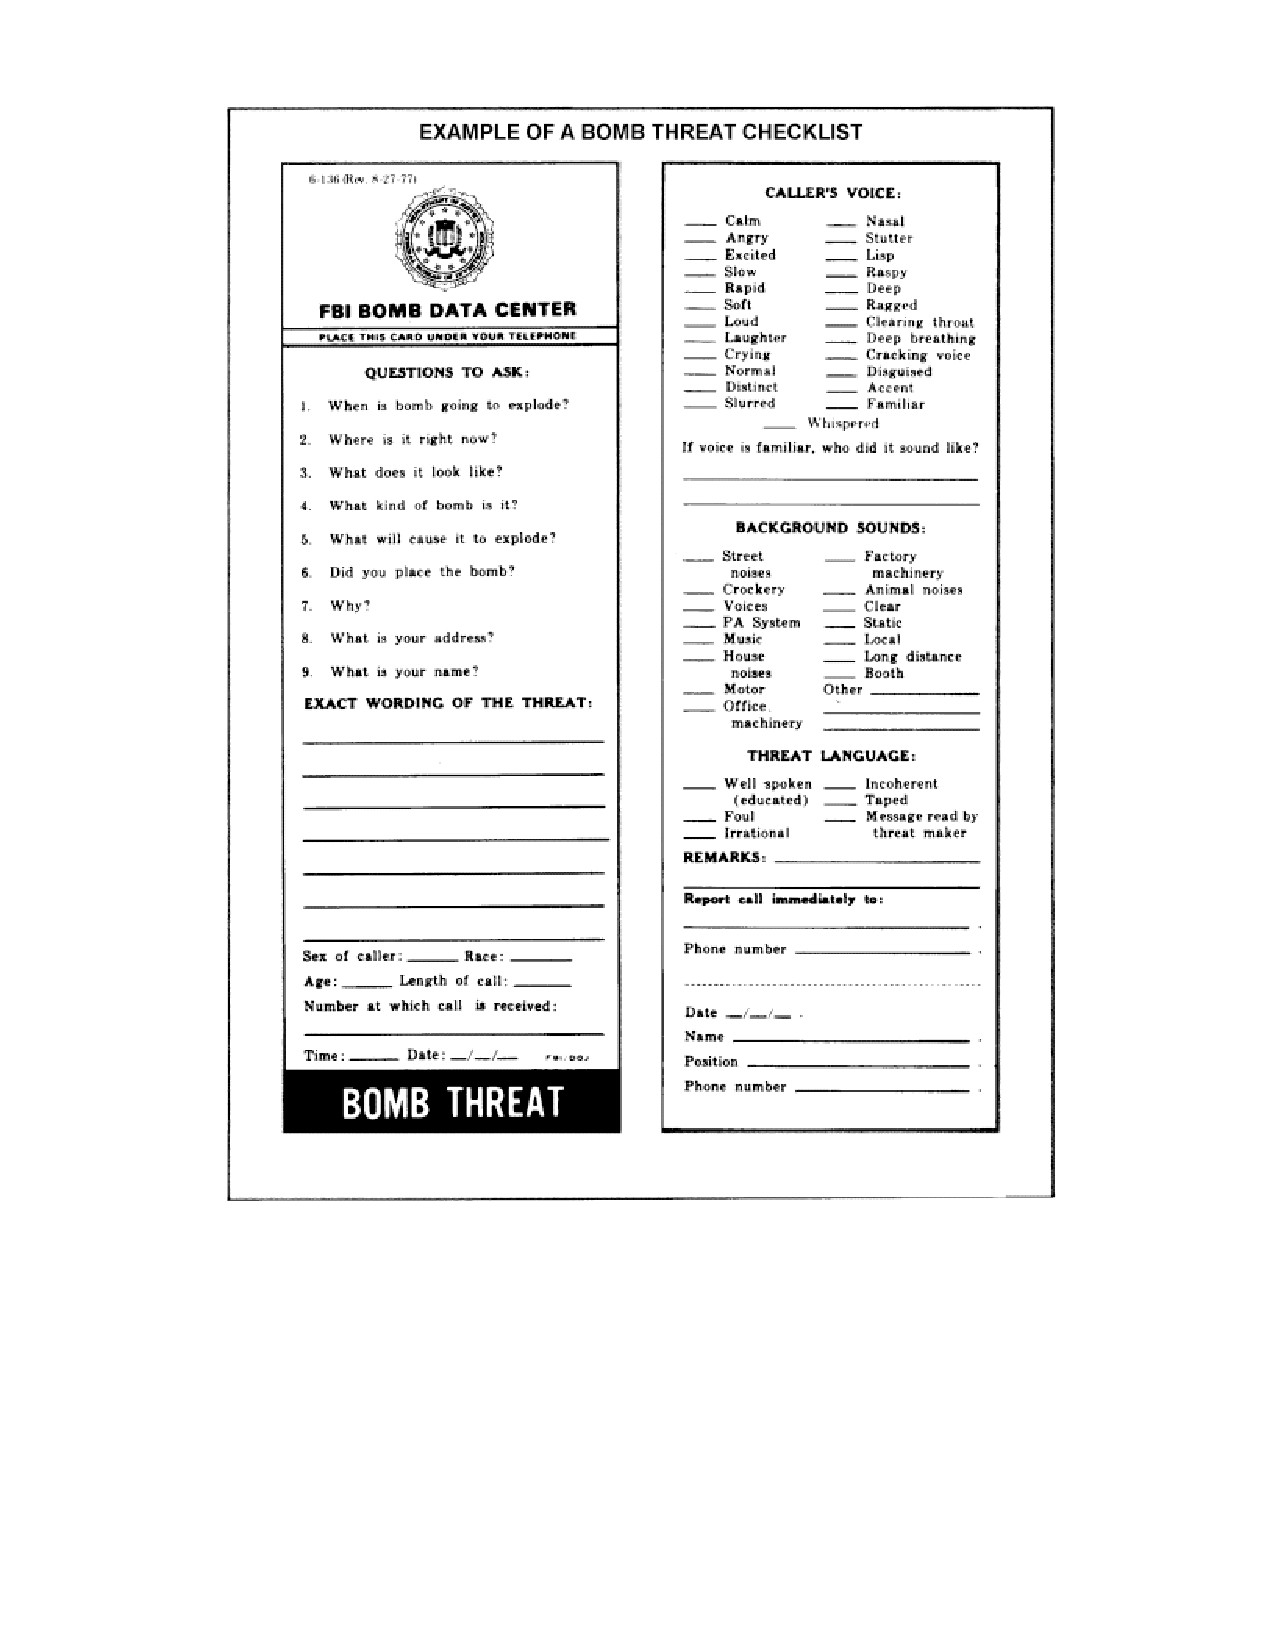
FIGURE 2-3. FBI BOMB DATA SHEET.
(2) The use of deadly force may be required to prevent acts of arson which would cause loss of human
life or destruction of facilities vital to public safety. However, only the minimum necessary force should
be used, and commanders are required to carefully weigh all alternatives and ensure that all other means
have been expended or are not feasible prior to authorizing the use of deadly force.
(3) Some general methods for controlling the use of accelerants as starting devices for fires are as
follows:
(a) Solicit active cooperation of vendors of various types of flammable liquids.
(b) Provide police protection to stations selling fuel in the disturbed area.
(c) Limit sale of gas in portable containers to 5 gallons.
(d) Protect gasoline supply in service stations abandoned because of civil disorders.
(e) Station auxiliary police in unattended fire stations.
COUNTER-SNIPING
o IMMEDIATE ACTION
o TAKE COVER
o WARN
o IDENTIFY
o REPORT
o LOCATE
FIGURE 2-5. NEUTRALIZATION OF SNIPER FIRE.
3. Snipers.
a. Counter-sniping.
(1) Soldiers committed to civil disturbance control operations must be well-trained and rehearsed in the
quick action that must be taken to stop sniper fire. Actual termination of the sniper should be
accomplished by a special reaction team. The success of this team would depend upon the quantity and
quality of prior planning and the proper preparation for handling such incidents. (See Figure 2-5)
(2) Immediate Action. The individual soldier or control force unit or team that encounters sniper fire
should accomplish the following:
(a) Take Cover. All exposed personnel should immediately seek cover whenever possible.
(b) Warn. Notify all bystanders to clear the area or seek cover.
(c) Identify. Ensure that sniper fire has, in fact, been encountered. Automobile backfires,
firecrackers, light flashes, accidental weapon discharges, random firing by control forces, or distance
sounds of firing may all be misidentified as sniper fire at your position.
(d) Report. After verifying the sniper fire, inform the appropriate personnel of the situation so that
help can be sent to the scene if required.
(e) Locate. Try to fix the exact position of the suspected sniper or snipers. Inform the special
reaction team leader of the sniper's location.
(f) Do not, during any of the immediate action steps, return the fire unless a positively identified
target is available and the requirements for the use of force can be met. If firing is necessary, it is
accomplished by a selected marksman acting on orders from an officer or the senior person present..
The military leader must make every effort to prevent a disorganized mass return of fire that will
likely endanger innocent persons. When crowd control formations are being used, the threat of
sniper fire increases. Members of the control force should be aware, however, that persons in the
crowd may try to disrupt the formation by the use of loud noises, such as fireworks or bursting paper
bags. Members of the control force should be alert to such tactics to prevent disruptions during
attempts to maintain order.
b. Securing the Area. After the individual soldier or control force unit or team has taken immediate action,
steps should be under-taken to secure the area. In most situations, however, it will be necessary to commit
reserves or other control force elements. Regardless of what forces are used, the senior member of the
element responsible for securing the area should accomplish the following:
(1) Isolate. Notify all control force units not committed to the termination of the sniper to stay clear of
the danger area. Establish roadblocks or checkpoints to keep unauthorized personnel out of the area to
block the escape routes of the sniper. Isolation should take place far enough away from the danger area to
prevent exposure to sniper fire.
(2) Evacuate.
(a) When meeting a sniper in a lightly populated area or building, make an announcement advising
residents to clear the area or building using a specific exit. Those personnel exiting the building or
area should be screened and identified since the sniper may well be one of them. Witnesses and those
suspected of involvement with the sniper should be detained. Some residents may be unwilling,
unable, or afraid to leave the area or building. A second announcement should also be made advising
the remaining residents to seek cover, remain still, and stay away from exposed areas and windows.
(b) When meeting a sniper in a heavily populated area or building where evacuation is impractical,
make an announcement to warn all residents to seek cover, remain still, and stay away from exposed
areas and windows.
(c) Observe. Establish observation posts on rooftops and in windows or adjacent high buildings.
Communications should be provided to the observers. A selected marksman, under appropriate
orders, may also be used with the observation posts.
(d) Support. Be prepared to provide necessary support to the special reaction unit. Such support may
include:
1. Establishment of a staging area for emergency and support equipment as well as for the team.
2. Establishment of a command and communications center for the coordinated control of the
operations.
3. Control of crowds.
(3) Employment of the Special Reaction Team. The actual search for and apprehension of a sniper is a
difficult and dangerous operation. It should be performed by a special reaction unit which has been
trained and equipped for such operations. The procedures outlined in this paragraph are suitable for the
team or for other control force elements assigned to terminate sniping when a team is unavailable.
(4) Establishment of a Command Post. The command element of the team should establish a central
location for the coordination of all elements. Communications should be set up and maintained with the
force securing the area and with observation posts. In addition, continuous communications between the
action and security elements must be maintained once they are deployed so that the progress of the search
team can be monitored and so that the cover team does not mistake persons in the search team for the
sniper.
(5) Deploy the Security Element. In order to observe sniper actions and all exits, the security element
should be positioned outside the immediate area. In addition, the security element should establish a
preferred route of entry into the area or building for use by the action element. The security element's
selected marksman should be positioned at a location giving him the best possible observation and field
of fire. If necessary, the selected marksman may fire at the sniper or snipers when they can be positively
identified as snipers, when they are continuing fire, and when the requirements of the use of deadly force
are met. This fire should be accomplished only by the selected marksman under the guidance and orders
of the commander.
(6) Prepare the Action Element for Entry Into the Area or Building. Preparation should include:
(a) A briefing on the area or building through the use of maps, drawings, and knowledgeable
residents.
(b) Equipment and communications checks.
(c) The issuance of an operations order.
(7) Prepare and Issue Warnings and Instructions to the Sniper. The sniper should be given enough time
to surrender.
(8) Attempt to Force the Sniper Into the Open. In open terrain or when meeting a sniper in a small
unoccupied building, use crowd control agents in an attempt to force the sniper into the open where he
can be taken into custody with less risk. Before using crowd control agents directly into the sniper's
location, saturate the areas and rooms adjacent to the sniper. This will prevent him from using unaffected
areas.
(9) If the sniper cannot be forced out, commit the action element to the area or building.
(a) When committing the action element to an open area, crowd control agents should be used to
saturate the area prior to entry. The action element should enter the area on one side of the perimeter
established by the cover element and then proceed through the area toward the other side of the
perimeter.
(b) When committing the action element to a building, the following methods of entry can be used:
1. Entry at the top. Whenever possible, buildings are entered and searched from the top down.
A sniper who is forced to the top may be cornered and fight desperately or escape over rooftops;
one who is forced down to the ground level may try to withdraw from the building, leaving
himself open to capture by the security element. Various means may be used to gain entry such
as ladders, drainpipes, vines, toggle ropes, grappling hooks, roofs of adjoining buildings, or
public utility vehicles designed for work on tall structures. Helicopters may also be used to
deploy the action element on top of buildings.
2. Entry on middle floor. Sometimes it is impossible to enter a building at the top. In these
instances, entry should be made at the highest possible point using the techniques described
above. The floor on which entry is made should be thoroughly searched and secured first. The
action element then moves to the top floor and searches from the top down.
3. Entry at the bottom. When entry must be made at the ground level, armored personnel
carriers should be used to gain entry and provide protection. Smoke may also be used to hide
movement. When entering single-story buildings, it may be preferable to use crowd control
agents to saturate the building before the action element enters.
(c) Search the Area or Building. A systematic search for the sniper must be conducted.
1. In an open area, the action element should maneuver and search under the protection of cover,
firing only when necessary to protect life and property. Either the security element or the action
element may use crowd control agents to aid the advance of the action element. Fire by selected
marksmen may also be employed, if necessary. The "base of fire" technique (massed firepower)
should NOT be used since it is destructive and creates hostility among innocent persons who
suffer property damage or injury. The security element on the side of the perimeter where the
action element entered the area should gradually close the perimeter as the action element moves
forward. The security element on the opposite side should remain in position as the "noose"
closes. The purpose of this action is to force the sniper to withdraw, leaving him open to capture
by the security element. The techniques used for terminating a sniper in an open area will
require close coordination and communication between all elements involved.
2. In an unoccupied building, when the sniper's location is not known, all rooms must be
searched by at least two men. One man may throw a crowd control agent grenade, then enter
quickly and place his back against the nearest wall. The second man follows and searches the
room in detail. The action element leader should be kept informed of the progress made.
3. In an occupied building, when the sniper's location is unknown, all suspected rooms must be
searched. The action element should try to have occupants submit voluntarily to the search of
their rooms. At the same time, occupants should be questioned in an attempt to pinpoint the
sniper's location. If occupants will not submit voluntarily and there is probable cause to believe
that the sniper is located in the room a search should be conducted as described above.
4. In a building, occupied or not, where the sniper's location is known, the action element should
proceed directly to the immediate area of the sniper's location. The rooms near the sniper's
location should be checked first to ensure that the sniper has not moved. Once the rooms
adjacent to the sniper have been cleared, crowd control agents should be introduced into the
sniper's room by either the action element using bursting-type grenades or the security element
using grenade launchers from the outside of the building. The door to the sniper's room should
be opened or, if necessary, broken down. Before entering the room, allow time for the sniper to
exit the room. If he does not do so, proceed with caution into the room.
5. Apprehend the Sniper. Whenever possible, the actual apprehension of the sniper is left to the
civil police with help provided by military forces.
4. Integrated Tasks.
a. General. There are many additional tasks which must be fulfilled along with the five additional
operational tasks. Some are more important than others and the following inclusions by no means exhaust
the list of these integrated tasks. The extent of their use will depend on the nature of control force
involvement in the civil disorder.
b. Specific Tasks.
(1) Gather, Record, and Report Data. Each functional element of the control force, regardless of size,
acts as a source for providing vital data upon which commanders at all levels can base their decisions.
Additionally, the requirements imposed for after-action reports, investigations, and other administrative
or judicial actions make it desirable that detailed unit journals or logs be kept by each separate operating
element. Consideration should be given to naming a person in each squad or platoon to act as a recorder
for the purpose of keeping an accurate journal of the unit's activity. Personnel named to act as recorders
should be equipped with appropriate recording devices and a camera as a minimum.
(2) Apprehend Law Violators. The apprehension of the individual law breaker is a vital function during
confrontation management operations because of the legal consideration involved; however, civil police
should make the actual apprehension whenever possible. When military forces detain or take a civilian
into temporary custody he will be turned over to civil police as soon as possible. The apprehending
individual will be required to complete DA Form 2708, Receipt for Inmate or Detainee, at the collection
point. This form, when properly completed, can provide civil authorities with all the basic data required
in case of prosecution. It further provides for proper control of those persons detained.
(3) Maintain Communications. Effective communications between all control force elements, both
within the military chain of command and with other law enforcement agencies, must be assured. Radio
equipment may require extensive interchange between military, state, and municipal agencies to provide
for cross-agency communications. Other planning considerations are the provision for alternate means,
such as commercial radios, pay telephones, and visual signals.
(4) Maintain Mobile Reserves. The control force commander and subordinate commanders must have
the ability to respond to unexpected requirements and to influence adverse situations. To this end,
mobile reserve forces should be set up and kept in readiness. Mobile reserves should be located at
secure locations close to the disturbed area to permit employment within minutes. The reserve force
must be reconstituted quickly upon commitment.
(5) Inform the Public. To deter the spread of rumors and false data, the control forces must ensure the
public is informed of the true nature and purpose of the measures being imposed upon them. This is
particularly important where dissident elements are known to be presenting false or distorted data.
Procedures must be set up to give news media access to the disturbed area and to the facts, if they are
denied this opportunity; their news coverage will likely be based on speculative or false data.
Additionally, rumor control centers operated by the control force may be required to deter the spread of
word-of-mouth rumors.
c. Firefighting Task Operations.
(1) General. In many civil disturbances, the existence of destructive violence, particularly demonstrated
by the setting of fires, requires that detailed consideration be given to the immediate and effective
response designed to limit the effect of such destruction.
(2) Firefighting Task Forces. A primary factor in such a response will be the firefighting task force,
which should be composed of a number of pieces of equipment and the required operational and security
people. The concept is to provide a mobile force capable of moving rapidly, having enough equipment
to quickly put out or contain large fires and then move on. In order for a task force to be efficient, the
following considerations should be made:
(a) A specific area of operation should be named.
(b) Several task forces should be created.
d. Security of Firefighting Task Forces. The primary mission of the firefighting task force is containing
fires and due to that total commitment, the task force must depend on other agencies for its security.
Firefighting personnel and equipment are extremely open to harassment and attacks by crowds or
individuals. This mission of security will normally be assigned to military units which have been
committed. When creating such a security force, two important areas must be addressed:
(1) Size. The size of the force will depend upon several factors such as:
(a) Size of the firefighting task force.
(b) Level and amount of hostility found in the area of operation.
(c) Available personnel and equipment that can be allocated to the mission.
(2) Techniques. Methods of providing security will incorporate a number of concepts.
(a) Mobility is a must and the best means to ensure this is to provide the security force with
sufficiently equipped vehicles and communication equipment. Vehicles should have flashing,
emergency lights to enable them to move safely or provide appropriate escort vehicles. Security
personnel should never ride or position themselves on fire fighting equipment. The humanitarian
(non-threatening) image must be maintained in the public.
(b) The following considerations should be observed at the fire scene:
1. The military unit leader should contact the senior fireman present and provide aid.
2. A protective cordon should be established around the fire service while it is operative. The
cordon should face outward and personnel should be assigned areas of responsibility.
3. All vehicle and pedestrian traffic entering the area should be blocked.
4. Observation posts should be positioned in any tall building to prevent sniper attacks.
5. Any hostile crowd activity should be controlled using appropriate crowd control techniques.
If necessary, reinforcement should be promptly requested.
6. Process detained personnel.
(e) Anti-looting measures.
General.
(1) Looting may start at any time or place as an isolated incident and quickly spread throughout the
affected area. From previous civil disorder, looting of businesses has emerged as a problem calling
for quick prevention action. Looting may take place at random throughout the time that an area is
in turmoil.
(2) From a previous discussion we know that looters are from all walks of life; young, old, male,
and female. Again, emphasis is placed on the use of force which should be no more than necessary.
(3) Lessons learned from various disorders have shown that looters will normally start with liquor
stores, arms and ammunition stores, and drug stores. However, looters will also take such things as
food, furniture, watches, rings, clothes, candy, television sets, major appliances, etc., whether they
need them or not. Department stores may be looted and then burned in order to destroy records of
money owed by the looters.
(4) Control of looting. The amount of force needed and the techniques used to control looting will
vary considerably within the area of operation. As a general rule, looting should be stopped as
quickly as possible to prevent it spreading to those who would not normally loot except when caught
up in the actions of others. The following control measures will help in this objective:
(a) Isolation and control of the affected area by use of barricades and road blocks to prevent
looters from increasing in numbers.
(b) Establishment of saturation patrolling and stationary guard posts within the affected area to
prevent looting.
(c) Quick arrest and removal of violators.
(d) The techniques applied and the amount of force used will depend on the situation and the
instructions issued to the commander. As a general rule, looters should not be fired upon
merely to prevent their escape.
(e) Looting can be expected to increase during hours of darkness. Therefore, favorite looting
targets should be patrolled often and special night lighting should be used when and wherever
possible to discourage open acts of looting. In addition, peak periods of looting activity should
be carefully charted and increased efforts used during these times.
SUMMARY
During the course of this lesson you have learned how to use crowd control, counter sniper, building search
techniques and supervise immediate action to be taken upon a notification of an explosive device as well as
actions to be taken in the event you come in contact with an explosive device. Additionally, we have learned
that confrontation management operations require control forces which can effectively confront a variety of
crowds and mobs and maintain order one it has been established.
Lesson 2 Test
The following questions are multiple choice and true/false. You are to select the one that is correct. Show your choice by
CIRCLING the letter beside the correct choice directly on the page. This is a self-graded lesson exercise. Do not look up
the correct answer from the lesson solution sheet until you have finished. To do so will endanger your ability to learn this
material. Also, your final examination score will tend to be lower than if you had followed this recommendation.
1. There are several options for crowd control, for large nonviolent demonstrations, where decisive action is not possible,
the best option would be
A. Disperse.
B. Contain.
C. Monitor.
D. Block.
2.
Which of the following is not used in the task of area control?
A. Fixed guard posts.
B. Motor patrols.
C. Curfew.
D. Air patrol.
3.
When encountering an explosive device, which of the following actions should be taken?
A. Notify all personnel to clear the area.
B. Visually examine device to relay such information to EOD en route.
C. Place sandbags around the device.
D. Try to disarm device.
4.
When conducting a bomb search, search teams should consist of
A. Only the control force.
B. Control force and select building occupants.
C. Control force and civil unit.
D. Only the civil police unit.
5.
Deadly force may be used in the prevention of arson act.
A. True.
B. False.
6.
What are the two types of searches that can be conducted of a building during a bomb threat?
A. Bomb Technician Search and EOD Search.
B. Specific area Search and General Area Search.
C. Supervisor Search and Search Team Search.
D. Firefighter Search and EOD Search.
1.
When military forces detain or take a civilian into temporary custody he will be turned over to civil police. The
apprehending individual will be required to complete:
A. DA Form 3975 Military Police Report.
B. DA Form 4137 Evidence/Property Custody Document.
C. DA Form 2823 Sworn Statement.
D. DA Form 2708, Receipt for Inmate or Detainee,
1.
When committing the action element to a building, what is the preferred method of entering the building?
A. Enter through a window.
B. Enter from the highest entry point.
C. Enter form the lowest entry point.
D. Enter from the middle floor of the building.
1.
When encountering a sniper that is firing from inside of a building, the control force should:
A. Create a team and assault the building.
B. Notify the special reaction team and let them handle the situation.
C. Notify the closes air base for support.
D. None of the above.
10.During a riot, firefighting personnel and equipment are extremely open to harassment and attacks by crowds or
individuals.
A. True
B. False
LESSON 2
PRACTICE EXERCISE
ANSWER KEY AND FEEDBACK
Item
Correct Answer and Feedback
1.
C.
Monitor.
While monitoring... (page 2-4)
2.
A.
Fixed guard posts.
The techniques... (page 2-11)
3.
A.
Notify all personnel to clear the area.
Warn. (page 2-13)
4.
B.
Control force and selective building occupants.
Selected occupants... (page 2-15)
5.
A.
True.
The use of deadly force may be required to prevent acts of… (page 2-18)
6.
C.
There are two types of searches that can be conducted, a
supervisor search or a search team search. (Page 2-15)
7.
D.
All of the above.
Once a disorder... (page 2-14, para 2f(1))
8.
B.
Entry at the highest entry point. Whenever possible, buildings are entered and
searched from the top down. (page 2-21)
9.
B.
Actual termination of the sniper should be accomplished by a
special reaction team. (page 2-18)
10.
A
Firefighting personnel and equipment are extremely open to
harassment and attacks by crowds or individuals. (page 2-23)
LESSON 3
CROWD CONTROL FORMATIONS
OVERVIEW
LESSON DESCRIPTION:
In this lesson you will learn the various crowd control formations and how to form up Soldiers into those
formations.
TERMINAL LEARNING OBJECTIVE:
ACTION:
Describe crowd control formations and how they are formed.
CONDITION: You will have this subcourse.
STANDARD: To demonstrate competency of this task you must achieve a score of 70 percent on the
subcourse examination.
REFERENCES:The material contained in this lesson was derived from the following publication: FM 3-19.15.
INTRODUCTION
We know from our studies of the histories of war that success in battle is not always determined by the number
of Soldiers or firepower. Success is more often determined by the discipline and training of the Soldiers
involved. This situation often applies to civil disturbance control operations because our Soldiers can be
expected to be greatly outnumbered. A system of crowd control formations has been devised to offset this
shortage of numbers. It is vital that you have a thorough knowledge of this system of formations to help you to
effectively employ your unit in a civil disturbance operation.
PART A - TYPES OF FORMATIONS AND WEAPONS
1. General.
a. Crowd control formations, when properly used and effectively carried out; represent one of the most
practical methods of controlling crowds. These formations are especially effective against a large crowd
because they enable the control forces to split the crowd into small groups. However, commanders must
realize their limitations; formations are not the answer to all disturbance situations. Soldiers should not be
subjected to unnecessary sniper fire and violent acts of troublemakers simply to impress the mob with a
show of force. When small dispersed groups are running wild in an area of operations, crowd control
formations will be of little value in stopping the disturbance.
b. With the development of non lethal weapons (NLW), the commander now has more options at his
disposal. Before NLW, the only other choices were chemical irritants, military working dogs (MWDs), and
lethal force. With the advances in NLW's, it is now possible to create an effective standoff distance of 15 to
100 meters between the crowd and the control force. Now commanders can create a standoff distance with
NLW that reduces the risk of close fighting with the mob.
c. Further, when a large mob has been broken up, the problem is not necessarily solved. It should not be
assumed that rioters have returned to peaceful activities. It may well be that the small groups breaking away
from the large group will engage in small mob tactics such as sniping, looting, and burning. If such a
situation develops, commanders should apply the tactics discussed in the preceding lessons and continue
active control measures until they are sure that law and order have been restored.
d. During CONUS operations, there are usually no enemy forces. However, the commander must still
assess and secure the areas of operations (AOs). This can be done by the use of helicopters conducting
over-flights observations or by visually securing rooftops, high elevations, and advantage points. When
utilizing crowd control formations, they can not only be utilized to break up crowds but also have the
capability to make apprehensions and detain certain personnel that the commander may feel will instigate
the crowed to further violence.
e. The manner of using formations and NLWs, the application of a certain formation to a particular
situation, and the stage of operations at which certain types of actions will be suitable, are matters which
must be decided by commanders.
2. Actions Before Movement
a. Control force formations, when properly employed and executed against a crowd, are some of the most
practical methods of crowd control. The riot baton has been the weapon of choice for the control force..
During any crowd control operation, the commander must protect the control force with lethal overwatch.
This overwatch may be in the form of marksmen and observer teams (sniper with observer) and a response
force with lethal capabilities.
b. Before moving the control force to the civil disturbance area and into a potentially hostile urban
environment, the commander and his staff must review the preincident plans and expand them (as needed)
based on current information. . During the planning phase, the information provided by the IPB will aid the
staff in selecting various routes and rally points. The selection of ingress and egress routes must include a
variety of ways in and out of the area. Direct and indirect routes and those with cover and concealment are
necessary. The rally point must be cleared and secured by an advanced party capable of controlling the area.
c. Additionally, civil disturbance training must be part of the annual unit training plan. If a Soldier is
deployed to an area where civil disturbances are a recurring event, sustainment training must occur more
frequently. Before moving the control force to the rally point, an intense rehearsal must be conducted by the
leadership and the control force. A top-down review of the rules of engagement (ROE/rules for the use of
force (RUF) must be accomplished. The ROE/RUF must be part of the unit training plan and each Soldier
must be trained to standard. The use of NLW (type specific) must be granted to the on-site commander from
the approval authority.
3. Control Force Formations. Dismounted crowd control formations constitute a means of blocking the
advance of a mob. The various crowd control formations are tools to be employed as required. Normally, the
line can be employed against any size crowd, and the echelon and wedge against a small group on a narrow
front or in confined areas. When Soldiers penetrate a crowd to capture one of its members, they may use a
modified formation, such as a circular or a diamond formation, with at least two unarmed soldiers inside the
formation; when the formation reaches the person to be seized, a gap is opened and the unarmed soldiers pull
the person inside. These soldiers should be equipped with handcuffs and/or restraining straps for use in
securing the person; however, the diamond and circular formations are open to being surrounded by the crowd.
4. Vehicle and Formations.
a. Vehicles can be employed with Soldiers in a control force formation. Although vehicles may add
strength to the formation certain precautions should be taken to protect the Soldiers riding inside the vehicle
such as covering the windshield with sturdy, close mesh fencing and standard safety glass. By placing a
wooden or metal frame with strung barbed wire can also act as a barrier. Additionally, have the control force
walk close to the side of the vehicle will prevent the crowd from attacking the sides and back of the
vehicles. Vehicles may be used to obtain shock action; as a base to release crowd control agents; or to enter
a crowd to arrest selected instigators.
b. Up-armored HMMWVs, ASVs. or armored vehicles may be employed with the control force when
determined by the mission, enemy, terrain, troops, time available and civilian considerations (METT-TC).
These up armored or armored vehicle can have a great psychological effect on the crowd as well as protect
members of the control force. The commander when utilizing these vehicles must keep in mind to maintain
visual and control of the vehicle formation. The commander can place himself the rear of the vehicle
formations and utilized vehicle radio communications to talk to the other vehicles. Additionally, he may
have to convert to utilizing hand signals if for some reason radio communications are not working. Either
way, the utilization of vehicle in a riot or demonstration must be practiced to be effective.
5. Type of Crowd Control Formations and Their Uses.
a. Control force formations when utilized properly can be an effective tool in crowd control. Experience
has shown that the most effective control force formation is the line and wedge. The two less used
formations are the diamond and circle. Descriptions of all the formations are as follows:
(1) Line formation: The line is the basic formation and it is used more often because of its offensive
and defensive applications. As an offensive formation, the line is used to push or drive crowds straight
back, across an open area, or up a city street. As a defensive formation, the line is used to hold the
crowd or to deny access to areas.
(2) Echelon formation: The echelon is an offensive formation used to turn or divert groups in open or
built-up areas and to move crowds away from buildings, fences, and walls.
(3) Wedge formation. The wedge is an offensive formation that is used to penetrate and split crowds
into smaller groups.
(4) Diamond formation: The diamond, when used as an offensive formation, is used to enter a crowd
and is the formation of choice for extraction teams. As a defensive formation, the diamond is used when
all-around security is required in open areas. The decision to use this formation is based on the
conformation of the crowd.
(5) Circular formation: The circular formation is used for the same purpose as the diamond formation.
The decision to use this formation is based on the conformation of the crowd.
b. Elements of a Control Force Formation
(1) Base element: The base element is made up of two ranks. The first rank is shield holders, while the
second rank contains the NLW. This is the front line of the formation.
(2) Support element: The support element forms up in a column formation behind the base element and
has a variety of uses. It may be used to replace base element members as needed, provide lateral or
direct support, or perform extraction team operations. The support element helps the base element by
performing the following three essential tasks:
(a) General support: The general-support element is formed from an uncommitted squad in the
platoon (generally the 2d squad). When a company is tasked as the control force element, one of the
platoons becomes the general-support element. The element is in a column formation centered on
and behind the main formation. From this formation, the general-support element can move to lateral
or direct support, as needed.
(b) Lateral support: The lateral -support element is used to protect the flanks of the formation. This
is done by moving a set number of teams forward from the general-support element or by using the
end teams in the formation; however, this will make the formation smaller. Once in position, three
teams become part of the formation, with their riot shields facing the flanks of the formation.
(c) Direct support: When direct-support is ordered, the general-support element moves forward as
they form their own formation. While moving forward, the squad and team leaders form the control
force formation step back and allow the riot shield holders from the support element to step behind
riot shield holders of the original formation. This allows the support riot shield holders to form up
between and behind the riot shield holders between the crowd and NLW fires. This formation is the
strongest of the formations and requires more planning and practice to master.
(d) Command element: The command element contains several different members. A general
configuration for the command element is the platoon leader, the platoon sergeant, a radio operator,
a video recorder operator (is required), and an interpreter (if required). This element does not have a
fixed location within the formation and moves about as needed.
(e) Lethal over watch elements: The lethal over watch element is a team formed from reserve
security forces.
6. Normal Preliminary Procedure. A show of force is often a useful tool for dispersing crowds. When the
soldiers arrive at the scene, the psychological effects of their arrival can be utilized. Soldiers should make a
strong surprise appearance using the following procedures:
a. Soldiers should dismount from helicopters, busses, trucks in plain sight of the crowd. Caution must be
taken that the rally point is close enough to the crowd to present a strong psychological presents but far
enough away from the demonstrators to prevent or provoke attacks of thrown objects.
b. The commander should place his lethal over watch (designated marksmen {DM} teams) in areas that
have a good field of vision over the crowd and control force. The DM teams can be sent to the flanks and
slightly to the front of the formation. It is their responsibility for protect the control force from any lethal
actions on the part of the crowd by continually scanning the crowd.
c. When the commander receives word that the DM teams are in place, he will form the control force into a
crowd control formation and move them from the rally point to where the demonstrator are located.
Depending on the situation, the commanders should move the control force in a column formation or one of
the three basic control force formations.
d. Reserve forces need to stay at the rally point until it is deemed necessary that they are needed to reinforce
the formation or provide additional lethal over watch for the control force formation.
e. The unit halts and remains in formation. The Soldiers hold their riot shields at the ready position while
the commander delivers the proclamation. Following the proclamation, the commander informs the
participants that they have a specific time in which to comply with the order to leave.
f. If the participants fail to leave within the given time, the commander uses measures necessary to break up
the crowd.
7. Special Preliminary Procedure. If rioters are known to be well-armed, and intelligence reports show that
they intend to open fire as soon as Soldiers appear, the commander may not make a show of force, but may
launch a crowd control agent attack from covered or hidden positions.
8. Lethal and Non Lethal Weapons Used in Formations.
a. Riot Shield: The riot shield has been proven over time to be the first line of defense for a formation. The
riot control shield may also be used as an offensive weapon when in contact with an aggressive crowd. The
riot shield is designed to withstand strikes from thrown objects. In addition to protecting the riot shield
bearer, it also protects other members of the formation form thrown objects.
b. Baton: The baton is considered the primary weapon for crowd control operations. It is an offensive
weapon and unlike the rifle, the loss of baton to the crowd does not create a serious threat. Soldiers must be
trained with the riot baton to the point that its various techniques are automatic. This training must also
include learning the venerable points of the human body so they can avoid areas that may cause permanent
injury or death when struck, (See FM 3-19.15 for targets areas of the human body).
c. Rifle. The rifle is the most practical weapon for general use by Soldiers in crowd control formations if
batons are not available. If the control force must carry their assigned rifle it should be carried across the
back with the barrel pointed toward the ground and the butt of the weapon pointed toward the sky.
d. Shotgun. The 12-gauge shotgun is a pump action shotgun currently in non lethal capabilities set (NLCS)
inventory. The pump action shotgun is chambered to take up to 3-inch shell. The 3-inch chamber allows
for the use of M1012 and M1013 non lethal munitions. This shotgun also provides a visually distinct
alternative to standard military weapons that may be desired based on mission considerations (force
signature and acceptability). A list of nonlethal munitions that can be utilized with the 12-gage shotgun are
listed below:
(1)
12-Gauge, Fin-Stabilized Point, Nonlethal Cartridge (M1012): The M1012 is a single projectile
round made of hard rubber that is shaped like a bomblet and designed to be fired a at a single target.
With a muzzle velocity of 500 feet per second, the M1012 has the effective range of no closer that 5
meters and no further than 30 meters. Engagement inside 5 meters could cause serious injury or death.
Beyond 30 meters the kinetic energy dissipates to the point where the round becomes ineffective.
(2)
12-Gauge, Crowd Dispersal, Nonlethal Cartridge (M1013): The M1013 is a multiple projectile
round with .23 caliber hard rubber pellets that is designed to be fired at and employed with the purpose
of affecting multiple targets. With a muzzle velocity of 900 feet per second, the M1013 has a effective
range on no closer then 5 meters and no further that 30 meters. Engagement inside 5 meters may cause
serious injury or death. Beyond 30 meters, the kinetic energy dissipates to the point where the rubber
pellets become ineffective.
(3) Rubber Ball Grenade (GG04): The GG04 is a multiple projectile, flash-bang grenade with 100 .25-
caliber hard rubber pellets. Each grenade has a fuse delay of 2.8 to 3 seconds with a flash measuring
approximately 1 million CP and 180 decibels at 3.5 feet. At detonation, rubber pellets are dispatched at
360° with an effective range of 2 to 3 meters and a maximum engagement range of 15 to 20 meters. The
rubber ball grenade is designed to be hand-thrown or muzzle-launched from a 12-gauge shotgun.
(4) Rubber Ball Grenade Launching Cup and AA30 12-Gauge Launch Round: The launch cup firmly
attaches to the 12-gauge shotgun without any additional tools. It works in concert with the AA30 12-
gauge launch round to propel the rubber ball grenade approximately 100 meters. The shooter simply
inserts the full body and the safety lever of the grenade into the launching cup, pulls the pin, loads a 12-
gauge round, and fires (approximately) at a 30° angle. The desired effect is to have the grenade explode
approximately 7 to 10 feet above the target.
e. Sniper rifle. When available, each platoon should have one sniper rifle which is carried by a selected
marksman to fire at specific targets as directed by the platoon leader or company commander.
f. Hand weapons. Hand weapons may be carried by the commander, drivers, grenadiers, extraction teams,
apprehension teams, and other personnel when it is impractical to carry rifles. They are used primarily as
defensive weapons.
g. Portable dispersers. Currently in the NLCS numerous chemical dispenser are available for use during a
demonstration. Some of these portable chemical dispensers are mentioned below:
(1) Individual riot Control Agent Disperser (M36): The M36 contains a Dibenz solution. It can deliver
25 one-second bursts out to 12 feet. Individual disposable Riot control Agent( RCA) disperser are
intended primarily for self-defense or to keep rioter out of arm's reach of soldiers conducting crowd
control formations or Soldiers engaged in missions where a noncombatant exist.
(2) Midsize Riot Control Agent Disperser (M37): The M37 is the size of a standard fire extinguisher
that uses compressed air to force the RCA out to a range of 30 feet. It has the capacity to employ 18
burst for 3 seconds per charge. It is excellent for providing a wide coverage of RCA onto hostile crowd
while maintaining excellent standoff capabilities.
(3) Squad Riot Control Dispenser (M33A1): The M33A1 is designed to provide crowd control and
protection at the squad level. It is capable of projecting a ballistic stream of RCAs beyond 25 feet in up
to 25 half-second bursts. It consists of a frame and harness assembly, compressed-gas cylinder (agent
container assembly), air pressure assembly, gun and hose, assembly, mutijet spray unit, and check valve
assembly. The M33A1 can be refilled and is rechargeable.
h. M234 Riot Control Launcher: This projectile fired from the M234 launcher has sufficient momentum to
cause pain and discomfort in order to deter individual violent rioters with minimum possibility of producing
injury. For more determined or fanatical rioters, the system can also use a round that will disperse a tearing
(CS) agent while it hits the person. The M234 maximum range for a point target is 40 meters and area
target is 60 meters. Only an M16A1 with closed end flash suppressor can be used for the M234. The M234
is scheduled to be modified at depot level for the M16A2.
i. M203 grenade launcher. The M203 grenade launcher firing the CS cartridge is used to engage selected
point or small area targets at a range of 200-400 meters. Additionally, other the following nonlethal
munitions may be used with the M203:
(1)
40-Millimeter Sponge Grenade (M1006): The M1006 is a single projectile round made of pliable
foam rubber with a hard plastic back. The M1006 is designed to be aimed and fired at a single target.
With a muzzle velocity of 265 feet per second, the M1006 has an effective range of no closer than 10
meters and no further than 50 meters. Engagements inside 10 meters could cause serious injury or death.
Beyond 50 meters, the kinetic energy dissipates to the point where the round becomes ineffective.
(2)
40-Millimeter Crowd Dispersal Cartridge: The crowd dispersal cartridge (CDC) is a multiple
projectile round with .48 caliber hard rubber balls that is designed to be fired and employed with the
purpose of affecting multiple targets. With a muzzle velocity of 450 feet per second, the CDC has an
effective range of no closer than 10 meters and no further than 30 meters. Engagement inside 10 meters
could cause serious injury or death and beyond 30 meters the kinetic energy dissipates until the rubber
balls become ineffective.
j. M7 66-Millimeter Launcher with M315 Installation Kit: The M7 is a 66-millimeter vehicle- mounted,
NL, grenade-launching device that is mounted on a HMMWV. It is an indirect fire support system that can
deliver the M98 distraction grenade that creates a flash-bang effect, L96A1 antiriot grenade, or M99 blunt
trauma grenade that creates a sting-ball effect. The M315 installation kit is used to install an M7 discharger
on the turret ring of appropriate HMMWV variants. An adjustable bracket allows the launch angle to be
depressed for engaging targets at ranges of 50, 75, and 100 meters. The system enforces standoff distances
and deters potential threats.
9. Position for Carrying Weapons. At the discretion of the unit commander, the Soldiers may carry their
weapons in any of the positions prescribed by FM 3-21.5. The descriptions and illustrations given below
pertain to the 12-gauge pump shotgun. The following positions are used as indicated:
a. Safe-port arms.
(1) Command. PORT ARMS (two count movement).
(2) Position (see Figure 3-1).
(a) On the command of execution ARMS, grasp the shotgun barrel with he right hand and raise the
shotgun diagonally across the body, keeping the elbow down (without strain).
(b) The left hand will grasp the hand guard at the base of the stock.
(c) On count two, regrasp the shotgun at the small of the butt stock with the right hand. Hold the
shotgun diagonally across the body, about 4-inches from the waist.
(d) Upper left arm is parallel to the ground, and forearm is as perpendicular to the ground as body
conformation permits.
(e) Elbows are held as close to the body as body conformation permits.
(f) Heel of the rifle butt is held slightly to the right of the waist belt buckle.
(g) Weapon is held just diagonally enough across the body to permit the person to look straight to
the front over the right side of the stock.
(3) Use.
(a) The safe-port position is extremely useful in making a show of force before rioters. The above
mentioned carrying position is the primary method of carrying weapons in the control force
formation. It allows the Soldier to control both ends of the weapon while moving in and out of the
formation and advancing the crowd.

FIGURE 3-1.SAFE-PORT ARMS
(b) Soldiers move into and gather from all crowd control formations with weapons in the safe-port
position. The command safe-port arms is given while the Soldiers are in column prior to execution
of any crowd control formation. Soldiers will automatically assume the port position before
reassembly from a crowd control formation.
(c) Commanders should use the safe-port position to impress rioters. However, Soldiers should not
be required to maintain the position for extended periods of time as it is very tiring.
b. High-port arms.
(1) Command. High-port arms (two count).
(2) Position (see Figure 3-2).

FIGURE 3-2. HIGH-PORT ARMS
(a) Right hand grasps the weapon on small portion of the stock; the under and inner part of the
forearm against the top of the stock; the shotgun is held across the body.
(b) Left hand grasps the hand guard at the most comfort-able point forward of the balance point; left
arm is slightly bent.
(c) Both the right and left arms are raised to lift the shotgun approximately 6 to 8 inches higher that
the safe-pot position.
(d) When at the halt, the feet are comfortably apart, toes pointed at rioter; knees slightly bent; body
leaning slightly forward; and the hip level.
(4) Use.
(a) The high-port position is a position of complete readiness. It is used whenever Soldiers are in
contact with a crowd that is showing resistance or is not withdrawing. .
(b) Commanders should rest Soldiers at every opportunity by using less tiring positions. The "high-
port arms" position is too tiring to maintain for long periods of time.
PART B - Unit Organization for Crowd Control Formations
NOTE: The formations covered in this lesson (12-man squad, 4-squad platoon, 3-squad platoon, 3-
platoon company with 4-squad platoons) are for illustration only, and are not intended to require
unit reorganization.
1. Commands.
a. Oral commands.
(1) Commands are given to the control force formation orally or with hand signals. Oral commands for
the on-guard position are given in one count. All other commands are given I tow count, a preparatory
command and a command of execution. If the commanders' oral commands cannot be heard by the
control force he may have to utilize hand signals.
(2) If vehicles are in the formation, radio's become an alternate method for relaying commands. The
commander may utilize both oral and hand signals to improve his communications with the control
force.
b. Hand signals. When necessary, hand signals should be used by commanders in conjunction with oral
commands. Hand signals for crowd control formations may be given as follows:
(1) Line. Raise both arms to the side until horizontal, arms and hands extended, palms down. (See
Figure 3-3.)
(2) Echelon right (left): Extend one arm 45-degrees above and the other 45-degrees below the
horizontal, palm to the front. The upper arm shows the direction of echelon when the commander faces
the formation. (See Figures 3-4 )
(3) Wedge: Extend both arms downward and to the sides of an angle approximately 45-degrees below
the horizontal, palms to the front. (See Figure 3-5.)
(4) Diamond: Extend both arms above the head, elbows bent slightly and fingertips touching. (See
Figure 3-6.)
(5) Circle: Give the diamond signal, then give a circular motion with the right hand.
(See Figure 3-7)
NOTE: Hand signals indicated by the silhouettes are as if facing the formation.

FIGURE 3-3. LINE.
FIGURE 3-4. ECHELON RIGHT or LEFT.
FIGURE 3-5. WEDGE.
FIGURE 3-6. DIAMOND.
FIGURE 3-7. CIRCLE.
2. Cadence.
a. The normal cadence for movement into and assembly from all crowd control formations is double time
(180 steps per minute).

b. The normal cadence for movement of Soldiers while in any crowd control formation is quick time (120
steps per minute). While in the on-guard position, the cadence is approximately 60 steps per minute. For
psychological effect, an on-guard step may be executed by accentuating each step on the left foot with a
resounding stamp.
c. Cadence may be increased or decreased at the discretion of the unit commander to meet varying
situations.
d. A unit may be ordered into or assembled from crowd control formations from the halt or while marching.
As each man reaches his proper position, he automatically faces in the direction of the unit's intended
advance and comes to a halt. He remains at the halt in the safe-port position and awaits further orders.
3. Position of Commander and Leaders.
a. When in column, the commander at each echelon normally assumes his position at the head of the
column.
b. When in crowd control formation, squad leaders and their teams, platoon leaders and teams, and
company commanders take positions in the rear of the assault elements of their respective units where they
can best direct and control their units. In the illustrations of crowd control formations, the platoon and
squad leaders are not shown uniformly in order to illustrate the flexibility of their positions behind the
formations. The symbols listed below are a key to identify Soldiers within crowd control formations (see
Figure 3-8).
c. When in column, messengers (radio operators), selected marksmen, dispersers, and other members of
platoon headquarters normally take positions at the rear of the column.
d. When a unit is in a crowd control formation, headquarters personnel, at the discretion of the unit
commander, are positioned near the commander. If the situation prevents this, they may be positioned
behind the assault element.
FIGURE 3-8. Key To Symbols Used to Identify soldiers within A Crowd Formation.
4. Interval and Distance.
a. Interval is the lateral space between elements. Distance is the space between elements in a column. The
usual interval and distance between soldiers in control force formations is 30 inches. The interval and
distance can be adjusted based on METT-TC. If the crowd has to be physically pushed back, a close interval
is preferred. This allows the riot shields to be overlapped, creating a stronger wall. During peaceful
demonstrations, the interval could increase to double arm width, allowing the formation to cover more area
and still control the crowd. The interval and distance could change several times during the course of
operations before the crowd is dispersed.
b. In any echelon formation with normal interval and distance, the angle made by the formation and the
route of advance will be approximately 45 degrees. The angle formed by the two wings of any wedge
formation will be approximately 90 degrees when normal interval and distance are used.
5. Masking Procedures. When it is necessary to use crowd control munitions to break up an unruly mob, or
when intelligence indicators point to mob use of chemicals, protective masks will have to be worn. A key
consideration in this regard is not to break formations while Soldiers are masking. Consistent with the security
of the Soldier, any of the following methods may be used.
a. Every other man drops back one or two paces, dons his mask, then resumes his place in the formation.
The other half of the formation then performs the same act.
b. Remaining in formation, Soldiers in every other squad put on their masks. Then remaining Soldiers don
their masks.
c. If there is sufficient space between Soldiers and a crowd, all men may don their masks at the same time.
d. Reserve units put on masks and replace units in the line. This act is repeated until all Soldiers are
masked and a new reserve is constituted.
e. When chemicals have been used by rioters, or early use of crowd control agents is anticipated by the
commander, Soldiers may be ordered to mask prior to commitment.
PART C - Squad Formations
1. General. When executing squad crowd control formations from the column, the squad leader takes one or
more steps to the right and faces his squad. As he gives his preparatory command, he points to the location at
which he desires the formation to be formed. If he does not point, the squad forms on the position of the
number 2 man (base man) of the squad.
2. Squad Line.
a. Command. "Squad Line Formation, Move."
b. Execution. On the command of execution, the A team leader leads the baseman to the place indicated by
the squad leader. The squad members align themselves in sequence with the baseman at normal intervals.
Based on the situation, the squad leader may designate a specific interval. He does this when he gives the
preparatory command. If no interval is specified, the squad automatically forms using the normal interval.
(See Figure 3-9).

FIGURE 3-9. Squad Line
3. Squad Echelon Right or Left.
Command. “Squad Echelon Right (or Left), Move." On the command of execution, the A team
leader places the baseman at the location indicated by the squad leader. The squad members align themselves in
sequence with the baseman, one pace to the side and one pace to the rear. (See Figure 3-10).
Figure 3-10. Squad Echelons Right Left and Right.
4. Squad Wedge.
a. Command. "Squad Wedge, Move."
b. Execution. At the command of execution, the base man advances to the position named by the squad
leader. Even-numbered men align themselves in sequence on the base man, one pace to the right and one
pace to the rear of each preceding man. Odd-numbered men align themselves in sequence on the baseman;
one pace to the left and one pace to the rear of each proceeding man (see Figure 3-11).
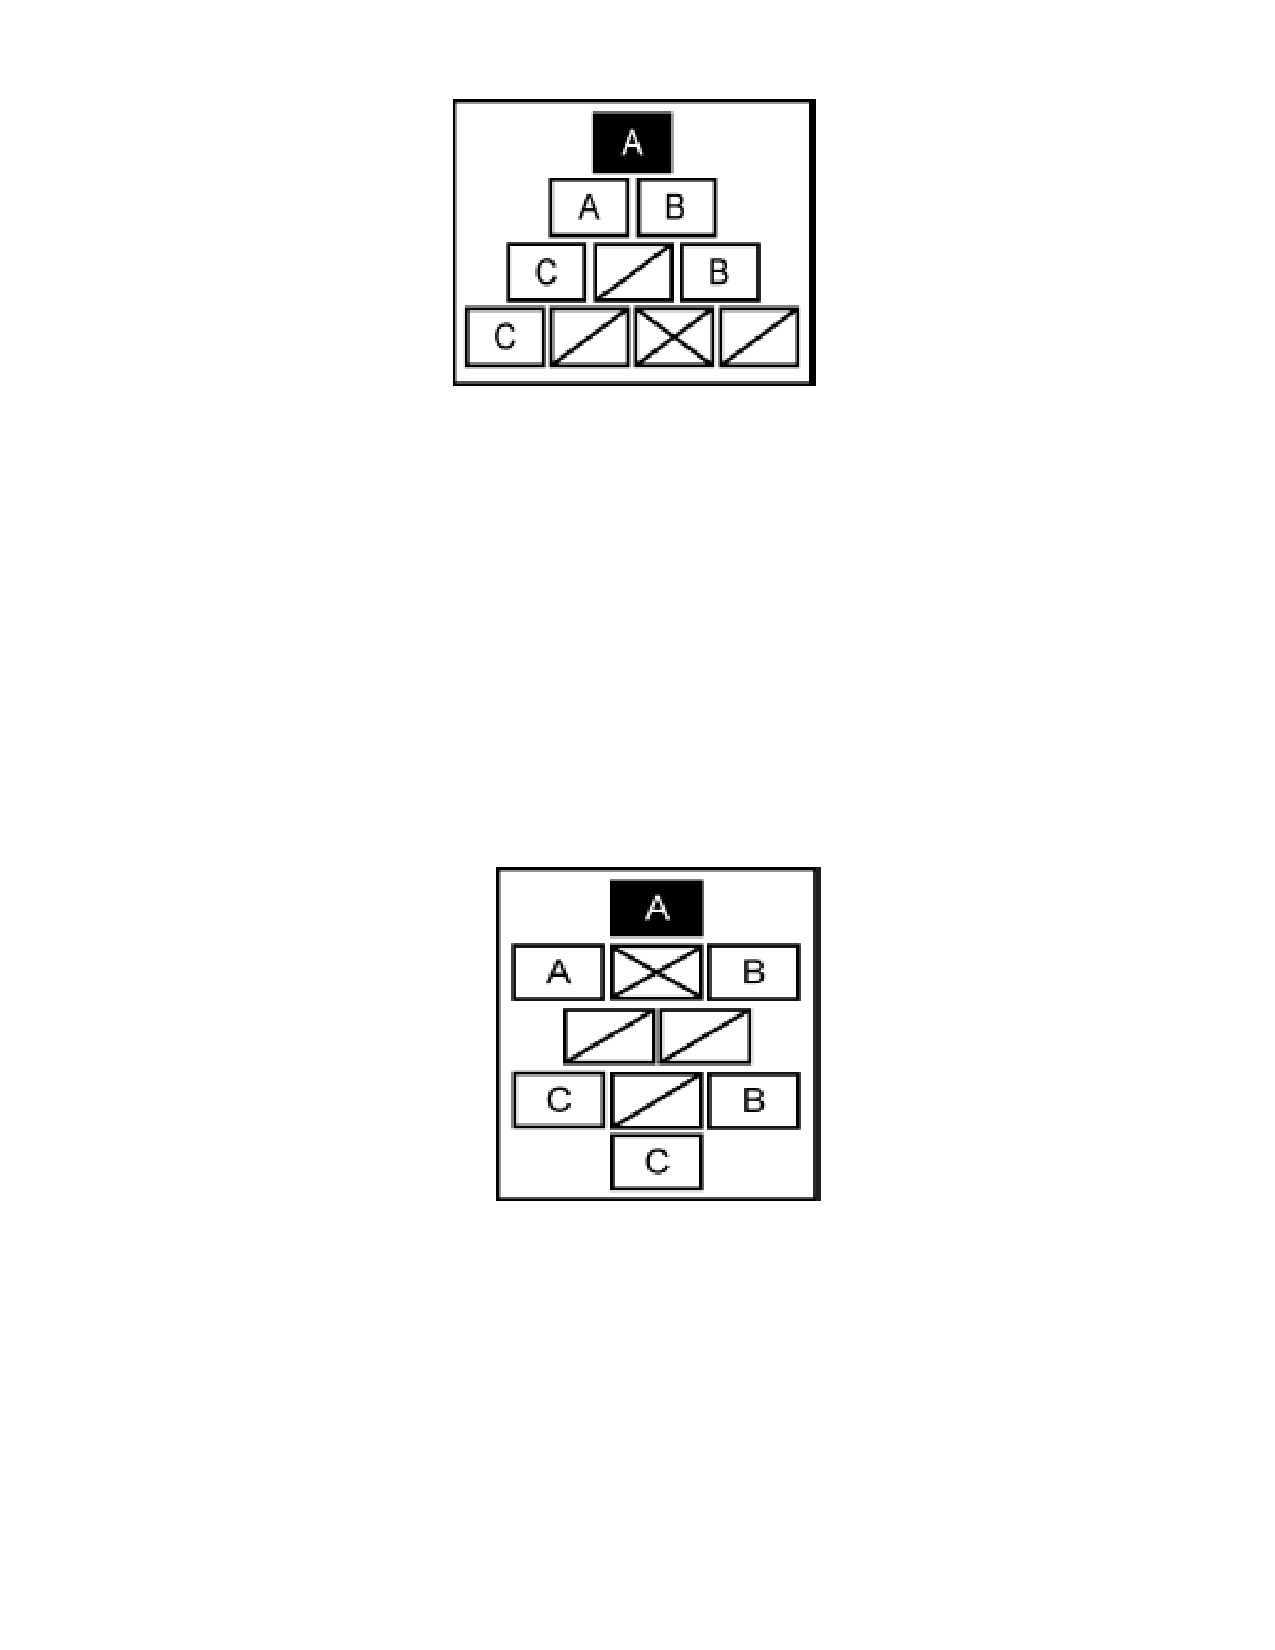
FIGURE 3-11. Squad Wedge.
5. Diamond and Circle Formations.
a. The diamond and circle formations are used during extraction team operations. They are small
formations used to penetrate the crowd or cover small areas. The decision on which formation to use is
based on METT-TC and the ability of the squad to perform.
b. Commands for forming a squad in a diamond or circle formation is “Squad Diamond (or Circle), Move.”
On the command of execution, the A team leader moves the baseman to the place indicated by the squad
leader. The A-team lines up to the left of the baseman, covering the 8 to 12 o’clock positions. B-team
members align themselves to the right of the baseman, covering the 12 to 4 o’clock positions. C team
members align themselves covering the 4 to 8 o’clock positions (see Figure 3-12).
Figure 3-12. Diamond and circle Information.
6. Assembling a Squad.
a. When assembling a squad from the line formation, the squad leader takes a position a sufficient distance
to the rear of the squad and commands, “Squad Assemble.” At the same time, he raises his right hand in the
air and makes a circular motion. Squad members, who hear the command, automatically come to the port
arms position. The A team leader and the baseman do an about-face movement.
b. The other squad members face toward the baseman. On the command of execution “Move,” the squad
leader points to the place where he wants the squad to assemble. The A team leader double-times to the
designated spot, and the other members of the squad follow him. Team leaders fall into the file in their
designated positions as they move to the AA. To assemble from a squad echelon formation, the steps are the
same as a line formation.
c. To assemble from a squad wedge formation, the squad leader takes the same steps as for the line and
echelon formations. B team members do a half left face, and the A team and C team members do a half right
face. The C team pauses at the baseman position and allows the B team to clear the formation before
moving to the AA.
d. To assemble from a squad diamond or circle formation, the squad leader takes the same steps as he
would for a line formation. The A team leads the squad to the AA followed by the B team and then the C
team. Teams fall into a column formation as they file back to the AA.
PART D - Platoon Formations (4 Squad)
1. General. Platoon headquarters should consist of the following individuals:
a. Platoon leader.
b. Platoon sergeant.
c. Radio Operator or messenger
d. When directed by the platoon leader, other persons, such as marksman, interpreters, RCA dispenser
operators, and firefighters may added to or become a part of the platoon headquarters.
e. In forming all control force formations from the column, the platoon leader moves to the right of the
platoon and faces them when giving his commands. He gives the hand-and-arm signal and the preparatory
command. On the command of execution “Move,” he points to the approximate location where he wants the
platoon to form. The platoon leader pauses between the preparatory command and the command of
execution to allow each squad leader to issue a preparatory command to his squad.
2. Platoon Line.
a. Command. "Platoon on Line, Move."
b. Execution. Immediately following the platoon leader's preparatory command, the squad leaders of the
1st and 4th squads command, “Follow Me.” The squad leaders of the 2d and 3d squads command “Stand
Fast.” On the platoon leader's command of execution, the 1st and 4th squads move forward to the point
designated by the platoon leader. The 1st A team member of the 1st squad is the baseman for the platoon
formation. The 1st squad forms a squad line to the left of the baseman and the 4th squad forms a squad line
to the right of the baseman with all lines dressed to the right. After the 1st and 4th squads have cleared the
platoon, the 2d and 3d squad leaders command, “Follow Me.” The 2d squad forms a squad line to the left of
the 1st squad. The 3d squad forms a squad line to the right of the 4th squad. All squads dress with the 4th
squad. (Figure 3-13).
3. Platoon Line Formation Assembly.
a. When assembling from the platoon line formation, the platoon leader and his HQ personnel take a

position to the rear of the platoon. He then gives the command, “Platoon Assemble,” while raising his right
arm and making a circular motion above his head.
b. Execution. Platoon members automatically assume the port arms position. The 1st squad leader and the
baseman do an about-face movement. All other platoon members do an about-face movement toward the
baseman. On the platoon leader's command of execution, he points to where he wants the platoon to
assemble. He commands, “Follow Me,” and moves his squad toward the AA. The 1st squad files to the
baseman position, followed by the 2d squad. As the 2d squad clears the baseman position, the 4th squad
leader then commands, “Follow Me,” and leads his squad to the AA, followed by the 3d squad. As the 1st
squad comes to a halt facing the crowd in the AA, the 2d squad assumes its position to the right of the 1st
squad. As the 4th squad assembles, it dresses on the 1st squad, leaving space for the 3d squad to return to its
place in the formation. Once the platoon is formed into a column formation, HQ personnel take their
position in the formation. The PSG then commands, “Countercolumn, March,” and moves the platoon to the
rally point.
FIGURE 3-13. Platoon Line Formation With Four Squads
4. Platoon Line Formation With General Support.

a. General Support. Whenever the command for establishing a crowd control formation contains the
phrase, IN SUPPORT Without Modification, it means that the support element is to remain in general
support.
(1) Command. “Platoon Line, 2d and 3d Squads in Support, Move.”
(2) Execution. The 1st and 4th squads execute the line, while the 2d and 3d squads remain in the
column. To assemble a platoon with two squads in general support, the procedure is the same as that of
the platoon line, except that the 1st and 4th squads dress on with the 2d and 3d squads. (See Figure 3-
14).
FIGURE 3-14. Platoon Line With 2d and 3d Squads in General Support.
b. Lateral Support.
(1) Command. “Platoon Line, 2d and 3d Squads in Lateral Support, Move.”
(2) Execution. The 4th and 1st squads execute the line as before, and the 2d and 3d squads stand fast.
After the line has been formed, the squad leaders of the 2d and 3d squads command, “Follow Me.” The
2d squad forms a column behind the last man of the 1st squad. The 3d squad forms a column behind the
last man of the 4th squad.
(3) Squads may be moved from general support to lateral support at any time by the platoon leader. He
commands, “2d and 3d Squads, Lateral Support, Move.” To have the 2d and 3d squads join the line from
either support position, the platoon leader commands, “2d and 3d Squads, Extend the Line, Move.” The
2d and 3d squad leaders command, “Follow Me.” On the command of execution, the squads set up
individual lines, closing and dressing with the existing line. To assemble the platoon from a platoon line
with lateral support, the procedure is the same as that of the platoon line, except lateral support squads
face forward until they move to the AA. (See Figure 3-15).

FIGURE 3-15. Platoon Line Formation With 2d and 3d Squads in Lateral Support.
c. Platoon Line Formation With Direct Support.
(1) Command. “Platoon Line, 2d and 3d Squads in Direct Support, Move.”
(2) Execution. The 1st and 4th squads execute a line as before. The 2d and 3d squads execute a 2d line
directly to the rear and centered on the 1st line. The members in the direct support line cover the
intervals between members in the baseline. To do this, the squad and team leaders of the 1st and 4th
squads must take two steps to the rear to allow space for the 2d and 3d squads to move into place. After
seeing the squad and team leaders move back from the line, 2d and 3d squad leaders command, “Follow
Me,” and lead their squads into position. (see Figure 3-16)
FIGURE 3-16. Platoon Line Formation With 2d and 3d Squads in Direct Support
d. Platoon Line Formation With One Support Squad.
(1) Command. “Platoon Line, 3d Squad in Support, Move.”
(2) Execution. The 1st squad moves out and executes a squad line. The 2d and 4th squads form a line
on the side of the left and rights sides of the 1st squad. The 3d squad remains in column formation. The
support squad may be used in lateral support on one or both sides of the formation or in direct support of
any segment of the formation. To assemble the platoon, the procedure is the same as that of a platoon
line, except that all squads dress with the 3d squad.
5. Platoon Echelon Right and Left Formations.
a. Command. "Platoon Echelon Right, Move."
b. Execution. After the platoon leader's preparatory command, the squad leader of the 1st squad
commands, “Follow Me.” The squad leaders of the 2d, 3d, and 4th squads command, “Stand Fast.” On the
command of execution, the 1st squad moves out and executes an echelon right at the location designated by
the platoon leader. As each squad clears the column, the next successive squad moves out and extends the
echelon that has been formed. To assemble the platoon, the procedure is the same as that of a platoon line,

except that all squads file back in order.
c. The command for forming a platoon echelon left formation is “Platoon Echelon Left, Move.” The
platoon echelon left is formed in the same manner as the echelon right, but in reverse order (see Figure 3-
17). To assemble the platoon, the procedure is the same as that of an echelon right. (See Figures 3-18, 3-19,
and 3-20, for examples of echelon formations with support.)
FIGURE 3-17. Platoon Echelon Left Formation With Four Squads

FIGURE 3-18. Platoon Echelon Left Formation With 2d and 3d Squads in General Support
FIGURE 3-19. Platoon Echelon Left Formation With 2d Squad in Lateral Support.

FIGURE 3-20. Platoon Echelon Left Formation With 2d and 3d Squads in Direct Support.
6. Platoon Wedge.
a. Command. "Platoon wedge, Move."
b. Execution. After the platoon leader’s preparatory command, the 1st and 4th squad leaders command,
“Follow Me.” At the same time, the 2d and 3d squad leaders command, “Stand Fast.” On the platoon
leader’s command of execution, the 1st and 4th squads move directly to the front. When the last members of
the 1st and 4th squads clear the 2d and 3d squads, the 2d and 3d squad leaders command, “Follow Me,” and
move out to the left and right. The 1st squad executes an echelon left on the baseman and the 4th squad
executes an echelon right. The 2d squad forms an echelon left on the last man of the 1st squad. The 3d squad
forms an echelon right on the last man of the 4th squad. This completes the wedge formation. (see Figure 3-
21)
FIGURE 3-21. Platoon Wedge Formation With Four Squads.
7. Platoon Wedge Formation With General Support.

a. General Support.
(1) Command. "Platoon Wedge, 2d and 3d Squads in Support, Move."
(2) Execution. The command for forming a platoon wedge formation with two squads in support is
“Platoon Wedge, 2d and 3d Squads in Support, Move.” The 1st and 4th squads execute the wedge while
the 2d and 3d squads remain in column formation. (see FIGURE 3-22)
FIGURE 3-22. Platoon Wedge Formation With Four Squads
b. Platoon Wedge Formation With Lateral Support.
(1) Command. Platoon Wedge, 2d and 3d Squads in Lateral Support, Move."
(2) Execution. The 1st and 4th squads execute the wedge while the 2d and 3d squads stand fast. After
the 1st and 4th squads have cleared the column, the 2d and 3d squad leaders command, “Follow Me,”
and move out to the left and right. The 2d squad forms a column formation behind the last man of the
1st squad. The 3d squad forms a column formation behind the last man of the 4th squad. (see Figure 3-
23)
(c) To move the 2d and 3d squads from general to lateral support, the platoon leader commands, “2d
and 3d Squads, Lateral Support, Move." To have the 2d and 3d squads join the wedge from general or
lateral support, the platoon leader commands, “2d and 3d Squads, Extend the Wedge, Move." The 2d
and 3d squad leaders command, “Follow Me,” and move out to the left and right to extend the wedge on
the 1st and 4th squads.

Figure 3-23. Platoon Wedge Formation With 2d and 3d Squads in Lateral Support
c. Platoon Wedge Formation With Direct Support.
(1) Command. Platoon Wedge, 2d and 3d Squads in Direct Support, Move."
(2) Execution. The command for forming a platoon wedge with two squads in direct support is
“Platoon Wedge, 2d and 3d Squads in Direct Support, Move." The 1st and 4th squads execute a wedge.
The 2d and 3d squads execute a wedge and close in on the leading wedge. The members in the
supporting wedge cover the intervals between members in the leading wedge. To do this, the squad and
team leaders of the 1st and 4th squads must take two steps to the rear to allow space for the 2d and 3d
squads to move into place. After seeing the squad and team leaders move back from the line, the 2d and
3d squad leaders command, “Follow Me,” and lead their squads into position. To move the 2d and 3d
squads back to general support, the platoon leader commands, “2d and 3d Squads Support, Move."
Then the 2d and 3d squads move to their general support positions. (see Figure 3-24)
(3) To assemble a platoon from a platoon wedge with direct support, the procedure is the same as that
of a platoon wedge, except that the 2d squad assembles first, followed by the 3d, 1st, and 4th squads.
FIGURE 3-24. Platoon Wedge Formation With 2d and 3d Squads in Direct Support
d. Platoon Wedge Formation With One Support Squad.
(1) Command. Platoon Wedge, 3d Squad in Support, Move."
(2) Execution. The 1st squad moves out and executes a squad wedge. The 2d and 4th squads form
echelons left and right on the 1st squad. The 3d squad remains in the column formation.
8. Platoon Diamond and Circle Formations.
a. Command. "Platoon Diamond (or Circle), Move."
b. Execution. On the command of execution, the 1st squad leader moves the baseman to the location
indicated by the squad leader. The baseman becomes the 12 o’clock position. The 1st squad lines up to the
left of the baseman covering the 9 to 12 o’clock positions. The 4th squad aligns themselves to the right of
the baseman covering the 12 to 3 o’clock positions. The 3d squad aligns itself covering the 3 to 6 o’clock
positions. The 2d squad aligns itself covering the 6 to 9 o’clock positions.
c. To assemble a platoon from a platoon diamond or circle formation, the HQ element uses the same
procedures as that of a line formation. The 1st squad leads the platoon back to the AA followed by the 2d,
3d, and 4th squads. The squads fall into a column formation as they file back to the AA.
9. Assembling a Platoon.
a. Command. "Platoon Assemble, Move."
b. Execution. The platoon leader moves out to the rear of his platoon. As he gives his preparatory
command, he points to the location at which the platoon is to assemble. If he does not point, the platoon
assembles directly in front of its present location. Immediately following the platoon leader's preparatory
command, the squad leaders move to the head of their respective squads and command FOLLOW ME. At
the command of execution, the squads follow their respective squad leaders to their appropriate positions to
form a platoon column.
10. Relief Elements in Place. During crowd control operations, the platoon leader may rotate his squads to give
them a rest. He is not limited to using only those squads specified in the preceding examples as the lead
elements of the formations. He can replace the base elements by commanding direct support to the 1st squad
and then directing the 1st squad into general support. The support element (the 2d squad) then passes through
the 1st squad. Once, the 2d squad is formed directly behind the 1st squad, the 1st squad leader commands,
“Right Face." The members of the 1st squad do a right-face movement and the 2d squad steps quickly though
the 1st squad and forms the base formation. The 1st squad leader then commands, “Follow Me,” and leads his
squad to the general support position. This procedure is often necessary when protective masks are used and
chemical irritants employed. The 1st squad then replaces the 3d squad in the same manner. Platoons
participating in company operations are relieved in the same manner.
11. Three -Squad Platoon Formations.
a. General.
(1) Platoon headquarters should consist of the following individuals:
(a) Platoon Leader.
(b) Platoon Sergeant.
(c) Radio Operator or messenger.
(2) When directed by the platoon leader, other persons, such as marksman, interpreters, RCA dispenser
operators, and firefighters may added to or become a part of the platoon headquarters.
(3) In forming all control force formations from the column, the platoon leader moves to the right of the
platoon and faces them when giving his commands. He gives the hand-and-arm signal and the
preparatory command. On the command of execution “Move,” he points to the approximate location
where he wants the platoon to form. The platoon leader pauses between the preparatory command and
the command of execution to allow each squad leader to issue a preparatory command to his squad.
b. Platoon Line Formation.
(1) Command. "Platoon on Line, Move."
(2) Execution. Immediately following the platoon leader's preparatory command, the squad leaders of
the 1st and 3d squads give the command, “Follow Me.” The leader of the 2d squad gives the command,
“Stand Fast.” On the platoon leader's command of execution, the 1st and 3d squads move forward to the
point designated by the platoon leader. The 1st team member of the 1st squad is the baseman for the
platoon formation. The 1st squad forms a squad line to the left of the baseman while the 3d squad forms
a squad line to the right of the baseman and dresses with the 1st squad. After the 1st and 3d squads have
cleared the platoon, the 2d squad leader gives the command, “Follow Me.” The 2d squad splits and the
A and B teams form a line to the right of the 3d squad. (see Figure 3-25)
(3) Assembling form a platoon Line Formation. When assembling the platoon from the platoon line
formation, the platoon leader and his HQ personnel take a position to the rear of the platoon. He then
gives the command, “Platoon Assemble,” while raising his right arm and making a circular motion
above his head. Platoon members automatically assume the port arms position. The 1st squad leader and
the baseman do an about face. The 3d squad leader moves to the head of his squad. All other members
do an about-face movement toward the baseman. On the platoon leader's command of execution, the
platoon leader points to where he wants the platoon to assemble. The 1st squad leader gives the
command, “Follow Me,” and moves his squad toward the AA. The squad moves to make a single file
line to the baseman position followed by the C team of the 2d squad. As the 1st squad clears the
baseman position, the 2d squad leader comes to a halt at the baseman position. The 3d squad leader
gives the command, “Follow Me,” and leads his squad to the AA followed by the A and B teams of the
2d squad. The A team leader of the 2d squad comes to a halt at the baseman position. Once the 3d
squad has cleared the baseman position, the 2d squad leader gives the command, “Follow Me,” and
leads his squad to the AA. The 2d squad reassembles into their original column formation as they move
to the AA. As the 1st squad comes to a halt (facing the crowd) in the AA, the 3d squad dresses with the
1st squad and leaves space for the 2d squad to return to its place in the formation. Once the platoon is
formed into a column formation, HQ personnel take their position in the formation. The PSG then gives
the command, “Counter-column March,” and moves the platoon to the rally point.
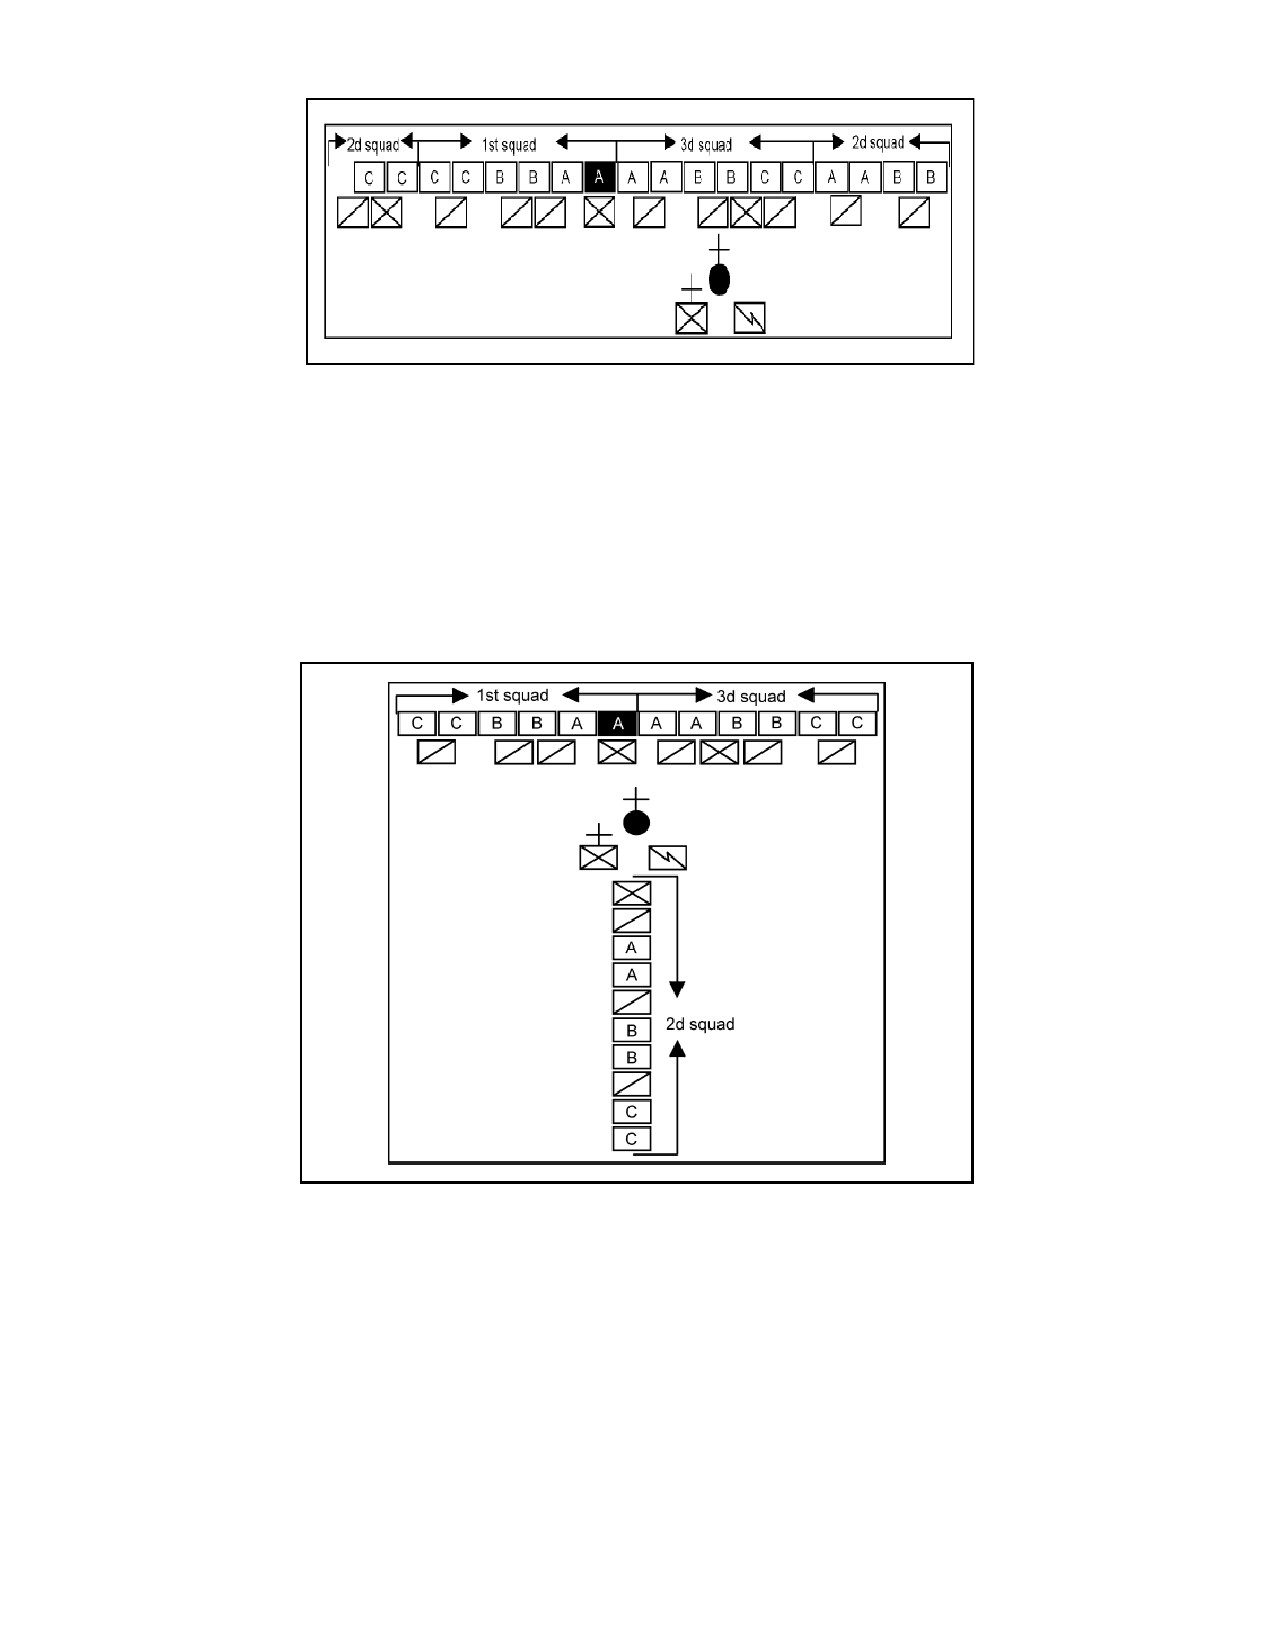
Figure 3-25. Platoon Line Formation
c. Platoon Line Formation with General Support.
(1) Command. “Platoon Line, 2d Squads in Support, Move.”
(2) Execution. The 1st and 3d squads of the platoon line with general support execute the line, while
the 2d squad remains in the column. To assemble a platoon with a squad in general support, the
procedure is the same as the platoon line, except that the 1st and 3d squads dress with the 2d squad.
FIGURE 3-26. Platoon Line Formation With General Support
d. Platoon Line Formation With Lateral Support.
(1) Command. “Platoon Line, 2d Squad in Lateral Support, Move.”
(2) Execution. The 1st and 3d squads execute the line as before, and the 2d squad stands fast. After the
line has been formed, the 2d squad leader gives the command, “Follow Me.” The A and B teams move
to the right flank while the squad leader and the C team move to the left flank of the formation. The 2d
squad forms columns behind the last men on the line formation. If no direction is given, the 2d squad
splits to cover both flanks. A squad may be used to cover one flank by giving the command, “2d Squad
Right (or Left) Lateral Support” (see Figure 3-27).

(3) The 2d squad may be moved from general to lateral support at any time by the platoon leader. The
platoon leader commands, “2d Squad, Lateral Support, Move.” To have the 2d squad join the line from
either support position, the platoon leader commands, “2d Squad, Extend the Line, Move.” The 2d
squad leader commands “Follow Me.” On the command of execution, the squads set up individual lines,
closing and dressing on the existing line. To assemble the platoon from a platoon
FIGURE 3-27 Platoon Line Formation With Lateral Support (Right)
e. Platoon Line Formation With Direct Support.
(1) Command. “Platoon Line, 2d Squad in Direct Support, Move.”
(2) Execution. The 1st and 3d squads execute a line as before. The 2d squad executes a squad line
directly to the rear and centered on the 1st line. The men in the supporting line cover the intervals
between the men in the 1st line. To do this, the squad and team leaders of the 1st and 3d squads must
take two steps to the rear to allow space for the 2d squad to move into place. After seeing the squad and
team leader move back from the line, the 2d squad leader commands, “Follow Me,” and leads his squad
into position (see Figure 3-28).
(3) To assemble a platoon with direct support, the procedure is the same as the platoon line, except that
the 2d squad moves to the AA first. To assemble the support squads from any position to general
support, the platoon leader commands, “2d Squad in Support, Move.” The 2d squad then returns to a
column behind the line formed by the other two squads.
Figure 3-28. Platoon Line Formation With Direct Support
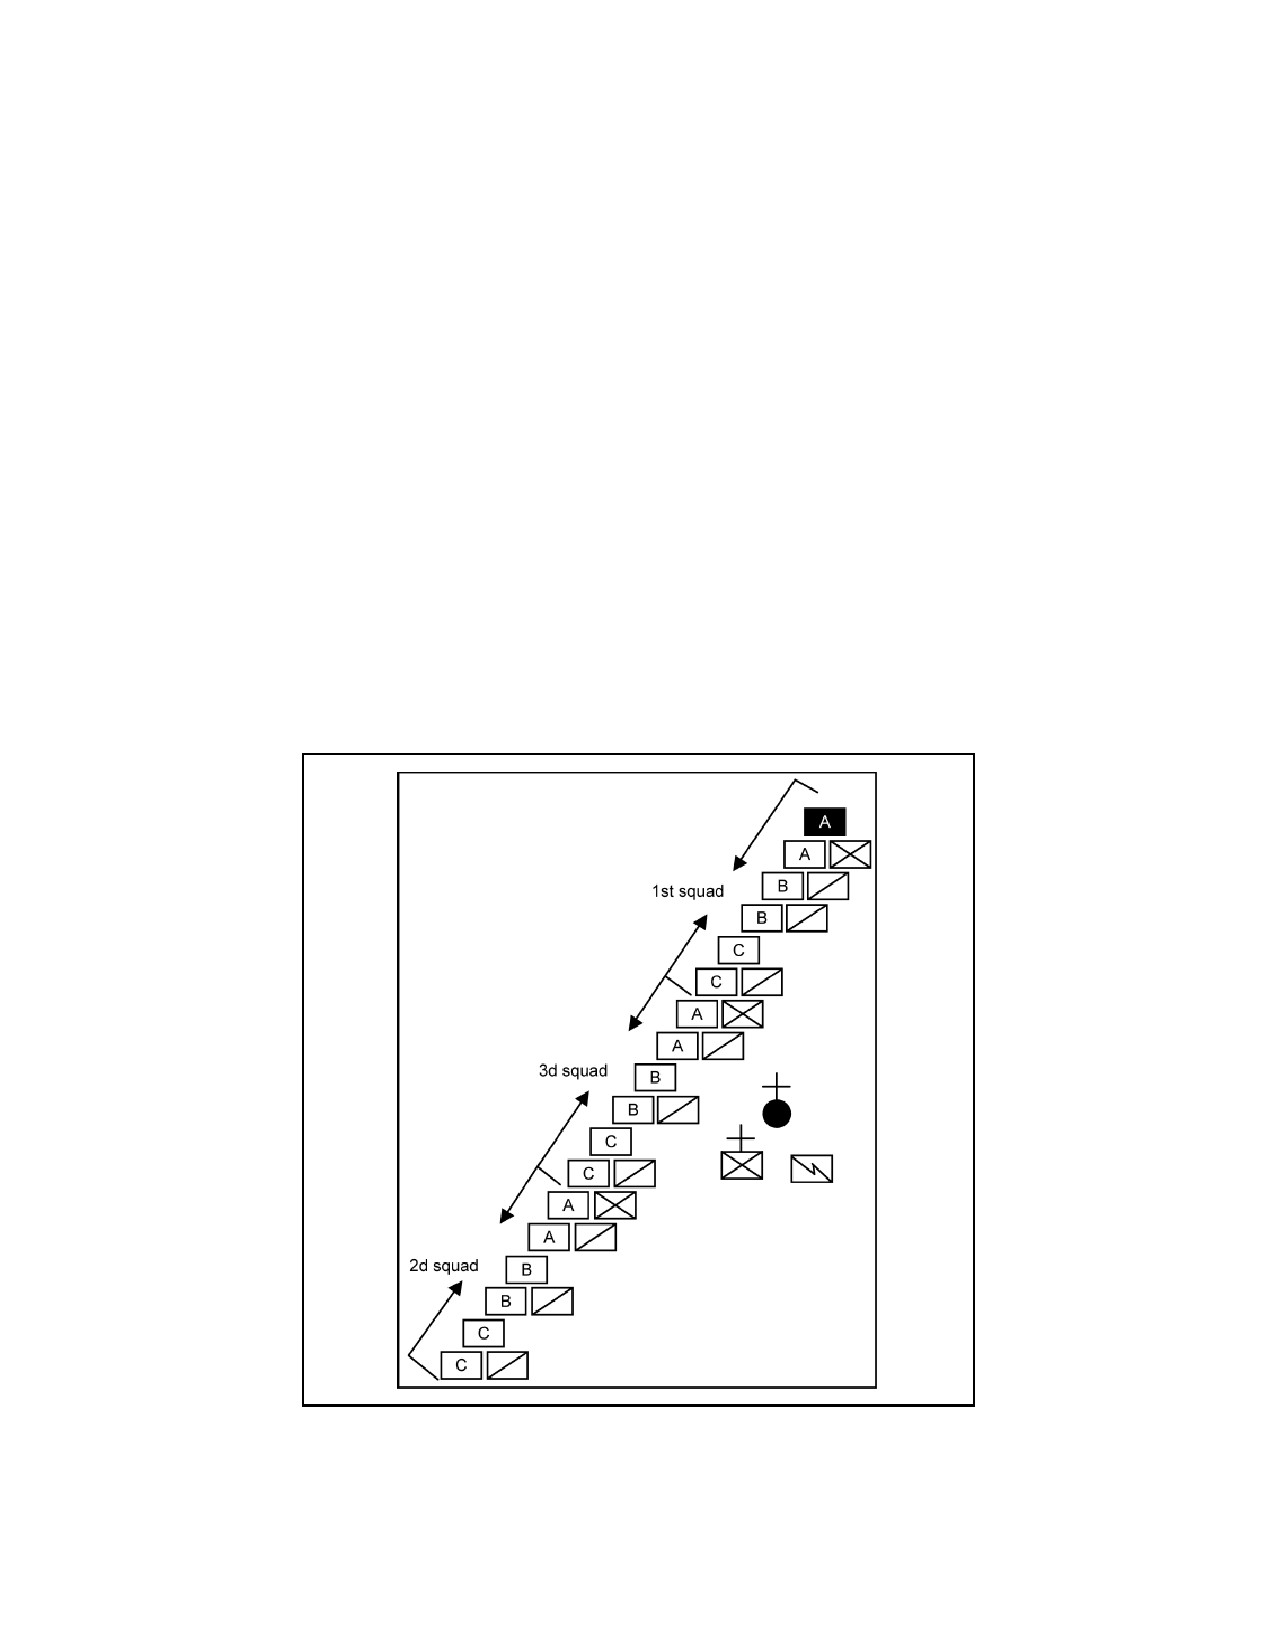
f. Platoon Echelon Right and Left Formations.
(1) Command. “Platoon Echelon Right, Move.”
(2) Execution. After the platoon leader's preparatory command, the squad leader of the 1st squad
commands, “Follow Me.” The squad leaders of the 2d and 3d squads command, “Stand Fast.” On the
command of execution, the 1st squad moves out and executes an echelon right at the location designated
by the platoon leader. As the 1st squad clears the column, the 3d and 2d squads extend the echelon. The
2d squad performs support to this formation in the same ways it supports a line formation.
(3) The command for forming a platoon echelon left is “Platoon Echelon Left, Move.” The platoon
echelon right is formed in the same manner as the echelon left. (Figures 3-29, 3-30 and 3-31 show
support formations in a left echelon).
(4) Assembly. To assemble the platoon, the commander takes his position to the rear of the formation
with the platoon HQ. On the preparatory command, “Platoon Assemble,” the 1st squad leader does an
about-face movement while all other members assume the port arms position and face the baseman. On
the command, “Move,” the 1st squad moves first, followed by the 3d and 2d squads. Each squad dresses
with the 1st squad as it reaches the AA. The assembly of the echelon right formation is the same as the
echelon left.
Figure 3-29. Platoon Echelon Left Formation

Figure 3-30 Platoon Echelon Left Formation with 2ed Squad in General Support

Figure 3-31. Platoon Echelon Left Formation With 2d Squad in Lateral Support.
Figure 3-32. Platoon Left with 2d squad in Direct Support.
g. Platoon Wedge Formation.
(1) Command. “Platoon Wedge, Move.”
(2) Execution. After the platoon leader's preparatory command, the squad leaders of the 1st and 3d
squads command, “Follow Me.” At the same time, the 2d squad leader commands, “Stand Fast.” On
the platoon leader's command of execution, the 1st and 4th squads move directly to the front. The 1st
squad executes an echelon left on the baseman while the 3d squad executes an echelon right. When the
last man of the 1st and 4th squads clear the 2d squad, the 2d squad leader commands, “Follow Me,” and
moves out to the left and right. The 2d squad splits and the A and B teams go to the right and the C
team goes to the left to extend the formation (see Figure 3-33).
(3) Assembly of the wedge formation is the same as the platoon line.

Figure 3-33. Platoon Wedge Formation
h. Platoon wedge Formation with General Support.
(1) Command. "Platoon wedge, 2d Squad in Support, Move."
(2) Execution. The 1st and 3d squads execute the wedge while 2d squad remains ina column formation
(see Figure 3-34)

Figure 3-34. Platoon wedge Formation with 2d Squad in General Support.
i. Platoon Wedge Formation with Lateral Support.
(1) Command. “Platoon Wedge, 2d Squad in Lateral Support, Move.”
(2) Execution. The 1st and 3d squads execute the wedge while the 2d squad stands fast. After the 1st
and 3d squads have cleared the column, the 2d squad leader commands, “Follow Me.” If no direction is
given, the 2d squad splits to cover both flanks. A squad may be used to cover one flank by commanding,
“2d Squad Right (or Left) Lateral Support” (see Figures 3-35 and 3-36).
(3) To move the 2d squad from general support to lateral support, the platoon leader commands, “2d
Squad, Lateral Support, Move.” To have the 2d squad join the wedge from general or lateral support,
the platoon leader commands, “2d Squad, Extend the Wedge, Move.” To extend the wedge, the 2d
squad splits and the teams move to the left and right, respectively.
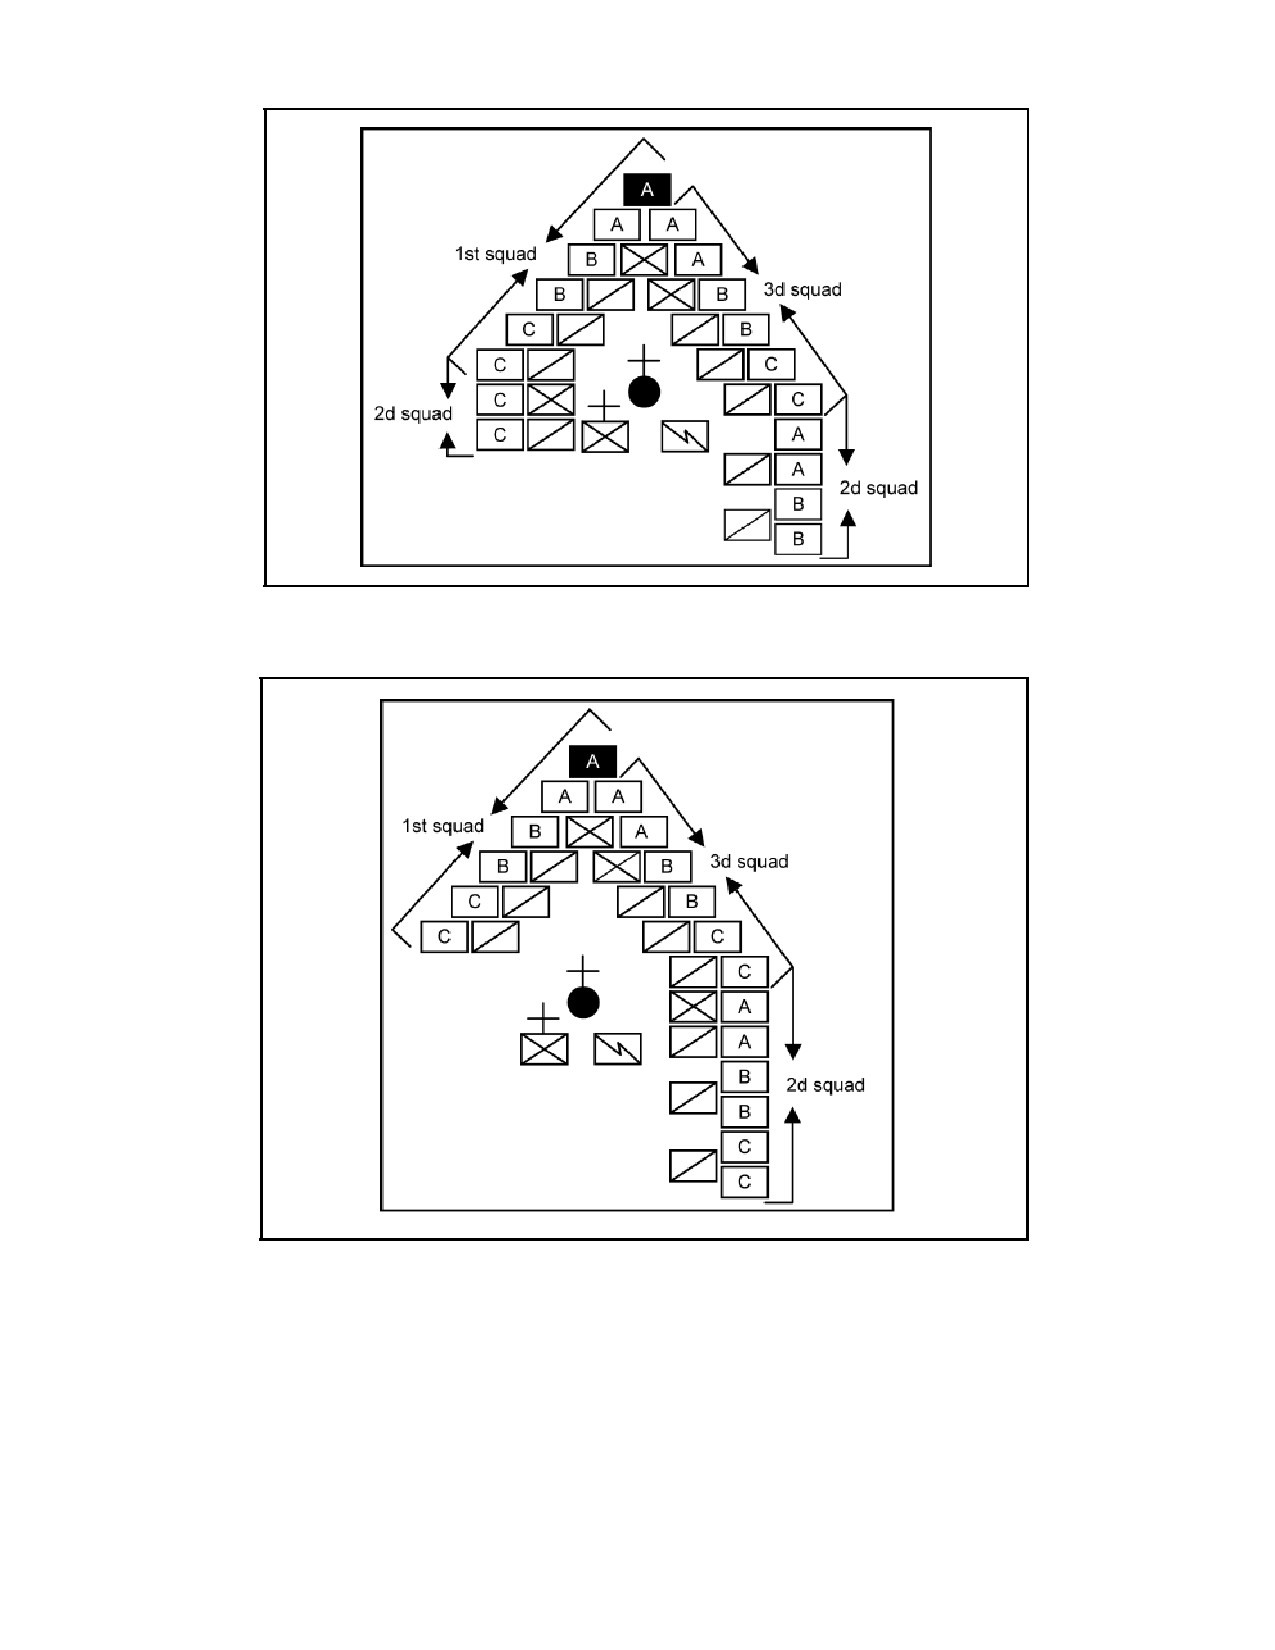
Figure 3-35. Platoon wedge Formation with 2d Squad in Lateral Support
Figure 3-36. Platoon Wedge Formation with 2d squad in Right Lateral Support
j. Platoon Wedge formation With Direct Support.
(1) Command. “Platoon Wedge, 2d Squad in Direct Support, Move.”
(2) Execution. The 1st and 3d squads execute a wedge. The 2d squad waits for the squad and/or team
leaders to move to the rear, as in the line formation, before executing a wedge directly behind and
centered on the main formation. The individuals in the supporting wedge cover the intervals between

individuals in the leading wedge (see Figure 3-37).
Figure 3-37. Platoon Wedge Formation with 2d Squad in Direct Support.
k. Platoon Diamond and Circle Formations.
(1) Command. “Platoon Diamond (or Circle), Move.”
(2) Execution. On the command of execution, the 1st squad leader moves the baseman to the place
indicated by the squad leader. The baseman becomes the 12 o’clock position while the 1st squad lines
up to the left of the baseman covering the 8 to 12 o’clock positions. The 3d squad aligns itself to the
right of the baseman, covering the 12 to 4 o’clock positions and the 2d squad aligns itself, covering the 4
to 8 o’clock positions (see Figures 3-38 and 3-39).
(3) To assemble from a platoon diamond or circle formation, the HQ element takes the same steps as
that of a line formation. The 1st squad leads the platoon back to the AA followed by the 2d and 3d
squads. Squads fall into a column formation as they file back to the AA.

Figure 3-38. Platoon Diamond Formation.
Figure 3-39. Platoon Circle Formation.
l. Assembling a Platoon. A 3-squad platoon is assembled in the same manner as a 4-squad platoon.
PART E - Company Formations
1. Company Headquarters.
a. Personnel. The company commander may use as many personnel as needed for his headquarters;
however, it is advantageous to use as few as possible. Personnel not in formation and not with the company
commander may be used to secure vehicles, or they may remain at the unit's administrative area. Minimum
personnel to accompany the company commander should be a messenger (radio operator) and a selected
marksman.
b. Equipment. The company commander should have the following equipment:
(1) Communications to maintain contact within his unit and with next higher headquarters.
(2) Sufficient transportation to keep an adequate amount of supplies available, such as crowd control
agent munitions.
(3) Loudspeaker or other voice amplifying equipment.
2. Designating Locations of Formations. When the company commander orders his company into crowd
control formations from the column, he moves out to the left or right near the head of the column, where he can
be seen by his platoon leaders, and faces the company. As he gives his preparatory command, he points to the
approximate location for the formation. If he does not indicate a location, the company forms immediately to
the front of the leading platoon.
3. Company Line In-Depth.
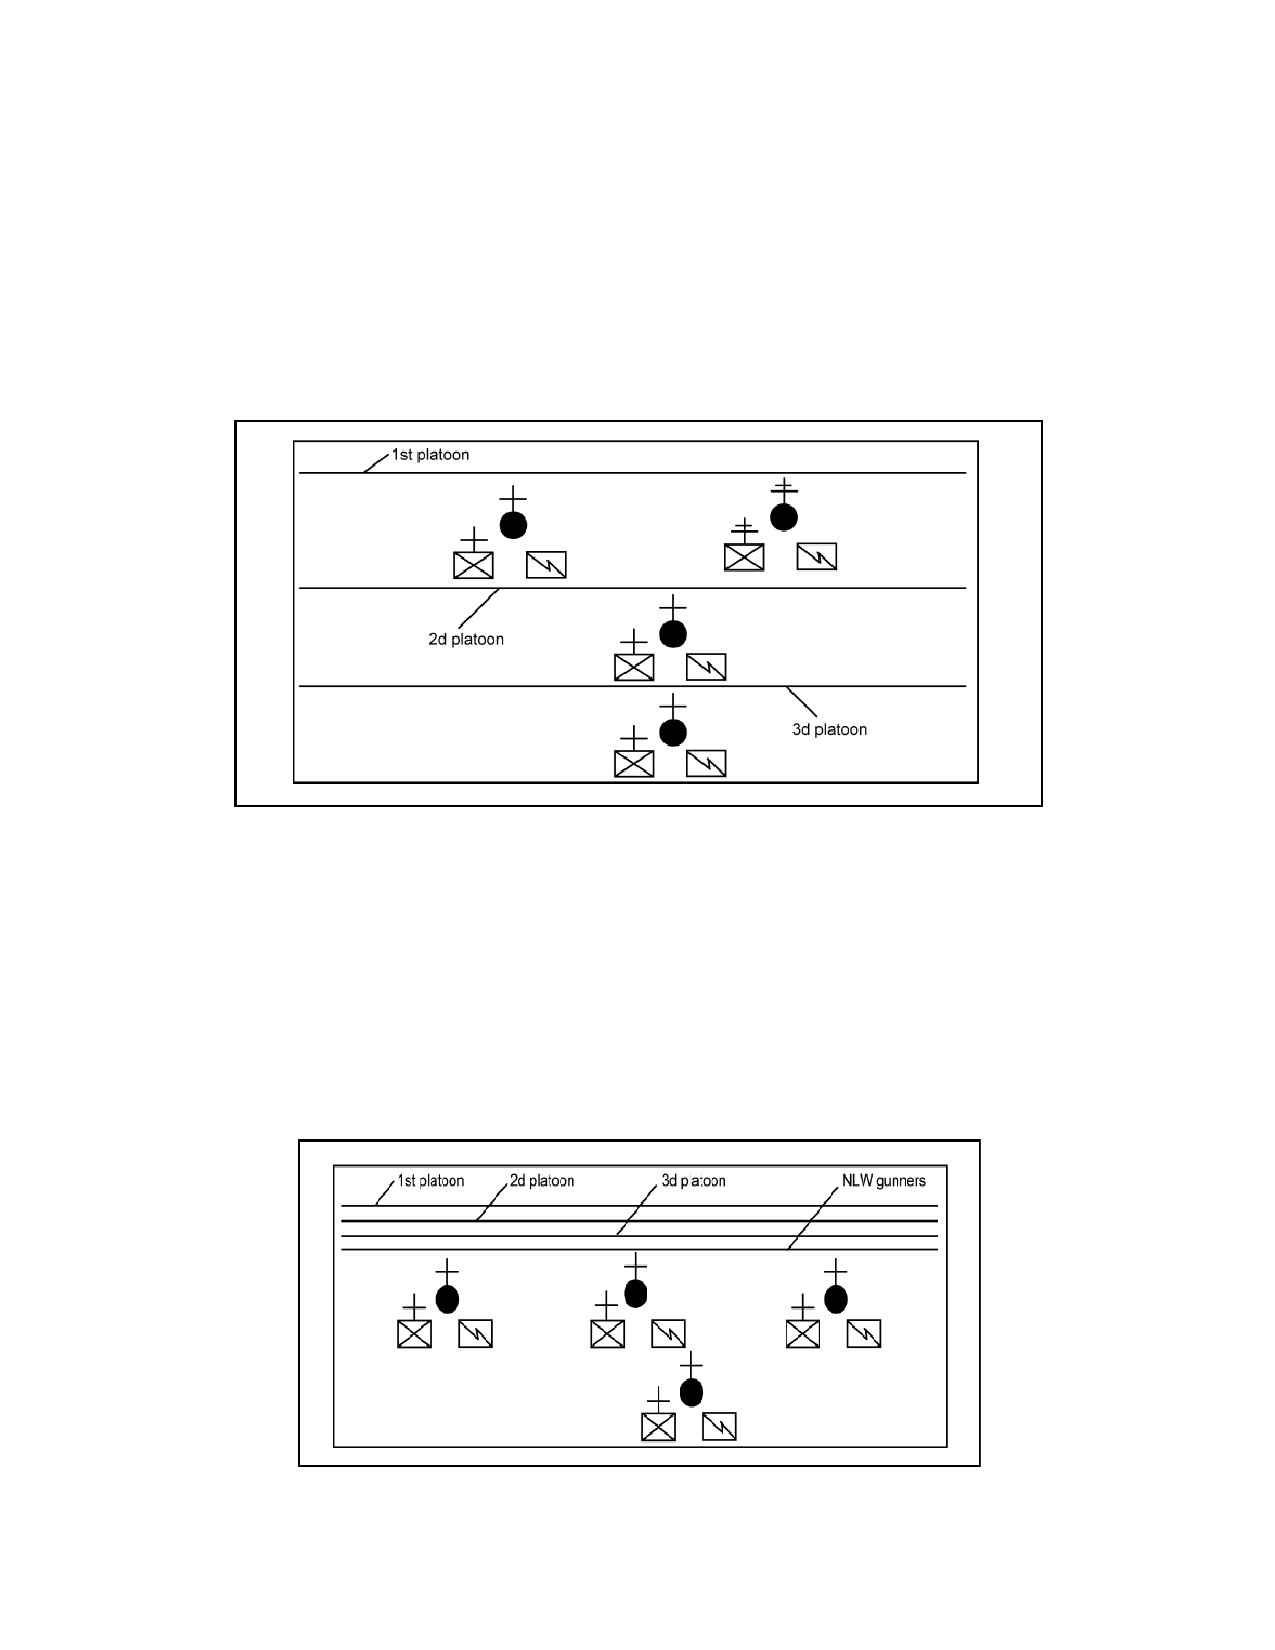
a. Command. "Company Line in Depth, Move."
b. Execution. After the company commander’s preparatory command, each platoon leader gives the
command, “Platoon Line.” The squad leaders follow with their commands to their squads to form the
platoon line. ON the command of execution, each platoon establishes a platoon line immediately to its front.
(see Figure 3-40)
c. If the 3d platoon is called on to support the company line, it moves forward and takes up a position
directly behind the 2d platoon in the same manner. Platoon leaders and PSGs help each other in controlling
the company.
FIGURE 3-40. Company Line in Depth Formation.
4. Company Line in Mass.
a. Command. "Company Line in Mass, Move."
b. Execution. The company line in mass is the same as a company line with both platoons in direct support.
Instead of forming it in stages, the company commander indicates his desire for this formation in his initial
command. The platoons each form a line and the 2d and 3d platoons close on the 1st platoon without
further command. (see Figure 3-41)
FIGURE 3-41. Company Line in Mass Formation

5. Company Line with Support. In company formations, the 1st platoon usually forms the lead element and the
2d and 3d platoons provide support (see Figures 3-42, 3-43, and 3-44). The support platoons can be employed
in the same manner as the support squads in platoon formations. One platoon can be relieved from the lead
element by another platoon while in formation by having a support platoon pass through the lead platoon.
FIGURE 3-42. Company Line in Mass Formation with One Platoon in Depth
FIGURE 3-43. Company Line in Mass Formation with One Platoon in Lateral Support.
FIGURE 3-44. Company Line, One Platoon in Lateral Support
and One Platoon in General Support.
6. Company Echelon and Wedge Formations. The company echelon (right or left) and company wedge are
formed in the same manner and with the same variations as the company line (see Figures 3-45 through 3-52).

FIGURE 3-45. Company Echelon Right Formation with One Platoon in Lateral support and One Platoon
in General support.
FIGURE 3-45. Company Echelon Right in Mass Formation with One Platoon in lateral Support
and
One Platoon in General Support.

Figure 3-46. Company Echelon Right in Mass Formation with One
Platoon in Lateral Support.
FIGURE 3-47. Company Echelon Right in Mass Formation With
One Platoon in General Support.

FIGURE 3-48. Company Wedge Formation with Two Platoons in
General Support.
FIGURE 3-49. Company wedge Formation with One Platoon in
Lateral Support.
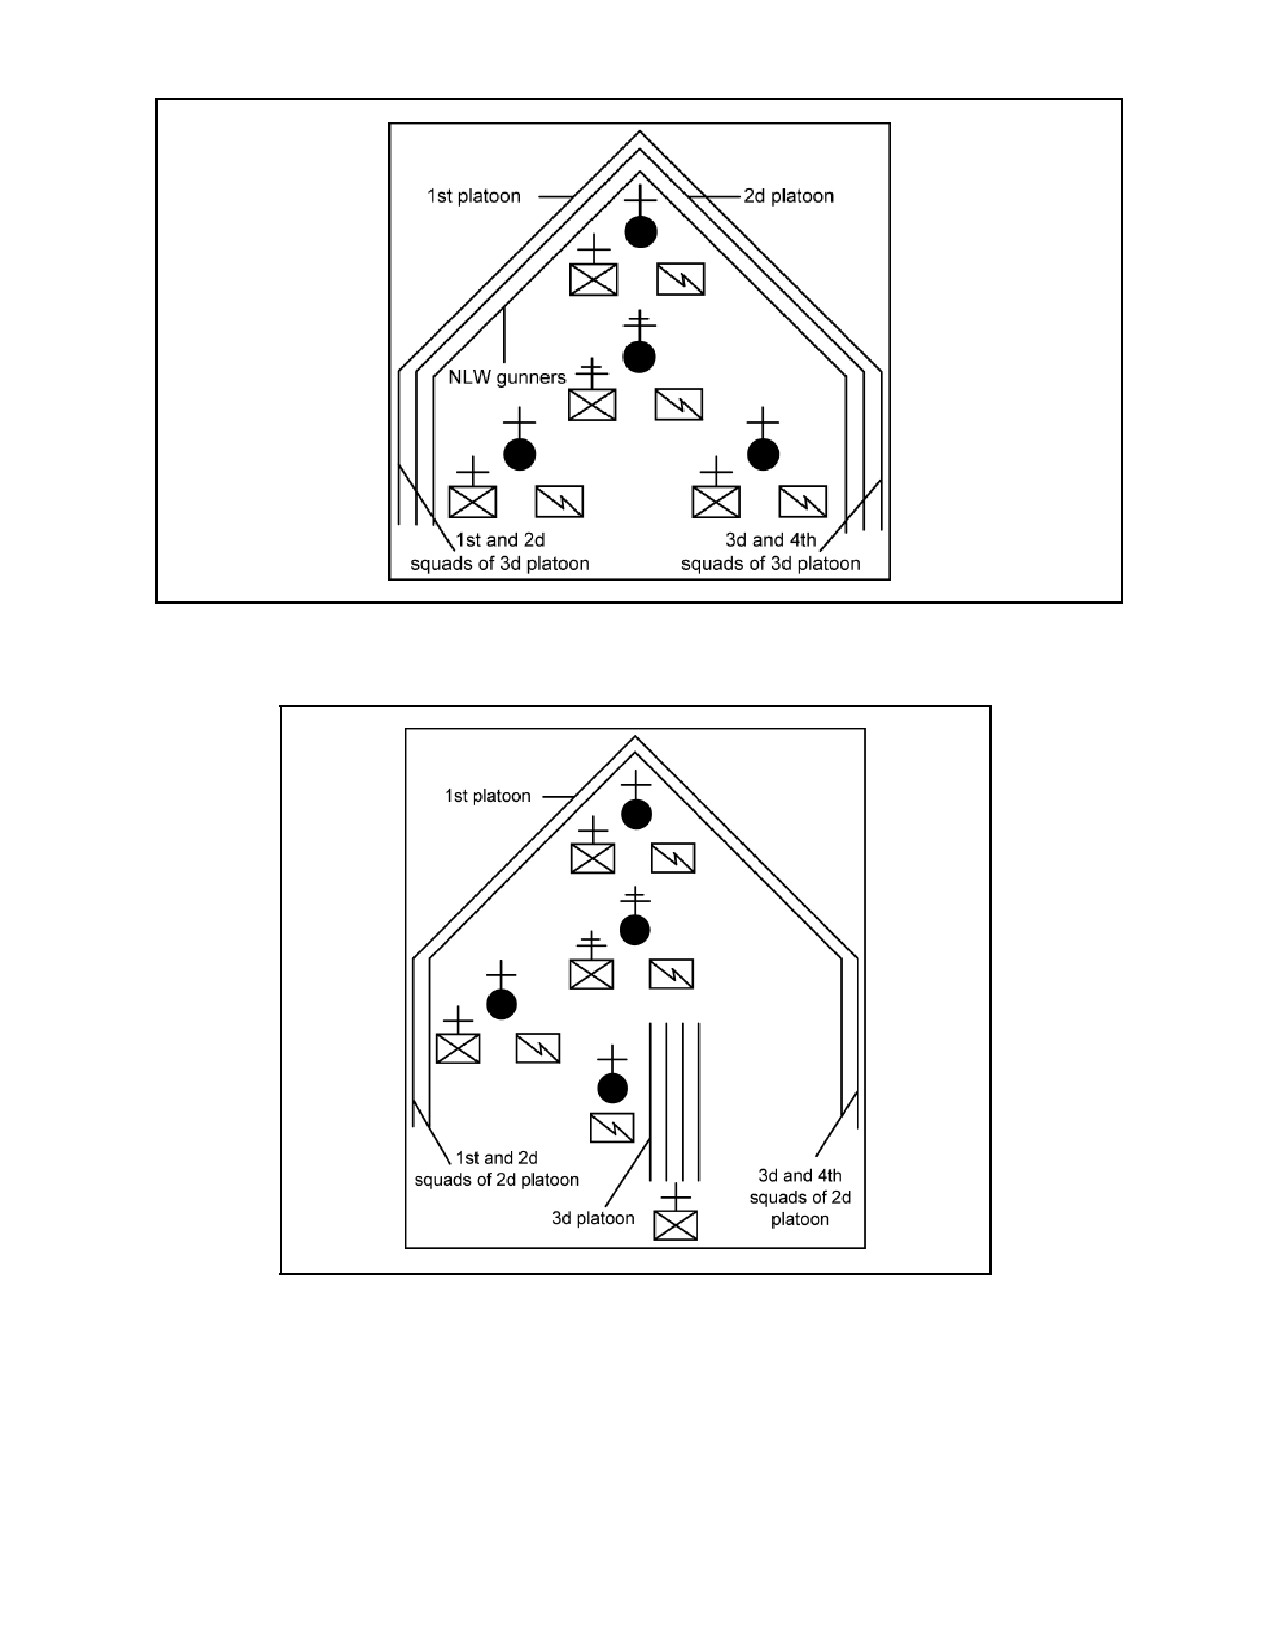
FIGURE 3-50. Company Wedge Formation with One Platoon in
Lateral Support and One Platoon in General Support.
FIGURE 3-51. Company Wedge Formation With One Platoon in
Lateral Support and One Platoon in General Support
7. Assembling a Company. A company assembles from a crowd control formation in the same manner as a
platoon or a squad does. However, due to the size of company formations, the commander must consider the
area that the company is operating in when he assembles the company. If he follows the guidelines of platoon
assembly, he will have no difficulty. When assembling the company, the commander takes a position to the
rear of the formation and commands, “Company Assemble.” The platoon leaders take charge of their respective
platoons. Usually, the 3d platoon assembles first, just behind the formation. After the 3d platoon is assembled,
the 2d platoon assembles in front of the 3d platoon and the 1st platoon assembles in front of the 2d. All platoons
assemble facing the commander. The 2d and 3d platoons then dress with the 1st platoon. As each platoon is
assembled, they are ordered to port arms by the platoon leader to await further orders from the commander. If
four platoons are used, the 4th platoon assembles first.
8. Company and Platoon Formations With Vehicles..
a. When encountering large riotous groups, it may be helpful to use vehicles with foot Soldiers in crowd
control formations. While vehicles add strength to formations, certain safeguard measures should be taken.
(1) Windshields of vehicles may be in upright positions, removed, or completely depressed. If
windshields are of safety glass, they offer some protection in an upright position to front seat occupants
with minimum danger of injury from glass fragments.
(2) Shields or mobile barriers may be constructed by mounting a wooden or metal frame strung with
barbed wire across the front of a vehicle.
(3) Foot Soldiers in formation should walk as near the front corners of each vehicle as possible to
prevent rioters from attacking the sides or rear of the vehicles.
b. Armored vehicles should be used when available and practicable because of their psychological effect
and the protection they afford their occupants.
(1) Vehicles should be used only in conjunction with foot Soldiers.
(2) Whenever vehicles and foot Soldiers are used, the commander of the foot Soldiers commands the
unit. He joins the leader of the motor section in the command (number 1) vehicle where he has a
position of vantage (see Figure 3-51). In every instance, his commands are carried out through the
subordinate leaders
(3) If possible, headquarters personnel should travel with the commander.

FIGURE 3-51. Position for Foot Soldiers and Vehicles Prior to Carrying out
Crowd Control Formations.
c. Company Line with Support.
(1) Command. The commands for vehicles and foot Soldiers are the same as foot Soldiers alone.
Because of the additional noise and distances involved, the company commander gives the arm and hand
signal for the line. The command and signal apply to the lead platoon only. The other platoons remain
in general support until directed further.
(2) Execution. The motor section moves out with vehicle number two moving to the right. Vehicle
number two passes the lead vehicle and establishes the position for the center of the line. At the same
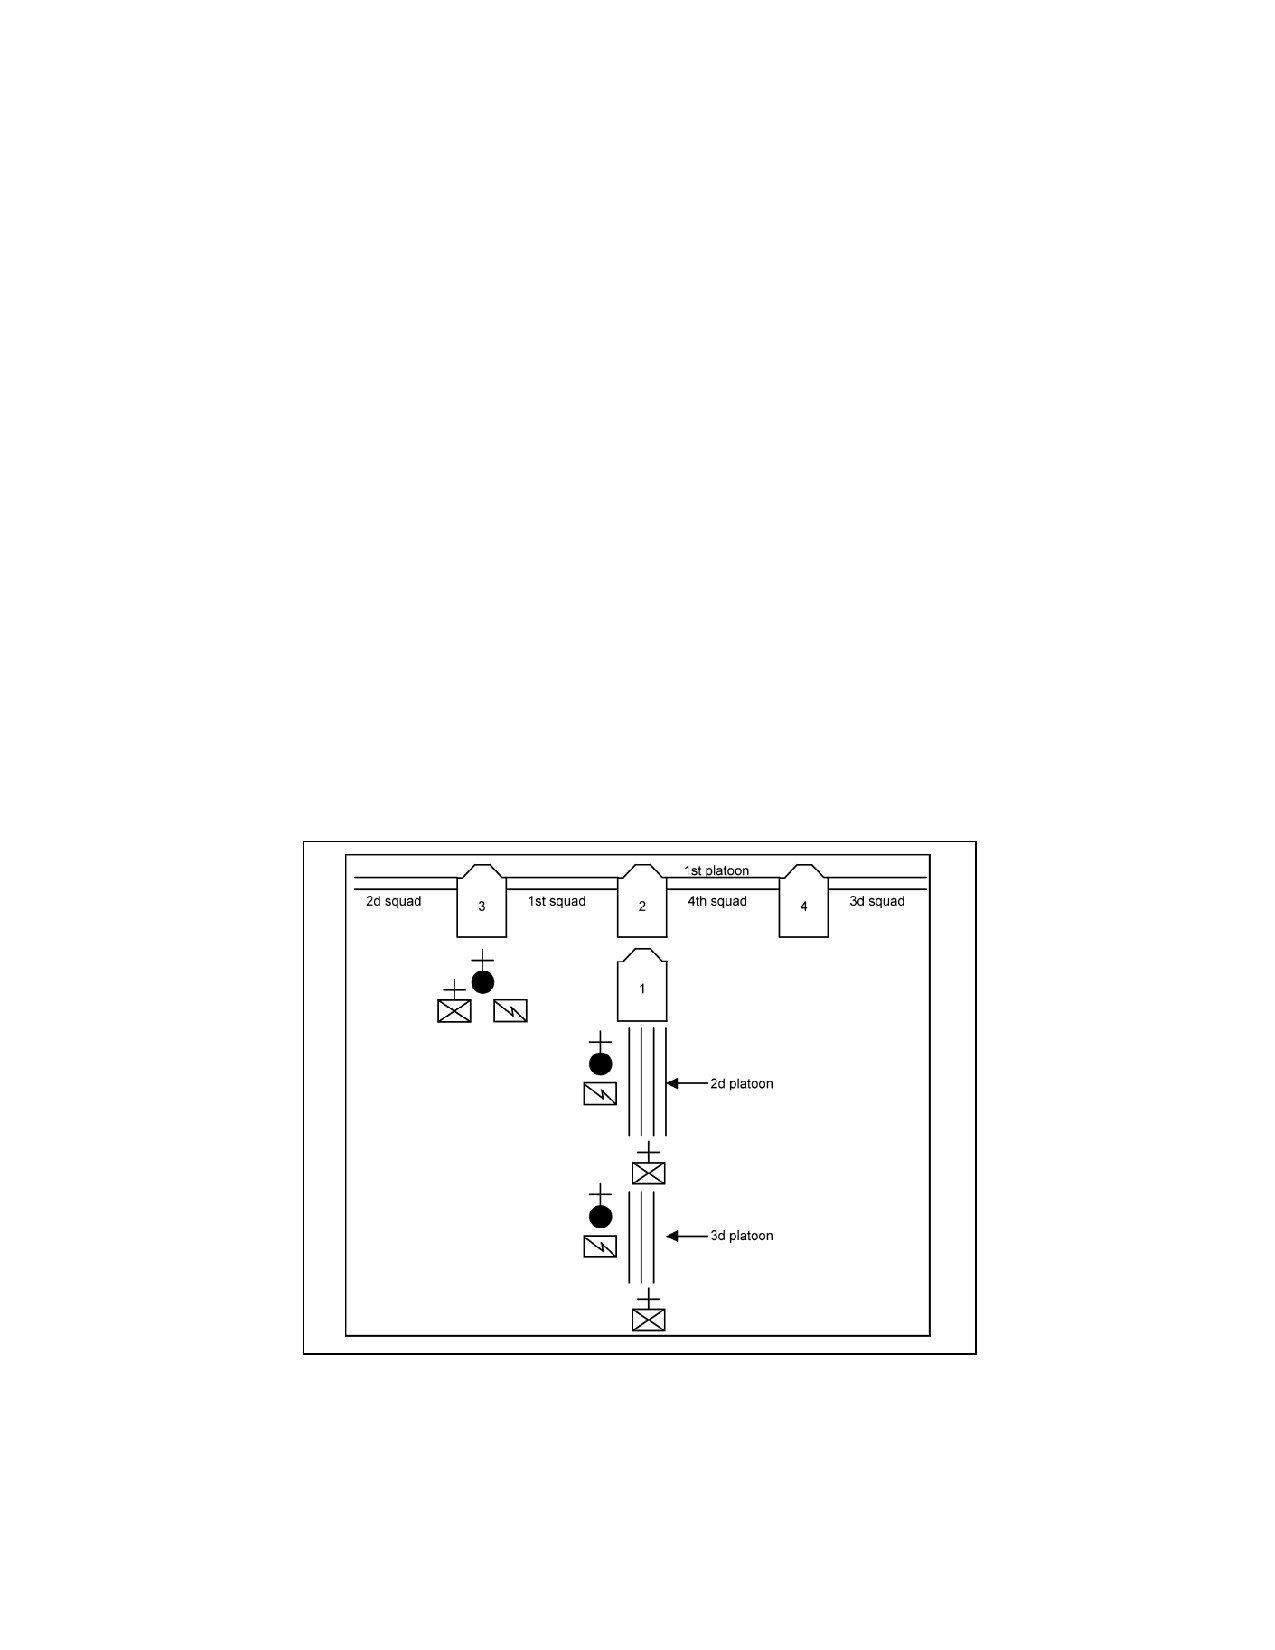
time, the 3d and 4th vehicles swing out to the left and right. They form to the left and right and slightly
to the rear of vehicle number two. The 1st and 4th squads of the lead platoon then move forward and
form lines to the left and right, on the front end of vehicle number two. As soon as the troops are in
position, the 3d and 4th vehicles close in on the squads and tighten the formation. The 2d and 3d squads
of the lead platoon then form a line to the left and right of the 3d and 4th vehicles to complete the
company line. The command vehicle (vehicle number one) takes up a position behind the line where the
commander can direct and control the unit. The 2d and 3d platoons move forward and are used in
general, lateral, or direct support. In some instances, foot troops move into position first and vehicles
join the formation, as needed. (see Figures 3-52, 3-53, 3-54, 3-55, 3-56, 3-57, and 3-58 for types of
vehicles formations)
9. Echelon or Wedge. To form a company echelon or a company wedge with vehicles, the company follows
the same procedures used for company formations without vehicles. Vehicles are moved into the appropriate
positions using procedures similar to those used for a company line.
10. Assembling Foot Soldiers and Vehicles. To assemble troops and vehicles, the command vehicle moves to a
position behind the formation. The commander faces the formation and gives the vehicle section the signal for
assembly. Immediately, the vehicles return to their proper positions in column formation behind the command
vehicle while the troops stand fast.
11. Variations of Formations. Many suitable variations to the formations described and illustrated above may
be used, and appropriate commands and signals may be devised to carry them out. Because of the somewhat
complicated nature and coordination required in these formations, however, new variations should be practiced
extensively before they are used in actual riot situations.
FIGURE 3-52. Company Line Formation With Vehicles
and Two Platoons in General Support.
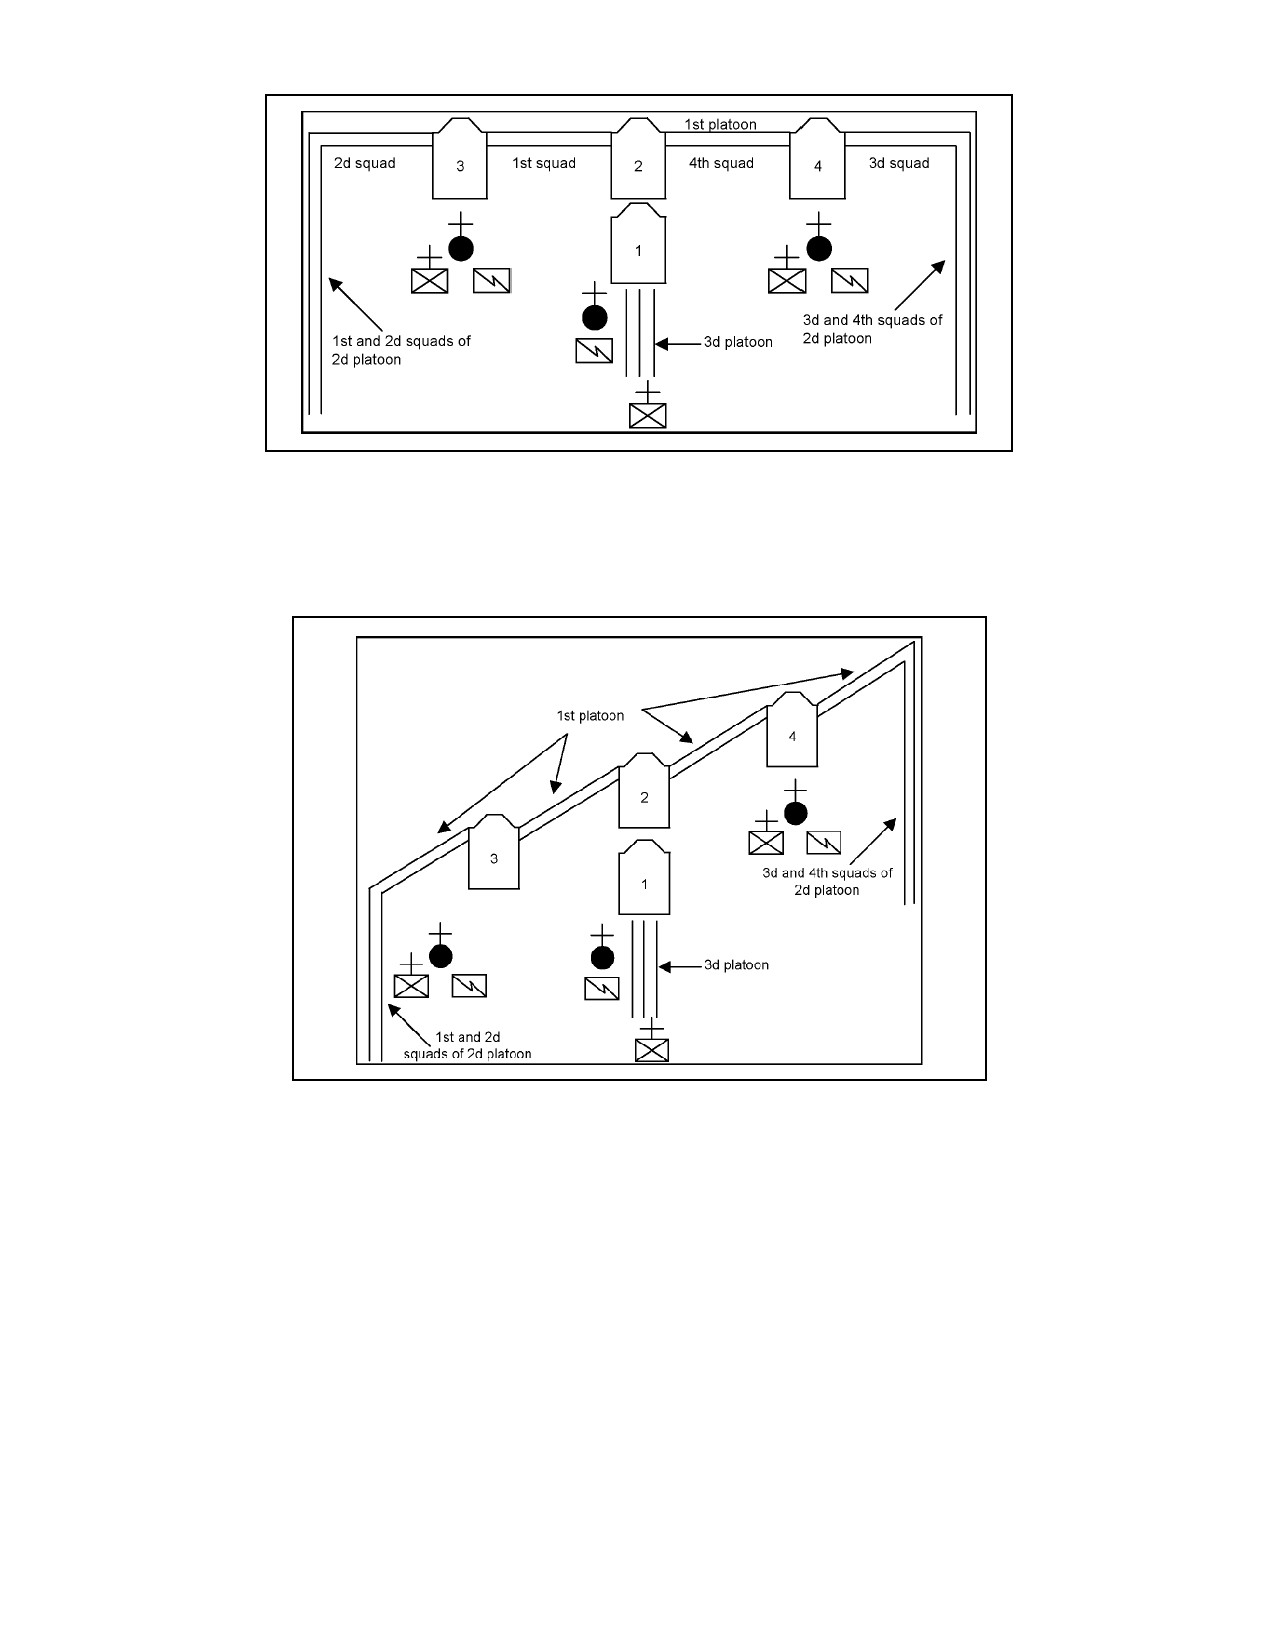
FIGURE 3-53. Company Line Formation with Vehicles, One Platoon in Lateral Support, and One Platoon in
General Support.
FIGURE 3-54. Company Echelon Right Formation with Vehicles, One Platoon in Lateral Support, and Platoon
in General Support.

FIGURE 3-55. Company Line in Mass Formation with Vehicles and One Platoon in General Support.

FIGURE 3-56. Platoon Line Formation with Vehicles.
FIGURE 3-57. Platoon Line Formation with Direct Support and Vehicles.