Peugeot 308 SW BL Dag (2009.5). Manual - part 6


  Index      Peugeot     Peugeot 308 SW BL Dag 2009.5 - service manual in english


Search            


Content   ..  4  5  6  7   ..


Peugeot 308 SW BL Dag (2009.5). Manual - part 6


93

VISIBILITY

EXTERIOR LIGHTING 
CONTROLS 

 Control stalk for the selection and con-
trol of the various front and rear lamps 
providing the vehicle's lighting. 

  Main lighting 

 The various front and rear lamps of the 
vehicle  are designed  to adapt the  driv-
er's visibility progressively in relation to 
the climatic conditions: 
   -  

sidelamps, to be seen, 

  -  

dipped  beam  headlamps  to  see 
without dazzling other drivers, 

  -  

main beam headlamps to see clearly 
when the road is clear.   

  Additional lighting 

 Other  lamps  are  fi tted  to  fulfi l  the  re-

quirements  of  particular  driving  condi-
tions: 
   -  

a  rear  foglamp  to  be  seen  from  a 
distance, 

  -  

front  foglamps  for  even  better 
forward vision, 

  -  

directional  headlamps  for  improved 
visibility when cornering, 

  -  

daytime  running  lamps  to  be  seen 
during the day.   

  Programming 

 Various 

automatic 

lighting 

control 

modes are also available depending on 
options: 
   -  

guide-me-home lighting, 

  -  

automatic lighting, 

  -  

directional lighting.   

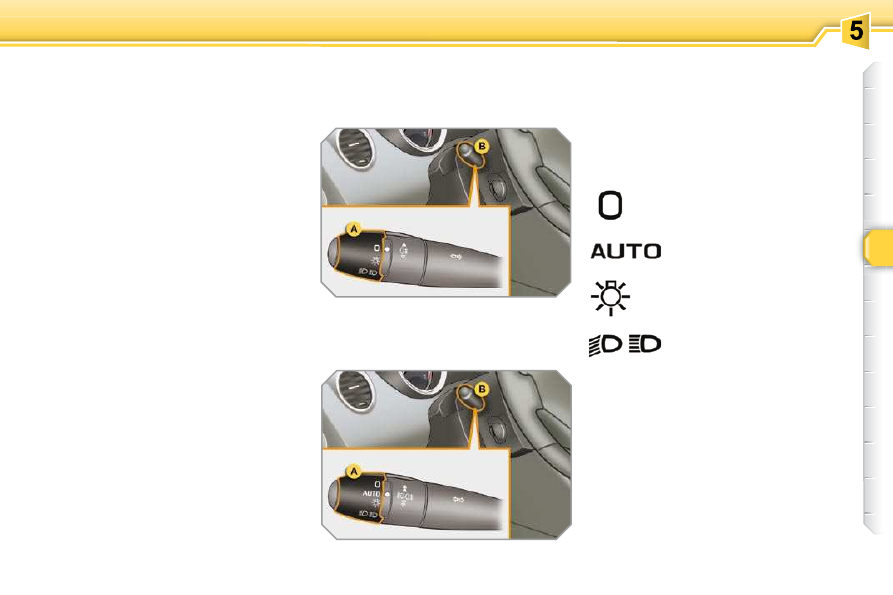
   Model without AUTO lighting   

   Model with AUTO lighting   

      Automatic  illumination  of 
headlamps. 

  Manual controls 

 The  lighting  commands  are  issued  di-
rectly  by  the  driver  by  means  of  the 
ring  A  and the stalk  B . 
  A.   Main  lighting  mode  selection  ring: 

turn it to position the symbol required 
facing the mark. 

 Lamps off.  

 Sidelamps only. 

  B.   Stalk  for  switching  headlamps:  pull 

to switch the lighting between dipped 
headlamps/main beam headlamps. 

 In the lamps off and sidelamps modes, 
the driver can switch on the main beam 
headlamps 

temporarily 

("headlamp 

fl ash") by maintaining a pull on the stalk. 

 Dipped headlamps or main 
beam headlamps. 

  Displays 

 Lighting  of  the  corresponding  indicator 

lamp  on  the  instrument  panel  confi rms 

the switching on of the lighting selected.  

!

i

94

VISIBILITY

   Model with rear foglamp only 

 rear foglamp 

      To  switch  on  the  foglamp,  turn  the 

ring  C  forwards.  

 When  the  lighting  is  switched  off  au-

tomatically  (with AUTO  model),  the  fo-

glamp  and  the  dipped  headlamps  will 
remain on. 
      To  switch  off  all  of  the  lighting,  turn 

the ring  C  rearwards.    

      In good or rainy weather, both day 
and  night,  the  front  foglamps  and 
the rear foglamp are prohibited. In 
these situations, the power of their 
beams  may  dazzle  other  drivers. 
They should only be used in fog or 
snow. 
 In  these  weather  conditions,  it  is 
your responsibility to switch on the 
foglamps  and  dipped  beam  head-
lamps  manually  as  the  brightness 

sensor may detect suffi cient light. 
 Do not forget to switch off the front 
foglamps and the rear foglamp when 
they are no longer necessary.  

  Switching off of the lamps when 
the ignition is switched off 
 On  switching  off  the  ignition,  all  of 
the lamps turn off immediately, ex-
cept  for  dipped  beam  if  guide-me-
home lighting is activated.  

   Model with front foglamps and 

a rear foglamp 

 Front and rear foglamps 

 Rotate and release the ring  C : 
   

   forwards a fi rst time to switch on the 

front foglamps. 

     forwards a second time to switch on 

the rear foglamp, 

  

   rearwards  a  fi rst  time  to  switch  off 

the rear foglamp 

     rearwards  a  second  time  to  switch 

of the front fog lamps.  

 When  the  lighting  is  switched  off  auto-

matically  (with  AUTO  model)  or  when 

the dipped headlamps are switched off 
manually,  the  foglamps  and  sidelamps 
will remain on. 
      Turn  the  ring  rearwards  to  switch 

off the foglamps, the sidelamps will 
then switch off.    

          C.  Foglamp selection ring. 
 The  foglamps  operate  with  the  dipped 
and main beam headlamps. 

  Switching on the lamps after the 
ignition is switched off 
 To  reactivate  the  lighting  control, 
rotate  ring   A   to  the   "0"   position  - 
lamps off, then to the desired posi-
tion. 
 On  opening  the  driver's  door  a 
temporary audible signal warns the 
driver that the lighting is on. 
 The  lamps,  with  the  exception  of 
the sidelamps, switch off automati-
cally  after  a  maximum  duration  of 
thirty  minutes  to  prevent  discharg-
ing of the battery.   

i

95

VISIBILITY

      Manual guide-me-home lighting 

 Temporarily  keeping  the  dipped  beam 
headlamps  on  after  the  vehicle's  igni-
tion  has  been  switched  off  makes  the 
driver's  exit  easier  when  the  light  is 
poor. 

  Switching on 
   

   With  the  ignition  off,  "fl ash"  the 

headlamps using the lighting stalk. 

  

   A further "headlamp fl ash" switches 

the function off.   

  Switching off 
 The  manual  guide-me-home  lighting 
switches  off  automatically  after  a  set 
time.   

       Daytime running lamps 

 Special daytime lighting, compulsory in 
certain  countries,  which  comes  on  au-
tomatically  when  the  engine  is  started 
so  that  the  vehicle  can  be  seen  more 
easily.  
This  function  is  provided  by  special 
dedicated lamps. 
 The  instruments  and  controls  (instru-
ment  panel,  multifunction  screen,  air 

conditioning  control  panel,  ...)  are  not 

lit, except on switching to the automatic 
lighting  mode  or  when  the  lighting  is 
switched on manually. 

  Programming 

 In  countries  in  which  this 
function is not imposed by 
regulations,  you  can  acti-
vate or deactivate it via the 
multifunction  screen  con-

fi guration menu. 

 In  some  climatic  conditions  (e.g. 

low  temperature  or  humidity),  the 

presence of misting on the internal 
surface  of  the  glass  of  the  head-
lamps  and  rear  lamps  is  normal; 
it  disappears  after  the  lamps  have 
been on for a few minutes.   

 In  countries  in  which  it  is  imposed  by 
regulations: 
   -  

by default, this function is activated, 

  -  

the sidelamps and the number plate 
lamps are also switched on.    

          Automatic illumination of headlamps 

 The sidelamps and dipped beam head-
lamps  are  switched  on  automatically, 
without  any  action  on  the  part  of  the 
driver, when a low level of external light 
is detected or in certain cases of activa-
tion of the windscreen wipers. 
 As  soon  as  the  brightness  returns  to  a 

suffi cient  level  or  after  the  windscreen 

wipers  are  switched  off,  the  lamps  are 
switched off automatically. 

  Activation 
      Turn ring  A  to the  "AUTO"  position. The 

automatic  illumination  of  headlamps 
is accompanied by a message on the 
multifunction screen.   

  Deactivation 
      Turn  ring   A   to  a  position  other  than 

 "AUTO" . Deactivation is accompanied 
by  a  message  on  the  multifunction 
screen.   

i

!

i

96

VISIBILITY

EXTERIOR WELCOME 
LIGHTING 

 The  remote  switching  on  of  the  light-
ing makes your approach to the vehicle 
easier  in  poor  light.  It  is  activated  ac-
cording to the level of light detected by 
the brightness sensor. 

  Switching on 

       Press  the  open  padlock  on  the 

remote control.  


The  dipped  beam  headlamps  and 
the sidelamps come on; your vehicle 
is also unlocked.    

  Programming 

  The lighting duration is se-
lected  via  the  multifunction 

screen confi guration menu. 

 The duration of the welcome light-
ing is associated with and identical 
to  that  of  the  automatic  guide-me-
home lighting.   

 In  fog  or  snow,  the  brightness 

sensor  may  detect  suffi cient  light. 

Therefore, the lighting will not come 
on automatically. 
 Do not cover the brightness sensor, 
coupled  with  the  rain  sensor  and 
located  in  the  centre  of  the  wind-
screen behind the rear view mirror; 
the  associated  functions  would  no 
longer be controlled.   

  Coupling with the automatic "Guide-
me-home" lighting 
 Association  with  the  automatic  illumina-
tion  of  headlamps  provides  "guide-me-
home" lighting with the following addition-
al options: 
   -  

selection  of  the  lighting  duration  to 
15, 30 or 60 seconds in the vehicle 
parameters  on  the  multifunction 

screen  confi guration  menu  (except 

in  the  case  of  the  monochrome 
screen  A,  for  which  the  duration  is 

set: 60 seconds), 

  -  

automatic  activation  of  "guide-me-
home"  lighting  when  automatic 
illumination  of  headlamps  is  in 
operation.   

  Operating fault 

 In the event of a fault with the bright-
ness sensor, the lighting come on, 
this warning lamp is displayed on 
the instrument panel and/or a mes-

sage appears on the multifunction screen, 
accompanied by an audible signal. 
 Consult a PEUGEOT dealer. 

MANUAL ADJUSTMENT OF 
HALOGEN HEADLAMPS 

 The initial setting is position  "0" . 

 To  avoid  causing  a  nuisance  to  other 
road  users,  the  height  of  the  halogen 
headlamps  should  be  adjusted  in  rela-
tion to the load in the vehicle. 
  0.   1 or 2 people in the front seats. 
  -.   3 people. 
  1.   5 people. 
  -.   Intermediate setting. 
  2.   5 people + maximum authorised load. 
  -.   Intermediate setting. 
  3.   Driver + maximum authorised load. 

  Switching off 

  The exterior welcome lighting switches 
off automatically after a set time, when 
the ignition is switched on or on locking 
the vehicle.   

i

!

i

96

VISIBILITY

EXTERIOR WELCOME 
LIGHTING 

 The  remote  switching  on  of  the  light-
ing makes your approach to the vehicle 
easier  in  poor  light.  It  is  activated  ac-
cording to the level of light detected by 
the brightness sensor. 

  Switching on 

       Press  the  open  padlock  on  the 

remote control.  


The  dipped  beam  headlamps  and 
the sidelamps come on; your vehicle 
is also unlocked.    

  Programming 

  The lighting duration is se-
lected  via  the  multifunction 

screen confi guration menu. 

 The duration of the welcome light-
ing is associated with and identical 
to  that  of  the  automatic  guide-me-
home lighting.   

 In  fog  or  snow,  the  brightness 

sensor  may  detect  suffi cient  light. 

Therefore, the lighting will not come 
on automatically. 
 Do not cover the brightness sensor, 
coupled  with  the  rain  sensor  and 
located  in  the  centre  of  the  wind-
screen behind the rear view mirror; 
the  associated  functions  would  no 
longer be controlled.   

  Coupling with the automatic "Guide-
me-home" lighting 
 Association  with  the  automatic  illumina-
tion  of  headlamps  provides  "guide-me-
home" lighting with the following addition-
al options: 
   -  

selection  of  the  lighting  duration  to 
15, 30 or 60 seconds in the vehicle 
parameters  on  the  multifunction 

screen  confi guration  menu  (except 

in  the  case  of  the  monochrome 
screen  A,  for  which  the  duration  is 

set: 60 seconds), 

  -  

automatic  activation  of  "guide-me-
home"  lighting  when  automatic 
illumination  of  headlamps  is  in 
operation.   

  Operating fault 

 In the event of a fault with the bright-
ness sensor, the lighting come on, 
this warning lamp is displayed on 
the instrument panel and/or a mes-

sage appears on the multifunction screen, 
accompanied by an audible signal. 
 Consult a PEUGEOT dealer. 

MANUAL ADJUSTMENT OF 
HALOGEN HEADLAMPS 

 The initial setting is position  "0" . 

 To  avoid  causing  a  nuisance  to  other 
road  users,  the  height  of  the  halogen 
headlamps  should  be  adjusted  in  rela-
tion to the load in the vehicle. 
  0.   1 or 2 people in the front seats. 
  -.   3 people. 
  1.   5 people. 
  -.   Intermediate setting. 
  2.   5 people + maximum authorised load. 
  -.   Intermediate setting. 
  3.   Driver + maximum authorised load. 

  Switching off 

  The exterior welcome lighting switches 
off automatically after a set time, when 
the ignition is switched on or on locking 
the vehicle.   

!

i

97

VISIBILITY

DIRECTIONAL LIGHTING 

 When  the  dipped  or  main  beam  head-
lamps are on, this function enables the 
light beams to provide improved lighting 
of the side of the road when cornering. 
 The  use  of  this  function,  from  approxi-

mately  12  mph  (20  km/h)  and  associ-

ated  with  the  xenon  headlamps  only, 
considerably  improves  the  quality  of 
your lighting when cornering. 

  with directional lighting  

  without directional lighting  

  Programming 

  Operating fault 

 The function is activated or 
deactivated  via  the  multi-

function  screen  confi gura-

tion menu.  

 If a malfunction occurs, this warn-

ing lamp fl ashes on the instrument 

panel,  accompanied  by  a  mes-
sage on the multifunction screen. 

 Consult a PEUGEOT dealer. 

AUTOMATIC ADJUSTMENT OF 
THE XENON HEADLAMPS 

 Do  not  touch  the  xenon  headlamp 
bulbs. Consult a PEUGEOT dealer. 

 In  order  to  avoid  causing  a  nuisance  to 
other  road  users,  this  system  corrects 
the height of the xenon headlamp beams 
automatically and when stationary, in rela-
tion to the load in the vehicle. 

 If  a  malfunction  occurs,  this 
warning  lamp  and/or  the  ser-
vice  warning  lamp  is  displayed 
on  the  instrument  panel,  ac-

companied  by  an  audible  signal  and  a 
message on the multifunction screen. 
 The system then places your headlamps 
in the lowest position. 

 When stationary or moving at very 
low speed or when reverse gear is 
engaged, the function is inactive. 
 The status of the function remains 
in the memory when the ignition is 
switched off.  

98

VISIBILITY

WIPER CONTROLS 

 System for selection and control of the 
various front and rear wiping modes for 
the elimination of rain and cleaning. 
 The  vehicle's  front  and  rear  wipers  are 
designed to improve the driver's visibility 
progressively  according  to  the  climatic 
conditions. 

  Manual controls 

 The wiper commands are issued directly 
by  the  driver  by  means  of  the  stalk   A  
and the ring  B . 

   Model with intermittent wiping   

   Model with AUTO wiping   

 fast (heavy rain), 

 normal (moderate rain), 

 intermittent (proportional to 

the speed of the vehicle), 

 automatic, 

then 

single 

wipe (see following page). 

 park,   

 single wipe (press downwards), 

  Programming 

 Various automatic wiper control modes 
are  also  available  according  to  the  fol-
lowing options: 
   -  

automatic rain sensitive windscreen 
wipers, 

  -  

rear  wiping  on  engaging  reverse 
gear.   

  Windscreen wipers 
  A.  wiping speed selection stalk: 

      or 

!

99

VISIBILITY

  Windscreen and headlamp wash 

  B.  rear wiper selection ring: 

 park, 

 intermittent wipe, 

 wash-wipe (set duration).  

  Reverse gear 
 When  reverse  gear  is  engaged,  the 
rear wiper will come into operation if the 
windscreen wipers are operating.  

       Pull  the  windscreen  wiper  stalk 

towards you. The windscreen wash 
then the windscreen wipers operate 

for a fi xed period.  

  If  the  dipped  headlamps  are  on,   the 
headlamp washers operate at the same 
time.   

             Rear wiper 

 If  a  signifi cant  accumulation  of 

snow or ice is present, or when us-
ing a tailgate bicycle carrier, deac-
tivate  the  automatic  rear  wiper  via 

the multifunction screen confi gura-

tion menu. 

  Programming 

 The function is activated or 
deactivated  via  the  multi-

function  screen  confi gura-

tion menu. 
 This  function  is  activated 
by default.   

           Screenwash/headlamp wash low 

 In the case of vehicles fi tted with 

headlamp  washers,  when  the 
minimum level of the reservoir is 
reached,  this  warning  lamp  and/

or  the  service  warning  lamp  is  displayed 
on the instrument panel, accompanied by 
an  audible  signal  and  a  message  on  the 
multifunction screen. 
 Next  time  you  stop,  fi ll  the  screenwash/

headlamp wash reservoir. 
 The warning lamp is displayed when the igni-
tion is switched on, or every time the stalk 

is operated, until the reservoir is fi lled.   

!

i

i

100

VISIBILITY

          Special position of the 
windscreen wipers 

            Automatic rain sensitive 
windscreen wipers 

 The  windscreen  wipers  operate  auto-
matically, without any action on the part 
of the driver, if rain is detected (sensor 

behind  the  rear  view  mirror),  adapting 

their  speed  to  the  intensity  of  the  rain-
fall. 

  Activation 
 This is controlled manually by the driver 
by pushing the  stalk downwards  to the 
 "AUTO"  position. 
 It is accompanied by a message on the 
multifunction screen.  

 This  position  permits  release  of  the 
windscreen wiper blades. 
 It  is  used  for  cleaning  or  replacement 
of  the  blades.  It  can  also  be  useful,  in 
winter,  to  detach  the  blades  from  the 
windscreen. 
 In the moment following switching off of 
the ignition, any action on the stalk posi-
tions  the  wipers  vertically  on  the  wind-
screen. 
 To  park  the  wipers  after  this  has  been 
done, switch on the ignition and operate 
the stalk. 

 Do not cover the rain sensor, linked 
with  the  brightness  sensor  and  lo-
cated  in  the  centre  of  the  wind-
screen behind the rear view mirror. 
 Switch  off  the  automatic  rain  sen-
sitive  wipers  when  using  an  auto-
matic car wash. 
 In  winter,  to  avoid  damaging  the 
wiper blades, it is advisable to wait 
until  the  windscreen  is  completely 
clear  of  ice  before  activating  the 
automatic rain sensitive wipers.   

 The  automatic  rain  sensitive  wip-
ers must be reactivated if the igni-
tion has been off for more than one 
minute, by pushing the stalk down-
wards.  

  Switching off 
 This is controlled manually by the driver 
by  moving  the  stalk  upwards  then  re-
turning it to position  "0" . 
 It is accompanied by a message on the 
multifunction screen. 

  Operating fault 
 If  an  automatic  wiping  malfunction  oc-
curs, the wipers will operate in intermit-
tent mode. 
 Have it checked by a PEUGEOT dealer. 

 For  maintain  the  effectiveness  of 

the  "fl at-blade"  wiper  blades,  it  is 

advisable to: 
   -  

handle them with care, 

  -  

clean  them  regularly  using 
soapy water, 

  -  

avoid  using  them  to  retain 
cardboard on the windscreen. 

  -   replace them at the fi rst signs of 

wear.   

i

i

!

101

VISIBILITY

COURTESY LAMPS 

   1.    Front courtesy   lamp  
  2.    Map reading   lamps  
  3.    Rear side reading   lamps  
  4.    Rear courtesy   lamp   

  Front and rear courtesy lamps 

 In  this  position,  the  courtesy 
lamp comes on gradually: 

  Map reading lamps 

      With  the  ignition  on,  press  the 

corresponding switch.   

 With the "permanent lighting" mode, 
the  duration  of  lighting  varies  de-
pending on the context: 
   -  

with the ignition off, approximately 
ten minutes, 

  -  

in 

energy 

economy 

mode, 

approximately thirty seconds, 

  -  

with the engine running, unlimited.  

   -  

when the vehicle is unlocked, 

  -  

when  the  key  is  removed  from  the 
ignition, 

  -  

when a door is opened, 

  -  

when the remote control locking button is 
activated, in order to locate your vehicle.  

 Permanently off. 

 Permanent lighting. 

 When the front courtesy lamp is in 
the  "permanent  lighting"  position, 
the  rear  courtesy  lamp  will  also 
come on, unless it is in the "perma-
nently off" position. 
 To  switch  off  the  rear  courtesy 
lamp,  place  it  in  the  "permanently 
off" position.  

  Rear side reading 
lamps 

 It switches off gradually: 
   -  

when the vehicle is locked, 

  -  

when the ignition is switched on, 

  -  

30  seconds  after  the  last  door  is 
closed.  

 Take  care  not  to  place  anything  in 
contact with the courtesy lamps. 

   

   With  the  ignition  on,  the  fi rst  press 

of the reading lamp switch switches 
on  the  reading  lamp  in  "permanent 
lighting" mode. 

     Following a second press, it comes 

on: 

   -   when the vehicle is unlocked, 
  -   when the key is removed from the 

ignition, 

  -   when a door is opened, 
  -   when  the  remote  control  locking 

button  is  pressed,  in  order  to 
locate your vehicle.   

 It switches off gradually: 
   -  

when the vehicle is locked, 

  -  

when the ignition is switched on, 

  -  

30 seconds after the last door is closed.   

i

i

102

VISIBILITY

INTERIOR MOOD LIGHTING 

 The  dimmed  passenger  compartment 
lighting improves visibility in the vehicle 
when the light is poor. 

 Different  lighting  times  are  avail-
able: 
   -  

when 

the 

ignition 

is 

off, 

approximately ten minutes, 

  -  

in 

energy 

economy 

mode, 

approximately thirty seconds, 

  -  

when the engine is running, no 
limit.  

 This  comes  on  automatically  when  the 
boot  is  opened  and  switches  off  auto-
matically when the boot is closed. 

INTERIOR WELCOME LIGHTING 

 The remote switching on of the passen-
ger  compartment  lighting  makes  your 
entry  into  the  vehicle  easier  in  poor 
light.  It  is  activated  in  accordance  with 
the light intensity detected by the bright-
ness sensor. 

BOOT LAMP 

  Switching on 

      Press  the  open  padlock  on  the 

remote control.  

 The  front  door  sill  lighting,  the  footwell 
lighting  and  the  courtesy  lamps  come 
on; your vehicle is also unlocked.  

  Switching off 

 The  interior  welcome  lighting  switch-
es  off  automatically  after  a  set  time  or 
when one of the doors is opened.  

  Programming 

  Switching on 

 At  night,  the  footwell  lighting  and  the 
front  courtesy  mood  lamp  come  on 
automatically  when  the  sidelamps  are 
switched on.  

  Switching off 

 The  interior  mood  lighting  switches  off 
automatically  when  the  sidelamps  are 
switched off.  

  Programming 

 The  welcome  lighting  duration  is 
associated  with  and  identical  to 
that  of  the  automatic  guide-me-
home lighting.  

 The function is activated or 
deactivated  via  the  multi-

function  screen  confi gura-

tion menu. 
 This  function  is  activated 
by default.  

 The  lighting  duration  is 
selected  via  the  multifunc-

tion  screen  confi guration 

menu. 

103

FITTINGS

INTERIOR FITTINGS 

   1.    Spectacles storage  

  2.    Sun visor   
 

(see details on following page) 

  3.    Grab handle with coat hook  

  4.    Toll card/car park ticket windows   
 

(see details on following page) 

  5.    Storage compartment  

  6.    Oddments box  

  7.    Bag hook  

  8.    Illuminated glove   box   
 

(see details on following page) 

  9.    Door trays  

  10.   Illuminated ashtray   
 

(see details on following page) 

  11.   Storage compartment 

with non-slip carpet  

  12.   12 V accessories socket   
 

(see details on following page) 

  13.   Cup   holder  

  14.   Front armrest   
 

(see details on following page) 

  15.   Storage box   


Content   ..  4  5  6  7   ..