Peugeot 308 SW BL Dag (2009.5). Manual - part 4


  Index      Peugeot     Peugeot 308 SW BL Dag 2009.5 - service manual in english


Search            


Content   ..  2  3  4  5   ..


Peugeot 308 SW BL Dag (2009.5). Manual - part 4


!

67

COMFORT

REAR SEATS 

 Never drive with the head restraints 
removed;  they  must  be  in  place 
and in the high position when pas-
sengers are seated in the rear.  

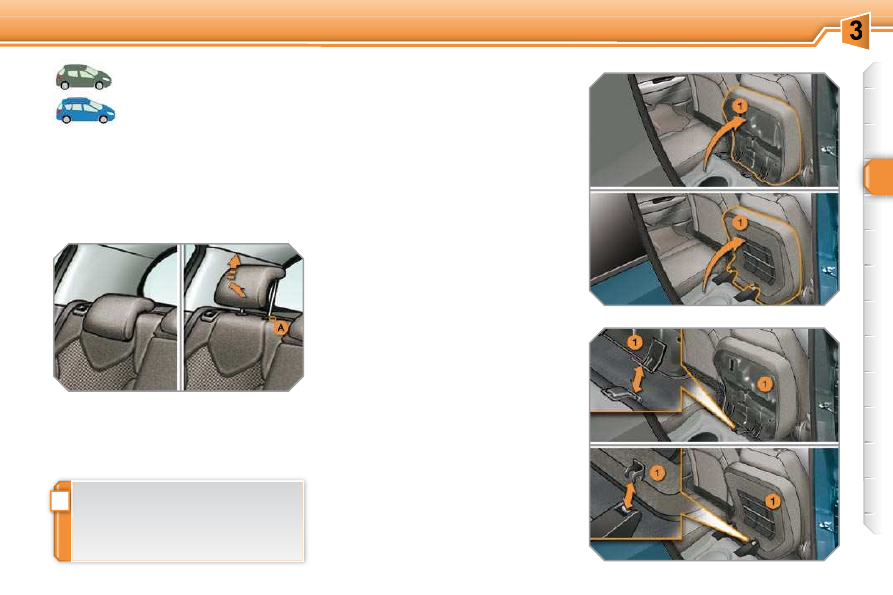
  Rear head restraints 

 These  have  a  high  position  (comfort 
and safety) and a low position (rear visi-
bility). 

 They can also be removed. 
 To remove a head restraint: 
      pull the head restraint fully forwards 

and upwards at the same time, 

     then, press the lug  A .  

  Removing the seat cushion 

      Move  the  corresponding  front  seat 

forwards if necessary. 

     Raise  the  seat  cushion   1   lifting  it 

with a hand from the rear. 

     Tilt  the  seat  cushion   1   fully  against 

the front seat. 

     Remove the seat cushion  1  from its 

fi xings by pulling upwards.   

  Refitting the seat cushion 

      Position the seat cushion  1  vertically in 

its fi xings. 

     Fold down the seat cushion  1 . 
     Press on the seat cushion to secure it.   

 Bench  seat,  the  left-hand  (2/3)  or  right-
hand (1/3) section of which can be folded 
to adapt the boot load space. 

!

i

68

COMFORT

  Folding the seat 

 In order to fold a rear seat without any 
risk  of  damage,   

always start with the 

seat  cushion,      never  with  the  seat 

back:  
      move  the  corresponding  front  seat 

forwards if necessary, 

     raise the seat cushion  1  lifting it with 

a hand from the rear, 

     tilt  the  seat  cushion   1   fully  against 

the front seat, 

  Returning the seat back to its 

original position 

 When returning the rear seat back to its 
original position: 
      put  the  seat  back   3   in  the  upright 

position and secure it, 

     fold the seat cushion  1 , 
  

   refi t the head restraints or put them 

back in place.  

     check that the seat belt is positioned 

correctly  on  the  side  of  the  seat 
back, 

     lower or remove the head restraints 

if necessary, 

     pull the control  2  forwards to release 

the seat back  3 , 

     tilt the seat back  3 .  

 When returning the rear seat back 
to its original position, take care not 
to  trap  the  seat  belts  and  ensure 
that  their  buckles  are  positioned 
correctly.  

 The seat cushion  1  can be removed 
to increase the loading volume.  

i

i

i

69

COMFORT

REAR SEATS 

  Forwards-backwards adjustment 

  Seat back angle adjustment 

      Pull  one  of  the  straps   B ,  located 

at  the  front  of  the  seat,  then  adjust 
the  angle  to  one  of  the  7  positions 
offered. 

     Release  the  strap  to  lock  the  seat 

back in this position.  

  Table position 

      Raise  the  bar   A   and  slide  the  seat 

forwards or backwards.   

      Place  the  head  restraint  in  the  low 

position. 

     Pull  one  of  the  straps   B ,  located  at 

the front of the seat. 

     Fold  the  seat  back  fully  onto  the 

seat cushion; the seat automatically 
moves back fully. 

     Press on the seat back to lock it.  

  Folding 

 Once  the  seat  has  been  placed  in  the 
table  position,  carry  out  the  following 
operations: 
      move  back  the  seat  fully  using  the 

bar  A , 

     raise the lever  C , located at the rear 

right of the seat, to release the rear 
feet, 

     raise the seat fully so that it remains 

in the  fully folded  position.  

 You can also carry out these oper-
ations  from  the  3rd  row  using  one 
of the straps  B , located at the rear 
of the seat.  

 These  operations  allow  access  to 
the  3


rd   row,  exit  from  the  3 rd   row 

and  folding  of  the  seats  from  the 
boot.  

 In  the  2nd  row,  these  three  seats  are 
identical  and  can  be  adjusted  for  your 
comfort. They can be placed in the table 
position, folded or removed to obtain a 

variety of loading confi gurations. 

 During  the  forwards-backwards  and 
seat  back  angle  adjustment  opera-
tions, take care not to apply any force 
to the load space cover roller.  

!

70

COMFORT

  Removal 

  Installation 

 Once  the  seat  has  been  folded,  carry 
out the following operations: 
      pull  the  red  strap   D   to  release  the 

front feet of the seat, 

     lift  the  seat  and  carry  it  using  the 

carrying handle  E .  

 Never  use  the  adjustment  straps 
to  remove,  install  or  carry  a  seat; 
use the carrying handle  E  provided 
for this purpose (weight of the seat: 
approximately 18 kg). 
 Once the seat has been removed, 
in  order  to  protect  its  electronic 
systems,  it  must  be  stored  in  a 
clean,  dry  location  sheltered  from 
bad weather.  

 Locked   

 Released  

     Tilt the folded seat rearwards; the front 

and rear feet lock automatically. 

     Pull one of the straps  B  to release the 

seat back, then raise it.   

      Check  that  no  object  is  obstructing 

the  anchorages  on  the  fl oor,  so 

preventing  correct  locking  seat's 
feet. 

     Carry  the  seat  using  the  carrying 

handle  E . 

     Put the front feet of the seat in place 

in the corresponding anchorages. 

     Raise  the  lever   C   to  check  that  the 

rear feet are released.  

!

71

COMFORT

ADDITIONAL SEATS 

  Table position 

      Place  the  head  restraint  in  the  low 

position. 

     Pull the strap  A , located at the rear 

left of the seat. 

     Fold  the  seat  back  onto  the  seat 

cushion.   

  Folding 

 Once  the  seat  has  been  placed  in  the 
table  position,  carry  out  the  following 
operations: 
      remove the load space cover roller, 
     raise the bar  B , located at the rear of 

the seat, to release the rear feet, 

     raise  the  seat  and  secure  it  to  the 

head  restraint  rod  of  the  2nd  row 
seat,  using  the  integrated  retaining 
strap  C .   

  Removal 

 Once  the  seat  has  been  folded,  carry 
out the following operations: 
      pull  the  red  strap   D   to  release  the 

front feet of the seat, 

     lift  the  seat  and  carry  it  using  the 

carrying handle  E , 

     put  the  anchorage  covers  back  in 

place to obtain a fl at boot fl oor.  

 Never  use  the  adjustment  and  re-
taining  straps  to  remove,  install 
or  carry  a  seat;  use  the  carrying 
handle  E  provided for this purpose 
(weight  of  the  seat:  approximately 
15 kg).  

 In the 3rd row, these two seats are iden-
tical  and  are  used  for  the  occasional 
carrying of additional passengers. They 
can  be  placed  in  the  table  position, 
folded or removed to obtain a variety of 

loading confi gurations. 

72

COMFORT

  Installation 

      First  remove  the  anchorage  covers 

on the fl oor. 

     Carry  the  seat  using  the  carrying 

handle  E . 

     Put  the  seat's  front  feet  in  place  in 

the corresponding anchorages. 

     Raise  the  bar   B   to  check  that  the 

rear feet are released. 

     Tilt  the  folded  seat  rearwards;  the 

front  and  rear  feet  lock  automati-
cally. 

     Raise the seat back.   

i

!

73

COMFORT

SEAT MODULARITY 
AND VARIOUS 
CONFIGURATIONS 

  Examples of configurations 

  7 seats  

 Operations  to  change  the  existing 

confi guration must only be carried 

out when stationary (see the "Rear 

seats"  and  "Additional  seats"  sec-

tions  of  the  SW  with  panoramic 
sunroof).  

  Special features 

 The outer seats of the 2nd row can be 
moved  inwards,  once  the  central  seat 
has been removed. 
 The  2nd  row  seats  can  be  installed  in 
the 3rd row. 
 Conversely,  the  3rd  row  seats  cannot 
be installed in the 2nd row. 

  5 seats with additional seats folded  

 Do not seat passengers in the 3rd 
row if the 2nd row seats are in the 
 fully folded  position. 

 Designed  to  be  modular,  your  vehicle 
offers  numerous  seat  installation  and 

loading confi gurations. 

74

COMFORT

  5 seats  

  5 seats with 2nd row seats moved inwards  

  Transporting long objects  

  Loading a large volume   

!

i

i

75

COMFORT

 The objects observed are, in reality, 
closer than they appear. 
 Take  this  into  account  in  order  to 
correctly  judge  the  distance  of  ve-
hicles approaching from behind.   

MIRRORS 

  Door mirrors 

 Each  fi tted  with  an  adjustable  mirror 

glass  permitting  the  lateral  rearward  vi-
sion necessary for overtaking or parking. 
They  can  also  be  folded  for  parking  in 

confi ned spaces. 

   Folding 
      From outside: lock the vehicle using 

the remote control or the key. 

     From inside: with the ignition on, pull 

control  A  rearwards.  

 The folding and unfolding of the door 
mirrors  using  the  remote  control 
can be deactivated by a PEUGEOT 
dealer. 
 Never fold or unfold the electric fold-
ing mirrors manually.   

  Adjustment 

  Unfolding 
      From  outside:  unlock  the  vehicle 

using the remote control or the key. 

     From inside: with the ignition on, pull 

control   rearwards.  

 If the mirrors are folded using con-
trol  A , they will not unfold when the 
vehicle  is  unlocked.  Pull  again  on 
control  A .  

      Move  control   A   to  the  right  or  to 

the  left  to  select  the  corresponding 
mirror. 

     Move control  B  in all four directions 

to adjust. 

     Return  control   A   to  the  central 

position.  

  Demisting - Defrosting 

 If  your  vehicle  is  fi tted  with 

heated  mirrors,  the  demisting-
defrosting  operates  with  the 
engine  running,  by  switching 

on the heated rear screen (refer to the 

"Rear screen demist-defrost" page).  

!

76

COMFORT

  Adjustment 
      Adjust  the  mirror  so  that  the  glass 

is  directed  correctly  in  the  "day" 

position.   

 As a safety precaution, the mirrors 
must  be  adjusted  to  reduce  the 

"blind spot".   

   Manual day/night model  

  Day/night position 
   

   Pull the lever to change to the "night" 

anti-dazzle position. 

     Push  the  lever  to  change  to  the 

normal "day" position.  


Automatic tilting in reverse gear 
 System  which  provides  a  view  of  the 
ground  during  parking  manoeuvres  in 
reverse gear.  

  Switching on 
      With  the  engine  running,  engage 

reverse gear. 

     Move  control   A   to  the  right  or  to 

the  left  to  select  the  corresponding 
mirror.  

 The  glass  of  the  mirror  selected  tilts 
downwards, in accordance with its pro-
gramming.  

  Programming 
      With  the  engine  running,  engage 

reverse gear. 

     Select  and  adjust  the  left-hand  and 

right-hand mirrors in succession.  

 The adjustment is stored immediately.  

  Switching off 
      Exit  reverse  gear  and  wait  ten 

seconds.  

 or 
      Return  control   A   to  the  central 

position.  

 The mirror glass returns to its initial po-
sition. 
 The mirror glass also returns to its initial 
position: 
   -  

if the speed exceeds 6 mph (10 km/h), 

  -  

if the engine is switched off.    


Rear view mirror 

 Adjustable  mirror  providing  a  central 
rearward view. 
 Equipped  with  an  anti-dazzle  system, 
useful in poor light.  

!

i

77

COMFORT

STEERING WHEEL ADJUSTMENT 

        

When  stationary ,  pull  the  control 

lever to release the steering wheel. 

     Adjust  the  height  and  reach  to  suit 

your driving position. 

     Push  the  control  lever  to  lock  the 

steering wheel.  

 As a safety precaution, these ope-
rations  should  only  be  carried  out 
while the vehicle is stationary.  


Automatic day/night model  

 It has an anti-dazzle system which dark-
ens  the  mirror  glass:  this  reduces  any 
driver  discomfort  caused  by  the  light 
beam of following vehicles, the sun... 

  In order to guarantee optimum visi-
bility during your manoeuvres, the 
mirror lightens automatically when 
reverse gear is engaged.   

 By means of a sensor, which measures 
the light from the rear of the vehicle, this 
system automatically and progressively 
changes  between  the  day  and  night 
uses. 

i

i

78

ACCESS

REMOTE CONTROL KEY 

 System  which  permits  central  unlock-
ing  or  locking  of  the  vehicle  using  the 
lock or from a distance. It is also used to 
locate  and  start  the  vehicle,  as  well  as 
providing protection against theft. 

  Unfolding the key 
      First  press  this  button  to  unfold  the 

key.   

  Unlocking the vehicle 

      Press  the  open  padlock  to 

unlock the vehicle.   

  Complete unlocking using the key 
      Turn the key to the left in the driver's 

door lock to unlock the vehicle.  

 Unlocking is confi rmed by rapid fl ashing 

of  the  direction  indicators  for  approxi-
mately two seconds. 
 According  to  version,  the  door  mirrors 
unfold at the same time.   

  Complete unlocking using the 
remote control 

           Unlocking and partial 
opening of the rear 
screen 

 If one of the doors, the rear screen 
or the boot is still open, the central 
locking does not take place. 
 When  the  vehicle  is  locked,  if  it  is 
unlocked inadvertently, it will relock 
automatically  after  thirty  seconds 
unless a door is opened. 

  Normal locking using the key 
      Turn  the  key  to  the  right  in  the 

driver's door lock to lock the vehicle 
completely.  

 Locking is confi rmed by fi xed lighting of 

the direction indicators for approximately 
two seconds. 
 According  to  version,  the  door  mirrors 
fold at the same time. 

                   Locking the vehicle 

      Press the closed padlock to 

lock the vehicle completely. 

     Press  the  closed  padlock  for  more 

than  two  seconds  to  close  the 
windows automatically in addition to 
locking.   

  Normal locking using the remote 
control 

       Press this button for more 

than two seconds to unlock 
the rear screen. This action 

unlocks the vehicle fi rst.  

 The  boot  and  the  rear  screen 
cannot  both  be  open  at  the  same 
time.   

!

i

79

ACCESS

 Deadlocking  renders  the  exterior 
and  interior  door  controls  inopera-
tive. 
 It also deactivates the manual cen-
tral control button. 
 Therefore,  never  leave  anyone  in-
side  the  vehicle  when  it  is  dead-
locked.  

        Deadlocking using the remote 
control  

  Deadlocking using the key  

 The  folding  and  unfolding  of  the 
door  mirrors  using  the  remote 
control  can  be  deactivated  by  a 
PEUGEOT dealer.   

       Press  the  closed  padlock 

to  lock  the  vehicle  com-
pletely or press the closed 
padlock for more than two 
seconds  to  close  the  win-
dows  automatically  in  ad-
dition to locking (according 
to version). 

     Press  the  closed  padlock  again 

within fi ve seconds to deadlock the 

vehicle.    

 Deadlocking is confi rmed by fi xed light-

ing  of  the  direction  indicators  for  ap-
proximately two seconds. 
 According  to  version,  the  door  mirrors 
fold at the same time. 

      Turn  the  key  to  the  right  in  the 

driver's door lock to lock the vehicle 
completely  and  hold  it  in  this 
position for more than two seconds 
to  close  the  windows  automatically 
in  addition  to  locking  (according  to 
version). 

     Turn  the  key  to  the  right  again 

within fi ve seconds to deadlock the 

vehicle.  

   Folding the key 
      First press button  A  to fold the key.    

       Locating your vehicle 

 This function allows you to identify your 
vehicle  from  a  distance,  particularly  in 
poor light. Your vehicle must be locked. 
      Press  the  closed  padlock  on  the 

remote control.  

 This  will  switch  on  the  courtesy  lamps 

and the direction indicators will fl ash for 

a few seconds.  

  Electronic engine immobiliser 
 The  key  contains  an  electronic  chip 
which  has  a  special  code.  When  the 
ignition  is  switched  on,  this  code  must 
be recognised in order for starting to be 
possible. 
 This electronic engine immobiliser locks 
the  engine  management  system  a  few 
minutes after the ignition is switched off 
and  prevents  starting  of  the  engine  by 
anyone who does not have the key. 

             Anti-theft protection 

 In  the  event  of  a  malfunction, 
you  are  informed  by  lighting  of 
this  warning  lamp,  an  audible 
signal  and  a  message  on  the 
multifunction screen. 

 In this case, your vehicle does not start; 
contact a PEUGEOT dealer as soon as 
possible.   

i

!

80

ACCESS

          Starting the vehicle 

      Insert the key in the ignition switch.  
 

The  system  recognises  the  starting 
code. 

     Turn  the  key  fully  towards  the 

dashboard to position  3 (Starting) . 

     When the engine starts, release the 

key.   

  Switching the vehicle off 

      Immobilise the vehicle. 
     Turn  the  key  fully  towards  you  to 

position  1 (Stop) . 

     Remove  the  key  from  the  ignition 

switch.   

                Remote control problem 

 Following  disconnection  of  the  vehicle 
battery, replacement of the remote con-
trol  battery  or  in  the  event  of  a  remote 
control  malfunction,  you  can  no  longer 
unlock, lock or locate your vehicle. 
      First of all, use the key in the lock to 

unlock or lock your vehicle. 

     Then, reinitialise the remote control.  
 If  the  problem  persists,  contact  a 
PEUGEOT dealer as soon as possible. 

  Changing the battery 

 Battery ref.: CR1620/3 volts. 

  Reinitialisation 
      Switch off the ignition. 
     Turn the key to position  2 (Ignition) . 
     Press  the  closed  padlock  immedi-

ately for a few seconds. 

     Switch  off  the  ignition  and  remove 

the key from the ignition switch.  

 The  remote  control  is  fully  operational 
again.  

 If the battery is fl at, you are in-

formed by lighting of this warn-
ing lamp, an audible signal and 
a message on the multifunction 
screen. 

 This  replacement  battery  is  available 
from PEUGEOT dealers. 

        Key left in the "Ignition" 
position  

 If the key has been left in the ignition 
switch, the ignition will be switched 
off automatically after one hour. 
 To switch the ignition back on, turn 
the  key  to  position   1  (Stop) ,  then 
back to position  2 (Ignition) .  

      Unclip the casing using a coin at the 

notch. 

  

   Slide  the  fl at  battery  out  of  its 

location. 

     Slide the new battery into its location 

observing the original direction. 

     Clip the casing. 
     Reinitialise the remote control.    

  A heavy object (key fob...), attached 
to  the  key  and  weighing  down  on 
its shaft in the ignition switch, could 
cause a malfunction.  


Content   ..  2  3  4  5   ..