Toyota Auris (2018 year). Manual in english - page 9

538
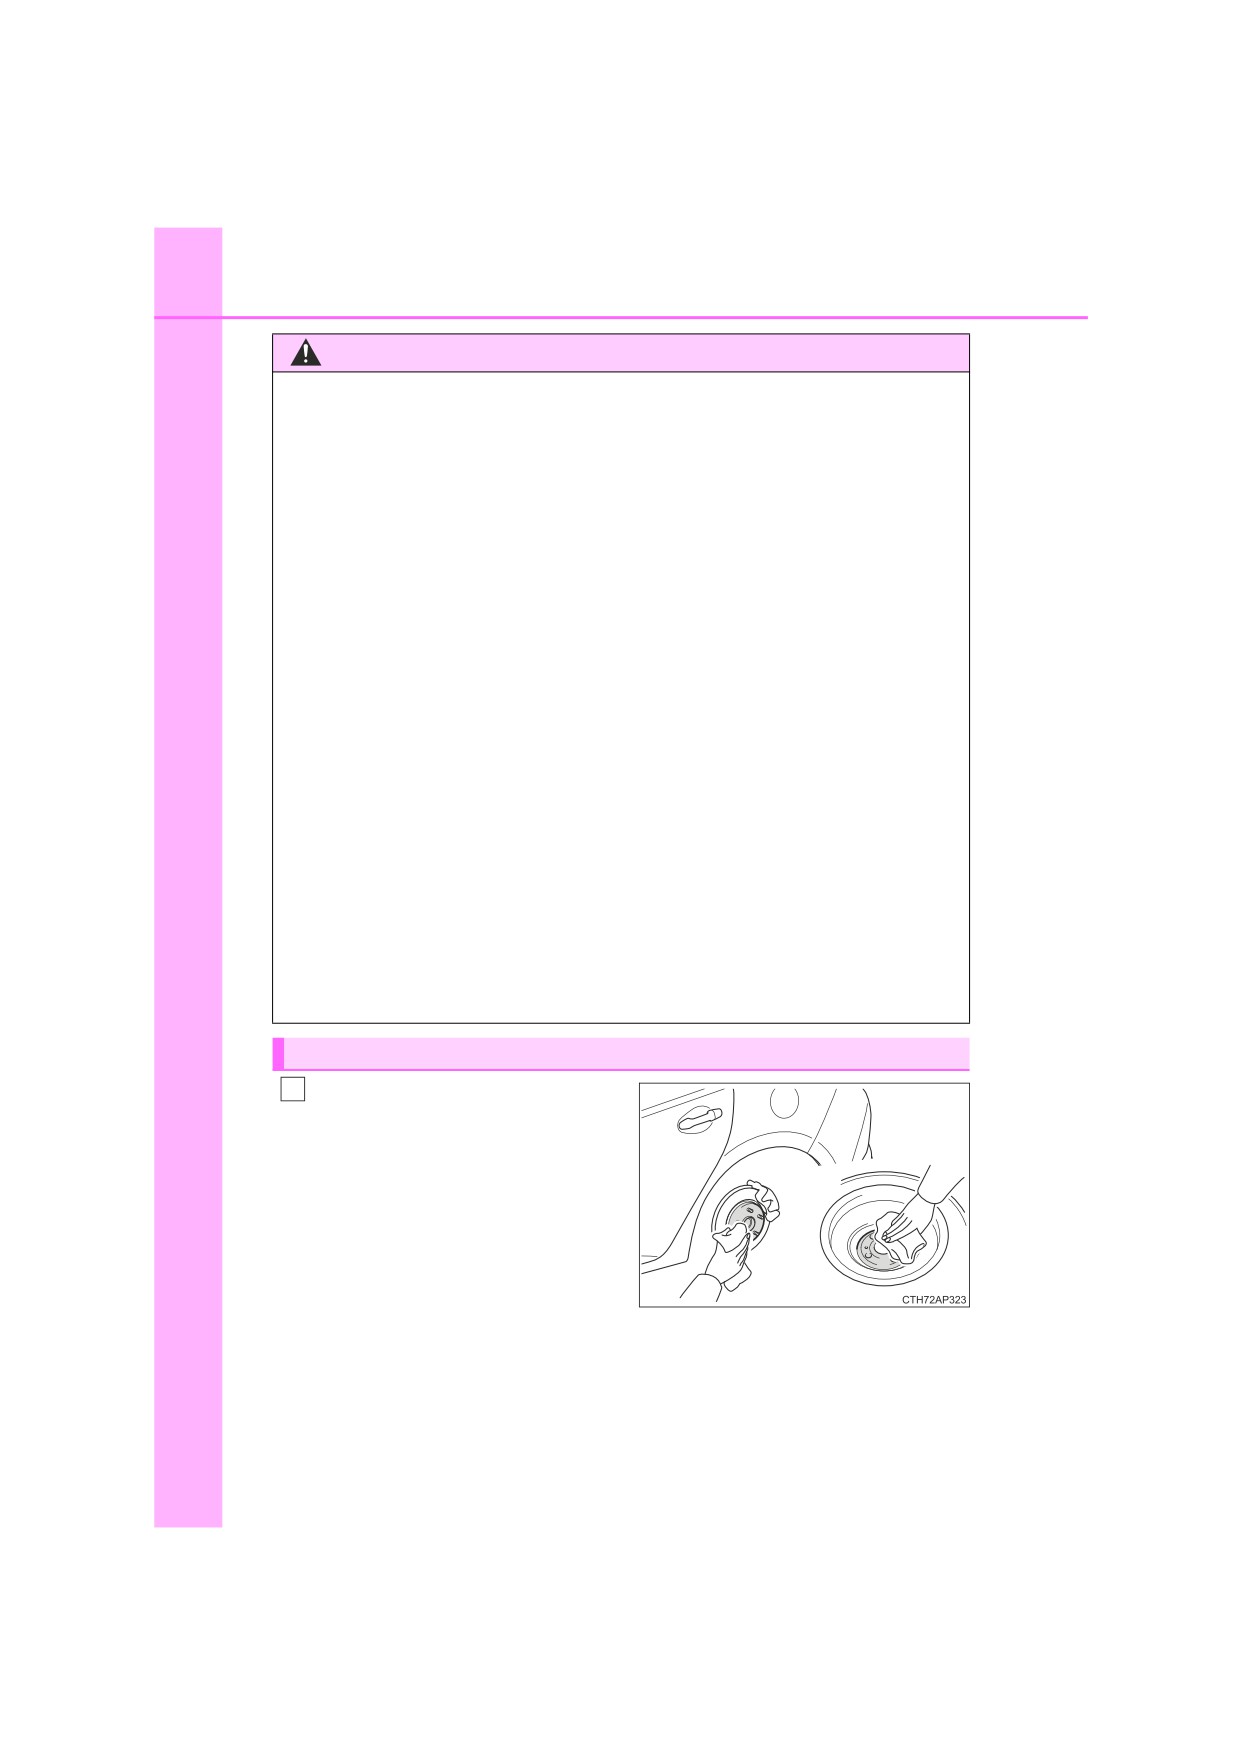
7-3. Do-it-yourself maintenance
Under the driver’s side instrument panel (left-hand drive vehicles)
Type A:
Remove the lid.
Type B:
Open the auxiliary box. Push in
1
each side of the auxiliary box to
disconnect the upper claws.
Pull out the auxiliary box and
2
disconnect the lower claws.

7-3. Do-it-yourself maintenance
539
Under the passenger’s side instrument panel (right-hand drive vehi-
cles)
Type A:
Remove the cover* and the lid.
Type B:
1
Open the glove box. Slide off
the damper.
2
Push in each side of the glove
box disconnect the upper
7
claws. Then pull out the glove
box and disconnect the lower
claws.
*: If equipped

540
7-3. Do-it-yourself maintenance
3
Remove the fuse with the pull-
out tool.
Only type A fuses can be removed
using the pullout tool.
7-3. Do-it-yourself maintenance
541
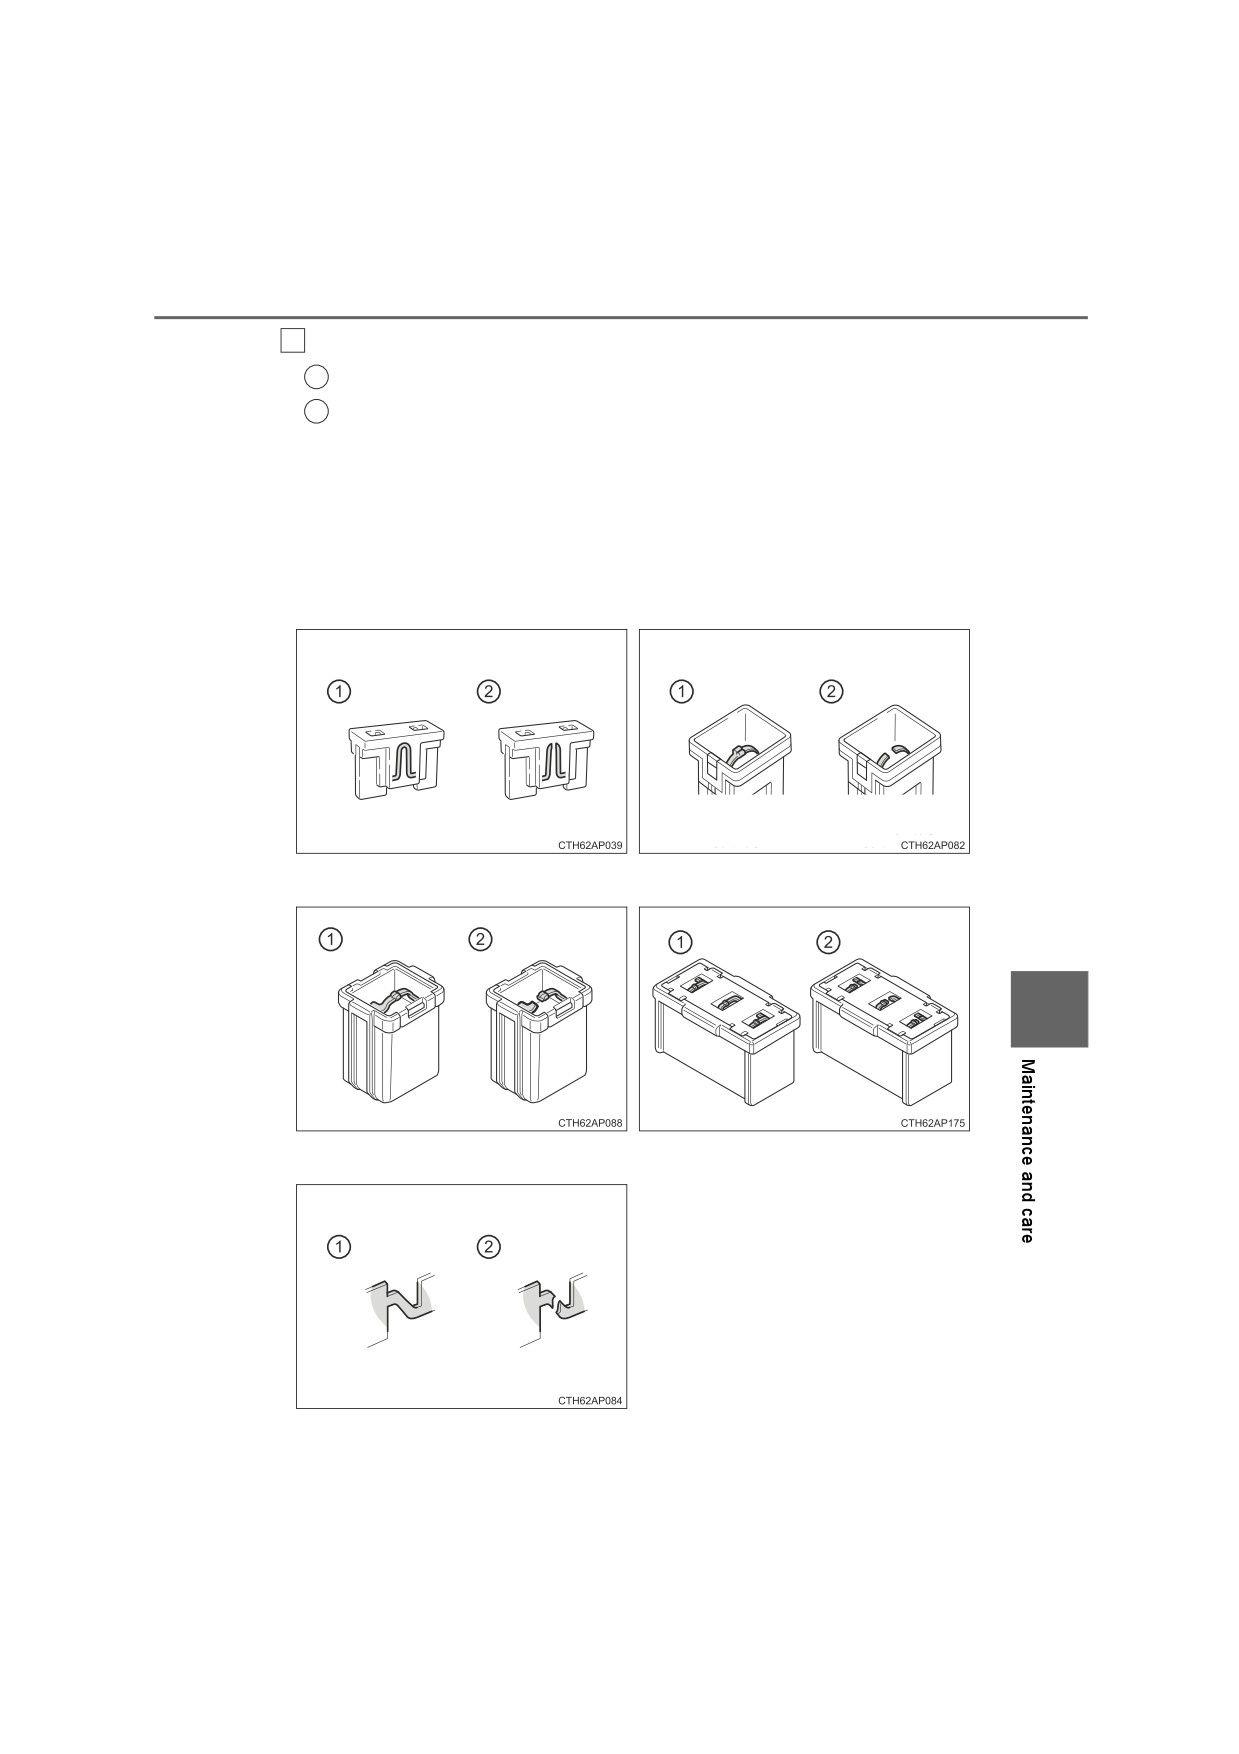
4
Check if the fuse is blown.
1
Normal fuse
2
Blown fuse
Type A, B, C and D:
Replace the blown fuse with a new fuse of an appropriate amperage rat-
ing. The amperage rating can be found on the fuse box lid.
Type E:
Contact any authorized Toyota dealer or repairer, or another duly qualified
and equipped professional.
Type A
Type B
Type C
Type D
7
Type E
542
7-3. Do-it-yourself maintenance
■ After a fuse is replaced
●If the lights do not turn on even after the fuse has been replaced, a bulb may
need replacement. (P. 543)
●If the replaced fuse blows again, have the vehicle inspected by any autho-
rized Toyota dealer or repairer, or another duly qualified and equipped pro-
fessional.
■ If there is an overload in a circuit
The fuses are designed to blow, protecting the wiring harness from damage.
■When replacing light bulbs
Toyota recommends that you use genuine Toyota products designed for this
vehicle. Because certain bulbs are connected to circuits designed to prevent
overload, non-genuine parts or parts not designed for this vehicle may be
unusable.
WARNING
■ To prevent system breakdowns and vehicle fire
Observe the following precautions.
Failure to do so may cause damage to the vehicle, and possibly a fire or
injury.
●Never use a fuse of a higher amperage rating than that indicated, or use
any other object in place of a fuse.
●Always use a genuine Toyota fuse or equivalent.
Never replace a fuse with a wire, even as a temporary fix.
●Do not modify the fuses or fuse boxes.
NOTICE
■ Before replacing fuses
Have the cause of electrical overload determined and repaired by any
authorized Toyota dealer or repairer, or another duly qualified and equipped
professional as soon as possible.

7-3. Do-it-yourself maintenance
543
Light bulbs
You may replace the following bulbs by yourself. The difficulty
level of replacement varies depending on the bulb. As there is a
danger that components may be damaged, we recommend that
replacement is carried out by any authorized Toyota dealer or
repairer, or another duly qualified and equipped professional.
Preparing for light bulb replacement
Check the wattage of the light bulb to be replaced. (P. 659)
Bulb locations
■ Front
Vehicles with halogen headlights
7
1
Headlights
2
Side turn signal lights
3
Front turn signal lights
4
Front fog lights (if equipped)

544
7-3. Do-it-yourself maintenance
Vehicles with LED headlights
1
Side turn signal lights
2
Front turn signal lights
3
Front fog lights (if equipped)
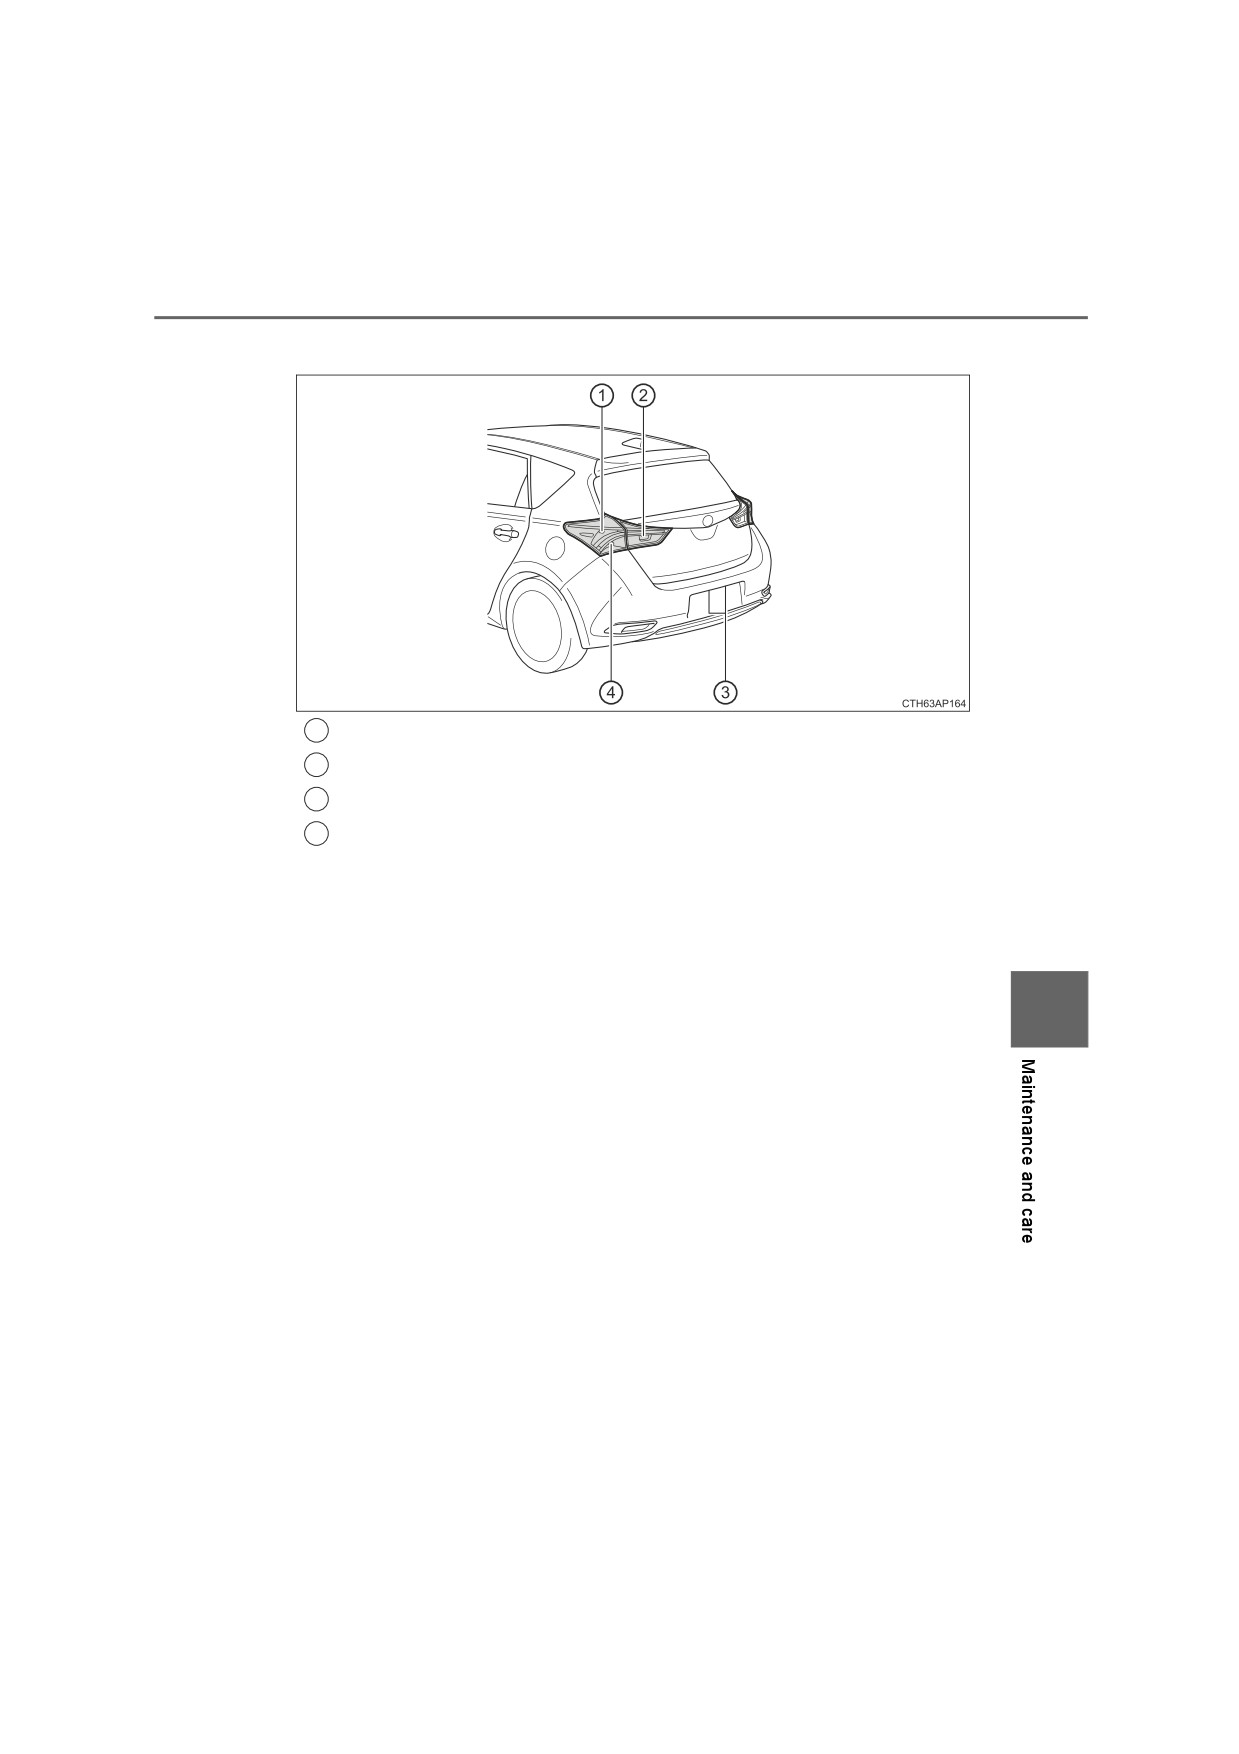
■ Rear (left-hand drive vehicles)
1
Back-up light
2
Stop lights
3
Rear turn signal lights
4
License plate lights
7-3. Do-it-yourself maintenance
545
■ Rear (right-hand drive vehicles)
1
Stop lights
2
Back-up light
3
License plate lights
4
Rear turn signal lights
7
546
7-3. Do-it-yourself maintenance
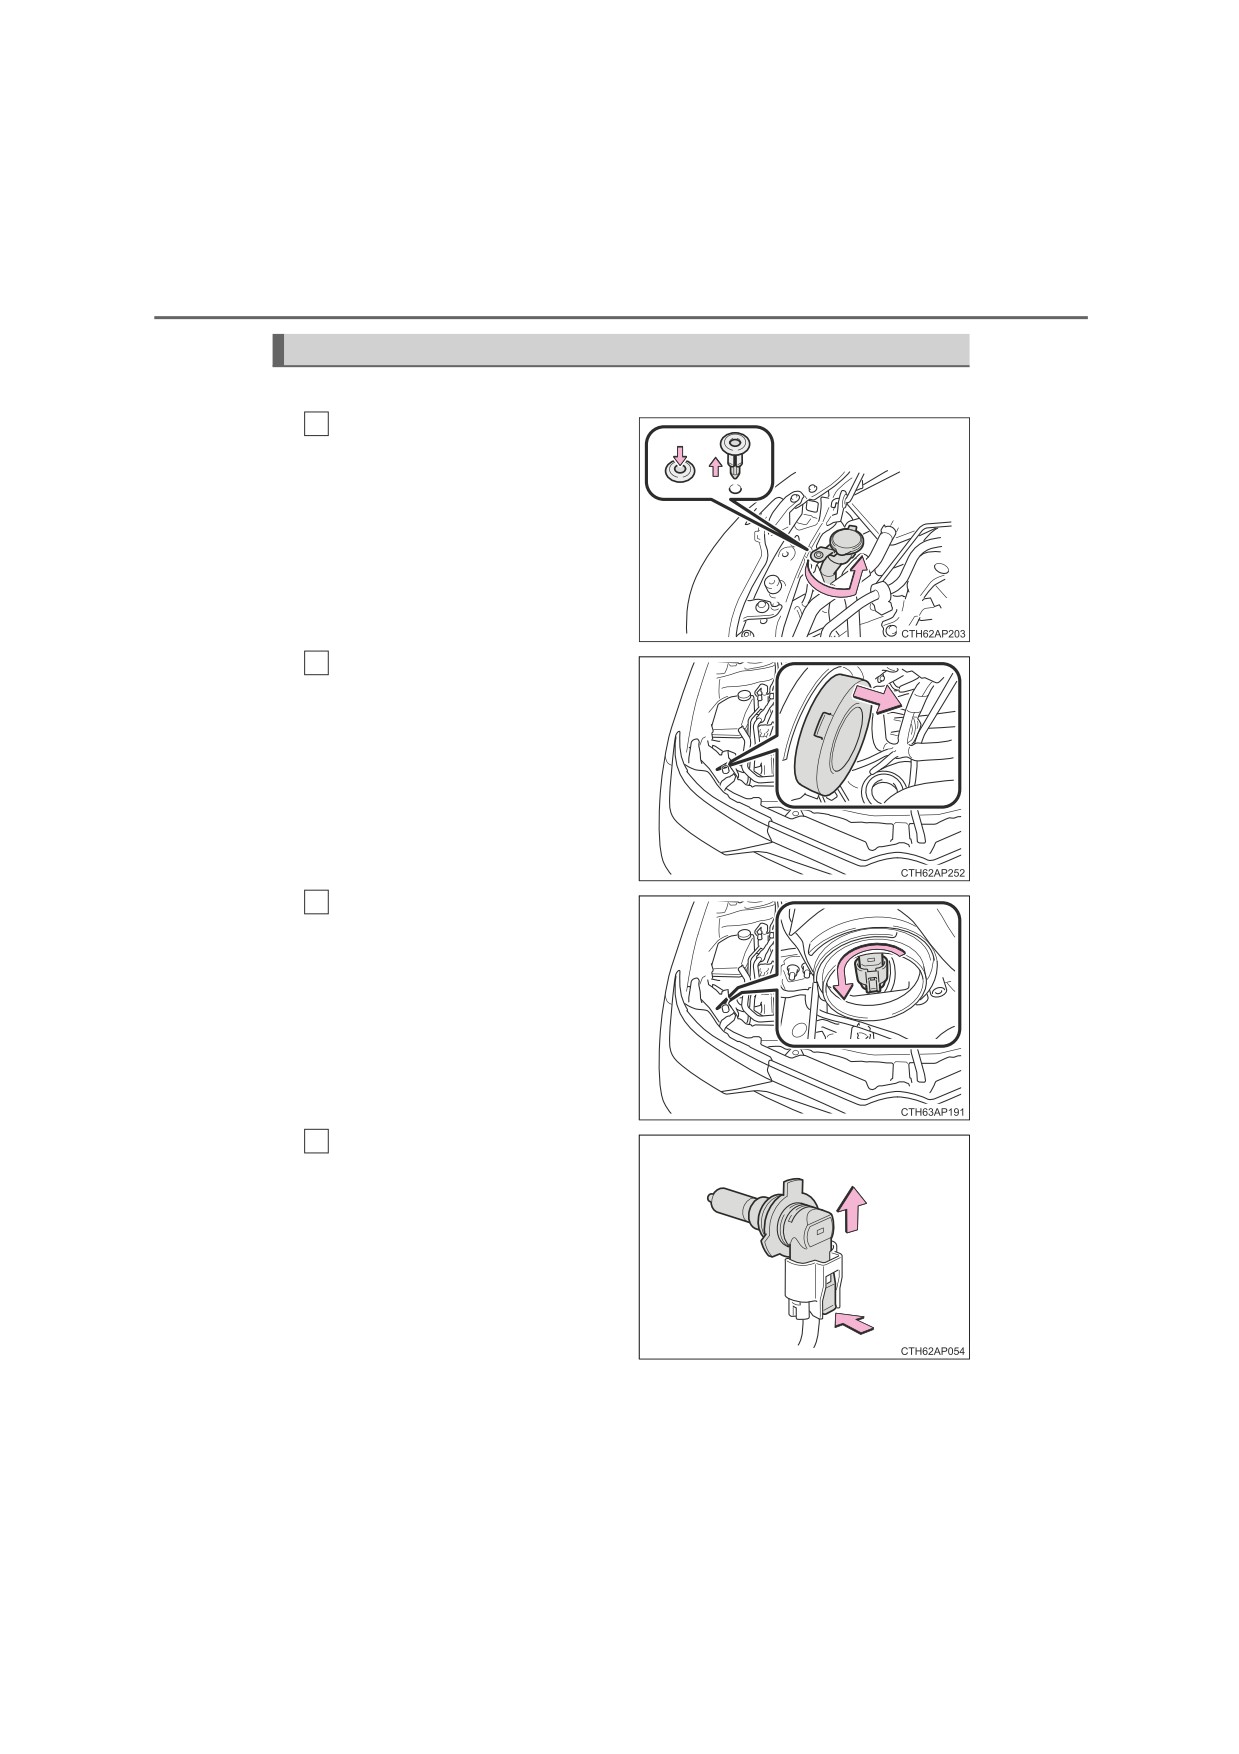
Replacing light bulbs
■ Headlights (vehicles with halogen headlights)
Remove the securing clip.
1
Pull out the washer fluid filler
opening after turning it.
(When replacing right side
bulb only.)
Remove the cover.
2
3
Turn
the
bulb
base
counterclockwise
and
remove it.
Unplug the connector while
4
pressing the lock release.
7-3. Do-it-yourself maintenance
547
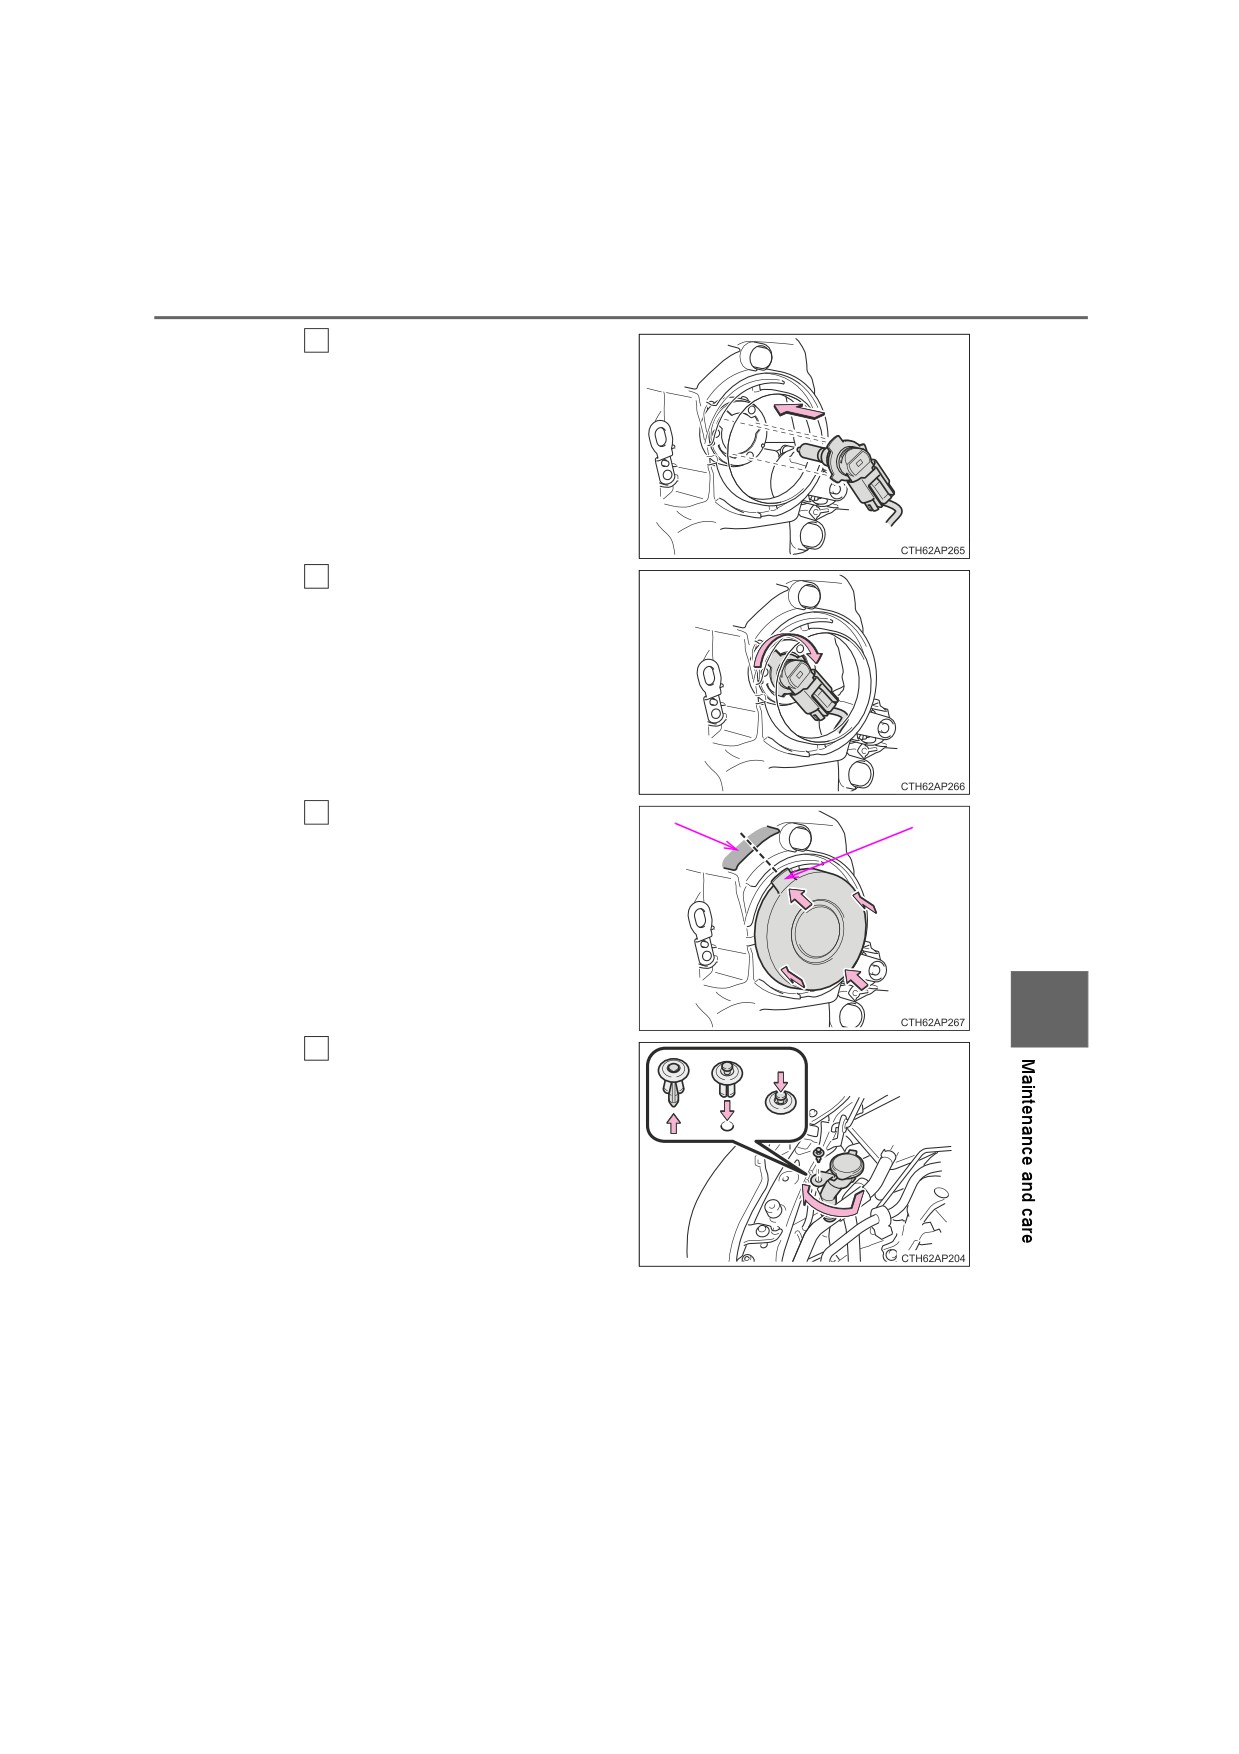
5
Replace the light bulb, and
install the bulb base.
Align the 3 tabs on the light bulb
with the mounting and insert.
6
Turn and secure the bulb
base.
Shake the bulb base gently to
check that it is not loose, turn
the headlights on once and visu-
ally confirm that no light is leak-
ing through the mounting.
7
Install the cover.
B
A
To make sure the cover is
installed securely, align the pro-
truding part (A) with the center
of the area
(B) shown in the
illustration and push the perime-
ter of the cover firmly.
7
Install the washer fluid filler
8
opening by inserting and
turning it. Install the securing
clip.
(When replacing right
side bulb only.)

548
7-3. Do-it-yourself maintenance
■ Front fog lights (if equipped)
Turn the steering wheel in
1
the opposite direction of the
light to be replaced.
Turn the steering wheel to a
point that allows your hand to
easily fit between the tire and
fender liner.
Remove the 2 screws and
2
partly remove the fender
liner.
Partly remove the fender
3
liner until the bulb is visible.
Unplug the connector while
4
pressing the lock release.

7-3. Do-it-yourself maintenance
549
5
Turn
the
bulb
base
counterclockwise
and
remove it.
Install a new light bulb.
6
Align the 3 tabs on the light bulb
with the mounting and insert.
Turn clockwise and secure the
bulb base.
7
Install the connector.
7
Shake the connector gently to
check that it is not loose, turn
the front fog lights on once and
visually confirm that no light is
leaking through the mounting.
8
When installing the fender liner, install by conducting
3
and
2
with the directions reversed.
Make sure that the fender liner is attached to the inside of the bumper.

550
7-3. Do-it-yourself maintenance
■ Front turn signal lights
Remove the securing clip.
1
Pull out the washer fluid filler
opening after turning it.
(When replacing right side
bulb only.)
2
Turn
the
bulb
base
counterclockwise.
Remove the light bulb.
3
4
When installing the light bulb, install by conducting
3
and
2
with the directions reversed.
Install the washer fluid filler
5
opening by inserting and
turning it. Install the securing
clip.
(When replacing right
side bulb only.)

7-3. Do-it-yourself maintenance
551
■ Stop lights and rear turn signal lights
1
Open the back door and
remove the
2 screws.
Remove the lamp assembly
by pulling it straight back.
2
Turn
the
bulb
base
counterclockwise.
1
Stop lights
2
Rear turn signal lights
3
Remove the light bulb.
1
Stop lights
2
Rear turn signal lights
7
4
When installing the light bulb, install by conducting
3
and
2
with the directions reversed.
5
Install the lamp assembly
and then install the 2 screws.
Align the guide
(
1
) and pin
(
2
) on the lamp assembly with
the mounting when installing it.

552
7-3. Do-it-yourself maintenance
■ Back-up light
1
Open the back door and
remove the cover.
Insert a flathead screwdriver or
similar into the hole at the top of
the cover and remove it as
shown in the illustration.
To prevent damaging the vehi-
cle, wrap the flathead screw-
driver with a tape.
2
Turn
the
bulb
base
counterclockwise
and
remove it.
3
Remove the light bulb.
4
When installing, reverse the steps listed.

7-3. Do-it-yourself maintenance
553
■ License plate lights
Remove the light unit
1
Insert a flathead screwdriver or
similar into the hole next to the
light and remove it as shown in
the illustration.
To prevent damaging the vehi-
cle, wrap the flathead screw-
driver with a tape.
2
Turn
the
bulb
base
counterclockwise
and
remove it.
7
Remove the light bulb
3
4
When installing, reverse the steps listed.

554
7-3. Do-it-yourself maintenance
■ Side turn signal lights
Remove the cover
1
Insert the flathead screwdriver
and slide along the side turn sig-
nal light.
To prevent damaging the vehi-
cle, wrap the flathead screw-
driver with a tape.
2
Press on the
2 clips and
remove the side turn signal
light from the visor housing.
Remove the socket from the
3
side turn signal light housing.
Remove the bulb.
4

7-3. Do-it-yourself maintenance
555
5
Replace the bulb and install
the socket to the side turn
signal light housing.
Align the grooves of the socket
to the side turn signal light hous-
ing.
With the wire harness pass-
6
ing through the lower part of
the side turn signal light,
install it to the visor housing.
7
Align the 6 tabs and install
the cover.
After hearing a click sound, con-
firm that the cover is secure.
7
■ Replacing the following bulbs
If any of the lights listed below has burnt out, have it replaced by
any authorized Toyota dealer or repairer, or another duly qualified
and equipped professional.
● Headlights (vehicles with LED headlights)
● Front position lights/daytime running lights
● High mounted stoplight
● Tail lights
● Rear fog light
556
7-3. Do-it-yourself maintenance
■ LED light bulbs
The headlights (vehicles with LED headlights), rear fog light, high mounted
stoplight, front position lights/daytime running lights and tail lights consist of a
number of LEDs. If any of the LEDs burn out, take your vehicle to any autho-
rized Toyota dealer or repairer, or another duly qualified and equipped profes-
sional to have the light replaced.
■ Condensation build-up on the inside of the lens
Temporary condensation build-up on the inside of the headlight lens does not
indicate a malfunction.
Contact any authorized Toyota dealer or repairer, or another duly qualified
and equipped professional for more information in the following situations:
● Large drops of water have built up on the inside of the lens.
● Water has built up inside the headlight.
■When replacing light bulbs
P. 542
WARNING
■ Replacing light bulbs
● Turn off the lights. Do not attempt to replace the bulb immediately after
turning off the lights.
The bulbs become very hot and may cause burns.
●Do not touch the glass portion of the light bulb with bare hands. When it is
unavoidable to hold the glass portion, use and hold with a clean dry cloth
to avoid getting moisture and oils on the bulb.
Also, if the bulb is scratched or dropped, it may blow out or crack.
●Fully install light bulbs and any parts used to secure them. Failure to do so
may result in heat damage, fire, or water entering the headlight unit. This
may damage the headlights or cause condensation to build up on the lens.
■ To prevent damage or fire
Make sure bulbs are fully seated and locked.
557
When trouble arises
8
8-1.
Essential information
8-2.
Steps to take in
Emergency flashers
558
an emergency
If your vehicle has to
If your vehicle needs to
be stopped in
be towed
561
an emergency
559
If you think something is
wrong
567
Fuel pump shut off
system
568
If a warning light turns on
or a warning buzzer
sounds
569
If a warning message is
displayed
581
If you have a flat tire
(vehicles with a spare
tire)
587
If you have a flat tire
(vehicles with an
emergency tire puncture
repair kit)
601
If the engine will not
start
617
If the electronic key does
not operate properly
619
If the vehicle battery is
discharged
622
If your vehicle
overheats
629
If you run out of fuel and
the engine stalls
634
If the vehicle becomes
stuck
635

558
8-1. Essential information
Emergency flashers
The emergency flashers are used to warn other drivers when the
vehicle has to be stopped in the road due to a breakdown, etc.
Press the switch.
All the turn signal lights will flash.
To turn them off, press the switch
once again.
■ Emergency flashers
If the emergency flashers are used for a long time while the engine is not
operating, the battery may discharge.
8-1. Essential information
559
If your vehicle has to be stopped in an
emergency
Only in an emergency, such as if it becomes impossible to stop
the vehicle in the normal way, stop the vehicle using the follow-
ing procedure:
Steadily step on the brake pedal with both feet and firmly depress it.
1
Do not pump the brake pedal repeatedly as this will increase the effort
required to slow the vehicle.
Shift the shift lever to N.
2
If the shift lever is shifted to N
3
After slowing down, stop the vehicle in a safe place by the road.
4
Stop the engine.
If the shift lever cannot be shifted to N
3
Keep depressing the brake pedal with both feet to reduce vehicle
speed as much as possible.
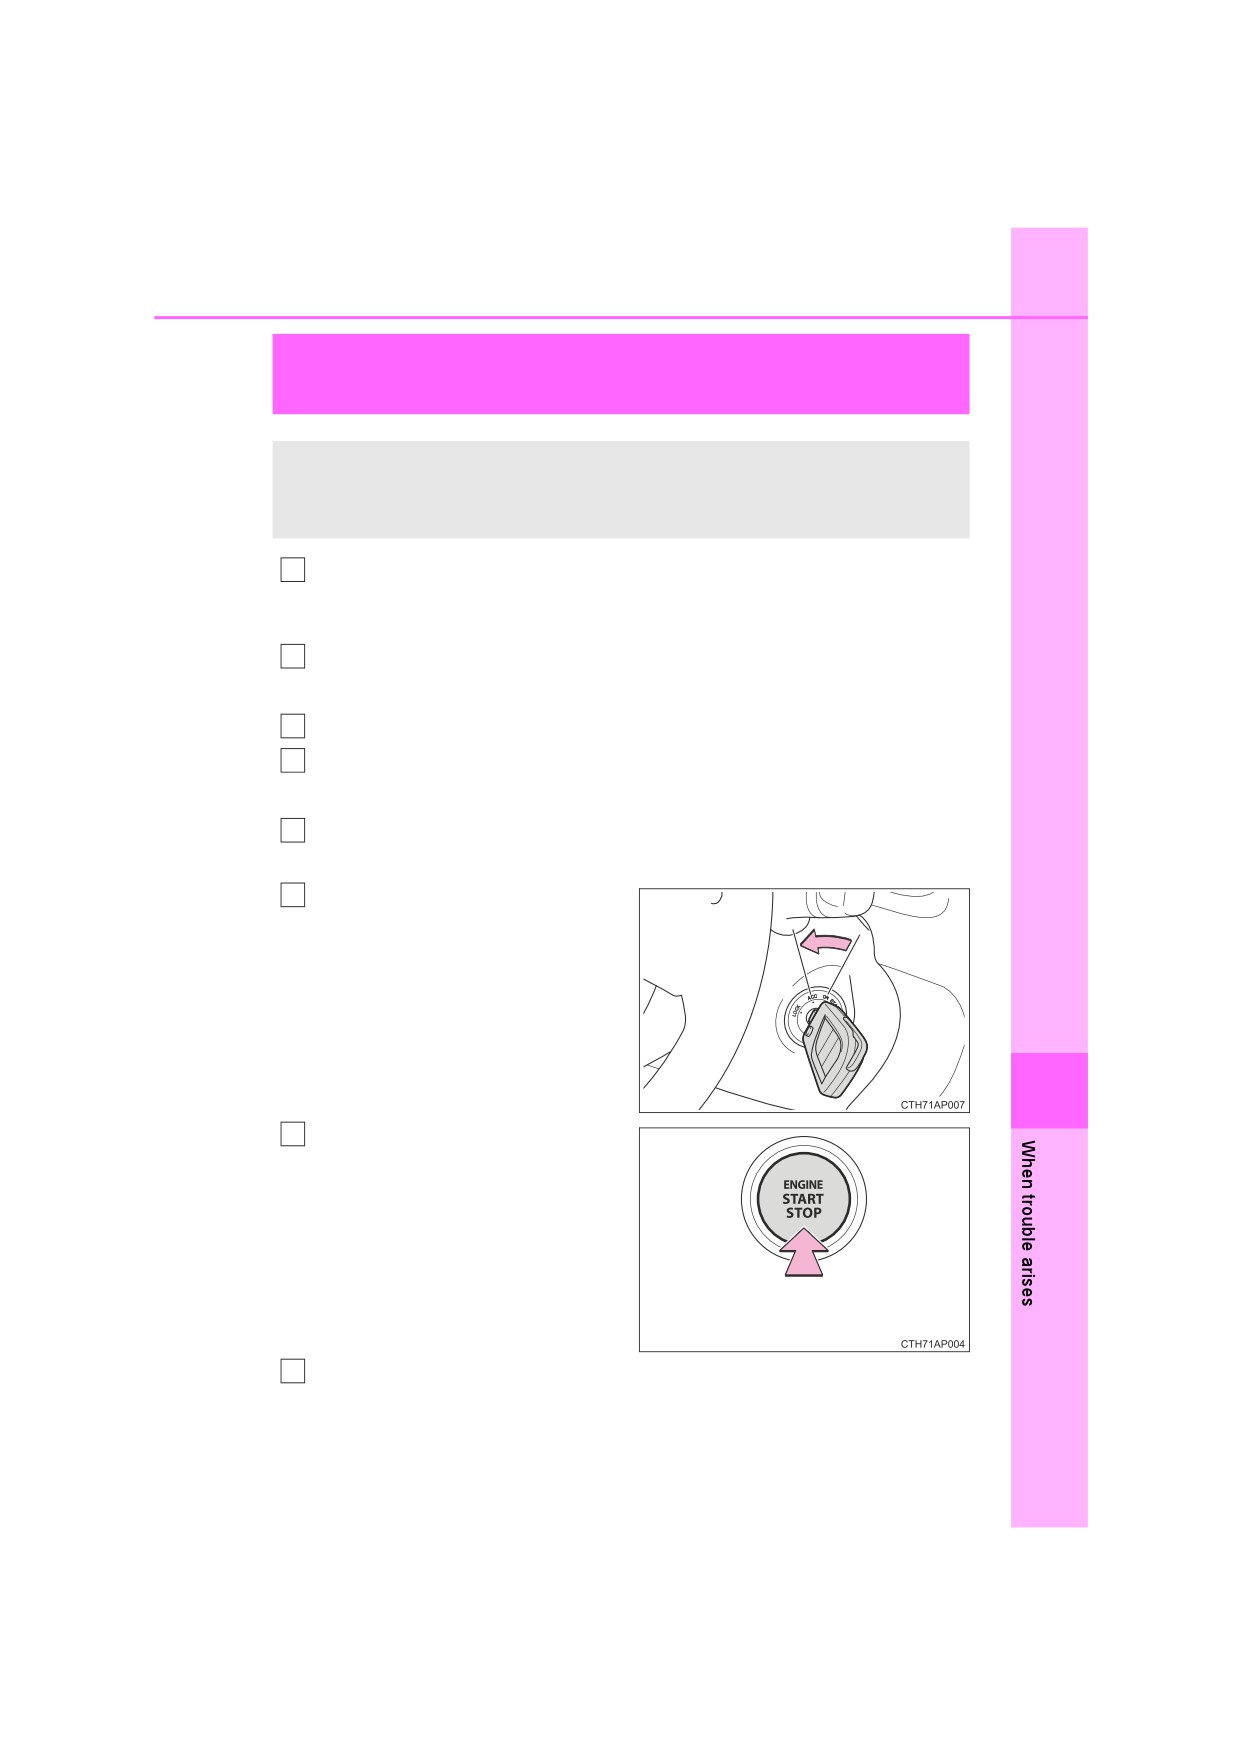
Vehicles without a smart entry
4
& start system: Stop the engine
by turning the engine switch to
the “ACC” position.
8
Vehicles with a smart entry &
4
start system: To stop the
engine, press and hold the
engine switch for 2 consecutive
seconds or more, or press it
briefly 3 times or more in suc-
Press and hold for 2 seconds or
cession.
more, or press briefly 3 times or more
Stop the vehicle in a safe place by the road.
5
560
8-1. Essential information
WARNING
■ If the engine has to be turned off while driving
●Power assist for the brakes and steering wheel will be lost, making the
brake pedal harder to depress and the steering wheel heavier to turn.
Decelerate as much as possible before turning off the engine.
● Vehicles without a smart entry & start system: Never attempt to remove
the key, as doing so will lock the steering wheel.

8-2. Steps to take in an emergency
561
If your vehicle needs to be towed
If towing is necessary, we recommend having your vehicle
towed by any authorized Toyota dealer or repairer, or another
duly qualified and equipped professional or commercial towing
service, using a wheel-lift type truck or flatbed truck.
Use a safety chain system for all towing, and abide by all state/
provincial and local laws.
Situations when it is necessary to contact dealers before towing
The following may indicate a problem with your transmission. Contact
any authorized Toyota dealer or repairer, or another duly qualified and
equipped professional or commercial towing service before towing.
● The engine is running but the vehicle does not move.
● The vehicle makes an abnormal sound.
Towing with a sling-type truck
Do not tow with a sling-type truck
to prevent body damage.
8

562
8-2. Steps to take in an emergency
Towing with a wheel-lift type truck
From the front
From the rear
Release the parking brake.
Use a towing dolly under the
front wheels.
Using a flatbed truck
Apply the parking brake and turn the engine switch off.
1
Use wheel chocks for all 4 wheels to prevent the vehicle from rolling.
Secure the vehicle by strapping
2
the tires to the deck of the tow
truck as shown.

8-2. Steps to take in an emergency
563
Emergency towing
If a tow truck is not available in an emergency, your vehicle may be
temporarily towed using cables or chains secured to the emergency
towing eyelets. This should only be attempted on hard surfaced roads
for at most 80 km (50 miles) at under 30 km/h (18 mph).
A driver must be in the vehicle to steer and operate the brakes. The
vehicle’s wheels, drive train, axles, steering and brakes must be in
good condition.
Emergency towing procedure
1
Take out the towing eyelet. (P. 588, 603)
2
Remove the eyelet cover using
a flathead screwdriver.
To prevent damage, cover the tip of
the screwdriver with a rag.
Insert the towing eyelet into the
3
hole and tighten partially by
hand.
8
Tighten down the towing eyelet
4
securely using a wheel nut
wrench* or hard metal bar.
*: If the vehicle is not equipped with a
wheel nut wrench, a wheel nut
wrench can be purchased at any
authorized Toyota dealer or
repairer, or another duly qualified
and equipped professional.
564
8-2. Steps to take in an emergency
5
Securely attach cables or chains to the towing eyelet.
Take care not to damage the vehicle body.
6
Vehicles without a smart entry & start system: Enter the vehicle
being towed and start the engine.
If the engine does not start, turn the engine switch to the “ON” position.
Vehicles with Stop & Start system: Before towing the vehicle, turn the
engine switch off once, and then start the engine.
Vehicles with a smart entry & start system: Enter the vehicle being towed
and start the engine.
If the engine does not start, turn the engine switch to IGNITION ON mode.
Vehicles with Stop & Start system: Before towing the vehicle, turn the
engine switch off once, and then start the engine.
Shift the shift lever to N and release the parking brake.
7
When the shift lever cannot be shifted: P. 253
■While towing
If the engine is not running, the power assist for the brakes and steering will
not function, making steering and braking more difficult.
■ Wheel nut wrench
Vehicles without a wheel nut wrench: Wheel nut wrench can be purchased at
any authorized Toyota dealer or repairer, or another duly qualified and
equipped professional.
Vehicles with a wheel nut wrench: Wheel nut wrench is installed in the lug-
gage compartment. (P. 588)

8-2. Steps to take in an emergency
565
WARNING
Observe the following precautions.
Failure to do so may result in death or serious injury.
■ When towing the vehicle
Be sure to transport the vehicle with the
front wheels raised or with all four wheels
raised off the ground. If the vehicle is
towed with the front wheels contacting
the ground, the drivetrain and related
parts may be damaged.
■ To prevent causing serious damage to the Stop & Start system when
towing (vehicles with a Stop & Start system)
Never tow this vehicle with four wheels on the ground. Use a flatbed truck,
or lift up front or rear of the vehicle by using a wheel-lift type truck.
■ While towing
●When towing using cables or chains, avoid sudden starts, etc. which place
excessive stress on the towing eyelets, cables or chains. The towing eye-
lets, cables or chains may become damaged, broken debris may hit peo-
ple, and cause serious damage.
● Vehicles without a smart entry & start system: Do not turn the engine
switch to the “LOCK” position.
There is a possibility that the steering wheel is locked and cannot be oper-
ated.
Vehicles with a smart entry & start system: Do not turn the engine switch
off.
There is a possibility that the steering wheel is locked and cannot be oper-
ated.
8
■ Installing towing eyelets to the vehicle
Make sure that towing eyelets are installed securely.
If not securely installed, towing eyelets may come loose during towing.
566
8-2. Steps to take in an emergency
NOTICE
■ To prevent damage to the vehicle when towing using a wheel-lift type
truck
● Vehicles without a smart entry & start system: Do not tow the vehicle from
the rear when the engine switch is in the “LOCK” position or the key is
removed.
The steering lock mechanism is not strong enough to hold the front wheels
straight.
● Vehicles with a smart entry & start system: Do not tow the vehicle from the
rear when the engine switch is off. The steering lock mechanism is not
strong enough to hold the front wheels straight.
● When raising the vehicle, ensure adequate ground clearance for towing at
the opposite end of the raised vehicle. Without adequate clearance, the
vehicle could be damaged while being towed.
■ To prevent damage to the vehicle when towing with a sling-type truck
Do not tow with a sling-type truck, either from the front or rear.
■ To prevent damage to the vehicle during emergency towing
Do not secure cables or chains to the suspension components.
■ To prevent damage to the vehicle when using a flatbed truck
●Do not drive over wheel chocks, as doing so may damage the tires.
●Do not tie down the vehicle over any parts other than the tires (do not use
parts such as the suspension).
■ When towing a vehicle equipped with the Stop & Start system (if
equipped)
Vehicles without a smart entry & start system: When it is necessary to tow
the vehicle with all 4 wheels contacting the ground, perform the following
procedure before towing the vehicle to protect the system.
Turn the engine switch off once, and then start the engine. If the engine
does not start, turn the engine switch to “ON” position.
Vehicles with a smart entry & start system: When it is necessary to tow the
vehicle with all 4 wheels contacting the ground, perform the following proce-
dure before towing the vehicle to protect the system.
Turn the engine switch off once, and then start the engine. If the engine
does not start, turn the engine switch to IGNITION ON mode.

8-2. Steps to take in an emergency
567
If you think something is wrong
If you notice any of the following symptoms, your vehicle proba-
bly needs adjustment or repair. Contact any authorized Toyota
dealer or repairer, or another duly qualified and equipped pro-
fessional as soon as possible.
Visible symptoms
● Fluid leaks under the vehicle.
(Water dripping from the air conditioning after use is normal.)
● Flat-looking tires or uneven tire wear
● Vehicles with a 3-ring meter: High engine coolant temperature
warning light comes on.
● Vehicles with a 2-ring meter: High engine coolant temperature
gauge needle continually points higher than normal.
Audible symptoms
● Changes in exhaust sound
● Excessive tire squeal when cornering
● Strange noises related to the suspension system
● Pinging or other noises related to the engine
Operational symptoms
● Engine missing, stumbling or running roughly
8
● Appreciable loss of power
● Vehicle pulls heavily to one side when braking
● Vehicle pulls heavily to one side when driving on a level road
● Loss of brake effectiveness, spongy feeling, pedal almost touches
the floor

568
8-2. Steps to take in an emergency
Fuel pump shut off system (gasoline engine
only)
To minimize the risk of fuel leakage when the engine stalls or
when an airbag inflates upon collision, the fuel pump shut off
system stops the supply of fuel to the engine.
Follow the procedure below to restart the engine after the system is
activated.
Vehicles without a smart entry & start system
1
Turn the engine switch to the “ACC” or “LOCK” position.
2
Restart the engine.
Vehicles with a smart entry & start system
1
Turn the engine switch to ACCESSORY mode or turn it off.
2
Restart the engine.
NOTICE
■ Before starting the engine
Inspect the ground under the vehicle.
If you find that fuel has leaked onto the ground, the fuel system has been
damaged and is in need of repair. Do not restart the engine.
8-2. Steps to take in an emergency
569
If a warning light turns on or a warning
buzzer sounds
Calmly perform the following actions if any of the warning lights
comes on or flashes. If a light comes on or flashes, but then
goes off, this does not necessarily indicate a malfunction in the
system. However, if this continues to occur, have the vehicle
inspected by any authorized Toyota dealer or repairer, or
another duly qualified and equipped professional.
Warning light and warning buzzer list
Warning light
Warning light/Details/Actions
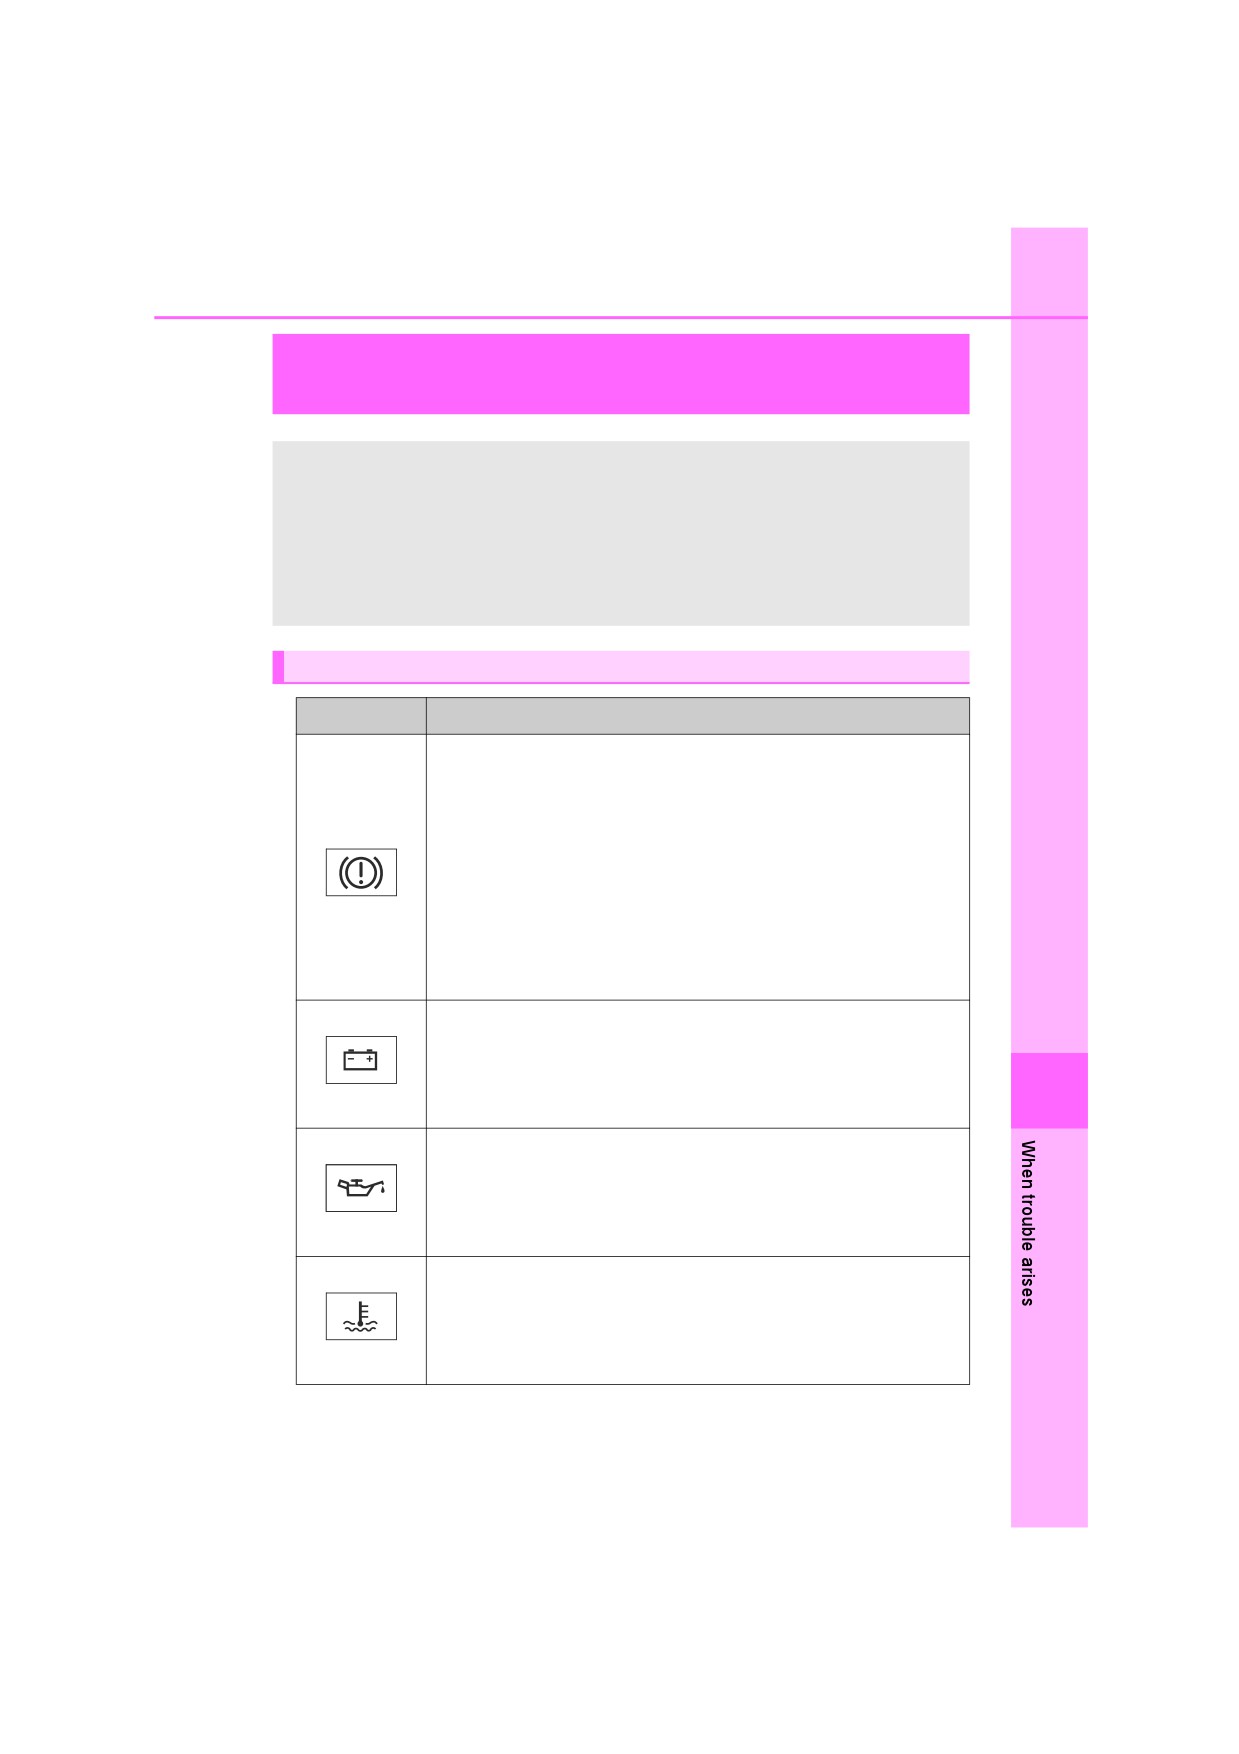
Brake system warning light (warning buzzer)*1
Indicates that:
• The brake fluid level is low; or
• The brake system is malfunctioning
This light also comes on when the parking brake is not
released. If the light turns off after the parking brake is
fully released the system is operating normally.
Immediately stop the vehicle in a safe place and con-
tact any authorized Toyota dealer or repairer, or
another duly qualified and equipped professional.
Continuing to drive the vehicle may be dangerous.
Charging system warning light
Indicates a malfunction in the vehicle’s charging system
Immediately stop the vehicle in a safe place and con-
tact any authorized Toyota dealer or repairer, or
8
(If equipped)
another duly qualified and equipped professional.
Low engine oil pressure warning light
Indicates that the engine oil pressure is too low.
Immediately stop the vehicle in a safe place and con-
(If equipped)
tact any authorized Toyota dealer or repairer, or
another duly qualified and equipped professional.
High engine coolant temperature warning light
Indicates that the engine is almost overheating. (P. 629)
Immediately stop the vehicle in a safe place and con-
(If equipped)
tact any authorized Toyota dealer or repairer, or
another duly qualified and equipped professional.

570
8-2. Steps to take in an emergency
Warning light
Warning light/Details/Actions
Malfunction indicator lamp
Indicates a malfunction in:
• The electronic engine control system;
• The electronic throttle control system; or
• The electronic Multidrive (if equipped) control system
Have the vehicle inspected by any authorized Toyota
dealer or repairer, or another duly qualified and
equipped professional immediately.
SRS warning light
Indicates a malfunction in:
• The SRS airbag system; or
• The seat belt pretensioner system
Have the vehicle inspected by any authorized Toyota
dealer or repairer, or another duly qualified and
equipped professional immediately.
ABS warning light
Indicates a malfunction in:
• The ABS; or
• The brake assist system
Have the vehicle inspected by any authorized Toyota
dealer or repairer, or another duly qualified and
equipped professional immediately.
Electric power steering system warning light (warning
buzzer)
Indicates a malfunction in the EPS (Electric Power Steer-
ing) system
Have the vehicle inspected by any authorized Toyota
dealer or repairer, or another duly qualified and
equipped professional immediately.
Cruise control indicator
Indicates a malfunction in the cruise control system.
Have the vehicle inspected by any authorized Toyota
(Comes on in yellow)
dealer or repairer, or another duly qualified and
(If equipped)
equipped professional immediately.
Speed limiter indicator
Indicates a malfunction in the speed limiter system.
Have the vehicle inspected by any authorized Toyota
(Comes on in yellow)
dealer or repairer, or another duly qualified and
(If equipped)
equipped professional immediately.

8-2. Steps to take in an emergency
571
Warning light
Warning light/Details/Actions
Slip indicator
Indicates a malfunction in:
• The VSC (Vehicle Stability Control) system;
• The TRC (Traction Control) system; or
• The hill-start assist control system
The light will flash when the VSC or the TRC is operating.
(Comes on)
(P. 358)
Have the vehicle inspected by any authorized Toyota
dealer or repairer, or another duly qualified and
equipped professional immediately.
PCS warning light
When the warning light flashes (and a buzzer sounds):
Indicates a malfunction in the PCS (Pre-Crash Safety sys-
tem)
Have the vehicle inspected by any authorized Toyota
dealer or repairer, or another duly qualified and
equipped professional immediately.
When the warning light illuminates:
Indicates that the PCS (Pre-Crash Safety system) is tem-
porarily unavailable, possibly due to either of the following:
• The part of the windshield around the front sensor being
dirty, fogged up or covered with condensation, ice, stick-
ers, etc.
(If equipped)
Clear the dirt, fog, condensation, ice, stickers, etc.
(P. 281)
• Front sensor temperature being outside of its opera-
tional range
Wait for a while until the area around the front sensor
has cooled down sufficiently.
• Either the VSC (Vehicle Stability Control) system or PCS
8
(Pre-Crash Safety system) is disabled or both are dis-
abled.
To enable the PCS, enable both the VSC system and
PCS. (P. 286, 359)
Stop & Start cancel indicator
Indicates a malfunction in the Stop & Start system
(The Stop & Start cancel indicator will come on when the
system is canceled.: P. 313)
(Flashes)
Have the vehicle inspected by any authorized Toyota
(If equipped)
dealer or repairer, or another duly qualified and
equipped professional immediately.
572
8-2. Steps to take in an emergency
Warning light
Warning light/Details/Actions
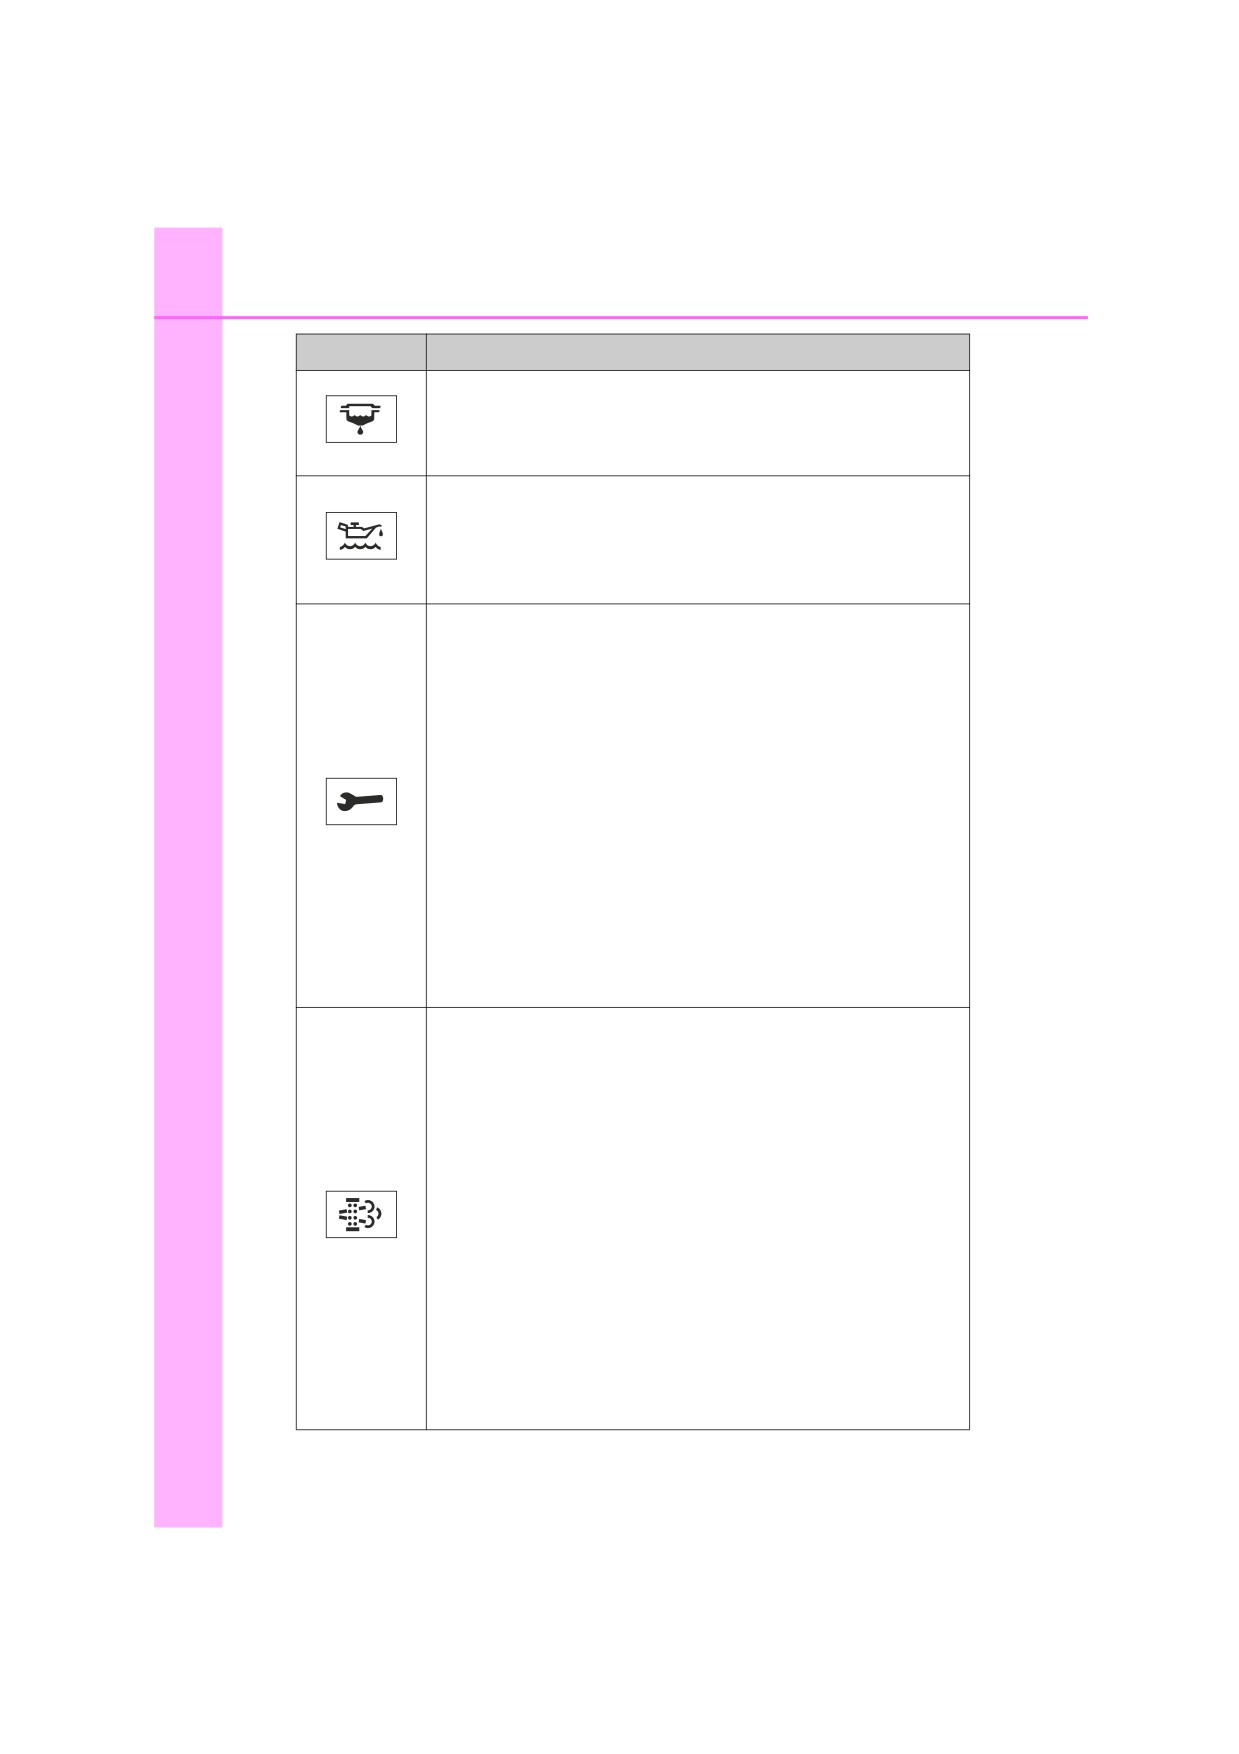
Fuel filter warning light
Indicate that the amount of accumulated water in the fuel
filter has reached the specified level.
(If equipped)
P. 507
Low engine oil level warning light
Indicates that engine oil level is low, but does not indicate
a malfunction.
Check the level of engine oil, and add if necessary.
(If equipped)
(P. 493)
Engine oil change reminder light
When the light flashes:
Indicates that the engine oil is scheduled to be changed.
(The indicator will not work properly unless the oil mainte-
nance date has been reset).
Check the engine oil, and change if necessary. After
changing the engine oil, the oil change system
should be reset. (P. 498)
When the light comes on:
(If equipped)
Indicates that the engine oil should be changed.
After the engine oil is changed and the oil maintenance
data has been reset.
Check and change the engine oil, and oil filter by any
authorized Toyota dealer or repairer, or another duly
qualified and equipped professional. After changing
the engine oil, the oil change system should be reset.
(P. 498)
DPF system warning light
• Indicates that the DPF catalytic converter needs to be
cleaned due to repeated short trips and/or low-speed
driving.
• Indicates that the amount of accumulated deposits in the
DPF catalytic converter has reached the specified level.
To clean with DPF catalytic converter, drive the vehi-
cle at a speed of 65 km/h (40 mph) or greater for 20 to
30 minutes as much as possible until the DPF system
warning light turns off*2.
(If equipped)
Do not turn off the engine as much as possible until
the DPF system warning light turns off.
If it is not possible to drive the vehicle at speeds of 65
km/h (40 mph) or greater, or the DPF system warning
light does not turn off even after driving for more than
30 minutes, have the vehicle inspected by any autho-
rized Toyota dealer or repairer, or another duly quali-
fied and equipped professional.

8-2. Steps to take in an emergency
573
Warning light
Warning light/Details/Actions
Open door warning light (warning buzzer)*3
Indicates that a door is not fully closed
(If equipped)
Check that all the doors are closed.
Smart entry & start system indicator
Indicates a malfunction in the smart entry & start system.
Have the vehicle inspected by any authorized Toyota
(Flashes in yellow for
15 seconds.)
dealer or repairer, or another duly qualified and
(If equipped)
equipped professional immediately.
Low fuel level warning light
3-ring meter:
Indicates that remaining fuel is approximately 7.5 L (2.0
gal., 1.6 Imp. gal.) or less
2-ring meter:
• Gasoline engine: Indicates that remaining fuel is approx-
imately 7.5 L (2.0 gal., 1.6 Imp. gal.) or less
• Diesel engine: Indicates that remaining fuel is approxi-
mately 8.3 L (2.2 gal., 1.8 Imp. gal.) or less
Refuel the vehicle.
Driver’s and front passenger’s seat belt reminder light
(warning buzzer)*4
Warns the driver and/or front passenger to fasten their
seat belts
Fasten the seat belt.
If the front passenger’s seat is occupied, the front
passenger’s seat belt also needs to be fastened to
make the warning light (warning buzzer) turn off.
Rear passengers’ seat belt reminder lights (warning
buzzer)*4
Warns the rear passengers to fasten their seat belts.
8
(If equipped)
Fasten the seat belt.

574
8-2. Steps to take in an emergency
Warning light
Warning light/Details/Actions
Tire pressure warning light
When the light comes on:
Low tire inflation pressure such as
• Natural causes (P. 577)
• Flat tire (P. 587, 601)
Adjust the tire inflation pressure to the specified
level.
The light will turn off after a few minutes. In case the
light does not turn off even if the tire inflation pres-
(If equipped)
sure is adjusted, have the system checked by any
authorized Toyota dealer or repairer, or another duly
qualified and equipped professional.
When the light comes on after blinking for 1 minute:
Malfunction in the tire pressure warning system (P. 578)
Have the system checked by any authorized Toyota
dealer or repairer, or another duly qualified and
equipped professional.
Master warning light
A buzzer sounds and the warning light comes on and
flashes to indicate that the master warning system has
(If equipped)
detected a malfunction.
P. 581
*1: Parking brake engaged warning buzzer:
The buzzer sounds to indicate that the parking brake is still engaged (with
the vehicle having reached a speed of 5 km/h [3 mph]).
*2: The DPF system warning light may not turn off when the engine oil change
reminder light is on. In this event, have the vehicle inspected by any autho-
rized Toyota dealer or repairer, or another duly qualified and equipped pro-
fessional.
*3: Open door warning buzzer:
A buzzer will sound if the vehicle reaches a speed of 5 km/h (3 mph) or
more with any door open.
*4: Driver’s and passengers’ seat belt buzzer:
The driver’s and passengers’ seat belt buzzer sounds to alert the driver and
passengers that his or her seat belt is not fastened. The buzzer sounds for
30 seconds after the vehicle reaches a speed of at least 20 km/h (12 mph).
Then, if the seat belt is still unfastened, the buzzer will sound in a different
tone for 90 more seconds.

8-2. Steps to take in an emergency
575
Follow the correction procedures. (vehicles with a smart entry &
start system and with a 3-ring meter)
After taking the specified steps to correct the suspected problem,
check that the warning light turns off.
Interior
Exterior
Warning
Warning light/Details/Action
buzzer
buzzer
light
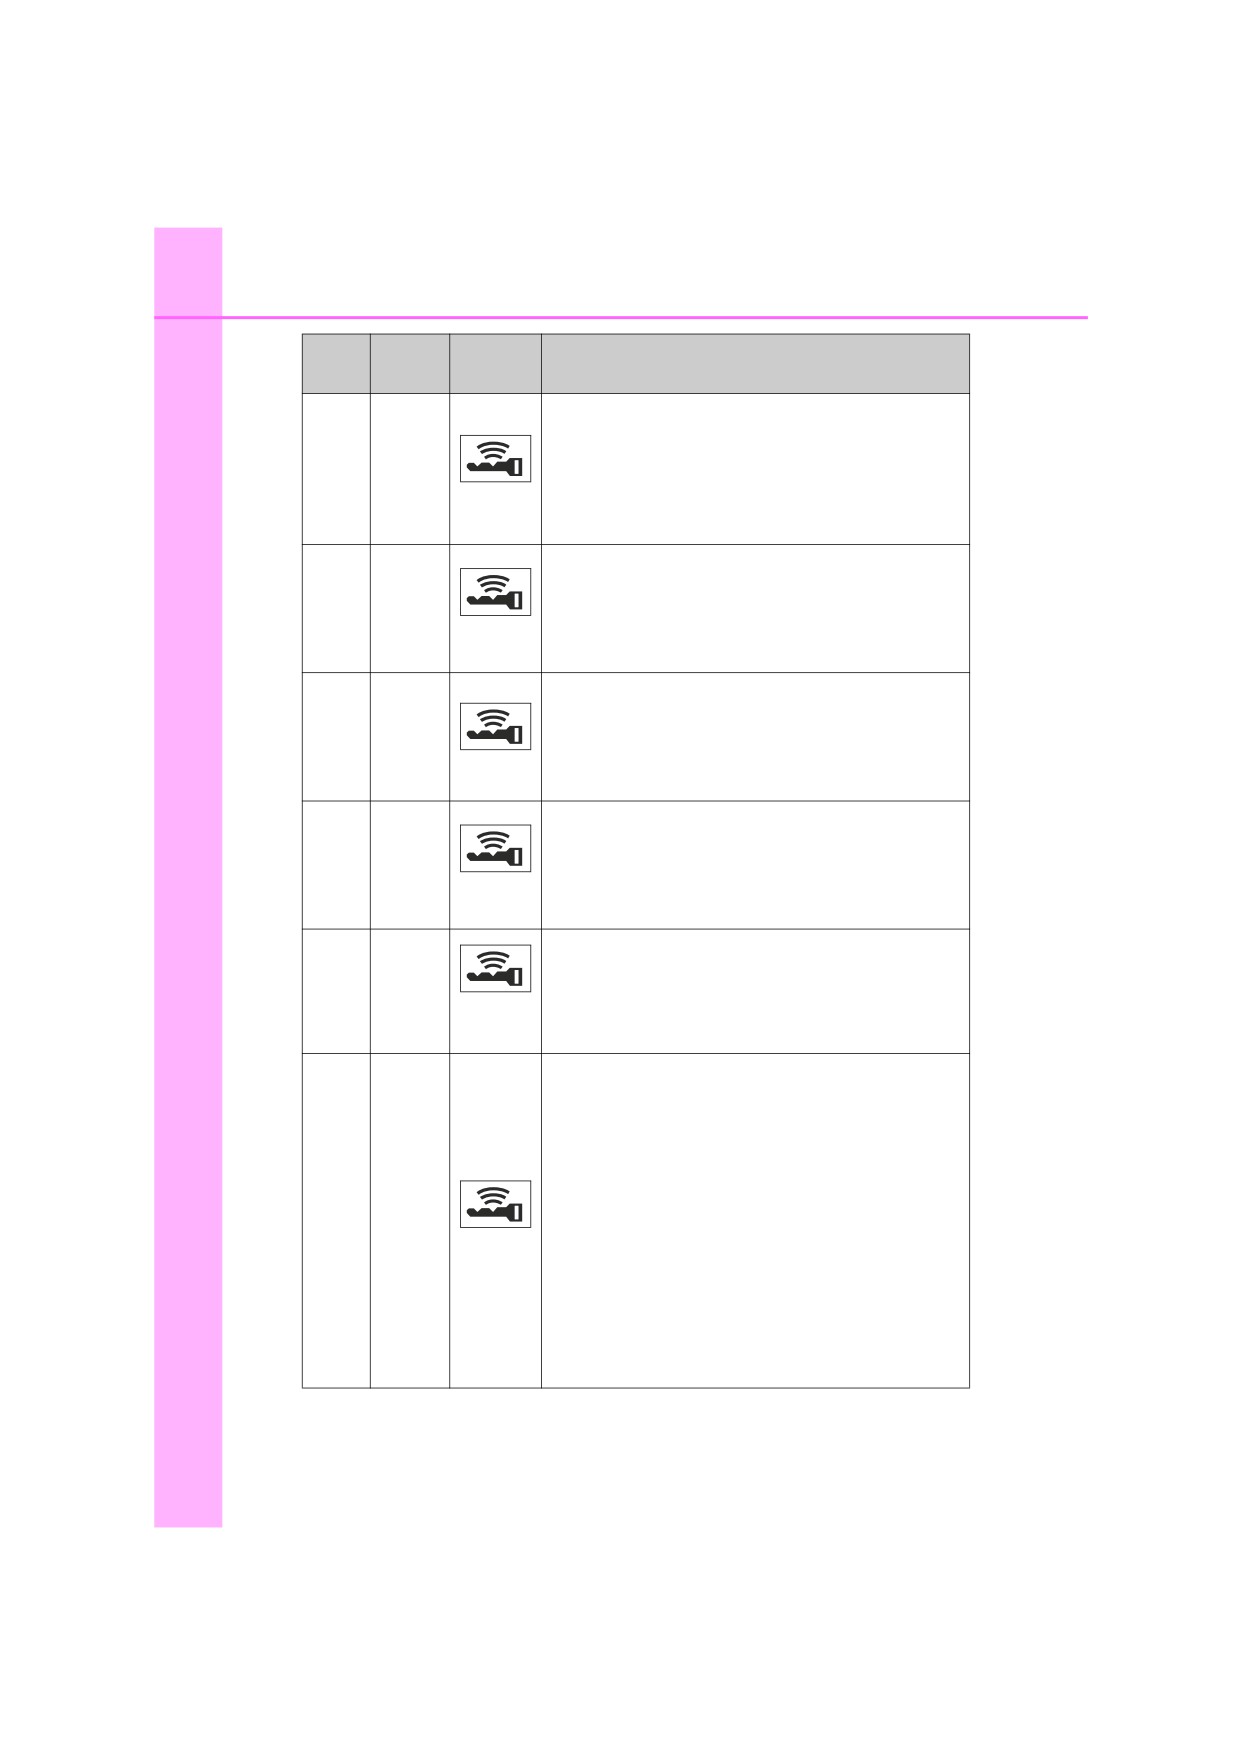
Smart entry & start system indicator (vehi-
cles with a Multidrive)
The electronic key was carried outside the
vehicle and the driver’s door was opened
and closed while any shift position other than
Continuous
Continuous
P was selected without turning off the engine
(Flashes in
yellow)
switch.
Change the shift position to P.
Bring the electronic key back into the
vehicle.
Smart entry & start system indicator (vehi-
cles with a Multidrive)
The electronic key was carried outside the
vehicle and the driver’s door was opened
Once
3 times
and closed while the shift position P was
(Flashes in
selected without turning off the engine
yellow)
switch.
Turn the engine switch off or bring the
electronic key back into the vehicle.
Smart entry & start system indicator
Indicates that a door other than the driver’s
door has been opened and closed with the
engine switch in any mode other than off and
8
Once
3 times
the electronic key outside of the detection
(Flashes in
yellow)
area.
Confirm the location of the electronic
key.
576
8-2. Steps to take in an emergency
Interior
Exterior
Warning
Warning light/Details/Action
buzzer
buzzer
light
Smart entry & start system indicator
An attempt was made to exit the vehicle with
Continuous
the electronic key and lock the doors without
Once
(5 seconds)
first turning the engine switch off.
(Flashes in
yellow)
Turn the engine switch off and lock the
doors again.
Smart entry & start system indicator
Indicates that the electronic key is not pres-
Once
ent when attempting to start the engine.
(Flashes in
yellow for 15
Confirm the location of the electronic
seconds)
key.
Smart entry & start system indicator
An attempt was made to drive when the reg-
9 times
ular key was not inside the vehicle.
(Flashes in
Confirm that the electronic key is inside
yellow)
the vehicle.
Smart entry & start system indicator
Indicates that the electronic key battery is
Once
low.
(Flashes in
yellow for 15
Replace the battery.
seconds)
(P. 534)
Smart entry & start system indicator
Indicates that the steering lock has not been
Once
(Flashes
released.
quickly in
green for 15
Release the steering lock. (P. 244)
seconds)
Smart entry & start system indicator
• When the doors were unlocked with the
mechanical key and then the engine switch
was pressed, the electronic key could not
be detected in the vehicle.
• The electronic key could not be detected in
the vehicle even after the engine switch
Once
(Flashes in
was pressed two consecutive times.
yellow for 30
Vehicles with a Multidrive: Touch the
seconds)
electronic key to the engine switch while
depressing the brake pedal.
Vehicles with a manual transmission:
Touch the electronic key to the engine
switch while depressing the clutch pedal.
8-2. Steps to take in an emergency
577
■ Front passenger detection sensor, seat belt reminder and warning
buzzer
●If luggage is placed on the front passenger seat, the front passenger detec-
tion sensor may cause the warning light to flash and the warning buzzer to
sound even if a passenger is not sitting in the seat.
●If a cushion is placed on the seat, the sensor may not detect a passenger,
and the warning light may not operate properly.
■ If the malfunction indicator lamp comes on while driving
For some models, the malfunction indicator lamp will come on if the fuel tank
becomes completely empty. If the fuel tank is empty, refuel the vehicle imme-
diately. The malfunction indicator lamp will go off after several trips.
If the malfunction indicator lamp does not go off, contact any authorized
Toyota dealer or repairer, or another duly qualified and equipped professional
as soon as possible.
■ When the tire pressure warning light comes on (vehicles with a tire pres-
sure warning system)
Carry out the following procedure after the tire temperature has lowered suffi-
ciently.
● Check the tire inflation pressure and adjust it to the appropriate level.
●If the warning light does not go out after several minutes, check that the tire
inflation pressure is at the specified level and carry out initialization.
The warning light may come on again if the above operations are conducted
without first allowing the tire temperature to lower sufficiently.
■ The tire pressure warning light may come on due to natural causes
(vehicles with a tire pressure warning system)
The tire pressure warning light may come on due to natural causes such as
natural air leaks and tire inflation pressure changes caused by temperature.
In this case, adjusting the tire inflation pressure will turn off the warning light
(after a few minutes).
8
■ When a tire is replaced with a spare tire (vehicles with a tire pressure
warning system)
The spare tire is not equipped with a tire pressure warning valve and trans-
mitter. If a tire goes flat, the tire pressure warning light will not turn off even
though the flat tire has been replaced with the spare tire. Replace the spare
tire with the repaired tire and adjust the tire inflation pressure. The tire pres-
sure warning light will go off after a few minutes.
■ Conditions that the tire pressure warning system may not function prop-
erly (vehicles with a tire pressure warning system)
P. 514
578
8-2. Steps to take in an emergency
■ If the tire pressure warning light frequently comes on after blinking for 1
minute (vehicles with a tire pressure warning system)
Vehicles without a smart entry & start system
If the tire pressure warning light comes on after blinking for 1 minute fre-
quently when the engine switch is turned to the “ON” position, have it
checked by any authorized Toyota dealer or repairer, or another duly qualified
and equipped professional.
Vehicles with a smart entry & start system
If the tire pressure warning light comes on after blinking for 1 minute fre-
quently when the engine switch is turned to IGNITION ON mode, have it
checked by any authorized Toyota dealer or repairer, or another duly qualified
and equipped professional.
■ Warning buzzer
In some cases, the buzzer may not be heard because of noisy place or an
audio sound.
■ If the engine oil change reminder light flashes (diesel engine)
Repeated short trips and/or low-speed driving may cause the oil to degrade
sooner than usual, regardless of the actual distance driven. If this happens,
the engine oil change reminder will flash.
■ Engine oil change reminder light comes on (diesel engine)
Replace the engine oil filter when the engine oil change reminder light does
not come on even if you have driven over 15000 km (9300 miles) after the
engine oil was changed.
There is a possibility that the engine oil change reminder light has been illumi-
nated when you have driven less than 15000 km (9300 miles) based on a
usage or driving condition.
■ Electric power steering system warning light (warning buzzer)
When the battery charge becomes insufficient or the voltage temporarily
drops, the electric power steering system warning light may come on and the
warning buzzer may sound.

8-2. Steps to take in an emergency
579
WARNING
■ If both the ABS and the brake system warning lights remain on
Stop your vehicle in a safe place immediately and contact any authorized
Toyota dealer or repairer, or another duly qualified and equipped profes-
sional. The vehicle will become extremely unstable during braking, and the
ABS system may fail, which could cause an accident resulting in death or
serious injury.
■ When the electric power steering system warning light comes on
The steering wheel may become extremely heavy.
If the steering wheel becomes heavier than usual when operating, hold
firmly and operate using more force than usual.
■ When driving to clean the DPF catalytic converter (diesel engine)
When driving, pay sufficient attention to weather, road conditions, terrain
and traffic conditions, and be sure to observe traffic laws and/or regulations.
Failure to do so may cause an unexpected accident, resulting in death or
serious injury.
■ If the tire pressure warning light comes on (vehicles with a tire pres-
sure warning system)
Be sure to observe the following precautions. Failure to do so could cause a
loss of vehicle control and result in death or serious injury.
●Stop your vehicle in a safe place as soon as possible. Adjust the tire infla-
tion pressure immediately.
● Vehicles with a spare tire: If the tire pressure warning light comes on even
after tire inflation pressure adjustment, it is probable that you have a flat
tire. Check the tires. If a tire is flat, change it with the spare tire and have
the flat tire repaired by the nearest authorized Toyota dealer or repairer, or
another duly qualified and equipped professional.
● Vehicles with an emergency tire puncture repair kit: If the tire pressure
warning light comes on even after tire inflation pressure adjustment, it is
8
probable that you have a flat tire. Check the tires. If a tire is flat, repair the
flat tire by using emergency tire puncture repair kit.
● Avoid abrupt maneuvering and braking. If the vehicle tires deteriorate, you
could lose control of the steering wheel or the brakes.
■ If a blowout or sudden air leakage should occur (vehicles with a tire
pressure warning system)
The tire pressure warning system may not activate immediately.
580
8-2. Steps to take in an emergency
NOTICE
■ To ensure the tire pressure warning system operates properly (vehi-
cles with a tire pressure warning system)
Do not install tires with different specifications or makers, as the tire pres-
sure warning system may not operate properly.
■ When the DPF system warning light comes on (diesel engine)
If the DPF system warning light is left on without performing cleaning, after
an additional 100 to 300 km (62 to 187 miles), the malfunction indicator
lamp may come on. If this happens, have the vehicle inspected by any
authorized Toyota dealer or repairer, or another duly qualified and equipped
professional immediately.
■ If the fuel filter warning light comes on (diesel engine)
Never drive the vehicle with the warning light on. Continued driving with
water accumulated in the fuel filter will damage the fuel injection pump.

8-2. Steps to take in an emergency
581
If a warning message is displayed (vehicles
with a 2-ring meter)
The multi-information display shows warnings of system mal-
functions, incorrectly performed operations, and messages that
indicate a need for maintenance. When a message is shown,
perform the correction procedure appropriate to the message.
Master warning light
1
The master warning light also
comes on or flashes in order to
indicate that a message is cur-
rently being displayed on the multi-
information display.
Multi-information display
2
If any of the message or indicator comes on again after the following
actions have been performed, contact any authorized Toyota dealer or
repairer, or another duly qualified and equipped professional.
Messages and warnings
The warning lights and warning buzzers operate as follows depending
on the content of the message. If a message indicates the need for
inspection by a dealer, have the vehicle inspected by any authorized
Toyota dealer or repairer, or another duly qualified and equipped pro-
8
fessional immediately.
System
warning
Warning buzzer*
Warning
light
Indicates an important situation,
such as when a system related to
Comes
Sounds
driving is malfunctioning or that
on
danger may result if the correction
procedure is not performed

582
8-2. Steps to take in an emergency
System
warning
Warning buzzer*
Warning
light
Indicates an important situation,
Comes
Sounds or does
such as when the systems shown
on or
not sound
on the multi-information display
flashes
may be malfunctioning
Indicates a situation, such as
Flashes
Sounds
when damage to the vehicle or
danger may result
Indicates a condition, such as
Comes
malfunction of electrical compo-
Does not sound
on
nents, their condition, or indicates
the need for maintenance
Indicates a situation, such as
when an operation has been per-
Does not sound
formed incorrectly, or indicates
how to perform an operation cor-
rectly
*: A buzzer sounds the first time a message is shown on the multi-informa-
tion display
If a message instructing to refer to the Owner’s Manual is dis-
played
● If the following message is displayed, take the appropriate actions.
•
“DPF full. See owner’s manual.” (diesel engine)
P. 585
● If the following message is displayed, there may be a malfunction.
Immediately stop the vehicle in a safe place and contact any autho-
rized Toyota dealer or repairer, or another duly qualified and
equipped professional.
•
“Brake effectiveness is reduced due to failure, please stop in a
safe area and check manual.”
8-2. Steps to take in an emergency
583
Other messages displayed on the multi-information display
Take the appropriate actions as instructed in the message displayed.
If any of the following messages are displayed, also refer to this
Owner’s Manual.
■ If “Check charging system.” is displayed
Indicates a malfunction in the vehicle’s charging system.
Immediately stop the vehicle in a safe place and contact any autho-
rized Toyota dealer or repairer, or another duly qualified and
equipped professional.
■ If “Engine oil pressure low.” is displayed
Indicates that the engine oil pressure is too low.
Immediately stop the vehicle in a safe place and contact any autho-
rized Toyota dealer or repairer, or another duly qualified and
equipped professional.
■ When “Headlight system malfunction. Visit your dealer.” is
displayed on the multi-information display (if equipped)
The following systems may be malfunctioning. Have the vehicle
inspected by any authorized Toyota dealer or repairer, or another
duly qualified and equipped professional immediately.
● The LED headlight system
● The automatic headlight leveling system
● Automatic High Beam
■ If “Front sensor systems are temporarily unavailable due to
inappropriate temp. Wait a moment.” or “Front Camera Vision
8
Blocked Clean and Demist Windshield.” is displayed
(if
equipped)
The following systems may be suspended until the problem shown
in the message is resolved.
● PCS (Pre-Crash Safety system)
● LDA (Lane Departure Alert)
● Automatic High Beam
● RSA (Road Sign Assist)
584
8-2. Steps to take in an emergency
■ If “Drain water from fuel filter.” is displayed (if equipped)
Indicates that the amount of water that has accumulated in the fuel
filter has reached a specified level.
P. 507, 508
■ If “Engine oil low.” is displayed (if equipped)
Indicates that the engine oil level may be low.
Check the engine oil level and add oil if necessary.
■ If “Oil Maintenance required soon.” is displayed (if equipped)
Indicates that the engine oil is scheduled to be changed. (The indi-
cator will not work properly unless the oil maintenance data has
been reset.)
Check the engine oil, and change if necessary. After changing the
engine oil, the oil change system should be reset. (P. 498)
■ If “Oil maintenance required.” is displayed (if equipped)
Indicates that the engine oil should be changed. (After the engine
oil is changed and the oil maintenance data has been reset.)
Check and change the engine oil, and oil filter by any authorized
Toyota dealer or repairer, or another duly qualified and equipped
professional. After changing the engine oil, the oil change system
should be reset. (P. 498)
8-2. Steps to take in an emergency
585
■ If “DPF full. See owner’s manual.” is displayed (diesel engine)
Indicates that the amount of accumulated deposits in the DPF cata-
lytic converter has reached a specified level and it is necessary to
clean the DPF catalytic converter. (Deposits may accumulate more
quickly due to repeated short trips and/or frequent low-speed driv-
ing.)
To clean the DPF catalytic converter, drive the vehicle at a speed of
65 km/h (40 mph) or higher for 20 to 30 minutes until the message
is cleared*.
If possible, do not turn off the engine until the message is cleared.
If it is not possible to drive the vehicle at a speed of 65 km/h (40
mph) or higher, or if the message is not cleared after driving for
more than 30 minutes, have the vehicle inspected by any autho-
rized Toyota dealer or repairer, or another duly qualified and
equipped professional.
*: This message may not be cleared if the engine oil change reminder is also
displayed on the multi-information display. In this event, have the vehicle
inspected by any authorized Toyota dealer or repairer, or another duly
qualified and equipped professional.
■ If
“DPF full, engine service required.” is displayed
(1WW
engine)
Indicates that the automatic cleaning function may not be able to
operate due to the amount of accumulated deposits in the DPF cat-
alytic converter exceeding a specified level.
Have the vehicle inspected by any authorized Toyota dealer or
repairer, or another duly qualified and equipped professional imme-
8
diately.

586
8-2. Steps to take in an emergency
■ System warning light
In the following situation, the master warning light will not come on or flash.
Instead, a separate system warning light will come on along with a message
displayed on the multi-information display.
● Malfunction of the brake system
The brake system warning light will come on. (P. 569)
■ Warning buzzer
In some cases, the buzzer may not be heard because of noisy place or an
audio sound.
■ Engine oil change reminder message comes on (1ND-TV engine only)
Replace the engine oil filter when the engine oil change reminder message
does not come on even if you have driven over 15000 km (9300 miles) after
the engine oil was changed.
There is a possibility that the “Oil maintenance required.” message has been
displayed when you have driven less than 15000 km (9300 miles) based on a
usage or driving condition.
WARNING
■ When driving to clean the DPF catalytic converter (diesel engine)
When driving, pay sufficient attention to weather, road conditions, terrain
and traffic conditions, and be sure to observe traffic laws and/or regulations.
Failure to do so may cause an unexpected accident, resulting in death or
serious injury.
NOTICE
■ When the DPF system warning message comes on (diesel engine)
If the DPF system warning message is left on without performing cleaning,
after an additional 100 to 300 km (62 to 187 miles), the malfunction indicator
lamp may come on. If this happens, have the vehicle inspected by any
authorized Toyota dealer or repairer, or another duly qualified and equipped
professional immediately.
■ If the fuel filter warning message comes on (diesel engine)
Never drive the vehicle with the warning message is shown. Continued driv-
ing with water accumulated in the fuel filter will damage the fuel injection
pump.
8-2. Steps to take in an emergency
587
If you have a flat tire (vehicles with a spare
tire)
Your vehicle is equipped with a spare tire. The flat tire can be
replaced with the spare tire.
For details about tires: P. 509
WARNING
■ If you have a flat tire
Do not continue driving with a flat tire.
Driving even a short distance with a flat tire can damage the tire and the
wheel beyond repair, which could result in an accident.
Before jacking up the vehicle
● Stop the vehicle in a safe place on a hard, flat surface.
● Set the parking brake.
● Shift the shift lever to P (Multidrive) or R (manual transmission).
● Stop the engine.
● Turn on the emergency flashers. (P. 558)
8

588
8-2. Steps to take in an emergency
Location of the spare tire, jack and tools
Vehicles with a compact spare tire
1
Tool bag
4
Towing eyelet
2
Wheel nut wrench
5
Jack
3
Jack handle
6
Spare tire

8-2. Steps to take in an emergency
589
Vehicles with a full-size spare tire
1
Jack handle
4
Jack
2
Towing eyelet
5
Spare tire
3
Wheel nut wrench
8

590
8-2. Steps to take in an emergency
WARNING
■ Using the tire jack
Observe the following precautions.
Improper use of the tire jack may cause the vehicle to suddenly fall off the
jack, leading to death or serious injury.
●Do not use the tire jack for any purpose other than replacing tires or install-
ing and removing tire chains.
●Only use the tire jack that comes with this vehicle for replacing a flat tire.
Do not use it on other vehicles, and do not use other tire jacks for replac-
ing tires on this vehicle.
●Put the jack properly in its jack point.
●Do not put any part of your body under the vehicle while it is supported by
the jack.
●Do not start the engine or drive the vehicle while the vehicle is supported
by the jack.
●Do not raise the vehicle while someone is inside.
● When raising the vehicle, do not put an object on or under the jack.
●Do not raise the vehicle to a height greater than that required to replace
the tire.
●Use a jack stand if it is necessary to get under the vehicle.
● When lowering the vehicle, make sure that there is no-one near the vehi-
cle. If there are people nearby, warn them vocally before lowering.
Taking out the jack
1
Remove the deck mat. (P. 459)
2
Take out the jack.
1
For tightening
2
For loosening

8-2. Steps to take in an emergency
591
Taking out the spare tire
1
Remove the deck mat and tray. (P. 459)
Vehicles with a compact spare
Vehicles with a full-size spare
tire
tire
Loosen the center fastener that
2
secures the spare tire.
WARNING
■ When storing the spare tire
Be careful not to catch fingers or other body parts between the spare tire
8
and the body of the vehicle.

592
8-2. Steps to take in an emergency
Replacing a flat tire
1
Chock the tires.
Flat tire
Wheel chock positions
Left-hand side
Behind the rear right-hand side tire
Front
Right-hand side
Behind the rear left-hand side tire
Left-hand side
In front of the front right-hand side tire
Rear
Right-hand side
In front of the front left-hand side tire
For vehicles with steel wheels,
2
remove the wheel ornament
using the wrench.
To protect the wheel ornament,
place a rag between the wrench
and the wheel ornament.
3
Slightly loosen the wheel nuts
(one turn).

8-2. Steps to take in an emergency
593
4
Turn the tire jack portion “A” by
hand until the notch of the jack
is in contact with the jack point.
The jack point guides are located
under the rocker panel. They indi-
cate the jack point positions.
5
Raise the vehicle until the tire is slightly raised off the ground.
Vehicles with
a compact spare
Vehicles with a
full-size spare
tire
tire
6
Remove all the wheel nuts and
the tire.
When resting the tire on the
ground, place the tire so that the
wheel design faces up to avoid
scratching the wheel surface.
8
594
8-2. Steps to take in an emergency
WARNING
■ Replacing a flat tire
●Do not touch the disc wheels or the area around the brakes immediately
after the vehicle has been driven.
After the vehicle has been driven the disc wheels and the area around the
brakes will be extremely hot. Touching these areas with hands, feet or
other body parts while changing a tire, etc. may result in burns.
●Failure to follow these precautions could cause the wheel nuts to loosen
and the tire to fall off, resulting in death or serious injury.
• Never use oil or grease on the wheel bolts or wheel nuts.
Oil and grease may cause the wheel nuts to be excessively tightened,
leading to bolt or disc wheel damage. In addition, the oil or grease can
cause the wheel nuts to loosen and the wheel may fall off, causing a
serious accident. Remove any oil or grease from the wheel bolts or
wheel nuts.
• Have the wheel nuts tightened with a torque wrench to 103 N•m
(10.5 kgf•m, 76 ft•lbf) as soon as possible after changing wheels.
• Do not attach a heavily damaged wheel ornament, as it may fly off the
wheel while the vehicle is moving.
• When installing a tire, only use wheel nuts that have been specifically
designed for that wheel.
• If there are any cracks or deformations in the bolt screws, nut threads or
bolt holes of the wheel, have the vehicle inspected by any authorized
Toyota dealer or repairer, or another duly qualified and equipped profes-
sional.
• When installing the wheel nuts, be sure to install them with the tapered
ends facing inward. (P. 530)
Installing the spare tire
Remove any dirt or foreign mat-
1
ter from the wheel contact sur-
face.
If foreign matter is on the wheel
contact surface, the wheel nuts
may loosen while the vehicle is in
motion, causing the tire to come
off.

8-2. Steps to take in an emergency
595
2
Install the tire and loosely tighten each wheel nut by hand by
approximately the same amount.
When replacing a steel wheel
Tapered portion
with a steel wheel (including a
compact spare tire), tighten the
wheel nuts until the tapered
portion comes into loose con-
tact with the disc wheel seat.
Disc wheel
seat
When replacing an aluminum
Tapered portion
wheel with a steel wheel
(including a compact spare
tire), tighten the wheel nuts until
the tapered portion comes into
loose contact with the disc
wheel seat.
Disc wheel seat
3
Lower the vehicle.
Vehicles with
a compact spare
Vehicles with a
full-size spare
tire
tire
8

596
8-2. Steps to take in an emergency
4
Firmly tighten each wheel nut
two or three times in the order
shown in the illustration.
Tightening torque:
103 N•m (10.5 kgf•m, 76 ft•lbf)
Stow the flat tire, tire jack and all tools.
5
■ The full-size spare tire
● On vehicles with a tire pressure warning system, the full-size spare tire has
a “Temporary use only” label on the outer surface of the wheel.
Use the full-size spare tire temporarily, and only in an emergency.
● Make sure to check the tire inflation pressure of the full-size spare tire.
(P. 657)
■ The compact spare tire
●The compact spare tire is identified by the label “TEMPORARY USE ONLY”
on the tire sidewall.
Use the compact spare tire temporarily, and only in an emergency.
● Make sure to check the tire inflation pressure of the compact spare tire.
(P. 657)
■ When the compact spare tire is equipped
The vehicle becomes lower when driving with the compact spare tire com-
pared to when driving with standard tires.
■ When using the spare tire (vehicles with a tire pressure warning system)
As the spare tire is not equipped with a tire pressure warning valve and trans-
mitter, low inflation pressure of the spare tire will not be indicated by the tire
pressure warning system. Also, if you replace the spare tire after the tire pres-
sure warning light comes on, the light remains on.

8-2. Steps to take in an emergency
597
■ If you have a flat front tire on a road covered with snow or ice
Install the compact spare tire on one of the rear wheels of the vehicle. Per-
form the following steps and fit tire chains to the front tires:
Replace a rear tire with the compact spare tire.
1
2
Replace the flat front tire with the tire removed from the rear of the vehicle.
3
Fit tire chains to the front tires.
■ When reinstalling the wheel ornament (vehicles with steel wheels)
Align the cutout of the wheel ornament
with the valve stem as shown in the illus-
tration.
8