Toyota Auris (2018 year). Manual in english - page 7
5-7. “SET UP” menu
407
Using the “SET UP” menu (“Bluetooth*”
menu)
Registering a Bluetooth® device in the system allows the system
to function. The following functions can be used for registered
devices:
*: Bluetooth is a registered trademark of Bluetooth SIG, Inc.
Registering a portable player
Select
“Pairing” using the
“<SELECT”,
“TUNE>” and
“SETUP/
ENTER” buttons (P. 403), and perform the procedure for registering
a portable player. (P. 406)
Listing the registered cellular phones
Select “List phone” using the “<SELECT”, “TUNE>” and “SETUP/
ENTER” buttons. (P. 403) The list of registered cellular phones will
5
be displayed.
● Connecting the registered cellular phone to the audio system
Select the name of the cellular phone to be connected using the
1
“<SELECT”, “TUNE>” and “SETUP/ENTER” buttons.
Select “Select” using the “<SELECT”, “TUNE>” and “SETUP/
2
ENTER” buttons.
● Deleting a registered cellular phone
1
Select the name of the cellular phone to be deleted using the
“<SELECT”, “TUNE>” and “SETUP/ENTER” buttons.
2
Select “Delete” using the “<SELECT”, “TUNE>” and “SETUP/
ENTER” buttons.
3
Press
“Yes”.

408
5-7. “SET UP” menu
● Disconnecting the registered cellular phone from the audio system
Select the name of the cellular to be disconnected using the
1
“<SELECT”, “TUNE>” and “SETUP/ENTER” buttons.
2
Select
“Disconnect” using the
“<SELECT”,
“TUNE>” and
“SETUP/ENTER” buttons.
3
Press
“Yes”.
Listing the registered portable players
Select “List audio” using the
“<SELECT”, “TUNE>” and “SETUP/
ENTER” buttons. (P. 403) The list of registered portable players will
be displayed.
● Connecting the registered portable player to the audio system
Select the name of the portable player to be connected using the
1
“<SELECT”, “TUNE>” and “SETUP/ENTER” buttons.
Select “Select” using the “<SELECT”, “TUNE>” and “SETUP/
2
ENTER” buttons.
● Deleting the registered portable player
1
Select the name of the portable player to be deleted using the
“<SELECT”, “TUNE>” and “SETUP/ENTER” buttons.
2
Select “Delete” using the “<SELECT”, “TUNE>” and “SETUP/
ENTER” buttons.
3
Press
“Yes”.

5-7. “SET UP” menu
409
● Disconnecting the registered portable player from the audio system
Select the name of the portable player to be disconnected using
1
the “<SELECT”, “TUNE>” and “SETUP/ENTER” buttons.
2
Select
“Disconnect” using the
“<SELECT”,
“TUNE>” and
“SETUP/ENTER” buttons.
3
Press
“Yes”.
● Selecting the connection method
Select the name of the desired portable player using the
1
“<SELECT”, “TUNE>” and “SETUP/ENTER” buttons.
Select “Connection method” using the “<SELECT”, “TUNE>” and
2
“SETUP/ENTER” buttons.
Select “From vehicle” or “From audio” using the “<SELECT”,
3
“TUNE>” and “SETUP/ENTER” buttons.
Changing the passkey
1
Select “Passkey” using the “<SELECT”, “TUNE>” and “SETUP/
5
ENTER” buttons. (P. 403)
2
Input a 4 to 8-digit passkey using the “<SELECT”, “TUNE>” and
“SETUP/ENTER” buttons.
Input the number 1 digit at a time.
3
When the entire number to be registered as a passkey has been
input, press
“Enter”.
If the passkey to be registered has 8 digits, pressing
“Enter” is not
necessary.

410
5-7. “SET UP” menu
Setting automatic connection of the device on or off
If
“BT power” is set to on, the registered device will be connected
automatically when the engine switch is turned to the “ACC” position.
Select “BT power” using the “<SELECT”, “TUNE>” and “SETUP/
1
ENTER” buttons. (P. 403)
Select “On” or “Off” using the “SETUP/ENTER” button.
2
Displaying the device status
Select “Bluetooth* info” using the “<SELECT”, “TUNE>” and “SETUP/
ENTER” buttons. (P. 403)
*: Bluetooth is a registered trademark of Bluetooth SIG, Inc.
● Displaying the device name
Select
“Device name” using the
“<SELECT”,
“TUNE>” and
“SETUP/ENTER” buttons.
● Displaying the device address
Select
“Device address” using the
“<SELECT”,
“TUNE>” and
“SETUP/ENTER” buttons.
Setting the automatic connection confirmation display to on or
off
If the “Display setting” is set to on, the portable player connection sta-
tus will be displayed when the engine switch is turned to the “ACC” or
“ON” position.
1
Select
“Display setting” using the
“<SELECT”,
“TUNE>” and
“SETUP/ENTER” buttons. (P. 403)
Select “On” or “Off” using the “SETUP/ENTER” button.
2

5-7. “SET UP” menu
411
Initialization
Select “Reset” using the “<SELECT”, “TUNE>” and “SETUP/ENTER”
buttons. (P. 403)
● Initializing the sound settings
Select
“Sound settings” using the
“<SELECT”,
“TUNE>” and
“SETUP/ENTER” buttons and press
“Yes”.
For details about sound settings: P. 415
● Initializing the device information
Select
“Car Device Info” using the
“<SELECT”, “TUNE>” and
“SETUP/ENTER” buttons and press
“Yes”.
The user set passkey and automatic confirmation display will be returned
to their default settings.
● Initializing all the settings
Select “Reset all” using the “<SELECT”, “TUNE>” and “SETUP/
ENTER” buttons and press
“Yes”.
5

412
5-7. “SET UP” menu
Using the “SET UP” menu (“Phone” menu)
Adding a new phone number
Select “Add contacts” using the “<SELECT”, “TUNE>” and “SETUP/
ENTER” buttons. (P. 403)
● Transferring all contacts from the cellular phone
Select “Overwrite all” using the “<SELECT”, “TUNE>” and “SETUP/
ENTER” buttons and press
“Yes”.
● Transferring one contact from the cellular phone
Select “Add contact” using the “<SELECT”, “TUNE>” and “SETUP/
ENTER” buttons and press
“Yes”.
Setting speed dials
1
Select “Add SD” using the “<SELECT”, “TUNE>” and “SETUP/
ENTER” buttons. (P. 403)
2
Select the desired data using the
“<SELECT”,
“TUNE>” and
“SETUP/ENTER” buttons.
3
Press and hold the desired preset button.
For details about setting speed dials from the call history: P. 421
For details about deleting speed dials: P. 420

5-7. “SET UP” menu
413
Deleting call histories
Select
“Delete call history” using the
“<SELECT”, “TUNE>” and
“SETUP/ENTER” buttons. (P. 403)
● Deleting outgoing call history
1
Select
“Outgoing calls” using the
“<SELECT”, “TUNE>” and
“SETUP/ENTER” buttons.
2
Select the desired phone number using the
“<SELECT”,
“TUNE>” and “SETUP/ENTER” buttons and press
“Yes”.
To delete all outgoing call history data, press
“All” and then
press
“Yes”.
● Deleting incoming call history
1
Select
“Incoming calls” using the
“<SELECT”, “TUNE>” and
“SETUP/ENTER” buttons.
2
Select the desired phone number using the
“<SELECT”,
5
“TUNE>” and “SETUP/ENTER” buttons and press
“Yes”.
To delete all incoming call history data, press
“All” and then
press
“Yes”.
414
5-7. “SET UP” menu
● Deleting missed call history
1
Select
“Missed calls” using the
“<SELECT”,
“TUNE>” and
“SETUP/ENTER” buttons.
2
Select the desired phone number using the
“<SELECT”,
“TUNE>” and “SETUP/ENTER” buttons and press
“Yes”.
To delete all missed call history data, press
“All” and then
press
“Yes”.
● Deleting a number from all call histories (Outgoing calls, Incoming
calls and Missed calls)
1
Select “All calls” using the “<SELECT”, “TUNE>” and “SETUP/
ENTER” buttons.
2
Select the desired phone number using the
“<SELECT”,
“TUNE>” and “SETUP/ENTER” buttons and press
“Yes”.
To delete all of the call history data, press
“All” and then
press
“Yes”.

5-7. “SET UP” menu
415
Deleting a registered phone number
1
Select
“Delete contacts” using the
“<SELECT”,
“TUNE>” and
“SETUP/ENTER” buttons. (P. 403)
2
Select the desired phone number using the “<SELECT”, “TUNE>”
and “SETUP/ENTER” buttons and press
“Yes”.
To delete all of the registered phone numbers, Press
“All”
and then press
“Yes”.
Press
“A-Z” to display the registered names in alphabetical
order of the initial.
Deleting another cellular phone’s phonebook
1
Select
“Delete other PB” using the
“<SELECT”, “TUNE>” and
“SETUP/ENTER” buttons. (P. 403)
2
Select the desired phonebook using the “<SELECT”, “TUNE>” and
5
“SETUP/ENTER” buttons and press
“Yes”.
Setting call volume
1
Select “Call volume” using the “<SELECT”, “TUNE>” and “SETUP/
ENTER” buttons. (P. 403)
2
Change the call volume.
To decrease the volume: Press the “<SELECT” button.
To increase the volume: Press the “TUNE>” button.
To set the volume, press
“Back”.

416
5-7. “SET UP” menu
Setting ringtone volume
1
Select
“Ringtone volume” using the
“<SELECT”, “TUNE>” and
“SETUP/ENTER” buttons. (P. 403)
2
Change the ringtone volume.
To decrease the volume: Press the “<SELECT” button.
To increase the volume: Press the “TUNE>” button.
To set the volume, press
“Back”.
Setting ringtone
1
Select “Ringtone” using the “<SELECT”, “TUNE>” and “SETUP/
ENTER” buttons. (P. 403)
2
Using the “<SELECT” or “TUNE>” button, select a ringtone (1 - 3).
To set the selected ringtone, press
“Back”.
Transferring call histories
Select
“Transfer history” using the
“<SELECT”,
“TUNE>” and
“SETUP/ENTER” buttons and press
“Yes”.
■Phone number
Up to 1000 names can be stored.
■ Call history
Up to 10 numbers can be stored in each of the outgoing, incoming and
missed call history memories.
■ Limitation of number of digits
A phone number that exceeds 24 digits cannot be registered.

5-8. Bluetooth® Audio
417
Operating a Bluetooth® enabled portable
player
1
Display text message
6
Playback
2
Playback/pause
7
Select a track, fast-forward or
5
reverse
3
Select an album
8
Volume
4
Repeat play
9
Power
5
Random playback

418
5-8. Bluetooth® Audio
Selecting an album
Press
“
” or
“
” to select the desired album.
Selecting a track
Press the “SEEK>” or “<TRACK” button to select the desired track.
Playing and pausing a track
Press
“
” to play or pause a track.
Fast-forwarding and reversing a track
To fast-forward or reverse, press and hold the “SEEK>” or “<TRACK”
button.
Random playback
Pressing
“RDM” changes the random playback mode in the
following order:
Album random All track random Off

5-8. Bluetooth® Audio
419
Repeat play
Pressing
“RPT” changes the repeat play mode in the following
order:
Track repeat Album repeat Off
Switching the display
Press
“Text”.
Track title and artist name are displayed on the display.
To return to the previous display, press
“Text” or
“Back”.
■ Bluetooth® audio system functions
Depending on the portable player that is connected to the system, certain
functions may not be available.
5

420
5-9. Bluetooth® Phone
Making a phone call
To enter the “PHONE” or “TEL” mode, press the off-hook switch.
Dialing by selecting a name
1
Select “Phonebook” using the “<SELECT”, “TUNE>” and “SETUP/
ENTER” buttons.
2
Select the desired name using the
“<SELECT”, “TUNE>” and
“SETUP/ENTER” buttons and press the off-hook switch.
By pressing
“Add S. Dial” and then one of the speed dial but-
tons while the desired name is selected, the selected item can be reg-
istered as a speed dial.
Press
“A-Z” to display the registered names in alphabetical
order of the initial.
Speed dialing
1
Select “Speed dials” using the “<SELECT”, “TUNE>” and “SETUP/
ENTER” buttons.
Press the desired preset button and press the off-hook switch.
2
To delete a registered speed dial, after selecting the desired preset
button press
“Delete” and then press
“Yes”.
Dialing by entering the number
1
Select
“Dial by number” using the
“<SELECT”, “TUNE>” and
“SETUP/ENTER” buttons.
2
Enter the phone number and press the off-hook switch.

5-9. Bluetooth® Phone
421
Dialing from call histories
Select “All calls”, “Missed calls”, “Incoming calls” or “Outgoing calls”
1
using the “<SELECT”, “TUNE>” and “SETUP/ENTER” buttons.
Select the desired number using the “<SELECT”, “TUNE>” and
2
“SETUP/ENTER” buttons and press the off-hook switch.
The following operations can be performed:
● Registering a number as a speed dial
Press
“Add S. Dial” and then press the desired preset but-
ton.
● Deleting the selected number
Press
“Delete” and press
“Yes”.
5

422
5-9. Bluetooth® Phone
Receiving a phone call
Answering the phone
Press the off-hook switch.
Refusing a call
Press the on-hook switch.
Receiving a call when on another call
Press the off-hook switch.
Pressing the off-hook switch again returns you to the previous call.
Adjusting the ringtone volume when receiving a call
Change the ringtone volume using the “VOL-” or “VOL+” button.
To decrease the volume: Press the “VOL-” button.
To increase the volume: Press the “VOL+” button.
5-9. Bluetooth® Phone
423
Speaking on the phone
Transferring a call
A call can be transferred between the cellular phone and system while
dialing, receiving a call, or during a call. Use one of the following
methods:
a. Operate the cellular phone.
Refer to the manual that comes with the cellular phone for the operation of
the phone.
b. Press
* “Phone”.
*: This operation can be performed only when transferring a call from the cel-
lular phone to the system during a call.
Muting your voice
Press
“Mute”.
Inputting digits
5
Press
“0 - 9” and use the “<SELECT”, “TUNE>” and “SETUP/
ENTER” buttons to input the desired digits.
• To send the input digits, press
“Send”.
• When finished, press
“Wait” to return to the previous screen.
Setting call volume
Change the call volume using the “VOL-” or “VOL+” button.
To decrease the volume: Press the “VOL-” button.
To increase the volume: Press the “VOL+” button.
424
5-9. Bluetooth® Phone
■When talking on the phone
● Do not talk at the same time as the other party.
●Keep the volume of the received voice down. Otherwise, voice echo will
increase.
■ Automatic volume adjustment
When vehicle speed is 80 km/h (50 mph) or more, the volume automatically
increases. The volume returns to the previous volume setting when vehicle
speed drops to 70 km/h (43 mph) or less.
■ Phone call system functions
Depending on the cellular phone, certain functions may not be available.
■ Situations where the system may not recognize your voice
● When driving on a rough road
● When driving at high speeds
● When air is blowing out of the vents onto the microphone
● When the air conditioning fan emits a loud noise

5-10. Bluetooth®
425
Bluetooth®
■When using the Bluetooth® audio/Phone
●In the following situations, the system may not function.
• The portable player does not support Bluetooth®
• The cellular phone is located outside the service area
• The Bluetooth® device is switched off
• The Bluetooth® device has a low battery
• The Bluetooth® device is not connected to the system
• The Bluetooth® device is behind the seat or in the glove box or console
box, or is touching or covered by metal objects
●There may be a delay if a cellular phone connection is made during
Bluetooth® audio playback.
● Depending on the type of portable audio player that is connected to the sys-
tem, operation may differ slightly and certain functions may not be available.
■ When transferring ownership of the vehicle
Be sure to initialize the system to prevent personal data from being improp-
erly accessed. (P. 411)
■ About Bluetooth®
5
Bluetooth is a registered trademark of
Bluetooth SIG, Inc.
■ Compatible models
●Bluetooth® specifications:
Ver. 1.1, or higher (recommended: Ver. 2.1 + EDR or higher)
●Following Profiles:
• A2DP (Advanced Audio Distribution Profile) Ver. 1.0, or higher (recom-
mended: Ver. 1.2 or higher)
• AVRCP (Audio/Video Remote Control Profile) Ver. 1.0 or higher (recom-
mended: Ver. 1.3 or higher)
Portable players must correspond to the above specifications in order to be
connected to the Bluetooth® audio system. However, please note that some
functions may be limited depending on the type of portable player.
● Cellular phone
• HFP (Hands Free Profile) Ver. 1.0 or higher (recommended: Ver. 1.5)
• OPP (Object Push Profile) Ver. 1.1
• PBAP (Phone Book Access Profile) Ver. 1.0
428
5-10. Bluetooth®
WARNING
■ While driving
Do not operate the portable audio player, cellular phone or connect a device
to the Bluetooth® system.
■ Caution regarding interference with electronic devices
● Your audio unit is fitted with Bluetooth® antennas. People with implantable
cardiac pacemakers, cardiac resynchronization therapy-pacemakers or
implantable cardioverter defibrillators should maintain a reasonable dis-
tance between themselves and the Bluetooth® antennas. The radio waves
may affect the operation of such devices.
●Before using Bluetooth® devices, users of any electrical medical device
other than implantable cardiac pacemakers, cardiac resynchronization
therapy-pacemakers or implantable cardioverter defibrillators should con-
sult the manufacturer of the device for information about its operation
under the influence of radio waves. Radio waves could have unexpected
effects on the operation of such medical devices.
NOTICE
■ When leaving the vehicle
Do not leave your portable audio player or cellular phone in the vehicle. The
inside of the vehicle may become hot, causing damage to the portable
audio player or cellular phone.
429
Interior features
6
6-1. Using the air
6-3. Using the storage
conditioning system
features
and defogger
List of storage features
451
Heater system
430
• Glove box
452
Automatic air conditioning
• Console box
452
system
435
• Bottle holders
453
Power heater
443
• Cup holders
454
Seat heaters
445
• Auxiliary boxes
455
6-2. Using the interior lights
Luggage compartment
Interior lights list
447
features
457
• Interior lights
448
6-4. Other interior features
• Vanity lights
448
Other interior features
463
• Personal lights
449
• Sun visors
463
• Vanity mirrors
463
• Clock
464
• Portable ashtray
464
• Power outlets
465
• Armrest
466
• Assist grips
467
• Coat hooks
467
• Panoramic roof
shade
468

430
6-1. Using the air conditioning system and defogger
Heater system
Heater controls
: If equipped

6-1. Using the air conditioning system and defogger
431
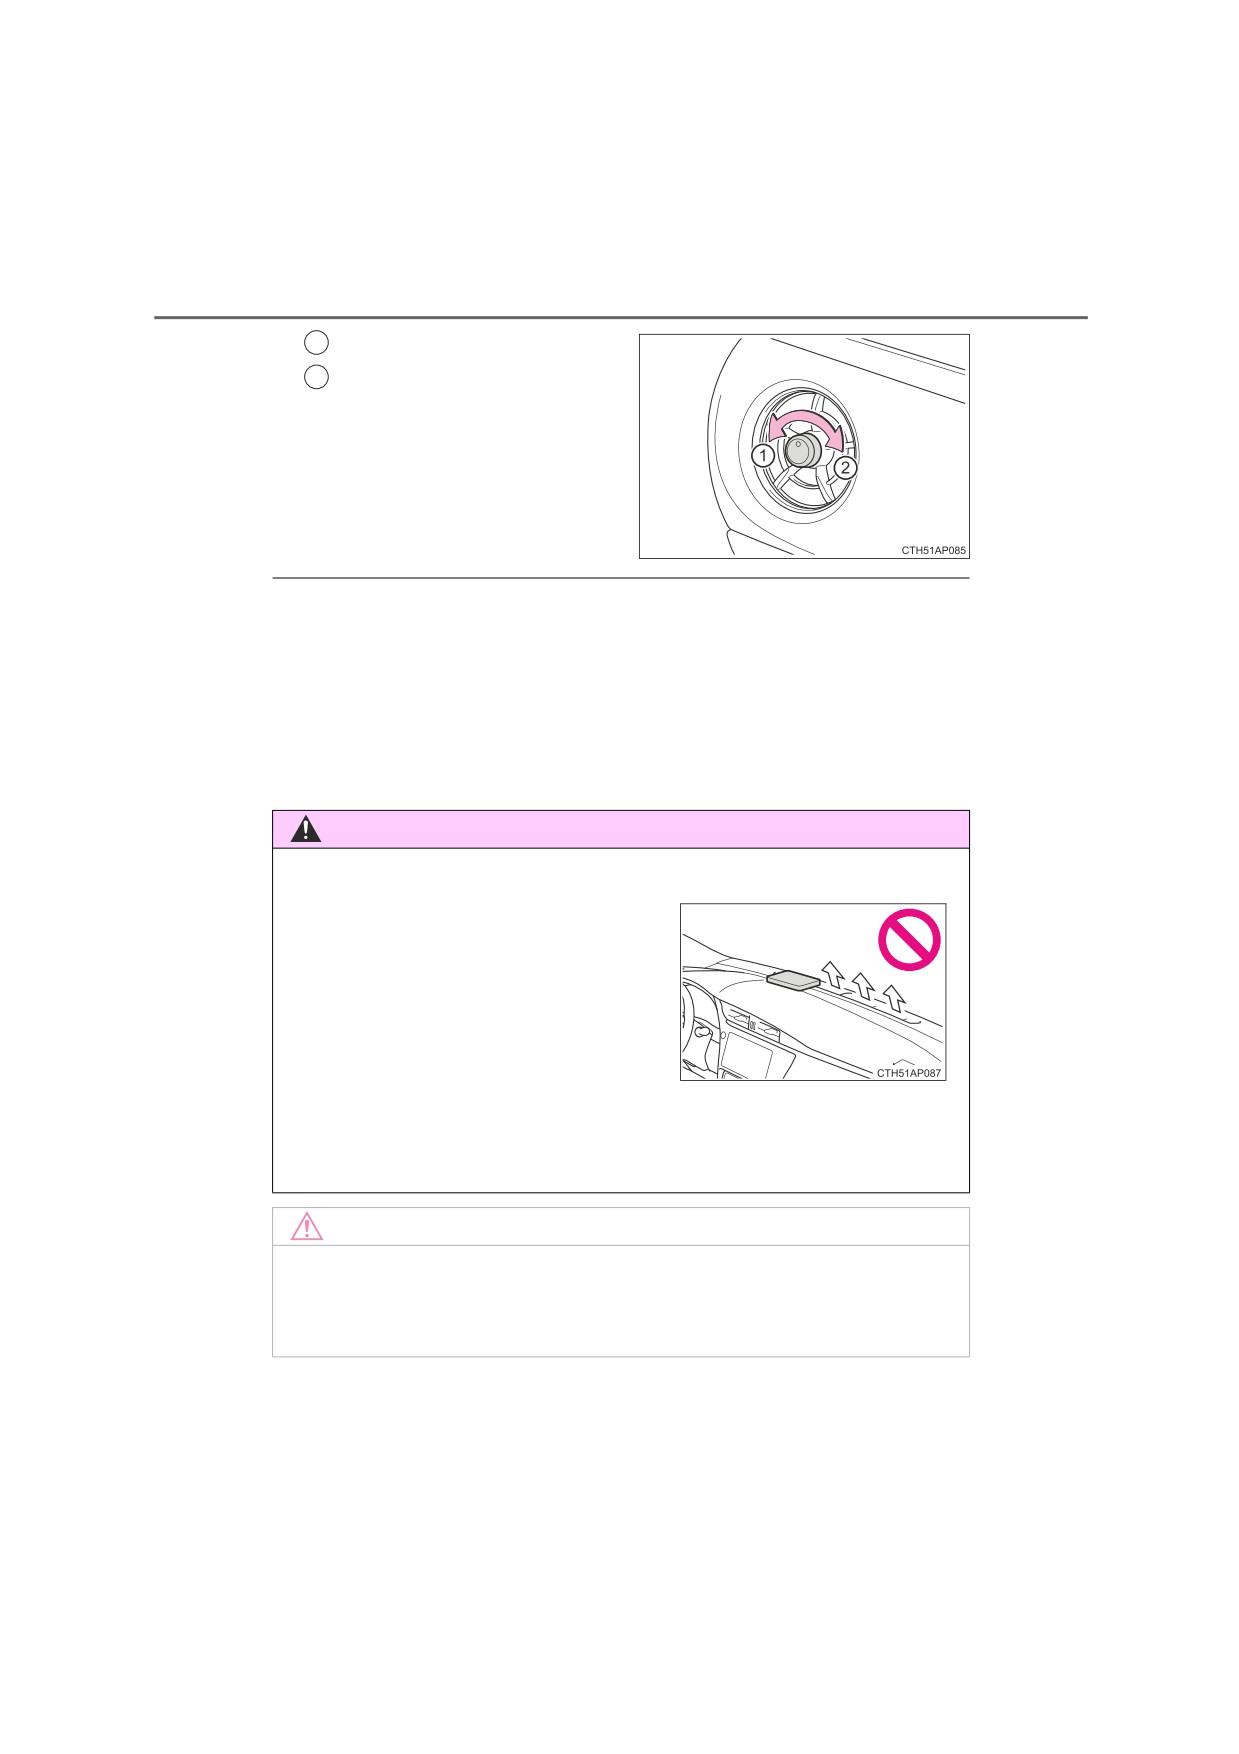
■ Adjusting the temperature setting
1
Increases the temperature
2
Decreases the temperature
■ Fan speed setting
1
Increases the fan speed
2
Decreases the fan speed
■ Change the airflow mode
6
To change the airflow mode,
move the airflow change knob
upward or downward.
The air outlets used are
changed each time the knob is
operated.
1
Air flows to the upper body.
2
Air flows to the upper body
and feet.
3
Air flows to the feet.
4
Air flows to the feet and the
Airflow change knob
windshield defogger oper-
ates.

432
6-1. Using the air conditioning system and defogger
Other functions
■ Switching between outside air and recirculated air modes
Press
The mode switches between outside air mode (indicator off) and recir-
culated air mode (indicator on) each time
is pressed.
■ Defogging the windshield
Defoggers are used to defog the windshield and front side win-
dows.
Press
The dehumidification function operates and fan speed increases.
Set the outside/recirculated air mode button to the outside air mode if
the recirculated air mode is used. (It may switch automatically.)
To defog the windshield and the front side windows early, turn the air
flow and temperature up.
To return to the previous mode, press
again when the windshield
is defogged.
■ Defogging the rear window and outside rear view mirrors
Defoggers are used to defog the rear window, and to remove rain-
drops, dew and frost from the outside rear view mirrors.
Press
The defoggers will automatically turn off after a period of time.

6-1. Using the air conditioning system and defogger
433
Air outlets
■ Location of air outlets
The air outlets and air volume
change according to the
selected airflow mode.
(P. 431)
: Some models
■ Adjusting the position of and opening and closing the air out-
lets
Front center outlets
1
Direct air flow to the left or
right, up or down.
2
Turn the knob up to open the
vent and down to close the
vent.
6
Front side outlets
Direct air flow to the left or right,
up or down.
434
6-1. Using the air conditioning system and defogger
1
Open the vent
2
Close the vent
■ Fogging up of the windows
The windows may fog up if the recirculated air mode is used.
■ Outside/recirculated air mode
When driving on dusty roads such as tunnels or in heavy traffic, set the out-
side/recirculated air mode button to the recirculated air mode. This is effective
in preventing outside air from entering the vehicle interior.
■ Air conditioning filter
P. 532
WARNING
■ To prevent the windshield from fogging up
Do not place anything on the instrument
panel which may cover the air outlets.
Otherwise, air flow may be obstructed,
preventing the windshield defoggers from
defogging.
■ To prevent burns
Do not touch the rear view mirror surfaces when the outside rear view mirror
defoggers are on.
NOTICE
■ To prevent battery discharge
Do not leave the heater system on longer than necessary when the engine
is stopped.

6-1. Using the air conditioning system and defogger
435
Automatic air conditioning system
Air outlets and fan speed are automatically adjusted according
to the temperature setting.
The illustrations below are for left-hand drive vehicles.
The button positions and shapes will differ for right-hand drive
vehicles.
Also, the display and button positions will differ depending on
the type of the system.
Air conditioning controls
Without dual control mode
6
: If equipped

436
6-1. Using the air conditioning system and defogger
With dual control mode
■ Adjusting the temperature setting
1
Increases the temperature
2
Decreases the temperature
■ Fan speed setting
1
Increases the fan speed
2
Decreases the fan speed

6-1. Using the air conditioning system and defogger
437
■ Change the airflow mode
To change the airflow mode,
move the airflow change knob
upward or downward.
The air outlets used are
changed each time the knob is
operated.
1
Air flows to the upper body.
2
Air flows to the upper body
and feet.
3
Air flows to the feet.
4
Air flows to the feet and the
Airflow change knob
windshield defogger oper-
ates.
Using automatic mode
1
Press
The dehumidification function begins to operate. Air outlets and fan
speed are automatically adjusted according to the temperature set-
6
ting.
2
Adjust the temperature setting.
3
To stop the operation, press
■ Automatic mode indicator
If the fan speed setting or air flow modes are operated, the auto-
matic mode indicator goes off. However, automatic mode for func-
tions other than that operated is maintained.

438
6-1. Using the air conditioning system and defogger
■ Adjusting the temperature for driver and passenger seats sep-
arately (vehicles with dual control mode)
To turn on the dual control mode, perform any of the following pro-
cedures:
● Press
● Adjust the passenger’s side temperature setting.
The indicator comes on when the dual control mode is on.
Other functions
■ Switching between outside air and recirculated air modes
Vehicles without dual control mode
Press
to change to recirculated air mode.
Press
to change to outside air mode.
When recirculated air mode is selected, the indicator on
illu-
minates.
When outside air mode is selected, the indicator on
illumi-
nates.
Vehicles with dual control mode
Press
The mode switches between outside air mode (indicator off) and recir-
culated air mode (indicator on) each time
is pressed.

6-1. Using the air conditioning system and defogger
439
■ Defogging the windshield
Defoggers are used to defog the windshield and front side win-
dows.
Press
The dehumidification function operates and fan speed increases.
Set the outside/recirculated air mode button to the outside air mode if
the recirculated air mode is used. (It may switch automatically.)
To defog the windshield and the front side windows early, turn the air
flow and temperature up.
To return to the previous mode, press
again when the windshield
is defogged.
■ Defogging the rear window and outside rear view mirrors
Defoggers are used to defog the rear window, and to remove rain-
drops, dew and frost from the outside rear view mirrors.
Press
The defoggers will automatically turn off after a period of time.
■ Blower customization
6
Fan speed settings can be changed.
1
Press
2
Press
3
Each time
is pressed, the fan speed changes as follows.
“MEDIUM”“SOFT”“FAST”

440
6-1. Using the air conditioning system and defogger
Air outlets
■ Location of air outlets
The air outlets and air volume
change according to the
selected airflow mode.
(P. 437)
: Some models
■ Adjusting the position of and opening and closing the air out-
lets
Front center outlets
1
Direct air flow to the left or
right, up or down.
2
Turn the knob up to open the
vent and down to close the
vent.
Front side outlets
Direct air flow to the left or right,
up or down.

6-1. Using the air conditioning system and defogger
441
1
Open the vent
2
Close the vent
■ Using automatic mode
Fan speed is adjusted automatically according to the temperature setting and
the ambient conditions.
Therefore, the fan may stop for a while until warm or cool air is ready to flow
immediately after
is pressed.
■ Fogging up of the windows
●The windows will easily fog up when the humidity in the vehicle is high.
Turning
on will dehumidify the air from the outlets and defog the wind-
shield effectively.
●If you turn
off, the windows may fog up more easily.
6
●The windows may fog up if the recirculated air mode is used.
■ Outside/recirculated air mode
● When driving on dusty roads such as tunnels or in heavy traffic, set the out-
side/recirculated air mode button to the recirculated air mode. This is effec-
tive in preventing outside air from entering the vehicle interior. During
cooling operation, setting the recirculated air mode will also cool the vehicle
interior effectively.
● Outside/recirculated air mode may automatically switch depending on the
temperature setting or the inside temperature.
■ When the outside temperature is low
The dehumidification function may not operate even when
is pressed.

442
6-1. Using the air conditioning system and defogger
■ Ventilation and air conditioning odors
● To let fresh air in, set the air conditioning system to the outside air mode.
● During use, various odors from inside and outside the vehicle may enter into
and accumulate in the air conditioning system. This may then cause odor to
be emitted from the vents.
● To reduce potential odors from occurring:
• It is recommended that the air conditioning system be set to outside air
mode prior to turning the vehicle off.
• The start timing of the blower may be delayed for a short period of time
immediately after the air conditioning system is started in automatic
mode.
■ Air conditioning filter
P. 532
■ Customization
Settings (e.g. air conditioning setting) can be changed.
(Customizable features P. 663)
WARNING
■ To prevent the windshield from fogging up
●Do not use
during cool air operation in extremely humid weather.
The difference between the temperature of the outside air and that of the
windshield can cause the outer surface of the windshield to fog up, block-
ing your vision.
●Do not place anything on the instrument
panel which may cover the air outlets.
Otherwise, air flow may be obstructed,
preventing the windshield defoggers
from defogging.
■ To prevent burns
Do not touch the rear view mirror surfaces when the outside rear view mirror
defoggers are on.
NOTICE
■ To prevent battery discharge
Do not leave the air conditioning system on longer than necessary when the
engine is stopped.

6-1. Using the air conditioning system and defogger
443
Power heater
This feature is used to keep the cabin warm in extremely cold
conditions.
On/off
The power heater turns on about
30 seconds after you press the
switch and it takes approximately
55 seconds to warm up.
■ The power heater can be operated when
The engine is running.
■ Normal characteristics of power heater operation
The following cases do not indicate a malfunction.
● When the power heater is turned on or off, some white smoke and a slight
odor may be emitted from the power heater exhaust, located under the floor.
6
● When the power heater is being used under extremely cold conditions,
vapor may be visible from its exhaust.
● When the power heater is turned off, you may hear a sound in the engine
compartment for about 2 minutes until the power heater turns off completely.
■ After the heater is off
We recommend not restarting the heater for 10 minutes after you turn it off.
Otherwise, a noise may be heard as the heater ignites.
■ When refueling your vehicle
The engine must be turned off. Turning the engine off turns the power heater
off.
: If equipped

444
6-1. Using the air conditioning system and defogger
WARNING
■ To prevent burns or damage to your vehicle
●Do not touch the heater or its exhaust
pipe as they are hot. You may burn
yourself.
●Keep flammable items such as fuel
away from the heater and its exhaust
pipe. This may cause a fire.
NOTICE
■ To prevent damage to your vehicle
●Do not turn the heater on and off repeatedly in 5 minute intervals as this
can shorten the life of the heater components. If the engine must be turned
on and off repeatedly within short intervals (such as when the vehicle is
being used for delivery purposes), turn the heater off.
●Do not modify or open the heater without consulting any authorized Toyota
dealer or repairer, or another duly qualified and equipped professional.
This may cause a heater malfunction or a fire.
●Be careful not to splash water or spill liquid directly on the heater or on the
heater fuel pump. This may cause the heater to malfunction.
●Keep the intake and exhaust pipes of the heater free from water, snow,
ice, mud, etc. If the pipes become clogged, this can cause the heater to
malfunction.
●If you notice anything unusual, such as a fluid leak, smoke or poor opera-
tion, turn off the heater and have your vehicle checked by any authorized
Toyota dealer or repairer, or another duly qualified and equipped profes-
sional.
6-1. Using the air conditioning system and defogger
445
Seat heaters
WARNING
●Care should be taken to prevent injury if anyone in the following categories
comes in contact with the seats when the heater is on:
• Babies, small children, the elderly, the sick and the physically chal-
lenged
• Persons with sensitive skin
• Persons who are fatigued
• Persons who have taken alcohol or drugs that induce sleep (sleeping
drugs, cold remedies, etc.)
●Observe the following precautions to prevent the minor burns or overheat-
ing
• Do not cover the seat with a blanket or cushion when using the seat
heater.
• Do not use seat heater more than necessary.
NOTICE
●Do not put heavy objects that have an uneven surface on the seat and do
not stick sharp objects (needles, nails, etc.) into the seat.
6
● To prevent battery discharge, do not use the functions when the engine is
not running.
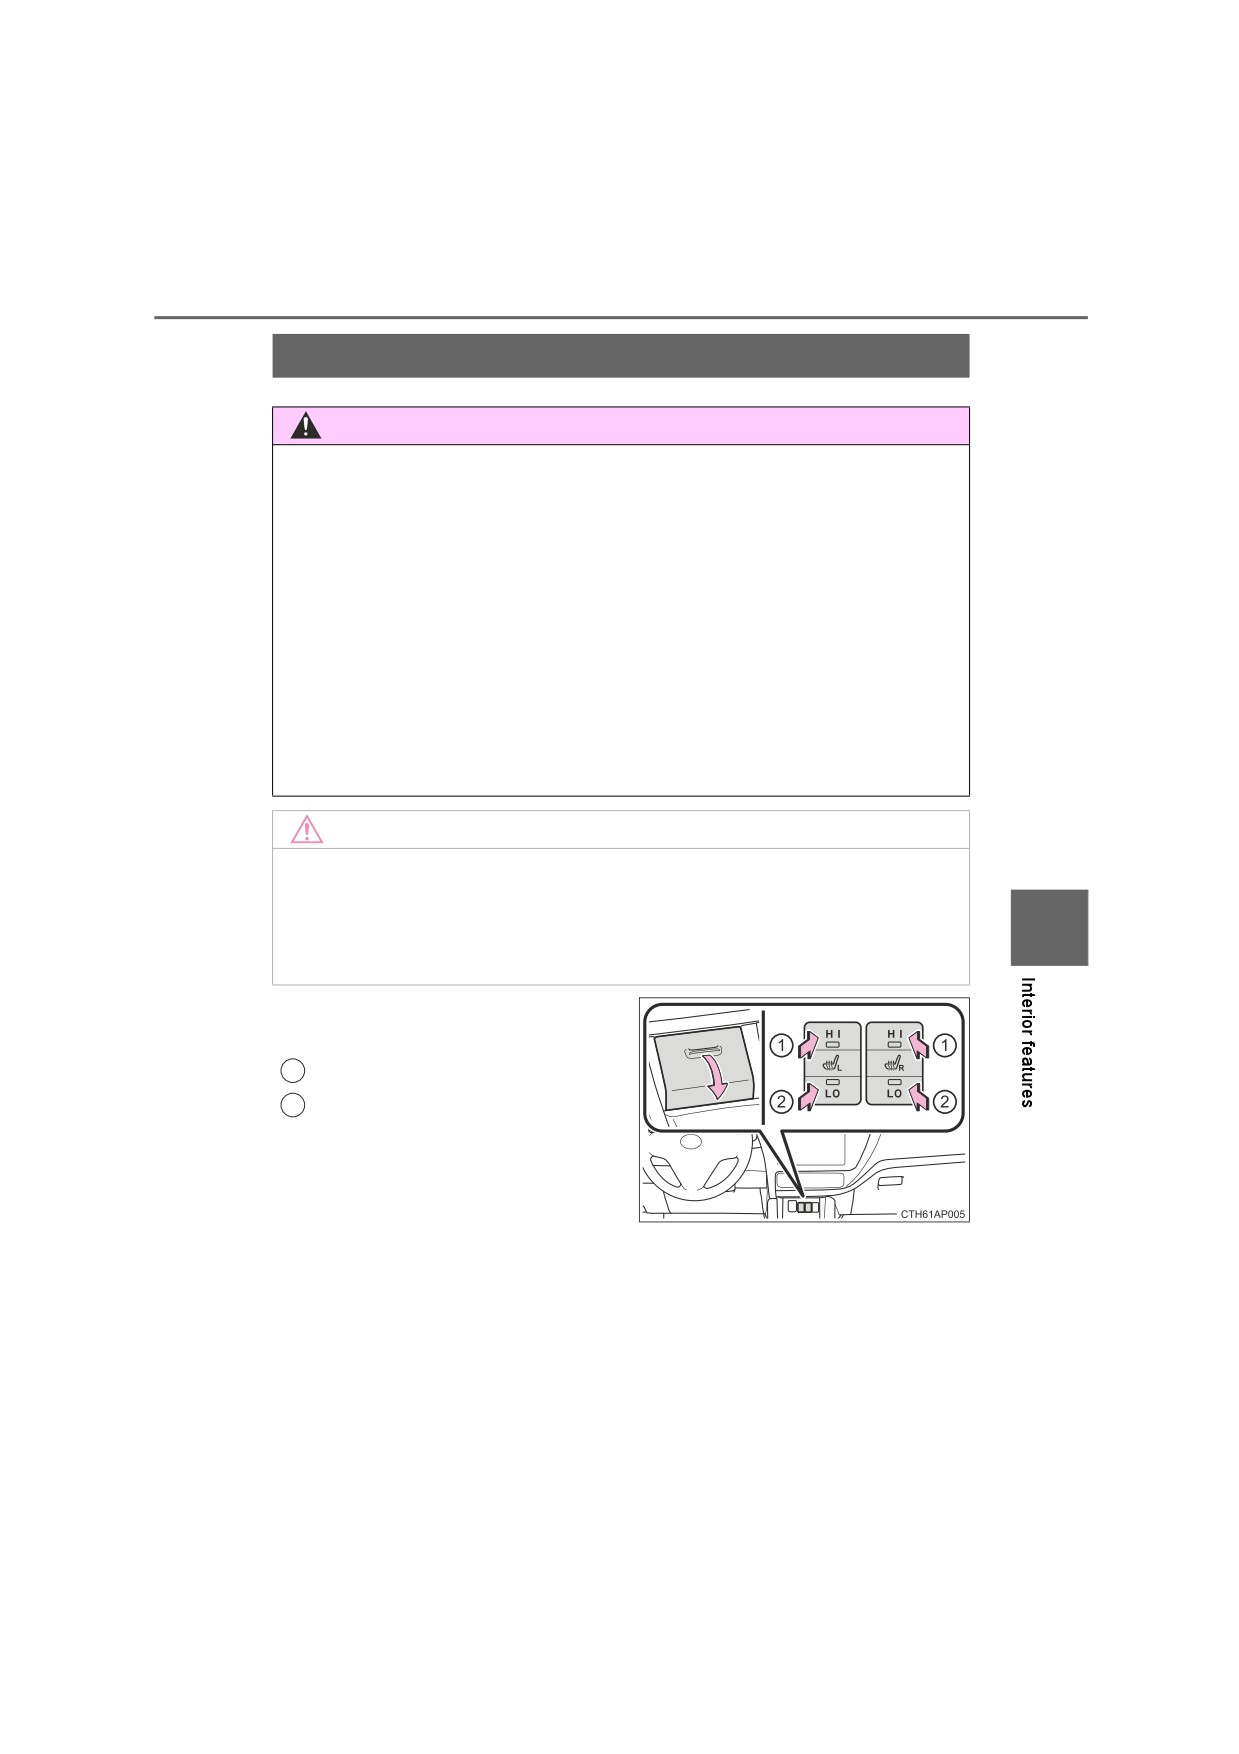
After pulling the lid to open, press
the switch.
1
High temperature
2
Low temperature
The indicator light comes on when
the switch is on.
: If equipped
446
6-1. Using the air conditioning system and defogger
● Vehicles without a smart entry & start system:
The seat heaters can be used when the engine switch is in the “ON” posi-
tion.
Vehicles with a smart entry & start system:
The seat heaters can be used when the engine switch is in IGNITION ON
mode.
● When not in use, put the switch in the neutral position. The indicator will turn
off.

6-2. Using the interior lights
447
Interior lights list
1
Vanity lights (if equipped) (P. 448)
2
Front interior/front personal lights (P. 448, 449)
6
3
Rear interior light (if equipped) (P. 448)
Rear personal light (if equipped) (P. 449)
Engine switch light (vehicles with a smart entry & start system)
4

448
6-2. Using the interior lights
Interior lights
■ Front
1
Door position
2
Off
CTH53AP035
■ Rear (if equipped)
1
On
2
Door position
3
Off
Vanity lights (if equipped)
1
On
2
Off

6-2. Using the interior lights
449
Personal lights
■ Front
On/off
When the lights are on due to
the door link switch, a light will
not turn off even if its lens is
pressed.
■ Rear (if equipped)
On/off
When the front interior lights are
on due to the door link switch, a
light will not turn off even if its
lens is pressed.
6
450
6-2. Using the interior lights
■ Illuminated entry system
Vehicles without a smart entry & start system
When the interior light switch is in the door position, the interior lights auto-
matically turn on/off according to the engine switch position, whether the
doors are locked/unlocked and whether the doors are open/closed.
Vehicles with a smart entry & start system
When the interior light switch is in the door position, the interior lights and
engine switch light automatically turn on/off according to engine switch mode,
the presence of the electronic key, whether the doors are locked/unlocked
and whether the doors are open/closed.
■ To prevent battery discharge
The following lights will turn off automatically after 20 minutes:
● Personal/interior lights
●Luggage compartment light
● Vanity lights (if equipped)
■ Customization that can be configured at any authorized Toyota dealer or
repairer, or another duly qualified and equipped professional
Settings (e.g. the time elapsed before lights turn off) can be changed.
(Customizable features: P. 663)

6-3. Using the storage features
451
List of storage features
1
Auxiliary boxes
(P. 455)
4
Cup holders (if equipped)
(P. 454)
2
Glove box
(P. 452)
6
5
Console box
(P. 452)
3
Bottle holders
(P. 453)
WARNING
●Do not leave glasses, lighters or spray cans in the storage spaces, as this
may cause the following when cabin temperature becomes high:
• Glasses may be deformed by heat or cracked if they come into contact
with other stored items.
• Lighters or spray cans may explode. If they come into contact with other
stored items, the lighter may catch fire or the spray can may release
gas, causing a fire hazard.
● When driving or when the storage compartments are not in use, keep the
lids closed.
In the event of sudden braking or sudden swerving, an accident may occur
due to an occupant being struck by an open lid or the items stored inside.

452
6-3. Using the storage features
Glove box
Pull up the lever to open the glove
box.
The glove box light turns on when the tail lights are
on.
Console box
Console box
Upper level box
Lift the lid while pulling up the Lift the lid while pulling up the
knob on the right seat side.
knob on the left seat side.
The console box lid can be slid forward or
backward. (with slide function)

6-3. Using the storage features
453
Bottle holders
Front
Rear
● When storing a bottle, close the cap.
● The bottle may not be stored depending on its size or shape.
WARNING
Do not place anything other than a bottle in the bottle holders.
Other items may be thrown out of the holders in the event of an accident or
sudden braking and cause injury.
6
454
6-3. Using the storage features
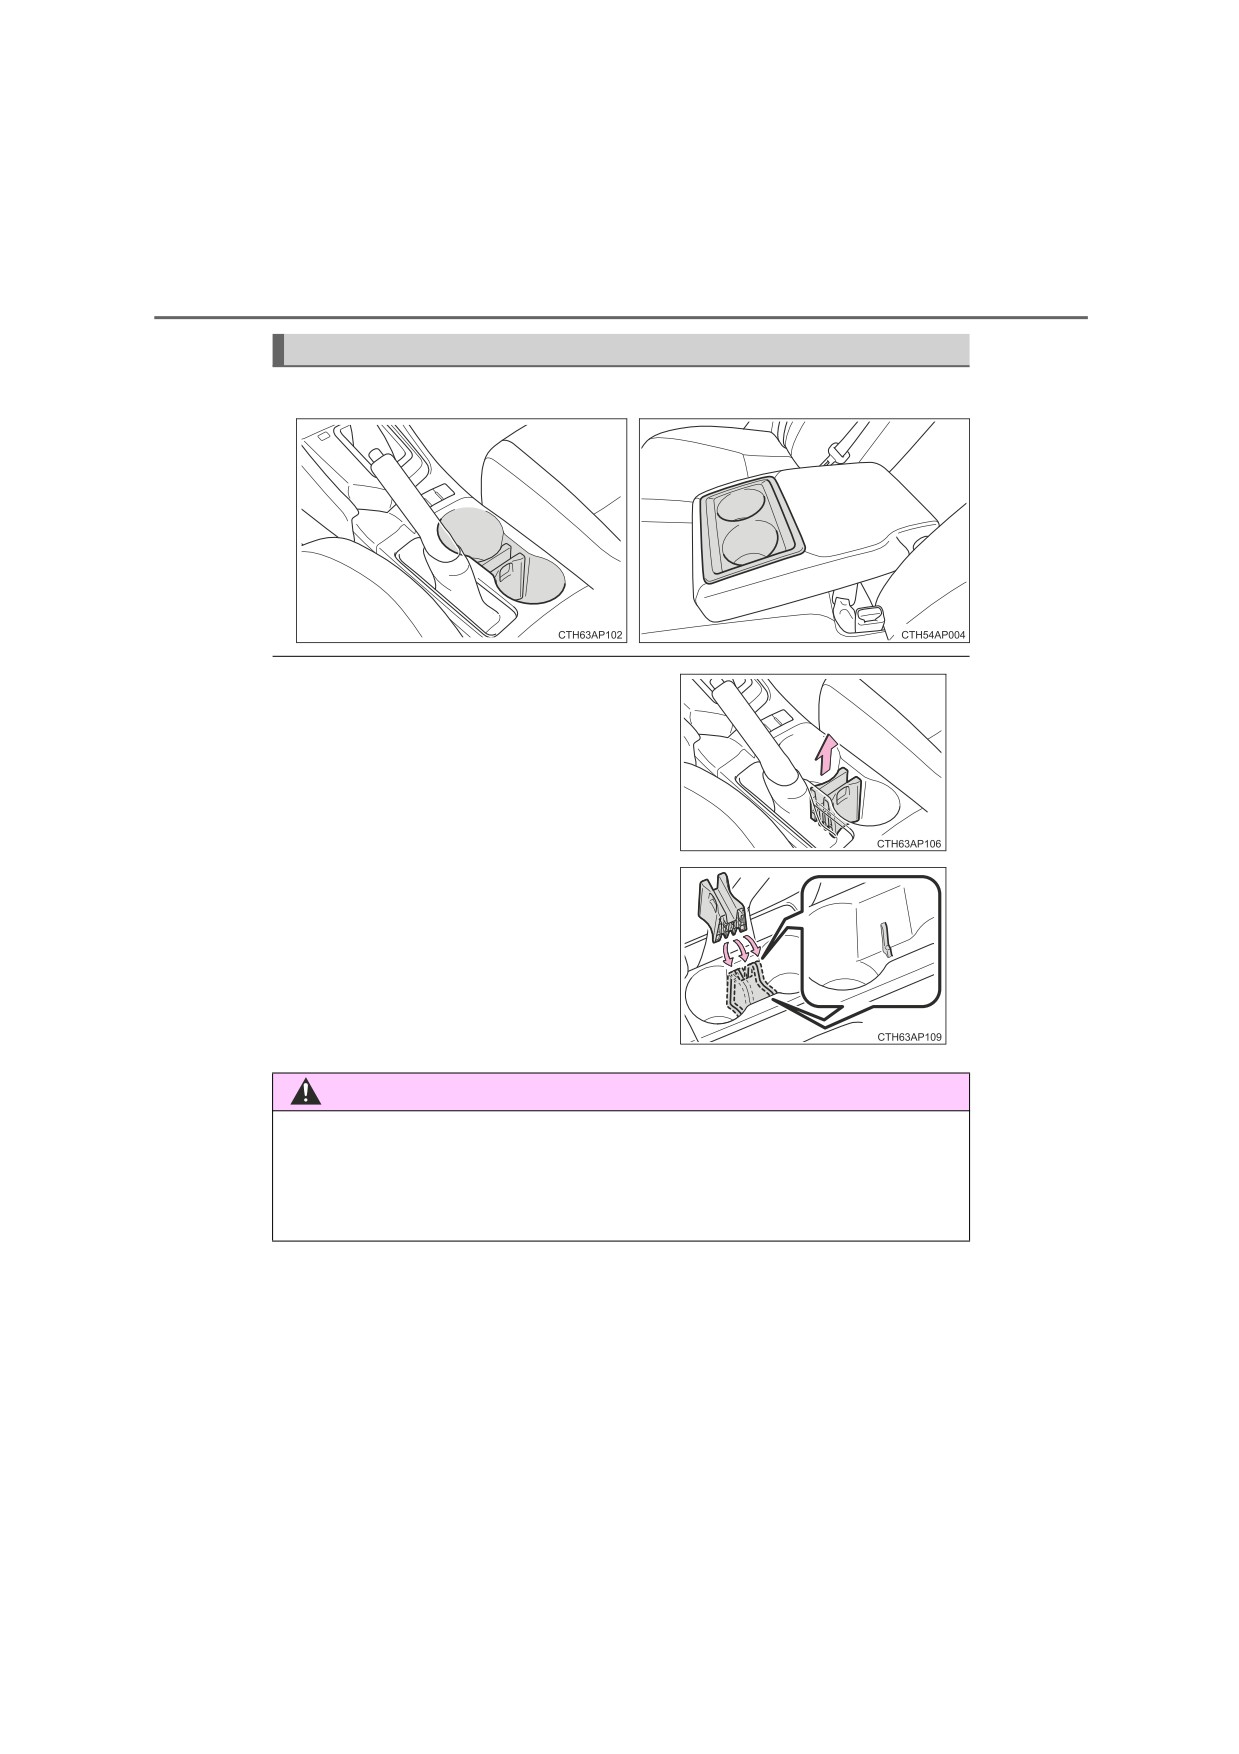
Cup holders
Front
Rear (if equipped)
● The insert for the front cup holders can
be removed for cleaning.
● The front cup holders can be adjusted to
the appropriate size for a cup or drink
can by changing the insert position.
WARNING
Do not place anything other than cups or aluminum cans in the cup holders.
Other items may be thrown out of the holders in the event of an accident or
sudden braking, causing injury. If possible, cover hot drinks to prevent
burns.

6-3. Using the storage features
455
Auxiliary boxes
Type A
Type B
Push the lid to open.
Pull the tab to open.
Type C
6
Pull the lid to open.
Type C only: The tray can be removed.

456
6-3. Using the storage features
WARNING
● Keep the auxiliary boxes closed. In the event of sudden braking, an acci-
dent may occur due to an occupant being struck by an open auxiliary box
or the items stored inside.
● Type A only: Do not store items heavier than 0.2 kg (0.4 lb.).
Doing so may cause the auxiliary box to open and the items inside may fall
out, resulting in an accident.

6-3. Using the storage features
457
Luggage compartment features
Cargo hooks (if equipped)
Cargo hooks are provided for
securing loose items.
WARNING
To avoid injury, always return the cargo hooks to their positions when they
are not in use.
Grocery bag hooks
6
NOTICE
Do not hang any object heavier than 4 kg (8.8 lb.) on the grocery bag hook.

458
6-3. Using the storage features
Deck board (if equipped)
1
Upper position
2
Lower position
The lower position can be used
when the deck board is placed on
the deck mat.
WARNING
Do not place anything on the deck board when operating the board.
Otherwise, your fingers may be caught or an accident may result causing
injuries.

6-3. Using the storage features
459
Auxiliary boxes (if equipped)
Lift the deck board tab and pull
1
it toward you to remove it. (if
equipped)
Lift the deck mat tab and pull it
2
toward you to remove it.
Type A
Type B
6
Type C

460
6-3. Using the storage features
Side auxiliary boxes (if equipped)
The luggage side trays can be
removed when the deck board is
in the lower position.

6-3. Using the storage features
461
Removing the luggage cover
1
Unhook the cords.
2
Remove the cover from the anchors.
The cover can be removed by pulling it in the direction of the arrow
labeled “A”.
If this does not work, pull the cover in the direction labeled “B”.
6

462
6-3. Using the storage features
The luggage cover can be stowed on the back of the rear seats.
1
Insert one side of the luggage cover into the gap between the back of the
rear seat and deck side trim.
2
While moving the luggage cover toward the back of the rear seat, insert the
other side of the luggage cover.
Make sure that the luggage cover is securely installed.
When using the luggage cover, reverse the steps listed.
NOTICE
Do not apply a strong impact to the stored luggage cover. Doing so may
damage the luggage cover.

6-4. Other interior features
463
Other interior features
Sun visors
To set the visor in the forward
1
position, flip it down.
To set the visor in the side posi-
2
tion, flip down, unhook, and
swing it to the side.
Vanity mirrors
Open the cover.
6

464
6-4. Other interior features
Clock
The clock can be adjusted by pressing the buttons.
1
Adjusts the hours
2
Adjusts the minutes
● Vehicles without a smart entry & start system:
The clock is displayed when the engine switch is in the “ACC” or “ON” posi-
tion.
Vehicles with a smart entry & start system:
The clock is displayed when the engine switch is in ACCESSORY or IGNI-
TION ON mode.
● When the battery terminals are disconnected and reconnected, the clock
will automatically be set to 1:00.
Portable ashtray (if equipped)
The ashtray can be installed in a
cup holder. (P. 454)
WARNING
● When not in use, keep the ashtray closed.
Injuries may result in the event of sudden braking, sudden swerving or an
accident.
● To prevent fire, fully extinguish matches and cigarettes before putting them
in the ashtray, then make sure the ashtray is fully closed.
● To prevent fire, do not place paper or any other type of flammable object in
the ashtray.

6-4. Other interior features
465
Power outlets
For front and rear: Please use as a power supply for electronic goods
that use less than 12 VDC/10 A (power consumption of 120 W).
When using electronic goods, make sure that the power consumption
of all the connected power outlets is less than 120 W.
For luggage compartment: Please use as a power supply for elec-
tronic goods that use less than 12 VDC/10 A (power consumption of
120 W).
Front
Rear
Pull the lid to
open
it, then open Open the cover.
the cover.
6
Luggage compartment
Open the cover.

466
6-4. Other interior features
● Vehicles without a smart entry & start system:
The power outlets can be used when the engine switch is in the “ACC” or
“ON” position.
Vehicles with a smart entry & start system:
The power outlets can be used when the engine switch is in ACCESSORY
or IGNITION ON mode.
● Vehicles with Stop & Start system: When the engine restarts after having
been stopped by the Stop & Start system, the power outlet may be tempo-
rarily unusable, but this is not a malfunction.
NOTICE
● To avoid damaging the power outlets, close the power outlet covers when
the power outlets are not in use.
Foreign objects or liquids that enter the power outlets may cause a short
circuit.
● To prevent battery discharge, do not use the power outlets longer than
necessary when the engine is not running.
Armrest (if equipped)
Fold down the armrest for use.
NOTICE
To prevent damage to the armrest, do not apply too much load on the arm-
rest.

6-4. Other interior features
467
Assist grips
An assist grip installed on the ceil-
ing can be used to support your
body while sitting on the seat.
WARNING
Do not use the assist grip when getting in or out of the vehicle or rising from
your seat.
NOTICE
To prevent damage to the assist grip, do not put a heavy load on the assist
grip.
Coat hooks
6
Coat hooks are provided on the
rear assist grips.
WARNING
Do not hang coat hangers or other hard or sharp objects on the hook. If the
SRS curtain shield airbags deploy, these items may become projectiles,
causing death or serious injury.

468
6-4. Other interior features
Panoramic roof shade (if equipped)
Use the overhead switch to open or close the panoramic roof shade.
1
Closing
2
Automatic full-closing
(press
and hold)*
3
Opening
4
Automatic full-opening
(press
and hold)*
*: Pressing either side of the switch
will stop the panoramic roof shade
travel partway.
■ The panoramic roof shade can be operated when
Vehicles without a smart entry & start system
The engine switch is in the “ON” position.
Vehicles with a smart entry & start system
The engine switch is in IGNITION ON mode.
■ Jam protection function
If an object is detected between the panoramic roof shade and the frame
while closing, travel is stopped and the panoramic roof shade opens slightly.
■ If the panoramic roof shade does not open/close automatically
Press the open side of the switch to open the panoramic roof shade.
1
Press and hold the open side of the switch until the panoramic roof shade
2
opens fully and then closes slightly.
After this procedure is completed, check that the automatic opening/closing
function is available.
If the automatic opening/closing function does not work properly, have the
vehicle inspected by any authorized Toyota dealer or repairer, or another duly
qualified and equipped professional.