Subaru Forester (2019). Instruction - part 9


  Index      Subaru     Subaru Forester (2019). Instruction in english


Search            copyright infringement  


Content   ..  7  8  9  10   ..


Subaru Forester (2019). Instruction - part 9


(69,1)

11. Latch the top tether hook onto the
tether anchorage that is located behind the
rear seat and tighten the top tether firmly.
For additional instructions, refer to “Top
tether anchorages” FP71.

12. To remove the child restraint system,

press the release button on the seatbelt
buckle and allow the belt to retract
completely. The belt will return to the
ELR mode.

Remember that the head restraint is not
intended to be used at the lowest position
(retracted position). Therefore, when the
rear center seat is occupied (including
when a child restraint system is installed)
next time, be sure to raise the head
restraint to the extended position.

NOTE

When the child restraint system is no
longer in use, remove it and restore the
ELR function of the retractor. That
function is restored by allowing the
seatbelt to retract fully.

&

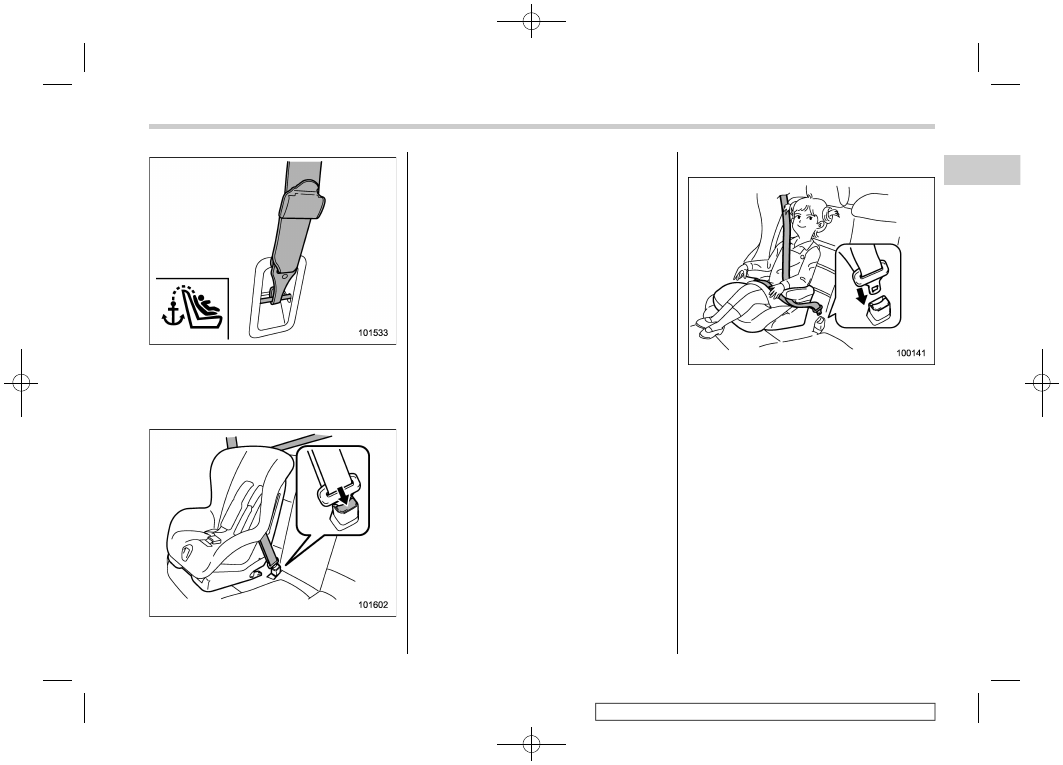
Installing a booster seat

1. Place the booster seat in the rear
seating position and sit the child on it.
The child should sit well back on the
booster seat.
2. Run the lap and shoulder belt through
or around the booster seat and the child
following the instructions provided by its
manufacturer.
3. Insert the tongue plate into the buckle
until you hear a click. Take care not to twist
the seatbelt.
Make sure the shoulder belt is positioned
across the center of child’s shoulder and
that the lap belt is positioned as low as
possible on the child’s hips.

– CONTINUED –

Child restraint systems

67

1

Seat,

seatbelt

and

SRS

airbags

-------------------------------------------------------------------------------------------------------------------------------------------------------------

(70,1)

4. To remove the booster seat, press the
release button on the seatbelt buckle and
allow the belt to retract.

WARNING

.

Never use a belt that is twisted or

reversed. In an accident, this can
increase the risk or severity of
injury to the child.

.

Never place the shoulder belt

under the child’s arm or behind
the child’s back. If an accident
occurs, this can increase the risk
or severity of injury to the child.

.

The seatbelt should fit snugly in

order to provide full restraint.
Loose fitting belts are not as

effective in preventing or redu-
cing injury.

.

Place the lap belt as low as

possible on the child’s hips. A
high-positioned lap belt will in-
crease the risk of sliding under
the lap belt and of the lap belt
sliding up over the abdomen, and
both can result in serious internal
injury or death.

.

Make sure the shoulder belt is

positioned across the center of
child’s shoulder. Placing the
shoulder belt over the neck may
result in neck injury during sud-
den braking or in a collision.

&

Installation of child restraint
systems by use of lower and
tether anchorages (LATCH)

!

Lower and tether anchorages

Some types of child restraint systems can
be installed on the rear seat of the vehicle
without use of the seatbelts. Such child
restraint systems are secured to the
designated anchorages provided on the
vehicle body. The lower and tether an-
chorages are sometimes referred to as the
LATCH system (Lower Anchors and
Tethers for CHildren).

Child restraint systems

68

-------------------------------------------------------------------------------------------------------------------------------------------------------------

(71,1)

This vehicle is equipped with five lower
anchorages (bars) and three upper an-
chorages (tether anchorages) for accom-
modating such child restraint systems.

!

Lower anchorages

There are a total of 5 lower anchorages at
the rear seat. The rear anchorage from the
right side is used for both the right seat and
center seat. Each lower anchorage is
located where the seat cushion meets
the seatback.

!

Tether anchorages

The tether anchorages (upper an-
chorages) are provided at the locations
shown in the above illustration. For details,
refer to “Top tether anchorages” FP71.

!

To install a child restraint system
using lower and tether an-
chorages

WARNING

Before installing a child restraint
system, be sure to confirm that the
seatback is securely locked into
place. Otherwise, in an accident,
serious injury or death could result.

1. Shake the seatback slightly to confirm
that it is securely locked into place.

– Check the red colored unlocking
marker which is attached to the bottom
of the lock release knob is not visible.
For details, refer to “Folding down the
rear seatback” FP40.

– CONTINUED –

Child restraint systems

69

1

Seat,

seatbelt

and

SRS

airbags

-------------------------------------------------------------------------------------------------------------------------------------------------------------

(72,1)

2. There are “

” marks at the bottom of

the rear seat seatbacks. These marks
indicate the positions of the lower an-
chorages (bars).

3. Peel off the anchorage cover from the
selected side of the rear seatback. Fold the
peeled anchorage cover in half and affix it
with hook and loop tape to expose the
anchorages (bars) to be used for installa-
tion of the child restraint system.
4. Remove the rear seat head restraint.
For details, refer to “Head restraints”
FP43.

CAUTION

Store the head restraint that has
been removed in the cargo area.
Avoid placing the head restraint in

the passenger compartment, as it
could be thrown around in the
passenger compartment in a sud-
den stop or a sharp turn.

5. For models with a reclining rear seat
mechanism, adjust the seatback to the
upright position.
6. Fasten the lower hooks onto the lower
anchorages located at “

” marks on the

bottom of the rear seatback. When the
hooks are fastened, make sure the adja-
cent seatbelts are not caught.

7. If your child restraint system is a
flexible attachment type, (which uses
tether belts).
Push the child restraint into the seat
cushion and pull both left and right lower
tether belts up to secure the child restraint
system by taking up the slack in the belt.
8. Fasten the top tether hook onto the
tether anchorage behind the rear seat and
tighten the top tether firmly. For additional
instructions, refer to “Top tether an-
chorages” FP71.

Child restraint systems

70

-------------------------------------------------------------------------------------------------------------------------------------------------------------

(73,1)

9. Before seating a child in the child
restraint system, shake it to verify that it
is securely in position.
10. To remove the child restraint system,
follow the reverse procedure of installa-
tion.

If you have any questions concerning this
type of child restraint system, consult with
your SUBARU dealer.

&

Top tether anchorages

This vehicle is equipped with three top
tether anchorages so that a child restraint
system having a top tether can be installed
in the rear seat. When installing such a
child restraint system, proceed as follows,
while observing the instructions from the
child restraint system manufacturer.

Since a top tether can provide additional
stability by offering another connection
between a child restraint system and the
vehicle, we recommend that you use a top
tether whenever possible.

!

Anchorage location

1)

Left seat

2)

Center seat

3)

Right seat

Three upper anchorages are installed on
the back side of the rear seatback.

– CONTINUED –

Child restraint systems

71

1

Seat,

seatbelt

and

SRS

airbags

-------------------------------------------------------------------------------------------------------------------------------------------------------------

(74,1)

!

To hook the top tether

CAUTION

.

Remove the head restraint when

mounting a child restraint sys-
tem. Otherwise, the top tether
cannot be fastened tightly.

.

Store the head restraint that has

been removed in the cargo area.
Avoid placing the head restraint
in the passenger compartment,
as it could be thrown around in
the passenger compartment in a
sudden stop or a sharp turn.

1. Remove the head restraint where the
child restraint system is to be installed. For
details, refer to “Head restraints” FP43.
2. For models with a reclining rear seat,
adjust the seatback to the upright position.

3. Attach the top tether hook to the
appropriate upper anchorage.
4. Tighten the top tether securely.

Contact your SUBARU dealer if you have
any questions regarding the installation of
a child restraint system.

WARNING

.

Do not use a seat belt extender. If

a seat belt extender is used when
installing a child restraint sys-
tem, the seat belt will not se-
curely hold the child restraint
system. Use of a seat belt exten-
der could cause death or serious
injury to children or other pas-
sengers in sudden braking, swer-
ving, or accidents.

.

Attach the child restraint system

to the anchors properly. When
using the LATCH anchors, be
sure that there are no foreign
objects around the anchors.
Also, the seat belts should not
be caught behind the child re-
straint system. Make sure the
child restraint system is securely
attached. Otherwise it may cause
death or serious injury to chil-
dren or other passengers in sud-
den braking, swerving, or acci-
dents.

Child restraint systems

72

-------------------------------------------------------------------------------------------------------------------------------------------------------------

(75,1)

1-8. *SRS airbag (Supple-
mental Restraint System air-
bag)

*SRS: This stands for supplemental re-
straint system. This name is used because
the airbag system supplements the vehi-
cle’s seatbelts.

Your vehicle is equipped with a supple-
mental restraint system in addition to a lap/
shoulder belt at each front seating position
and each rear window-side seating posi-
tions. The supplemental restraint system
(SRS) consists of seven airbags.
The configurations are as follows.
.

Driver’s and front passenger’s frontal

airbags
.

Driver’s and front passenger’s side

airbags
.

Curtain airbags (for driver, front pas-

senger, and window-side rear passen-
gers)
.

Knee airbag for driver

These SRS airbags are designed only
as a supplement to the primary protec-
tion provided by the seatbelt.
The system also controls seatbelt preten-
sioners. For operation instructions and
precautions concerning the seatbelt pre-

tensioner, refer to “Seatbelt pretensioners”
FP56.

&

General precautions regard-
ing SRS airbag system

WARNING

.

To obtain maximum protection in

the event of an accident, the
driver and all passengers must
always wear seatbelts when in
the vehicle. The SRS airbag is
designed only to be a supplement
to the primary protection pro-
vided by the seatbelt. It does not
eliminate the need to fasten seat-
belts. In combination with the
seatbelts, it offers the best com-
bined protection in case of a
serious accident.

Not wearing a seatbelt increases
the chance of severe injury or
death in a crash even when the
vehicle has the SRS airbag.

For instructions and precautions
concerning the seatbelt system,
refer to “Seatbelts” 
FP47.

.

The SRS side airbag and SRS

curtain airbag are designed only
to be a supplement to the primary
protection provided by the seat-

belt. They do not eliminate the
need to fasten seatbelts. It is also
important to wear your seatbelt to
help avoid injuries that can result
when an occupant is not seated
in a proper upright position.

WARNING

.

The SRS airbags deploy with

considerable speed and force.
Occupants who are out of proper
position when the SRS airbag
deploys could suffer very serious
injuries. Because the SRS airbag
needs enough space for deploy-
ment, the driver should always sit
upright and well back in the seat
as far from the steering wheel as

– CONTINUED –

SRS airbag (Supplemental Restraint System airbag)

73

1

Seat,

seatbelt

and

SRS

airbags

-------------------------------------------------------------------------------------------------------------------------------------------------------------

(76,1)

practical while still maintaining
full vehicle control and the front
passenger should move the seat
as far back as possible and sit
upright and well back in the seat.

WARNING

.

Do not sit or lean unnecessarily

close to either front door. The
SRS side airbags are stored in
both front seat seatbacks next to
the door, and they provide pro-
tection by deploying rapidly (fas-
ter than the blink of an eye) in the
event of a side impact collision.
However, the force of SRS side
airbag deployment may cause
injuries if your head or other

parts of the body are too close to
the SRS side airbag.

.

Since your vehicle is equipped

with SRS curtain airbags, do not
sit or lean unnecessarily close to
the front or rear door on either
side. Also, do not put your head,
arms or hands out of the window.
The SRS curtain airbags on both
sides of the cabin are stored in
the roof side (between the front
pillar and a point behind the rear
quarter glass), and they provide
protection by deploying rapidly
(faster than the blink of an eye) in
the event of a side impact, roll-
over or an offset frontal collision.
However, the force of its deploy-
ment may cause injuries if your
head is too close to it.

.

Do not sit or lean unnecessarily

close to the SRS airbag. Because
the SRS airbag deploys with
considerable speed (faster than
the blink of an eye) and force to
protect in high speed collisions,
the force of an airbag can injure
an occupant whose body is too
close to SRS airbag.

It is also important to wear your
seatbelt to help avoid injuries
that can result when the SRS

airbag contacts an occupant not
in proper position, such as one
thrown forward during pre-acci-
dent braking.

Even when properly positioned,
there remains a possibility that
an occupant may suffer minor
injury such as abrasions and
bruises to the face or arms be-
cause of the SRS airbag deploy-
ment force.

WARNING

.

Do not rest your arm on either

front door or its internal trim. You
could be injured in the event of
SRS side airbag deployment.

SRS airbag (Supplemental Restraint System airbag)

74

-------------------------------------------------------------------------------------------------------------------------------------------------------------


Content   ..  7  8  9  10   ..