Peugeot 3008 (2017 year). Manual - part 6


  Index      Peugeot     Peugeot 3008 - service manual 2017 year in english


Search            copyright infringement  


Content   ..  4  5  6  7   ..


Peugeot 3008 (2017 year). Manual - part 6


2

Access

79

3008-2_en_Chap02_ouvertures_ed01-2016

When opening and closing a motorised tailgate 
manually, there is no assistance from gas-filled 
struts. Resistance to opening and closing is 
therefore entirely normal.

Repeated opening and closing of 
the motorised tailgate can cause 
overheating of its electric motor, after 
which opening and closing will not be 
possible.
Allow at least 10 minutes for the electric 
motor to cool down before operating the 
tailgate again.
If you are unable to wait, operate it 
manually.

Detection of obstacles

If an obstacle (person or object) is 
encountered, the anti-pinch system stops the 
closing movement and raises the tailgate by a 
few centimetres to clear the obstacle.

Memorising an opening 
position

Where height is restricted (garage with a low 
ceiling, ...) it is possible to limit and memorise 
the opening angle of the motorised tailgate.

This memorisation is done as follows:
F  open the tailgate to the desired position,
F  press button C or the exterior control B for 

more than 3 seconds.

Memorisation of the maximum opening position 
of the tailgate is confirmed by an audible signal.

To cancel the memorised position:
F  stop the tailgate in an intermediate 

position,

F  press button C or the exterior control B for 

more than 3 seconds.

Cancellation of the memorised position is 
confirmed by an audible signal.

Manual operation

The tailgate can be opened and closed 
manually, even if motorised operation is 
activated.
However, any manual operation must be done 
with the tailgate first stopped.

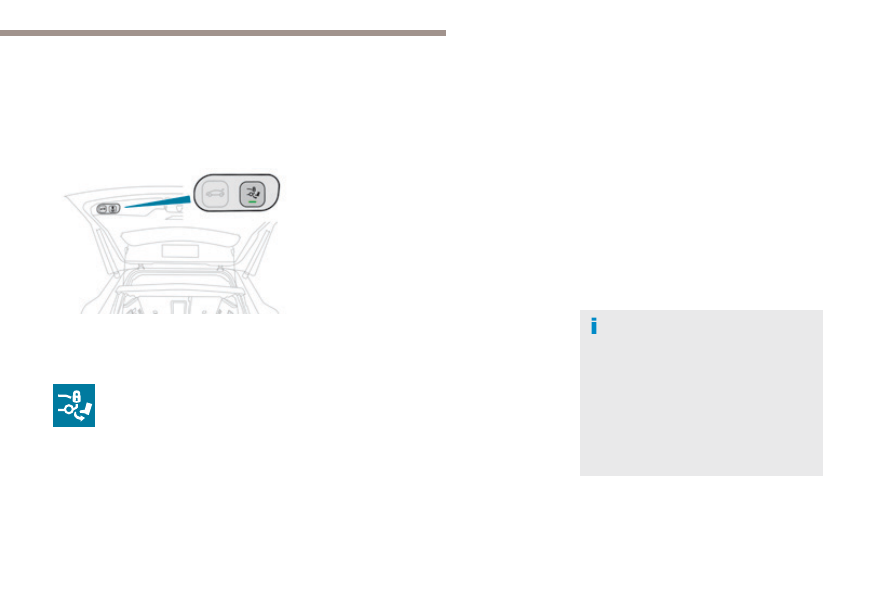
It is possible to activate automatic locking of 
the vehicle on closing the tailgate, using the 
Hands-Free Tailgate Access function.

F  Press this button; its indicator 

lamp comes on.

Pressing this button again deactivates the 
function; its indicator lamp goes off.

Automatic locking by the Hands-
Free Tailgate Access function

Access

80

3008-2_en_Chap02_ouvertures_ed01-2016

Precautions in use

In wintry conditions

In the event of an accumulation of snow 
on the tailgate, clear the snow before 
commanding a motorised opening of 
the tailgate.
The formation of ice can block the 
tailgate and prevent its opening: wait 
until the ice melts with the heating of 
the passenger compartment.

When washing

When washing the vehicle in an 
automatic car wash, don't forget to 
lock your vehicle to avoid the risk of 
unexpected opening.

Reinitialising the motorised 
tailgate

This operation is necessary where there is 
no movement - after detection of an obstacle, 
connecting or recharging the battery, ...
F  Open the tailgate manually, if necessary.
F  Fully close the tailgate manually.
If the problem persists, contact a PEUGEOT 
dealer or a qualified workshop.

2

Access

81

3008-2_en_Chap02_ouvertures_ed01-2016

Back-up release

Unlocking

F  Fold back the rear seats to gain access to 

the lock from inside the boot.

F  Insert a small screwdriver into hole A of the 

lock to unlock the tailgate.

F  Move the latch to the left.

Locking after closing

If the fault persists after closing again, the boot 
will remain locked.

To manually unlock the boot in the event of a 
battery or central locking failure.

Recommendations related to the "Hands-free tailgate 
access" function

If several passes of your foot below the rear 
bumper fail to open the tailgate, wait a few 
seconds before starting again.

The function is automatically deactivated in the 
event of heavy rain or accumulation of snow.

If the function fails to operate, check that 
the electronic key is not exposed to strong 
electromagnetic interference (a smartphone, ...).

The function may not work correctly with a 
prosthetic leg.

The function may not work correctly if your 
vehicle is fitted with a towbar.

In some circumstances, the tailgate may only 
open or close, particularly if:

your vehicle is fitted with a towbar,

you hitch or unhitch a trailer,

you fit or remove a bicycle carrier,

you load or unload bicycles from a bicycle 
carrier,

you place or lift something behind the 
vehicle,

an animal approaches the rear bumper,

you are washing your vehicle,

a service is being carried out on your 
vehicle,

you are accessing the spare wheel 
(depending on version).

To avoid such operating problems, keep the 
electronic key away from the recognition zone 
or deactivate "Hands-free tailgate access".

Ensure that no object or person might 
prevent the correct opening or closing 
of the tailgate.
Be particularly aware of children when 
operating the tailgate.

Access

82

3008-2_en_Chap02_ouvertures_ed01-2016

Electric windows

Manual operation

To open or close the window, press or pull the 
switch gently. The window stops as soon as the 
switch is released.

1.  Left-hand front.
2.  Right-hand front.
3.
  Right-hand rear.
4.
  Left-hand rear.
5.  Deactivate the electric window switches 

located at the rear seats.

Automatic operation

Safety anti-pinch

To open or close the window, press or pull 
the switch fully: the window opens or closes 
completely when the switch is released. 
Pressing the switch again stops the movement 
of the window.

When the window rises and meets an obstacle, 
it stops and immediately partially lowers again.
In the event of unwanted opening of the 
window on closing, press the switch until the 
window opens completely, then pull the switch 
immediately until the window closes. Continue 
to hold the switch for approximately one second 
after the window has closed.
The safety anti-pinch function is not active 
during this operation.

The electric window switches 
remain operational for approximately 
45 seconds after switching off the 
ignition.
Once this time has elapsed, the electric 
windows will not operate. To reactivate 
them, switch the ignition on again.

2

Access

83

3008-2_en_Chap02_ouvertures_ed01-2016

For the safety of your children, press switch 5 
to prevent operation of the rear windows 
irrespective of their positions.

In the event of contact during operation 
of the windows, you must reverse the 
movement of the window. To do this, 
press the switch concerned.
When operating the passenger electric 
window switches, the driver must 
ensure that nothing is preventing 
correct closing of the windows.
The driver must ensure that the 
passengers use the electric windows 
correctly.
Be particularly aware of children when 
operating the windows.
Be aware of passengers or other 
persons present when closing the 
windows using the electronic key or the 
"Keyless Entry and Starting" system.

Deactivating the rear 
controls for the rear 
windows

The indicator lamp in the button comes on, 
accompanied by a message confirming 
activation. It remains on, as long as the child 
lock is off (deactivated).
Use of the rear electric windows from the 
driver's controls remains possible.

Reinitialising the electric 
windows

Following reconnection of the battery, the 
safety anti-pinch function must be reinitialised.
The safety anti-pinch function is not active 
during these operations.

For each window:

lower the window completely, then raise it, 
it will rise in steps of a few centimetres with 
each action. Repeat the operation until the 
window closes completely,

continue to pull the switch for at least one 
second after reaching this position, window 
closed.

Access

84

3008-2_en_Chap02_ouvertures_ed01-2016

Panoramic opening sunroof

The control buttons for the sunroof and blind 
can be used:

with the ignition on, if the state of charge of 
the battery is adequate,

with the engine running,

in STOP mode of Stop & Start,

during the 45 seconds after switching off 
the ignition,

during the 45 seconds after locking the 
vehicle.

Opening

The panoramic sunroof and its blind are 
opened and closed using the buttons in the roof 
console.
A.  Blind control button.
B.  Sunroof control button.

Ensure that any luggage or accessories 
carried on the roof bars do not interfere 
with the movement of the sunroof.
Do not place heavy loads on the fixed 
or mobile glass of the sunroof.

Before operating the sunroof or blind 
control buttons, ensure that no object or 
person might prevent the movement.

Principles

Complete opening of the sunroof involves partly 
raising the mobile glass, then sliding it over the 
fixed glass.
Any intermediate position is possible.
Opening the sunroof also opens its blind.
However, the blind can be left open when the 
sunroof is closed.

With the sunroof fully closed or 
partly raised:
F  press and release the rear of 

button B without going beyond 
the point of resistance to fully 
raise the sunroof.

With the sunroof open in the raised position:
F  press and release the rear of button B 

without going beyond the point of 
resistance to open the sunroof.

With the sunroof partly or fully closed:
F  press and release the rear of button B 

going beyond the point of resistance to fully 
close the sunroof.

Any new action on this button interrupts the 
movement.

Operating the sunroof

F  Press and hold the rear of button B without 

going beyond the point of resistance; the 
sunroof opens and stops when you release 
the button.

2

Access

85

3008-2_en_Chap02_ouvertures_ed01-2016

If the sunroof is wet, following a shower 
or washing the vehicle, wait until it is 
completely dry before opening.
Do not operate the sunroof if it is 
covered by snow or ice - Risk of 
damage!
Use only plastic scrapers to remove 
snow or ice.

Do not extend your head or arms 
through the open sunroof when driving - 
Risk of serious injury!

Closing

F  press and hold the front of button B without 

going beyond the point of resistance; the 
sunroof closes and stops when you release 
the button.

Never leave the vehicle with the sunroof 
open.

Anti-pinch system

If the sunroof encounters an obstacle when 
closing, the movement is automatically 
reversed.
The anti-pinch system is designed to be 
effective at speeds of up to 75 mph (120 km/h).

Reinitialisation

Following reconnection of the battery or in 
the event of a fault or jerky movement of 
the sunroof, the opening sunroof must be 
reinitialised:
F  press the rear of button B until the sunroof 

is fully open,

F  press and hold the rear of button B again 

for at least 3 seconds.

Check the condition of the sunroof 
seals regularly (presence of dust or 
deposits, dead leaves...).
Before using a car wash, first check that 
the sunroof is closed. If using a high 
pressure jet wash, keep the tip of the 
lance at least 30 centimetres from the 
seals.

With the sunroof partially or fully 
open:
F  press and release the front of 

button B going beyond the point 
of resistance to fully close the 
sunroof.

Any new action on this button 
interrupts the movement.

With the sunroof partly or fully open:
F  press and release the front of button B 

without going beyond the point of 
resistance to close the sunroof to its raised 
position.

F  press and release the front of button B 

again to fully close the sunroof.

With the sunroof fully or partly raised:
F  press and release the front of button B 

without going beyond the point of 
resistance to fully close the sunroof.

Access

86

3008-2_en_Chap02_ouvertures_ed01-2016

Operating the sunroof blind

Opening

F  Press and hold the rear of button A, without 

going beyond the point of resistance; the 
blind opens and stops when you release 
the button.

During simultaneous closing of the 
sunroof and the blind, if the blind 
catches up with the sunroof, the 
blind then suspends its movement 
and automatically resumes when the 
sunroof stops.

The closing movement of the blind is limited by 
the position of the opening sunroof: the blind 
cannot be further forward than the front of the 
mobile glass.

Closing

Any new action on this button interrupts the 
movement.

Anti-pinch system

If the blind encounters an obstacle when 
closing, the movement is automatically 
reversed.

Reinitialisation

Following reconnection of the battery or in the 
event of a fault or jerky movement of the blind, 
the blind must be reinitialised:
F  press the rear of button A until the blind is 

fully open,

F  press and hold the rear of button A again 

for at least 3 seconds.

F  Press the rear of button A going 

beyond the point of resistance to 
fully open the blind.

Any new action on this button interrupts the 
movement.

F  Press the front of button A

going beyond the point of 
resistance to fully close the 
blind.

F  Press and hold the front of button A

without going beyond the point of 
resistance; the blind closes and stops 
when you release the button.

2

Access

87

3008-2_en_Chap02_ouvertures_ed01-2016

When locking the vehicle, pressing 
and holding the locking button also 
closes the windows and the sunroof 
and then the blind. The movements 
are interrupted when you release the 
locking button.

Never leave the electronic key inside 
the vehicle if you get out of the vehicle, 
even for a short time.
If something is trapped when closing 
the sunroof or blind, you should reverse 
the movement of the sunroof or blind. 
To do this, press the control button in 
question.
The driver must ensure that passengers 
use the sunroof and blind correctly.
Be particularly aware of children when 
operating the sunroof or blind.

88

Ease of use and comfort

3008-2_en_Chap03_ergonomie-et-confort_ed01-2016

Driving position

Adopting a good driving position helps improve your comfort and protection.
It also optimises interior and exterior visibility as well as access to controls.

Sitting comfortably

Driver

Sit fully back in the seat with your pelvis, back 
and shoulders in contact with the seat backrest.
Adjust the height of the seat so that your eyes 
are level with the middle of the windscreen.
Your head should be at a distance of at least  
10 cm from the roof.
Adjust the longitudinal position of the seat so 
that you can fully depress the pedals with your 
legs still slightly bent.

Passenger

Sit fully back in the seat with your pelvis, back 
and shoulders in contact with the seat backrest.
Adjust the longitudinal position of the seat so 
that you are at a distance of at least 25 cm from 
the dashboard.
Adjust the head restraint so that its upper edge 
is level with the top of your head.

If your vehicle has electric seats, the 
ignition must be on to adjust them.

The distance between your knees and the 
dashboard should be at least 10 cm, for easy 
access to the controls in the dashboard.
Adjust the seat backrest angle to the most 
vertical position possible; the backrest must not 
be reclined more than 25° from vertical.
Adjust the head restraint so that its upper edge 
is level with the top of your head.
Adjust the length of the seat cushion to support 
your thighs.
Adjust the lumbar support to fit the shape of 
your spine.
Adjust the steering wheel so that it is at 
distance of at least 25 cm from your chest  and 
you are able to hold it with your arms slightly 
bent.
The steering wheel must not obstruct your view 
of the instrument panel.

As a safety measure, the seats and 
steering wheel must only be adjusted 
when stationary.

The presence in the vehicle of certain seat adjustments described in this section depends on the trim level and country of sale.

3

Ease of use and comfort

89

3008-2_en_Chap03_ergonomie-et-confort_ed01-2016

Before moving off

If your vehicle has electric door mirrors, 
the ignition must be on to adjust them.

When driving

Adjust the interior and exterior door mirrors so 
as to reduce blind spots.

Maintain a good driving position and hold the 
steering wheel with both hands at the quarter 
to three position, so that you can easily and 
quickly reach the controls behind and near the 
steering wheel.

Fasten your seat belt: place the diagonal belt in 
the middle of your shoulder and adjust the lap 
belt so that is tightened over your pelvis.
Ensure that all passengers have fastened their 
seat belts correctly.

Never adjust the seats or steering 
wheel when driving.
Always keep your feet on the floor.

90

Ease of use and comfort

3008-2_en_Chap03_ergonomie-et-confort_ed01-2016

Front seats

Before moving the seat backwards, ensure that there is nothing that might prevent the full 
travel of the seat.
There is a risk of trapping or pinching passengers if present in the rear seats or jamming the 
seat if large objects are placed on the floor behind the seat.

Manual seats

1. Adjusting the seat forwards and backwards
F  Raise the control bar and slide the seat 

forwards or backwards.

F  Release the bar to engage the seat in 

position in the runners.

2. Adjusting the seat height
F  Raise or lower the control as many times 

as needed to obtain the desired seat 
height.

3. Adjusting the seat backrest angle
F  Turn the knob forwards or backwards to 

recline the backrest to the desired angle.

4. Adjusting the height of the head restraint
Refer to the corresponding section.

5. Adjusting the lumbar support
(only on the driver's seat)
F  Turn the knob forwards or backwards to 

increase or decrease the level of lumbar 
support.

3

Ease of use and comfort

91

3008-2_en_Chap03_ergonomie-et-confort_ed01-2016

"AGR" certified seats

Additional adjustments

1. Adjustment of the length of the seat cushion
F  Pull the handle forwards to release the 

cushion, then move the front part of the 
seat cushion forwards or backwards.

2.  Adjusting the seat cushion angle 

electrically

F  Press and hold the front or rear of the 

control to raise or lower the front of the seat 
cushion.

3. Adjusting the lumbar support electrically
The control allows independent adjustment of 
the depth and vertical position of the lumbar 
support.
F  Press and hold the front or rear of the 

control to increase or reduce the lumbar 
support.

F  Press and hold the top or bottom of the 

control to raise or lower the lumbar support 
area.

92

Ease of use and comfort

3008-2_en_Chap03_ergonomie-et-confort_ed01-2016

Placing the passenger seat in the table position

The backrest of the passenger seat can be fully 
folded forward and secured in this position.
This function, when associated with folding 
of the backrest of the rear seats, helps in 
transporting long and voluminous objects.

First steps:
F  lower the head restraint,
F  move the seat fully back to allow space for 

the head restraint when folding,

F  adjust the seat to the lowest position,
F  check that there is nothing that might 

interfere with folding of the backrest (seat 
belt, child seat, items of clothing, bags...).

Folding the backrest

F  Pull the control fully up to release the 

backrest.

F  Tip the backrest fully forward.

In this position, the backrest can 
support a maximum load of 30 kg.
When the front passenger seat is 
fully folded, only the outer rear seat 
behind the driver can be occupied by a 
passenger.

Returning the backrest to the 
normal position

F  Pull the control fully up to release the 

backrest.

F  Raise the backrest and guide it back until it 

latches into place.

F  Check that the backrest has engaged 

correctly.

3

Ease of use and comfort

93

3008-2_en_Chap03_ergonomie-et-confort_ed01-2016

Front head restraints

Adjusting the height

Upward:
F  pull the head restraint up to the desired 

position; the head restraint can be felt to 
click into position.

Downward:
F  press the lug A and push the head restraint 

down to the desired position.

The adjustment is correct when the 
upper edge of the head restraint is level 
with the top of your head.

Removing a head restraint

F  Pull the head restraint up as far as it will 

go.

F  Press the lug A to free the head restraint 

and then pull it fully out.

F  Stow the head restraint securely.

Refitting a head restraint

F  Introduce the head restraint rods into the 

guides in the seat backrest.

F  Push the head restraint down as far as it 

will go.

F  Press the lug A to free the head restraint 

and push it down.

F  Adjust the height of the head restraint.

Never drive with the head restraints 
removed; they should be in place and 
correctly adjusted for the occupant of 
the seat.

94

Ease of use and comfort

3008-2_en_Chap03_ergonomie-et-confort_ed01-2016

Before moving the seat backwards, 
ensure that there is nothing that might 
prevent the full travel of the seat.
There is a risk of trapping or pinching 
passengers if present in the rear seats 
or jamming the seat if large objects are 
placed on the floor behind the seat.

To adjust the seat electrically, switch 
on the ignition, or start the engine if the 
vehicle has gone into energy economy 
mode.
These electric adjustments remain 
available for about a minute after 
opening the driver's door. They are 
deactivated about a minute after 
switching off the ignition.

Electric driver's seat


Content   ..  4  5  6  7   ..