Peugeot 607 (2007.5). Manual - part 8


  Index      Peugeot     Peugeot 607 2007.5 - service manual in english


Search            


Content   ..  6  7  8  9   ..


Peugeot 607 (2007.5). Manual - part 8


8

95

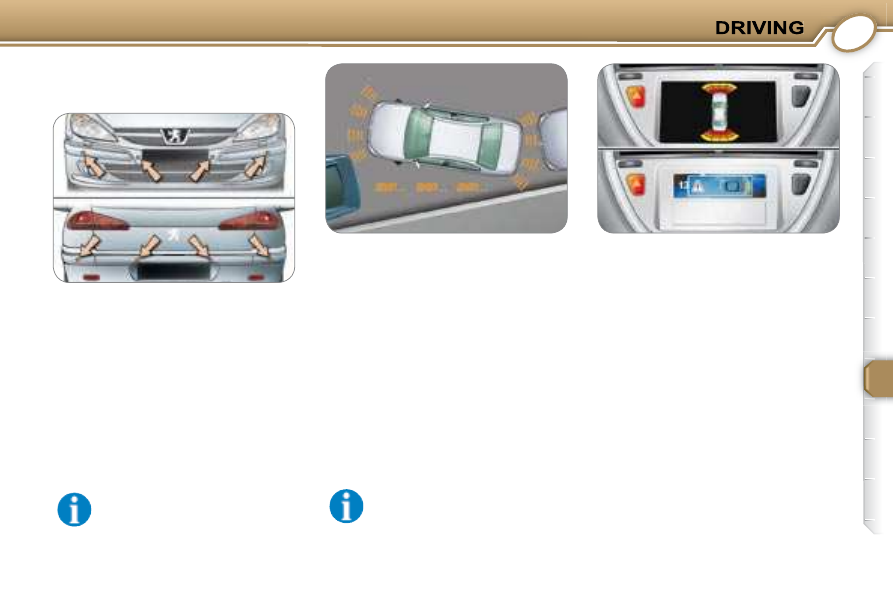
 VISUAL AND AUDIBLE REAR 
AND/OR FRONT PARKING 
ASSISTANCE 

  Detection zone   

  Detection 

 The system is activated when:  

   -   reverse gear is engaged, 

  -   the speed is below 6 mph (10 km/h) 

in forward gear.  

 It is accompanied by an audible signal 

and/or displaying of the vehicle on the 

multifunction display. 

 The  proximity  of  the  obstacle  is  indi-

cated by: 

   -   an  audible  signal  which  becomes 

more  rapid  as  the  vehicle  ap-

proaches the obstacle, 

  -   a graphic on the multifunction dis-

play, with blocks which become in-

creasingly close to the vehicle.  

 The  obstacle  is  located  in  relation  to 
the  emission  of  the  audible  signal  by 

the speakers; that is, front or rear and 

right or left. 
 When the distance between the vehi-

cle  and  the  obstacle  is  less  than  ap-

proximately  twenty-i ve  centimetres, 

the  audible  signal  becomes  continu-

ous  and/or  the  "Danger"  symbol  ap-

pears on the multifunction display. 

 The system becomes inactive again: 

   -   when you exit reverse gear, 

  -   when  the  speed  is  above  6 mph 

(10 km/h), 

  -   at the end of the manoeuvre, when 

stationary,  after  a  few  seconds 

(front parking assistance only).   

 The system is deactivated when 

the vehicle has been stationary 

for more than 3 seconds. 

 This  system  consists  of  four  proxim-

ity sensors, located in the rear and/or 

front bumper. 

 It detects any obstacle (person, vehi-

cle,  tree,  gate,  etc.)  in  front  of  or  be-

hind  the  vehicle.  However,  it  cannot 

detect obstacles located directly under 

the bumper.  

 An object, such as a stake, cone or any 

other  similar  object  may  be  detected 

at the beginning of the manoeuvre but 

may no longer be detected when the 

vehicle comes close to it. 
  

 In  bad  weather  or  in  winter, 

ensure  that  the  sensors  are 

not covered with mud, frost or 

snow.  

8

96

 If  there  is  an  operating  fault, 

when reverse gear is engaged, 

the  indicator  light  l ashes,  ac-

companied  by  an  audible  sig-

nal and a message on the multifunction 

display.  

  Deactivation 

  Reactivation 
 Press button  

 again to reactivate the 

system. The indicator light on the but-

ton is switched off. 

 Press  button   

 to deactivate the sys-

tem (child asleep in the rear...). The in-

dicator light on the button comes on. 
  Note: 

 the  rear  parking  assistance 

function only will be deactivated auto-

matically when a trailer is being towed 

(vehicle  i tted  with  a  towbar  recom-

mended by PEUGEOT).  

9

CHECKS

98

 BONNET  

  Closing 
   

   Lower the bonnet and release it at 

the end of its travel. 

     Check that it is locked.    

 RUNNING OUT OF FUEL 
(DIESEL) 

 If you should run out of fuel, it is nec-

essary to re-prime the circuit. 
 If the engine does not start after 15 sec-

onds, repeat the repriming ope-ration. 

  Opening 
   

   Pull  the  lever,  located  on  the  left 

beneath  the  dashboard,  down-

wards. 

     Lift the catch and raise the bonnet.  
 Bonnet  struts  open  the  bonnet  and 

keep it open.  

  2 litre 16V HDI engine 

   -   i ll the fuel tank with at least i ve li-

tres of diesel, 

  -   unclip  the  style  cover  to  gain  ac-

cess to the repriming pump, 

  -   unscrew the degas screw, 
  -  

squeeze  and  release  the  manual 

repriming pump until diesel is seen 

escaping via the degas screw, 

  -   retighten the degas screw, 

  -   operate the starter until the engine 

starts.   

  2.2 litre 16V HDI engine 

   -   i ll the fuel tank with at least i ve li-

tres of diesel, 

  -   unclip  the  style  cover  to  gain  ac-

cess to the repriming pump, 

  -   operate the pump until pressure is 

felt, 

  -   operate the starter until the engine 

starts.   

9

CHECKS

99

 3 LITRE V6 24V INJECTION 
PETROL ENGINE 

   1.

   Windscreen/headlamp wash 

reservoir. 

  2.

   Power steering reservoir. 

  3.

   Coolant reservoir. 

  4.

   Dipstick. 

  5.

   Engine oil i ller cap. 

  6.

   Air i lter. 

  7.

   Fuse box. 

  8.

   Brake and clutch l uid reservoir.  

9

CHECKS

100

 2 LITRE HDI 16V AND 
2.2 LITRE HDI 16V TURBO 
DIESEL ENGINES 

   1.

   Windscreen/headlamp wash 

reservoir. 

  2.

   Power steering reservoir. 

  3.

   Coolant reservoir. 

  4.

   Dipstick. 

  5.

   Engine oil i ller cap. 

  6.

   Air i lter. 

  7.

   Fuse box. 

  8.

   Brake and clutch l uid reservoir. 

  9.

   Priming pump. 

  10.

  Degas screw * .  

  *    On the 2 litre HDI 16V engine only.  

9

CHECKS

101

 CHECKING THE LEVELS 

 There  are  two  marks  on 

the dipstick: 
  A  =

 maximum 

 Never i ll past this mark. 
  B  = minimum 
 To  maintain  the  reliability 
of  engines  and  emission 

control  systems,  the  use 

of additives in engine oil is 

prohibited.  

  Dipstick 

  Oil change 
 According  to  the  information  given  in 

the servicing booklet.  

  Brake and clutch fluid level 

 The level must always be between the 

DANGER and MAXIMUM marks in the 

reservoir. 

 If the level drops substantially, contact 

a PEUGEOT dealer immediately. 

  Windscreen and headlamp 
wash level 

 For best quality cleaning and for your 

safety,  we  advise  that  you  use  prod-

ucts  recommended  by  PEUGEOT 

(reservoir capacity 4 litres or 6.5 litres 

with headlamp wash). 

  Viscosity selection 
 In all cases, the oil selected must meet 

the manufacturer’s requirements.   

  Fluid change: 
   -  

must  be  carried  out  according 

to  the  manufacturer’s  servicing 

schedule. 

  -   use  l uids  recommended  by  the 

manufacturer,  which  fuli l  DOT4 

standards.  


  Used oil 

 Prevent used oil from coming 

into  prolonged  contact  with 

the skin. 
 Brake  and  clutch  l uid  is  harmful  to 

health and very corrosive. 

 Do not dispose of used oil, brake and 

clutch  l uid  or  coolant  into  drains  or 

onto the ground.  

  Power steering reservoir 

   

   Open the reservoir, with the engine 

cold  at  ambient  temperature.  The 

level  should  always  be  above  the 

MINI  mark  and  close  to  the  MAXI 
mark.   

  Oil level 

   

   Check  the  level  regularly  and  top 

up  between  changes.  Maximum 

consumption is 0.5 l per 600 miles 

(1.000 km).  

 Carry  out  this  check  with  the  vehicle 

level,  engine  cold,  using  the  oil  level 

gauge on the instrument panel or the 

dipstick. 

Characteristics of the l uid

 For  best  quality  cleaning  and  to  pre-

vent  freezing,  this  l uid  must  not  be 

topped up or replaced with water.   

9

CHECKS

102

 CHECKS 

  Handbrake 

 Where the handbrake travel is 

too  great  or  there  is  a  reduc-

tion in the performance of the system, 

the  handbrake  should  be  adjusted. 

Have the system checked by a PEUGEOT 

dealer.  

 Only  use  products  recom-

mended  by  PEUGEOT  or 

products  of  equivalent  quality 

and specii cation. 

 To  ensure  best  performance 

from components as important as the 

power  steering  and  the  braking  sys-

tem,  PEUGEOT  selects  and  offers 

specii c products. 

 To  prevent  damage  to  the  electrical 

units,  high  pressure  washing  of  the

engine compartment is strictly  prohibited .  

  In  order  to  check  the  main  levels 
and  certain  components,  in  ac-
cordance with the manufacturer’s 
servicing  schedule,  refer  to  the 
pages  of  the  servicing  booklet 
which  correspond  to  your  vehi-
cle’s engine.
  

  Battery 

 At  the  start  of  winter,  have 

your  battery  checked  by  a 
PEUGEOT dealer.  

  Air filter and passenger 
compartment filter 

 Have  the  i lter  elements  re-

placed regularly.  If you drive 

in  dusty  conditions,  change  them 
twice as often
 .  

  Particulate emission filter - 
Additive reservoir (Diesel) 

 Maintenance  of  the  particulate  emis-

sion  i lter  and  i lling  of  the  additive 

reservoir  must  be  carried  out  by  a 

PEUGEOT  dealer,  according  to  the 

manufacturer’s servicing schedule.  

  Brake pads 

 Brake  pad  wear  depends  on 

the style of driving, in particu-

lar for vehicles which are used in town, 

over short distances. 

  Manual gearbox 

 This  does  not  need  an  oil  change. 

Have the level checked, according to 

the manufacturer’s servicing schedule.  

  Automatic gearbox 

 This  does  not  need  an  oil  change. 

Have the level checked by a PEUGEOT 

dealer,  according  to  the  manufactur-

er’s servicing schedule.  

  Oil filter 

 Change the i lter regularly, in accord-

ance with the servicing schedule.  

 It may be necessary to check 

the  thickness  of  the  pads, 

even between services.  

  Disc wear condition 

 For any information relating to check-

ing of the disc wear condition, contact 

a PEUGEOT dealer. 

10

10

PRACTICAL INFORMATION

103

  Access to the spare wheel and the 
jack in the boot 
      Detach the luggage net. 
  

   Lift the boot carpet using the lifting 

hook. Secure this hook behind the 
boot seal.   

 CHANGING A WHEEL 

  Tools available 
 The following tools are located in the 

polystyrene holder in the centre of the 

spare wheel: 
   1.   Wheelbrace. 
  2.   Centralising tool. 
  3.

   Wheelbrace extension. 

  4.   Jack. 
  5.

   Removable towing eye. 

  6.

   Alloy wheel trim remover. 

  7.

   Trim cover tool.   

  Removal 
   

   For  vehicles  with  alloy  wheels  i t-

ted with wheel trims, pull the cen-

tre trim by using tool  6  in one of the 
holes. 

  

   Loosen the wheel bolts. 

  

   Take the jack  4  from the tool kit  . 

  

   Place  the  jack  in  one  of  the  four 

locations  A

  underneath the vehicle 

(the nearest one to the wheel to be 

changed). 

  

   Extend the jack using wheelbrace 

 1

  and the extension  3 .  

  

   Remove  a  wheel  bolt  at  the  top 

and i t the centralising tool  2  in its 

place. 

  

   Unscrew  the  other  bolts  and  re-

move the wheel.   

   

   Park  the  vehicle  on  level,  stable 

and non-slippery ground. 

  

   Apply the handbrake, switch off the 

ignition and engage i rst or reverse 

gear (position  P  for the automatic 

gearbox).   

10

10

PRACTICAL INFORMATION

104

  Fitting a wheel 

  

   Put the tool holder back in position. 

This helps to keep the boot l oor in 

its correct position, to prevent any 

deformation of the l oor when loaded. 

  

   Tighten  the  spare  wheel  securing 

strap to prevent noise and for your 

safety in the event of impact.   

  For your safety, always 
change the wheel: 

   

   Position  the  wheel  using  the  cen-

tralising tool  2  to assist you. 

     Tighten  the  bolts  by  hand  and  re-

move the centralising tool. 

     Partly  tighten  the  bolts  using  the 

wheelbrace  1 . 

  

   Fold the jack  4  and remove it. 

     Fully  tighten  the  bolts  using  the 

wheelbrace. 

  

   Replace the wheel trim. 

  

   For the alloy trims, position the re-

moval hole opposite the valve. 

  After changing the wheel: 
   -   have the tightening of the bolts and 

the  tyre  pressure  checked  by  a 

PEUGEOT dealer as soon as pos-

sible, 

  -   have the punctured wheel repaired 

and rei t it to the vehicle as soon as 

possible, 

  -   the steel spare wheel must only be 

Tyres i tted with the Tyre Under-

Inl ation Detection System.

 These wheels have a pressure sensor. 

Have  them  repaired  by  a  PEUGEOT 

dealer.   

   -   on  level,  stable,  non-slippery 

ground, 

  -   with the handbrake applied, 

  -   with i rst or reverse gear engaged 

(position  P  for the automatic gear-

box), 

  -   never  go  underneath  a  vehicle 

which is supported only by a jack 

(use a ramp).   

10

10

PRACTICAL INFORMATION

  Special features of alloy 
wheels 

  Fitting the spare wheel 

  Anti-theft bolts 

  Fitting snow tyres 
 If you wish to i t snow chains on your 

vehicle,  contact  a  PEUGEOT  dealer 

to  i nd  out  which  models  are  recom-

mended for your vehicle.   

  Bolt covers 
 Alloy  wheel  bolts  are  covered  by 

chrome trims. 
 Use  the  yellow  tool  7  to  remove  the 

trims before slackening the bolts.  

 If your vehicle is i tted with a steel spare 

wheel,  when  i tting  it,  it  is   normal   to

notice when tightening the bolts that the 

washers do not come into contact with 

the rim. The spare wheel is secured by 

the cone-shape of each bolt.   

 If  your  wheels  are  i tted  with  an  anti-

theft bolt (one per wheel), the chrome 

trim must be removed using the yellow 

tool,  before  unscrewing  the  bolt  us-

ing the anti-theft socket and the wheel 

brace. 

  Note:   the  anti-theft  socket 

was  given  to  you  on  delivery 

of your vehicle along with the 

duplicate  keys  and  the  coni -

dential card. 

 Make  a  careful  note  of  the  code 

number engraved on the head of the 

anti-theft socket. This will enable you 

to  obtain  a  duplicate  socket  from  a 

PEUGEOT dealer.  

10

10

PRACTICAL INFORMATION

106

 CHANGING A BULB 

  2 - Main beam headlamps: H1-55 
W. 
   

   Turn  the  protective  cover  of  the 

faulty bulb a quarter of a turn and 

remove it. 

     Disconnect the connector.  
  

   Press the end of the securing clip 

to free it. Change the bulb. 

  

   When i tting the new bulb, ensure 

that  the  direction  notches  are  po-

sitioned correctly and the securing 

clip is i xed properly. 

     Reconnect the connector. 
  

   Rei t the protective cover.   

  3 - Side lights: W 5 W. 
   

   Pull the socket rearwards. 

  

   Remove the bulb and change it.   

  Front foglamps:  H1-55 W. 

 The headlamps are i tted with 

polycarbonate  glass  with  a 

protective  coating.  Do  not 

clean them with a dry or abra-

sive cloth, nor with a detergent or solvent 

product. 

 Use a soft, damp cloth with soapy water. 

 In  the  engine  compartment,  remove 

the style cover secured by one or two 

butterl y screws, a plastic retainer clip 

and two quarter turn screws. 

 On the left-hand side, remove the par-

tition by lifting it to gain access to the 
lights. 
 When you have i nished, do not forget 

to put everything back correctly. 

  WARNING: RISK OF
ELECTROCUTION
  
 Xenon bulbs must be replaced 

by a PEUGEOT dealer.  

  Note:   in  certain  climatic  con-

ditions  (low  temperature,  hu-

midity),  condensation on the 

inside  surface  of  the  head-

lamp  glass  is  normal ;

  it  disappears 

a  few  minutes  after  the  lights  are 

switched on. 

 Handle the bulbs with a dry cloth.  

  Front lights 

  1 -  Dipped beam headlamps:

H7-55 W or Xenon bulb. 

  4 -  Direction indicators: PY 21 W 

(amber). 

      Turn the bulb holder a quarter turn 

and remove it. 

  

   Remove the bulb and change it. 

  

   Rei t the style cover.  

  High pressure washing  
 When  using  this  type  of  washing  on 

stubborn  dirt,  do  not  persist  on  the 

headlamps,  the  lights  and  their  sur-

rounds  to  avoid  damaging  their  var-

nish and their seal.  

10

10

PRACTICAL INFORMATION

107

  Integrated direction indicator 
repeaters 

 Amber  coloured  bulbs,  such 

as the direction indicators and 

side  repeaters,  must  be  re-

placed  with  bulbs  of  identical 

specii cation and colour.   

  Rear lights 

  

   Remove the two butterl y nuts se-

curing the light. 

  

   Remove the eyelet. 

  

   Take out the lamp. 

  

   Unclip the bulb holder. 

  

   Change the faulty bulb. 

  

   Clip the bulb holder.   

 When rei tting it, ensure that the lamp 

is correctly positioned and secured.  

   1.    Direction indicators: 

Hp16.  

  2.    Brake lights/side lights: 

Hp16.   

    

 Detach the luggage net. 

  

   Lift the boot carpet with the lifting 

hook. Secure this hook behind the 
boot seal. 

  

   Unclip  the  lower  part  of  the  sill 

trim, then dislodge it by pulling up-

wards. 

  

   Remove  the  plastic  retainer  clip 

securing the side trim to the l oor. 

  

   Unclip the side trim. 

   

   Push the repeater forwards and re-

lease it. 

  

   Remove the repeater and change it.  

 This can be obtained from a PEUGEOT 
dealer. 

  Rear wing lights 

10

10

PRACTICAL INFORMATION

108

    


Remove  the  three  plastic  retainer 

clips securing the cover trim (those 

nearest to the lamp). 

    

   Move aside the trim. 

    

   Disconnect the lamp harness. 

  

   Extract the lamp from its housing. 

  

   Remove the l at seal. 

  

   Unclip the bulb holder. 

    

   Change the faulty bulb. 

    

   Clip the bulb holder. 

    

   Put the l at seal back in place.  

 When rei tting it, ensure that the lamp 

is correctly positioned and secured. 

  Number plate lights:  W 5 W. 
   

   Remove the transparent cover us-

ing a screwdriver blade. 

     Change the faulty bulb.  

  Boot lid lights 

   1.    Reversing lights: 

Hp16.  

  2.    Side lights: 

Hp16.  

  3.    Fog lamps: 

Hp16.   

 If you encounter any difi culties, 

contact a PEUGEOT dealer.   

10

10

PRACTICAL INFORMATION

109

 CHANGING A FUSE 

 The fuse boxes are placed in the lower 

part of the fascia (driver's side), in the 

engine  compartment  (left-hand  side) 

and in the left boot trim. 

  Replacing a fuse 

 Before replacing a fuse, the cause of 

the  incident  must  be  found  and  recti-

i ed. The  fuse  numbers  are  indicated 

on the fuse box. 

  Correct  

  Incorrect   

   Fuse N°   

   Rating   

   Functions   

   F31   

   5 A   

 Right-hand brake light. 

   F32   

   5 A   

 Left-hand brake light. 

   F33   

   5 A   

 Third brake light. 

   F34   

  -  

 Not used. 

   F35   

   5 A   


Tyre under-inl ation detection control unit, CD changer. 

   F36   

   30 A   

 Passenger seat relay. 

   F37   

   30 A   

 Passenger and rear right heated seats. 

   F38   

   30 A   

 Driver's and rear left heated seats. 

   F39   

   30 A   

 Driver's seat relay. 

   F40   

   5 A   

 Diagnostics socket. 

 Always  replace  a  faulty  fuse 

with a fuse of the same rating 

(same colour). 
 Use the special pliers located 

on  the  support  next  to  the  fuse  box, 

this support also contains the replace-

ment fuses. 

  Fascia fuses 

 To  access  the  fuses,  open  the  cover 

of  the  storage  compartment  on  the 

driver's  side.  Tilt  the  fuse  box  down-

wards. 

10

10

PRACTICAL INFORMATION

109

 CHANGING A FUSE 

 The fuse boxes are placed in the lower 

part of the fascia (driver's side), in the 

engine  compartment  (left-hand  side) 

and in the left boot trim. 

  Replacing a fuse 

 Before replacing a fuse, the cause of 

the  incident  must  be  found  and  recti-

i ed. The  fuse  numbers  are  indicated 

on the fuse box. 

  Correct  

  Incorrect   

   Fuse N°   

   Rating   

   Functions   

   F31   

   5 A   

 Right-hand brake light. 

   F32   

   5 A   

 Left-hand brake light. 

   F33   

   5 A   

 Third brake light. 

   F34   

  -  

 Not used. 

   F35   

   5 A   


Tyre under-inl ation detection control unit, CD changer. 

   F36   

   30 A   

 Passenger seat relay. 

   F37   

   30 A   

 Passenger and rear right heated seats. 

   F38   

   30 A   

 Driver's and rear left heated seats. 

   F39   

   30 A   

 Driver's seat relay. 

   F40   

   5 A   

 Diagnostics socket. 

 Always  replace  a  faulty  fuse 

with a fuse of the same rating 

(same colour). 
 Use the special pliers located 

on  the  support  next  to  the  fuse  box, 

this support also contains the replace-

ment fuses. 

  Fascia fuses 

 To  access  the  fuses,  open  the  cover 

of  the  storage  compartment  on  the 

driver's  side.  Tilt  the  fuse  box  down-

wards. 


Content   ..  6  7  8  9   ..