Honda Odyssey (2019 year). Manual - part 42


  Index      Honda     Honda Odyssey - service manual 2019 year in english


Search            copyright infringement  


Content   ..  40  41  42  43   ..


Honda Odyssey (2019 year). Manual - part 42


uu

Maintenance Under the Hood

u

Engine Coolant

656

Main

tenan

ce

1. Make sure the engine and radiator are 

cool.

2. Remove the engine compartment cover.

Engine Compartment Cover P. 649

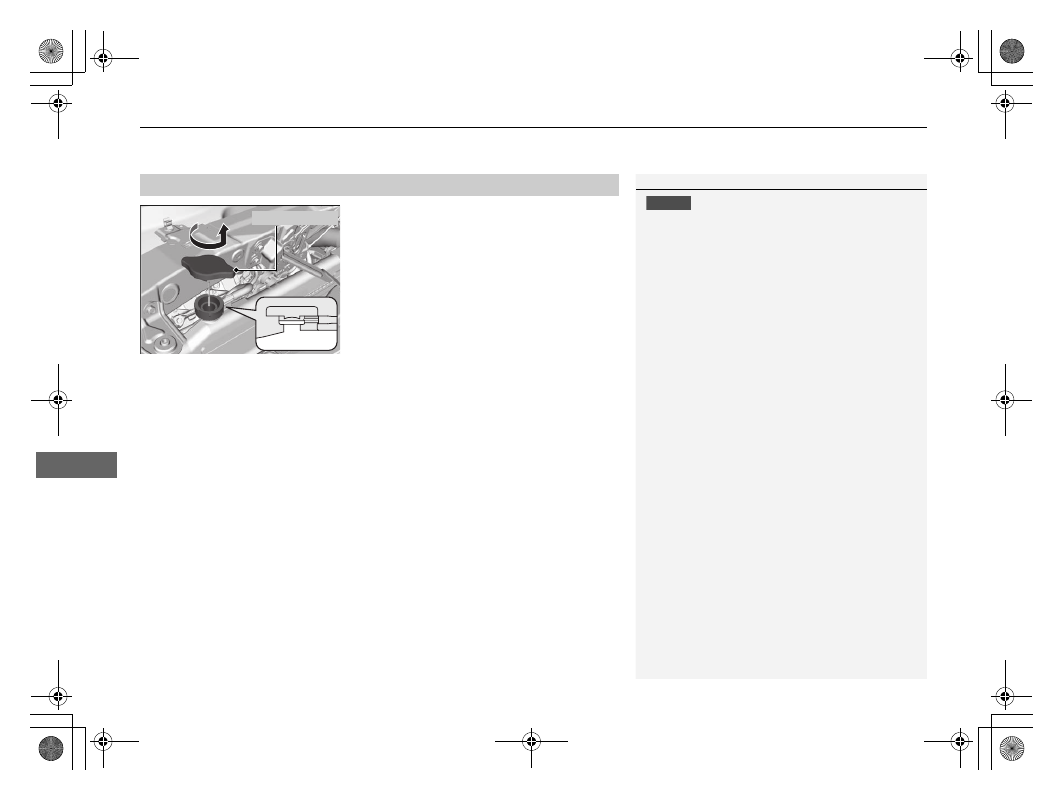
3. Turn the radiator cap 1/8 turn counter-

clockwise and relieve any pressure in the 
cooling system.

4. Push down and turn the radiator cap 

counter-clockwise to remove it.

5. The coolant level should be up to the base 

of the filler neck. Add coolant if it is low.

6. Put the radiator cap back on, and tighten it 

fully.

Radiator

1

Radiator

NOTICE

Pour the fluid slowly and carefully so you do not spill 
any. Clean up any spills immediately; they can 
damage components in the engine compartment.

Radiator Cap

657

uu

Maintenance Under the Hood

u

Transmission Fluid

Main

tenan

ce

Transmission Fluid

Have a dealer check the fluid level and replace if necessary.

Do not attempt to check or change the automatic transmission fluid yourself.

Automatic Transmission Fluid

Specified fluid: Honda Automatic Transmission Fluid ATF-Type 2

Specified fluid: Honda Automatic Transmission Fluid ATF-Type 3.1 or 
higher

1

Automatic Transmission Fluid

NOTICE

Honda ATF-Type 2 fluid must not be mixed with 
other transmission fluids.
Using a transmission fluid other than Honda ATF-
Type 2 may adversely affect the operation and 
durability of your vehicle’s transmission, and damage 
the transmission.
Any damage caused by using a transmission fluid that 
is not equivalent to Honda ATF-Type 2 is not covered 
by Honda’s new vehicle limited warranty.

NOTICE

Honda ATF-TYPE 3.1 (or higher) fluid must not 
be mixed with other transmission fluids.
Using a transmission fluid other than Honda ATF-
TYPE 3.1 (or higher) may adversely affect the 
operation and durability of your vehicle’s 
transmission, and damage the transmission.
Any damage caused by using a transmission fluid that 
is not equivalent to Honda ATF-TYPE 3.1 (or higher) is 
not covered by Honda’s new vehicle limited warranty.

ELITE and TOURING grade models

Except ELITE and TOURING grade models

ELITE and TOURING grade models

Except ELITE and TOURING grade models

658

uu

Maintenance Under the Hood

u

Brake Fluid

Main

tenan

ce

Brake Fluid

The fluid level should be between the MIN 
and MAX marks on the side of the reserve 
tank.

Specified fluid: Honda Heavy Duty Brake Fluid DOT 3

Checking the Brake Fluid

1

Brake Fluid

NOTICE

Brake fluid marked DOT 5 is not compatible with your 
vehicle’s braking system and can cause extensive 
damage.

If the specified brake fluid is not available, you should 
use only DOT 3 or DOT 4 fluid from a sealed 
container as a temporary replacement.

Using any non-Honda brake fluid can cause corrosion 
and decrease the longevity of the system. Have the 
brake system flushed and refilled with Honda Heavy 
Duty Brake Fluid DOT 3 as soon as possible.

If the brake fluid level is at or below the MIN mark, 
have a dealer inspect the vehicle for leaks or worn 
brake pads as soon as possible.

Reserve Tank

MIN

MAX

659

uu

Maintenance Under the Hood

u

Refilling Window Washer Fluid

Main

tenan

ce

Refilling Window Washer Fluid

Check the amount of window washer fluid by looking at the reservoir.

If the level is low, fill the washer reservoir.

If the washer fluid is low, a message appears 
on the driver information interface.

Pour the washer fluid carefully. Do not overflow the reservoir.

1

Refilling Window Washer Fluid

NOTICE

Do not use engine antifreeze or a vinegar/water 
solution in the windshield washer reservoir.
Antifreeze can damage your vehicle’s paint. A 
vinegar/water solution can damage the windshield 
washer pump.

Canadian models

660

Main

tenan

ce

Replacing Light Bulbs

Headlight Bulbs

When replacing, use the following bulbs.

1. Remove the engine compartment cover.

Engine Compartment Cover P. 649

2. Remove the clips.
3. Remove the air intake duct.

High beam headlight: 60 W (HB3 for halogen bulb type)

Low beam headlight:

55 W (H11 for halogen bulb type)

High beam headlight: LED type

Low beam headlight:

LED type

High Beam Headlights

1

Headlight Bulbs

NOTICE

Halogen bulbs get very hot when lit.
Oil, perspiration, or a scratch on the glass can cause 
the bulb to overheat and shatter.

The headlight aim is set by the factory, and does not 
need to be adjusted. However, if you regularly carry 
heavy items in the cargo area or tow a trailer, have 
the aiming readjusted at a dealer or by a qualified 
technician.

When replacing a halogen bulb, handle it by its base, 
and protect the glass from contact with your skin or 
hard objects. If you touch the glass, clean it with 
denatured alcohol and a clean cloth.

Headlights are LED type. Have an authorized Honda 
dealer inspect and replace the light assembly.

Models with halogen headlights

All models

Models with halogen headlights

Models with LED headlights

Models with halogen headlights

Models with LED headlights

Models with halogen headlights

Clip

Air Intake Duct

Driver side

Continued

661

uu

Replacing Light Bulbs

u

Headlight Bulbs

Main

tenan

ce

1. Remove the engine coolant reserve tank 

out of its hose clip and bracket.

2. Push the tab to remove the coupler.
3. Rotate the old bulb counter-clockwise to 

remove.

4. Insert a new bulb into the headlight 

assembly and turn it clockwise.

5. Insert the coupler into the connector of the 

bulb.

1

High Beam Headlights

Remove the clip using a Phillips-head screwdriver.

Insert the clip with the center pin raised, and push 
until it is flat.

Center pin

Push until the pin 
is flat.

Hose Clip

Reserve 
Tank

Bracket

Passenger side

Both sides

Tab

Coupler

Bulb

662

uu

Replacing Light Bulbs

u

Headlight Bulbs

Main

tenan

ce

1. Push the tab to remove the coupler.
2. Rotate the old bulb counter-clockwise to 

remove.

3. Insert a new bulb into the headlight 

assembly and turn it clockwise.

4. Insert the coupler into the connector of the 

bulb.

Low Beam Headlights

Models with halogen headlights

Tab

Coupler

Bulb

663

uu

Replacing Light Bulbs

u

Fog Light Bulbs

*

Main

tenan

ce

Fog Light Bulbs

*

When replacing, use the following bulbs.

1. Turn the steering wheel all the way to the 

opposite side from the fog light being 
replaced.
Passenger side: Turn the steering wheel 
to the left.
Driver side: Turn the steering wheel to the 
right.

2. Remove the screws, and pull the inner 

fender back.

3. Push the tab to remove the coupler.
4. Rotate the old bulb counter-clockwise to 

remove.

5. Insert a new bulb into the fog light 

assembly and turn it clockwise.

6. Insert the coupler into the connector of the 

bulb.

Fog Light: 35 W (H8 for halogen bulb type)

Fog Light: LED type

1

Fog Light Bulbs

*

NOTICE

Halogen bulbs get very hot when lit. Oil, perspiration, 
or a scratch on the glass can cause the bulb to 
overheat and shatter.

When replacing a halogen bulb, handle it by its 
plastic case, and protect the glass from contact with 
your skin or hard objects. If you touch the glass, clean 
it with denatured alcohol and a clean cloth.

Fog lights are LED type. Have an authorized Honda 
dealer inspect and replace the light assembly.

Models with halogen fog lights

Models with LED headlights

Models with halogen headlights

Models with LED headlights

Screws

Bulb

Coupler

Tab

* Not available on all models

664

uu

Replacing Light Bulbs

u

Parking/Daytime Running Lights

Main

tenan

ce

Parking/Daytime Running Lights

Parking/daytime running lights are LED type. Have an authorized Honda dealer 
inspect and replace the light assembly.

Daytime Running Lights

Daytime running light bulbs and high beam headlight bulbs are the same.

Headlight Bulbs P. 660

Models with fog lights

Models without fog lights

665

uu

Replacing Light Bulbs

u

Front Turn Signal/Parking

*

 Light Bulbs

Main

tenan

ce

Front Turn Signal/Parking

*

 Light Bulbs

When replacing, use the following bulbs.

1. Turn the steering wheel all the way to the 

opposite side from the light being replaced.
Passenger side: Turn the steering wheel 
to the left.
Driver side: Turn the steering wheel to the 
right.

2. Remove the screws, and pull the inner 

fender back.

3. Rotate the socket counter-clockwise and 

remove it.

4. Remove the old bulb and insert a new bulb.

Front Turn Signal/Parking

*

 Light: 28/8 W (Amber)

Screws

Bulb

Socket

* Not available on all models

666

uu

Replacing Light Bulbs

u

Front Side Marker Light Bulbs

Main

tenan

ce

Front Side Marker Light Bulbs

When replacing, use the following bulb.

1. Turn the steering wheel all the way to the 

opposite side from the light being replaced.
Passenger side: Turn the steering wheel 
to the left.
Driver side: Turn the steering wheel to the 
right.

2. Remove the holding clip and screw, and 

pull the inner fender back.

3. Rotate the socket counter-clockwise and 

remove it.

4. Remove the old bulb and insert a new bulb.

Side Turn Signal/Emergency Indicator Lights

*

Door mirror side turn lights are LED type. Have an authorized Honda dealer inspect 
and replace the light assembly.

Front Side Marker Light: 3 CP

1

Front Side Marker Light Bulbs

Press down the center pin until it clicks to unlock it.

Push the center pin back to lock the clip. Then, insert 
the clip into the hole and press on the center pin until 
it is flat.

Center pin

Push until 
the pin is 
flat.

Clip

Screw

Socket

Bulb

* Not available on all models

667

uu

Replacing Light Bulbs

u

Brake, Rear Turn Signal Light Bulbs, and Rear Side Marker/Taillights

Continued

Main

tenan

ce

Brake, Rear Turn Signal Light Bulbs, and Rear Side 
Marker/Taillights

When replacing, use the following bulbs.

1. Use a Phillips-head screwdriver to remove 

the bolt.

2. Pull the cover out of the rear pillar.

3. Use a Phillip-head screwdriver to remove 

the bolts.

4. Pull on the light assembly to rotate about 

the grommet and remove from the rear 
pillar.

Brake Light: 21 W
Rear Turn Signal Light: 21 W
Rear Side Marker/Taillight: LED

1

Brake, Rear Turn Signal Light Bulbs, and Rear Side Marker/
Taillights

Rear side marker/taillights are LED type. Have an 
authorized Honda dealer inspect and replace the light 
assembly.

Bolt

Cover

Grommet

Pin

Bolts

668

uu

Replacing Light Bulbs

u

Brake, Rear Turn Signal Light Bulbs, and Rear Side Marker/Taillights

Main

tenan

ce

5. Turn the socket counter-clockwise and 

remove it. Remove the old bulb.

6. Insert a new bulb and turn the socket 

clockwise.

7. Slide the light assembly onto the guide on 

the body.

8. Align the pin with the body grommet, then 

push in until it fully seats.

Bulb

Socket

Pin

669

uu

Replacing Light Bulbs

u

Back-Up Light Bulbs/Taillights

Main

tenan

ce

Back-Up Light Bulbs/Taillights

When replacing, use the following bulbs.

1. Remove the cover by prying on the edge of 

the cover using a flat-tip screwdriver.

u

Wrap the flat-tip screwdriver with a cloth 
to prevent scratches.

2. Turn the socket counter-clockwise and 

remove it.

3. Remove the old bulb and insert a new bulb.

Back-Up Light: 21 W
Taillight: LED

1

Back-Up Light Bulbs/Taillights

Taillights are LED type. Have an authorized Honda 
dealer inspect and replace the light assembly.

Cover

Bulb

Socket

670

uu

Replacing Light Bulbs

u

Rear License Plate Light

Main

tenan

ce

Rear License Plate Light

Rear license plate light is LED type. Have an authorized Honda dealer inspect and 
replace the light assembly.

High-Mount Brake Light

High-mount brake light is LED type. Have an authorized Honda dealer inspect and 
replace the light assembly.

671

Continued

Main

tenan

ce

Checking and Maintaining Wiper Blades

Checking Wiper Blades

If the wiper blade rubber has deteriorated, it will leave streaks and the hard surfaces 
of the blade may scratch the window glass.

Changing the Front Wiper Blade Rubber

1. Set the power mode to VEHICLE OFF.
2. While holding the wiper switch in the 

MIST position, set the power mode to ON, 
then to VEHICLE OFF.

u

Both wiper arms are set to the 
maintenance position as shown in the 
image.

3. Lift both wiper arms.

1

Changing the Front Wiper Blade Rubber

NOTICE

Avoid dropping the wiper arm onto the windshield, it 
may damage the wiper arm and/or the windshield.


Content   ..  40  41  42  43   ..