Honda Odyssey (2019 year). Manual - part 43


  Index      Honda     Honda Odyssey - service manual 2019 year in english


Search            copyright infringement  


Content   ..  41  42  43  44   ..


Honda Odyssey (2019 year). Manual - part 43


672

uu

Checking and Maintaining Wiper Blades

u

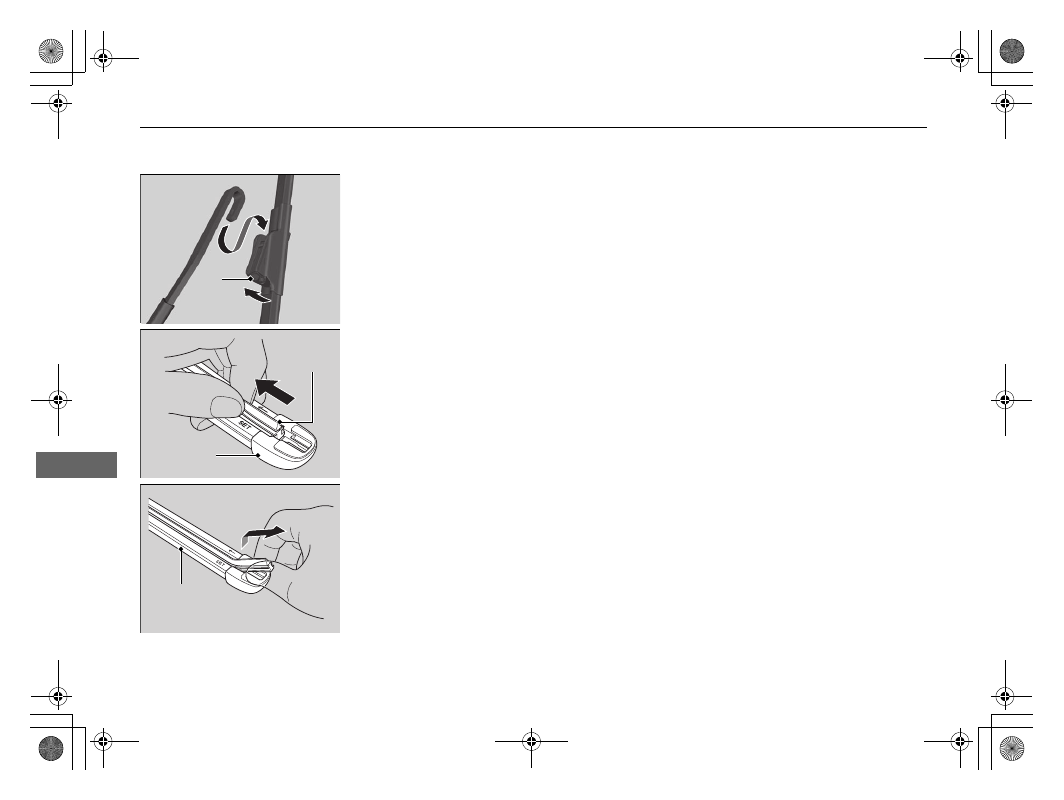
Changing the Front Wiper Blade Rubber

Main

tenan

ce

4. Press and hold the tab, then slide the 

holder off the wiper arm.

5. Pull the end of the wiper blade in the 

direction of the arrow in the image until it 
is out of the holder’s end cap.

6. Pull the wiper blade in the opposite 

direction to slide it out of the holder.

Tab

Wiper 
Blade

End Cap at 
the bottom

Holder

Continued

673

uu

Checking and Maintaining Wiper Blades

u

Changing the Rear Wiper Blade Rubber

Main

tenan

ce

7. Insert the flat side of the new wiper blade 

onto the bottom part of the holder. Insert 
the blade all the way.

8. Install the end of the wiper blade into the 

cap.

9. Slide the holder onto the wiper arm until it 

locks.

10. Lower both wiper arms.
11. Set the power mode to ON and hold the 

wiper switch in the MIST position until 
both wiper arms return to the standard 
position.

Changing the Rear Wiper Blade Rubber

1. Raise the wiper arm off.
2. Pivot the bottom end of the wiper blade up 

until it comes off from the wiper arm.

Cap

Wiper 
Blade

Holder

1

Changing the Rear Wiper Blade Rubber

NOTICE

Avoid dropping the wiper arm, it may damage the 
rear window.

Wiper 
Blade

Wiper 
Arm

674

uu

Checking and Maintaining Wiper Blades

u

Changing the Rear Wiper Blade Rubber

Main

tenan

ce

3. Slide the blade out of the holder.

4. Remove the retainers from wiper blade and 

mount it to a new rubber blade.

5. Slide the new wiper blade onto the holder.

u

Make sure it is engaged correctly, then 
install the wiper blade assembly onto the 
wiper arm.

Blade

Retainer

Rubber

675

Main

tenan

ce

Checking and Maintaining Tires

Checking Tires

To safely operate your vehicle, your tires must be of the proper type and size, in 
good condition with adequate tread, and properly inflated.

Inflation guidelines

Properly inflated tires provide the best combination of handling, tread life, and 
comfort. Refer to the driver’s doorjamb label or specifications page for the specified 
pressure.

Underinflated tires wear unevenly, adversely affect handling and fuel economy, and 
are more likely to fail from overheating.

Overinflated tires make your vehicle ride harshly, are more prone to road hazards, 
and wear unevenly.

Every day before you drive, look at each of the tires. If one looks lower than the 
others, check the pressure with a tire gauge.

At least once a month or before long trips, use a gauge to measure the pressure in 
all tires, including the spare. Even tires in good condition can lose 1-2 psi (10-20 kPa, 
0.1-0.2 kgf/cm

2

) per month.

Inspection guidelines

Every time you check inflation, also examine the tires and valve stems. Look for:
• Bumps or bulges on the side or in the tread. Replace the tire if you find any cuts, 

splits, or cracks in the side of the tire. Replace it if you see fabric or cord.

• Remove any foreign objects and inspect for air leaks.
• Uneven tread wear. Have a dealer check the wheel alignment.
• Excessive tread wear.

Wear Indicators P. 680

• Cracks or other damage around valve stem.

1

Checking Tires

Measure the air pressure when tires are cold. This 
means the vehicle has been parked for at least three 
hours, or driven less than 1 mile (1.6 km). If 
necessary, add or release air until the specified 
pressure is reached.

If checked when hot, tire pressure can be as much as 
4–6 psi (30–40 kPa, 0.3–0.4 kgf/cm

2

) higher than if 

checked when cold.

Have a dealer check the tires if you feel a consistent 
vibration while driving. New tires and any that have 
been removed and reinstalled should be properly 
balanced.

Check the spare tire pressure once a month or before 
long trips.

3

WARNING

Using tires that are excessively worn or 
improperly inflated can cause a crash in 
which you can be seriously hurt or killed.

Follow all instructions in this owner’s 
manual regarding tire inflation and 
maintenance.

676

uu

Checking and Maintaining Tires

u

Tire and Loading Information Label

Main

tenan

ce

Tire and Loading Information Label

The label attached to the driver’s doorjamb provides necessary tire and loading 
information.

Tire Labeling

The tires that came on your vehicle have a 
number of markings. Those you should be 
aware of are described as follows.

Whenever tires are replaced, they should be replaced with tires of the same size.

1

Tire and Loading Information Label

The tire and loading information label attached to the 
driver’s doorjamb contains:

a

The number of people your vehicle can carry.

b

The total weight your vehicle can carry. Do not 
exceed this weight.

c

The original tire sizes for front, rear, and spare.

d

The proper cold tire pressure for front, rear, and 
spare.

Label 
Example

Example

Tire Size

Tire 
Identification 
Number (TIN)

Maximum 
Tire Load

Maximum 
Tire Pressure

Tire Size

Tire Sizes

1

Tire Sizes

Following is an example of tire size with an 
explanation of what each component means.
P235/60 R18 102T
P: Vehicle type (P indicates passenger vehicle).
235: Tire width in millimeters.
60: Aspect ratio (the tire’s section height as a 
percentage of its width).
R: Tire construction code (R indicates radial).
18: Rim diameter in inches.
102: Load index (a numerical code associated with 
the maximum load the tire can carry).
T: Speed symbol (an alphabetical code indicating the 
maximum speed rating).

677

uu

Checking and Maintaining Tires

u

Tire Labeling

Main

tenan

ce

The tire identification number (TIN) is a group of numbers and letters that look like 
the example in the side column. TIN is located on the sidewall of the tire.

Cold Tire Pressure – The tire air pressure when the vehicle has been parked for at 
least three hours or driven less than 1 mile (1.6 km).
Load Rating – Means the maximum load that a tire is rated to carry for a given 
inflation pressure.
Maximum Inflation Pressure – The maximum tire air pressure that the tire can 
hold.
Maximum Load Rating – Means the load rating for a tire at the maximum 
permissible inflation pressure for that tire.
Recommended Inflation Pressure – The cold tire inflation pressure 
recommended by the manufacturer.
Treadwear Indicators (TWI) – Means the projections within the principal grooves 
designed to give a visual indication of the degrees of wear of the tread.

Tire Identification Number (TIN)

Glossary of Tire Terminology

1

Tire Identification Number (TIN)

DOT B97R FW6X 2209
DOT: This indicates that the tire meets all 
requirements of the U.S. Department of 
Transportation.
B97R: Manufacturer’s identification mark.
FW6X: Tire type code.
22 09: Date of manufacture.

Year
Week

678

uu

Checking and Maintaining Tires

u

DOT Tire Quality Grading (U.S. Vehicles)

Main

tenan

ce

DOT Tire Quality Grading (U.S. Vehicles)

The tires on your vehicle meet all U.S. Federal Safety 
Requirements. All tires are also graded for treadwear, traction, 
and temperature performance according to Department of 
Transportation (DOT) standards. The following explains these 
gradings.

Quality grades can be found where applicable on the tire sidewall 
between tread shoulder and maximum section width.

The treadwear grade is a comparative rating based on the wear 
rate of the tire when tested under controlled conditions on a 
specified government test course. For example, a tire graded 150 
would wear one and one-half (1 1/2) times as well on the 
government course as a tire graded 100. The relative performance 
of tires depends upon the actual conditions of their use, however, 
and may depart significantly from the norm due to variations in 
driving habits, service practices and differences in road 
characteristics and climate.

Uniform Tire Quality Grading

Treadwear

1

Uniform Tire Quality Grading

For example:
Treadwear 200
Traction AA
Temperature A

All passenger car tires must conform 
to Federal Safety Requirements in 
addition to these grades.

679

uu

Checking and Maintaining Tires

u

DOT Tire Quality Grading (U.S. Vehicles)

Main

tenan

ce

The traction grades, from highest to lowest, are AA, A, B, and C. 
Those grades represent the tire’s ability to stop on wet pavement 
as measured under controlled conditions on specified 
government test surfaces of asphalt and concrete. A tire marked 
C may have poor traction performance.

The temperature grades are A (the highest), B, and C, 
representing the tire’s resistance to the generation of heat and its 
ability to dissipate heat when tested under controlled conditions 
on a specified indoor laboratory test wheel. Sustained high 
temperature can cause the material of the tire to degenerate and 
reduce tire life, and excessive temperature can lead to sudden tire 
failure. The grade C corresponds to a level of performance which 
all passenger car tires must meet under the Federal Motor Vehicle 
Safety Standard No. 109. Grades B and A represent higher levels 
of performance on the laboratory test wheel than the minimum 
required by law.

Traction

Temperature

1

Traction

Warning: The traction grade 
assigned to this tire is based on 
straight-ahead braking traction tests, 
and does not include acceleration, 
cornering, hydroplaning, or peak 
traction characteristics.

1

Temperature

Warning: The temperature grade for 
this tire is established for a tire that is 
properly inflated and not 
overloaded. Excessive speed, 
underinflation, or excessive loading, 
either separately or in combination, 
can cause heat buildup and possible 
tire failure.

680

uu

Checking and Maintaining Tires

u

Wear Indicators

Main

tenan

ce

Wear Indicators

The groove where the wear indicator is 
located is 1/16 inch (1.6 mm) shallower than 
elsewhere on the tire. If the tread has worn so 
that the indicator is exposed, replace the tire. 
Worn out tires have poor traction on wet 
roads.

Tire Service Life

The life of your tires is dependent on many factors, including driving habits, road 
conditions, vehicle loading, inflation pressure, maintenance history, speed, and 
environmental conditions (even when the tires are not in use).

In addition to regular inspections and inflation pressure maintenance, it is 
recommended that you have annual inspections performed once the tires reach five 
years old. All tires, including the spare, should be removed from service after 10 
years from the date of manufacture, regardless of their condition or state of wear.

Example of a Wear 
Indicator mark

681

uu

Checking and Maintaining Tires

u

Tire and Wheel Replacement

Main

tenan

ce

Tire and Wheel Replacement

Replace your tires with radials of the same size, load range, speed rating, and 
maximum cold tire pressure rating (as shown on the tire’s sidewall). Using tires of a 
different size or construction can cause certain vehicle systems such as the ABS and 
Vehicle Stability Assist® (VSA®) system to work incorrectly.

It is best to replace all four tires at the same time. If that isn’t possible, replace the 
front or rear tires in pairs.

If you replace a wheel, only use TPMS specified wheels approved for your vehicle.
Make sure that the wheel’s specifications match those of the original wheels.

1

Tire and Wheel Replacement

3

WARNING

Installing improper tires on your vehicle can 
affect handling and stability. This can cause 
a crash in which you can be seriously hurt or 
killed.

Always use the size and type of tires 
recommended in this owner’s manual.

682

uu

Checking and Maintaining Tires

u

Tire Rotation

Main

tenan

ce

Tire Rotation

Rotating tires according to the maintenance messages on the driver information 
interface helps to distribute wear more evenly and increase tire life.

Tires without rotation marks

Rotate the tires as shown here.

Tires with rotation marks

Rotate the tires as shown here.

1

Tire Rotation

Tires with directional tread patterns should only be 
rotated front to back (not from one side to the other).
Directional tires should be mounted with the rotation 
indication mark facing forward, as shown below.

Front

Rotation Mark

Front

Front

683

uu

Checking and Maintaining Tires

u

Winter Tires

Main

tenan

ce

Winter Tires

If driving on snowy or frozen roads, mount all season marked M+S tires, snow tires, 
or tire chains; reduce speed; and maintain sufficient distance between vehicles when 
driving.

Be particularly careful when operating the steering wheel or brakes to prevent 
skidding.

Use tire chains, snow tires, or all season tires when necessary or according to the 
law.

When mounting, refer to the following points.

For winter tires:
• Select the size and load ranges that are the same as the original tires.
• Mount the tires to all four wheels.
For tire chains:
• Install them on the front tires only.
• Because your vehicle has limited tire clearance, we strongly recommend using the 

chains listed below:

• Follow the chain manufacturer’s instruction when installing. Mount them as 

tightly as you can.

• Check that the chains do not touch the brake lines or suspension.
• Drive slowly.

Peerless Auto-Trac 231905

Peerless Auto-Trac 232405

1

Winter Tires

NOTICE

Traction devices that are the wrong size or improperly 
installed can damage your vehicle’s brake lines, 
suspension, body, and wheels. Stop driving if they are 
hitting any part of the vehicle.

When tire chains are mounted, follow the chain 
manufacturer’s instructions regarding vehicle 
operational limits.

If your vehicle is equipped with summer tires, be 
aware that these tires are not designed for winter 
driving conditions. For more information, contact a 
dealer.

3

WARNING

Using the wrong chains, or not properly 
installing chains, can damage the brake 
lines and cause a crash in which you can be 
seriously injured or killed.

Follow all instructions in this owner’s 
manual regarding the selection and use of 
tire chains.

Models with 235/60R18 tires

Models with 235/55R19 tires

684

Main

tenan

ce

Battery

Checking the Battery

The condition of the battery is monitored by a 
sensor located on the negative terminal of the 
battery. If there is a problem with this sensor, 
the driver information interface will display a 
warning message. If this happens, have your 
vehicle inspected by a dealer.

Check the battery terminals for corrosion 
monthly.
To access the battery terminals:
1. Remove the engine compartment cover.

Engine Compartment Cover P. 649

2. Remove the clips using a Phillips-head 

screwdriver, then remove the air intake 
duct.

High Beam Headlights P. 660

If your vehicle’s battery is disconnected or goes dead:
• The audio system is disabled.

Reactivating the audio system P. 263

• The clock resets.

Clock P. 142

The immobilizer system needs to be reset.

Immobilizer System Indicator P. 93

1

Battery

WARNING: Battery post, terminals, 
and related accessories contain lead 
and lead compounds.
Wash your hands after handling.

When you find corrosion, clean the battery terminals 
by applying a baking powder and water solution. 
Clean terminals with a damp towel. Cloth/towel dry 
the battery. Coat the terminals with grease to help 
prevent future corrosion.

When replacing the battery, the replacement must be 
of the same specifications.
Consult a dealer for more information.

3

WARNING

The battery gives off explosive hydrogen 
gas during normal operation.

A spark or flame can cause the battery to 
explode with enough force to kill or 
seriously hurt you.

When conducting any battery 
maintenance, wear protective clothing and 
a face shield, or have a skilled technician do 
it.

Canadian models only

685

uu

Battery

u

Charging the Battery

Main

tenan

ce

Charging the Battery

Disconnect both battery cables to prevent damaging your vehicle’s electrical system. 
Always disconnect the negative (–) cable first, and reconnect it last.

Charging the AGM Battery

AGM labeled batteries like those installed in your vehicle require a compatible 
charger to be properly charged. Damage to the battery can result if the battery is 
charged improperly or with the wrong equipment. For more information on how to 
charge your vehicle’s AGM battery, consult a dealer.

Models without Auto Idle Stop

1

Battery

The battery installed in this vehicle is specifically 
designed for a model with Auto Idle Stop.
Using a battery other than this specified type may 
shorten the battery life, and prevent Auto Idle Stop 
from activating. If you need to replace the battery, 
make sure to select the specified type. Ask a dealer 
for more details.

Models with Auto Idle Stop

Models with Auto Idle Stop

686

Main

tenan

ce

Remote Transmitter Care

Replacing the Button Battery

If the indicator does not come on when the button is pressed, replace the battery.

1. Remove the built-in key.

2. Remove the upper half of the cover by 

carefully prying on the edge with a coin.

u

Remove carefully to avoid losing the 
buttons.

u

Wrap a coin with a cloth to prevent 
scratching the remote.

3. Make sure to replace the battery with the 

correct polarity.

1

Replacing the Button Battery

NOTICE

An improperly disposed of battery can damage the 
environment. Always confirm local regulations for 
battery disposal.

Replacement batteries are commercially available or 
at a dealer.

3

WARNING

CHEMICAL BURN HAZARD
The battery that powers the remote 
transmitter can cause severe internal burns 
and can even lead to death if swallowed.
Keep new and used batteries away from 
children.

If you suspect that a child has swallowed 
the battery, seek medical attention 
immediately.

Battery type: CR2032

Battery

687

Continued

Main

tenan

ce

Remote Control and Wireless Headphone Care

*

Replacing the Battery

If it takes several pushes on the remote control buttons to operate the Blu-ray/DVD 
rear entertainment system, replace the batteries.

1. Remove the cover.
2. Make sure to replace the batteries with the 

correct polarity.

Remote Control

Models with Blu-ray/DVD rear entertainment system

1

Replacing the Battery

NOTICE

An improperly disposed of battery can damage the 
environment. Always confirm local regulations for 
battery disposal.

Replacement batteries are commercially available or 
at a dealer.

Make sure to replace the two batteries at once.

Battery type: AAA

* Not available on all models


Content   ..  41  42  43  44   ..