Lincoln Mark LT (2008 year). Instruction - part 16


  Index      Lincoln     Lincoln Mark LT (2008 year) - instruction in english


Search            copyright infringement  


Content      ..     14      15      16      17     ..


Lincoln Mark LT (2008 year). Instruction - part 16


Standard fuse amperage rating and color

COLOR

Fuse

rating

Mini

fuses

Standard

fuses

Maxi

fuses

Cartridge

maxi

fuses

Fuse link

cartridge

2A

Grey

Grey

3A

Violet

Violet

4A

Pink

Pink

5A

Tan

Tan

7.5A

Brown

Brown

10A

Red

Red

15A

Blue

Blue

20A

Yellow

Yellow

Yellow

Blue

Blue

25A

Natural

Natural

30A

Green

Green

Green

Pink

Pink

40A

Orange

Green

Green

50A

Red

Red

Red

60A

Blue

Yellow

Yellow

70A

Tan

Brown

80A

Natural

Black

Black

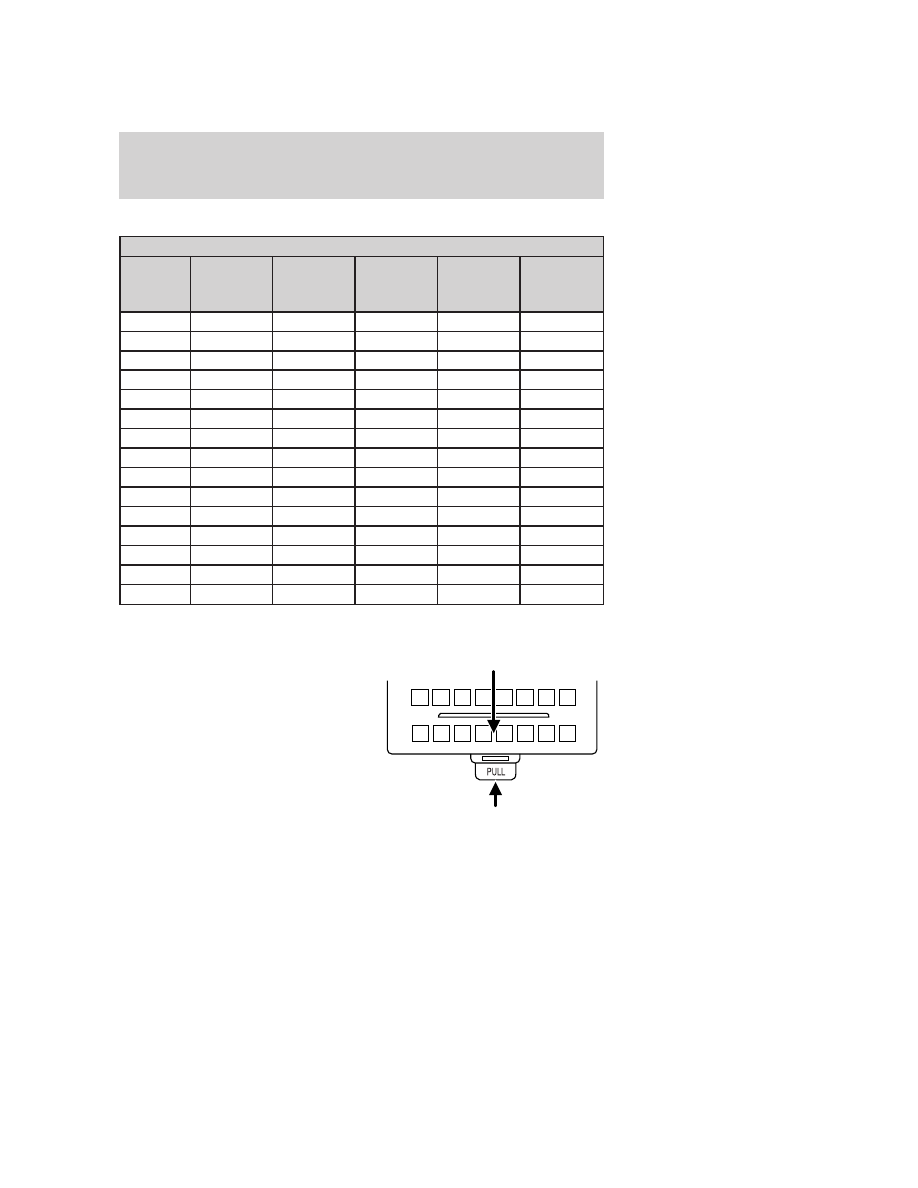
Passenger compartment fuse panel / power distribution box
The fuse panel is located under the right-hand side of the instrument
panel. Remove the trim panel and fuse box cover to access the fuses.

To remove the fuse box cover, place
a finger behind the PULL tab and
your thumb above the PULL tab as
shown in the illustration, then pull
the cover off.

To reinstall the fuse box cover, place the top part of the cover on the
fuse panel, then push the bottom part of the cover until you hear it click
shut. Gently pull on the cover to make sure it is seated properly.

2008 Mark LT (mlt)
Owners Guide (post-2002-fmt)
USA 
(fus)

Roadside Emergencies

241

-------------------------------------------------------------------------------------------------------------------------------------------------------------

Always disconnect the battery before servicing high current
fuses.

To reduce risk of electrical shock, always replace the cover to
the Power Distribution Box and Auxiliary Relay Box before

reconnecting the battery or refilling fluid reservoirs.

If the battery has been disconnected and reconnected, refer to the
Battery section of the Maintenance and Specifications chapter.

The fuses are coded as follows.

Fuse/Relay

Location

Fuse Amp

Rating

Passenger Compartment Fuse

Panel Description

1

10A*

Run/Accessory - Wipers,
Instrument cluster

2

20A*

Stop/Turn lamps, Brake on/off
switch, Hazard flashers

2008 Mark LT (mlt)
Owners Guide (post-2002-fmt)
USA 
(fus)

Roadside Emergencies

242

-------------------------------------------------------------------------------------------------------------------------------------------------------------

Fuse/Relay

Location

Fuse Amp

Rating

Passenger Compartment Fuse

Panel Description

3

7.5A*

Power mirrors, Memory seats and
pedals, Driver power seat

4

10A*

DVD battery power, Power fold
mirror

5

7.5A*

Keep alive memory for Powertrain
Control Module (PCM) and
climate control module

6

15A*

Parklamps, BSM, Instrument
panel illumination

7

5A*

Radio (start signal)

8

10A*

Heated mirrors, Switch indicator

9

20A*

Fuel pump relay, Fuel injectors

10

20A*

Trailer tow back-up lamps relay
(PCB1), Trailer tow parklamp
relay (R201)

11

10A*

A/C clutch, 4x4 solenoid

12

5A*

PCM relay coil

13

10A*

Climate control module power,
Flasher relay

14

10A*

Back-up lamp and Daytime
Running Lamps (DRL) relay coil,
A/C pressure switch, Redundant
speed control switch, Heated PCV,
Trailer tow back-up lamps relay
coil, ABS, Reverse park aid, EC
mirror, Navigation radio (reverse
input)

15

5A*

Overdrive cancel, Cluster,
Traction control switch

16

10A*

Brake-shift interlock solenoid

17

15A*

Fog lamp relay (R202)

2008 Mark LT (mlt)
Owners Guide (post-2002-fmt)
USA 
(fus)

Roadside Emergencies

243

-------------------------------------------------------------------------------------------------------------------------------------------------------------

Fuse/Relay

Location

Fuse Amp

Rating

Passenger Compartment Fuse

Panel Description

18

10A*

Run/Start feed - Overhead power
point, Electrochromatic mirror,
Heated seats, BSM, Compass, RSS
(Reverse Sensing System)

19

10A*

Restraints (Air bag module), OCS

20

10A*

Battery feed for overhead power
point

21

15A*

Cluster keep alive power

22

10A*

Delayed accessory power for
audio, power door lock switch and
moon roof switch illumination

23

10A*

RH low beam headlamp

24

15A*

Battery saver power for demand
lamps

25

10A*

LH low beam headlamp

26

20A*

Horn relay (PCB3), Horn power

27

5A*

Passenger Air bag Deactivation
(PAD) warning lamp, Cluster RUN
/START power

28

5A*

SecuriLock transceiver (PATS)

29

15A*

PCM 4x4 power

30

15A*

PCM 4x4 power

31

20A*

Radio power, Satellite radio
module

32

15A*

Vapor Management Valve (VMV),
A/C clutch relay, Canister vent,
Heated Exhaust Gas Oxygen
(HEGO) sensors #11 and #21,
CMCV, Mass Air Flow (MAF)
sensor, VCT, Electronic fan clutch

33

15A*

Shift solenoid, CMS #12 and #22

34

15A*

Fuel injectors and PCM power

2008 Mark LT (mlt)
Owners Guide (post-2002-fmt)
USA 
(fus)

Roadside Emergencies

244

-------------------------------------------------------------------------------------------------------------------------------------------------------------

Fuse/Relay

Location

Fuse Amp

Rating

Passenger Compartment Fuse

Panel Description

35

20A*

Instrument cluster high beam
indicator, High beam headlamps

36

10A*

Trailer tow right turn/stop lamps

37

20A*

Rear power point, Center console
power point

38

25A*

Subwoofer power

39

Not used

40

20A*

Low beam headlamps, DRL

41

Not used

42

10A*

Trailer tow left turn/stop lamps

101

30A**

Starter solenoid

102

20A**

Ignition switch feed

103

20A**

ABS valves

104

Not used

105

30A**

Electric trailer brakes

106

30A**

Trailer tow battery charge

107

30A**

Power door locks (BSM)

108

30A**

Passenger power seat

109

30A**

Driver power seat, Adjustable
pedals, Memory module (pedals,
seat, mirror)

110

20A**

Cigar lighter, Diagnostic connector
power

111

30A**

4x4 relays

112

40A**

ABS pump power

113

30A**

Wipers and washer pump

114

40A**

Heated backlite, Heated mirror
power

115

20A**

Moon roof

116

30A**

Blower motor

117

20A**

Instrument panel power point

118

30A**

Heated seats

2008 Mark LT (mlt)
Owners Guide (post-2002-fmt)
USA 
(fus)

Roadside Emergencies

245

-------------------------------------------------------------------------------------------------------------------------------------------------------------

Fuse/Relay

Location

Fuse Amp

Rating

Passenger Compartment Fuse

Panel Description

401

30A Circuit

breaker

Delayed accessory power: Power
windows, Moon roof, Power
sliding backlite

R01

Full ISO relay

Starter solenoid

R02

Full ISO relay

Accessory delay

R03

Full ISO relay

Hi-beam headlamps

R04

Full ISO relay

Heated backlite

R05

Full ISO relay

Trailer tow battery charge

R06

Full ISO relay

Blower motor

R201

Half ISO relay

Trailer tow park lamps

R202

Half ISO relay

Fog lamps

R203

Half ISO relay

PCM

* Mini fuses ** Cartridge fuses

Auxiliary relay box

The relay box is located in the engine compartment on the left fender.

• With Daytime Running Lamp (DRL) or 4x4 options

2008 Mark LT (mlt)
Owners Guide (post-2002-fmt)
USA 
(fus)

Roadside Emergencies

246

-------------------------------------------------------------------------------------------------------------------------------------------------------------

• Without Daytime Running Lamp (DRL) and 4x4 options
The relays are coded as follows:

Fuse/Relay

Location

Fuse Amp

Rating

Description

F03

5A

Clockspring illumination

R01

Full ISO

Relay

4x4 CCW

R02

Full ISO

Relay

4x4 CW

R03

1

2

ISO

Relay

Daytime Running Lamps (DRL) high beam
disable

R201

Relay

DRL

R202

Relay

A/C clutch

D01

Diode

A/C clutch

D02

Diode

One Touch Integrated Start (OTIS)

CHANGING THE TIRES

If you get a flat tire while driving, do not apply the brake heavily.
Instead, gradually decrease your speed. Hold the steering wheel firmly
and slowly move to a safe place on the side of the road.

Note: The tire pressure monitoring system (TPMS) indicator light will
illuminate when the spare tire is in use. To restore the full functionality
of the monitoring system, all road wheels equipped with tire pressure
monitoring sensors must be mounted on the vehicle.

Have a flat serviced by an authorized dealer in order to prevent damage
to the TPMS sensors, refer to Tire Pressure Monitoring System
(TPMS) 
in the Tires, Wheels and Loading chapter. Replace the spare
tire with a road tire as soon as possible.

2008 Mark LT (mlt)
Owners Guide (post-2002-fmt)
USA 
(fus)

Roadside Emergencies

247

-------------------------------------------------------------------------------------------------------------------------------------------------------------

The use of tire sealants may damage your Tire Pressure
Monitoring System and should not be used.

Refer to Tire Pressure Monitoring System (TPMS) in the
Tires, Wheels and Loading chapter for important information. If

the tire pressure monitor sensor becomes damaged, it will no longer
function.

Dissimilar spare tire/wheel information

Failure to follow these guidelines could result in an increased
risk of loss of vehicle control, injury or death.

If you have a dissimilar spare tire/wheel, then it is intended for
temporary use only. This means that if you need to use it, you should
replace it as soon as possible with a road tire/wheel that is the same size
and type as the road tires and wheels that were originally provided by
Ford. If the dissimilar spare tire or wheel is damaged, it should be
replaced rather than repaired.

A dissimilar spare tire/wheel is defined as a spare tire and/or wheel that
is different in brand, size or appearance from the road tires and wheels
and can be one of three types:

1. T-type mini-spare: This spare tire begins with the letter “T” for tire
size and may have “Temporary Use Only” molded in the sidewall

2. Full-size dissimilar spare with label on wheel: This spare tire has
a label on the wheel that states: “THIS TIRE AND WHEEL FOR
TEMPORARY USE ONLY”

When driving with one of the dissimilar spare tires listed above, do not:
• Exceed 50 mph (80 km/h)
• Load the vehicle beyond maximum vehicle load rating listed on the

Safety Compliance Label

• Tow a trailer
• Use snow chains on the end of the vehicle with the dissimilar spare

tire

• Use more than one dissimilar spare tire at a time
• Use commercial car washing equipment
• Try to repair the dissimilar spare tire

2008 Mark LT (mlt)
Owners Guide (post-2002-fmt)
USA 
(fus)

Roadside Emergencies

248

-------------------------------------------------------------------------------------------------------------------------------------------------------------

Use of one of the dissimilar spare tires listed above at any one wheel
location can lead to impairment of the following:
• Handling, stability and braking performance
• Comfort and noise
• Ground clearance and parking at curbs
• Winter weather driving capability
• Wet weather driving capability
3. Full-size dissimilar spare without label on wheel

When driving with the full-size dissimilar spare tire/wheel, do not:
• Exceed 70 mph (113 km/h)
• Use more than one dissimilar spare tire/wheel at a time
• Use commercial car washing equipment
• Use snow chains on the end of the vehicle with the dissimilar spare

tire/wheel

The usage of a full-size dissimilar spare tire/wheel can lead to
impairment of the following:
• Handling, stability and braking performance
• Comfort and noise
• Ground clearance and parking at curbs
• Winter weather driving capability
• Wet weather driving capability
• All-Wheel driving capability (if applicable)
• Load leveling adjustment (if applicable)
When driving with the full-size dissimilar spare tire/wheel additional
caution should be given to:
• Towing a trailer
• Driving vehicles equipped with a camper body
• Driving vehicles with a load on the cargo rack
Drive cautiously when using a full-size dissimilar spare tire/wheel and
seek service as soon as possible.

2008 Mark LT (mlt)
Owners Guide (post-2002-fmt)
USA 
(fus)

Roadside Emergencies

249

-------------------------------------------------------------------------------------------------------------------------------------------------------------

Location of the spare tire and tools

The spare tire and tools for your vehicle are stowed in the following
locations:

Tool

Location

Spare tire

Under the vehicle, just forward of
the rear bumper

Jack, jack handle and lug nut

wrench

Under the rear seat on the
passenger side

The wing nut must be removed and the jack screw turned
counterclockwise to release pressure before the jack can be removed
from the holder.

Removing the spare tire

1. Use the ignition key to remove
the lock cylinder from the access
hole of the bumper to allow access
to the guide tube. Assemble the jack
handle as shown in the illustration.

2. Fully insert the jack handle
through the bumper hole and into
the guide tube through the access
hole in the rear bumper.

3. Turn the handle counterclockwise until tire is lowered to the ground,
the tire can be slid rearward and the cable is slightly slack.

4. Slide the retainer through the center of the wheel.

2008 Mark LT (mlt)
Owners Guide (post-2002-fmt)
USA 
(fus)

Roadside Emergencies

250

-------------------------------------------------------------------------------------------------------------------------------------------------------------

Tire change procedure

To help prevent the vehicle from moving when you change a tire,
be sure the parking brake is set, then block (in both directions)

the wheel that is diagonally opposite (other side and end of the
vehicle) to the tire being changed.

If the vehicle slips off the jack, you or someone else could be
seriously injured.

Do not attempt to change a tire on the side of the vehicle close
to moving traffic. Pull far enough off the road to avoid the

danger of being hit when operating the jack or changing the wheel.

Refer to the instruction sheet (located with the jack) for detailed tire
change instructions.

1. Park on a level surface, activate
hazard flashers and set the parking
brake.

2. Place gearshift lever in P (Park)
and turn engine off.

3. Block the diagonally opposite
wheel.

4. Obtain the spare tire and jack
from their storage locations.

5. Use the tip of the lug wrench to
remove any wheel trim.

BRAKE

2008 Mark LT (mlt)
Owners Guide (post-2002-fmt)
USA 
(fus)

Roadside Emergencies

251

-------------------------------------------------------------------------------------------------------------------------------------------------------------

6. Loosen each wheel lug nut
one-half turn counterclockwise but
do not remove them until the wheel
is raised off the ground.

7. Position the jack according to the following guides and turn the jack
handle clockwise until the wheel is completely off the ground.

When one of the rear wheels is off the ground, the transmission
alone will not prevent the vehicle from moving or slipping off the

jack, even if the transmission is in P (Park). To prevent the vehicle
from moving when you change the tire, be sure that the parking brake
is set and the diagonally opposite wheel is blocked. If the vehicle slips
off the jack, someone could be seriously injured.

• Front
Note: Use the frame rail as the jacking location point, NOT the control
arm.

2008 Mark LT (mlt)
Owners Guide (post-2002-fmt)
USA 
(fus)

Roadside Emergencies

252

-------------------------------------------------------------------------------------------------------------------------------------------------------------

• Rear

To lessen the risk of
personal injury, do not put

any part of your body under the
vehicle while changing a tire. Do
not start the engine when your
vehicle is on the jack. The jack is
only meant for changing the tire.

• Never use the front or rear

differential as a jacking point.

8. Remove the lug nuts with the lug wrench.
9. Replace the flat tire with the spare tire, making sure the valve stem is
facing outward. Reinstall the lug nuts until the wheel is snug against the
hub. Do not fully tighten the lug nuts until the wheel has been lowered.
10. Lower the wheel by turning the jack handle counterclockwise.

11. Remove the jack and fully
tighten the lug nuts in the order
shown (Refer to Wheel lug nut
torque specifications 
later in this
chapter for the proper lug nut
torque specification).

12. Stow the flat tire. Refer to Stowing the flat/spare tire.
13. Stow the jack and lug wrench. Make sure the jack is fastened so it
does not rattle when you drive.
14. Unblock the wheels.

2008 Mark LT (mlt)
Owners Guide (post-2002-fmt)
USA 
(fus)

Roadside Emergencies

253

-------------------------------------------------------------------------------------------------------------------------------------------------------------

Stowing the flat/spare tire

Note: Failure to follow spare tire stowage instructions may result in
failure of cable or loss of spare tire.

1. Lay the tire on the ground with the valve stem facing in the direction
specified on the Tire Changing Instructions located with the jack
hardware.

2. Slide the wheel partially under the vehicle and install the retainer
through the wheel center. Pull on the cable to align the components at
the end of the cable.

3. Turn the jack handle clockwise until the tire is raised to its stowed
position underneath the vehicle. The effort to turn the jack handle
increases significantly and the spare tire carrier ratchets or slips when
the tire is raised to the maximum tightness. Tighten to the best of your
ability, to the point where the ratchet/slip occurs, if possible. The spare
tire carrier will not allow you to overtighten. If the spare tire carrier
ratchets or slips with little effort, take the vehicle to your authorized
dealer for assistance at your earliest convenience.

4. Check that the tire lies flat against the frame and is properly
tightened. Try to push or pull, then turn the tire to be sure it will not
move. Loosen and retighten, if necessary. Failure to properly stow the
spare tire may result in failure of the winch cable and loss of the tire.

5. Repeat this tightness check procedure when servicing the spare tire
pressure (every six months, as per your scheduled maintenance
information), 
or at any time that the spare tire is disturbed through
service of other components.

6. If removed, install the spare tire lock (if equipped) into the bumper
drive tube with the spare tire lock key (if equipped) and jack handle.

WHEEL LUG NUT TORQUE SPECIFICATIONS

Retighten the lug nuts to the specified torque within 100 miles (160 km)
after any wheel disturbance (rotation, flat tire, wheel removal, etc.).

Bolt size

Wheel lug nut torque*

lb.ft.

N

m

M14 x 2.0

150

200

* Torque specifications are for nut and bolt threads free of dirt and
rust. Use only Ford recommended replacement fasteners.

2008 Mark LT (mlt)
Owners Guide (post-2002-fmt)
USA 
(fus)

Roadside Emergencies

254

-------------------------------------------------------------------------------------------------------------------------------------------------------------

When a wheel is installed, always remove any corrosion, dirt or
foreign materials present on the mounting surfaces of the wheel

or the surface of the wheel hub, brake drum or brake disc that
contacts the wheel. Ensure that any fasteners that attach the rotor to
the hub are secured so they do not interfere with the mounting
surfaces of the wheel. Installing wheels without correct metal-to-metal
contact at the wheel mounting surfaces can cause the wheel nuts to
loosen and the wheel to come off while the vehicle is in motion,
resulting in loss of control.

Note: Inspect the wheel pilot hole
prior to installation. If there is
visible corrosion in wheel pilot hole,
remove loose particles by wiping
with clean rag and apply grease.
Apply grease only to the wheel pilot
hole surface by smearing a “dime”
(1 square cm) sized glob of grease
around the wheel pilot surface (1)
with end of finger. DO NOT apply
grease to lugnut/stud holes or
wheel-to-brake surfaces.

JUMP STARTING

The gases around the battery can explode if exposed to flames,
sparks, or lit cigarettes. An explosion could result in injury or

vehicle damage.

Batteries contain sulfuric acid which can burn skin, eyes and
clothing, if contacted.

Do not attempt to push-start your automatic transmission
vehicle. Automatic transmissions do not have push-start
capability. Attempting to push-start a vehicle with an automatic
transmission may cause transmission damage.

2008 Mark LT (mlt)
Owners Guide (post-2002-fmt)
USA 
(fus)

Roadside Emergencies

255

-------------------------------------------------------------------------------------------------------------------------------------------------------------

Preparing your vehicle

When the battery is disconnected or a new battery is installed, the
automatic transmission must relearn its shift strategy. As a result, the
transmission may have firm and/or soft shifts. This operation is
considered normal and will not affect function or durability of the
transmission. Over time, the adaptive learning process will fully update
transmission operation.

1. Use only a 12–volt supply to start your vehicle.

2. Do not disconnect the battery of the disabled vehicle as this could
damage the vehicle’s electrical system.

3. Park the booster vehicle close to the hood of the disabled vehicle
making sure the two vehicles do not touch. Set the parking brake on
both vehicles and stay clear of the engine cooling fan and other moving
parts.

4. Check all battery terminals and remove any excessive corrosion before
you attach the battery cables. Ensure that vent caps are tight and level.

5. Turn the heater fan on in both vehicles to protect from any electrical
surges. Turn all other accessories off.

Connecting the jumper cables

1. Connect the positive (+) jumper cable to the positive (+) terminal of
the discharged battery.

Note: In the illustrations, lightning bolts are used to designate the
assisting (boosting) battery.

+

+

2008 Mark LT (mlt)
Owners Guide (post-2002-fmt)
USA 
(fus)

Roadside Emergencies

256

-------------------------------------------------------------------------------------------------------------------------------------------------------------


Content      ..     14      15      16      17     ..