Lincoln Zephyr (2006 year). Instruction - part 3


  Index      Lincoln     Lincoln Zephyr (2006 year) - instruction in english


Search            copyright infringement  


Content      ..     1      2      3      4      ..


Lincoln Zephyr (2006 year). Instruction - part 3


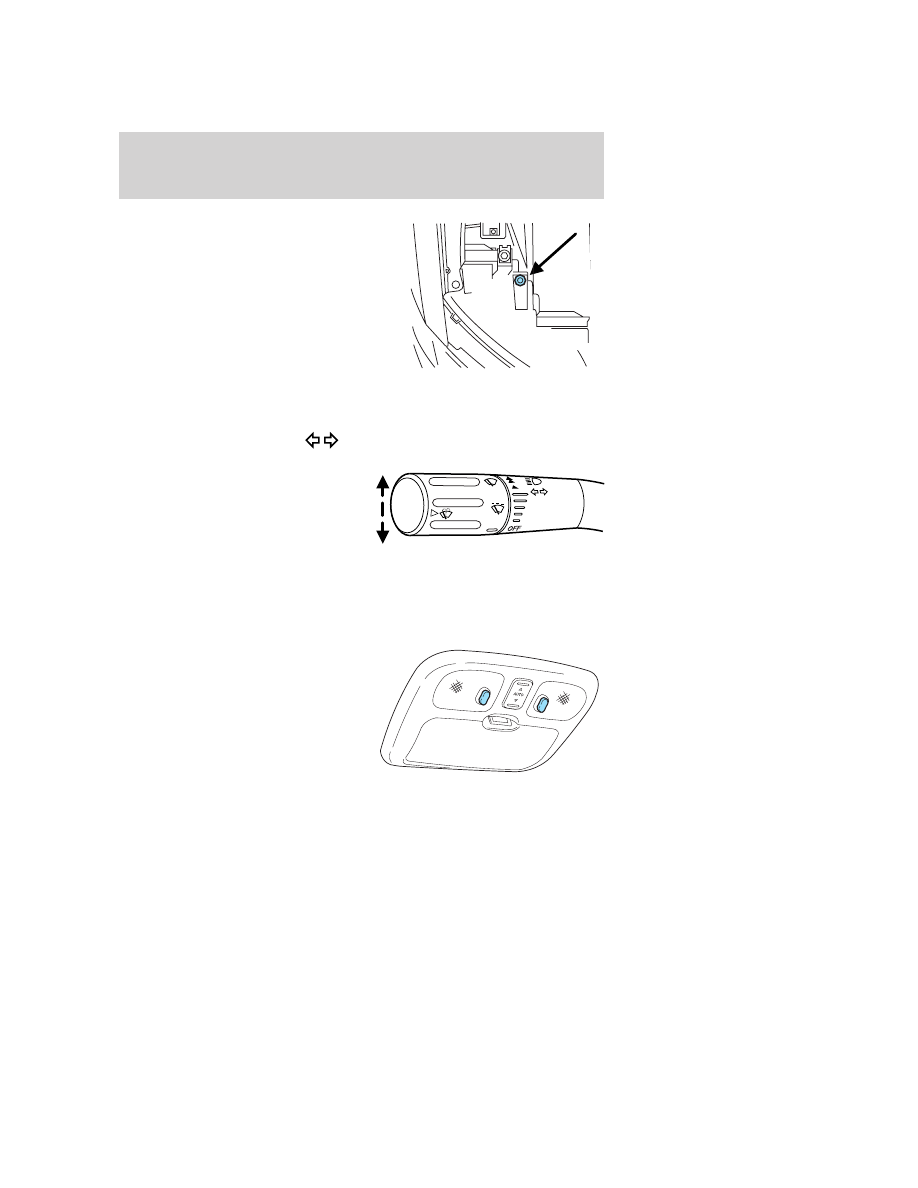
5. Locate the vertical adjuster on
each headlamp. Using a Phillips #2
screwdriver, turn the adjuster either
clockwise (to adjust down) or
counterclockwise (to adjust up).
The horizontal edge of the brighter
light should touch the horizontal
reference line.

6. Close the hood and turn off the
lamps.

HORIZONTAL AIM IS NOT REQUIRED FOR THIS VEHICLE AND IS
NON-ADJUSTABLE.

TURN SIGNAL CONTROL
• Push down to activate the left

turn signal.

• Push up to activate the right turn

signal.

INTERIOR LAMPS

Dome lamps and map lamps

The map lamps are located on the
overhead console. Press the controls
to turn on the lamps.

2006 Zephyr (378)
Owners Guide (post-2002-fmt)
USA 
(fus)

Lights

33

-------------------------------------------------------------------------------------------------------------------------------------------------------------

Your vehicle may also have reading
lamps within the rear dome lamp(s).

Press the switches on either side of
the dome lamp to turn on the
lamps.

BULB REPLACEMENT

Headlamp Condensation

The headlamps are vented to equalize pressure. When moist air enters
the headlamp(s) through the vents, there is a possibility that
condensation can occur. This condensation is normal and will clear
within 45 minutes of headlamp operation.

Replacing exterior bulbs

Check the operation of all the bulbs frequently.

Using the right bulbs

Replacement bulbs are specified in the chart below. Headlamp bulbs
must be marked with an authorized “D.O.T.” for North America and an
“E” for Europe to ensure lamp performance, light brightness and pattern
and safe visibility. The correct bulbs will not damage the lamp assembly
or void the lamp assembly warranty and will provide quality bulb burn
time.

Function

Number of bulbs

Trade

number

Headlamp high beam

2

H7

Headlamp low beam

2

H11LL (HID

optional)

Front park/turn signal
lamp

2

3457AK

(amber)

Front redundant park
lamp

4

168 NA

*Rear sidemarker lamp

N/A

LED

*Stop/tail lamp

N/A

LED

2006 Zephyr (378)
Owners Guide (post-2002-fmt)
USA 
(fus)

Lights

34

-------------------------------------------------------------------------------------------------------------------------------------------------------------

Function

Number of bulbs

Trade

number

Rear turn signal lamp

2

3157A

(amber)

Redundant tail lamp

8

161

Backup lamp

2

921

License plate lamp

2

C5WL

High-mount brake lamp

1

921

Foglamp

2

H11

Front map lamp

2

12V6W

Rear dome/reading lamp

6

578

Glove box lamp

1

194

Visor vanity lamp - Slide
on Rail system (SOR)

2

37

Puddle lamp

2

W5W

Luggage compartment
lamp

1

578

All replacement bulbs are clear in color except where noted.

To replace all instrument panel lights - see your authorized dealer.

*To replace these lamps - see your authorized dealer.

Replacing headlamp bulbs

Highbeam bulb replacement

1. Make sure headlamp switch is in the OFF position, then open the
hood.

2. Reach over the front bolster.

3. Disengage top of flexible washer
bottle filler neck from snap strap
attachment and position it to gain
access path to the high beam bulb
(Passenger Side Only).

2006 Zephyr (378)
Owners Guide (post-2002-fmt)
USA 
(fus)

Lights

35

-------------------------------------------------------------------------------------------------------------------------------------------------------------

4. Remove the vertical shield from
the bolster by disengaging the
S-shaped clip and rotate it up in a
clockwise direction. (Driver’s side
only)

5. Remove the AirTube from the air
filter assembly. (Driver’s side only).

6. Remove the protective rubber cap
from the housing by grabbing it and
pulling rearward.

7. Remove the bulb socket by
rotating it counterclockwise, then
pulling it straight out of the lamp
assembly.

8. Carefully pull bulb straight out of
socket and push in the new one.

Handle a halogen headlamp
bulb carefully and keep out

of children’s reach. Grasp the bulb
only by its plastic base and do not
touch the glass. The oil from your
hand could cause the bulb to
break the next time the
headlamps are operated.

2006 Zephyr (378)
Owners Guide (post-2002-fmt)
USA 
(fus)

Lights

36

-------------------------------------------------------------------------------------------------------------------------------------------------------------

9. For ease of bulb socket installation into the lamp assembly, hold the
bulb socket at 15 degrees clockwise from a vertical position. Using the 2
lead wires oriented exactly up to represent the vertical reference
position.

10. From the 15 degree position rotate the bulb socket clockwise to a
locked position.

11. Tuck the 2 lead wires into the lamp housing to assure that they are
not pinched when installing the protective rubber cap.

12. Install the protective rubber cap to the housing circular ring by
pushing and pressing it forward.

13. Re-apply pressure around the complete circular ring on the housing
to make sure the protective rubber cap is completely seated.

14. Reconnect washer bottle filler neck snap strap by reversing step 3
(Passenger Side Only).

15. Reinstall the AirTube to the air filter assembly. (Driver’s side only).

16. Reinstall the vertical shield to the bolster. (Driver’s side only).

17. Turn the headlamps on and make sure they work properly. If the
headlamp was correctly aligned before you changed the bulb, you should
not need to align it again.

Lowbeam bulb replacement

1. Make sure headlamp switch is in OFF position, then open the hood.

2. Remove the vertical shield from
the bolster by disengaging the
S-shaped clip and rotate it up in a
clockwise direction. (Driver’s side
only)

3. Remove the AirTube from the air
filter assembly. (Driver’s side only).

2006 Zephyr (378)
Owners Guide (post-2002-fmt)
USA 
(fus)

Lights

37

-------------------------------------------------------------------------------------------------------------------------------------------------------------

4. Remove screw from oval splash
shield access panel from the
exterior wheel well area. Lift up and
rearward to release a hidden finger
attachment at the lower portion of
the panel (Passenger side only).

5. From the exterior wheel well area
reach arm through splash shield
opening to access bulb socket
(Passenger side only).

6. Remove the protective rubber cap
from the housing by grabbing it and
pulling rearward.

7. Remove the bulb socket by
rotating it counterclockwise, then
pulling it straight out of the lamp
assembly.

8. Let go of the bulb socket and
leave it dangling near the lamp
housing (Passenger side only).

9. Reach over the front bolster in the engine area, with a tool if
necessary, bring the bulb socket upwards into an unobstructed area to
replace the bulb (Passenger side only).

10. Disconnect the electrical
connector from the bulb socket and
discard the old bulb socket.

11. Connect the new bulb socket to
the electrical connector.

Handle a halogen headlamp
bulb carefully and keep out

of children’s reach. Grasp the bulb
only by its plastic base and do not
touch the glass. The oil from your
hand could cause the bulb to
break the next time the
headlamps are operated.

2006 Zephyr (378)
Owners Guide (post-2002-fmt)
USA 
(fus)

Lights

38

-------------------------------------------------------------------------------------------------------------------------------------------------------------

12. After the new bulb is installed, carefully let the bulb socket dangle
downward near the lamp housing (Passenger side only).

13. From the exterior wheel well area reach arm through splash shield
opening to install bulb socket with new bulb (Passenger side only).

14. Install the new bulb socket into the lamp assembly by aligning the
indexing fingers, then rotate clockwise to locked position.

15. Install the protective rubber cap to the housing circular ring by
pushing and pressing it forward.

16. Re-apply pressure around the complete circular ring on the housing
to make sure the protective rubber cap is completely seated.

17. Reinstall the AirTube to the air filter assembly. (Driver’s side only).

18. Reinstall the vertical shield to the bolster. (Driver’s side only).

19. Turn the headlamps on and make sure they work properly. If the
headlamp was correctly aligned before you changed the bulb, you should
not need to align it again

Replacing HID headlamp bulbs (if equipped)

The low beam headlamps on your vehicle use a “high intensity discharge”
source. These lamps operate at a high voltage. When the bulb is burned
out, the bulb and starter capsule assembly must be replaced by your
authorized dealer.

Replacing redundant park bulbs

1. Make sure headlamp switch is in OFF position, then open the hood.

2. Remove the vertical shield from
the bolster by disengaging the
S-shaped clip and rotate it up in a
clockwise direction. (Driver’s side
only)

2006 Zephyr (378)
Owners Guide (post-2002-fmt)
USA 
(fus)

Lights

39

-------------------------------------------------------------------------------------------------------------------------------------------------------------

3. Remove the AirTube from the air
filter assembly. (Driver’s side only).

4. Remove screw from oval splash
shield access panel from the
exterior wheel well area. Lift up and
rearward to release a hidden finger
attachment at the lower portion of
the panel.

5. From the exterior wheel well area
reach arm through splash shield
opening to access bulb socket.

6. Remove the bulb socket by
rotating it counterclockwise, then
pulling it out of the lamp assembly.

7. Let go of the bulb socket and
leave it dangling near the lamp
housing.

8. Reach over the front bolster in
the engine area, with a tool if
necessary, bring the bulb socket
upwards into an unobstructed area to replace the bulb.

9. Carefully pull bulb straight out of
socket and push in the new one.

10. After the new bulb is installed,
carefully let the bulb socket dangle
downward near the lamp housing.

11. From the exterior wheel well
area reach arm through splash
shield opening to install bulb socket
with new bulb.

2006 Zephyr (378)
Owners Guide (post-2002-fmt)
USA 
(fus)

Lights

40

-------------------------------------------------------------------------------------------------------------------------------------------------------------

12. Install the new bulb socket into the lamp assembly by aligning the
indexing fingers, then rotate clockwise to locked position.

13. Reinstall splash shield with screw.

14. Reinstall Air Tube to the air filter assembly (Driver’s Side Only).

Replacing primary park/turn signal bulbs

1. Make sure headlamp switch is in the OFF position, then open the
hood.

2. Reach over the front bolster.

3. Disengage top of flexible washer
bottle filler neck from snap strap
attachment and position it to gain
access path to the high beam bulb
(Passenger Side Only).

4. Remove the vertical shield from
the bolster by disengaging the
S-shaped clip and rotate it up in a
clockwise direction. (Driver’s side
only)

5. Remove the AirTube from the air
filter assembly. (Driver’s side only).

2006 Zephyr (378)
Owners Guide (post-2002-fmt)
USA 
(fus)

Lights

41

-------------------------------------------------------------------------------------------------------------------------------------------------------------

6. Remove the bulb socket by
rotating it counterclockwise, then
pulling it straight out of the lamp
assembly.

7. Discard the old bulb and install
the new bulb into bulb socket.

8. Install the new bulb socket into
the lamp assembly by aligning the
indexing fingers, then rotate
clockwise to locked position.

9. If required, position the flexible
washer bottle filler neck back to its
original position and connect the snap strap (Passenger side only).

10. If required, reinstall the AirTube to the air filter assembly. (Driver’s
side only).

Replacing stop/tail/turn and side marker bulbs

Your vehicle is equipped with a rear lamp that has a stop/tail/turn and
side marker lamp module containing integral multiple light emitting
diodes (LED). If one or more LEDs burn out, the complete lamp module
has to be replaced. See your authorized dealer for the replacement LED
module.

Replacing rear turn signal bulbs

1. Make sure the headlamp switch is in the OFF position and open the
trunk.

2. Lift out trunk floor carpeting panel to access a Luggage Scuff Plate
(Hard Molding) shingles and a Trunk Side Panel (dark grey, soft
wheelhouse side trim panel) at the lamp area.

3. Carefully pull/push the Trunk Side Panel (dark grey, soft wheelhouse
side trim panel) outboard to expose the lamp assembly. The most
effective point to grasp the Trunk Side Panel when pulling it out from
the Luggage Scuff Plate is at it’s bottom edge where that edge meets the
exposed sheet metal of the trunk floor.

2006 Zephyr (378)
Owners Guide (post-2002-fmt)
USA 
(fus)

Lights

42

-------------------------------------------------------------------------------------------------------------------------------------------------------------

Note: Do not allow the Trunk Side Panel to remain bent and untucked
from the Luggage Scuff Plate (hard molding) for a long period of time.
Doing so may result in permanent deformation.

4. Remove the bulb socket by
rotating it counterclockwise, then
pulling it out of the lamp assembly.

5. Pull the bulb from the socket and
push in the new bulb.

6. Install the bulb socket into the
lamp assembly by rotating it
clockwise.

7. Carefully push the Trunk Side
Panel (dark grey, soft wheelhouse
side trim panel) back to the shingle position to the Luggage Scuff Plate
(hard molding).

8. Install trunk floor carpeting panel.

Replacing backup lamp/redundant tail lamp bulbs

The backup lamp and redundant tail lamp bulbs are located in the trunk
lid. Follow the same steps to replace either bulb.

1. Make sure headlamp switch is in
OFF position and open trunk to
access the lamp assembly.

2. Position the decklid trim aside by
removing 3 to 4 pin-type retainers
to expose the lamp assembly.

3. Remove the bulb socket by
rotating it counterclockwise, then
pulling it out of the lamp assembly.

4. Pull the bulb from the socket and
push in the new bulb.

5. Install the bulb socket into the
lamp assembly by rotating it
clockwise.

6. Carefully reposition the trim back
to its original position and secure
the retainers.

2006 Zephyr (378)
Owners Guide (post-2002-fmt)
USA 
(fus)

Lights

43

-------------------------------------------------------------------------------------------------------------------------------------------------------------

Replacing high-mount brake lamp bulb

1. Make sure the ignition control is
in the LOCK (OFF) position.

2. Open the trunk and reach
underneath package tray to locate
lamp assembly.

3. Remove the bulb socket by
rotating it counterclockwise, then
pulling it out of the lamp assembly.

4. Pull the bulb straight from the
socket and push in the new bulb.

5. Install the bulb socket into the lamp assembly by rotating it clockwise.

Replacing license plate lamp bulbs

1. Make sure the headlamp switch is
in the OFF position.

2. Remove the two screws from the
license plate lamp assembly.

3. Remove bulb socket by turning
counterclockwise.

4. Carefully pull the bulb out from
the socket.

Install new bulb(s) in reverse order.

Replacing foglamp bulbs

1. Make sure the foglamp switch is
in the OFF position.

2. From underneath the vehicle,
partially remove the tire splash
shield by removing four drive
screws.

After removing to allow free access
to the front fog lamp bulb and
electrical wire harness, the splash shield flap should be able to be
repositioned.

2006 Zephyr (378)
Owners Guide (post-2002-fmt)
USA 
(fus)

Lights

44

-------------------------------------------------------------------------------------------------------------------------------------------------------------

3. Rotate the harness/bulb assembly
counterclockwise, to remove from
the fog lamp.

4. Carefully disconnect the bulb
from the harness assembly via the
two snap clips.

Install the new bulb in reverse order.

2006 Zephyr (378)
Owners Guide (post-2002-fmt)
USA 
(fus)

Lights

45

-------------------------------------------------------------------------------------------------------------------------------------------------------------

MULTI-FUNCTION LEVER

Windshield wiper: Rotate the end
of the control away from you to
increase the speed of the wipers;
rotate towards you to decrease the
speed of the wipers.

Speed dependent wipers: When the wiper control is set on the
intermittent settings, the speed of the wipers will automatically adjust
with the vehicle speed. The faster your vehicle is travelling the faster the
wipers will go.

Windshield washer: Push the end
of the stalk:
• briefly: causes a single swipe of

the wipers without washer fluid.

• a quick push and hold: the wipers

will swipe three times with
washer fluid.

• a long push and hold: the wipers

and washer fluid will be activated
for up to ten seconds.

Windshield wiper/washer features
(if equipped with Autolamp feature)

The exterior lamps will turn on with the ignition on, headlamp control in
the Autolamp position and the windshield wipers are turned on (for a
fixed period of time).

2006 Zephyr (378)
Owners Guide (post-2002-fmt)
USA 
(fus)

Driver Controls

46

-------------------------------------------------------------------------------------------------------------------------------------------------------------

TILT/TELESCOPE STEERING WHEEL

To adjust the steering wheel:

1. Pull the lever down to unlock the
steering column.

2. While the lever is in the down
position, move the steering wheel
up or down and in or out until you
find the desired position.

3. While holding the steering wheel
in place, pull the lever up to its
original position to lock the steering
column.

Never adjust the steering wheel when the vehicle is moving.

ILLUMINATED VISOR MIRROR

Lift the mirror cover to turn on the
visor mirror lamps.

Slide on rod feature

Rotate the visor towards the side
window and extend it rearward for
additional sunlight coverage.

Note: To stow the visor back into
the headliner, visor must be
retracted before moving it back
towards the windshield.

2006 Zephyr (378)
Owners Guide (post-2002-fmt)
USA 
(fus)

Driver Controls

47

-------------------------------------------------------------------------------------------------------------------------------------------------------------

OVERHEAD CONSOLE

The appearance of your vehicle’s overhead console will vary according to
your option package.

Storage compartment

Press the latch to open the storage
compartment.

The storage compartment may be
used to secure sunglasses or a
similar object.

CLOCK

Press the right (+) control to move
the time display forwards.

Press the left (-) control to move
the time display backwards.

2006 Zephyr (378)
Owners Guide (post-2002-fmt)
USA 
(fus)

Driver Controls

48

-------------------------------------------------------------------------------------------------------------------------------------------------------------


Content      ..     1      2      3      4      ..