Emergency War Surgery (2004) - page 8
Emergency War Surgery
ο
The role of halo immobilization in the acute combat setting
is quite limited. In nonpenetrating trauma to the cervical
spine, immobilization with a cervical hard collar or sand bags
is preferable until arrival at a definitive treatment site.
ο
Should traction be indicated for cervical spine injuries (eg,
facet joint dislocations or burst fractures with a tenuous
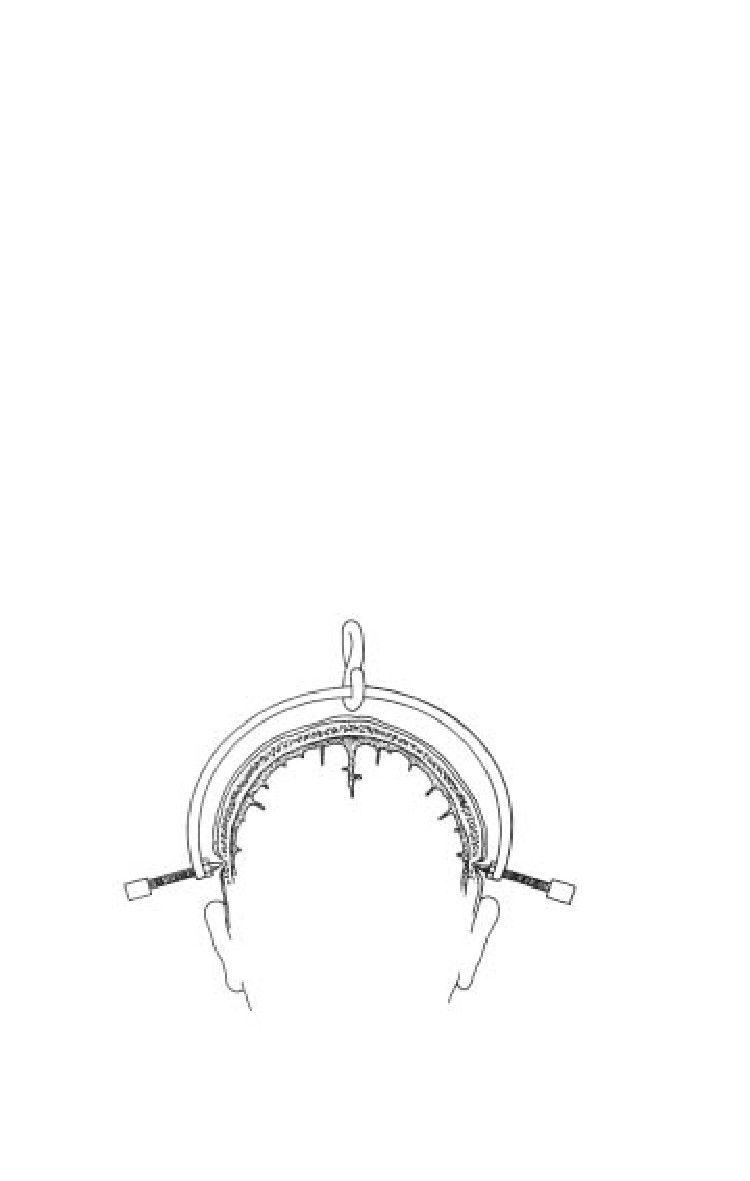
neurologic status), the Gardner-Wells tongs should be
applied and sufficient weight (generally 2-10 kg) placed
in line of the spine (Fig. 20-2, Table 20-2). It is paramount
to remember that injuries to occipitocervical articulation
should not be treated with traction-in effect, putting these
injuries in traction “pulls the head off”. If traction is
applied, radiographs must be obtained to be certain that
no undiagnosed ligamentous injury has been exacerbated
by the weight.
ο
The role of collar immobilization in penetrating injuries
to the cervical spine is less well established. Soft-tissue care
is compromised by the collar’s position and, in general,
penetrating injuries coupled with osseous instability
should be managed in Gardner-Wells traction.
Fig. 20-2. Gardner-Wells tongs.
20.6
Wounds and Injuries of the Spinal Column and Cord
Table 20-2. Application of Gardner-Wells Tongs.
Step
Procedure
Comment
1
Inspect Insertion Site: Select a
Rule out depressed skull fracture
point just above apex of each ear.
in this area.
2
Shave and Prep Pin Insertion Site.
3
Inject Local Anesthetic: Inject 2-3
May omit if patient is unconscious.
cc of 1% Xylocaine or equivalent
agent 1 cm above each ear in line
with the external auditory meatus.
4
Advance Gardner-Wells Tong Pins:
A spring-loaded device in one of
Insert pins into skull by symmet-
the two pins will protrude when
rically tightening the knobs.
the pins are appropriately seated.
(A data plate on the tongs provides
additional information.)
5
Apply Skeletal Traction: Use a
Use 5 lb rule (ie, 5 lb of weight for
pulley fixed to the head of the
each level of injury). High cervical
litter or frame to direct horizontal
fractures usually require minimal
traction to the tongs.
traction to reduce. Monitor with
series radiographs. The tong-pin
site requires anterior or posterior
positioning to adjust for cervical
spine flexing or extension as
indicated.
6
Elevate Head of Litter: Use blocks
The knot in the cord should not be
in order to provide body-weight
permitted to drift up against the
counter traction.
pulley. Should this occur, traction
is no longer being applied.
7
Decrease Traction Weight: When
Unreducible or unstable fractures
radiographs confirm that
should be maintained in
reduction is adequate, decrease
moderate traction until surgical
traction to 5-15 lb.
intervention. If neurological
deterioration occurs, immediate
surgical intervention must be
considered.
8
Daily Pin Care.
Cleanse tracts with saline and apply
antibiotic ointment to the pin sites.
Maintain pin force (see Step 4)
by tightening as necessary to keep
spring-loaded device in the
protruded position.
20.7
Emergency War Surgery
9
Turn Patient Appropriately: Use When initially proned, obtain radio-
Stryker, Foster, or similar frame
graphs to ensure that the reduction
and turn patient every 4 h.
is maintained. If reduction is not
maintained when the patient is
proned, rotate the patient only
between the 30° right and left
quarter positions. The use of a
circle electric bed is contraindicated
with injuries of the spinal cord
or column.
10
If Satisfactory Alignment Cannot Consider myelogram, CT scan,
Be Obtained, Further Workup Is tomograms, and neurosurgical
Necessary.
/orthopedic consultations.
Thoracic and Lumbar Spine
Although the thoracic rib cage contributes considerable
rotatory stability, it does not protect completely against
injuries.
The vascular supply of the spinal cord is most vulnerable
between T-4 and T-6 where the canal is most narrow. Even
minor deformity may result in cord injury.
The most common place for compression injuries is at the
thoracolumbar junction between T-10 and L-2.
Most burst fractures result from an axial load, and occur at
the thoracolumbar junction. These fractures are associated
with compromise of the spinal canal and progressive angular
deformity. They are often associated with significant
neurologic injury.
Evaluation for surgical stabilization and spinal cord
decompression should be done with advanced imaging such
as CT and/or magnetic resonance imaging (MRI).
When complex wounds involving the head, thorax,
abdomen, or extremities coexist with vertebral column
injuries, lifesaving measures take precedence over the
definitive diagnosis and management of spinal column
and cord problems. During these interventions, further
injury to the unstable spine must be prevented by
appropriate protective measures.
20.8
Wounds and Injuries of the Spinal Column and Cord
Emergent Surgery
Emergent spine surgery for penetrating or closed injuries
of the spinal cord is indicated only in the presence of
neurological deterioration.
Penetrating Spine Injuries.
ο Injuries associated with a hollow-viscus should undergo
appropriate treatment of the viscus injury without
extensive debridement of the spinal injury, followed by
appropriate broad-spectrum antibiotics for 1-2 weeks.
Inadequate debridement and irrigation may lead to
meningitis.
ο Removal of a fragment from the spinal canal is indicated
for patients with neurologic deterioration.
ο In neurologically stable patients with fragments in the
cervical canal, delaying surgery for 7-10 days reduces
problems with dural leak and makes dural repair
considerably easier.
ο Casualties not requiring immediate surgery may be
observed with spine immobilization and treated with 3
days of IV antibiotics. Surgical stabilization can be
performed following evacuation.
Pharmacologic Treatment
Penetrating injuries of the spine should NOT receive
corticosteroid treatment.
Closed spinal cord injuries may be treated with an IV
corticosteroid if started within 8 hours of injury.
ο 30 mg/kg bolus of methylprednisolone initially.
ο 5.4 mg/kg/h of methylprednisolone for the next 24-48
hours.
♦ If therapy is started within 3 hours of injury, continue
treatment for 24 hours.
♦ If therapy is started within 3-8 hours after injury, then
treat for 48 hours.
20.9
Emergency War Surgery
General Management Considerations
Neurogenic shock
Traumatically induced sympathectomy with spinal cord
injury.
Symptoms include bradycardia and hypotension.
Treatment:
ο Volume resuscitation to maintain systolic BP > 90 mm Hg.
ο May use phenylephrine (50-300 µg/min) or dopamine (2-
10 µg/kg/min) to maintain BP.
Gastrointestinal tract
Ileus is common and requires use of a nasogastric tube.
Stress ulcer prevention using medical prophylaxis.
Bowel training includes a schedule of suppositories and may
be initiated within one week of injury.
Deep vein thrombosis
Start mechanical prophylaxis immediately.
Initiate chemical prophylaxis after acute bleeding has stopped
(See Chapter 11, ICU Care).
Bladder Dysfunction
Failure to decompress the bladder may lead to autonomic
dysreflexia and a hypertensive crisis.
The bladder is emptied by intermittent or indwelling
catheterization.
Antibiotic prophylaxis for the urinary tract is not advised.
Decubitus ulcers
Skin breakdown begins within 30 minutes in the immobilized
hypotensive patient.
For prolonged transport, the casualty should be removed
from the hard spine board and placed on a litter.
Frequent turning and padding of prominences and diligence
on the part of caretakers are essential to protect the insensate
limbs.
All bony prominences are inspected daily.
Physical therapy is started early to maintain range of motion
in all joints to make seating and perineal care easier.
20.10
Chapter 21
Pelvic Injuries
Introduction
Injuries of the pelvis are an uncommon battlefield injury.
Blunt injuries may be associated with major hemorrhage and
early mortality.
Penetrating injuries to the skeletal pelvis are usually
associated with abdominopelvic organ injury.
Blunt Injuries
Patterns and mechanisms are the same as those seen in
civilian blunt trauma.
ο Lateral compression injuries are marked by internal
rotation or midline displacement of the hemipelvis.
ο Anterior posterior injuries demonstrate external rotation
of the hemipelvis.
ο Vertical shear injuries have cephalad displacement of the
hemipelvis.
Increasing degrees of displacement in any direction are
associated with greater risk of hemorrhage.
ο Anterior posterior injuries with complete disruption of all
sacroiliac ligaments represent an internal hemipelvectomy
and have the greatest potential for hemorrhage.
Early pelvic stabilization can control hemorrhage and
reduce mortality. This is particularly true in an austere
environment with limited blood replacement products and
other treatment resources.
Open injuries require early recognition and prompt treatment
to prevent high mortality due to early hemorrhage and late
sepsis.
21.1
Emergency War Surgery
Diagnosis.
ο Physical examination demonstrates instability of the pelvis
when manual pressure is applied to the iliac crests.
ο Leg length difference, scrotal or labial swelling/
ecchymosis, or abrasions over the pelvis raise suspicion
for pelvic ring injury.
ο Perineum, rectum, and vaginal vault must be evaluated
for lacerations to rule out an open injury.
ο Radiograph (AP pelvis, and when possible, inlet and outlet
views) confirm the diagnosis. Computed tomography (CT)
defines the location of injury more accurately.
ο Bladder and urethral injuries are suspected when blood is
present at the meatus or in the urine, or when a Foley
catheter cannot be passed. Retrograde urethrogram and
cystography confirm the diagnosis.
Treatment.
ο Hemorrhage control.
♦ Mechanical stabilization.
◊ Tying a sheet or placing a binder around the pelvis
at the level of the greater trochanters.
◊ Bean bags or sand bags.
◊ Lateral decubitus positioning with the affected side
dependent.
External fixator placement in the iliac crests allows for
the most direct control of the pelvis.
♦ Angiography is a useful adjunct, but is not usually
available in the deployed environment.
♦ As a last resort, retroperitoneal packing may be
attempted, but will expend tremendous resources and
is often unsuccessful.
ο Open blunt injuries require:
♦ Immediate hemorrhage control by packing.
♦ Aggressive and thorough debridement.
♦ Pelvic stabilization.
♦ Diverting colostomy in the presence of wounds at risk
for fecal soilage.
21.2

Pelvic Injuries
ο Definitive internal pelvic stabilization (plates, screws,
among others) is done outside of the combat zone.
Missile and fragmentation wounds can cause fracture of
the pelvis.
The pelvis usually remains stable.
The colon, small intestine, rectum, and the genitour-
inary tracts must all be assessed for associated injury.
Major hemorrhage can result from injury to the iliac
vessels.
Penetrating Injuries
Evaluation.
ο Diagnosis of associated injuries may require exploratory
laparotomy.
ο Fractures should be assessed with radiographs and CT
scans, when available, to rule out extension into the hip
and acetabulum.
Treatment.
ο Control hemorrhage.
ο Control hollow visceral injury.
ο Debride wounds and fractures.
For combined hollow-viscus and acetabulum /hip joint
injuries, the joint is contaminated and must be explored
and treated as described in Chapter 24, Open Joint
Injuries.
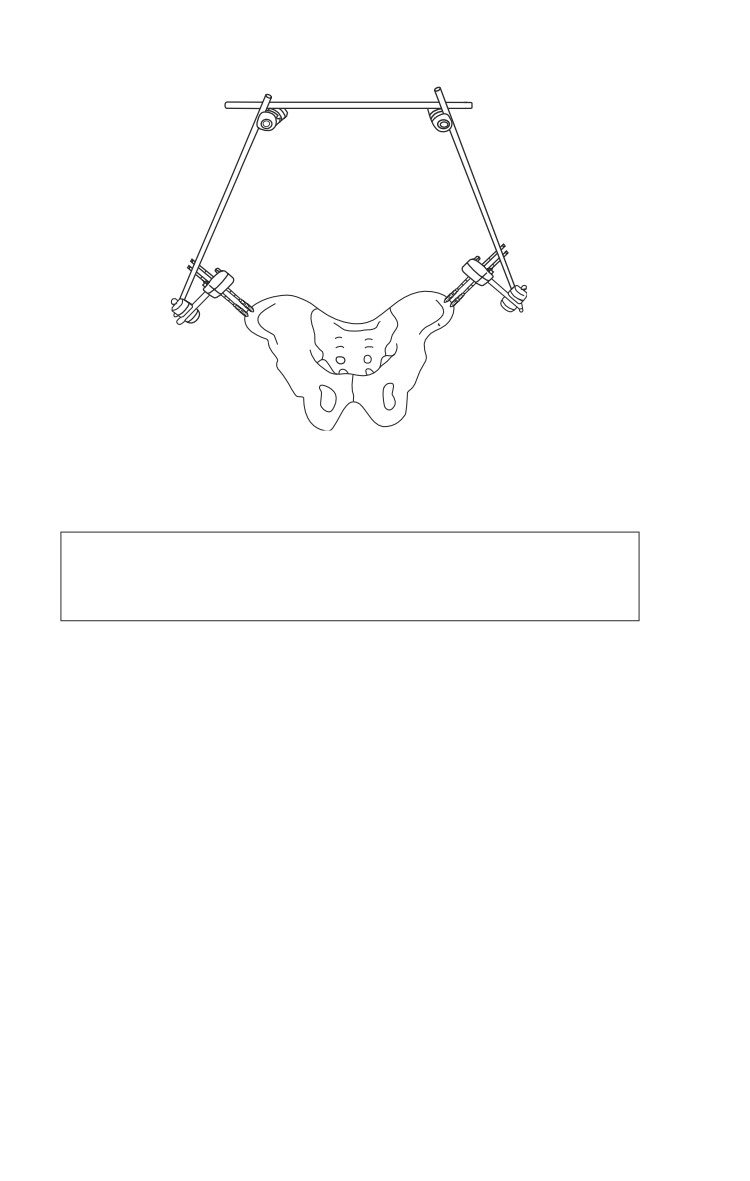
Technique of pelvic external fixator placement (Fig. 21-1).
ο Prep the iliac crests.
ο Place a 2-cm horizontal incision over the iliac crest, 2
fingerbreadths proximal or medial ventral to the anterior
superior iliac crest.
ο Bluntly dissect to the iliac crest.
ο To determine the angle of the pelvis, first slide a guide pin
between the muscle and the bone along the inner table of
the iliac wing, no deeper than 3-4 cm.
21.3
Emergency War Surgery
Fig. 21-1. Pelvic external fixator placement.
Failure to properly determine the angle of the iliac wing
leads to inadequate fixation and may cause significant
complications.
ο Locate the junction of the middle and medial thirds of the
thickness of the iliac crest with the tip of a 5-mm external
fixator pin.
ο Paralleling the guide pin, begin drilling the pin into the crest.
ο Drill between the inner and outer tables to a depth of about
4 cm, aiming generally towards the greater trochanter.
Only gentle pressure should be applied once the pin
threads have engaged, to allow for the pin to guide itself
between the tables.
ο A second pin is inserted 1-2 cm more posteriorly on the crest.
ο Check the stability of each pin. If unsatisfactory, attempt
reinsertion by aiming between the tables.
ο Place pins in the contralateral iliac crest in the same
manner.
ο Reduce the pelvis by applying pressure on the pelvis (not
the pins!) and connect the external fixator pins with bar(s)
across the abdomen and pelvis to maintain reduction.
21.4
Chapter 22
Soft-Tissue Injuries
All war wounds are contaminated and should not be
closed primarily.
The goal in treatment of soft-tissue wounds is to save lives,
preserve function, minimize morbidity and prevent infections
through early and aggressive surgical wound care far forward
on the battlefield.
Presurgical Care
Prevent infection.
ο Antibiotics:
♦ Antibiotics are not a replacement for surgical
treatment.
♦ Antibiotics are therapeutic, not prophylactic, in war
wounds.
♦ Give antibiotics for all penetrating wounds as soon as
possible.
ο Sterile dressing.
♦ Place a sterile field dressing as soon as possible.
♦ Leave dressing undisturbed until surgery. A one-look
soft-tissue examination may be performed on initial
presentation. Infection rate increases with multiple
examinations prior to surgery. Initial wound cultures
unnecessary.
Surgical Wound Management Priorities
Life-saving procedures before limb and soft-tissue wound care.
Save limbs.
ο Vascular repair.
ο Compartment release.
22.1
Emergency War Surgery
Prevent infection.
ο Wound surgery within 6 hours of wounding.
ο Antibiotics.
ο Sterile dressing.
ο Fracture immobilization.
Superficial penetrating fragment (single or multiple)
injuries usually do not require surgical exploration. Simply
cleanse the wounds with antiseptic and scrub brush.
Nonetheless, depending on location and clinical presentation,
maintain high suspicion for vascular injury or intraabdominal
penetration.
ο Avoid “Swiss cheese” surgery (in an attempt to excise all
wounds and retrieve fragments).
Wound Care
Primary Surgical Wound Care
Limited longitudinal incisions.
Excision of foreign material and devitalized tissue.
Irrigation.
LEAVE WOUND OPEN—NO PRIMARY CLOSURE.
Antibiotics and tetanus prophylaxis.
Splint for transport (improves pain control).
Longitudinal incisions.
ο Wounds are extended with incisions parallel to the long
axis of the extremity, to expose the entire deep zone of
injury. At the flexion side of joints, the incisions are made
obliquely to the long axis to prevent the development of
flexion contractures.
ο The use of longitudinal incisions, rather than transverse
ones, allows for proximal and distal extension, as needed,
for more thorough visualization and debridement.
Wound excision (current use of the term debridement).
ο Skin.
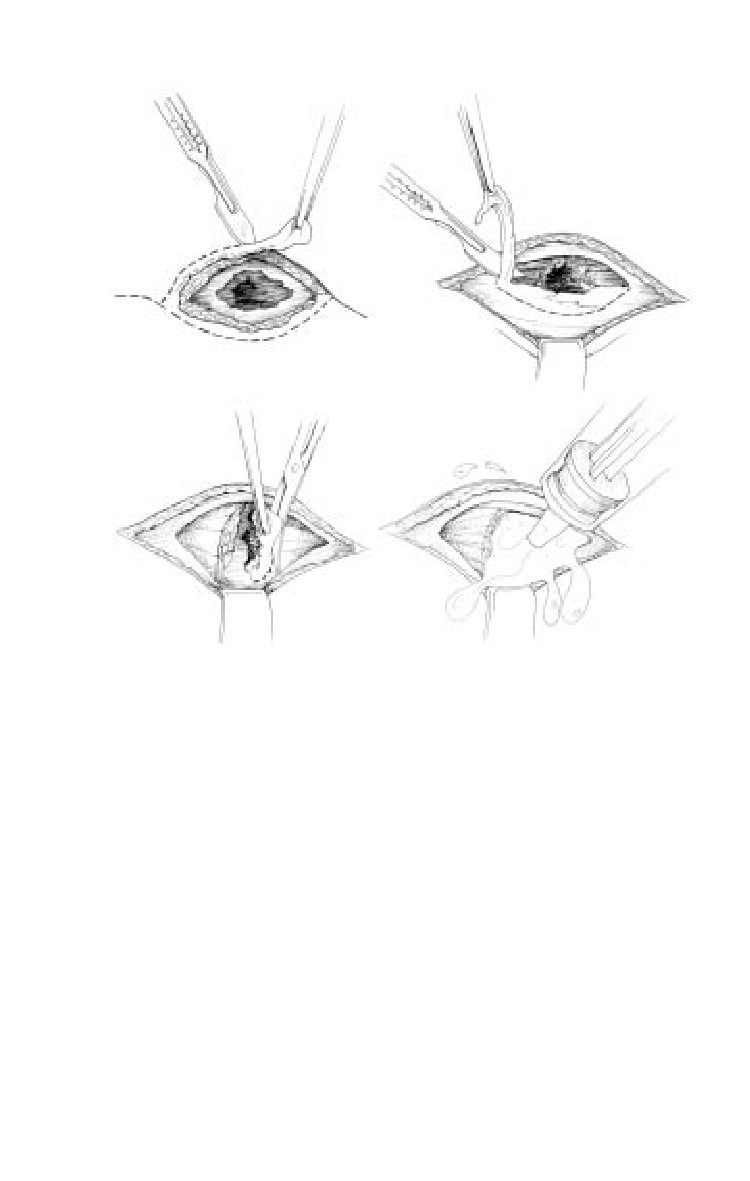
♦ Conservative excision of 1-2 mm of damaged skin edges
(Fig. 22-1a).
♦ Excessive skin excision is avoided; questionable areas
can be assessed at the next debridement.
22.2
Soft-Tissue Injuries
b
a
c
d
Fig. 22-1. (a) Skin excision, (b) removal of fascia, (c) removal of avascular
tissue, (d) irrigation.
ο Fat.
♦ Damaged, contaminated fat should be generously
excised.
ο Fascia.
♦ Damage to the fascia is often minimal relative to the
magnitude of destruction beneath it (Fig 22-1b).
♦ Shredded, torn portions of fascia are excised, and the
fascia is widely opened through longitudinal incision
to expose the entire zone of injury beneath.
♦ Complete fasciotomy is often required as discussed
below.
ο Muscle.
22.3
Emergency War Surgery
Removal of dead muscle is important to prevent
infection. ACCURATE INITIAL ASSESSMENT OF MUSCLE VIABILITY
IS DIFFICULT. Tissue sparing debridement is acceptable if
follow-on wound surgery will occur within 24 hours.
More aggressive debridement is required if subsequent
surgery will be delayed for more than 24 hours.
♦ Sharply excise all nonviable, severely damaged,
avascular muscle (Fig. 22-1c).
♦ The “4 Cs” may be unreliable for initial assessment of
muscle viability (color, contraction, consistency,
circulation).
◊ Color is the least reliable sign of muscle injury.
Surface muscle may be discolored due to blood under
the myomesium, contusion, or local vasoconstriction.
◊ Contraction is assessed by observing the retraction
of the muscle with the gentle pinch of a forceps.
◊ Consistency of the muscle may be the best predictor
of viability. In general, viable muscle will rebound to
its original shape when grasped by a forceps, while
muscle that retains the mark has questionable viability.
◊ Circulation is assessed via bleeding tissue from a
fresh wound. Transient vasospasm, common with
war wounds, may not allow for otherwise healthy
tissue to bleed.
ο
Bone.
♦ Fragments of bone with soft-tissue attachments and
large free articular fragments are preserved.
♦ Remove all devitalized, avascular pieces of bone smaller
than thumbnail size that have no soft-tissue attachment.
♦ Deliver each of the bone ends of any fracture indepen-
dently, clean the surface and clean out the ends of the
medullary canal.
ο
Nerves and tendons.
♦ Do not require debridement, except for trimming frayed
edges and grossly destroyed portions.
♦ Primary repair is not performed. To prevent desiccation,
use soft-tissue or moist dressings for coverage.
22.4
Soft-Tissue Injuries
ο
Vessels.
♦ Only minimal debridement of vessel is required for a
successful repair.
ο
Irrigation.
♦ Following surgical removal of debris and nonviable
tissue, irrigation is performed until clean (Fig. 22-1d).
♦ While sterile physiologic fluid is preferred, do not
deplete resuscitation fluid resources. May use potable
water as an alternative. The last liter of irrigant should
be a sterile solution with antibiotics.
ο
Local soft-tissue coverage.
♦ The development and rotation of flaps for this purpose
should not be done during primary surgical wound care.
♦ Local soft-tissue coverage through the gentle mobilization
of adjacent healthy tissue to prevent drying, necrosis,
and infection is recommended. Saline-soaked gauze is
an alternative.
No Primary Closure of War Wounds.
ο
Dressing.
♦ Do not plug the wound with packing as this prevents
wound drainage. Leaving the wound open allows the
egress of fluids, avoids ischemia, allows for unrestricted
edema, and avoids the creation of an anaerobic
environment.
♦ Place a nonconstricting, nonocclusive dry dressing over
the wound.
Wound Management After Initial Surgery
The wound undergoes a planned second debridement and
irrigation in 24-72 hours, and subsequent procedures until a
clean wound is achieved.
Between procedures there may be better demarcation of
nonviable tissue or the development of local infection.
Early soft-tissue coverage is desirable within 3-5 days, when
the wound is clean, to prevent secondary infection.
22.5
Emergency War Surgery
Delayed primary closure (3-5 days) requires a clean wound
that can be closed without undue tension. This state may be
difficult to achieve in war wounds.
Soft-tissue war wounds heal well without significant loss of
function through secondary intention. This is especially true
of simple soft-tissue wounds.
Definitive closure with skin grafts and muscle flaps should
not be done in theater when evacuation is possible. These
techniques may be required, however, for injured civilians
or prisoners of war.
Crush Syndrome
When a victim is crushed or trapped with compression on
the extremities for a prolonged time, there is the possibility
for the crush syndrome (CS), characterized by ischemia and
muscle damage or death (rhabdomyolysis).
ο With rhabdomyolysis there is an efflux of potassium,
nephrotoxic metabolites, myoglobin, purines, and
phosphorous into the circulation, resulting in cardiac and
renal dysfunction.
ο Reperfusion injury can cause up to 10 L of third-space fluid
loss per limb that can precipitate hypovolemic shock.
ο Acute renal failure (ARF) can result from the combination
of nephrotoxic substances from muscle death (myoglobin,
uric acid) and hypovolemia resulting in renal low-flow state.
Recognition.
ο History.
♦ Suspect in patients in whom there is a history of being
trapped (eg, urban operations, mountain operations,
earthquakes, or bombings) for a prolonged period (from
hours to days).
♦ Clear history is not always available in combat, and the
syndrome may appear insidiously in patients who
initially appear well.
ο Physical findings.
A thorough examination must be done with attention to
extremities, trunk, and buttocks. The physical findings
depend on the duration of entrapment, treatment
rendered, and time since the victim’s release.
22.6
Soft-Tissue Injuries
♦ Extremities.
◊ May initially appear normal just after extrication.
◊ Edema develops and the extremity becomes swollen,
cool, and tense.
◊ May have severe pain out of proportion to examination.
◊ Anesthesia and paralysis of the extremities, which
can mimic a spinal cord injury with flaccid paralysis,
but there will be normal bowel and bladder function.
♦ Trunk/buttocks: may have severe pain out of proportion
to examination in tense compartments.
ο
Laboratory findings.
♦ Creatinine phosphokinase (CK) is elevated with values
usually > 100,000 IU/mL.
♦ The urine may initially appear concentrated and later
change color to a typical reddish-brown color, so called
“port wine” or “iced tea” urine. The urine output
decreases in volume over time.
♦ Due to myoglobin, urine dipstick is positive for blood,
but microscopy will not demonstrate red blood cells
(RBCs). The urine may be sent to check for myoglobin,
but results take days and should not delay therapy.
♦ Hematocrit/hemoglobin (H/H) can vary depending on
blood loss, but in isolated crush syndrome H/H is
elevated due to hemoconcentration from third spacing
fluid losses.
♦ With progression, serum potassium and CK increase
further with a worsening metabolic acidosis. Creatinine
and BUN will rise as renal failure ensues. Hyperkalemia
is typically the ultimate cause of death from cardiac
arrhythmia.
Therapy.
ο On scene while still trapped.
♦ The primary goal of therapy is to prevent acute renal
failure in crush syndrome. Suspect, recognize, and treat
rhabdomyolysis early in victims of entrapment.
♦ Therapy should be initiated as soon as possible,
preferably in the field, while the casualty is still trapped.
Ideally it is recommended to establish IV access in a
free arm or leg vein.
22.7
Emergency War Surgery
◊ Avoid potassium and lactate containing IV solutions.
◊ At least 1 L should be given prior to extrication and
up to 1 L/h (for short extrication times) to a
maximum of 6-10 L/d in prolonged entrapments.
♦ As a last resort, amputation may be necessary for rescue
of entrapped casualties (ketamine 2 mg/kg IV for
anesthesia and use of proximal tourniquet).
ο
Hospital care.
♦ Other injuries and electrolyte anomalies must be treated
while continuing fluid resuscitation, as given above, to
protect renal function.
♦ Foley catheter for urine output monitoring.
♦ Establish and maintain urine output > 100 cc/h until
pigments have cleared from the urine. If necessary, also
◊ Add sodium bicarbonate to the IV fluid (1 amp/L
D5W) to alkalinize the urine above a pH of 6.5.
If unable to monitor urine pH, put 1 amp in every
other IV liter.
◊ Administer mannitol, 20% solution 1-2 g/kg over 4
hours (up to 200 g/d), in addition to the IV fluids.
♦ Central venous monitoring may be needed with the
larger volumes (may exceed 12 L/d to achieve necessary
urine output) of fluid given.
♦ Electrolyte abnormalities.
◊ Hyperkalemia, hyperphosphatemia, hypocalcemia,
hyperuricemia must be addressed.
♦ Dialysis.
◊ ARF requiring dialysis occurs in 50%-100% of those
with severe rhabdomyolysis.
♦ Surgical management centers on diagnosis and
treatment of compartment syndrome—remember to
check torso and buttocks as well.
◊ Amputation: consider in casualties with irreversible
muscle necrosis/necrotic extremity.
♦ Hyperbaric oxygen therapy: may be useful after surgical
therapy to improve limb survival.
22.8
Soft-Tissue Injuries
Compartment Syndrome (see Chapter 27, Vascular Injuries)
Compartment syndrome may occur with an injury to any
fascial compartment. The fascial defect caused by the injury
may not be adequate to fully decompress the compartment,
and compartment syndrome may still occur.
Mechanisms of injuries associated with compartment
syndrome.
ο Open fractures.
ο Closed fractures.
ο Penetrating wounds.
ο Crush injuries.
ο Vascular injuries.
ο Reperfusion following vascular repairs.
Early clinical diagnosis of compartment syndrome.
ο Pain out of proportion.
ο Pain with passive stretch.
ο Tense, swollen compartment.
Late clinical diagnosis.
ο Paresthesia.
ο Pulselessness and pallor.
ο Paralysis.
Measurement of compartment pressures: Not recommended,
just do the fasciotomy.
ο The diagnosis of a compartment syndrome is made on
clinical grounds.
ο Measurement of compartment pressures is not recommended
in the combat zone.
Consider prophylactic fasciotomy.
ο High-energy wounds.
ο Intubated, comatose, sedated.
ο Closed-head injuries.
ο Circumferential dressings or casts.
ο Vascular repair.
ο Prolonged transport.
ο High index of suspicion.
22.9
Emergency War Surgery
Fasciotomy Technique
Upper extremity.
ο
Arm: The arm has two compartments:
The anterior flexors (biceps, brachialis) and the posterior
extensors (triceps).
♦ Lateral skin incision from the deltoid insertion to the
lateral epicondyle.
♦ Spare the larger cutaneous nerves.
♦ At the fascial level the intermuscular septum between
the anterior and posterior compartment is identified,
and the fascia overlying each compartment is released
with longitudinal incisions.
♦ Protect the radial nerve as it passes through the
intermuscular septum from the posterior compartment
to the anterior compartment just below the fascia.
♦ Compartment syndrome in the hand is discussed in
Chapter 26, Injuries to the Hands and Feet.
ο
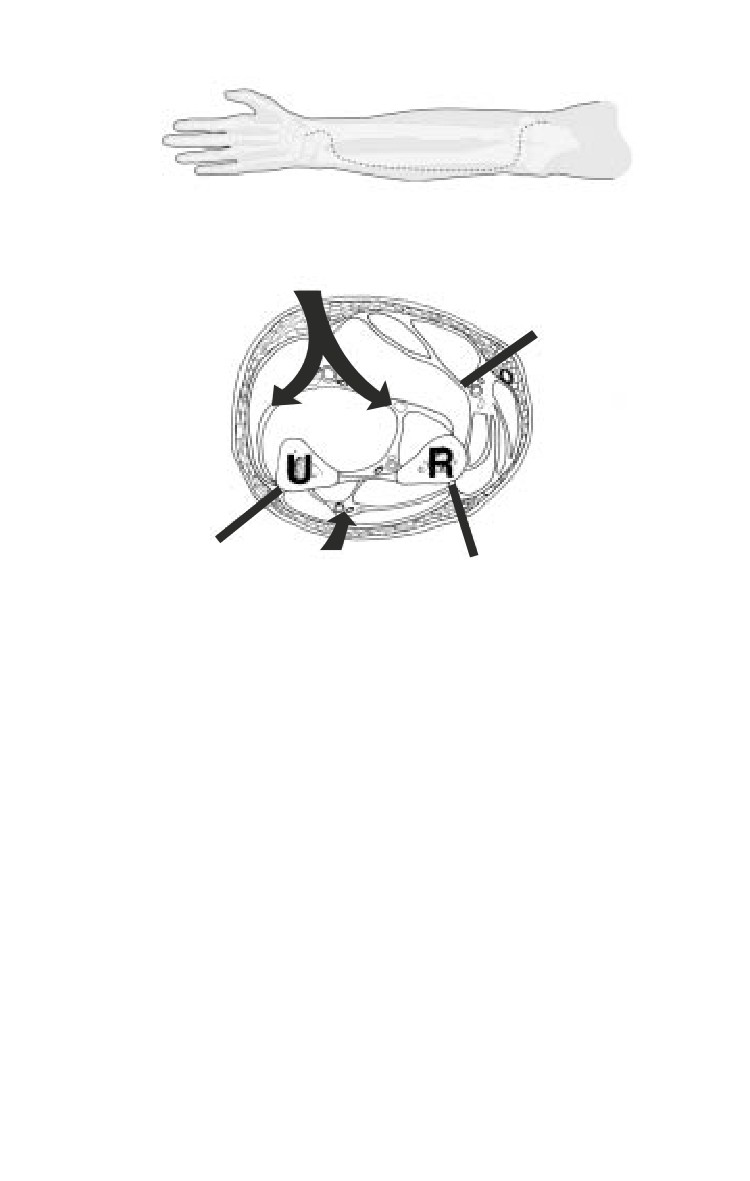
Forearm: The forearm has three compartments:
The mobile wad proximally, the volar compartment, and
the dorsal compartment (Fig 22-2).
♦ A palmar incision is made between the thenar and
hypothenar musculature in the palm, releasing the
carpal tunnel as needed.
♦ This incision is extended transversely across the wrist
flexion crease to the ulnar side of the wrist, and then arched
across the volar forearm back to the ulnar side at the elbow.
♦ At the elbow, just radial to the medial epicondyle, the
incision is curved across the elbow flexion crease. The
deep fascia is then released.
♦ At the antecubital fossa, the fibrous band of the lacertus
fibrosus overlying the brachial artery and median nerve
is carefully released.
♦ This incision allows for soft-tissue coverage of the
neurovascular structures at the wrist and elbows, and
prevents soft-tissue contractures from developing at the
flexion creases.
♦ A second straight dorsal incision can be made to release
the dorsal compartment, reaching proximally to release
the mobile wad if necessary.
22.10
Soft-Tissue Injuries
a
Volar Compartment
Mobile Wad
Medial
Lateral
Dorsal Compartment
b
Fig. 22-2. Forearm compartments.
Lower extremity.
ο Thigh: The thigh has three compartments:
The anterior (quadriceps), the medial compartment
(adductors), and the posterior compartment (hamstrings).
♦ A lateral incision is made from greater trochanter to
lateral condyle of the femur.
♦ Then iliotibial band is incised, and the vastus lateralis
is reflected off the intermuscular septum bluntly,
releasing the anterior compartment.
♦ The intermuscular septum is then incised the length of
the incision, releasing the posterior compartment.
♦ This release of the intermuscular septum should not be
made close to the femur, because there are a series of
perforating arteries passing through the septum from
posterior to anterior near the bone.
♦ The medial adductor compartment is released through
22.11
Emergency War Surgery
a separate anteromedial incision.
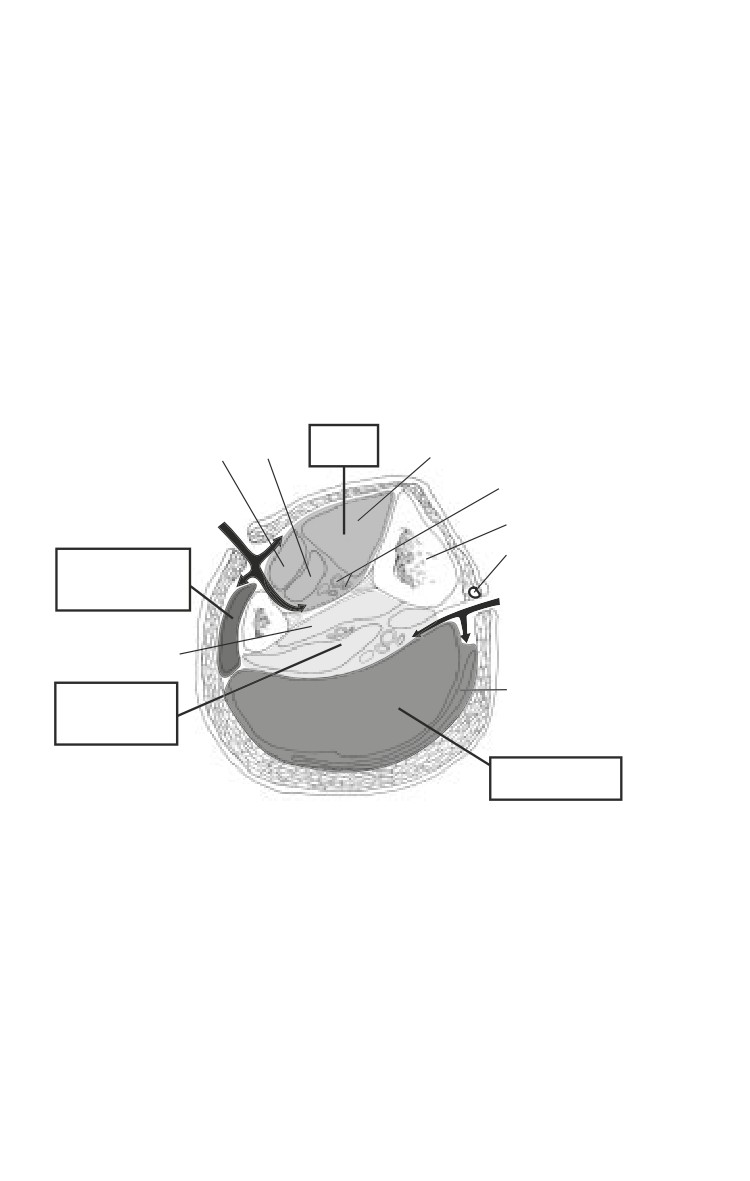
ο Calf: The calf has four compartments:
The lateral compartment, containing peroneal brevis and
longus; the anterior compartment, containing extensor
hallucis longus, extensor digitorum communis, tibialis
anterior, and peroneus tertius; the superficial posterior
compartment, containing gastrocnemius and soleus; and
the deep posterior compartment, containing the flexor
hallucis longus, flexor digitorum longus, and the tibialis
posterior (Fig. 22-3).
♦ Two-incision technique.
Anterior
EDL EHL
Tibialis Anterior
Cmpt.
Anterior Tibial
Artery, Vein,
Anterolateral
Peroneal Nerve
Incision
Tibia
G. Saphenous V.
Peroneus Brevis
and Longus in
Posterior Medial
Lateral Cmpt.
Incision
Tibialis Posterior
Gastrocnemius M.
FHL in the
Deep Posterior
Cmpt.
Superficial
Posterior Cmpt.
Fig. 22-3. Calf compartments.
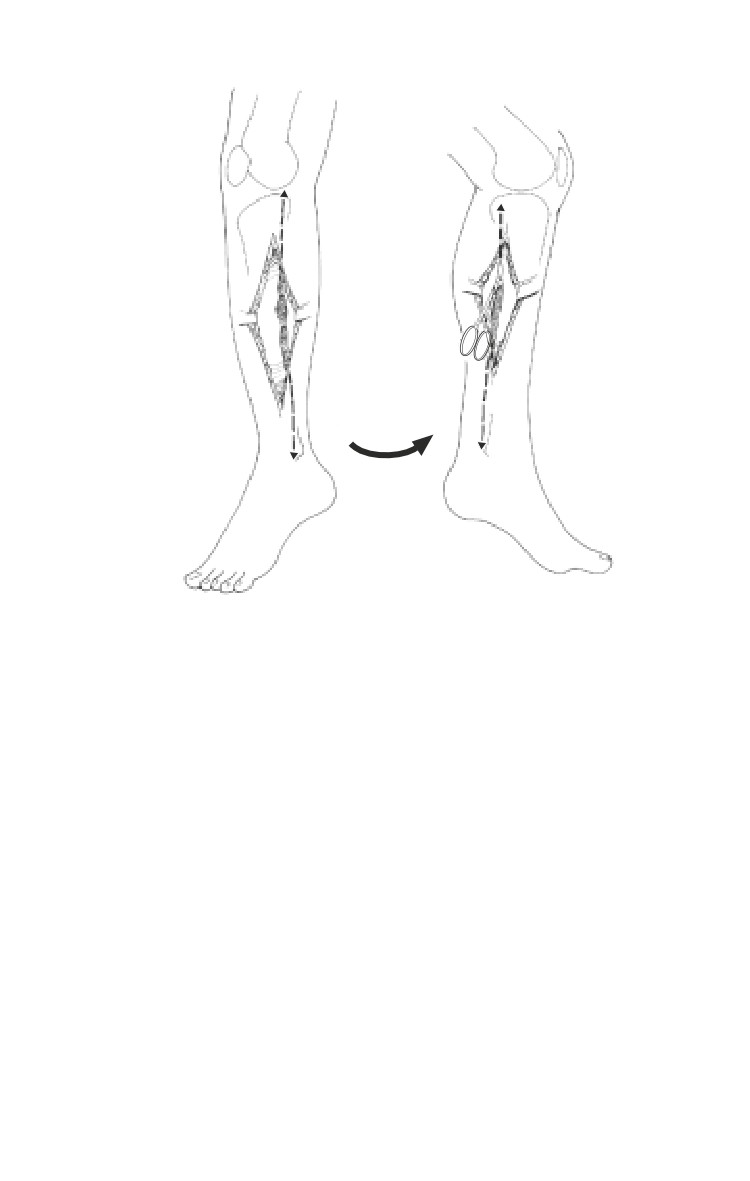
◊ Incisions must extend the entire length of the calf to
release all of the compressing fascia and skin (Fig. 22-4).
◊ A lateral incision is made centered between the fibula
and anterior tibial crest.
◊ The lateral intermuscular septum and superficial
peroneal nerve are identified, and the anterior
compartment is released in line with tibialis anterior
22.12
Soft-Tissue Injuries
turn
Fig. 22-4. Anteromedial incision of the calf.
muscle, proximally toward the tibial tubercle, and
distally toward anterior ankle.
◊ The lateral compartment is then released through this
incision in line with the fibular shaft, proximally
toward the fibular head, distally toward the lateral
malleolus.
◊ A second incision is made medially at least 2 cm medial
to the medial-posterior palpable edge of the tibia.
◊ A medial incision over or near the subcutaneous
surface of the tibia is avoided, preventing exposure
of the tibia when the tissues retract.
◊ The saphenous vein and nerve are retracted anteriorly.
◊ The superficial compartment is released through its
length, and then the deep posterior compartment
over the FDL is released. Then identify the tibialis
posterior and release its fascia.
22.13
Emergency War Surgery
ο Foot: See Chapter 26, Injuries to Hands and Feet.
Fasciotomy wound management.
ο Following the fasciotomy, the fasciotomy wound undergoes
primary surgical wound management, removing all
devitalized tissue.
ο As with all war wounds, the fasciotomy is left open, and
covered with sterile dressings.
Vacuum Wound Closure Systems.
o
Vacuum assisted wound closure is an important adjunct
to modern combat wound care.
o
Only one device is currently approved for this application:
the Wound Vacuum Assisted Closing (VAC) Therapy
System.
o
Field expedient vacuum assisted wound closure is an
alternative. Field expedient vacuum dressings are easily
created with standard issue items, including the following:
♦ Laparotomy sponges.
♦ Jackson-Pratt (JP) drains.
♦ Ioban.
♦ Benzoin.
♦ Adaptec (nonadherent gauze, for skin grafts).
♦ Sterile perforated IV bags.
◊ For wounds of the soft tissue and extremities, layer
laparotomy sponges with JP drains sandwiched
between the sponges and covered with Ioban. Apply
benzoin to the skin edges to prevent leaks.
◊ Attach the JP drains to the standard vacuum pump,
adjusted to 125 mm Hg suction. This dressing
eliminates the need for skin traction in amputations.
◊ For skin grafts, staple the graft to the edges of the
wound. Apply nonadhering gauze, and apply to
field-expedient vacuum dressing. Do not remove for
3 days. Grafts can be dressed with Silvadene when
the field-expedient vacuum dressing is removed.
◊ For open abdominal wounds, place sterile
perforated IV bags on the bowel, and sew the IV bag
to the fascia, or underlay the fascia with the IV bag.
Place laparotomy sponges on the IV bags and layer
22.14
Soft-Tissue Injuries
with JP drains. Apply benzoin to the skin edge and
cover with Ioban. Attach the drains to suction. This
dressing prevents leaking of abdominal fluids during
transport.
Many surgeons consider this an important part of wound
management because the use of vacuum systems may improve
and accelerate wound healing in a variety of conditions to
include: pressure ulcers, partial thickness burns, orthopaedic
wounds with large soft tissue defects, open abdominal wounds,
and assistance with skin graft viability.
The treatment of soft tissue injury is the most common
denominator in the management of war wounds. This chapter
summarizes some principles of this mangement.
22.15
Chapter 23
Extremity Fractures
Introduction
This chapter discusses two techniques for safe transportation
of a wounded soldier with a long bone fracture: transportation
casts and temporary external fixation. Both of these methods
are acceptable for initial treatment of a patient who will be
evacuated out of theater. Precise indications for external fixator
use versus casting have not been established.
In general, good indications for external fixator use include
when the soft tissues need to be evaluated while en route, such
as with a vascular injury; when other injuries make use of casting
impractical, such as with a femur fracture and abdominal injury;
or when the patients have extensive burns. Advantages of
external fixation are that it allows for soft tissue access, can be
used for polytrauma patients, and has a minimal physiologic
impact on the patient. Disadvantages are the potential for pin
site sepsis or colonization and less soft tissue support than casts.
Advantages of transportation casts are that they preserve the
maximum number of options for the receiving surgeon; the soft
tissues are well supported, and the casts are relatively low tech.
Disadvantages are that casts cover soft tissues, may not be
suitable for polytrauma patients, and are more labor-intensive
than external fixators.
Both transportation casts and external fixators are equally
acceptable methods for the initial management of long bone
fractures. In the end, the choice of initial fracture stabilization
must be made on a case-by-case basis by the treating surgeon.
That decision should be based on the surgeon’s experience, his
assessment of the evacuation process, the materials available,
23.1
Emergency War Surgery
the nature of the patient’s wounds and the patient’s overall
condition.
Though standard in civilian trauma centers, intramedullary
nailing of major long bone fractures is contraindicated in
combat zone hospitals because of a variety of logistical
and physiologic constraints. This method may be used
once a patient reaches an echelon above corps (EAC) or
other site where more definitive care can be provided.
In this chapter, the term casting material is used in place of
describing either plaster or fiberglass for constructing casts. Both
are acceptable materials for application of transportation casts.
General Considerations of Wound Management
Initial management.
ο Treat by irrigation and debridement as soon as feasible to
prevent infection.
ο Femur fractures are at high risk for infection (about 40%,
historically).
ο Biplanar radiographs should be obtained.
ο Neurovascular status of the extremity should be documented
and checked repeatedly.
ο Internal fixation is contraindicated.
ο Begin IV antibiotics as soon as possible and maintain
throughout the evacuation chain. Use a broad spectrum
cephalosporin (cefazolin 1 g q 8 h). An aminoglycoside
may be harmful for someone in shock or dehydrated. The
two most harmful bacteria—clostridia and streptococci—
are covered by a 1st generation cephalosporin.
Wound incision/excision.
ο Guidelines as per soft tissue injury section.
ο Longitudinal incisions to obtain exposure.
ο Fascia incised longitudinally to expose underlying
structures and compartment release.
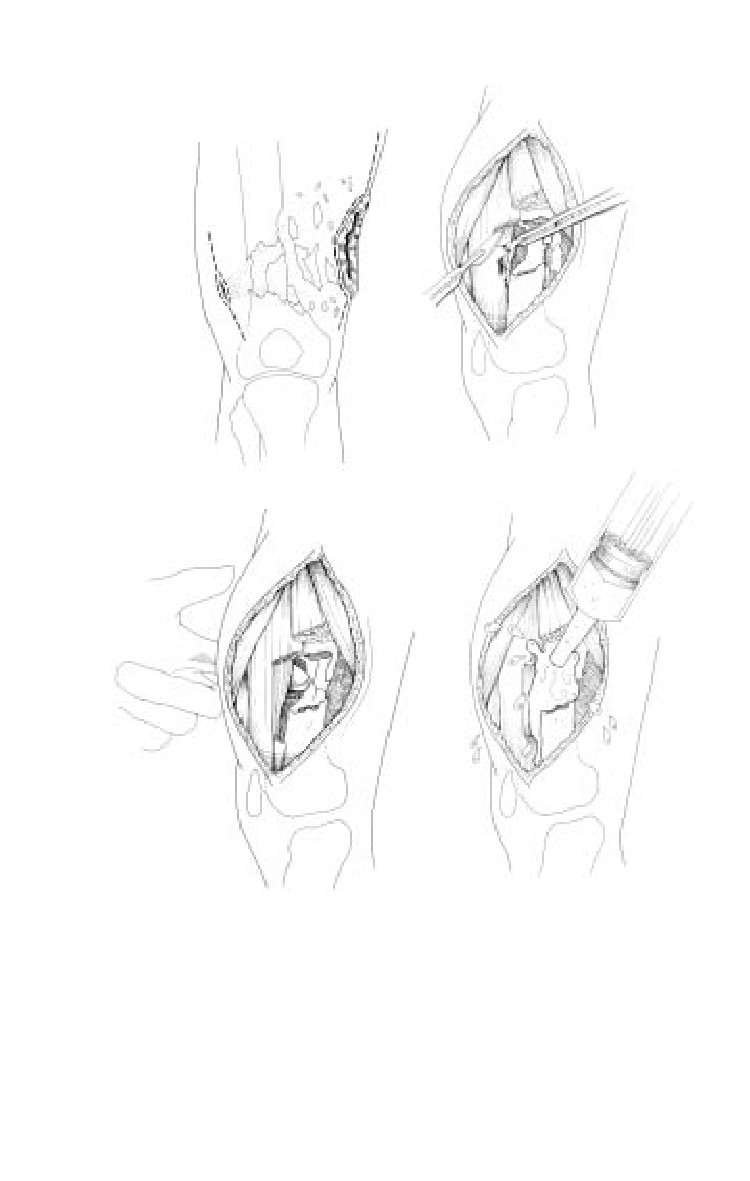
ο All foreign material in the operative field must be removed
(Fig. 23-1a, b, c).
23.2
Extremity Fractures
a
b
c
d
Fig. 23-1. Wound incision/excision.
ο Bone fragments should be retained if they have a soft tissue
attachment.
23.3
Emergency War Surgery
ο Detached bone fragments smaller than a thumbnail are
discarded.
ο Larger fragments that contribute to the structural integrity
of the long bone should be retained.
ο Irrigation is essential (Fig. 23-1d).
Closure of wounds.
ο Primary closure is never indicated. Loose approximation
of tissues with one or two retention sutures is appropriate
to cover nerves, vessels, and tendons, but there must be a
provision for substantial free drainage.
ο Skin grafts, local flaps, and relaxing incisions are
contraindicated in the initial management.
ο Delayed primary closure may be attempted as described
in the section on soft tissue wounds. This should be
accomplished in a stable environment.
Transportation Casts
Introduction.
ο
A transportation cast is a well-padded cast that is unique
to the treatment of combat casualties. It is used to transport
patients between hospitals and not intended as a means
of definitive care.
ο
Definitive reduction is not required with the initial surgical
procedure.
ο
The goal of transportation casts is to immobilize a fracture
along the evacuation chain. The cast must meet the
dimensions of the standard NATO litter (FM 8-10-6).
ο
Transportation casts are applied prior to evacuation.
ο
All casts must be bivalved prior to evacuation. (Hip spica
— univalved.)
ο
If a patient is expected to have multiple procedures at the
same hospital, balanced skeletal traction should be utilized
until the last procedure prior to transportation. The traction
pin may be incorporated into the transportation cast.
ο
Slab splinting may not be adequate for transportation,
particularly for severely unstable fractures. Splinting is
appropriate for stable fractures, particularly in the hand,
wrist, forearm, foot, ankle and lower leg.
23.4
Extremity Fractures
Fig. 23-2. Portable fracture table.
ο Portable skeletal traction should not be used for transpor-
tation of a patient.
ο Tobruk splint (a Thomas splint with circular plaster)
should not be used.
Hip, femur, and knee, and some proximal tibia fractures.
ο Low hip spica transportation cast.
ο Disadvantages: Limited soft tissue access. Not suitable in
polytrauma.
ο Technique.
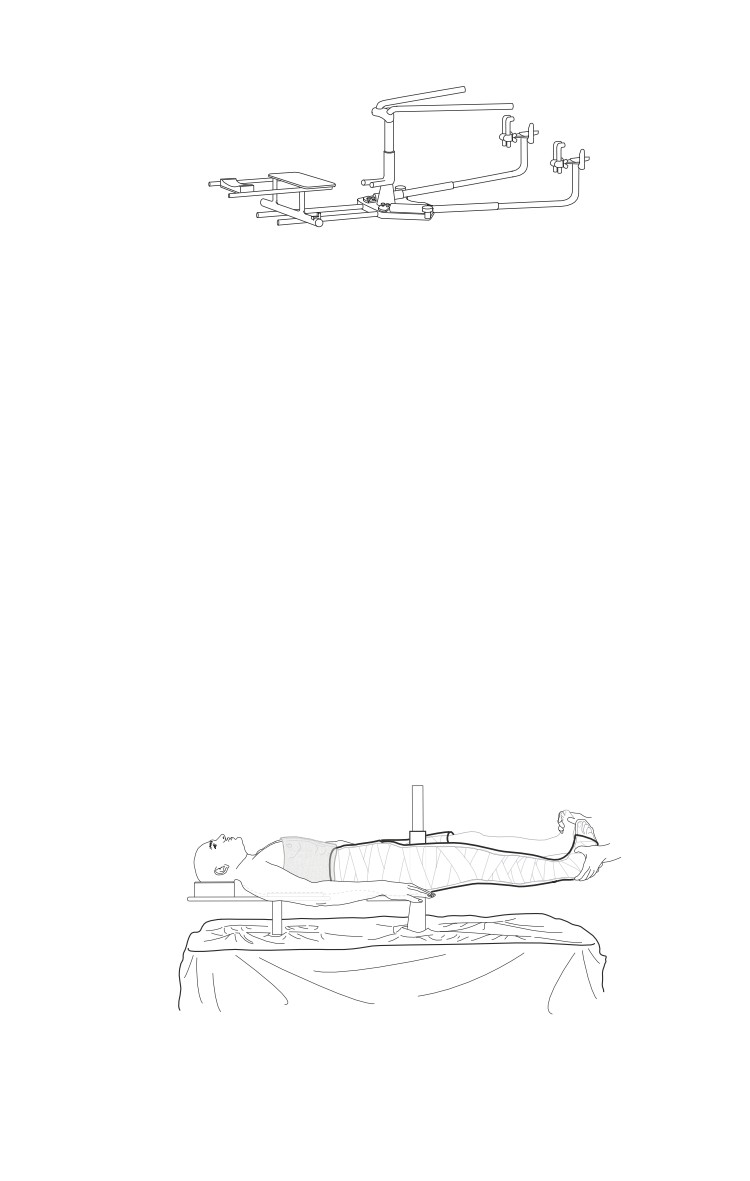
♦ Adequate anesthesia is given, and patient is placed on
fracture table (Fig. 23-2).
♦ Irrigation and debridement as indicated above.
♦ Precise reduction not necessary, but usually requires two
assistants.
♦ Stockinette over abdomen, distal thigh of uninvolved
side, and foot of the involved side (Fig. 23-3).
Fig. 23-3. Patient position on fracture table.
23.5
Emergency War Surgery
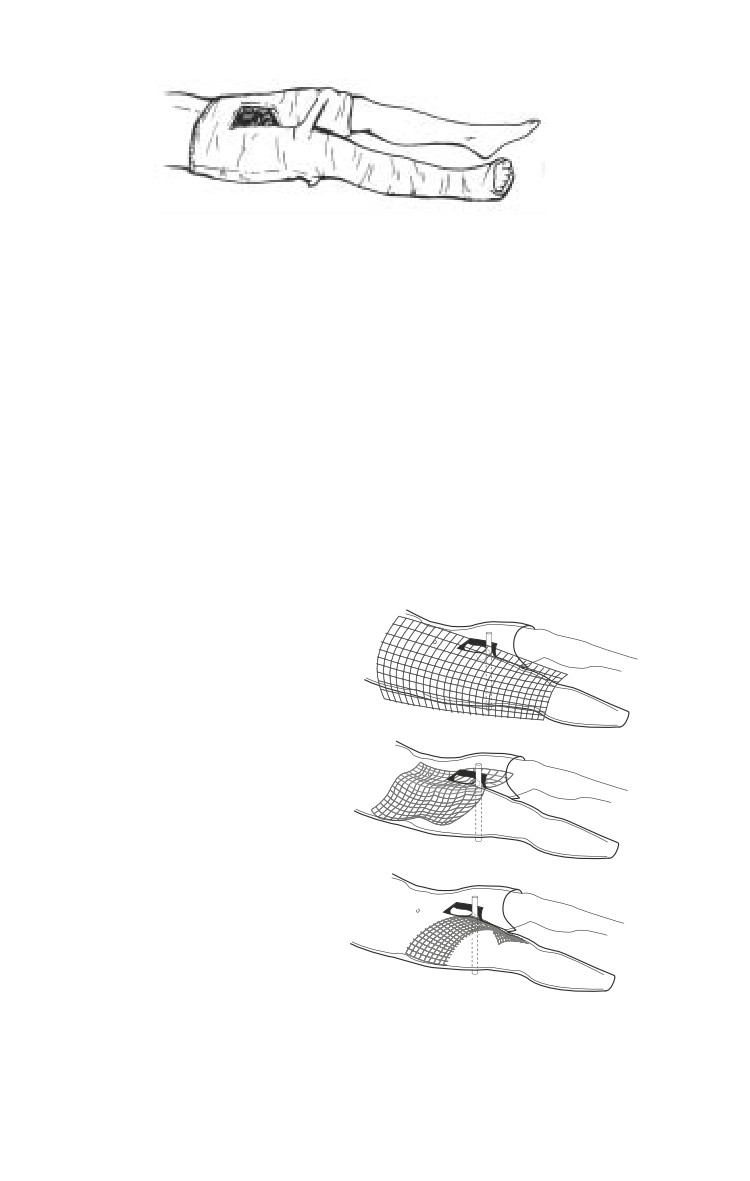
Fig. 23-4. Hip spica transportation cast.
♦ Felt padding is placed over sacrum and anterior
superior iliac spine (ASIS) and other bony prominences.
♦ Towel is placed over abdomen to allow breathing space.
♦ Six-inch Webril or similar cotton batting is wrapped, 2-
4 layers.
♦ Six-inch casting material is then rolled over the Webril
from ASIS to the foot on the affected side to the distal
thigh on the unaffected side (Fig. 23-4). Splints are
applied over the posterior, lateral, or groin areas to
reinforce the groin (Fig. 23-5). Use a finishing roll after
turning down the edges of the stockinette to give a neat
appearance.
♦ An adequate perineal
space must be left for
hygiene.
♦ Use a 1/2" dowel or
similar material to
make anterior/post-
erior crossbars.
♦ Affected knee bent
about 20°.
♦ Space between feet
must not exceed stan-
dard litter, although
this makes perineal
access difficult.
♦ Towel is removed,
cast is bivalved, and
a circular area over
Fig. 23-5. Reinforce cast at hip with
the abdomen is cut
splints.
out.
23.6
Extremity Fractures
♦ Use an indelible marker to draw the fracture configuration,
and note the dates of surgery and wounding on the cast.
♦ Support the cast with towels, blankets, or pillows to
relieve pressure on the cast, especially the back edge.
Proximal/mid/distal tibia and ankle fractures.
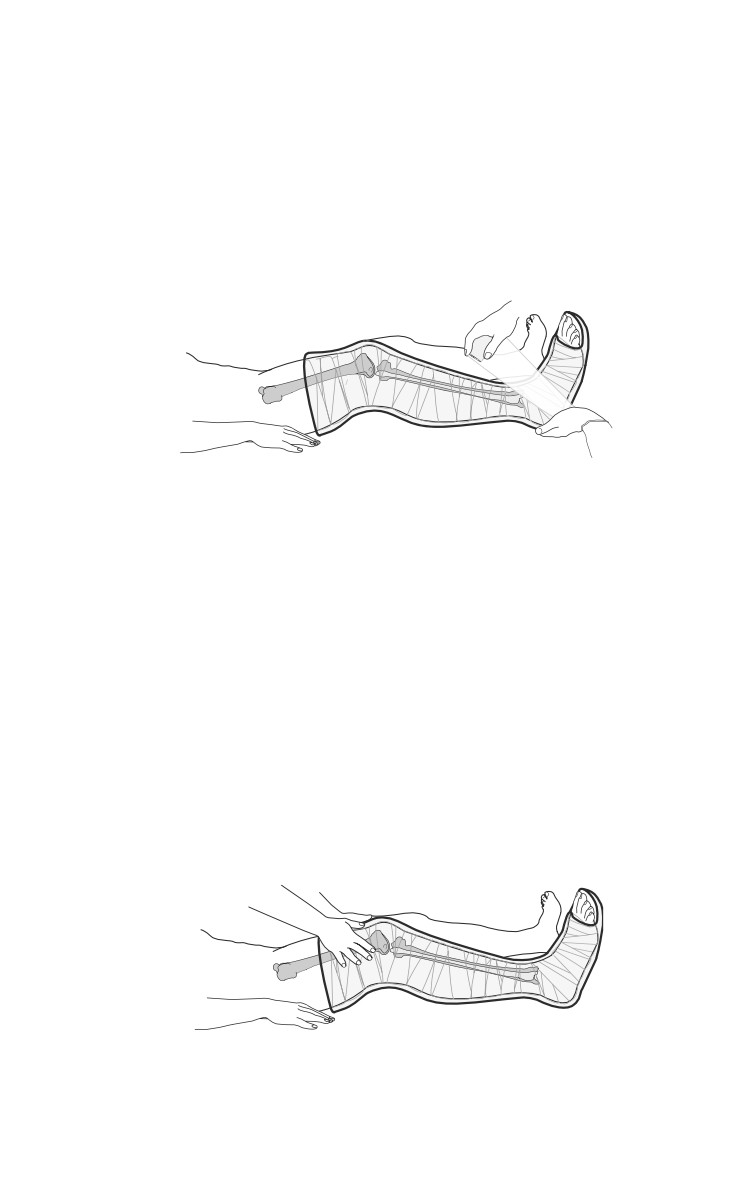
ο Long Leg Cast (Fig. 23-6).
Fig 23-6. Long leg cast.
ο Technique.
♦ The foot, leg, and thigh are placed in a stockinette at
the conclusion of the operation for the open wounds.
♦ Two people are needed to maintain the reduction and
apply the cast. Hold the knee flexed about 20°.
♦ Webril applied from the toes to the groin.
♦ Six-inch wide casting material is then rolled over this
region, with a turn down of the stockinette prior to the
final layer, to make a neat edge.
♦ Reinforce the knee to strengthen the cast.
♦ Make a supracondylar mold to provide support (Fig. 23-7).
Fig. 23-7. Supracondylar mold of long leg cast.
23.7
Emergency War Surgery
♦ Bivalve the cast.
♦ Label the cast with the dates of injury and surgery, and
draw the fracture on outside of the cast.
♦ Elevate the leg so the tibia is parallel to the litter or bed.
Shoulder and humeral shaft fractures.
ο
Velpeau technique. (External fixator is an acceptable
alternative, however without direct visualization there is
a high risk of iatrogenic injury to the radial nerve and
vascular structures. Review anatomy carefully.)
♦ At the conclusion of open wound treatment, the
extremity is manipulated on the fracture table to obtain
the best alignment.
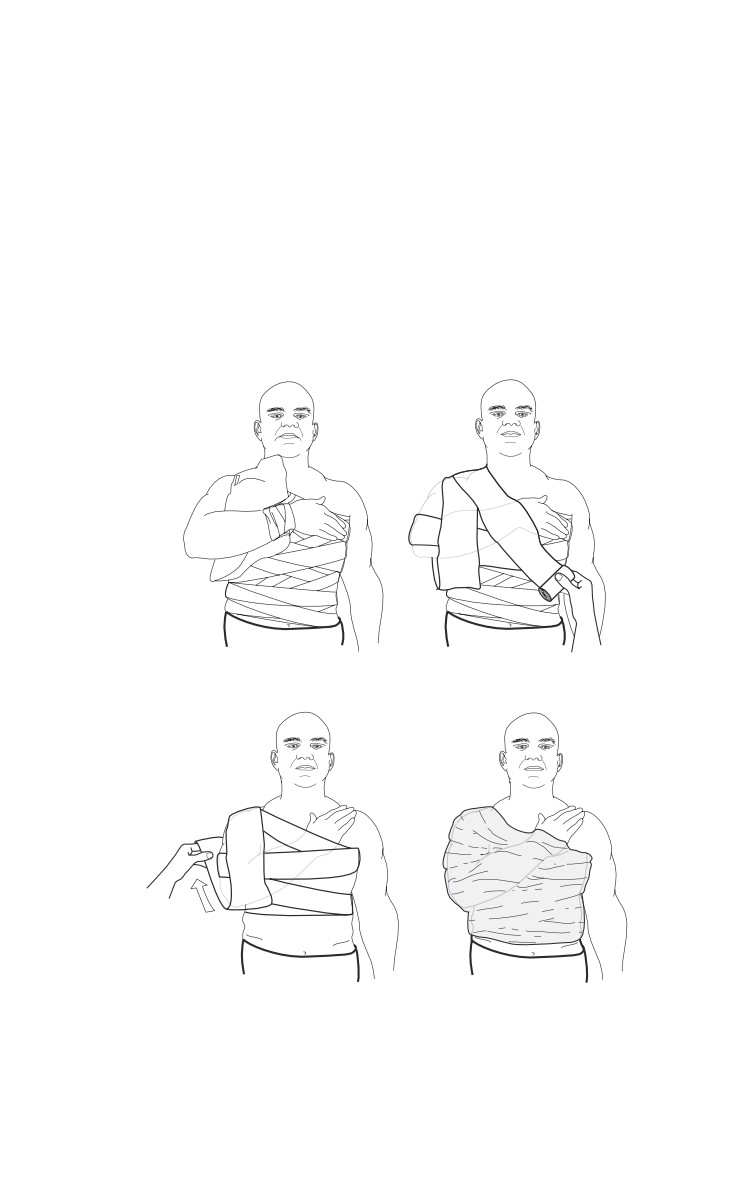
♦ Large cotton pads are placed under the axilla and arm
(Fig. 23-8a).
♦ The Webril is wrapped around the torso and affected
extremity to the wrist (Fig. 23-8b).
♦ Six-inch wide casting material is then wrapped over the
extremity and the torso. The first wrap should start
around the trunk, go over the shoulder posteriorly,
down the arm anteriorly, around the elbow, and then
up the posterior aspect of the arm (Fig. 23-8c).
♦ The trunk and the extremity should be wrapped in
plaster to stabilize the cast.
♦ Four layers should be sufficient (Fig. 23-8d).
♦ Bivalve this cast, and wrap with elastic bandages. There
are no cast saws available on the aircraft. If a patient in
a Velpeau cast develops any respiratory problems,
emergency measures cannot be taken if the cast cannot
be removed.
Elbow/forearm.
ο Long arm cast.
ο Technique.
♦ After treatment of open wounds, the extremity is
wrapped in stockinette from the fingers to the axilla.
♦ Gross alignment of fractures is the goal. Precise
reduction is not necessary.
♦ Four-inch wide Webril is wrapped from metacarpal
heads to axilla.
23.8
Extremity Fractures
♦ Four-inch wide casting material is applied from
metacarpal heads to axilla.
♦ Fold the stockinette before finishing layer for a neat edge.
♦ Bivalve cast after drying.
♦ Reassess neurovascular status.
Bivalving Casts
When a cast is bivalved, it is completely split longitudinally
along opposing sides of the cast. Splitting the cast into anterior
and posterior halves is preferred. The purpose of bivalving is
to allow room for soft tissue swelling, thus lessening the chance
a
b
c
d
Fig. 23-8a. Padding Velpeau.
Fig. 23-8b-c. Webril application for Velpeau cast.
Fig. 23-8d. Completed Velpeau cast.
23.9
Emergency War Surgery
of postcasting compartment syndrome. It is important that the
underlying cast padding also be completely split underneath
the cast cuts; otherwise, the cast padding can restrict swelling
and a compartment syndrome could still develop.
External Fixation
General technique: The surgeon should be familiar with four
types of standard constructs of external fixation for use in
the initial care of battle casualties: femur, tibia, knee, and
ankle. External fixation can also be applied for humerus and
ulna fractures as needed.
ο
A thorough understanding of the anatomy of the lower
extremity is essential for application of the pins in a safe
corridor.
ο
The external fixator for military purposes should be modular
and allow for building up or down as healing progresses.
ο
Application of the external fixator may be done without
the use of plain films or fluoroscopy.
ο
Pins can be inserted by hand using a brace without power
instruments.
ο
Enough pins should be used to adequately stabilize the
fracture for transport. This is usually two per clamp, but
three may occasionally be required.
ο
The present external fixation system (Hoffmann II) allows
for the use of either single pin clamps or multipin clamps.
Both clamps are acceptable to use in standard constructs.
ο
Multipin clamps provide geater stability and are the
current fixators fielded. Dual pin placement (with multipin
clamps) is described here. The technique for single pin
placement is similar.
Femur diaphyseal fracture technique.
ο The entire limb is prepared for surgery, from the ASIS to the toes.
ο A standard OR table or portable fracture table may be used.
ο An assistant should apply counter pressure while pins are
inserted.
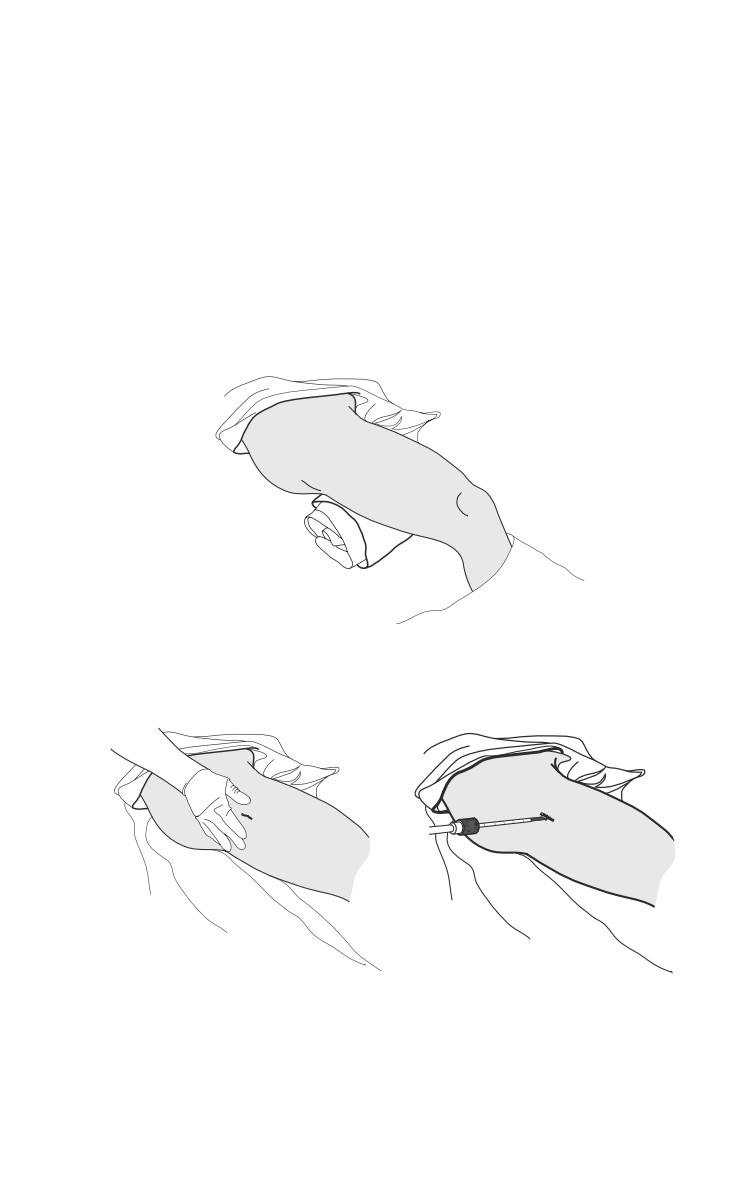
ο Precise reduction is not necessary. A padded “bump”
under the thigh will help reduce the fracture (Fig. 23-9).
23.10
Extremity Fractures
ο The position of the proximal femur should be identified
by palpation. A 1-cm longitudinal stab incision is made
over the midaxis, or midlateral axis, of the femur (Fig. 23-
10). The pin closest to the fracture should be outside of the
fracture hematoma, and at least three fingerbreadths from
the fracture (Fig. 23-11).
ο Bluntly spread with a clamp down to bone. Put the pin
down on the bone, and determine the midportion of the
bone by moving the pin back and forth across the width
of the femur. You do not want to plunge to one or the other
side. Your assistant should provide stability and counter
Fig. 23-9. Placing a towel underneath the thigh helps to reproduce
the bow of the femur.
Fig. 23-10. A 1-cm or so incision Fig. 23-11. Femur pin placement.
directly over the middle of the bone,
cut in a longitudinal direction.
23.11
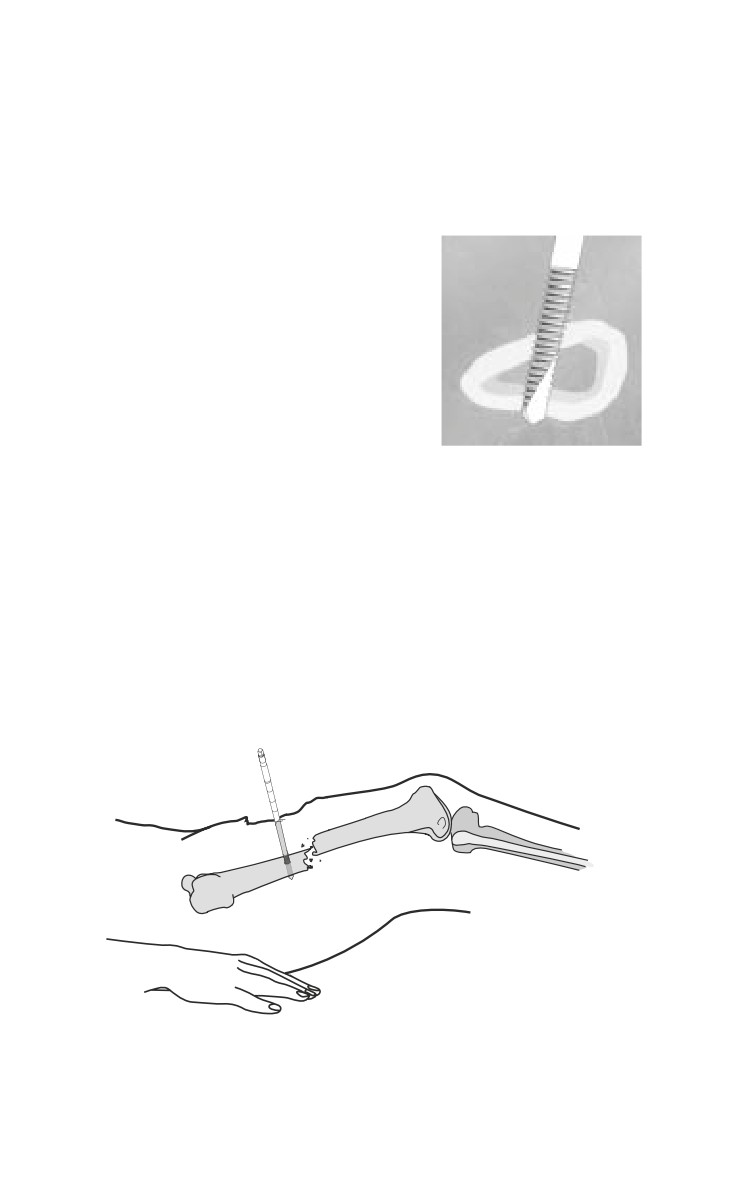
Emergency War Surgery
pressure. Two taps on the end of the bit brace should
provide an indent in the bone and allow you to start
insertion. Apex pins are placed by hand. There is no
predrill nor power insertion. 5-mm half-pins should be
used. Insert the pin in the midportion of the bone through
both the near and far cortex of the
bone (Fig. 23-12). The pin will
move easier as it enters the inter-
medullary canal, and then get
more difficult to drive as it enters
the far cortex.
ο
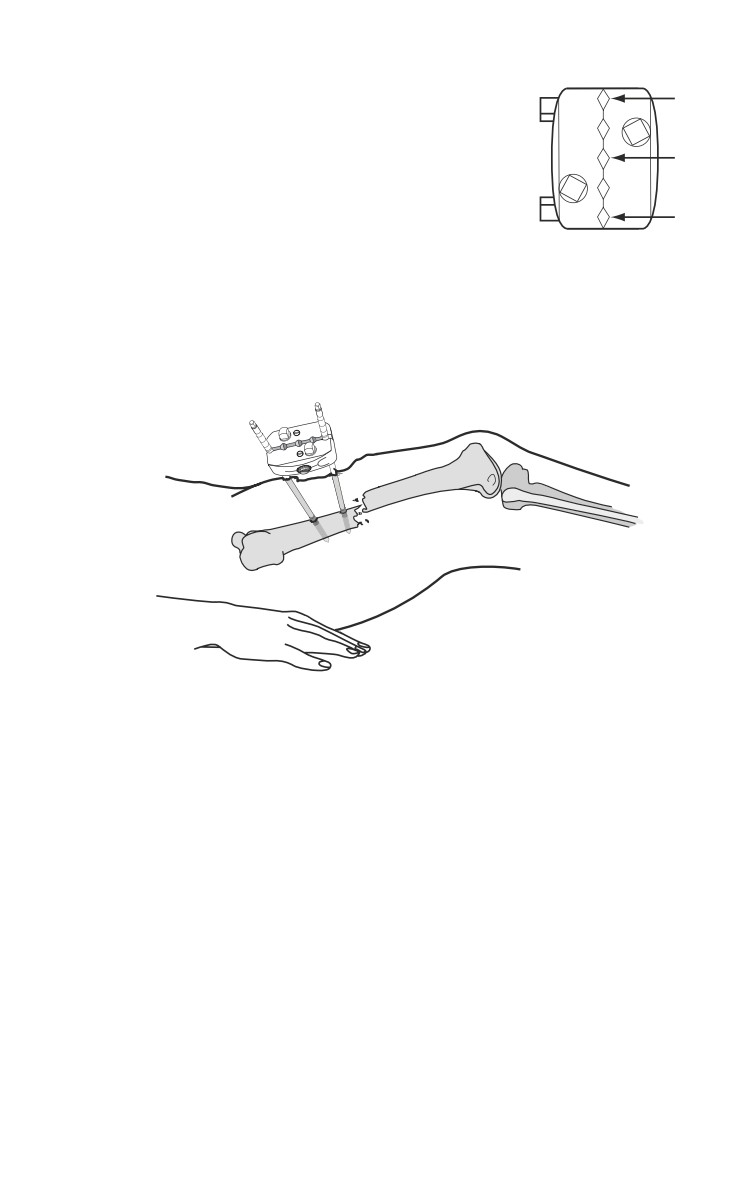
Place a multipin clamp over the
inserted pin (Fig. 23-13). Ideally,
the pin should occupy one of the
end positions (eg, position 1, Fig.
23-14).
Fig 23-12. Bicortical
ο
Using the clamp as a guide, insert
placement of 5-mm
a second pin through the clamp.
half-pin.
An assistant should hold the
clamp. Ensure that the clamp is aligned to the bone and
that bicortical purchase is obtained with the second pin.
The second pin must be parallel to the first (Fig. 23-15).
Use the pin sites that are the farthest apart on the clamp as
possible for biomechanical stability (clamp positions 1 and
Fig. 23-13.
23.12
Extremity Fractures
5 are best, see Fig. 23-14). A third pin
1
may be inserted if needed for
2
additional clamp stability.
3
ο Apply a second multipin clamp and
4
pins in the same manner to the distal
femoral fracture fragment.
5
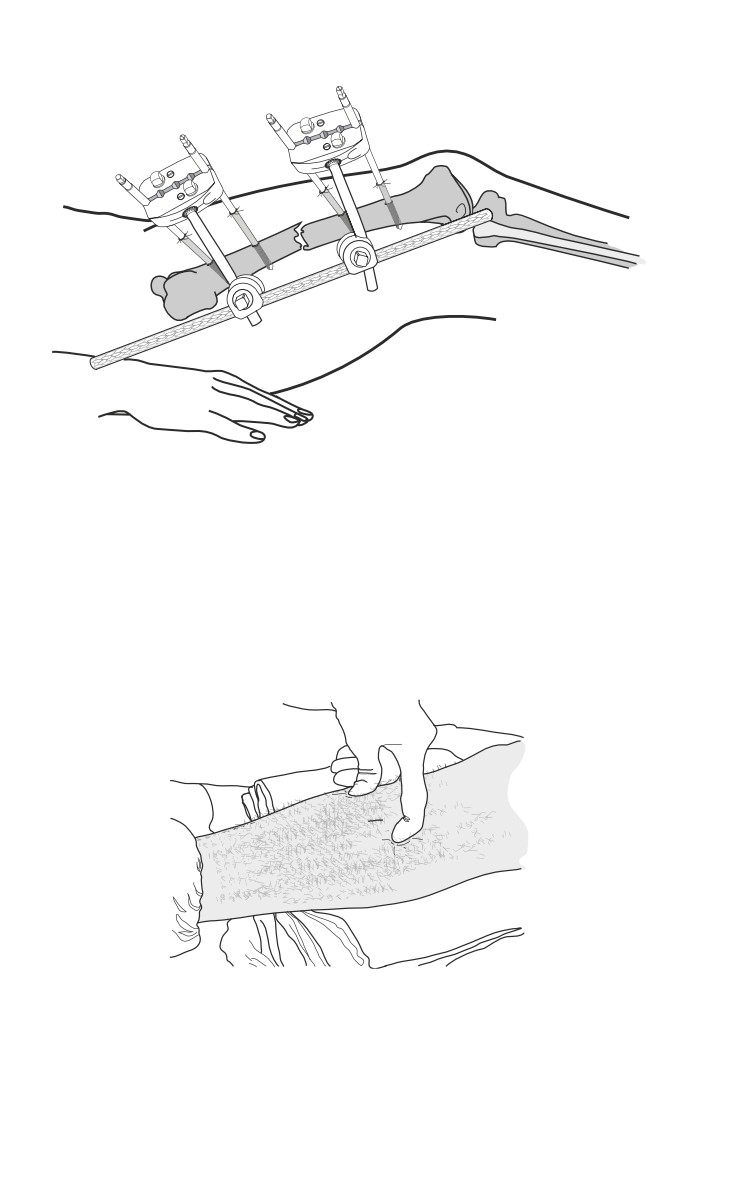
ο Connect the two clamps with elbows,
Fig. 23-14.
bar-to-bar clamps, and two
Multipin clamp
longitudinal bars placed parallel to
showing pin
each other (Fig. 23-16).
positions 1-5.
Fig. 23-15.
ο Reduce the fracture with longitudinal traction. Manipulating
the fracture fragments using the clamps may be helpful.
Once adequate reduction is achieved, tighten all the
connections. Precise reduction is not necessary.
Tibia shaft fracture technique.
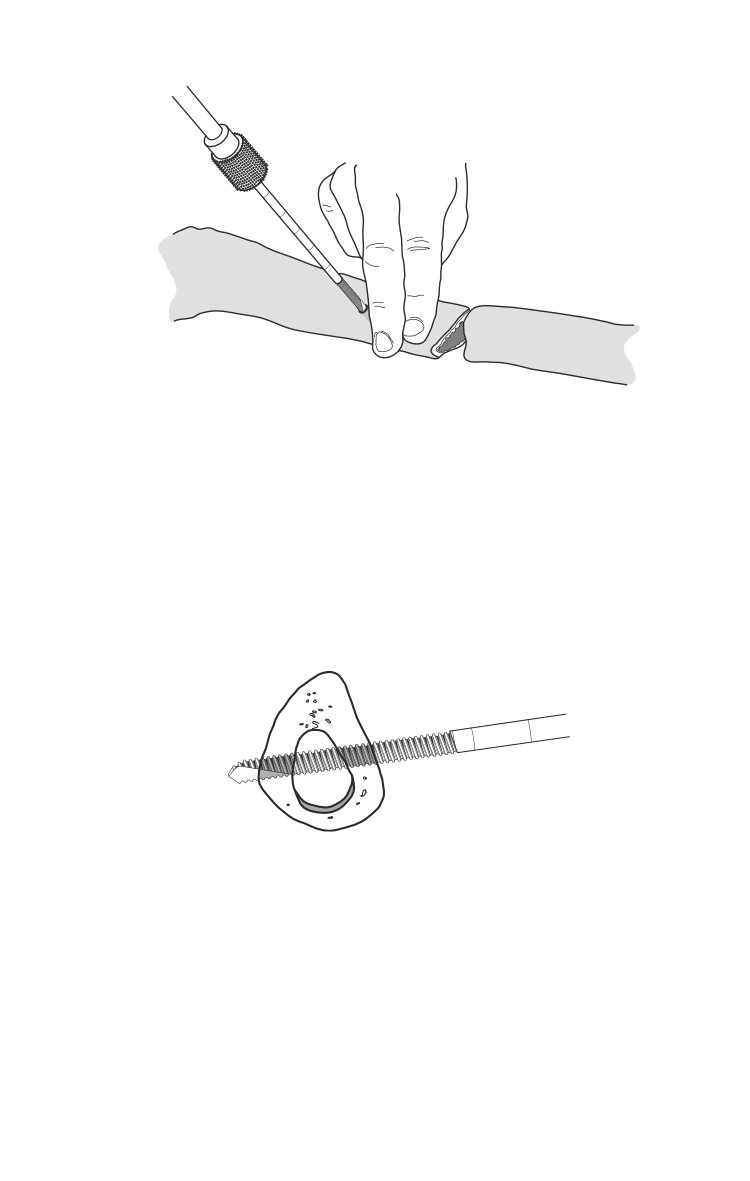
ο Palpate the anterior-medial border of the tibia. Place a 1-
cm longitudinal incision over the midportion of the surface
(Fig. 23-17). The pin closest to the fracture site should be
outside the hematoma and at least three fingerbreadths
away from the fracture site (Fig. 23-18).
23.13
Emergency War Surgery
Fig 23-16.
ο Insert one pin into either the proximal or distal fragment,
engaging both cortices. This pin should be placed
perpendicular to the subcutaneous border of the tibia, and
centered across the width of the tibia (Fig. 23-19).
Fig. 23-17. Palpation of the anterior and posterior margins of the
medial face of the tibia where a 1 cm incision has been made
midway between these two points.
23.14
Extremity Fractures
Fig. 23-18. The anteriomedial surface is the safest way to introduce pins
to the tibia. The pin should be a minimum of two or three fingerbreadths
from the fracture site.
o Using the clamp as a guide, insert a second pin through
the clamp. An assistant should hold the clamp. Ensure that
the clamp is aligned to the bone and that bicortical
purchase is obtained with the second pin. The second pin
Fig. 23-19. This is the ideal bicortical placement for a pin in the tibia.
must be parallel to the first. Use the pin sites as far apart
on the clamp as possible for biomechanical stability (Figure
23-20 and positions 1 and 5 in Fig. 23-14). The second pin
should be through the clamp farthest away from the
fracture site (Fig. 23-20).
23.15
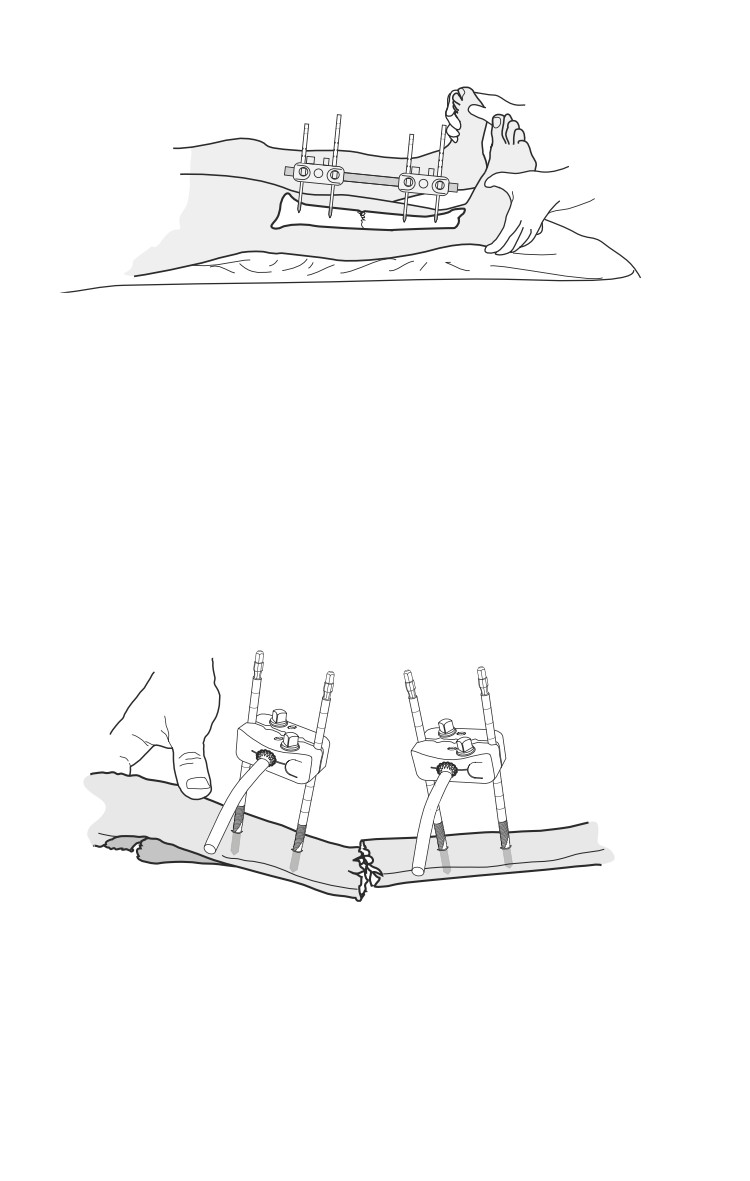
Emergency War Surgery
Fig. 23-20. Application of tibia external fixation with multipin clamps.
ο Apply a second multipin clamp and two pins in the same
manner to the other main fracture fragment (Fig. 23-21).
Connect the two clamps via two elbows, bar-bar clamps,
and a single bar (Fig. 23-22).
ο Most battle caused fractures are comminuted; therefore, a
second bar should be added to the construct (Fig. 23-23).
Use a single bar for stable fractures only.
ο Check the reduction.
Fig. 23-21. Application of the second multipin clamp and two pins.
Repeat those steps with the other major fracture fragment so that
you have two sets of multipin clamps as shown here. You will then
add the 30 degree elbows as shown here, pointing them in a
direction that allows for the best access. At this point you should
have gross alignment of the fracture.
23.16