Vauxhall Corsa F (2023 year). Manual in english - page 6
 

  Index      Manuals     Vauxhall Corsa F (2023 year). Manual in english


Search            copyright infringement  


Content      ..     4      5      6      7     ..


Vauxhall Corsa F (2023 year). Manual in english - page 6


166

Climate control

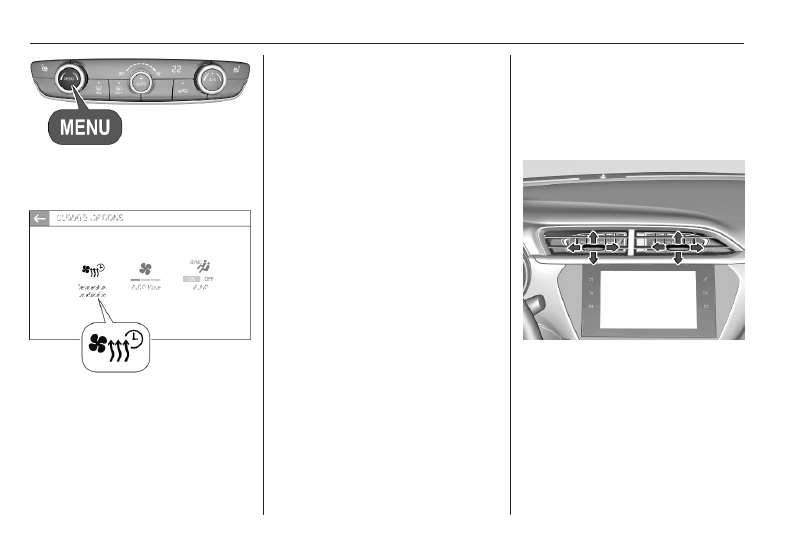
Press MENU .
Touch OPTIONS.

Select 

=

.

Touch + to define a new timer.
Touch --:--.
Enter time and day.
Press 

A

 to confirm the settings.

Press ON to activate the timer.

To delete a timer, press 

f

 at the top

of the Info Display and delete the

desired timer.
Confirm the deletion.
The heating / ventilation procedure

starts approx. 45 minutes before the

programmed time, and is maintained

ten minutes after it.

Air vents

Adjustable air vents

Centre air vents in the instrument

panel

Direct the flow of air by tilting and

swivelling the slats.
To close the vent, swivel the slats

inwards.

Climate control

167

Outer air vents in the instrument

panel

Direct the flow of air by tilting and

swivelling the slats.
To close the vent, swivel the slats

outwards.
At least two air vents must be open

while cooling is on.

9

Warning

Do not attach any objects to the

slats of the air vents. Risk of

damage and injury in case of an

accident.

Fixed air vents

Additional air vents are located

beneath the windscreen and door

windows and in the foot wells.

Maintenance

Air intake

The air intake in front of the

windscreen in the engine

compartment must be kept clear to

allow air intake. Remove any leaves,

dirt or snow.

168

Climate control

Air conditioning regular

operation

In order to ensure continuously

efficient performance, cooling must

be operated for a few minutes once a

month, irrespective of the weather

and time of year. Operation with

cooling is not possible when the

outside temperature is too low.

Service

For optimal cooling performance, it is

recommended to annually check the

climate control system, starting

three years after initial vehicle

registration, including:

● functionality and pressure test
● heating functionality
● leakage check
● check of drive belts
● cleaning of condenser and

evaporator drainage

● performance check

Driving and operating

169

Driving and

operating

Driving hints ............................... 170

Control of the vehicle ............... 170

Steering ................................... 170

Emergencies ........................... 170

Starting and operating ............... 171

New vehicle running-in ............ 171

Ignition switch positions ........... 171

Power button ........................... 171

Starting the engine .................. 173

Overrun cut-off ........................ 174

Stop-start system .................... 174

Parking .................................... 176

Engine exhaust .......................... 177

Exhaust filter ............................ 177

Catalytic converter ................... 178

AdBlue ..................................... 178

Electric drive unit ....................... 181
Automatic transmission .............. 185
Manual transmission .................. 191
Drive systems ............................ 192

Drive modes ............................ 192

Brakes ........................................ 193

Antilock brake system ............. 193

Parking brake .......................... 193

Brake assist ............................. 196

Hill start assist ......................... 196

Regenerative braking .............. 196

Ride control systems ................. 197

Electronic Stability Control and

Traction Control system ......... 197

Sport mode .............................. 198

Driver assistance systems ......... 198

Cruise control .......................... 198

Speed limiter ........................... 201

Adaptive cruise control ............ 203

Forward collision alert ............. 210

Active emergency braking ....... 212

Front pedestrian protection ..... 215

Parking assist .......................... 217

Advanced parking assist ......... 222

Side blind spot alert ................. 227

Panoramic view system ........... 229

Rear view camera ................... 232

Traffic sign assistant ................ 233

Lane departure warning .......... 236

Lane keep assist ..................... 237

Driver alert ............................... 239

Charging .................................... 241

General information ................. 241

Charging types ........................ 241

Charging cable ........................ 242

Programmable charging .......... 248

Charging status ....................... 249

Fuel ............................................ 249

Fuel for petrol engines ............. 249

Fuel for diesel engines ............ 250

Refuelling ................................ 251

Fuel consumption - CO

2

-

Emissions  .............................. 252

Trailer hitch ................................ 253

General information ................. 253

Driving characteristics and

towing tips .............................. 253

Trailer towing ........................... 254

170

Driving and operating

Driving hints

Control of the vehicle

Never coast with engine not

running

Many systems will not function in this

situation (e.g. brake servo unit, power

steering). Driving in this manner is a

danger to yourself and others.
All systems function during an

Autostop.
Stop-start system 

3

 174.

Pedals

To ensure the pedal travel is

uninhibited, there must be no mats in

the area of the pedals.
Use only floor mats, which fit properly

and are fixed by the retainers on the

driver side.

Steering

If power steering assist is lost

because the engine stops or due to a

system malfunction, the vehicle can

be steered but may require increased

effort.

Emergencies

9

Warning

Damage to the high voltage

battery or high voltage system can

create a risk of electric shock,

overheating, or fire.
If the vehicle has been damaged

or affected by a moderate to

severe crash, it must be inspected

as soon as possible by qualified

personnel. Until the technical

inspection has been carried out,

the vehicle must be stored outside

at a minimum distance of

5 metres from any structure or

other flammable objects.

If the vehicle has been damaged

or affected by flood or fire, it must

not be moved at all and has to be

inspected by qualified personnel

as soon as possible.

Driving and operating

171

Starting and operating

New vehicle running-in

Do not brake unnecessarily hard for

the first few journeys.
During the first drive, smoke may

occur because of wax and oil

evaporating off the exhaust system.

Park the vehicle in the open for a

while after the first drive and avoid

inhaling the fumes.
During the running-in period, fuel and

engine oil consumption may be

higher.
Additionally, the cleaning process of

the exhaust filter may take place more

often.
Exhaust filter 

3

 177.

Ignition switch positions

Turn key:

0 : ignition off: some functions

remain active until key is

removed or driver's door is

opened, provided the ignition was

on previously

1 : ignition on power mode: ignition

is on, diesel engine is preheating,

control indicators illuminate and

most electrical functions are

operable

2 : engine start: release key after

engine has been started

Steering wheel lock

Depending on version, the vehicle

may be equipped with a steering

wheel lock.

In this case, remove key from ignition

switch and turn steering wheel until it

engages.

9

Danger

Never remove the key from

ignition switch during driving as

this will cause, depending on

version, steering wheel lock.

Power button

The electronic key must be inside the

vehicle.

172

Driving and operating

Engine start

Operate the clutch pedal (manual

transmission), the brake pedal and

press Start/Stop.

Ignition on power mode without

starting the engine

Press Start/Stop without operating

any pedal. Control indicators

illuminate and most electrical

functions are operable.

Engine and ignition off

Press Start/Stop briefly in each mode

or when engine is running and vehicle

is stationary. Some functions remain

active until driver's door is opened.

Emergency shut off during driving

Press Start/Stop for 5 seconds

3

 173. Depending on version,

steering wheel locks as soon as

vehicle is stationary.

Steering wheel lock

Depending on version, the vehicle

may be equipped with a steering

wheel lock.

In this case, the steering wheel lock

activates automatically when:

● the vehicle is stationary.
● the ignition has been switched

off.

To release steering wheel lock, open

and close driver's door and switch the

ignition on power mode or start the

engine directly.

9

Warning

If the vehicle battery is discharged,

the vehicle must not be towed or

tow-started as the steering wheel

lock cannot be disengaged.

Operation in case of failure

If either the electronic key fails or the

battery of the electronic key is weak,

a message may be displayed in the

Driver Information Centre.

Hold the electronic key at the marking

on the steering column cover as

shown in the illustration.
On vehicles with manual

transmission, select neutral gear,

operate the clutch pedal, the brake

pedal and press Start/Stop.
On vehicles with automatic

transmission, set the selector lever to

position P, operate the brake pedal

and press Start/Stop.
This option is intended for

emergencies only. Replace the

electronic key battery as soon as

possible 

3

 8.

Driving and operating

173

For unlocking or locking the doors,

see fault in radio remote control unit

or electronic key system 

3

 10.

Starting the engine

Vehicles with ignition switch

Depending on version, turn key to

position 1 to release the steering

wheel lock.
Manual transmission: operate clutch

and brake pedal.
Automatic transmission: operate

brake pedal and move selector lever

to P or N.
Do not operate accelerator pedal.

Diesel engines: wait until control

indicator 

z

 extinguishes.

Turn key briefly to position 2 and

release after engine has been

started.
Manual transmission: during an

Autostop, the engine can be started

by depressing the clutch pedal

3

 174.

Automatic transmission: during an

Autostop, the engine can be started

by releasing the brake pedal 

3

 174.

Vehicles with power button

● Manual transmission: select

neutral gear, operate clutch and

brake pedal.

● Automatic transmission: operate

brake pedal and move selector

lever to P or N.

● Do not operate accelerator pedal.
● Press Start/Stop button.
● Release button after starting

procedure begins. Diesel engine

starts after control indicator 

z

for preheating extinguishes.

● Before restarting or to switch off

the engine when vehicle is

stationary, press Start/Stop once

more briefly.

Manual transmission: during an

Autostop, the engine can be started

by depressing the clutch pedal

3

 174.

Automatic transmission: during an

Autostop, the engine can be started

by releasing the brake pedal 

3

 174.

Emergency shut off during driving

If the engine needs to be switched off

during driving in case of emergency,

press Start/Stop for 5 seconds.

174

Driving and operating

9

Danger

Switching off the engine during

driving may cause loss of power

support for brake and steering

systems. Assistance systems and

airbag systems are disabled.

Lighting and brake lights will

extinguish. Therefore power down

the engine and ignition while

driving only when required in case

of emergency.

Starting the vehicle at low

temperatures

Starting the engine without additional

heaters is possible down to -25 °С for

diesel engines and -30 °C for petrol

engines. Required is an engine oil

with the correct viscosity, the correct

fuel, performed services and a

sufficiently charged vehicle battery.
With temperatures below -30 °C the

automatic transmission requires a

warming phase of approx. 5 minutes.

The selector lever must be in position

P.

Turbo engine warm-up

Upon start-up, engine available

torque may be limited for a short time,

especially when the engine

temperature is cold. The limitation is

to allow the lubrication system to fully

protect the engine.

Overrun cut-off

The fuel supply is automatically cut off

during overrun, i.e. when the vehicle

is driven with a gear engaged but

accelerator pedal is released.
Depending on driving conditions, the

overrun cut-off may be deactivated.

Stop-start system

The stop-start system helps to save

fuel and to reduce the exhaust

emissions. When conditions allow, it

switches off the engine as soon as the

vehicle is at a low speed or at a

standstill, e.g. at a traffic light or in a

traffic jam.

Activation

The stop-start system is available as

soon as the engine is started, the

vehicle starts-off and the conditions

as stated below in this section are

fulfilled.

The system is ready to operate when

the LED in the button 

D

 is not

illuminated. To activate the system

when the system is deactivated,

press 

D

.

If the stop-start system is temporarily

not available and the button 

D

 is

pressed, the LED in the button

flashes.

Driving and operating

175

Deactivation

Deactivate the stop-start system

manually by pressing 

D

. The

deactivation is indicated when the

LED in the button illuminates.

Autostop

Vehicles with manual transmission

Activate an Autostop as follows:

● Set the selector lever to neutral.
● Release the clutch pedal.

The engine will be switched off while

the ignition stays on.

Vehicles with automatic transmission

If the vehicle is at a standstill with

depressed brake pedal, Autostop is

activated automatically.
The engine will be switched off while

the ignition stays on.
The stop-start system will be disabled

on steep inclines.

Indication

An Autostop is indicated by control

indicator 

n

.

During an Autostop, the heating and

brake performance will be

maintained.

Conditions for an Autostop

The stop-start system checks if each

of the following conditions is fulfilled.

● The stop-start system is not

manually deactivated.

● The driver's door is closed or the

driver's seat belt is fastened.

● The vehicle battery is sufficiently

charged and in good condition.

● The engine is warmed up.
● The engine coolant temperature

is not too high.

● The engine exhaust temperature

is not too high, e.g. after driving

with high engine load.

● The ambient temperature is not

too low or too high.

● The climate control system

allows an Autostop.

● The brake vacuum is sufficient.
● The self-cleaning function of the

exhaust filter is not active.

● The vehicle was driven at least at

walking speed since the last

Autostop.

Otherwise an Autostop will be

inhibited.

Notice

The Autostop may be inhibited for

several hours after a battery

replacement or reconnection.

Certain settings of the climate control

system may inhibit an Autostop.
Climate control 

3

 159.

Immediately after higher speed

driving an Autostop may be inhibited.
New vehicle running-in 

3

 171.

176

Driving and operating

Vehicle battery discharge protection

To ensure reliable engine restarts,

several vehicle battery discharge

protection features are implemented

as part of the stop-start system.

Power saving measures

During an Autostop, several electrical

features such as auxiliary electric

heater or rear window heating are

disabled or switched to a power

saving mode. The fan speed of the

climate control system is reduced to

save power.

Restart of the engine by the driver

Vehicles with manual transmission

Depress the clutch pedal without

depressing the brake pedal to restart

the engine.

Vehicles with automatic transmission

The engine is restarted in the

following cases:

● brake pedal released while the

selector lever in position D or M

● brake pedal released or selector

lever in position N when selector

lever is moved to position D or

M

● selector lever moved to position

R

Restart of the engine by the stop-

start system

Vehicles with manual transmission:

The selector lever must be in neutral

to enable an automatic restart.
If one of the following conditions

occurs during an Autostop, the

engine will be restarted automatically

by the stop-start system:

● stop-start system manually

deactivated

● driver's seat belt unfastened and

driver's door opened

● engine temperature too low

● charging level of vehicle battery

below a defined level

● brake vacuum not sufficient
● vehicle is driven or rolls at least at

walking speed

● climate control system requests

engine start

● air conditioning manually

switched on

If an electrical accessory, e.g. a

portable CD player, is connected to

the power outlet, a brief power drop

during the restart might be noticeable.

Parking

9

Warning

● Do not park the vehicle on an

easily ignitable surface. The

high temperature of the

exhaust system could ignite the

surface.

● Always apply the parking

brake. Activate the parking

brake without pressing the

release button. Apply as firmly

Driving and operating

177

as possible on a downhill slope

or uphill slope. Depress brake

pedal at the same time to

reduce operating force.

● If the vehicle is on a level

surface or uphill slope, engage

first gear or set the selector to

position P. On an uphill slope,

turn the front wheels away from

the kerb.
If the vehicle is on a downhill

slope, engage reverse gear or

set the selector to position P.

Turn the front wheels towards

the kerb.

● Close the windows.
● Switch off the engine.
● Remove the ignition key from

the ignition switch or switch off

ignition on vehicles with power

button. Depending on version,

turn the steering wheel until the

steering wheel lock is felt to

engage.

● Lock the vehicle.
● Activate the anti-theft alarm

system.

● The engine cooling fans may run

after the engine has been

switched off 

3

 259.

Caution

After running at high engine

speeds or with high engine loads,

operate the engine briefly at a low

load or run in neutral for

approx. 30 seconds before

switching off, in order to protect

the turbocharger.

Notice

In the event of an accident with

airbag deployment, the engine is

switched off automatically if the

vehicle comes to a standstill within a

certain time.

In countries with extremely low

temperatures it may be necessary to

park the vehicle without applied

parking brake. Make sure to park the

vehicle on a level surface.
Parking brake 

3

 193.

Engine exhaust

9

Danger

Engine exhaust gases contain

poisonous carbon monoxide,

which is colourless and odourless

and could be fatal if inhaled.
If exhaust gases enter the interior

of the vehicle, open the windows.

Have the cause of the fault

rectified by a workshop.
Avoid driving with an open load

compartment, otherwise exhaust

gases could enter the vehicle.

Exhaust filter

Automatic cleaning process

The exhaust filter system filters soot

particles out of the exhaust gases.
The start of saturation of the exhaust

filter is indicated by the temporary

illumination of 

t

 or 

C

,

accompanied by a message in the

Driver Information Centre.

178

Driving and operating

As soon as the traffic conditions

permit, regenerate the filter by driving

at a vehicle speed of at least 40 mph

until the control indicator

extinguishes.

Notice

On a new vehicle, the first exhaust

filter regeneration operations may

be accompanied by a burning smell,

which is normal. Following

prolonged operation of the vehicle at

very low speed or at idle, water

vapour can be emitted at the

exhaust on acceleration. This does

not affect the behaviour of the

vehicle or the environment.

Cleaning process not possible

If 

t

 or 

C

 stays on, accompanied

by an audible signal and a message,

this indicates that the exhaust filter

additive level is too low.
The reservoir must be topped-up

without delay. Seek the assistance of

a workshop.

Catalytic converter

The catalytic converter reduces the

amount of harmful substances in the

exhaust gases.

Caution

Fuel grades other than those listed

on pages 

3

 249

3

 301 could

damage the catalytic converter or

electronic components.
Unburnt petrol will overheat and

damage the catalytic converter.

Therefore avoid excessive use of

the starter, running the fuel tank

dry and starting the engine by

pushing or towing.

In the event of misfiring, uneven

engine running, a reduction in engine

performance or other unusual

problems, have the cause of the fault

rectified by a workshop as soon as

possible. In an emergency, driving

can be continued for a short period,

keeping vehicle speed and engine

speed low.

AdBlue

General information

The selective catalytic reduction

(BlueInjection) is a method to

substantially reduce the nitrogen

oxides in the exhaust emission. This

is achieved by injecting a Diesel

Exhaust Fluid (DEF) into the exhaust

system. The ammonia released by

the fluid reacts with nitrous gases

(NO

x

) from the exhaust and turns it

into nitrogen and water.
The designation of this fluid is

AdBlue

®

. It is a non-toxic, non-

flammable, colourless and odourless

fluid which consists of 32% urea and

68% water.

9

Warning

Avoid contact of your eyes or skin

with AdBlue.
In case of eye or skin contact,

rinse off with water.

Driving and operating

179

Caution

Avoid contact of the paintwork with

AdBlue.
In case of contact, rinse off with

water.

AdBlue freezes at a temperature of

approx. -11 °C. As the vehicle is

equipped with an AdBlue pre-heater,

the emissions reduction at low

temperatures is ensured. The AdBlue

pre-heater works automatically.
In some circumstances below the

mentioned temperature, an error

message appears in the Driver

Information Centre. In this event, park

the vehicle in a space with a higher

ambient temperature until AdBlue is

liquefied.

Notice

Frozen and again liquefied AdBlue is

usable without quality loss.

The typical AdBlue consumption is

approx. 2 l per 600 miles, but can also

be higher depending on driving

behaviour (e.g. high load or towing).

Level warnings

Depending on the calculated range of

AdBlue, different messages are

displayed in the Driver Information

Centre. The messages and the

restrictions are a legal requirement.

1. The first warning level is entered

when the estimated AdBlue range

is between 1500 miles and

500 miles.
When switching on the ignition,

this warning will show up once

briefly with the calculated range.

Additionally, control indicator 

u

will illuminate and a chime will

sound. Driving is possible without

any restrictions.

2. The next warning level is entered

when the estimated AdBlue range

is below 500 miles. The message

with the current range will always

be displayed when ignition is

switched on. Additionally, control

indicator 

u

 will flash and a chime

will sound. Refill AdBlue before

entering the next warning level.

3. The next warning level is entered

with a range below 60 miles. The

message with the current range

will always be displayed when

ignition is switched on.

Additionally, control indicator 

u

will flash and a chime will sound.

Refill AdBlue as soon as possible

before the AdBlue tank is

completely empty. Otherwise, a

restart of the engine will not be

possible.

4. The last warning level is entered

when the AdBlue tank is empty.

Restart of the engine is not

possible.
A message appears in the Driver

Information Centre. Additionally,

control indicator 

u

 will flash and

a chime will sound.
Refill the tank to a level of at least

5 l of AdBlue, otherwise restarting

of the engine is not possible.

High emission warnings

In the event of a fault with the

emissions control system, different

messages are displayed in the Driver

Information Centre.

180

Driving and operating

The messages and the restrictions

are a legal requirement. The warning

messages are accompanied by the

control indicators 

u

C

 and 

W

.

Additionally, a chime will sound.
Follow the instructions of the warning

messages. If starting is prevented,

seek the assistance of a workshop.

Refilling AdBlue

Caution

Only use AdBlue that complies

with European standards

DIN 70 070 and ISO 22241-1.
Do not use additives.
Do not dilute AdBlue.
Otherwise the selective catalytic

reduction system could be

damaged.

Notice

Whenever a filling pump with a

nozzle for passenger cars is not

available at a filling station, use only

AdBlue bottles or canisters with a

sealed refill adapter for refilling, to

prevent splashback and overspill,

and in order to ensure that the fumes

from the tank are captured and do

not emerge. AdBlue in bottles or

canisters is available in many filling

stations and can be purchased e.g.

at Vauxhall dealers and other retail

outlets.
Since AdBlue has a limited

durability, check the date of expiry

before refilling.
Notice

Refill the AdBlue tank to a level of at

least 10 l, to ensure that the new

AdBlue level is being detected.
In case AdBlue refill is not

successfully detected:

1. Continuously drive the vehicle

for ten minutes making sure that

vehicle speed is always higher

than 12 mph.

2. If AdBlue refill is detected

successfully, AdBlue supply-

driven warnings or limitations will

disappear.

If AdBlue refill is still not detected,

seek the assistance of a workshop.

If AdBlue must be refilled at

temperatures below -11 °C, the

refilling of AdBlue may not be

detected by the system. In this

event, park the vehicle in a space

with a higher ambient temperature

until AdBlue is liquified.
Notice

When unscrewing the protective cap

from the filler neck, ammonia fumes

may emerge. Do not inhale as the

fumes have a pungent smell. The

fumes are not harmful by inhalation.

The AdBlue tank should be filled

completely. This must be done if the

warning message regarding

prevention of an engine restart is

already displayed.
AdBlue refilling quantity 

3

 303.

The vehicle must be parked on a level

surface.
The filler neck for AdBlue is located

behind the fuel filler flap.
The fuel filler flap can only be opened

if the vehicle is unlocked.

1. Switch off the ignition.

Driving and operating

181

2. Close all doors to avoid ammonia

fumes entering the interior of the

vehicle.

3. Release the fuel filler flap by

pushing the flap 

3

 251.

4. Unscrew protective cap from the

filler neck.

5. Open AdBlue canister.
6. Mount one end of the hose on the

canister and screw the other end

on the filler neck.

7. Lift the canister until it is empty, or

until the flow from the canister has

stopped.

8. Place the canister on the ground

to empty the hose, wait

15 seconds.

9. Unscrew the hose from the filler

neck.

10. Mount the protective cap and turn

clockwise until it engages.

Notice

Dispose of AdBlue canister

according to environmental

requirements. Hose can be reused

after flushing with clear water before

AdBlue dries out.

Electric drive unit

The vehicle uses an electric drive unit

with a 1-gear transmission.

Caution

If the vehicle seems to accelerate

slowly or not respond when you try

to go faster, do not continue your

journey. The electric drive unit

could be damaged. Consult a

workshop as soon as possible.

Caution

Spinning the tyres or holding the

vehicle in one place on a hill using

only the accelerator pedal may

damage the electric drive unit. If

you are stuck, do not spin the

tyres. When stopping on a hill, use

the brakes to hold the vehicle in

place.

There are two different selector types.

182

Driving and operating

Type A

P : park position

R : reverse gear

N : neutral

D : automatic mode

B : automatic mode with one-pedal

driving

After selecting a mode, the selector

will return to the centre position. The

selected mode is indicated in the

Driver Information Centre.
Do not accelerate while engaging a

mode. Never depress the accelerator

pedal and brake pedal at the same

time.

When D or R is selected, the vehicle

slowly begins to creep when the

brake is released.

Park position P

9

Warning

Do not leave the vehicle when the

propulsion system is running, the

vehicle may move suddenly. You

or others can be injured. To be

sure the vehicle will not move,

even if you are on even ground,

make sure the parking brake is

applied and P is selected.

To shift into P, press button P when

vehicle is stationary. In P, the front

wheels of the vehicle are blocked.
To shift out of P, depress the brake

pedal and select the desired mode.
The vehicle shifts automatically into

P when

● the ignition is switched off
● the driver's door is opened while

the vehicle's speed is below

1 mph

Reverse gear R

To shift into and out of R, the vehicle

must be at standstill and the brake

pedal has to be depressed.

Caution

Shifting into R while the vehicle is

moving forwards could damage

the electric drive unit. Only shift

into R after the vehicle has been

stopped.

Neutral N

In this position, the propulsion system

does not transfer torque to the

wheels.

Automatic mode D

This mode is for normal driving.

Automatic mode B with one-pedal

driving

In this mode, vehicle speed is

significantly reduced by releasing the

accelerator pedal, without operating

the brake pedal.
Use B when driving down steep hills,

in deep snow, in mud or in stop-and-

go traffic.

Driving and operating

183

9

Warning

In the case of extreme

temperatures or if the high voltage

battery is almost fully charged, the

brake force of the engine braking

may be temporarily reduced. If the

braking force is not sufficient, the

driver has to be prepared to use

the brake pedal.

B can only be activated if D is

selected. Press button B.
To deactivate B, press button B.
Regenerative braking 

3

 196.

Type B

P : park position

R : reverse gear

N : neutral

D : automatic mode

B : automatic mode with one-pedal

driving

The selected mode is indicated in the

Driver Information Centre.
Do not accelerate while engaging a

mode. Never depress the accelerator

pedal and brake pedal at the same

time.
When D or R is selected, the vehicle

slowly begins to creep when the

brake is released.

Park position P

This position locks the front wheels. It

is the recommended position when

starting the propulsion system

because the vehicle cannot move

easily.

9

Warning

It is dangerous to get out of the

vehicle if the selector lever is not

fully in P with the parking brake

firmly applied. The vehicle can roll.
Do not leave the vehicle when the

propulsion system is running, the

vehicle may move suddenly. You

or others can be injured. To be

sure the vehicle will not move,

even if you are on even ground,

always apply the parking brake

and move the selector lever to P.

The UNLOCK button is designed to

prevent inadvertent shifting out of P

unless the vehicle has been started,

the brake pedal is depressed, and the

release button is pressed.

184

Driving and operating

When the vehicle is stopped, press

START/STOP to switch off the

vehicle. The electric drive unit will

shift to P automatically.
The vehicle will not shift into P if it is

moving too fast. Stop the vehicle and

shift into P.
To shift into P, press the P button on

the selector lever.
To shift out of P:

1. Depress the brake pedal and

press the UNLOCK button.

2. Shift into the desired gear.

Reverse gear R

To shift in to R, the vehicle must be at

standstill and the brake pedal has to

be depressed. Press UNLOCK if

necessary and move the selector

lever to R.

Caution

Shifting into R while the vehicle is

moving forward could damage the

electric drive unit. Only shift into

R after the vehicle has been

stopped.

Neutral N

In this position, the propulsion system

does not transfer torque to the

wheels.
The vehicle is not designed to stay in

N for extended periods of time. It will

automatically shift into P.

Automatic mode D

This mode is for normal driving.

Automatic mode with one-pedal

driving  B

In this mode, the vehicle speed is

significantly reduced by releasing the

accelerator pedal without operating

the brake pedal.
Use B when driving down steep hills,

in deep snow, in mud or in stop-and-

go traffic.

9

Warning

In the case of extreme

temperatures or if the high voltage

battery is almost fully charged, the

brake force of the engine braking

may be temporarily reduced. If the

braking force is not sufficient, the

driver has to be prepared to use

the brake pedal.

To activate B, select D and push the

selector backwards. To shift out of B,

push the selector again.

Free wheeling

In certain situations, e.g., in an

automatic car wash etc., it is

necessary that the wheels can move

freely when the engine is switched off.
To enable free wheeling, the vehicle

has to be stationary, the engine has

to be running and the driver's door

has to be closed.
Selector type A

1. Depress the brake pedal and

select N.

2. Within 5 seconds, depress and

hold the brake pedal, switch off

ignition and move the selector

forwards or backwards.

3. Release the brake pedal and

switch on ignition.

Driving and operating

185

4. Depress and hold the brake pedal

and push the switch 

j

.

5. Release the brake pedal and

switch off ignition.

Selector type B

1. Select N and switch off ignition.
2. Within 5 seconds, switch on

ignition, depress and hold the

brake pedal and move the

selector forwards or backwards.

3. Still hold the brake pedal and push

the switch 

j

.

4. Release the brake pedal and

switch off ignition.

A message is displayed in the Driver

Information Centre indicating that the

wheels are unblocked for the next 15

minutes.
To revert to normal operation,

depress the brake pedal, switch on

the engine and select P.
Parking brake 

3

 193.

Automatic transmission

The automatic transmission permits

automatic gearshifting (automatic

mode) or manual gearshifting

(manual mode).

Gear selector type A

P : park position

R : reverse gear

N : neutral

D : automatic mode

M : manual mode

After selecting a mode, the selector

will return to the centre position. The

selected mode is indicated in the

Driver Information Centre.
Do not accelerate while engaging a

mode. Never depress the accelerator

pedal and brake pedal at the same

time.
When D or R is selected, the vehicle

slowly begins to creep when the

brake is released.

Park position P

9

Warning

Do not leave the vehicle when the

propulsion system is running, the

vehicle may move suddenly. You

or others can be injured. To be

sure the vehicle will not move,

even if you are on even ground,

make sure the parking brake is

applied and P is selected.

To shift into P, press button P when

vehicle is stationary. In P, the front

wheels of the vehicle are blocked.

186

Driving and operating

To shift out of P, depress the brake

pedal and select the desired mode.
The vehicle shifts automatically into

P when

● the ignition is switched off
● the driver's door is opened while

the vehicle's speed is below

1 mph

The vehicle will not shift into P if it is

moving too fast. Stop the vehicle and

shift into P.

Reverse gear R

To shift into and out of R, the vehicle

must be at standstill and the brake

pedal has to be depressed.

Caution

Shifting into R while the vehicle is

moving forward could damage the

automatic transmission. Only shift

into R after the vehicle has been

stopped.

Neutral N

In this position, the propulsion system

does not transfer torque to the

wheels.

When N is selected and ignition is

switched off, P is engaged after a

short time.

Automatic mode D

This mode is for normal driving.
To shift into and out of D, the vehicle

must be at standstill and the brake

pedal has to be depressed.

Gear selector type B

Move the selector lever or press the

respective buttons.
P : park position

R : reverse gear

N : neutral

D : automatic mode

M : manual mode
The engine can only be started with

the selector lever in P or N. When

position N is selected, press the brake

pedal or apply the parking brake

before starting.
The selected mode is indicated in the

Driver Information Centre.
Do not accelerate while engaging a

mode. Never depress the accelerator

pedal and brake pedal at the same

time.
When D or R is selected, the vehicle

slowly begins to creep when the

brake is released.

Park position P

9

Warning

Do not leave the vehicle when the

propulsion system is running, the

vehicle may move suddenly. You

or others can be injured. To be

sure the vehicle will not move,

Driving and operating

187

even if you are on even ground,

make sure the parking brake is

applied and P is selected.

This position locks the front wheels.

P is automatically engaged when

ignition is switched off.
To shift into P, apply the parking

brake and press button P.

UNLOCK  button

The selector lever is locked in P.

Before unlocking, ensure that the

ignition is on. Apply the brake pedal,

press UNLOCK if necessary and

move the selector lever to the desired

mode.
Before engaging the reverse gear,

come to a total stop. Apply the brake

pedal, press UNLOCK and move the

selector lever to R.

Gear selector type C

P : park position

R : reverse gear

N : neutral

D : automatic mode

M : manual mode
With P or N selected, the parking

brake and the brake pedal applied,

start the engine.
With the engine running, depress the

brake pedal, release the parking

brake and select the respective gear

to move off.

Caution

Never select N while the vehicle is

moving.
If N is selected unintentionally

while driving, allow the engine to

idle and then select D to

accelerate.

Before switching off the engine, come

to a stop, apply the parking brake,

unless it is set to automatic mode, and

select P or N.

Caution

If the selector is not in P when the

driver's door is opened or approx.

45 seconds after the ignition has

been switched off, a warning

message is displayed in the Driver

Information Centre accompanied

by an audible signal.
Set the selector to P.

188

Driving and operating

Free wheeling / car wash mode

In certain situations, e.g., in an

automatic car wash etc., it is

necessary that the wheels can move

freely when the engine is switched off.
To enable free wheeling, the vehicle

has to be stationary, the engine has

to be running and the driver's door

has to be closed.
Parking brake 

3

 193.

Selector type A

1. Depress the brake pedal and

select N.

2. Within 5 seconds, depress and

hold the brake pedal, switch off

ignition and move the selector

forwards or backwards.

3. Release the brake pedal and

switch on ignition.

4. Depress and hold the brake pedal

and push the switch 

j

.

5. Release the brake pedal and

switch off ignition.

To revert to normal operation,

depress and hold the brake pedal,

switch on the engine and press P.

Selector type B and electric parking

brake

1. Select N and switch off ignition.
2. Within 5 seconds, switch on

ignition, depress and hold the

brake pedal and move the

selector forwards or backwards.

3. Still hold the brake pedal and push

the switch 

j

.

4. Release the brake pedal and

switch off ignition.

To revert to normal operation,

depress and hold the brake pedal,

switch on the engine and press P.

Selector type B and manual parking

brake

1. Select N and switch off ignition.
2. Within 5 seconds, switch on

ignition, depress and hold the

brake pedal and move the

selector forwards or backwards.

3. Switch off ignition.

To revert to normal operation, press

P.

Selector type C

1. Depress and hold the brake

pedal.

2. Select N and switch off ignition.
3. Release brake pedal and switch

on ignition.

4. Depress and hold the brake pedal

and push the switch 

j

.

5. Release the brake pedal and

switch off ignition.

To revert to normal operation,

depress the brake pedal, switch on

the engine and apply the parking

brake.
A message is displayed in the Driver

Information Centre indicating that the

wheels are unblocked for the next 15

minutes.

Deactivation of the automatic

operation of the electric parking brake

For this procedure, refer to the

description of the automatic parking

brake.
Parking brake 

3

 193.

Driving and operating

189

Manual mode

Manual mode M can be activated

from position D in each driving

situation and speed.
The selected gear is indicated in the

Driver Information Centre.
If a higher gear is selected when

vehicle speed is too low, or a lower

gear when vehicle speed is too high,

the shift is not executed. This can

cause a message in the Driver

Information Centre.
In manual mode, no automatic

shifting to a higher gear takes place

at high engine revolutions.

6-gear automatic transmission

Move selector lever out of position D

towards the left in position M.
Move selector lever to the front + to

shift to a higher gear.
Move selector lever to the rear - to

shift to a lower gear.

8-gear automatic transmission

Type A

Type B

190

Driving and operating

Press button M.
Pull steering wheel paddles to select

gears manually.
Pull right paddle + to shift to a higher

gear.
Pull left paddle - to shift to a lower

gear.
Multiple pulls allow gears to be

skipped.

Gear shift indication

The symbol 

Y

 or 

Z

 with a number

beside it is indicated when

gearshifting is recommended for fuel

saving reasons.
Shift indication appears only in

manual mode.

Engine braking

To utilise the engine braking effect,

select a lower gear in good time when

driving downhill.

Electronic driving programmes

Following a cold start, the operating

temperature programme increases

engine speed to quickly bring the

catalytic converter to the required

temperature.
Special programmes automatically

adapt the shifting points when driving

up inclines or down hills.
In snowy or icy conditions or on other

slippery surfaces, the electronic

transmission control enables the

driver to select manually first, second

or third gear for starting off.

Kickdown

Pressing down the accelerator pedal

beyond the kickdown detent will lead

to maximum acceleration

independent of selected driving

mode. The transmission shifts to a

lower gear depending on engine

speed.

Fault

In the event of a fault, 

C

 illuminates

a message is displayed in the Driver

Information Centre.

Vehicle messages 

3

 79.

Electronic transmission control

enables only third gear. The

transmission no longer shifts

automatically.
Do not drive faster than 62 mph.
Have the cause of the fault remedied

by a workshop.

Interruption of power supply

In the event of an interruption of

power supply, it is not possible to

select another mode when P is

selected.
Towing the vehicle 

3

 287.

If the vehicle battery is discharged,

start the vehicle using jump leads

3

 285.

If the vehicle battery is not the cause

of the fault, seek the assistance of a

workshop.

Driving and operating

191

Manual transmission

To engage reverse on 5-speed

transmission, with the vehicle

stationary and engine at idle, depress

the clutch pedal and move the

selector lever to the right and rear.

To engage reverse on 6-speed

transmission, with the vehicle

stationary and engine at idle, depress

the clutch pedal, pull the ring under

the selector lever and move the

selector lever quite to the left and

front.
If the gear does not engage, set the

selector lever to neutral, release the

clutch pedal and depress again. Then

repeat gear selection.
Do not slip the clutch unnecessarily.
When operating, depress the clutch

pedal completely. Do not use the

pedal as a foot rest.

When clutch slip is detected for a

specific time, the engine power will be

reduced. A warning is displayed in the

Driver Information Centre. Release

the clutch.

Caution

It is not advisable to drive with the

hand resting on the selector lever.

Gear shift indication 

3

 70.

Stop-start system 

3

 174.

192

Driving and operating

Drive systems

Drive modes

Following drive modes are selectable:

● Normal mode
● Sport mode
● Eco mode

Each drive mode corresponds to a

different vehicle setting.

To select the respective drive mode,

use the shown toggle switch.

Normal mode

The settings in this mode are set by

default. Everytime the ignition is

switched on, this mode is selected.
BEV: To optimise range, electric

engine power output is reduced.

Sport mode

The settings in this mode allow more

dynamic driving. The vehicle's

dynamic parameters can be

displayed in the Driver Information

Centre.
BEV: This mode allows maximum

electric engine power output.

Eco mode

Reduces fuel consumption by

optimising the operation of the

climate control system and,

depending on version, the accelerator

pedal, the automatic transmission

and the gear shifting indicator.
While coasting the vehicle, the engine

is idling with reduced engine brake.
BEV: To optimise range, electric

engine power output is reduced and

heating is switched off.

Propulsion types 

3

 4.

Driving and operating

193

Brakes

Antilock brake system

Antilock brake system (ABS)

prevents the wheels from locking.
ABS starts to regulate brake pressure

as soon as a wheel shows a tendency

to lock. The vehicle remains

steerable, even during hard braking.
ABS control is made apparent

through a pulse in the brake pedal

and the noise of the regulation

process.
For optimum braking, keep the brake

pedal fully depressed throughout the

braking process, despite the fact that

the pedal is pulsating. Do not reduce

the pressure on the pedal.
When braking in an emergency, the

hazard warning flashers are switched

on automatically depending on the

force of deceleration. They are

switched off automatically the first

time you accelerate.
After starting off, the system performs

a self-test which may be audible.

Control indicator 

i


3

 70.

Fault

9

Warning

If there is a fault in the ABS, the

wheels may be liable to lock due

to braking that is heavier than

normal. The advantages of ABS

are no longer available. During

hard braking, the vehicle can no

longer be steered and may

swerve.

Have the cause of the fault remedied

by a workshop.

Parking brake

9

Warning

Before leaving the vehicle, check

parking brake status. Control

indicator 

j

 illuminate constantly

when electric parking brake is

applied.

Manual parking brake

194

Driving and operating

9

Warning

Always apply parking brake firmly

without operating the release

button, and apply as firmly as

possible on a downhill or uphill

slope.
To release the parking brake, pull

the lever up slightly, press the

release button and fully lower the

lever.
To reduce the operating forces of

the parking brake, depress the

foot brake at the same time.

Control indicator 

h


3

 69.

Electric parking brake

Applying when vehicle is stationary

9

Warning

Pull switch 

m

 for a minimum of

1 second until control indicator 

m

illuminates constantly and electric

parking brake is applied. The

electric parking brake operates

automatically with adequate force.
Before leaving the vehicle, check

the electric parking brake status.
Control indicator 

m


3

 69.

The electric parking brake can always

be activated, even if the ignition is off.
Do not operate electric parking brake

system too often without engine

running as this will discharge the

vehicle battery.

Releasing

Switch on ignition. Keep foot brake

pedal depressed and then push

switch 

j

.

Drive away function

Vehicles with manual transmission:

Depressing the clutch pedal and then

slightly releasing the clutch pedal and

slightly depressing the accelerator

pedal releases the electric parking

brake automatically. This is only

possible if the automatic operation of

the electric parking brake is activated.

It is not possible when switch 

j

 is

pulled at the same time.
Vehicles with automatic transmission:

Engaging R, D or M and then

depressing the accelerator pedal

releases the electric parking brake

automatically. This is only possible if

the automatic operation of the electric

Driving and operating

195

parking brake is activated. It is not

possible when switch 

j

 is pulled at

the same time.

Braking when vehicle is moving

When the vehicle is moving and the

switch 

j

 is kept pulled, the electric

parking brake system will decelerate

the vehicle. As soon as the switch

j

 is released, braking will be

stopped.
The antilock brake system and the

Electronic Stability Control stabilise

the vehicle while the switch 

j

 is kept

pulled. If an error of the electric

parking brake occurs, a warning

message is displayed in the driver

information centre. If the antilock

brake system and the Electronic

Stability Control fail, one or both

indicators 

i

 and 

J

 illuminate in the

instrument cluster. In this case,

stability during deceleration of the

vehicle can only be maintained with

repeated short pulls of the switch until

the vehicle is immobilised.

Automatic operation

Automatic operation includes

automatic application and automatic

release of the electric parking brake.
The electric parking brake can also be

applied or released manually by using

the switch 

j

.

Automatic application:

● The electric parking brake is

automatically applied when the

vehicle is stationary and the

ignition is switched off.

j

 illuminates in the instrument

cluster and a display message

pops up to confirm the

application.

Automatic release:

Notice

The automatic release of the electric

parking brake is inhibited as long as

the driver's door is open.

● Parking brake releases

automatically on driving off.

j

 extinguishes in the

instrument cluster and a display

message pops up to confirm the

release.

Deactivation of automatic operation

In certain situations, e.g. in very cold

weather conditions, when being

towed etc., it may be necessary that

the automatic operation of the electric

parking brake is deactivated.

1. Start the engine.
2. If the parking brake is released,

apply the parking brake pulling the

switch 

j

.

3. Release the brake pedal.
4. Press the switch 

j

 for at least

10 seconds and maximum

15 seconds.

5. Release the switch 

j

.

6. Depress and hold the brake

pedal.

7. Pull the switch 

j

 for 2 seconds.

The deactivation of the automatic

operation of the electric parking brake

is confirmed by 

o

 illuminating in the

Driver Information Centre 

3

 70. The

electric parking brake can only be

applied and released manually.
To reactivate the automatic

operation, repeat the steps described

above.

196

Driving and operating

Fault

Failure mode of electric parking brake

is indicated by a control indicator

k

 and by a message displayed in

the Driver Information Centre.
Vehicle messages 

3

 79.

Control indicator 

j

 flashes: electric

parking brake is not fully applied or

released. When continuously

flashing, release electric parking

brake and retry applying.

Brake assist

If brake pedal is depressed quickly

and forcefully, maximum brake force

is automatically applied.
Operation of brake assist might

become apparent by a pulse in the

brake pedal and a greater resistance

when depressing the brake pedal.
Maintain steady pressure on the

brake pedal as long as full braking is

required. Maximum brake force is

automatically reduced when brake

pedal is released.

Hill start assist

The system helps prevent unintended

movement when driving away on

inclines.
When releasing the brake pedal after

stopping on an incline, brakes remain

on for further 2 seconds. The brakes

release automatically as soon as the

vehicle begins to accelerate.

Regenerative braking

9

Warning

In the case of extreme

temperatures or if the high voltage

battery is almost fully charged, the

brake force of the engine braking

may be temporarily reduced. If the

braking force is not sufficient, the

driver has to be prepared to use

the brake pedal.

9

Warning

Depending on the engine braking

force the brake lights are

illuminated.

Regenerative braking generates

electrical energy resulting from

engine braking to charge the high

voltage battery.
Electric drive unit 

3

 181.

Driving and operating

197

Ride control systems

Electronic Stability Control

and Traction Control system

Electronic Stability Control improves

driving stability when necessary,

regardless of the type of road surface

or tyre grip.
As soon as the vehicle starts to

swerve (understeer / oversteer),

engine output is reduced and the

wheels are braked individually.
Electronic Stability Control operates

in combination with the Traction

Control system. It prevents the driven

wheels from spinning.
The Traction Control system is a

component of the Electronic Stability

Control.
The Traction Control system

improves driving stability when

necessary, regardless of the type of

road surface or tyre grip, by

preventing the driven wheels from

spinning.

As soon as the driven wheels starts to

spin, engine output is reduced and

the wheel spinning the most is braked

individually. This considerably

improves the driving stability of the

vehicle on slippery road surfaces.

Electronic Stability Control and the

Traction Control system are

operational after each engine start as

soon as the control indicator 

J

extinguishes.
When Electronic Stability Control or

the Traction Control system operates,

J

 flashes.

On some occasions, e.g. after

disconnecting the vehicle battery, the

control indicator 

J

 may illuminate

during some seconds accompanied

by a message in the Driver

Information Centre. This may be

caused by the reset of the steering

angle sensor.

9

Warning

Do not let this special safety

feature tempt you into taking risks

when driving.
Adapt speed to the road

conditions.

Control indicator 

b


3

 71.

Deactivation

The Traction Control system can be

deactivated in the Info Display.
Info Display 

3

 77.

Deactivation is confirmed by a

message in the Driver Information

Centre.
Traction Control system is reactivated

everytime the ignition has been

switched on again or in the case that

the vehicle is driven faster than

30 mph. It can also be reactivated via

the Info Display.


Content      ..     4      5      6      7     ..