Vauxhall Astra L (2023 year). Manual in english - page 6
 

  Index      Manuals     Vauxhall Astra L (2023 year). Manual in english


Search            copyright infringement  


Content      ..     4      5      6      7     ..


Vauxhall Astra L (2023 year). Manual in english - page 6


166

Driving and operating

Press 

_

 and activate Close

Obstacle Detection.
Once activated, the system is ready

to operate when 

e

 is not shown in the

Driver Information Centre.
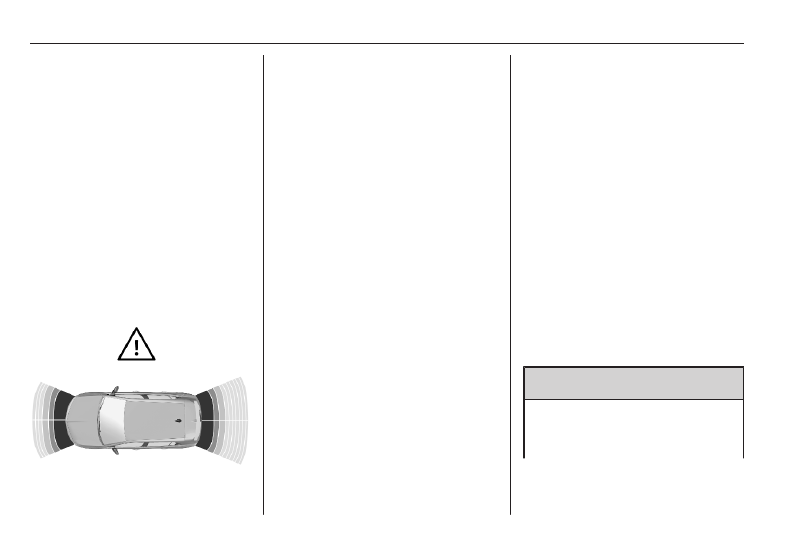
The front parking assist is triggered

when an obstacle is detected in front

and the speed of the vehicle is below

6 mph. The rear parking assist is

triggered, when the reverse gear is

engaged.

Indication

As soon as an obstacle gets closer to

the vehicle, you will hear acoustic

warning signals.

The interval between the sounds

becomes shorter as the vehicle gets

closer to the obstacle in the driving

direction. When the distance is less

than approx. 30 cm, the sound is

continuous.

Deactivation

The system is deactivated

automatically if vehicle speed

exceeds 6 mph, the vehicle stops for

more than three seconds in a forward

gear or the obstacle is no longer

detected.
If the vehicle is electrically connected

to a trailer, a bicycle carrier etc., the

rear assist is automatically

deactivated. In this case, the outline

of a trailer is displayed at the rear part

of the vehicle in the Driver Information

Centre.
To manually deactivate the system,

press 

_

 and deactivate the system

in the Info Display. 

e

 will illuminate in

the Driver Information Centre.

System limitations

In the event of a fault or if the system

does not work temporarily, e.g.

because of high external noise level

or other interference factors, 

C

illuminates in the Driver Information

Centre, 

e

 illuminates in the Driver

Information Centre, a message is

displayed and a warning chime

sounds.

Notice

Make sure that the front number

plate is properly mounted, vertically

and horizontally centred and the

sensors are firmly in place. The

performance of the parking assist

will be reduced if the license plate is

bent or a license plate support is

used.

9

Warning

Under certain circumstances,

various reflective surfaces on

objects or clothing as well as

Driving and operating

167

external noise sources may cause

the system to fail to detect

obstacles.
Special attention must be paid to

low obstacles which can damage

the lower part of the bumper.

Caution

In the case of a severe failure of

the vehicle with the need to stop

the vehicle, the system is

deactivated.
In the case of a gearbox failure,

the parking assist system is not

active, when reverse gear is

engaged.
In the case of a loudspeaker

failure, the audible signals may not

be given.
Performance of the system can be

reduced when sensors are

covered, e.g. by ice or snow.
If a sensor is covered, a message

is displayed indicating that the

sensors have to be cleaned.

Performance of the parking assist

system may be limited or the

functionality may not be available

at all if 

C

 illuminates or if the

image shown on the Info Display

is frozen or if the screen is black.
Performance of the parking assist

system can be reduced due to

heavy loading.
Special conditions apply if there

are taller vehicles in the vicinity

(e.g. off-road vehicles, mini vans,

vans). Object identification and

correct distance indication in the

upper part of these vehicles

cannot be guaranteed.
Objects with a very small reflection

cross-section, e.g. objects of

narrow size or soft materials, may

not be detected by the system.
Parking assist systems do not

detect objects outside the

detection range, e.g. below the

bumper or underneath the vehicle.

During a reverse parking

manoeuvre, the system does not

consider a mounted coupling ball

bar. The driver has to consider this

additional length.

Notice

It is possible that the sensor detects

a non-existing object caused by

echo disturbance from external

acoustic noise or mechanical

misalignments (sporadic false

warnings may occur).
Make sure that the front number

plate is properly mounted (not bent

and no gaps to the bumper on the left

or right side) and the sensors are

firmly in place. The performance of

the parking assist may be reduced if

the license plate is bent or a license

plate support is used.
Low curbs and surface irregularities,

e.g. on construction zones, are not

detected by the system. The driver

accepts responsibility.

168

Driving and operating

Side blind spot alert

The side blind spot alert system

detects and warns of vehicles

approaching from the rear in

neighbouring lanes up to 75 m or of

another vehicle in the blind spot of the

vehicle.
The system displays a visual alert in

each exterior mirror when detecting

objects that may not be visible in the

interior and exterior mirrors.
Side blind spot alert uses two radar

sensors located in the rear bumper on

each side of the vehicle.

9

Warning

Damage or scratches on the

vehicle surface near the radar

sensors may affect the

performance of the system. This

can cause wrong warnings or the

loss of warnings.
Seek the assistance of a

workshop.

9

Warning

Side blind spot alert is only a lane

changing aid and does not replace

driver vision.
Side blind spot alert does not

detect:

● Vehicles approaching very

rapidly.

● Pedestrians or animals.
● Non-moving objects, e.g.

stationary vehicles, street

lights, road signs, etc.

Failure to use proper care when

changing lanes may result in

damage to the vehicle, injury, or

death. Always check the outside

and rearview mirrors, glance over

your shoulder, and use the turn

signal before changing lanes.

Activation

Press 

_

 and activate / deactivate the

system in the Info Display.
When the system is activated and the

engine is switched on, the LEDs in

each exterior mirror come on to

indicate the system's activation.
Info Display 

3

 87.

Driving and operating

169

Functionality

When the system detects a vehicle in

the side blind zone while driving

forwards, an LED will illuminate in the

relevant exterior mirror. If the turn

lights of the relevant side are

activated, the LED will flash.
The LED comes on immediately when

your vehicle is being passed.
The LED comes on after a delay when

your vehicle is passing another

vehicle slowly.

Operation conditions

The following conditions have to be

fulfilled:

● all vehicles moving in the same

direction and in adjacent lanes

● passing a vehicle with a speed

difference of less than 9 mph

● normal traffic flow
● vehicle not pulling a trailer
● sensors not covered by mud, ice,

snow etc.

● LEDs in the door mirrors or the

rear radars not covered with

stickers or other objects

No alert will be given in the following

situations:

● non-moving objects, e.g. parked

vehicles, barriers, street lamps,

road signs

● in very dense traffic, when

moving vehicles might be

confused with a stationary object

● vehicles moving in the opposite

direction

● passing too quickly

The function will not work properly

due to adverse weather conditions

such as heavy rain, damage of the

surface near the radar sensor or

when the sensors are covered with

mud / dirt from the road.

Caution

If the rear bumper or front bumper

is to be repainted or repaired,

contact a workshop. Certain types

of paint could interfere with the

operation of the radars.

Deactivation

Press 

_

 and deactivate the system

in the Info Display.
The system is automatically

deactivated when the vehicle is

electrically connected to a trailer,

bicycle carrier, etc.

Fault

In the event of a fault, 

C

 illuminates

in the Driver Information Centre and a

message is displayed. Seek the

assistance of a workshop.

170

Driving and operating

Panoramic view system

This system allows views of the

vehicle's surroundings to be

displayed as a full 360° picture in the

Info Display, like a bird's eye view.

9

Warning

The panoramic view system does

not replace driver vision. It will not

display children, pedestrians,

cyclists, crossing traffic, animals,

or any other objects outside of the

camera view area, e. g. below the

bumper, or underneath the

vehicle.
Do not drive or park the vehicle

using only the panoramic view

system.
Always check the surrounding of

the vehicle before and during

driving.
Displayed images may be further

or closer than they appear. The

area displayed is limited and

objects that are close to either

edge of the bumper or under the

bumper are not displayed on the

screen.
Depending on the load of the

vehicle, the inclination of the

vehicle may be changed including

the view of the camera.

The system uses:

● rear camera above the rear

number plate

● front camera
● two side cameras in the exterior

mirrors

● ultrasonic parking sensors in the

bumpers

Visualisation on the Info Display

The screen is divided into four areas,

from left to right:

● selectable views: standard,

panoramic front, panoramic rear

● view visualisation
● top view including four selectable

side views (in standard view only)

● settings 

:

The parking sensors complete the

information on the view from above

the vehicle.

Driving and operating

171

Activation

The panoramic view system is

activated by:

● engaging the reverse gear when

the engine is switched on

● manual activation in the Info

Display when the vehicle speed

is below 10 mph

Info Display 

3

 87.

Functionality

Different views can be selected in the

left part of the display. Change the

type of view at any time during a

manoeuvre by selecting a view from

the left side:

● standard view
● panoramic view
● side view

The display is immediately updated

with the type of view selected.
By default, the zoom view is enabled.

This setting can be changed in the

settings of the panoramic view

system in the Info Display.
The state of the system is kept in

memory when the ignition is switched

off.

Standard view

The standard view consists of a rear

view and a front view.
Rear view

The area behind the vehicle is

displayed in the screen. The vertical

lines represent the width of the

vehicle with mirrors unfolded. The

direction of the lines changes with the

steering angle.
The first horizontal line represents a

distance of about 30 cm beyond the

edge of vehicle's rear bumper. The

upper horizontal lines represent

distances of about 1 m and 2 m.
This view is available in auto mode or

can be chosen from the left side of the

screen.

Front view

The area in front the vehicle is

displayed in the screen. The vertical

lines represent the width of the

vehicle with mirrors unfolded. The

direction of the lines changes with the

steering angle.
The first horizontal line represents a

distance of about 30 cm beyond the

edge of vehicle's front bumper. The

upper horizontal lines represent

distances of about 1 m and 2 m.
This view is displayed automatically

or can be chosen from the left side of

the screen.

Panoramic view

The panoramic view facilitates

leaving a parking bay, making it

possible to see the approach of

vehicles, pedestrians and cyclists.

This view is not recommended for

carrying out a complete manoeuvre.

This view can only be selected from

the left side of the screen.

172

Driving and operating

Side view

This view allows to view the

surroundings, e.g. a pavement, a low

wall, the vehicle parked to the next

etc. on the left-hand or right-hand side

of the vehicle.
Select the standard view and touch

the required side of the vehicle. The

selected side is highlighted and the

side view is displayed.

Zoom view

The zoom view cannot be selected. It

is only displayed if the distance

between the vehicle and the obstacle

is less than 60-80 cm.
The zoom provides a view from above

the rear or the front of the vehicle in

its near surroundings.Thus, the

vehicle can be manoeuvred around

obstacles nearby.
The automatic display of the zoom

view can be disabled in the Info

Display:
Press 

_

 below the Info Display and

select Panoramic camera.
Press 

:

.

Activate View Adaptation.

The setting is memorised when the

ignition is switched off.

Settings

The following settings can be

adjusted:

● volume of the audible signal
● brightness
● contrast

Deactivation

Panoramic view system is

deactivated when:

● driving faster than 10 mph in

forward gear

● by pressing the icon X in the left

upper corner of the touch screen

System limitations

Caution

For optimal operation of the

system, it is important to keep the

lenses of all cameras always

clean. For the rear view camera,

there is a washer nozzle which will

be activated when the rear window

washer is operating.
If manually cleaning the lenses of

the cameras, rinse the lenses with

water and wipe with a soft cloth.
Do not clean the lenses with a

steam-jet or high-pressure jet

cleaner.

The panoramic view system may not

operate properly when:

● The surrounding is dark.
● The sun or the beam of

headlights is shining directly into

the camera lenses.

● Weather limits visibility, such as

fog, rain, or snow.

● The camera lenses are blocked

by snow, ice, slush, mud, dirt.

● The vehicle is towing an

electrically connected trailer,

bicycle carrier, etc.

● The vehicle had an accident.

Contact a workshop.

● There are extreme temperature

changes.

Driving and operating

173

Caution

It is very important that any repair

to the panoramic view system is

performed accurately according to

Vauxhall specifications.

Otherwise, the system may not

work properly and there is a risk of

unexpected behaviour and / or

messages from the system.

Rear view camera

The rear view camera assists the

driver when reversing by displaying a

view of the area behind the vehicle. It

allows views of the vehicle's

surroundings to be displayed as a

nearly 180° picture in the Info Display,

like a bird's eye view.

9

Warning

The rear view camera does not

replace driver vision. Note that

objects that are outside the

camera's field of view and the

parking assist sensors, e.g. below

the bumper or underneath the

vehicle, are not displayed.
Do not reverse or park the vehicle

using only the rear view camera.
Always check the surrounding of

the vehicle before and during

driving.

The system uses:

● rear view camera, mounted

above the rear number plate

● ultrasonic parking sensors in the

rear bumper

The screen in the Info Display is

divided into three parts:

● On the right side, there is a view

from above the vehicle.

● The middle part consists of a

contextual view.

● The left side consists of the view

selection as well as the settings

menu.

The parking sensors complete the

information on the view from above

the vehicle.

The area displayed by the rear view

camera is limited. Displayed images

may be further or closer than they

appear.
The system automatically selects the

best view to display according to the

information from the parking sensors.

The state of the system is not kept in

memory when the ignition is switched

off.

Activation

The rear view camera is activated

when the reverse gear is engaged.

Functionality

Different views can be selected in the

left part of the display.
Change the type of view at any time

during a manoeuvre by selecting the

required view from the view selection

in the left part of the Info Display:

174

Driving and operating

● Standard view
● 180° view

The display is immediately updated

with the type of view selected.
Using the camera, the vehicle's close

surroundings are recorded during low

speed manoeuvres. An image from

above the vehicle in its close

surroundings is created in real time

(on the side of the screen), as the

vehicle progresses. This view makes

it easier to align the vehicle when

parking and to perceive nearby

obstacles. It is automatically deleted

if the vehicle remains stationary for

too long.

Standard view

The area behind the vehicle is

displayed in the screen. The vertical

lines represent the width of the

vehicle with mirrors unfolded. The

direction of the lines changes with the

steering angle.
The first horizontal line represents a

distance of about 30 cm beyond the

edge of vehicle's rear bumper. The

upper horizontal lines represent

distances of about 1 m and 2 m.

This view is displayed automatically

or can be chosen from the view

selection.
Trajectory lane of the vehicle is

shown in accordance with the

steering angle.

180° view

The 180° view facilitates reversing

out of a parking bay, making it

possible to see the approach of

vehicles, pedestrians and cyclists.

This view is not recommended for

carrying out a complete manoeuvre.

Zoom view

The rear view camera records the

vehicle's surroundings during the

manoeuvre in order to reconstruct a

view from above the rear or the front

of the vehicle in its near surroundings.

An image from above the vehicle in its

close surroundings is created as the

vehicle progresses. Thus, the vehicle

can be manoeuvred around obstacles

nearby. Zoom view cannot be

manually selected. It is automatically

activated if the distance between the

vehicle and the obstacle is approx.

60-80 cm.

Settings menu

The settings menu allows to adjust

the following settings:

● volume of the audible signal
● brightness
● contrast

Deactivation

The rear view camera is deactivated

when:

● driving faster than 6 mph in a

forward gear

● by pressing the icon X in the left

upper corner of the touch screen

System limitations

Caution

For optimal operation of the

system, it is important to keep the

lense of the camera, which is

located between the number plate

lights, always clean. The rear view

camera can be cleaned by a

washer nozzle which is

automatically activated when the

Driving and operating

175

rear window washer is operating.

To wip away water drops from the

lense, use a soft cloth.
Do not clean the lense with a

steam-jet or high-pressure jet

cleaner.

The rear view camera may not

operate properly when:

● surrounding is dark
● sun or beam of headlights is

shining directly into camera

lenses

● weather limits visibility, such as

fog, rain, or snow

● camera lenses blocked by snow,

ice, slush, mud, dirt. Clean the

lense, rinse with water, and wipe

with a soft cloth

● the tailgate will be opened
● vehicle is electrically connected

to a trailer, bicycle carrier, etc.

● vehicle had a rear end accident
● extreme temperature changes

Rear cross traffic alert

Caution

The driver must monitor the

surroundings before and during

the whole manoeuvre. Drive

slowly and carefully in reverse

gear in case of reduced or no

visibility.
It is possible that warnings are not

given, are given too late or seem

unjustified. Be prepared to react at

any time to avoid an accident.

Notice

If repainting the rear bumper,

consult a qualified workshop since

certain types of paint could interfere

with the operation of the radar units.

Additional to the side blind spot alert

3

 168, rear cross traffic alert warns of

cross traffic from left or right side

when driving rearwards at a speed up

to 6 mph. It warns of approaching

objects such as vehicles, trucks,

pedestrians, cyclists and

motorcycles.

To monitor the area left and right

behind the vehicle, the system uses

two radar sensors located in the rear

bumper on each side of the vehicle.

Activation / deactivation

Press 

_

 and activate / deactivate the

system in the Info Display.
Info Display 

3

 87.

176

Driving and operating

Detection zone

The system detects obstacles moving

at speeds faster than 2 mph and at a

maximum distance of 40 m.

Functionality

If an approaching obstacle is

detected while the vehicle is in

reverse gear, 

q

 or 

r

 flashes in the

Driver Information Centre. In addition,

an audible signal is given when the

vehicle is moving backwards.

System limitations

The system may not operate properly

in the following situations:

● towing trailer
● using a bicyle carrier on a towing

device

● extreme temperature changes
● the rear bumper damaged
● accumulation or projection of

external elements (e.g. mud, ice,

snow), application of stickers.

Fault

In the event of a fault, 

C

 appears in

the Driver Information Centre,

accompanied by a message and a

warning chime. Seek the assistance

of a workshop.

Traffic sign assistant

Speed limit

Using the camera at the top of the

windscreen and the speed limit

information of the vehicle's navigation

system, this system detects and

reads speed limit signs and end of

speed limit signs. Up to two speed

limit signs including supplementary

signs are displayed in the Driver

Information Centre. If several speed

limits are recognised, the vehicle may

analyse and display the valid speed

limit.
When a traffic sign for a certain area,

e.g. city or motorway, is recognised

and the vehicle is fitted with

integrated navigation, the

corresponding speed limit will also be

displayed.
If the system is activated but does not

detect a speed limit sign, the following

sign is displayed:

If a speed limit is detected and the

vehicle exceeds it for the first time by

more than 3 mph, the speed is

displayed and flashes about ten

seconds.
Speed limiter 

3

 152.

Driving and operating

177

Cruise control 

3

 150.

Adaptive cruise control 

3

 154.

Activation

The speed limit function of the traffic

sign assistant is activated via the

Drive Assist.

Press 

_

 below the Info Display and

activate Drive Assist.

Press 

,

 at the steering wheel

successively until the Drive Assist

mode is selected.
The Drive Assist screen is displayed

in the Driver Information Centre.
Info Display 

3

 87.

Deactivation

Press 

,

 successively until the mode

to switch off assistance is selected.

Other traffic signs

The system recognises traffic signs

and displays them in the Driver

Information Centre.

178

Driving and operating

9

Warning

The actual traffic sign always

takes priority over the traffic sign

displayed in the Driver Information

Centre.

If the entry of a lane is forbidden by

the corresponding traffic sign and the

vehicle enters the lane in the wrong

direction, the traffic sign and a

message is displayed in the Driver

Information Centre.

Activation / deactivation

Press 

_

 and activate / deactivate the

system in the Info Display.

System limitations

Traffic sign assistant may not operate

properly when:

● Driving on winding or hilly roads.
● During nighttime driving.
● Driving with snow chains.
● Driving with a trailer.

● The area of the windscreen,

where the front camera is

located, is not clean or affected

by foreign items, e.g. stickers.

● Weather limits visibility, such as

fog, rain, or snow.

● The sun is shining directly into

the camera lens.

● Traffic signs are completely or

partially covered or difficult to

discern.

● Traffic signs are incorrectly

mounted or damaged.

● Traffic signs do not comply with

the Vienna Convention on Road

Signs and Signals.

● The navigation map data is

outdated.

Caution

The system is intended to help the

driver within a defined speed

range to discern certain traffic

signs. Do not ignore traffic signs

which are not displayed by the

system.

The system does not discern any

other than the conventional traffic

signs that might give or end a

speed limit.
Do not let this special feature

tempt you into taking risks when

driving.
Always adapt speed to the road

conditions.
The driver assistance systems do

not relieve the driver from full

responsibility for vehicle

operation.

Lane keep assist

Lane keep assist supports the driver

to avoid unintended leaving of the

lane. The front camera observes road

edges, as well as the lane markings

between which the vehicle is driving.

If the vehicle approaches a road edge

or a lane marking, the steering wheel

is gently turned to position so that the

vehicle turns back into the lane. The

driver will then notice a turning

movement of the steering wheel. Turn

steering wheel in same direction, if

the system does not steer sufficiently.

Driving and operating

179

Turn steering wheel gently into

opposite direction, if lane change is

intended.
When the system steers to correct the

trajectory of the vehicle, 

L

 flashes

yellow in the Driver Information

Centre.
Unintended lane departure is not

assumed by the system when the turn

lights are operated and during few

seconds after turn lights have been

switched off.
If the system detects that the steering

wheel is not held permanently, it

interrupts the correction.
A lane departure warning message in

the Driver Information Centre

accompanied by a warning chime

alerts when the system cannot hold

the vehicle within the lane and

immediate driver´s action is required.

Notice

The system may be switched off if it

detects lanes which are too narrow,

too wide or too curved.

Following preconditions have to be

fulfilled that the system corrects,

otherwise only a warning is given in

the Driver Information Centre:

● vehicle speed must be between

approx. 43 mph and 112 mph

● the driver must hold the steering

wheel

● the turn lights are not activated
● the electronic stability control is

activated and not in operation

● the vehicle is not connected to a

trailer or a bicycle carrier

● normal driving behaviour (system

detects dynamic driving style, i.e.

pressure on the brake or

accelerator pedal)

● roads with good lane markings
● no spare wheel is used
● the vehicle is not driven in a tight

corner

● no system fault is present which

prevents corrections

Activation / deactivation

The system is activated / deactivated

in the vehicle settings 

_

 in the Info

Display.
The system is automatically

reactivated at the next vehicle start.
Info Display 

3

 87.

Fault

In the event of a fault, 

L

 and 

C

appear in the Driver Information

Centre, accompanied by a display

message and a warning chime. Seek

the assistance of a workshop.

System limitations

The system performance may be

affected by:

● a dirty or foggy windscreen or if

the windscreen is affected by

foreign objects, e.g. stickers

● close vehicles ahead
● banked roads
● winding or hilly roads
● road edges
● sudden lighting changes

180

Driving and operating

● adverse environmental

conditions, e.g. heavy rain or

snow

● vehicle modifications, e.g. tyres

Switch off the system if the system is

disturbed by tar marks, shadows,

road cracks, temporary or

construction lane markings, or other

road imperfections.

9

Warning

Always keep your attention on the

road and maintain proper vehicle

position within the lane, otherwise

vehicle damage, injury or death

could occur.
Lane keep assist does not

continuously steer the vehicle.
The system may not keep the

vehicle in the lane or give an alert,

even if a lane marking is detected.
The steering of the lane keep

assist may not be sufficient to

avoid a lane departure.

The system may not detect hands-

off driving due to external

influences like road condition and

surface and weather. The driver

has full responsibility to control the

vehicle and is always required to

keep the hands on the steering

wheel while driving.
Using the system while towing a

trailer or on slippery roads could

cause loss of control of the vehicle

and a crash. Switch the system off.

Advanced lane keep assist

9

Warning

The system assists the driver in

managing the steering,

acceleration and braking within

the limits of the laws of physics

and the capabilities of the vehicle.

Some road infrastructure

elements or vehicles present on

the road may not be properly seen

or may be poorly interpreted by the

camera, which may lead to an

unexpected change in direction, a

lack of steering correction and/or

inappropriate management of the

acceleration or braking.

Advanced lane keep assist is an

enhancement of the lane keep assist

system.

The activated system observes the

lane markings by using the camera

located at the top of the windscreen.

It steers the vehicle inside the

detected lane. The driver will notice a

turning movement of the steering

wheel.

Driving and operating

181

Thus, the current position of the

vehicle within the lane is kept. This

position is not necessarily the centre

of the lane.
In the case that the vehicle is driving

at the outer edge of the lane, the

system corrects the trajectory

smoothly towards the centre of the

currently driven lane when a

determined speed has been

exceeded. Again, the driver will notice

a turning movement of the steering

wheel.
When the vehicle is steered by the

system, 

(

 illuminates green in the

Driver Information Centre.
However, the control of the vehicle

can be taken over at any time by the

driver. Therefore, the driver needs to

apply some additional force when

turning the steering wheel.

If the system detects that the driver is

not holding the wheel firmly enough,

it triggers a series of gradual alerts. If

the interruption takes too long, the

system will be deactivated.

(

 extinguishes in the Driver

Information Centre. The system has

to be reactivated again by the driver.
Advanced lane keep assist operates

only in combination with adaptive

cruise control.
Adaptive cruise control 

3

 154.

Required preconditions

● Adaptive cruise control must be

activated.

● The driver must hold the steering

wheel.

● The turn lights are not activated

except when using with semi-

automated lane change.

● The Electronic Stability Control is

activated and not in operation.

● The vehicle is not connected to a

trailer or a bicycle carrier.

● Normal driving behaviour is

required (system detects

dynamic driving style, i.e.

pressure on the brake or

accelerator pedal).

● Roads with good lane markings

are required.

● No spare wheel is used.
● The vehicle is not driven in a tight

corner.

Activation

Press 

_

 and activate Drive Assist in

the Info Display, if not activated.

182

Driving and operating

Press 

,

 successively until the Drive

Assist mode is selected.
The Drive Assist screen is displayed

in the Driver Information Centre.
Info Display 

3

 87.

Deactivation

Press 

,

 successively until the mode

to switch off assistance is selected.

Pausing / suspending the system

Advanced lane keep assist may be

paused or suspended in the following

situations:

● The Electronic Stability Control is

in operation or it has been

deactivated.

● At least one of the lane markings

is not detected by the system for

several seconds. The system will

be reactivated once the operating

conditions are regained.

● The turn lights are not activated

except when using with semi-

automated lane change.

● Driving outside the lane limits.
● The steering wheel is held too

tight or moved too dynamically.

● The brake pedal or the

accelerator pedal is applied.

● The adaptive cruise control is

paused.

● The road is too narrow or wide.
● The lateral acceleration in curves

is too high.

Fault

In the event of a fault, 

(

 and 

C

illuminate in the Driver Information

Centre, accompanied by a message

and a warning chime. Seek the

assistance of a workshop.

System limitations

The system performance may be

affected by:

● dirty or foggy windscreen or if the

windscreen is affected by foreign

objects, e.g. stickers

● close vehicles ahead
● banked roads
● winding or hilly roads
● road edges
● sudden lighting changes
● adverse environmental

conditions, e.g. heavy rain or

snow

● vehicle modifications, e.g. tyres
● load condition of the vehicle, i.e.,

whether the vehicle heavily or

lightly loaded

Driving and operating

183

A warning message may appear

when the vehicle is travelling in a long

straight lane on a smooth road

surface even if the driver is holding

the steering wheel properly.
Deactivate the system if the system is

disturbed by tar marks, shadows,

road cracks, temporary or

construction lane markings, or other

road imperfections.

9

Warning

Always keep your attention on the

road and maintain proper vehicle

position within the lane, otherwise

vehicle damage, injury or death

could occur.
The system may not keep the

vehicle in the lane or give an alert,

even if a lane marking is detected.
The steering of the advanced lane

keep assist may not be sufficient

to avoid a lane departure.
The system may not detect hands-

off driving due to external

influences (road condition and

surface, weather etc). The driver

has full responsibility to control the

vehicle and is always required to

keep the hands on the steering

wheel while driving.
Using the system while towing a

trailer or on slippery roads could

cause loss of control of the vehicle

and a crash. Switch the system off.

Semi-automated lane

change

Semi-automated lane change assists

the driver when changing lanes. It

uses a camera at the top of the

windscreen, a radar sensor located in

the middle of the front bumper and

four radar sensors located on the left

and right side of the front and rear

bumper.

9

Warning

Only initiate a semi-automated

lane change if the traffic conditions

allow a safe lane change.

Caution

Do not install mechanical anti-theft

devices on the steering wheel.

Operation conditions

The following conditions have to be

fulfilled:

● vehicle speed between 43 mph

and 112mph

● adaptive cruise control activated
● advanced lane keep assist

activated

● Drive Assist activated in the Info

Display

● driving on a road with separate

lanes and prohibited access for

cyclists and pedestrians

● lane markings can be clearly

detected by the system

● traffic situation allows a safe lane

change

184

Driving and operating

Activation

Press 

_

 and activate Drive Assist in

the Info Display, if not activated.

Press 

,

 at the steering wheel

successively until the Drive Assist

mode is selected.
The Drive Assist screen is displayed

in the Driver Information Centre.
Info Display 

3

 87.

To start a semi-automated lane

change manoeuvre, activate the turn

lights of required direction.
The semi-automated lane change

can be interrupted by deactivating the

turn light indicator, firmly holding the

steering wheel or depressing the

brake pedal.

Deactivation

Press 

,

 successively until the mode

to switch off assistance is selected.

Functionality

If the turn light indicator has been set

and the operation conditions are met,

OK? is displayed in the Driver

Information Centre.
Press OK on the steering wheel.
A message is displayed reminding

the driver to be attentive. The vehicle

is now steered to the target lane by

small steering inputs.
Keep your hands at the steering

wheel during the manoeuvre.

Otherwise the system will be

deactivated.
When the vehicle has been

positioned in the target lane, the

system is deactivated.
If the operation conditions are not

met, the lane change manoeuvre is

rejected. In this case, orange lines are

displayed in the drive assist view.

Driving and operating

185

A semi-automated lane change

manoeuvre may be interrupted if the

operating conditions are no longer

met:

● If no wheel has crossed the lane

marking, the system steers the

vehicle back in its original lane.

● If the lane change manoeuvre is

already in progress, the system

prompts the driver to take back

control of the vehicle.

In both situations, a message is

displayed, the system is automatically

deactivated and an audible signal

may be given.

Fault

In the event of a fault, 

C

 appears in

the Driver Information Centre,

accompanied by a message and a

warning chime. Seek the assistance

of a workshop.

System limitations

Caution

If the rear bumper or front bumper

is to be repainted or repaired,

contact a workshop. Certain types

of paint could interfere with the

operation of the radars.

The system may not function in the

following situations:

● the steering wheel is covered or

the driver is wearing thick gloves

● poor visibility caused by

insufficient road lighting,

snowfall, rain, fog etc.

● dazzle (headlamps of an

oncoming vehicle, low sun,

reflections on a wet road surface,

leaving a tunnel, alternating light

and shade)

● windscreen area in front of the

camera damaged or covered by

dirt, stickers or other foreign

objects

● lane markings eroded, partially

hidden (snow, mud) or multiple

(roadworks, surface joints)

● in a tight curve
● on winding roads
● road surface repairs

Never use the system in the following

situations:

● towing or with a bicycle carrier on

a towing device

● adverse weather conditions
● road with low grip (risk of

aquaplaning, snow, ice)

● road works, toll areas and

emergency lanes

● on racing circuits
● on a rolling road
● when a temporary spare wheel is

used

Driver alert

The driver alert system monitors the

driving time and the vigilance of the

driver. Monitoring the vigilance of the

186

Driving and operating

driver is based on the trajectory

variations of the vehicle compared to

the lane markings.
The system cannot replace the need

for vigilance on the part of the driver.

Taking a break is recommended as

soon as feeling tired or at least every

two hours. Do not drive when feeling

tired.

Activation or Deactivation

The system is activated / deactivated

in the Info Display.

Press 

_

 and activate / deactivate the

system in the Info Display .
Info Display 

3

 87.

The system is automatically activated

when ignition is switched on.

Driving time alert

The driver gets notified by a pop-up

reminder symbol 

 in the Driver

Information Centre simultaneously

with an acoustic alert if the driver has

not taken a break after two hours of

driving at a speed above 43 mph. The

alert is repeated hourly until the

vehicle is stopped, no matter how

vehicle speed evolves.
The counting of driving time alert is

reset if one of the following conditions

are met:

● The ignition has been switched

off for a few minutes.

● The driver's seat belt is

unfastened and the door at the

driver's side is opened.

Driver drowsiness detection

The system monitors the driver's level

of vigilance at speeds above 43 mph.

A camera at the top of the windscreen

detects variations in trajectory

compared to the lane markings.

If the trajectory of the vehicle

suggests a certain level of

drowsiness or inattention by the

driver, the system triggers the first

level of alert. The driver is notified by

a message and an audible signal is

given.
After three first level alerts, the

system triggers a new alert with a

message, accompanied by a more

pronounced audible signal.
In certain driving conditions such as

poor road surface or strong winds

etc., the system may give alerts

independent of the driver's level of

vigilance.
The driver drowsiness detection is

reinitialised when the ignition has

been switched off for a few minutes or

the speed remains below 40 mph for

a few minutes.
The system is also reintialised when

the driver's seat belt is unfastened

and the door at the driver's side is

opened.

Driving and operating

187

System limitations

In the following situations, the system

may not operate properly or even not

operate at all:

● poor visibility caused by

inadequate lighting of the

roadway, falling snow, heavy

rain, dense fog etc.

● dazzle caused by headlamps of

oncoming vehicles, low sun,

reflections on damp roads,

leaving a tunnel, alternating

shade and light etc.

● windscreen area in front of the

camera covered by dirt, snow,

stickers etc.

● no lane markings detected or

multiple lane markings due to

roadworks

● close vehicles ahead
● winding roads or narrow roads
● when advanced lane keep assist

is active

Charging

General information

9

Warning

Persons with a pacemaker should

consult a doctor for possible

precautions.

Charging the vehicle's high voltage

battery depends upon several factors:

● high voltage battery of the vehicle
● internal onboard charger (OBC)
● external charging device
● charging cable

The charging cable connects the

vehicle's high voltage battery with an

external charging device providing

electric power. This may be a

domestic electrical outlet, a

Green'Up outlet, a wall box or a public

charging station.
The high voltage battery can be

charged with direct current (DC) only.

When charging from a domestic

electrical outlet, a wall box or an

alternating current (AC) charging

station, AC has to be converted into

DC. This is done by the vehicle's

onboard charger.
PHEV: The onboard charger (single-

phase) is available with 3.7 kW or

7.4 kW.
BEV: The onboard charger (3-phase)

is available with 11 kW.
Propulsion types 

3

 4.

The speed of charging the vehicle's

high voltage battery depends upon

the weakest element of the charging

chain. To achieve the maximum

charging speed, charging cable and

charging device have to be attuned to

each other.

Notice

Make sure that the charging cable

used fits to the vehicle's onboard

charger.

188

Driving and operating

Charging types 

3

 188.

Charging cable 

3

 195.

Electric power consumption and

range

The electric power consumption

(combined under WLTP condition) is

within a range of 15.6 to 14.6 kWh/

100 km.
The all electric range is up to 38 miles

(PHEV) / 261 miles (BEV).
Propulsion types 

3

 4.

For the values specific to your

vehicle, refer to the EEC Certificate of

Conformity provided with your vehicle

or other national registration

documents.
The determination of electric power

consumption is regulated by directive

R (EC) No. 715/2007 and No.

2017/1151 (in the latest applicable

version).

Charging types

There are different types of charging

the vehicle's high voltage battery.

Charging times refer to charging an

empty battery until it is completely

charged.

Charging at wall boxes / AC

charging stations

A wall box / AC charging station may

or may not provide a charging cable

which has to be connected to the

vehicle's charging port.

PHEV: Charging time takes approx.

three hours and 25 minutes with the

3.7 kW onboard charger and 16 A.

For the 7.4 kW onboard charger with

32 A, charging time takes approx. one

hour and 40 minutes.

BEV: Charging time takes approx.

five hours with the 11 kW onboard

charger.
Propulsion types 

3

 4.

Charging at DC charging stations

Up to approx. 80% of battery capacity

may be charged in approx. 30

minutes at a charging power of

100 kW.

Charging at Green'Up outlets

The high voltage battery can be

charged at a Green'Up outlet.

Connect the charging cable to the

vehicle's charging port and to the

Green'Up outlet.
PHEV: Charging time takes approx.

three hours and 55 minutes.

Driving and operating

189

Charging at domestic electrical

outlets

The high voltage battery can be

charged at a domestic electrical

outlet. Connect the charging cable to

the vehicle's charging port and to the

domestic electrical outlet.
PHEV: Charging time takes approx.

seven hours and five minutes.
BEV: Charging time takes approx.

30 hours.
Propulsion types 

3

 4.

Charging cable

Depending on the charging type,

different charging cables are used.

9

Warning

Improper use of portable charging

cables may cause a fire, electrical

shock, or burns, and may result in

damage to property, serious

injury, or death.

● Do not use extension cables,

multi-outlet power strips,

splitters, grounding adaptors,

surge protectors, or similar

devices.

● Do not use an electrical socket

that is worn or damaged, or one

that will not hold the plug firmly

in place.

● Do not immerse the charging

cable into any liquid.

● Do not use an electrical socket

that is not properly grounded.

● Do not use an electrical socket

that is on a circuit with other

electrical loads.

9

Warning

Read all the safety warnings and

instructions before using this

product. Failure to follow the

warnings and the instructions may

result in electric shock, fire, and /

or serious injury.
Never leave children unattended

near the vehicle while the vehicle

is charging and never allow

children to play with the charging

cable.
If the plug provided does not fit the

electrical outlet, do not modify the

plug. Arrange for a qualified

electrician to inspect the electrical

outlet.
Do not put fingers into the electric

vehicle connector.

190

Driving and operating

9

Danger

There is a risk of electric shock

that may cause personal injury or

death.
Do not use the charging cable if

any part of the charging cable is

damaged.
Do not open or remove the

charging cable cover.
Service by qualified personnel

only. Connect the charging cable

to a properly grounded outlet with

cables that are not damaged.

Basic domestic cable (mode 2) /

enhanced domestic cable (mode

2)

1. Vehicle plug
2. Status indicators
3. Wall plug

Basic domestic cables (mode 2) are

used for charging at domestic

electrical outlets. A basic domestic

cable (mode 2) consists of a vehicle

plug, a control box and a plug for the

domestic electrical outlet. The control

box has an intergrated charge

controller and several LEDs

indicating the charging status.

Enhanced domestic cables (mode 2)

are similar to basic domestic cables

(mode 2). However, the charging

performance of enhanced domestic

cables (mode 2 charging) is better

than the charging performance of

basic domestic cables (mode 2).

Enhanced domestic cables (mode 2)

are used at Green'Up sockets which

have to be installed by a certified

electrician at the customer's site.

Charging cable status indicators

After plugging in the charging cable,

it will perform a quick self test and all

status indicators illuminate for a

moment. For the functions of the

status indicators, refer to the manual

of the charging cable manufacturer.

Important information about

portable electric vehicle charging

● Charging an electric vehicle can

stress a building's electrical

system more than a typical

household appliance.

● Before you plug in to any

electrical outlet, have a qualified

electrician inspect and verify the

Driving and operating

191

electrical system (electrical

outlet, wiring, junctions and

protection devices) for heavy-

duty service at a 10 A continuous

load.

● Electrical outlets may wear out

with normal usage or be

damaged over time, making them

unsuitable for electric vehicle

charging.

● Check the electrical outlet / plug

while charging and discontinue

use if the electrical outlet / plug is

hot, then have the electrical

outlet serviced by a qualified

electrician.

● When outdoors, plug into an

electrical outlet that is weather-

proof while in use.

● Mount the charging cable to

reduce strain on the electrical

outlet / plug.

Mode 3 charging cable

1. Vehicle plug
2. Plug for wall box / AC charging

station

Mode 3 charging cables are used for

charging at wall boxes and AC

charging stations. A mode 3 charging

cable provides a vehicle plug and a

plug for the wall box / AC charging

station. Wall boxes / AC charging

stations may provide an integrated

mode 3 charging cable. For more

information on the mode 3 charging

cable, refer to the manual of the

charging cable manufacturer.

Mode 4 charging cable

Notice

Only use DC charging cables shorter

than 30 metres.

Mode 4 charging cables are used for

DC charging. Since mode 4 charging

cables are integrated within DC

charging stations, they only provide a

vehicle plug.

Charging

9

Warning

Persons with a pacemaker or

similar devices should consult a

doctor for possible precautions.
If in doubt, during charging do not

remain inside or near the vehicle,

near the charging cable or the

charging unit.

In order to ensure the compatibility of

plug and outlet, a label is used. The

label is located on the inside of the

vehicle's charging port flap. Make

sure to connect only a cable of the

same type.

192

Driving and operating

Type 2 plug or outlet used for AC

charging

FF plug or outlet used for DC charging

9

Warning

Avoid any entry of fluids into the

charging port of the vehicle, the

vehicle plug of the charging cable

and the domestic electrical outlet.

When charging at a public AC

charging station / public DC charging

station, follow the instructions for the

use of the respective charging

station. Public AC charging stations

may not provide an integrated

charging cable. In this case, a

portable mode 3 charging cable is

required.

9

Warning

When charging at a domestic

electrical outlet, only use an outlet

which is properly grounded and

protected by a 30 mA differential

switch.
Only use a domestic electrical

outlet protected by a circuit

breaker adapted to the amperage

of the electrical circuit.
Have a qualified electrician check

the electrical installation to be

used. The installation has to be in

compliance with national

standards and compatible with the

vehicle.
When using a dedicated domestic

electrical outlet, have it installed

by a qualified electrician.

Make sure that the electrical

outlet, the plug and the cable do

not support the weight of the

control box.

9

Warning

The engine does not start if the

charging cable is connected to the

vehicle. A warning is displayed in

the Driver Information Centre.
During the charging process,

unlocking the vehicle will interrupt

charging. If no action is taken on

tailgate, the doors or the charging

nozzle, the vehicle will lock again

after 30 seconds and charging will

resume automatically.
Do not work in the engine

compartment. Some areas remain

very hot, even an hour after

charging and the fan may start at

any time.

Driving and operating

193

9

Warning

Make sure that the charging port

flap is closed.
Do not leave the charging cable

connected to the domestic

electrical outlet.

1. Shift into P and switch off the

vehicle.

2. Push the charging port flap to

release it.

3. If necessary, take the charging

cable out of the load

compartment.

4. If necessary, plug in the plug of

the charging cable into the

corresponding port of the external

power source.
Charging cable 

3

 195.

5. If necessary, remove the

protective cover from the vehicle

plug of the charging cable.

6. Plug in the vehicle plug of the

charging cable into the charging

port of the vehicle.
Charging status 

3

 194.

The start of charging is indicated by

the green flashing of the status

indicator at the charging port and at

the control box of the charging cable

if available.

194

Driving and operating

Once charging, the vehicle plug will

be locked to the charging port and

cannot be disconnected while

charging is active. 

-

 indicator

illuminates.
Charging types 

3

 188

Cancelling the charging process

Notice

At public charging stations, the

cancelling and subsequent

resuming of the charging process

may cause additional costs.
Once the charging process has

started, only the driver's door can be

unlocked without cancelling the

charging process. Therefore,

activate the driver's door only

function in the vehicle

personalisation.

Press 

<

 on the remote control to

cancel the charging process at any

time.
Press 

<

 twice to cancel the charging

process at any time if the function

driver's door only is activated in the

vehicle personalisation.
Central locking system 

3

 10.

Vehicle personalisation 

3

 91.

Stop charging

The high voltage battery is fully

charged if the status indicator on the

charging port permanently illuminates

green.

1. Unlock the vehicle before

removing the vehicle plug from

the charging port.
If the vehicle is already unlocked,

lock the vehicle and unlock it

again.

2. Disconnect the vehicle plug of the

charging cable from the charging

port within 30 seconds after

unlocking.

3. Close the charging port flap by

pressing firmly in the centre to

latch properly.

4. Disconnect the charging cable

from the external power source.

5. If necessary, store the charging

cable in the load compartment.

While the charging cable is plugged

into the vehicle, the vehicle cannot be

driven.

Programmable charging

By default, charging starts as soon as

the charging cable is connected to the

charging port of the vehicle. It is also

possible to schedule charging using

the Info Display.
Programmable charging is only

possible when charging at a domestic

electrical outlet / Green'Up socket or

a wall box.
Programmable charging is also

available via the MyVauxhall App.

Driving and operating

195

Notice

On vehicles without integrated

navigation system, programmable

charging can only be used via the

MyVauxhall App.

1. Press 

?

.

2. Touch 

a

.

3. Select Charging.
4. Touch 

b

.

5. Define the number of hours and

minutes after which the charging

process starts.

6. Touch OK.
7. Plug in the vehicle.

8. Within one minute, press 

b

 to

activate programmable charging.

9. Depending on version, lock the

vehicle.

The status indicator illuminates blue

indicating that programmable

charging is active.
Charging 

3

 191.

Charging status 

3

 195.

Charging status

If the vehicle is plugged in and the

ignition is switched off, the charging

status indicator indicates the

following:

● Illuminates white: welcome

lighting when charging port flap is

opened

● Illuminates green: charging

complete

● Flashes green: charging in

process

● Illuminates blue: programmable

charging active

● Illuminates red: malfunction

196

Driving and operating

A malfunction may be caused by the

vehicle or the electrical installation at

the customer's site.
Further charging status indicators are

located on the control box of the basic

domestic cable (mode 2) / enhanced

domestic cable (mode 2).
Charging cable 

3

 189.

Programmable charging 

3

 194.

Fuel

Fuel for petrol engines

Only use unleaded fuel that complies

with European standard EN 228 or

E DIN 51626-1 or equivalent.
The engine is capable of running with

fuel that contains up to 10% ethanol

(e.g. named E10).
Use fuel with the recommended

octane rating. A lower octane rating

can reduce engine power and torque

and slightly increases fuel

consumption.

Notice

The only petrol additives authorised

for use are those that meet the

B715001 standard.

Caution

Do not use fuel or fuel additives

that contain metallic compounds

such as manganese-based

additives. This may cause engine

damage.

Caution

Use of fuel with a lower octane

rating than the lowest possible

rating could lead to uncontrolled

combustion and engine damage.

The engine specific requirements

regarding octane rating are given in

the engine data overview 

3

 248. A

country-specific label at the fuel filler

flap can supersede the requirement.

In certain countries, the use of a

particular fuel, e.g. a specific octane

rating, may be required to ensure

proper engine operation.

Driving and operating

197

Fuel for diesel engines

The Diesel engines are compatible

with bio-fuels that conform to current

and future European standards and

and can be obtained from filling

stations:

Diesel fuel that meets standard

EN590 mixed with a biofuel that

meets standard EN14214 (possibly

containing up to 7% Fatty Acid Methyl

Ester).

Diesel fuel that meets standard

EN16734 mixed with a biofuel that

meets standard EN14214 (possibly

containing up to 10% Fatty Acid

Methyl Ester).

Paraffinic Diesel fuel that meets

standard EN15940 mixed with a

biofuel that meets standard

EN14214 (possibly containing up to

7% Fatty Acid Methyl Ester).

The use of B20 or B30 fuel meeting

standard EN16709 is possible in your

Diesel engines. However, this use,

even occasional, requires strict

application of the special servicing

conditions referred to as "Arduous

conditions".
For more information, contact a

workshop.

Caution

The use of any other type of (bio)

fuel (vegetable or animal oils, pure

or diluted, domestic fuel etc.) is

strictly prohibited (risk of damage

to the engine and fuel system).

Notice

The only Diesel additives authorised

for use are those that meet the

B715000 standard.

Low temperature operation

At temperatures below 0 °C, some

diesel products with biodiesel blends

may clog, freeze or gel, which may

affect the fuel supply system. Starting

and engine operation may not work

properly. At ambient temperatures

below 0 °C, use winter grade diesel

fuel.


Content      ..     4      5      6      7     ..