MCRP 3-028 Marine Corps Martial Arts Program (MCMAP, 2011) - page 3

5-14
MCRP 3-02B
Section IV
Major Outside Reap Throw
This technique is used to bring your aggressor to the ground from an extremely close range when
tied up in a clinch using the outside reap throw, both pushing and pulling.
Refer to appendix A for corresponding safeties 1, 2, 3, 6, 10, 11, 12, 13, and 15.
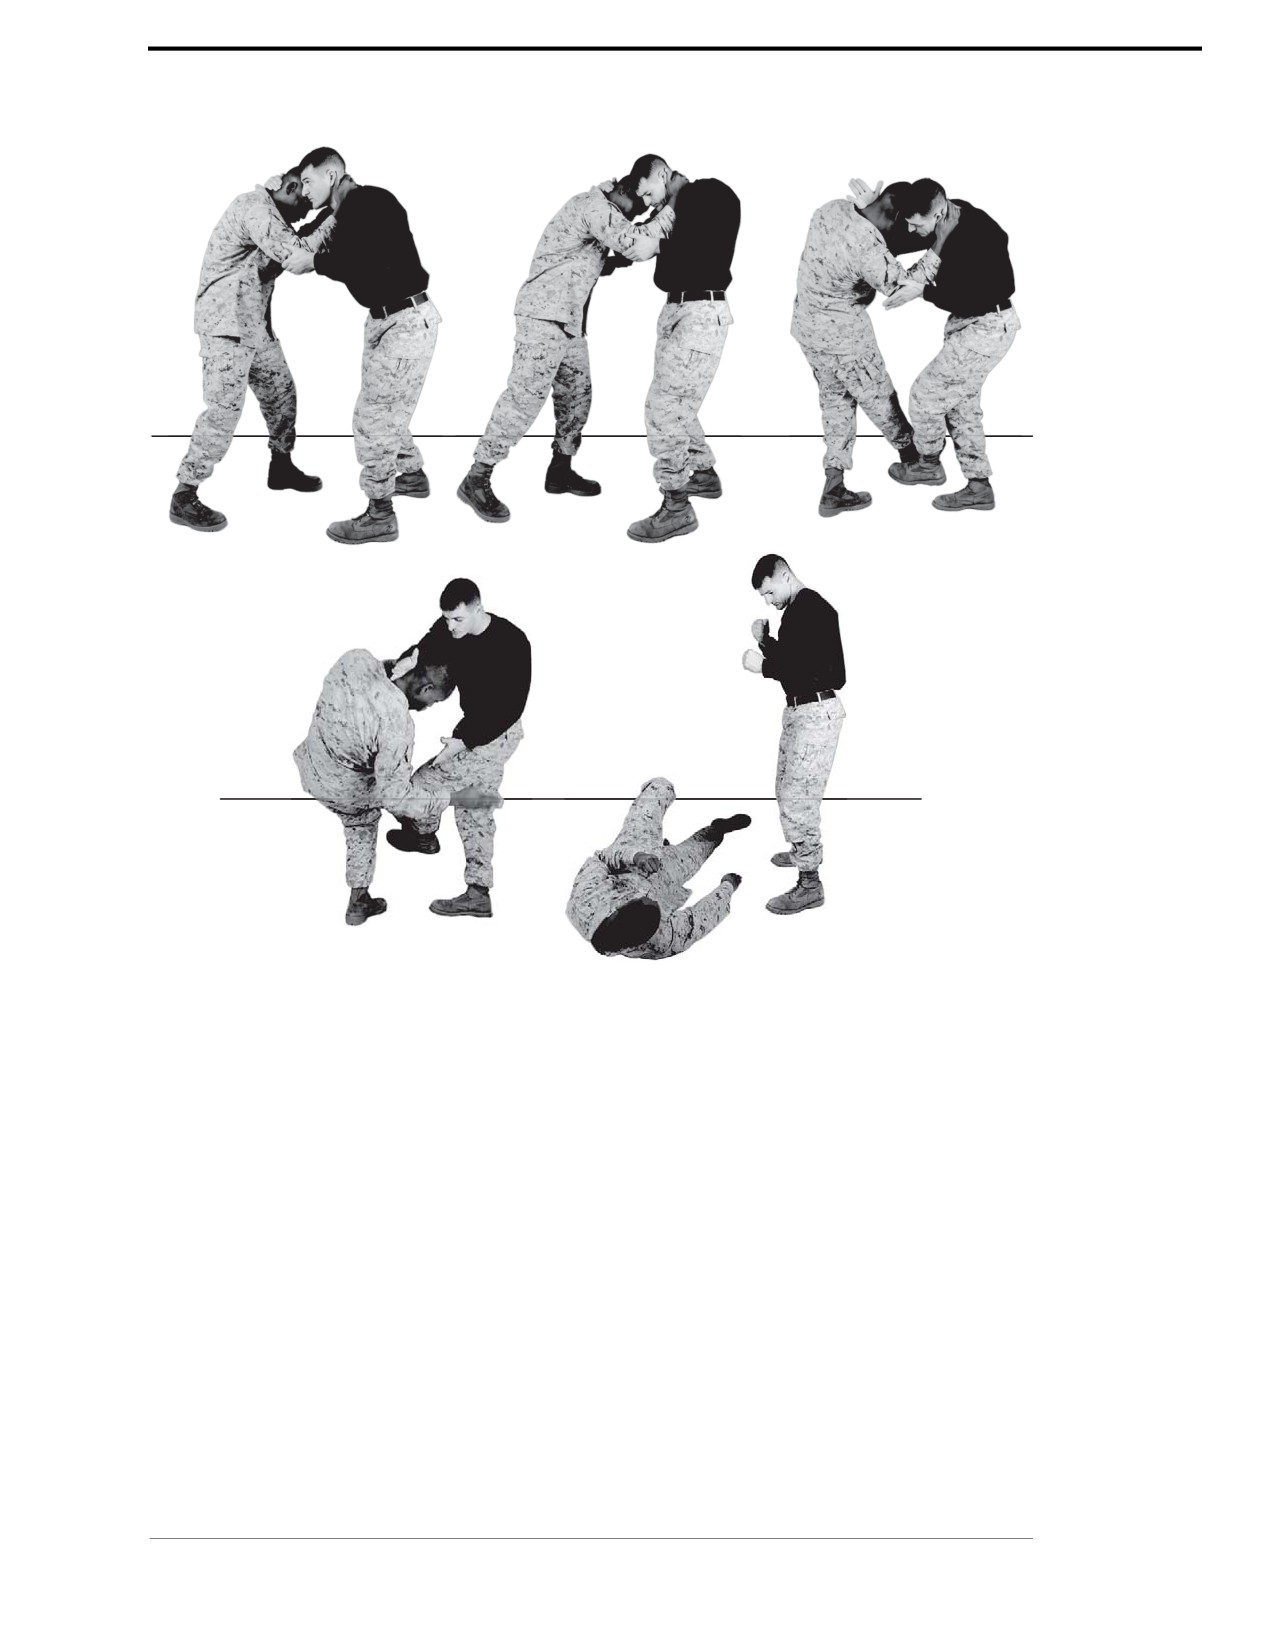
Major Outside Reap Throw: Aggressor Pushing
A major outside reap throw can be used to take the aggressor to the deck while you remain
standing. It is particularly effective if the aggressor is already off balance, pushing you and
defending against the leg sweep.
Technique
~ From the clinch, (right hand behind the aggressor’s neck and left hand on aggressor’s
right triceps), off balance the aggressor by pulling his right arm in and downward with your
left hand.
~ With your right hand on the left side of his neck or head, push down and to your left in an
arcing movement.
~ While off balancing the aggressor, just before weight is transferred back on to the
aggressor’s right foot, sweep his right leg across his body with the inside of your left foot.
See figure 5-12.
CAUTION
For safety during training, make sure that you do not strike directly on
your aggressor’s ankle with the inside of your boot.
For Official Use Only
Chapter 5: Brown Belt
Marine Corps Martial Arts Program
5-15
Figure 5-12. Major Outside Reap Throw: Aggressor Pushing.
Chapter 5: Brown Belt
For Official Use Only

5-16
MCRP 3-02B
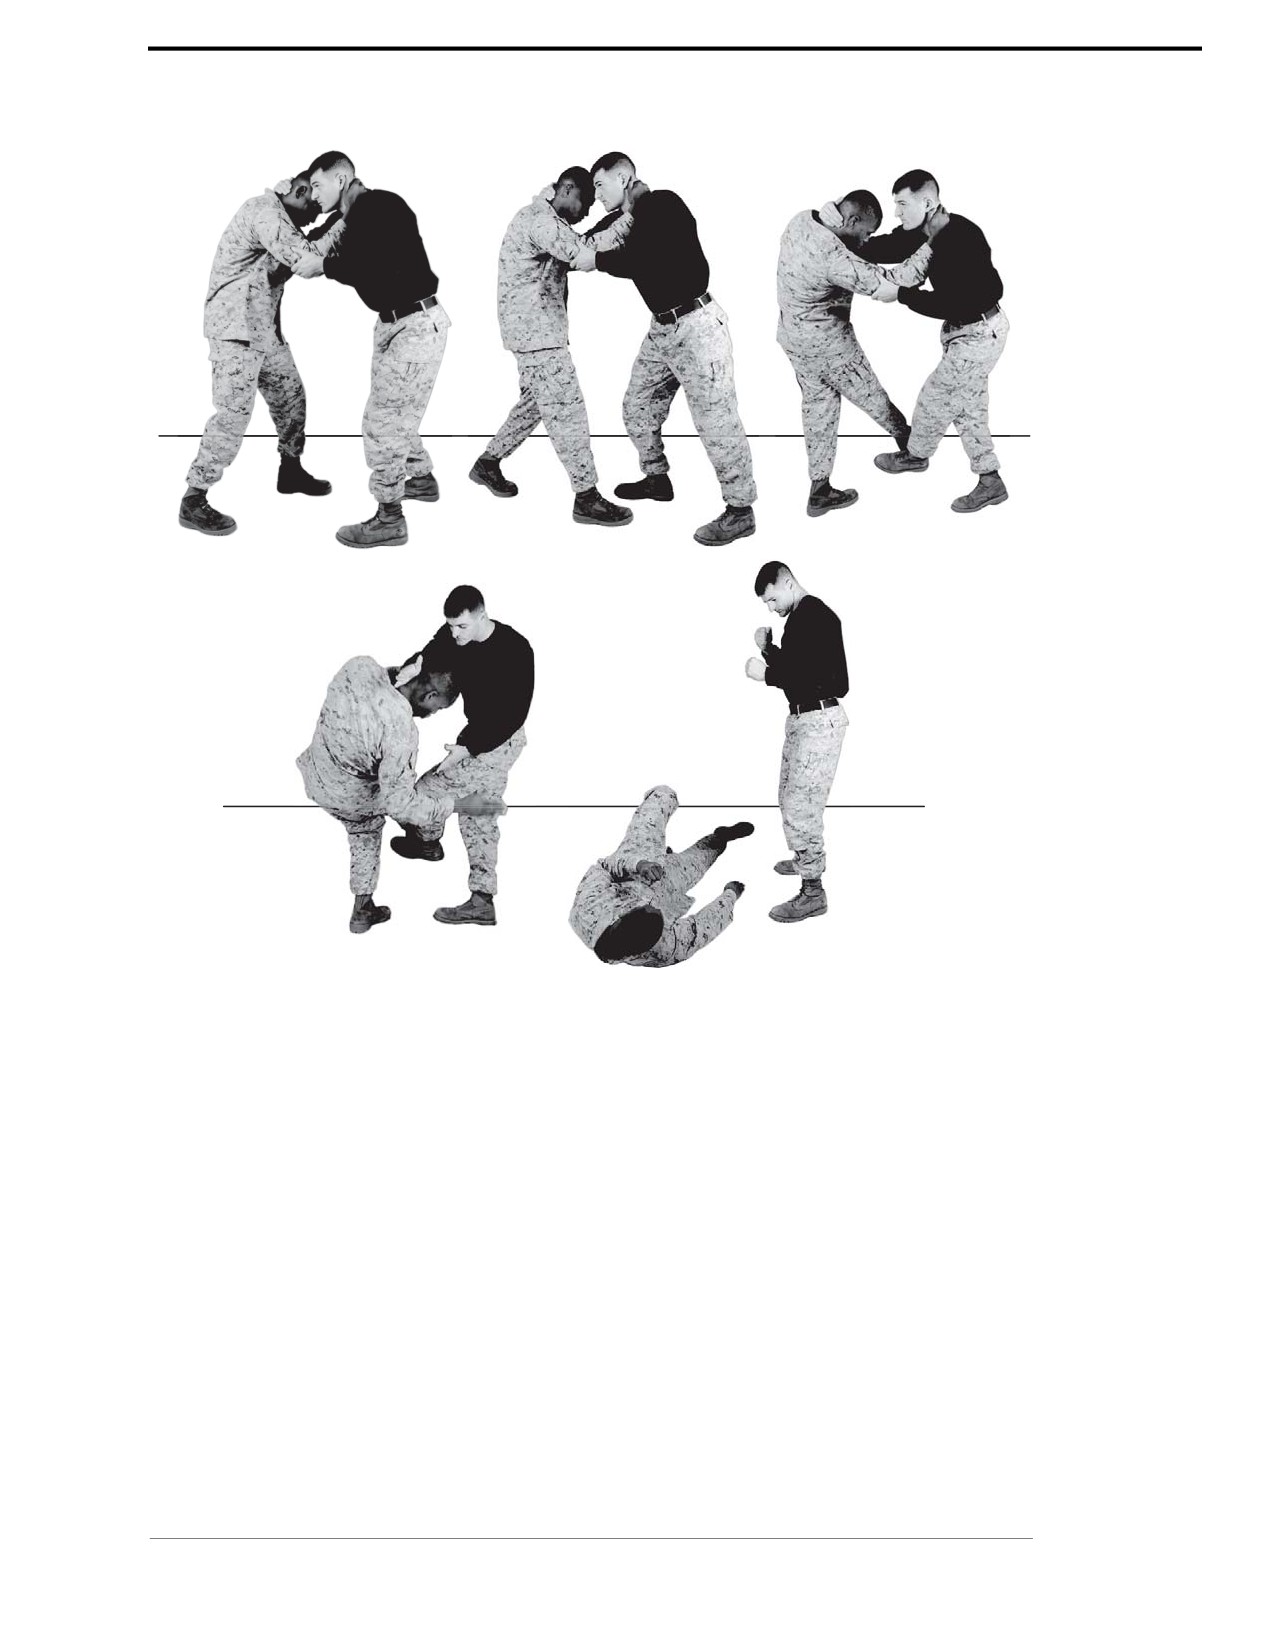
Major Outside Reap Throw: Aggressor Pulling
A major outside reap can be used to take the aggressor to the deck while you remain standing. It
is particularly effective if the aggressor is already off balance, pulling you and defending against
the leg sweep.
Technique
~ From the clinch (right hand behind the aggressor’s neck and left hand on the aggressor’s
right triceps) off balance the aggressor by pulling his right arm in and downward with your
left hand.
~ With your right hand on the left side of the aggressor’s neck or head, push down and to your
left in an arcing movement.
~ While off balancing the aggressor, just before weight is transferred off of the aggressor’s right
foot, sweep his right leg across his body with the inside of your left foot.
See figure 5-13.
CAUTION
For safety during training, make sure that you do not strike directly on
your aggressor’s ankle with the inside of your boot.
For Official Use Only
Chapter 5: Brown Belt
Marine Corps Martial Arts Program
5-17
Figure 5-13. Major Outside Reap Throw: Aggressor Pulling.
Chapter 5: Brown Belt
For Official Use Only

5-18
MCRP 3-02B
Section V
Unarmed Verses Handheld
The purpose of unarmed versus handheld is to be able to disarm the aggressor without the
aid of a weapon using hollowing out and follow-on techniques, reverse armbar counter, or bent
armbar counter.
In any engagement against a knife, a stick, or some other weapon of opportunity, you must estab-
lish and retain a mindset to go on the offensive rather than be on the defensive. Your survival
depends on it.
A counter is used to control the situation, in order to regain the tactical advantage and end the
fight. Regardless of the type of weapon or angle of attack, the following actions apply to coun-
tering the attack with a handheld weapon.
• The first action in a counter is to move out of the line of attack. Movement is executed in a
45-degree angle forward to the left or right.
• The second action is to block the attack.
Note: The first and second actions are taken simultaneously.
• The third action is to control the weapon by controlling the aggressor’s hand or arm, which-
ever is holding the weapon. Never attempt to grab the aggressor’s weapon.
• The fourth action is to execute appropriate follow ups to end the fight such as strikes, joint
manipulations, throws, or takedowns. You should continue your assault on the aggressor until
you end the fight.
Refer to appendix A for corresponding safeties 1, 2 6, 10, and 13.
Hollowing Out with Follow-on Technique
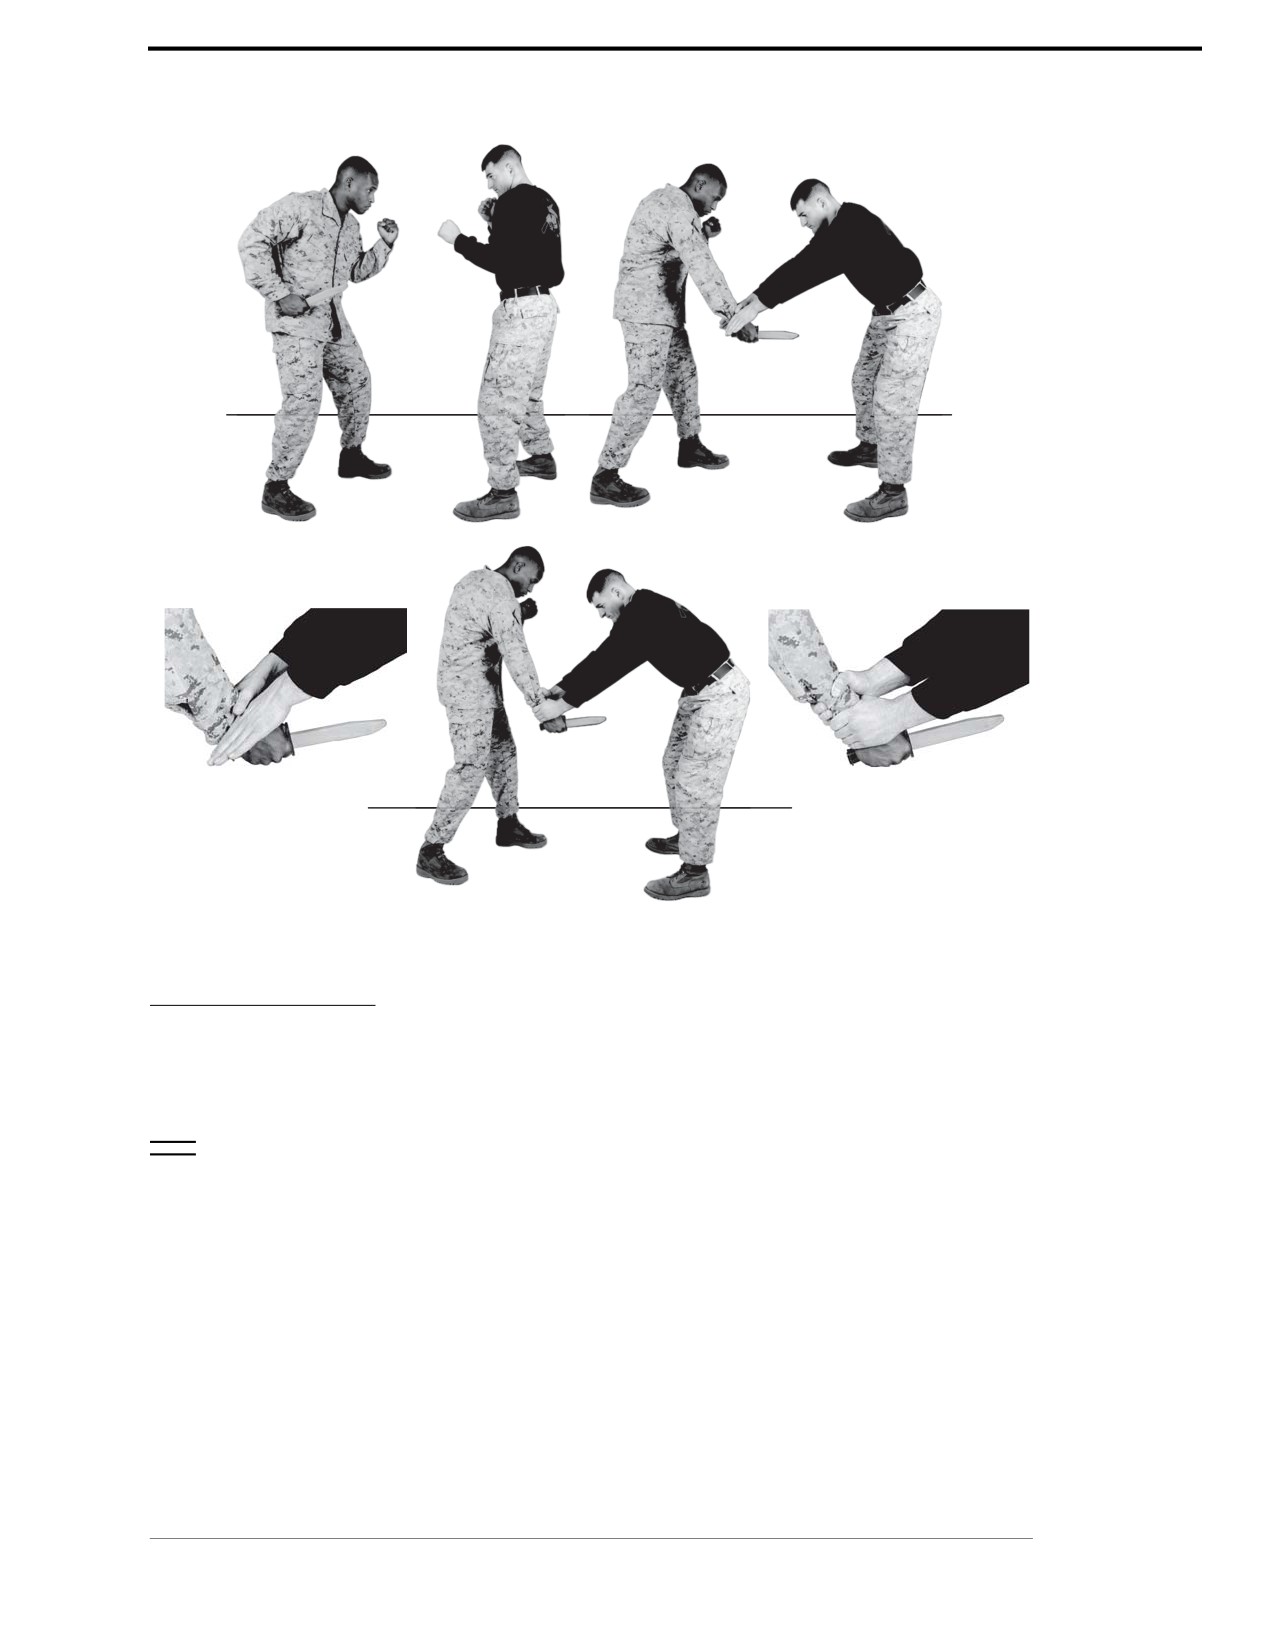
Hollowing out allows you to move away from an aggressor’s attack in order to create space for
follow-on strikes.
Technique
~ Start from the basic warrior stance, facing the aggressor who attacks with a straight thrust.
~ Bend at the waist moving your hips backwards and jumping backwards with both feet moving
away from the attack. This action is known as hollowing out.
~ Hollow out and block the attack with your elbows slightly bent and hands together on top of
the attacking arm.
~ Your hands should be palm down and slightly overlapped so that one thumb is on top of the
other hand’s index finger; the other thumb should be under the other hand’s index finger in an
inverted V.
~ Maintain control of the aggressor’s attacking arm by firmly grasping his wrist.
~ Follow-on techniques, such as strikes and joint-locks, are used to control the weapon,
subdue the aggressor, and remove the weapon.
See figure 5-14.
For Official Use Only
Chapter 5: Brown Belt
Marine Corps Martial Arts Program
5-19
Figure 5-14. Hollowing out with Follow-on Technique.
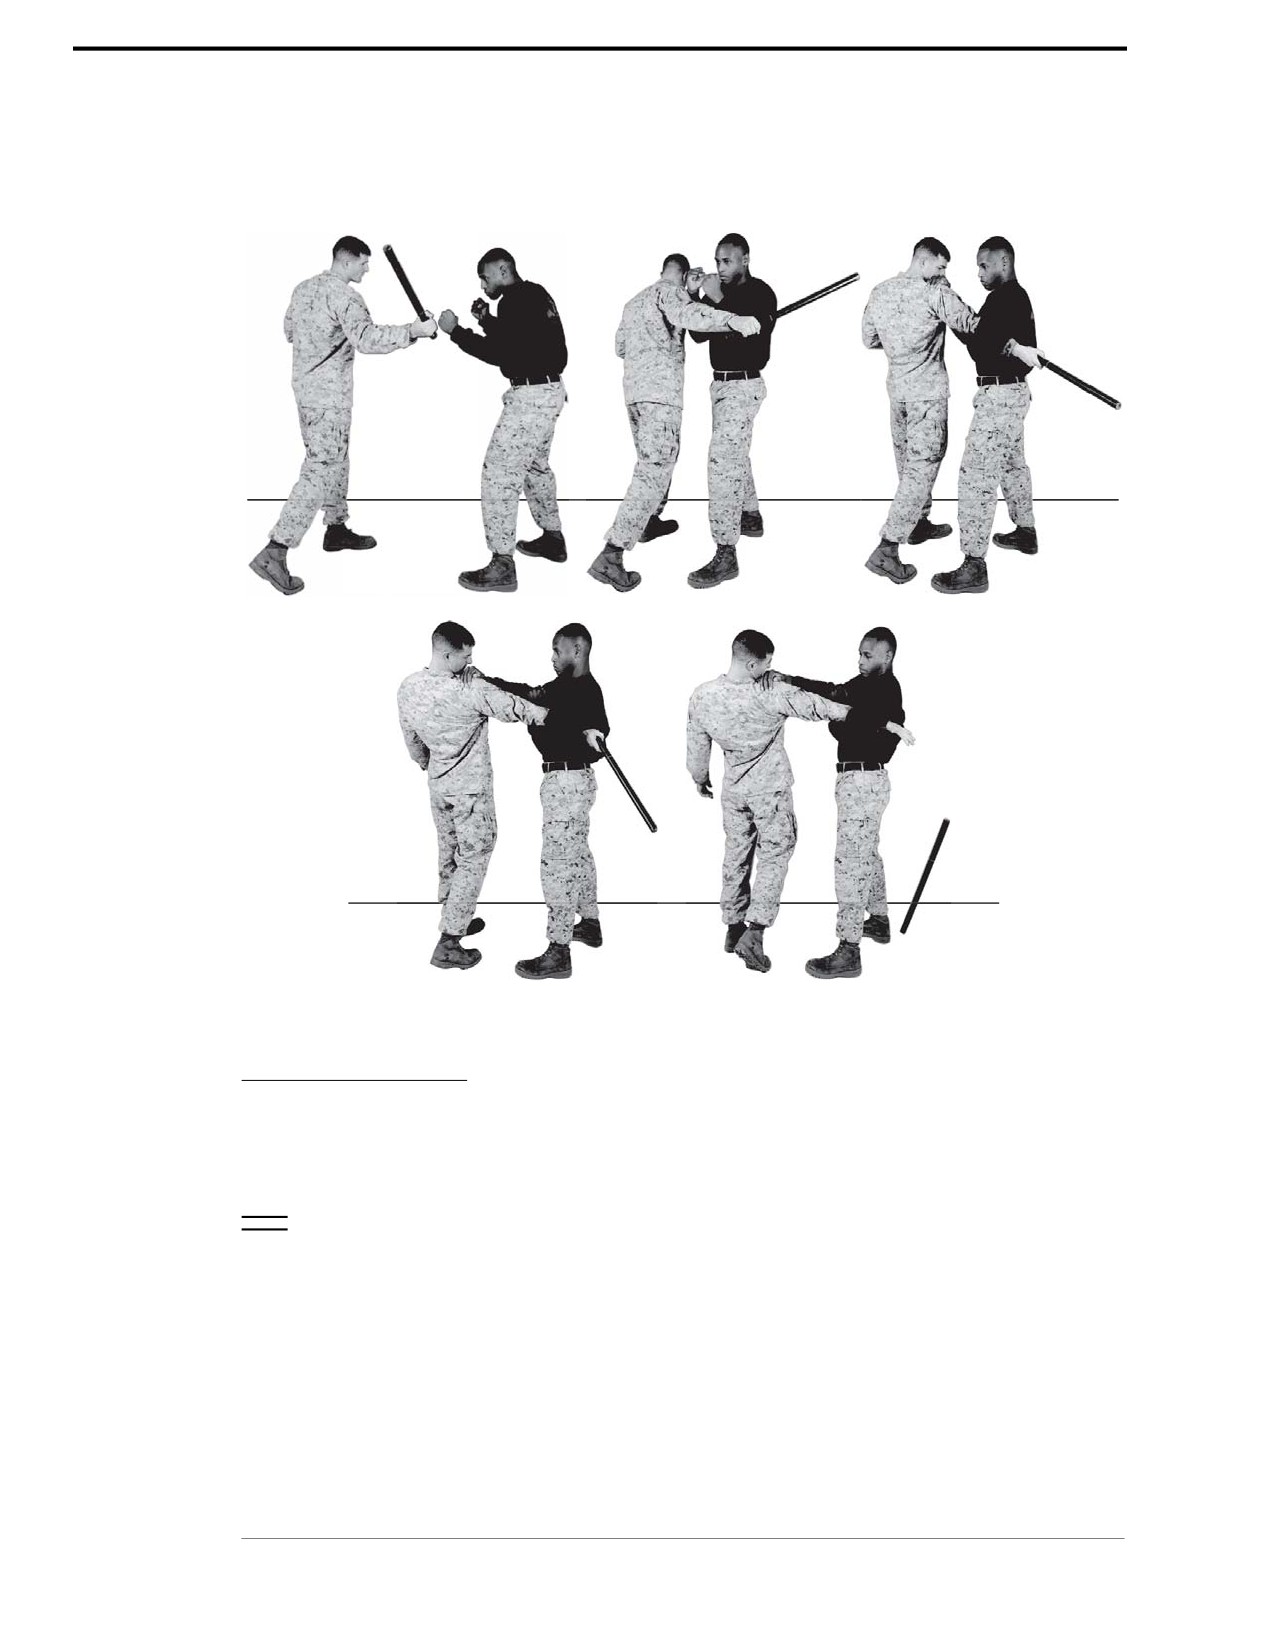
Forward Armbar Counter
The forward armbar counter is effective against an opponent that is excuting a forward strike.
Technique
~ Face the aggressor in the basic warrior stance. The aggressor attacks with a forward strike
coming in anywhere from a 45-degree angle of attack to parallel to the deck.
~ Move forward-left, inside the arc of the aggressor’s attack.
~ Block the attack with both arms bent so that the outside of your forearms makes two points of
contact with the aggressor’s biceps and forearm.
~ Immediately after making two points of contact, over hook or wrap your left arm over the
aggressor’s arm, trapping his attacking arm between your bicep and your torso by pulling
your elbow in. His forearm should be under your armpit with your left forearm making
pressure on the aggressor’s right elbow.
~ Place your right hand on the aggressor’s shoulder or upper arm and your left palm on your
right wrist to further control his arm and to effect an armbar with your left forearm exerting
pressure on his right elbow.
Chapter 5: Brown Belt
For Official Use Only
5-20
MCRP 3-02B
~ Follow-on techniques, such as strikes and joint-locks, are used to control the weapon,
subdue the aggressor, and remove the weapon.
See figure 5-15.
Figure 5-15. Forward Armbar Counter.
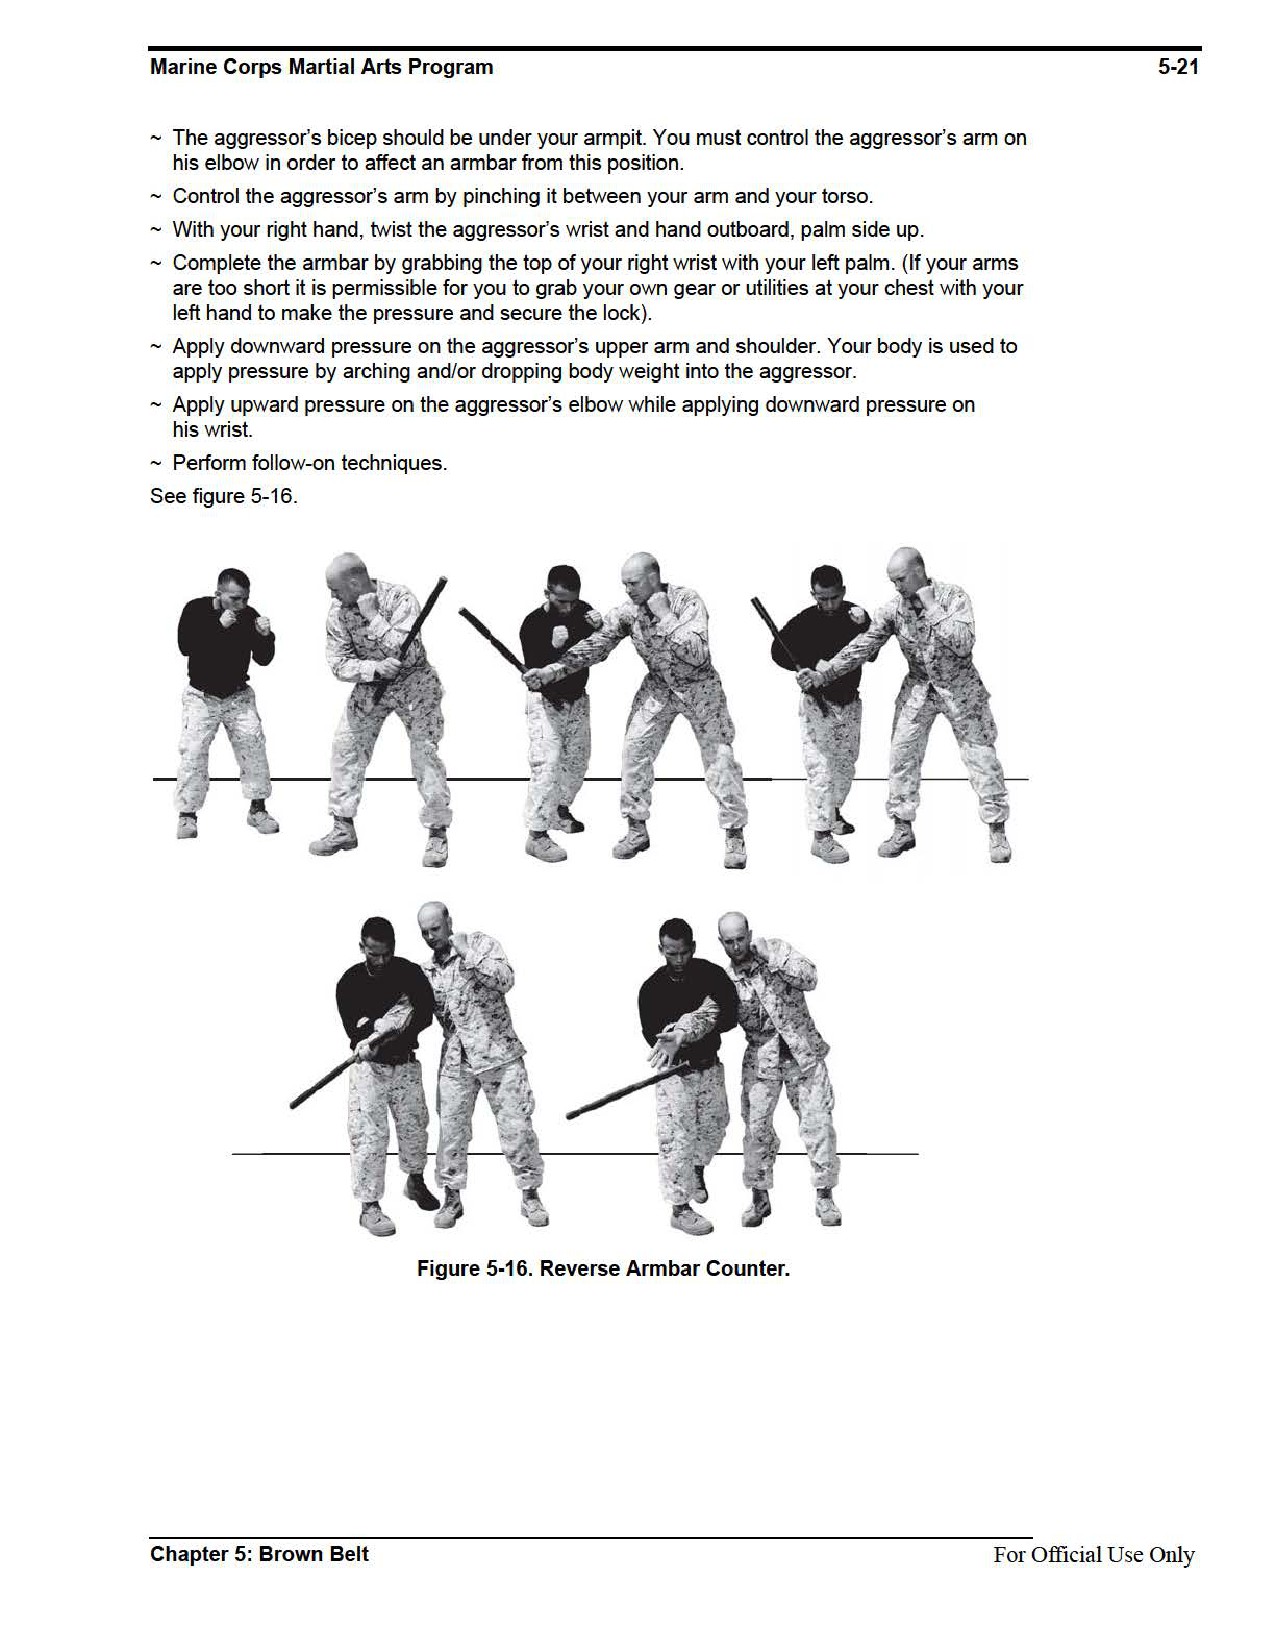
Reverse Armbar Counter
The reverse armbar counter is effective aginst an opponent excuting a reverse strike.
Technique
~ Face the aggressor in the basic warrior stance. The aggressor attacks with a reverse strike
coming in anywhere from a 45-degree angle of attack to parallel to the ground.
~ Move forward-right, outside the arc of the aggressor’s attack.
~ Block the attack with both arms bent so that your forearms make two points of contact with
the aggressor’s biceps and forearm.
~ While maintaining control of the aggressor’s wrist with your right hand, pivot to your right so
that your back is against the aggressor’s right side. Immediately over hook the aggressor’s
right arm with your left and wrap your arm tightly around his arm, trapping his attacking arm
between your biceps and your torso.
For Official Use Only
Chapter 5: Brown Belt

5-22
MCRP 3-02B
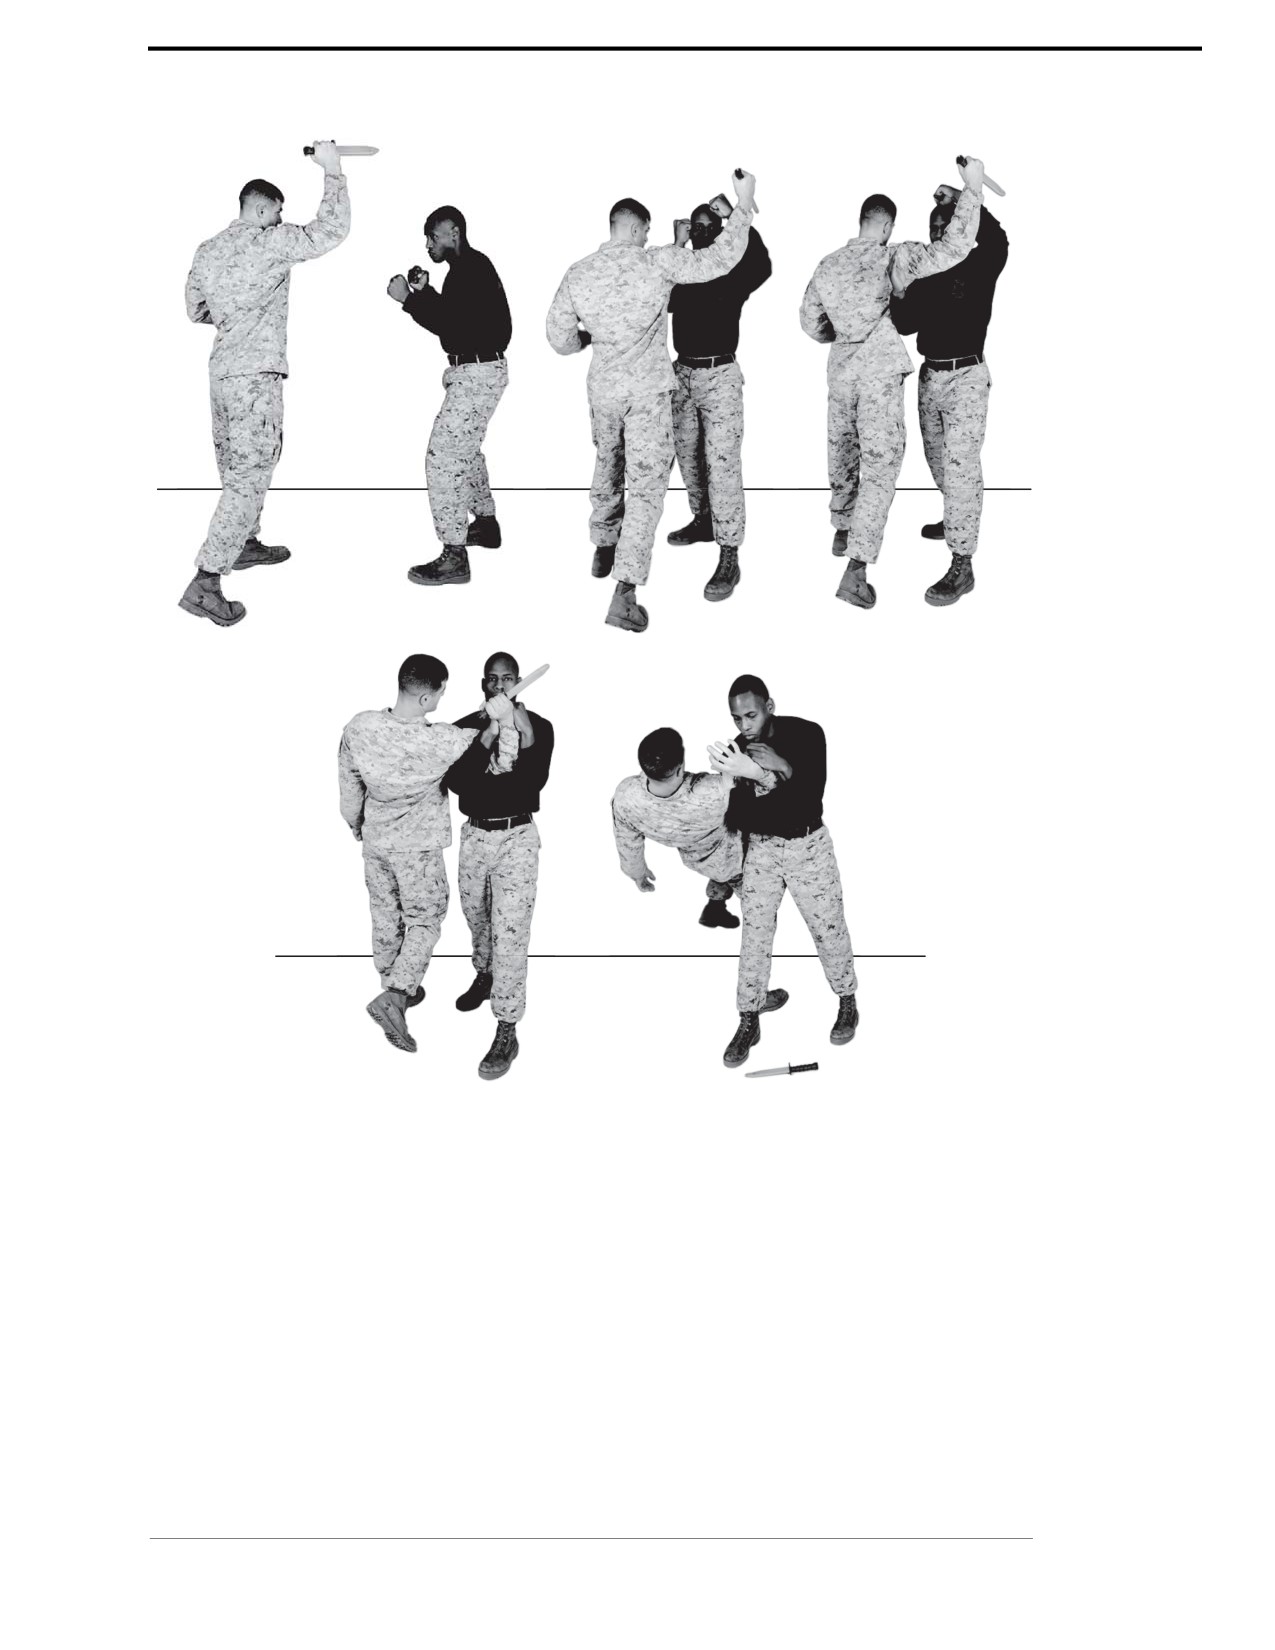
Bent Armbar Counter
The bent armbar counter is particularly effective against a vertical attack.
Technique
~ Face the aggressor in a basic warrior stance. The aggressor attacks you with a vertical strike.
~ Move forward-left to the inside of the aggressor’s attacking arm.
~ Block the attack with both arms bent so that your forearms make contact with the aggressor’s
biceps and forearm.
~ With your left hand, grab the aggressor’s right wrist. At the same time, slide your right arm
underneath his triceps and hook his forearm or wrist with your right hand, hand over hand,
bringing your elbows close together.
~ Apply pressure forward and down with your hands against the aggressor’s forearm to off
balance him. Keep the aggressor’s arm bent and elbow in close to your body to maintain
leverage. This action can dislocate or damage the aggressor’s shoulder.
~ To take the aggressor to the ground, step past him with your right foot, while keeping the
aggressor’s arm tight into your body, execute the leg sweep.
See figure 5-17.
For Official Use Only
Chapter 5: Brown Belt
Marine Corps Martial Arts Program
5-23
Figure 5-17. Bent Armbar Counter.
Chapter 5: Brown Belt
For Official Use Only
5-24
MCRP 3-02B
Section VI
Firearm Retention
Firearm retention techniques are designed to provide Marines with the skills necessary to main-
tain positive control of their weapons and, if necessary, restrain aggressors that are attempting to
disarm them. This can be accomplished by executing the blocking technique, armbar technique,
wristlock technique, or same side grabs.
Refer to appendix A for corresponding safeties 1, 2, 6, 8, 9, 10, and 13.
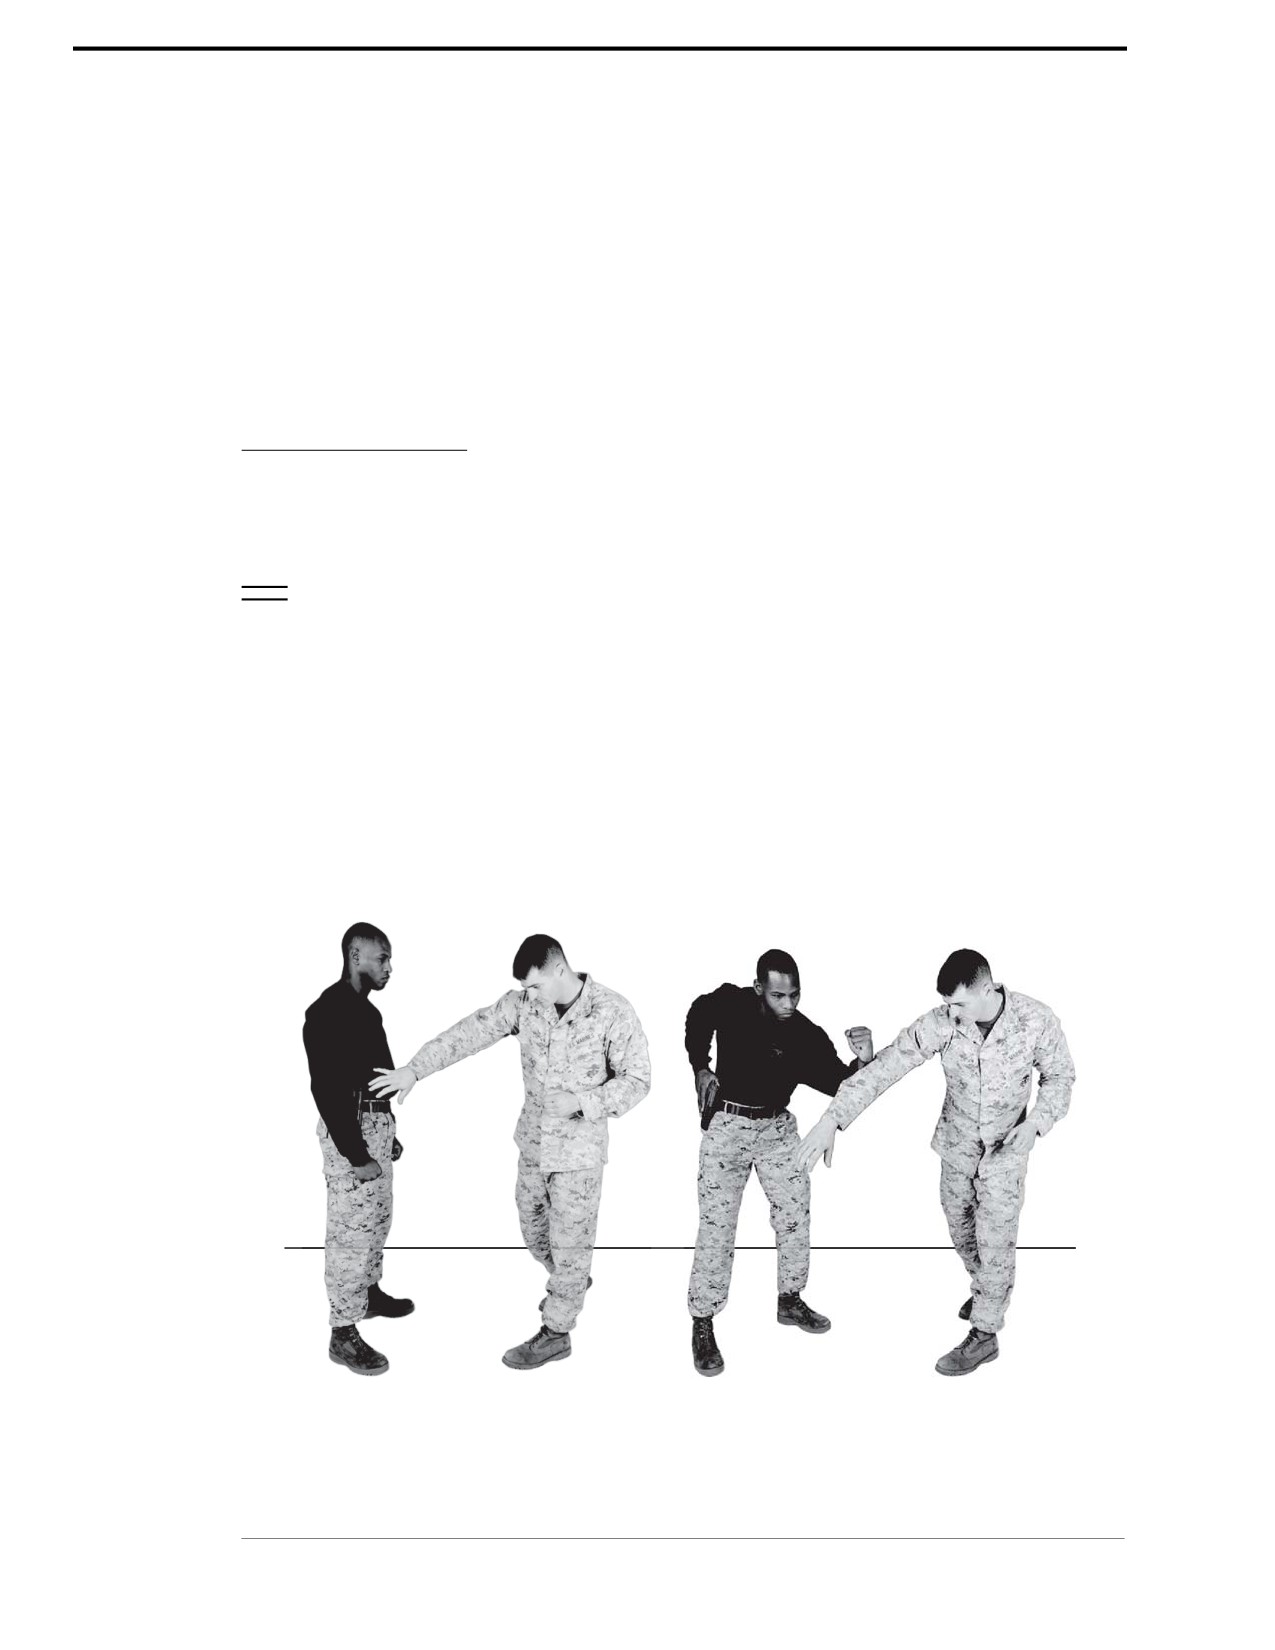
Blocking Technique
The blocking technique is used when the aggressor attempts to grab your pistol from the holster.
Technique
~ While you are facing the aggressor, he attempts to grab your holstered pistol with his
right hand.
~ Step back with your right foot pivoting your body away from the aggressor while placing your
hand on the grip of the pistol.
~ Extend the forearm of your left arm and block, deflect, or strike the aggressor’s arm, while
forcefully yelling Get Back or any authoritative command.
~ Continue to create distance between you and the aggressor to enable you to access and
present your weapon or set up for follow-on actions that are appropriate to the situation
and conditions.
See figure 5-18.
Figure 5-18. Blocking Technique.
For Official Use Only
Chapter 5: Brown Belt

Marine Corps Martial Arts Program
5-25
Armbar Technique
The armbar technique is used when an aggressor grabs your pistol in the holster with his right
hand or if you are left-handed and the aggressor grabs your pistol with his left hand.
Technique
~ Begin with the aggressor facing you and grabbing the pistol in your holster with his
right hand.
~ Trap the aggressor’s right hand by grabbing his wrist or hand with your right hand and
applying pressure against your body and the pistol to keep it in its holster.
~ Step back with your right foot and pivot sharply to your right, off balancing the aggressor,
so that you are next to him. Bring your left arm perpendicular to, and down on, the
aggressor’s elbow.
~ At the same time, straighten the aggressor’s arm and apply an armbar. The aggressor’s
trapped arm should be straight across your torso. From here you should be able to
control and take the aggressor down. In the case that you are unable to control the situation
in this manner and the aggressor is fighting to straighten up, you should execute the
following steps:
•Execute a crossface, by turning his head to the opposite direction and off balancing him.
•Grab the aggressor’s face, apply both back and down pressure to his face, and step back
with the left foot in order to take him to the ground. Maintain control of the aggressor’s right
hand at your right side the entire time.
~ If you are unable to crossface your aggressor, the following steps are used:
•Grab the aggressor’s right shoulder with your left hand.
•Digging your fingers into his brachial plexus tie-in, bring him up far enough to crossface
your aggressor.
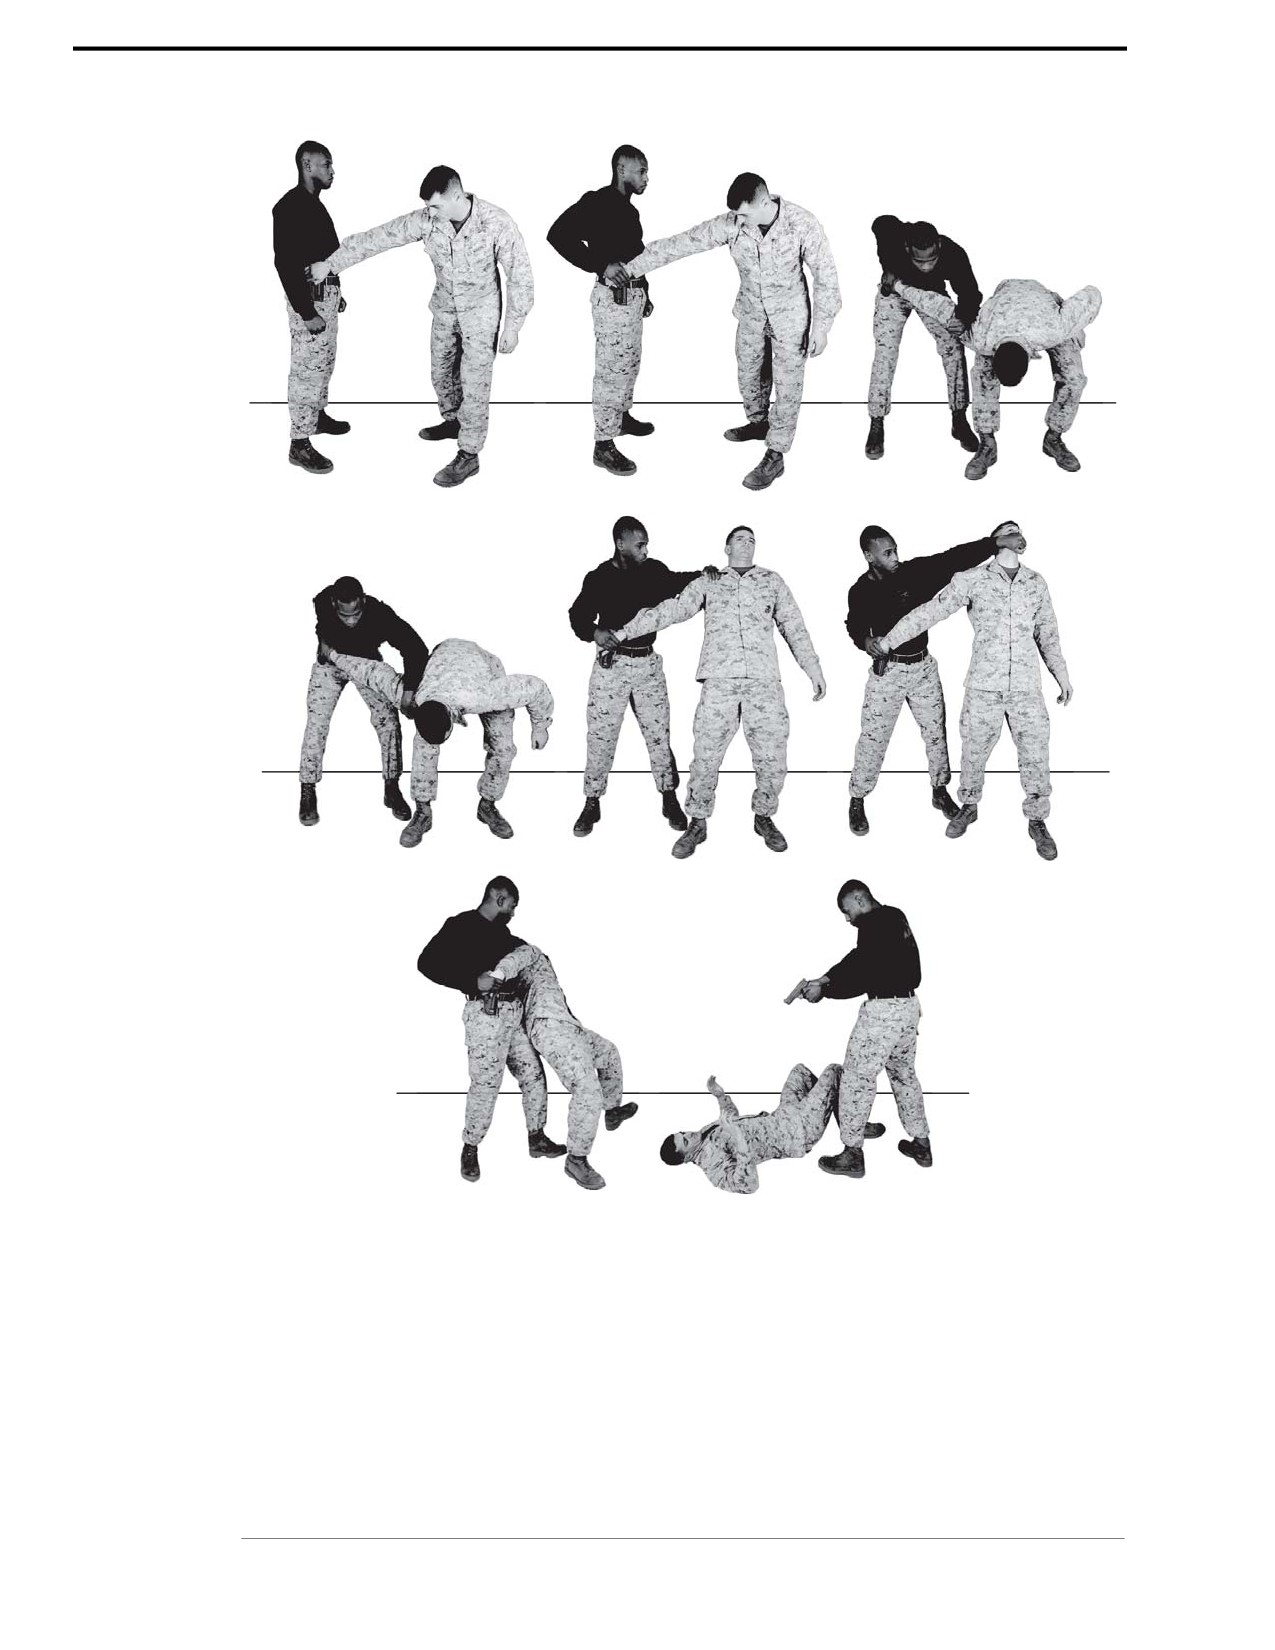
•Follow-on by releasing the aggressor as he falls to the ground and transition to your firearm.
See figure 5-19 on 5-26.
Wristlock Technique
The wristlock technique is used when an aggressor grabs your pistol in the holster with his
right hand.
Technique
~ Begin with the aggressor facing you and grabbing the pistol in your holster with his
right hand.
~ With your right hand, trap the aggressor’s right hand by grasping his hand and apply
pressure against your body and on the pistol to trap it in its holster.
~ Step back with your right foot and pivot sharply to your right, off balancing the aggressor, so
that you are next to him while bringing your left arm perpendicular to and down on his elbow.
~ Maintain pressure on the aggressor’s right elbow with your left elbow and maintain a slight
bend at the waist. Pivot your left hand to trap the aggressor’s right hand so that your forearm
is parallel with the aggressor’s attacking arm.
Chapter 5: Brown Belt
For Official Use Only
5-26
MCRP 3-02B
Figure 5-19. Armbar Technique.
~ Execute a wristlock using the following technique.
•Place your left thumb on the back of the aggressor’s right hand so that your knuckles are
facing to your left.
•With your left hand, hook your fingers across the fleshy part of the aggressor’s palm.
•Incorporate your second hand into the wristlock, exert downward pressure with your
thumbs, and rotate the aggressor’s hand to your left. Step back with your left foot, pivoting to
your left to off balance the aggressor and drive him to the ground.
For Official Use Only
Chapter 5: Brown Belt
Marine Corps Martial Arts Program
5-27
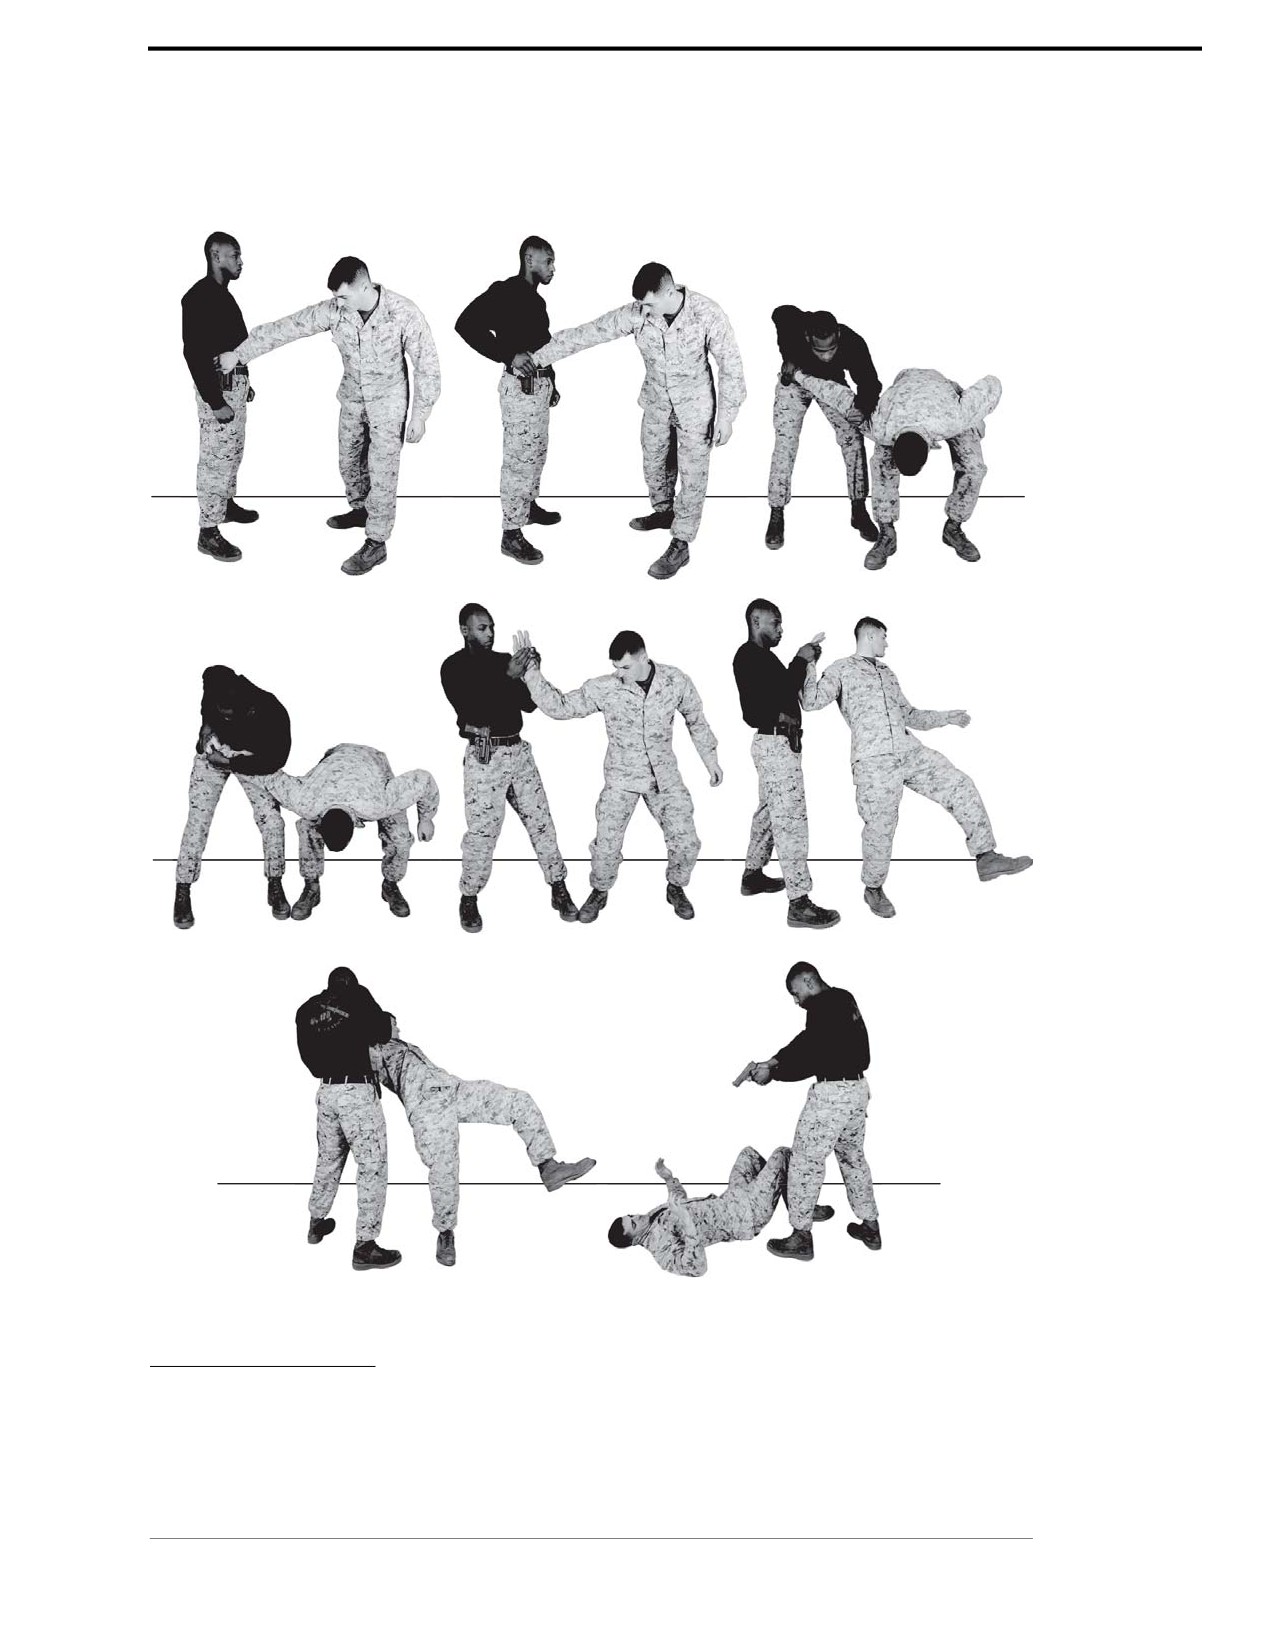
~ Follow-on by releasing the aggressor as he falls to the ground and transition to your firearm.
See figure 5-20.
Figure 5-20. Wristlock Technique.
Same Side Grab: From Front
The same side grab from the front technique can be used when the aggressor grabs your pistol in
the holster with his left hand.
Chapter 5: Brown Belt
For Official Use Only
5-28
MCRP 3-02B
Technique
~ Begin with the aggressor facing you and grabbing the pistol in your holster with his left hand.
~ With your right hand, trap the aggressor’s right hand by grasping his hand. Apply pressure
against your body and on the pistol to trap it in its holster.
~ Step back with the right foot, rotating the hip (right side) to the rear, at the same time with
your left hand, strike the aggressor in the upper torso area (simulating a strike to the
trachea). Striking surface will be the webbing between thumb and pointer finger.
~ Follow up by releasing the aggressor’s hand, doubling the distance and transition to
your firearm.
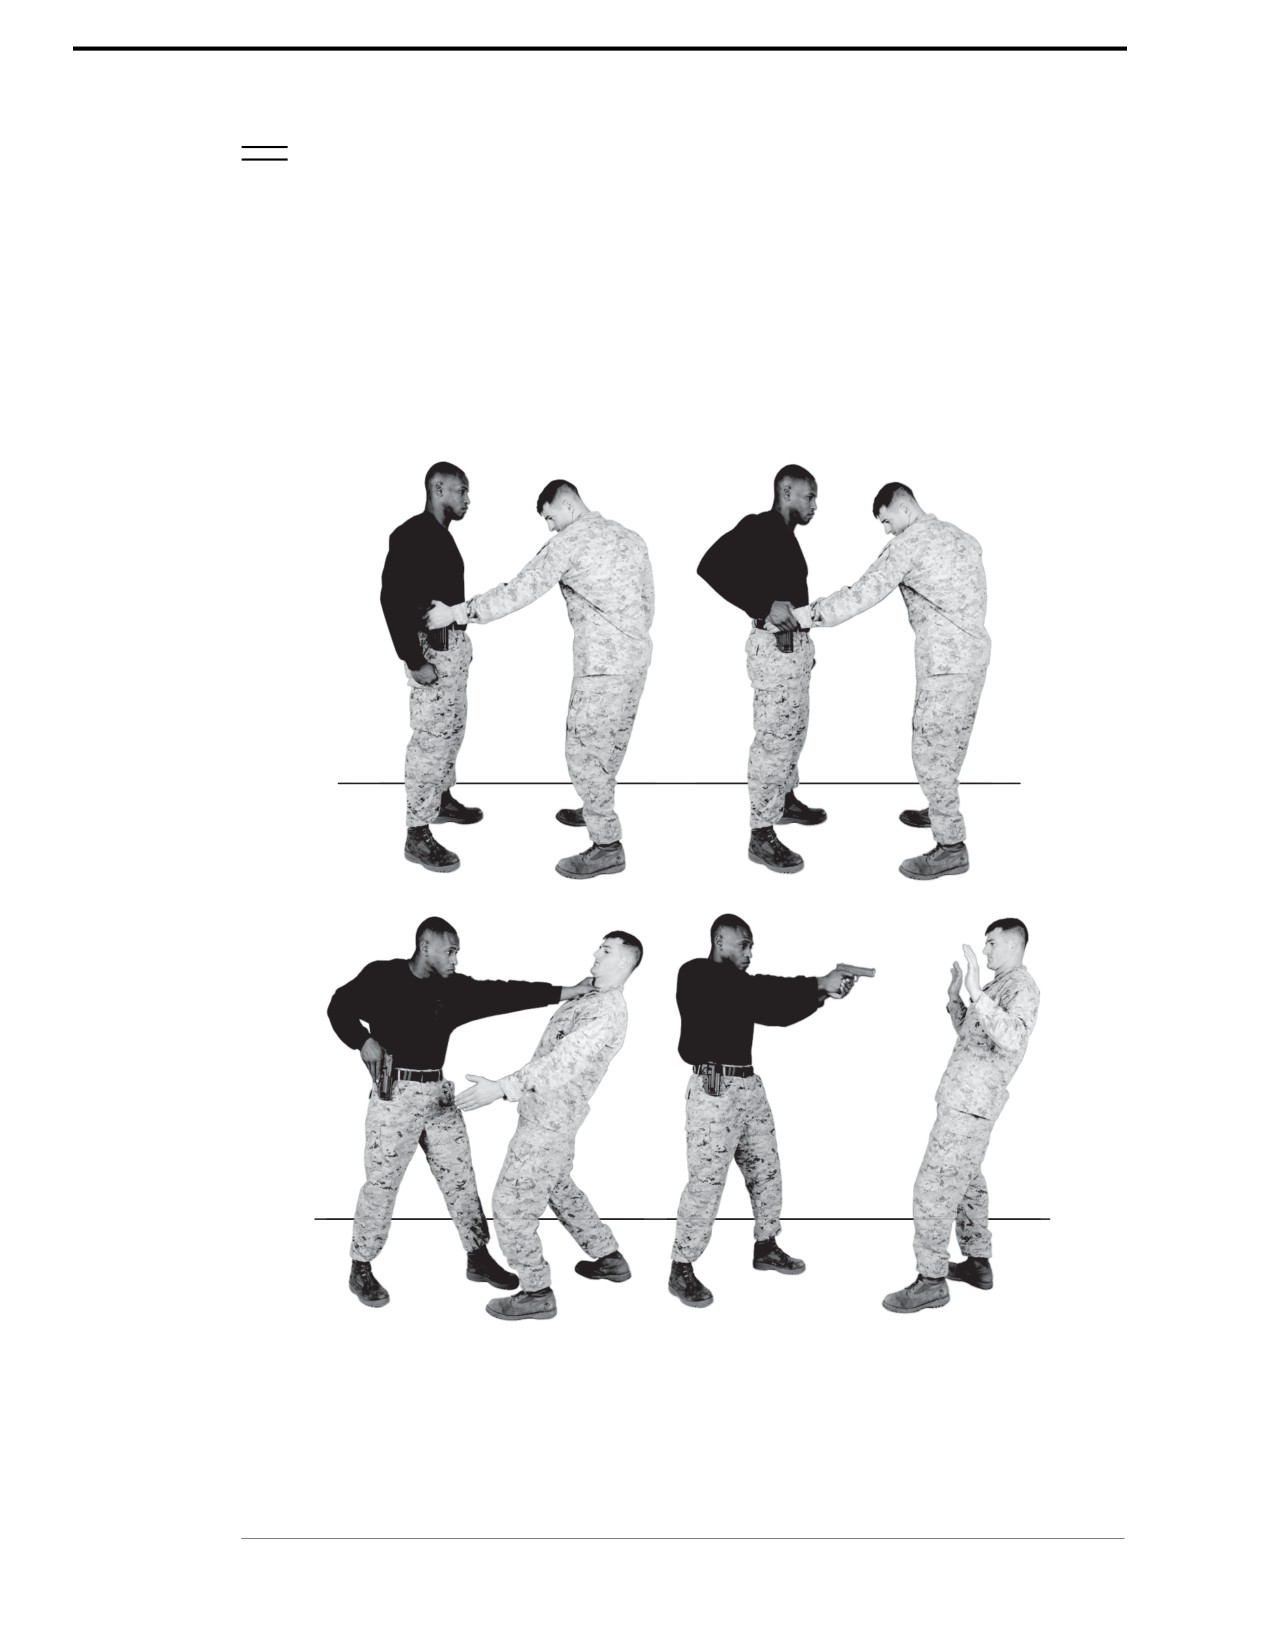
See figure 5-21.
Figure 5-21. Same Side Grab: From Front.
For Official Use Only
Chapter 5: Brown Belt

Marine Corps Martial Arts Program
5-29
Same Side Grab: From Rear
The same side grab from the rear technique can be used when an aggressor grabs your pistol in
the holster with his right hand.
Technique
~ Begin with the aggressor behind you and grabbing the pistol in your holster with his
right hand.
~ With your right hand, trap the aggressor’s right hand by grasping his hand. Apply pressure
against your body and on the pistol to trap it in its holster.
~ Execute a reverse wristlock using the following technique:
•Place the palm of your right hand on the back of the aggressor’s right hand and wrap your
fingers across the fleshy part of his palm below his little finger.
•Twist the aggressor’s hand to the right while placing the hand against your chest. Bring up
the left hand to support the right hand by grabbing the aggressor’s hand in between both
hands, mimicing praying. Apply downward pressure on his hand against the chest. Leave the
aggressor’s hand on the chest to fully control him and to gain leverage. The aggressor’s hand
should be rotated 90-degrees so that his palm is facing left.
•Step back with your right foot to maintain better balance and lean forward to use body
weight to add additional pressure to the joint.
•Follow up by releasing the aggressor and transition to your firearm.
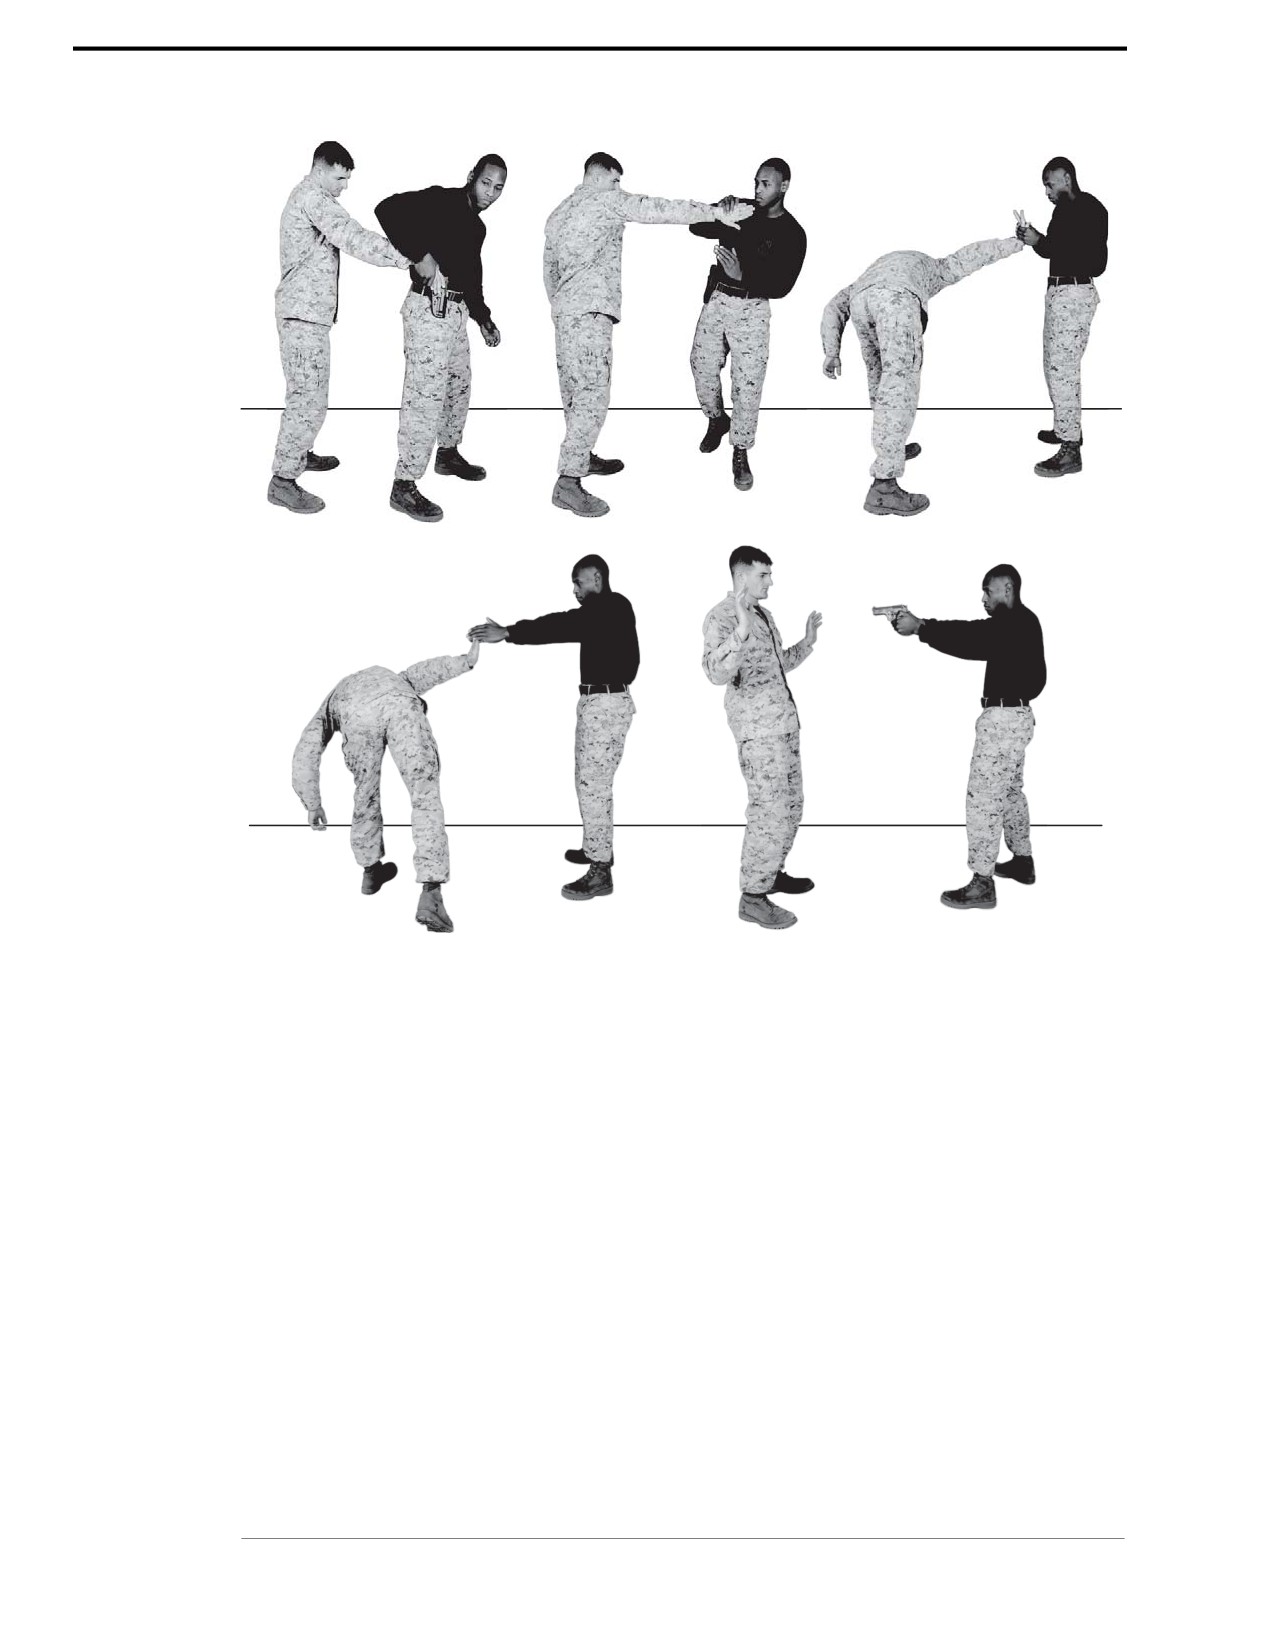
See figure 5-22 on page 5-30.
Chapter 5: Brown Belt
For Official Use Only
5-30
MCRP 3-02B
Figure 5-22. Same Side Grab: From Rear.
For Official Use Only
Chapter 5: Brown Belt

Marine Corps Martial Arts Program
5-31
Section VII
Firearm Disarmament
The purpose of firearm disarmament is to disarm the aggressor and control the situation by per-
forming counter to the pistol, either front or rear.
Refer to appendix A for corresponding safeties 1, 2, 6, 8, 9, and 13.
CAUTION
To prevent injury during training, the aggressor should grip below
the trigger housing only, keeping his finger out of the trigger housing at
all times.
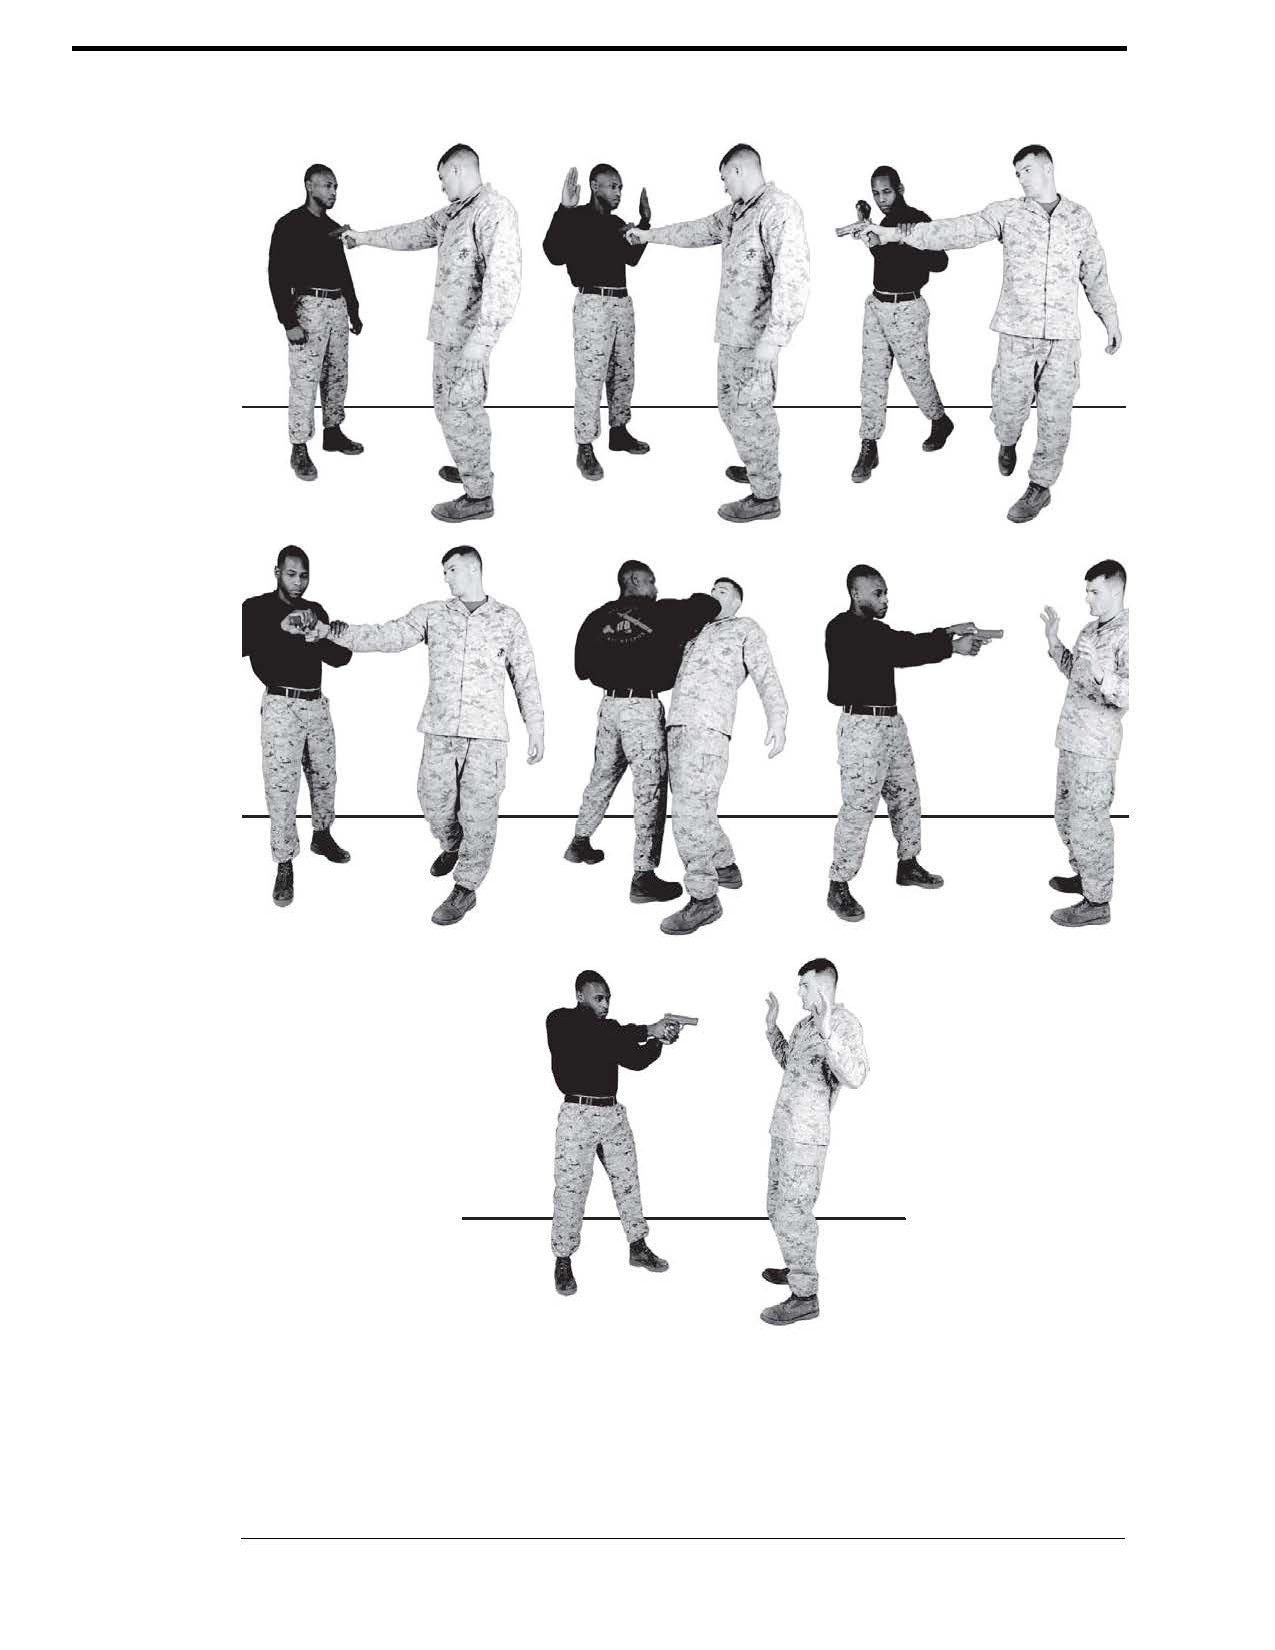
Counter to Pistol: Front
The counter to the pistol to the front technique is performed when you are unarmed and your
aggressor is in front of you pointing a pistol at your head or chest. The technique is the same if
the aggressor sticks the pistol under your chin.
Technique
~ Begin with the aggressor presenting a pistol in his right hand to your chest. The pistol must
be touching or very close to you for this technique to work.
~ Place your hands in a submissive posture even with your shoulders, elbows into the body,
and palms facing the aggressor. Make a submissive verbal statement.
~ Clear your body from the line of fire by rotating your torso bringing the right shoulder back
and, at the same time, grabbing the aggressor’s wrist in a C-grip with your left hand pushing
the weapon offline. Maintain control of the aggressor’s arm.
~ Step into the aggressor with your right foot and grab the weapon with your right hand in a
C-grip by placing your thumb underneath the pistol and your fingers over top of the pistol.
This rotates the pistol in the aggressor’s hand. An incidental forward horizontal elbow strike
to the aggressor is possible while removing the pistol from his grip.
~ Step back to create distance from the aggressor and transition to employ follow-on actions by
performing an expedient press check on the firearm.
See figure 5-23 on page 5-32.
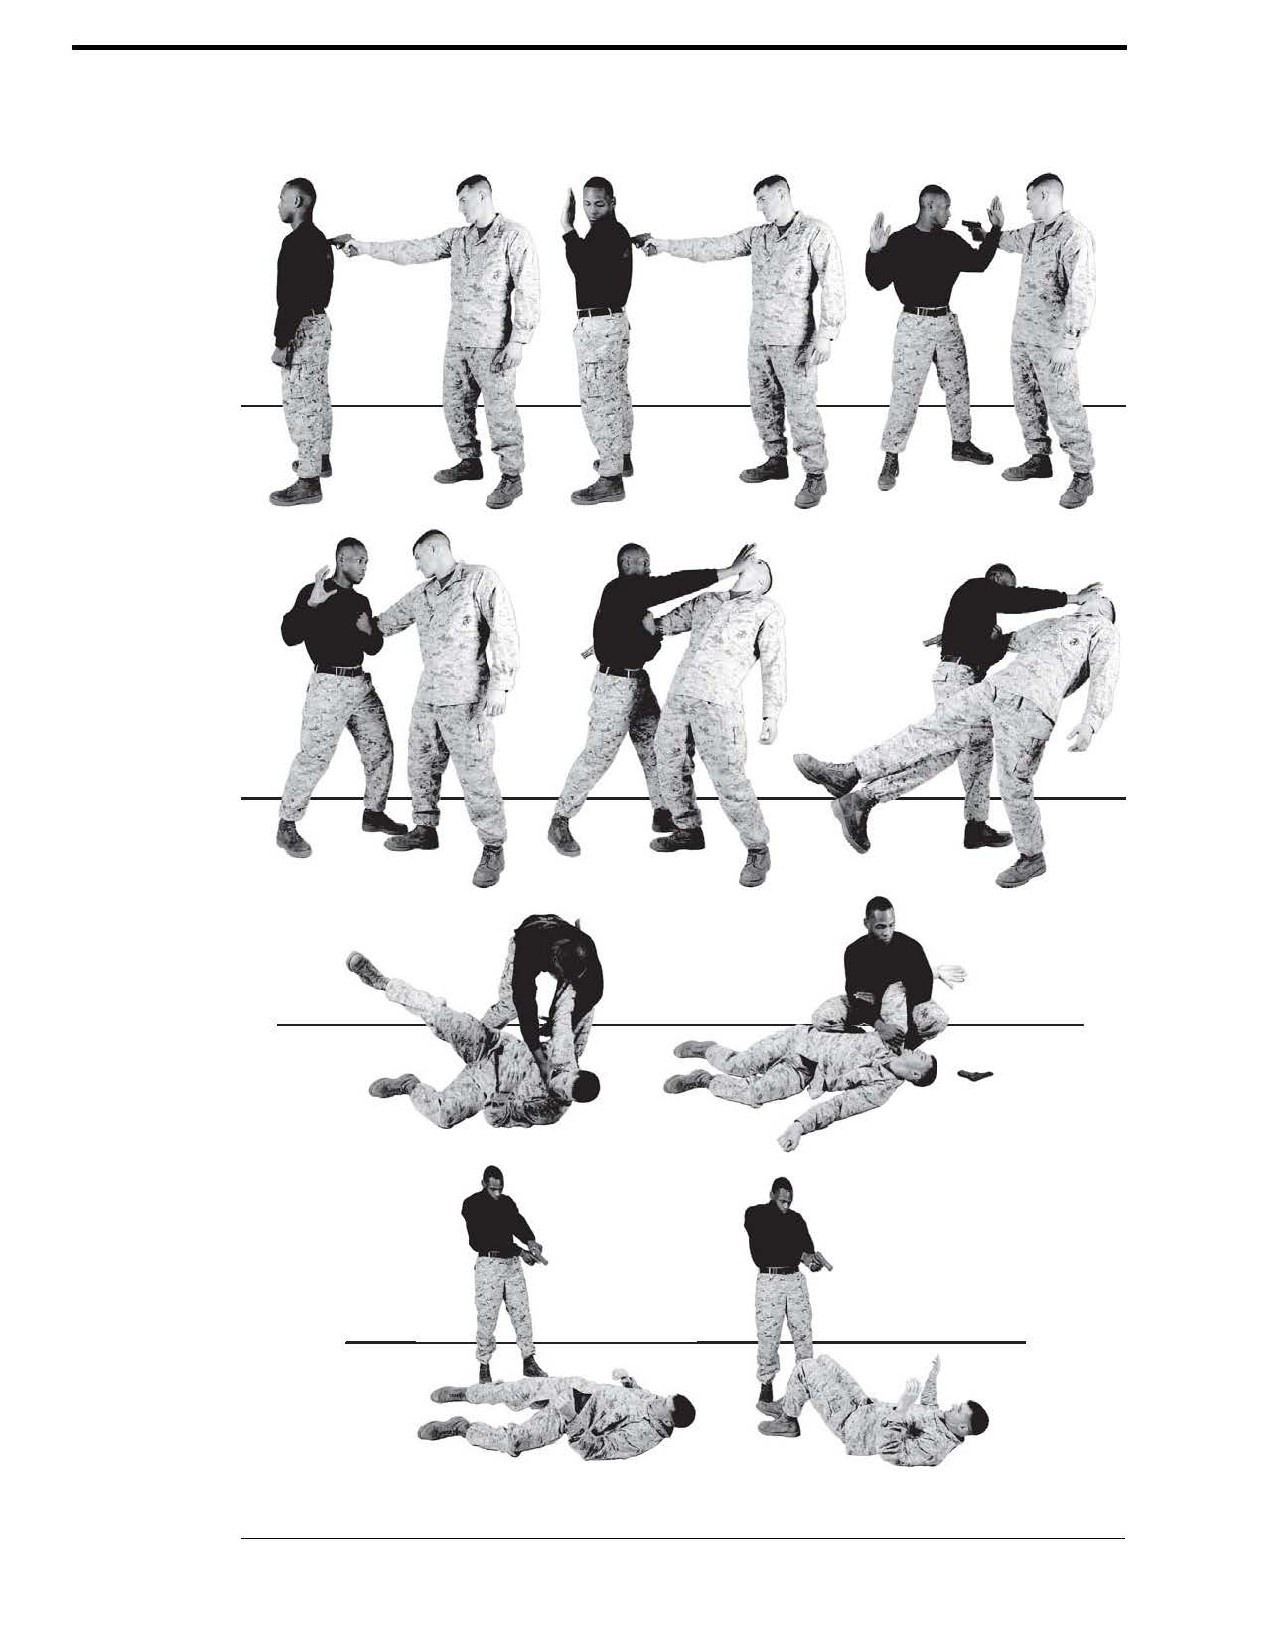
Counter to Pistol: Rear
The counter to the pistol to the rear technique is performed when you are unarmed and your
aggressor is behind you pointing a pistol at the back of your head or your back.
Technique
~ Begin with the aggressor presenting a pistol in his right hand to your back. The pistol must be
touching or very close to you for this technique to work.
Chapter 5: Brown Belt
For Official Use Only
5-32
MCRP 3-02B
Figure 5-23. Counter to Pistol: Front.
For Official Use Only
Chapter 5: Brown Belt

Marine Corps Martial Arts Program
5-33
~ Place your hands in a submissive posture even with your shoulders, elbows into the body,
and palms facing away from you. Make a submissive verbal statement and take a quick look
in order to identify which hand the weapon is in.
~ Turn into the aggressor with your left foot, pivoting on your right foot while rotating your torso.
The movement with the left foot should be deep enough to set up for the subsequent leg
sweep. Use your left forearm to knock the weapon offline, doubling the distance between the
weapon and your body, clearing you from the weapon’s line of fire. Keep your hands up.
~ Quickly over hook the aggressor’s right arm with your left arm trapping it in your armpit
between the torso and the biceps, execute a right chin jab/palm heel strike.
~ Execute a leg sweep taking the aggressor to the ground. Maintain control of the aggressor’s
right arm.
~ Place your right hand on the aggressor’s left shoulder or upper arm and your left palm on
your right wrist to further control his arm and to affect an armbar.
~ Execute an armbar and continue to exert steady pressure against the arm to force the
aggressor’s release of the weapon. Use your right knee to control his hips and/or
abdominal area.
~ Once the aggressor releases the weapon, release his arm, retrieve the weapon, and step
back to create distance from him. Execute follow-on actions by performing an expedient
press check in order to ensure that a round is chambered in the firearm.
See figure 5-24 on page 5-34.
Chapter 5: Brown Belt
For Official Use Only
5-34
MCRP 3-02B
Figure 5-24. Counter to Pistol: Rear.
For Official Use Only
Chapter 5: Brown Belt

Marine Corps Martial Arts Program
5-35
Section VIII
Knife Techniques
The purpose of knife fighting is to kill or cause enough damage and massive trauma to stop the
aggressor by executing a block for a reverse strike or a block for a straight thrust.
Refer to appendix A for corresponding safeties 1, 2, 3, and 14.
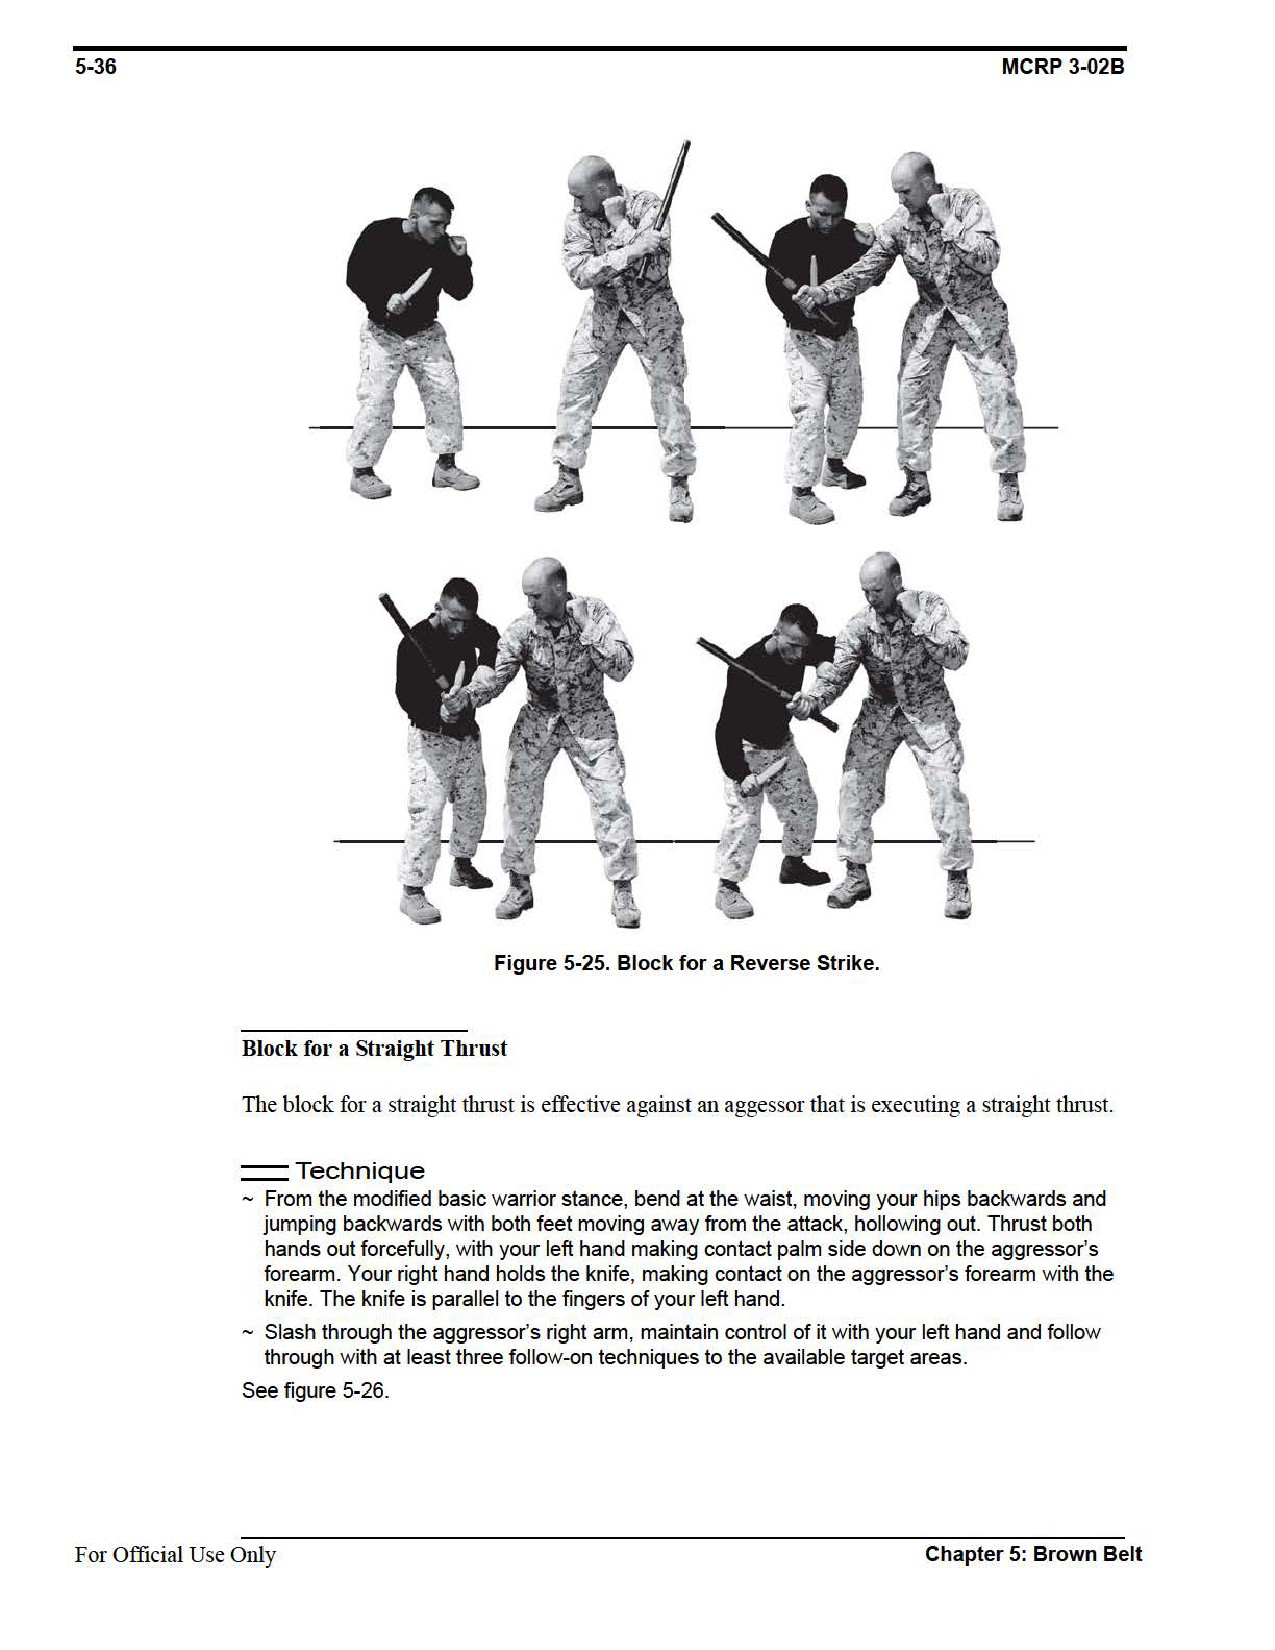
Block for a Reverse Strike
The block for a reverse strike is effective against an aggressor that is excuting a reverse strike.
Technique
~ From the modified basic warrior stance, move forward right, outside the arc of the
aggressor’s attack.
~ Block the attack with your left arm and knife. Keep your left arm bent so that your forearm
makes contact with the aggressor’s triceps. Make contact with the knife and slash the
aggressor’s forearm.
~ Maintain control of the aggressor’s arm and follow through with at least three follow-on
techniques to the available target areas.
See figure 5-25 on page 5-36.
Chapter 5: Brown Belt
For Official Use Only
Marine Corps Martial Arts Program
5-37
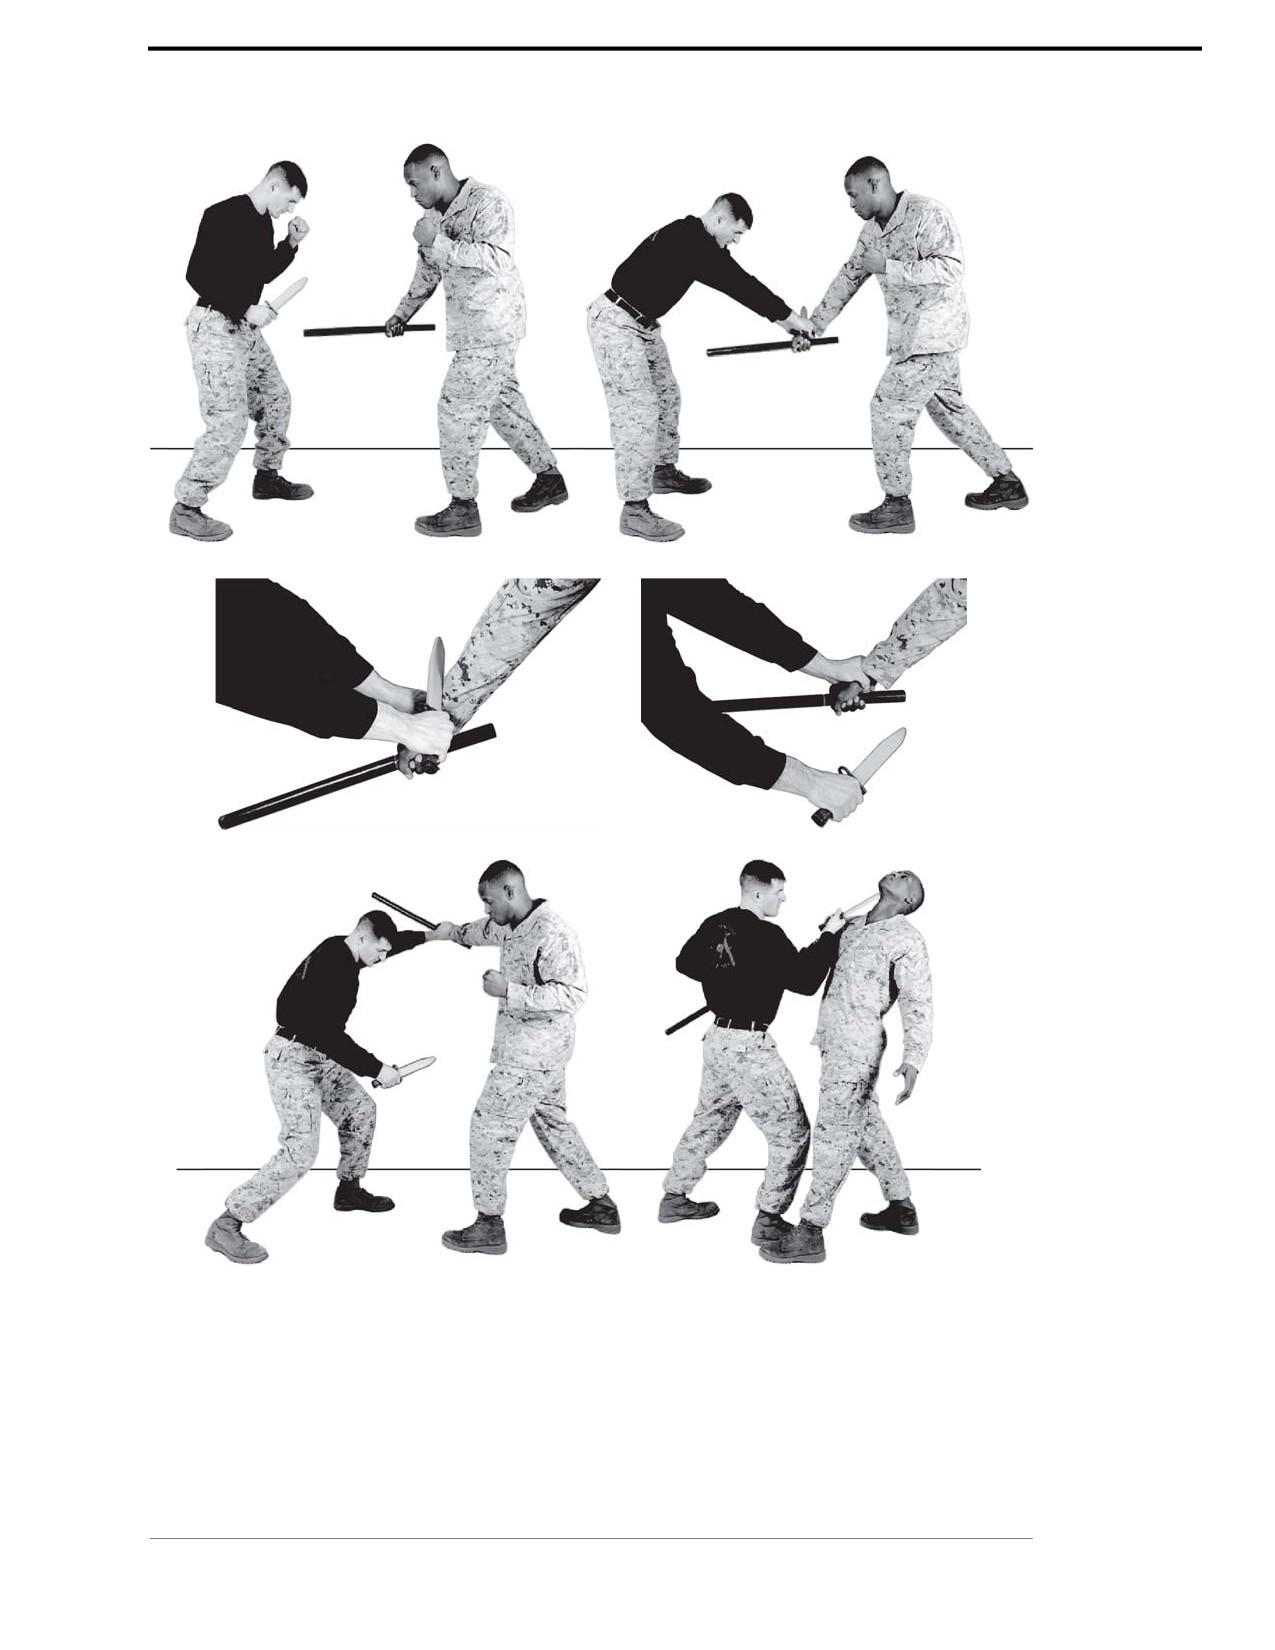
Figure 5-26. Block for a Straight Thrust.
Chapter 5: Brown Belt
For Official Use Only

THIS PAGE INTENTIONALLY LEFT BLANK.
For Official Use Only

CHAPTER 6
Black Belt
The Black Belt is the fifth belt ranking within MCMAP. Upon qualifying as a Brown Belt,
all Marines are highly encouraged to continue MCMAP sustainment training in order to
advance to Black Belt. At an advanced level, the purpose and principles remain the same as
outlined in all of the previous belts.
Black Belt Requirements.
Prerequisites
Recommendation of reporting senior
Complete Brown Belt sustainment and inte-
gration training
Appropriate level PME complete
Training Hours
Minimum of 20.7 hours, excluding remedial
practice time and testing
Sustainment
Minimum of 20 hours of sustainment,
Hours
excluding integration training time and
practice time for testing
For Official Use Only

6-2
MCRP 3-02B
Section I
Bayonet Techniques
The purpose of bayonet techniques is to disable or kill the aggressor.
Refer to appendix A for corresponding safeties 1, 2, 4, 7, 8, 9, and 14.
Bayonet Training: Stage One
Stage one of bayonet training focuses on basic posture, movement, and sequence of movements
against a compliant target:
• The placement of the right hand on the pistol grip allows greater generation of force when
executing the forward thrust, which is the primary offensive bayonet technique. Additionally,
it allows you to transition immediately to assault fire as needed by moving the finger back to
the trigger. For safety reasons, the finger is kept off of the trigger when executing bayonet
techniques, this prevents an accidental discharge and protects the finger.
• The left hand is placed on the handguards in a position that is comfortable for the individual.
If the hand is placed too far forward it causes an over extension of the left hand and mitigates
some of the power and control that is generated with the offensive bayonet techniques.
• The buttstock locked into the hip is critical because it provides stability during a bayonet
engagement when locking up with an aggressor or ensuring optimum power is generated
when executing the thrust or any of the other offensive bayonet techniques.
• The blade of the bayonet is always pointed at the aggressor in order to facilitate a rapid
engagement. Movement should be within an imaginary box that is shoulder-width wide from
your neck to your waist.
Bayonet Training: Stage Two
Stage two of bayonet training adds the movement against multiple aggressors and integrates
multiple weapons systems and bayonet techniques.
Bayonet Training: Stage Three
Stage three of bayonet training develops the ability to react effectively in the dark. Using your
eyes effectively at night requires the application of the principles of night vision such as dark
adaptation, off center vision, and scanning. Applying night vision principles alone will not guar-
antee a victory in a low light environment. It is necessary to combine these techniques with all of
the others that you have practiced such as movement, posture, and technique. Low light engage-
ments also require you to adjust your approach and close speeds due to uncertain terrain.
For Official Use Only
Chapter 6: Black Belt

Marine Corps Martial Arts Program
6-3
Dark Adaptation
Dark adaptation allows the eyes to become accustomed to low levels of illumination. It takes
approximately 30 minutes for you to be able to distinguish objects in dim light.
Off Center Vision
Off center vision is the technique that allows your attention to be focused on an object without
looking directly at it. When you look directly at an object, the image is formed on the cone
region of your eye, which is not sensitive at night. When you look slightly off center (optimum is
usually 6 to 10 degrees of an object), the image is formed on the area of your retina containing
rod cells, which are sensitive in darkness.
Scanning
Scanning uses off center vision to observe an area or an object. Since rod cells only retain an
image for 4 to 10 seconds, you must shift your eyes slightly so fresh rod cells are used. This is
accomplished by moving your eyes in short, abrupt, irregular movements over and around your
primary target.
Common Error
It is common for the Marine to wait too long and thrust too late, also known as cocking the
weapon. When at closing distance, you should begin to thrust the bayonet trainer so that you can
engage the aggressor at the longest possible distance. As a result of waiting too long to thrust,
you get caught up and entangled with your aggressor, the bayonet trainer, or both and tend to pull
the weapon back too far with your arms. The results put the Marine at a serious disadvantage for
the following reasons:
• It completely disrupts the Marine’s momentum. Often the Marine will find it necessary to
completely stop and reverse direction of movement to clear the blade.
• Pulling the weapon back too far puts it in the Marine’s weaker range of motion, which nega-
tively impacts the power and ability to execute follow-on bayonet techniques.
• Cocking the weapon at any time serves to telegraph the Marine’s intent to thrust the bayonet.
Allowing the aggressor to turn this into two, one-on-one engagements increases the chances of
the Marines being separated and killed without the support or cover of his fellow Marine. While
sometimes unavoidable, this is the least desirable of all outcomes.
Chapter 6: Black Belt
For Official Use Only

6-4
MCRP 3-02B
Section II
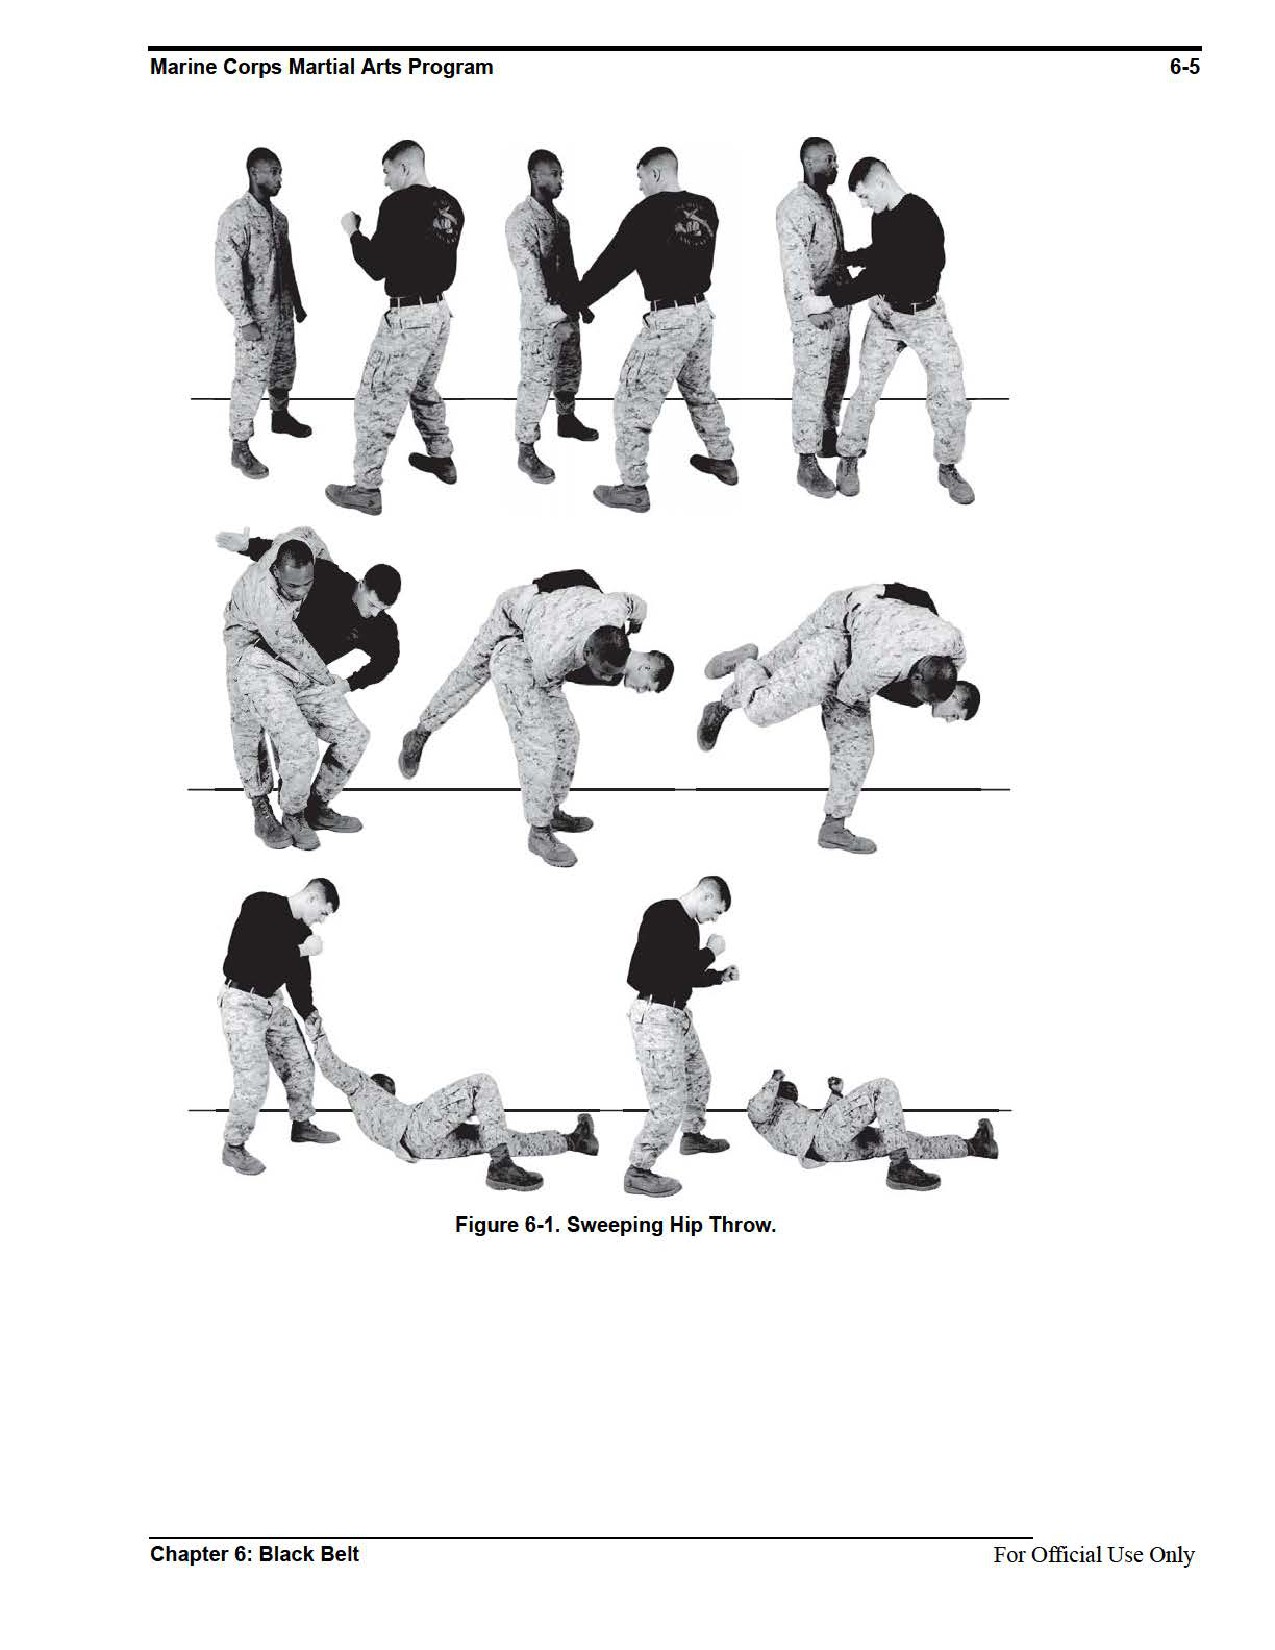
Sweeping Hip Throw
A sweeping hip throw is particularly effective if the aggressor is moving forward or pushing on
you. The sweeping hip throw is used to take your aggressor to the ground if your aggressor
widens his stance in an attempt to prevent you from executing the hip throw. Execution of the
sweeping hip throw uses the aggressor’s forward momentum. This is accomplished by sweeping
your aggressor’s supporting leg and simultaneously continuing to take him to the ground while
you remain standing. When teaching the sweeping hip throw, walk the students through the tech-
nique, step by step, working on the proper body position and execution.
Refer to appendix A for corresponding safeties 1, 2, 6, 13, and 15.
Technique
~ Stand facing the aggressor in the basic warrior stance.
~ Grab the aggressor’s right wrist with your left hand.
~ Step forward with your right foot even with or slightly inside of the aggressor’s right foot. Your
heel should be between his feet, and your toes should be even with the aggressor’s toes.
~ Step back with your left foot, rotating on the ball of your right foot. Your feet should be in
between the aggressor’s with your knees bent.
~ At the same time, rotate your waist and hook your right arm around the back of the
aggressor’s body anywhere from his waist to his head, depending on the size of the
aggressor. If the aggressor is shorter than you, it may be easier to hook your arm around
his head.
•Hand placement should allow you to control the aggressor and pull him in close to you.
•Your back side and hip should be up against the aggressor.
~ Rotate your hip up against the aggressor. Your hips must be lower than his. Use your right
hand to pull the aggressor up on your hip to maximize contact.
~ Pull the aggressor’s arm across your body and, at the same time, slightly lift him off of the
ground by bending at the waist, straightening your legs.
~ Once the aggressor starts to come off of the deck, forcefully sweep his upper right thigh back
with your right leg.
~ At the same time, continue to pull the aggressor’s right arm forcefully to the left across your
body to assist in bringing him to the deck.
•If the aggressor cannot be easily lifted, your body positioning is not correct.
•Students will execute a minimum of 10 fit ins per throw.
See figure 6-1.
For Official Use Only
Chapter 6: Black Belt

6-6
MCRP 3-02B
Section III
Ground Fighting
The purpose of ground fighting is to apply the techniques that will allow you to get back to your
feet as quickly as possible and cause damage to the aggressor by executing the face rip from the
guard, the straight armbar from the scarf hold, and the bent armbar from the scarf hold.
Refer to appendix A for corresponding safeties 1, 2, 6, and 10.
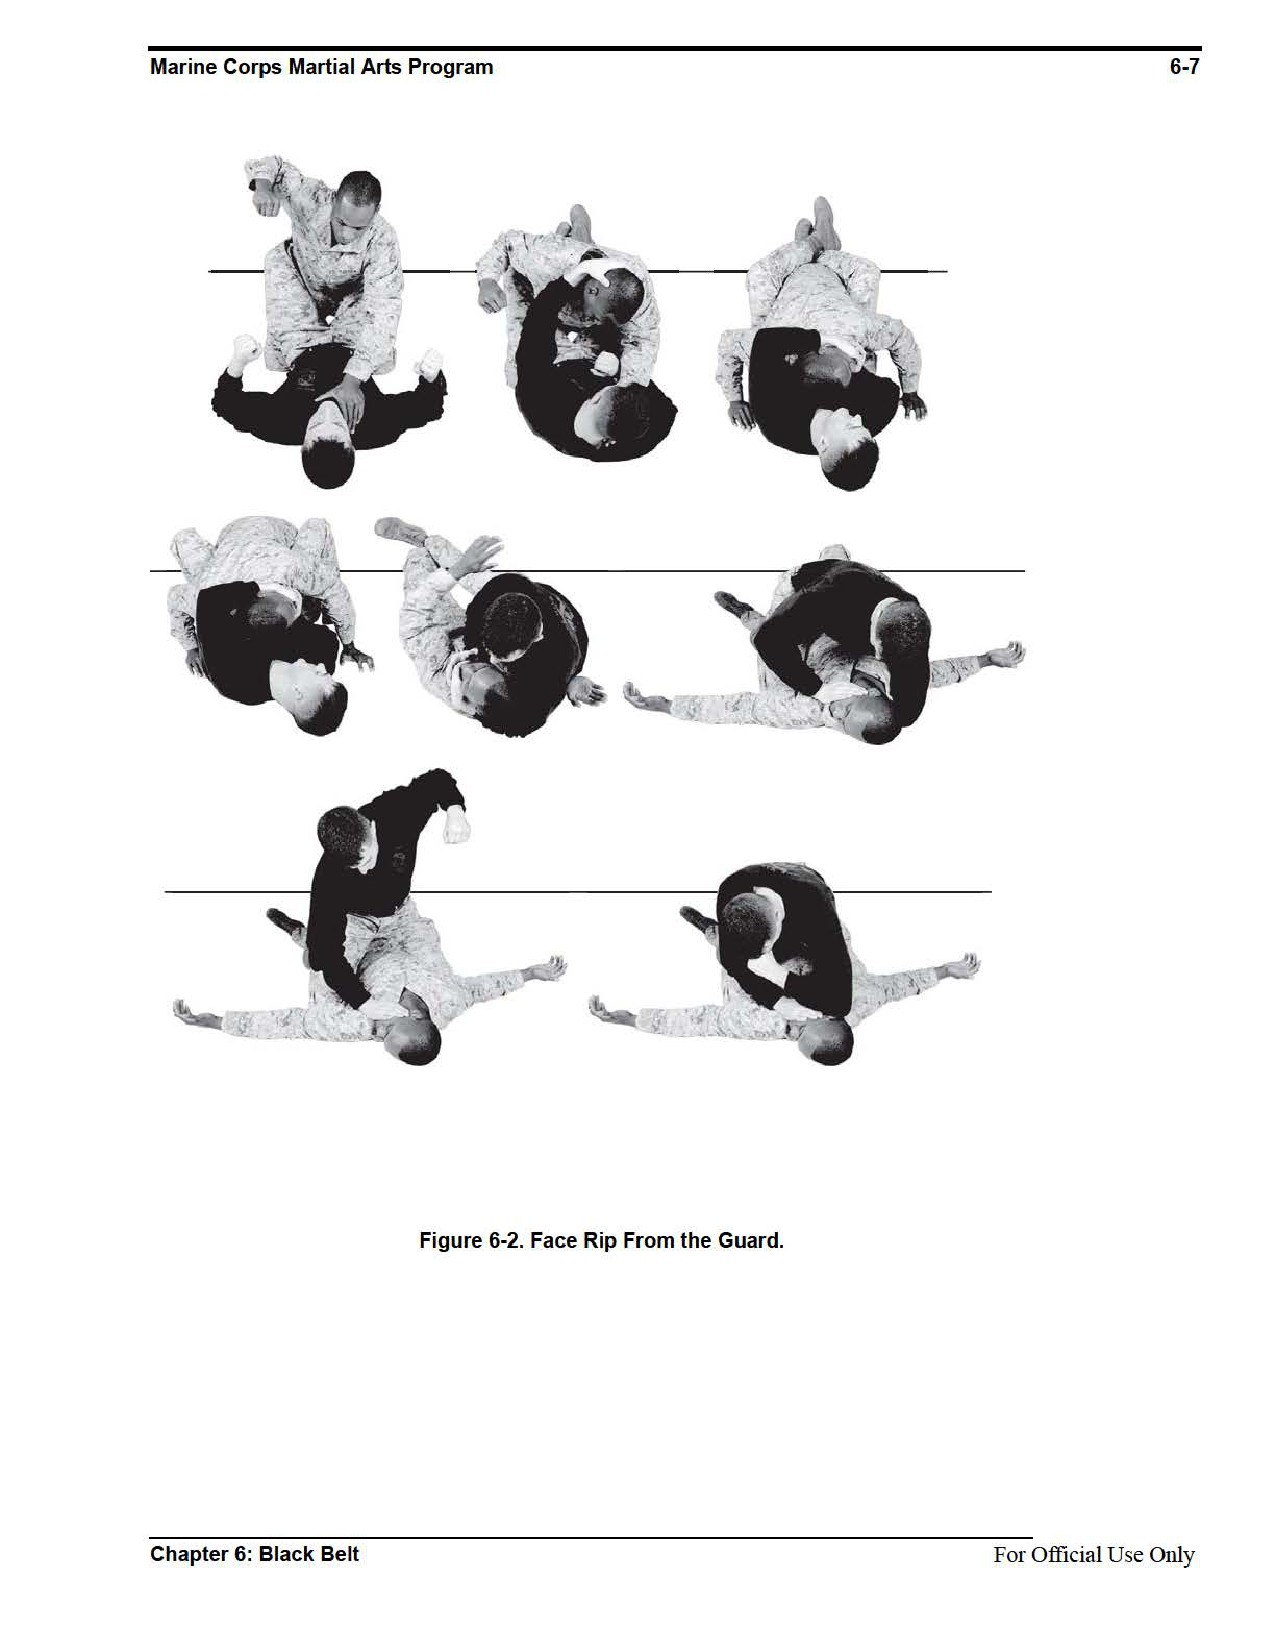
Face Rip From the Guard
The face rip from the guard technique damages your aggressor and assists you in transitioning
back to your feet as quickly as possible gaining a tactical advantage. It is executed when you are
in the aggressor’s guard and the aggressor is trying to damage you by striking at your face and
head.
Technique
~ Lay on your back with the aggressor kneeling in your guard position.
~ The aggressor is trying to cause damage to you by striking your head.
~ Pull down on the back of the aggressor’s neck or head with both hands so that his head is on
or next to your right shoulder, and his chin is facing outboard. Hug the back of the
aggressor’s neck to keep him on your chest and to ensure that you have control of his head.
~ Reach around the back of the aggressor’s neck with your left arm and grab his chin with your
left hand.
~ Place your right hand on the right side of the aggressor’s chin.
~ Twist the aggressor’s neck by pulling to the left with your left hand and pushing up with your
right hand.
~ Push off of the ground with your right foot while blocking the aggressor’s right leg with your
left leg. Continue to exert pressure on his neck, coming to the mount position over top of him.
~ Continue to apply pressure to the aggressor’s chin and face with your right hand and follow-
on with strikes with your left hand.
See figure 6-2.
For Official Use Only
Chapter 6: Black Belt

6-8
MCRP 3-02B
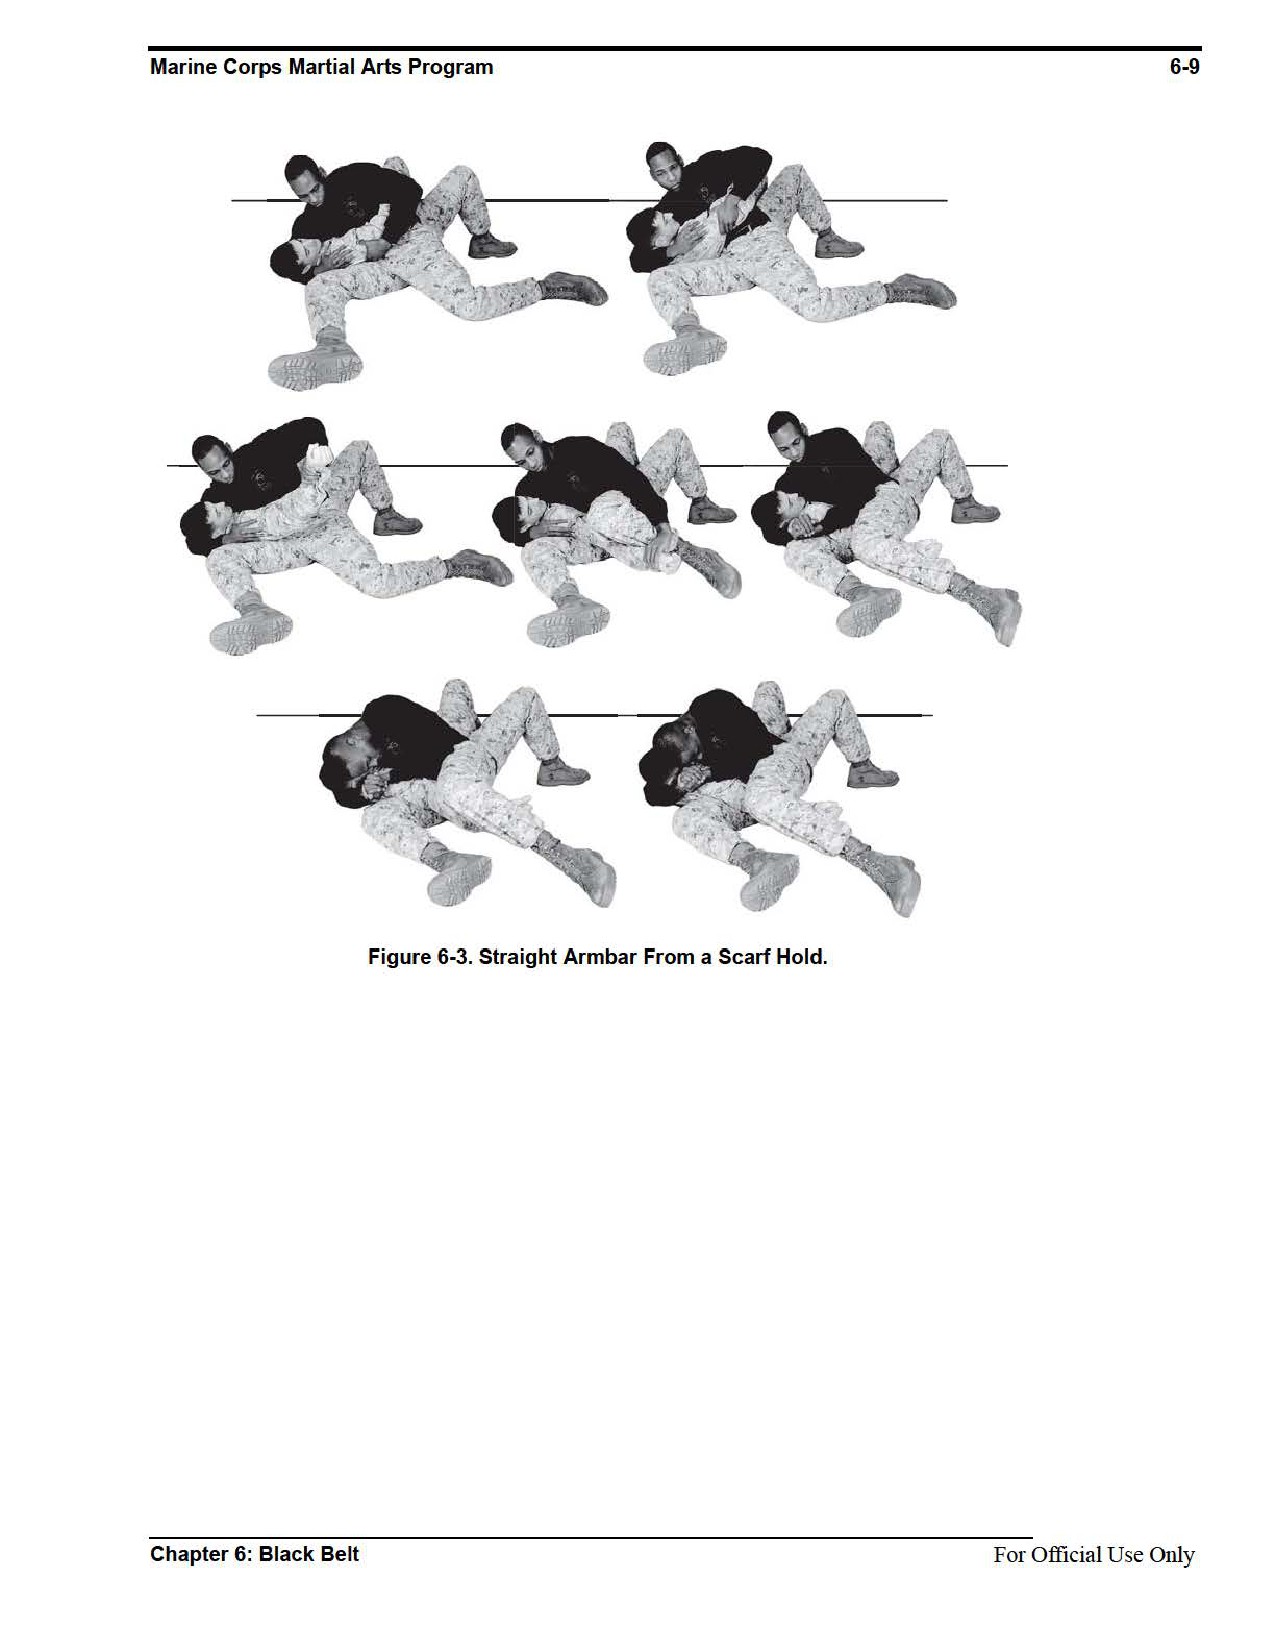
Straight Armbar From a Scarf Hold
A straight armbar from a scarf hold technique causes pain compliance in your aggressor
and assists you in transitioning back to your feet as quickly as possible in order to gain a
tactical advantage.
Technique
~ Begin with the aggressor lying on his back. You sit to his right with your back/right side
against the right side of his chest/ribs. Place the majority of your weight on your right hip.
Wrap your right arm around the back of the aggressor’s neck and grasp his right triceps with
your left hand.
~ Spread your legs to better maintain your balance and to reduce the chance of the aggressor
rolling you.
~ Release the aggressor’s triceps with your left hand and grab his right wrist. Apply downward
pressure with your left hand on his arm so that it is straight across your right leg. Maintain
control of his head with your right arm.
~ Drape your left leg over the aggressor’s right forearm and apply downward pressure by
forcing your left knee toward the deck, simultaneously applying upward pressure with your
right leg in a scissoring motion. Maintain control of your aggressor’s arm.
~ Keep your head and chin tucked to avoid being grabbed or choked by the aggressor’s free
hand. During training, apply slow, steady pressure giving your training partner a chance to
tap out. For joint destruction, quickly scissor legs while maintaining control of your aggressor.
See figure 6-3.
For Official Use Only
Chapter 6: Black Belt
6-10
MCRP 3-02B
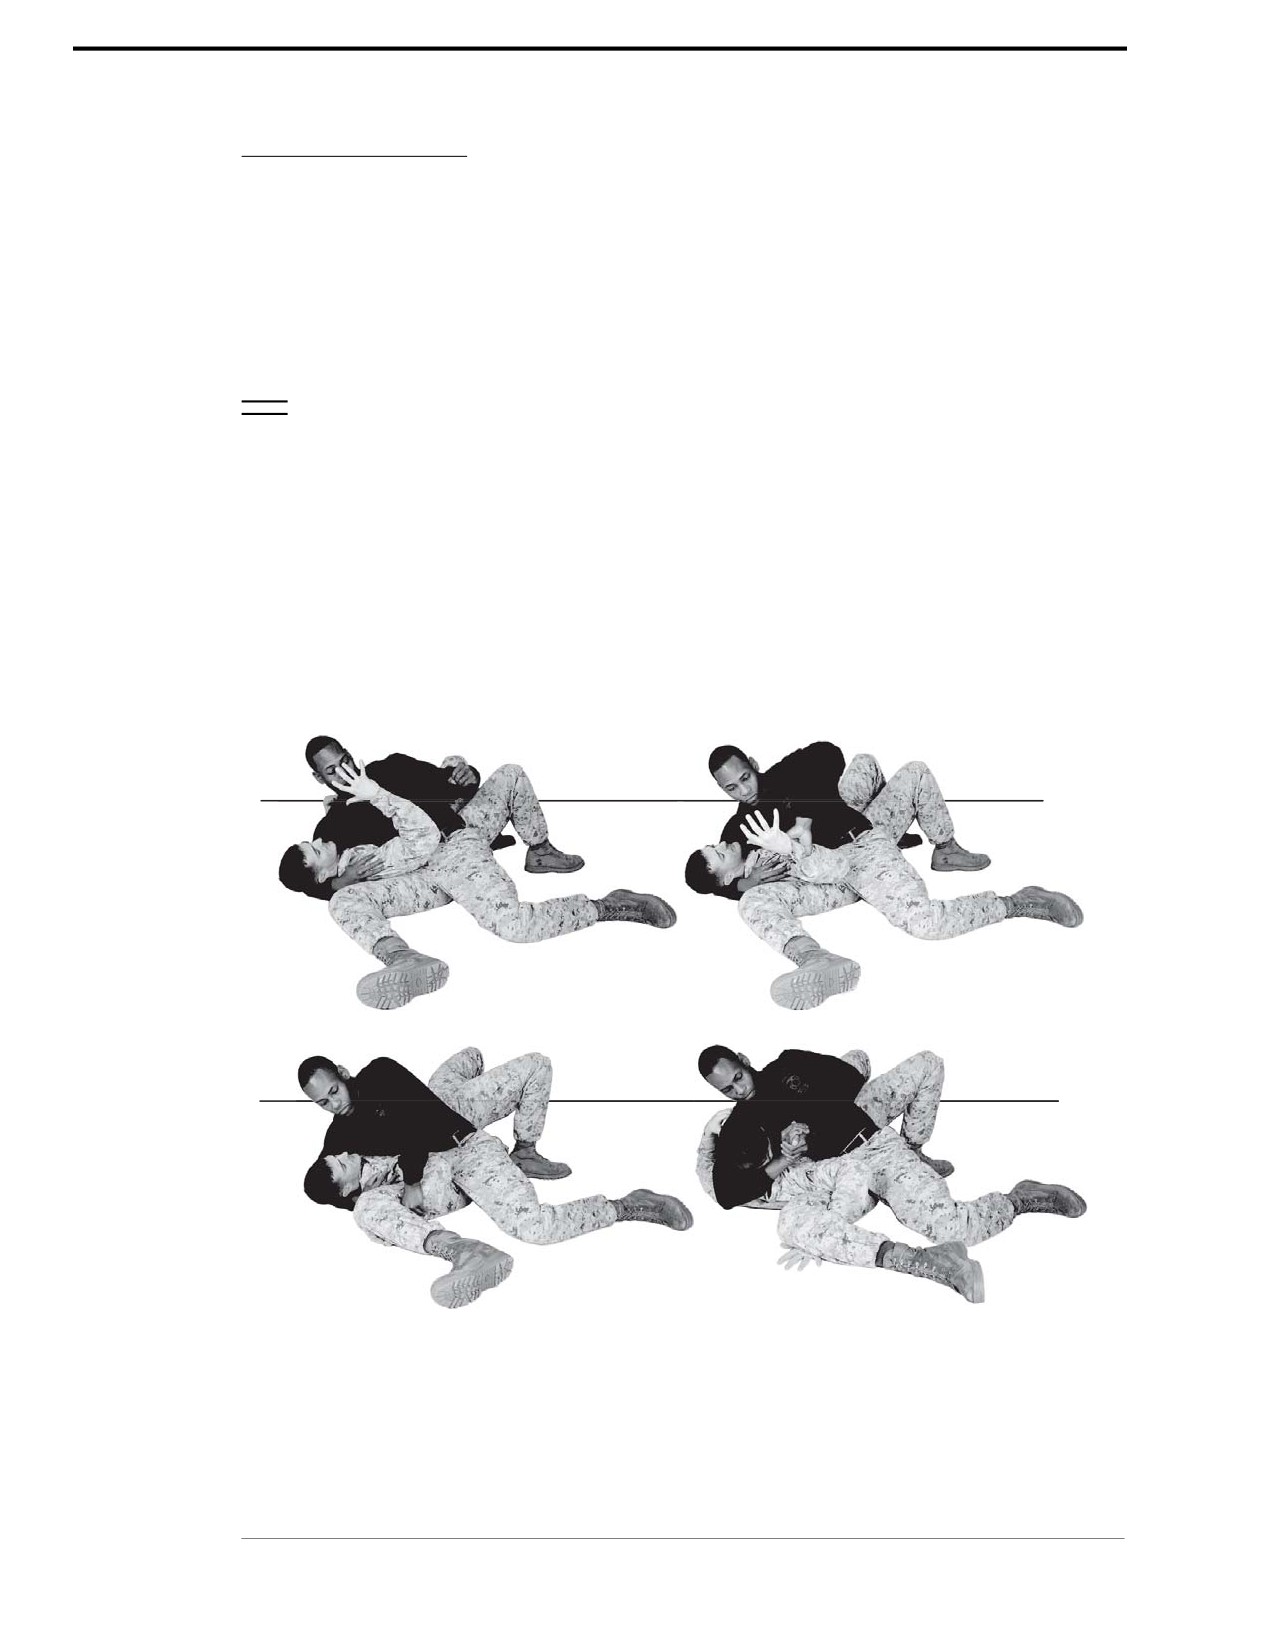
Bent Armbar From a Scarf Hold
A bent armbar from a scarf hold technique causes pain compliance in your aggressor and assists
you in transitioning back to your feet as quickly as possible in order to gain a tactical advantage
in a fight. Attempt to put the aggressor in a straight armbar of the straight armbar from a scarf
hold technique as shown in figure 6-3. The aggressor will often try to bend his arm to avoid the
straight armbar from a scarf hold technique.
Technique
~ Elevate your right knee over the aggressor’s right wrist and trap his wrist in the bend of your
right knee.
~ Press your right knee back to the ground while drawing your right foot toward your buttocks.
At the same time, clasp your hands together and pull up on the aggressor’s head to apply
additional pressure to the shoulder.
~ Keep your head and chin tucked to avoid being grabbed or choked by the aggressor’s
free hand. During training, apply slow, steady pressure giving your training partner a
chance to tap out. For joint destruction, quickly draw your legs back and jerk up on your
aggressor’s head.
See figure 6-4.
Figure 6-4. Bent Armbar From a Scarf Hold.
For Official Use Only
Chapter 6: Black Belt

Marine Corps Martial Arts Program
6-11
Section IV
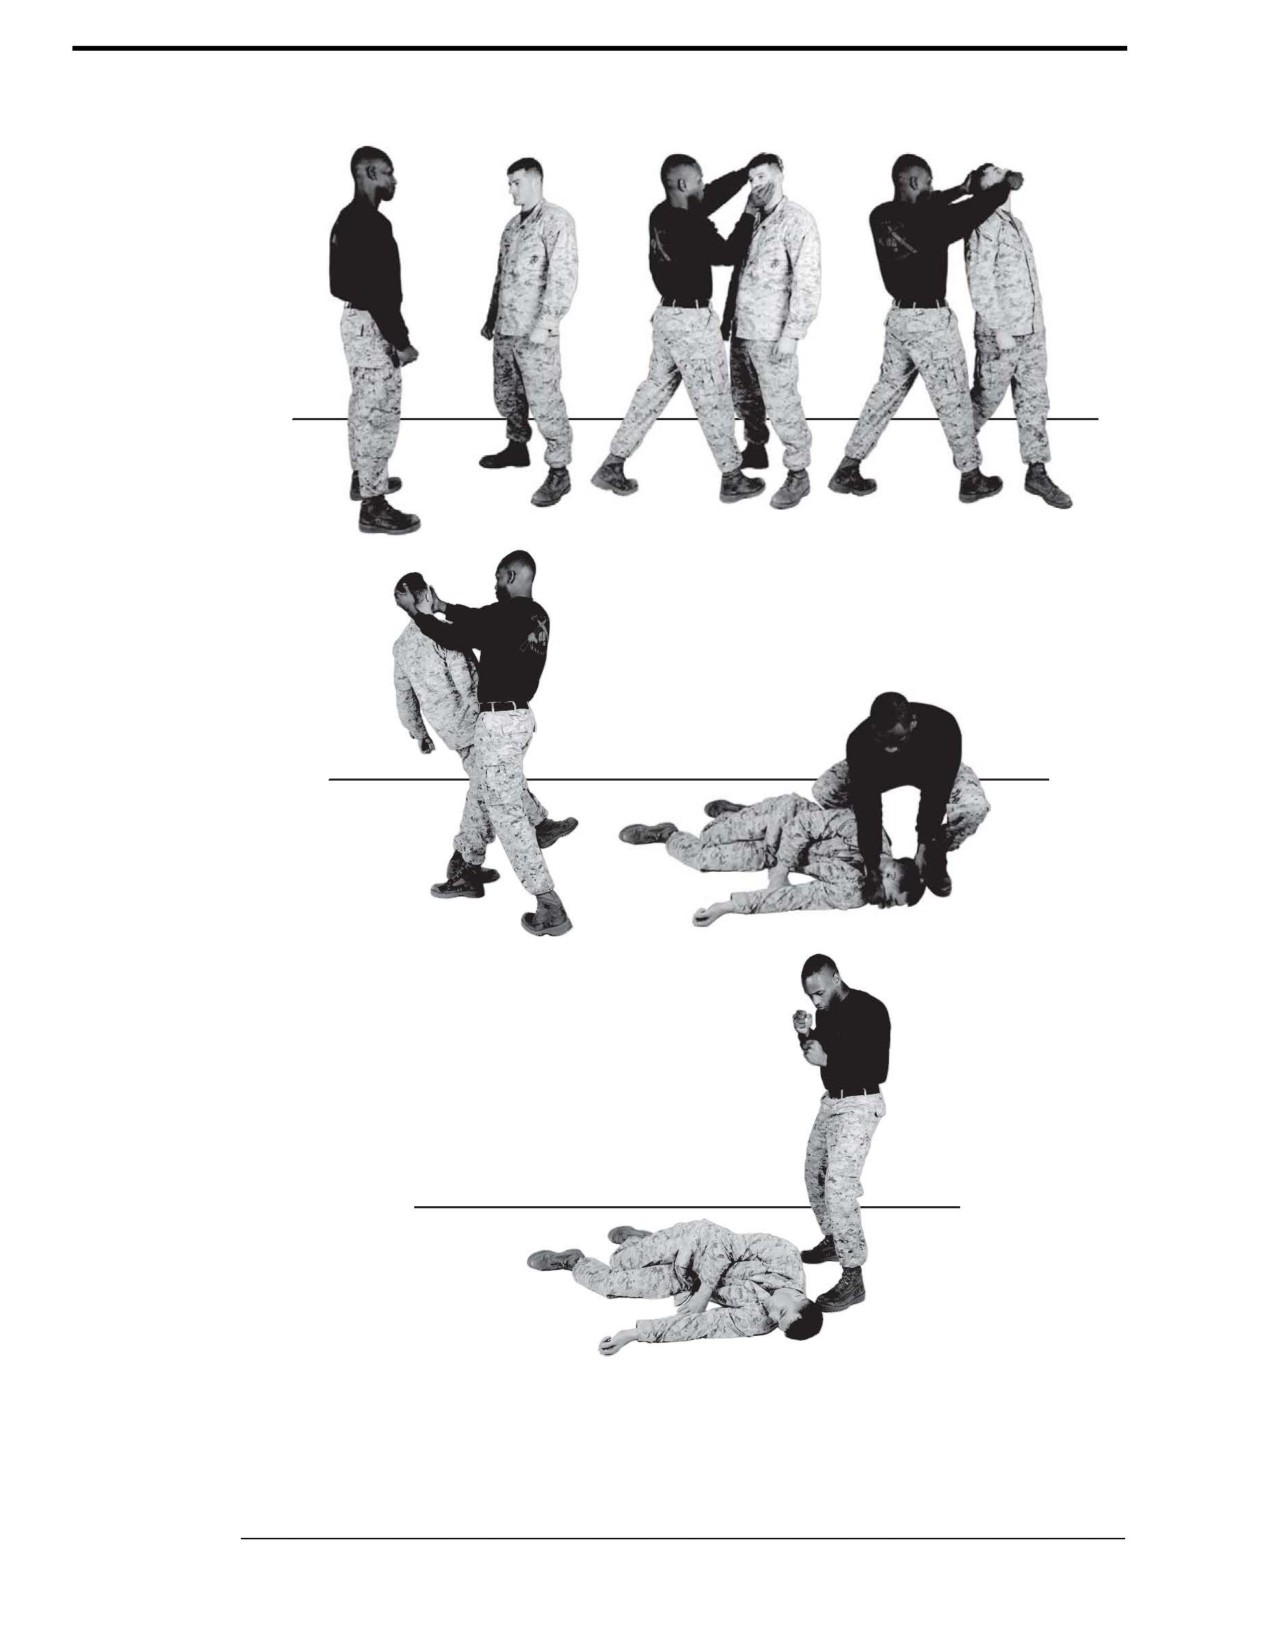
Unarmed Manipulation: Neck-Crank Takedown
Marines operate within a continuum of force, particularly in support of peacekeeping- or human-
itarian-type operations. In these situations, Marines must act responsibly to handle situations
without resorting to deadly force. Unarmed restraints and manipulation techniques, such as a
neck-crank takedown, can be used to control an aggressor and gain the tactical advantage.
Refer to appendix A for corresponding safeties are 1, 2, 6, and 10.
Technique
~ Begin in a static position with your feet in line and shoulder-width apart in front of the
aggressor. Step in with the right foot while quickly placing your left hand behind the
aggressor’s head and firmly grasping his upper neck/lower head. At the same time, quickly
place your cupped, right palm on the aggressor’s chin with your fingers extended across the
left side of his face so that he cannot pull away.
~ Pull your left hand down and to the left as you forcefully push the aggressor’s chin up and to
the right to off balance him.
~ Step back with your left foot and continue to apply pressure to the aggressor’s neck, forcing
him to the deck.
~ Once the aggressor is on the deck, maintain control by applying pressure, keeping his head
on the deck. Additionally place your knee on your aggressor’s shoulder for control.
~ Return to the basic warrior stance, creating a safe distance from the aggressor and
maintaining awareness of your surroundings.
See figure 6-5 on page 6-12.
Chapter 6: Black Belt
For Official Use Only
6-12
MCRP 3-02B
Figure 6-5. Neck-Crank Takedown.
For Official Use Only
Chapter 6: Black Belt

Marine Corps Martial Arts Program
6-13
Section V
Chokes
The purpose of a choke is to render your aggressor unconscious or gain control of a close combat
situation through less than lethal force. Chokes are performed by either closing off the airway to
the lungs, thereby preventing oxygen from reaching the heart or by cutting off the blood flow to
the brain.
When executed properly, a blood choke takes between 8 to 13 seconds for the aggressor to lose
consciousness. The air choke is least preferred because it takes longer to render the aggressor.
A blood choke, such as the triangle choke and the guillotine choke is performed on the carotid
artery that carries oxygen-enriched blood from the heart to the brain. The carotid artery is located
on both sides of the neck. When executed properly, a blood choke takes between 8 and 13 sec-
onds for the aggressor to lose consciousness. The blood choke is the preferred choke because the
intended effect is for the aggressor to quickly lose consciousness, ending the fight. A blood
choke is used to render your aggressor unconscious or gain control of a close combat situation
through less than lethal force.
An air choke is performed on the windpipe or trachea, cutting off the air to the lungs and heart.
When executed properly, an air choke takes between 2 and 3 minutes for the aggressor to lose
consciousness. Due to the length of time it takes to stop the fight with an air choke, air chokes
are not recommended and will not be taught as part of MCMAP. This section covers the triangle
choke and the guillotine choke.
Refer to appendix A for corresponding safeties 1, 2, 6, 10, 11, and 12.
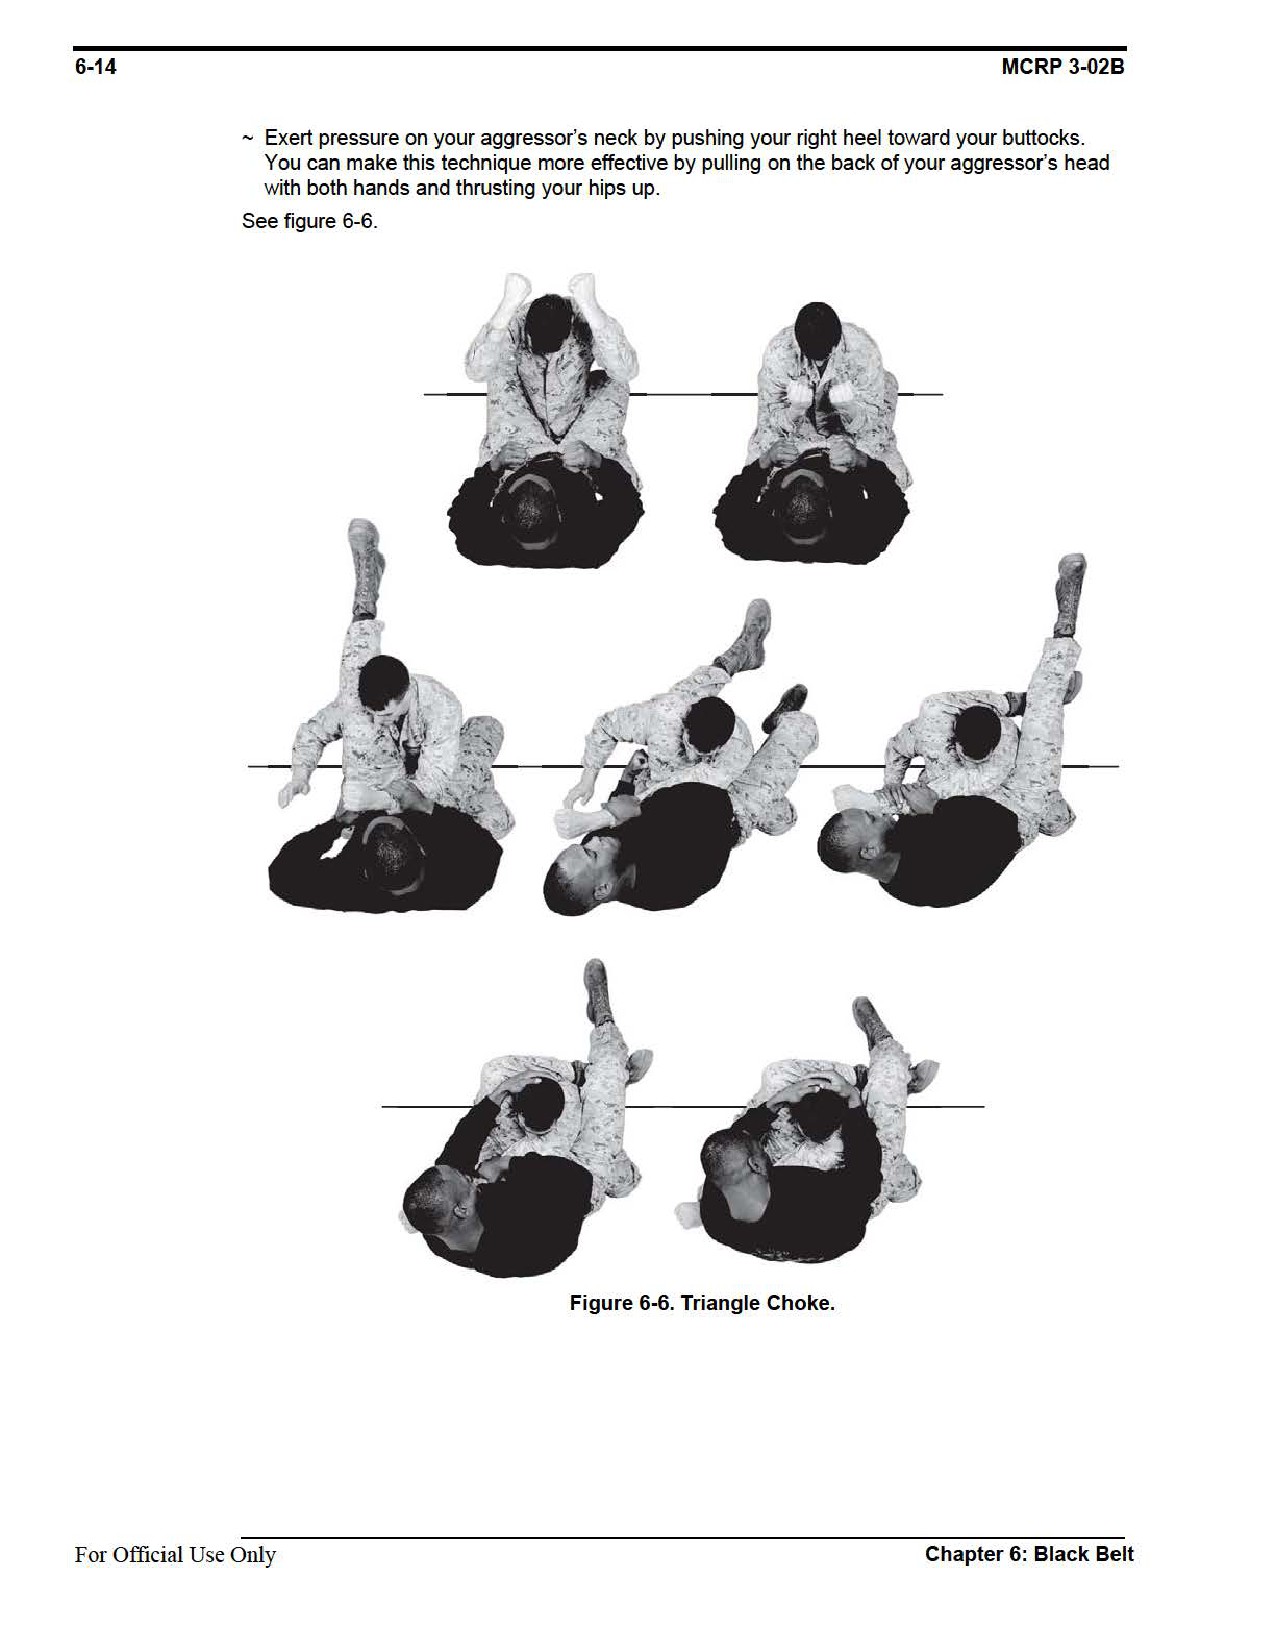
Triangle Choke
The purpose of the triangle choke is to render an aggressor unconscious and quickly get back to
your feet to gain the tactical advantage. This technique is executed if the aggressor is on top of
you and your legs are wrapped around the aggressor’s waist. In the following scenario, the
aggressor is trying to pass your guard position and gain the tactical advantage.
Technique
~ Begin by lying on your back with the aggressor kneeling between your legs in your
guard position.
~ The aggressor tries to pass your guard position by reaching back with his right arm and
attempting to throw your left leg over his head.
~ As the aggressor tries to throw your left leg over his head, turn your body slightly to the left,
quickly place the back of your left knee along the right side of the aggressor’s neck.
~ Bend your left knee so that your calf is applying pressure on the back of your aggressor’s
neck. If necessary, elevate your hips slightly to help achieve the position.
~ With both hands, grasp your aggressor’s left wrist and pull it forcefully toward your left hip.
~ Maintain control of your aggressor’s left arm, lift your right leg off of the deck, and place the
back of your right knee on the top of your left ankle.
Chapter 6: Black Belt
For Official Use Only
Marine Corps Martial Arts Program
6-15
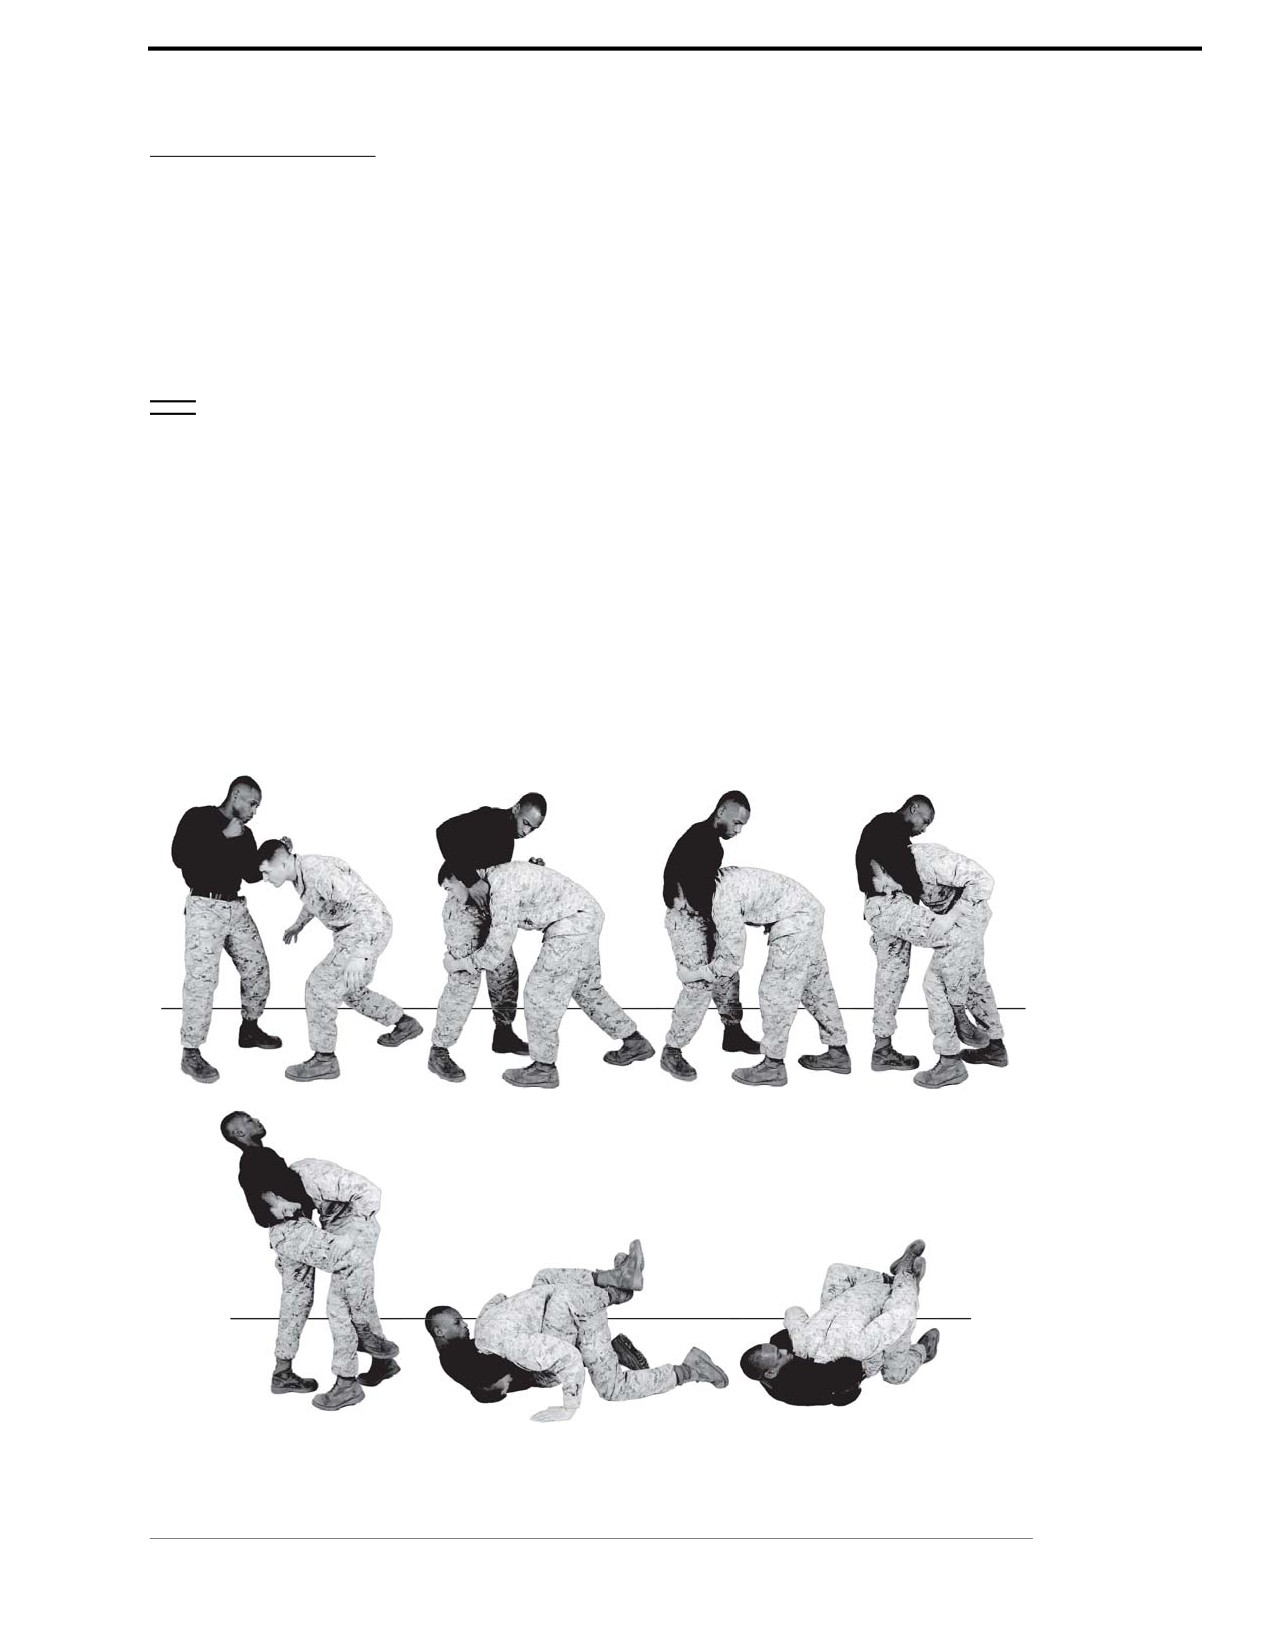
Guillotine Choke
The purpose of a guillotine choke is to render an aggressor unconscious and quickly get back on
your feet to gain the tactical advantage. This technique is performed when the aggressor is trying
to tackle you by either grabbing both of your legs or grabbing around your waist and forcing you
to the ground to gain a tactical advantage. This technique can be performed from either the
standing position or from the ground.
Technique
~ Begin by standing facing each other.
~ As your aggressor tries to tackle you, wrap your right arm around his neck and clasp your
hands together, then wrap your right leg around his left leg.
~ By arching your back straight and pulling upward with the clasp of your hands, the force
against the neck will cause your aggressor to choke out.
~ If the engagement reaches the ground, wrap both legs around your aggressor’s body (guard
position), maintaining a tight clasp around the aggressor’s neck.
~ Use your ankles to separate the aggressor’s legs. Make sure that you arch your back
and apply pressure with your legs and arms at the same time, causing the aggressor to
choke out.
See figure 6-7.
Figure 6-7. Guillotine Choke.
Chapter 6: Black Belt
For Official Use Only

6-16
MCRP 3-02B
Section VI
Knee Bar
The purpose of the knee bar is to apply joint manipulation to the aggressor’s knee in order
to escape from a hold by executing the rolling knee bar or the sitting knee bar to gain a
tactical advantage.
Refer to appendix A for corresponding safeties 1, 2, 5, 6, 10, and 13.
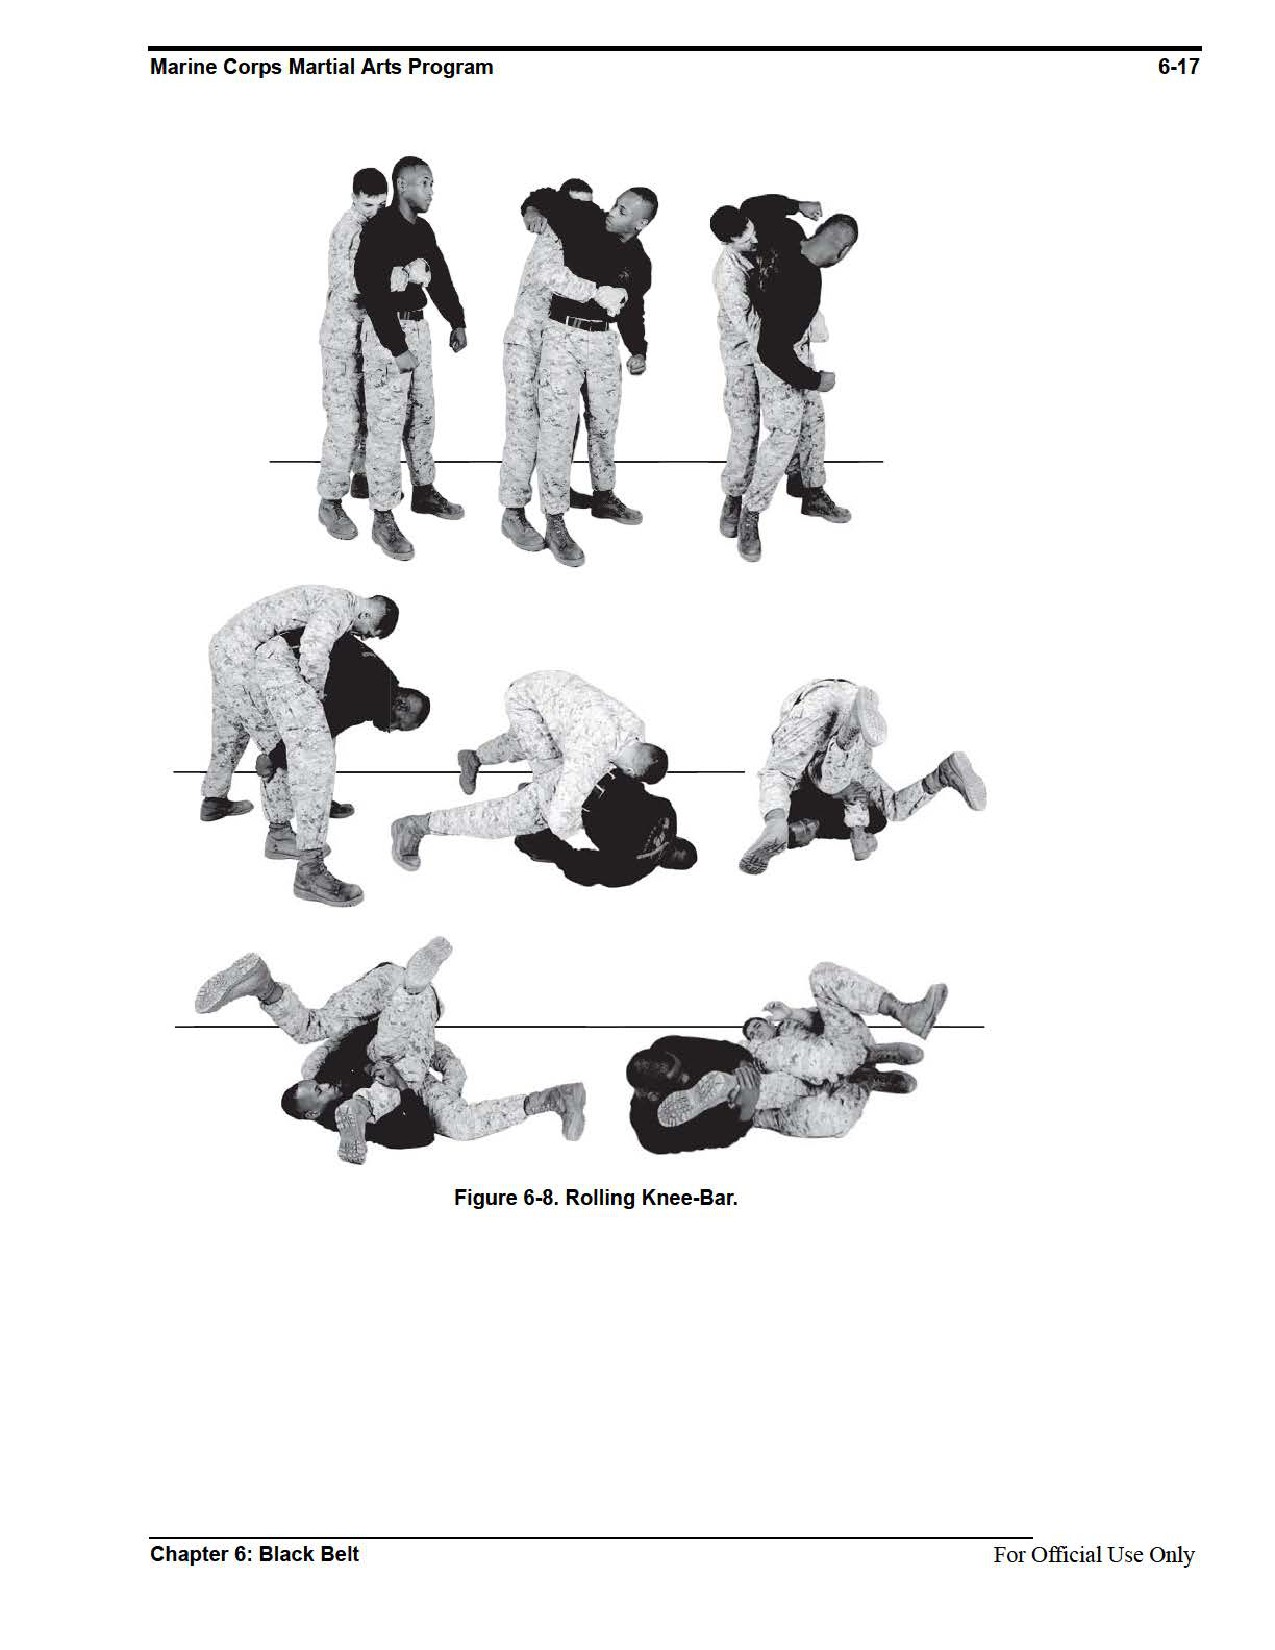
Rolling Knee Bar
The purpose of rolling the knee bar is to apply joint manipulation to the aggressor’s knee in order
to escape from a hold and gain a tactical advantage. This technique requires that your arms
remain free.
Technique
~ The aggressor executes a rear bear hug leaving your arms free.
~ Execute a rear horizontal elbow strike to loosen the aggressor’s grasp.
•Horizontal elbow strikes are aimed at the head, but for training purpose they will be thrown
in the air, do not make contact with your training partner.
•Other distracters such as the vertical stomp to instep and the rear head-butt can be
executed in a live situation.
~ Step out slightly with your right foot, bending at the knees and the waist.
~ Reach between your legs with both hands and firmly grasp the aggressor’s right leg at or
below the knee.
~ Execute a forward shoulder roll and pull the aggressor’s right leg close against your torso.
~ Upon completing the forward shoulder roll you should be lying on your hip with the
aggressor’s leg held tight against your torso.
•Your left leg should be between the aggressor’s legs, tight to his groin, your left foot
supported by your right foot. Keep your knees bent and pinched together so you can control
the aggressor’s upper leg.
•The aggressor’s knee should be at or slightly above your groin.
~ Maintain control of the aggressor’s leg and arch your hips into his knee while pulling back
with your whole body. Your arms, which are holding his leg to your torso, and your feet will
also cinch the aggressor’s leg and pull.
~ Thrust your hips forward quickly while yanking back on the aggressor’s leg for joint
destruction. During training, apply slow, steady pressure for the submission with your
training partner.
See figure 6-8.
For Official Use Only
Chapter 6: Black Belt

6-18
MCRP 3-02B
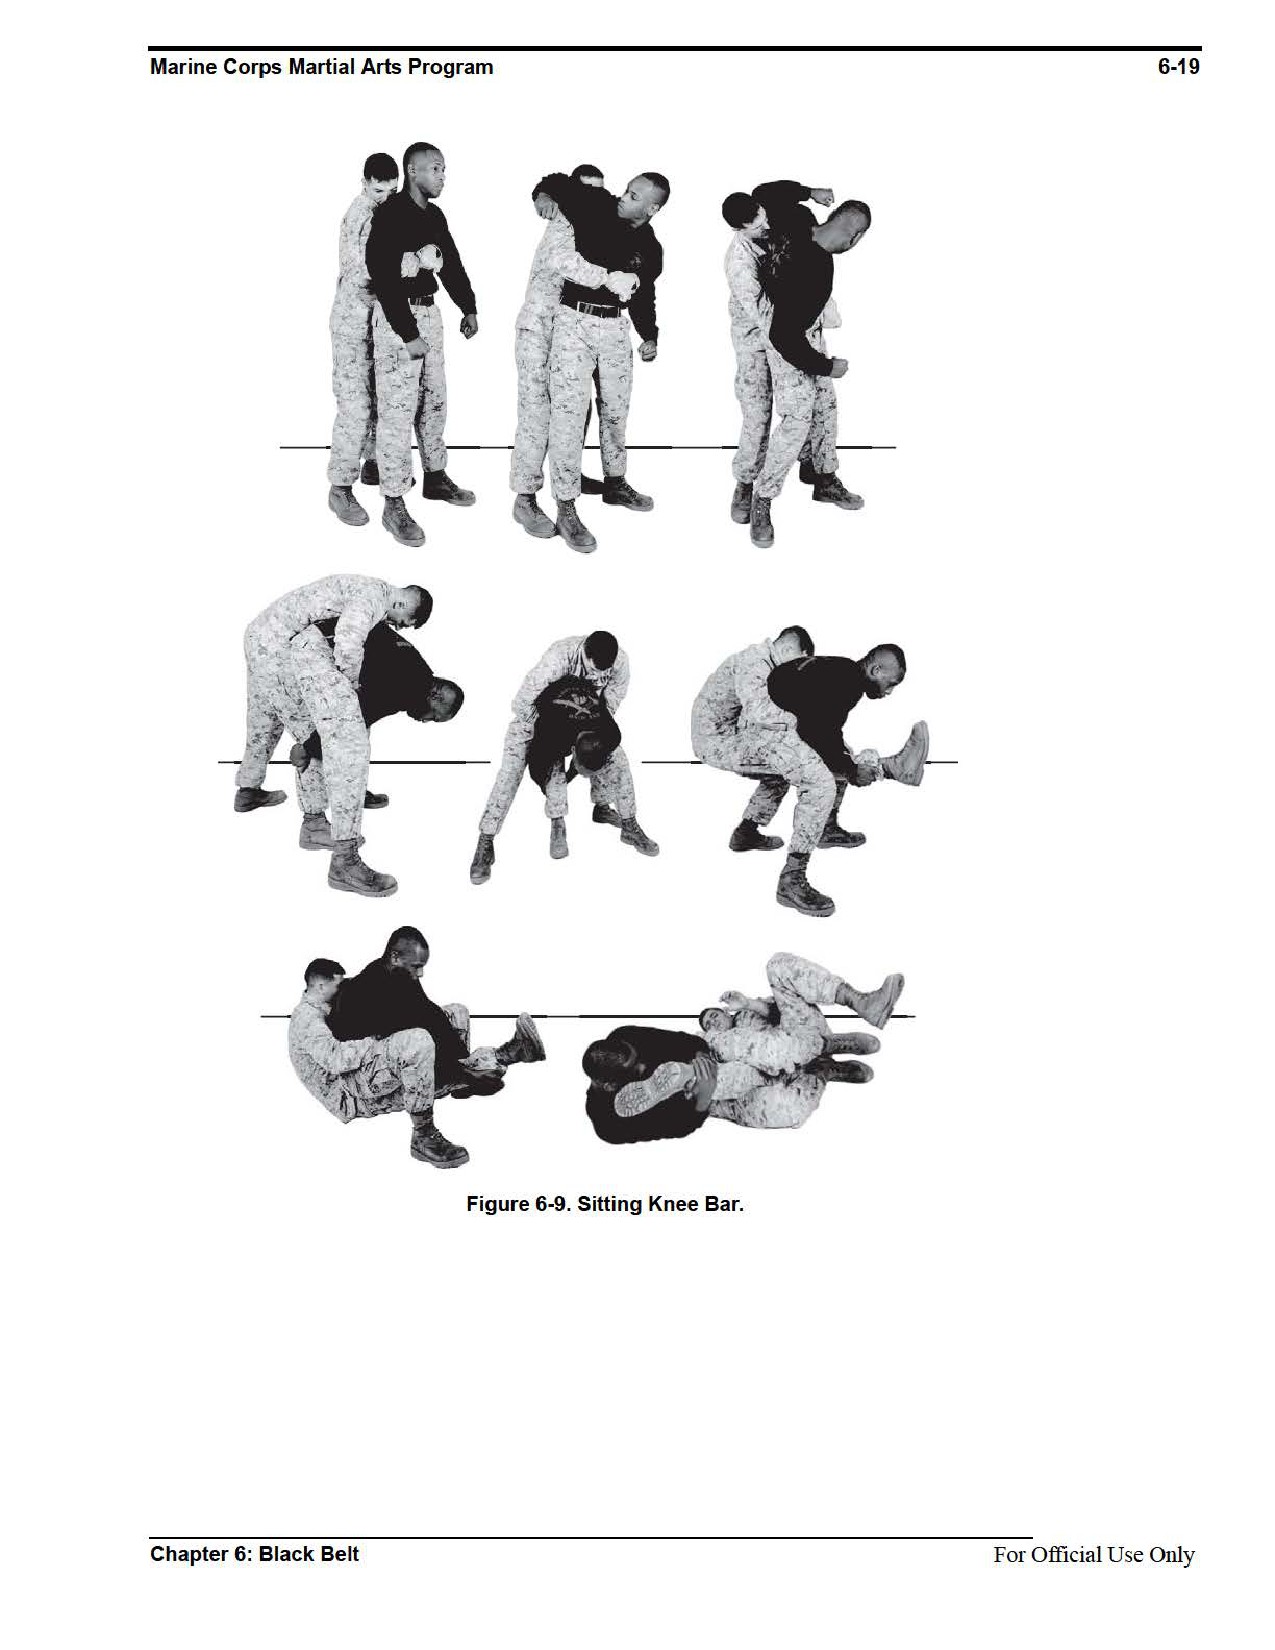
Sitting Knee Bar
The purpose of the sitting knee bar is to apply joint manipulation to the aggressor’s knee to
escape from a hold and gain a tactical advantage. This technique requires that your arms
remain free.
Technique
~ The aggressor executes a rear bear hug leaving your arms free.
~ Execute a rear horizontal elbow strike to loosen the aggressor’s grasp.
•Horizontal elbow strikes are aimed at the head, but for training purpose they will be thrown
in the air, do not make contact with your training partner.
•Other distracters such as the vertical stomp to instep and the rear head-butt can be
executed in a live situation.
~ Step out slightly with your right foot, bending at the knees and waist.
~ Reach between your legs with both hands and firmly grasp the aggressor’s right leg at or
below the knee.
~ Sit back on your aggressor’s leg while simultaneously pulling the aggressor’s leg close
against your torso.
~ After completing the sitting motion, you should be laying on your hip with the aggressor’s leg
held tight against your torso.
•Your left leg should be between the aggressor’s legs, tight to his groin, left foot supported
by your right foot. Keep your knees bent and pinched together so you can control the
aggressor’s upper leg.
•The aggressor’s knee should be at or slightly above your groin.
~ Maintain control of the aggressor’s leg and arch your hips into his knee while pulling back
with your whole body. Your arms, which are holding the leg to your torso, and your feet will
also cinch the aggressor’s leg and pull.
~ Thrust your hips forward quickly while yanking back on the aggressor’s leg for joint
destruction. During training, apply slow, steady pressure for the submission with your
training partner.
See figure 6-9.
For Official Use Only
Chapter 6: Black Belt

6-20
MCRP 3-02B
Section VII
Counter to Pistol to the Head
Firearm disarmament techniques are designed to counter a confrontation with a pistol while per-
mitting you to gain the tactical advantage against an aggressor.
Refer to appendix A for corresponding safeties 1, 2, 6, 8, 9, 10, and 13.
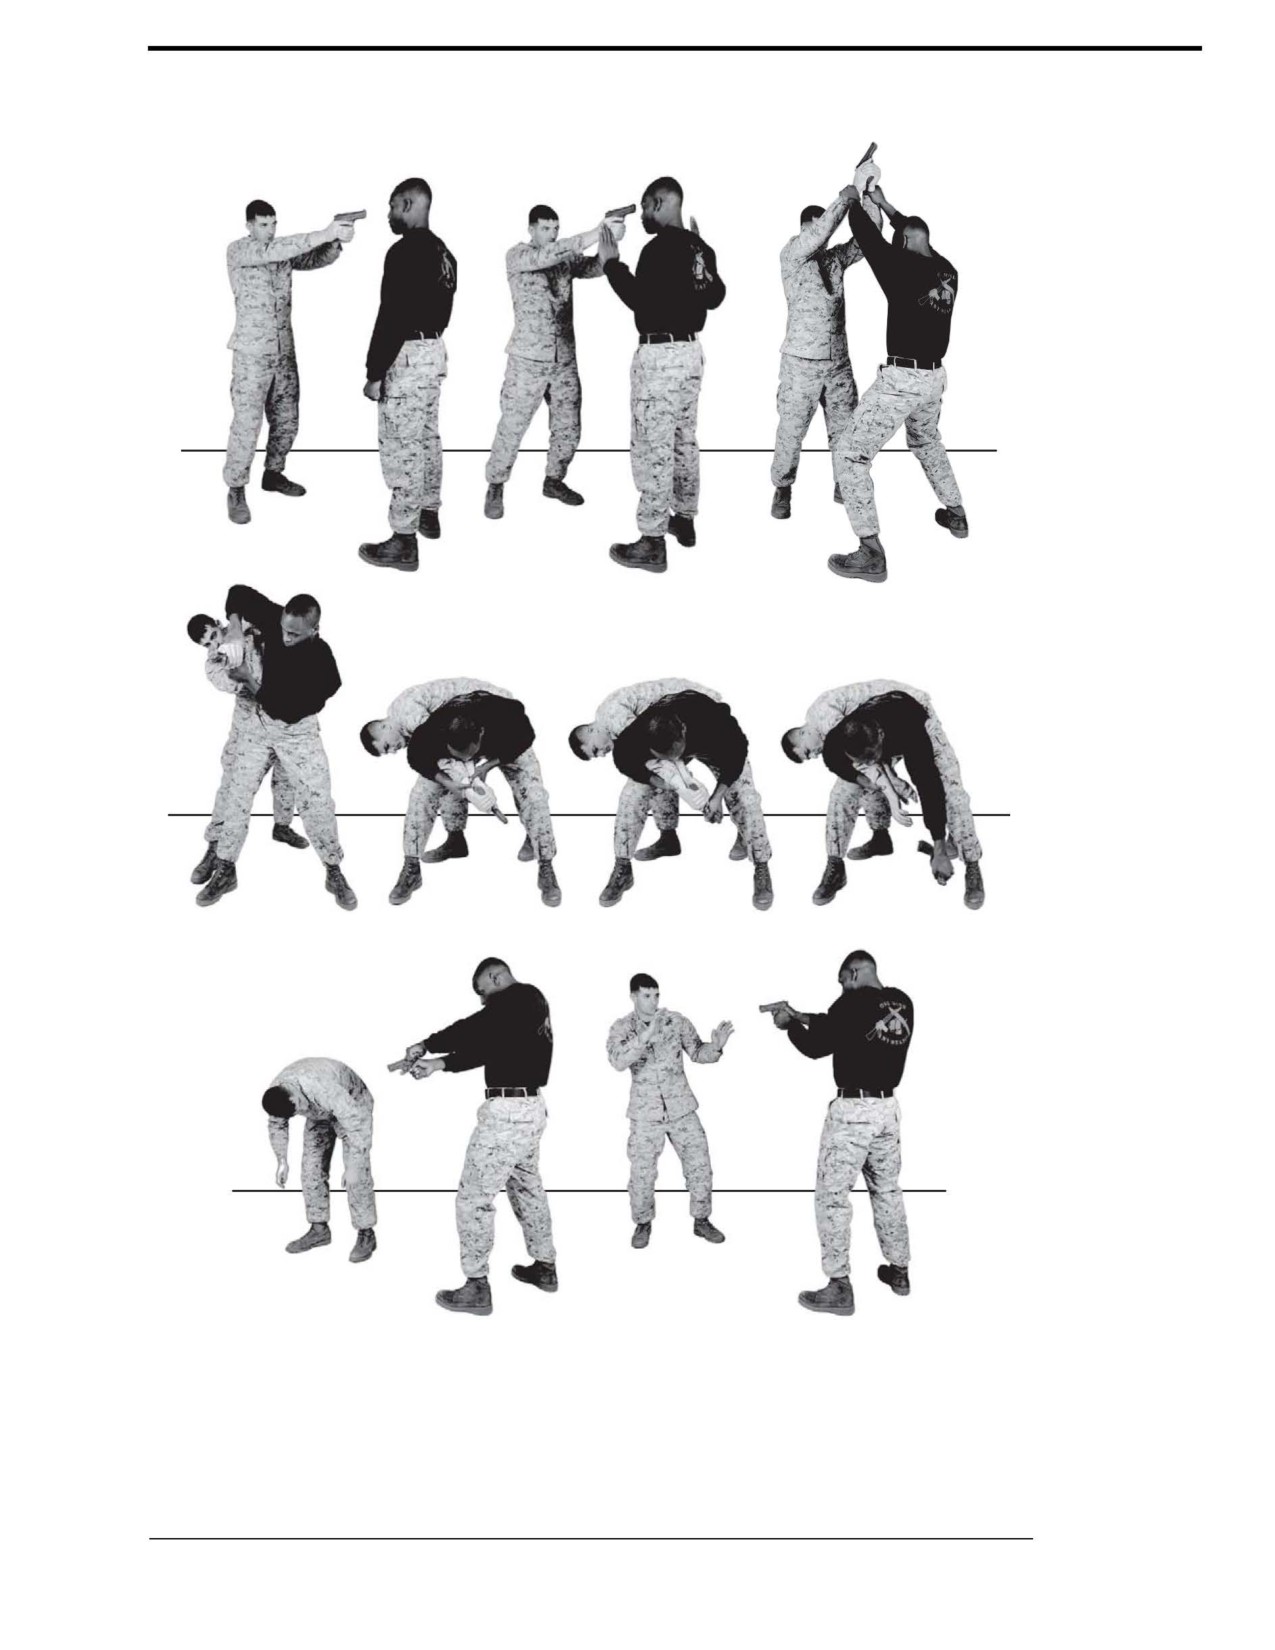
Counter to Pistol to the Head: Two Handed
This technique is performed when you are unarmed and your aggressor has a pistol pointing at
your head. The pistol must be in close distance to you for this technique to be effective.
Technique
~ Begin at close range with the aggressor pointing a pistol at your head. The aggressor is
holding the pistol with both hands.
~ Assume a submissive posture, your hands about chest high and palms out. Place your hands
as close to the weapon as possible without raising the aggressor’s suspicion. Make a
submissive verbal statement.
~ Grab your aggressor’s wrists with both hands and thrust them upward. At the same time,
drop your body and head down quickly, while bending your knees. You must do this at the
same time to double your distance from the barrel of the pistol and to clear your head out of
the line of fire.
•Maintain control of the aggressor’s arm(s).
•It does not matter which hand the aggressor is holding the weapon with, always grab his
wrist(s) and clear your head in the same manner.
~ Step your right foot to the outside of the aggressor’s right foot and trap his arm in your right
armpit. Rotate your torso and thrust your hip into him to off balance him.
~ Pull your right elbow in tight to your side to trap the aggressor’s arms. Retain a firm grip on
the aggressor’s wrist(s) and do not allow them to rotate in your grasp.
~ Maintain your right over hook; grab the pistol with your left hand, rotating it out of the
aggressor’s hand. Make sure the muzzle is never pointed at you and that you keep your hand
clear of it.
~ Use your hips and your upper body leverage to off balance the aggressor and to put space
between you and the aggressor. Turn toward the aggressor, perform an expedient press
check, and prepare for follow-on actions.
See figure 6-10.
For Official Use Only
Chapter 6: Black Belt
Marine Corps Martial Arts Program
6-21
Figure 6-10. Counter to Pistol to the Head: Two Handed.
Chapter 6: Black Belt
For Official Use Only

6-22
MCRP 3-02B
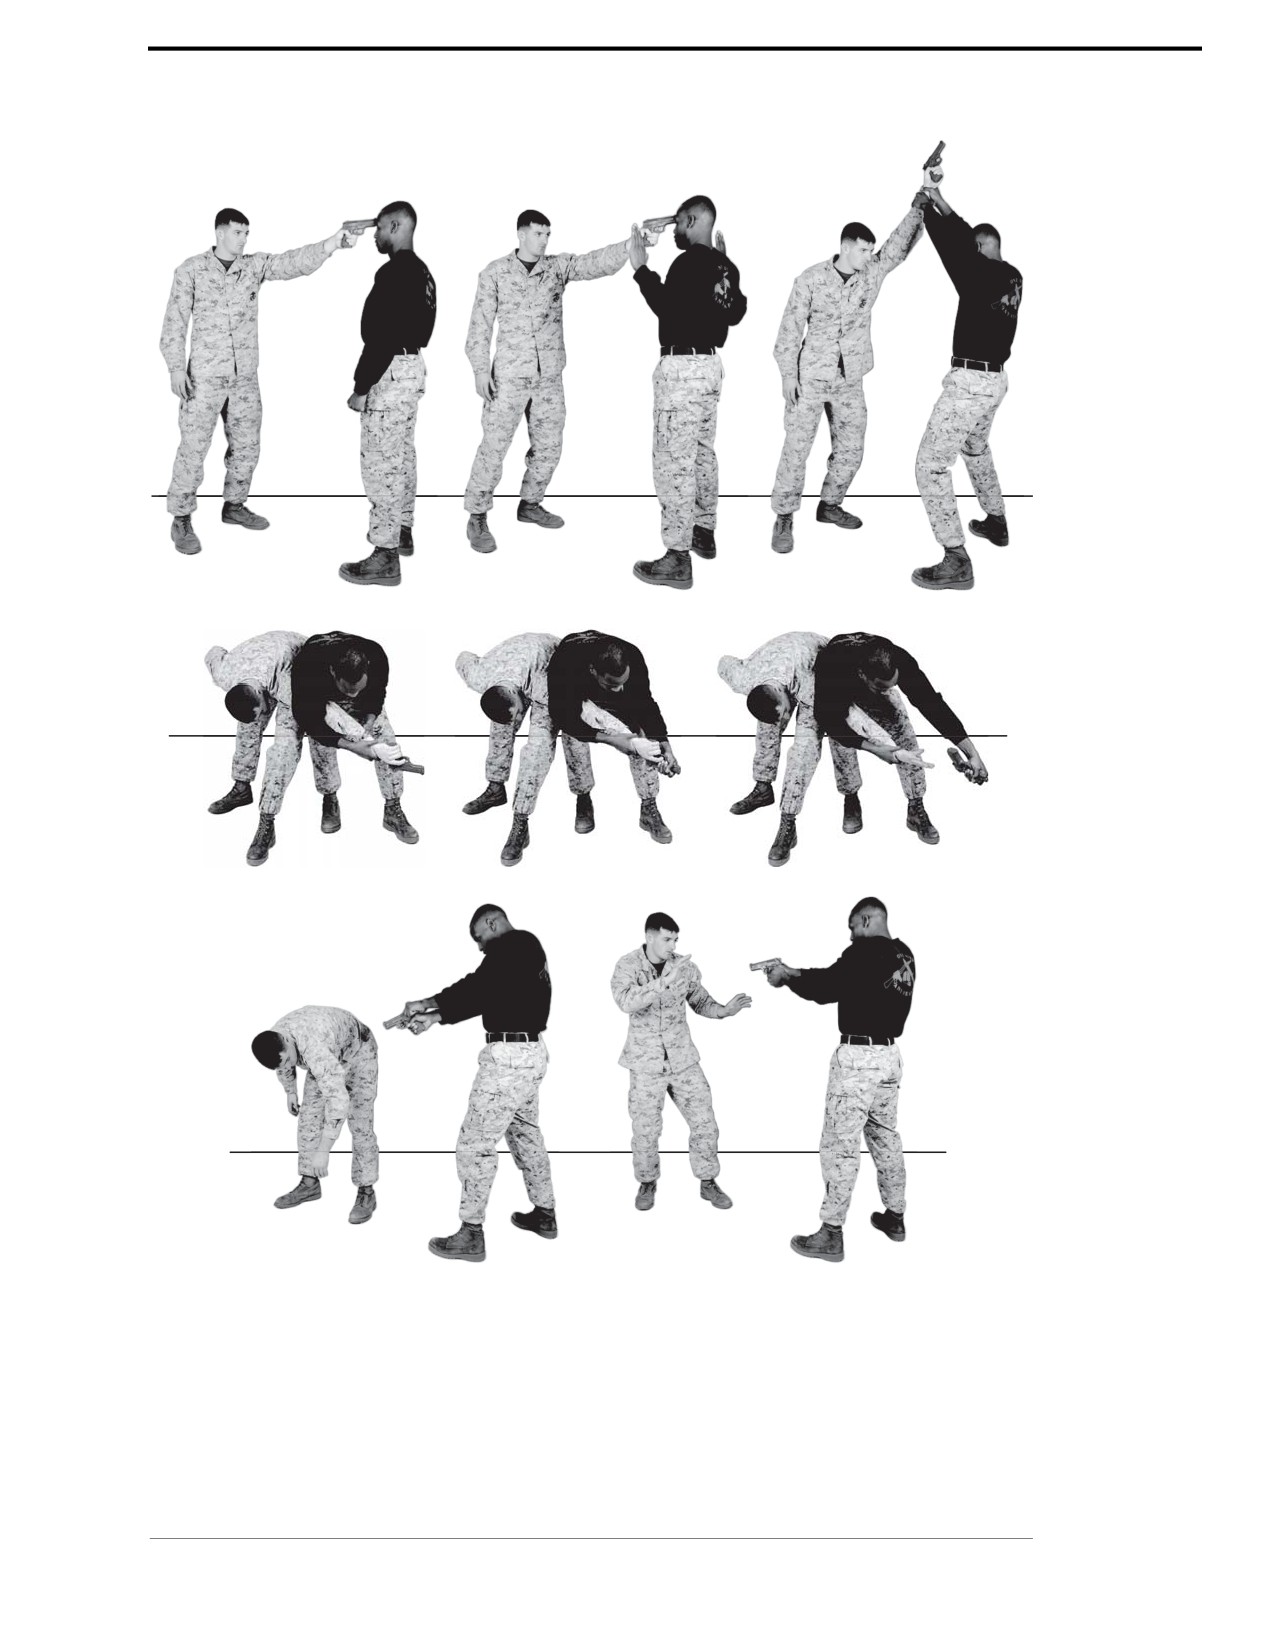
Counter to Pistol to the Head: One Handed
This technique is performed when you are unarmed and your aggressor has a pistol pointing at
your head. The pistol must be in close distance to you for this technique to be effective.
Technique
~ Begin at close range with the aggressor pointing a pistol at your head. The aggressor is
holding his pistol with his right hand and his left arm is down.
~ Assume a submissive posture, your hands about chest high and palms out. Place your hands
as close to the weapon as possible without raising the aggressor’s suspicion. Make a
submissive verbal statement.
~ Grab your aggressor’s wrist with both hands and thrust upward. At the same time, drop your
body and head down quickly, while bending your knees. You must do this at the same time to
double your distance from the barrel of the pistol and to clear your head out of the line of fire.
•Maintain control of the aggressor’s arm.
•It does not matter which hand the aggressor is holding the weapon with, always grab his
wrist(s) and clear your head in the same manner.
~ Step with your right foot to the outside of the aggressor’s right foot and trap his arm in your
right armpit. Rotate your torso and thrust your hip into the aggressor to off balance him.
~ Pull your right elbow in tight to your side to trap the aggressor’s arm. Retain a firm grip on the
aggressor’s wrist and do not allow him to rotate in your grasp.
~ Maintain your right over hook; grab the pistol with your left hand, rotating it out of the
aggressor’s hand. Make sure that the muzzle is never pointed at you and that you keep your
hand clear of it.
~ Use your hips and your upper body leverage to off balance the aggressor and to put space
between you and the aggressor. Turn toward the aggressor, perform an expedient press
check, and prepare for follow-on actions.
See figure 6-11.
For Official Use Only
Chapter 6: Black Belt
Marine Corps Martial Arts Program
6-23
Figure 6-11. Counter to Pistol to the Head: One Handed.
Chapter 6: Black Belt
For Official Use Only

6-24
MCRP 3-02B
Section VIII
Upper Body Strikes
The purpose of an upper body strike is to stun the aggressor by using the cupped hand strike and
the face smash, which sets the aggressor up for follow up techniques.
Refer to appendix A for corresponding safeties 1, 2, 3, and 4.
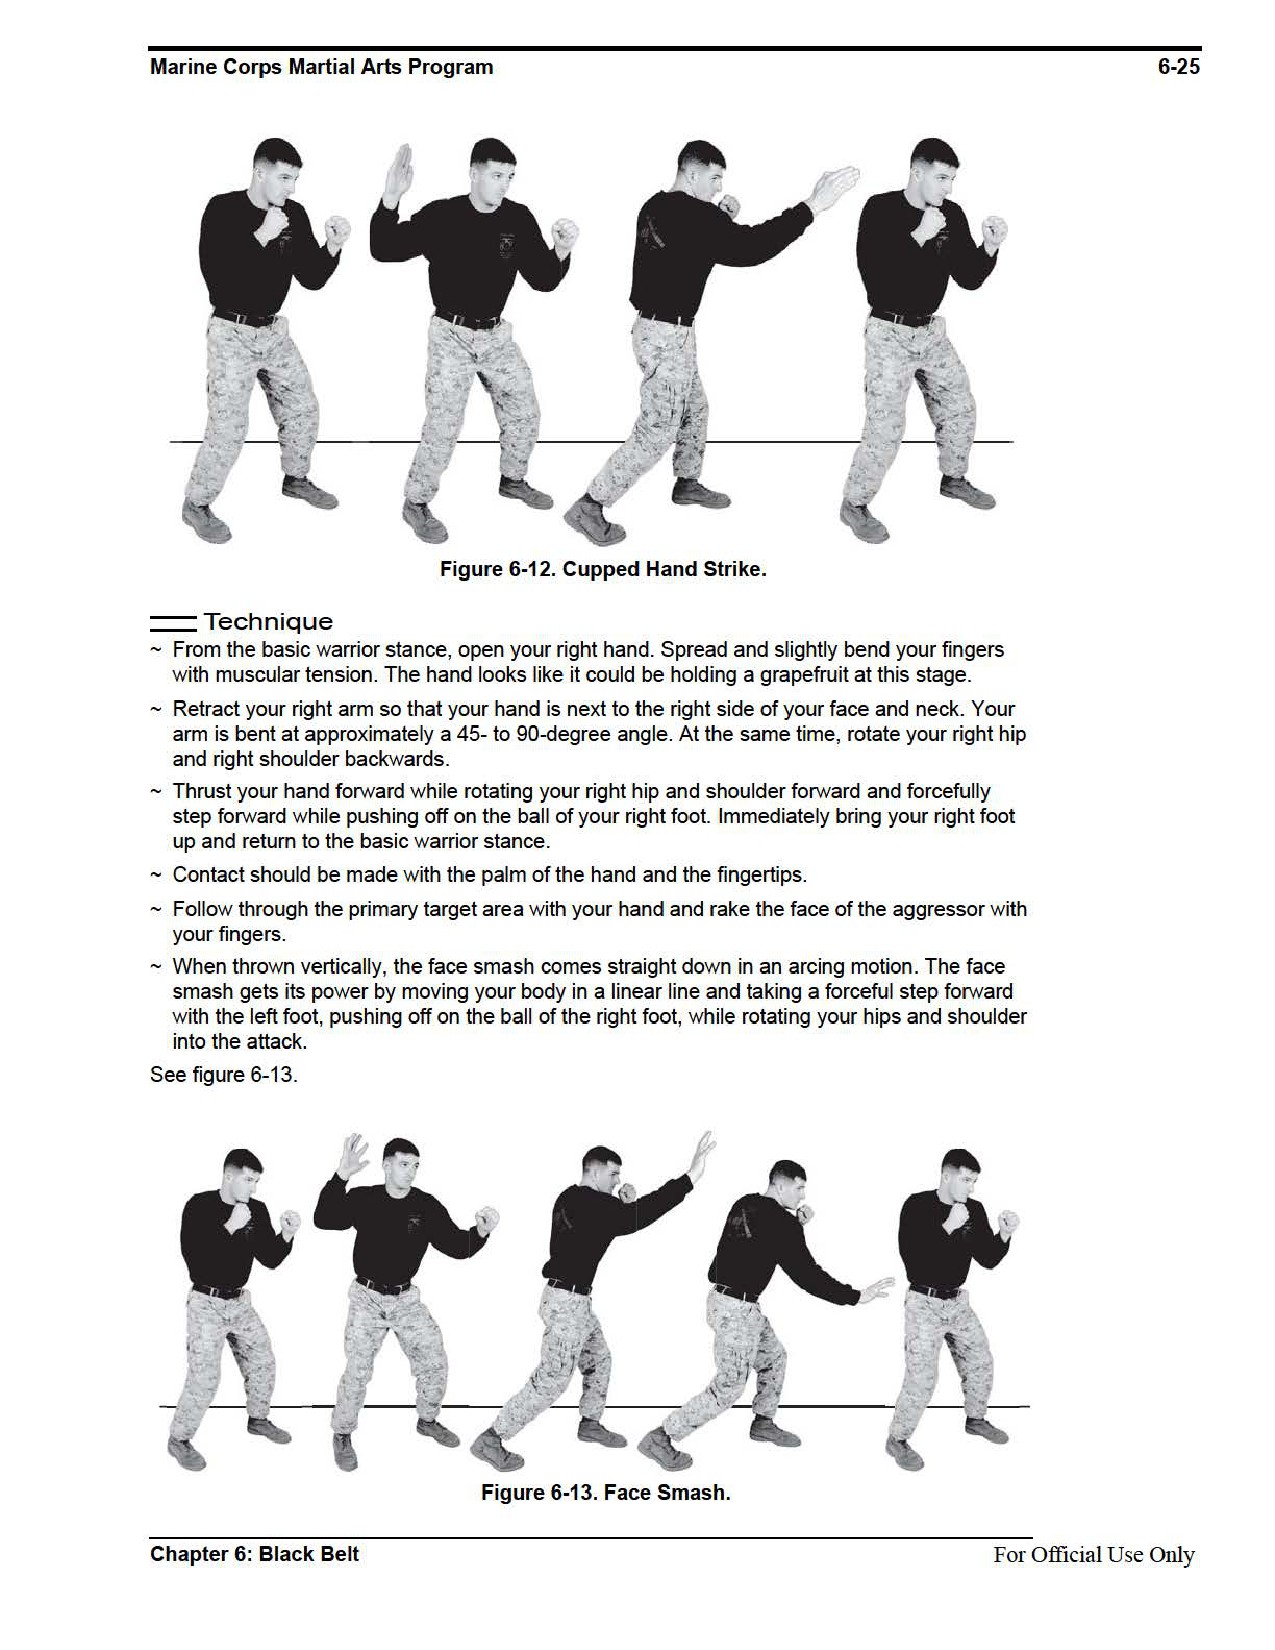
Cupped Hand Strike
Striking with the cupped hand concentrates power in a small part of the hand which, when trans-
ferred to the primary target, can have a devastating effect.
Striking Surface
The striking surface of the cupped hand strike is primarily the palm of the hand.
Target Areas of the Body
The primary target areas of the body are the neck, the face, the head, the ribs, the groin, and
the kidneys.
Technique
~ From the basic warrior stance, open your right hand about halfway, keeping your fingers and
thumb together.
~ Retract your right arm so that your hand is next to the right side of your face and neck. Your
arm is bent at approximately a 45- to 90-degree angle. At the same time, rotate your right hip
and right shoulder backwards.
~ Thrust your hand forward while rotating your right hip and shoulder forward.
~ Rotate your shoulder so that the concave portion of the cupped hand makes contact on
the aggressor.
~ Follow through the primary target area with your hand and return to the basic warrior stance.
See figure 6-12.
Face Smash
Striking with the face smash concentrates power in a small part of the hand which, when trans-
ferred to the primary target, can have a devastating effect.
Striking Surface
The striking surface is primarily the palm of the hand, and secondarily, the fingertips.
Target Areas of the Body
The primary target area of a face smash is the face.
For Official Use Only
Chapter 6: Black Belt
6-26
MCRP 3-02B
Section IX
Knife Techniques
The purpose of knife fighting is to kill or cause enough damage and massive trauma to stop
an aggressor.
Refer to appendix A for corresponding safeties 1, 2, 3, and 14.
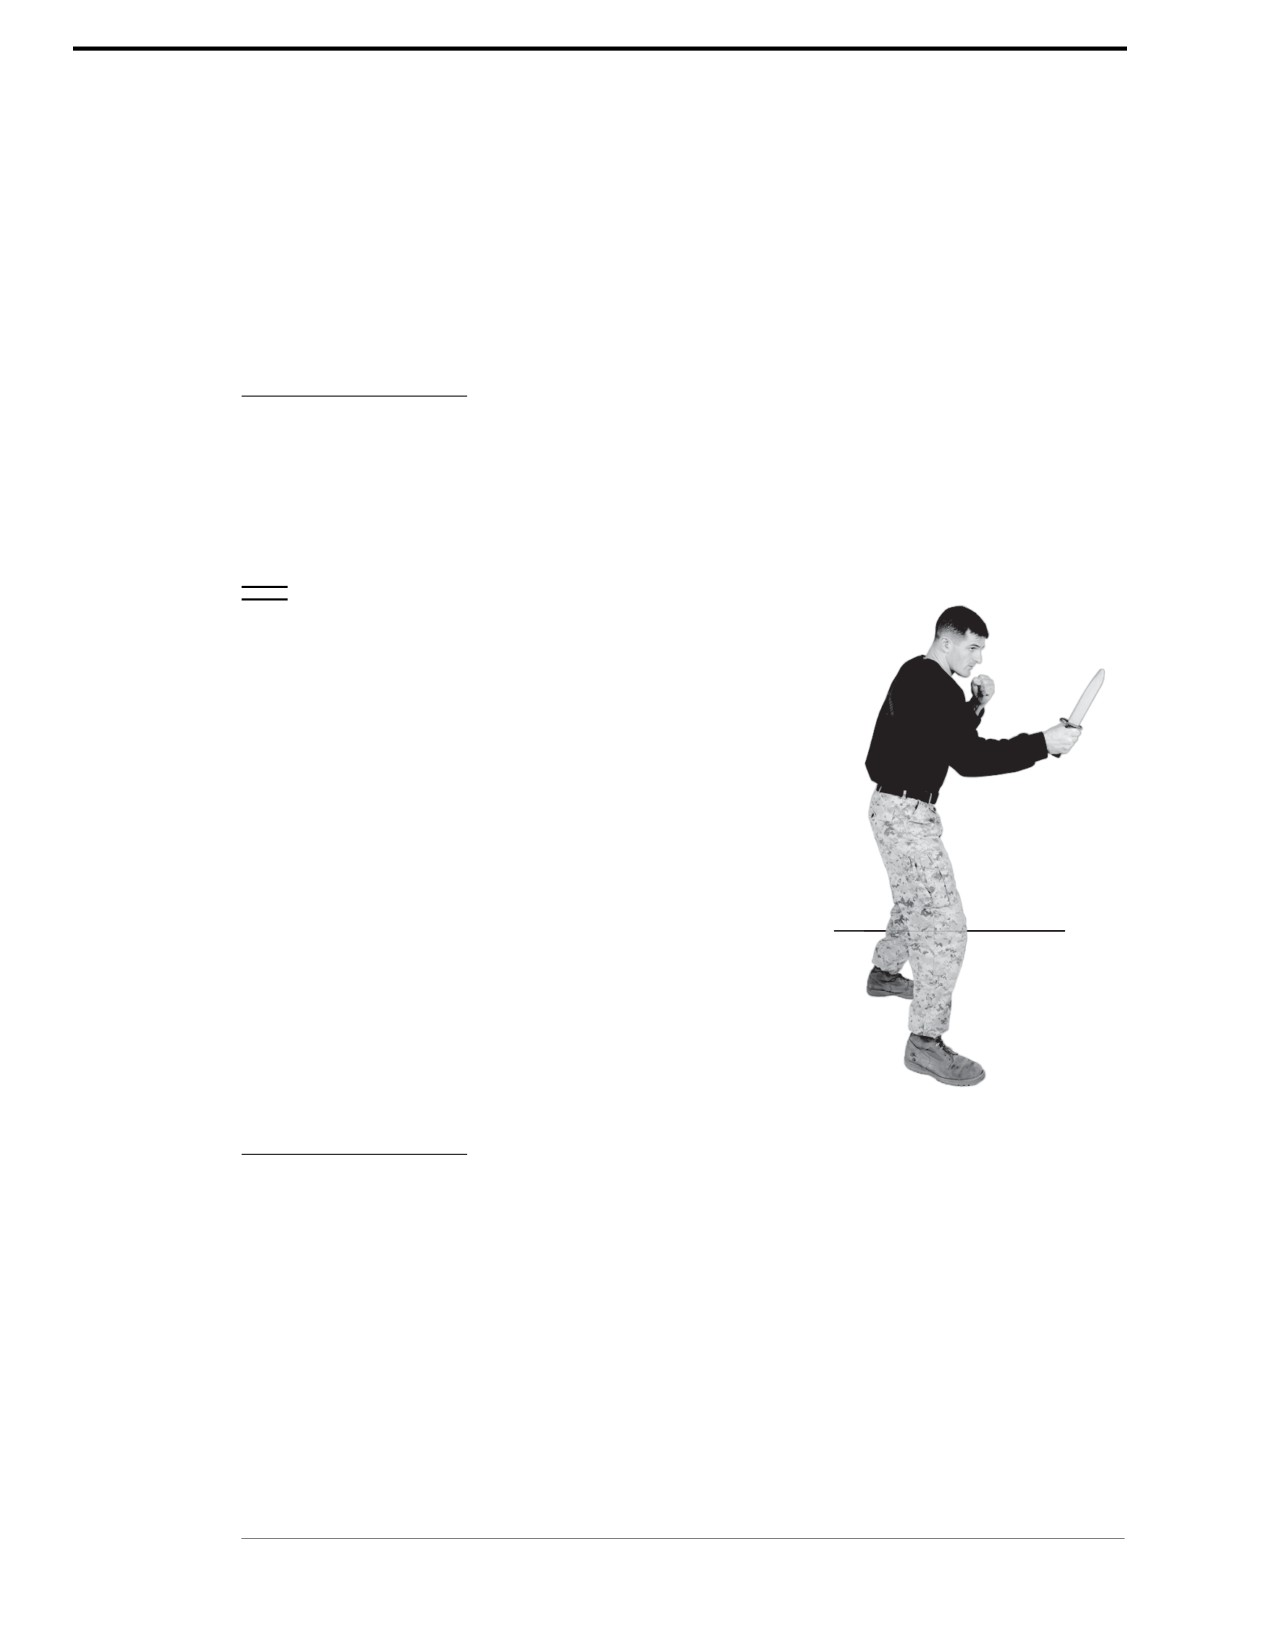
Lead Hand Knife
The purpose of a lead hand knife is to give you the ability to use more speed than power, it also
gives you more space between you and the aggressor, especially if he is armed with an edged
weapon. Your stance will be slightly different than your normal modified basic warrior stance.
Technique
~ The weak side hand serves as a vertical shield
protecting the ribs, head, and neck. It will also be
used to strike when bulldogging your aggressor.
~ Place your strong side leg forward, your strong side
elbow slightly bent with the blade and tip pointing
forward toward the aggressor’s head. This position
serves as an index point, where all lead hand
techniques are initiated.
~ Your strong side forearm will be almost parallel to
the deck and forward of your weak side elbow. The
weapon will be held approximately chest high to
belt level inside your box.
~ The weapon will be kept away from your body to
facilitate quicker strikes and to control the distance.
~ Hold the knife in a hammer grip in your lead hand.
See figure 6-14.
Figure 6-14.
Lead Hand Knife.
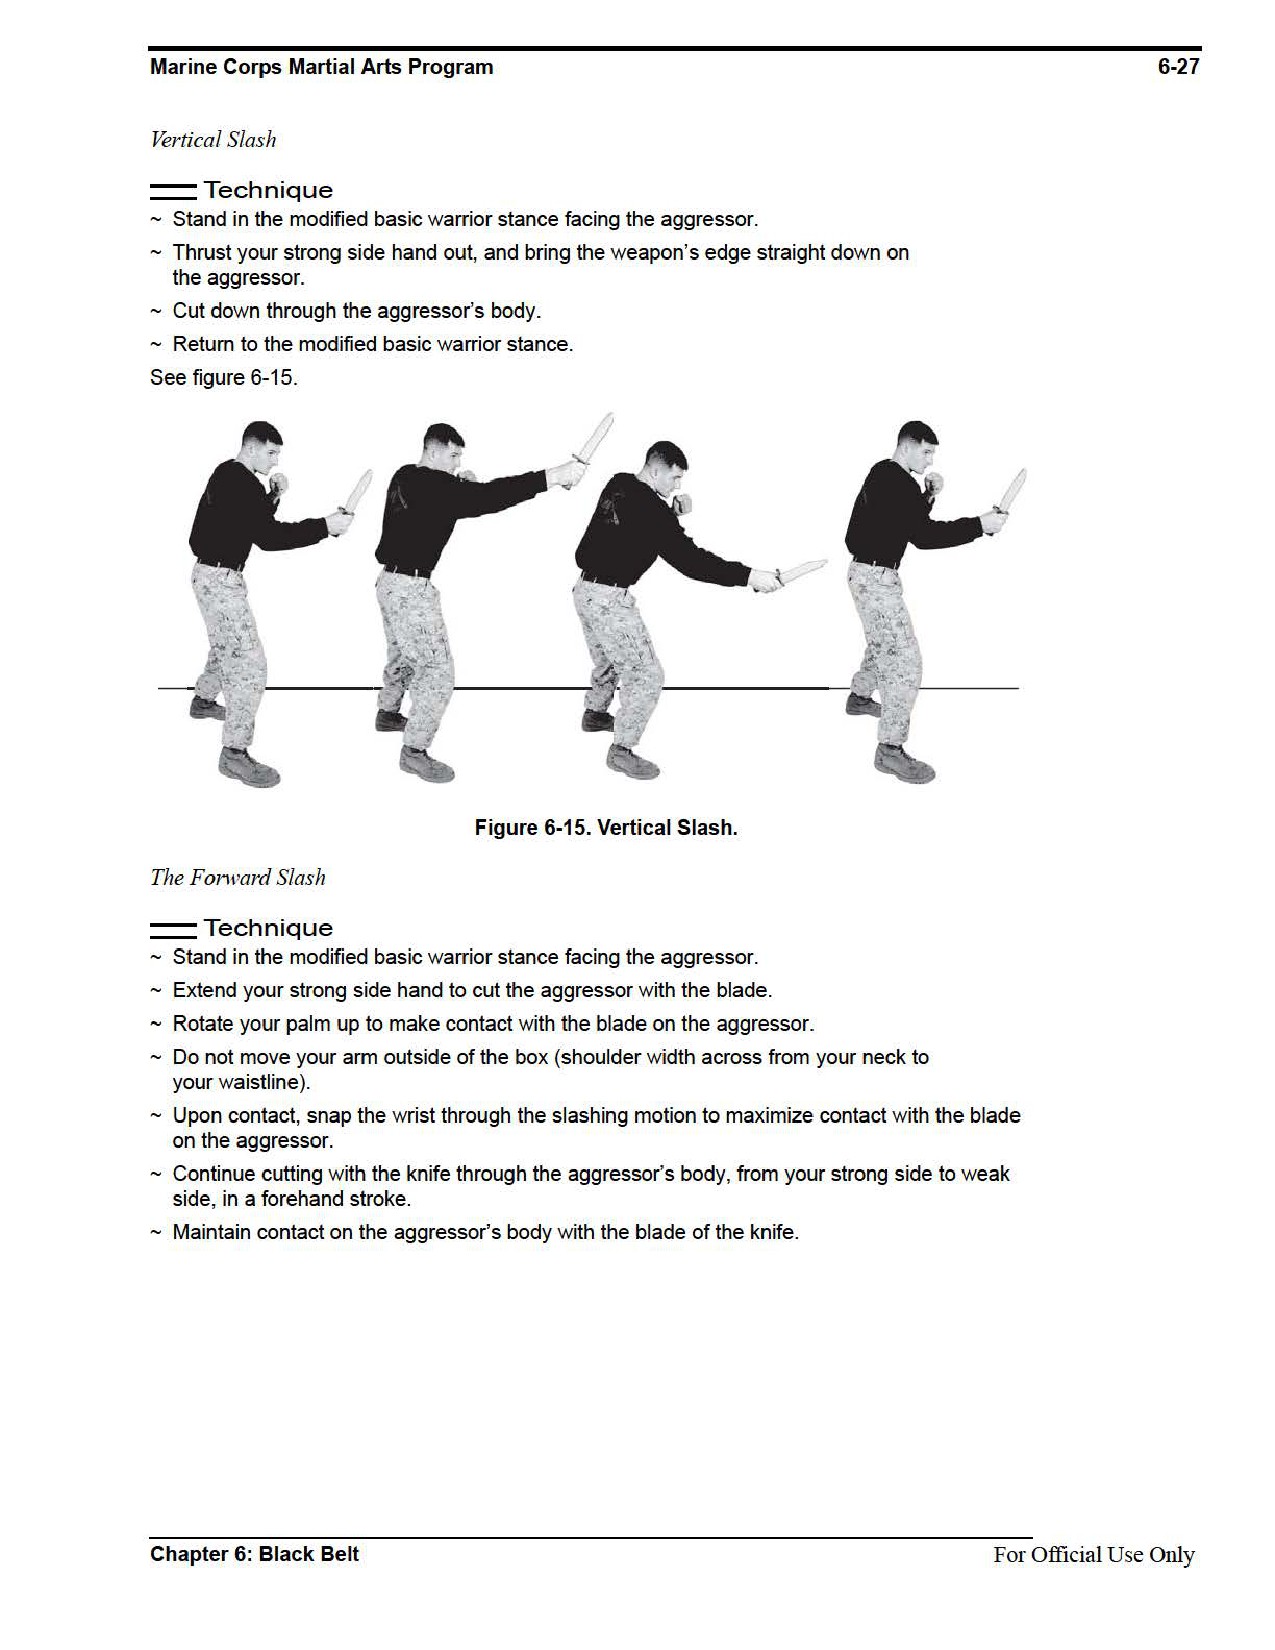
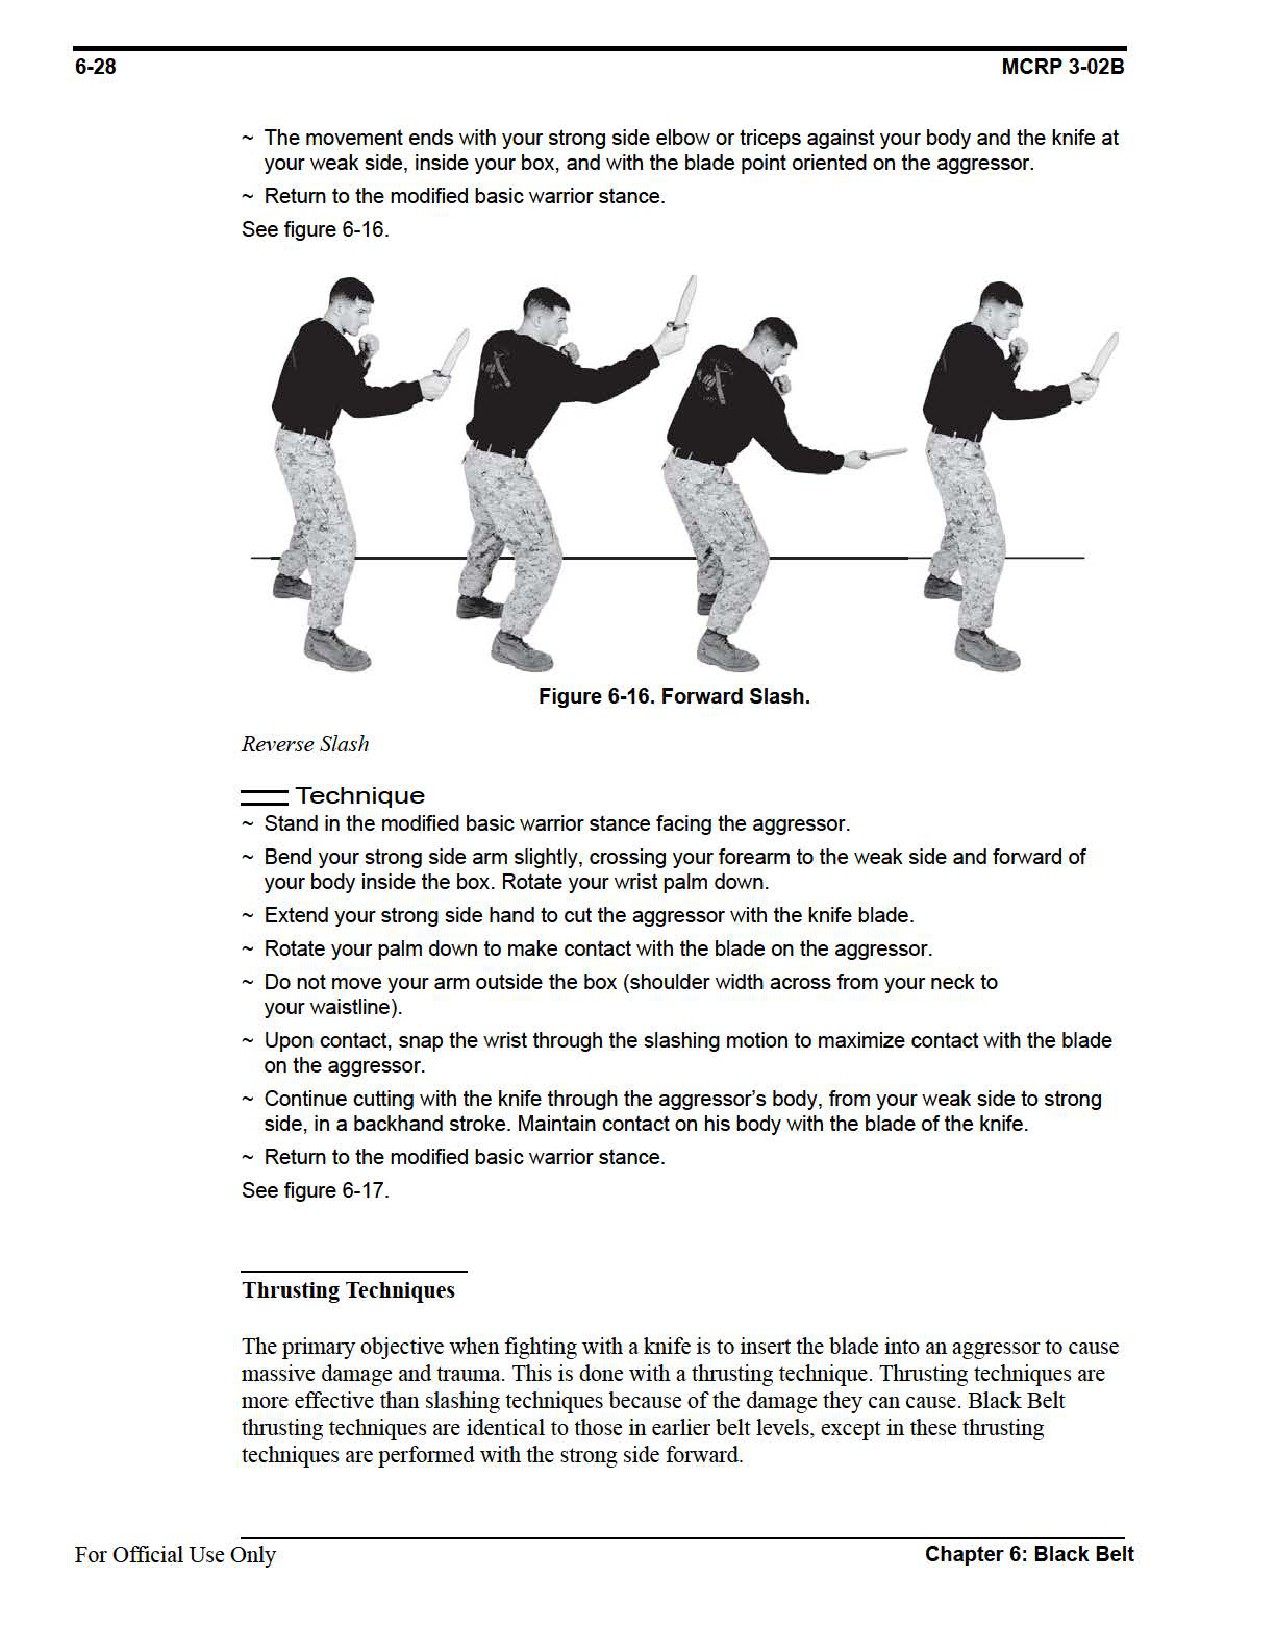
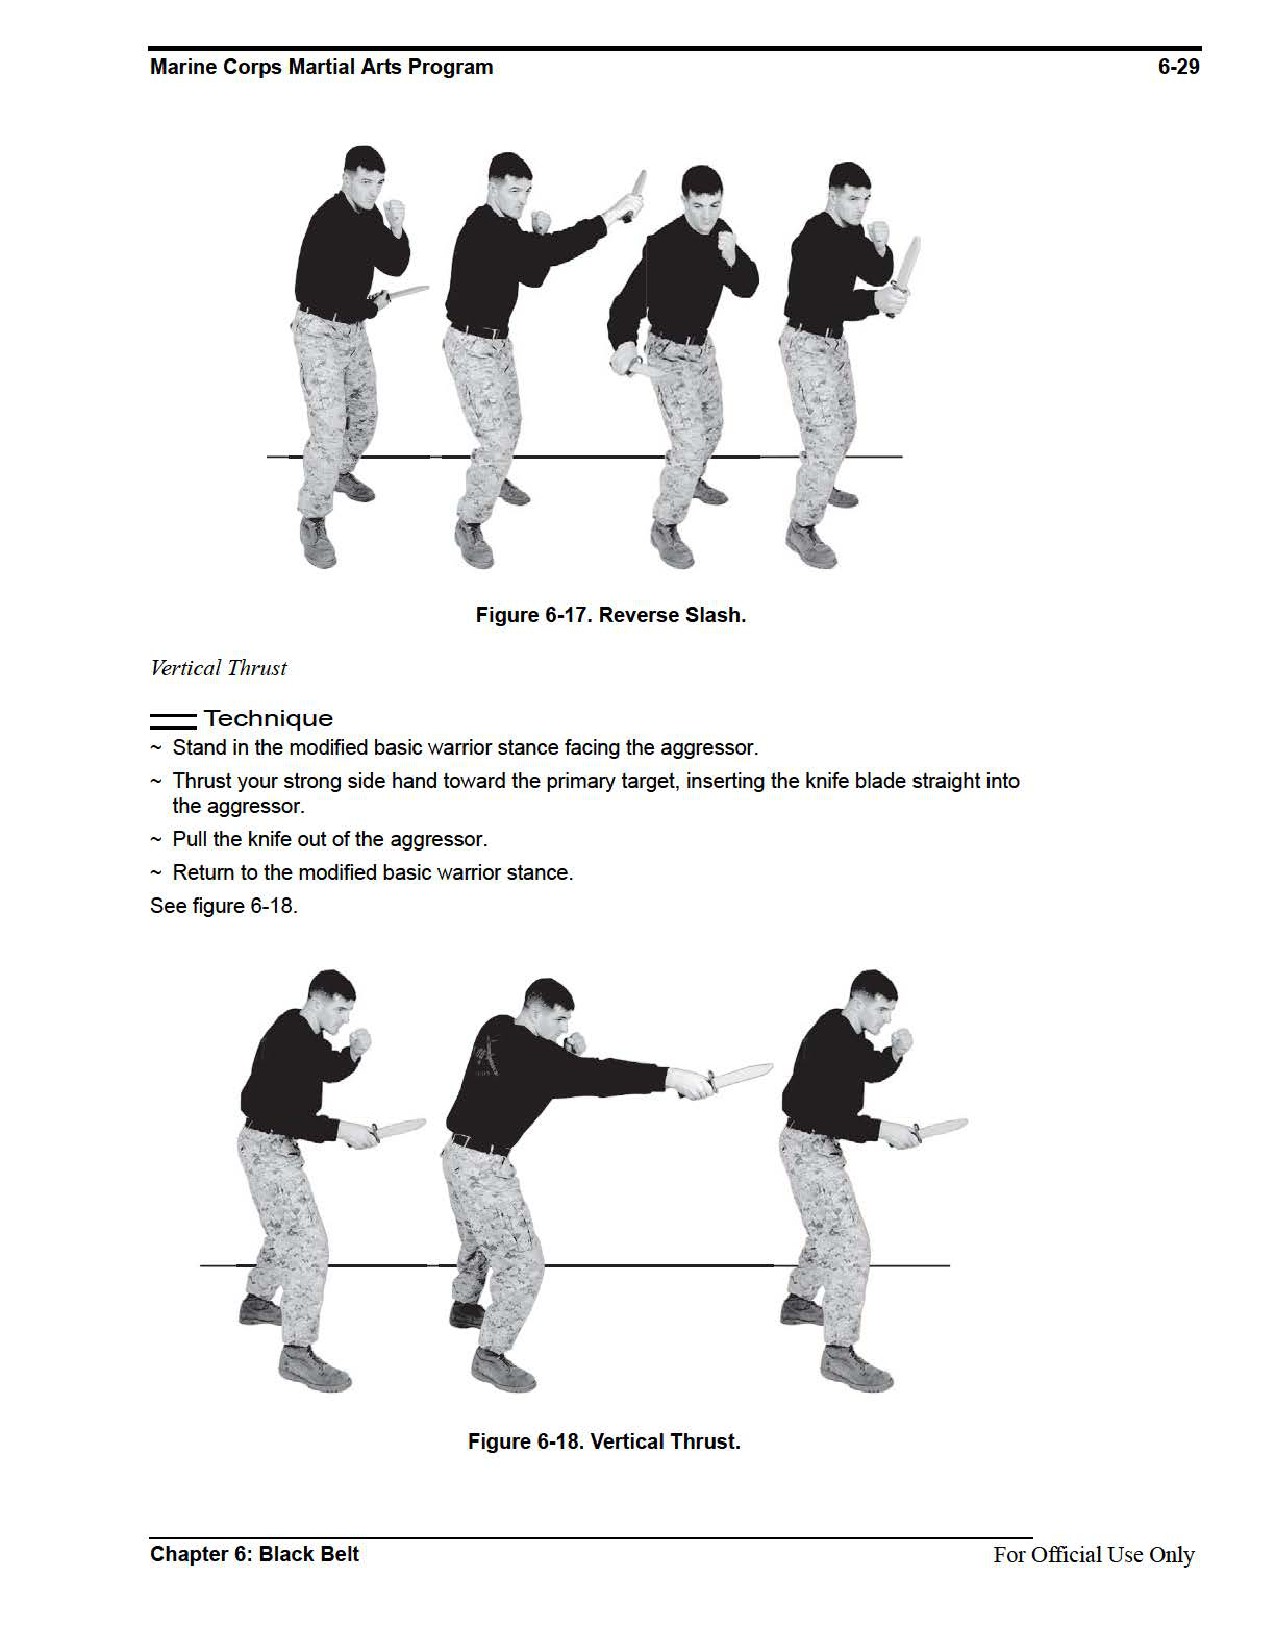
Slashing Techniques
Slashing techniques distract the aggressor or cause enough damage so that you can close with
him and apply more damaging techniques. Primary target areas are usually the limbs or any por-
tion of the body that is presented. Black Belt vertical, forward, and reverse slashing techniques
are identical to those in earlier belt levels, except these slashing techniques are performed with
the strong side forward.
For Official Use Only
Chapter 6: Black Belt
Marine Corps Martial Arts Program
6-35
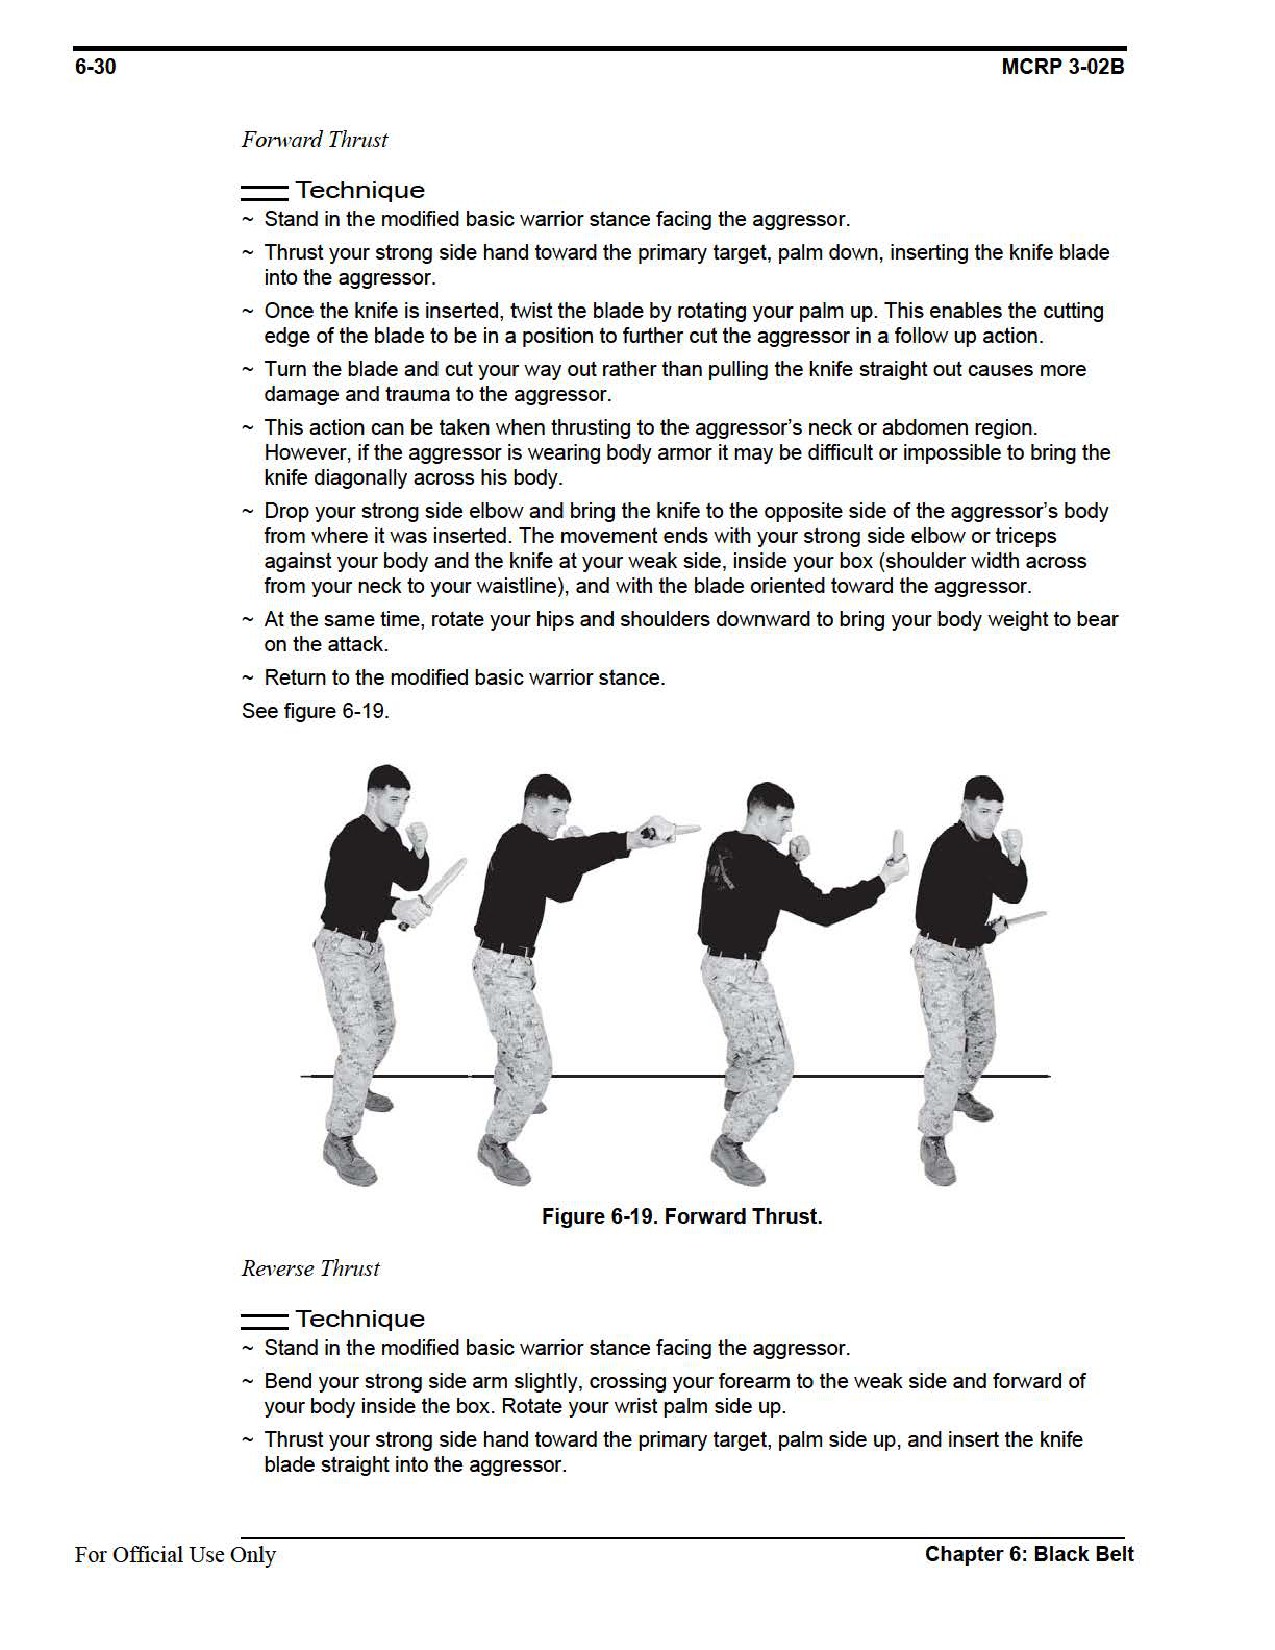
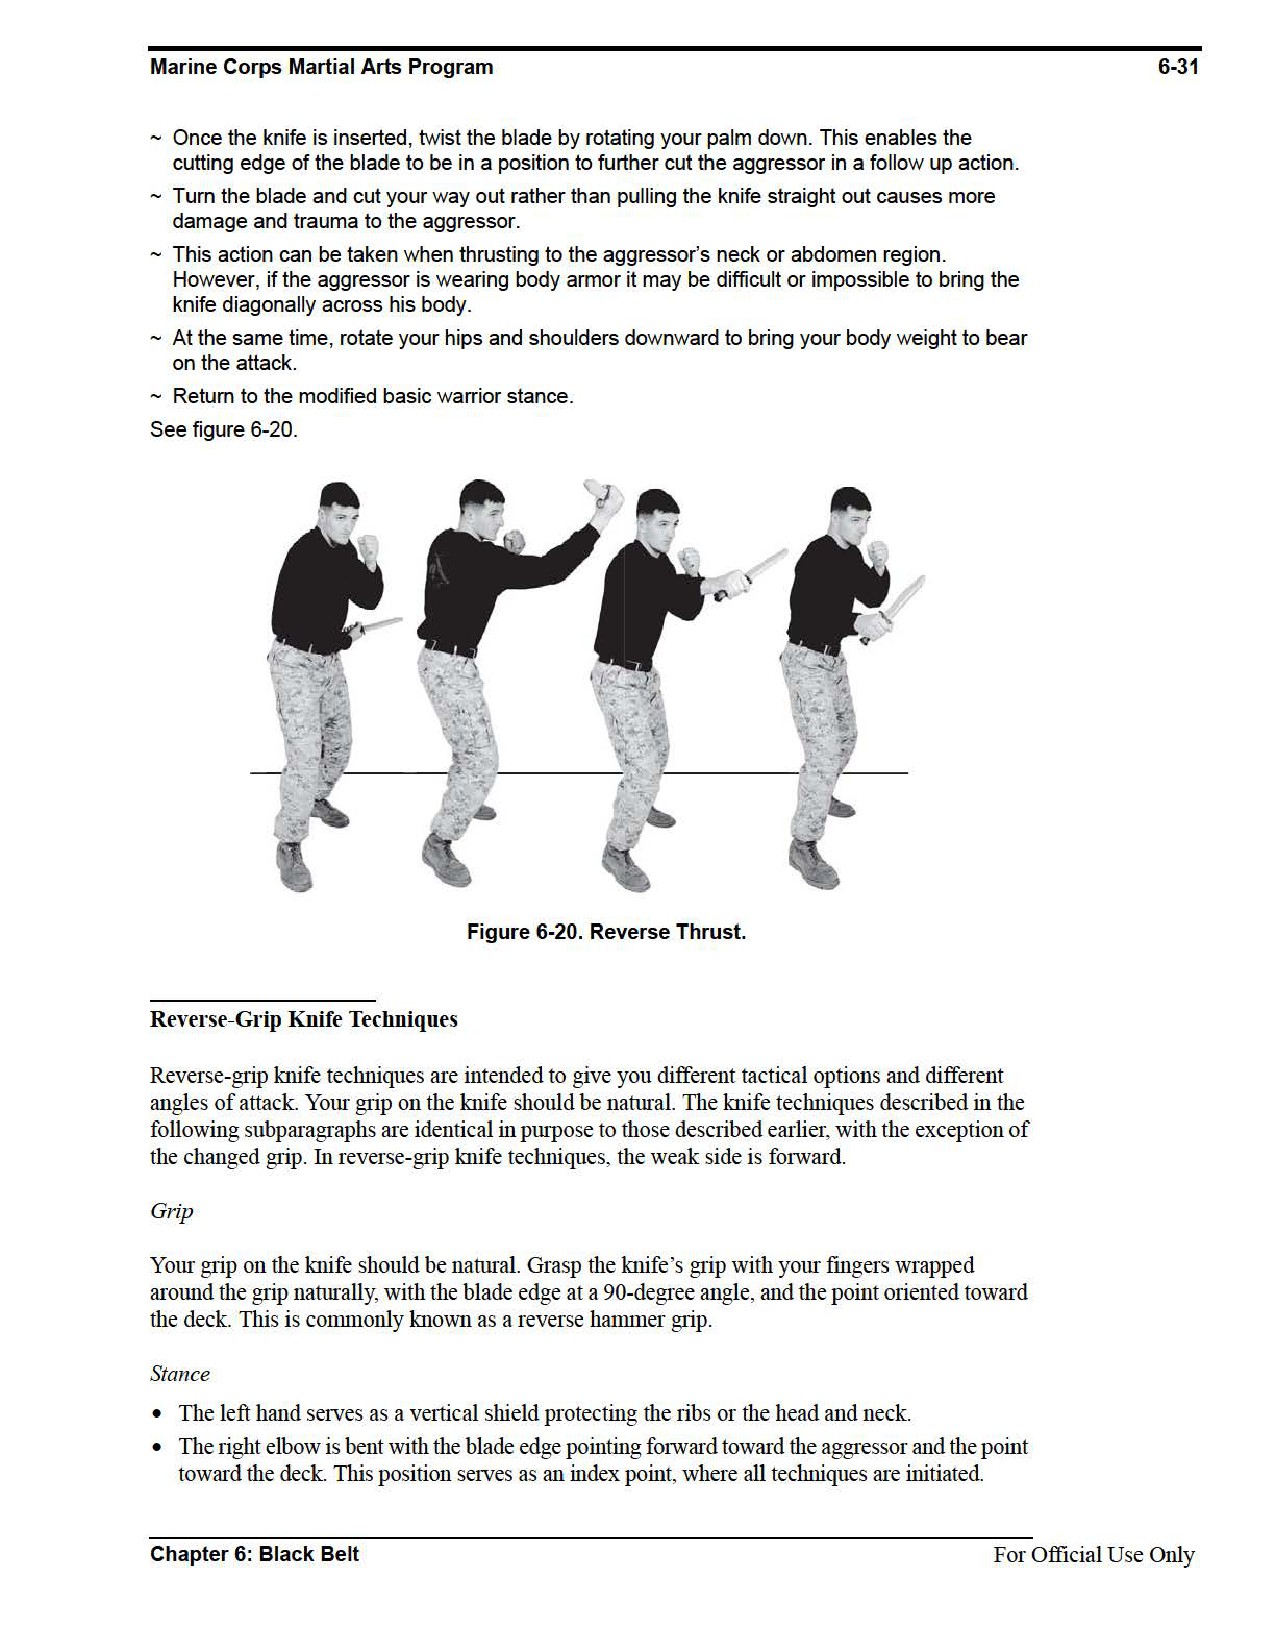
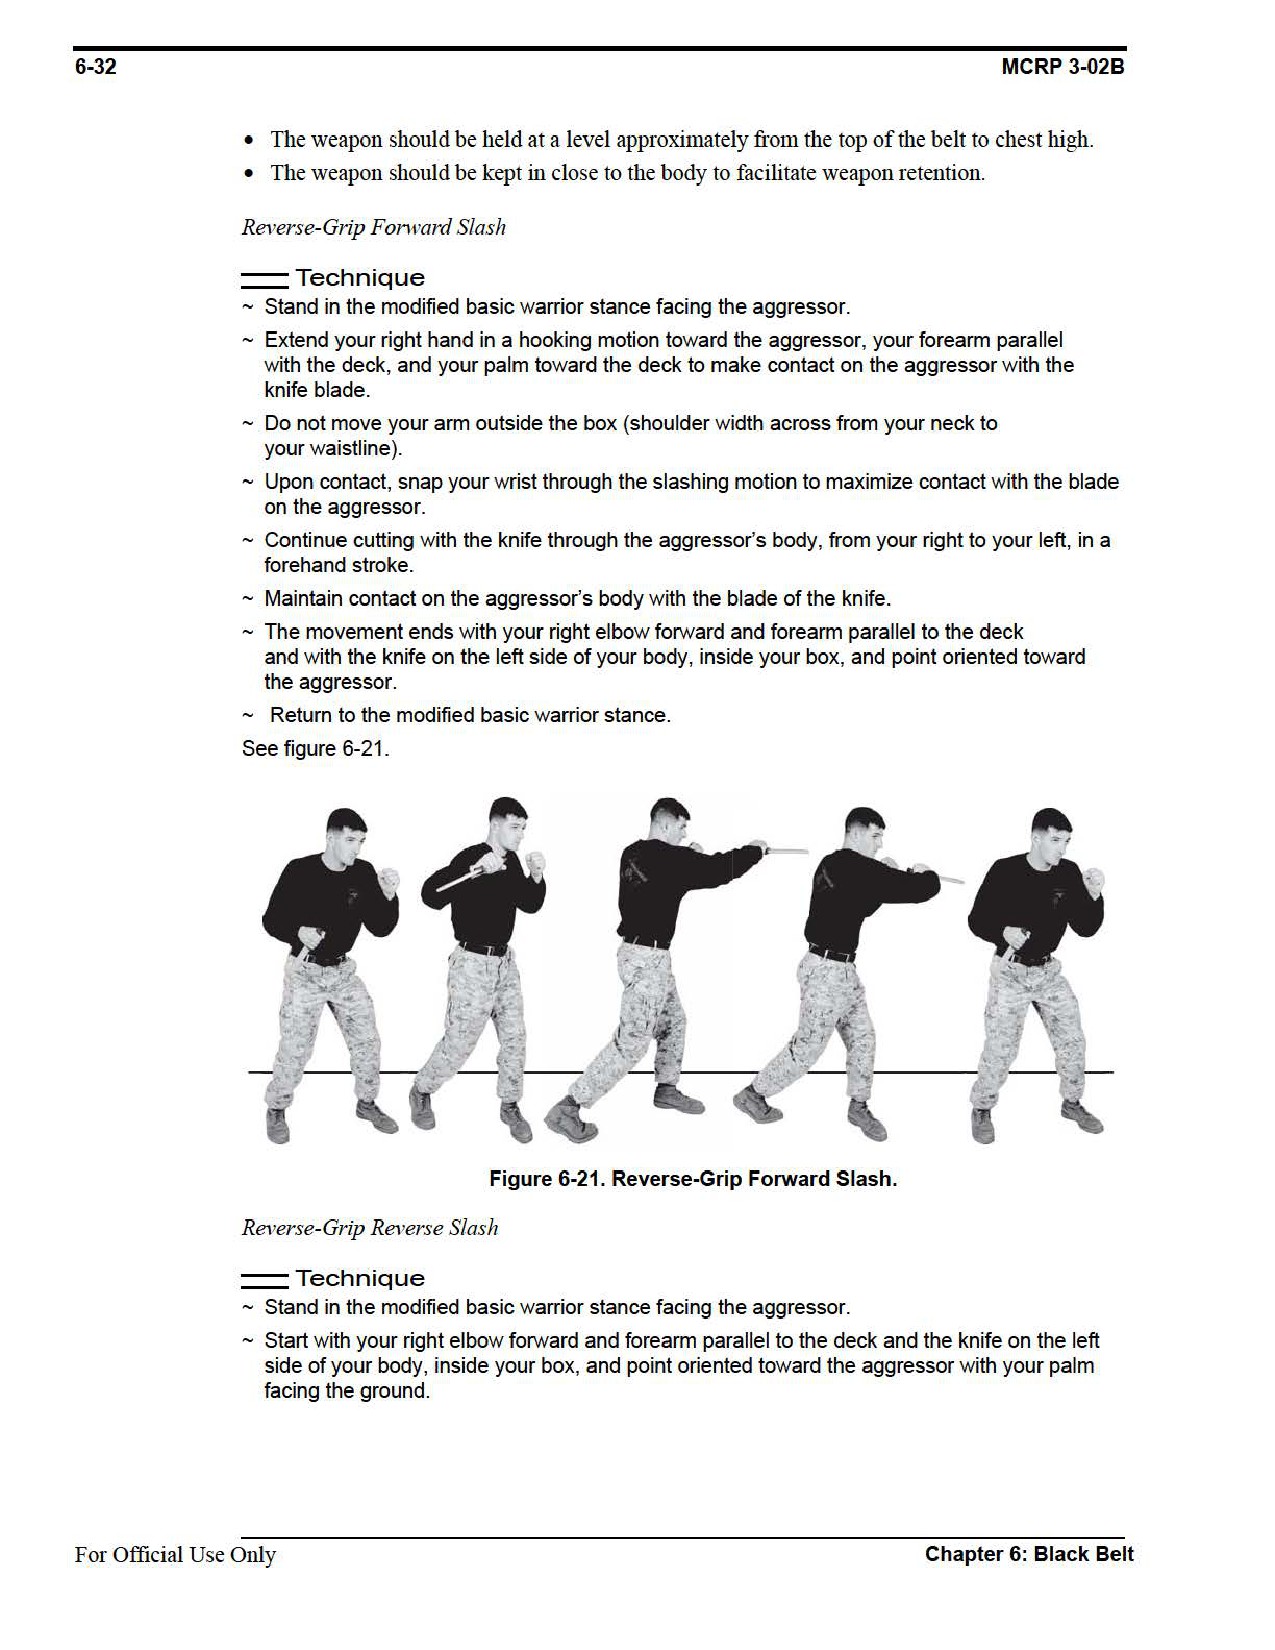
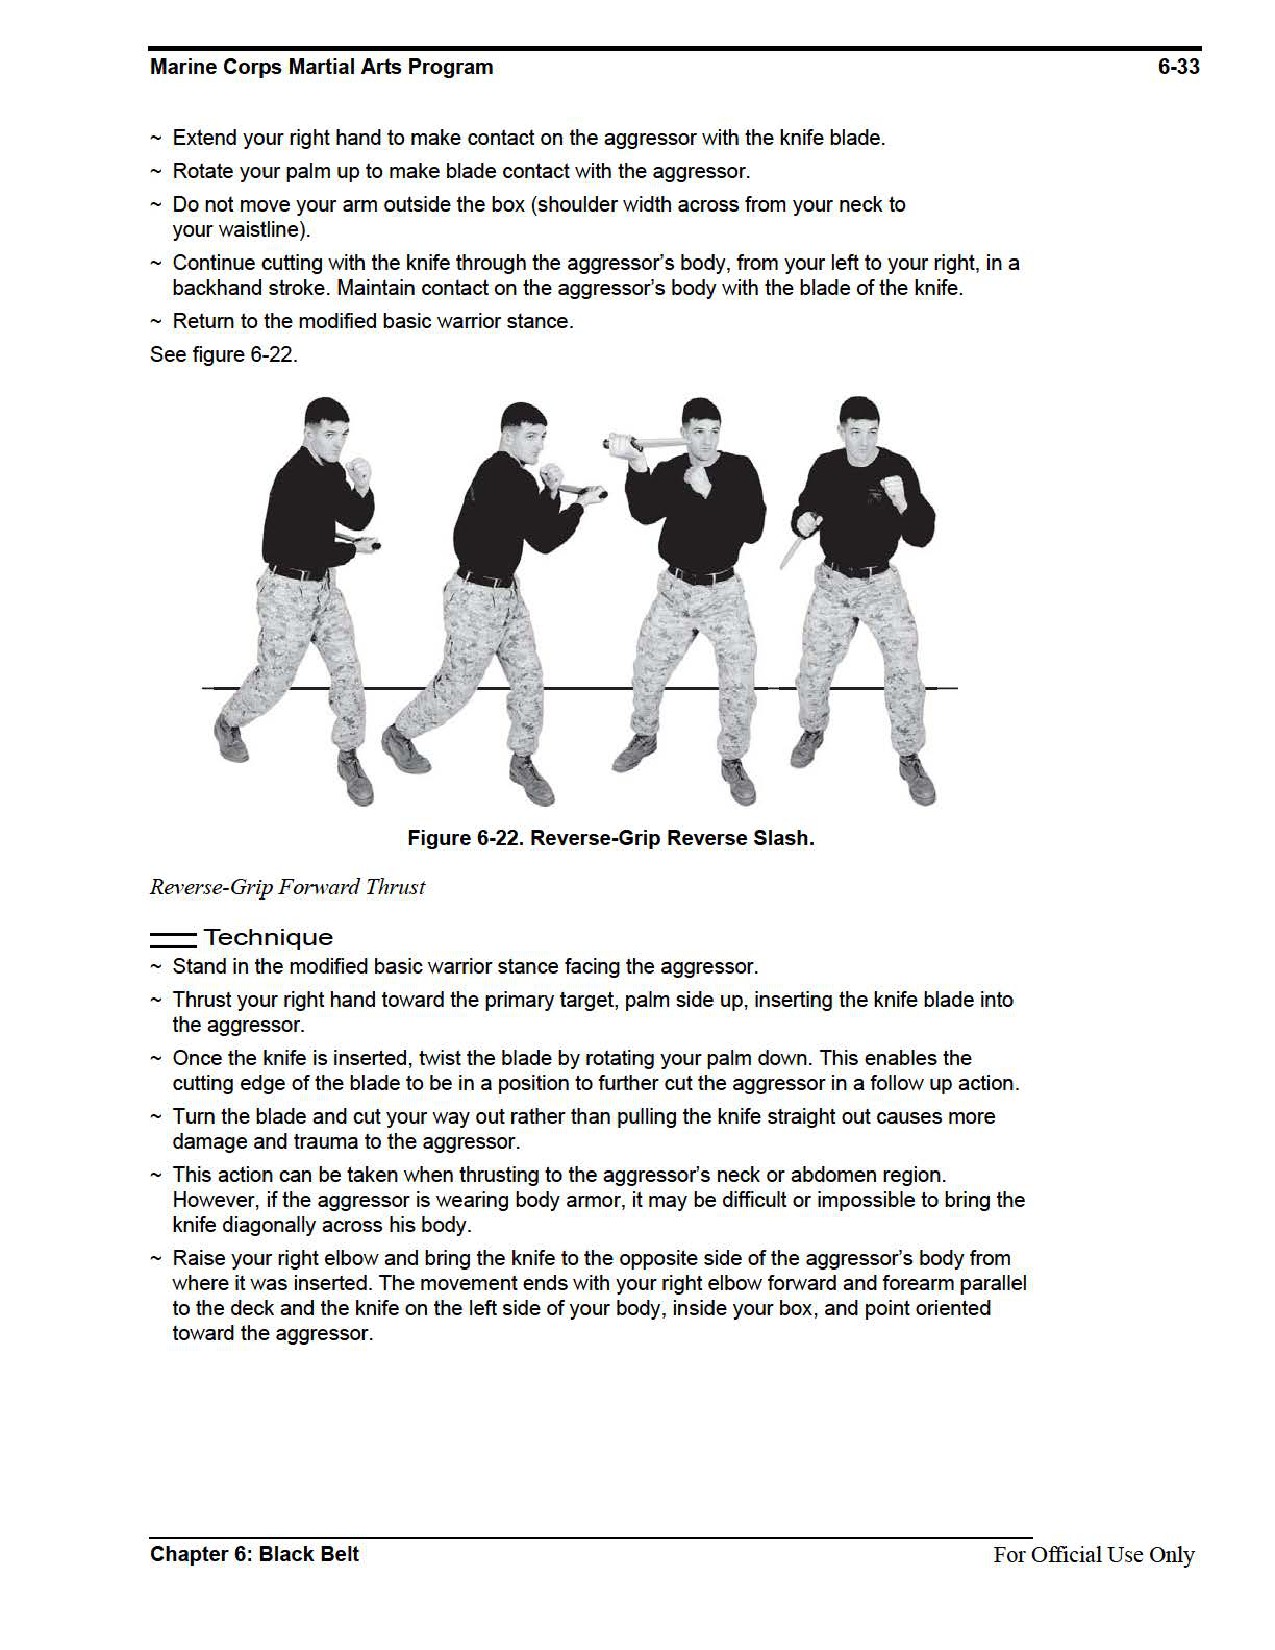
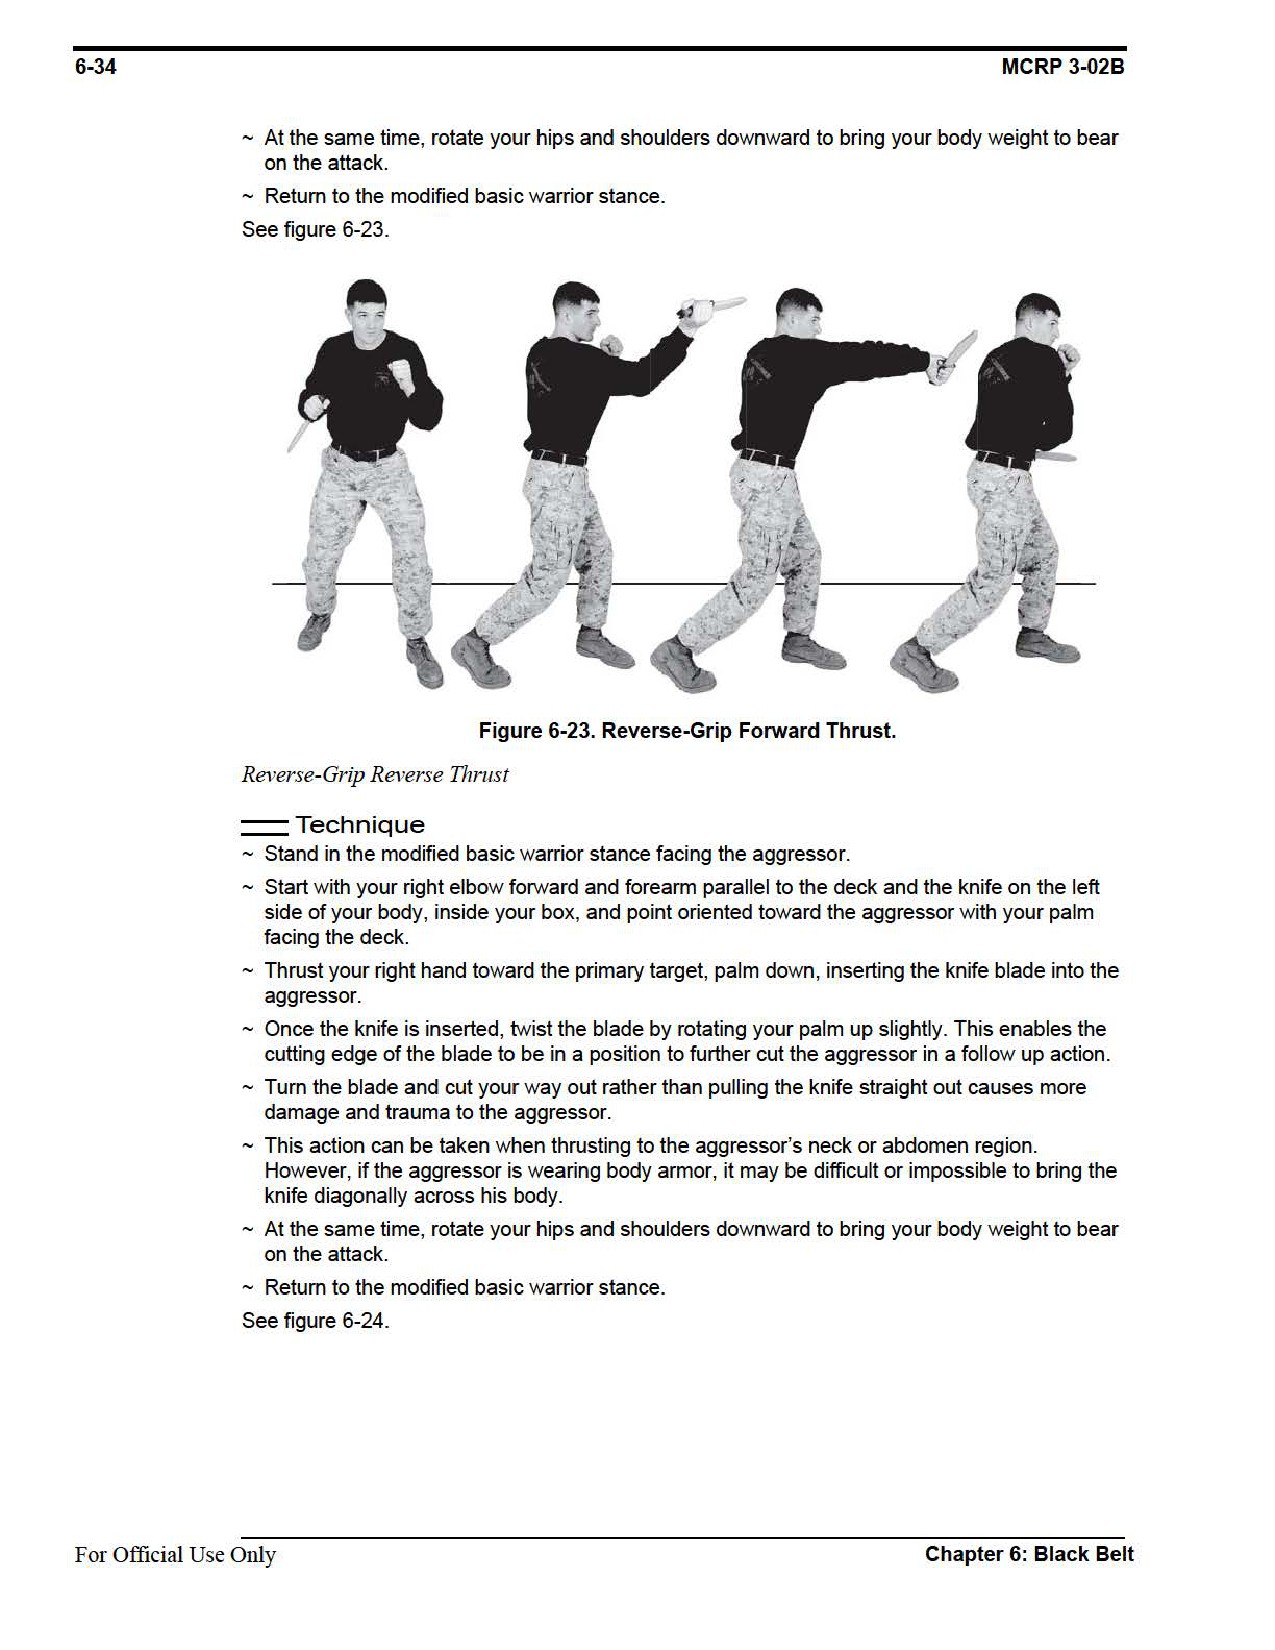
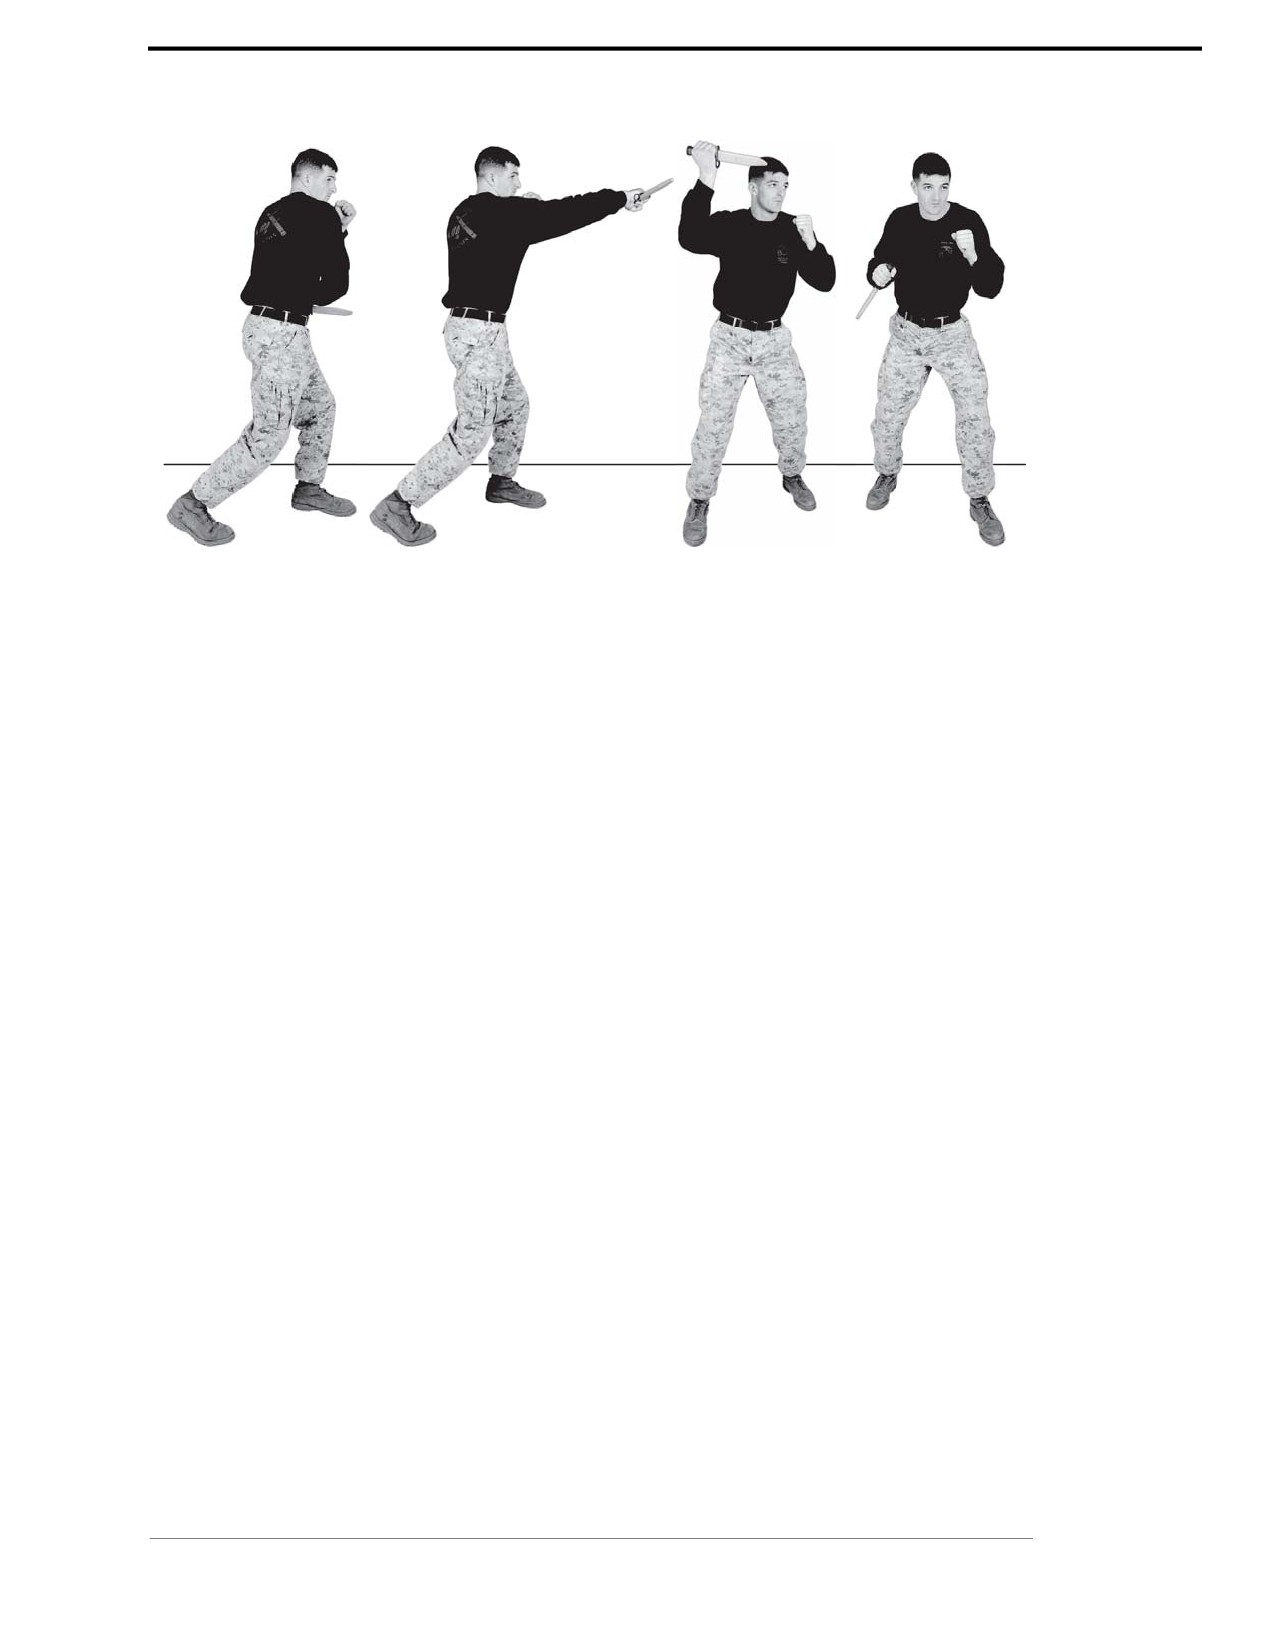
Figure 6-24. Reverse-Grip Reverse Thrust.
Chapter 6: Black Belt
For Official Use Only

6-36
MCRP 3-02B
Section X
Improvised Weapons
Improvised weapons, such as hard and soft garrotes, are made from locally available material.
Unlike weapons of opportunity, improvised weapons are designed as a weapon for a specific
function. The most common use of improvised weapons is for the silent removal of sentries
during a raid, infiltration, reconnaissance mission, or other tactical scenarios as a means of
incapacitating a potential prisoner or for use during a survival, escape, and evasion situation.
There are several methods for employing the various types of garrotes. The method chosen will
depend on the tactical situation and intended results. The employment of a garrote is considered
deadly force. In most cases, the garrote will be employed when silence and stealth are required.
The approach and close with the aggressor should be deliberate and noiseless. Stay low with
your body below the aggressor’s line of sight. The entry should be rapid while applying explo-
sive force to achieve the best results.
Refer to appendix A for corresponding safeties 1, 2, 6, 10, 11, 12, 13, and 14.
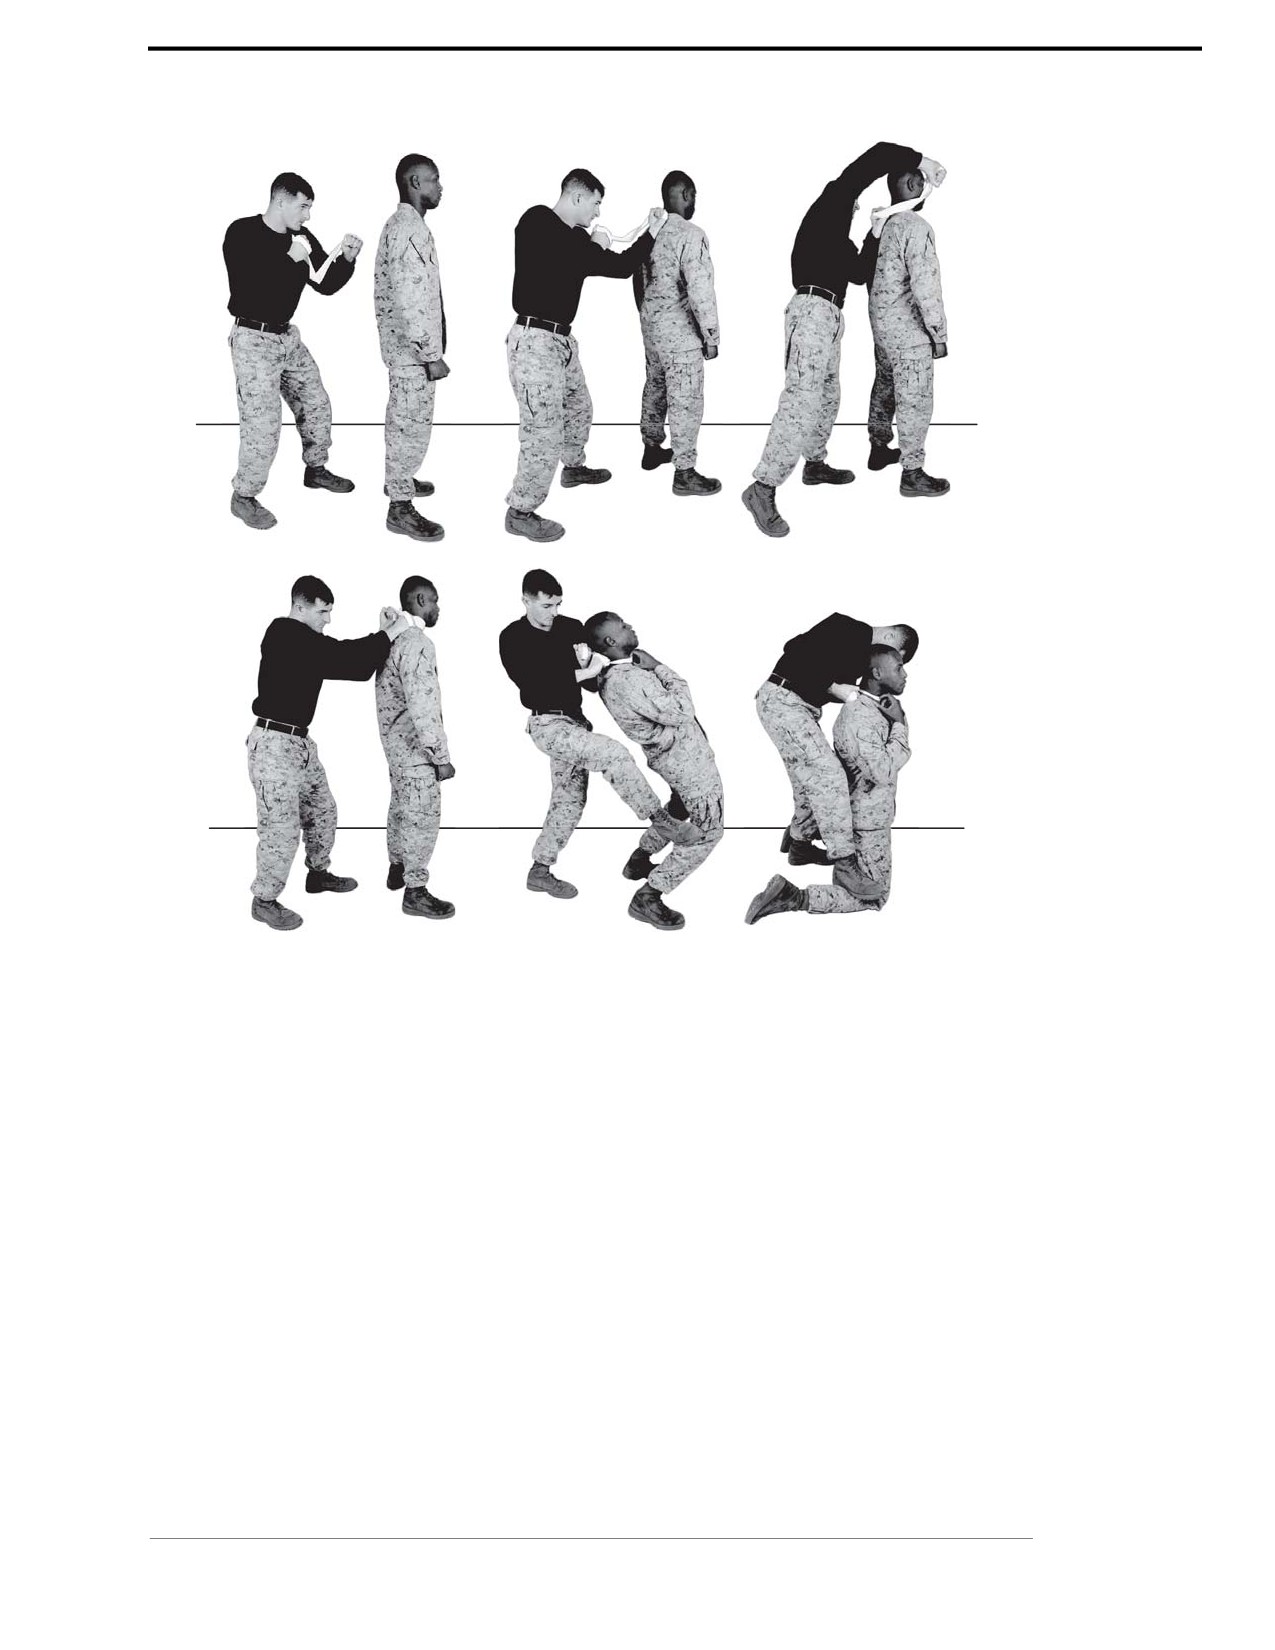
Garrote From the Rear
The garrote from the rear is intended to allow you to apply deadly force to an aggressor before he
is aware of your presence.
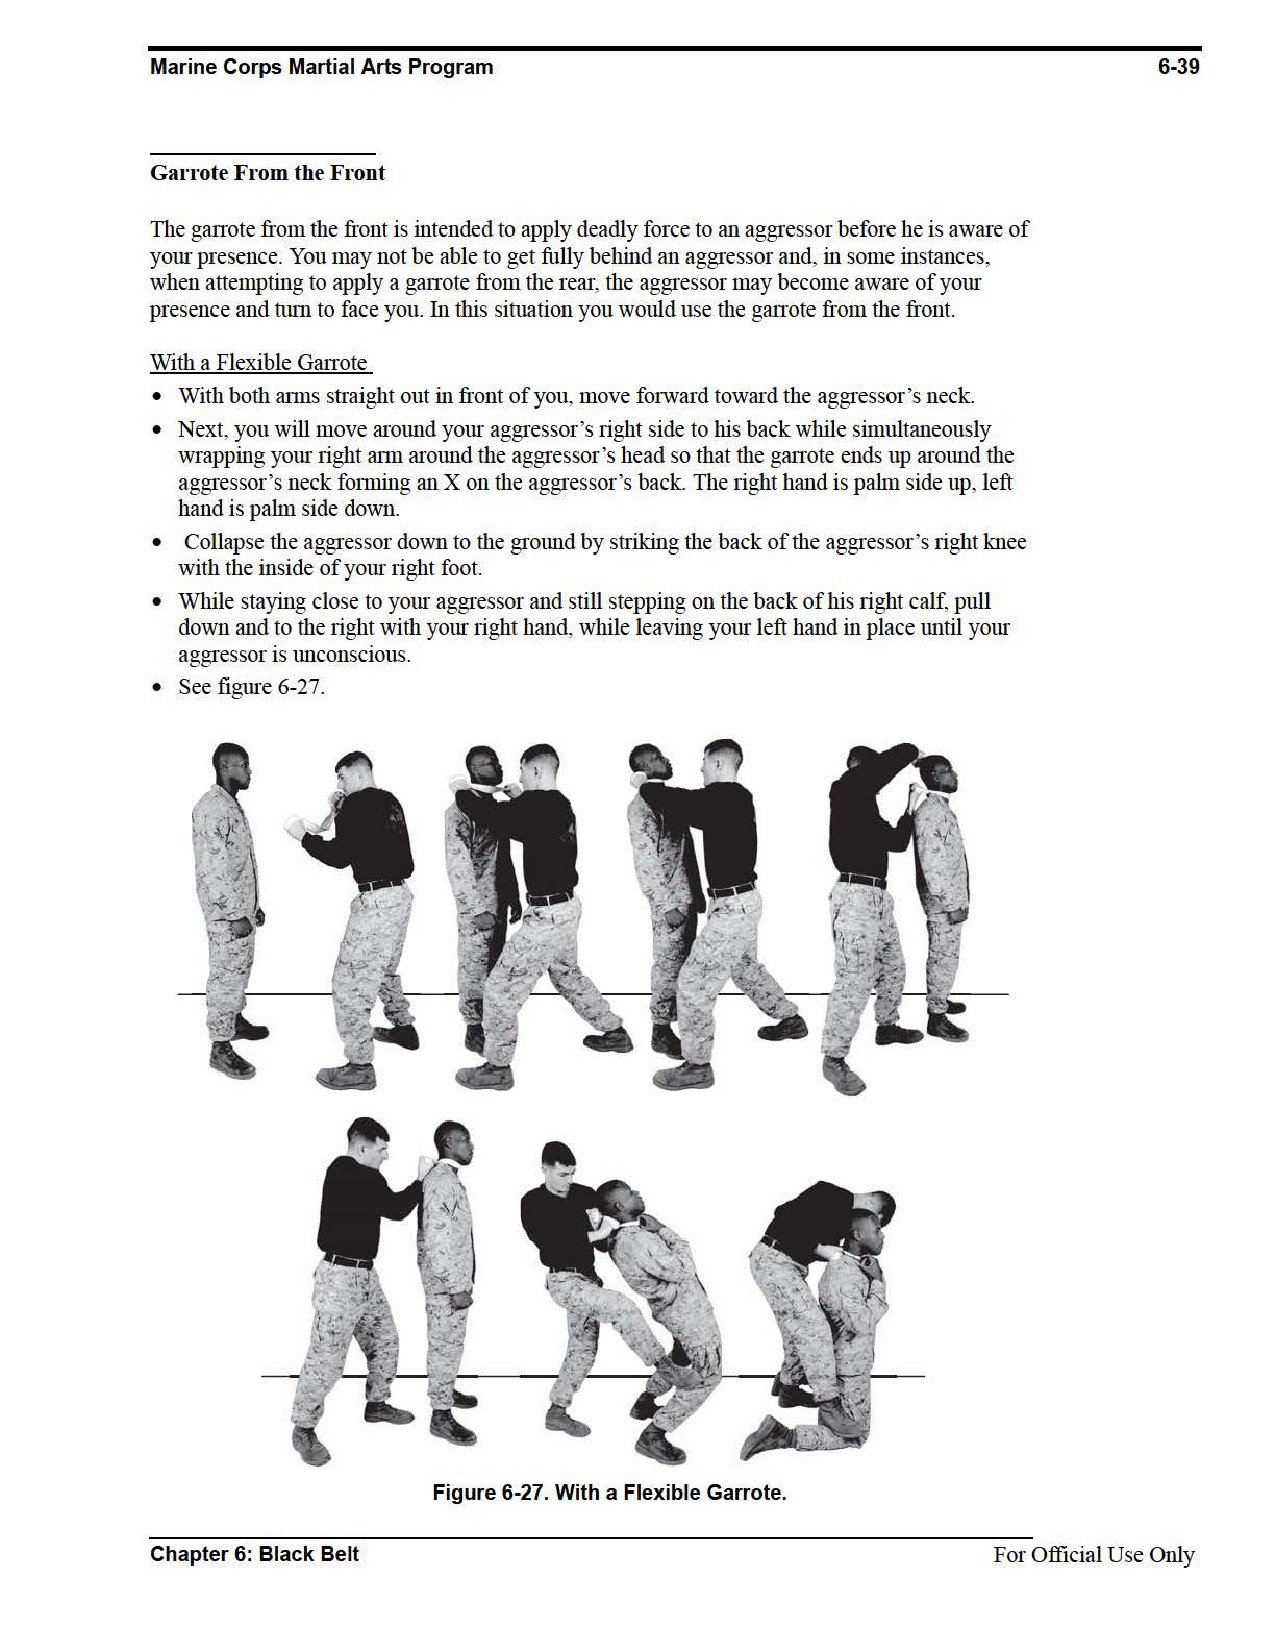
With a Flexible Garrote
• Place your left hand palm side up in the center of your aggressor’s back just below the neck.
• With your right hand, palm side down, loop the flexible garrote around your aggressor’s neck
from right to left, forming an X across your aggressor’s back.
• With the inside of your right foot, collapse your aggressor down by striking the back of his
right knee and riding it down to the ground.
• While staying close to your aggressor and still stepping on the back of his right calf, pull
down and to the right with your right hand, while leaving your left hand in place until your
aggressor is unconscious.
• See figure 6-25.
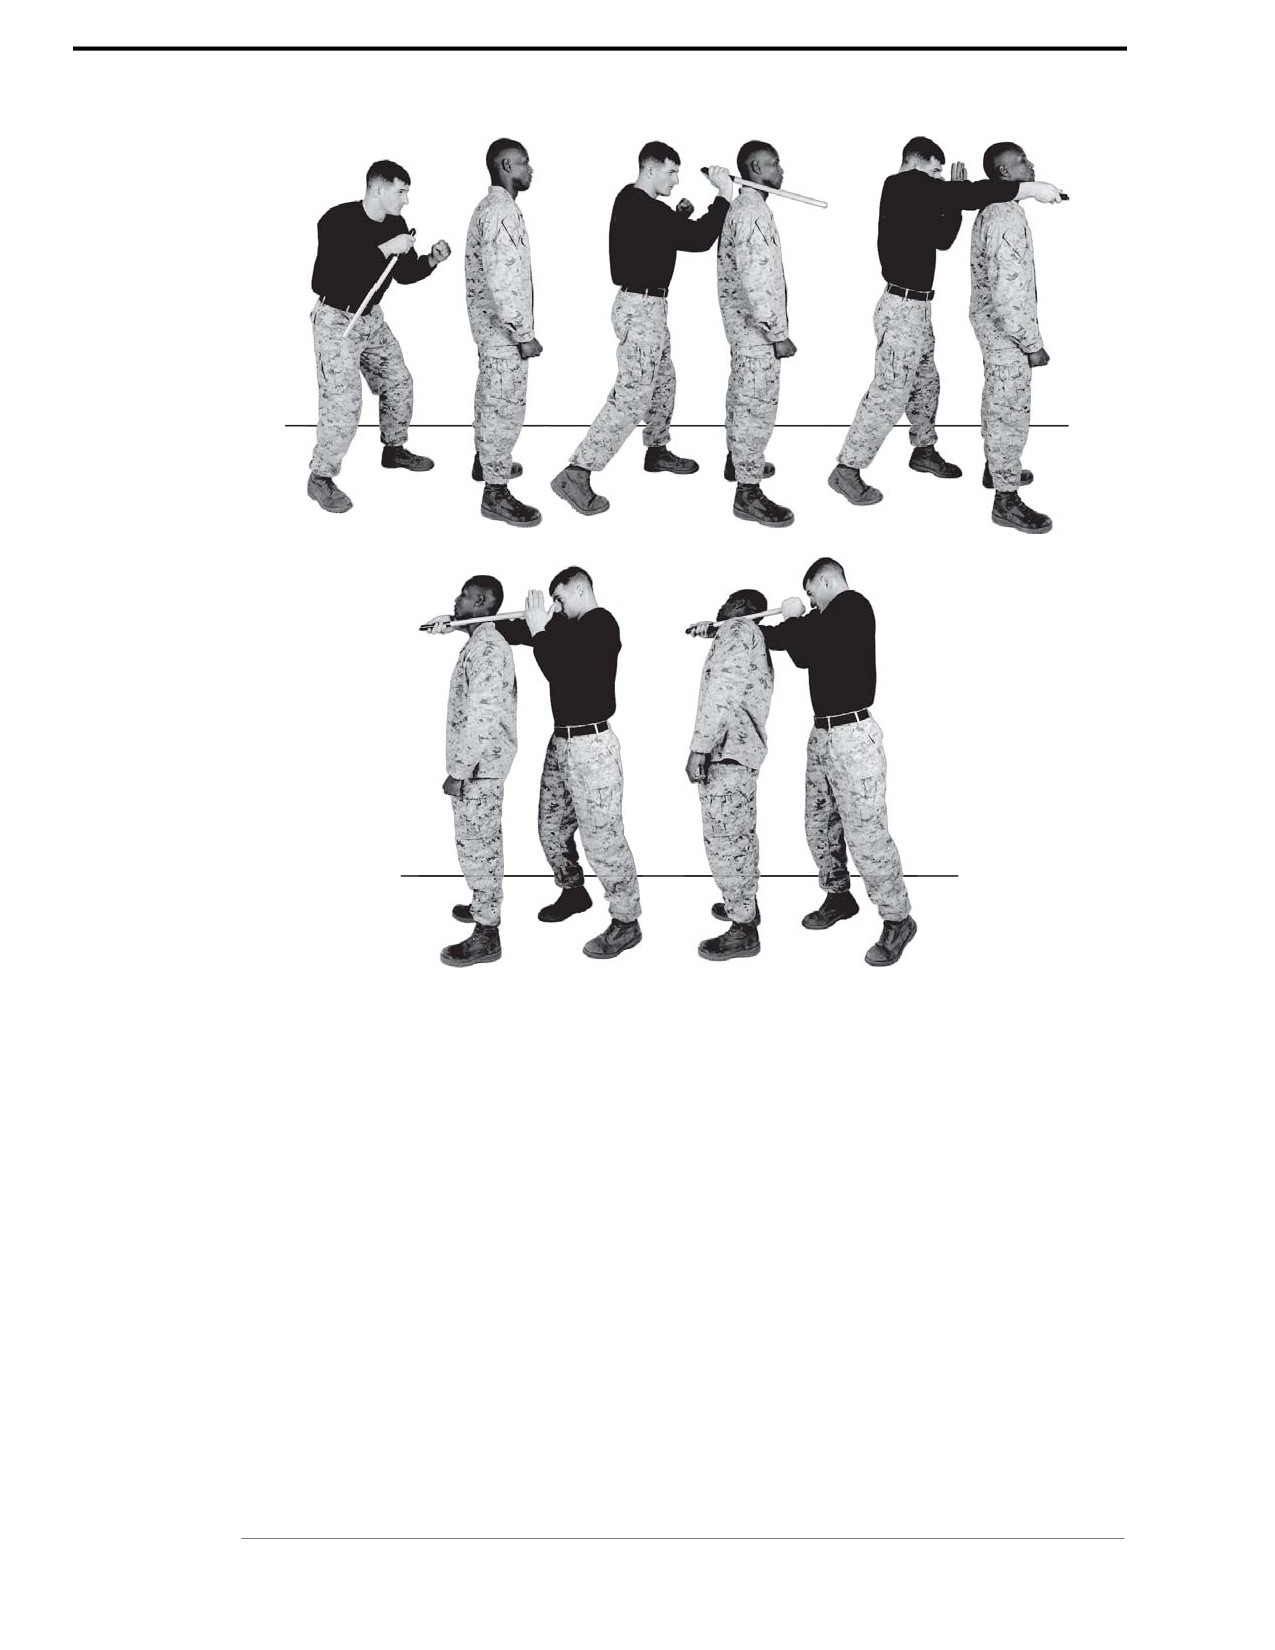
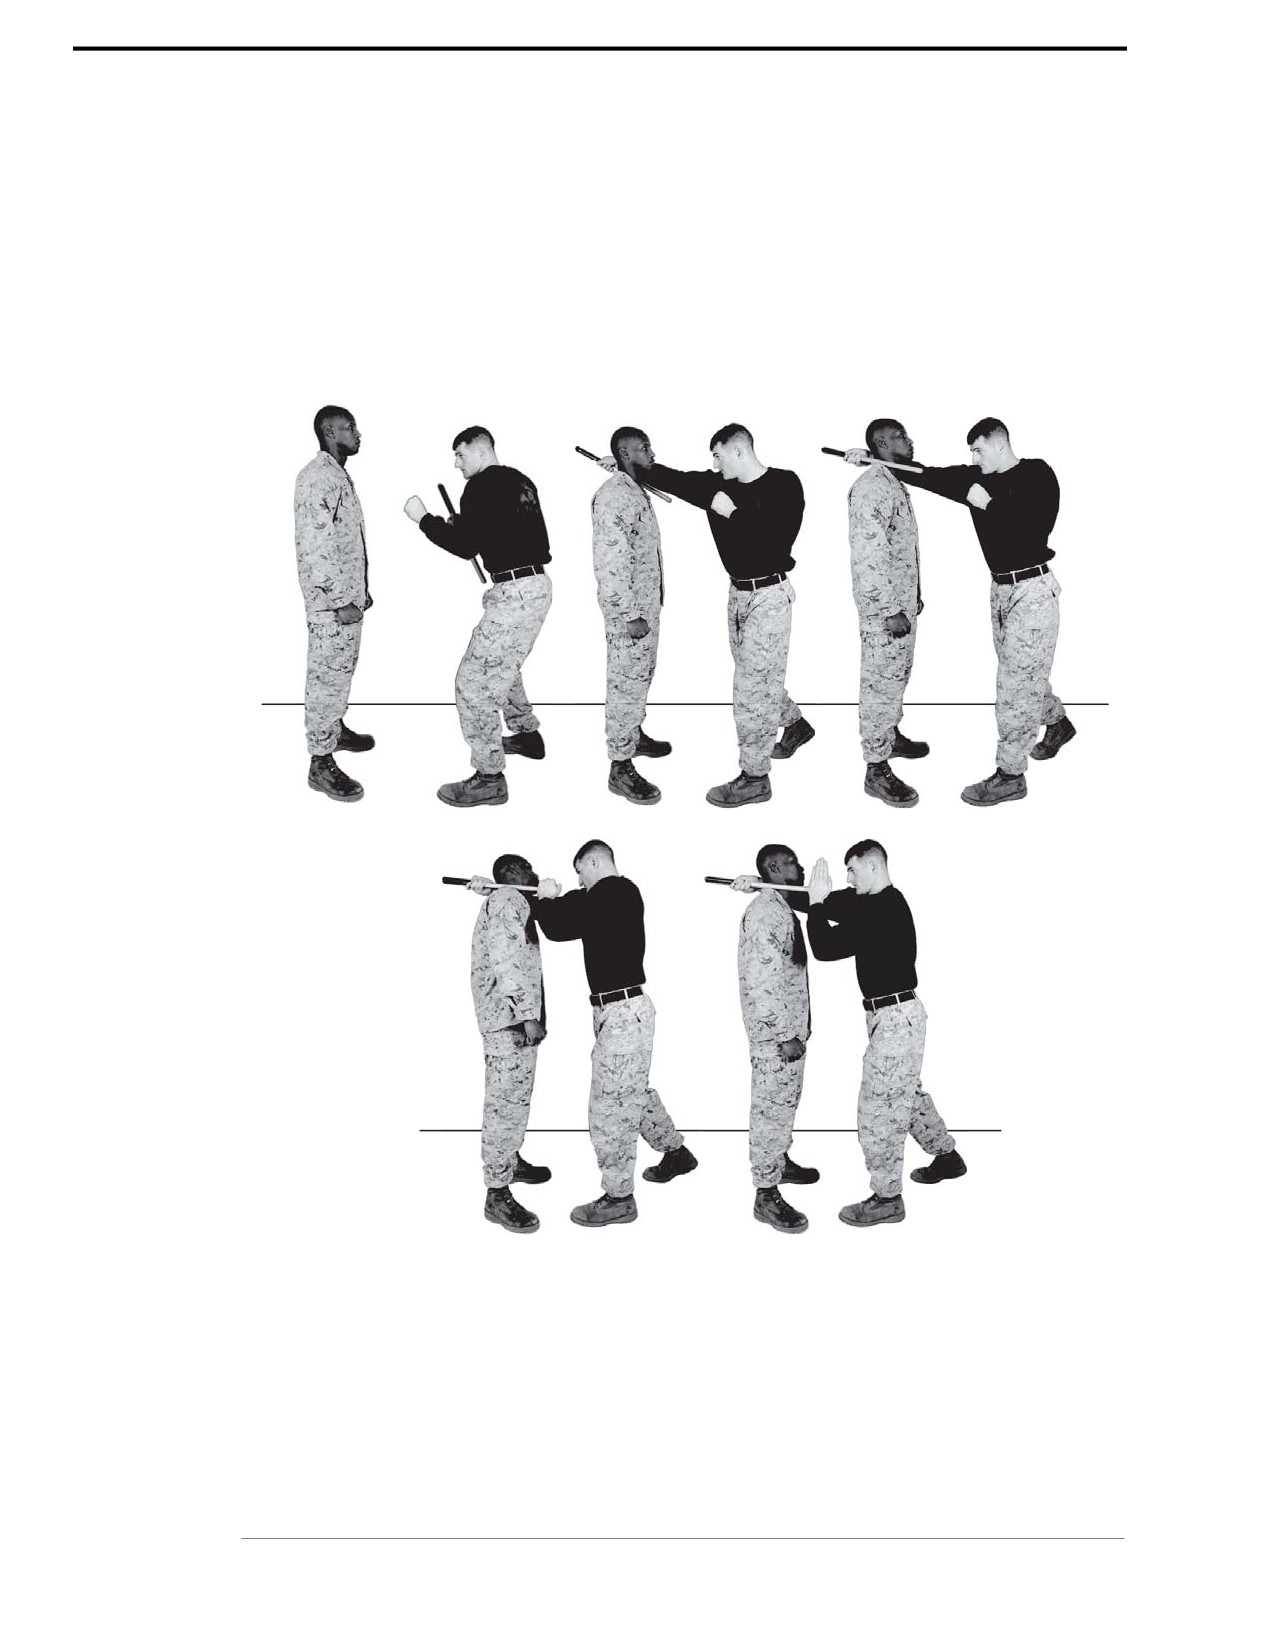
With a Hard Garrote
• Shoot the long end of a garrote across the aggressor’s neck. From right to left, palm side up
with the right ulna bone making contact against the aggressor’s right carotid artery.
• With your left hand, grab the garrote palm side down placing the weapon across the
aggressor’s left carotid artery.
• While keeping your elbows in tight, squeeze with both arms in a vise motion until the
aggressor is unconscious.
• See figure 6-26 on page 6-38.
For Official Use Only
Chapter 6: Black Belt
Marine Corps Martial Arts Program
6-37
Figure 6-25. With a Flexible Garrote.
Chapter 6: Black Belt
For Official Use Only
6-38
MCRP 3-02B
Figure 6-26. With a Hard Garrote.
For Official Use Only
Chapter 6: Black Belt
6-40
MCRP 3-02B
With a Hard Garrote
• Shoot the long end of the garrote across the back of the aggressor’s neck, from your right to
left palm side up with the right ulna across the aggressor’s left carotid artery.
• With your left hand, grab the weapon palm side down, placing the weapon across the
aggressor’s right carotid artery.
• While keeping elbows in tight, squeeze with both arms in a vise motion until aggressor
is unconscious.
• See figure 6-28.
Figure 6-28. With a Hard Garrote.
For Official Use Only
Chapter 6: Black Belt

Appendix A
Training Safety Sheet
The following safeties are to be used for all belt levels.
I.
Begin slowly and increase speed with proficiency.
II.
Never execute techniques at full force or full speed.
III.
When executing punches, ensure the joints are kept slightly bent to avoid hyperextension.
IV.
Students will train under the supervision of a martial art instructor or on MAIT in
accordance with all safety and logistical requirements and in the following stages:
•In the air (e.g., shadow boxing/imaginary targets).
Note: Punches or strikes are not applied to the pads.
•On the striking pads or training tools.
•On the body during free sparring.
V.
Prevent injuries during training; train break-falls in stages from the lowest position to the
highest position.
VI.
Techniques will be performed on a soft-footed area.
VII.
Begin by executing bayonet techniques in the air. Ensure bayonets are sheathed. Ensure
contact is not made with an aggressor when doing the target acquisition phase of air drills.
VIII.
Before training with any firearms, unload and show clear will be conducted.
IX.
When handling weapons, the following four safety rules apply:
•Treat every weapon as if were loaded.
•Never point your weapon at anything you do not intend to shoot.
•Keep your finger straight and off of the trigger until you intend to fire.
•Keep your weapon on SAFE until you are ready to fire.
X.
Techniques are applied with slow, steady pressure to the point where the aggressor is
uncomfortable; the aggressor must then tap out. Marines must immediately release pres-
sure or stop the technique. The aggressor will tap out by tapping on the deck three times,
on himself three times, on the Marine three times, or by verbally saying “tap-tap-tap.”
XI.
Never hold a choke for more than 5 seconds in training. The aggressor should never
become light-headed during a choke.
XII.
Do not apply pressure to the aggressor’s trachea during training.
XIII.
Students being thrown should execute proper break-falls.
XIV.
Conduct all practical application periods utilizing approved training gear.
XV.
Ensure that calf-on-calf contact is being made.
For Official Use Only

THIS PAGE INTENTIONALLY LEFT BLANK.
For Official Use Only

Glossary
LINE
linear infighting neural-override engagement
MAIT
martial arts instructor trainer
MCMAP
Marine Corps Martial Arts Program
MCRP
Marine Corps reference publication
MOS
military occupational specialty
PME
professional military education
For Official Use Only

THIS PAGE INTENTIONALLY LEFT BLANK.
For Official Use Only

References
Marine Corps Orders (MCOs)
1500.59
Marine Corps Martial Arts Program (MCMAP)
P3500.72A
Marine Corps Ground Training and Readiness (T & R) Program
Marine Corps Institute (MCI)
0337
Leading Marines
For Official Use Only

THIS PAGE INTENTIONALLY LEFT BLANK.
For Official Use Only