MCRP 3-028 Marine Corps Martial Arts Program (MCMAP, 2011) - page 2
Marine Corps Martial Arts Program
3-11
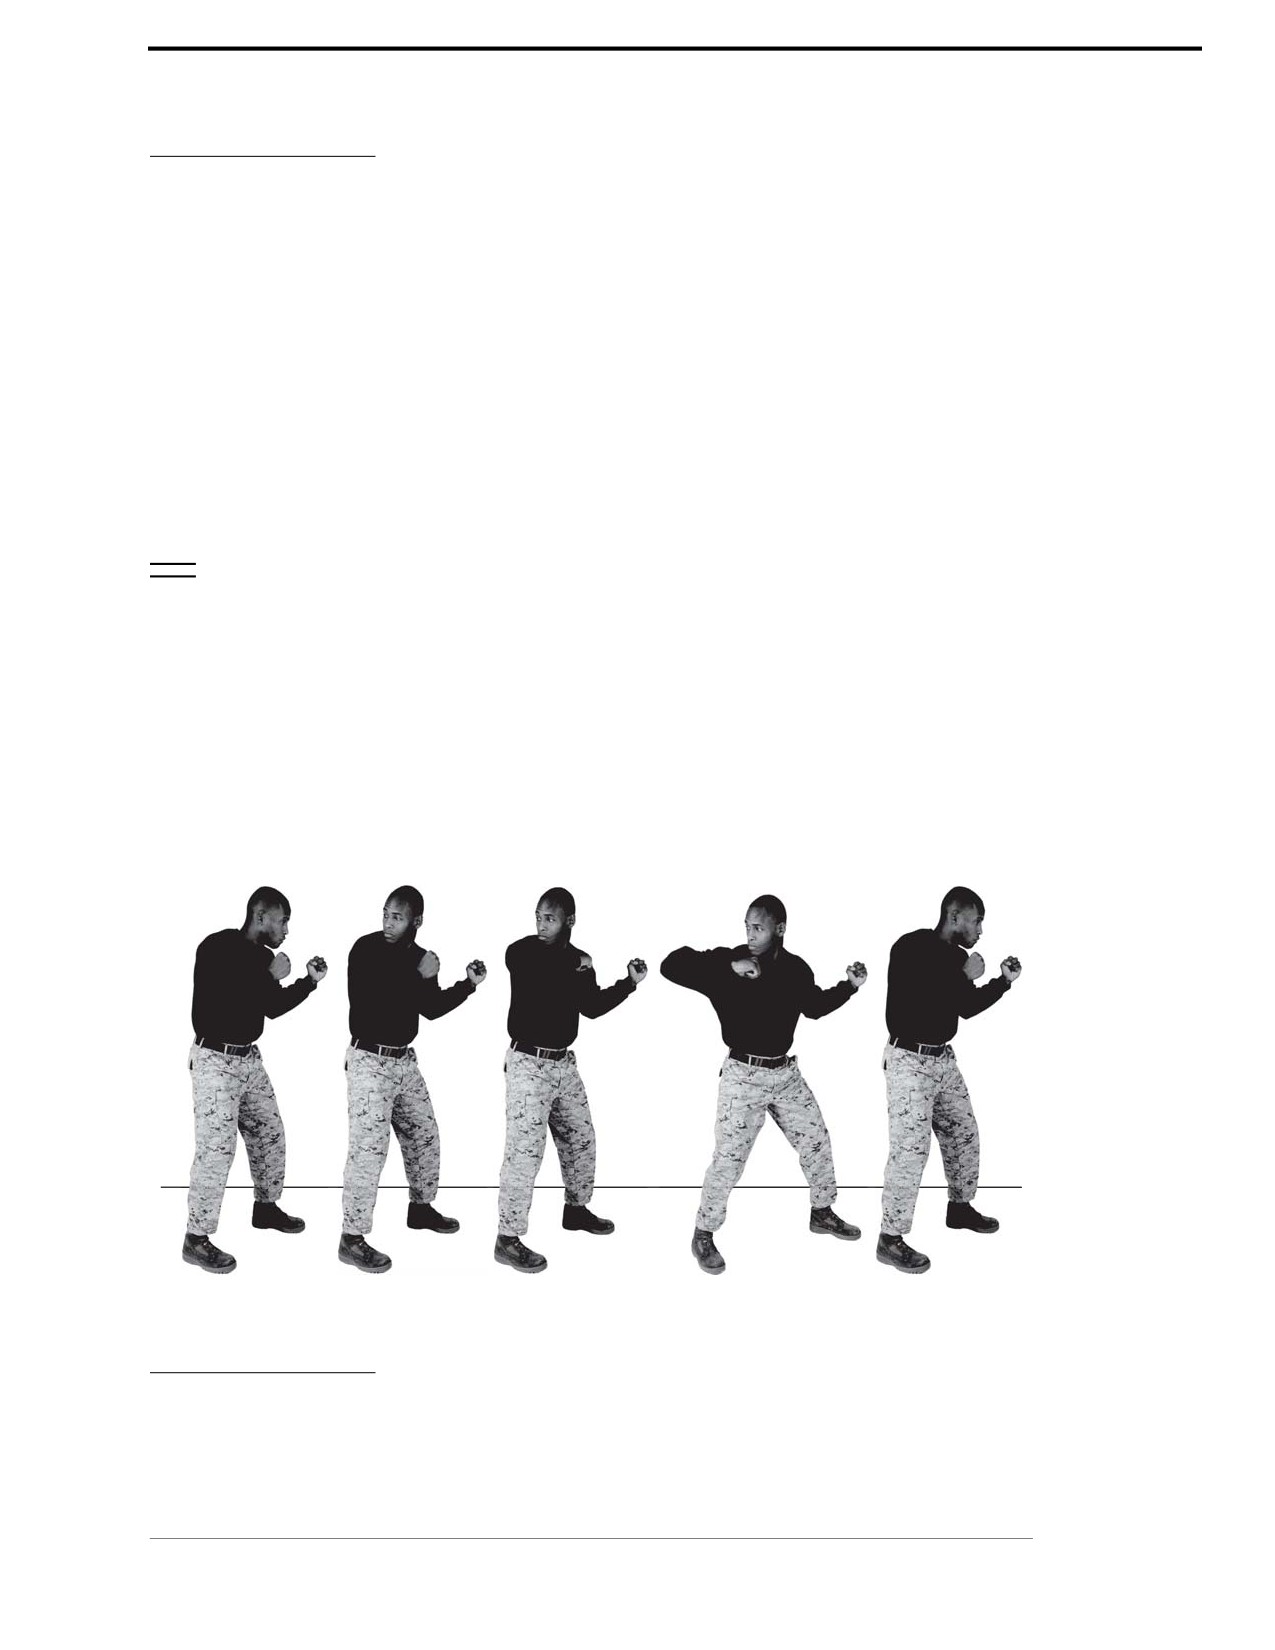
The Rear Horizontal Elbow Strike
The rear horizontal elbow strike is primarily effective when being attacked from the rear. The
strike is used to stun the aggressor and allow for follow-on techniques.
Striking Surface
The striking surface is 2 inches above or below the point of the elbow, depending on your angle
of attack, the aggressor’s attack angle, and the position of the aggressor.
Target Area of the Body
The primary target area of the body is the aggressor’s body at the level of your elbow.
Technique
~ From the basic warrior stance, look over your shoulder to acquire your primary target.
~ Thrust your right elbow horizontally backwards toward the aggressor while taking a slight
step backwards to generate power. The right forearm is parallel to the deck, with the palm
facing the deck.
~ Take a step backwards, in order to bring yourself within striking range of the aggressor.
Rotate your left hip forward and your right shoulder backwards to generate additional power.
~ Follow through with the strike through the primary target area.
~ Rapidly return to the basic warrior stance.
See figure 3-9.
Figure 3-9. Rear to Horizontal Elbow Strike.
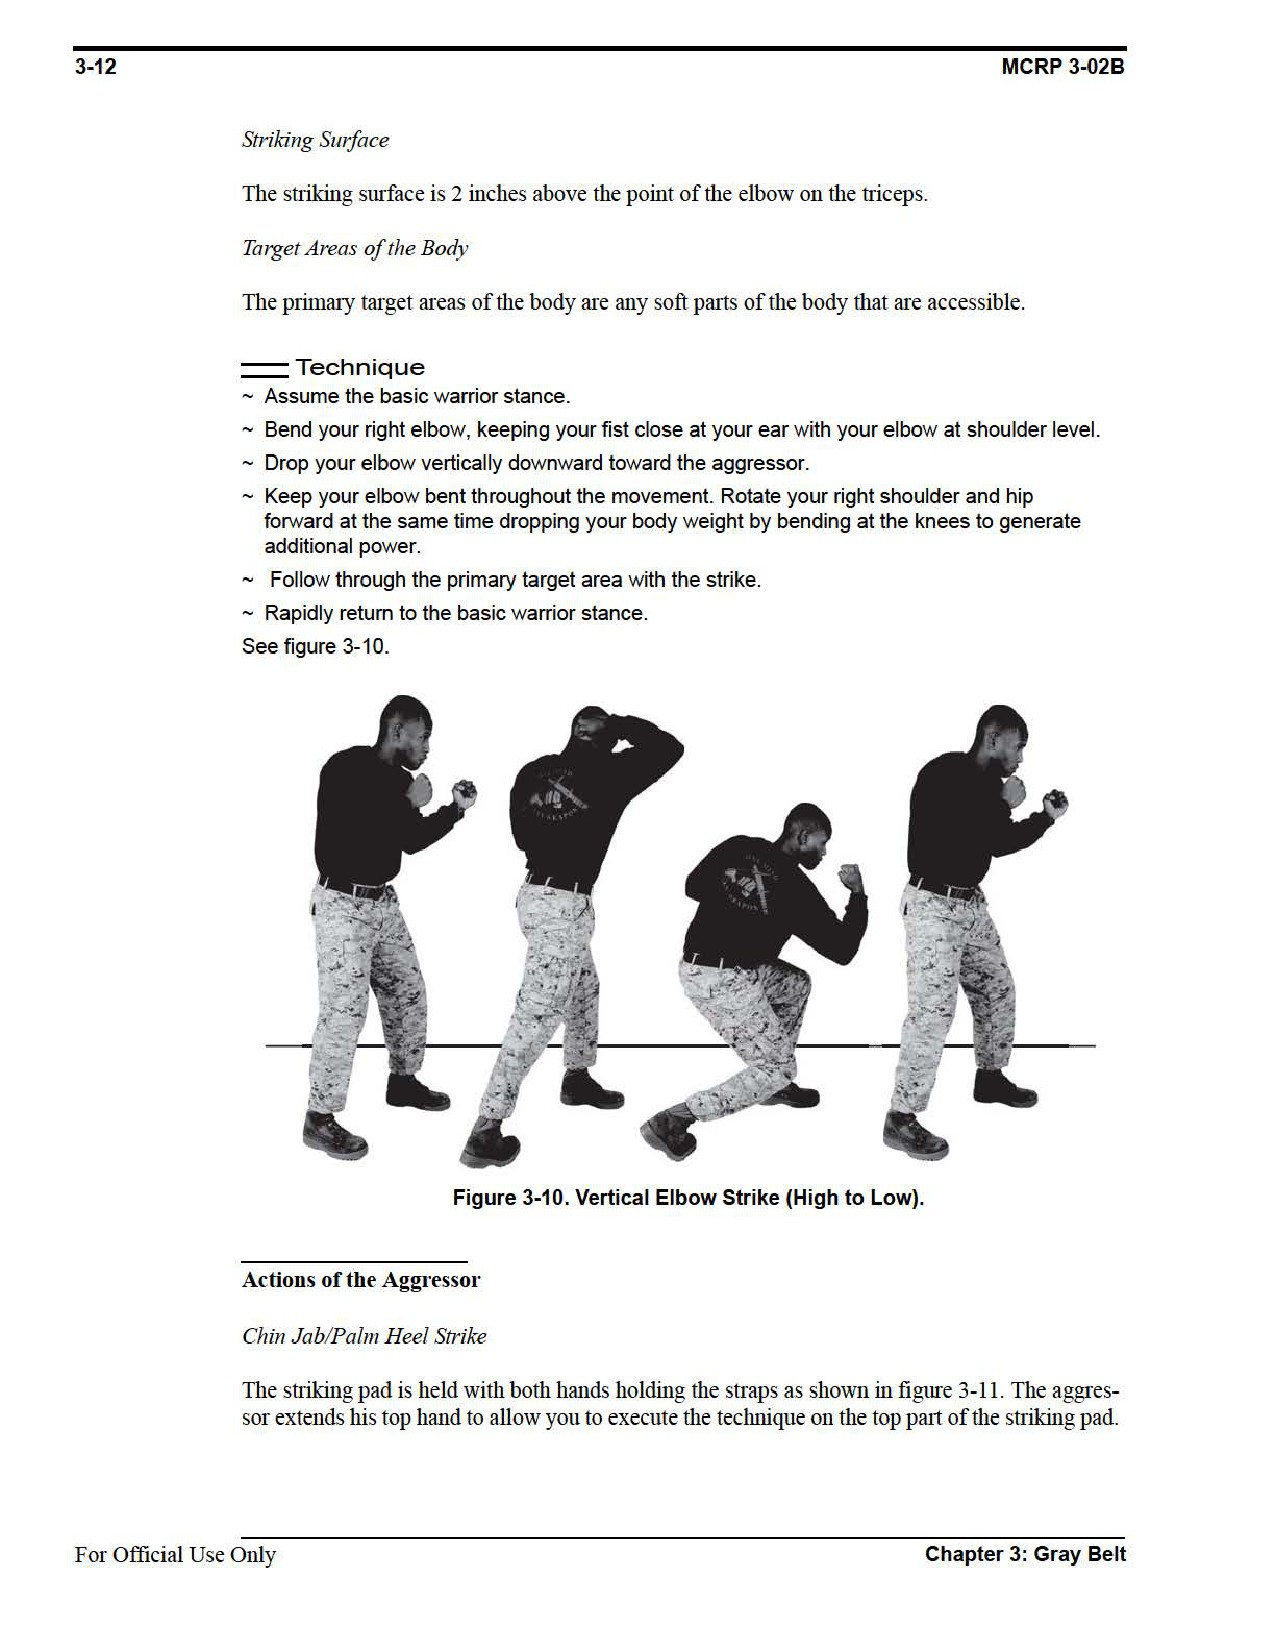
Vertical Elbow Strike (High to Low)
The vertical elbow strike is primarily effective if the aggressor is bent over to where you can
attack the back of the neck. This can stun the aggressor and allow for follow-on techniques.
Chapter 3: Gray Belt
For Official Use Only

3-14
MCRP 3-02B
Section III
Lower Body Strikes
The purpose of lower body strikes is to stop an aggressor’s attack or create an opening in his
defense to launch an attack. Lower body strikes include kicks, knee strikes, and stomps. The
lower extremities, groin, and targets below your own waistline are the primary target areas.
Never kick high as this jeopardizes your balance and leaves you more vulnerable to a counter-
attack. Kicks such as the horizontal knee strike, the sidekick, and the axe stomp can be per-
formed with either the lead leg or rear leg. Kicks with the rear leg have greater power because
the hips are rotated into the attack. However, the rear leg is further away from the aggressor
allowing him a greater reaction time.
Refer to appendix A for corresponding safeties 1, 2, 3, and 4.
Horizontal Knee Strike
Knee strikes are excellent weapons of the body during the grappling stage or during close
range fighting.
Striking Surface
The striking surface is the front of the leg, two inches above the knee. If you are unable to
separate your hips from your aggressor, the inside of the knee may be utilized as an alternate
striking surface.
Target Areas of the Body
If the aggressor is upright, the inside or outside of the thigh are often the primary target areas.
Technique
~ From the basic warrior stance, grab the aggressor’s neck or gear with both hands, without
interlacing your fingers. If you interlace your fingers, your aggressor can pull back or reach
behind your head and break the fingers.
~ Pull the aggressor down and at the same time raise your right knee driving it up forcefully into
the aggressor. Pulling the aggressor down and thrusting the leg horizontally into the
aggressor with your hips generating power. Follow through the primary target area with your
knee ensuring to strike the aggressor two inches above the knee.
~ Return to the basic warrior stance.
See figure 3-14.
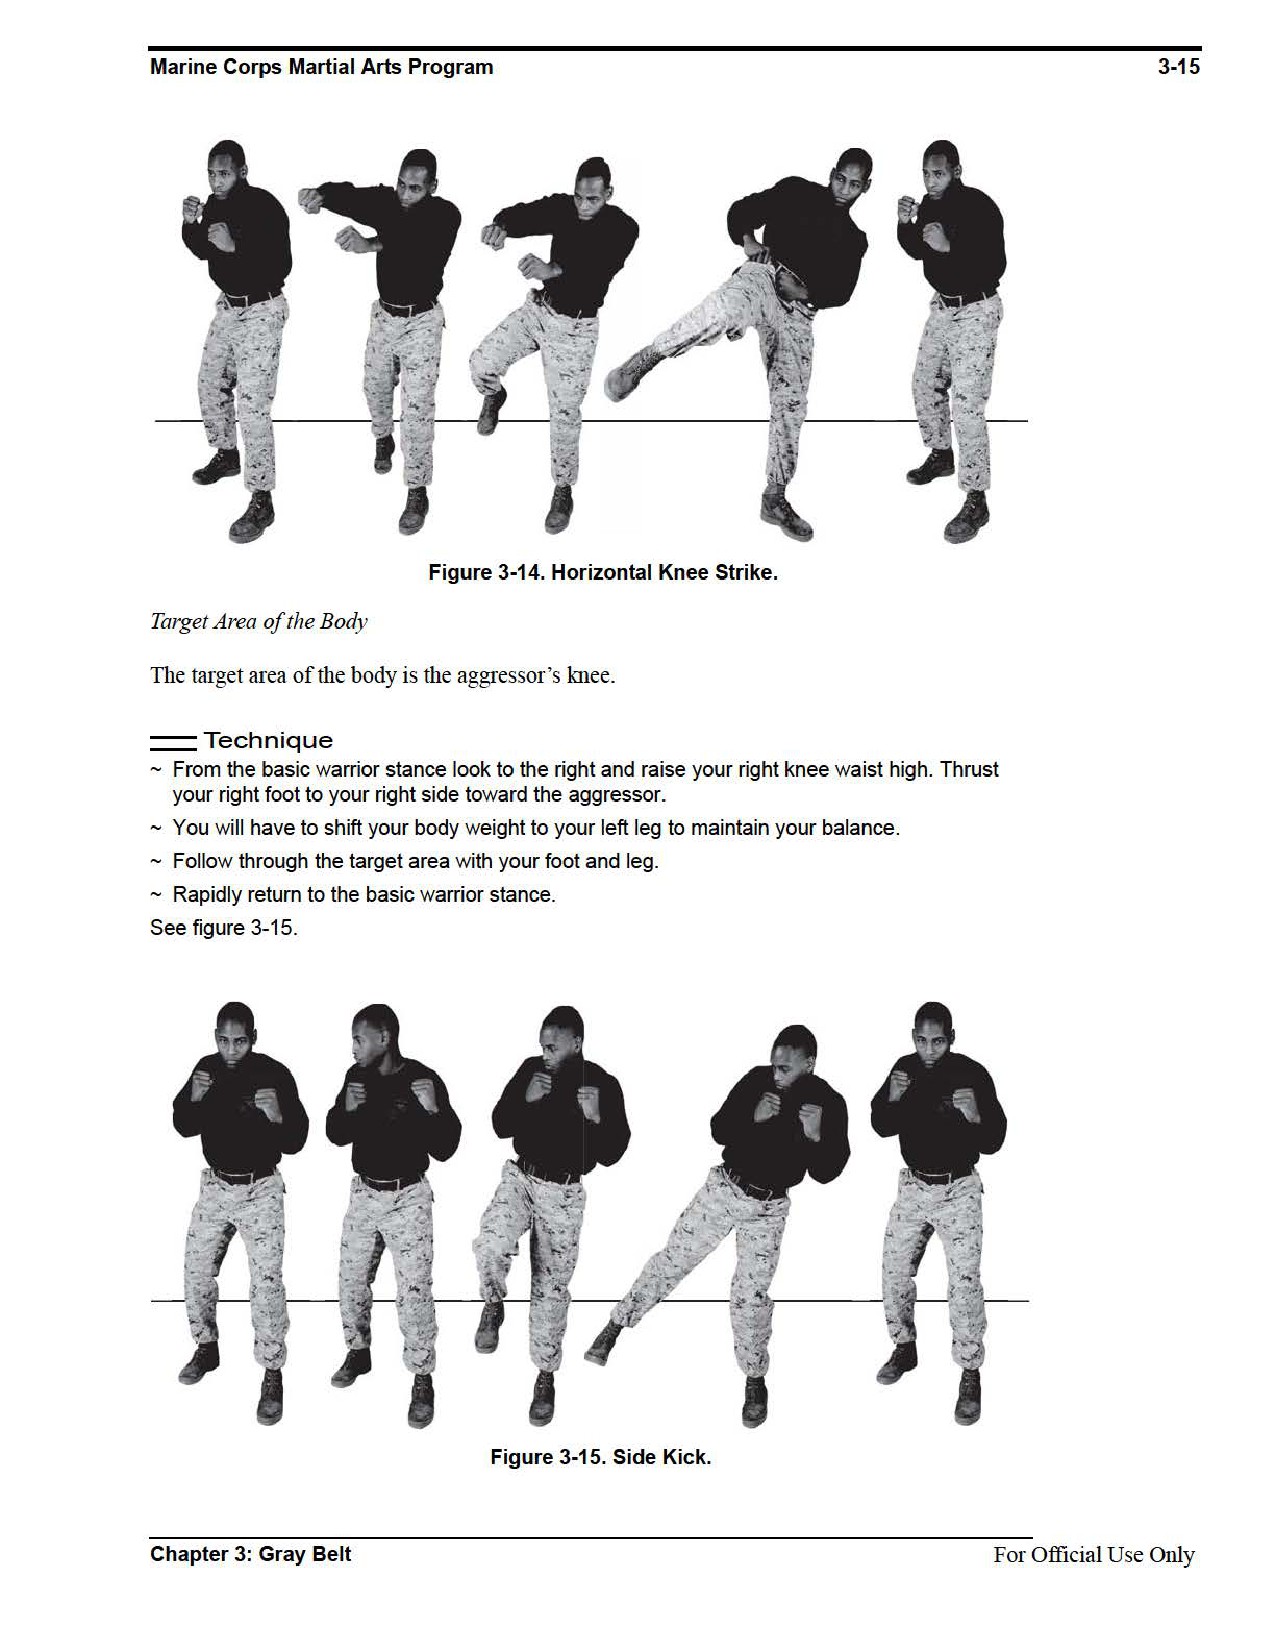
Side Kick
The side kick is executed when the aggressor is on either side of you.
Striking Surface
The striking surface is the outside cutting edge of your boot.
For Official Use Only
Chapter 3: Gray Belt
Marine Corps Martial Arts Program
3-17
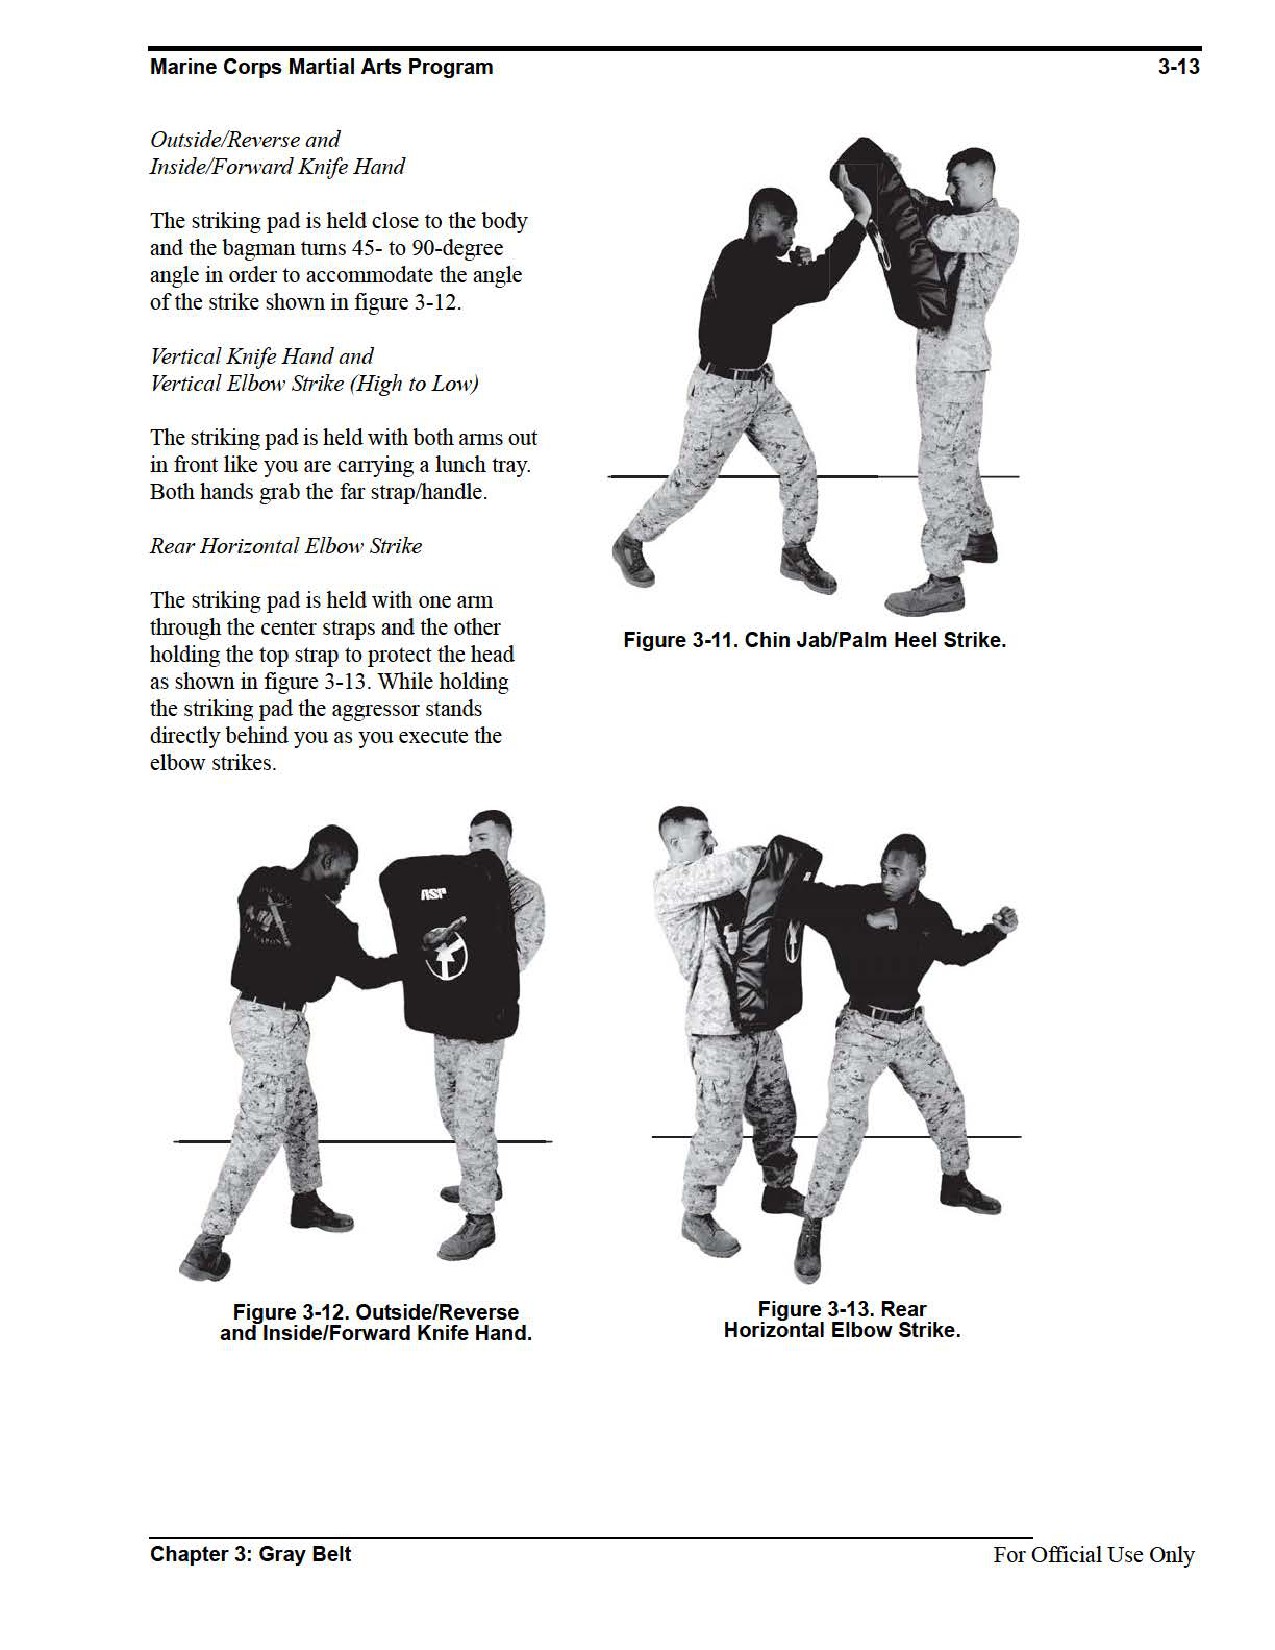
Actions of the Aggressor
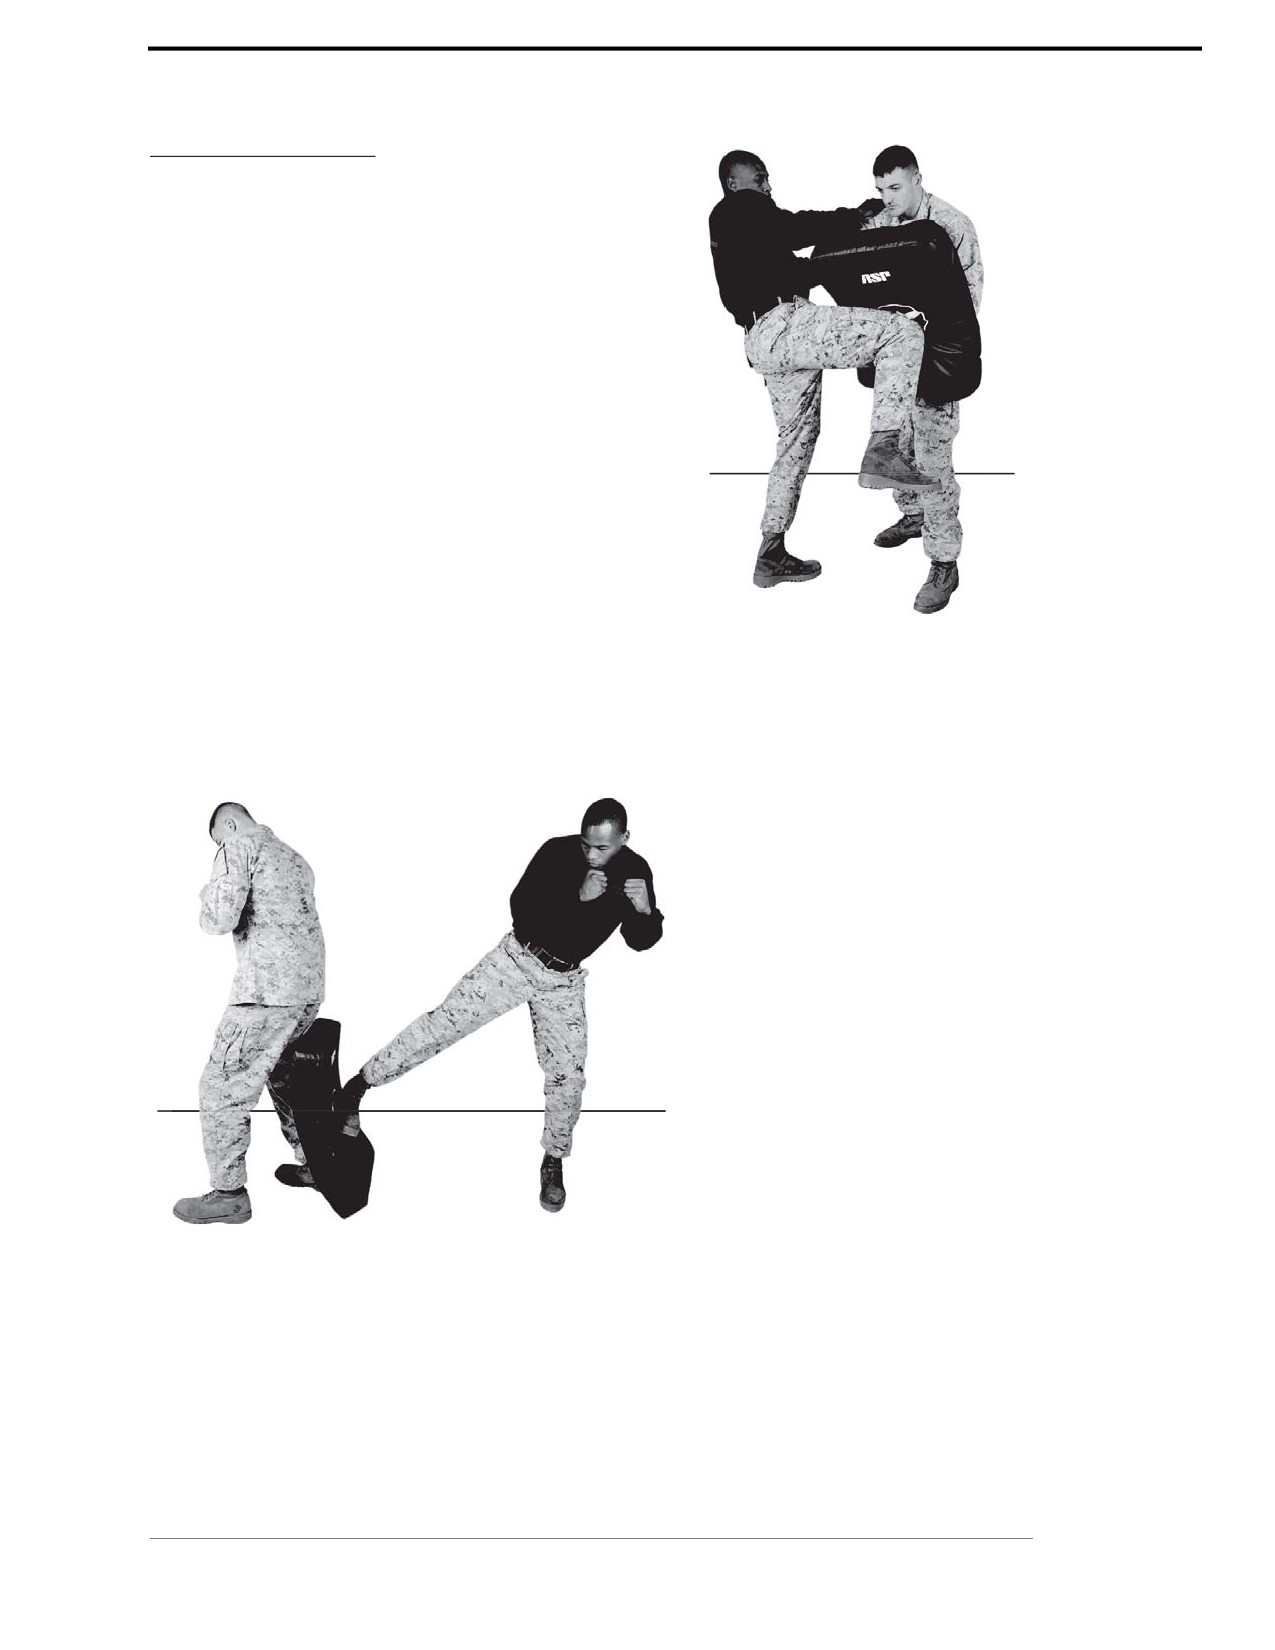
Horizontal Knee Strike
The striking pad is held with one arm
through the center straps and the other
holding the top strap as shown in figure
3-17. Hold the striking pad tight to your
body to avoid injury to your extremities.
Keep the striking pad low and well in the
range of your thighs, which are the pri-
mary target areas.
Figure 3-17.
Horizontal Knee Strike.
Side Kick
Use your hand to hold the top
strap on the striking pad. Hold it
along the back of your leg so all
impacts go in the direction of
your knee bending. The strikes
should never go against the knee
during practice, even with a
striking pad (see fig. 3-18).
Figure 3-18. Side Kick.
Chapter 3: Gray Belt
For Official Use Only

3-18
MCRP 3-02B
Section IV
Front Choke
The purpose of a choke is to render your aggressor unconscious or gain control of a close combat
situation through less than lethal force. Chokes are performed by either closing off the airway to
the lungs, thereby preventing oxygen from reaching the heart, or by cutting off the blood flow to
the brain.
When executed properly, a blood choke takes between 8 to 13 seconds for the aggressor to lose
consciousness. The air choke is least preferred because it takes longer to render the aggressor
unconscious.
Refer to appendix A for corresponding safeties 1, 2, 6, 10, 11, 12.
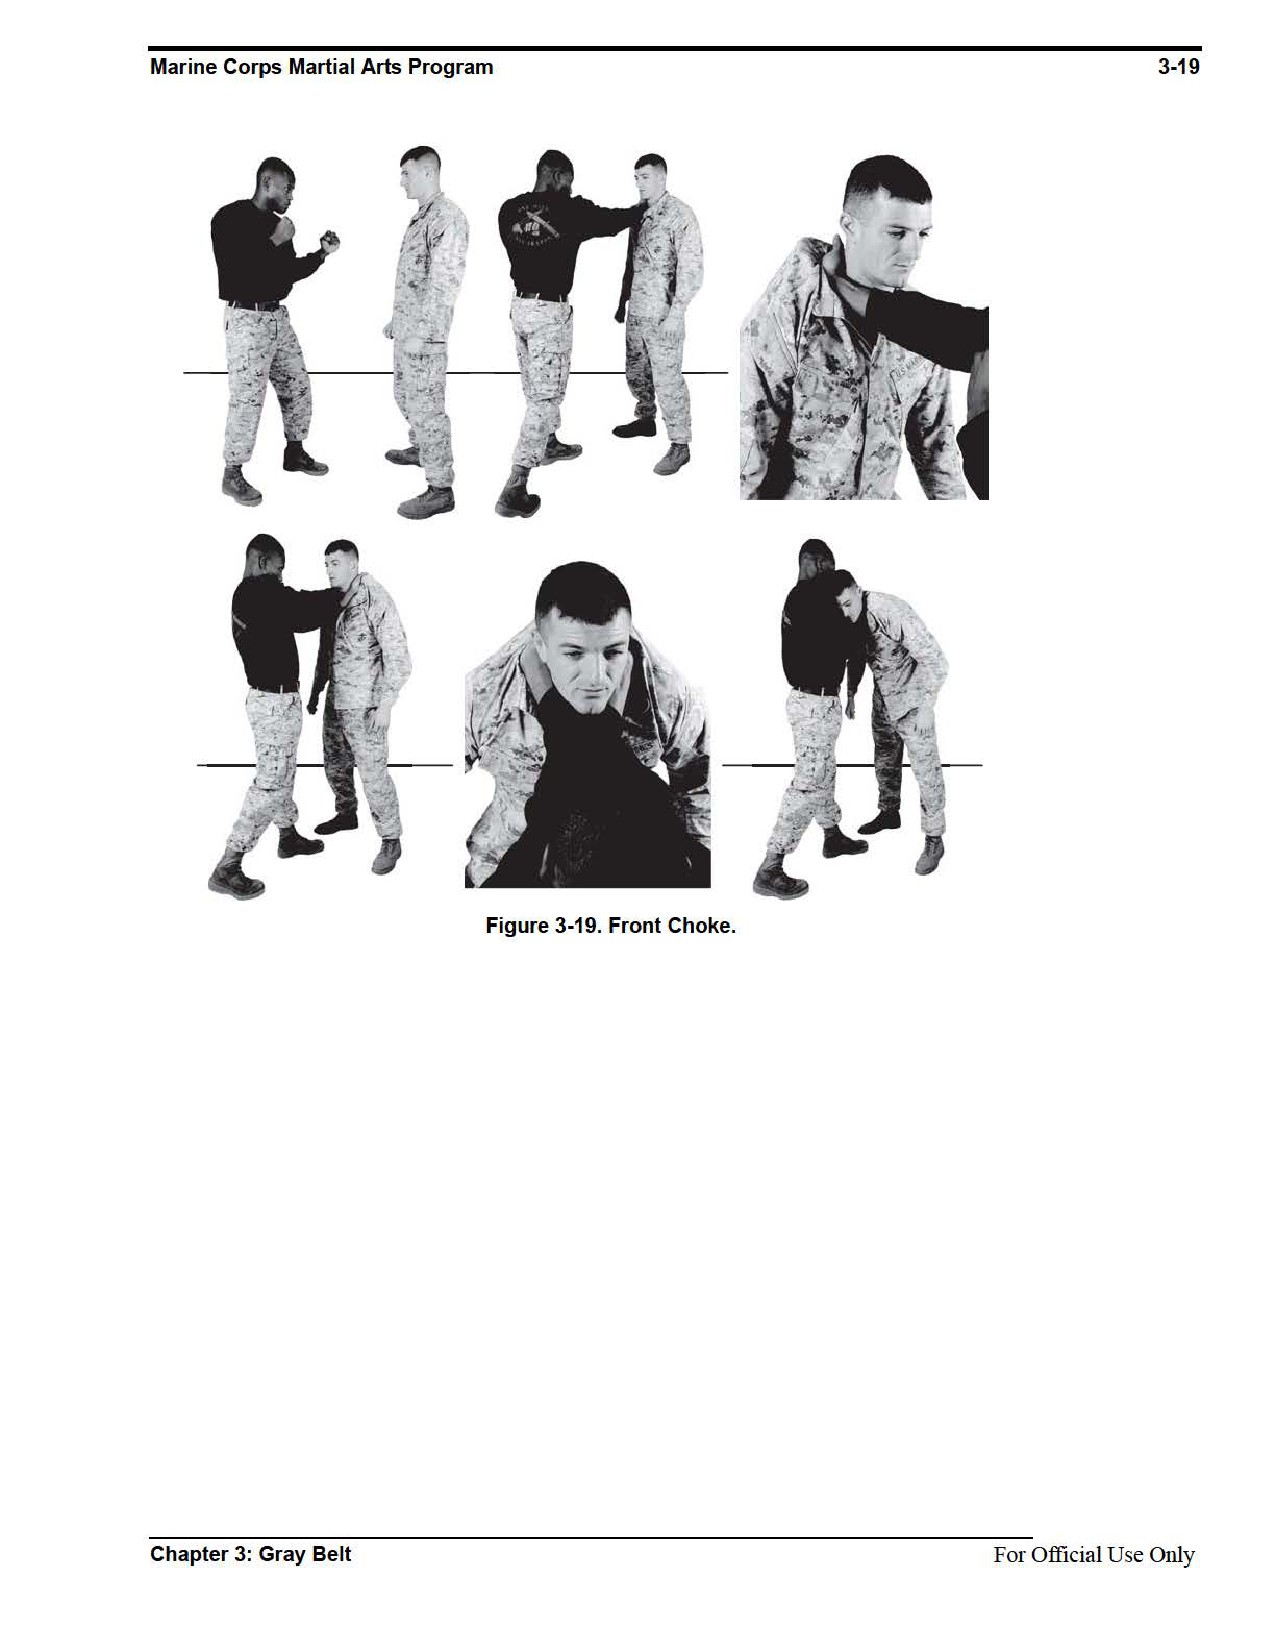
The front choke is a blood choke performed when you and your aggressor are facing each other.
The front choke employs the aggressor’s collar to execute the choke.
Technique
~ Begin by facing the aggressor.
~ With your right hand, grab the back of the aggressor’s right collar, ensure that your palm is
facing up.
~ Keeping the collar tight in your right palm. Reach under your right arm with your left hand and
grab the back of the aggressor’s left collar, making certain that your palm is facing up,
forming an X with your wrists. Attempt to make your thumbs touch.
~ Grab the collar with your elbows facing down, curl your wrist inward and pull down toward
your chest. Your left radius bone will cut off the aggressor’s left carotid artery. Your right
radius bone will cut off the aggressor’s right carotid artery.
~ Make sure that you apply pressure on the carotid arteries and not on the trachea.
See figure 3-19.
For Official Use Only
Chapter 3: Gray Belt

3-20
MCRP 3-02B
Section V
Hip Throw
The purpose of the hip throw is to bring an aggressor to the deck gaining the tactical advantage
in a fight. If an aggressor is moving toward you to attack, a hip throw can be used to take him to
the deck while you remain standing. A hip throw is particularly effective if the aggressor is mov-
ing forward or pushing you. Execution of the hip throw uses the aggressor’s forward momentum.
Refer to appendix A for corresponding safeties 1, 2, 6, 13, and 15.
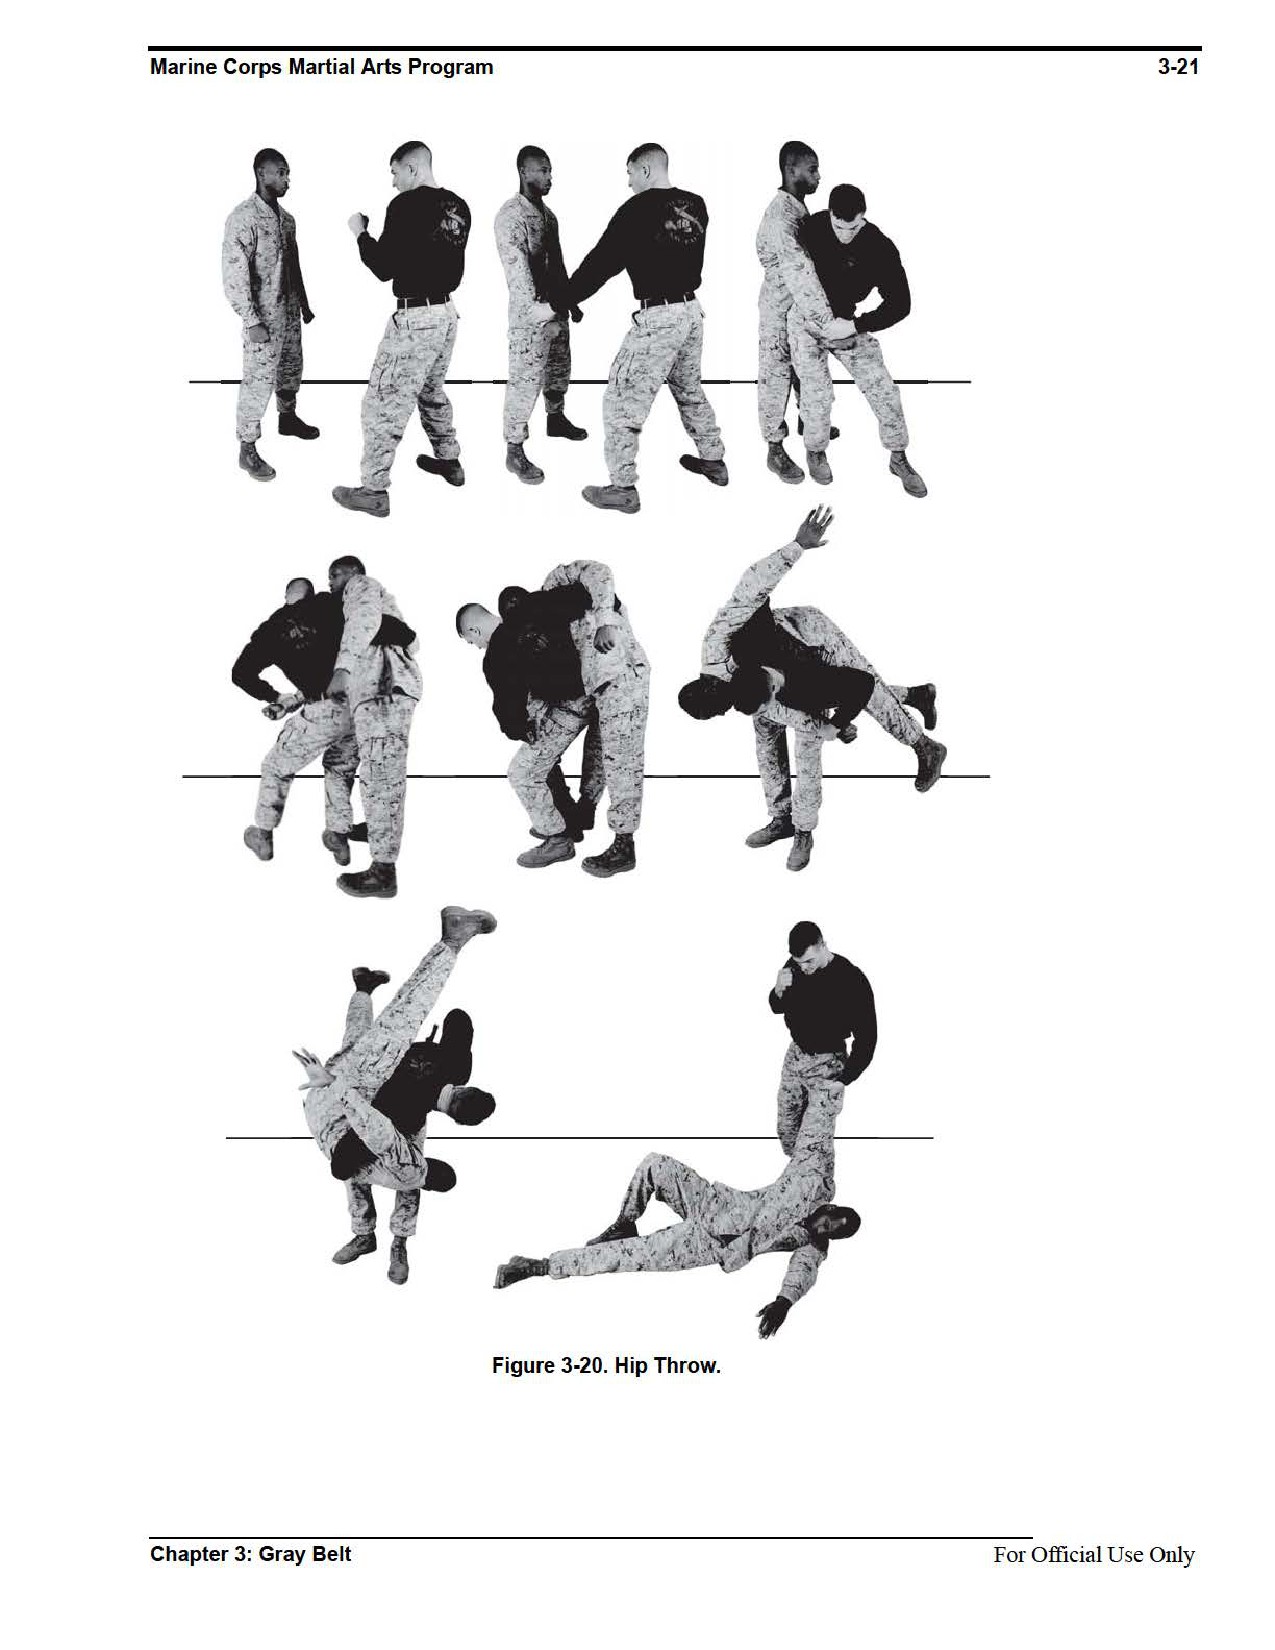
There is a minimum of 10 fit ins for each throw during sustaining (see fig. 3-20). Completion of
steps 1 through 9 would be considered one fit in. To execute a proper fit in, you should stop the
technique just before the execution of throwing the aggressor to the deck.
Fit in
~ Stand facing your aggressor.
~ With your left hand, grasp the aggressor’s right wrist.
~ Step forward with your right foot on the inside of the aggressor’s right foot. The back of your
heel should be next to the center or the toe of aggressor’s right foot.
~ Step back with your left foot, rotating on the ball of your right foot. The back of your heel
should be next to the aggressor’s toe. Your knees should be bent.
~ At the same time, rotate at your waist, and hook your right hand around the back of the
aggressor’s body anywhere from his waist to his head, depending on your size. If the
aggressor is shorter than you, it may be easier to hook your arm around his head. Hand
placement should allow you to control the aggressor and pull him in close to you.
~ Your backside and hip should be up against the aggressor.
~ Rotate your hip up against the aggressor. Your hips must be lower than the aggressor’s. Use
your right hand to pull the aggressor up on your hip to maximize contact.
~ Pull the aggressor’s arm across your body and, at the same time, slightly lift the aggressor off
of the deck by bending at the waist, straightening your legs, and rotating your body to your
left. If the aggressor cannot be easily lifted, your body positioning is not correct.
~ Practice these steps as many times as necessary until you determine the proper
body positioning.
~ Practice the steps again and, this time, continue this action to force the aggressor around
your hip and on to the deck.
See figure 3-20.
If an aggressor is moving toward you to attack you, a hip throw can be used to take the aggressor
to the deck while you remain standing. A hip throw is particularly effective if the aggressor
is moving toward you or pushing you. Execution of the hip throw uses the aggressor’s
forward momentum.
For Official Use Only
Chapter 3: Gray Belt

3-22
MCRP 3-02B
Section VI
Counters to Strikes
The purpose of counters to strikes is to counter the aggressor’s attack with the counter to the lead
hand punch or the counter to the lead leg kick in order to gain a tactical advantage.
Refer to appendix A for corresponding safeties 1, 2, 3, 6, 10, 11, 12, 13, and 15.
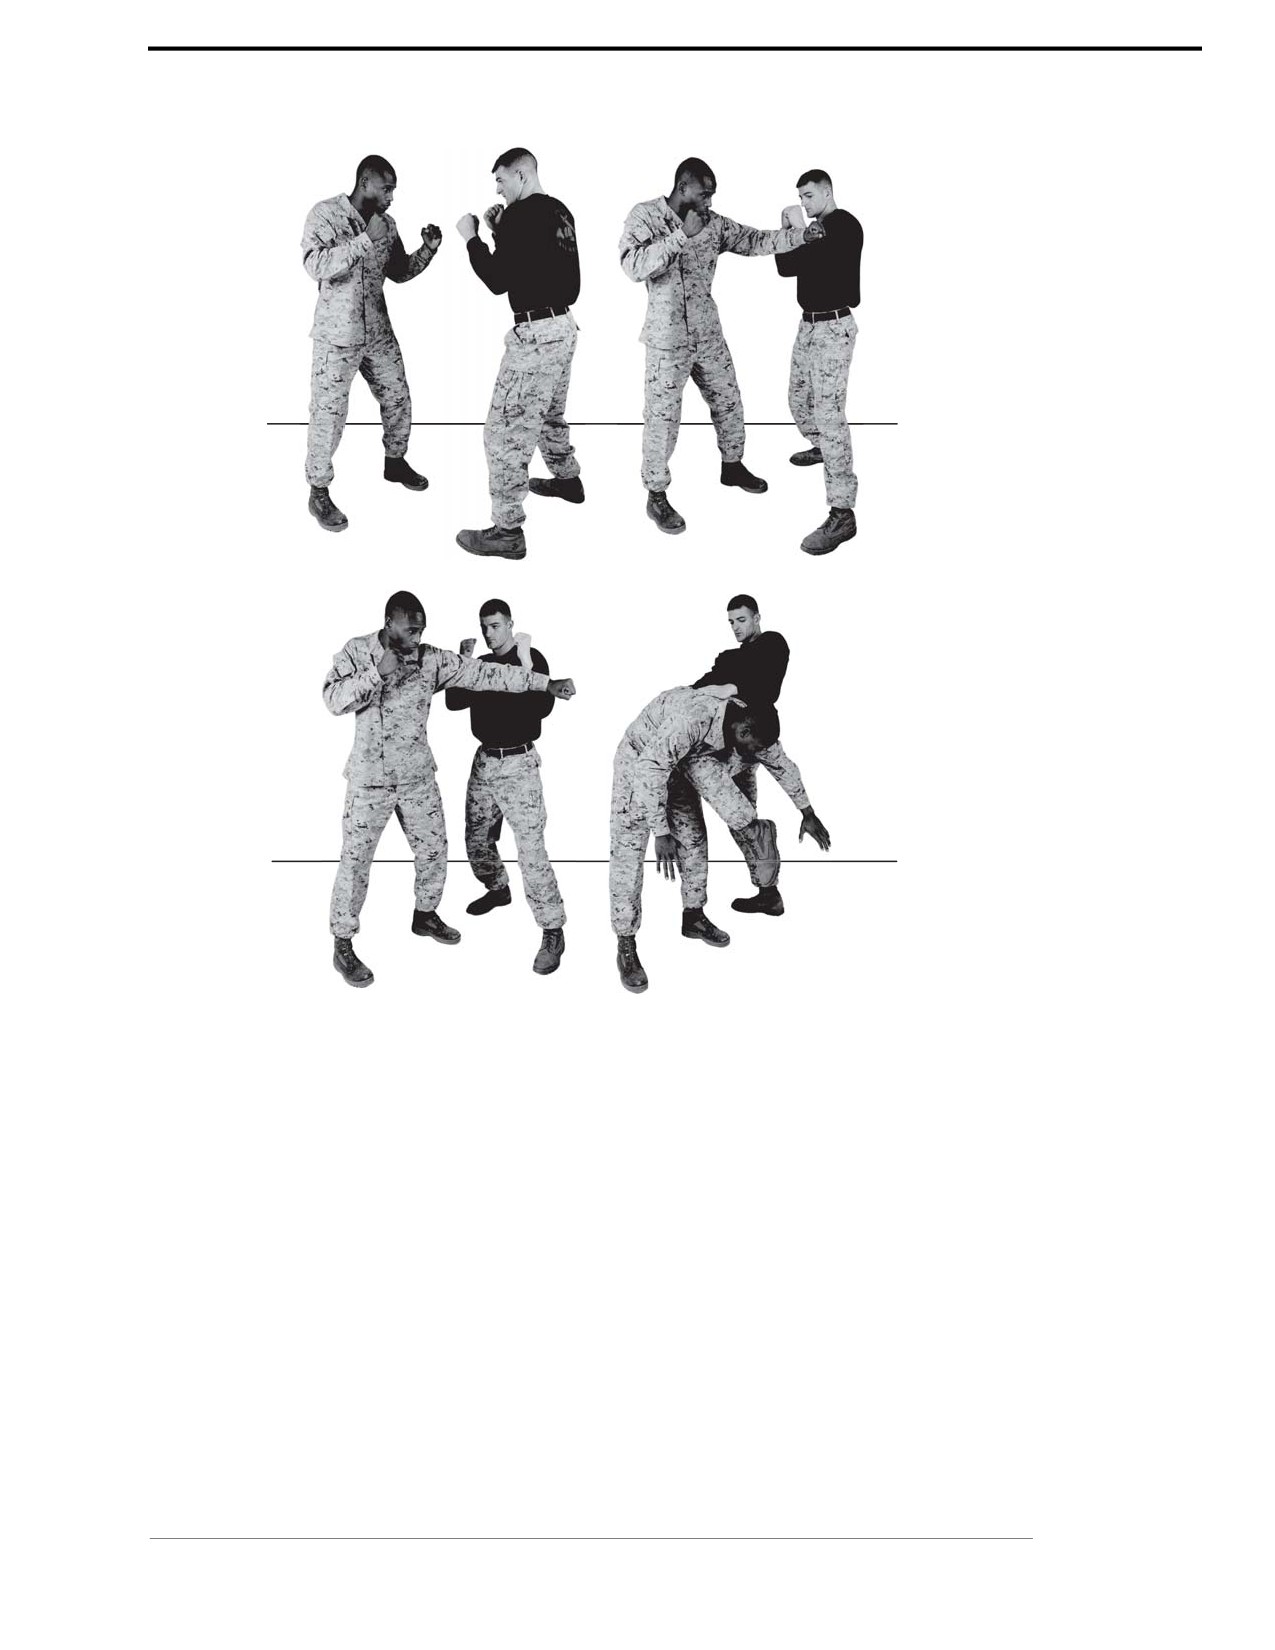
Counter to Lead Hand Punch
This counter is used when the aggressor throws a lead hand punch.
Technique
~ Begin with the aggressor extending his left hand in a lead hand punch.
~ Execute a forward-right angle of movement moving toward the aggressor. Movement is
always made to the outside of the aggressor’s attacking arm.
~ At the end of the movement, the left foot is forward with the toe pointing toward
the aggressor.
~ At the same time, raise your left arm and block or deflect the aggressor’s attacking arm.
Block the punch with the meaty portion of your hand, your palm, or the meaty portion of
the forearm.
~ Leave your left arm against the aggressor’s right arm while stepping forward and to the left at
approximately a 45-degree angle to close with the aggressor.
~ Follow through by applying pressure against the aggressor’s arm to redirect the strike and,
simultaneously, throw the aggressor off balance.
~ Continuing to step forward will position you to strike an exposed area on the aggressor.
~ Counter with a strike to the aggressor’s exposed target areas.
See figure 3-21.
For Official Use Only
Chapter 3: Gray Belt
Marine Corps Martial Arts Program
3-23
Figure 3-21. Counter to Lead Hand Punch.
Chapter 3: Gray Belt
For Official Use Only
3-24
MCRP 3-02B
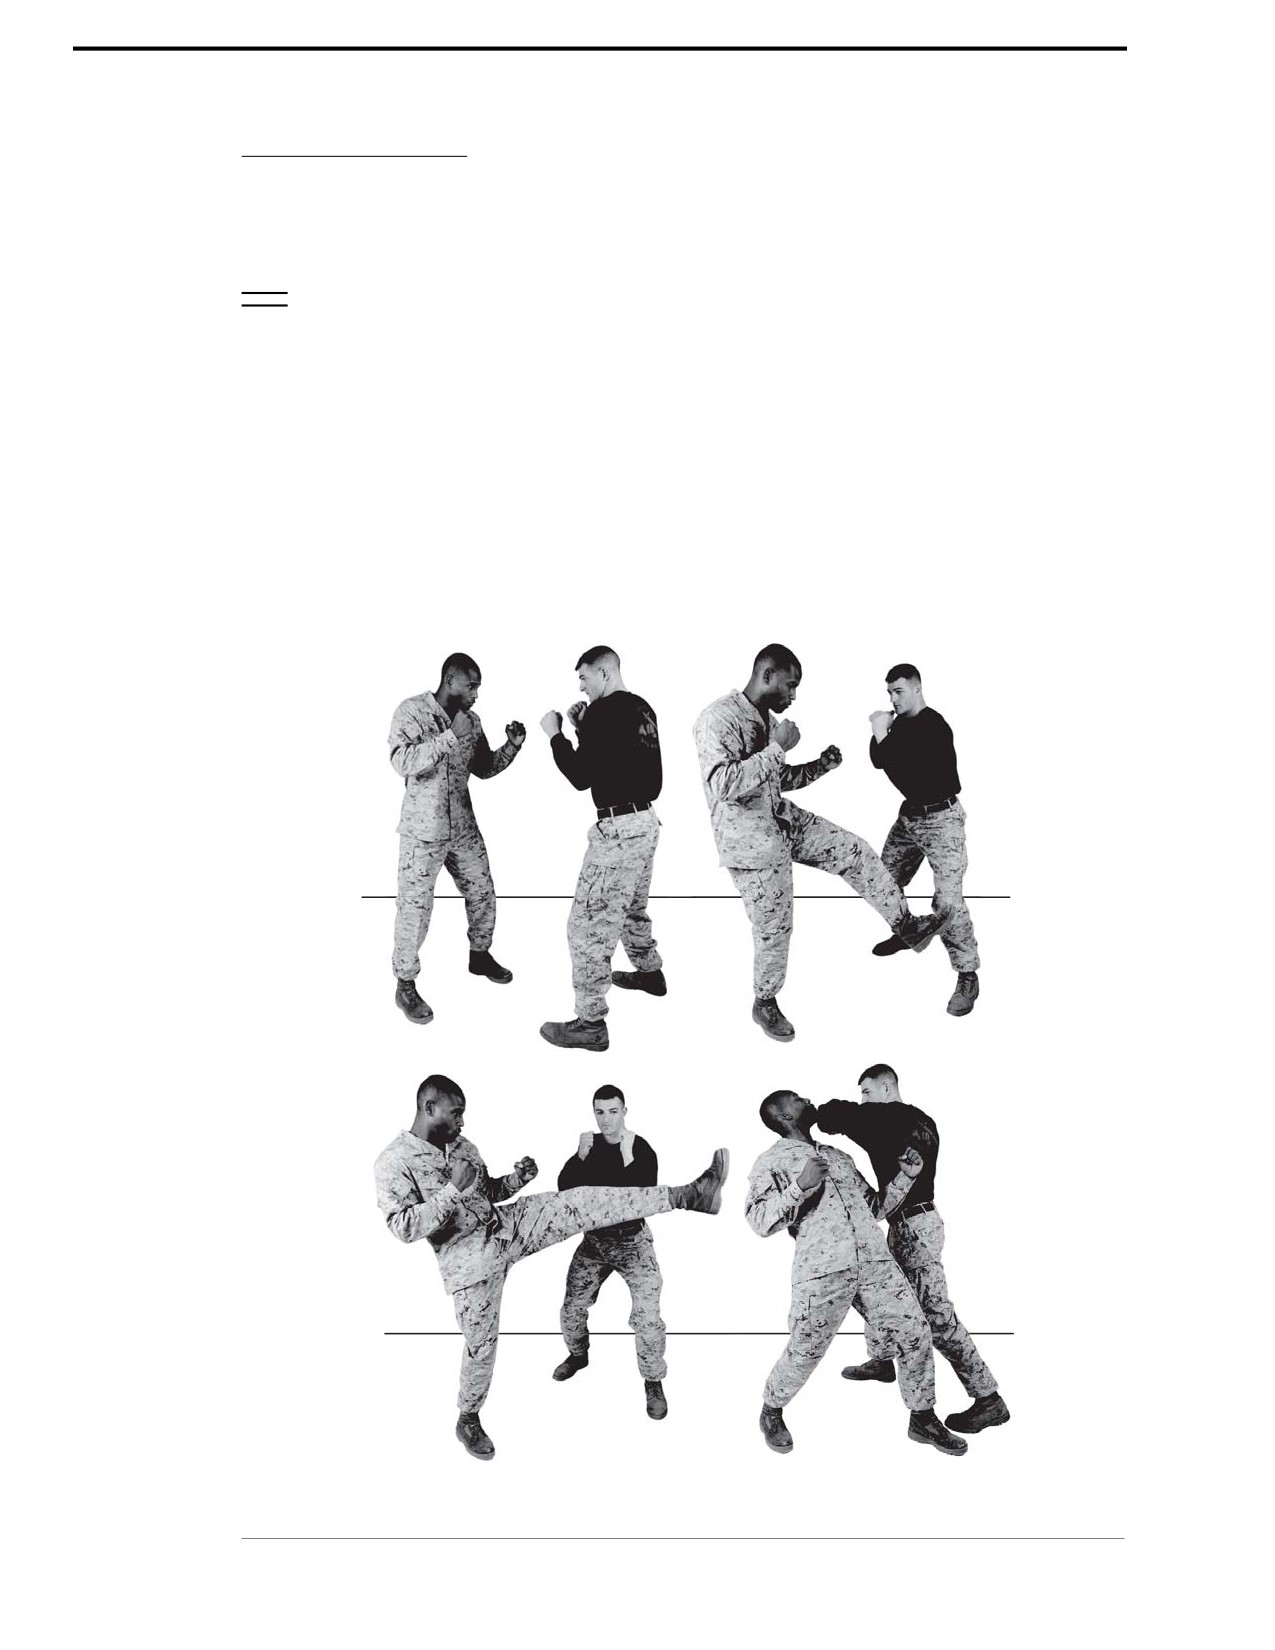
Counter to Lead Leg Kick
The counter to a lead kick is used when the aggressor executes a front kick with his left leg.
Technique
~ Begin with the aggressor extending his lead leg into a front kick.
~ Step forward using a forward-right angle of movement moving in toward the aggressor.
Movement is always to the outside of the aggressor’s striking leg.
~ At the end of the movement, the left foot is forward with the toe pointing toward the
aggressor. At the same time, raise your left arm and block or deflect the aggressor’s leg.
~ Block the kick with the meaty portion of your hand, your palm, or the meaty portion of the
forearm. Move out of the way of the strike it is better than bending down to block the kick.
~ Continuing to step forward will position you to strike an exposed area on the aggressor.
~ Counter with a strike to the aggressor’s exposed target areas.
See figure 3-22.
Figure 3-22. Counter to Lead Leg Kick.
For Official Use Only
Chapter 3: Gray Belt
Marine Corps Martial Arts Program
3-25
Section VII
Counters to Chokes and Holds
The purpose of counters to chokes and holds is to be able to remove you from the choke and hold
in order for you to counterattack and regain the tactical advantage. This section will cover the
counter to the front choke, counter to the front headlock, and the counter to the front bear hug.
Refer to appendix A for corresponding safeties 1, 2, 3 6, 10, 11, 12, 13, and 15.
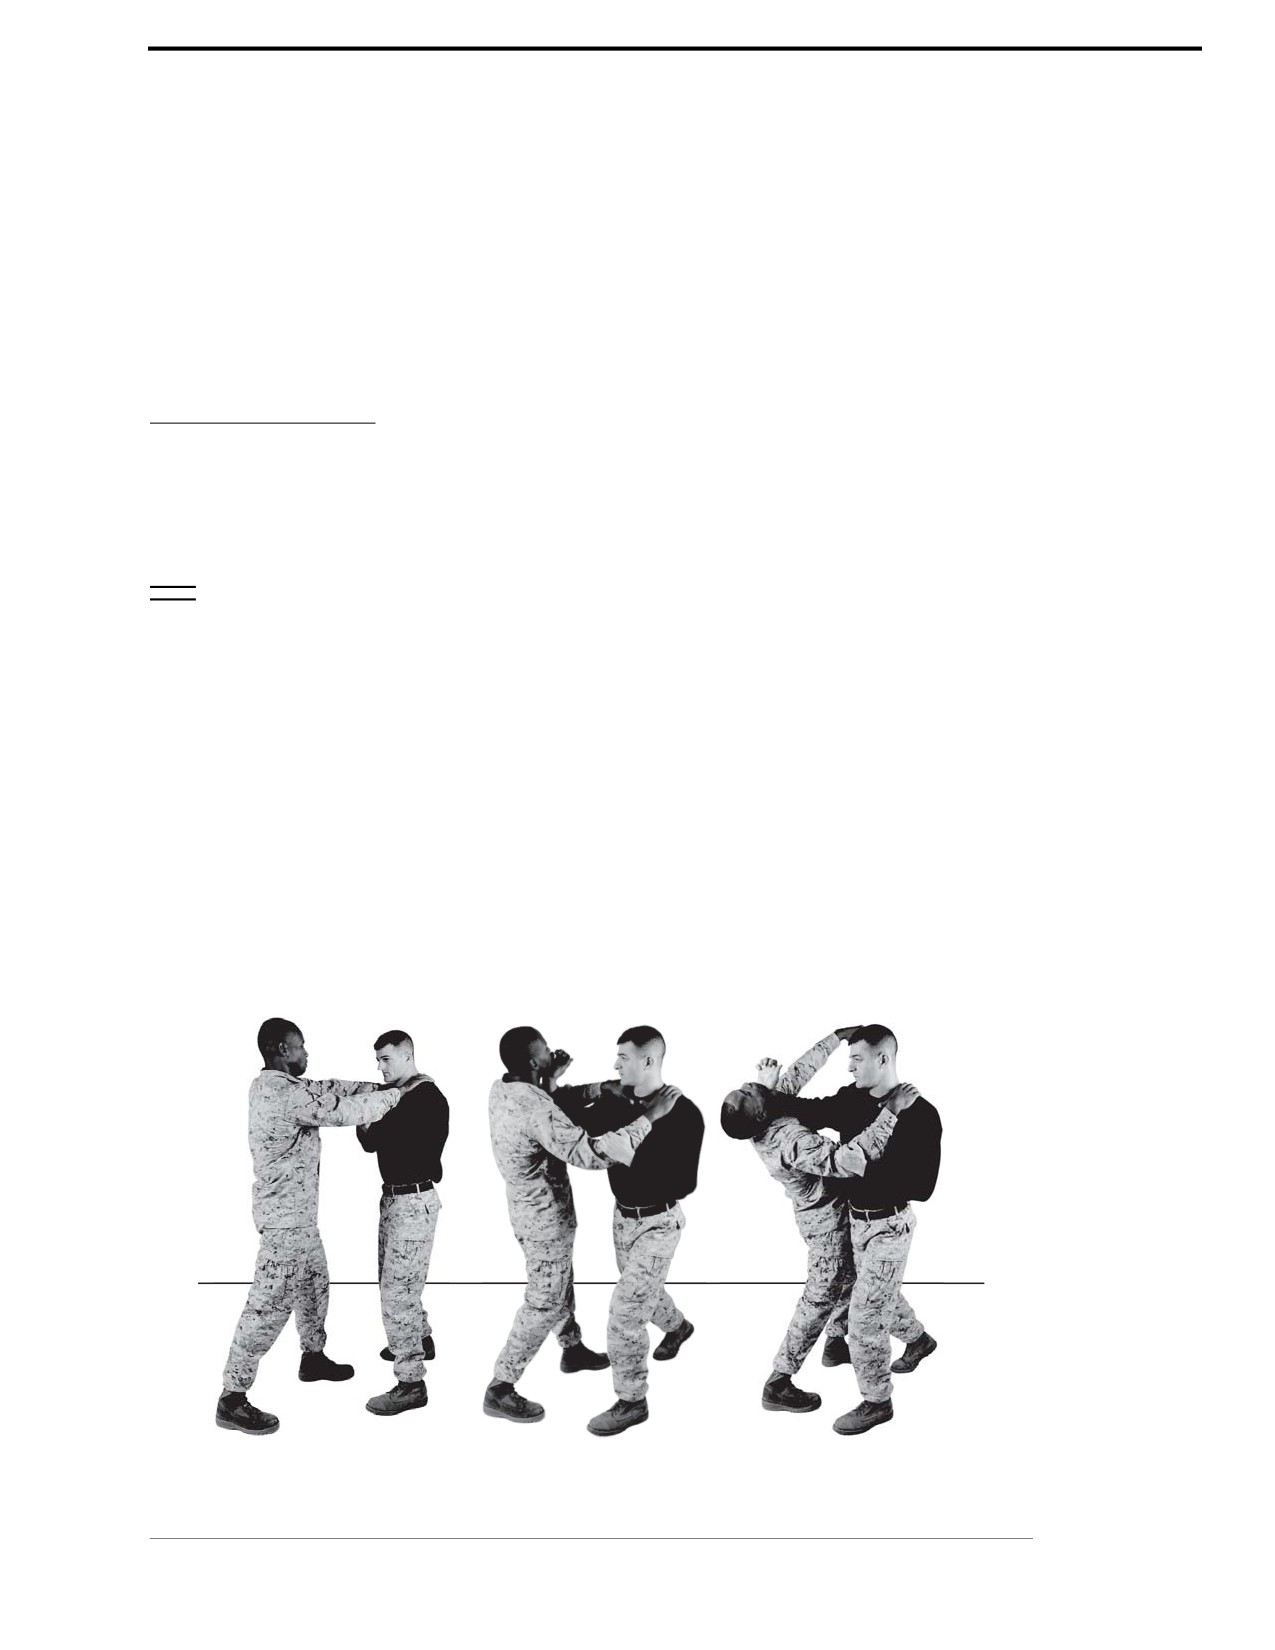
Counter to Front Choke
The counter to the front choke is used when the aggressor approaches from the front and places
both hands around your neck to choke you.
Technique
~ Begin with the aggressor facing the student and placing both hands around the
student’s neck.
~ The aggressor should place his thumbs on the student’s throat and fingers along the side of
the student’s neck without applying pressure.
~ With your left hand, strike and grasp the aggressor’s right forearm where the elbow bends
and apply downward pressure on the radial nerve with your fingers. The radial nerve is
located along the inside of the forearm along the radius bone.
~ This action will loosen the aggressor’s grip so that you can clear your airway. With your right
hand, execute a chin jab/palm heel strike to the aggressor’s chin. The chin jab will be
delivered between your aggressor’s arms.
~ At the same time, generate power into the strike by executing a forward movement bringing
your left foot to the outside of the aggressor’s right foot and rotating your hips into the strike.
See figure 3-23.
Figure 3-23. Counter to Front Choke.
Chapter 3: Gray Belt
For Official Use Only

3-26
MCRP 3-02B
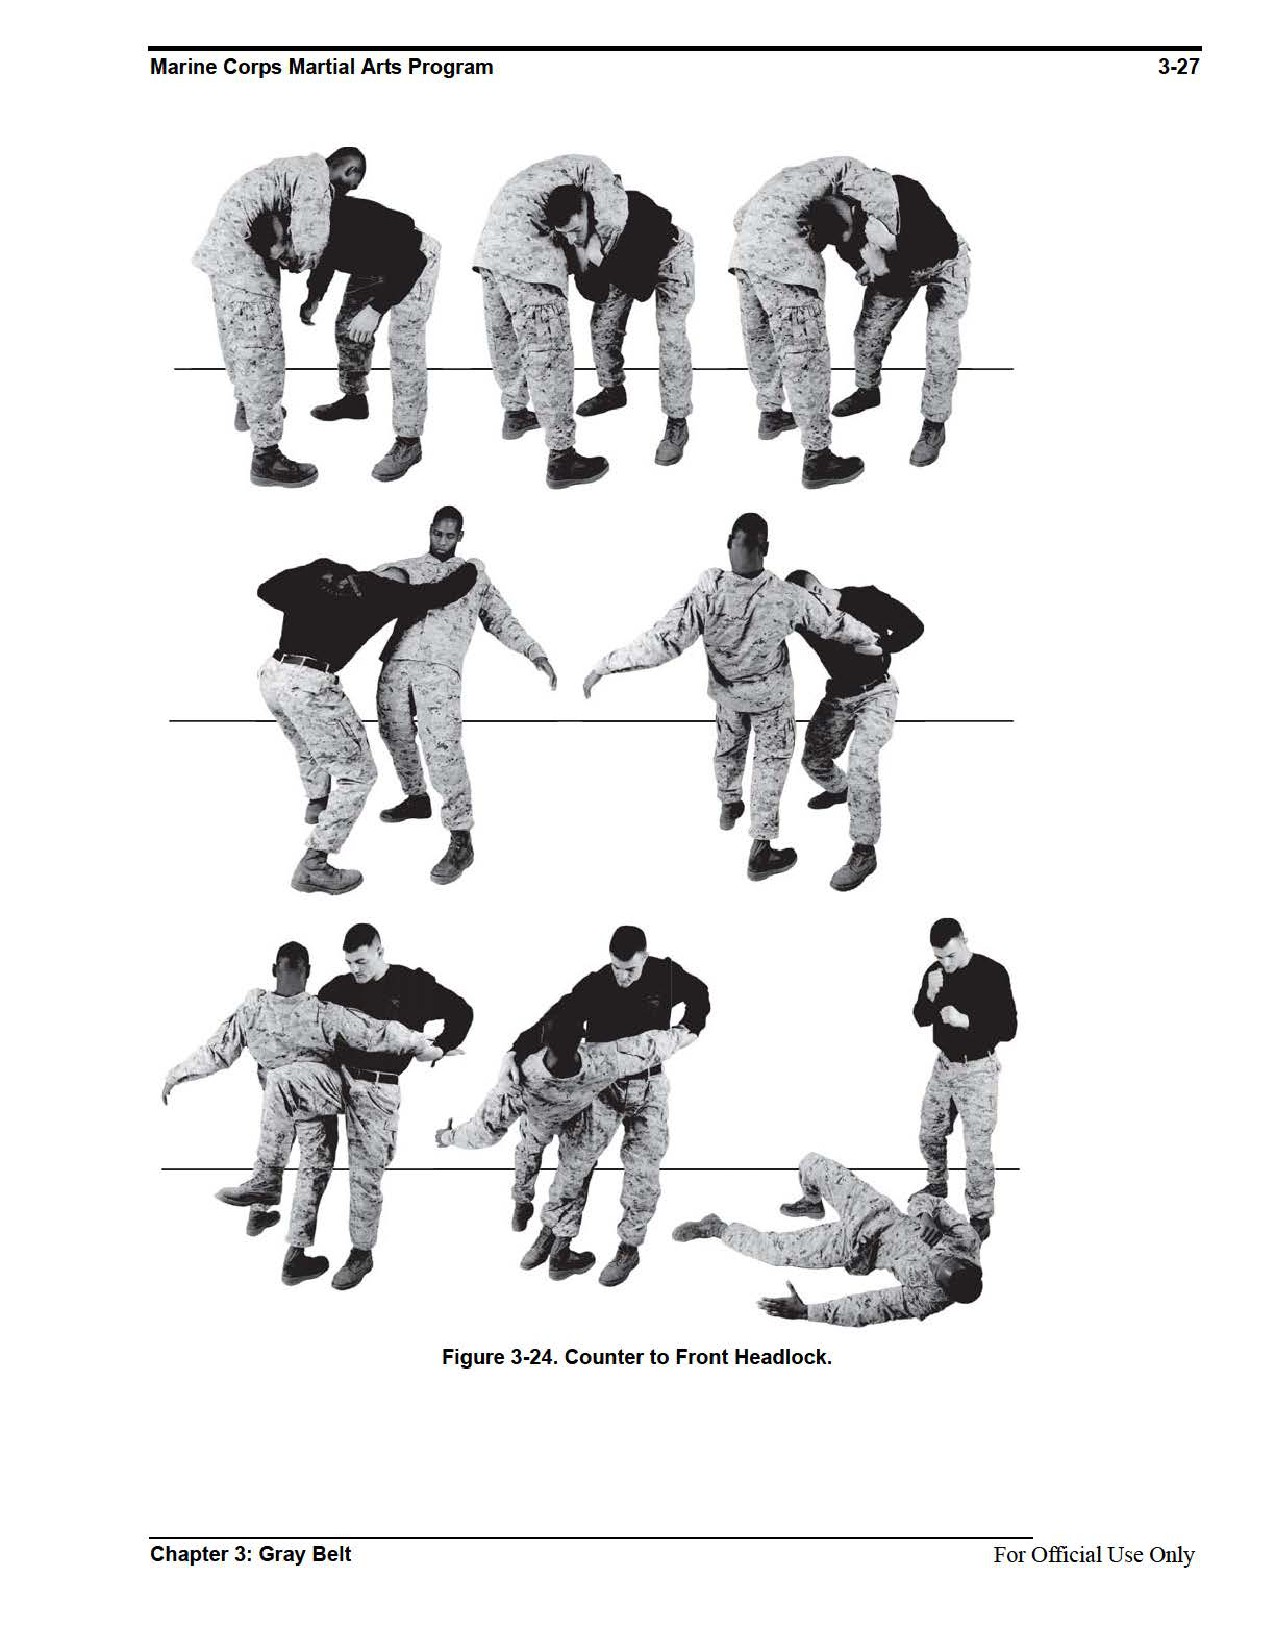
Counter to Front Headlock
The counter to a front headlock is used when the aggressor approaches from the front and puts
his right arm around your neck, bending you forward and locking your head against his hip.
Technique
~ Begin by having the student bend forward at the waist.
~ The aggressor faces the student and places his right arm around the student’s neck, his
forearm across the student’s throat.
~ With both hands, grasp the aggressor’s wrist and forearm, pull him down to clear your airway.
Maintain control of the aggressor’s wrist throughout the move. Once the airway is clear, tuck
your chin to protect your airway and to prevent the aggressor from re-applying the choke.
~ Move your right hand and arm across the aggressor’s torso.
~ With your left foot, step forward and to the left at a 45-degree angle. Your left foot should be
past your aggressor’s right foot and out far enough to bring your right foot through and
execute a sweep with your right foot against the aggressor’s right leg. At the same time, push
against the aggressor’s chest with your right arm and shoulder to off balance and generate
more power for the sweep.
See figure 3-24.
For Official Use Only
Chapter 3: Gray Belt

3-28
MCRP 3-02B
Counter to Front Bear Hug
The counter to a front bear hug is executed when the aggressor approaches from the front and
puts both of his arms around your body, trapping your arms to your sides.
Technique
~ Drop your body weight by bending at your knees and then spread your feet to maintain your
balance. At the same time, thrust your shoulders straight up and slightly flare your elbows
while raising your hands.
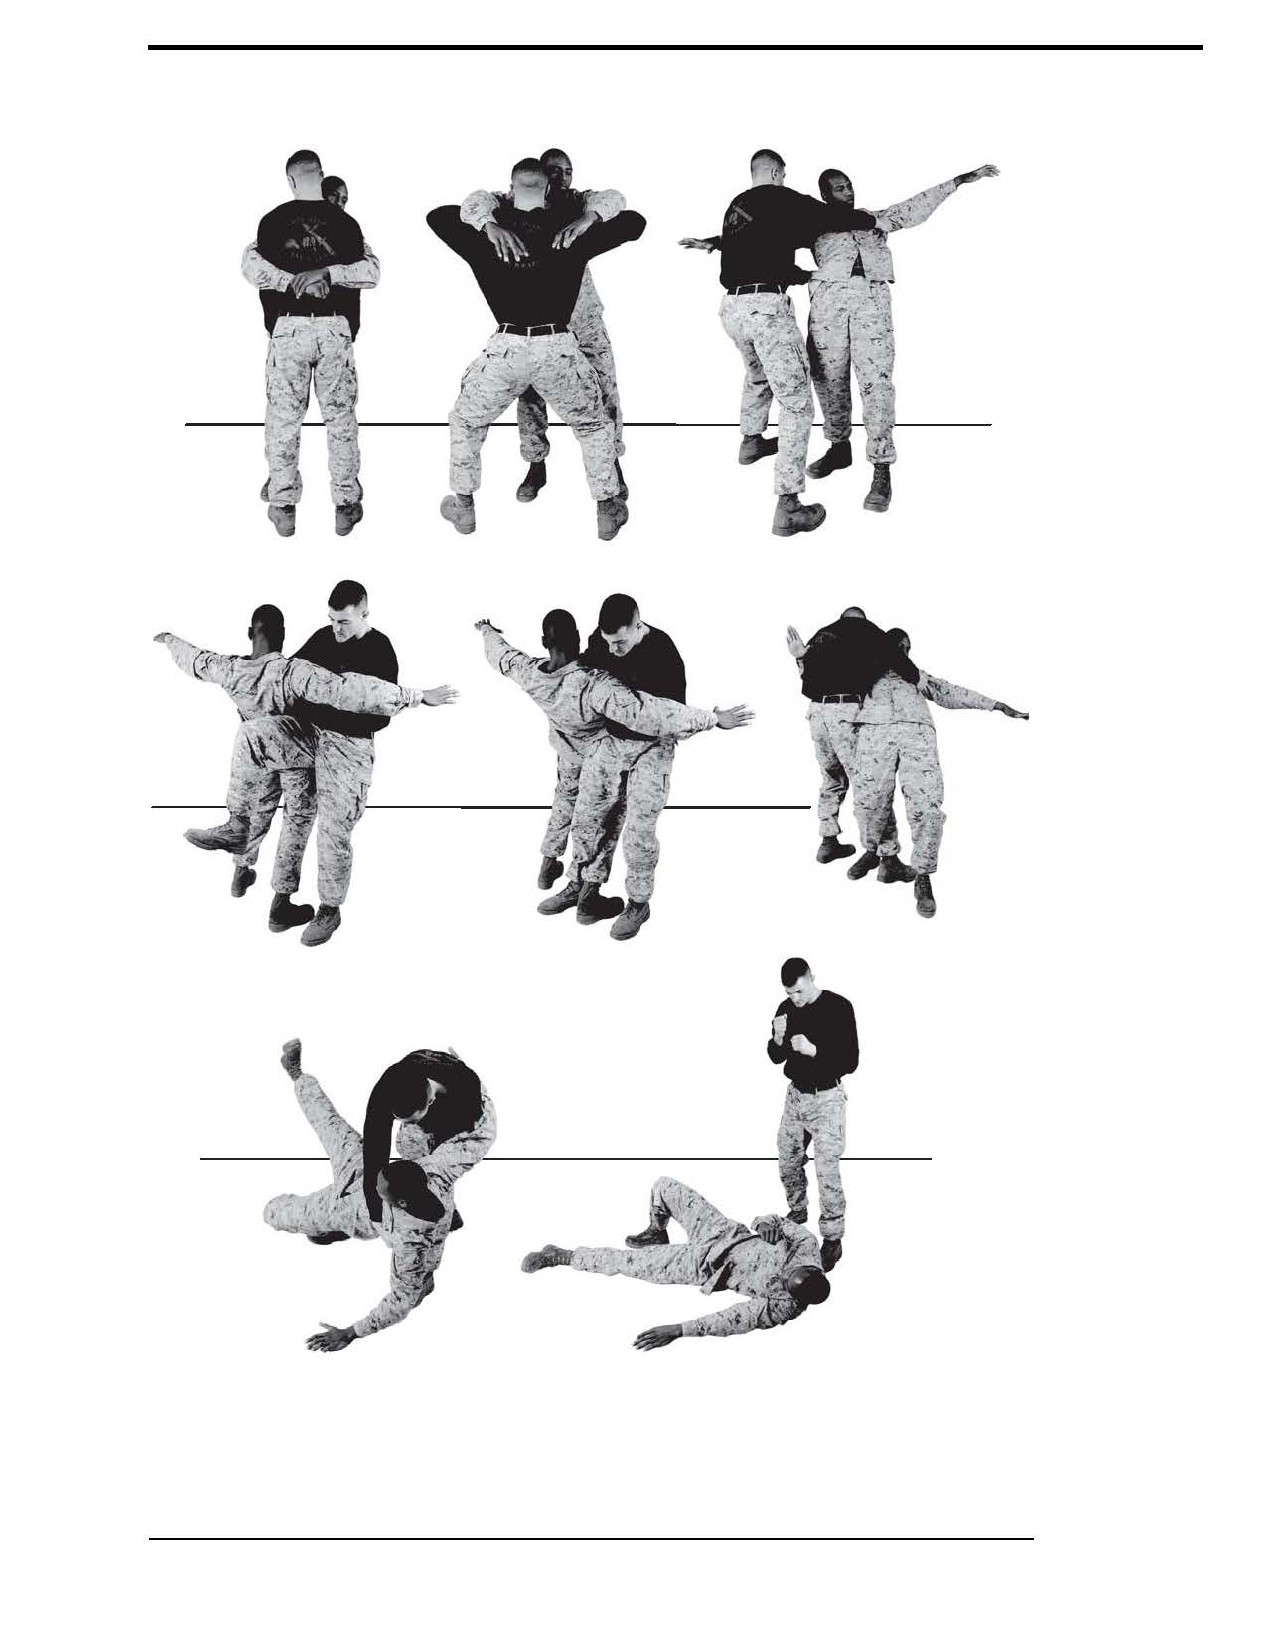
~ With your right hand, grasp the upper portion of the aggressor’s torso; with your left hand
grasp the lower torso on the aggressor’s left side.
~ With your left foot, step forward and to the left at a 45-degree angle to the outside of the
aggressor’s right leg, keeping your left leg bent. Ensure that you step deep enough to off
balance the aggressor.
~ This movement will begin to off balance the aggressor sending him backwards. Continue to
push and pull on the aggressor to keep him off balance.
~ Drive your right arm and shoulder forward and, at the same time, bring your right leg forward
and sweep the aggressor’s right leg making calf-on-calf contact, bringing him to the deck.
See figure 3-25.
For Official Use Only
Chapter 3: Gray Belt
Marine Corps Martial Arts Program
3-29
Figure 3-25. Counter to Front Bear Hug.
Chapter 3: Gray Belt
For Official Use Only

3-30
MCRP 3-02B
Section VIII
Unarmed Manipulation
The purpose of unarmed manipulations is to teach individuals how to operate within the contin-
uum of force, particularly in support of peacekeeping- or humanitarian-type missions. The
wristlock come-along, the takedown from a wristlock come-along, takedown from a wristlock
come-along and double flexi cuff, escort position, and escort position takedown and single flexi
cuff are all forms of unarmed manipulations. In these situations, Marines must act responsibly
and handle situations without resorting to deadly force. Unarmed restraints and manipulation
techniques can be used to control an aggressor.
Refer to appendix A for corresponding safeties 1, 2, 6, 10, and 13.
Wristlock Come-Along
Technique
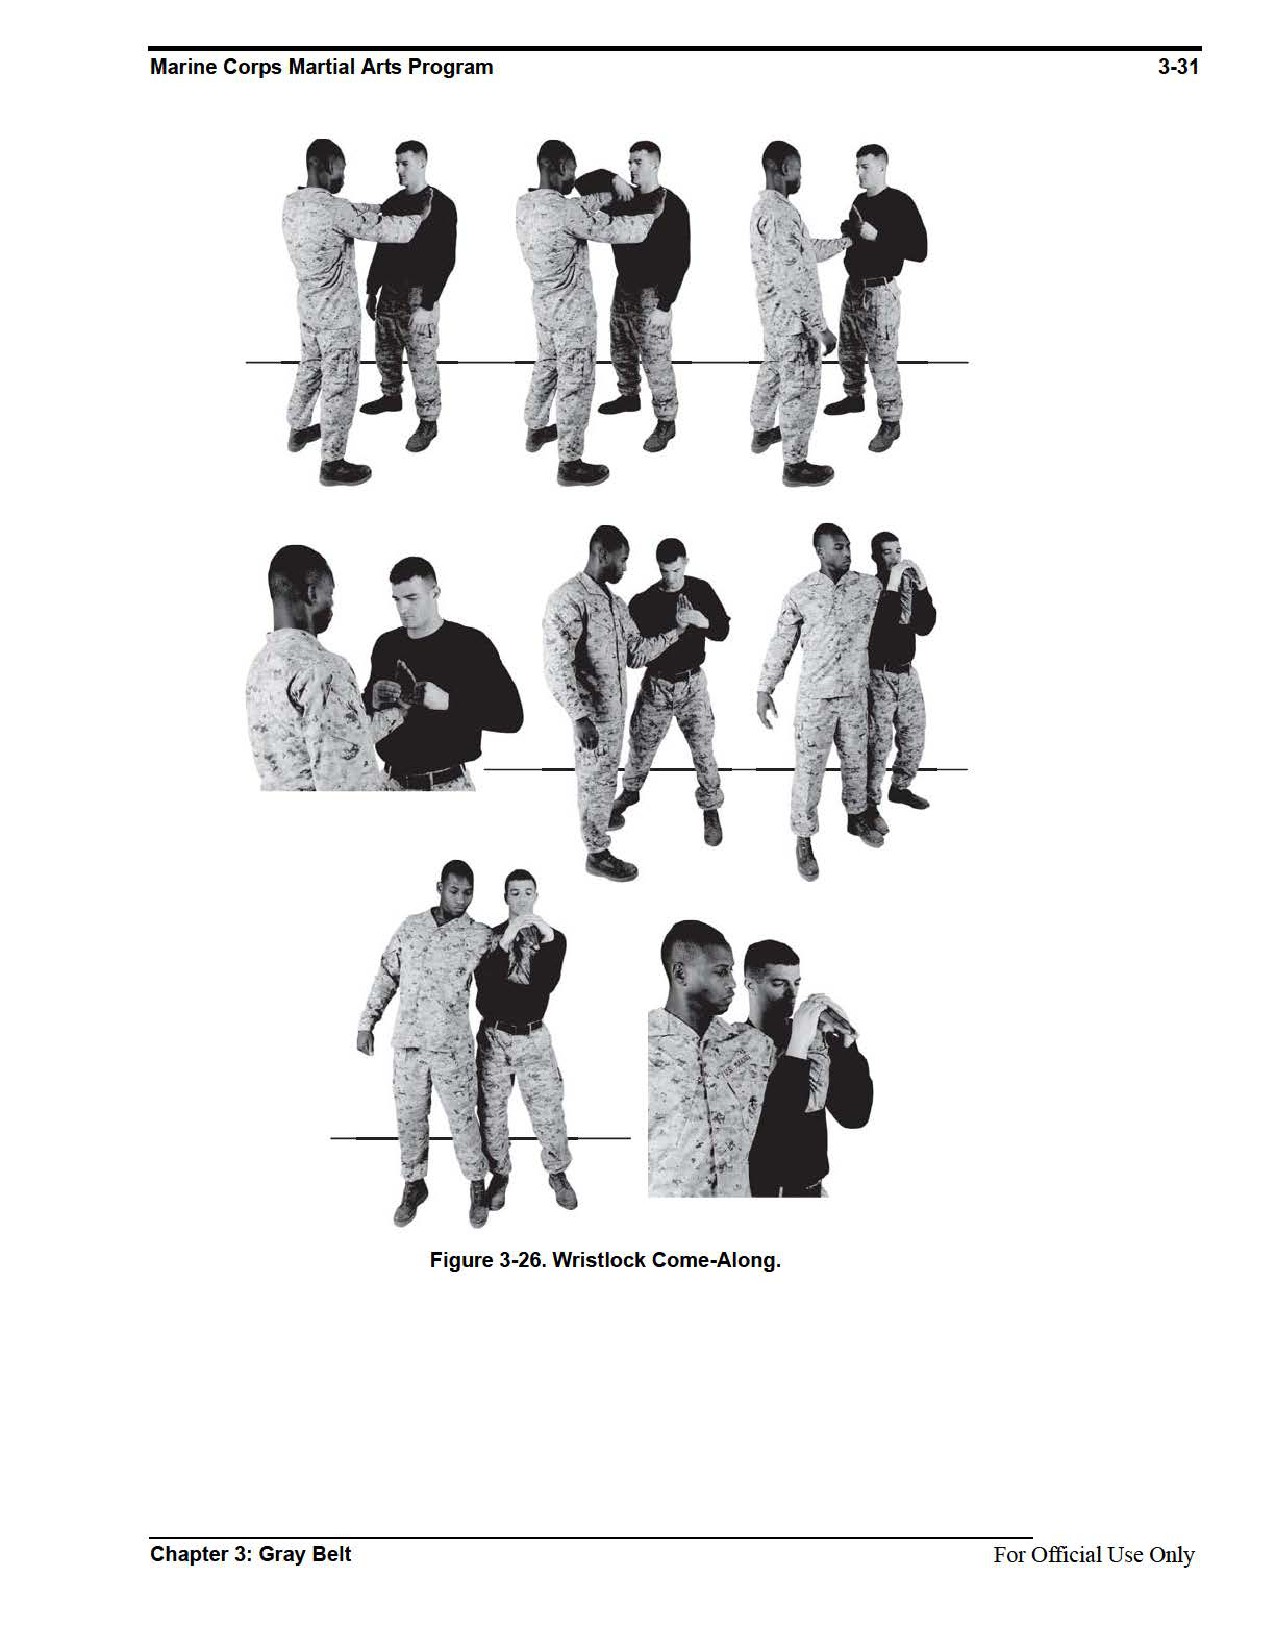
~ With your right hand, execute a basic wristlock. Incorporate your left hand in a two-handed
wristlock in order to gain more control.
~ While maintaining pressure on the wrist with your right hand, step forward and to the right
and pivot around so that you and the subject are standing next to one another. At the same
time, release your right hand and quickly reach under the subject’s left arm from behind and
grab his hand.
~ Your palm and fingers of both hands should be on top of the subject’s hand, which is palm
side down and your thumbs are across his palm. The subject’s elbow should be pointed
straight down, with his arm controlled between your forearm and biceps.
~ With your left hand, apply downward pressure on the subject’s wrist.
~ While maintaining downward pressure on the subject’s wrist, release your left hand and grab
his elbow.
~ Apply pressure on the subject’s elbow and rotate his elbow up while bringing his wrist down
and his hand around to the center of his back.
~ Maintain inward and upward pressure on the subject’s wrist and elbow throughout to
control him.
See figure 3-26.
For Official Use Only
Chapter 3: Gray Belt

3-32
MCRP 3-02B
Takedown From a Wristlock Come-Along and Double Flexi Cuff
A takedown is a method used to bring a subject to the deck in order to gain further control of
him. This technique is used as a continuation of the wristlock come-along against a subject that
is noncompliant.
Technique
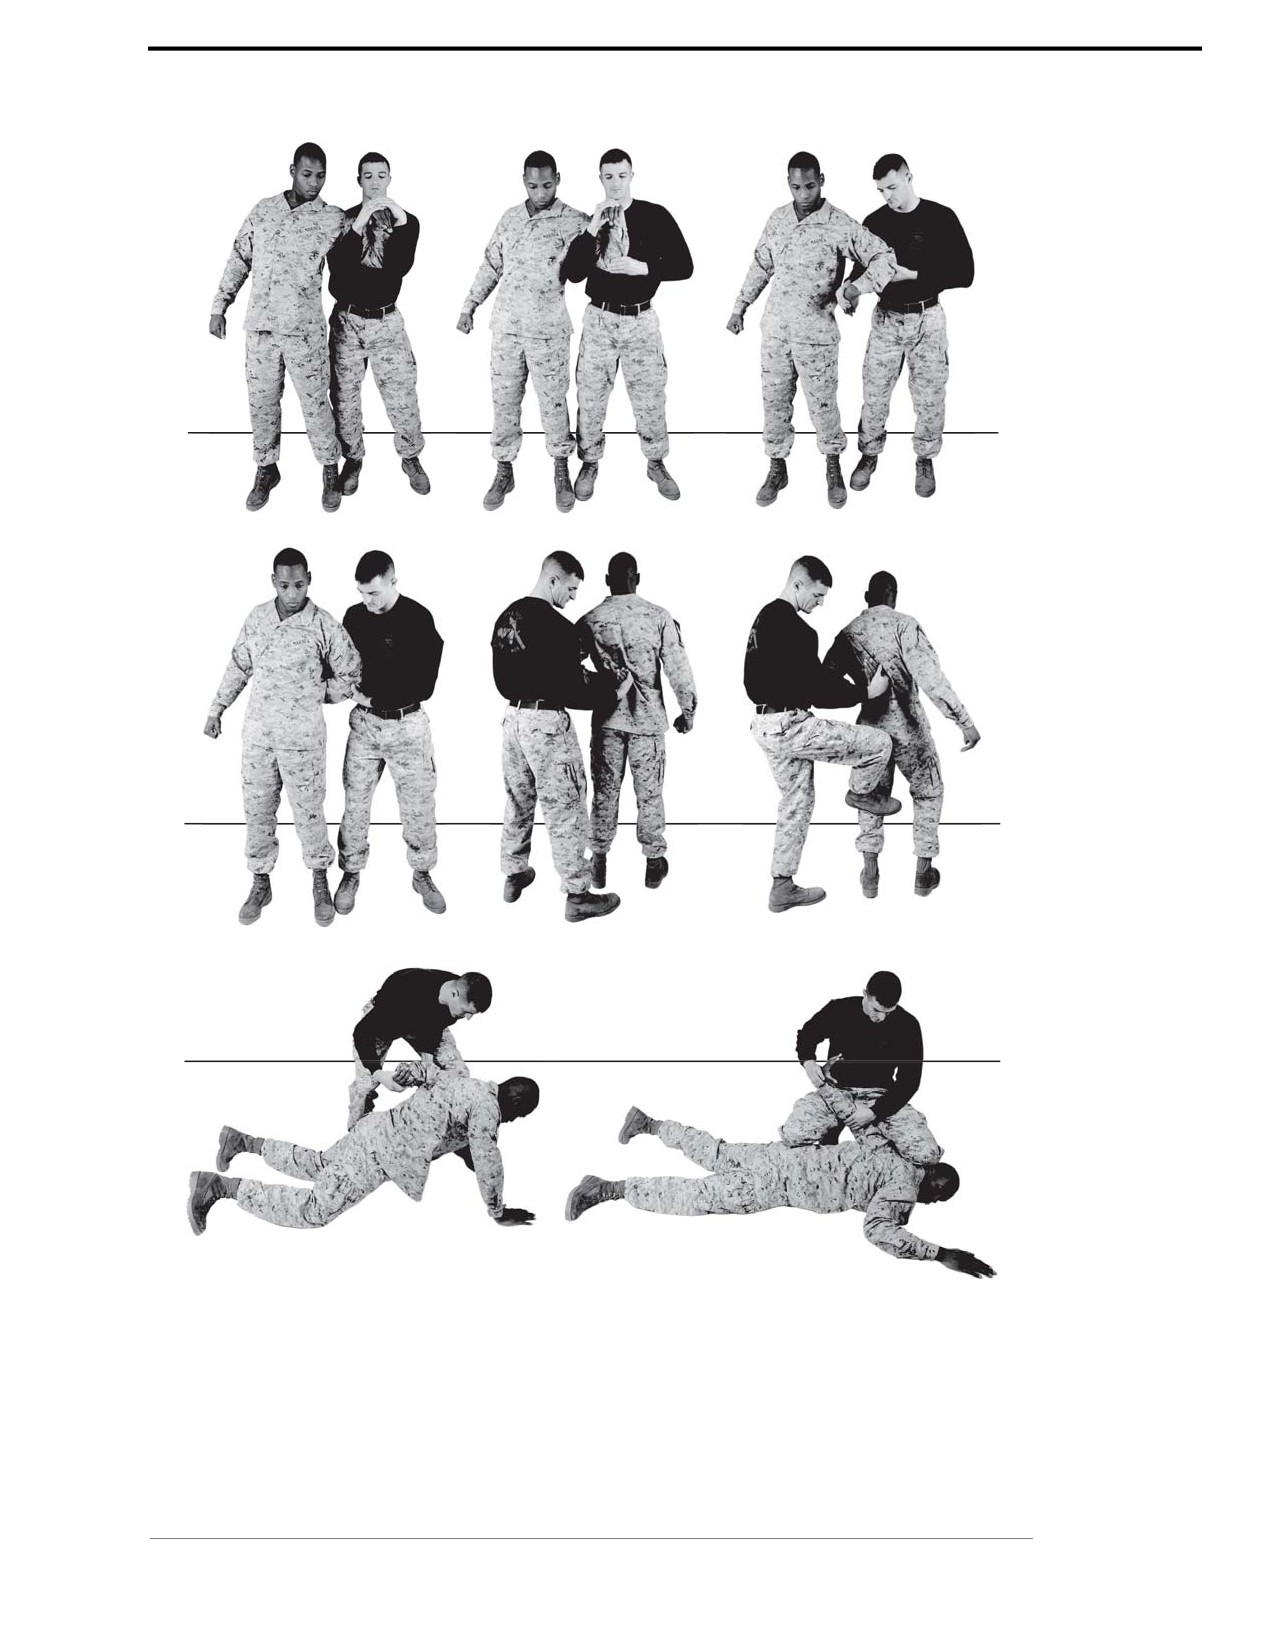
~ From the basic wristlock come-along, maintain downward pressure on the wrist with your
right hand and remove your left hand and place it just above the elbow joint. With your right
hand, pull down on the wrist while at the same time use your left hand to pull up on the elbow
keeping pressure with the right hand on the wrist, bring the arm into the back.
~ With your right foot, push down on the subject’s calf or Achilles tendon.
~ While maintaining control of the subject’s wrist and elbow, apply a slow, steady pressure to
bring the subject to the deck.
~ Kneel down with both knees on either side of his arm, placing your knees on the subject’s
back. Apply inward pressure with your knees to lock the subject’s arm in place.
~ Tell the subject to put his other hand in the middle of his back. Bring the subject’s controlled
hand to the center of his back.
See figure 3-27.
For Official Use Only
Chapter 3: Gray Belt
Marine Corps Martial Arts Program
3-33
Figure 3-27. Takedown from a Wristlock Come-Along and Double Flexi Cuff.
Chapter 3: Gray Belt
For Official Use Only
3-34
MCRP 3-02B
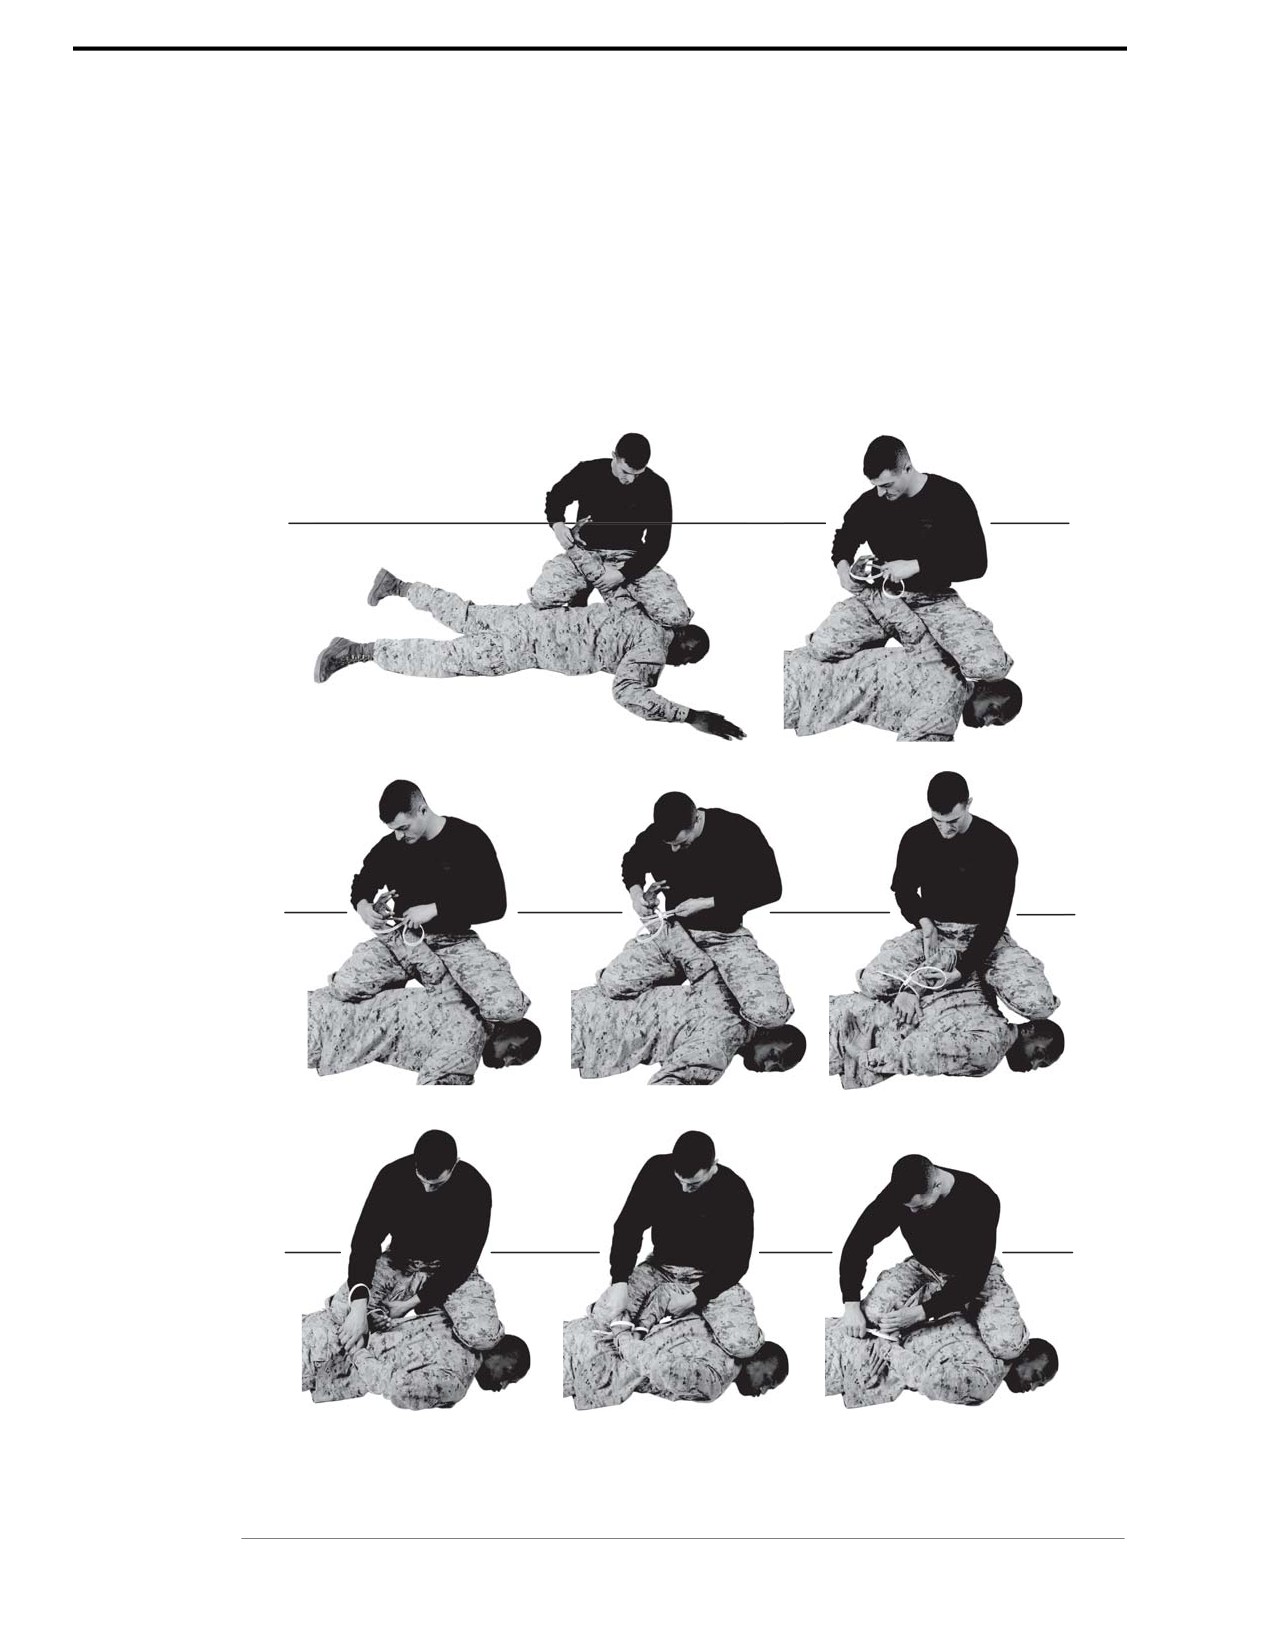
~ Apply the flexi cuffs by grasping the flexi cuffs with your outside hand in the center of the
cuffs with the loops pointing up. Place the cuff with the pinky side up on the subject’s
controlled wrist. Ensure you maintain pressure on the subject’s wrist by controlling the
subject’s hand.
~ Using the proper verbal commands, instruct the subject to place his free hand in the center
of his back, look away, and cross his ankles. Take your outside hand and slip it through the
free cuff.
~ Break down the arm naturally and grab the subject’s hand as if you are shaking hands with
your outside hand. Slip the cuff on after the shake is complete and properly secure the cuff.
See figure 3-28.
Figure 3-28. Applying Double Flexi Cuffs.
For Official Use Only
Chapter 3: Gray Belt
Marine Corps Martial Arts Program
3-35
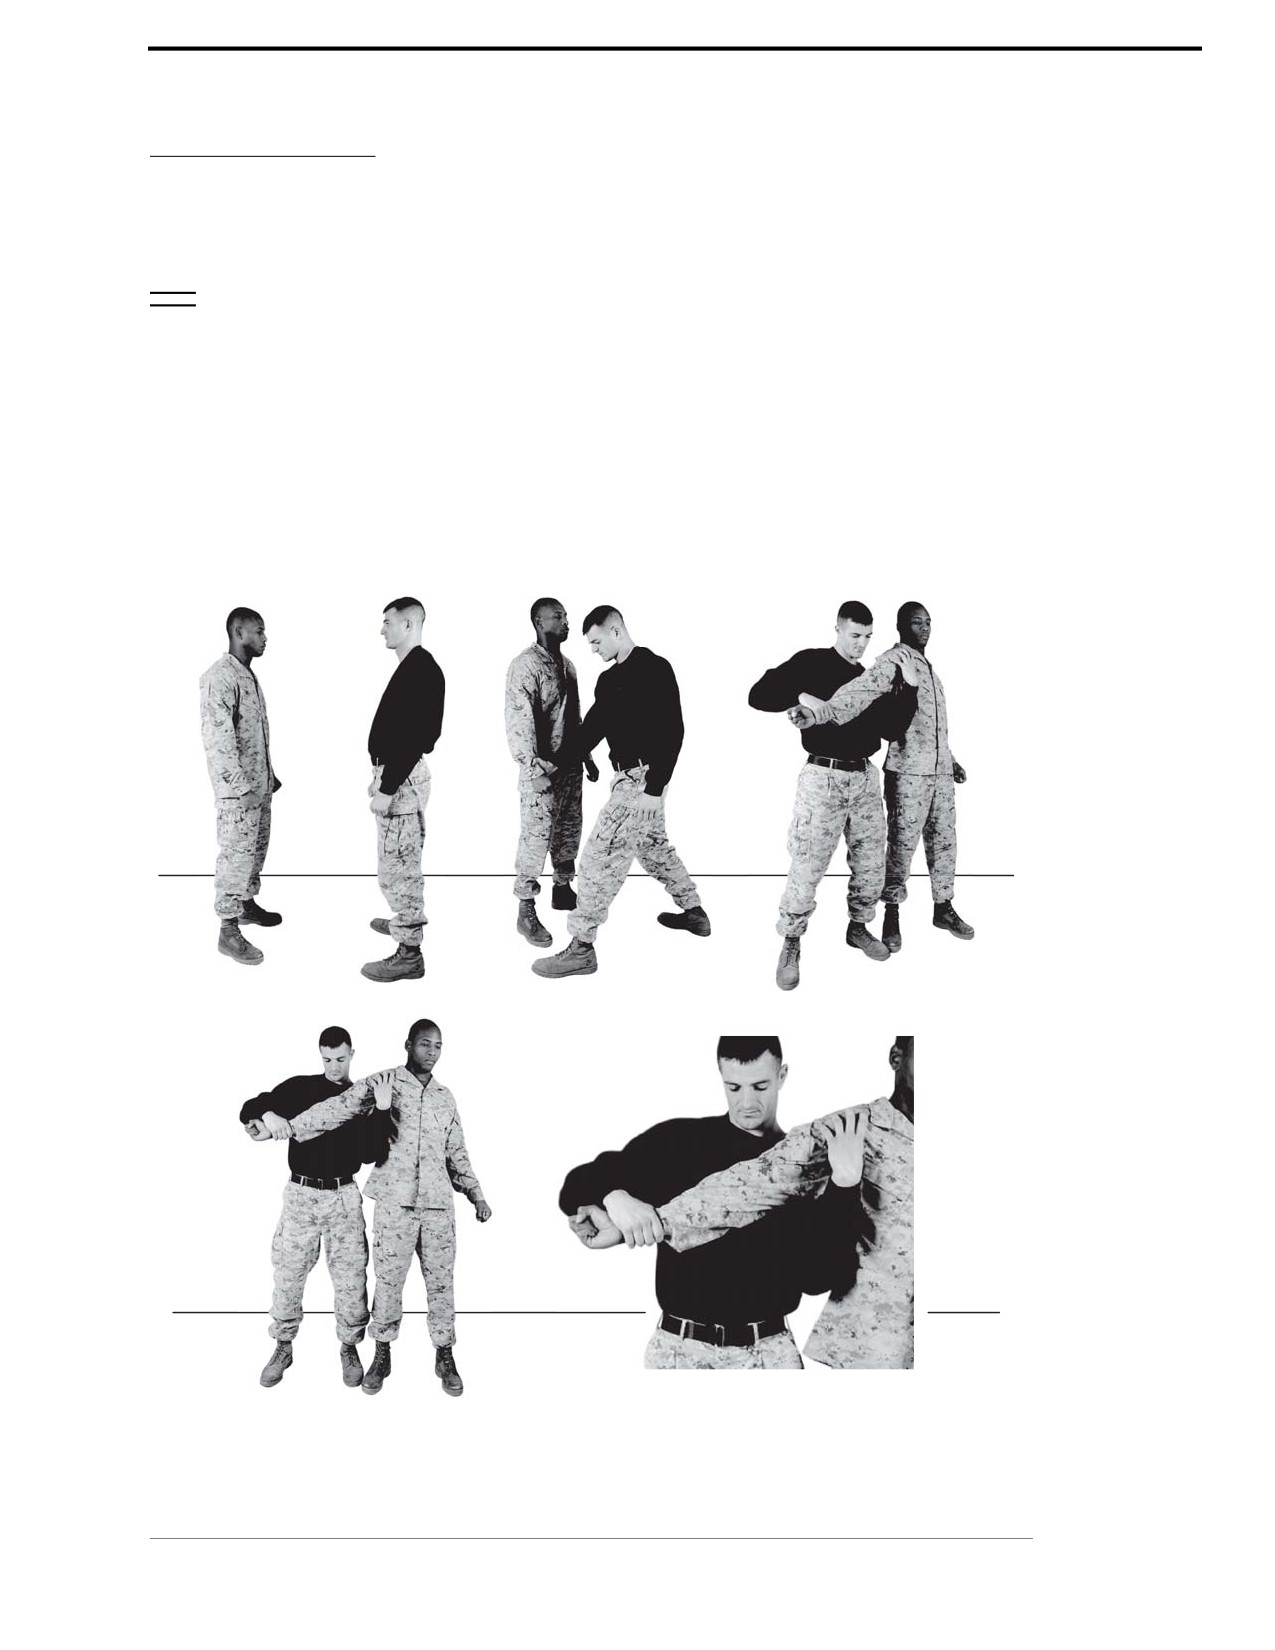
Escort Position
The escort position is used, when necessary, to transport a subject from one location to another.
Technique
~ Begin facing the aggressor. Grab the aggressor’s right wrist with your right hand and step
forward-left. Turn so that you are facing the same direction as the aggressor. Ensure that the
aggressor’s right palm is facing away from your torso.
~ Grab the aggressor’s right biceps with your left hand. Your thumb can be used in his armpit
on his brachial plexus tie-in for enhanced pain compliance.
~ Position the aggressor’s right arm diagonally across your torso, keeping his wrist against your
right hip. You should be standing to the right of and behind the aggressor. A limited amount
of control is achieved by using your chest to place pressure on the aggressor’s elbow.
See figure 3-29.
Figure 3-29. Escort Position.
Chapter 3: Gray Belt
For Official Use Only
3-36
MCRP 3-02B
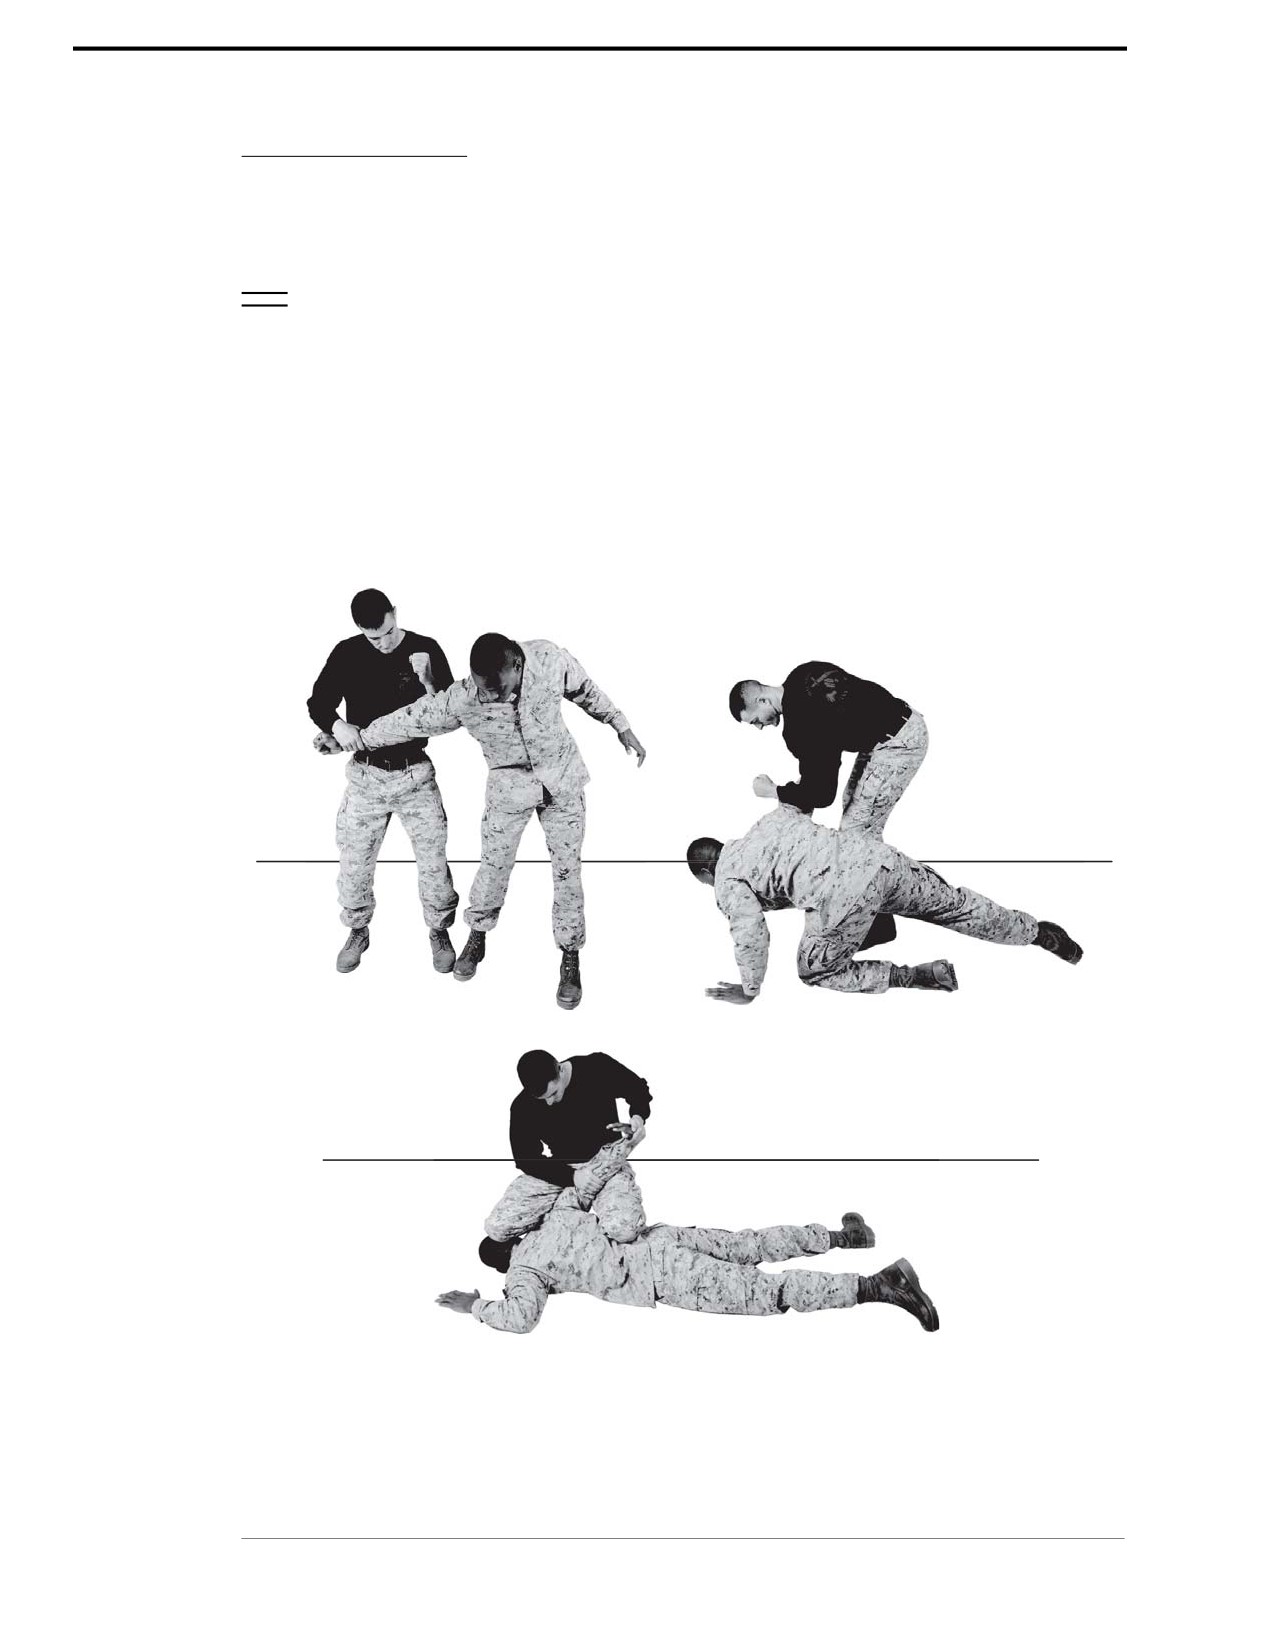
Escort Position Takedown and Single Flexi Cuff
This technique is used as a continuation of the escort position against a noncomplaint subject.
Technique
~ From the escort position with the subject to your left, lock the subject’s arm straight across
your body while rotating his wrist either inboard or outboard away from your body.
~ The wrist should be rotated in a direction that will prevent the subject from bending his elbow.
~ Rotating your torso away from the subject will allow you to further maintain leverage on
the armbar.
~ With your left hand or forearm, apply downward pressure above the subject’s elbow where
the triceps meet, utilizing a straight armbar takedown.
See figure 3-30.
Figure 3-30. Escort Position Takedown and Single Flexi Cuff.
For Official Use Only
Chapter 3: Gray Belt
Marine Corps Martial Arts Program
3-37
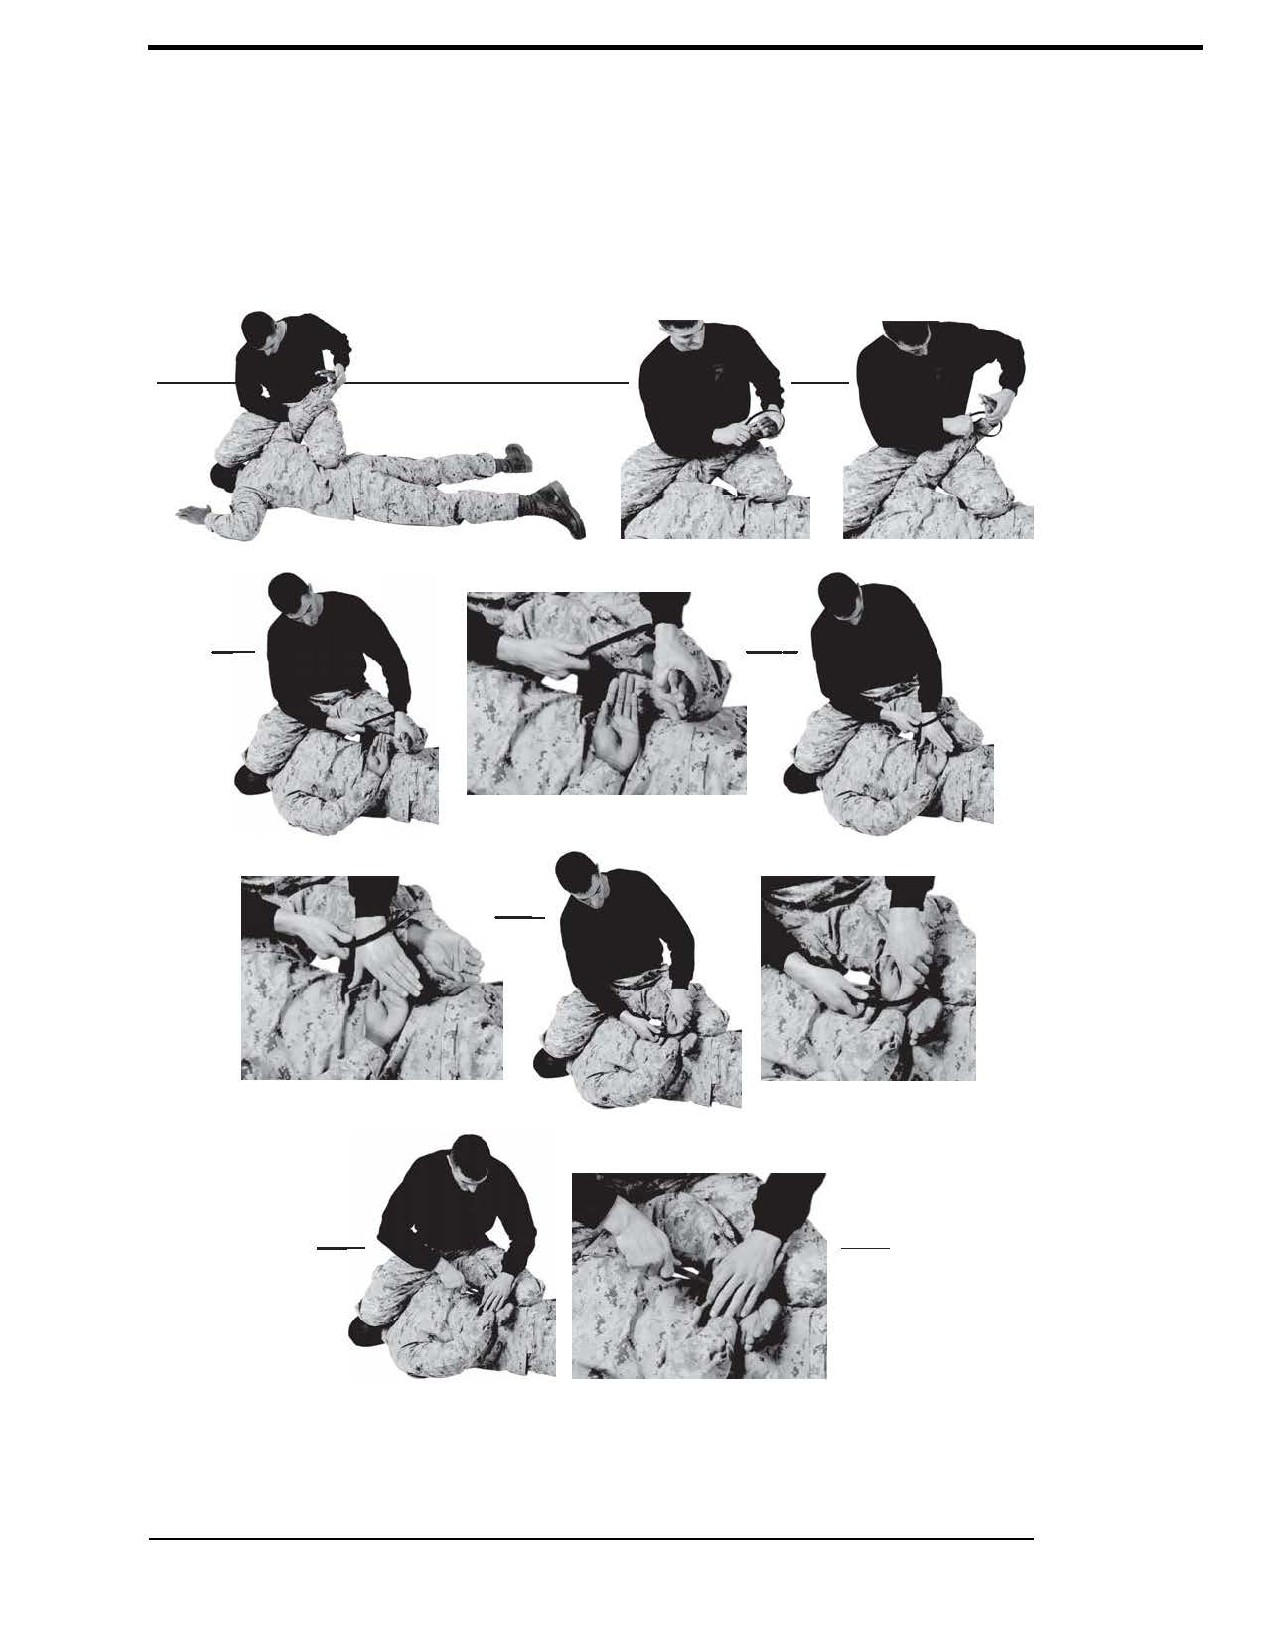
~ Apply the flexi cuffs by grasping the flexi cuff with your outside hand. Place the cuff on the
subject’s controlled wrist and grasp the flexi cuff with the ring or pinky finger. Ensure that you
maintain pressure on the subject’s wrist by controlling the subject’s hand.
~ Using the proper verbal commands instructing the subject to place his free hand in the center
of his back. Take your outside hand and slip it through the free cuff.
See figure 3-31.
Figure 3-31. Applying Single Flexi Cuffs.
Chapter 3: Gray Belt
For Official Use Only

3-38
MCRP 3-02B
Section IX
Armed Manipulation
The purpose of armed manipulation is to ensure that Marines operate within the continuum of
force utilizing weapon retention techniques. Weapon retention techniques are used when a
Marine is carrying a weapon in a port-arm position and an aggressor attempts to remove the
weapon from his grip.
Refer to appendix A for corresponding safeties 1, 2, 8, 9.
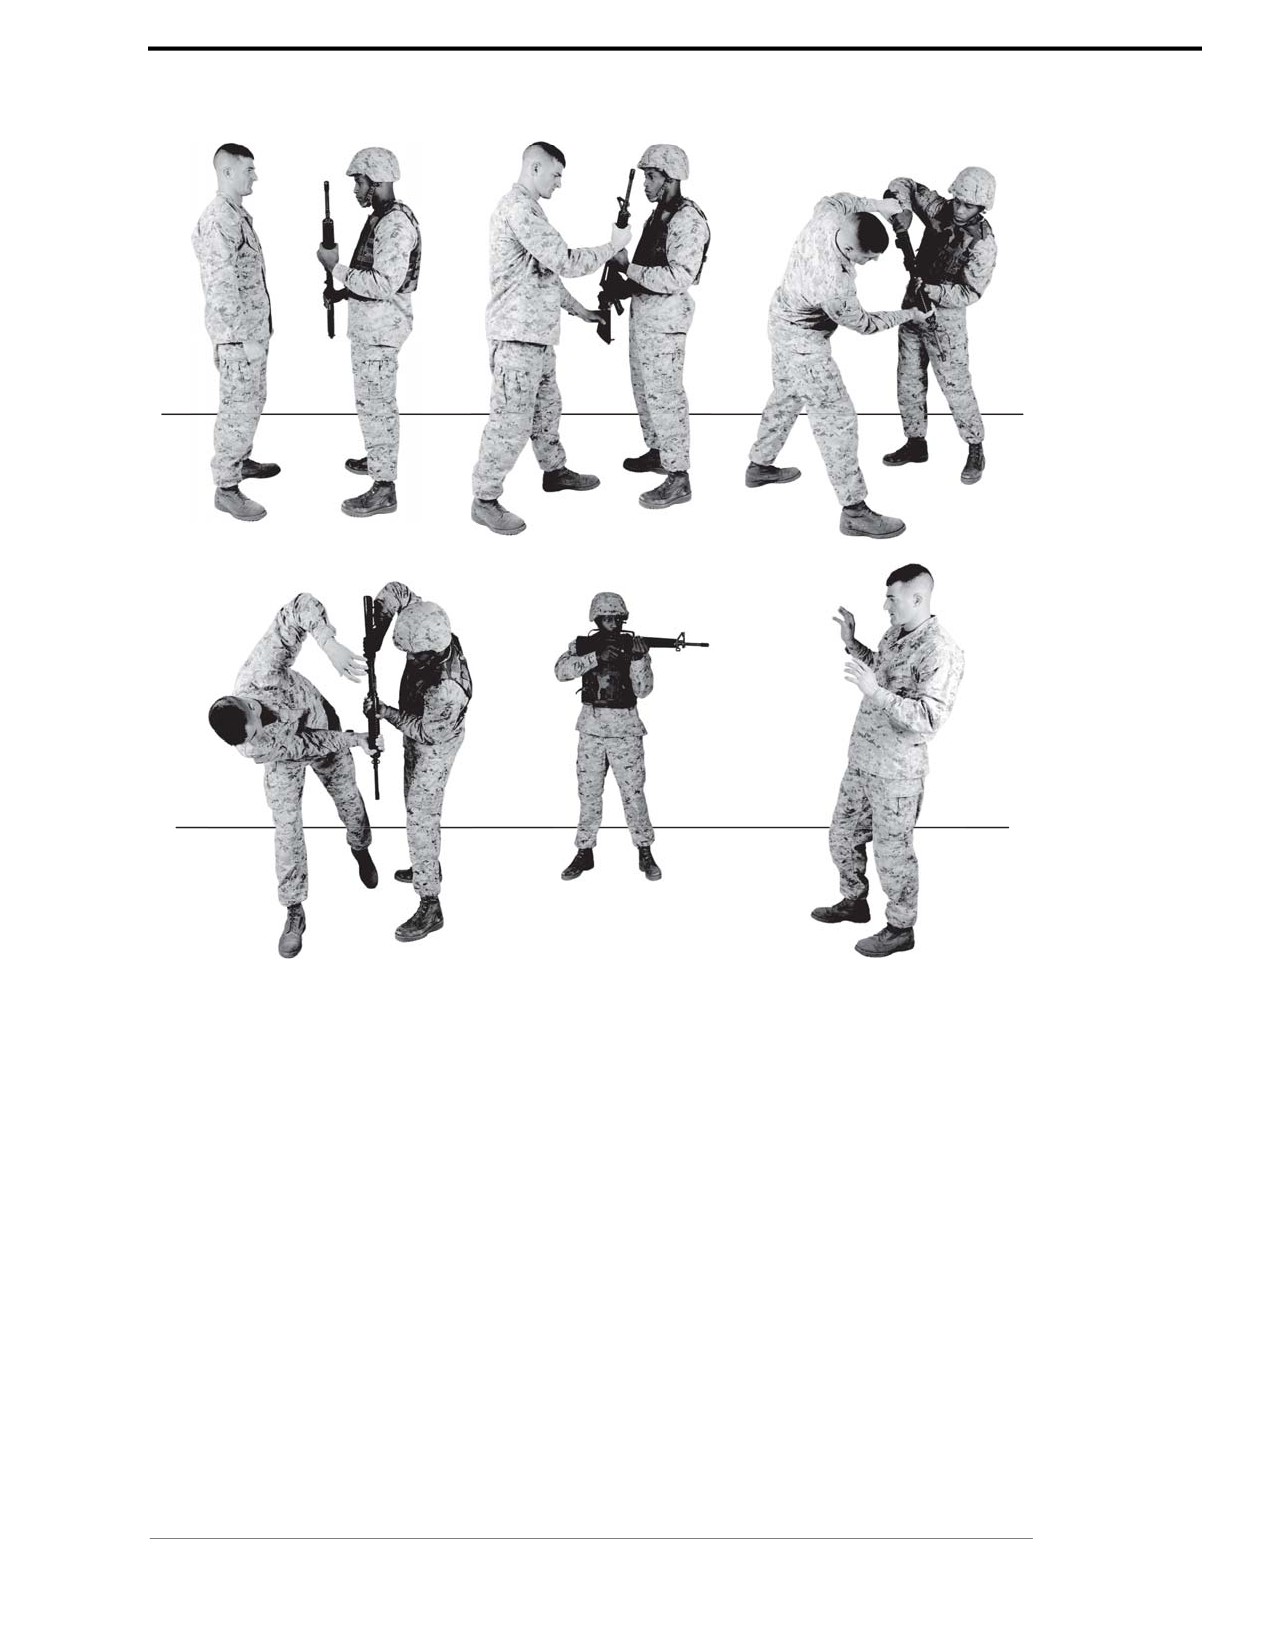
Aggressor Grabs With Both Hands (Pushing)
Technique
~ Begin with the aggressor grabbing your weapon and pushing on it.
~ Utilize the aggressor’s momentum and movement by pivoting the body to the left while
stepping back with the left foot.
~ Throw the person to the deck with a quick jerking movement by lowering the muzzle and
swinging the butt of the weapon up, no higher than the shoulders.
~ Quickly return to a defensive posture.
See figure 3-32.
For Official Use Only
Chapter 3: Gray Belt
Marine Corps Martial Arts Program
3-39
Figure 3-32. Aggressor Grabs with Both Hands (Pushing).
Chapter 3: Gray Belt
For Official Use Only

3-40
MCRP 3-02B
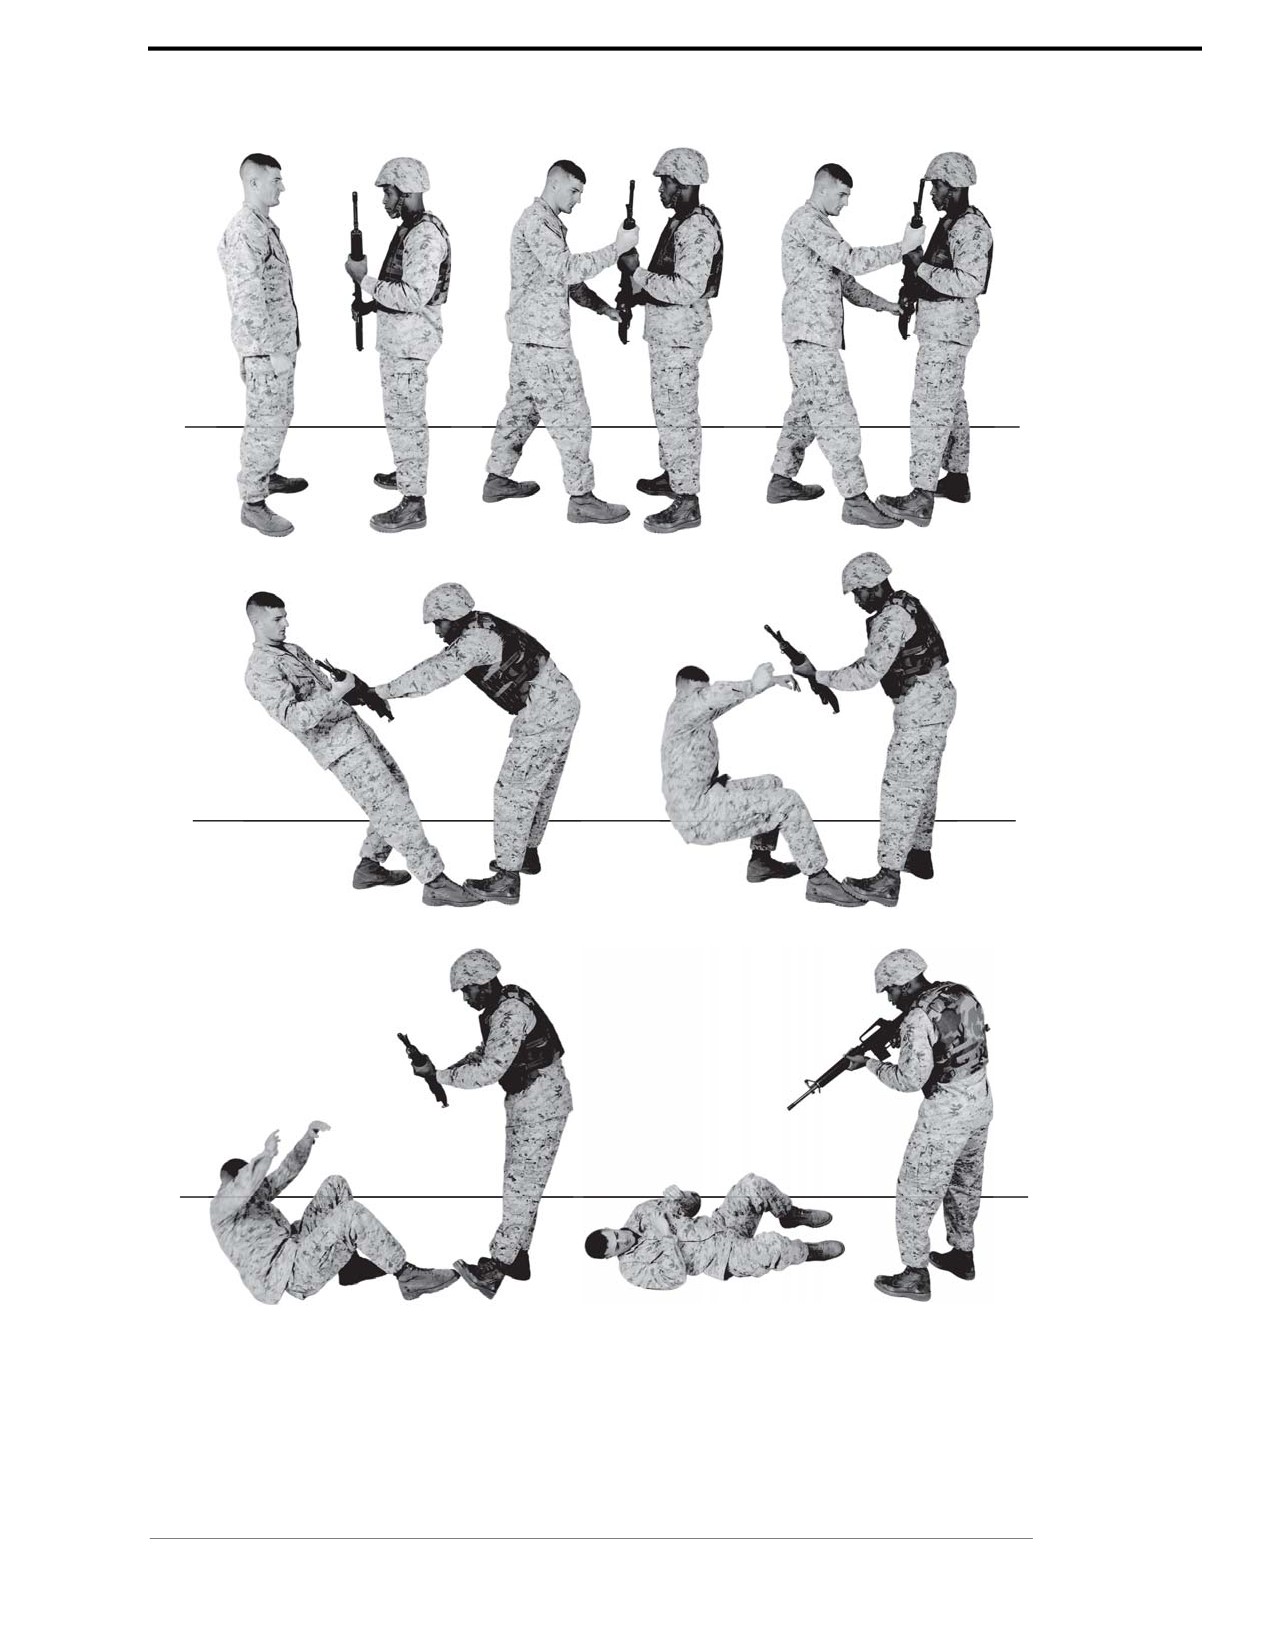
Aggressor Grabs With Both Hands Pulling (Stationary)
Technique
~ Begin with the aggressor grabbing the weapon and pulling on it.
~ Step on the aggressor’s foot and push forward to off balance him. This action will drive him to
the deck where he can be further controlled.
CAUTION
During training it is essential that you let up on your training partner’s
foot as soon as his balance breaks. Staying with the foot down on
the aggressor’s foot as he falls to the deck could cause the ankle or foot
to break.
~ Quickly return to a defensive posture.
See figure 3-33.
For Official Use Only
Chapter 3: Gray Belt
Marine Corps Martial Arts Program
3-41
Figure 3-33. Aggressor Grabs with Both Hands Pulling (Stationary).
Chapter 3: Gray Belt
For Official Use Only

3-42
MCRP 3-02B
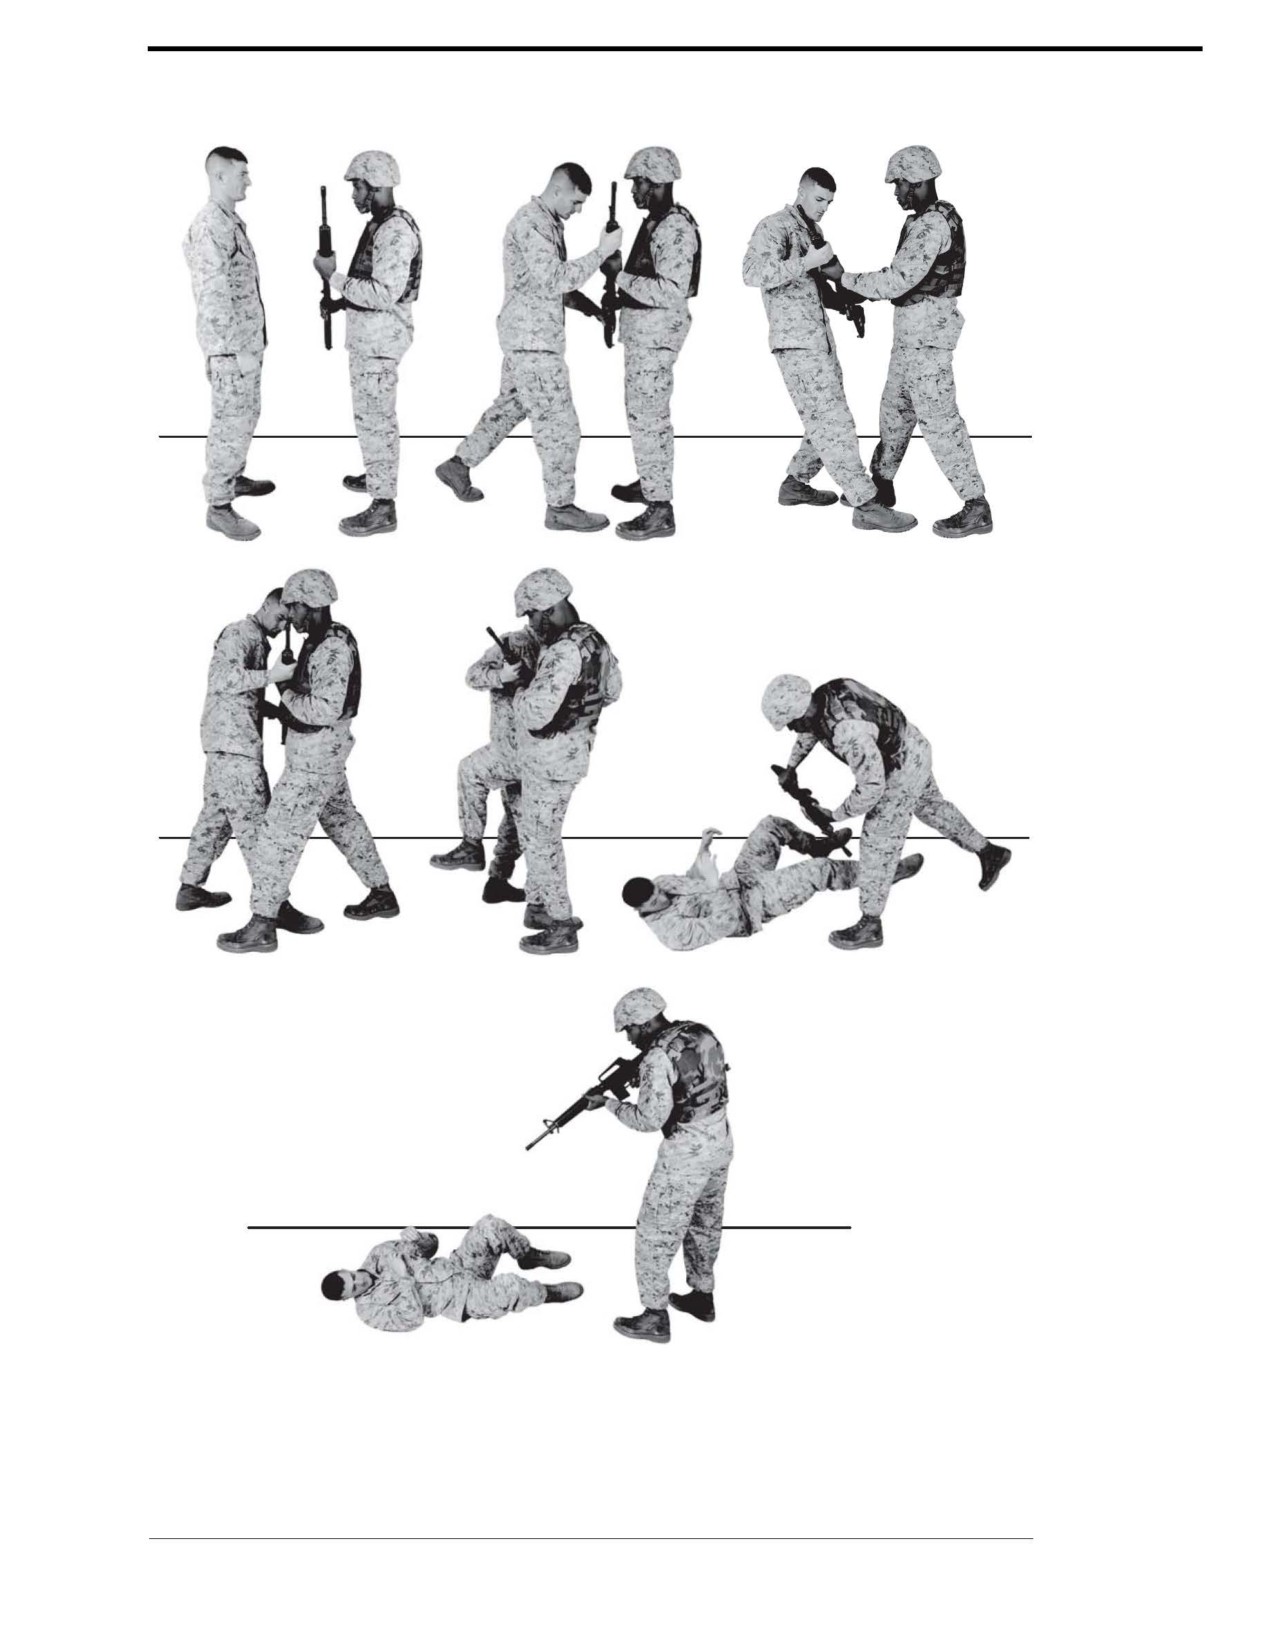
Aggressor Grabs With Both Hands Pulling (Moving)
Technique
~ Begin with the aggressor grabbing the weapon and pulling on it while moving backwards.
~ Extend the weapon outward from the body to gain distance.
~ Quickly pull the aggressor inward tight to the body and execute a leg sweep on the
aggressor’s right leg. This action will drive the person to the deck where he can be
further controlled.
~ When the aggressor releases the weapon, pull the rifle into his shoulder to the ready
weapons carry aiming at the aggressor.
See figure 3-34.
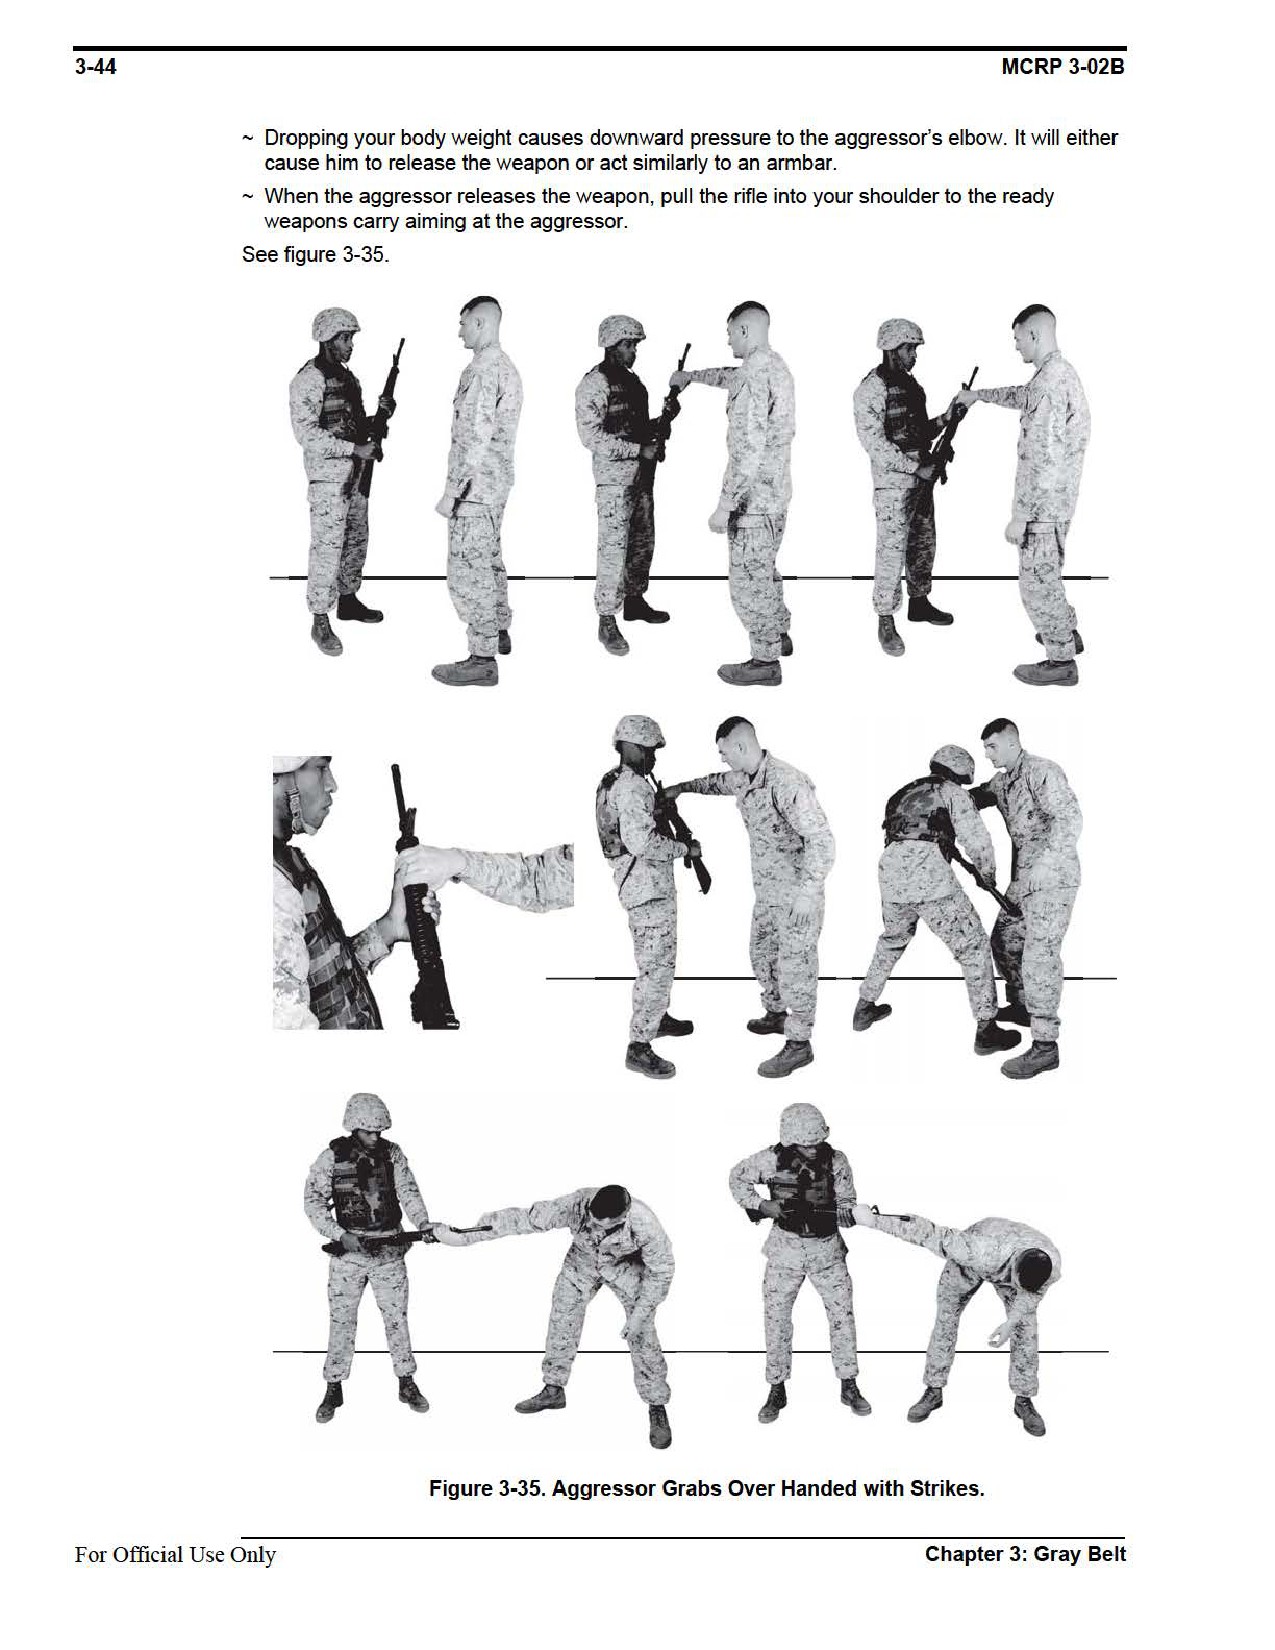
Aggressor Grabs Over Handed With Strikes
Technique
~ While you are standing at modified port-arms, the aggressor grabs your handguards with the
right hand, palm side down. Attempt a counter to the over/under hand grab.
~ If unsuccessful, slide your left hand up the handguards; trap the aggressor’s finger with your
thumb, holding his hand in place with bone pressure on that single digit.
~ Attempt to rotate the barrel placing it parallel with the aggressor’s forearm.
~ If the technique does not work, step forward with the right foot and execute a strike with the
toe of the weapon to the aggressor’s lead leg. Strikes are to be made to the inside (femoral
nerve) or outside (peroneal nerve) of the thigh.
~ Complete the counter to the over hand grab technique by stepping back and returning to the
basic warrior stance. While maintaining bone pressure on that single digit, rotate the barrel
placing it parallel to the aggressor’s forearm. Drop your body weight. You can step forward or
back in accordance with the aggressor’s actions in order to drop body weight.
For Official Use Only
Chapter 3: Gray Belt
Marine Corps Martial Arts Program
3-43
Figure 3-34. Aggressor Grabs with Both Hands Pulling (Moving).
Chapter 3: Gray Belt
For Official Use Only

Marine Corps Martial Arts Program
3-45
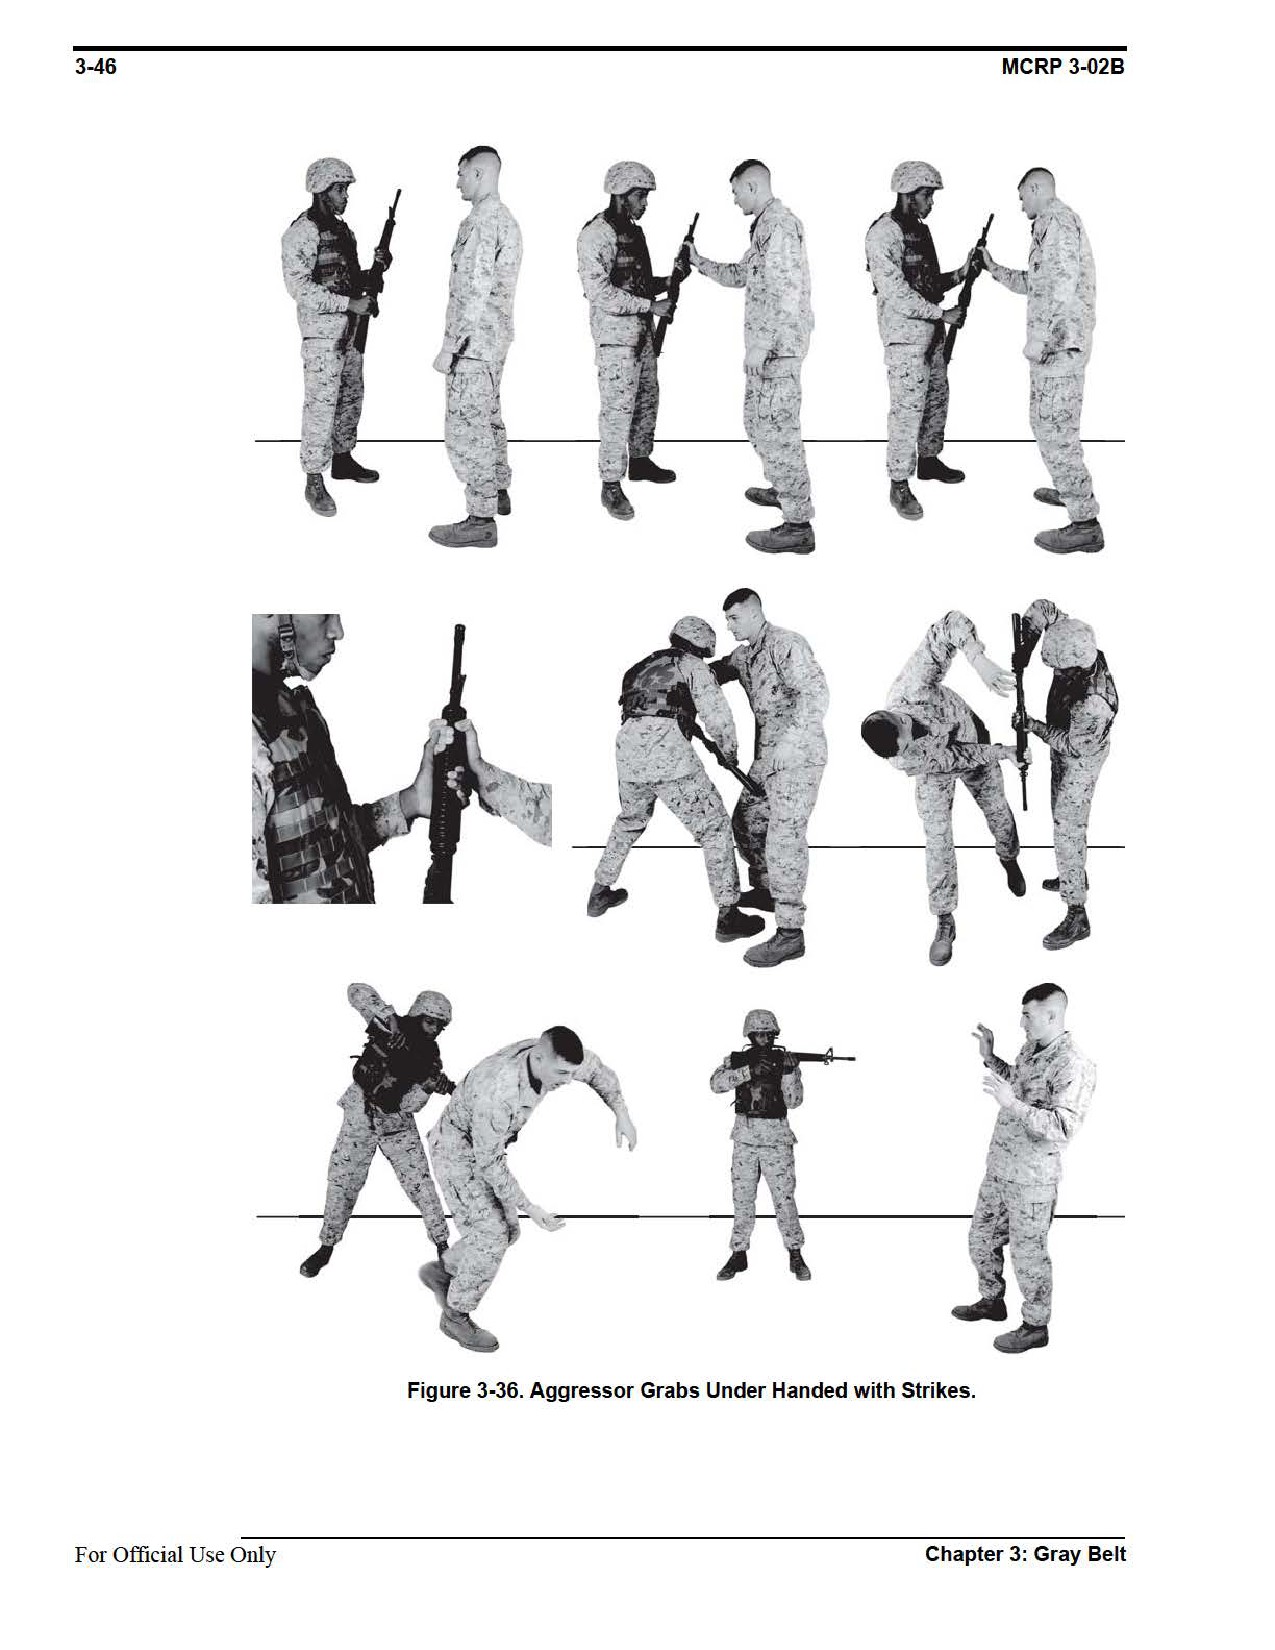
Aggressor Grabs Under Handed With Strikes
Technique
~ While you are standing at modified port-arms the aggressor grabs your handguards with your
left hand, palm side up. Attempt a counter to the over/under hand grab.
~ Slide your left hand up the handguards and trap the aggressor’s closest finger above the
knuckle with your thumb so that he cannot release his grip. Apply bone pressure on the
aggressor’s finger to initiate pain compliance.
~ While maintaining pressure on the aggressor’s hand, attempt to execute the counter to
underhand grab by lowering the muzzle and raising the buttstock of the weapon no higher
than the aggressor’s shoulder.
~ If the technique does not work, step forward with the right foot and execute a strike with the
toe of the weapon to the aggressor’s lead leg. Strikes are to be made to the inside (femoral
nerve) or outside (peroneal nerve) of the thigh.
~ Stepping back with your left foot, pivot on your right, and throw the aggressor past your
left side.
~ These actions cause the aggressor to release his grip on the weapon or drive him to the deck
where he can further be controlled.
~ When the aggressor releases the weapon, pull the rifle into his shoulder to the ready
weapons carry aiming at the aggressor.
See figure 3-36 on page 3-46.
Chapter 3: Gray Belt
For Official Use Only

Marine Corps Martial Arts Program
3-47
Section X
Knife Techniques
The purpose of knife techniques is to cause enough damage and massive trauma to stop an aggres-
sor by executing the forward thrust, reverse thrust, forward slash, reverse slash, or bulldogging.
Thrusting techniques are more effective than slashing techniques because of the damage they can
cause. Slashing techniques are used to close with an aggressor. Slashing techniques distract the
aggressor or cause enough damage to allow you to close with him and apply more damaging tech-
niques. Targets are usually the limbs or any portion of the body that is presented in proximity
where a thrusting technique can be used.
Refer to appendix A for corresponding safeties 1, 2, 3, and 14.
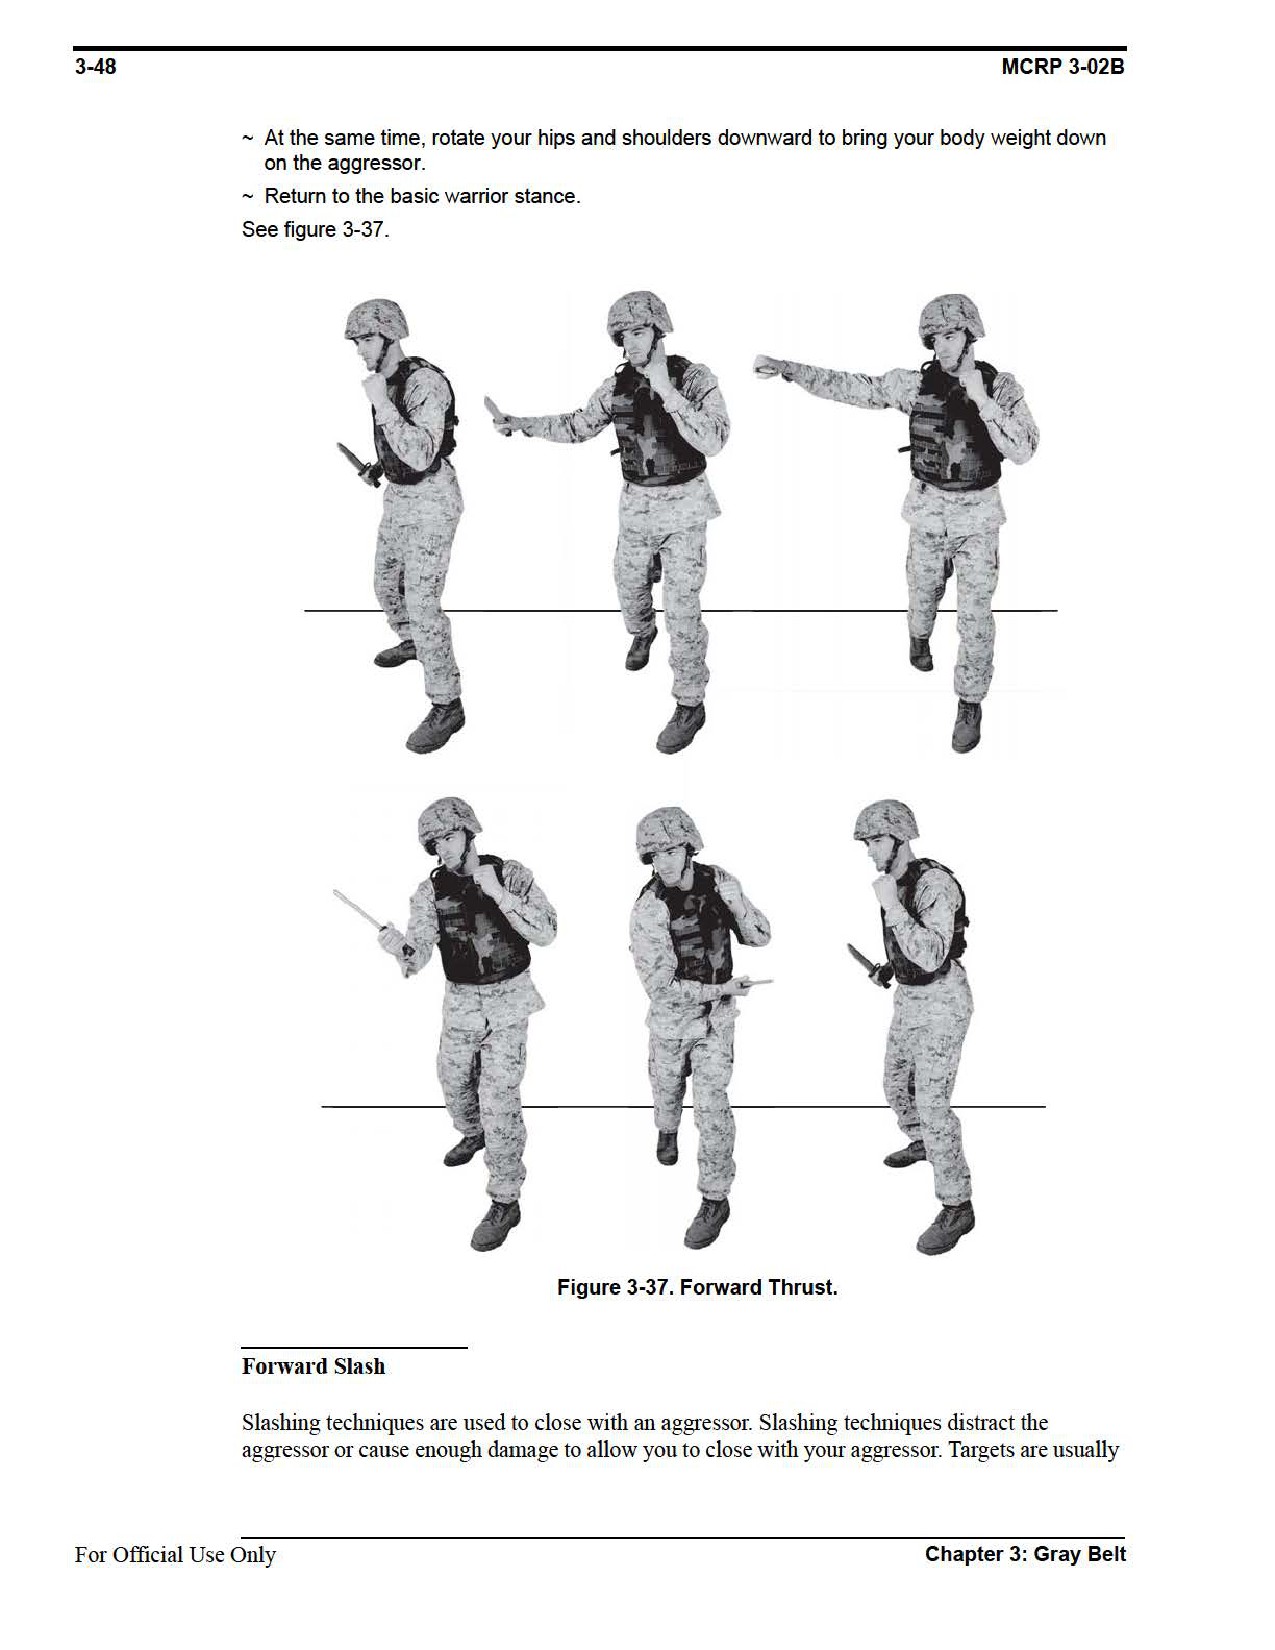
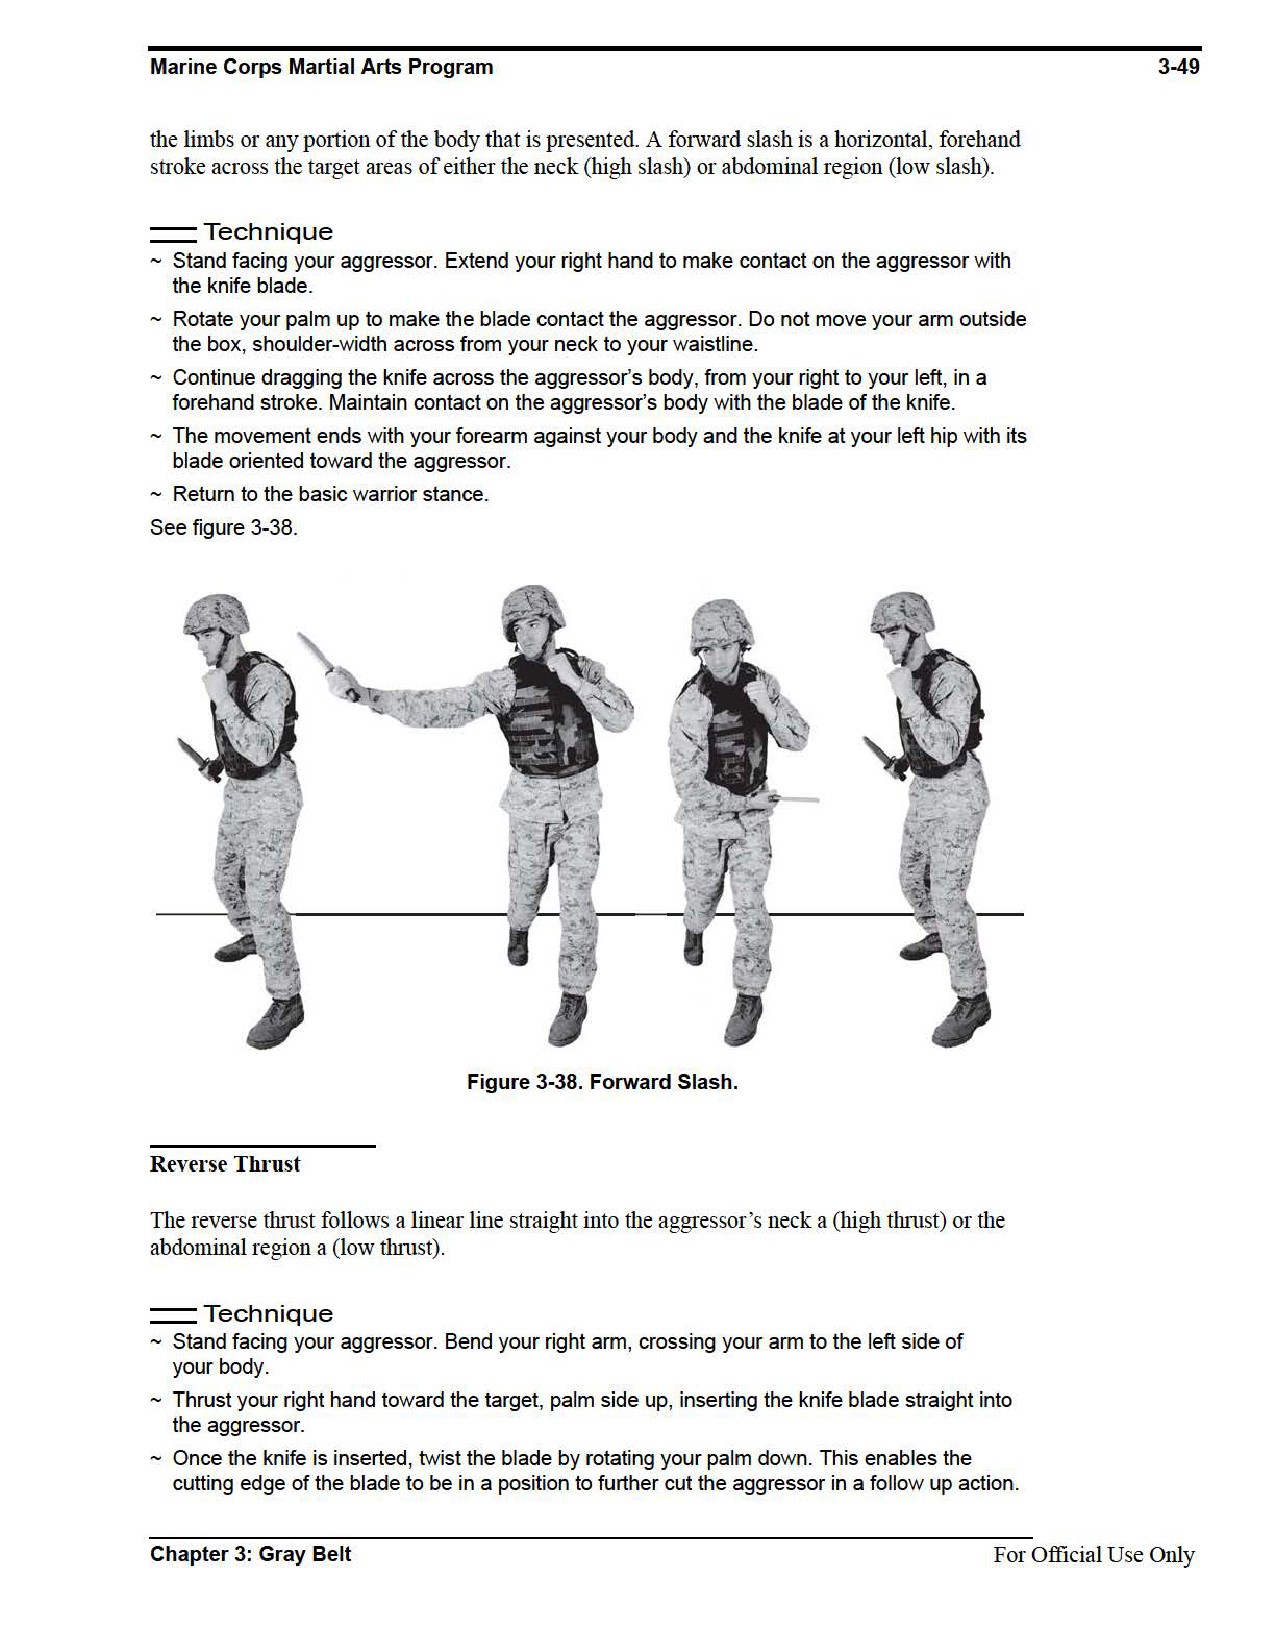
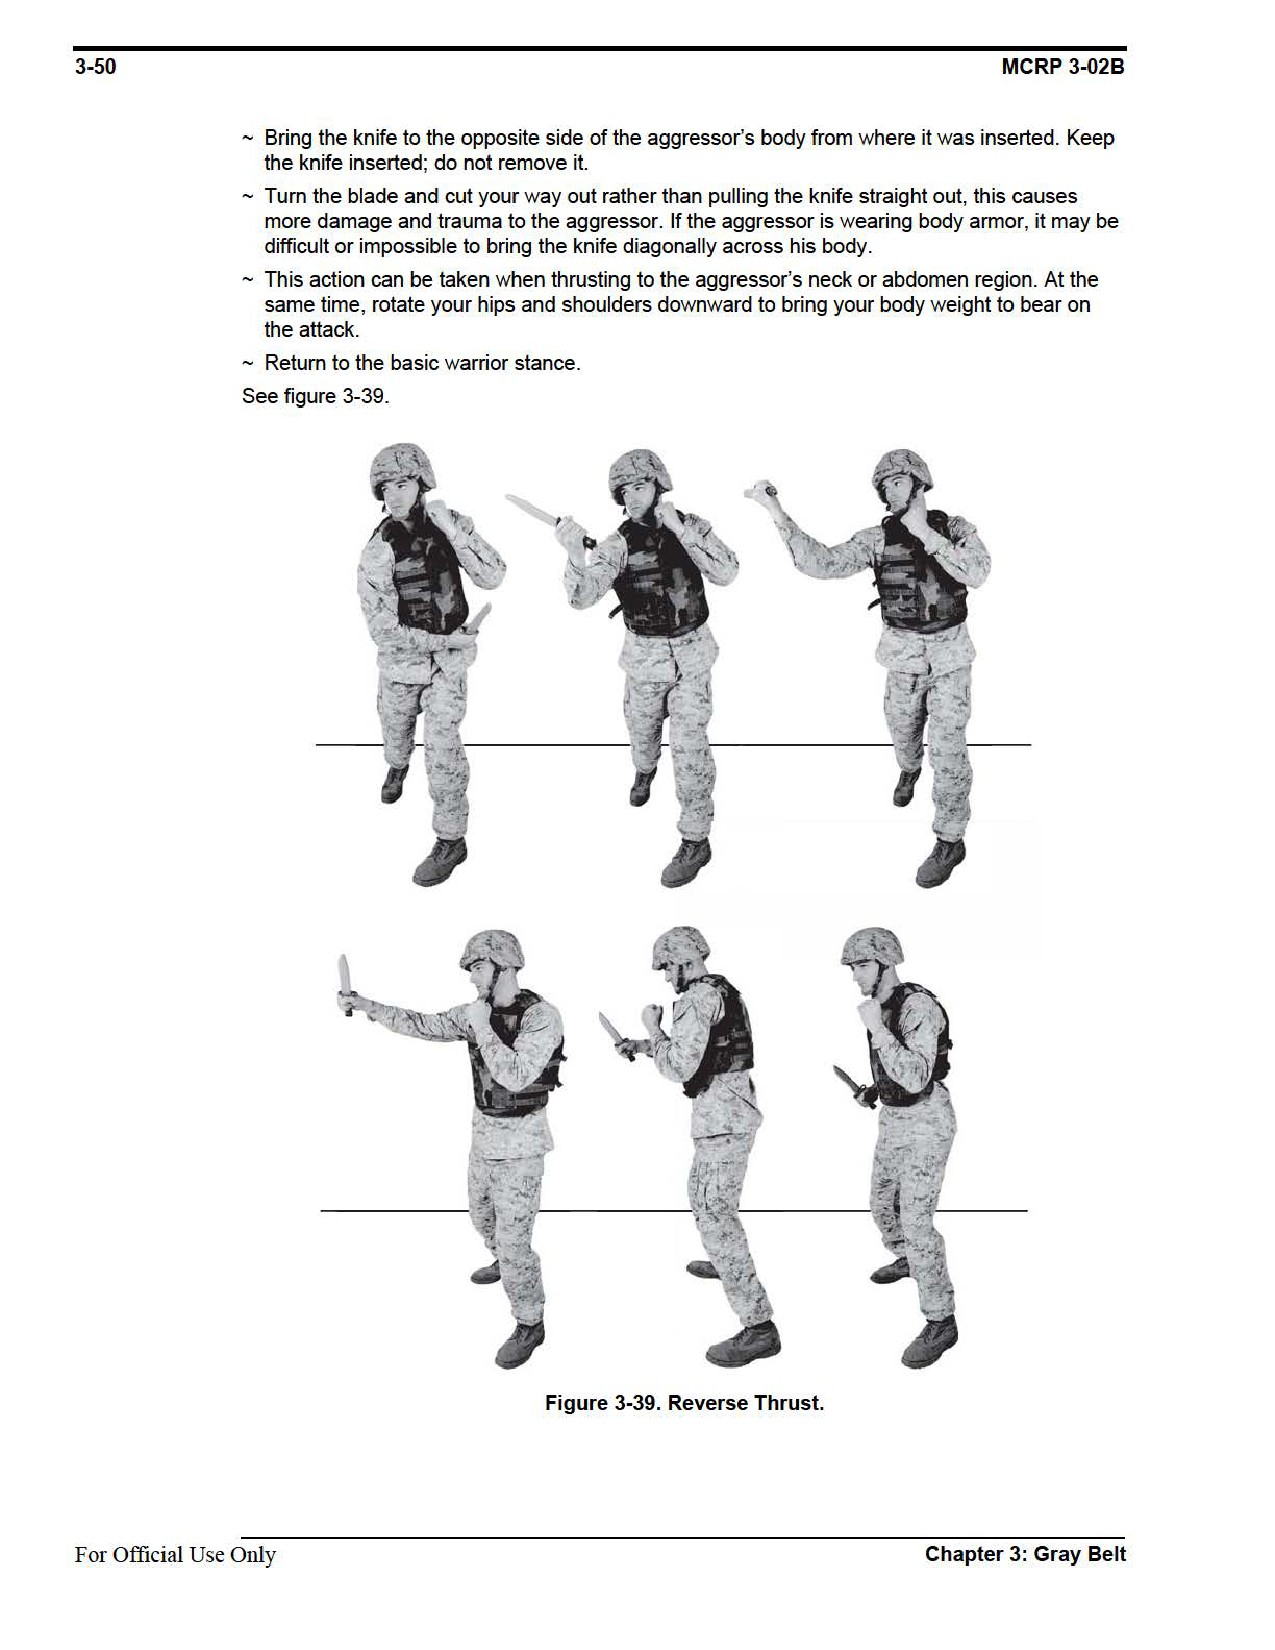
Forward Thrust
The primary objective when fighting with a knife is to insert the blade into an aggressor to cause
extensive damage and trauma. A forward thrust follows a linear line straight into the aggressor’s
neck (high thrust) or abdominal region (low thrust).
Technique
~ Stand facing your aggressor. Thrust your right hand toward the target, palm side down,
inserting the knife blade straight into the aggressor.
~ Once the knife is inserted, twist the blade inward, rotating your palm up. This enables the
cutting edge of the blade to be in a position to further cut the aggressor in a follow up action.
~ Drop your right elbow and bring the knife to the opposite side of the aggressor’s body from
where it was inserted. Turn the blade and cut your way out rather than pulling the knife
straight out, this causes more damage and trauma to the aggressor. If the aggressor is
wearing body armor, it may be difficult or impossible to bring the knife diagonally across
his body.
Chapter 3: Gray Belt
For Official Use Only
Marine Corps Martial Arts Program
3-51
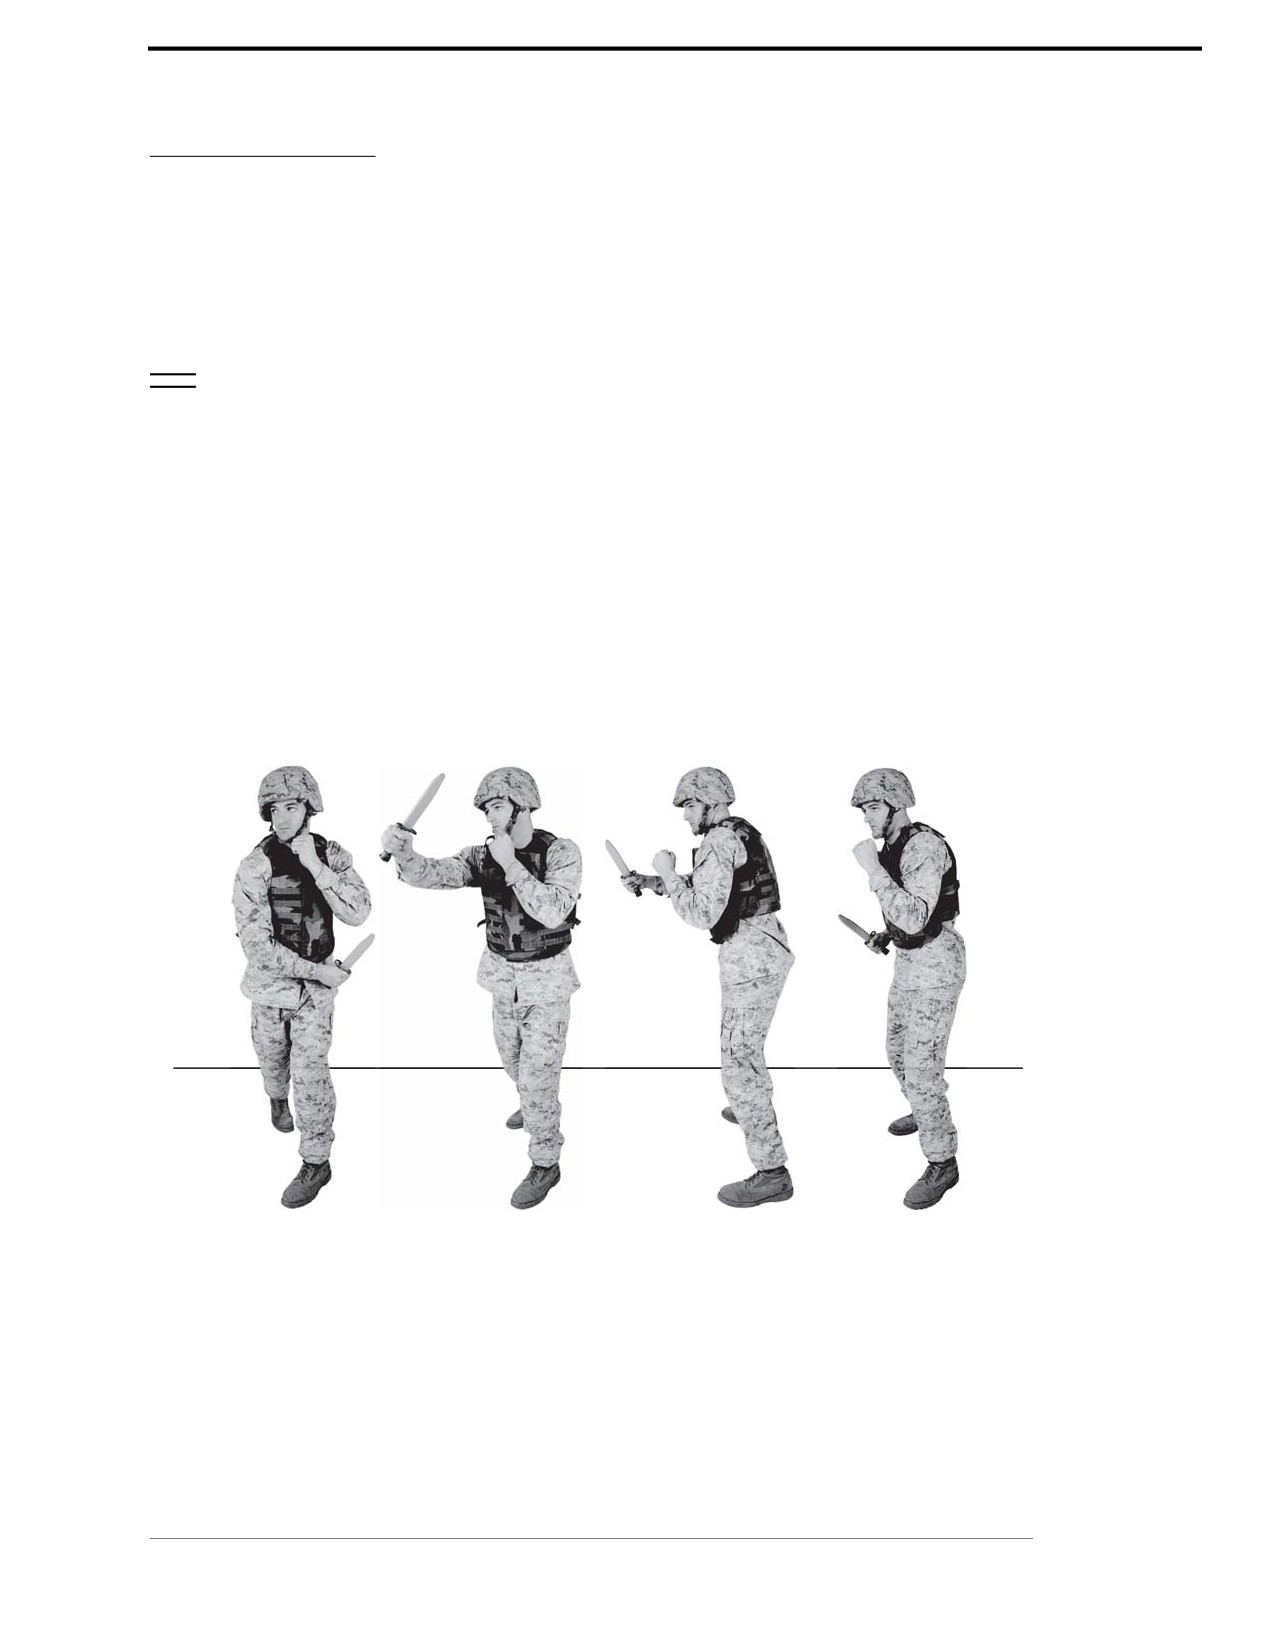
Reverse Slash
Slashing techniques are used to close with an aggressor. Slashing techniques distract the aggres-
sor or cause enough damage to close with your aggressor. Targets are usually the limbs or any
portion of the body that is presented. A reverse slash is a horizontal, forehand stroke, across the
target areas of either the neck (high slash) or abdominal region (low slash).
Technique
~ Stand facing your aggressor.
~ Bend your right arm, crossing your arm to the left side of your body. Extend your right hand to
make contact on the aggressor with the knife blade.
~ Rotate your palm down to place the blade in contact with the aggressor. Do not move your
arm outside of the box, shoulder-width across from your neck to your waistline.
~ Continue dragging the knife across the aggressor’s body, from your left to your right, in a
backhand stroke. Maintain contact on the aggressor’s body with the blade of the knife.
~ Return to the basic warrior stance.
See figure 3-40.
Figure 3-40. Reverse Slash.
Chapter 3: Gray Belt
For Official Use Only

3-52
MCRP 3-02B
Bulldogging
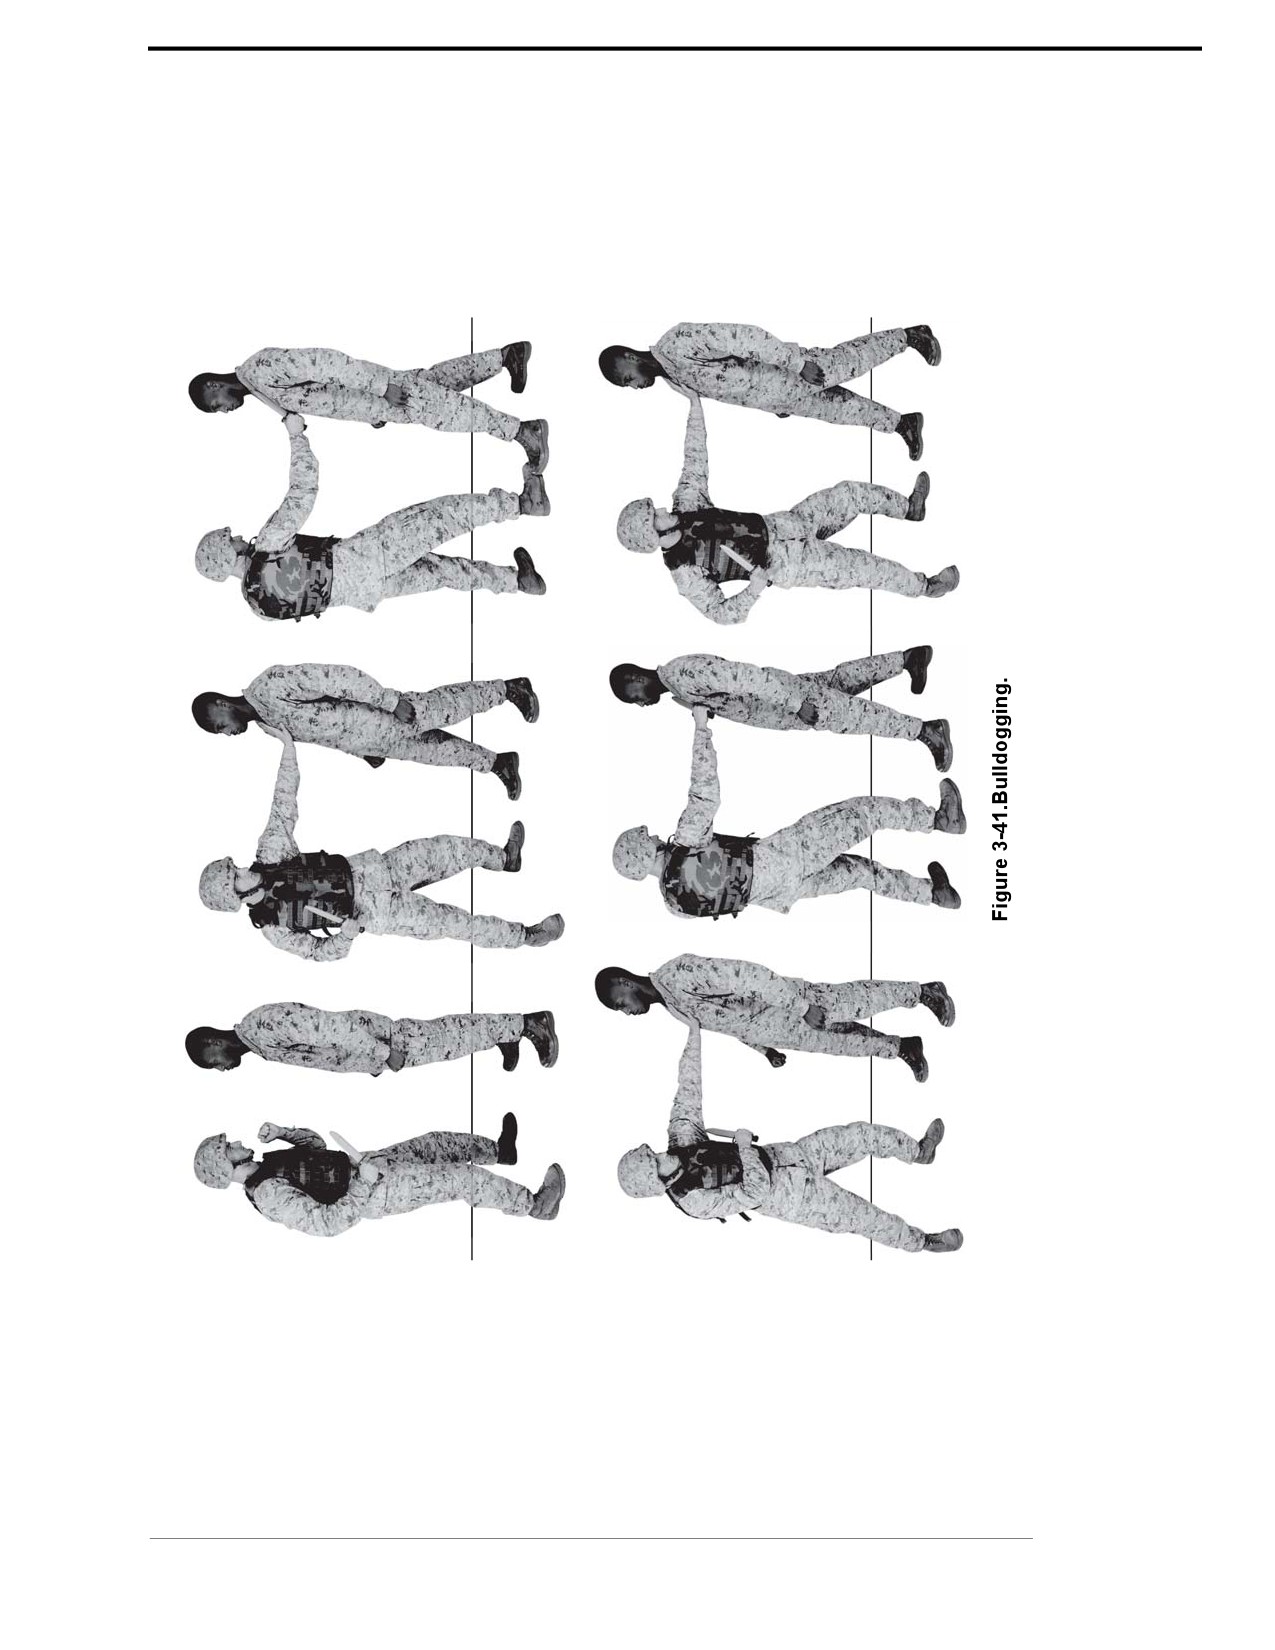
Bulldogging is used to incorporate knife techniques such as thrusting and slashing with move-
ment and open hand strikes.
Technique
~ Assume the modified basic warrior stance.
~ Maintaining a low silhouette, move forward in a normal walking motion. While moving forward
perform a thrusting or a slashing technique.
~ After each knife strike, use a strike to the face to stun and distract the aggressor. This is done
with an open hand strike with the lead hand.
~ Follow up the lead hand strike with one of the thrusting or slashing techniques.
~ Have the students practice this combination in sequence while moving forward for a series
of repetitions.
See figure 3-41.
For Official Use Only
Chapter 3: Gray Belt
Marine Corps Martial Arts Program
3-53
Chapter 3: Gray Belt
For Official Use Only

3-54
MCRP 3-02B
Section XI
Weapons of Opportunity
In any unarmed close combat situation, a Marine can rely on his body as a weapon by executing
the straight thrust, the vertical strike, or a forward strike. In addition, weapons of opportunity
enable each individual Marine the creative and innovative ability to utilize any object on the bat-
tlefield in order to inflict maximum damage to any aggressor. A Marine should be ready and able
to use anything around him to serve as a weapon. This may mean throwing sand or liquid in an
aggressor’s eyes to temporarily impair his vision so that fatal damage can be done to his head
with a rock, e-tool, helmet, or anything that is readily available to the Marine. In a confrontation,
a Marine must use whatever it takes to win or face the very real possibility of losing his life.
The principles of employment of weapons of opportunity will depend upon the type of weapon
used. Depending upon the shape of the weapon, many of the techniques that are used for
employing rifle and bayonet, knife, or baton can be adapted for use with a weapon of opportu-
nity. In cases where this does not apply, the basic principles of angles of attack, stance, move-
ment, and target areas are still applicable.
Refer to appendix A for corresponding safeties 1, 2, 3 4, and 14.
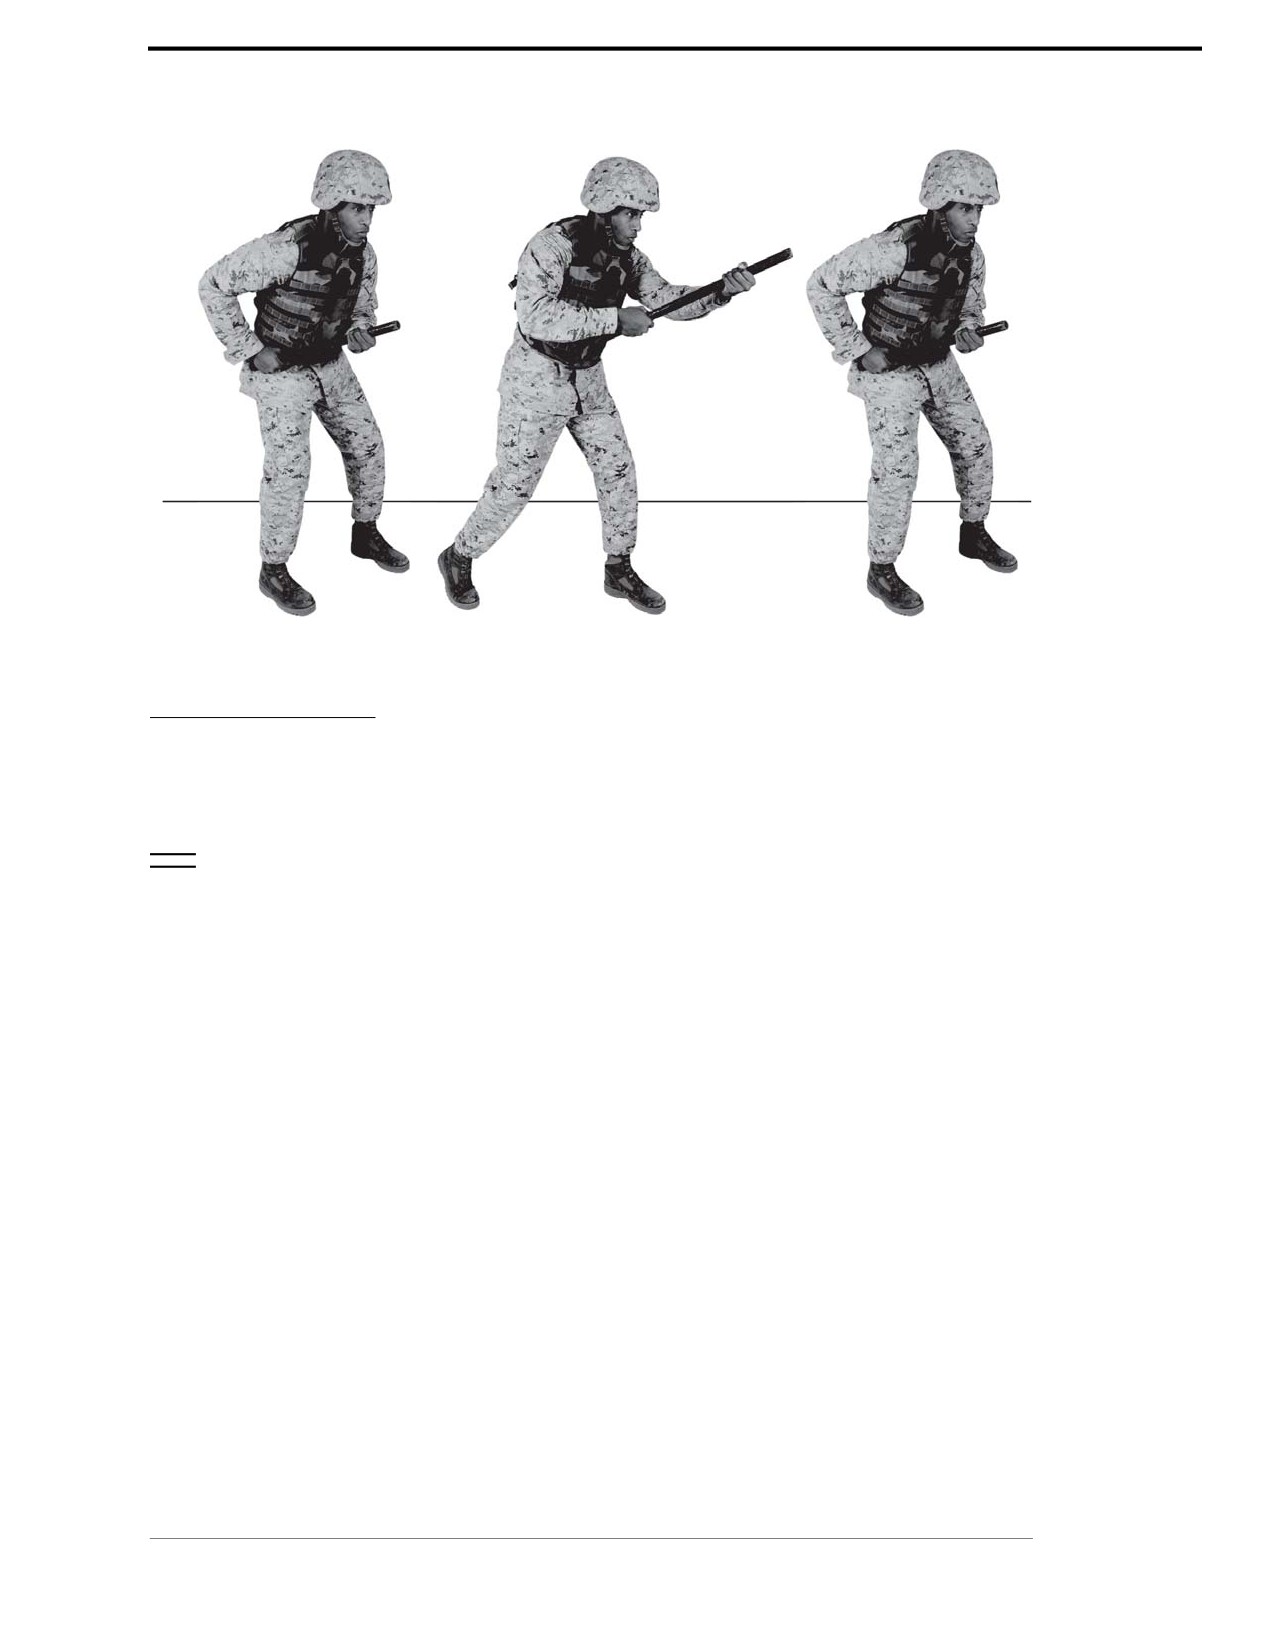
Straight Thrust
The straight thrust technique is effective for executing a frontal attack; it can also be executed as
a quick poke to keep a subject away from you, puncture the aggressor’s abdominal area, break
the aggressor’s bones along the rib cage, or cause damage to the aggressor’s head or neck.
Technique
~ Place your weapon in a two-handed carry. Place your left hand palm side up on the front
portion of the weapon, with the rear hand locked into the hip. The weapon should be pulled
slightly up with the lead hand.
~ Move forward, pushing off with your rear foot to close the distance and generate power. At
the same time, thrust your weapon into your aggressor with both hands. The weapon is held
either horizontal to the deck or at a slight upward angle, depending on your target area.
~ Return to the modified basic warrior stance.
See figure 3-42.
For Official Use Only
Chapter 3: Gray Belt
Marine Corps Martial Arts Program
3-55
Figure 3-42. Straight Thrust.
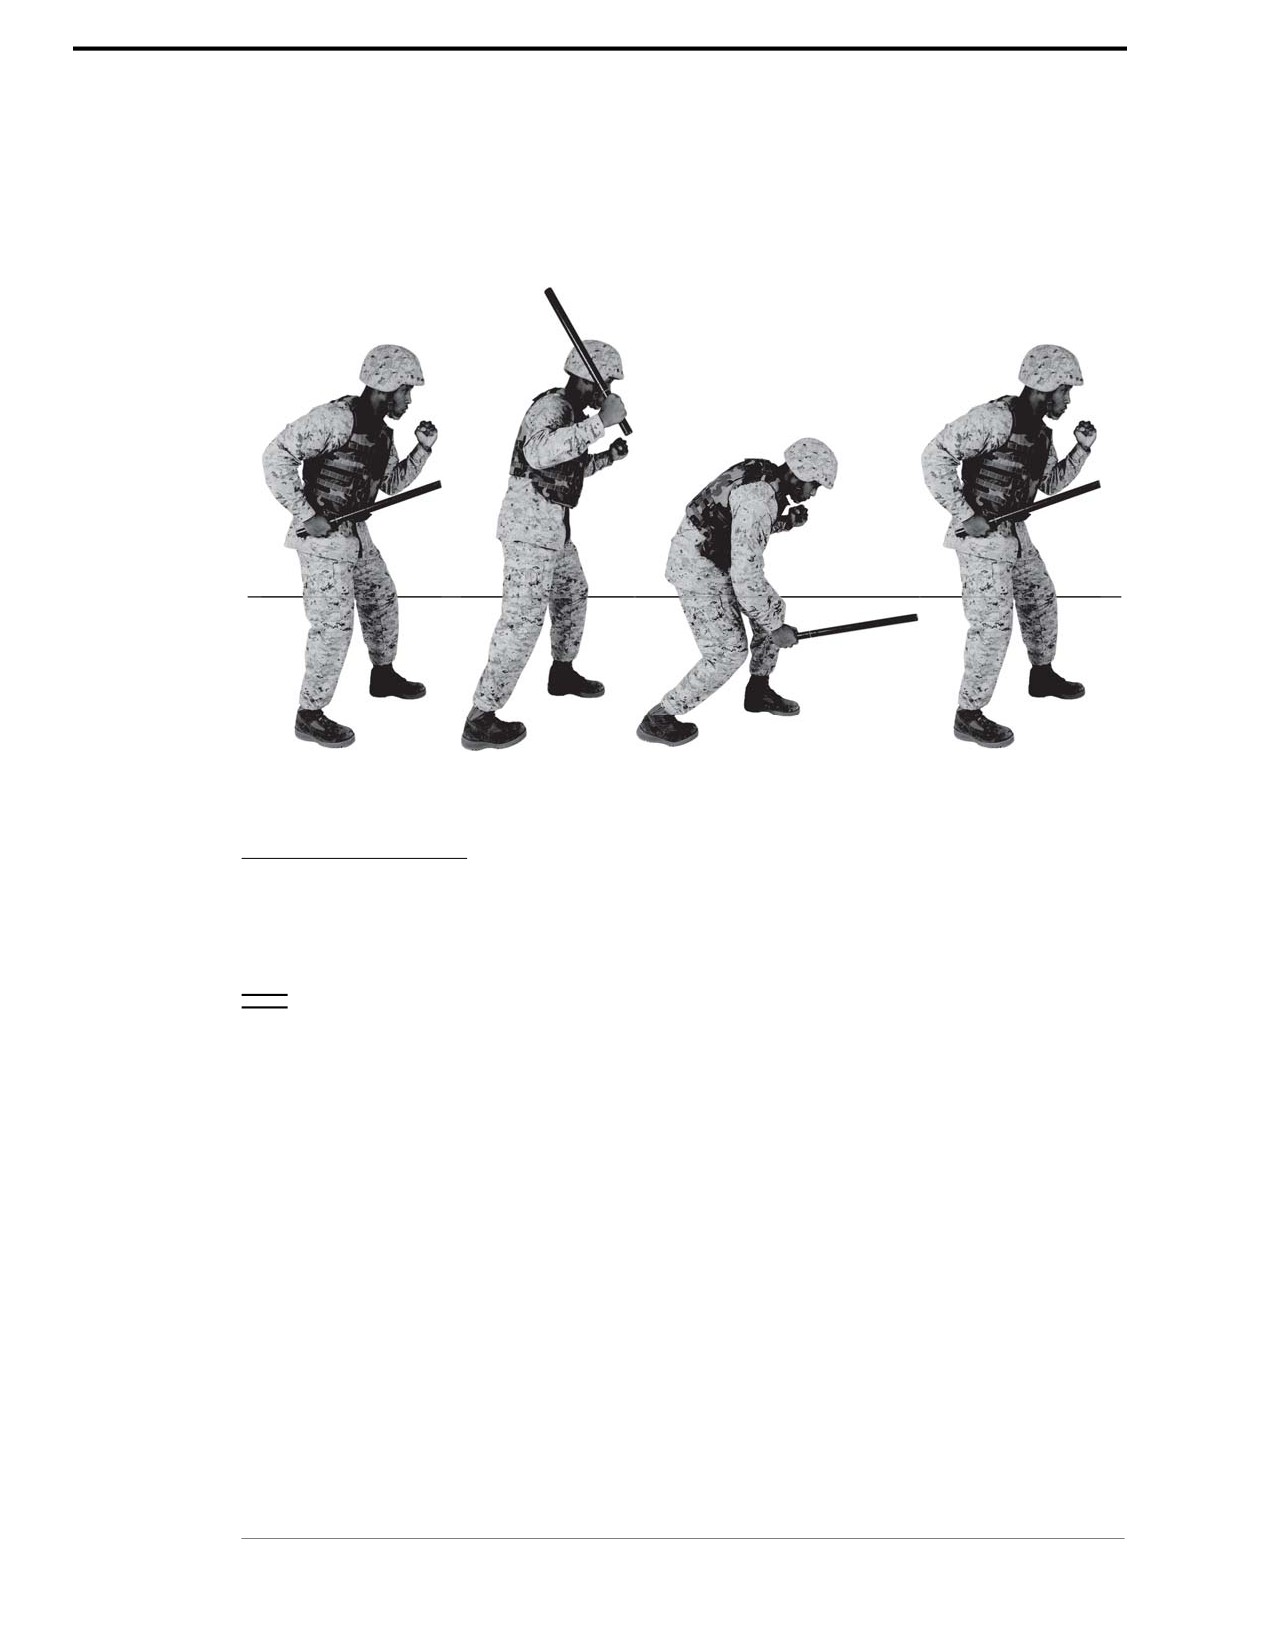
Vertical Strike
The vertical strike is effective for executing a frontal attack (high to low).
Technique
~ Begin at the modified basic warrior stance.
~ Rotate your right forearm straight down at the elbow to bring the weapon down on the
aggressor. At the same time, forcefully rotate your hips and shoulders toward the aggressor.
~ Shift your body weight to your left foot while pushing off on the ball of your right foot. Drop
your body weight into the aggressor from high to low by slightly bending at your back and
bending at the knees.
Chapter 3: Gray Belt
For Official Use Only
3-56
MCRP 3-02B
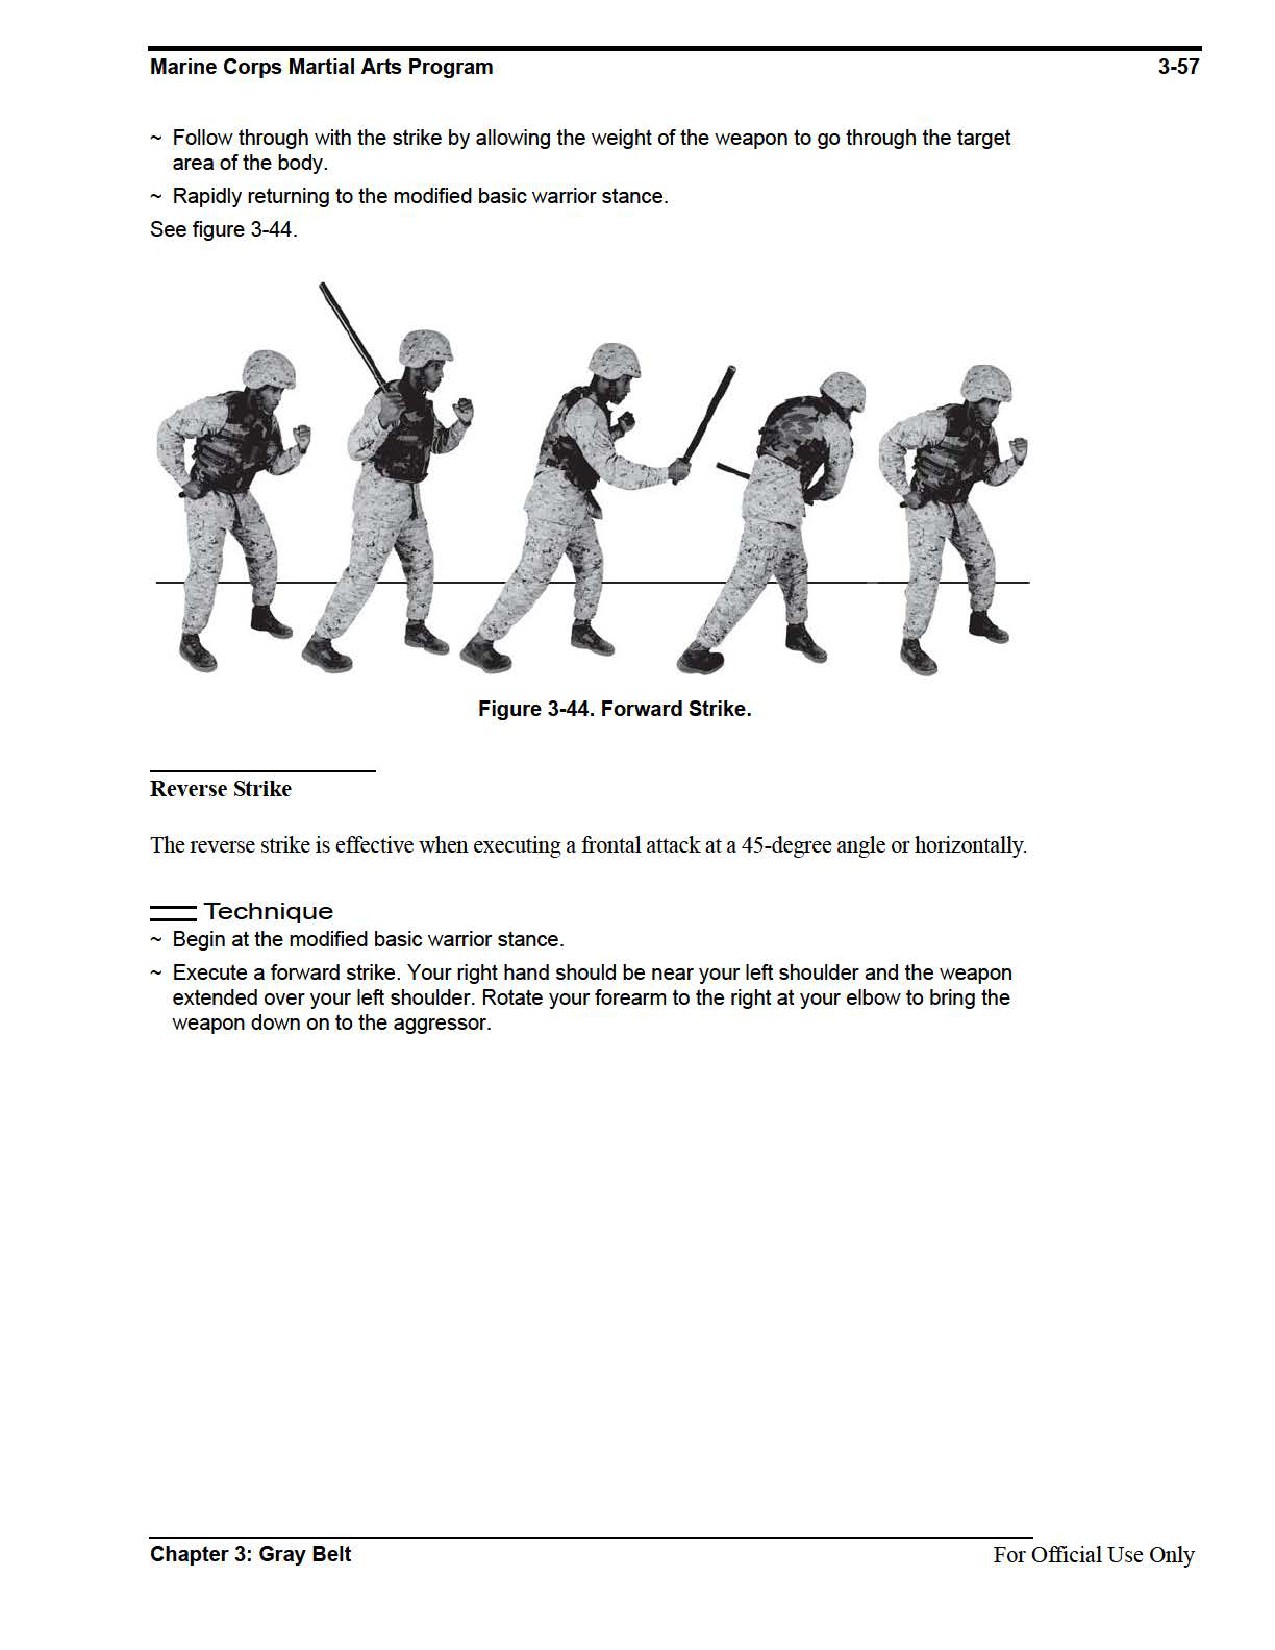
~ Follow through with the strike by allowing the weight of the weapon to go through the target
area of the body.
~ Rapidly returning to the modified basic warrior stance.
See figure 3-43.
Figure 3-43. Vertical Strike.
Forward Strike
The forward strike is effective when executing a frontal attack at a 45-degree angle or horizontally.
Technique
~ Begin at the basic warrior stance.
~ With your left foot, step forward in the direction of the strike. Movement is always made
toward the direction of the strike. At the end of the movement, the left foot should be forward
with the toe pointing toward the aggressor.
~ Rotate your forearm to the right at the elbow to bring the weapon down onto the aggressor.
At the same time, forcefully rotate your hips and shoulders toward the aggressor.
For Official Use Only
Chapter 3: Gray Belt
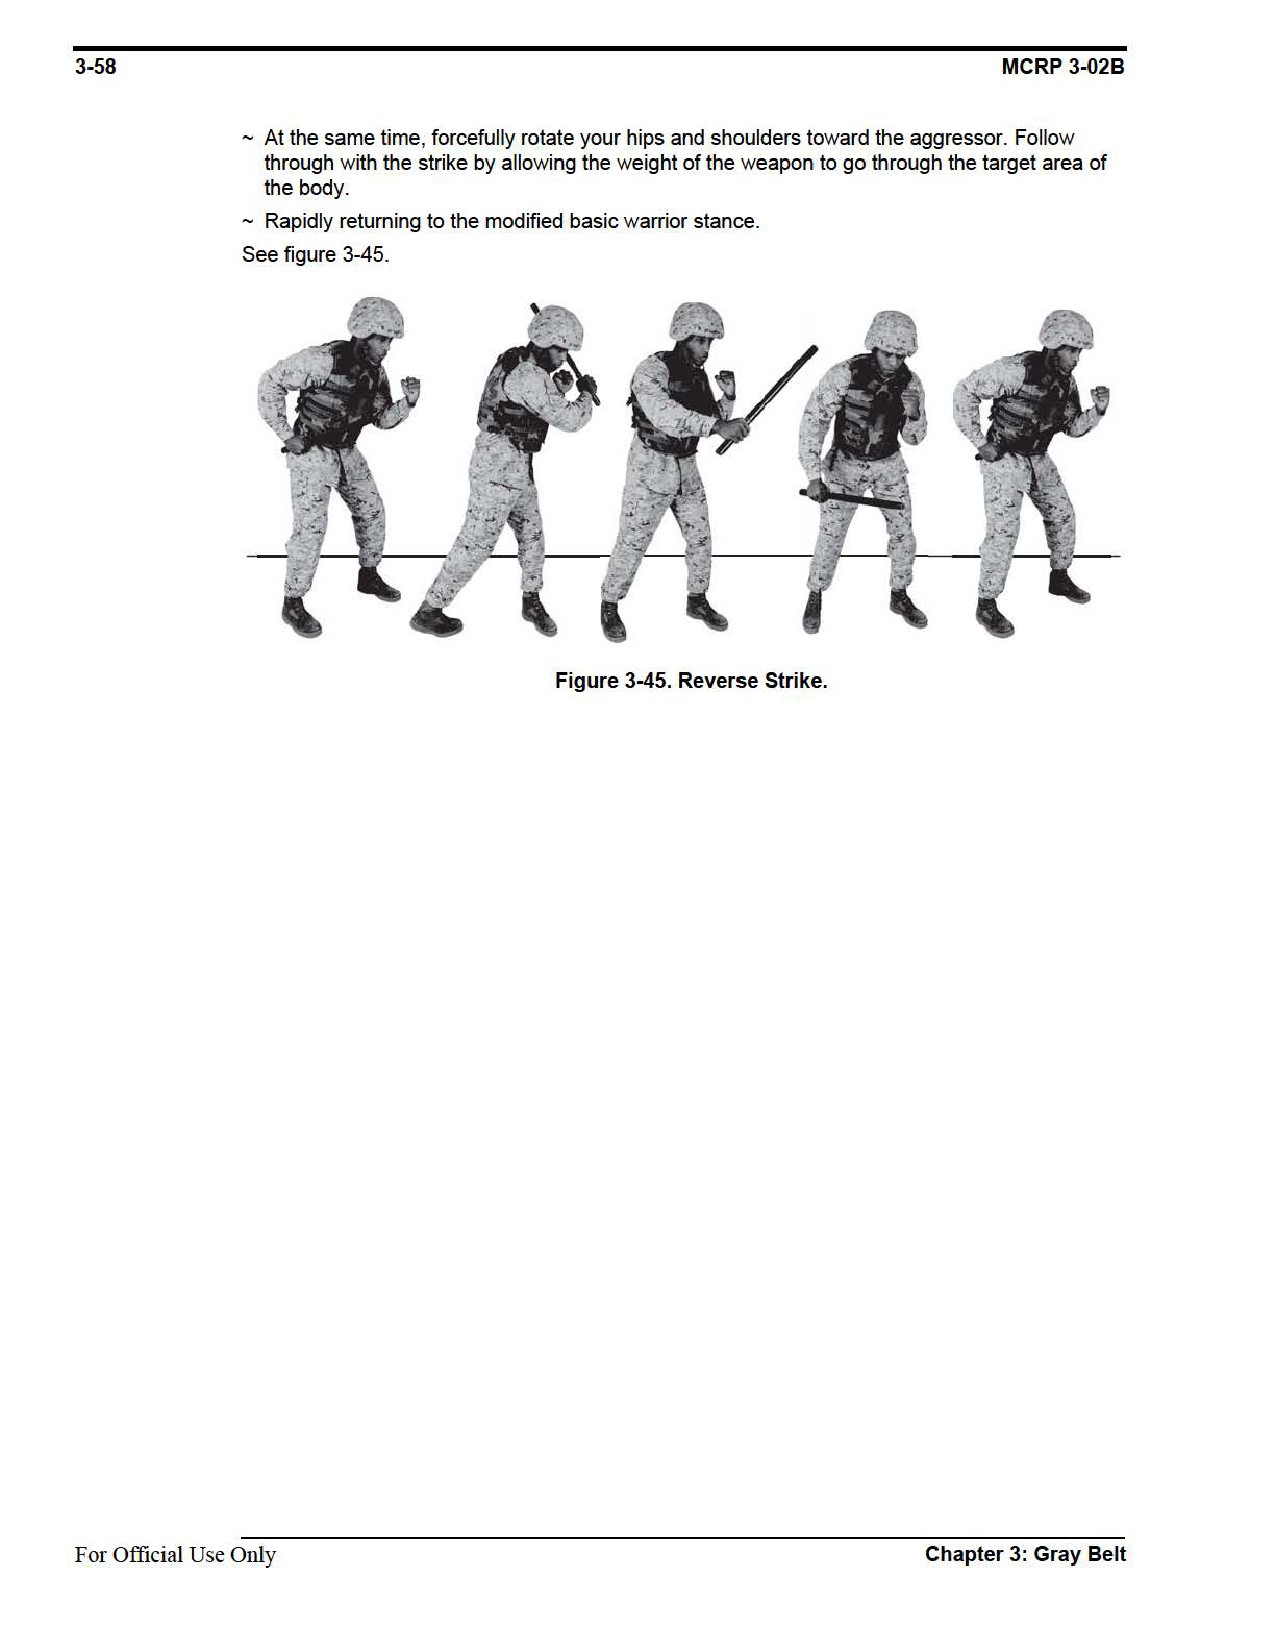

Marine Corps Martial Arts Program
3-59
Section XII
Ground Fighting
The purpose of ground fighting is to provide techniques that allow you to get back to your
feet as quickly as possible by executing the counter to the mount position and the counter to the
guard position.
Refer to appendix A for corresponding safeties 1, 2, 6, and 10.
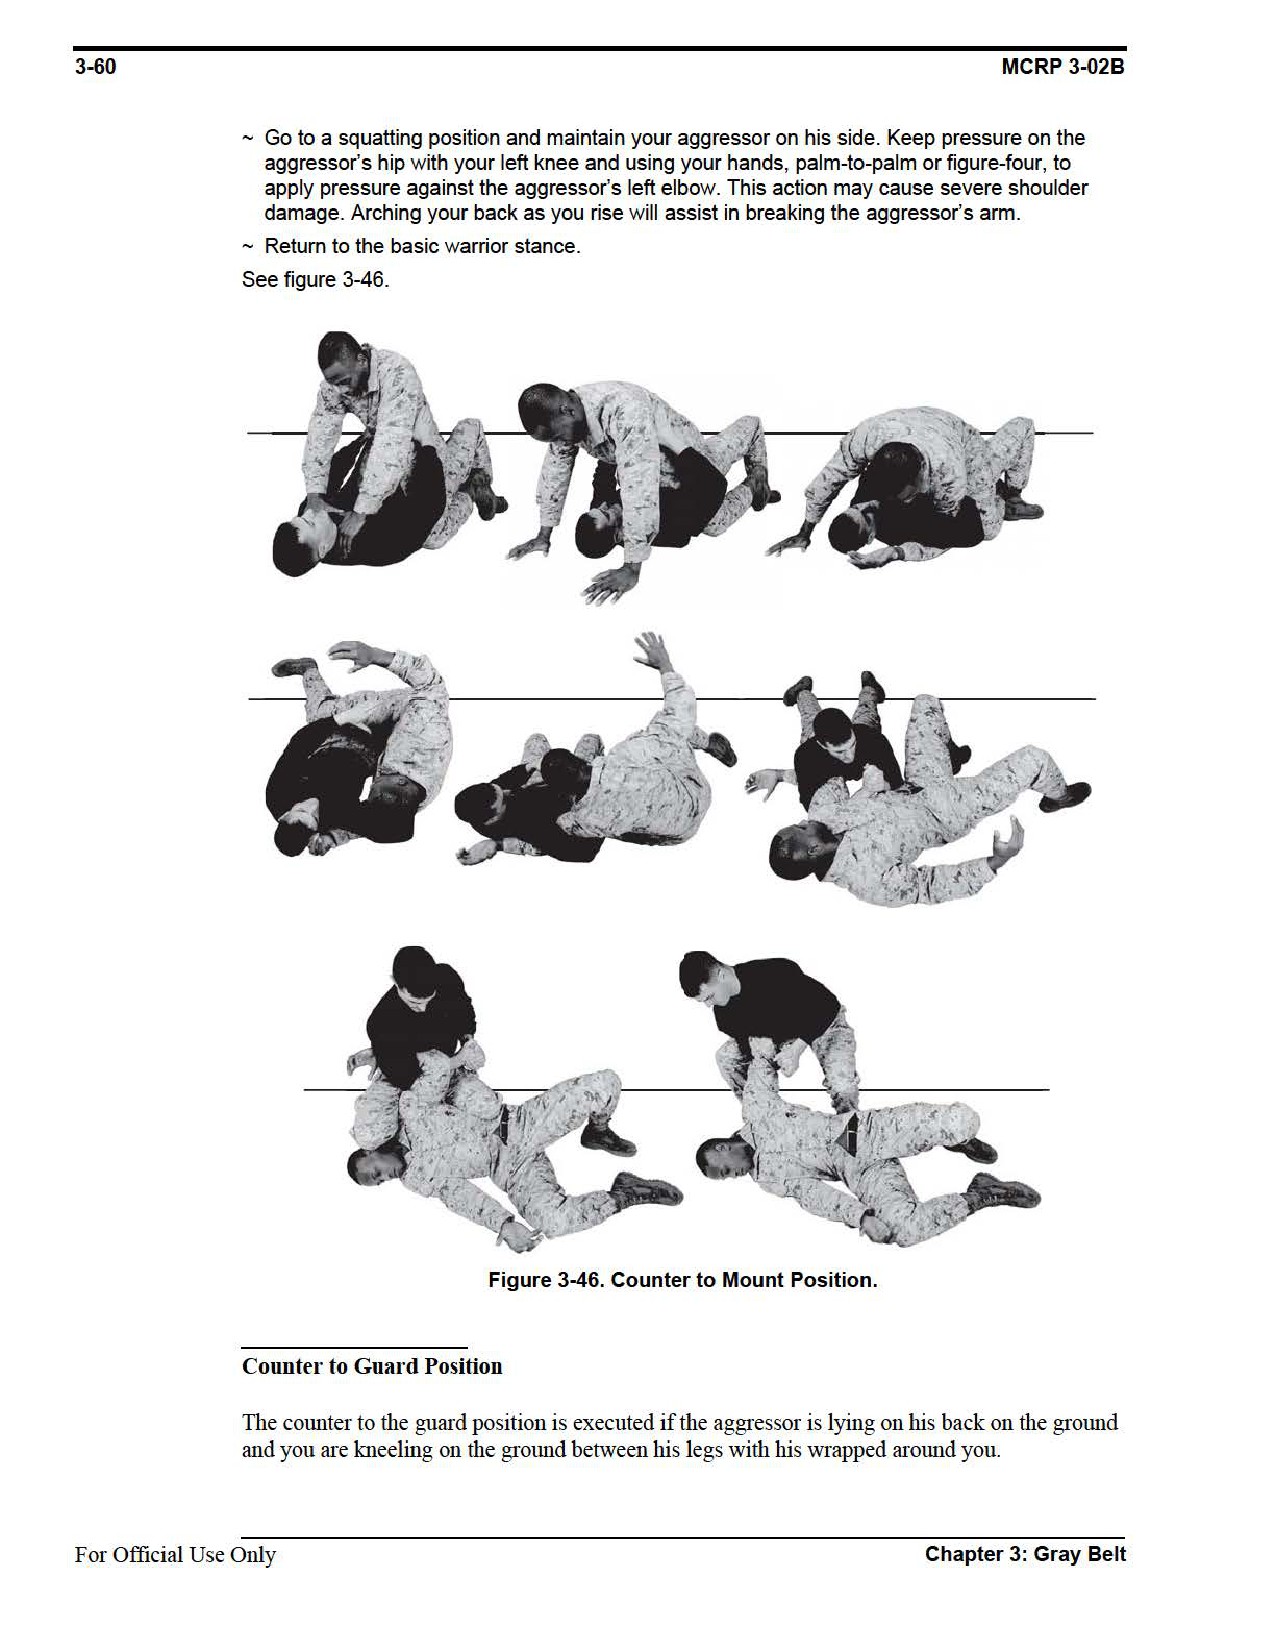
Counter to Mount Position
The counter to the mount position is executed if you are lying on your back on the ground and
the aggressor is mounted on top of you. The aggressor has the tactical advantage.
Technique
~ Begin by lying on your back with the aggressor mounted on top of you.
~ Grab the aggressor’s gear or clothing on his upper torso and pull him down close to you,
while thrusting your hips upward. This will set the aggressor off balance and cause him to
extend his arms in front of him and place his hands on the ground to regain his balance.
~ With your right arm, over hook your aggressor’s arm, from the inside around to the outside,
above his elbow.
~ Draw your elbow in wrapping it around the aggressors elbow, bending it, bringing him down
close to you.
CAUTION
At this point in training, have the aggressor turn his left hand palm side
up in order to remove the risk of injury to his wrist.
~ Drive the knuckles of your right hand into his chest.
~ With your right foot, hook the aggressor’s left leg or ankle. This prevents the aggressor from
using his leg to prevent you from rolling him over.
~ With your left hand, strike the aggressor’s side and continue to push him over and roll him off
of you to your right side. At the same time, raise your hips and push off with your left leg to
assist in rolling the aggressor on his back. Maintain control of the aggressor’s hooked arm.
~ Avoid being pulled into the aggressor’s guard while continuing to maintain control of his over
hooked arm, this can be done by bridging at a 45-degree angle over your right shoulder.
Chapter 3: Gray Belt
For Official Use Only
Marine Corps Martial Arts Program
3-61
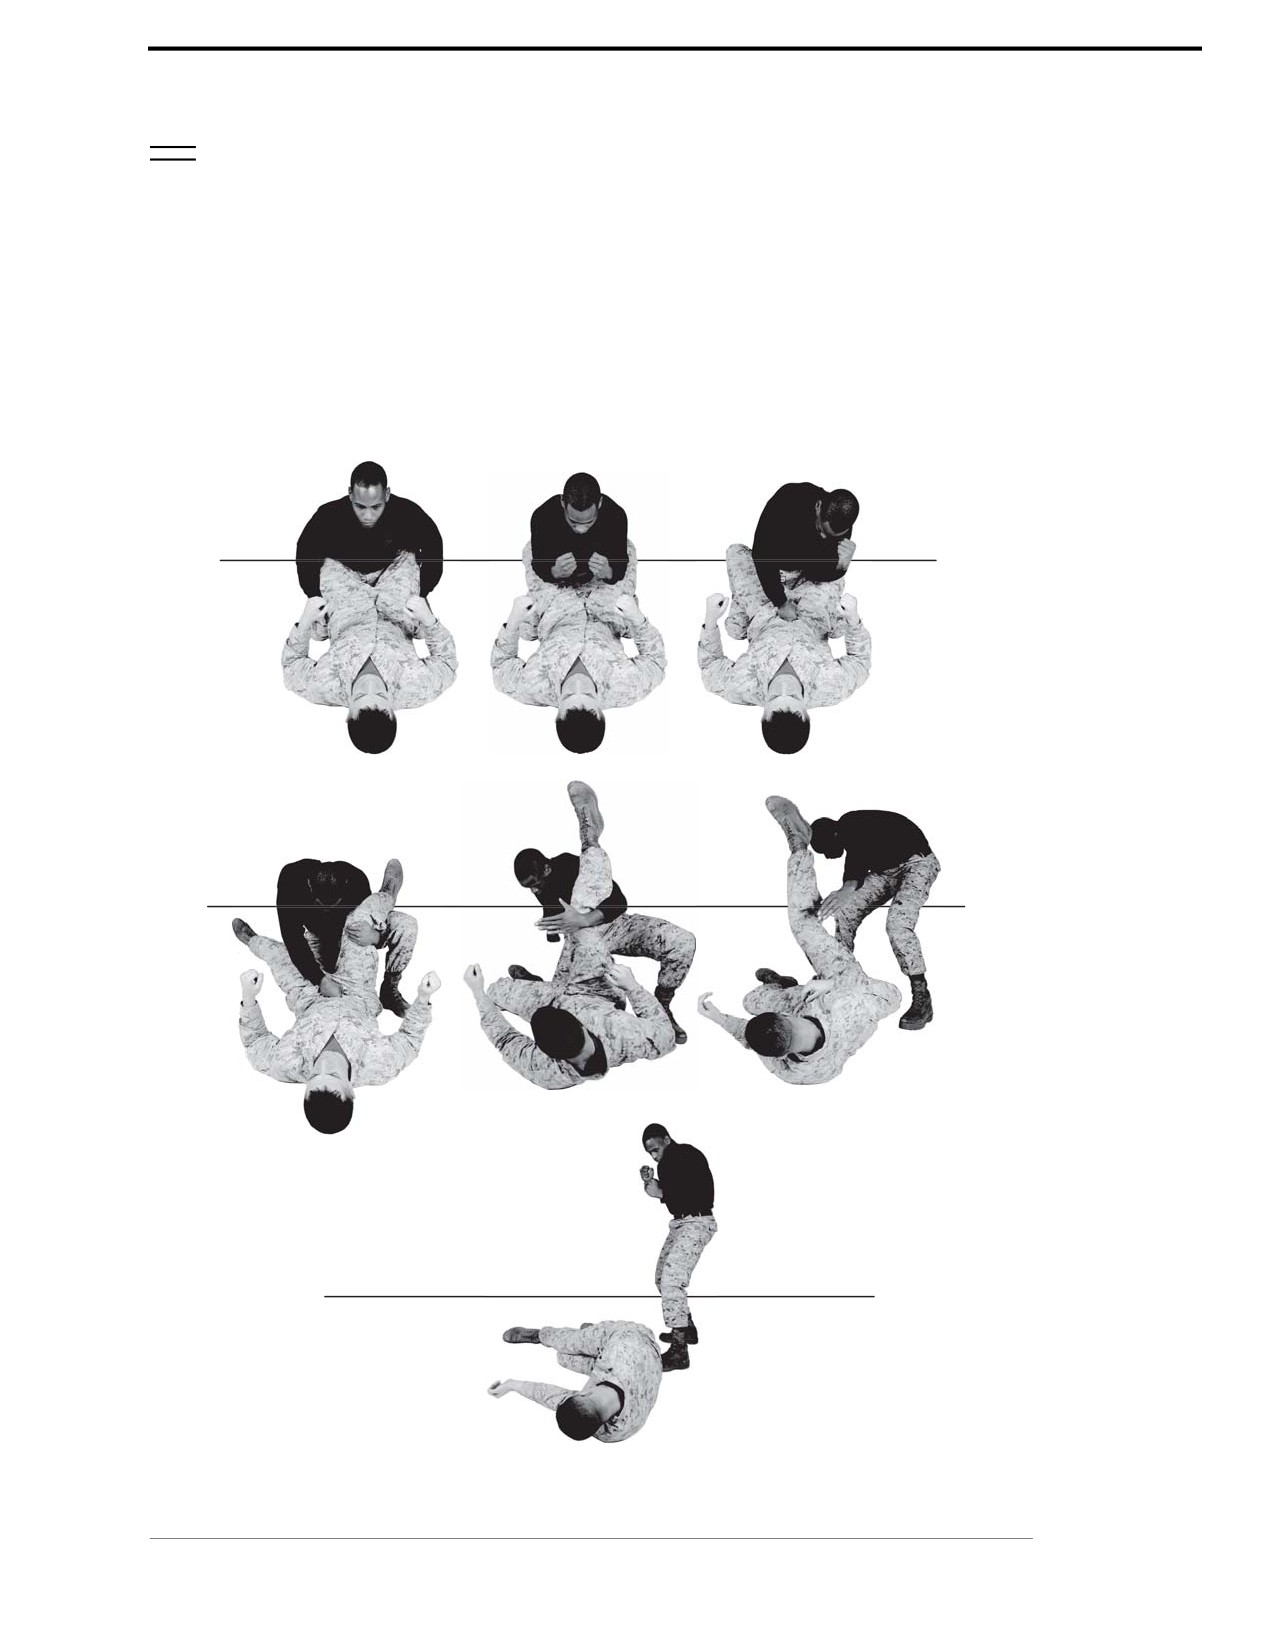
Technique
~ Begin with the aggressor lying on his back on the deck. You are in his guard.
~ With your elbows, strike the aggressor’s legs at the femoral nerve on the inside of the thigh to
drive and separate his legs.
~ With your right fist, strike the aggressor’s groin.
~ At the same time, hook your left arm underneath the aggressor’s right knee from the inside,
ensure your upper body is staying low and your chin is tucked.
~ Quickly throw the aggressor’s right leg over your head with your left arm, as you move to
your left, and return to the basic warrior stance.
See figure 3-47.
Figure 3-47. Counter to Guard Position.
Chapter 3: Gray Belt
For Official Use Only

THIS PAGE INTENTIONALLY LEFT BLANK.
For Official Use Only

CHAPTER 4
Green Belt
Green Belt is the third belt ranking within MCMAP. Within two years of qualifying as a
Gray Belt, all Marines are expected to advance to Green Belt. Green Belt includes comple-
tion of intermediate fundamentals. Purpose, principles, and movement remain the same as
outlined in Gray Belt.
Green Belt Requirements.
Prerequisites
Recommendation of reporting senior
Complete Gray Belt sustainment and
integration training
Appropriate level PME complete
Training Hours
Minimum of 17.65 hours, excluding remedial
practice time and testing
Sustainment
Minimum of 8 hours of sustainment,
Hours
excluding integration training time and
practice time for testing
For Official Use Only

4-2
MCRP 3-02B
Section I
Bayonet Techniques
When using bayonet techniques you will approach, close, and thrust in order to disable or kill an
aggressor. When executing bayonet techniques, all movement begins and ends with the basic
warrior stance.
Refer to appendix A for corresponding safeties 1, 2, 4, 7, 8, 9, and 14.
Fundamentals
Mindset
When engaging in combat, mindset will be the determining factor of success or failure, regard-
less of technical proficiency. Anyone can train in a martial skill, but few have the mind and will
to use their skills to kill or injure. Mindset is often the mental trigger in the defining moment that
forces you to commit to an aggressor with the goal of injury or death.
Holding the Rifle
When executing bayonet techniques, the rifle is held in a modified basic warrior stance. All
movement initiates and ends with the basic modified warrior stance:
• With the right hand, grasp the pistol grip with the trigger finger kept straight and off of the
trigger.
• With the left hand, grasp the handguards of the rifle underhanded.
• Lock the buttstock of the rifle against the hip with the right forearm.
• Always execute movements with the bayonet blade at the waistline. The aggressor has a
greater chance of blocking your attack if you bring the blade in a wide sweeping movement to
the aggressor.
• Your attacks should close with the aggressor, coming straight to your target. Always keep the
bayonet end of the rifle oriented toward the aggressor.
Movement
Movement is used to get from one place to another when the threat of contact with the aggressor
is imminent. The principles of angles of approach and movement taught in the Tan Belt
fundamentals class apply to movement with the rifle and bayonet:
• Assume the modified basic warrior stance.
• Execute movement in the specified direction for one step. Once all of the students have
become familiar with all of the movements, they will all execute multiple steps in unison.
For Official Use Only
Chapter 4: Green Belt

Marine Corps Martial Arts Program
4-3
Executing Turns
There will be times when it is necessary to turn during an engagement. This is especially true
when engaging with multiple attackers. To execute a turn—
• Turn both right and left while keeping the rifle locked into position and the blade oriented to
the front. Ensure that you are turning at the torso and not using your arms to move the weapon
from left to right.
• Move in a straight line while scanning the area from right to left and left to right by turning
your torso and keeping the bayonet oriented in the direction of vision.
• Change the direction of movement to the right by pivoting off of the ball of your left foot as it
hits the deck and step with the right foot in the new direction of movement. Ensure that the
rifle remains locked into position with the bayonet oriented in the direction of movement.
• Change the direction of movement to the left by pivoting off of the ball of your right foot and
step with your left foot in the new direction of movement. Ensure that the rifle remains locked
into position with the bayonet oriented in the direction of movement.
Approaching
Approaching is used when you have located an aggressor and you are within 20 to 25 yards from
the aggressor. To approach—
• Assume the modified basic warrior stance.
• Bend your knees so that you have a lower center of gravity and so that your profile
is decreased.
• Bend at your waist so that you are hunched over the weapon and your chin is tucked to pro-
tect your neck, minimizing target area.
• Move at a fast walk using your legs to absorb the impact of your steps. Ensure that your upper
body is not bouncing around as you move and the bayonet stays locked on the aggressor.
Closing
Closing is done when you are actively engaged with an aggressor at approximately 5 to 10 feet.
Closing is executed to gain the psychological and tactical advantage over the aggressor.
To close—
• Assume the modified basic warrior stance.
• Bend your knees so that you have a lower center of gravity and so that your profile
is decreased.
• Bend at your waist so that you are hunched over your weapon and your chin is tucked to
protect your neck, minimizing target area.
• As you reach the critical distance of 5 to 10 feet, you will use a burst of speed to close
the final distance between you and the aggressor using your legs to absorb the impact of
your steps.
• Ensure that the upper body is not bouncing around as you move.
• Ensure that the bayonet stays locked on the aggressor. This could cause the aggressor to hesi-
tate during the engagement, which can give you the psychological and tactical advantage.
Chapter 4: Green Belt
For Official Use Only

4-4
MCRP 3-02B
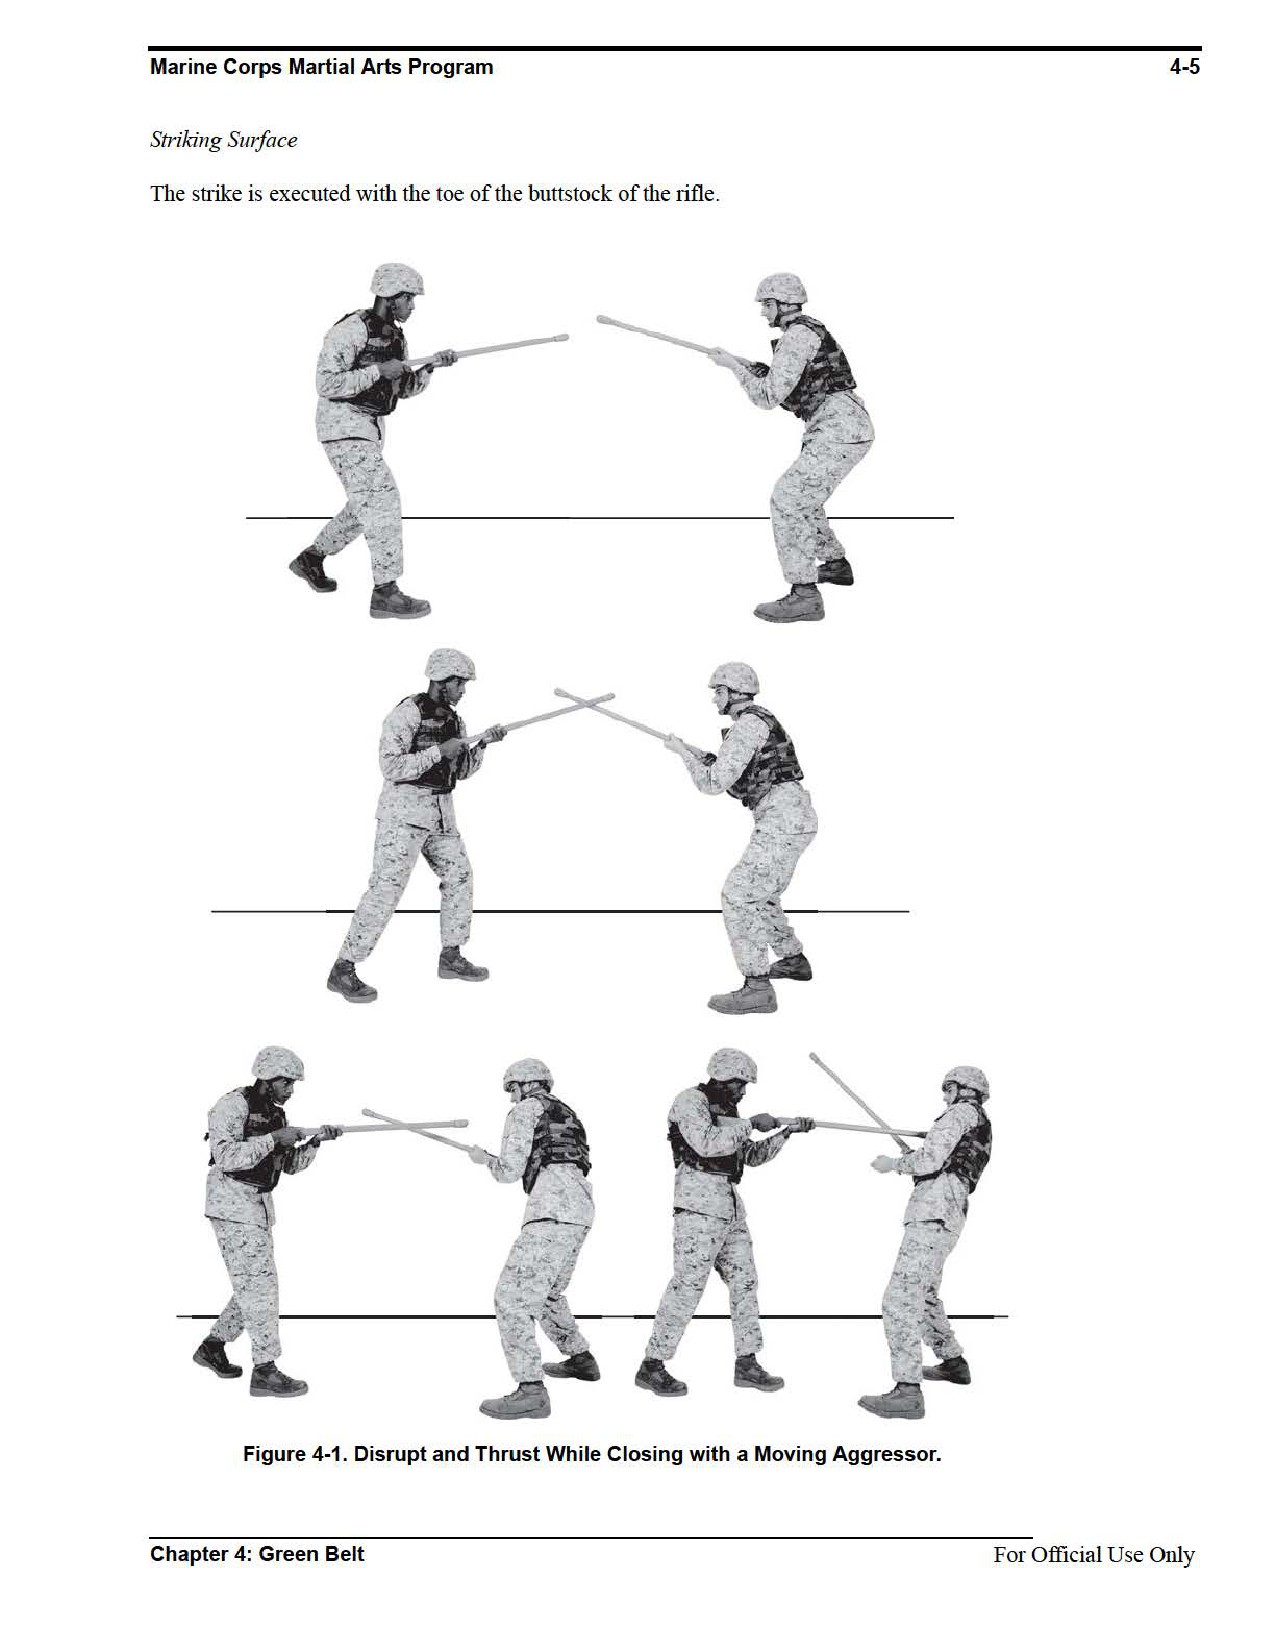
Execute a Disrupt and a Thrust While Closing With a Moving Aggressor
A disrupt is used as a defensive technique to redirect or deflect an attack in preparation for
executing a thrust or other appropriate offensive bayonet techniques. A disrupt is a slight redirec-
tion of an aggressor’s linear attack followed on by a thrust. The straight thrust is performed to
disable or kill an aggressor and is the most deadly offensive technique. The straight thrust will
cause the most trauma to an aggressor and is the primary offensive bayonet technique. During
training, when performing a disrupt and a thrust while closing with a moving aggressor, have the
students execute the movement slowly using another person as the aggressor. When training,
have the students execute movement slowly using another Marine as the aggressor.
Target Areas of the Body
The primary target areas of the body are the aggressor’s throat, groin, or face. The aggressor’s
chest and stomach are also excellent target areas if they are not protected by body armor or
combat equipment.
Technique
~ As you close on a moving aggressor, disrupt the aggressor’s weapon by attacking at a slight
angle. Contact is made with the bayonet end of the rifle against the barrel or bayonet of the
aggressor’s weapon.
~ Redirect or guide the aggressor’s weapon away from your body by exerting pressure against
the aggressor’s weapon with your weapon. You only need to redirect the aggressor’s weapon
a few inches, enough so that the weapon misses your body. This will give your blade a clear
path to your target.
~ Thrust the blade end of the weapon directly toward the target by thrusting both hands
forward. Retract the weapon and continue moving forward.
See figure 4-1.
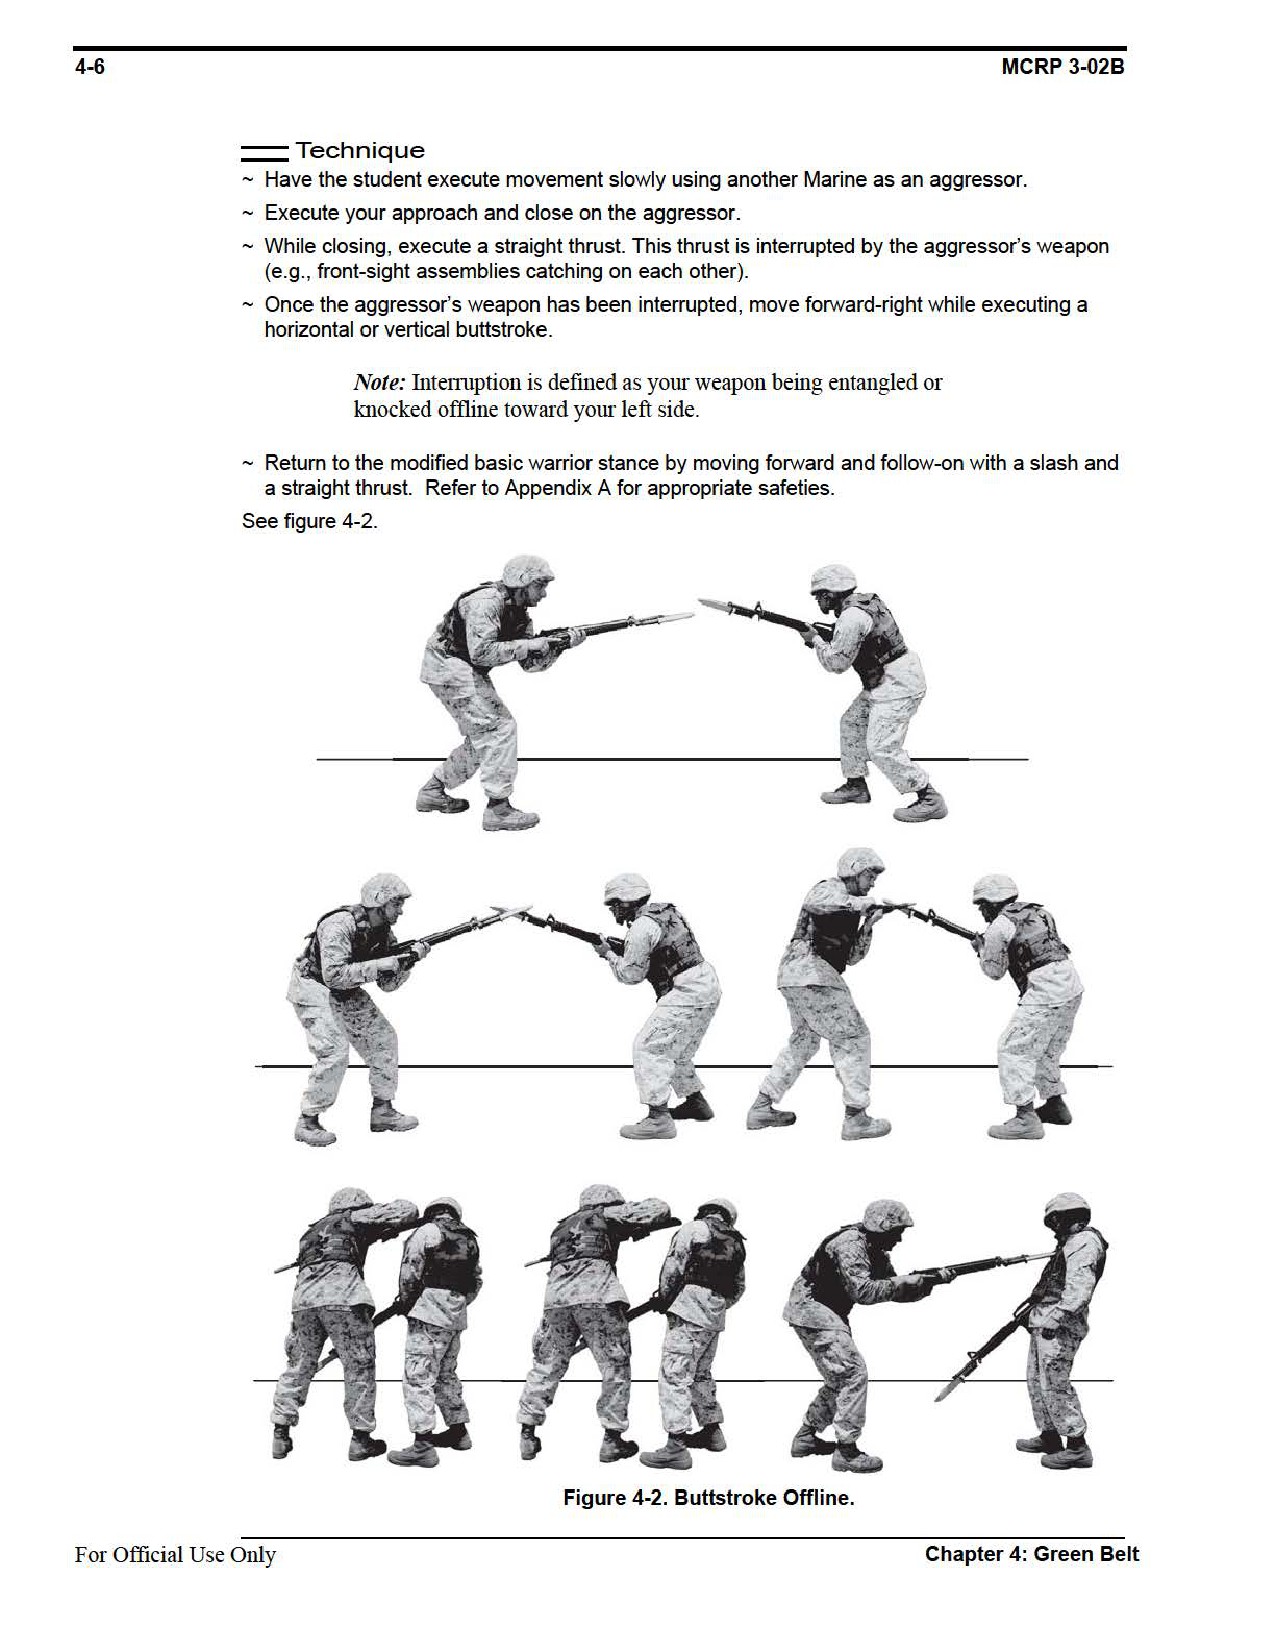
Buttstroke Offline
The buttstroke is used to weaken an aggressor’s defenses, to cause serious injury, or to set him up
for a killing blow. The strike is executed with the heel of the buttstock of the rifle. It is best
executed after a thrust, but if executed as the initial movement, it should be followed by a slash
and/or thrust.
Target Areas
For lethal applications, the head, neck, and unprotected torso are the primary target areas of
the body. In a nonlethal situation, the arms, shoulders, and the meaty portion of the legs can be
target areas.
For Official Use Only
Chapter 4: Green Belt

Marine Corps Martial Arts Program
4-7
Section II
Side Choke
The purpose of a choke is to render your aggressor unconscious or gain control of a close combat
situation through less than lethal force. Chokes are performed by either closing off the airway to
the lungs, thereby preventing oxygen from reaching the heart, or by cutting off the blood flow to
the brain.
When executed properly, a side choke, which is a blood choke, takes between 8 to 13 seconds for
the aggressor to lose consciousness. The air choke is least preferred because it takes longer to
render the aggressor.
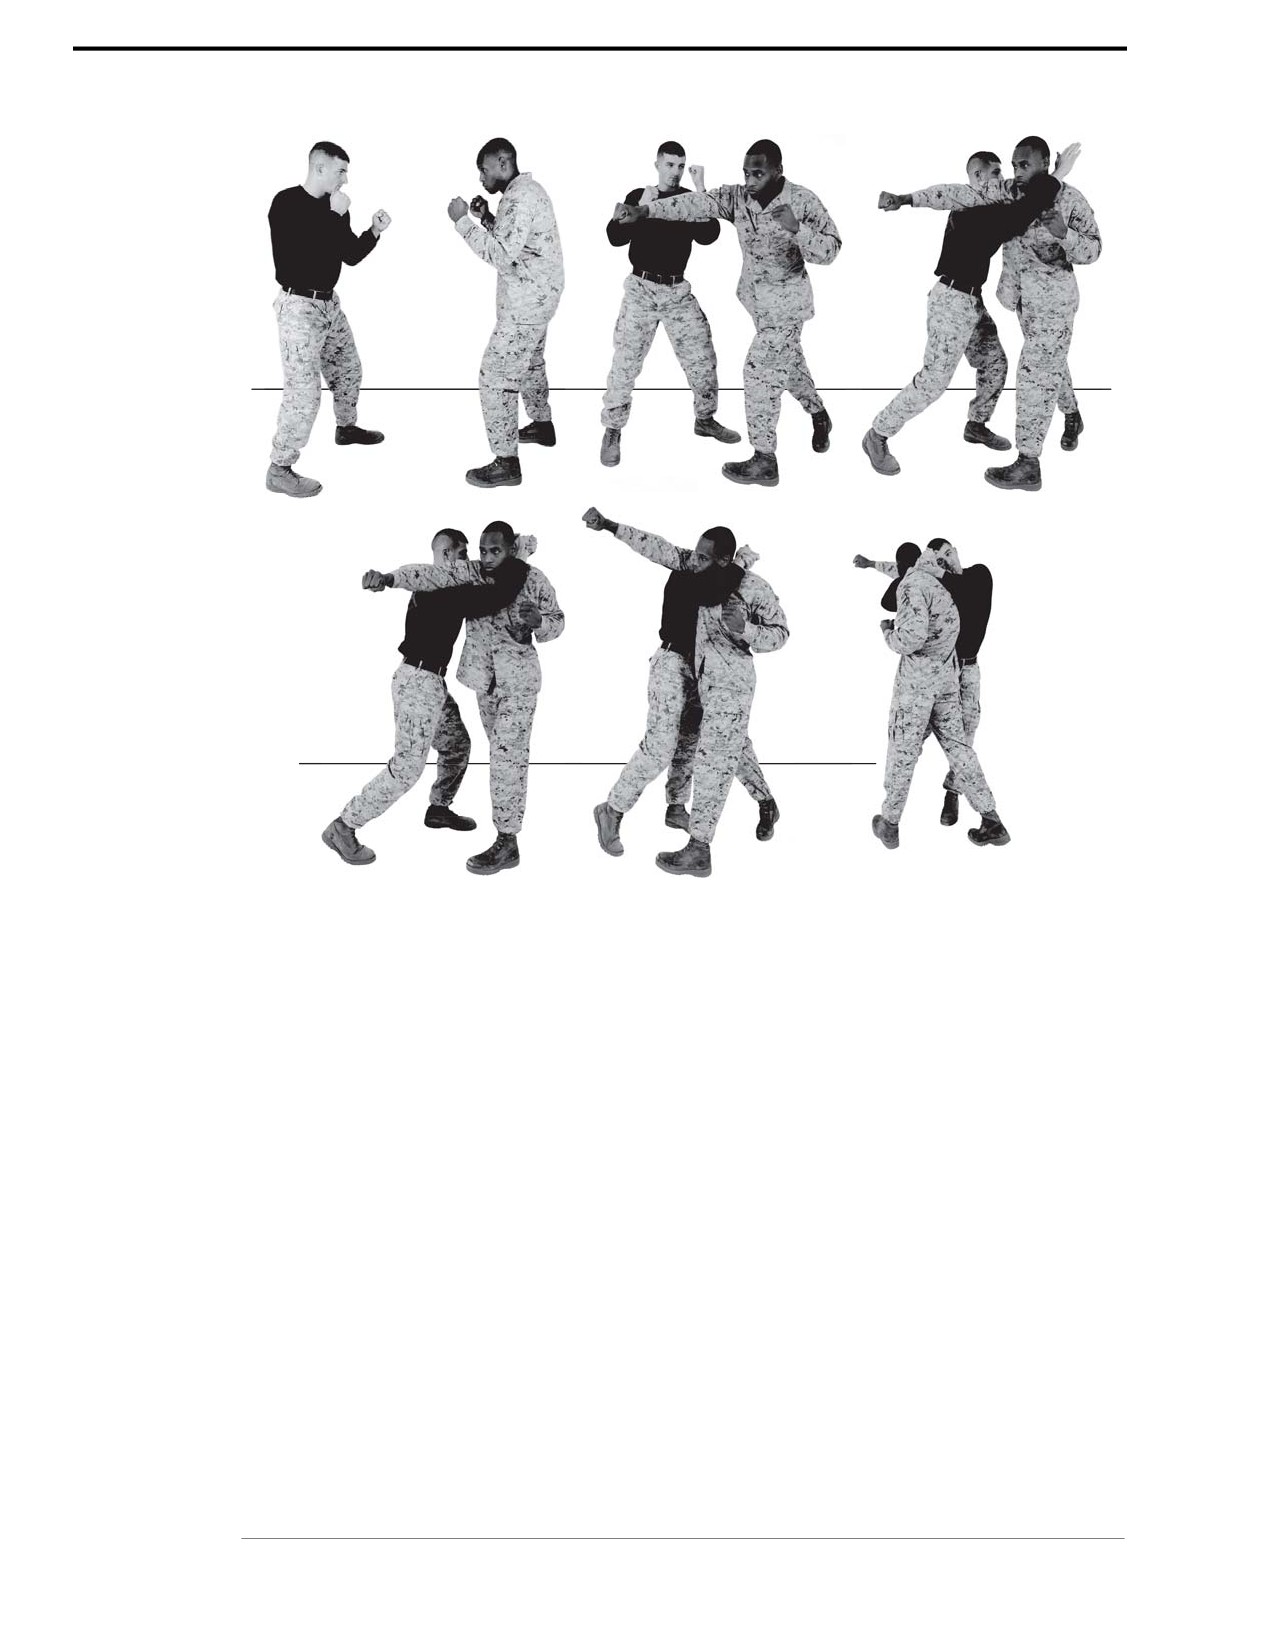
The side choke is a blood choke that is particularly effective when deflecting a punch thrown by
an aggressor. It is performed when you and your aggressor are facing each other. When training,
do not have the students execute the entire technique, instead walk the students step by step,
focusing on arm placement and execution.
Refer to appendix A for corresponding safeties 1, 2, 6, 10, 11, and 12.
Technique
~ Begin by facing the aggressor.
~ The aggressor executes a rear hand punch. Block the aggressor’s arm inboard with your
lead forearm.
~ Bring your right arm from underneath the aggressor’s right arm and place your wrist or radius
bone across your aggressor’s carotid artery along the left side of the neck. Your right palm
should be face down with your fingers extended and your thumb pointing toward you.
~ With your left hand, reach around the back of the aggressor’s neck and clasp your hands
together with the left hand, palm side up. The aggressor’s right arm should be over your
right shoulder.
~ Pull the aggressor toward your chest, exerting pressure on his left carotid artery with your
right radius bone. This is accomplished by pulling your clasped hands toward your chest. At
the same time, push up with your shoulder and head against the aggressor’s triceps, driving
his right shoulder into his right carotid artery. This allows you to apply pressure to both sides
of the neck and not the trachea or windpipe.
•Your shoulder and head should be placed high on the triceps close to the armpit to ensure
that the shoulder is being driven in more effectively. Your aggressor’s side should be up
against you.
•Ensure that pressure is exerted against either side of the neck and not on the throat
(trachea or windpipe).
See figure 4-3 on page 4-8.
Chapter 4: Green Belt
For Official Use Only
4-8
MCRP 3-02B
Figure 4-3. Side Choke.
For Official Use Only
Chapter 4: Green Belt

Marine Corps Martial Arts Program
4-9
Section III
Shoulder Throw
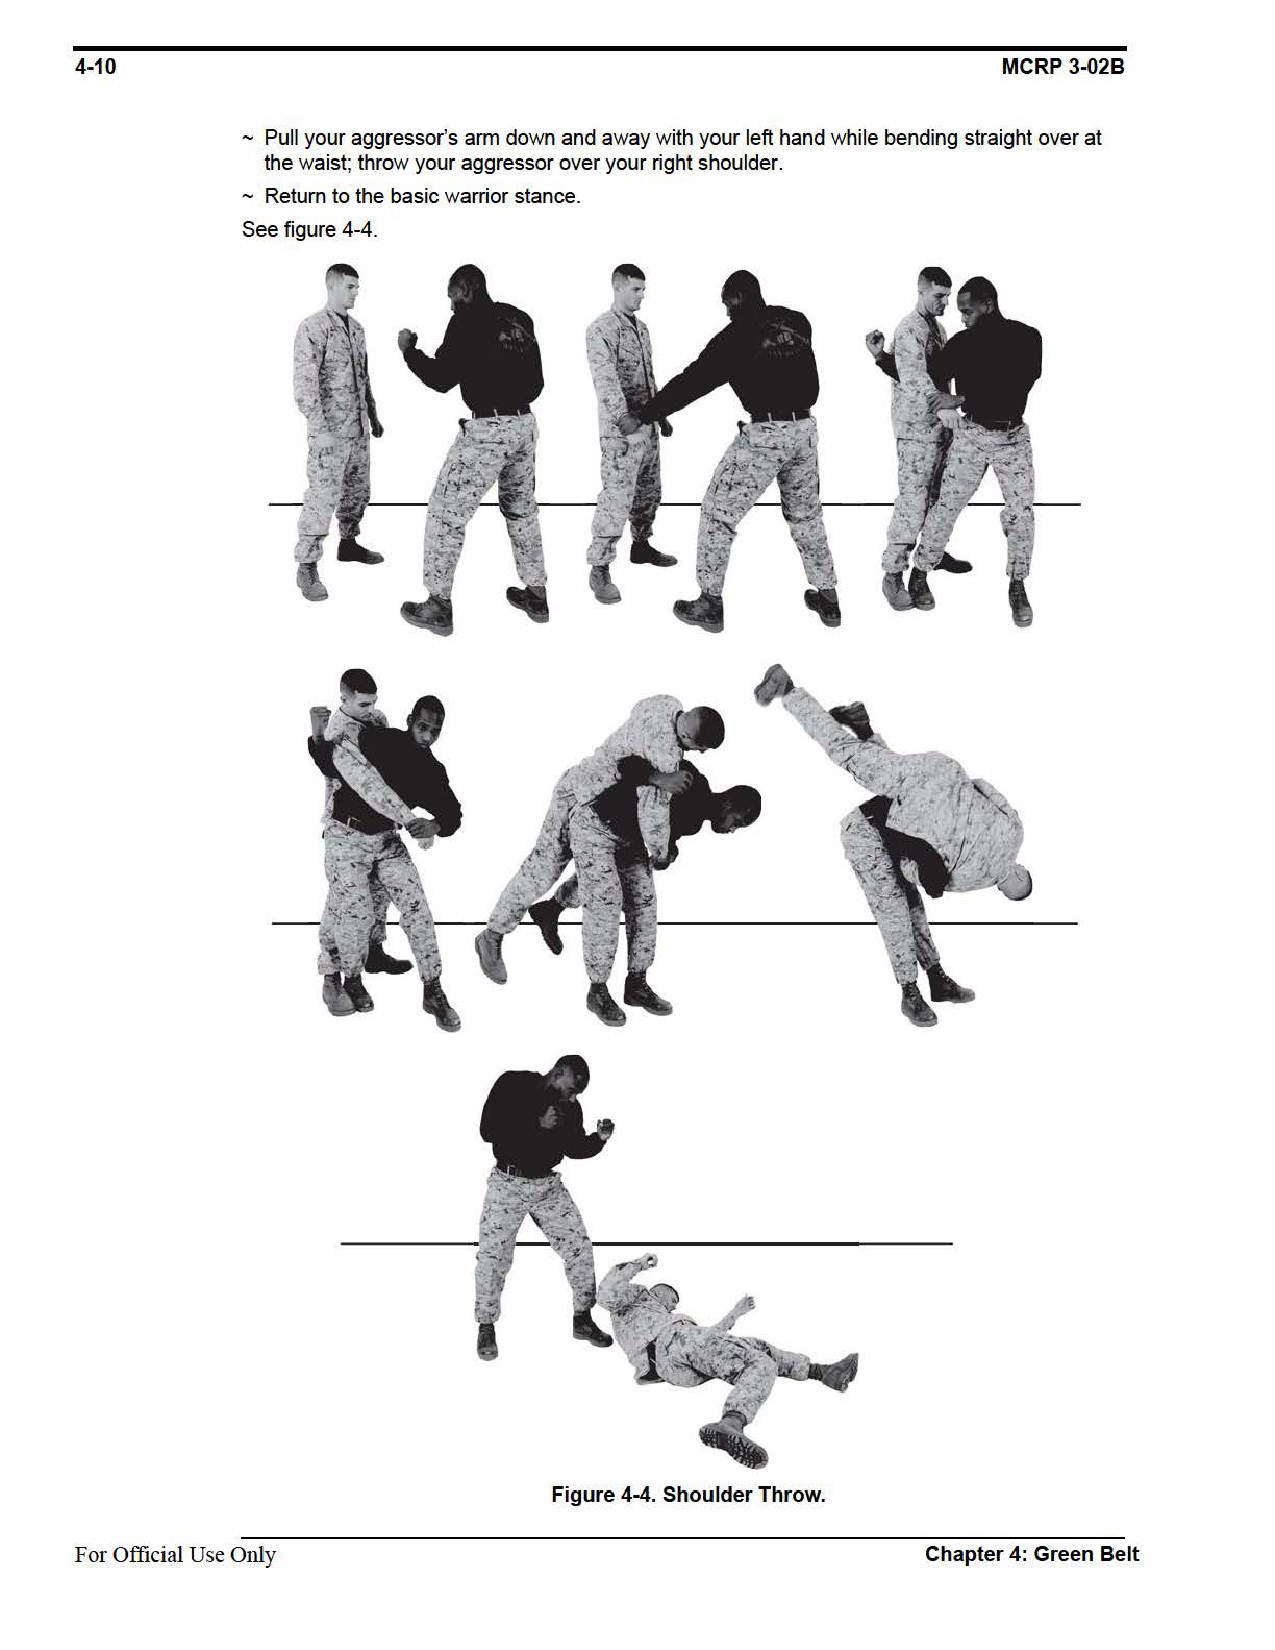
The purpose of a shoulder throw is to bring an aggressor to the ground and gain the tactical
advantage in a fight. If an aggressor is moving toward you to attack, a shoulder throw can be
used to take him to the ground while you remain standing. A shoulder throw is particularly effec-
tive if the aggressor is moving forward or pushing on you. Execution of the shoulder throw uses
the aggressor’s forward momentum.
There are a minimum of 10 fit ins for each throw during sustaining. Walk through the technique,
step by step, working on proper body positioning and execution.
Refer to appendix A for corresponding safeties 1, 2, 6, 13, and 15.
Fit in
~ Stand facing the aggressor in the basic warrior stance.
~ Grab the aggressor’s right wrist with your left hand and pull it into your left hip.
~ Step forward with your right foot to the inside of the aggressor’s right foot. Your heel should
be between the aggressor’s feet and your toes should be even with the aggressor’s toes.
~ Step back with your left foot, rotating on the ball of your right foot. Your heels should come
close together as if you were in the position of attention. Your feet should be in between the
aggressor’s feet with your knees bent.
~ At the same time, under-hook the aggressor’s right arm with your right arm, pinching his arm
between your biceps and forearm. You may grasp the aggressor’s upper arm with your right
hand for more control.
•Hand placement should allow you to control the aggressor and pull him in close to you.
•Your backside should be up against the aggressor. Your hips should be slightly lower than
your aggressor’s hips.
~ Pull the aggressor’s arm across your body. Lift the aggressor by straightening your legs and
bending slightly at the waist.
CAUTION
Have students stop prior to throwing the aggressor to the deck. Practice
this step prior to continuing.
Chapter 4: Green Belt
For Official Use Only

Marine Corps Martial Arts Program
4-11
Section IV
Counter to Strikes
A counter to a strike counters the aggressor’s attack and allows the Marine to gain the
tactical advantage.
Refer to appendix A for corresponding safeties 1, 2, 3, 6, 10, 11, 12, 13, and 15.
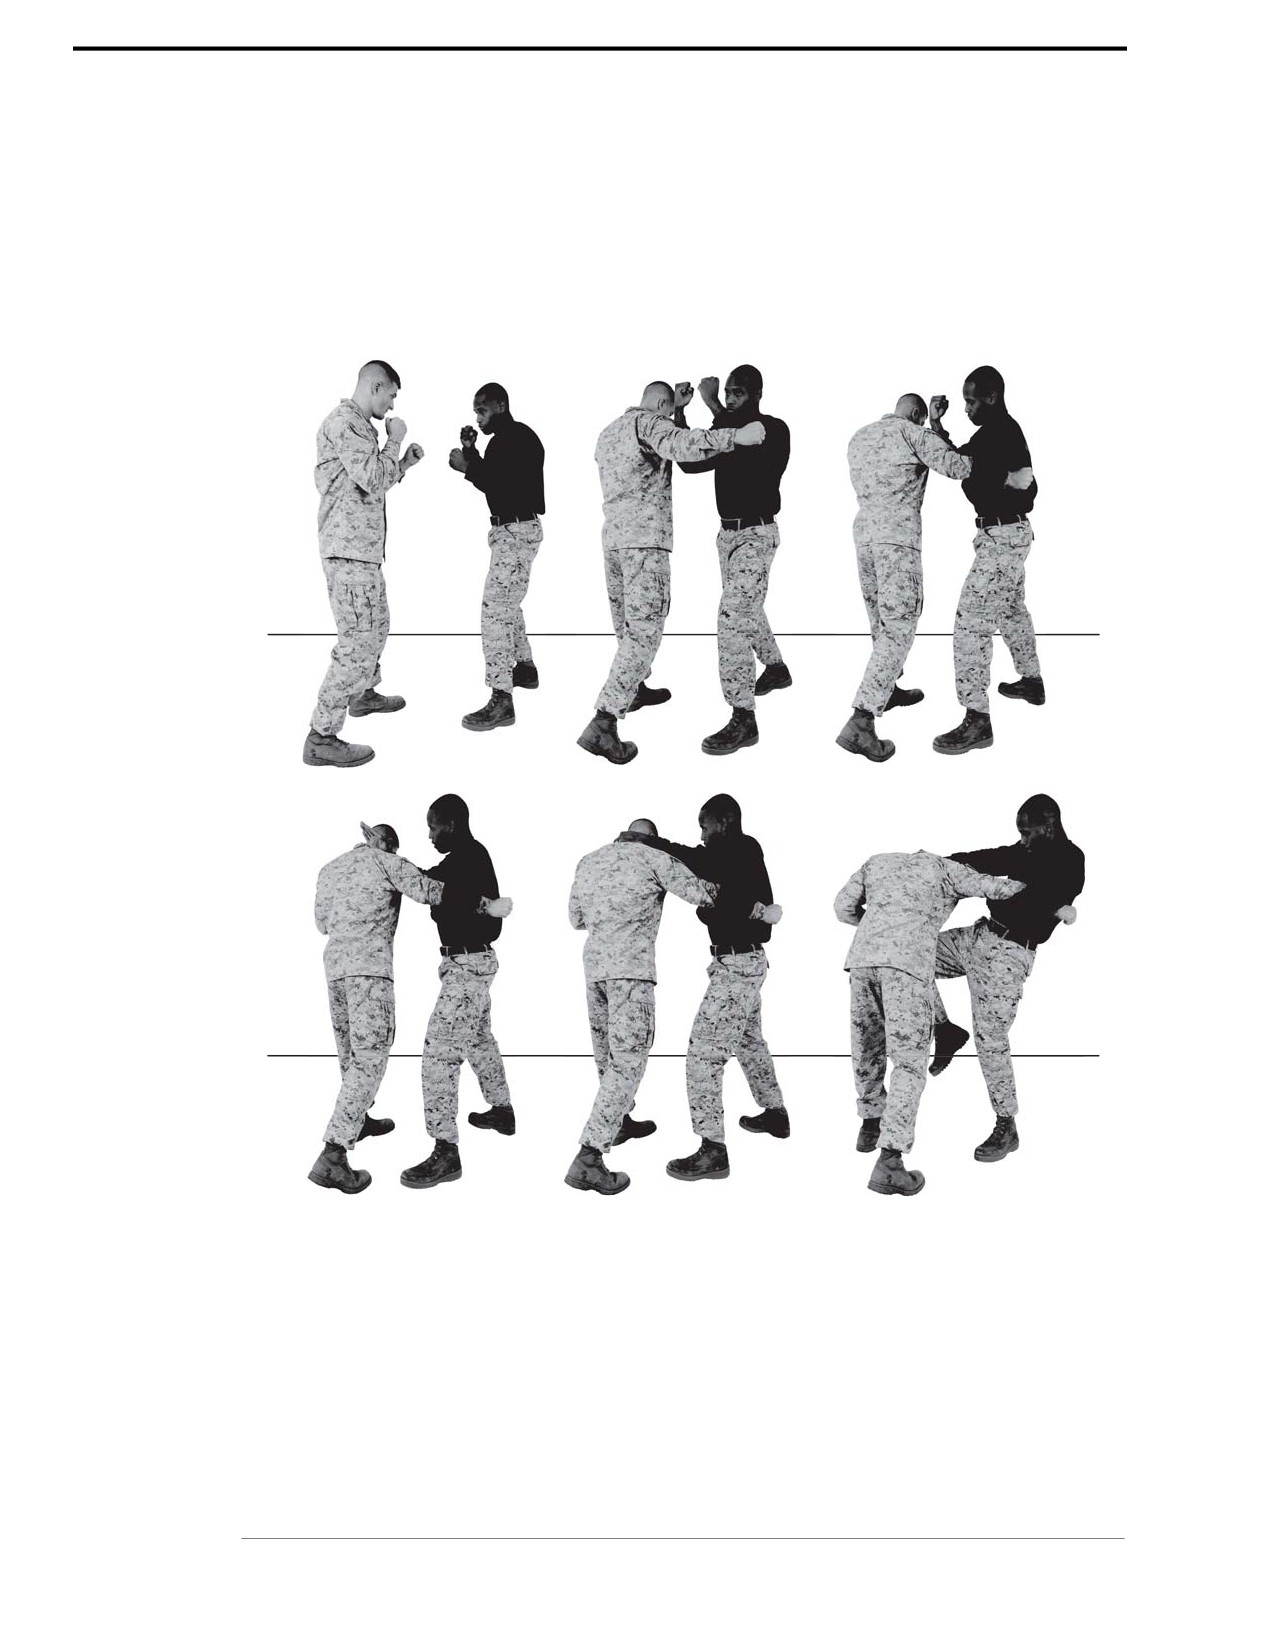
Counter to a Round Punch
The counter to a round punch will stop your aggressor’s forward attack and gain control of
the situation.
Technique
~ From the basic warrior stance, begin with the aggressor extending his right arm as if
executing a round punch, forward-left to the inside of the aggressor’s attacking arm.
~ This immediately moves your body out of the line of attack and places you inside the strike.
Do not move backwards. You increase your chances of being hit because the outside of your
aggressor’s arm is moving faster than the inside and this is where all the power is generated.
~ Attack with both arms bent so that your forearms make contact with the aggressor’s biceps
and forearm. Block the attack with the force of a strike, applying the principle that every block
is a strike.
~ With your left arm, over hook the aggressor’s right arm at or slightly above the elbow.
Chapter 4: Green Belt
For Official Use Only
4-12
MCRP 3-02B
~ Control the aggressor’s arm by pinching it between your bicep and torso and execute a right
inside knife hand strike to the right side of your aggressor’s neck.
~ Grab the back of your aggressor’s neck with the right hand, apply downward pressure,
execute a right vertical knee strike to the aggressor’s available target areas. After a minimum
of three combination strikes, create distance between you and your aggressor. Return to the
basic warrior stance.
See figure 4-5.
Figure 4-5. Counter to a Round Punch.
For Official Use Only
Chapter 4: Green Belt

Marine Corps Martial Arts Program
4-13
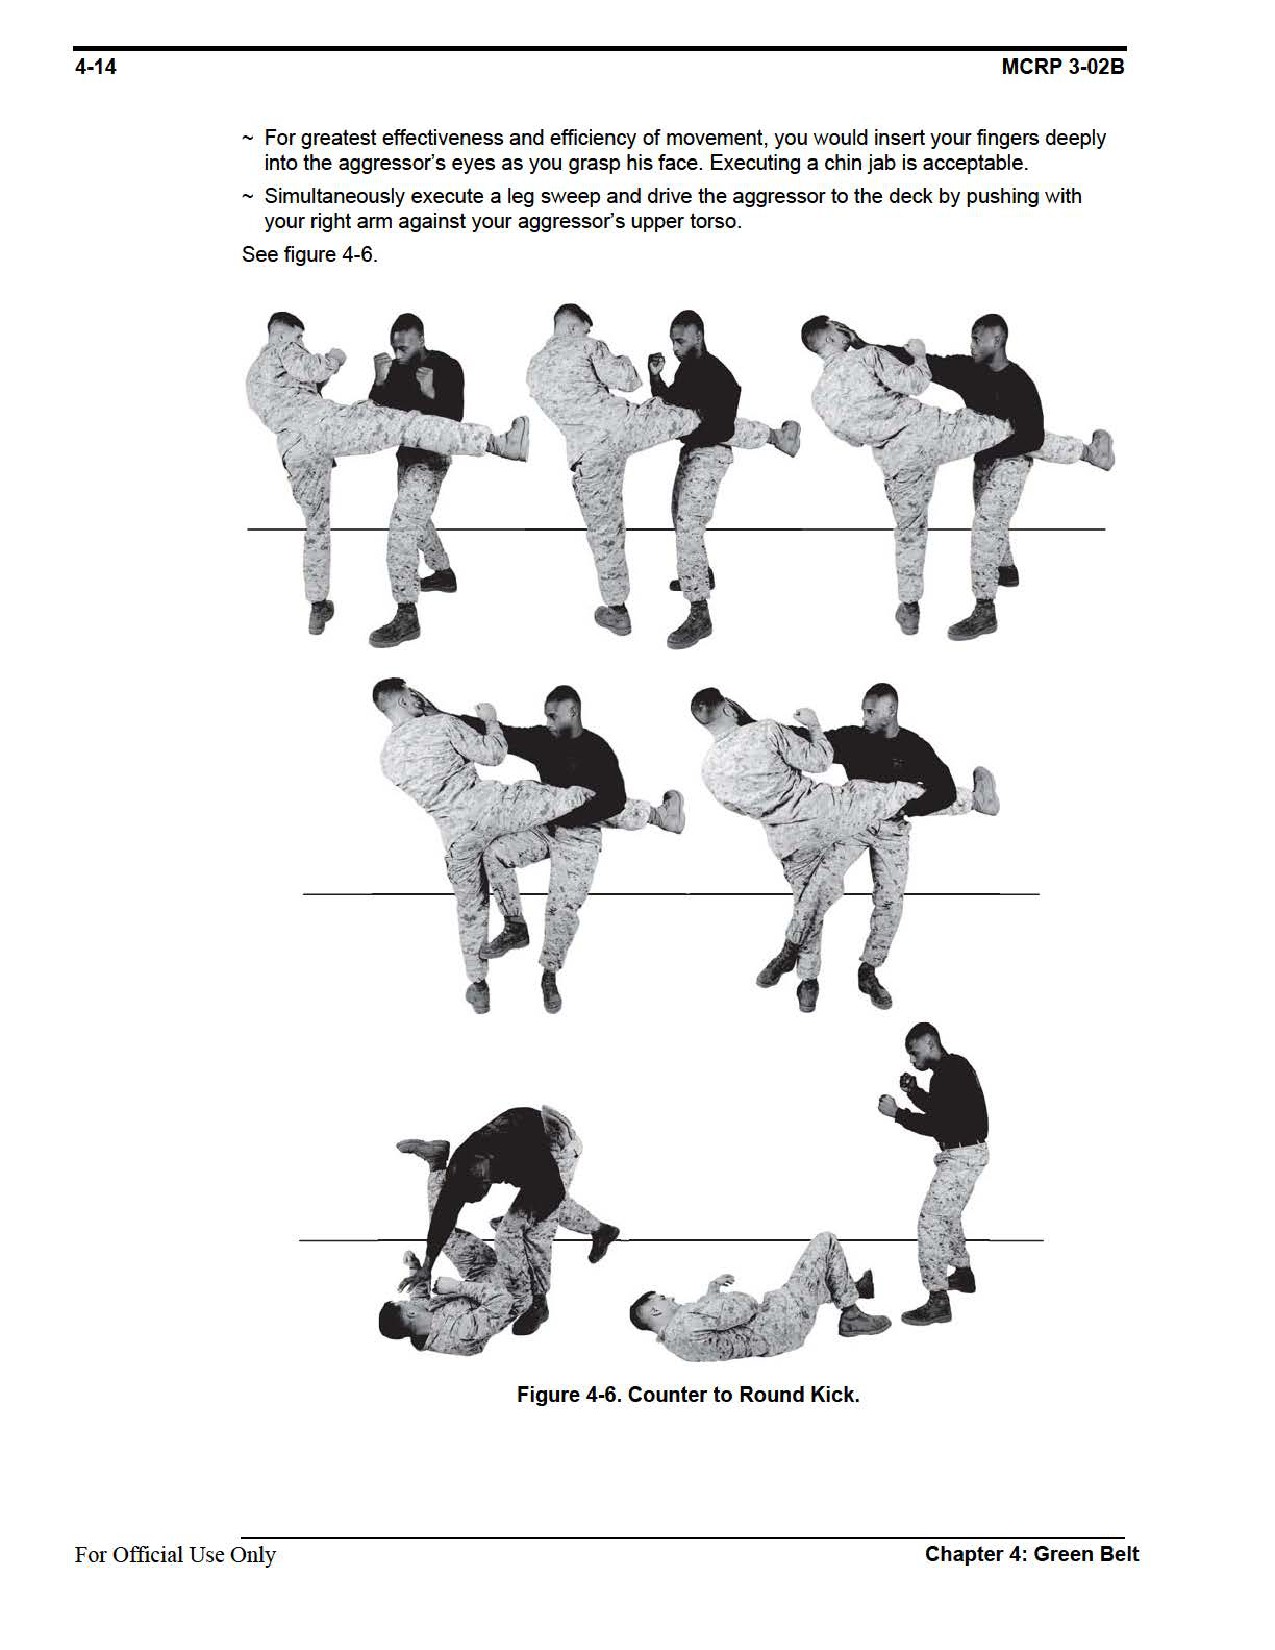
Counter to a Round Kick
The counter to the round kick is used when the aggressor executes a round kick with his right
leg. A counter to a round kick allows you to take your aggressor to the deck and gain the tactical
advantage over the situation.
Technique
~ Begin with the aggressor extending his right leg, approximately waist level or slightly higher,
in a round kick fashion. As the student’s proficiency increases, the technique can be taught
so that the student can defend against an aggressor executing a round kick.
~ From the basic warrior stance, forward-left to the inside of the aggressor’s attacking leg.
~ This moves your body out of the line of attack and places you inside the power of the strike.
~ At the same time, block your aggressor’s attacking leg with the meaty portion of your
forearms. Do not bend down to block the attack. Make two points of contacts on the attacking
leg with both of your arms.
~ Wrap your left arm over the aggressor’s attacking leg, at or below the knee, and trap it
between your bicep and torso.
~ With your right hand, forcefully grasp the aggressor’s face, push forward and to the left to
further off balance the aggressor.
Chapter 4: Green Belt
For Official Use Only

Marine Corps Martial Arts Program
4-15
Section V
Lower Body Strikes
Lower body strikes are used to stop an aggressor’s attack or create an opening in his defense in
order to launch an attack. The legs provide the most powerful weapons of the body with which to
execute strikes because they use the largest muscles of the body and are less prone to injury. The
feet are the preferred choice for striking because boots protect them. The feet, heels, and knees of
the legs are used to execute knee strikes, kicks, and stomps. Never kick high, because this jeop-
ardizes your balance and leaves you more vulnerable to a counterattack.
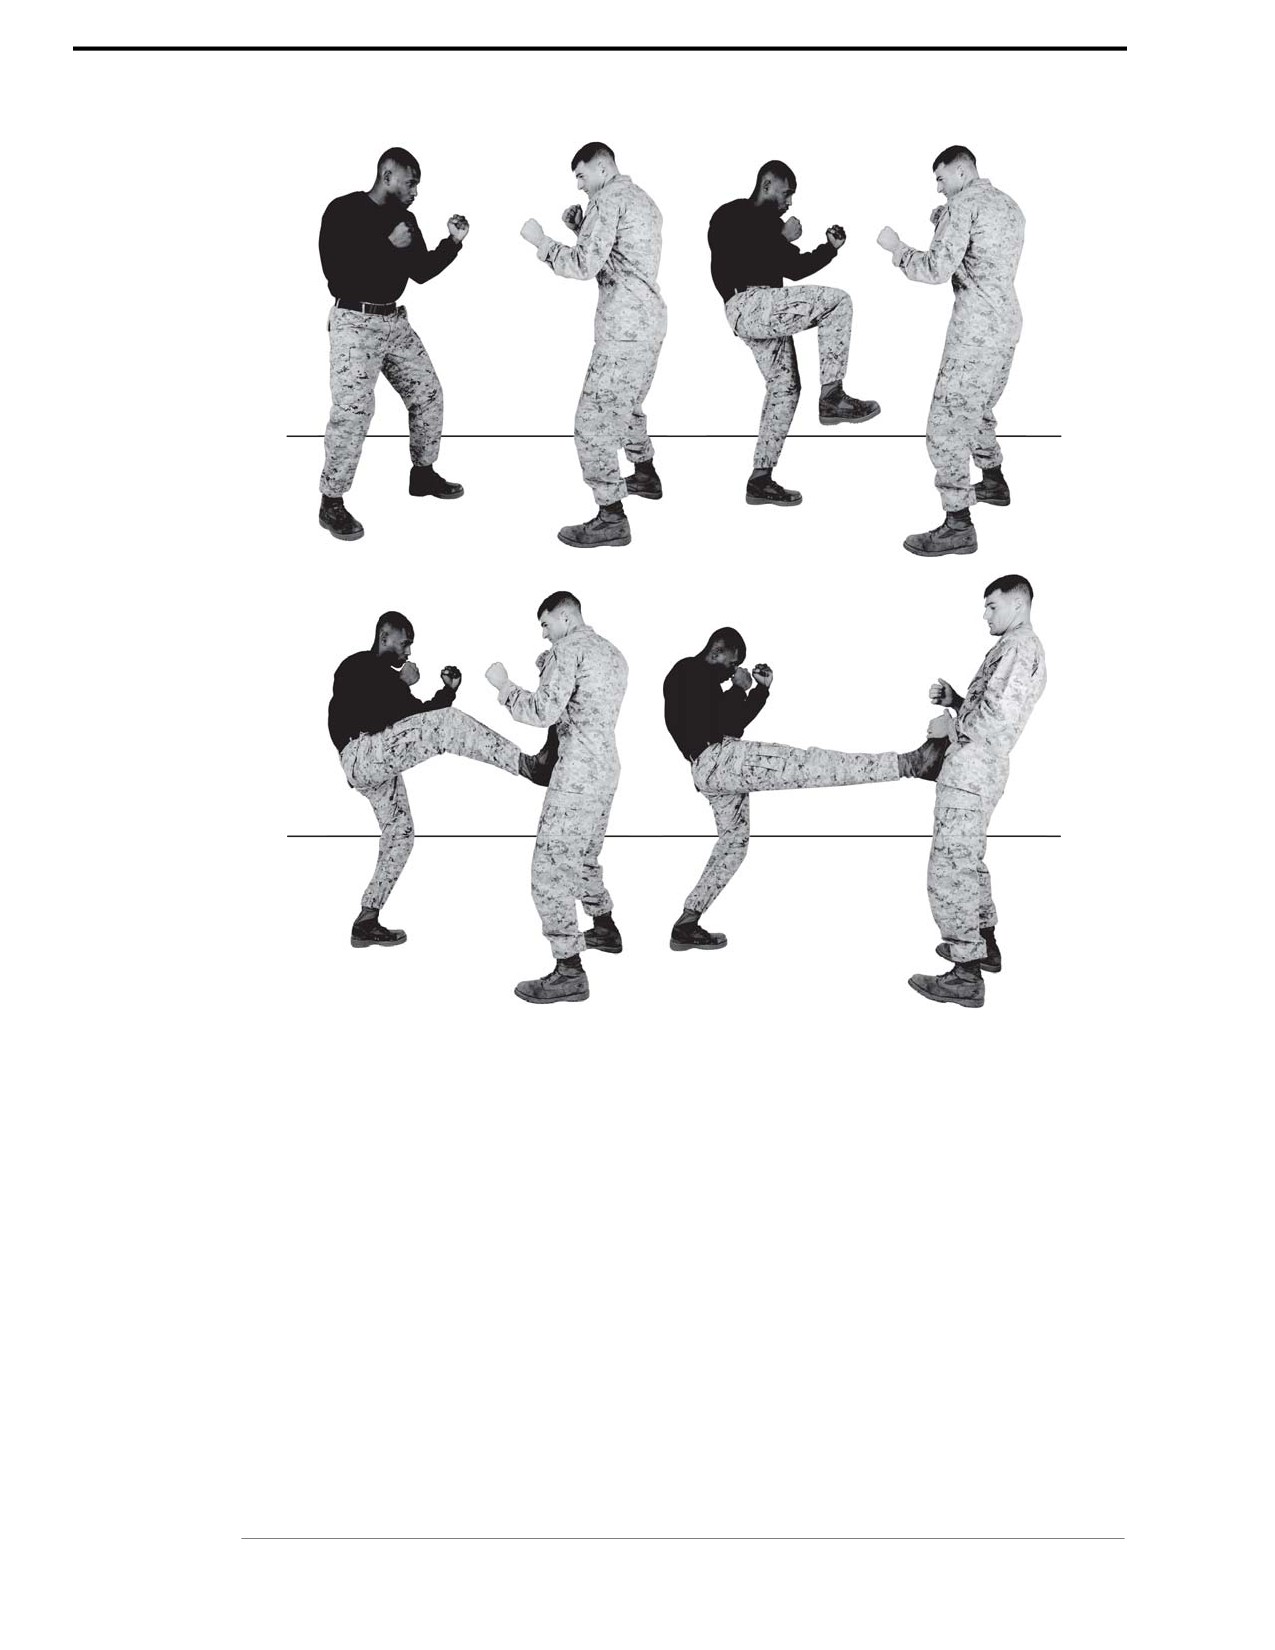
The push kick is executed when the aggressor is in front of you and you need to stop an
aggressor’s attack or to create an opening in his defense in order to launch an attack. The striking
surface is the ball of the foot. Primary target areas of the body are the aggressor’s upper torso,
any targets below the waist line, and the front of the thighs all the way down to the knees.
Technique
~ Always keep your right knee waist high or parallel to the deck.
~ Always keep your hands up to protect yourself from any strikes.
~ Make contact on the aggressor’s abdomen with the ball of your rear foot. There is limited
movement on one leg, so keep in mind that it is difficult to change the direction of a kick after
it is initiated.
~ Follow through the target area by thrusting your hips forward toward your aggressor.
~ Rapidly return to the basic warrior stance.
See figure 4-7 on page 4-16.
Chapter 4: Green Belt
For Official Use Only
4-16
MCRP 3-02B
Figure 4-7. Push Kick.
For Official Use Only
Chapter 4: Green Belt

Marine Corps Martial Arts Program
4-17
Section VI
Unarmed Manipulations
The purpose of unarmed manipulations is to teach Marines how to operate within the continuum
of force, particularly in support of peacekeeping- or humanitarian-type missions. In these situa-
tions, Marines must act responsibly to handle situations without resorting to deadly force.
Unarmed restraints and manipulation techniques such as enhanced pain compliance, the reverse
wristlock come-along, and controlling techniques can be used to control an aggressor.
Refer to appendix A for corresponding safeties 1, 2, 6, 8, 9, 10, and 13.
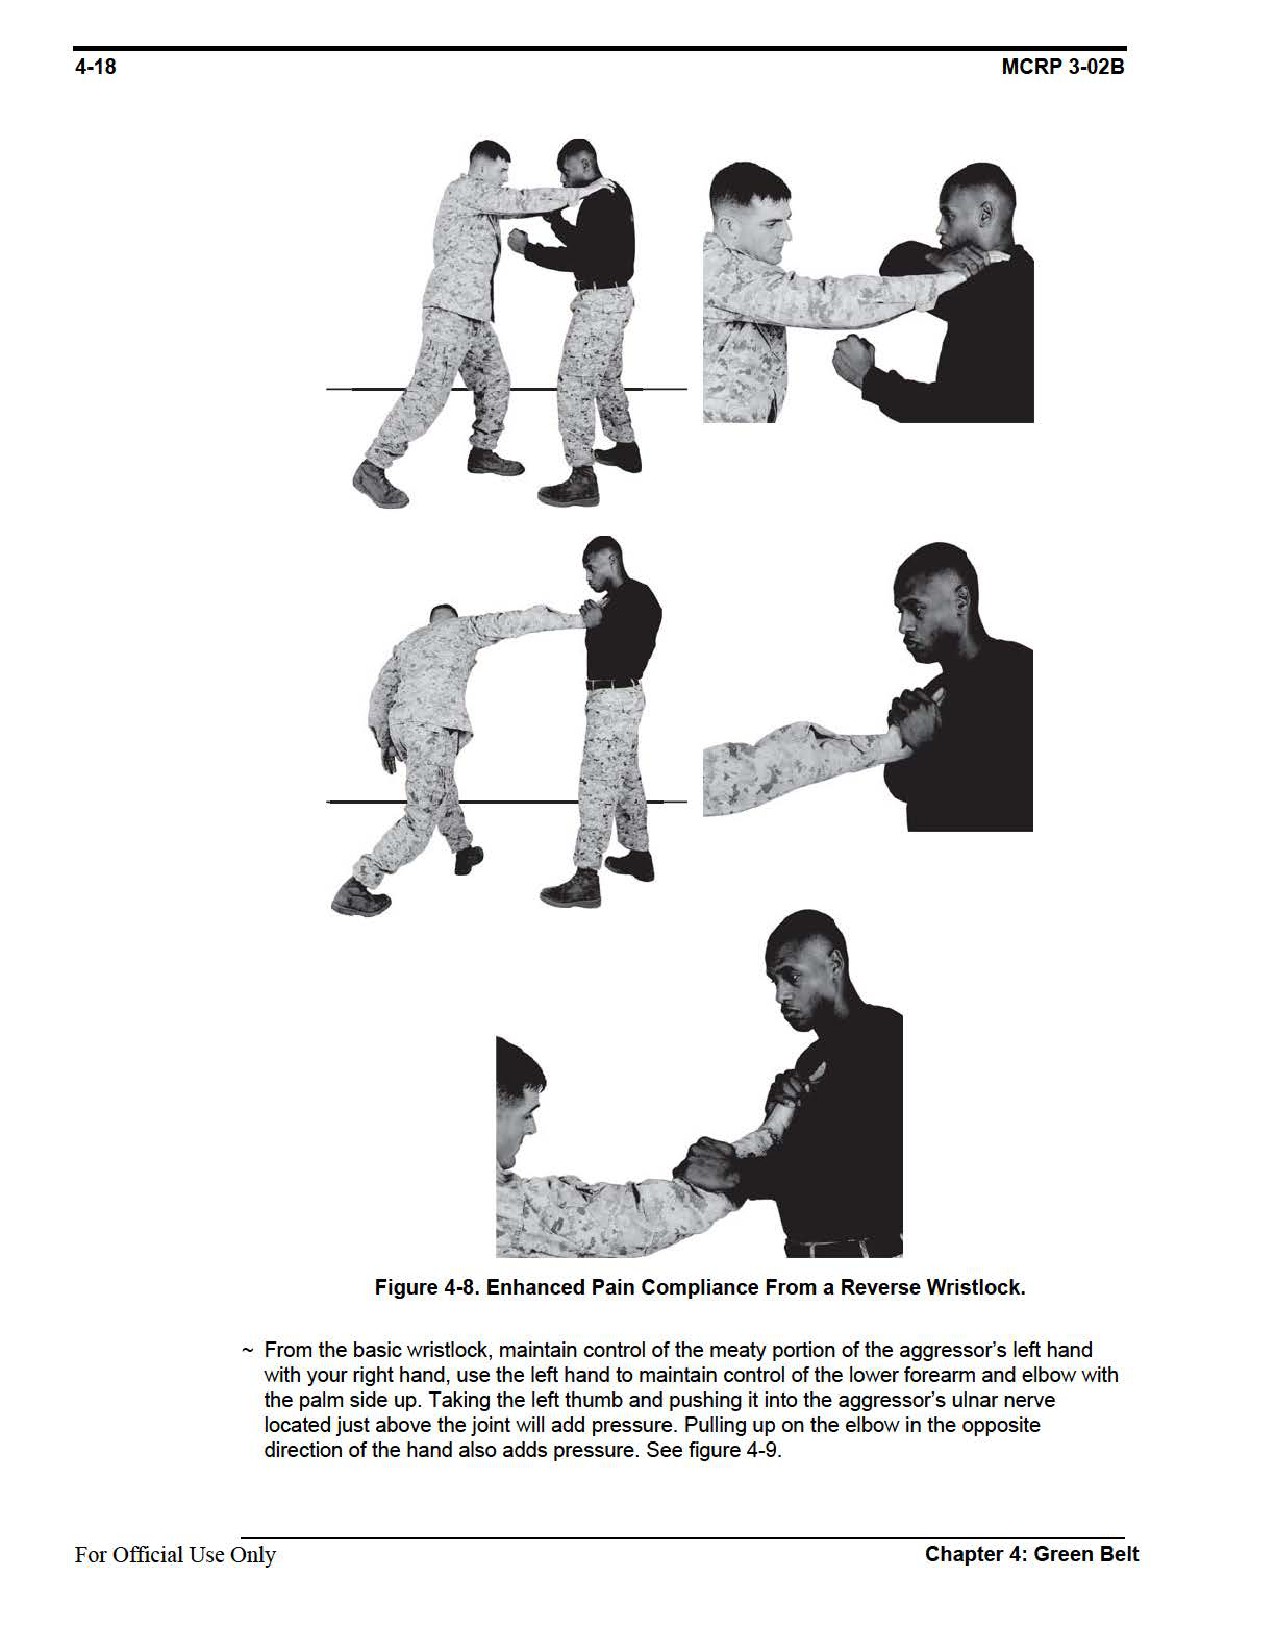
Enhanced Pain Compliance
Applying two points of pain enhances control and leverage while applying a technique.
Technique
~ From a reverse wristlock, continue to control the aggressor’s right hand with your right hand.
Use your left hand to pull down and apply pressure on the aggressor’s radial nerve. When
pressure is added to the radial nerve, do not loosen your right hand’s grip on the reverse
wristlock. See figure 4-8 on page 4-18.
•Pressure can be added to the nerve by moving out and down, in a circular motion.
•It is acceptable to strike with the left hand before grabbing the radial nerve is.
Chapter 4: Green Belt
For Official Use Only
Marine Corps Martial Arts Program
4-19
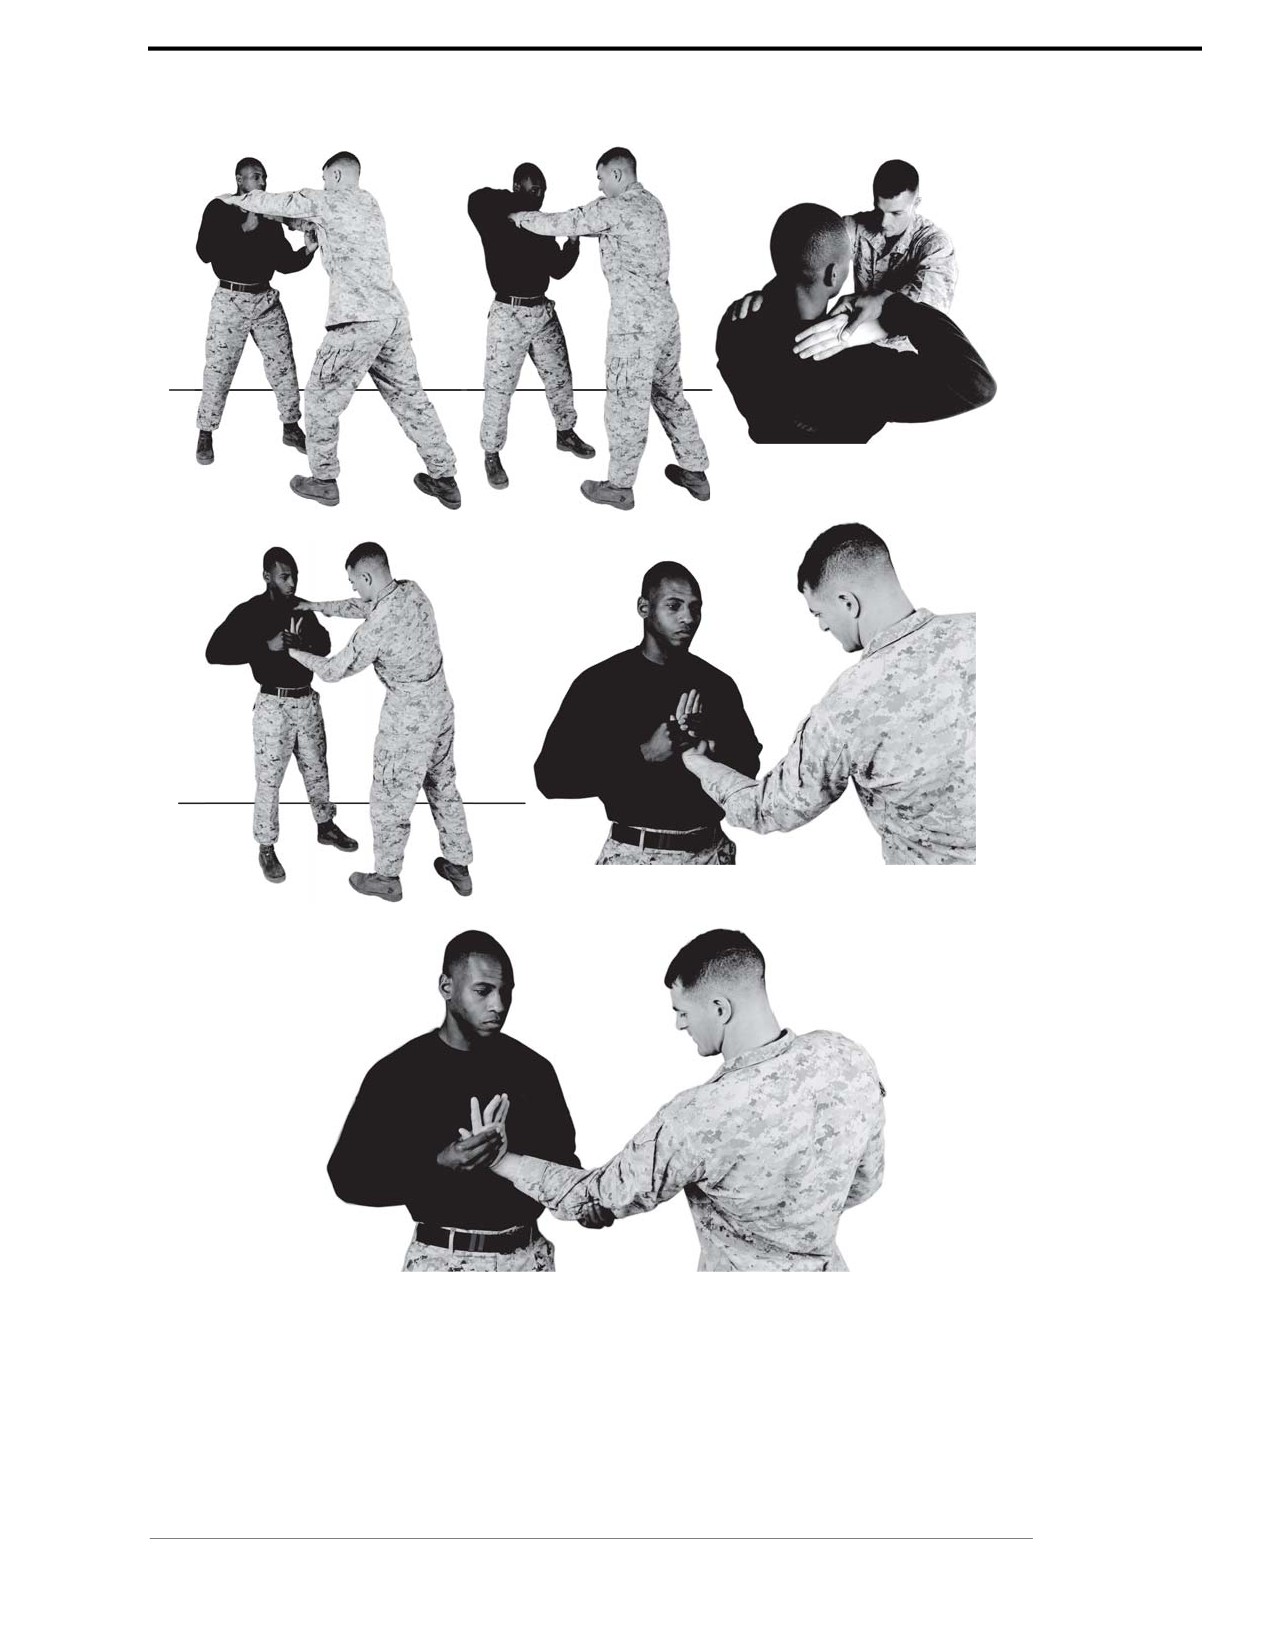
Figure 4-9. Enhanced Pain Compliance from a Basic Wristlock.
Chapter 4: Green Belt
For Official Use Only
4-20
MCRP 3-02B
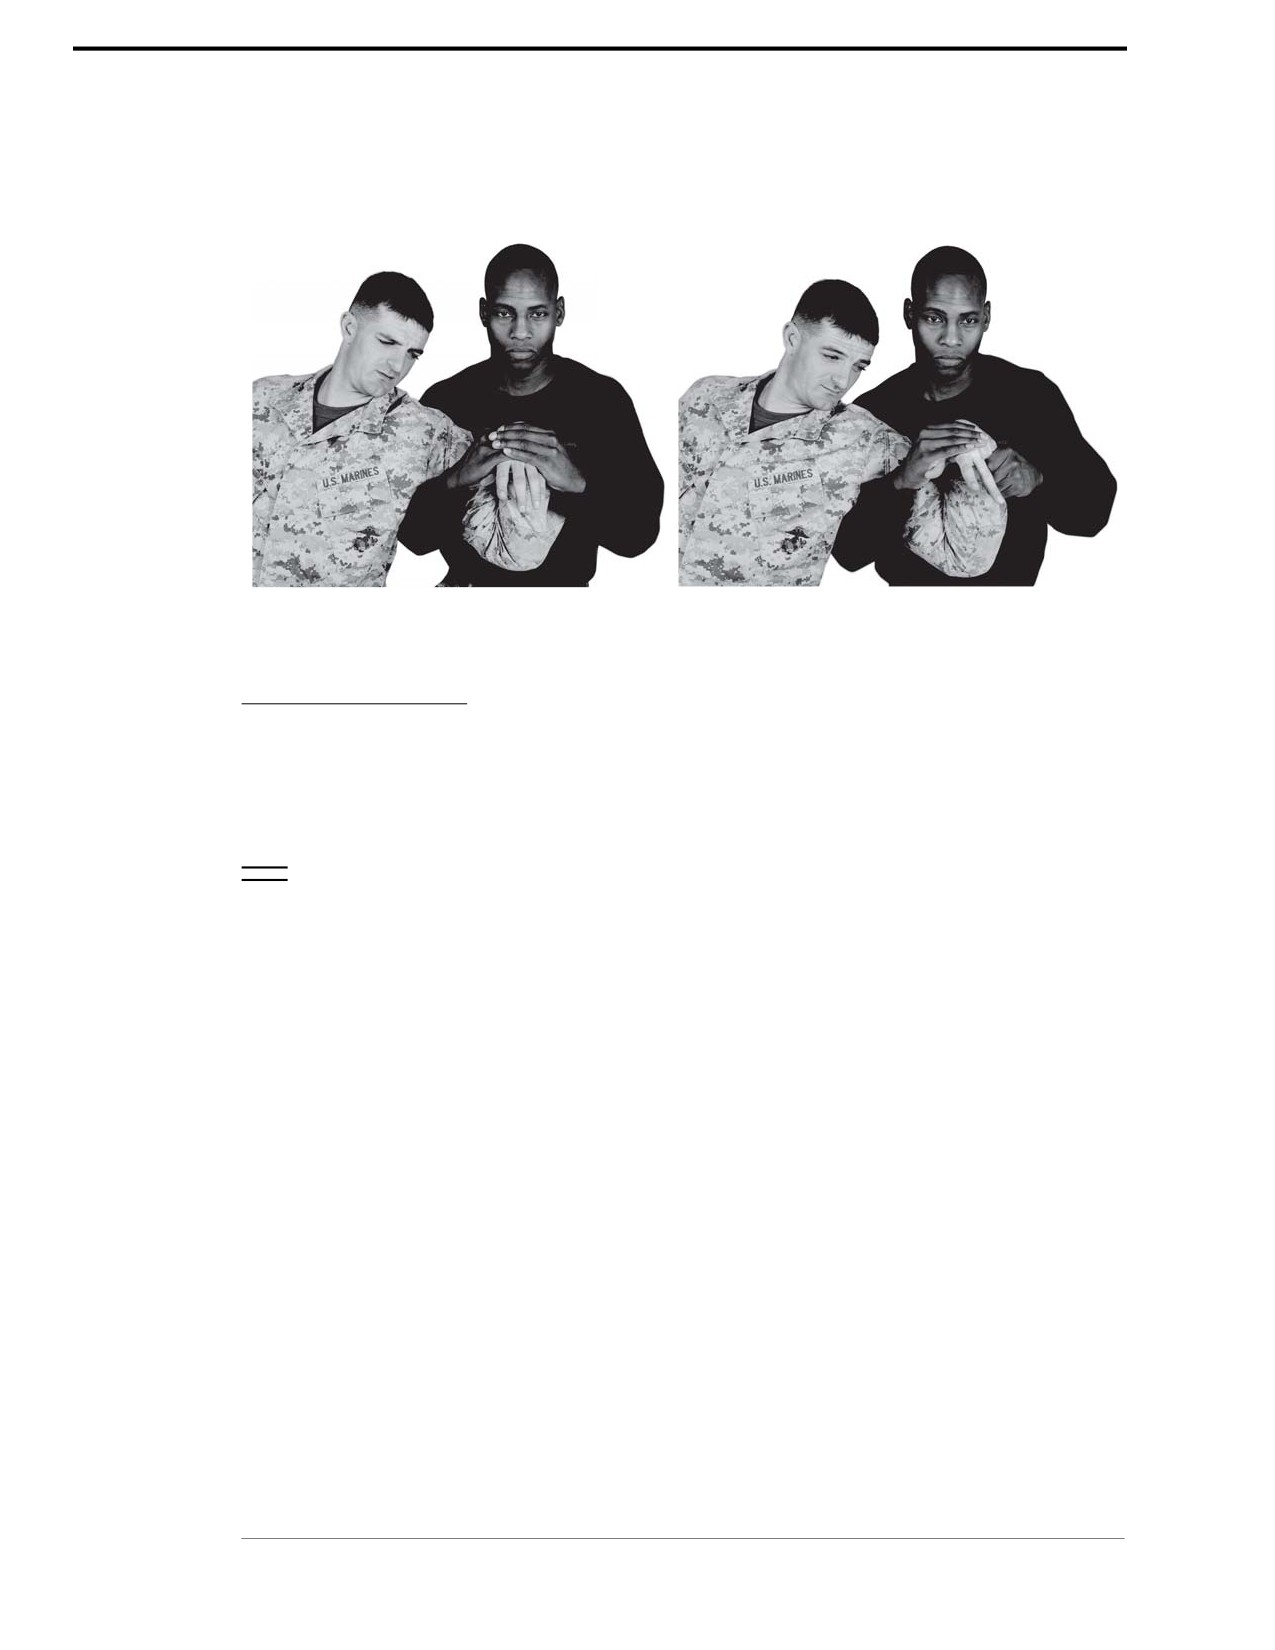
~ From the wristlock come-along, maintain control of the wrist with both hands, and lock the
aggressor’s elbow with the forearms. Apply pressure against the finger joints to bend them
away from each other, splitting the fingers in opposite directions. See figure 4-10.
Figure 4-10. Enhanced Pain
Compliance from a Wristlock Come-Along.
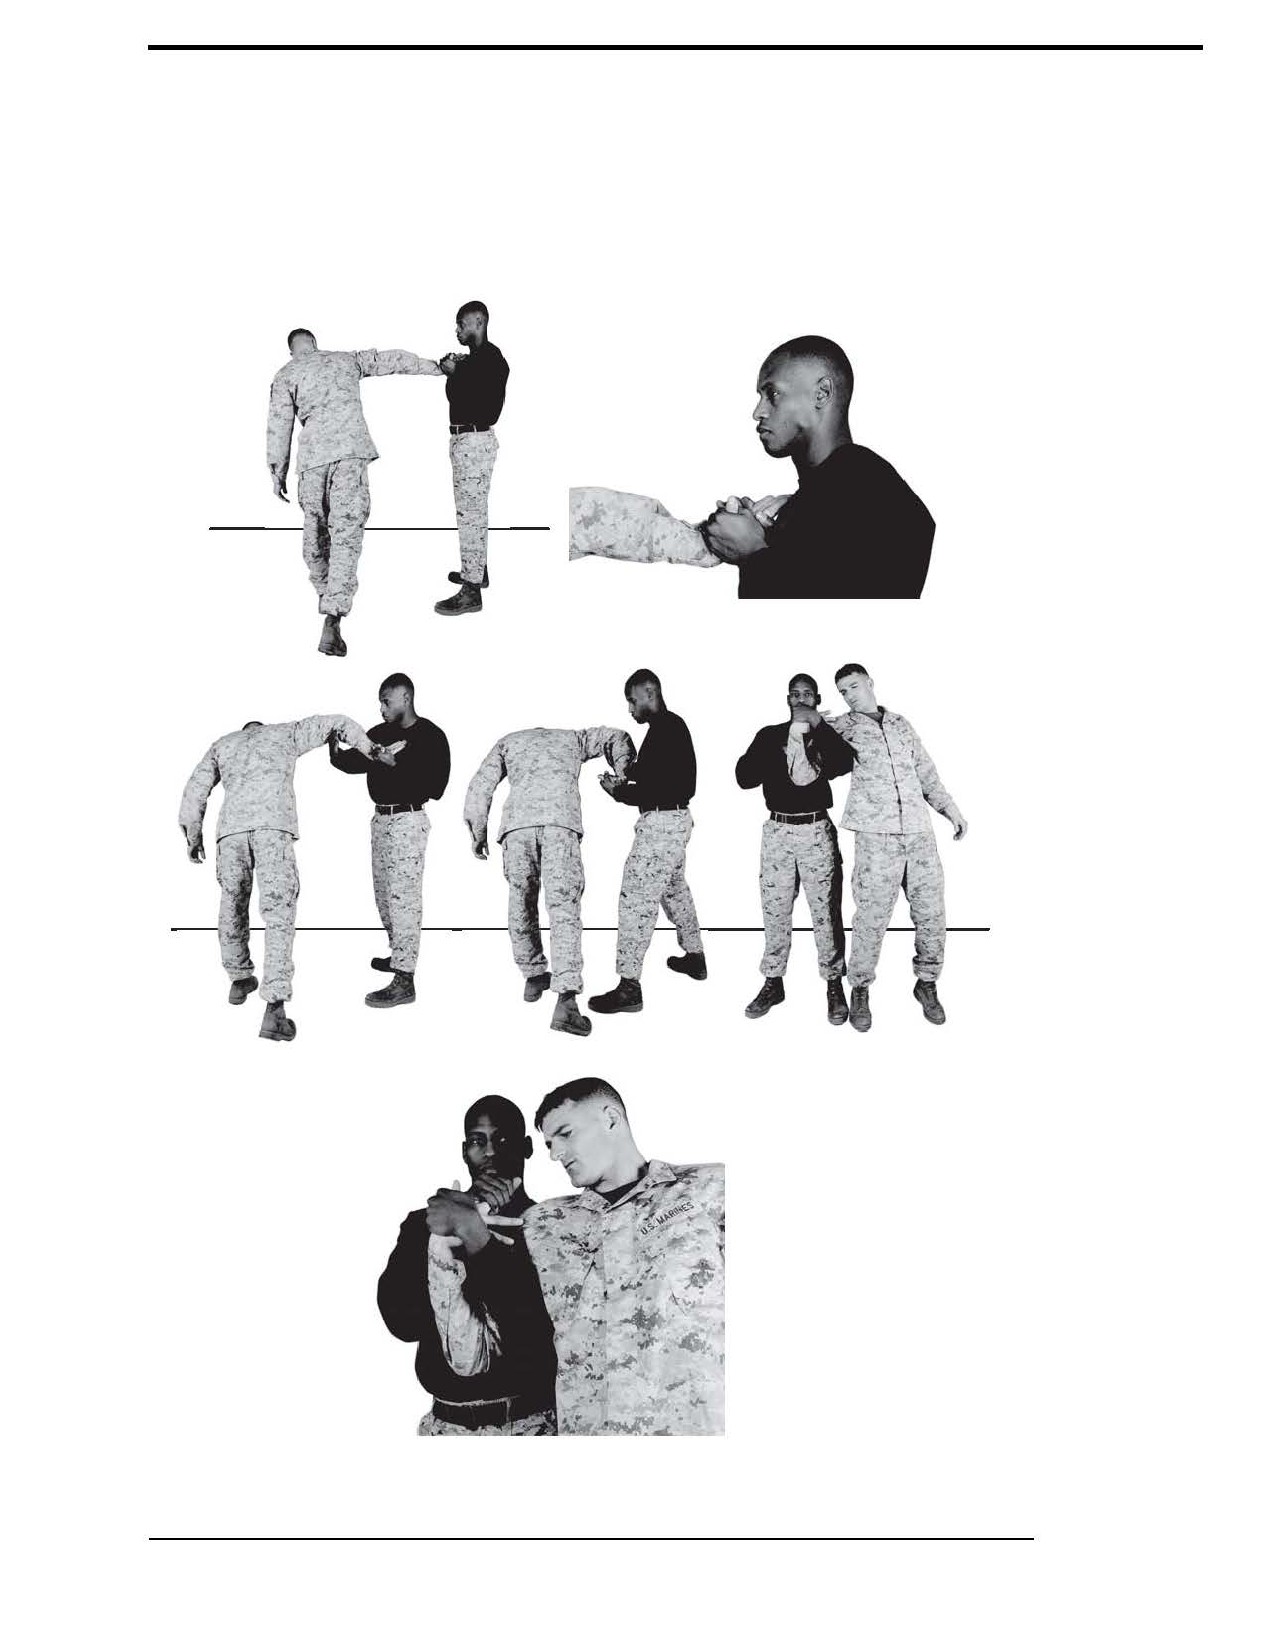
Reverse Wristlock Come-Along
The reverse wristlock come-along is effective when transporting a subject from one location to
another. It can be used as follow-on technique to the reverse wristlock.
Technique
~ With your right hand, execute a reverse wristlock. Instead of stopping the rotation at
90-degrees, continue the rotation until the aggressor’s palm is facing straight up toward
the sky.
~ Ensure you keep the aggressor’s hand close to your chest.
~ With your left hand, grab the meaty portion of the aggressor’s thumb and as much of the
palm as possible.
~ With your right hand, collapse the aggressor’s right arm by applying pressure or striking the
inner portion of his elbow.
~ At the same time step forward with the left foot pivoting on the ball of your right foot so that
you are facing in the same direction as your aggressor.
~ With your right hand pull the aggressor’s elbow to your chest as you bring your left arm high
into your aggressor’s armpit.
~ Maintain upward pressure with your left arm to keep your aggressor off balance.
~ Keep pressure on your aggressor’s wrist by rotating your palm toward you while keeping
downward pressure on the hand to maintain compliance over your aggressor.
~ Your right hand will move on top of the aggressor’s right hand. Keep your elbows tight to
control the aggressor’s arm.
For Official Use Only
Chapter 4: Green Belt
Marine Corps Martial Arts Program
4-21
See figure 4-11.
Note: For enhanced pain compliance release with your right hand and
re-grasp the bottom two fingers on the aggressor’s hand and pull them
down and away from his hand.
Figure 4-11. Reverse Wristlock Come-Along.
Chapter 4: Green Belt
For Official Use Only

4-22
MCRP 3-02B
Controlling Techniques
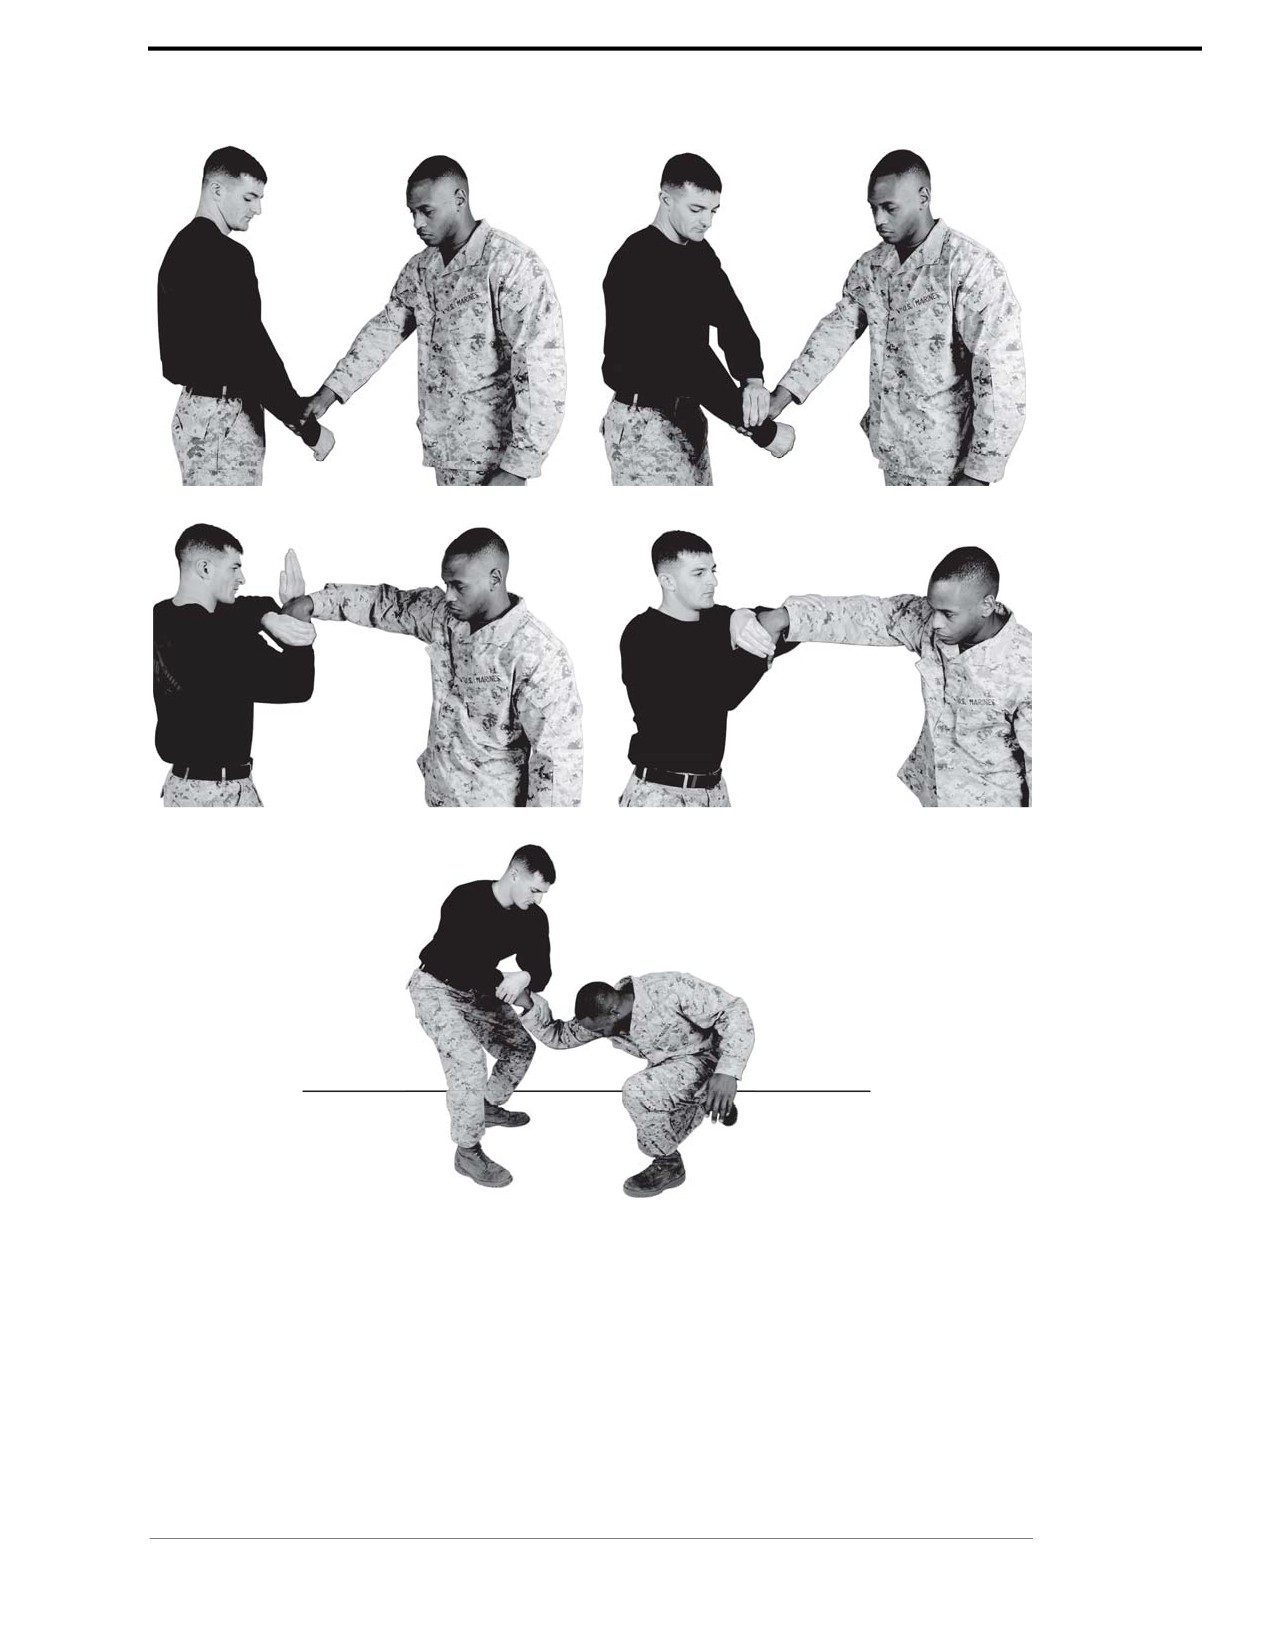
Opposite Side Grab
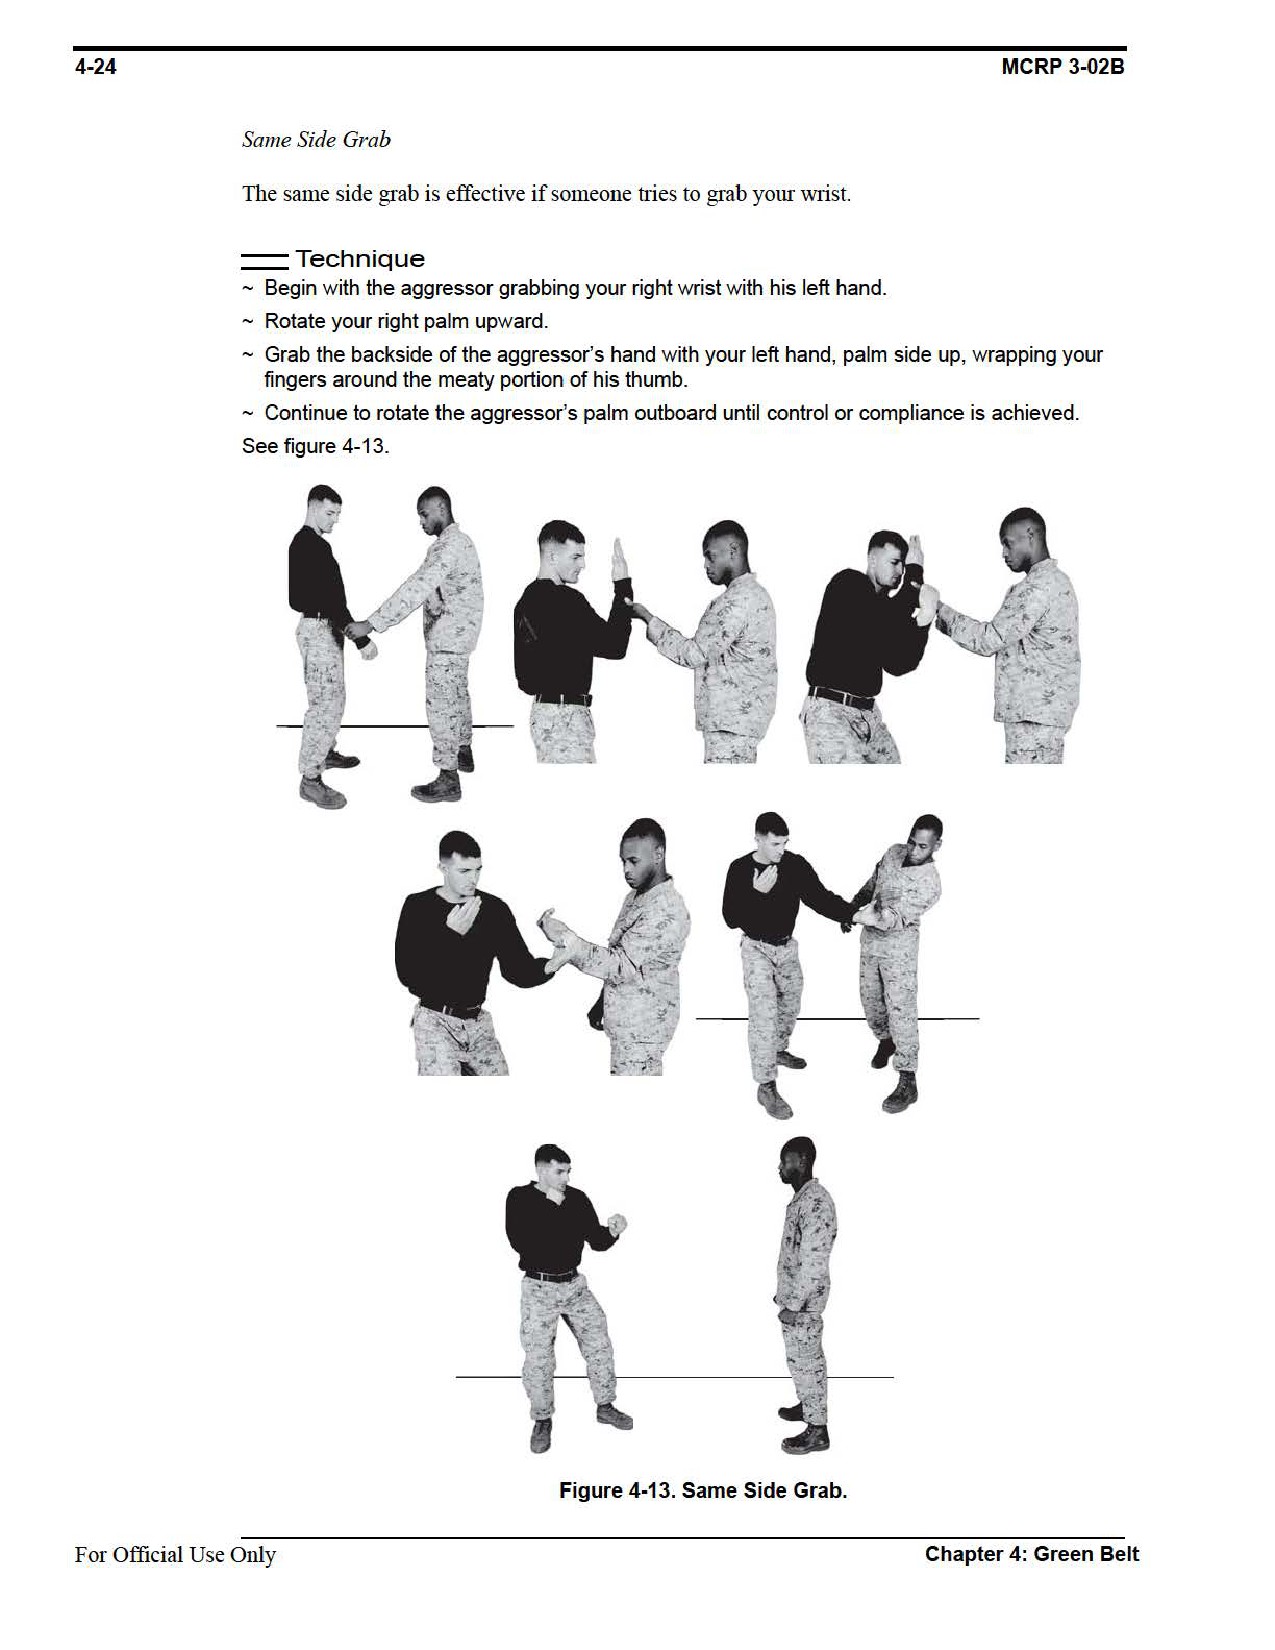
The opposite side grab is effective if someone tries to grab your wrist.
Technique
~ Begin with the aggressor grabbing your right wrist with his right hand.
~ Trap the aggressor’s right hand in place on the right wrist with the palm of your left hand.
~ Rotate your right hand to reach up and grasp the aggressor’s right forearm while maintaining
downward pressure on the aggressors trapped right hand, with your left hand.
~ The target area to grasp on the right forearm is the radial nerve.
~ Apply downward pressure in and down with both hands until the aggressor is forced to one
knee and is effectively controlled.
See figure 4-12.
For Official Use Only
Chapter 4: Green Belt
Marine Corps Martial Arts Program
4-23
Figure 4-12. Opposite Side Grab.
Chapter 4: Green Belt
For Official Use Only
Marine Corps Martial Arts Program
4-25
Section VII
Knife Techniques
The purpose of knife techniques is to cause enough damage and massive trauma to stop an
aggressor by properly executing a counter knife strike from a vertical attack and a forward strike.
Refer to appendix A for corresponding safeties 1, 2, 6, 8, 9, 10, and 13.
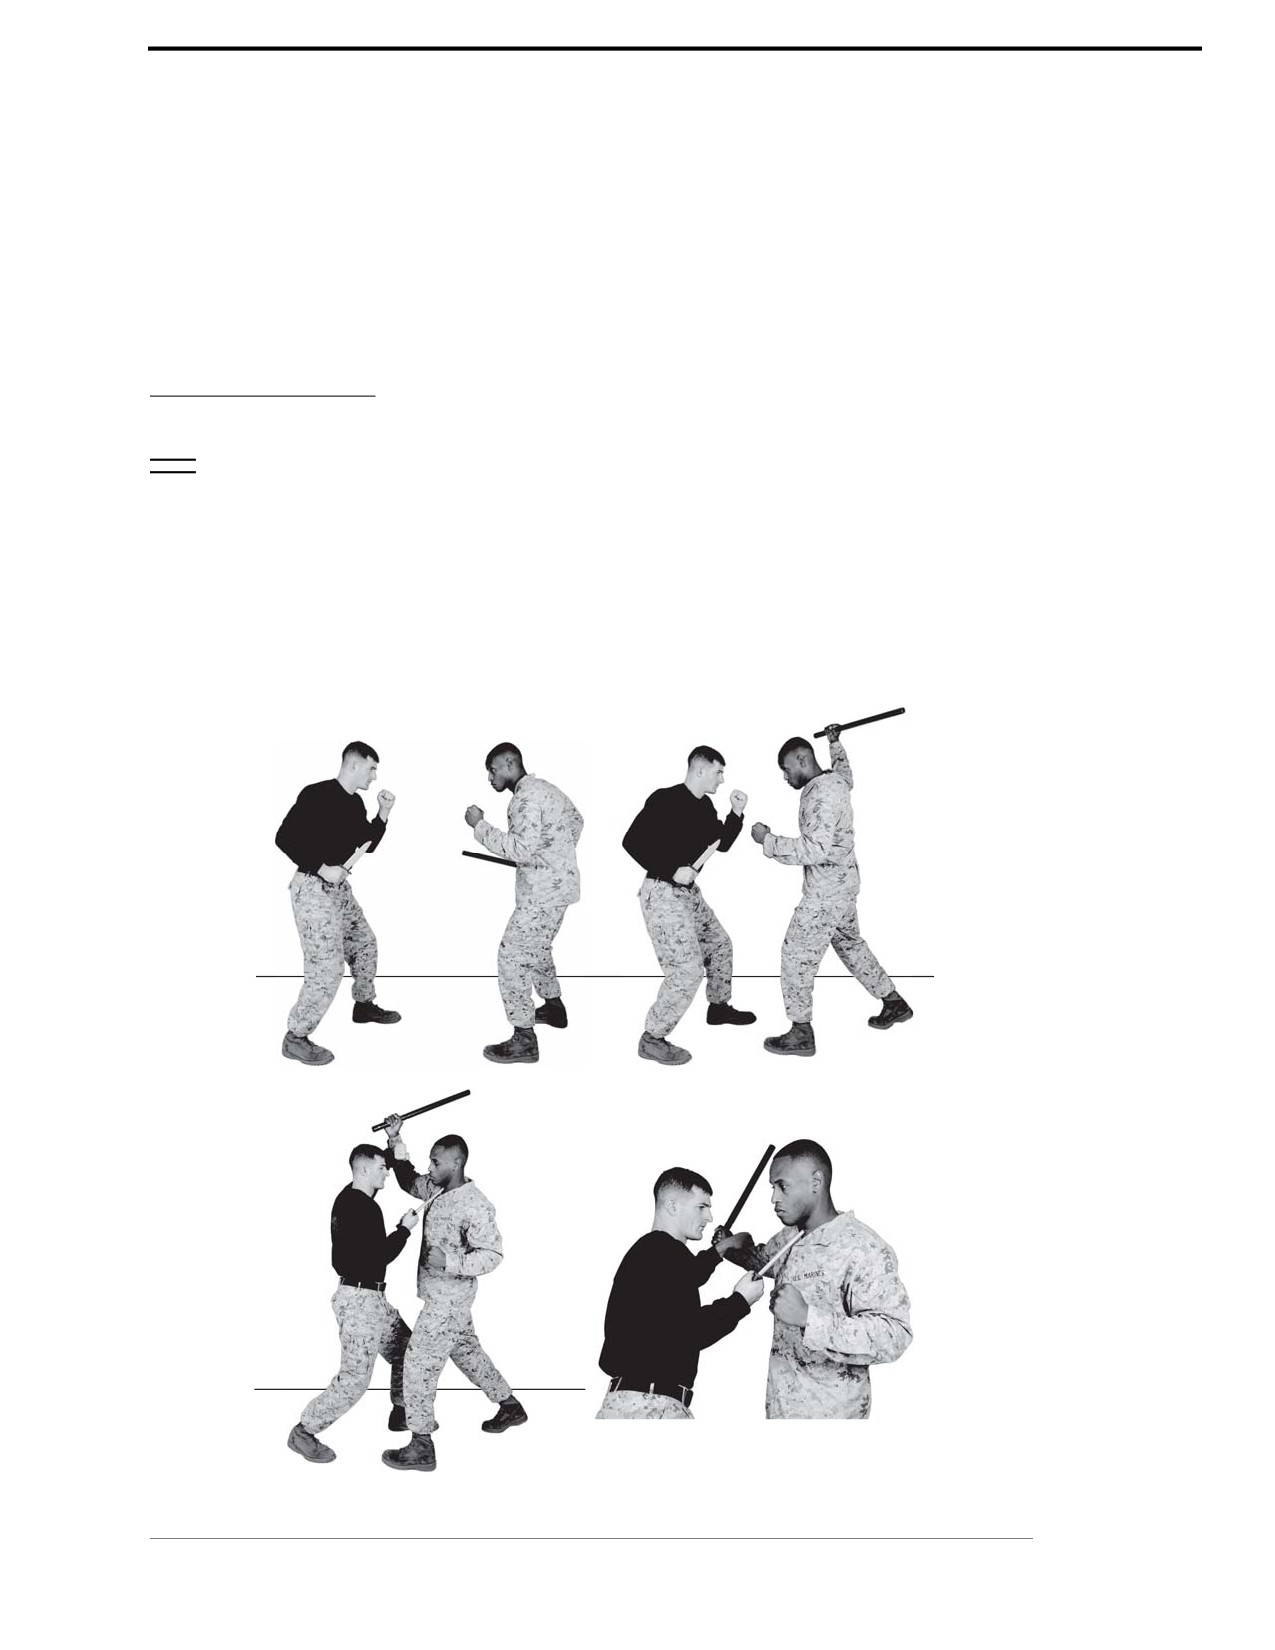
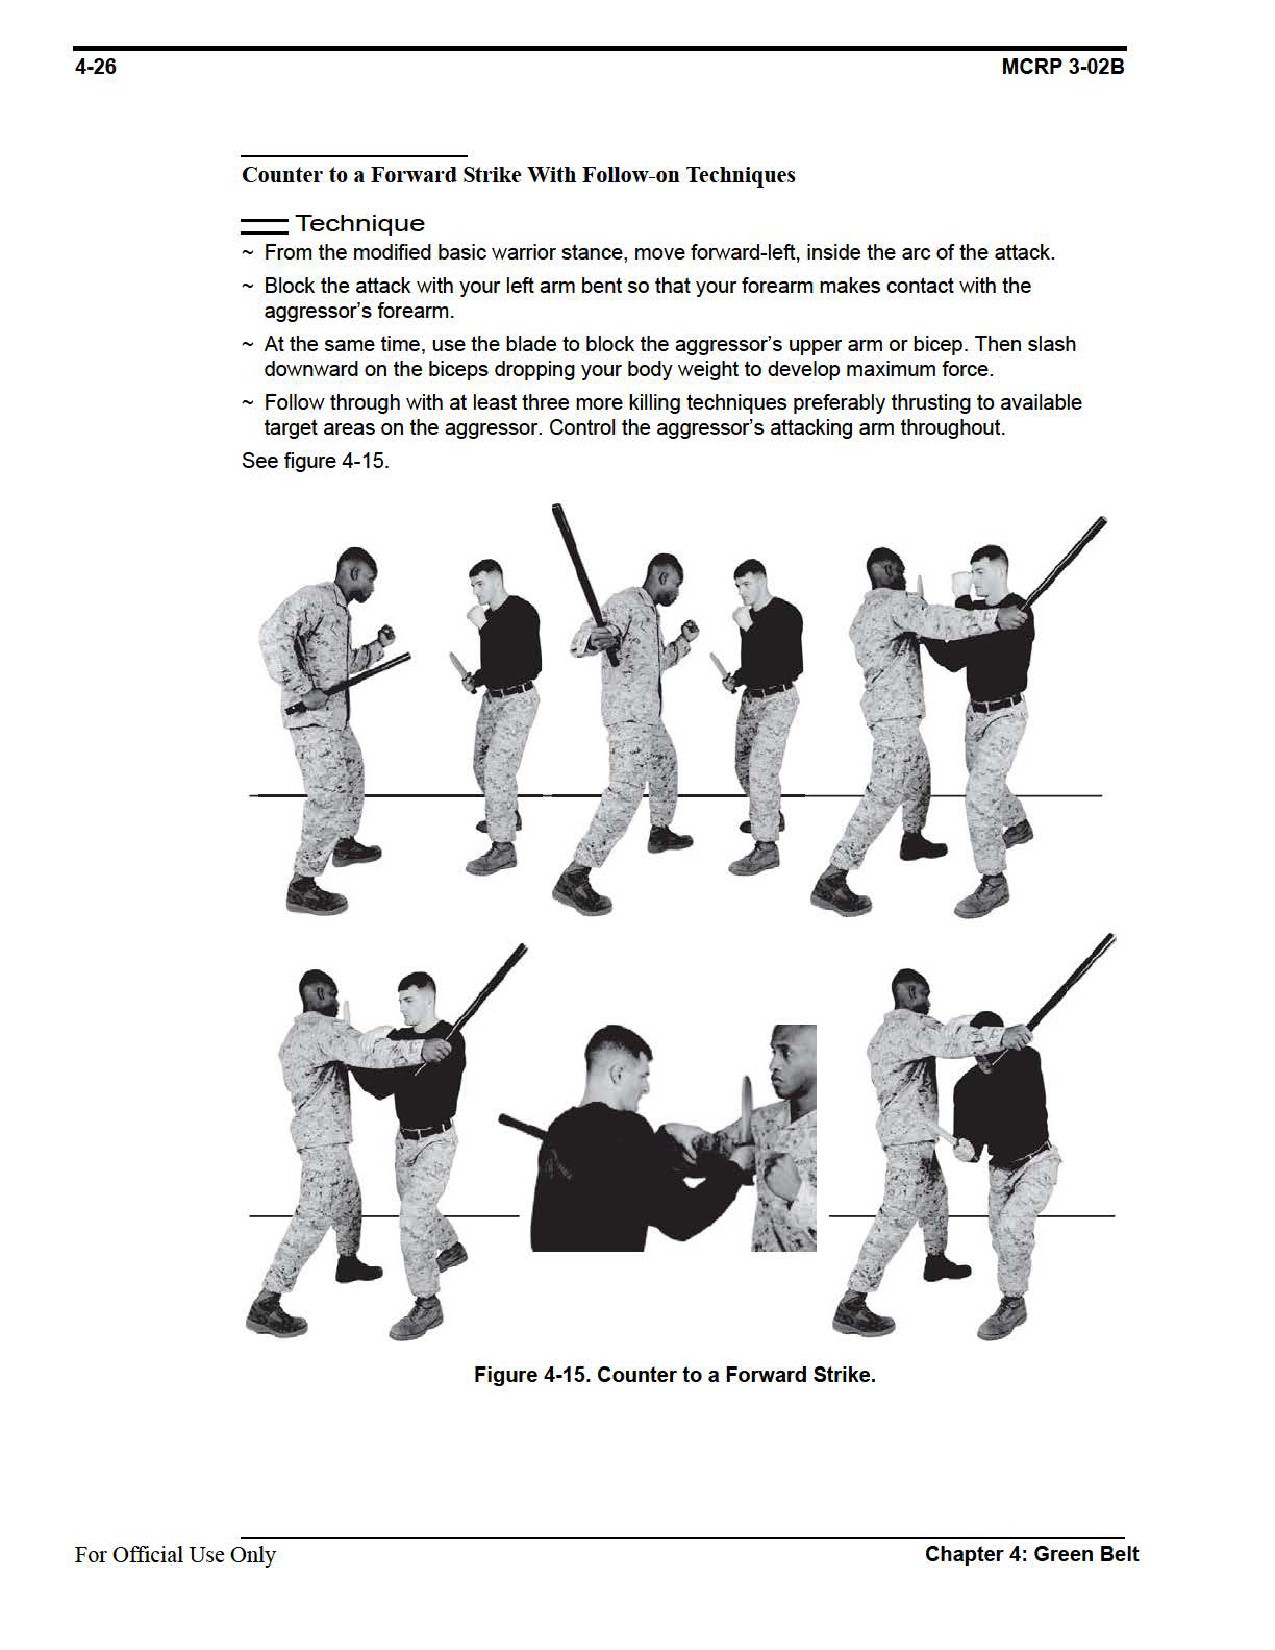
Counter to a Vertical Strike With Follow-on Techniques
Technique
~ From the modified basic warrior stance, move forward, inside the arc of attack.
~ Block the attack, over and in front of your head, with your left arm. The arm is bent so that
your forearm makes contact with the aggressor’s forearm.
~ At the same time execute a vertical thrust into the aggressor’s neck and follow through with
at least three more killing techniques, preferably thrusting to available target areas. Control
the aggressor’s attacking arm throughout.
See figure 4-14.
Figure 4-14. Counter to a Vertical Strike.
Chapter 4: Green Belt
For Official Use Only

Marine Corps Martial Arts Program
4-27
Section VIII
Weapons of Opportunity
The purpose of weapons of opportunity is to enable each individual Marine to be creative and
utilize any object on the battlefield in order to inflict maximum damage to the aggressor. A
Marine should be ready and able to use anything around him to serve as a weapon. This may
mean throwing sand or liquid in an aggressor’s eyes to temporarily impair his vision or execut-
ing blocks: the block for a vertical strike, the block for a forward strike, the block for a reverse
strike, and the block for a straight thrust. Weapons of opportunity blocks are effective when you
are blocking attacks and the aggressor is using a weapon of opportunity. In any given confronta-
tion, a Marine must use whatever it takes to win and move on to the next aggressor.
Refer to appendix A for corresponding safeties 1, 2, 3, 4, and 14.
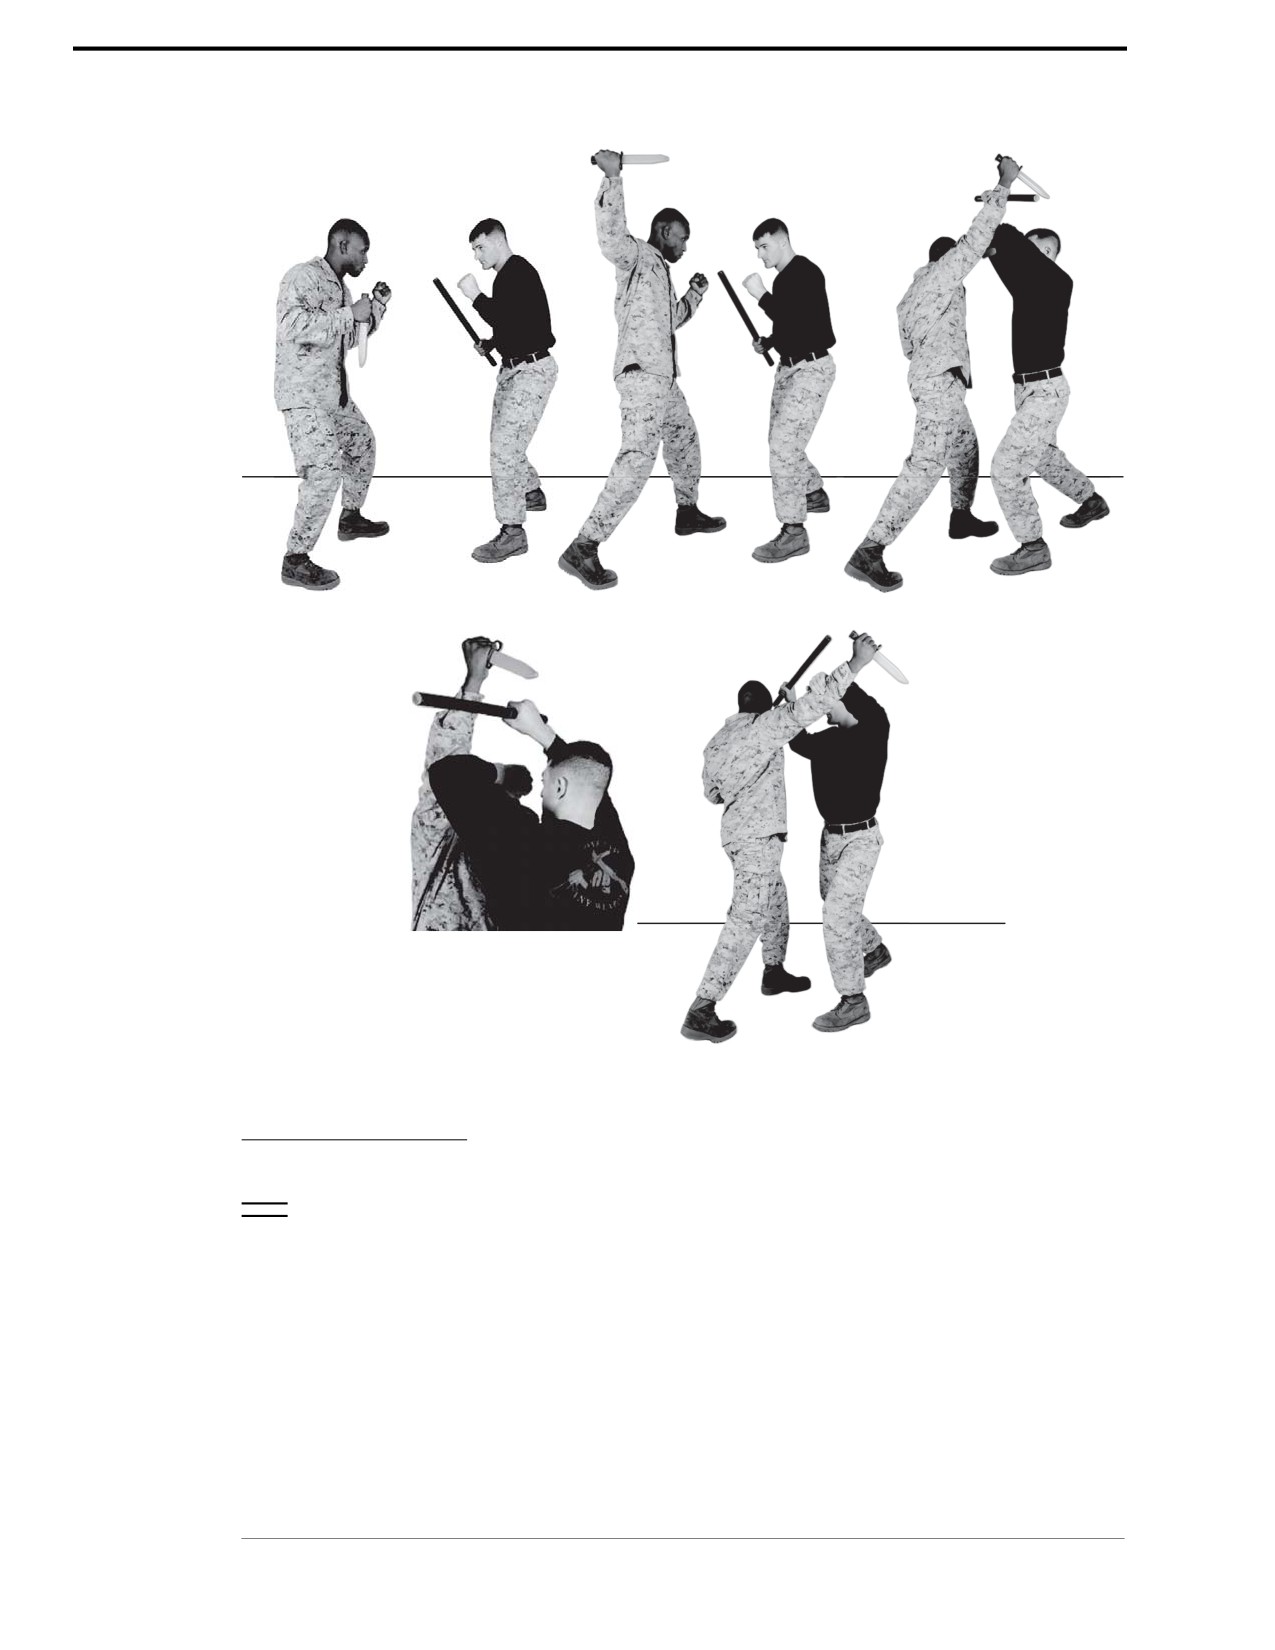
Block for a Vertical Strike With Follow-on Strikes
All blocks being taught in this lesson will begin from the one-handed carry or two-handed carry.
When the aggressor has a weapon, blocks are executed with your weapon.
Technique
~ Begin in the modified basic warrior stance with a one-handed grip. The aggressor extends his
right hand in a vertical attack.
~ Move forward to get your body inside the arc of attack. This movement gets you inside the
aggressor’s strike and his generated power. When you step in forcefully, you prevent the
aggressor from developing power in his swing and you stop his momentum.
~ Block the aggressor’s weapon by making two points of contact to disperse the impact of
the attack.
~ Block the aggressor’s weapon by positioning your weapon so it is perpendicular to the
aggressor’s weapon. If your weapon is not perpendicular to the aggressor’s weapon, the
aggressor’s weapon can slide through and make contact on you.
~ With the muscular portion of your left forearm, block the aggressor’s wrist or forearm with two
points of contact. Control the arm with your left arm or grip the arm with your hand to
maintain control.
~ If you are closer to the aggressor, use your weapon to block the aggressor’s arm. It is the
same movement, except now you block the aggressor’s arm with both your weapon and
your arm.
~ Follow up with strikes to lethal target areas on the aggressor.
See figure 4-16 on page 4-28.
Chapter 4: Green Belt
For Official Use Only
4-28
MCRP 3-02B
Figure 4-16. Block for a Vertical Strike.
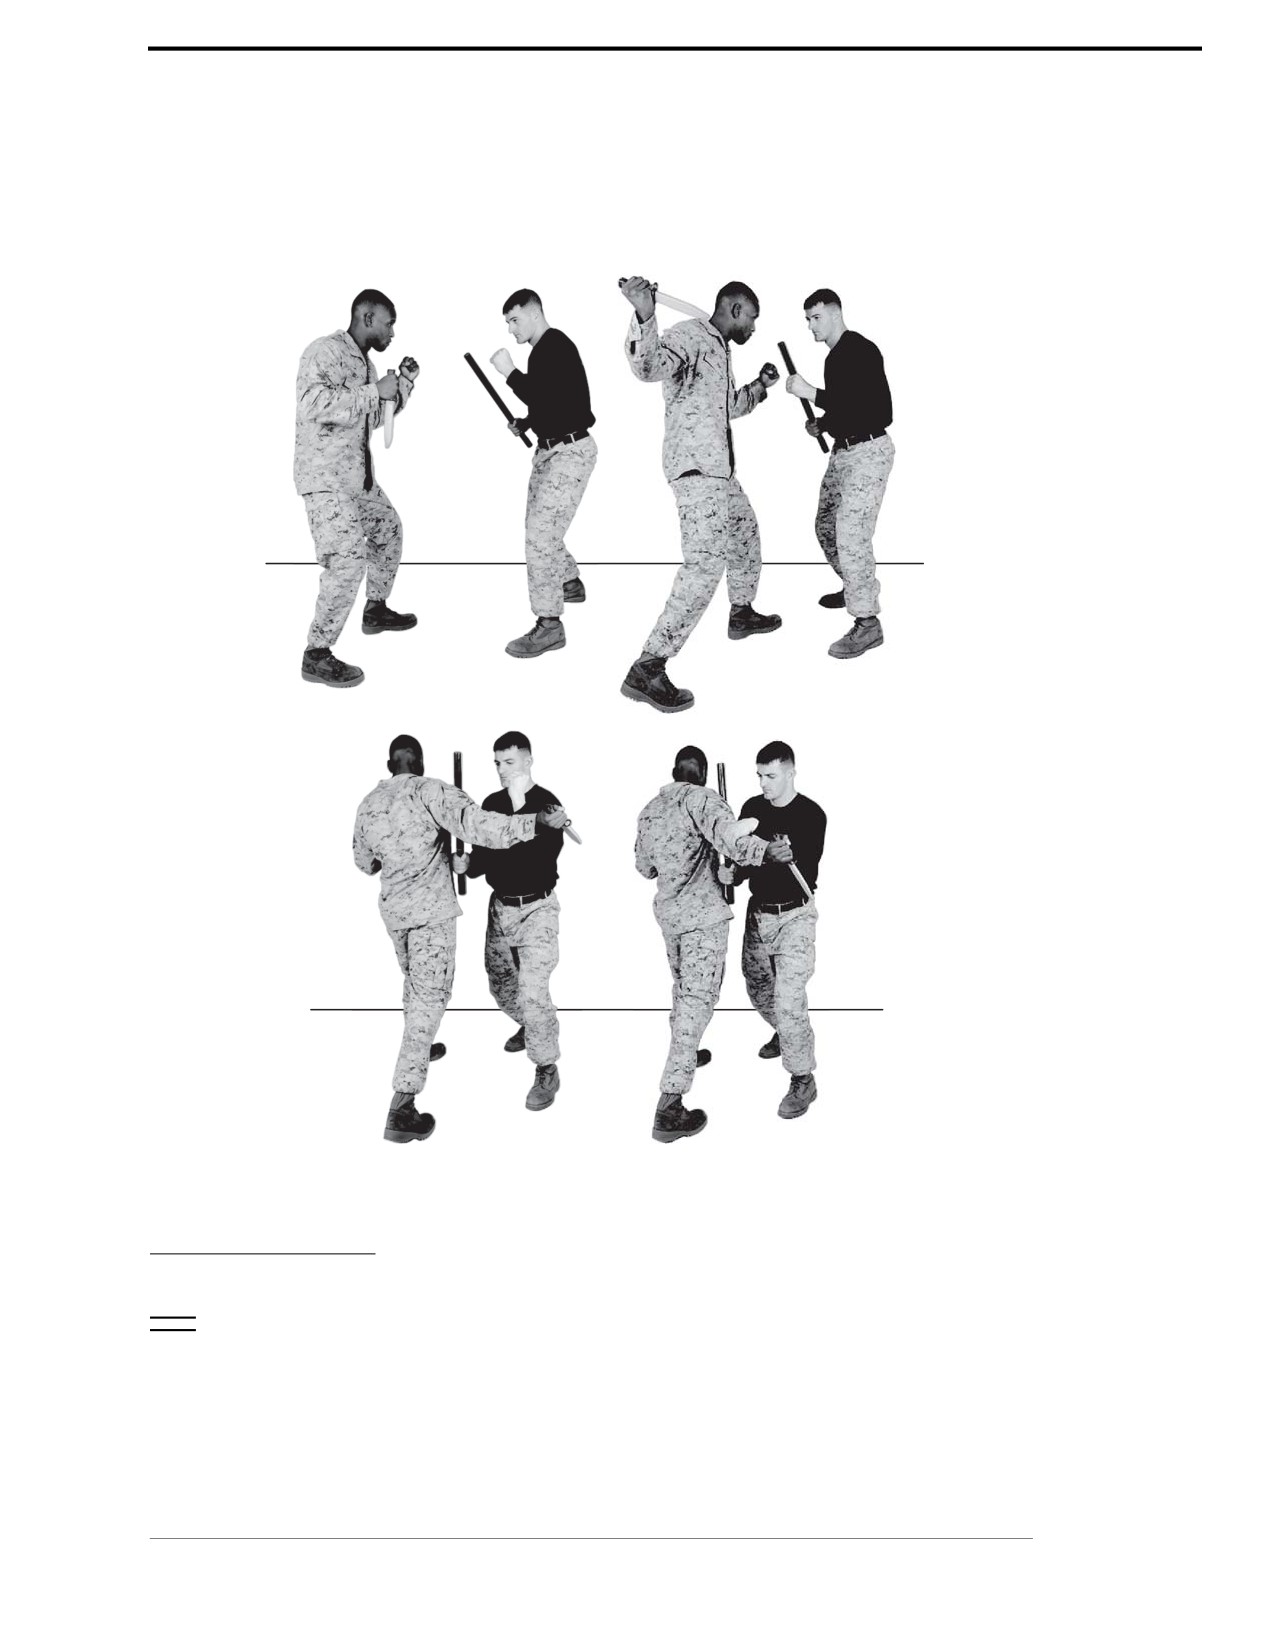
Block for a Forward Strike With Follow-on Strikes
Technique
~ Begin in the modified basic warrior stance with a one-handed carry. The aggressor extends
his right hand in a forward strike.
~ Move forward-left to get your body inside the arc of the attack.
~ To disperse the impact of the attack, block with two points of contact. Block the aggressor’s
wrist or forearm with the meaty portion of your left forearm and maintain control of the arm.
~ Strike the aggressor’s attacking biceps with your weapon.
For Official Use Only
Chapter 4: Green Belt
Marine Corps Martial Arts Program
4-29
~ Control the arm with your left arm or grip the arm with your hand to maintain control.
~ Follow up with strikes to lethal target areas.
See figure 4-17.
Figure 4-17. Block for a Forward Strike.
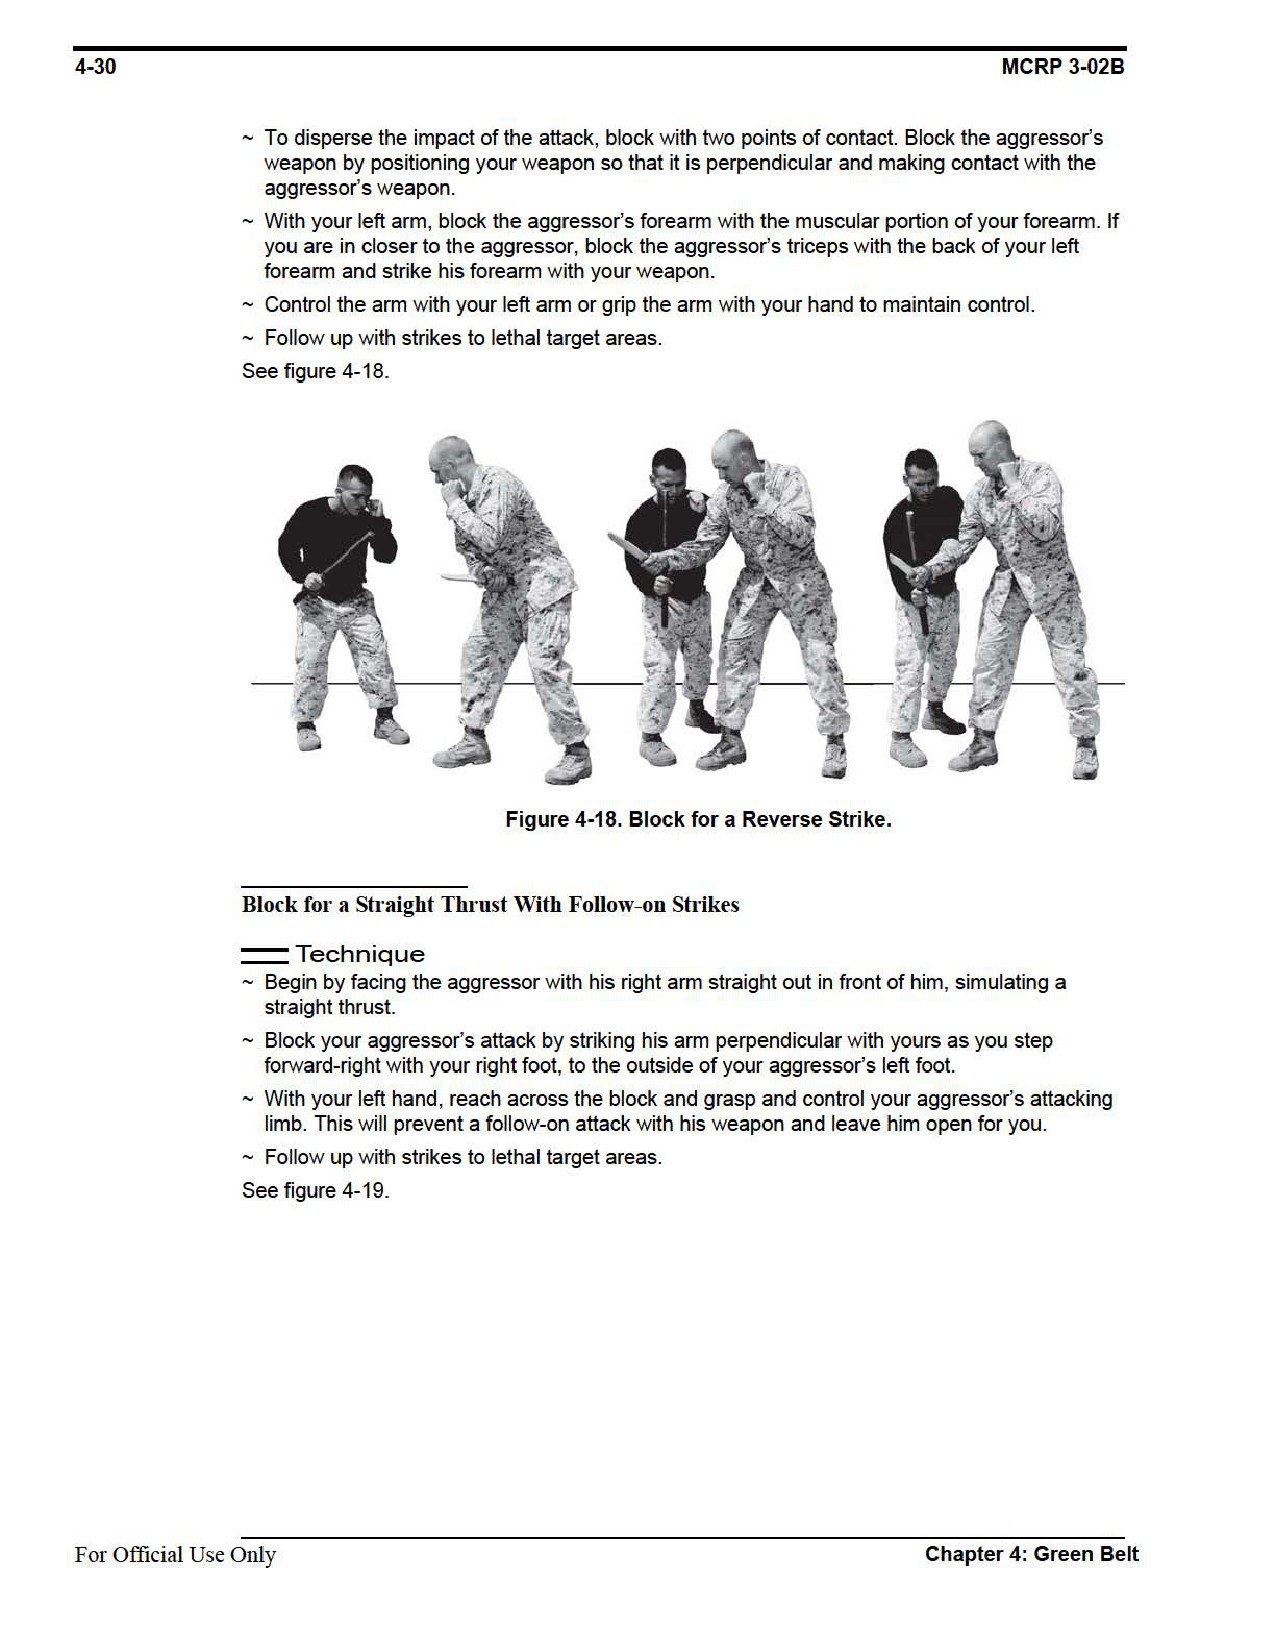
Block for a Reverse Strike With Follow-on Strikes
Technique
~ Begin in the modified basic warrior stance with a one-handed carry. The aggressor extends
his right hand in a reverse strike.
~ Move forward-right to get your body inside the arc of the attack.
Chapter 4: Green Belt
For Official Use Only
Marine Corps Martial Arts Program
4-31
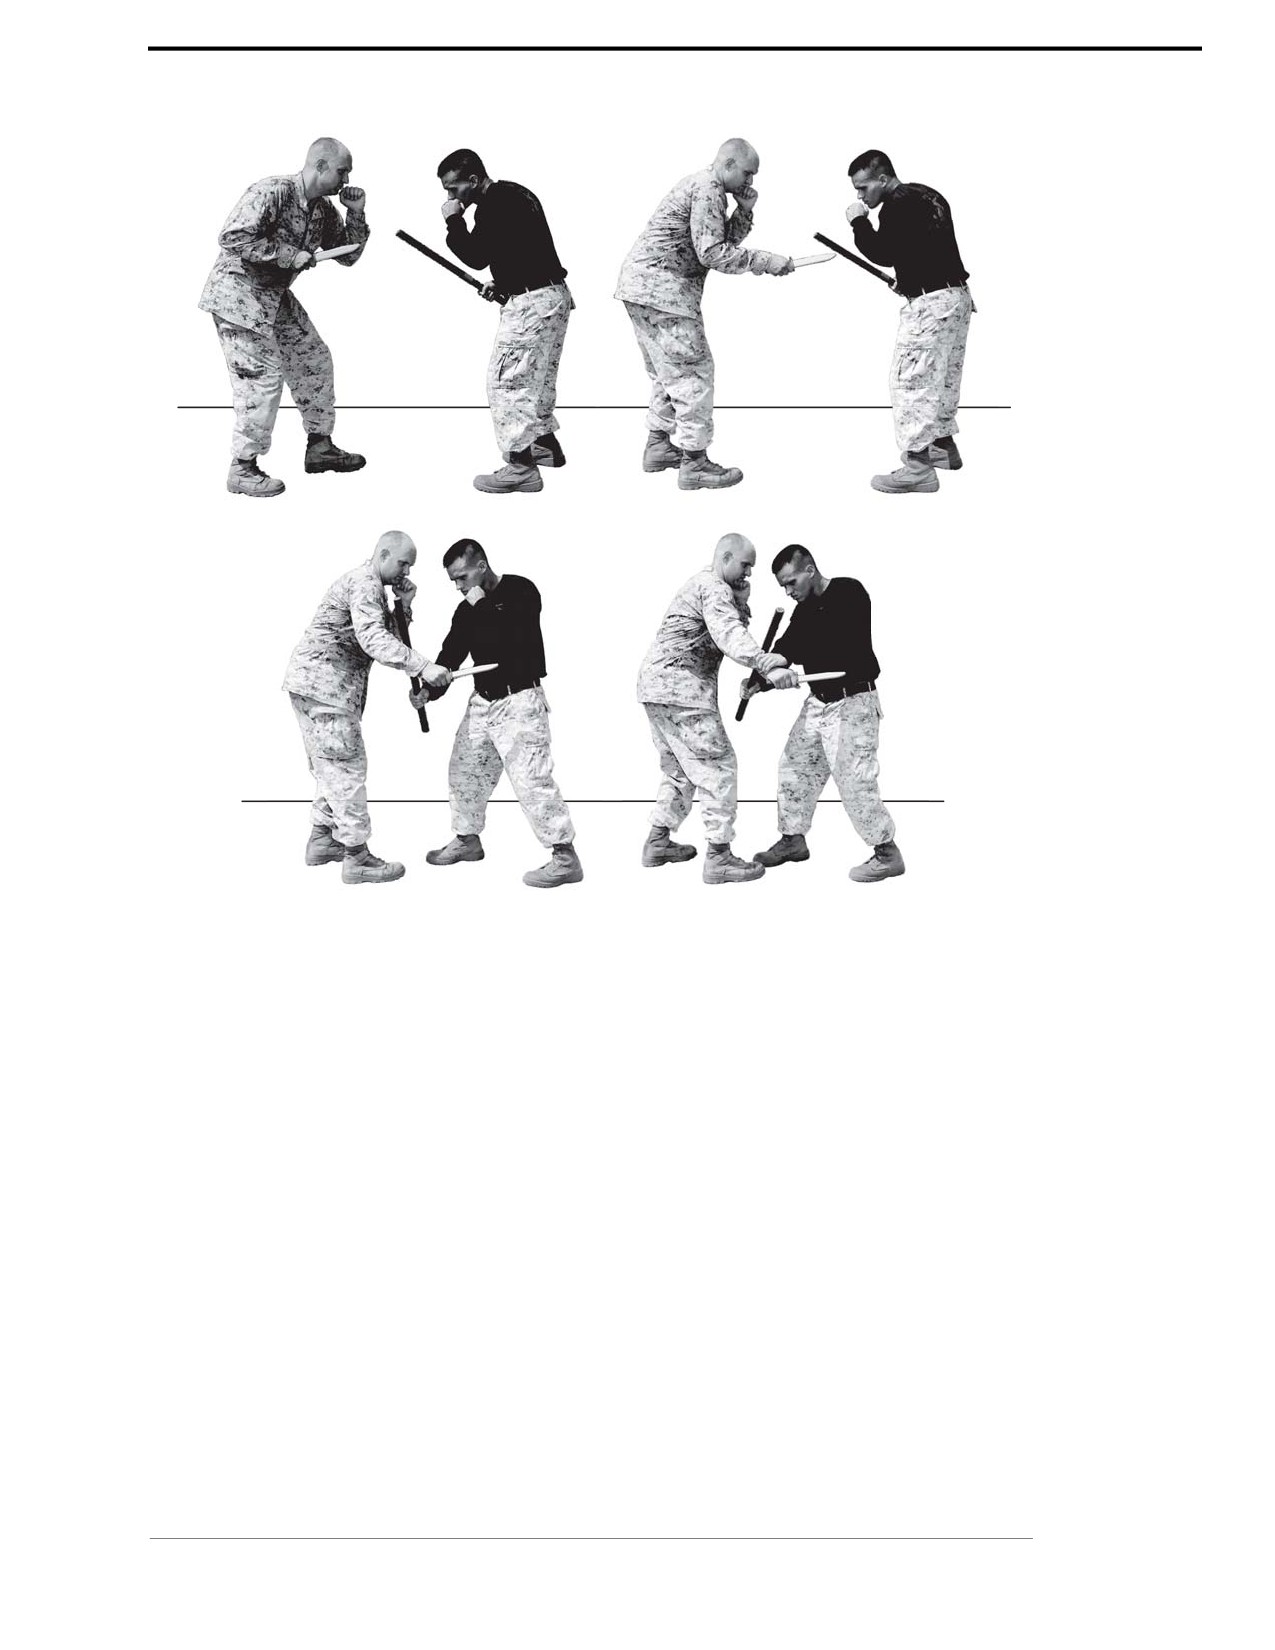
Figure 4-19. Block for a Straight Thrust with Follow-on Strikes.
Chapter 4: Green Belt
For Official Use Only

4-32
MCRP 3-02B
Section IX
Ground Fighting
In any close combat situation, the fight may end up on the ground. The purpose of ground
fighting techniques is to allow you to return to your feet as quickly as possible and regain the
tactical advantage. Techniques that can be used in ground fighting are the armbar from the mount
position and the armbar position from the guard position.
Refer to appendix A for corresponding safeties 1, 2, 6, and 10.
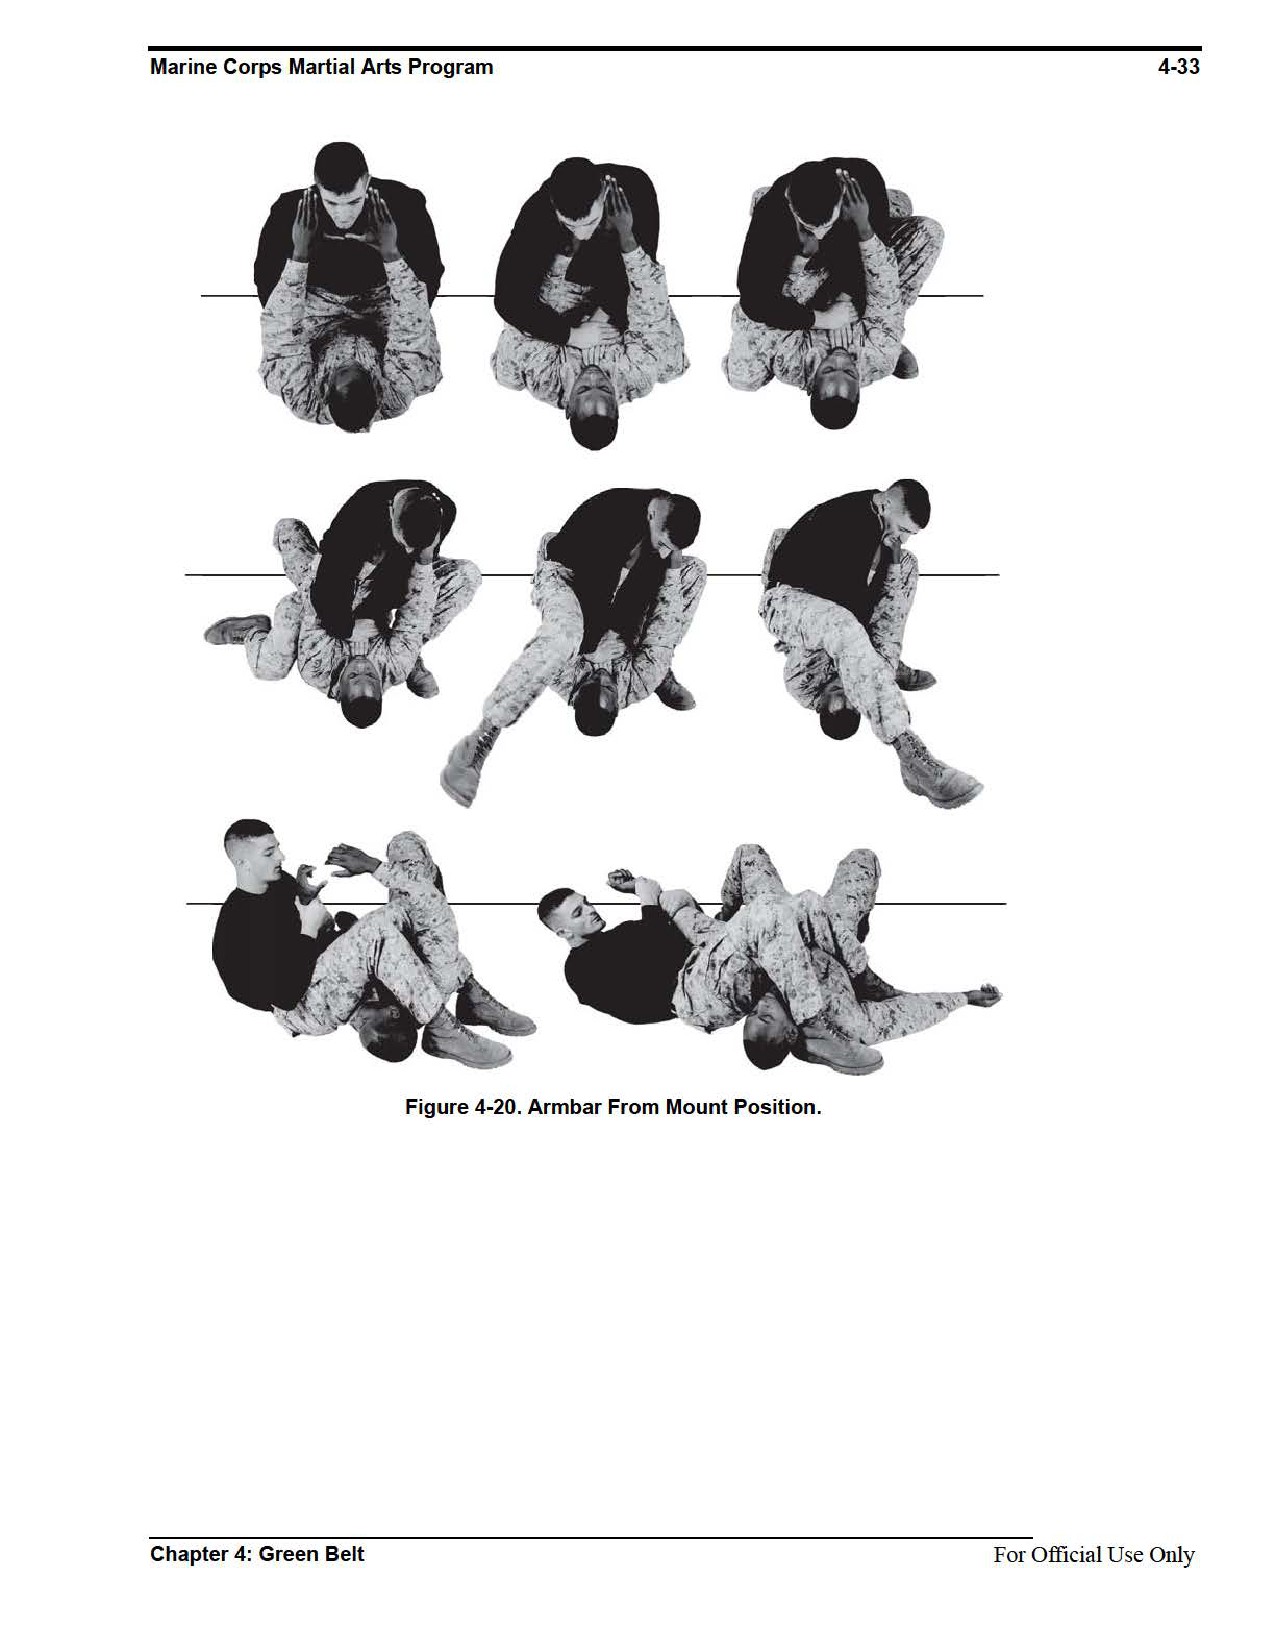
Armbar From Mount Position
The armbar from the mount position is effective for causing damage to an aggressor’s arm pro-
viding you with a tactical advantage and allowing you to get on your feet.
Technique
~ Begin with the aggressor on his back, on the ground.
~ Sit astride on the aggressor’s abdomen. Both legs are bent, with your knees touching the
ground. Use your weight and hips to control your aggressor. Keeping all of your weight on
your knees makes it easier for the aggressor to maneuver and escape.
~ The aggressor attempts to choke or push you off of him with straight arms.
~ Place both palms in the center of the aggressor’s chest. Your right arm will weave over the
aggressor’s left arm and your left arm under his right arm. Post the majority of your weight on
your two hands pinning the aggressor to the ground.
~ Keep your right hip/upper, inside thigh in constant contact with your aggressor’s body,
creating pressure on the aggressor’s left triceps. Turn your body to face left and swing your
right leg over the aggressor’s head.
~ Pull your feet in toward your buttocks to trap his body and pinch your knees together to trap
his arm, hug his left arm to your chest and sit back with your upper body to straighten and
lock out the aggressor’s arm.
~ Maintain pressure against the aggressor’s neck with the back of your right foot and against
his side with your left foot underneath his armpit. Your legs are on either side of the
aggressor’s left arm. Use your hips to make pressure into the aggressor’s elbow in the
direction of his left pinky. Your aggressor’s left palm should be facing the sky.
~ Falling back quickly and thrusting your hips up strongly against the aggressor’s elbow can
break or dislocate the aggressor’s elbow. It is important to do this slowly in training in order
to give your training partner an opportunity to tap out and avoid injury. The aggressor will
tap out by tapping on the deck three times, on himself three times, or by verbally saying
tap-tap-tap.
~ Return to your feet, gaining the tactical advantage. You can follow-on with controlling
techniques to lethal force depending on the temper and intent of your adversary.
See figure 4-20.
For Official Use Only
Chapter 4: Green Belt

4-34
MCRP 3-02B
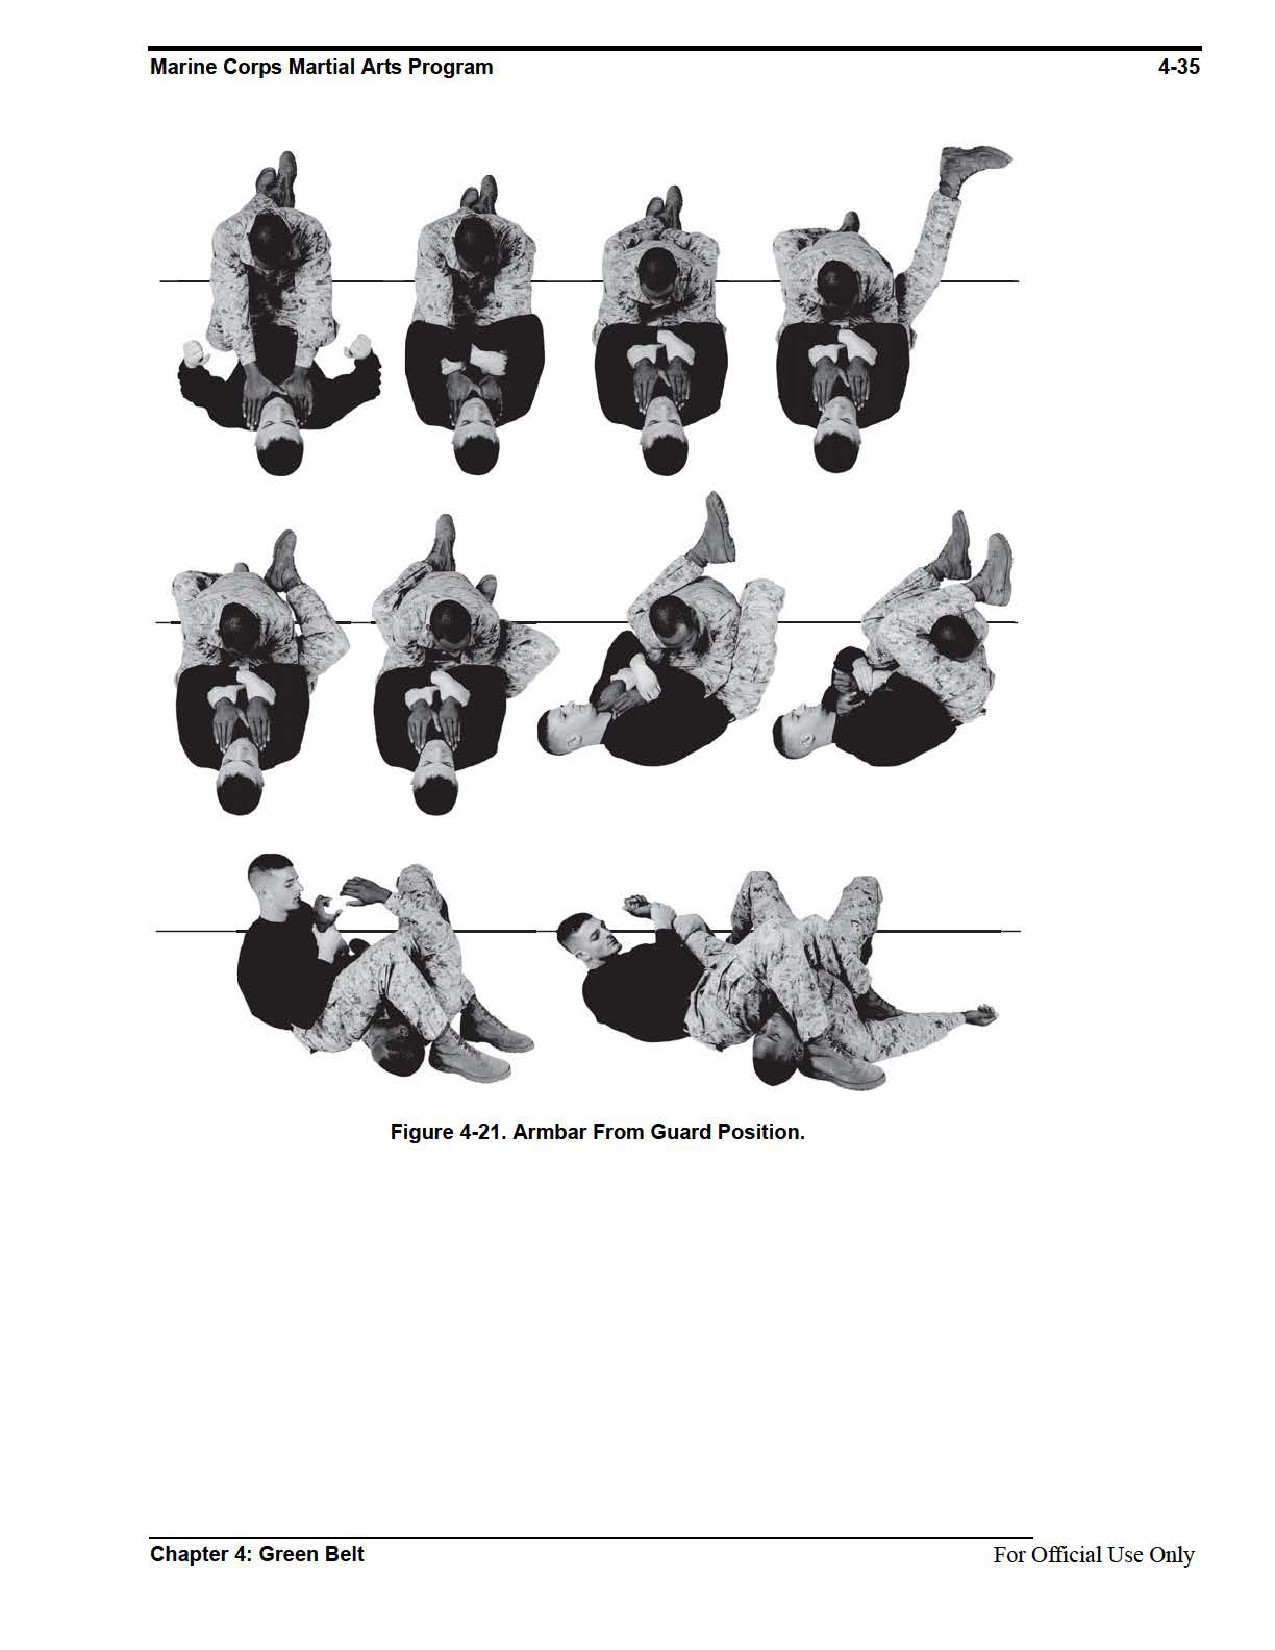
Armbar From Guard Position
The armbar from the guard position is effective for causing damage to an aggressors arm and
providing you with a tactical advantage and allowing you to get on your feet.
Technique
~ Begin by lying on your back with the aggressor kneeling between your legs with his hands
around your neck. Wrap your legs around the aggressor’s waist.
~ Trap the aggressor’s hands on your chest by crossing your hands on your chest so that your
forearms are resting on his/her forearms.
~ With the cutting edge of your right heel, strike the outside of the aggressor’s left thigh. This
will cause the aggressor to jerk to that side.
~ Quickly move your head to your left and swivel your hips to your right while maintaining
positive control of your aggressor’s left arm. Simultaneously, bring up both of your legs so
that they are on the right side of the aggressor’s body.
~ Bring your right leg down, hooking the aggressor’s neck and head, and exert downward
pressure to roll him over on his back. Grasp and maintain control of the aggressor’s left arm.
~ You should end up sitting up with your legs bent over the aggressor while maintaining control
of his left arm. Your buttocks are tight against the aggressor’s shoulder. Move closer to your
aggressor if necessary. Your legs are on either side of the aggressor’s right arm.
~ Keeping your legs and knees bent, maintain pressure against the aggressor’s neck with the
back of your right foot and your left foot underneath his armpit against his side. Squeeze your
knees together, tightly locking in the aggressor’s arm.
~ Pull the aggressor’s arm straight up and fall back sharply, pulling his arm to the side in the
direction of his little finger. Your aggressor’s left palm should be facing the sky. This action
will break the aggressor’s arm. Raise your hips slightly and pinch your toes in around the
aggressor’s shoulder to maintain control and to generate power in the break.
~ Return to the basic warrior stance.
See figure 4-21.
For Official Use Only
Chapter 4: Green Belt

THIS PAGE INTENTIONALLY LEFT BLANK.
For Official Use Only

CHAPTER 5
Brown Belt
The fourth belt ranking within MCMAP is Brown Belt. Upon qualifying as a Green Belt,
all Marines are highly encouraged to continue MCMAP sustainment training in order to
advance to Brown Belt. Brown Belt is the introduction to advanced fundamentals of each
discipline. Brown Belt is the minimum training goal of all infantrymen. Purpose and
principles remain the same as in Gray Belt.
Brown Belt Requirements.
Prerequisites
Recommendation of reporting senior
Complete Green Belt sustainment and
integration training
Complete PME
Training Hours
A minimum of 18.5 hours, excluding remedial
practice time
and testing
Sustainment
A minimum of 15 hours of sustainment,
Hours
excluding integration training time and
practice time for testing
For Official Use Only
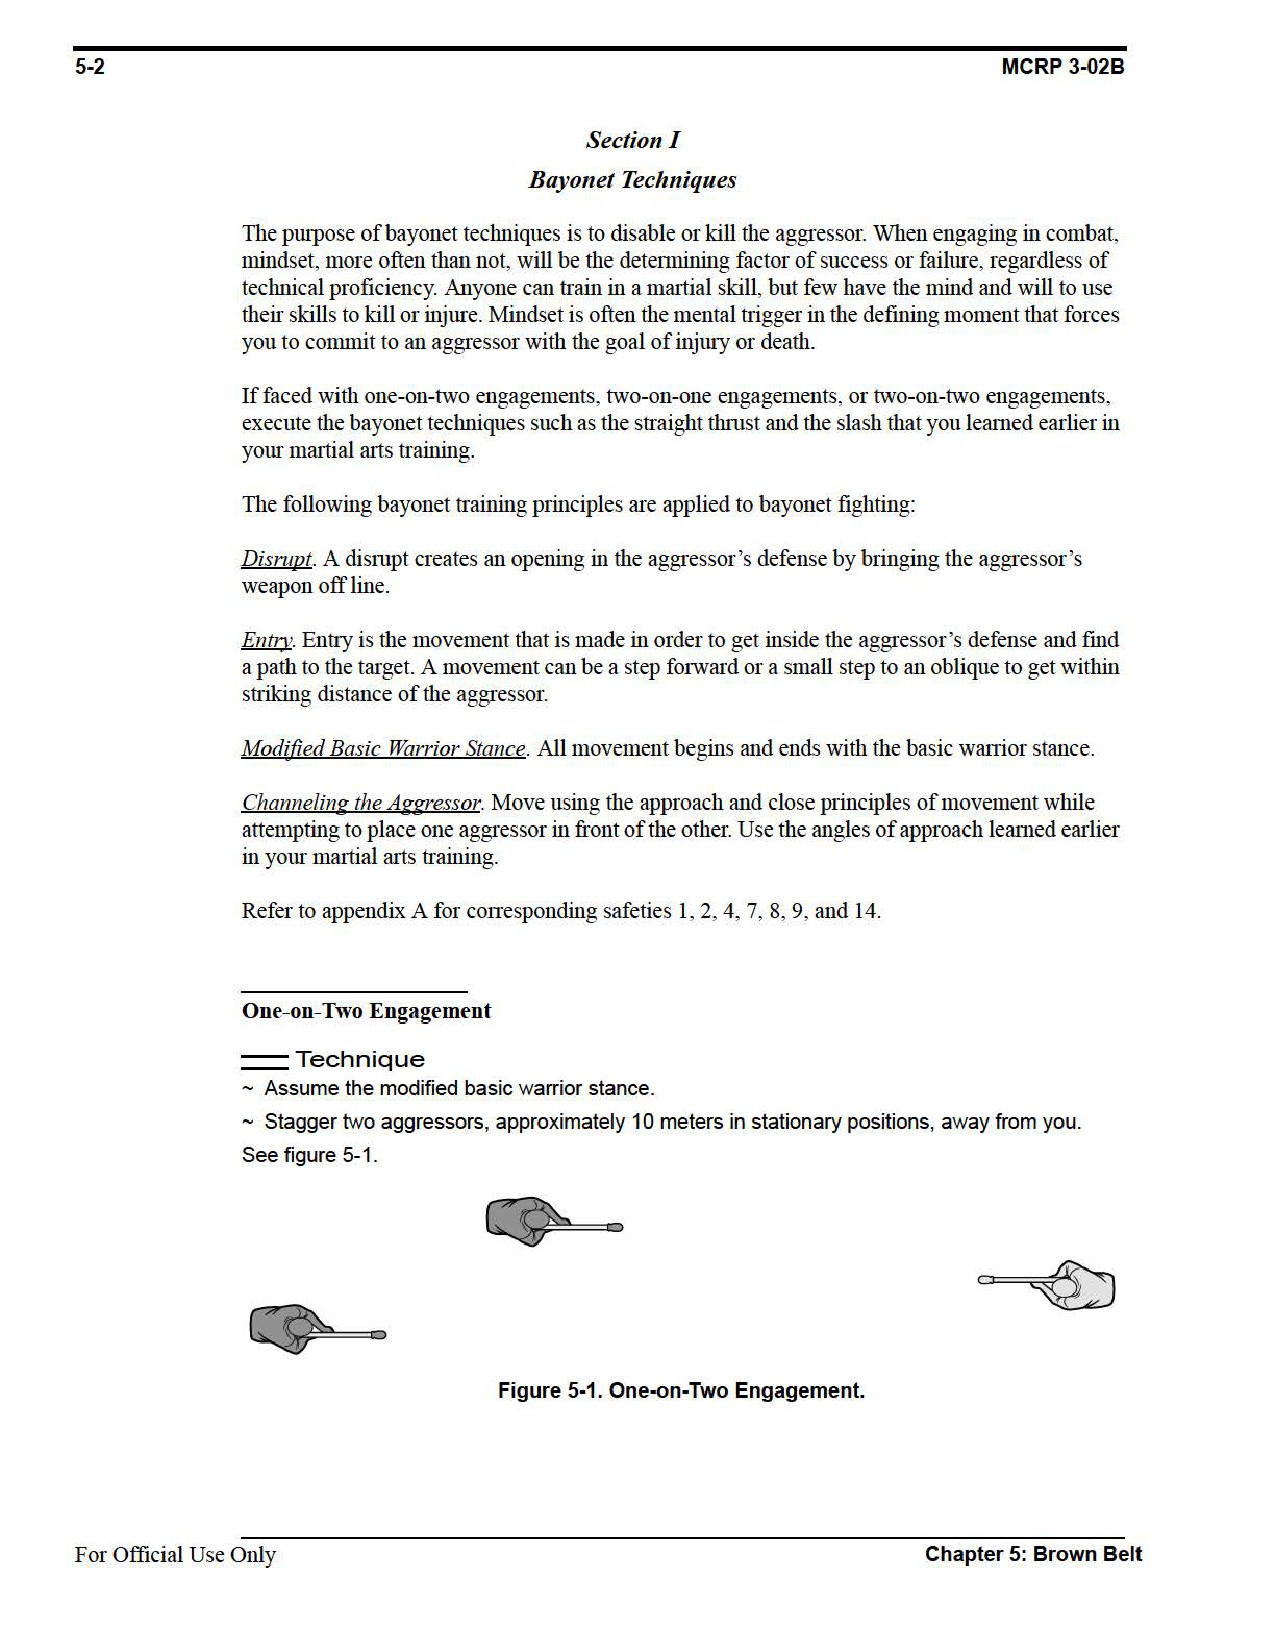
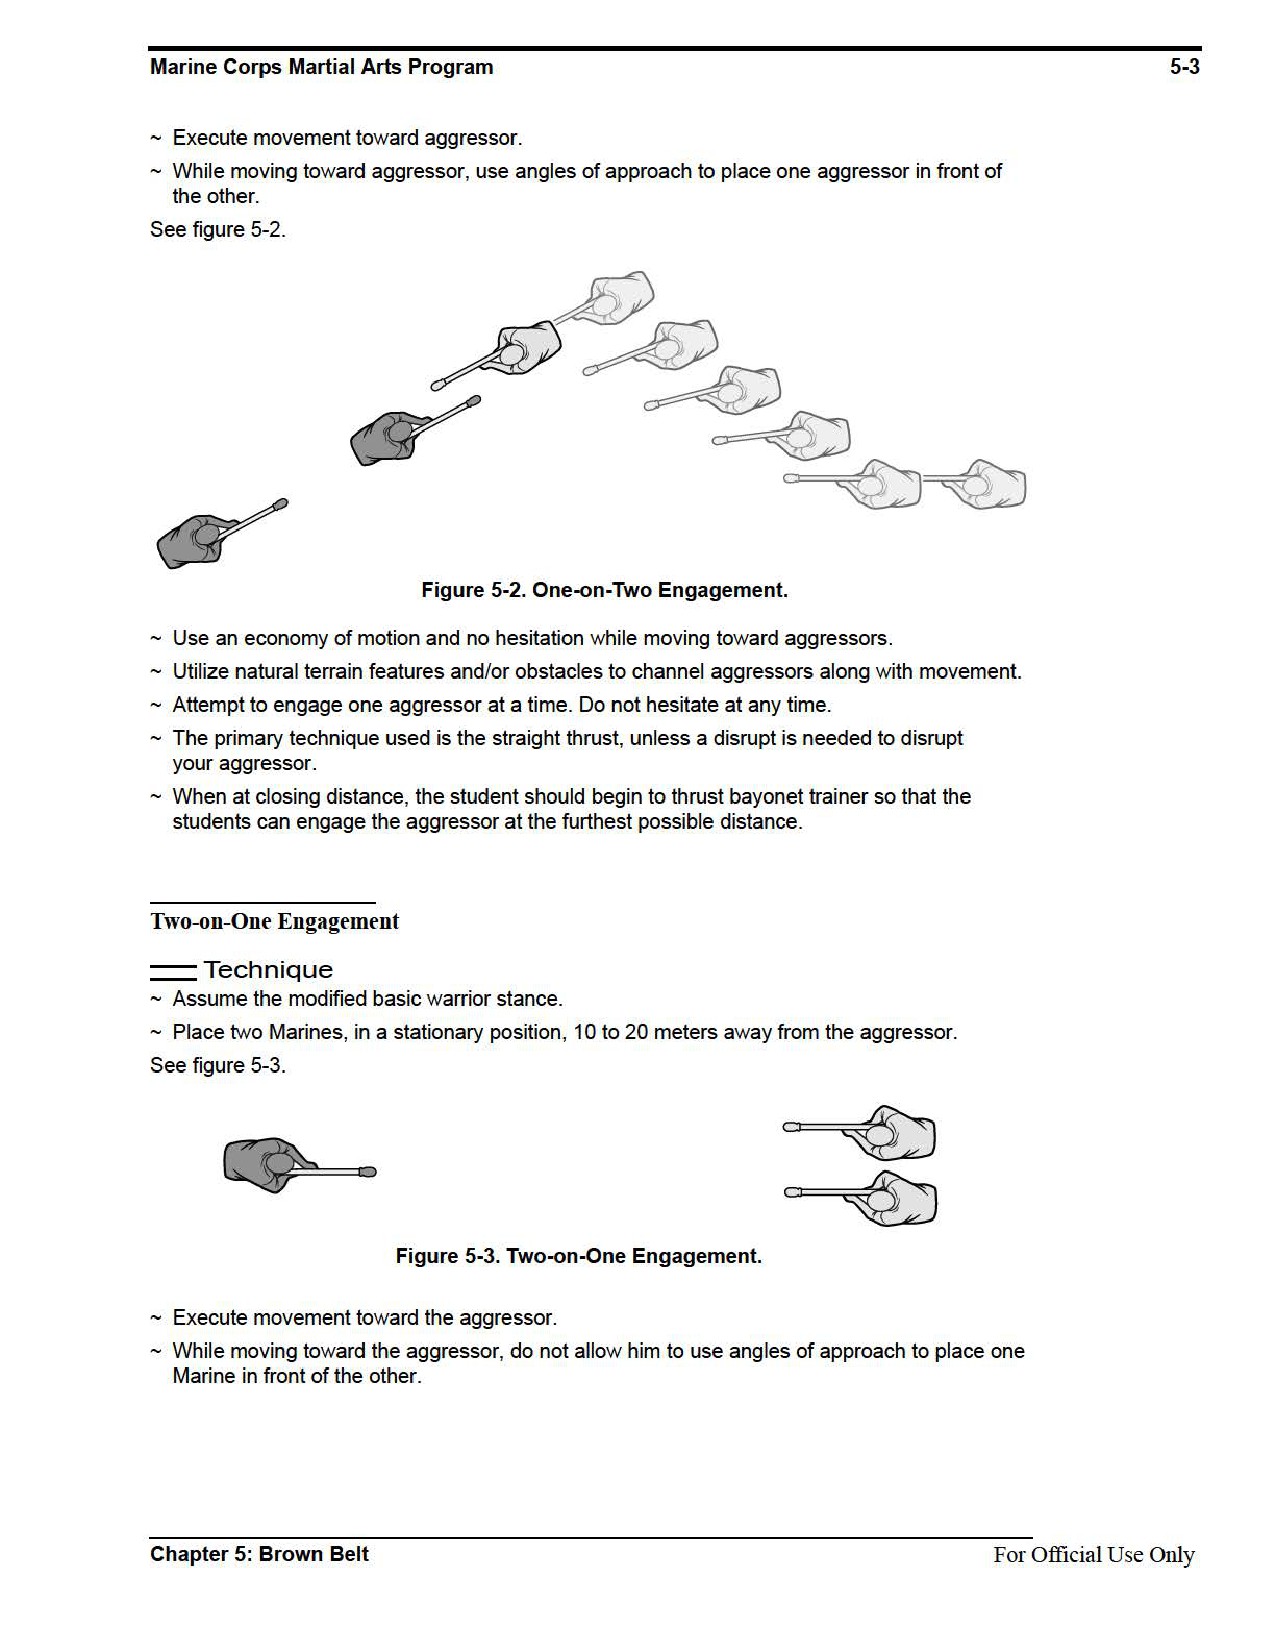
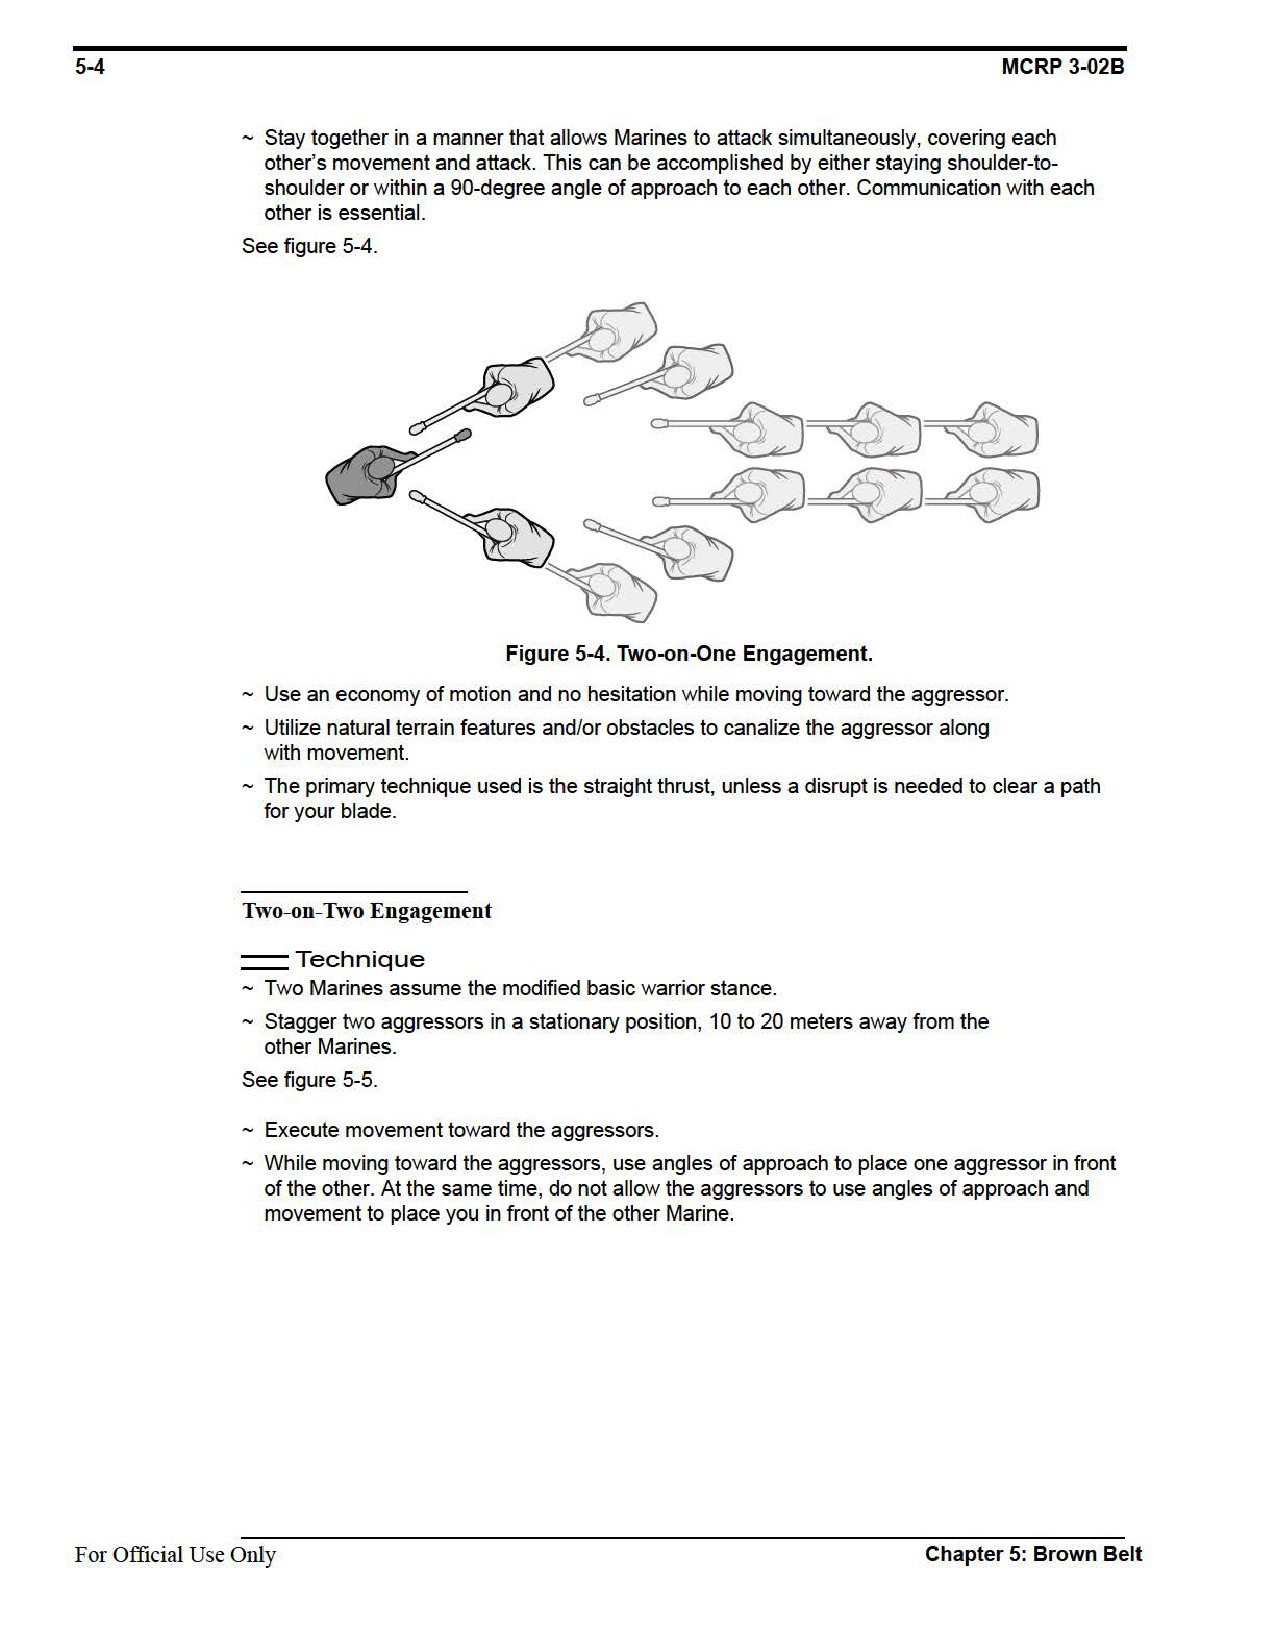
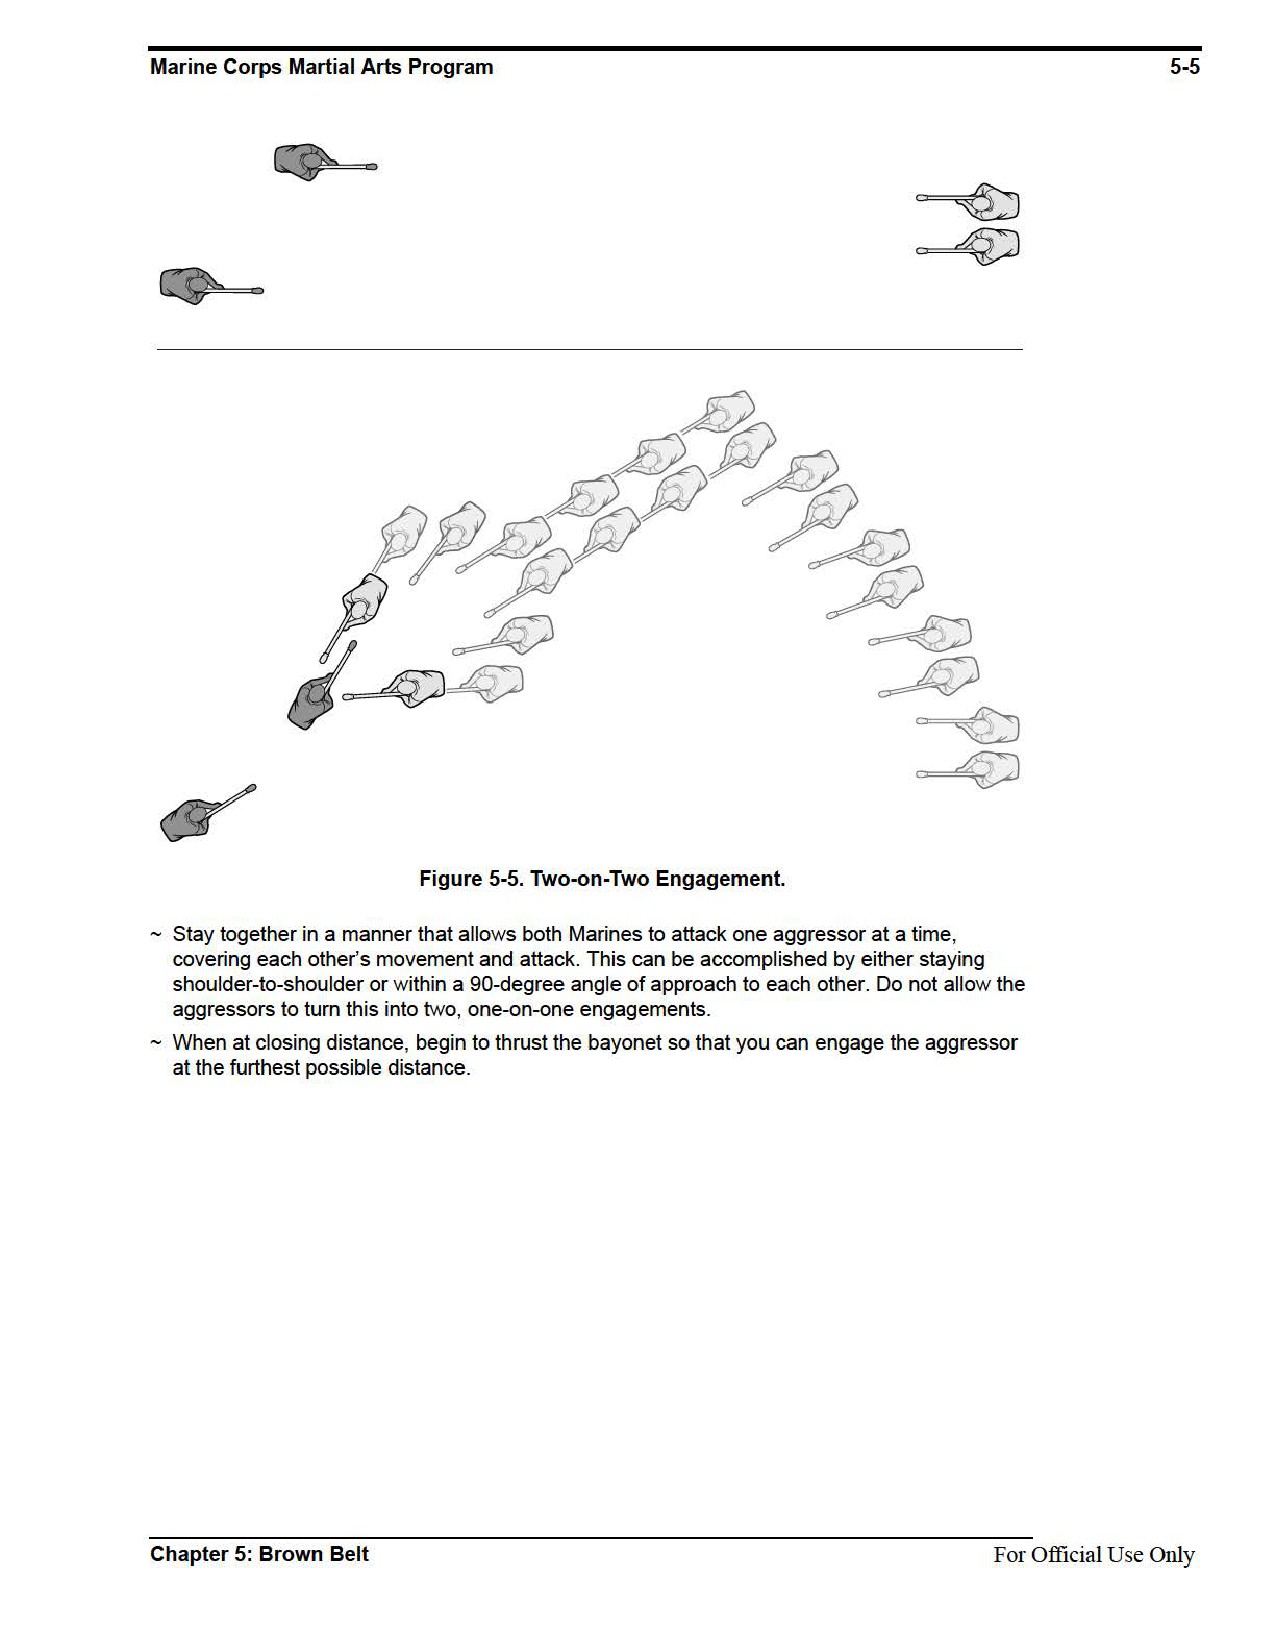

5-6
MCRP 3-02B
Section II
Ground Fighting
The purpose of ground fighting is to apply techniques that will allow you to get to your feet as
quickly as possible and cause damage to the aggressor.
Refer to appendix A for corresponding safeties 1, 2, 6, and 10.
Ground Fighting Techniques
Ground fighting techniques are used to cause damage to the aggressor using the bent armbar
from the side mount position and the basic leg lock, which will enable you to get to your feet.
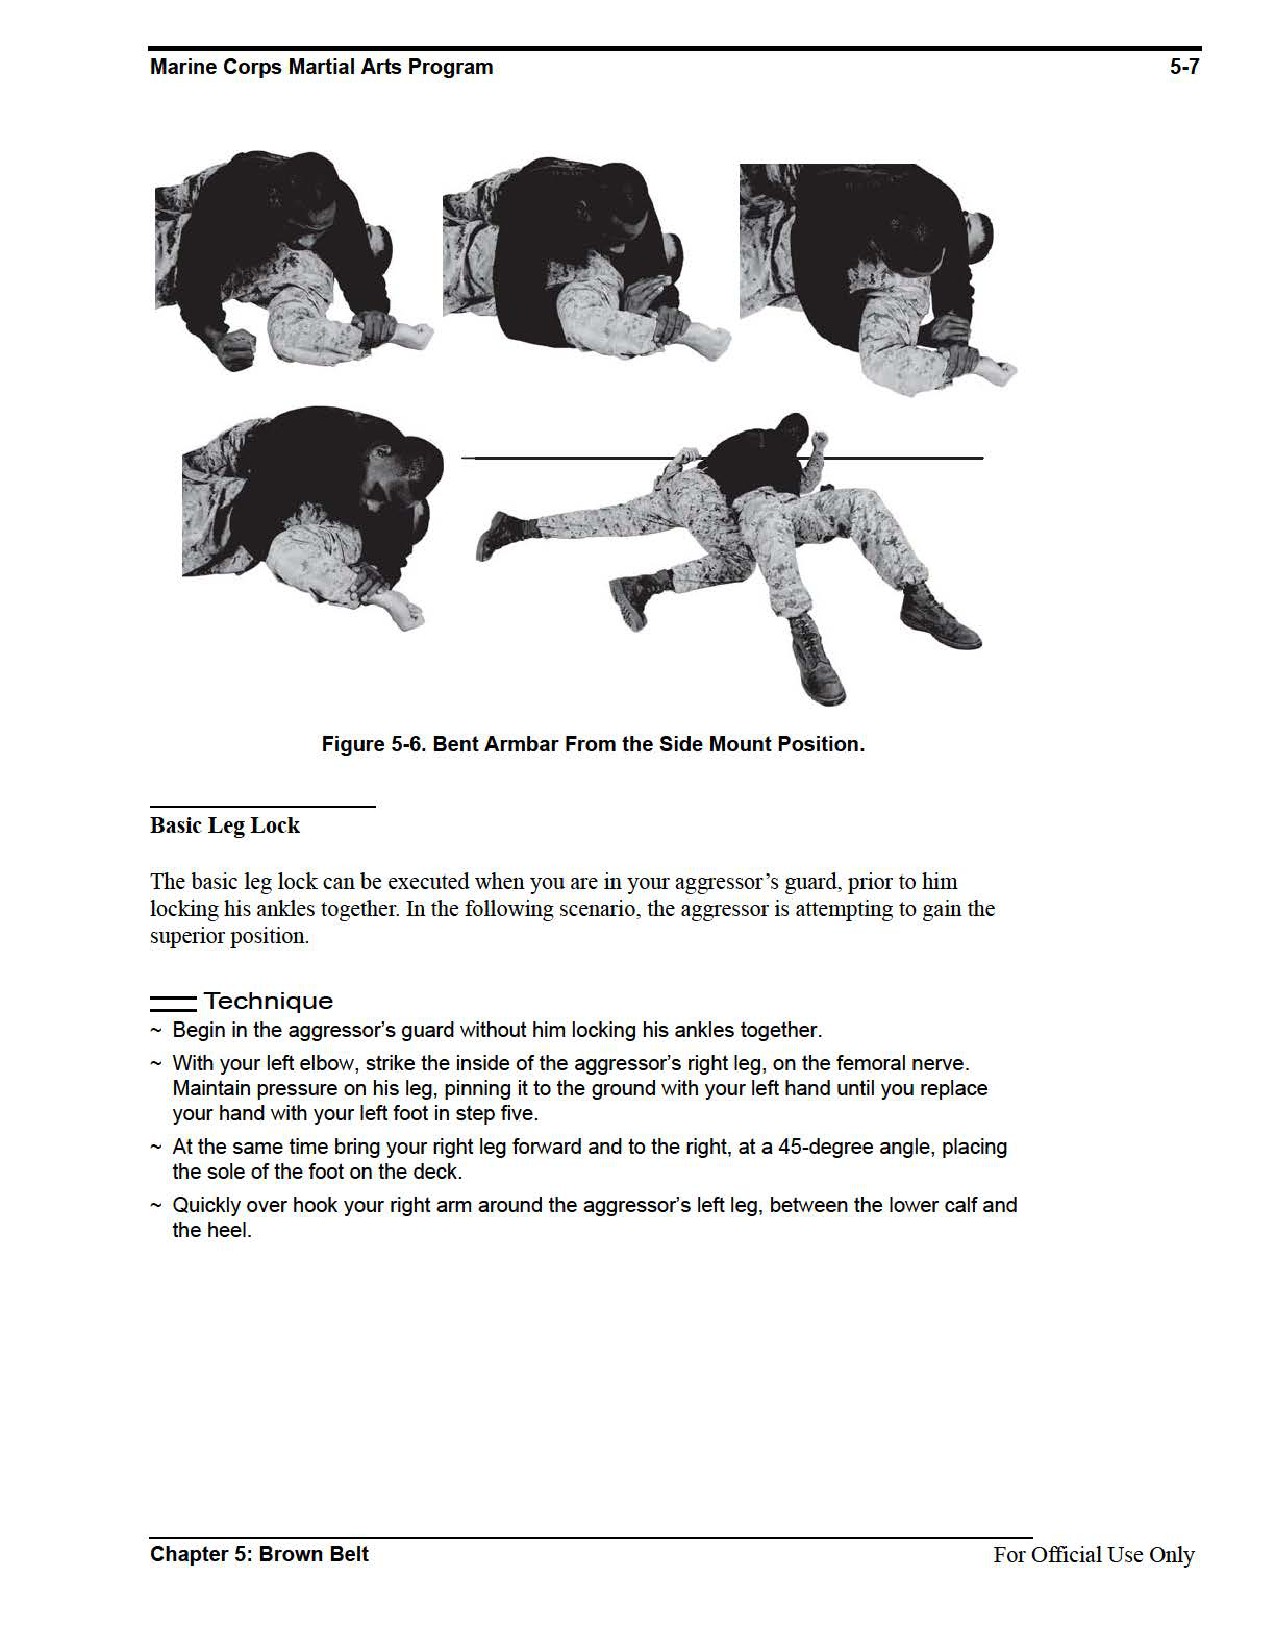
Bent Armbar From the Side Mount Position
The bent armbar from the side mount position technique can be executed from many positions,
but we will focus on executing this technique from the side mount position, while the aggressor
uses his free hand to attempt an eye gouge.
Technique
~ Begin with the aggressor lying flat on his back. Position yourself in the right side mount
position, chest to chest with the aggressor.
~ Your left leg is straight and your right leg is bent, on the ground at the aggressor’s hip. Your
body weight will control the aggressor.
~ The aggressor attempts an eye gouge with his left hand.
~ With your left hand, grab the aggressor’s left wrist and place your left elbow against the
aggressor’s left ear.
~ With your right hand, reach underneath the aggressor’s left triceps and grab your left wrist,
both palms down.
~ Apply downward pressure as you pull the aggressor’s wrist toward his hips or feet,
simultaneously elevating his left elbow by raising your right elbow. For submission, apply
slow and steady pressure.
~ For joint destruction, rapidly execute full force and full speed while raising the right elbow or
your aggressor’s left elbow.
~ Return to your feet and assume the basic warrior stance.
See figure 5-6.
For Official Use Only
Chapter 5: Brown Belt
5-8
MCRP 3-02B
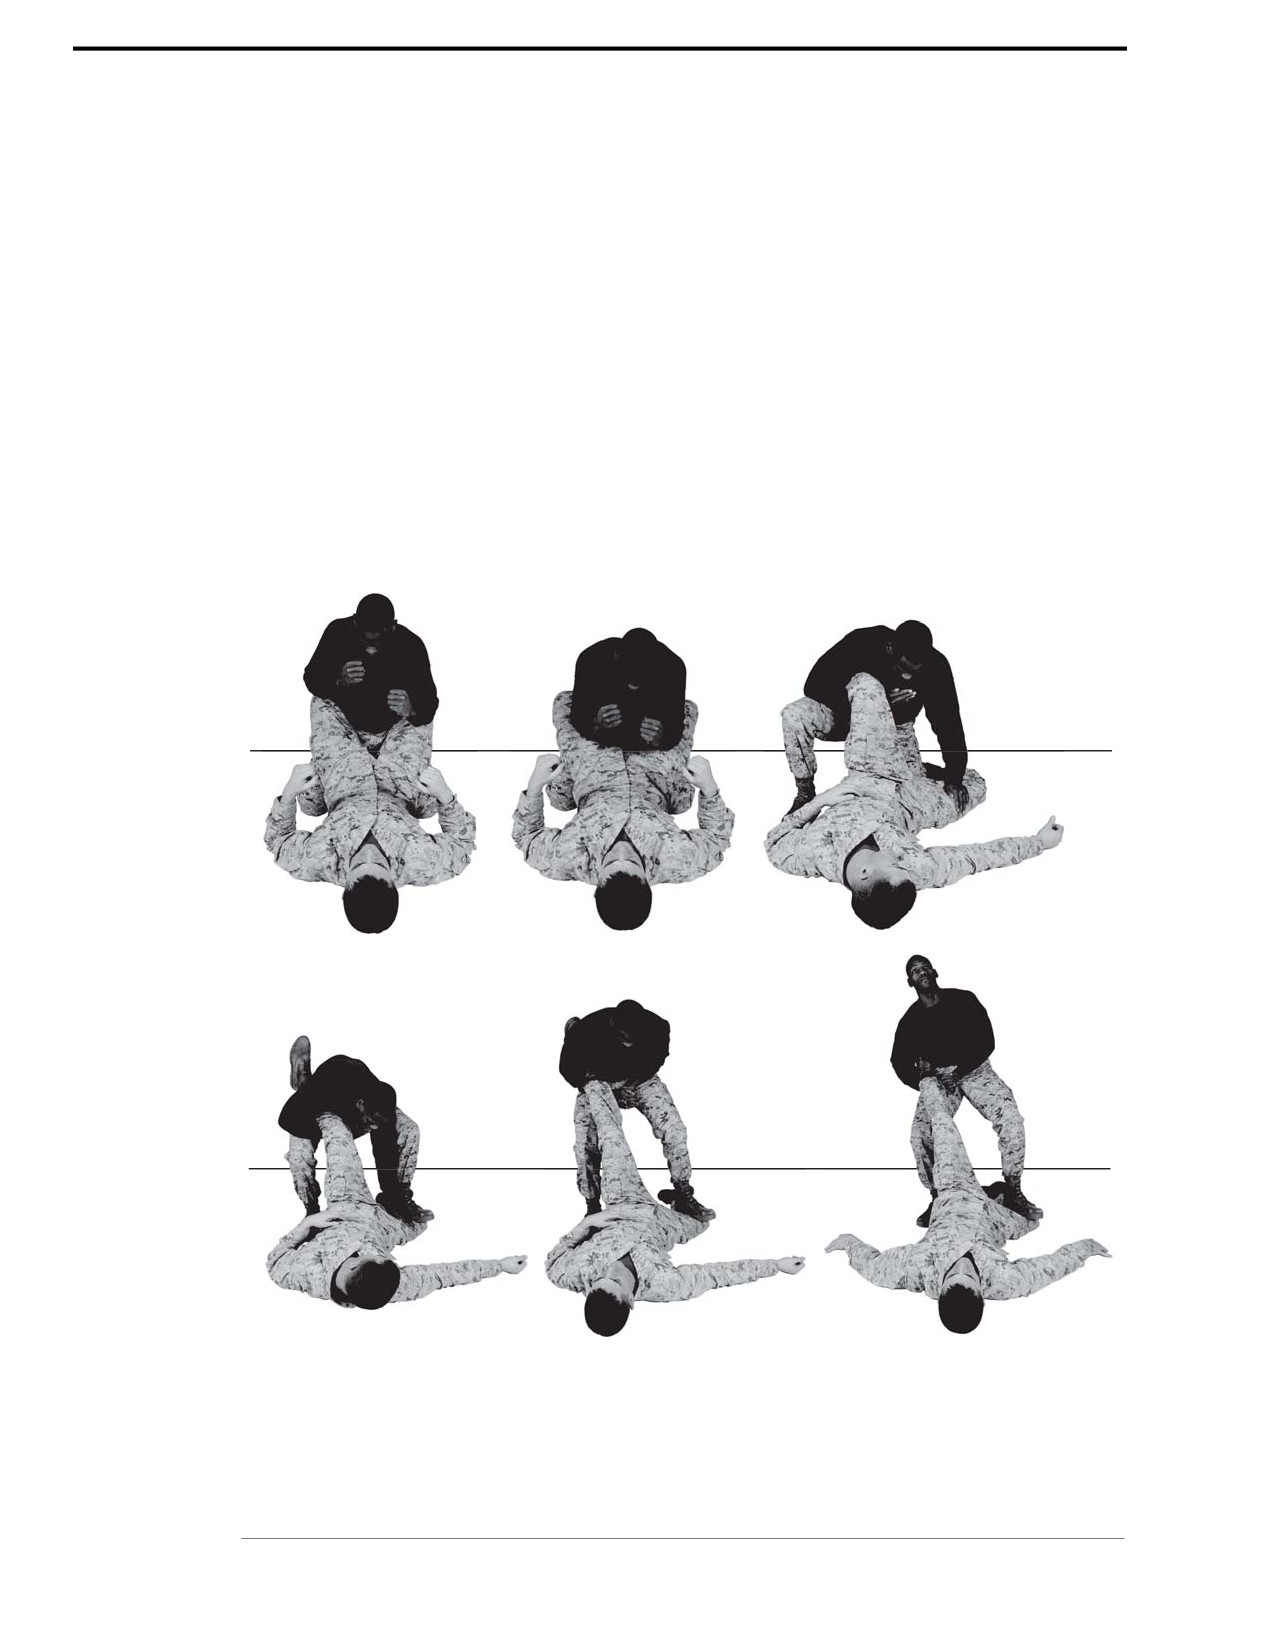
~ Quickly come to the standing position, maintaining control of the aggressor’s legs, keeping
your back straight and your knees slightly bent. With your left leg, execute a vertical stomp on
the aggressor’s groin region. For safety, place your foot on your aggressor’s thigh.
CAUTION
For safety during training, simulate stomping the groin by placing your
left foot on the inside of the aggressor’s thigh.
~ Clasp your hands together; palm-to-palm, with your right palm toward the deck. Apply bone
pressure to the aggressor’s Achilles tendon by rotating your right radius bone up and into the
Achilles tendon. Maintain pressure on the aggressor’s Achilles tendon throughout the
movement. Slowly straighten your back and look up to increase the pressure for the
submission. Stand quickly, arching your back for the joint destruction.
~ Return to the basic warrior stance.
See figure 5-7.
Figure 5-7. Basic Leg Lock.
For Official Use Only
Chapter 5: Brown Belt

Marine Corps Martial Arts Program
5-9
Section III
Ground Chokes
The purpose of ground chokes is to render the aggressor unconscious as quickly as possible by
using the rear ground choke, figure-4 variation, side choke, or front choke.
Refer to appendix A for corresponding safeties 1, 2, 6, 10, 11, and 12.
Rear Ground Choke
The rear ground choke is a blood choke that is performed when you are behind the aggressor on
the ground.
Technique
~ Begin by sitting on the ground with the aggressor sitting between your legs with his back to
your chest.
~ Place your lower legs over the aggressor’s thighs, this should be done simultaneously or
after the choke is executed in order to prevent a counter. Do not cross your ankles at any
time, this will compromise your position and places you in a vulnerable position to counter-
attack. Use your insteps and toes to create constant pressure on the aggressor’s thighs.
Note: Do not try to get your toes under the aggressor’s legs.
~ With your left arm, reach up and grab the aggressor’s forehead and pull back.
~ With your right arm, reach over the aggressor’s right shoulder and hook the bend between
the forearm and bicep of your arm around his neck. Ensure that the aggressor’s windpipe is
positioned within the bend of your arm and that pressure is not being exerted directly on
his windpipe.
~ With your left hand, palm side up, clasp both hands together, palm-to-palm.
Chapter 5: Brown Belt
For Official Use Only
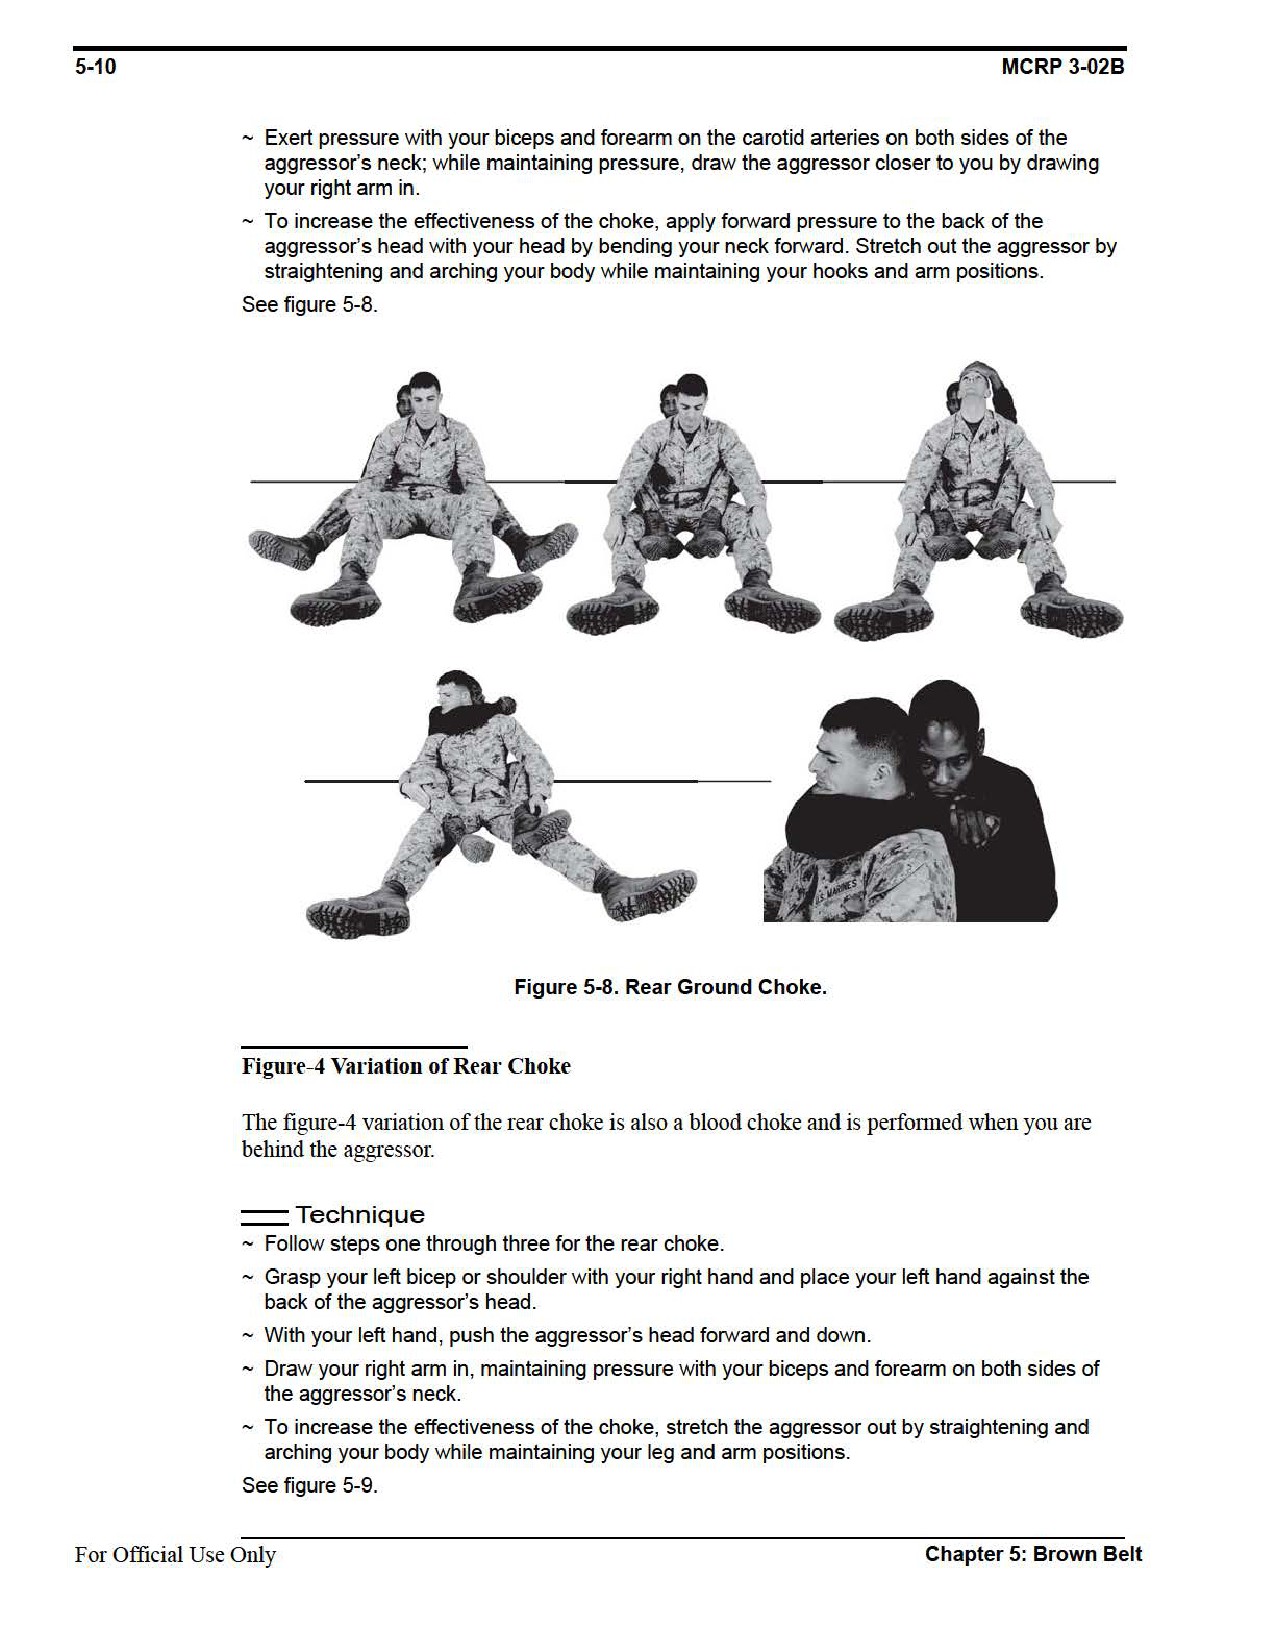
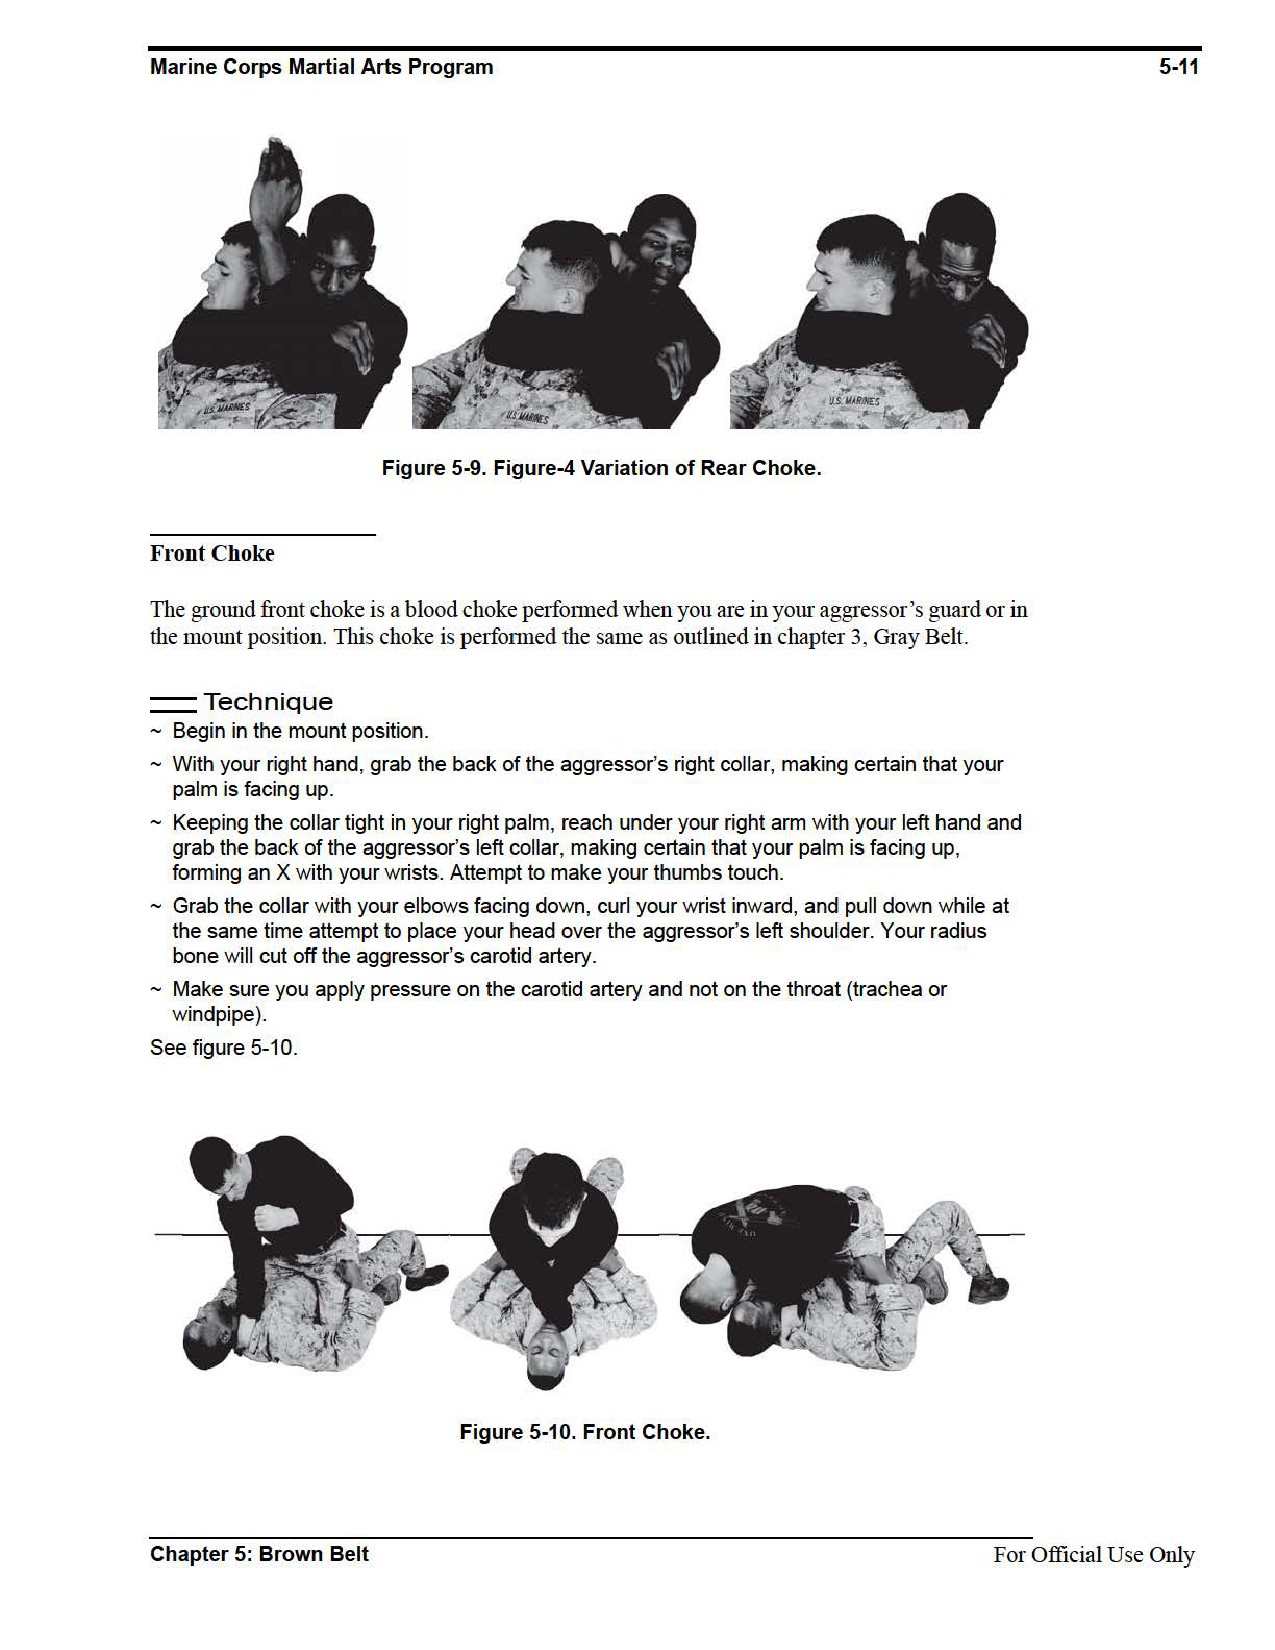

5-12
MCRP 3-02B
Side Choke
The side choke is a blood choke performed from the mount position and is particularly effective
when the aggressor raises his arms and places them on your chest or throat. The side choke is
performed the same as outlined in the Green Belt chapter.
Technique
~ Begin facing the aggressor in the mount position.
~ The aggressor will push up on you in an effort to get you up and off of him.
~ Disrupt the aggressor’s right arm inboard, cross-chest with your left hand.
~ Bring your right arm underneath the aggressor’s right arm and place your wrist and radius
bone across the aggressor’s carotid artery along the left side of his neck. Your right palm
should face down with your fingers extended and your thumb pointing toward you.
~ With your left hand, reach around the back of the aggressor’s neck and clasp your palms
together with your left hand, palm side up. The aggressor’s right arm should be over your
right shoulder.
~ Pull the aggressor toward your chest, exerting pressure on the side of his neck with your
forearm. At the same time, push up with your shoulder and head against the aggressor’s
triceps, driving his shoulder into his right carotid artery. This allows you to apply pressure on
the carotid artery and not the trachea or windpipe. Finish by pulling your clasped hands
towards your chest.
See figure 5-11.
For Official Use Only
Chapter 5: Brown Belt