MCRP 3-028 Marine Corps Martial Arts Program (MCMAP, 2011) - page 1


Marine Corps Martial Arts Program
TABLE OF CONTENTS
Chapter 1. Overview
Structure
1-2
Belt Ranking System
1-3
Testing
1-4
Martial Arts Instructor
1-4
Martial Arts Instructor Trainer
1-5
Tactics and Techniques
1-5
Chapter 2. Tan Belt
Section I: Fundamentals of the Marine Corps Martial Arts Program
2-2
Ranges of Close Combat Engagements
2-2
Target Areas of the Body
2-2
Weapons of the Body
2-3
Basic Warrior Stance
2-3
Angles of Movement
2-4
Section II: Punches
2-6
Muscle Relaxation
2-6
Making a Fist
2-6
Weight Transfer
2-7
Rapid Retraction
2-7
Telegraphing
2-8
Lead Hand Punch
2-8
Rear Hand Punch
2-9
Uppercut
2-10
Hook
2-11
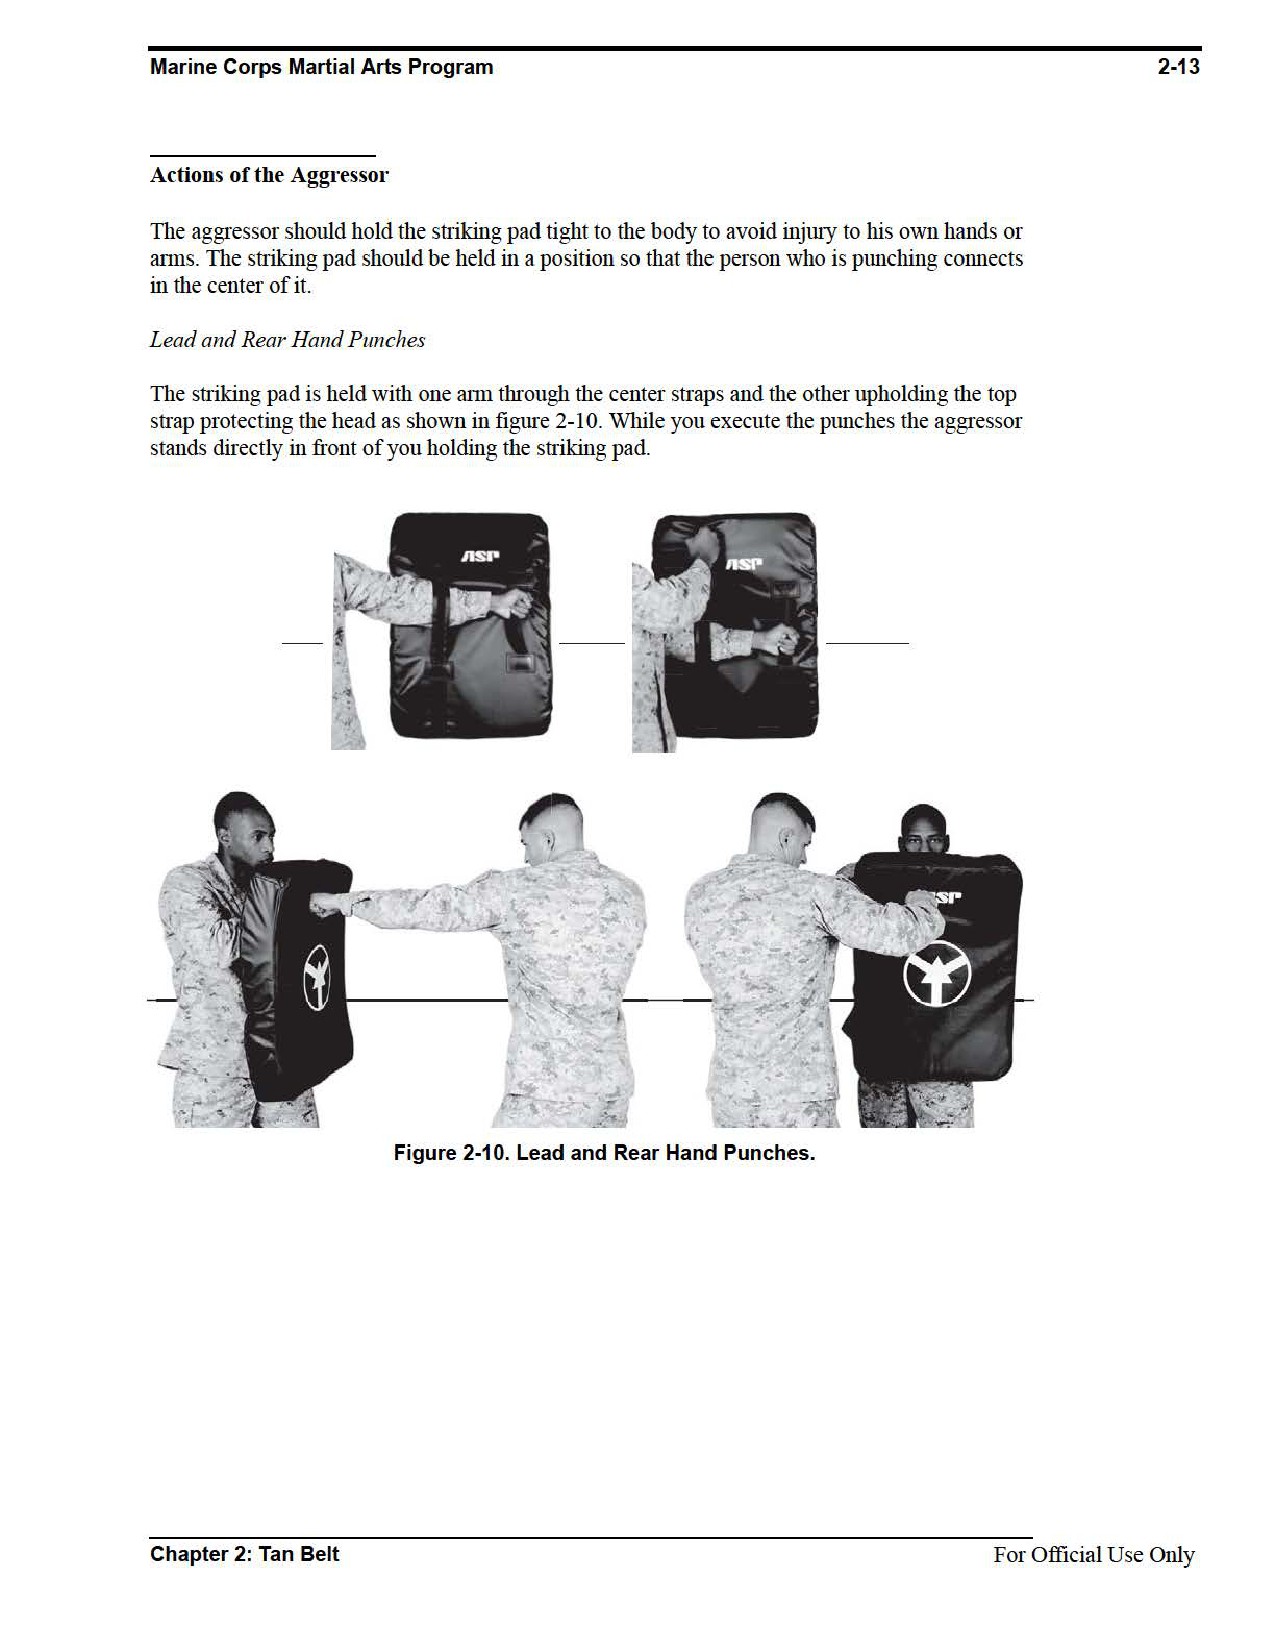
Actions of the Aggressor
2-13
Section III: Break-Falls
2-15
Front Break-Fall
2-15
Back Break-Fall
2-16
Side Break-Fall
2-17
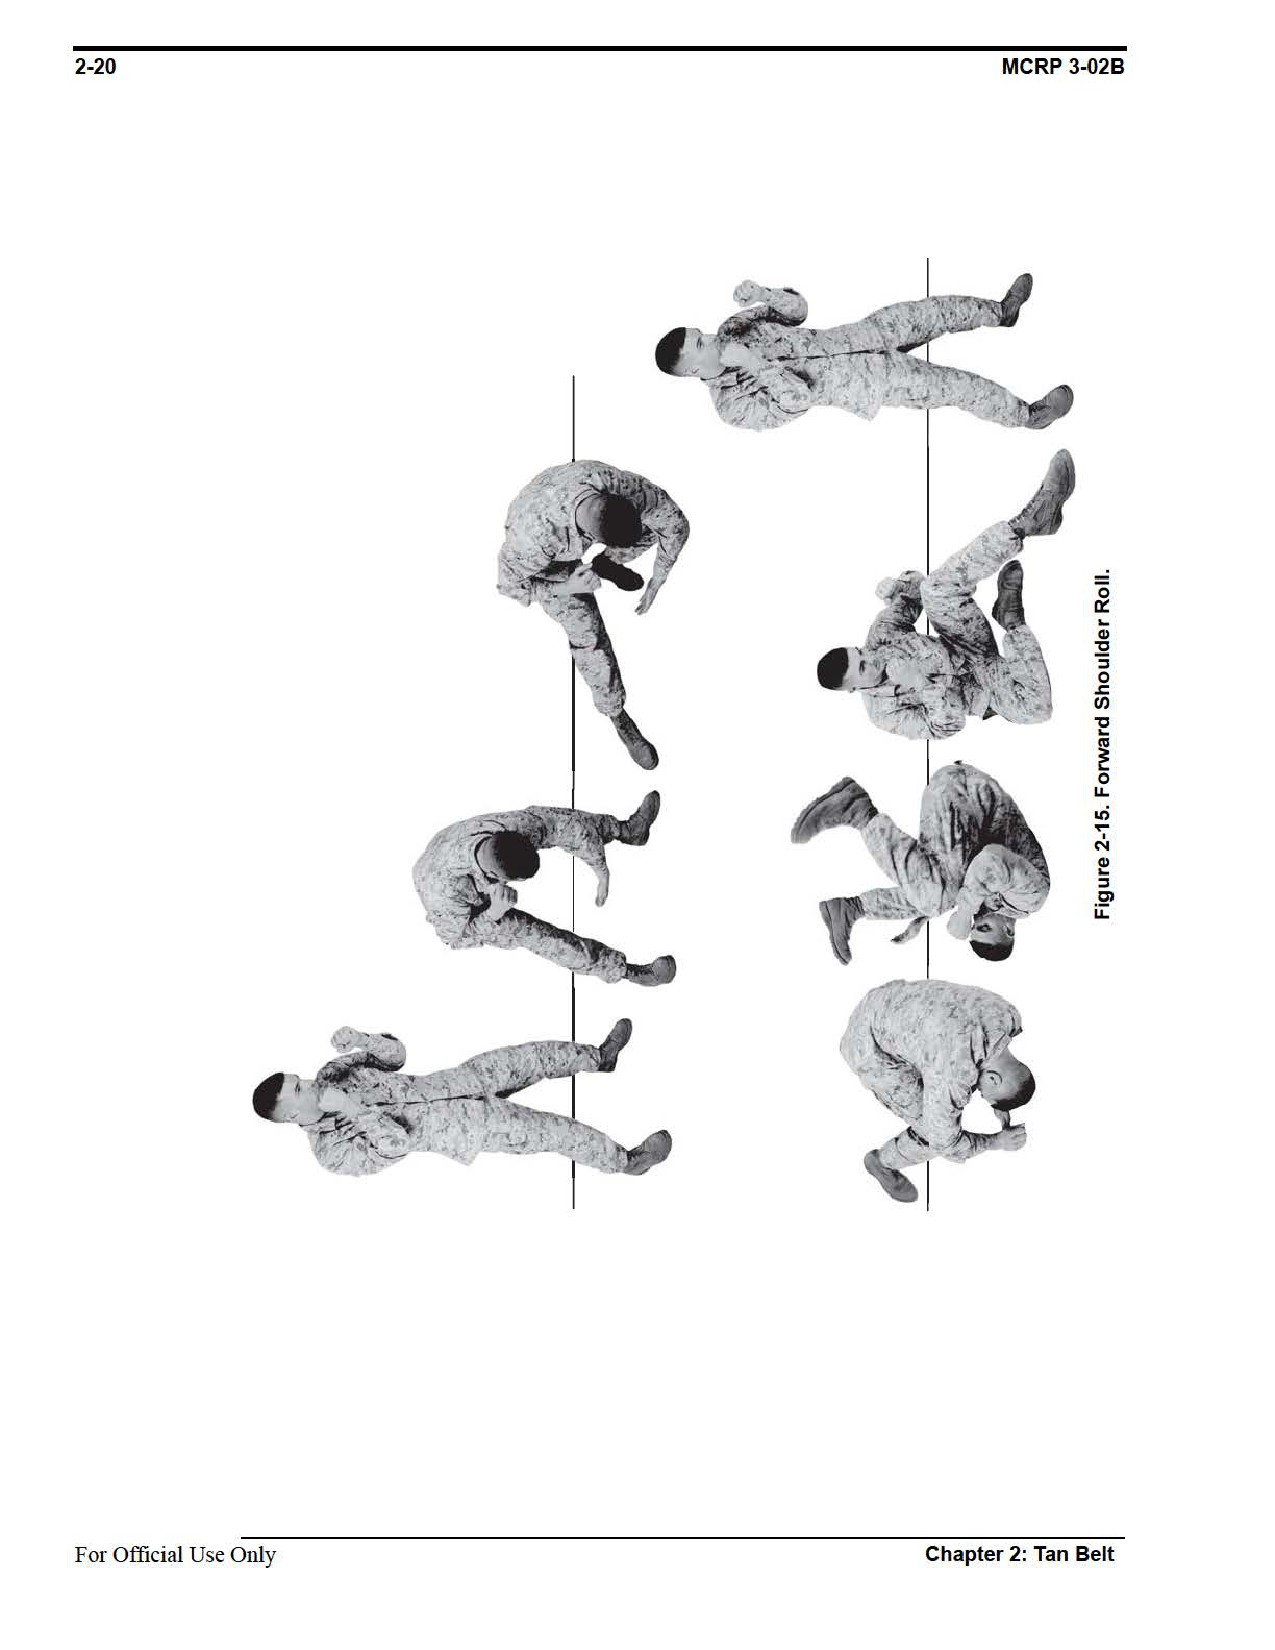
Forward Shoulder Roll
2-19
For Official Use Only

iv
MCRP 3-02B
Section IV: Bayonet Techniques
2-21
Straight Thrust
2-21
Horizontal Buttstroke
2-22
Vertical Buttstroke
2-23
Smash
2-24
Slash
2-25
Disrupt
2-26
Section V: Upper Body Strikes
2-28
Principles
2-28
Hammer Fist
2-29
Eye Gouge
2-31
Vertical Elbow Strike (Low to High)
2-32
Forward Horizontal Elbow Strike
2-33
Actions of the Aggressor
2-34
Section VI: Lower Body Strikes
2-36
Vertical Knee Strike
2-36
Front Kick
2-36
Round Kick
2-37
Vertical Stomp
2-38
Actions of the Aggressor
2-40
Section VII: Introduction to Chokes
2-41
Rear Choke
2-41
Figure Four Variation
2-43
Section VIII: Throws
2-45
Throw
2-45
Actions of the Aggressor
2-47
Section IX: Counters to Strikes
2-49
Counter to Strikes
2-49
Counter to Rear Hand Punch
2-49
Counter to the Rear Leg Kick
2-50
Section X: Counters to Chokes and Holds
2-52
Counter to the Rear Choke
2-52
Counter to the Rear Headlock
2-53
Counter to the Rear Bear Hug
2-54
Section XI: Unarmed Manipulation
2-56
Compliance Techniques
2-56
Distracter Techniques
2-56
For Official Use Only

Marine Corps Martial Arts Program
v
Joint Manipulation
2-57
Wristlocks
2-57
Armbar Takedown
2-58
Section XII: Armed Manipulations
2-62
Rifle and Shotgun Retention Techniques
2-62
Blocks
2-65
Section XIII: Knife Fighting
2-69
Principles of Knife Fighting
2-69
Vertical Slash
2-71
Vertical Thrust
2-72
Chapter 3. Gray Belt
Section I: Bayonet
3-2
Execution
3-2
Movement
3-2
Closing
3-3
Bayonet Techniques Disrupt and Thrust While Closing
3-3
Section II: Upper Body Strikes
3-6
Chin Jab/Palm Heel Strike
3-6
Knife Hand Strikes
3-7
Inside/Reverse Knife Hand Strike
3-8
Vertical Knife Hand Strike
3-9
Elbow Strikes
3-10
The Rear Horizontal Elbow Strike
3-11
Vertical Elbow Strike (High to Low)
3-11
Actions of the Aggressor
3-12
Section III: Lower Body Strikes
3-14
Horizontal Knee Strike
3-14
Side Kick
3-14
Axe Stomp
3-16
Actions of the Aggressor
3-17
Section IV: Front Choke
3-18
Section V: Hip Throw
3-20
For Official Use Only

vi
MCRP 3-02B
Section VI: Counters to Strikes
3-22
Counter to the Lead Hand Punch
3-22
Counter to a Lead Leg Kick
3-24
Section VII: Counters to Chokes and Holds
3-25
Counter to the Front Choke
3-25
Counter to the Front Headlock
3-26
Counter to the Front Bear Hug
3-28
Section VIII: Unarmed Manipulation
3-30
Wristlock Come-Along
3-30
Takedown From a Wristlock Come-Along and Double Flexi Cuff
3-32
Escort Position
3-35
Escort Position Takedown and Single Flexi Cuff
3-36
Section IX: Armed Manipulation
3-38
Aggressor Grabs With Both Hands (Pushing)
3-38
Aggressor Grabs With Both Hands Pulling (Stationary)
3-40
Aggressor Grabs With Both Hands Pulling (Moving)
3-42
Aggressor Grabs Over Handed With Strikes
3-42
Aggressor Grabs Under Handed With Strikes
3-45
Section X: Knife Techniques
3-47
Forward Thrust
3-47
Forward Slash
3-48
Reverse Thrust
3-49
Reverse Slash
3-51
Bulldogging
3-52
Section XI: Weapons of Opportunity
3-54
Straight Thrust
3-54
Vertical Strike
3-55
Forward Strike
3-56
Reverse Strike
3-57
Section XII: Ground Fighting
3-59
Counter to Mount Position
3-59
Counter to Guard Position
3-60
Chapter 4. Green Belt
Section I: Bayonet Techniques
4-2
Fundamentals
4-2
For Official Use Only

Marine Corps Martial Arts Program
vii
Execute a Disrupt and a Thrust While Closing With a Moving Aggressor
4-4
Buttstroke Offline
4-4
Section II: Side Choke
4-7
Section III: Shoulder Throw
4-9
Section IV: Counters to Strikes
4-11
Counter to a Round Punch
4-11
Counter to Round Kick
4-13
Section V. Lower Body Strikes
4-15
Section VI: Unarmed Manipulations
4-17
Enhanced Pain Compliance
4-17
Reverse Wristlock Come-Along
4-20
Controlling Techniques
4-22
Section VII: Knife Techniques
4-25
Counter to a Vertical Strike With Follow-on Techniques
4-25
Counter to a Forward Strike With Follow-on Techniques
4-26
Section VIII: Weapons of Opportunity
4-27
Block for a Vertical Strike With Follow-on Strikes
4-27
Block for a Forward Strike With Follow-on Strikes
4-28
Block for a Reverse Strike With Follow-on Strikes
4-29
Block for a Straight Thrust With Follow-on Strikes
4-30
Section IX: Ground Fighting
4-32
Armbar From Mount Position
4-32
Armbar From Guard Position
4-34
Chapter 5. Brown Belt
Section I: Bayonet Techniques
5-2
One-on-Two Engagement
5-2
Two-on-One Engagement
5-3
Two-on-Two Engagement
5-4
Section II: Ground Fighting
5-6
Ground Fighting Techniques
5-6
Basic Leg Lock
5-7
For Official Use Only

viii
MCRP 3-02B
Section III: Ground Chokes
5-9
Rear Ground Choke
5-9
Figure-4 Variation of Rear Choke
5-10
Front Choke
5-11
Side Choke
5-12
Section IV: Major Outside Reap Throw
5-14
Major Outside Reap Throw: Aggressor Pushing
5-14
Major Outside Reap Throw: Aggressor Pulling
5-16
Section V: Unarmed Versus Handheld
5-18
Hollowing Out with Follow-on Technique
5-18
Forward Armbar Counter
5-19
Reverse Armbar Counter
5-20
Bent Armbar Counter
5-22
Section VI: Firearm Retention
5-24
Blocking Technique
5-24
Armbar Technique
5-25
Wristlock Technique
5-25
Same Side Grab: From Front
5-27
Same Side Grab: From Rear
5-29
Section VII: Firearm Disarmament
5-31
Counter to Pistol to: Front
5-31
Counter to Pistol to: Rear
5-31
Section VIII: Knife Techniques
5-35
Block for a Reverse Strike
5-35
Block for a Straight Thrust
5-36
Chapter 6. Black Belt
Section I: Bayonet Techniques
6-2
Bayonet Training: Stage One
6-2
Bayonet Training: Stage Two
6-2
Bayonet Training: Stage Three
6-2
Common Error
6-3
For Official Use Only

Marine Corps Martial Arts Program
ix
Section II: Sweeping Hip Throw
6-4
Section III: Ground Fighting
6-6
Face Rip From the Guard
6-6
Straight Armbar From a Scarf Hold
6-8
Bent Armbar From a Scarf Hold
6-10
Section IV: Unarmed Manipulation: Neck-Crank Takedown
6-11
Section V: Chokes
6-13
Triangle Choke
6-13
Guillotine Choke
6-15
Section VI: Knee Bar
6-16
Rolling Knee Bar
6-16
Sitting Knee Bar
6-18
Section VII: Counter to Pistol to the Head
6-20
Counter to Pistol to the Head: Two Handed
6-20
Counter to Pistil to the Head: One Handed
6-22
Section VIII: Upper Body Strikes
6-24
Cupped Hand Strike
6-24
Face Smash
6-24
Section IX: Knife Techniques
6-26
Lead Hand Knife
6-26
Slashing Techniques
6-26
Thrusting Techniques
6-28
Reverse-Grip Knife Techniques
6-31
Section X: Improvised Weapons
6-36
Garrote From the Rear
6-36
Garrote From the Front
6-39
Appendices
A
Training Safety Sheet
Glossary
References
For Official Use Only

THIS PAGE INTENTIONALLY LEFT BLANK.
For Official Use Only


THIS PAGE INTENTIONALLY LEFT BLANK.
For Official Use Only

CHAPTER 1
Overview
The focus of Marine Corps Martial Arts Program (MCMAP) is the personal development of
each Marine in a team framework using a standardized, trainable, and sustainable close com-
bat fighting system. As a weapon-based system, all techniques are integrated with equip-
ment, physical challenges, and tactics found on the modern battlefield. The MCMAP is
designed to increase the warfighting capabilities of individual Marines and units, enhance
Marines’ self-confidence and esprit de corps, and foster the warrior ethos in all Marines. The
MCMAP is a weapon-based system rooted in the credo that every Marine is a rifleman and
will engage the aggressor from 500 meters to close quarter combat. The MCMAP:
• Enhances the Marine Corps’ capabilities as an elite fighting force.
• Provides basic combative skills for all Marines.
• Applies across the spectrum of violence.
• Strengthens the Marine Corps warrior ethos.
The motto of MCMAP best states the essence of the program: “One mind, any weapon.”
This means that every Marine is always armed even without a weapon. He is armed with a
combat mindset, the ability to assess and to act, and the knowledge that all Marines can rely
on one another.
The Marine Corps was born during the battles that created this country. Drawing upon the
experiences of the first Marines, we have developed a martial culture unrivaled in the world
today. This legacy includes not only our fighting prowess but also the character and soul of
what makes us unique as Marines. This training continued to evolve up to World War II.
During these early years, the leadership and core values training that are our hallmark today
developed in concert with the martial skills.
As World War II burst upon the Corps, individuals and units were developing specialized
training based upon experiences of Marines from the interwar years. This included exposure
of Marines to far eastern martial arts systems such as judo and karate. These various systems
such as combat hitting skills, the O’Niel System, and those of the Marine Raiders were
employed by Marines during the island-hopping campaigns. Additionally, the rapid expan-
sion of the Marine Corps saw a refinement of character and leadership development pro-
grams. This trend continued after World War II through the post Vietnam war period. Marines
tested and refined new techniques adapted to the technologies and the innovation of a new
generation of Marines. In response to societal changes after Vietnam, professional military
education and structured leadership training became the focus during the 1970s and 1980s.
For Official Use Only

1-2
MCRP 3-02B
The 1980s saw the development of the linear infighting neural-override engagement (LINE) sys-
tem. The LINE system, developed in response to a perceived need for a standardized close
combat system, was an important step in the evolution of a Marine Corps specific martial arts
program. In 1996 a review of the LINE system, combat hitting skills, pugil stick training, and
lessons learned from past programs were combined with the input of 10 subject matter experts
from numerous martial arts disciplines to develop the Marine Corps Close Combat Program.
This program combined all aspects of close combat into one program. In June 1999,
Commandant James L. Jones detailed his vision of a martial arts program and, with his guidance,
the close combat program underwent a period of testing and review that resulted in MCMAP.
The MCMAP evolved into its present day form by combining the best combat-tested martial arts
skills and time-honored close combat training techniques with proven Marine Corps core values
and leadership training.
Structure
The MCMAP consists of three disciplines: mental, character, and physical. Each discipline is
divided and presented systematically to Marines at each belt level. Those disciplines taught at
lower belt levels are then reviewed and reinforced during follow-on training and at the next belt
level. Many skills specific to one discipline reinforce the strengths of the other disciplines.
Martial culture studies strengthen the mental character of Marines through the historical study of
war, at the same time reinforcing the importance of character to a warrior and a martial society.
What makes this a complete program is the synergy of all three disciplines, which are inextricably
linked to each other, and to the advancement process within the belt ranking system. Commanders
are required to certify that the Marine meets annual training requirements and the prerequisites of
each specific belt level and possesses the maturity, judgment, and moral character required for
advancement. This ensures that as a Marine develops increased levels of lethality with additional
physical skills, he also develops a commensurate level of maturity and self-discipline.
Mental Discipline
Mental discipline has two main components, warfighting and PME, that encompasses
the following:
• Warfighting:
•The study of the art of war.
•Tactical decisionmaking training.
•The tactics, techniques, and procedures of expeditionary maneuver warfare.
•Marine Corps common skills training.
•Force protection and operational risk management.
• PME:
•The professional reading program.
•Martial culture studies.
•The historical study of war.
•The study of Marine Corps history, customs, courtesies, and traditions.
For Official Use Only
Chapter 1: Overview

Marine Corps Martial Arts Program
1-3
Mental discipline creates a smarter Marine, who is capable of understanding and handling the
complexity of modern warfare—a Marine who is tactically and technically proficient. This train-
ing begins with the transformation at recruit training and serves as the foundation of the future
leadership of the Corps.
Character Discipline
Character discipline encompasses the study of the human dimensions of combat and has two main
components: the Marine Corps core values program; which consists of honor, courage, and com-
mitment, and the Marine Corps leadership training program; which consists of mentoring, and
leadership schools and courses. This discipline is designed to instill the Marine Corps ethos into
every Marine. Character discipline is the spiritual aspect of each Marine and the collective spirit
of the Marine Corps. The components of the character discipline instill the warrior spirit in every
Marine and emphasize the best traditions for developing esprit de corps, camaraderie, and a
warrior mindset. By building the character of a Marine, the Marine develops as a warrior-defender
who embodies the core values and who is self-disciplined, confident, and capable of making the
right decision under any condition, from combat to liberty. The proverbial ethical warrior.
Physical Discipline
Physical discipline consists of two main components: fighting techniques and the combat condi-
tioning program. The fighting techniques are trained as part of MCMAP, a weapons-based
system beginning at assault fire and moving to the four elements of the fighting component (rifle
and bayonet, edged weapons, weapons of opportunity, and unarmed combat). All four elements
have a role across the entire spectrum of combat. The various armed and unarmed combat tech-
niques are combined with physical preparedness into the Marine Corps combat conditioning pro-
gram. It is the sinew of the Corps and prepares every Marine for his role as a basic rifleman—to
seek out, close with, and destroy the enemy by fire and movement or repel his assault by fire and
close combat. The Marine Corps combat conditioning program:
• Is battlefield oriented.
• Is based on being equipped for combat and develops the Marine’s ability to overcome physical
hardship and physical obstacles under any climatic condition and in any geographic location.
• Is designed on the philosophy that there are no time limits, level playing fields, or second
chances in combat.
• Develops a physical toughness in every Marine that will translate into mental toughness.
• Produces Marines who possess combat fitness and the ability to handle any situation that
confronts them.
Belt Ranking System
The MCMAP consists of a belt ranking system with five basic levels: tan, gray, green, brown,
and black belt (see table 1-1 on page 1-4). The colored belt levels are identified as user levels
and are designed to progressively develop the physical skills and lethality of the individual
Marine so that he becomes a stronger link in the Marine Corps chain. The user’s responsibilities
include participating in all technique classes, tie-ins, warrior studies, and sustaining techniques.
Marines must also participate in the appropriate belt-level drills and free sparring. Marines are
responsible at all times for their individual actions and conduct.
Chapter 1: Overview
For Official Use Only

1-4
MCRP 3-02B
Table 1-1 Marine Corps Martial Arts Program Belt Ranking System.
Tan Belt
Conducted at entry-level training as part of the transformation
process.
Requires proficiency in basic techniques and a basic understand-
ing of Marine Corps leadership and core values.
Gray Belt
Follow-on training after entry level.
Builds on the basics with introduction to intermediate techniques.
Requires mastery of Tan Belt techniques and proficiency of Gray
Belt techniques along with continued mental and character
discipline training.
Qualified to attend the instructor course and become MOS 0916.
Green Belt
Skill level for the noncommissioned officers.
Continued development of intermediate level training.
Requires mastery of Tan through Gray Belt techniques and
proficiency of Green Belt techniques.
Leadership and core values development training and PME
requirements.
Brown Belt
Continued intermediate level training as well as introduction to
advance techniques.
Mastery of Tan through Green Belt techniques and proficiency of
Brown Belt techniques. D
Develop ability to teach leadership and core values training.
Black Belt: 1st Degree
Becoming a serious student of the martial arts.
Advanced level skills training begins in earnest.
Mastery of Tan through Brown Belt techniques and proficiency in
Black Belt techniques.
Proven leader and mentor.
Black Belt:
Continued development and mastery of all components of the
various disciplines.
2d degree through 6th degree
Proven leader, teacher, and mentor.
Testing
Advancement in the belt ranking system includes meeting mental and character discipline
requirements and the prerequisites for each belt level. Each Marine will be required to show that
he has maintained proficiency in the physical disciplines of his current belt and the physical dis-
ciplines of the next belt level.
Martial Arts Instructor
The martial arts instructor develops users at the small unit level and is responsible for teaching
up to their own belt certification. An instructor teaches the physical techniques that are the
For Official Use Only
Chapter 1: Overview

Marine Corps Martial Arts Program
1-5
building blocks of our physical discipline and develops a unit’s character and mental training to
positively influence cohesion, esprit de corps, and readiness.
Martial Arts Instructor Trainer
The martial arts instructor trainer (MAIT) develops instructors within his unit, develops a unit
level plan, and coordinates the resources and abilities of the instructors within the unit. The
MAIT course is a 7 week, military occupational specialty (MOS) 0917-producing course held at
the lead school in Quantico, VA. A MAIT can run the instructor courses at the unit level and also
train and test Marines up to black belt instructor. Course attendance requirements are Green Belt
instructor or higher, sergeant or above with appropriate level PME completed, commander’s
consent, a first class physical fitness test, and medical screening.
Tactics and Techniques
The MCMAP provides the individual Marine with a set of weapons-based and unarmed tech-
niques for engaging in close combat across the spectrum of violence. Individual techniques can
be combined into various procedures to fit the tactical situation. The MCMAP techniques, in the
following subparagraphs, are key Marine Corps tactical concepts that are not standalone ideas
but are to be combined to achieve an effect that is greater than their separate sum.
Achieving a Decision
An indecisive fight creates a loss of energy and possibly Marines’ lives. Whether the intent is to
control an aggressor through restraint or defend themselves in war, Marines must have a clear
purpose before engaging in close combat and act decisively once engaged.
Gaining an Advantage
A basic principle of martial arts is to use the aggressor’s strength and momentum against him to
gain more leverage than one’s own muscles alone can generate, thereby gaining an advantage.
Achieving surprise through deception or stealth can also greatly increase leverage. In close com-
bat, Marines must exploit every advantage over an aggressor to ensure a successful outcome.
This can include employing various weapons and close combat techniques that will present a
dilemma to the aggressor.
Speed
In close combat, the speed and violence of the attack against an aggressor provides Marines with
a distinct advantage. Marines must know and understand the basics of close combat so that they
can act instinctively with speed to execute close combat techniques.
Adapting
Close combat can be characterized by chaos, friction, uncertainty, disorder, and rapid change.
Each situation is a unique combination of shifting factors that cannot be controlled with
Chapter 1: Overview
For Official Use Only

1-6
MCRP 3-02B
precision or certainty. For example, a crowd control mission may call for Marines to employ var-
ious techniques ranging from nonlethal restraint to more forceful applications. Marines who
adapt quickly will have a significant advantage.
Exploiting Success
An aggressor will not typically surrender simply because he was placed at a disadvantage.
Marines cannot be satisfied with gaining an advantage in a close combat situation. Marines must
exploit any advantage aggressively and forcefully until an opportunity arises to completely dom-
inate the aggressor. Marines must exploit success by using every advantage that can be gained.
For Official Use Only
Chapter 1: Overview

CHAPTER 2
Tan Belt
The Tan Belt is the first belt level in MCMAP and is the minimum basic requirement for all
Marines. Tan Belt training includes the introduction to the basic fundamentals of the mental,
character, and physical disciplines of MCMAP conducted during entry-level training. War-
fighting concepts, character values, and the basic fighting techniques that are required of a
basically trained Marine are also included in Tan Belt training. In addition to MCMAP
requirements, Tan Belt training and readiness events are also a component of Marine Corps
common skills volume I in accordance with Marine Corps Order P3500.72A, Marine Corps
Ground Training and Readiness (T & R) Program.
Tan Belt Requirements.
Prerequisites
None
Training Hours
Minimum of 27.5 hours of instruction, exclud-
ing remedial practice time and testing
Sustainment
None
Hours
For Official Use Only

Marine Corps Martial Arts Program
2-3
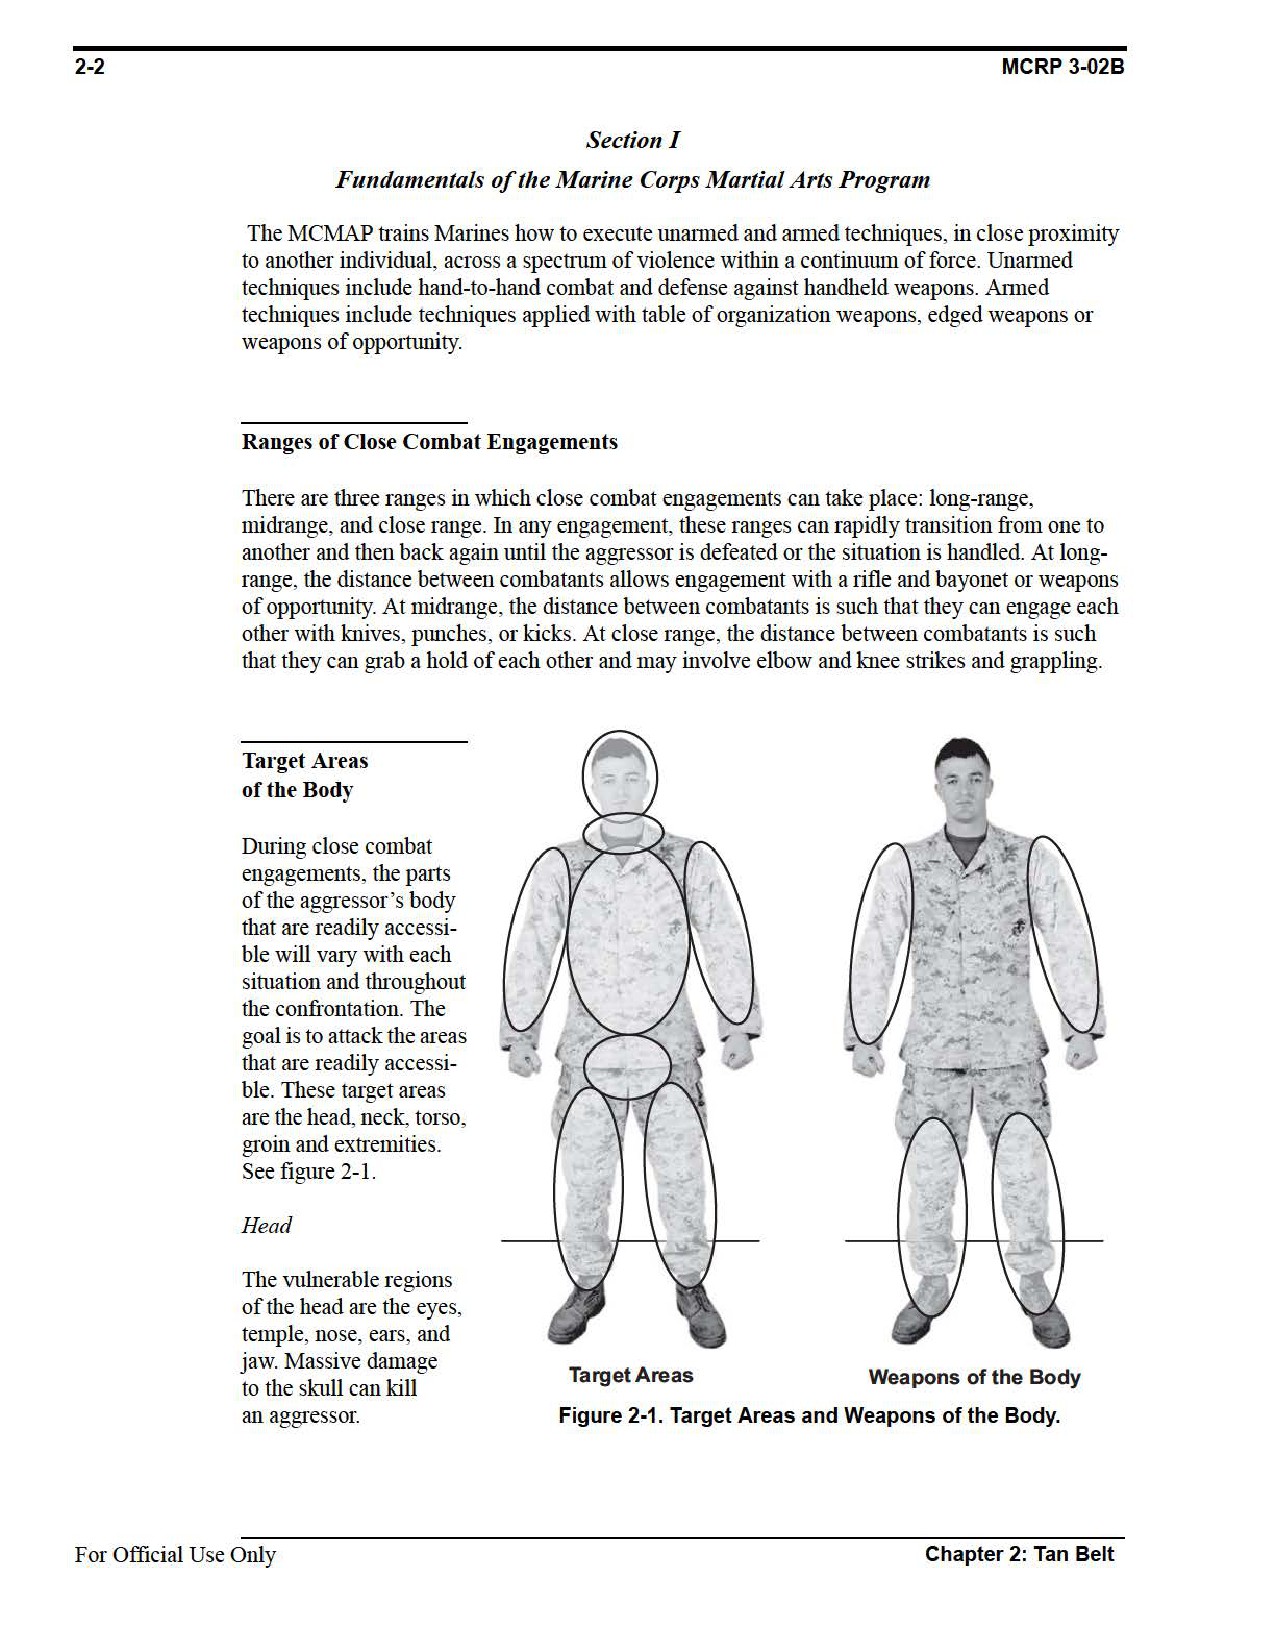
Neck
The entire neck is vulnerable as it contains vital blood vessels, the trachea, and the upper portion
of the spine.
Torso
The clavicle, ribs, solar plexus, spine, and internal organs are vulnerable to attack.
Groin
This is a very sensitive area.
Extremities
Significant damage to joints and structure can cause immobilization or loss of the use of
that limb.
Weapons of the Body
The weapons of the body are divided into two groups: the arms (to include the hands, forearms,
and elbows) and the legs (to include the knees, shins, instep, toe, heel, and the ball of the foot).
See figure 2-1.
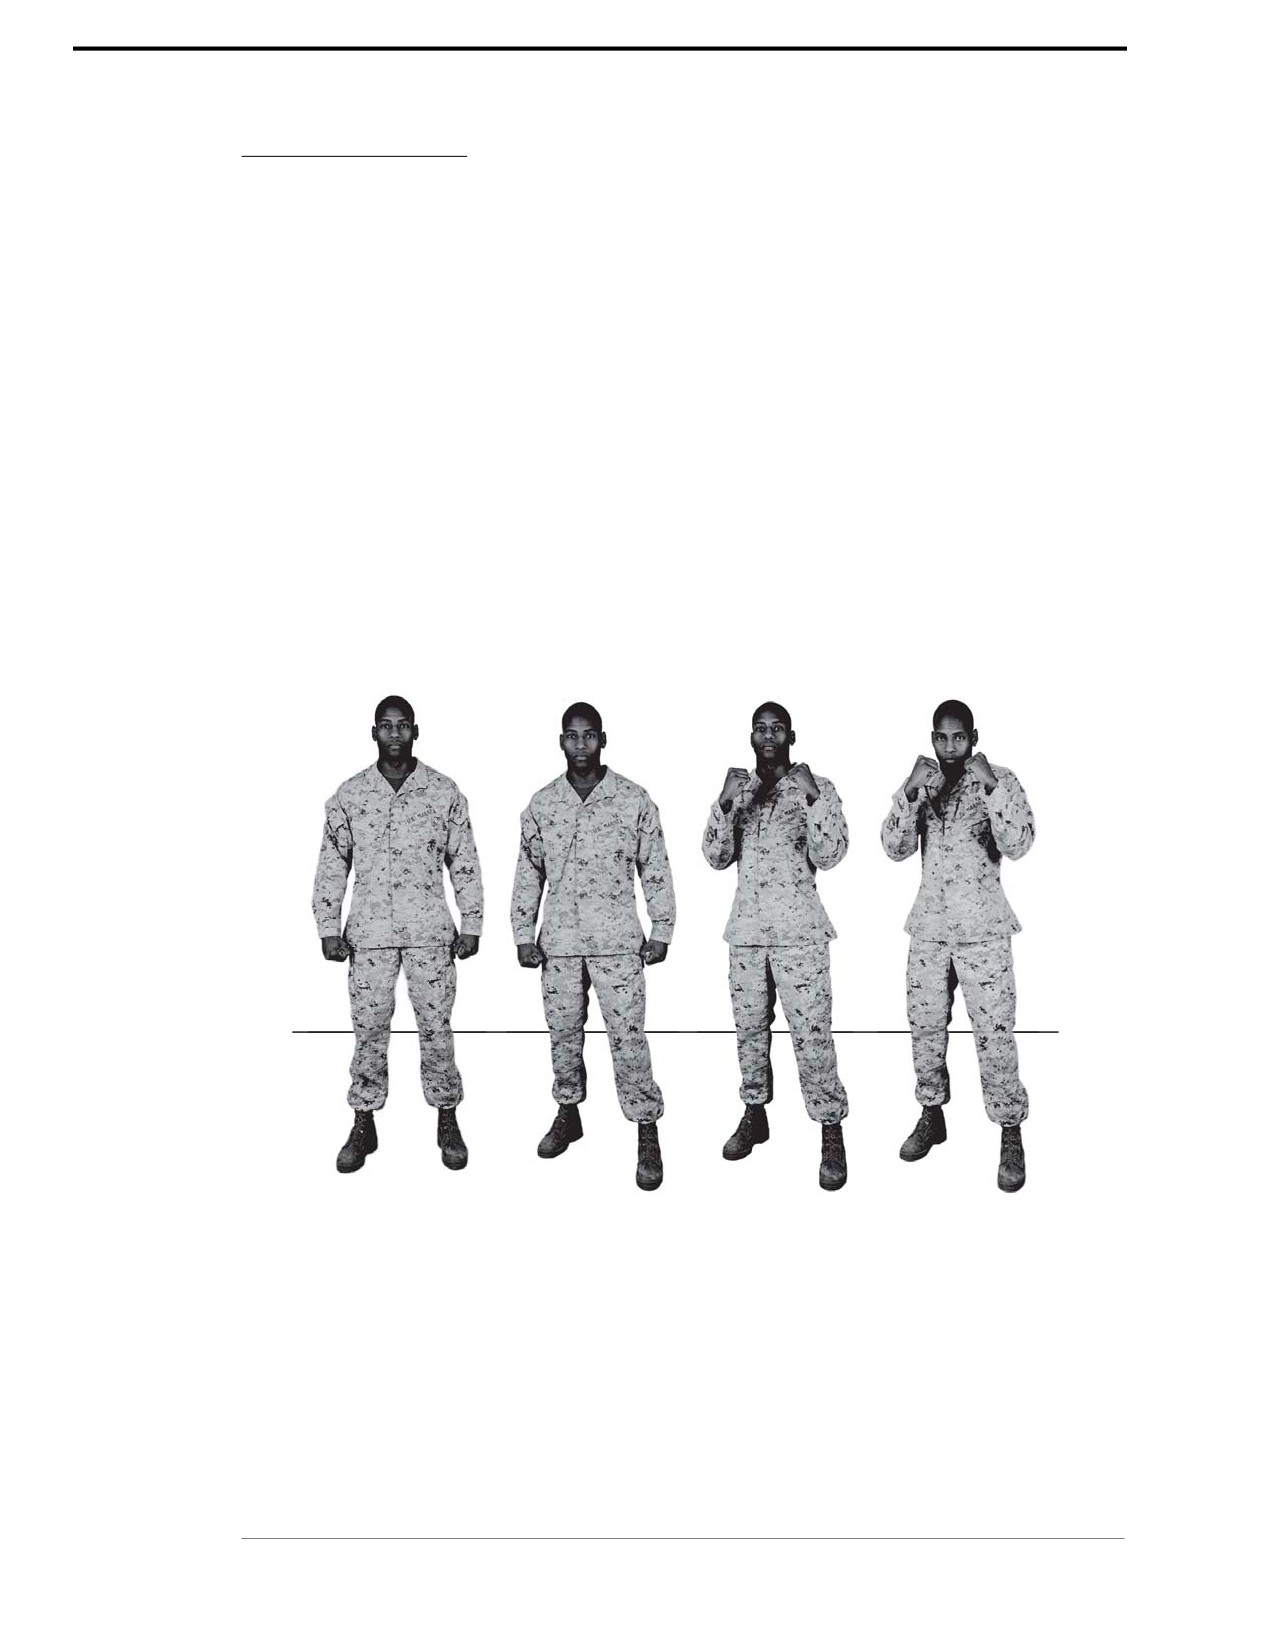
Basic Warrior Stance
The basic warrior stance provides the foundation for all movements and techniques in a close
combat situation using the feet, hands, elbows, and chin.
Feet Apart
Place the feet shoulder-width apart, take a half step forward with the left foot, and turn the hips
and shoulders at approximately a 45-degree angle. Distribute your weight evenly by bending the
knees slightly and adjusting your feet in order to maintain your balance.
Hands Up
Loosen your fists and bring your hands up to chin level or high enough to protect the head
without obstructing your vision.
Elbows In
Tuck your elbows in close to your body protecting the torso.
Chin Down
Tuck your chin down taking advantage of the natural protection provided by the shoulders.
Chapter 2: Tan Belt
For Official Use Only
2-4
MCRP 3-02B
Angles of Movement
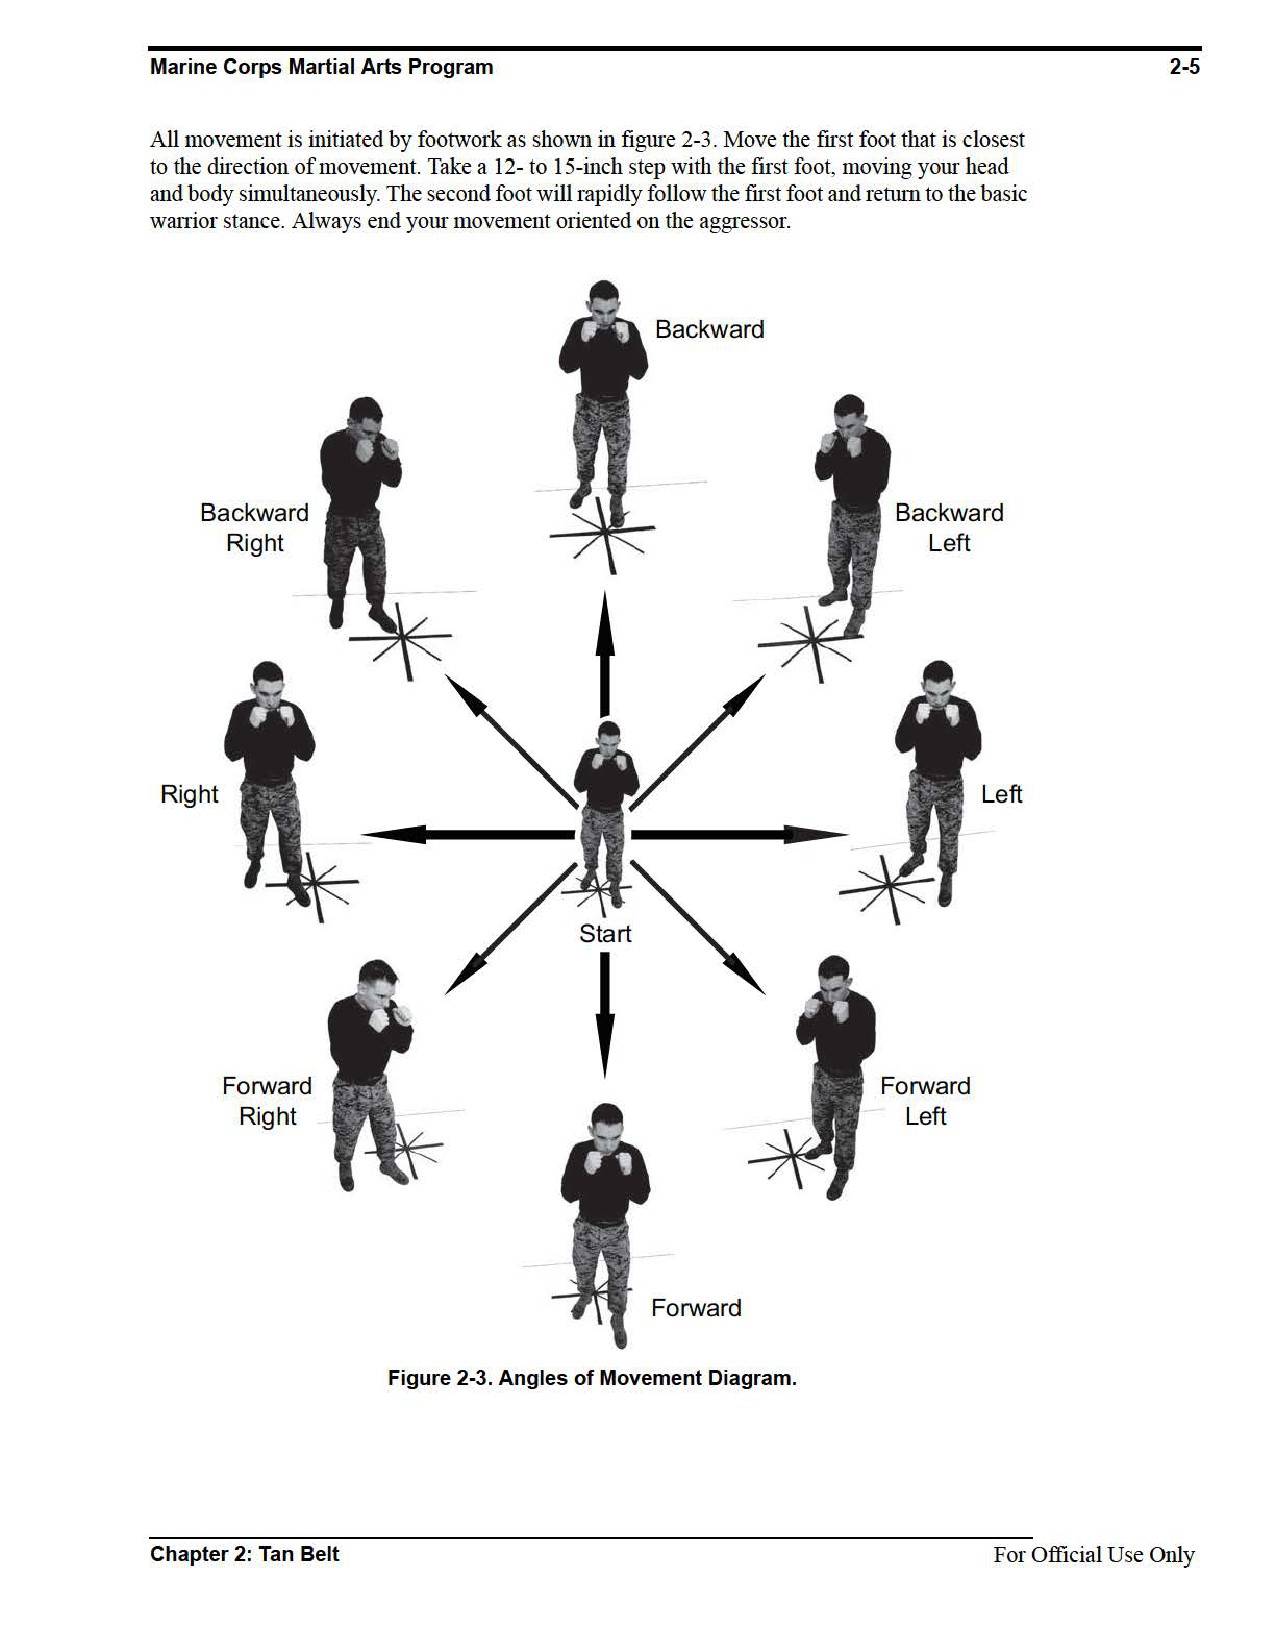
The purpose of movement is to take control of the confrontation and retain a tactical advantage.
Movement is necessary because it—
• Makes the different target areas of the aggressor’s body accessible.
• Enables the use of different weapons of your body.
• Increases power and maximize momentum.
When facing an aggressor, movement is made at approximately 45-degree angles to either side
of the aggressor. Moving at a 45-degree angle is the best way to avoid an aggressor’s strike and
put yourself in the best position to attack an aggressor using all of your weapons of the body.
Since MCMAP techniques are initiated from the basic warrior stance shown in figure 2-2, you
must know how to move in all directions while maintaining your stance. During any movement,
the legs and feet should never cross. Once a movement is completed, you should return to the
basic warrior stance. This will help to protect yourself and to put you in the proper position for
launching an attack against an aggressor.
Figure 2-2. Basic Warrior Stance.
For Official Use Only
Chapter 2: Tan Belt

2-8
MCRP 3-02B
Telegraphing
Telegraphing a strike informs your aggressor that your intentions are to launch an attack through
your body movements. Often, an untrained fighter will telegraph his intention to attack by draw-
ing his hand back in view of his aggressor, changing facial expression, tensing neck muscles,
or twitching.
These movements, however small, immediately indicate an attack is about to be delivered. If
your aggressor is a trained fighter, he may be able to evade or counter your attack. If your
aggressor is an untrained fighter, he may be able to minimize the effect of your attack. Staying
relaxed helps to reduce telegraphing.
Lead Hand Punch
The lead hand punch is a snapping straight punch executed by the forward or the lead hand. It is
a fast, unexpected punch designed to stun an aggressor and to set up for follow-on techniques. A
lead hand punch conceals movement and allows you to get close to the aggressor. If possible,
lead hand punches should strike soft tissue areas.
Striking Surface
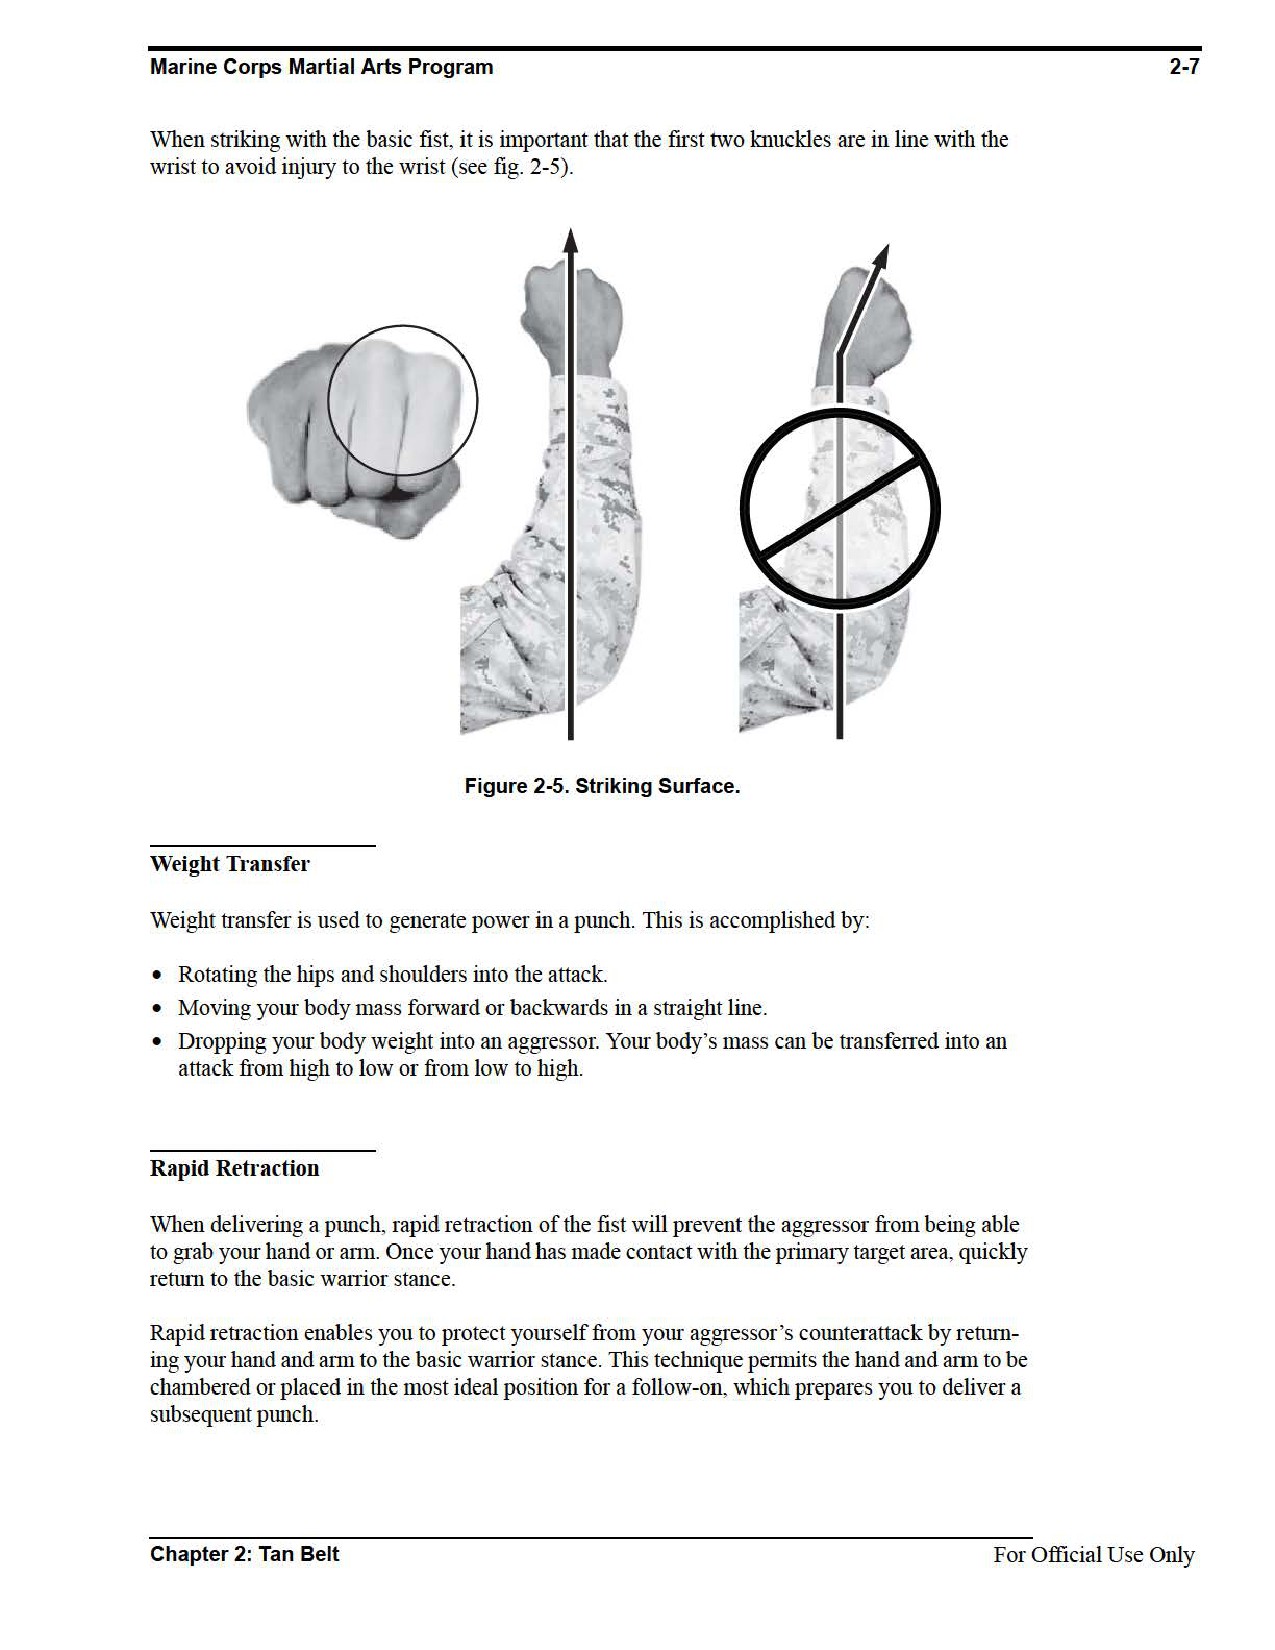
The striking surface is the first two knuckles of the fist.
Target Areas of the Body
Soft tissue areas such as the nose, the jaw, and the throat are the primary target areas.
Technique
~ Assume the basic warrior stance.
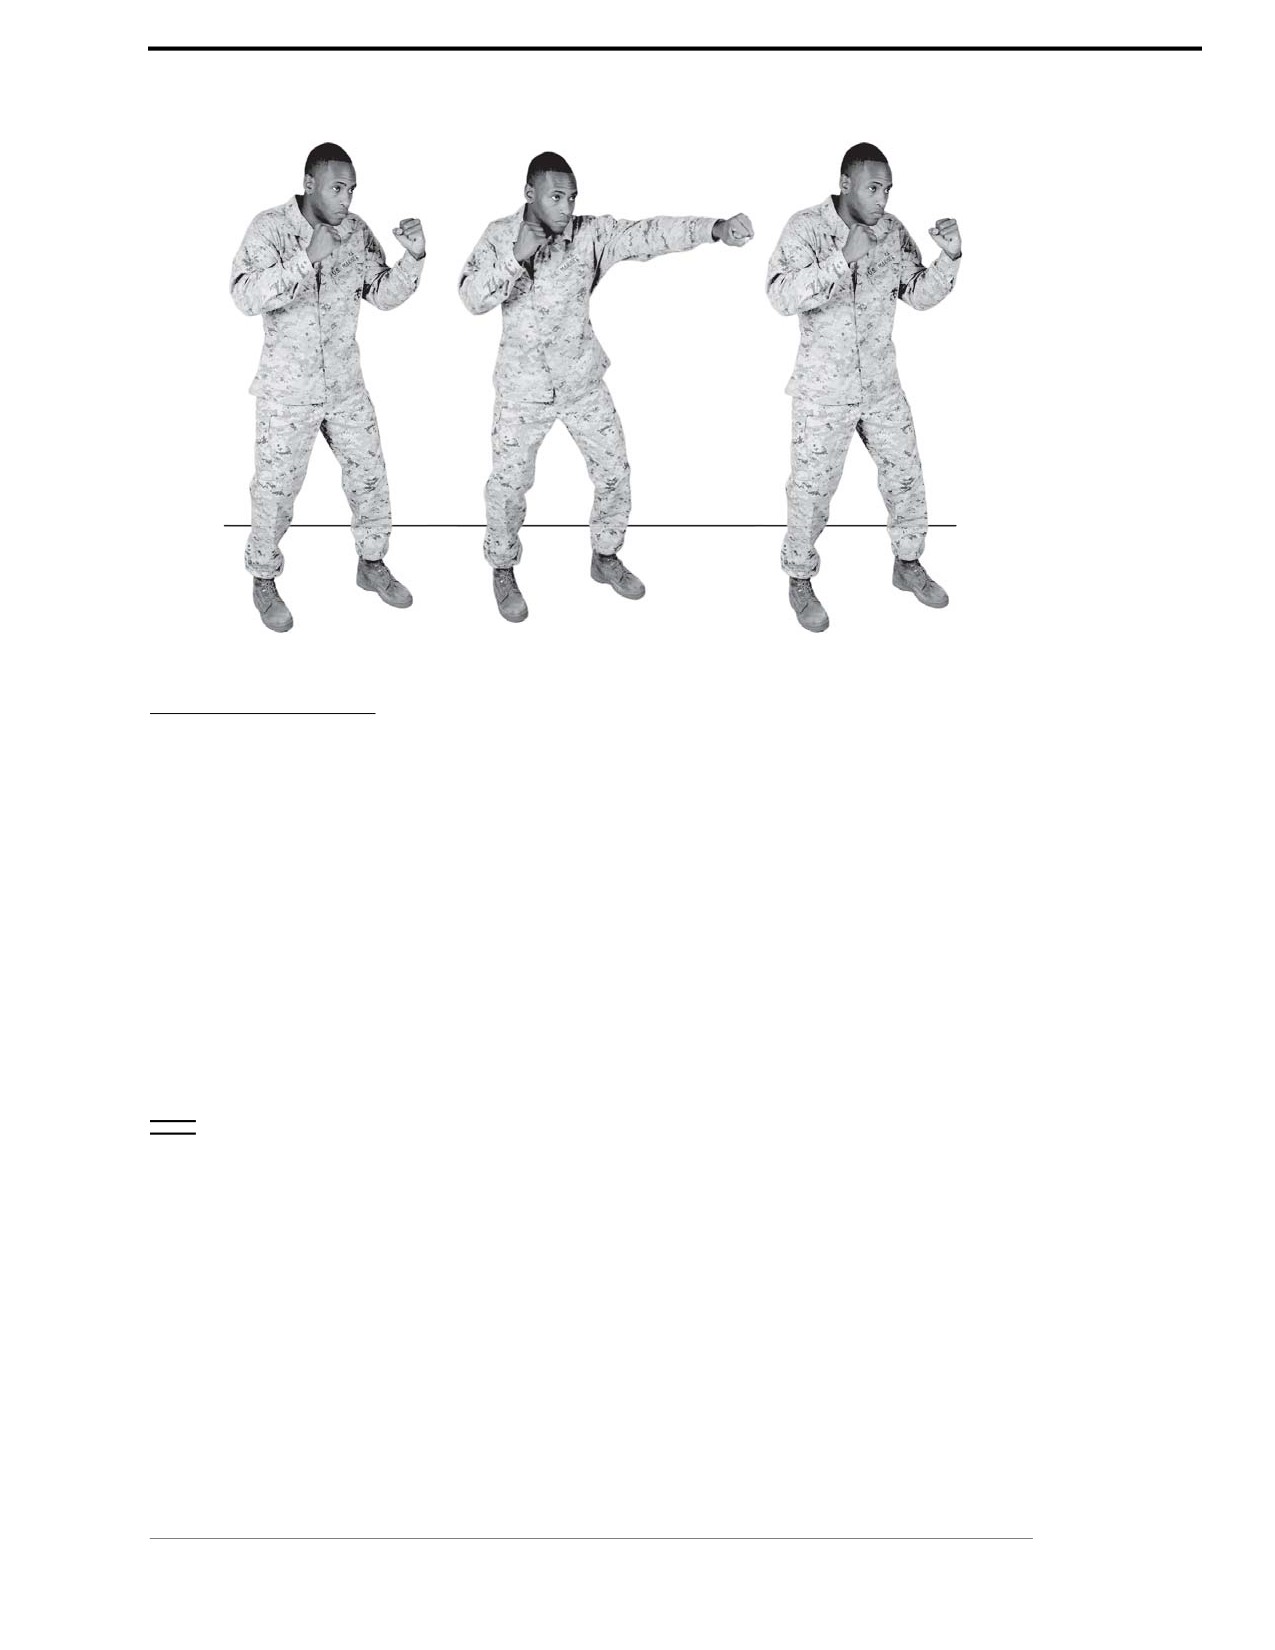
~ Snap your lead hand out to nearly a full extension, while rotating your palm to the deck.
Do not over extend your elbow because this can cause an injury due to hyperextension
of the joint.
~ Keep your rear hand in place to protect your head.
~ Retract your hand rapidly, returning to the basic warrior stance.
~ The fist will travel out and back in a straight line. A mistake that is commonly made is pulling
back low and then resetting, which will leave you open to a counter punch.
See figure 2-6.
For Official Use Only
Chapter 2: Tan Belt
Marine Corps Martial Arts Program
2-9
Figure 2-6. Lead Hand Punch.
Rear Hand Punch
The rear hand punch is a snapping punch that is executed by the rear hand. This is a power punch
that is designed to inflict the maximum damage on your aggressor. The power comes from push-
ing off of your rear leg while rotating your hips and shoulders.
Striking Surface
The striking surface is the first two knuckles of the fist.
Target Areas of the Body
Soft tissue areas such as the nose, the jaw, and the throat are the primary target areas.
Technique
~ Assume the basic warrior stance.
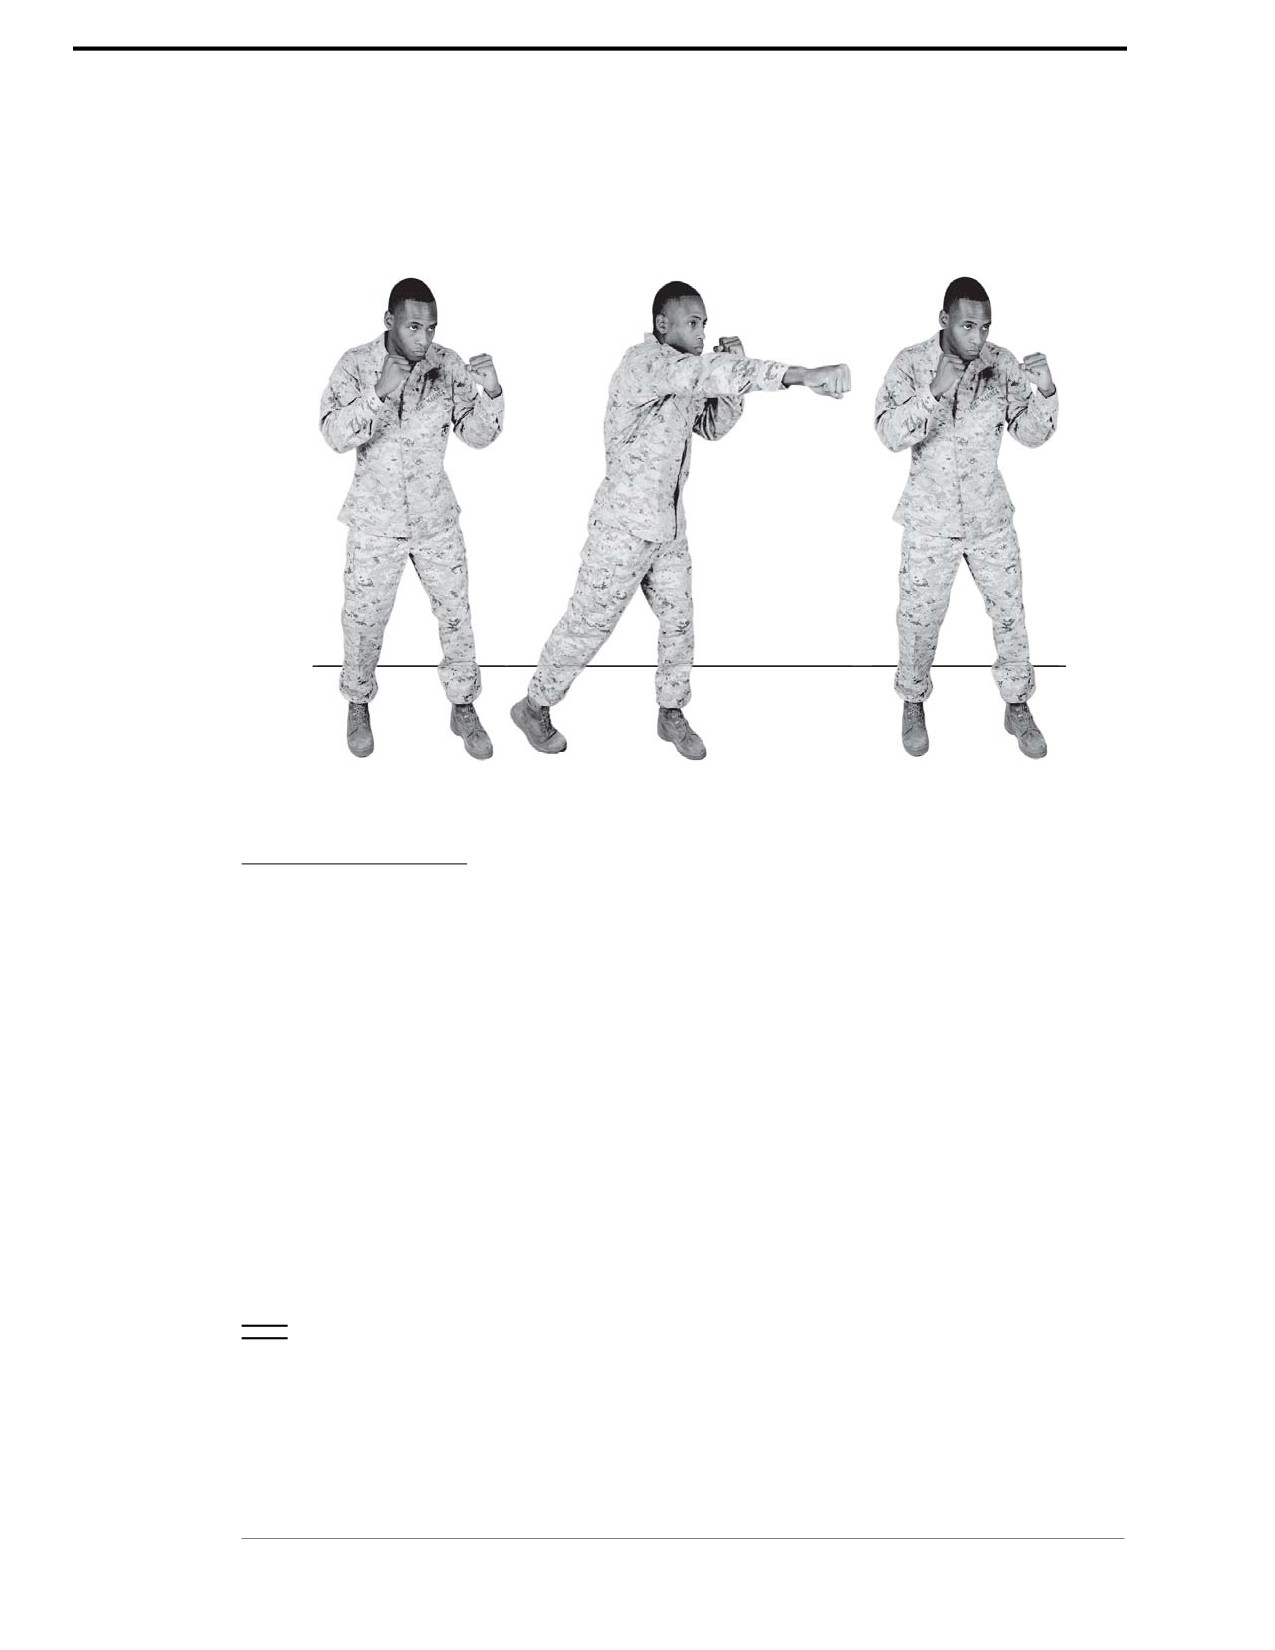
~ Rotate your hips and shoulders forcefully toward the aggressor and thrust your rear hand
straight out, palm down, to nearly full extension.
~ Shift your body weight to your lead foot while pushing off on the ball of your rear foot.
~ Your rear heel may raise or flare off of the deck.
~ Keep your lead hand in place to protect your head.
~ Make contact on the aggressor with the first two knuckles of your fist.
Chapter 2: Tan Belt
For Official Use Only
2-10
MCRP 3-02B
~ Rapidly return to the basic warrior stance.
~ The fist travels out and back in a straight line. A common mistake is to pull back low and then
reset. This is incorrect and leaves you open to a counterattack.
See figure 2-7.
Figure 2-7. Rear Hand Punch.
Uppercut
The uppercut is a powerful punch originating below the aggressor’s line of vision. It is executed
in an upward motion traveling up the centerline of the aggressor’s body. It is delivered in close
and usually follows a preparatory strike that leaves the primary target area unprotected. When
delivered to the chin or jaw, the uppercut can render an aggressor unconscious, cause extensive
damage to the neck, or sever the tongue.
Striking Surface
The striking surface is the first two knuckles of the fist.
Target Areas of the Body
Soft tissue areas such as the nose, the jaw, and the throat are the primary target areas of the body.
Technique
~ Assume the basic warrior stance.
~ Rotate your fist so that your palm is facing you. Ensure that your lead hand stays up and in
place to protect your head.
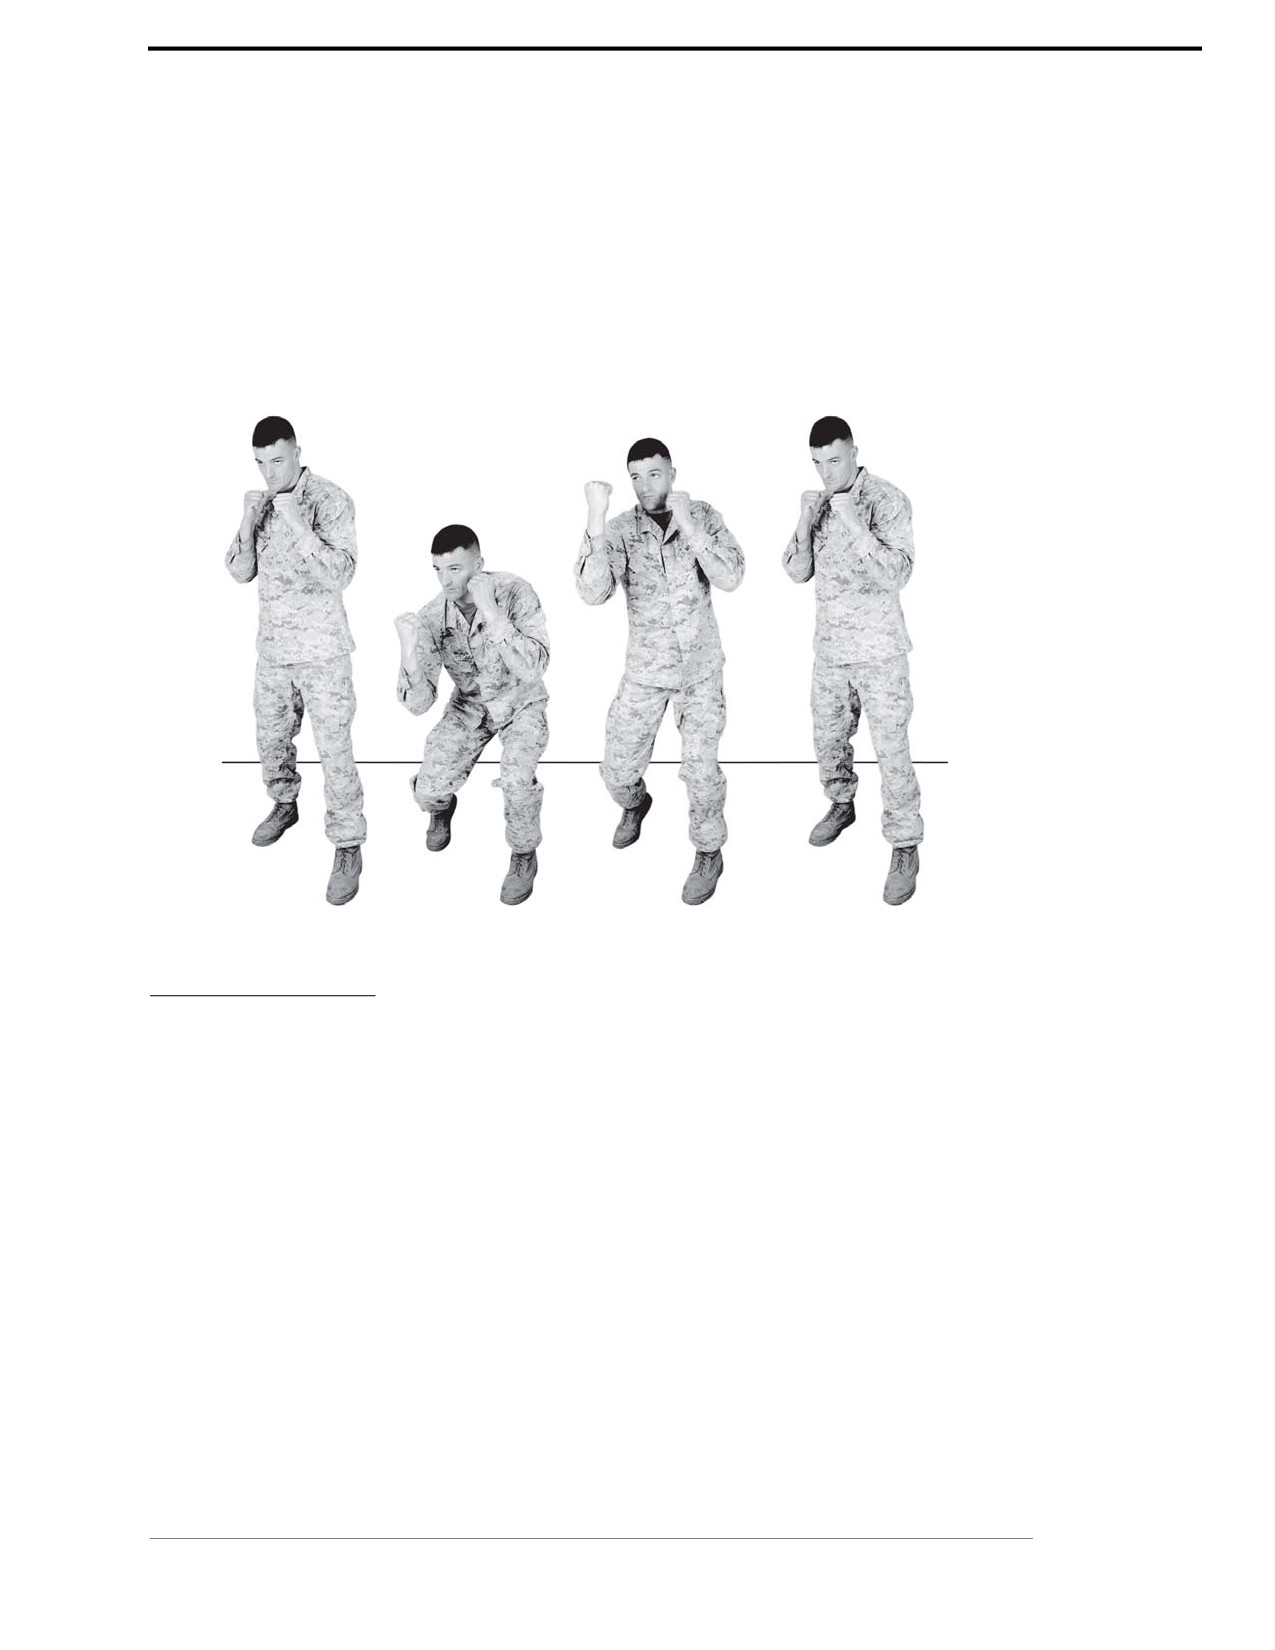
~ Power is generated from low to high. Start with your body weight low, legs slightly bent.
For Official Use Only
Chapter 2: Tan Belt
Marine Corps Martial Arts Program
2-11
~ Explode upwards with your legs, hips, and shoulders, drive your fist straight up through the
primary target area.
~ Rapidly retract your hand and return to the basic warrior stance.
~ Your fist should never drop below chest level or rise above the aggressor’s head when
executing this punch to the primary target area of the jaw. A common mistake is to drop the
hand all the way to your waist during the execution of the punch, which is incorrect. This
execution is used in an effort to get all the power from the arm that is executing the punch. Its
power derives from the use of the lower body.
See figure 2-8.
Figure 2-8. Uppercut.
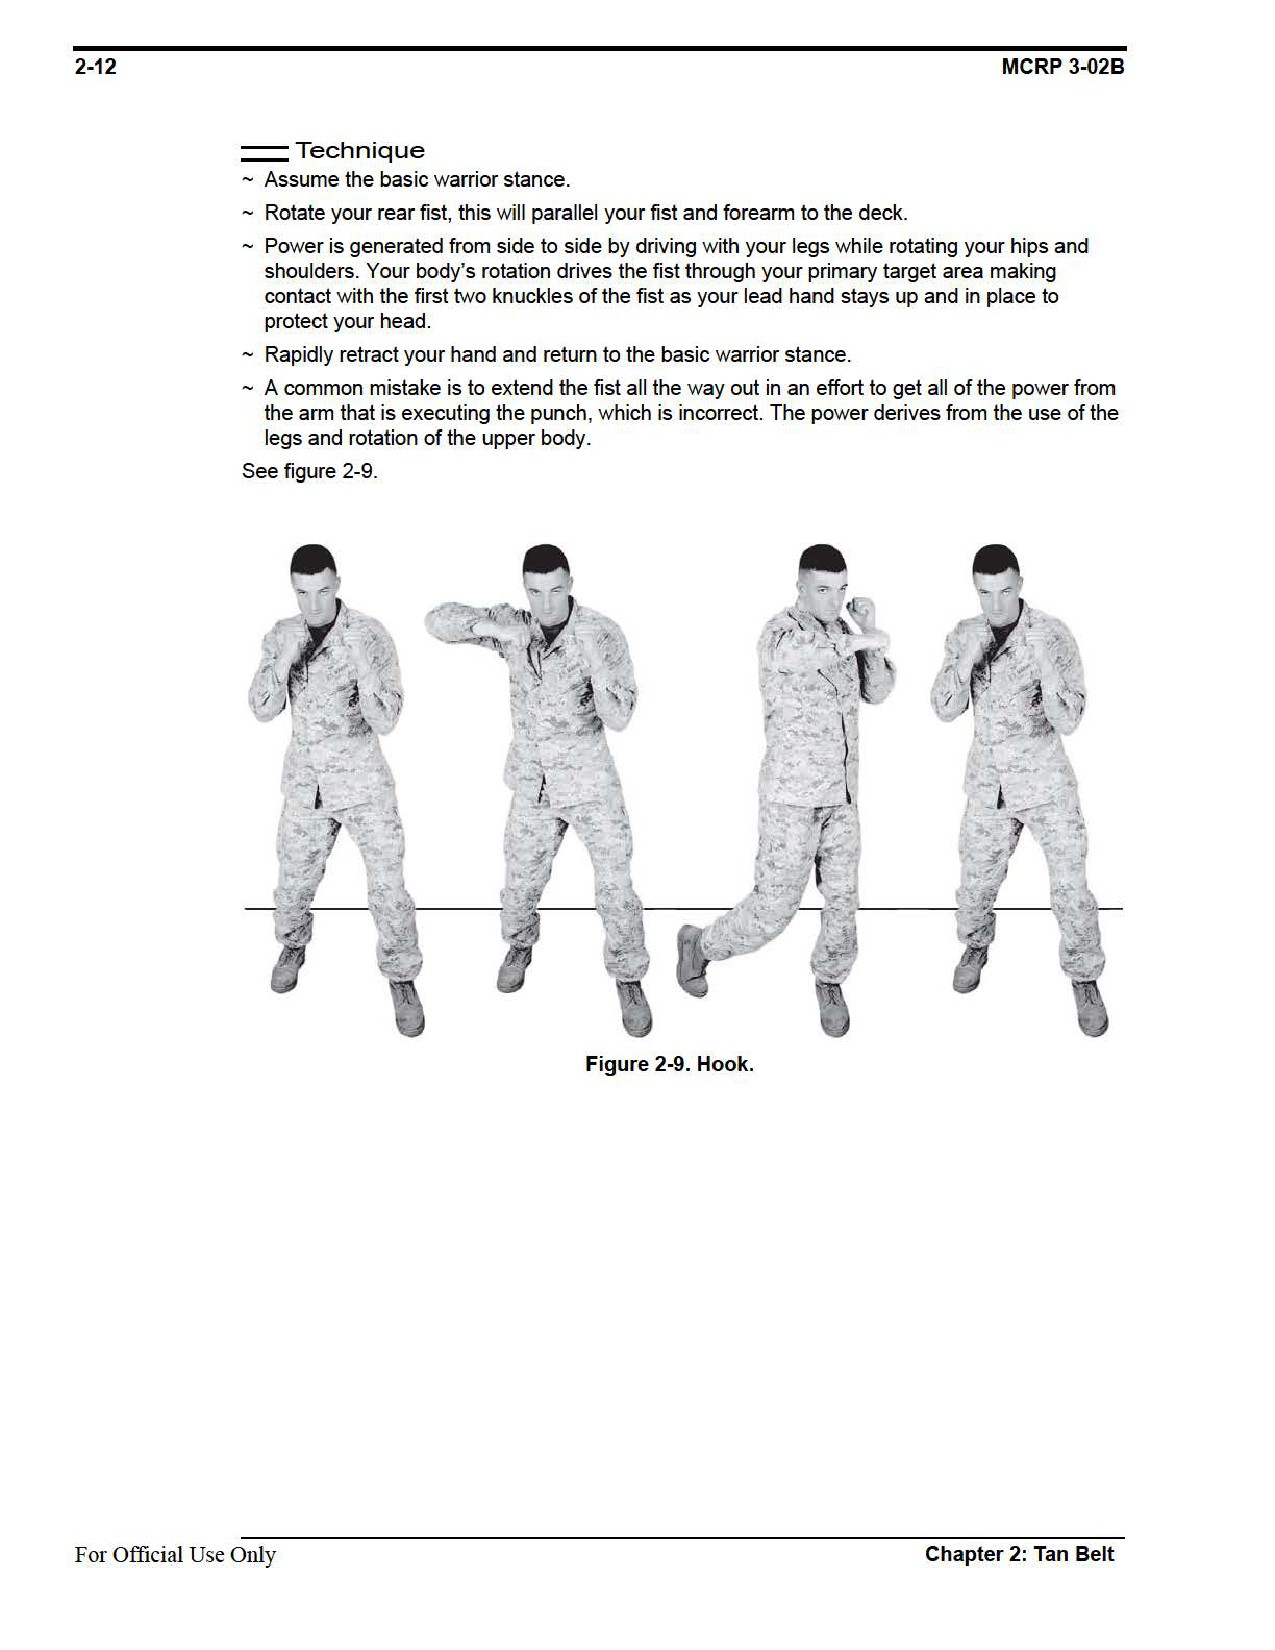
Hook
The hook is a powerful punch that is executed close in and is usually preceded by a pre-
paratory strike.
Striking Surface
The striking surface is the first two knuckles of the fist.
Target Areas of the Body
When delivered to the chin or jaw, the hook can render an aggressor unconscious or cause exten-
sive damage to the neck. When delivered to the body it can cause pain, shortness of breath, and
even break ribs.
Chapter 2: Tan Belt
For Official Use Only
2-14
MCRP 3-02B
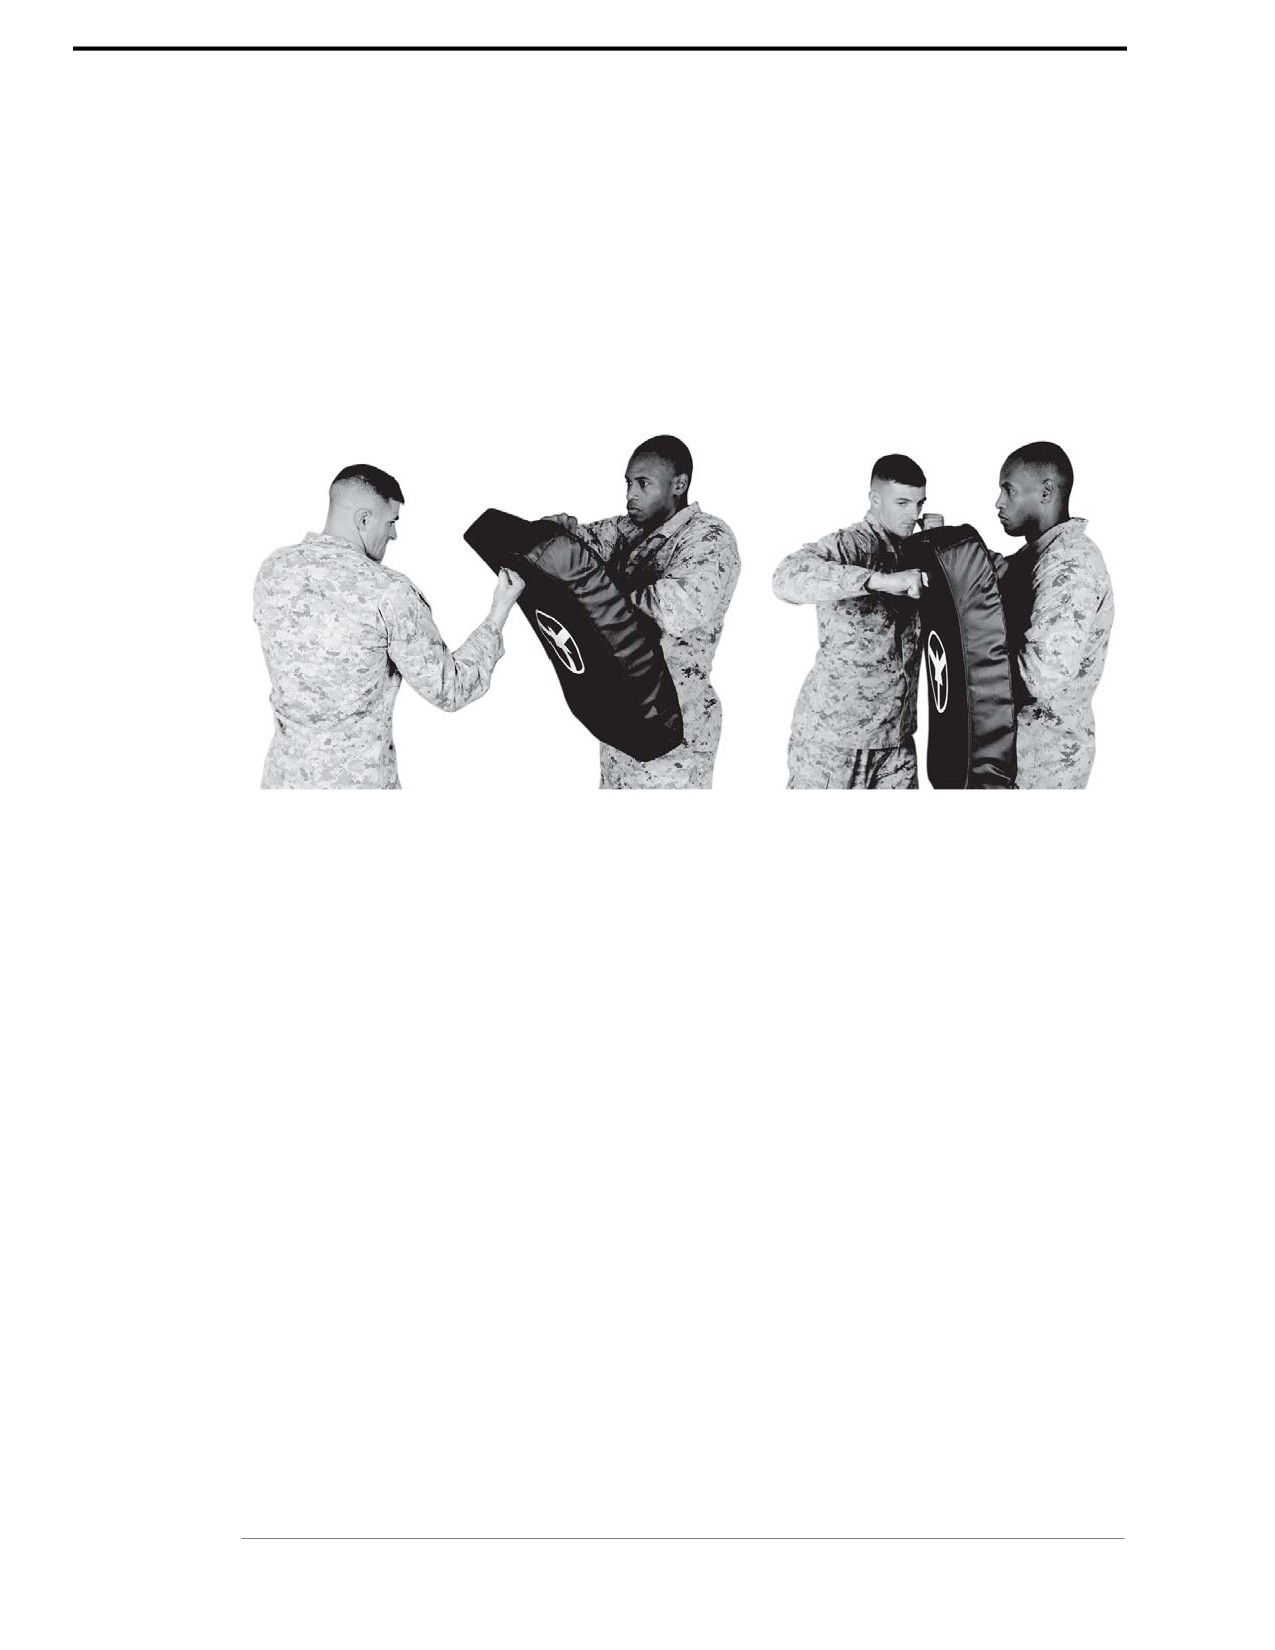
Upper Cut
The striking pad is held with one arm through the center straps and the other upholding the top
strap. The aggressor will extend his hand holding the top of the striking pad, creating a horizon-
tal striking surface so that you can execute the uppercut (see fig. 2-11).
Hook
The striking pad is held the same as when executing the lead and rear hand punches. The differ-
ence is that the aggressor will turn 90-degrees to the side of the incoming hook (see fig. 2-11).
Figure 2-11. Upper Cut and Hook.
For Official Use Only
Chapter 2: Tan Belt

Marine Corps Martial Arts Program
2-15
Section III
Break-Falls
The purpose of break-falls is to reduce the chance of injury. Break-falls are used to absorb the
impact if you should fall or are thrown. This will allow you to quickly get back on your feet and
minimize any injury sustained by the fall. This section will cover the front break-fall, back
break-fall, left/right side break-fall, and the forward shoulder roll.
Refer to appendix A for corresponding safeties 1, 5, and 6.
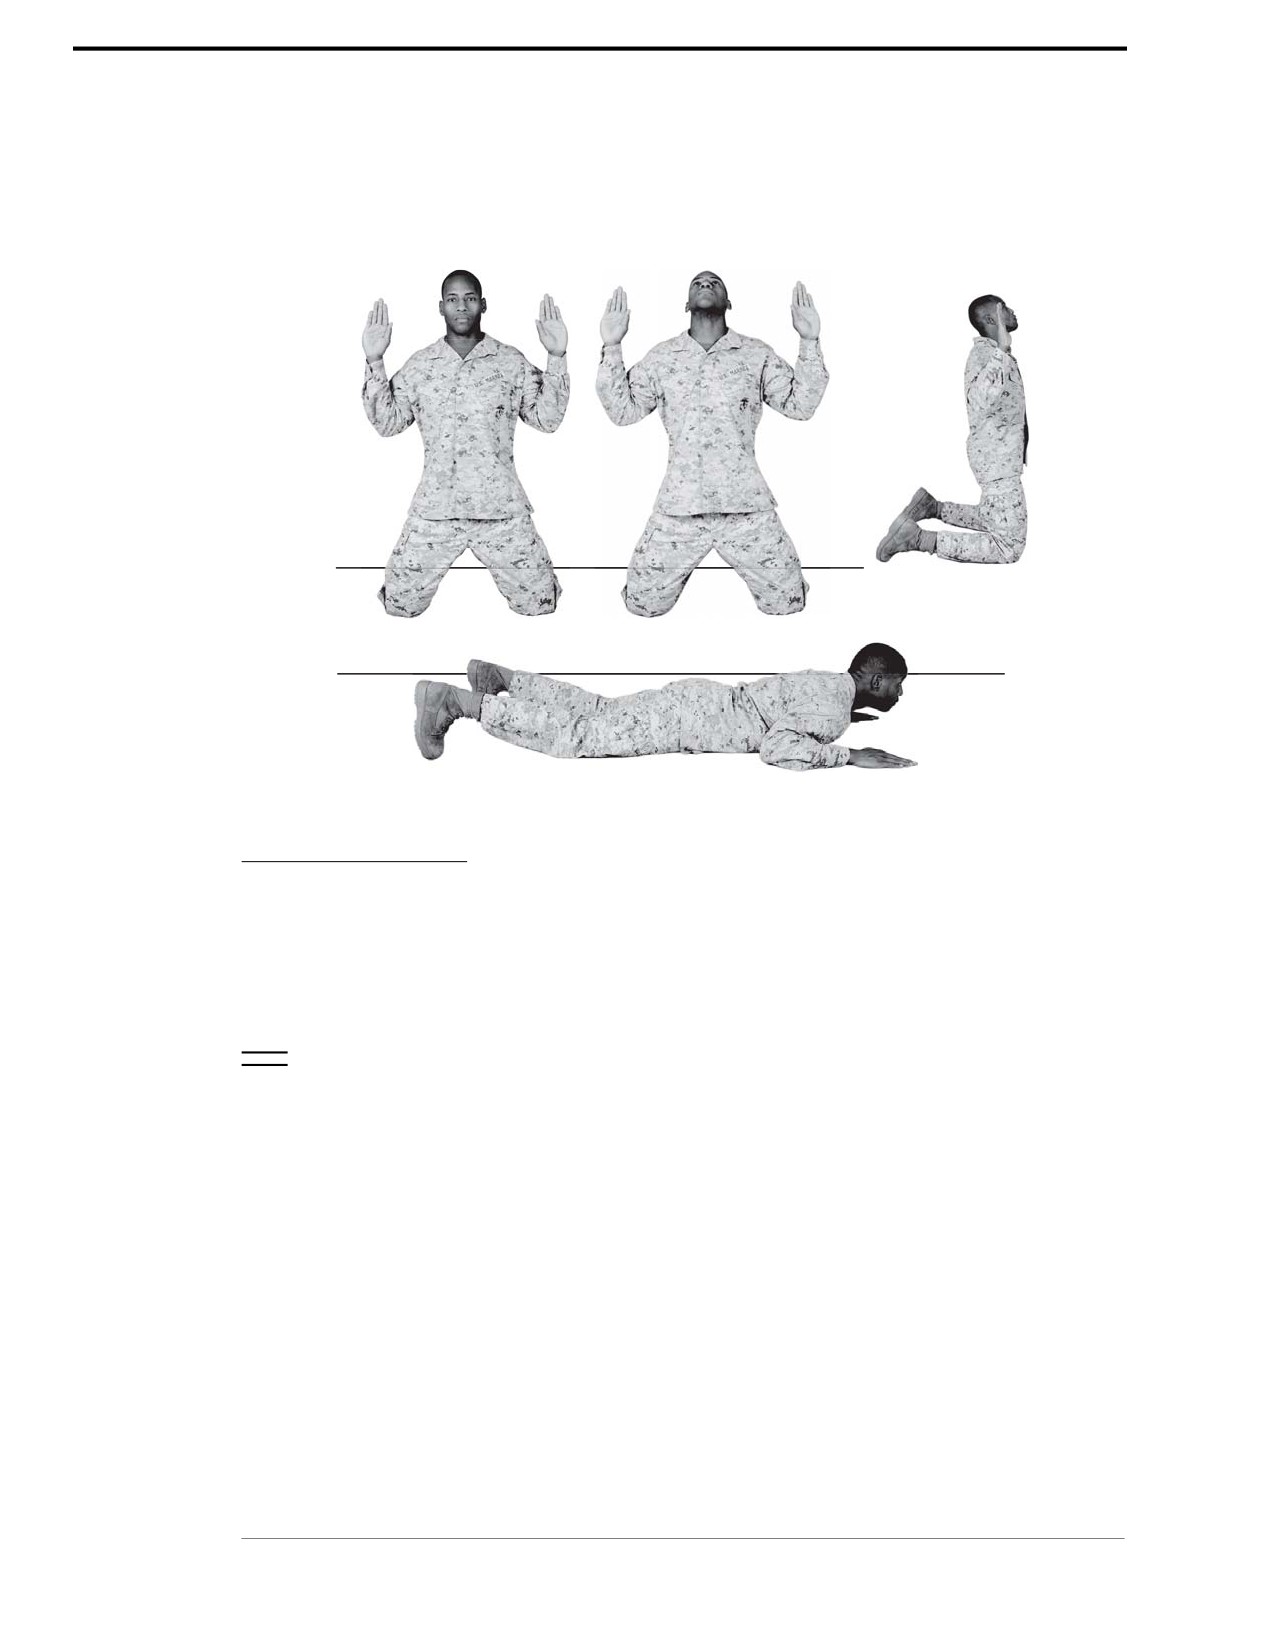
Front Break-Fall
A front break-fall is executed to break your fall when falling forward and will never be executed
from the standing position during training.
Technique
The front break-fall is taught and practiced in stages, from the deck and from a kneeling
position. The front break-fall is never executed from the standing position.
From the Deck
~ Begin by lying on the deck on your stomach.
~ Place your forearms and palms flat on the deck, with your elbows bent and your chest and
head raised off of the deck.
~ Raise your head and neck so that you are looking straight ahead.
~ Determine the proper hand placement that will allow your forearms and palms to support your
upper torso and keep your head off of the deck.
~ Proper hand and forearm placement will disperse the impact of the fall and help to keep your
head from hitting the deck.
~ Practice by raising the forearm and slapping the deck with the fingers extended and joined.
From a Kneeling Position
~ Assume a two-knee kneeling position and look up raising your chin.
~ Bend your elbows in close to your body and place your palms facing away from you in the
position that will allow you to disperse the impact of the fall.
Chapter 2: Tan Belt
For Official Use Only
2-16
MCRP 3-02B
~ Fall forward, breaking your fall with your forearms and palms. The forearms and palms,
should strike the deck simultaneously. Fingers will be extended and joined.
~ Keep your head up to avoid striking your chin on the deck.
See figure 2-12.
Figure 2-12. Front Break-Fall.
Back Break-Fall
A back break-fall is executed to break the fall when being thrown or falling backwards and will
never be executed from the standing position during training. The back break-fall is taught and
practiced in stages, from the deck and from a squatting position.
Technique
The back break-fall is taught in stages, from the deck and from a squatting position.
From the Deck
~ Begin by lying on the deck on your back as shown in figure 2-13.
~ Place your arms at approximately a 45-degree angle downward, out and away from your
body, with your palms down.
~ Tuck in your chin.
~ Offer resistance with your arms to raise your head, neck, and shoulders off of the deck.
~ Determine proper arm placement that allows you to keep your head off of the deck.
~ Proper arm placement will disperse the impact of the fall.
~ Once proper arm placement is determined, cross your hands in an X in front of your chest.
~ Tuck in your chin to keep your head up off of the deck.
~ Bend your knees to raise them off of the deck.
For Official Use Only
Chapter 2: Tan Belt
Marine Corps Martial Arts Program
2-17
~ Swing your arms out and slap the deck, making contact from your forearms to your palms.
The forearms and the meaty portion of the palms, down to the fingertips, should strike the
deck simultaneously. Your fingers and thumb will be extended and joined.
~ Offer resistance with your arms to raise your head, neck, and shoulders off of the deck.
~ Practice this step as many times as necessary to ensure proper arm placement to break
the fall.
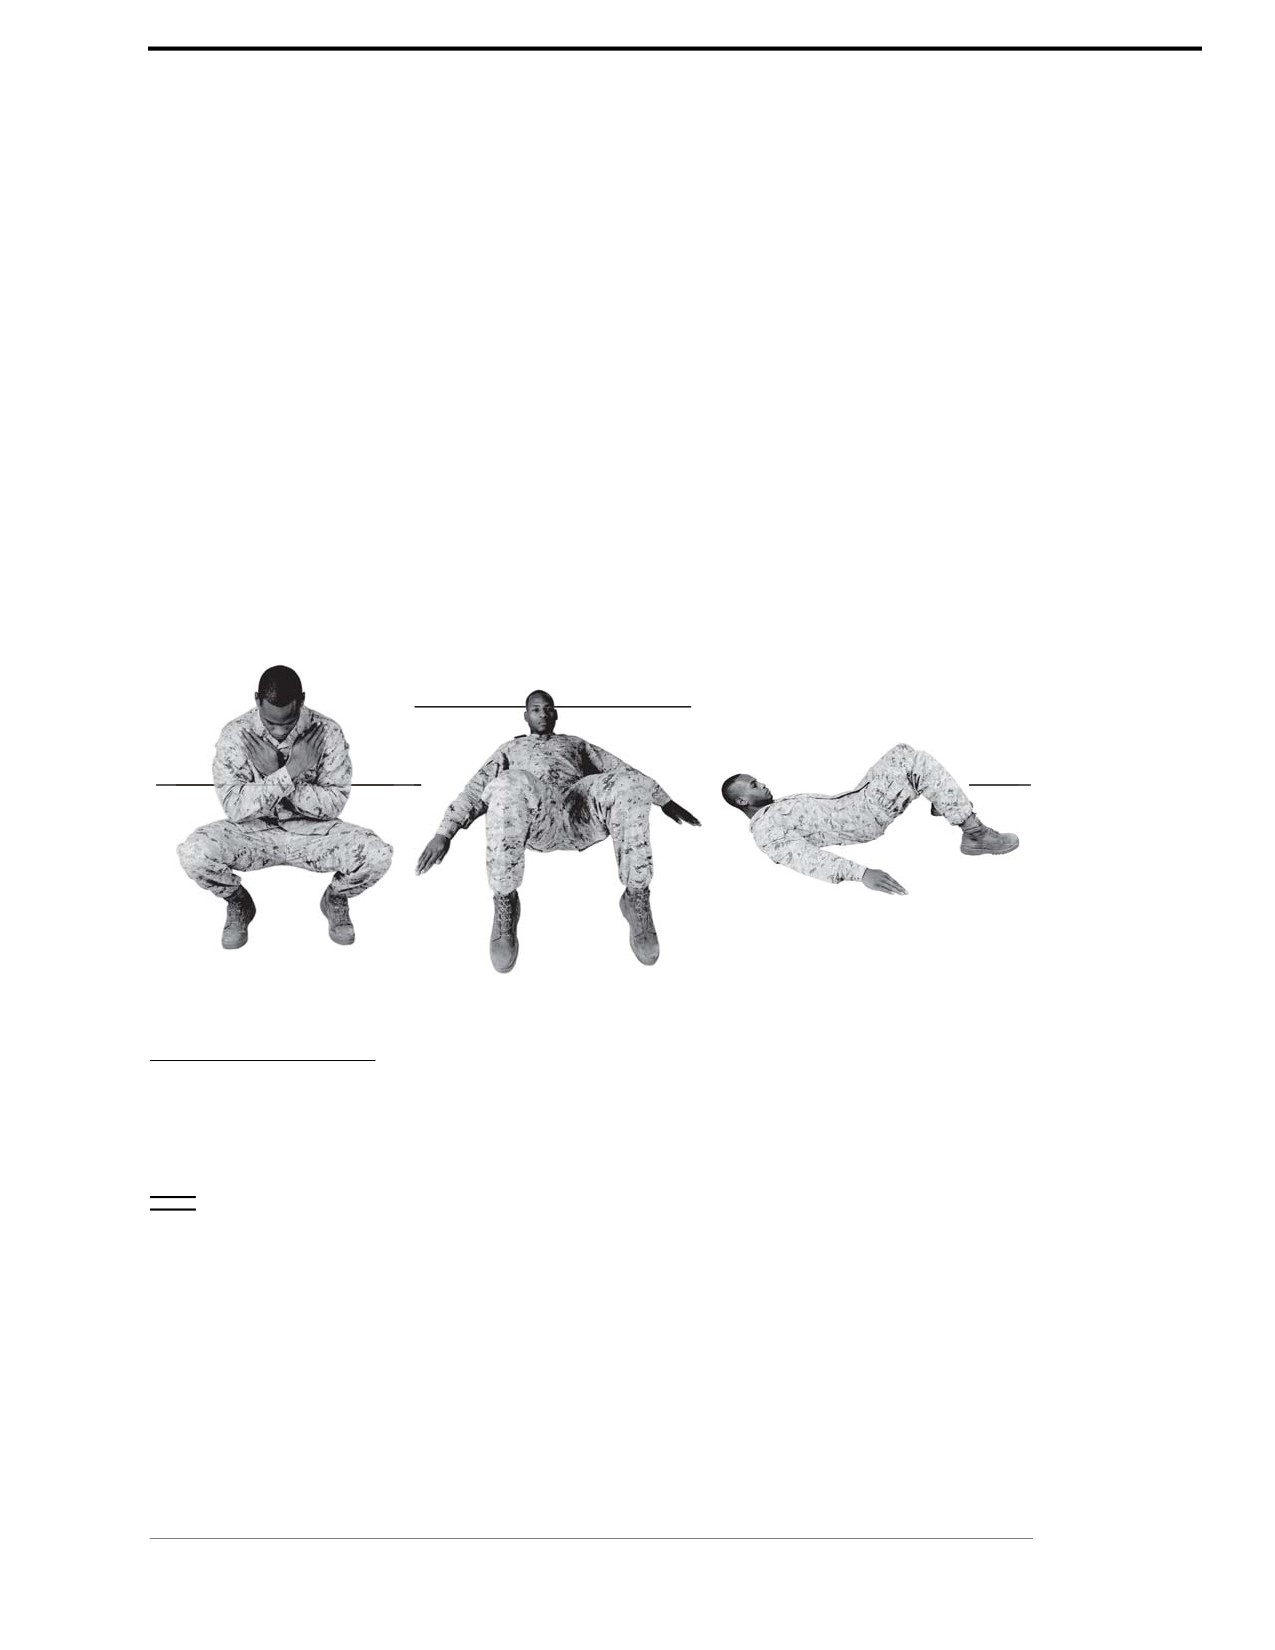
From a Squatting Position
~ Squat down on the balls of your feet, tuck your chin in and cross your arms in front of your
torso, palms facing you, with fingers and thumb extended and joined.
~ Roll backwards, without pushing off or straightening your legs, keeping your chin tucked to
protect your head from the impact.
~ Slap the deck with both extended arms and palms to help disperse the impact. Contact
between the deck and your torso and arms should happen simultaneously and your arms
should form a 45-degree angle to your body.
~ Keeping your head off of the deck will protect your neck and spinal column from injury.
~ Practice this step as many times as necessary to properly break the fall.
See figure 2-13.
Figure 2-13. Back Break-Fall.
Side Break-Fall
A side break-fall is executed to break your fall, if you should fall on your side.
Technique
It is difficult to execute a break-fall in training because you have to be thrown in order to
execute the break-fall properly, however this would create a potentially hazardous condition.
The break-fall will be taught and practiced in stages, from the deck, from a squatting position,
and from a standing position written for right side, reverse sides for the left.
From the Deck
~ Begin by lying on the deck on your right side. Your right leg should be straight and your left
leg should be bent with your foot flat on the deck.
~ Place your right arm, palm facing down, at a 45-degree angle out and away from your body.
~ Raise your head and neck by tucking your chin and tilting your head up away from the deck.
Chapter 2: Tan Belt
For Official Use Only

2-18
MCRP 3-02B
~ Bring your right arm across your body so that your hand is next to your left shoulder with your
palm facing inboard.
~ With your right arm, slap the deck making contact from your shoulder or forearm down to
your hand. Tuck your chin and keep your head raised off of the deck.
~ Determine the proper arm placement that allows you to keep your head off of the deck.
Proper arm placement will disperse the impact of the fall.
~ Practice this step as many times as necessary to determine proper arm placement.
From a Squatting Position
~ Assume a one-knee position.
~ Bring your right arm across your body so that your hand is next to your left shoulder with your
palm facing inboard.
~ Fall on your side by sliding your right foot to the left and rolling on your right hip.
~ Break your fall with your right arm, slapping the deck, making contact from your shoulder or
forearm down to your hand. The arm should strike the deck at a 45-degree angle with
respect to your body while simultaneously tucking your chin and keeping your head raised
off of the deck.
~ To disperse the impact, stretch out your right leg making contact with the deck. Bend your left
leg and ensure that your foot makes contact with the deck.
~ Practice this step as many times as necessary to ensure proper arm placement to break
the fall.
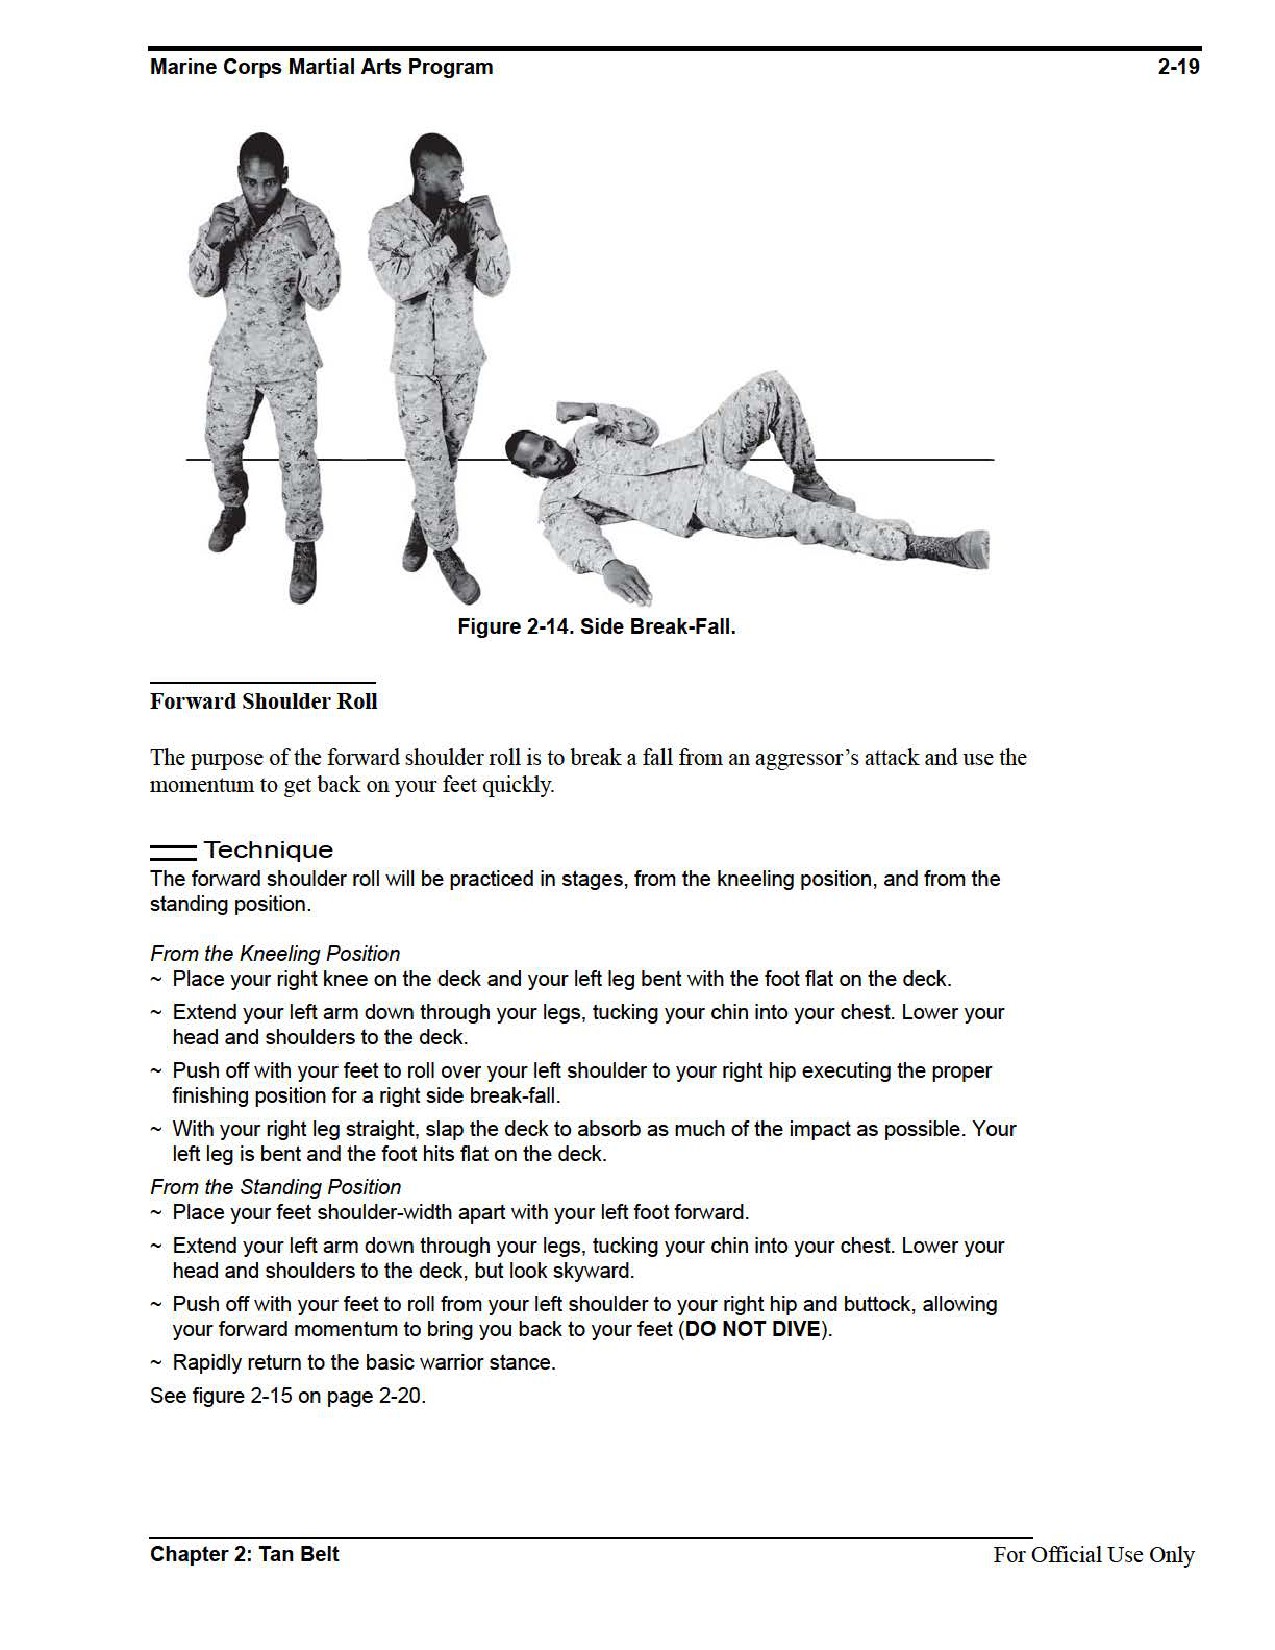
From a Standing Position Written for Right Side, Reverse Sides for the Left
~ From the basic warrior stance bring your right arm across your body so that your hand is next
to your left shoulder with your palm facing you. Tuck your chin to the left to avoid striking the
deck with your head.
~ Fall on your right side by sliding your right foot to the left and collapse to the right onto your
right thigh, buttocks, and lat muscle.
~ Break your fall with your right arm by slapping the deck, making contact from your shoulder
or forearm down to your hand. The arm should strike the deck at a 45-degree angle with
respect to your body. Keep your head raised off of the deck.
~ Everything should make contact with the deck at the same time to disperse the impact. Your
right leg is stretched straight to make contact with the deck. Your left leg is bent with the sole
of your left foot flat on the deck.
See figure 2-14.
For Official Use Only
Chapter 2: Tan Belt
Marine Corps Martial Arts Program
2-21
Section IV
Bayonet Techniques
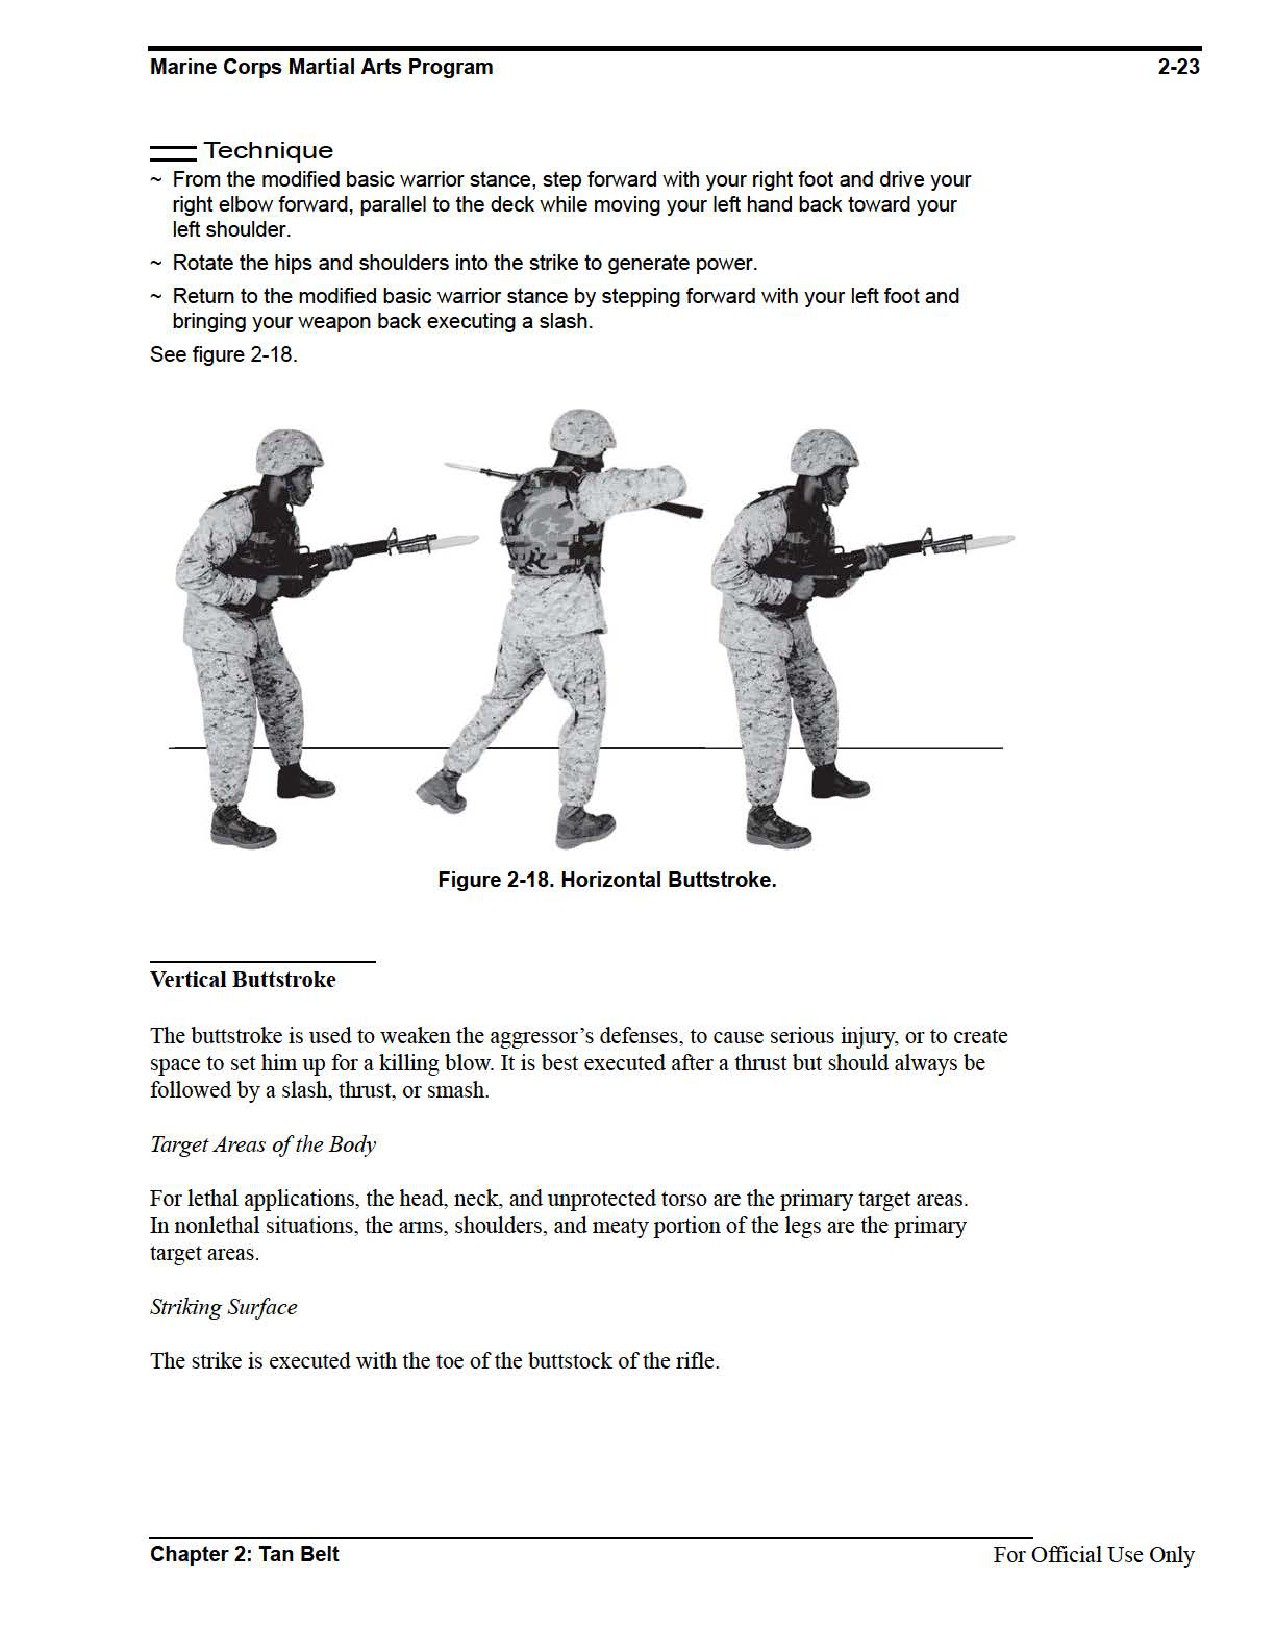
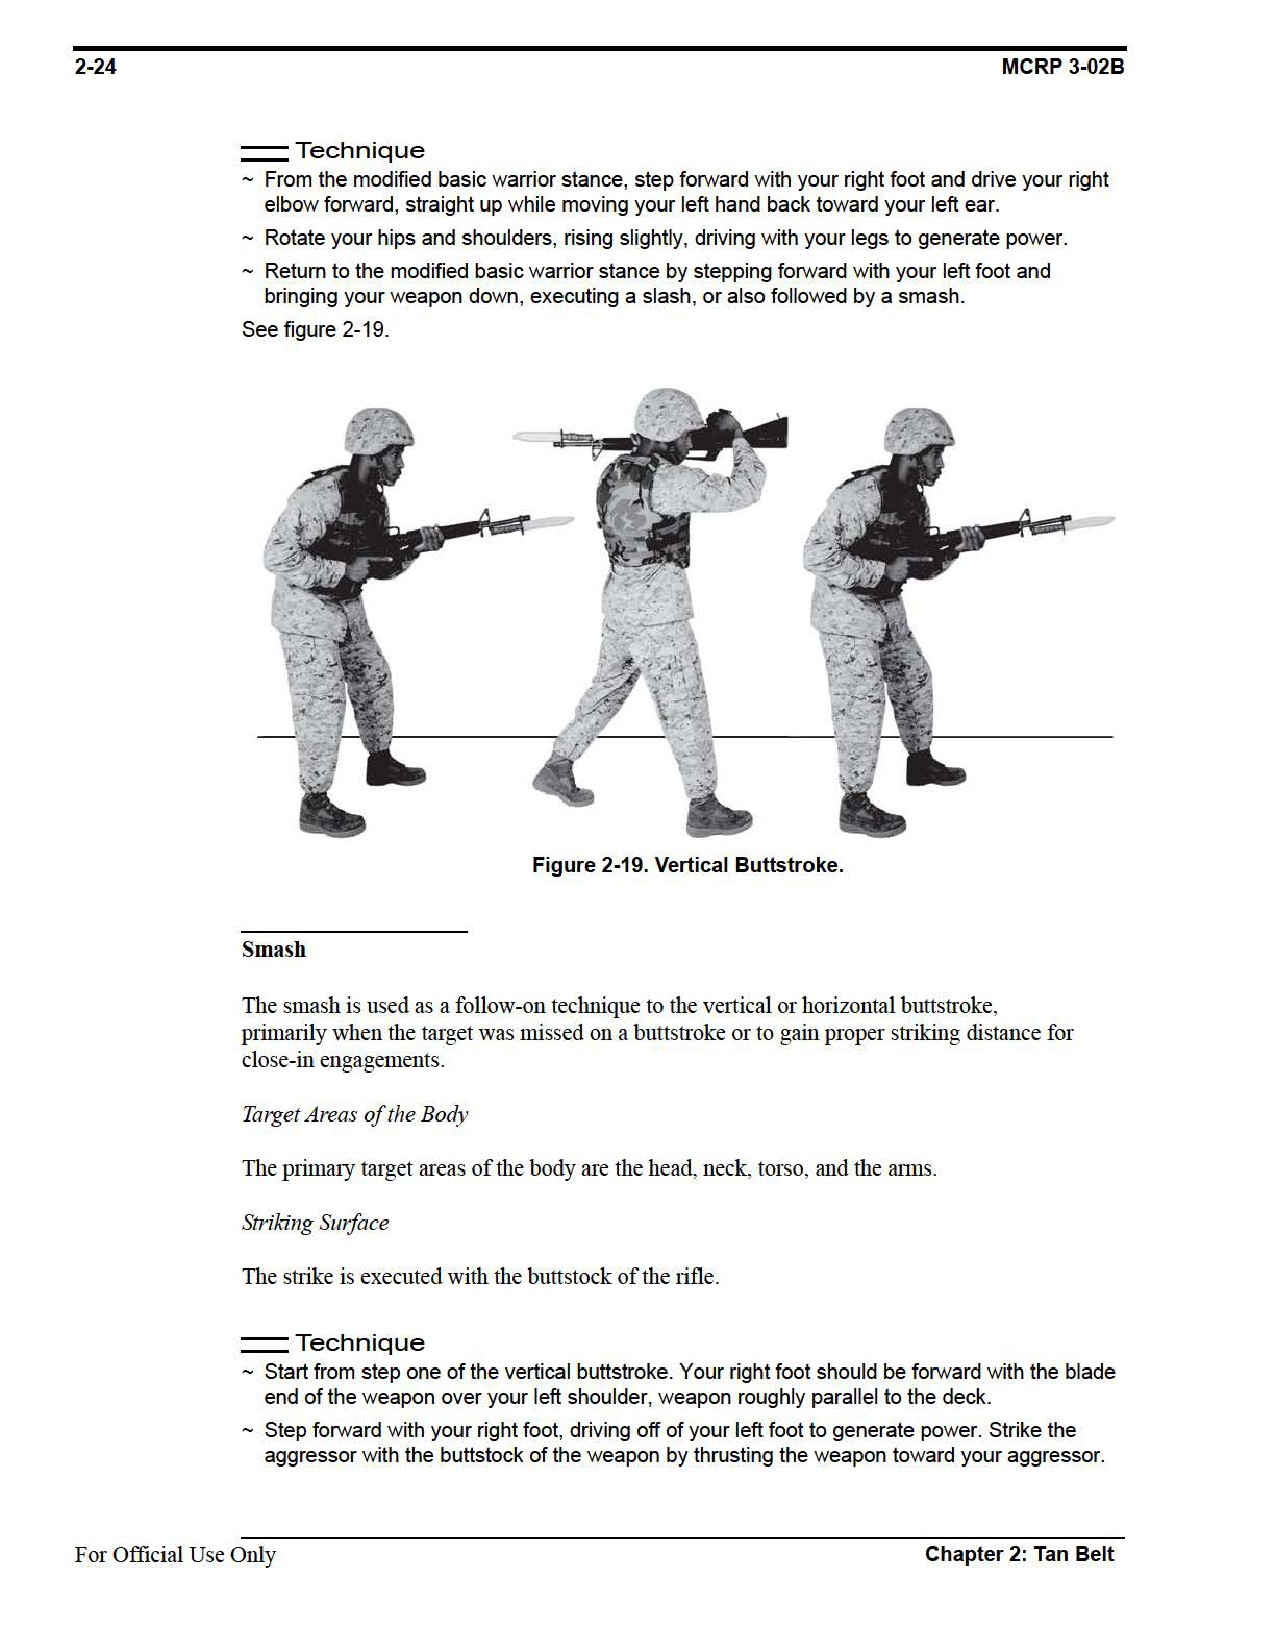
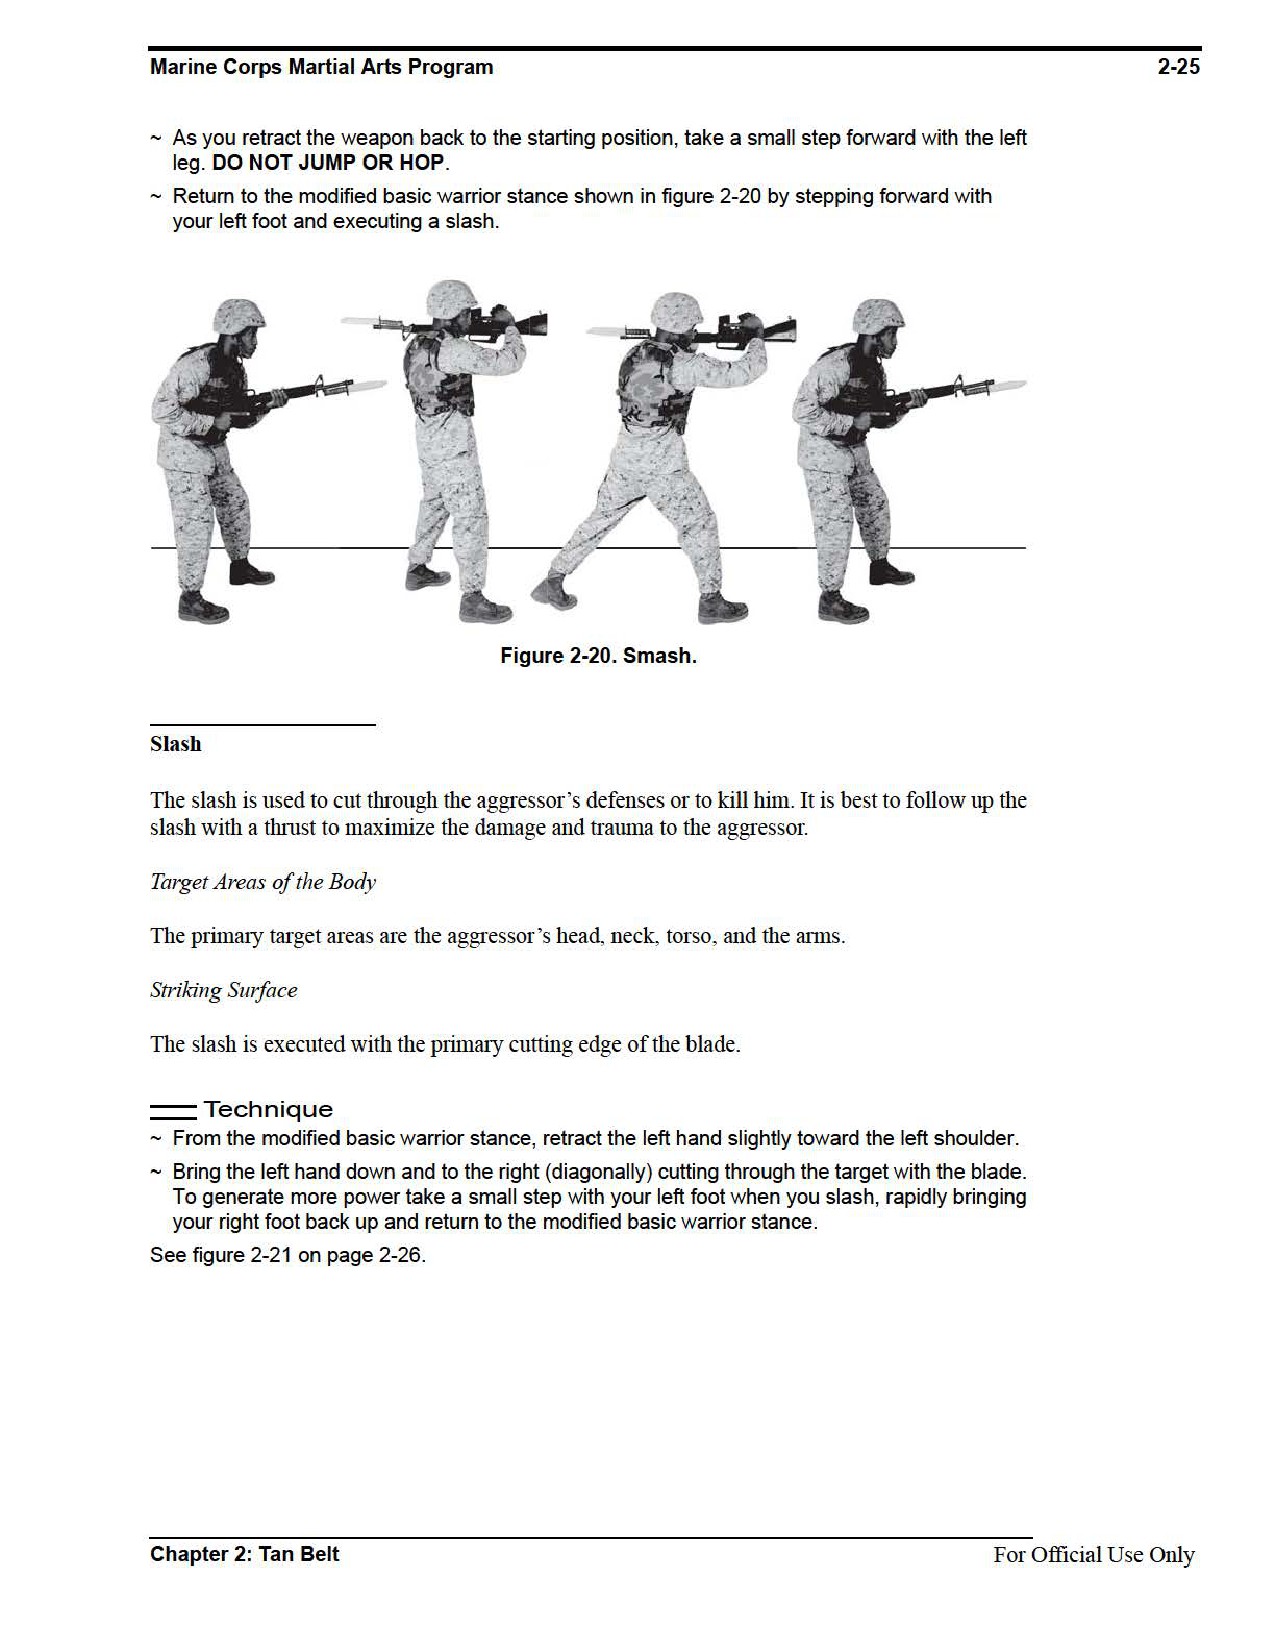
When executing bayonet techniques, the rifle is held in a modified basic warrior stance. All
movement begins and ends with the basic warrior stance.
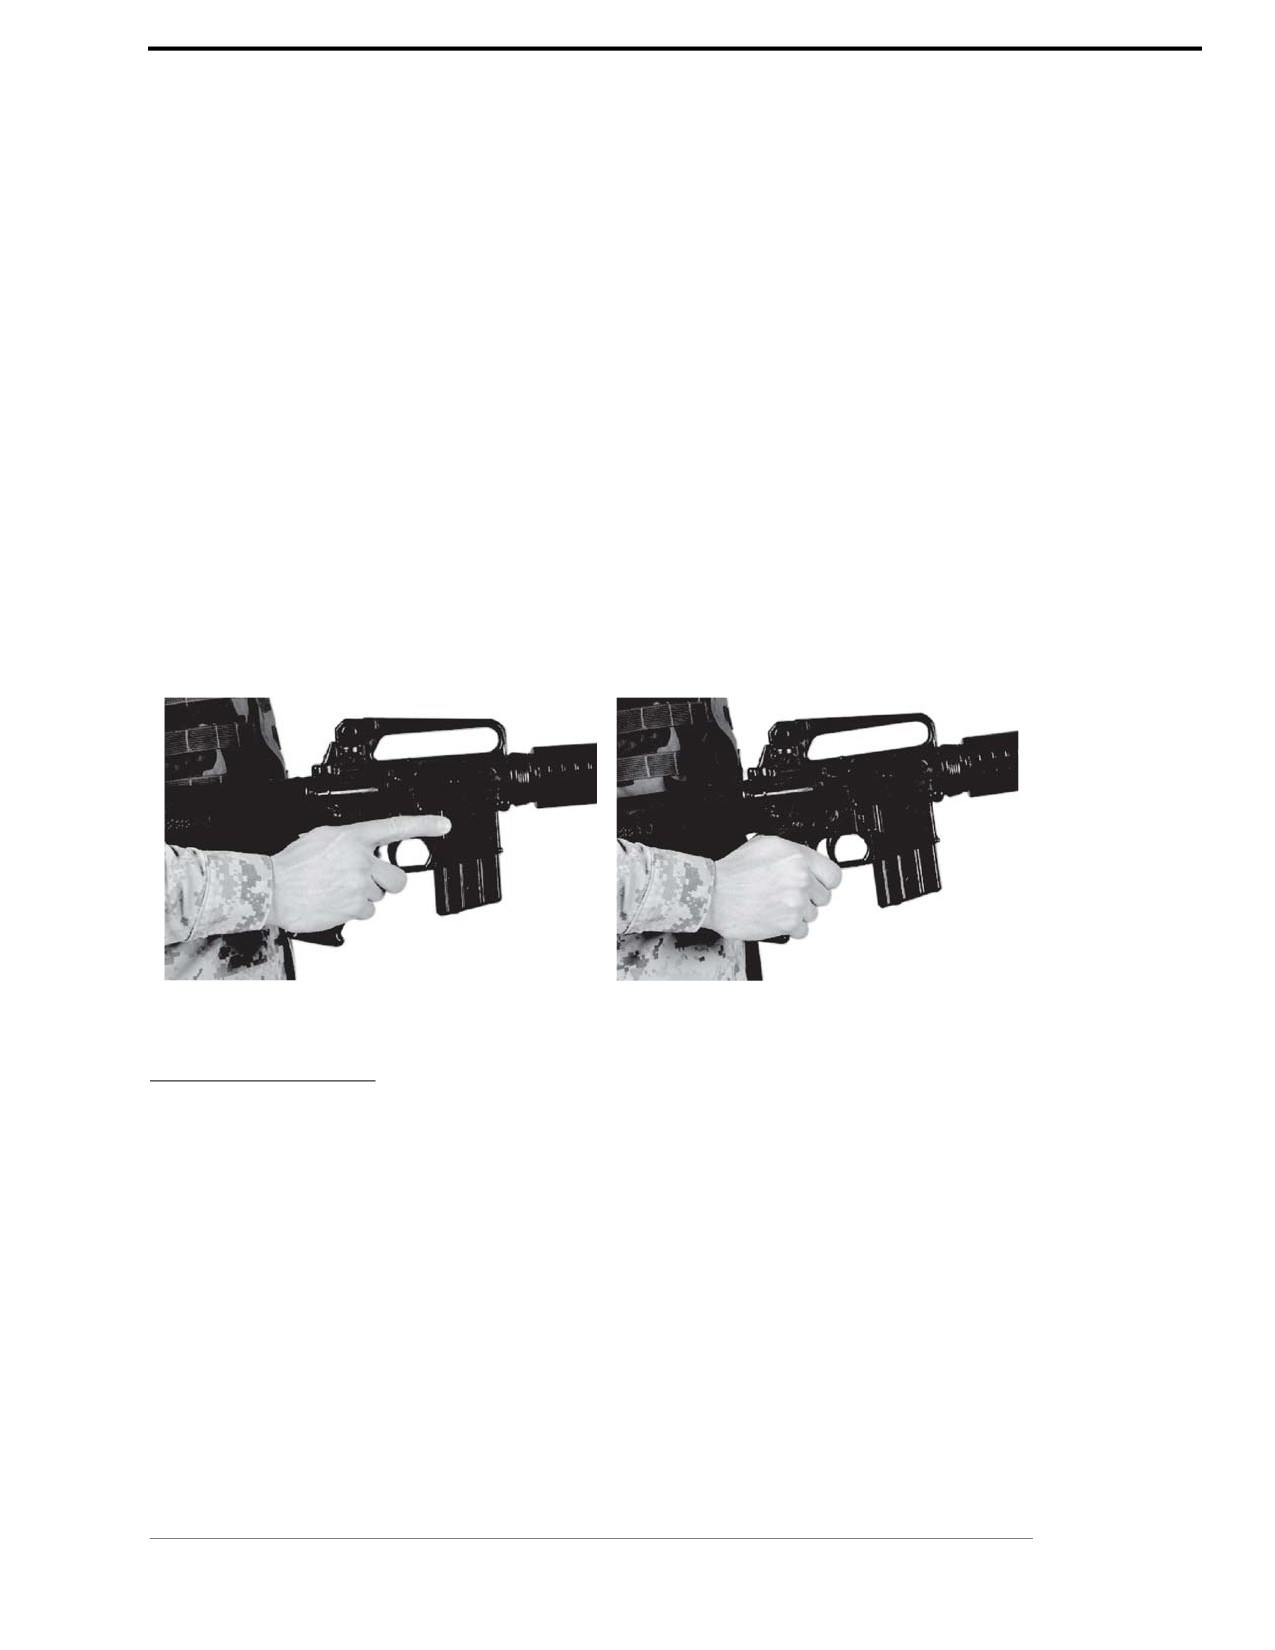
Grab the pistol grip with your right hand. Keep your trigger finger off of the trigger and include
it in the grip. See figure 2-16. While it is possible to execute these bayonet techniques while
gripping the buttstock of the weapon, use of the pistol grip allows greater generation of force.
These are lethal, offensive techniques that can be used in conjunction with assault fire move-
ment. The small of the buttstock grip is used in nonlethal situations.
With the left hand, grab the handguards of the rifle underhanded. Lock the buttstock of the rifle
against the hip with the right forearm. Keep movements of the bayonet blade within a box,
shoulder-width across from your neck down to your waistline. The aggressor has a greater
chance of blocking your attack if you bring the blade in a wide sweeping movement. Your
attacks should close with the aggressor. Bayonet techniques disable or kill an aggressor.
Refer to appendix A for corresponding safeties 1, 2, 4, 7, 8, and 9.
Figure 2-16. Bayonet Techniques.
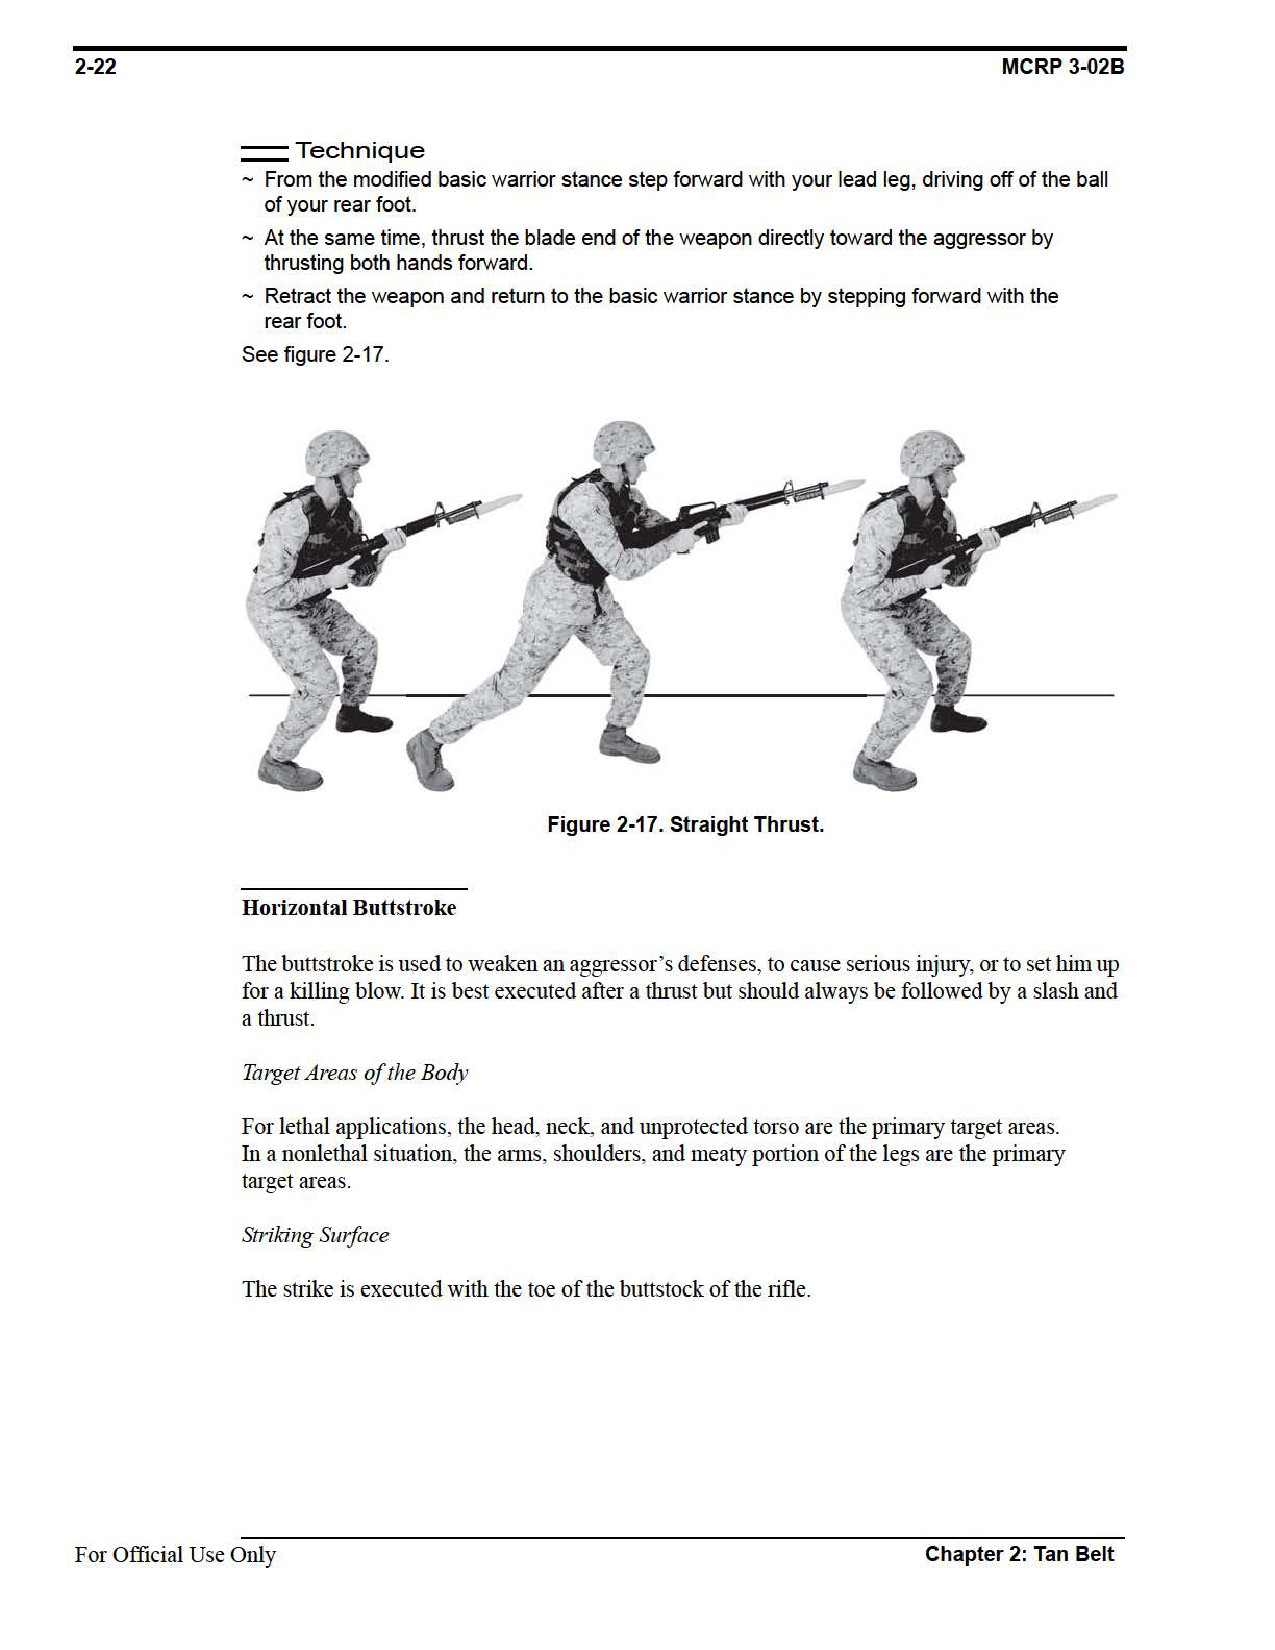
Straight Thrust
The straight thrust is the most deadly offensive technique because it will cause the most trauma
to an aggressor and is the primary offensive bayonet technique. The straight thrust is used to dis-
able or kill an aggressor.
Target Areas of the Body
The primary target areas of the body are the aggressor’s throat, groin, or face. The aggressor’s
chest and stomach are also excellent target areas if he is not protected by body armor or
combat equipment.
Chapter 2: Tan Belt
For Official Use Only
2-26
MCRP 3-02B
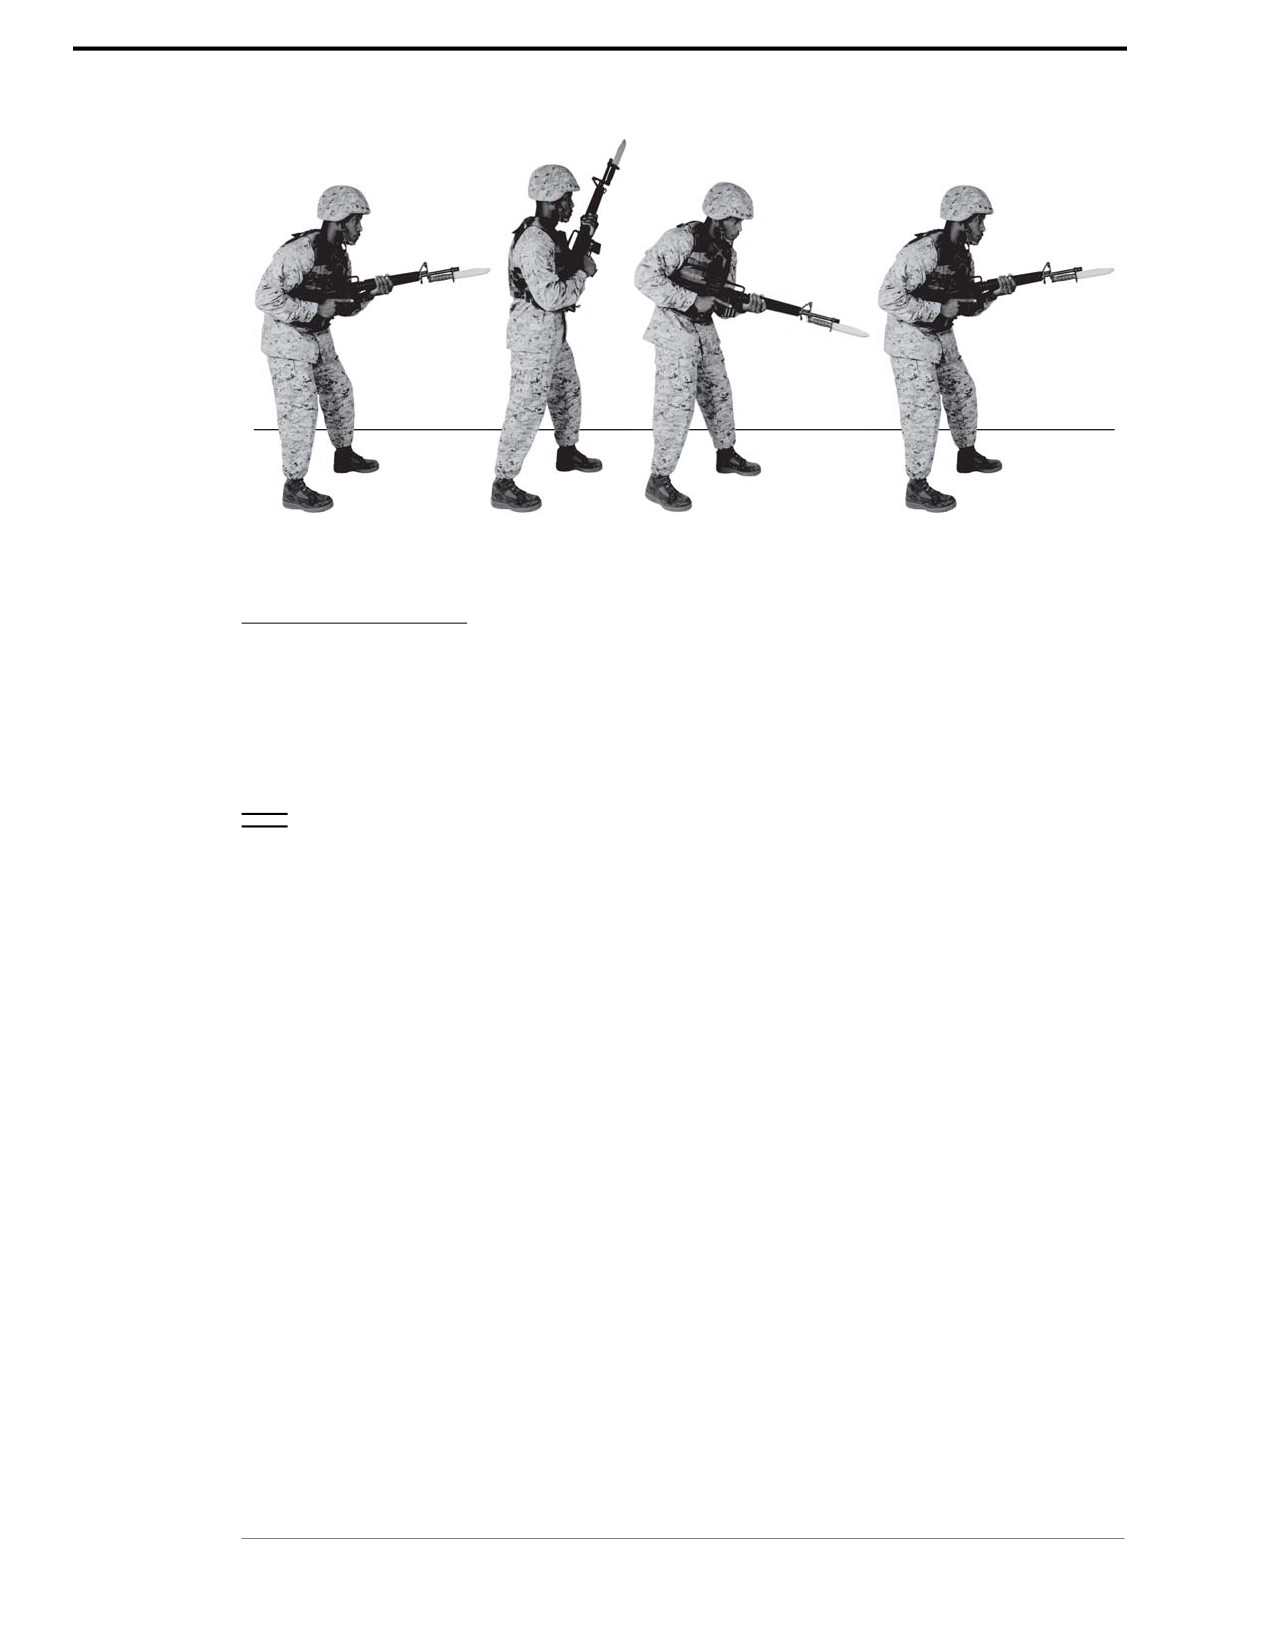
Figure 2-21. Slash.
Disrupt
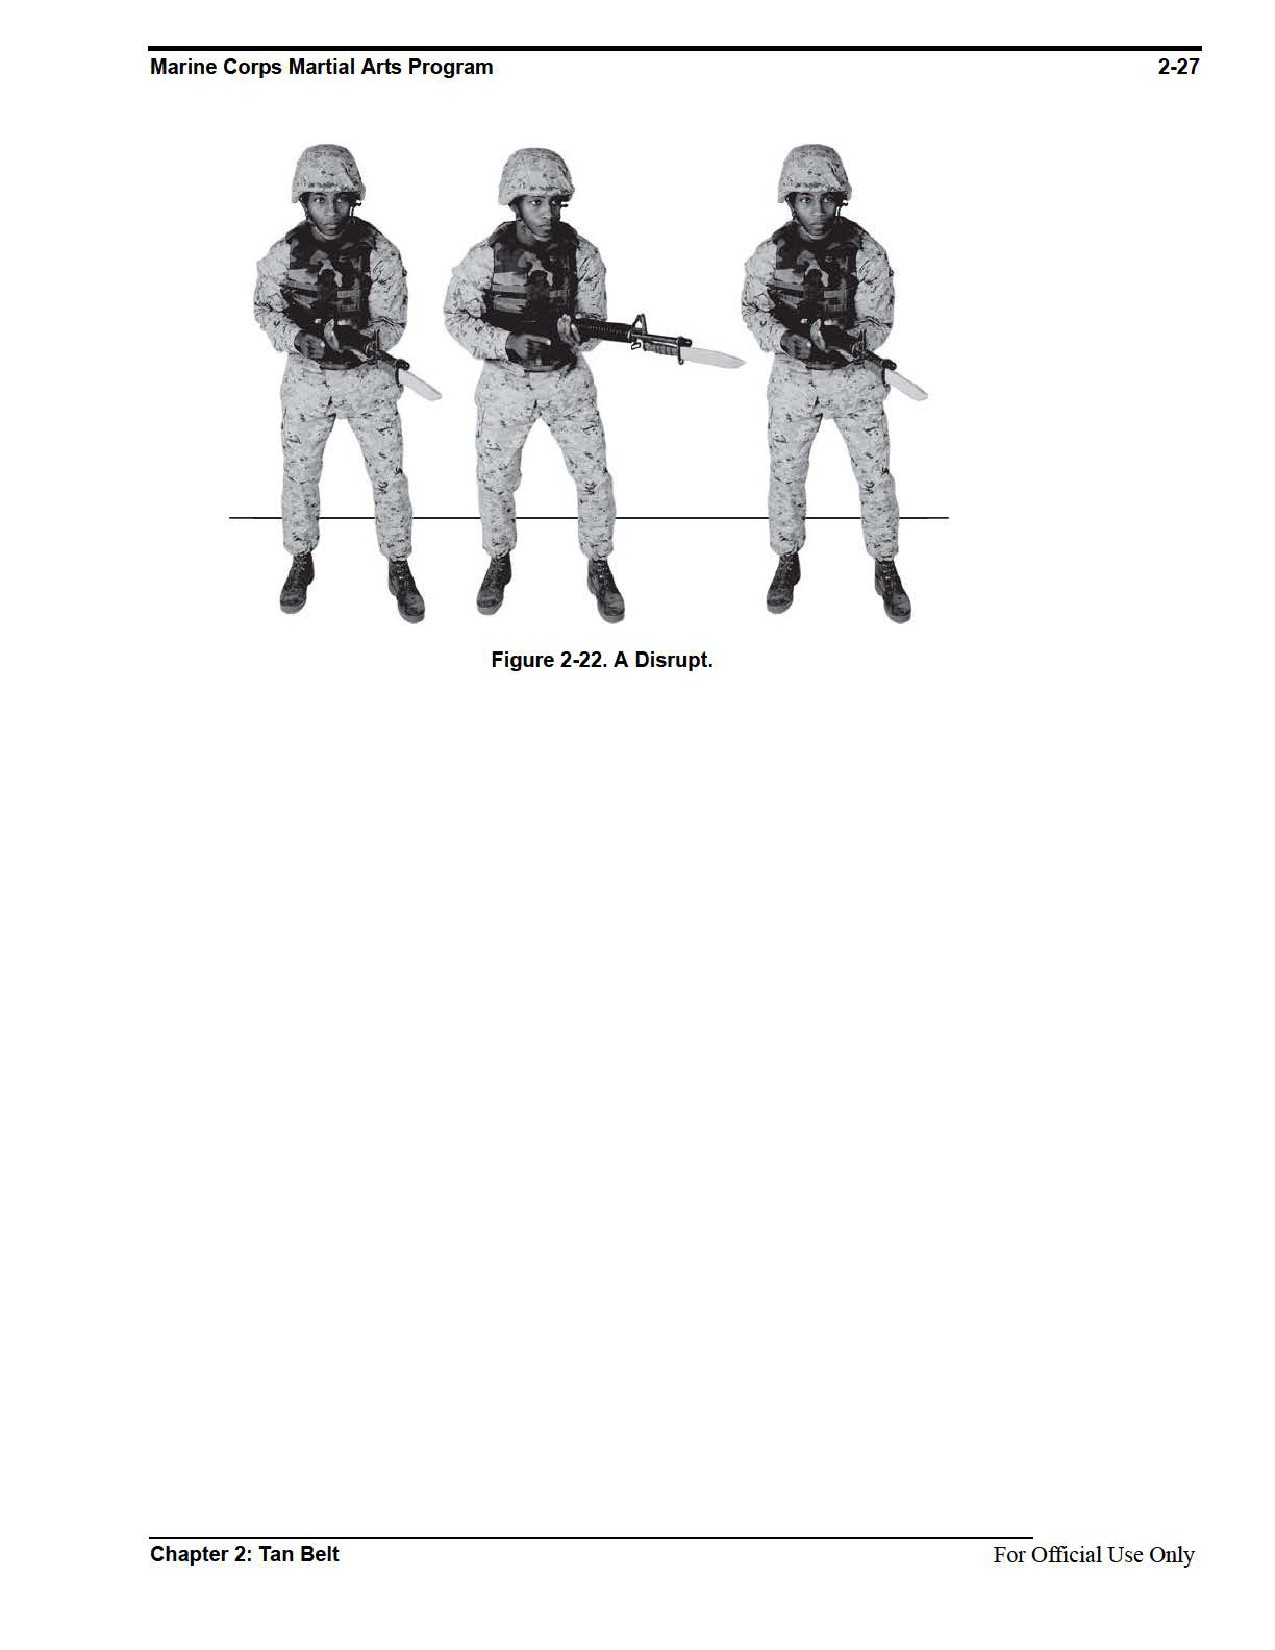
A disrupt is used as a defensive technique to redirect or deflect an attack in preparation for exe-
cuting a thrust or other appropriate offensive bayonet techniques. A disrupt is a slight redirection
of an aggressor’s linear attack such as a straight thrust or a smash.
Technique
~ With the weapon locked against the hip with the right forearm, rotate the body to the right or
left, moving the bayonet end of the rifle to disrupt the aggressor’s attack. Rotation should
generate from the hips.
~ Contact is made with the bayonet end of the rifle against the barrel or bayonet of the
aggressor’s weapon.
~ Redirect or guide the aggressor’s weapon away from your body by exerting pressure against
the aggressor’s weapon with your weapon. A disrupt should be executed with an economy of
motion. You only have to redirect the aggressor’s weapon a couple of inches so that the
weapon will miss your body.
See figure 2-22.
For Official Use Only
Chapter 2: Tan Belt

2-28
MCRP 3-02B
Section V
Upper Body Strikes
The purpose of upper body strikes is to stun the aggressor or to set him up for a follow up finish-
ing technique. Strikes are unarmed individual striking techniques that are performed with the
arms and legs as personal weapons. The hands, forearms, and elbows are individual weapons of
the arms and can be used to execute strikes including the hammer fist, knife hand, chin jab, eye
gouge, and elbow strikes. These strikes provide a variety of techniques that can be used in any
type of close combat encounter.
Refer to appendix A for corresponding safeties 1, 2, 3, and 4.
Principles
Regardless of the strike, there are several principles of execution that ensure its effectiveness.
Generating Power
In executing an effective strike, it is important to generate maximum power through
weight transfer:
• Rotate the hips and shoulders into the attack.
• Move your body mass straight forward or backwards in a straight line.
• Drop your body weight into an aggressor. Body mass can be transferred into an attack from
high to low or from low to high.
Muscular Tension
There should be muscular tension in the hand and forearm at the moment of impact to maximize
damage to the aggressor and to avoid injury to your hand. The arms are relaxed until the moment
of impact.
Follow Through
A strike should be delivered so that the weapon such as the hand, or the elbow, hits and remains
on the impact target and follows through the target. This technique will inflict maximum damage
to the aggressor:
• Strikes with the arms are executed with heavy hands, which means that the strike is executed
by driving through with the strike to allow the weight of the hand to go through the primary
target area of the body.
• Contact on an aggressor should be made with the arm slightly bent, the arm extends as it
moves through the target.
• Using this technique, strikes do not have to be executed at full force to be effective.
For Official Use Only
Chapter 2: Tan Belt

Marine Corps Martial Arts Program
2-29
Movement
Your movement will put you in the proper position for launching an attack against your aggres-
sor as well as to help protect yourself. Movement is initiated from the basic warrior stance and
ends with returning to the basic warrior stance. Each strike can be performed with either the left
or right arm depending upon—
• Your angle of attack.
• The position of the aggressor.
• The available vulnerable target areas exposed on the aggressor.
Target Areas of the Body
For each strike, there are target areas on the body: abdominals, ribs, kidneys, chest, and head. A
strike to these areas can cause maximum damage to an aggressor. Strikes use gross motor skills
as opposed to fine motor skills. The target areas of the body are just that, areas. Pinpoint accu-
racy on a specific nerve is not needed for the strike to be effective.
Hammer Fist
Striking with the hammer fist concentrates power in a small part of the hand which, when trans-
ferred to the target, can have a devastating effect.
Striking Surface
The striking surface of the hammer fist is the meaty portion of the hand below the little finger.
Target Areas of the Body
The primary target areas of the body are the arm and leg joints, the neck, the head, the ribs, and
the kidneys.
Angles of Attack
The hammer fist can be thrown horizontally or vertically:
• When thrown horizontally, the hammer fist strike gets its power from hip and shoulder
rotation.
• When thrown vertically, the hammer fist strike comes straight down in a straight line and gets
its power from dropping your weight into the aggressor by bending the knees and transferring
your weight from high to low.
Technique
~ From the basic warrior stance, make a fist. Retract your right hand so that your fist is next to
your face and neck. Your arm is bent at approximately a 45- to 90-degree angle.
Simultaneously, rotate your right hip and right shoulder backwards.
Chapter 2: Tan Belt
For Official Use Only
2-30
MCRP 3-02B
~ Thrust your fist forward onto the aggressor while rotating your right hip and shoulder forward.
Rotate your wrist so that the hammer fist makes contact on the aggressor. Contact should be
made with the meaty portion of your hand below the little finger.
~ Follow through the primary target area with your fist.
~ Return to the basic warrior stance.
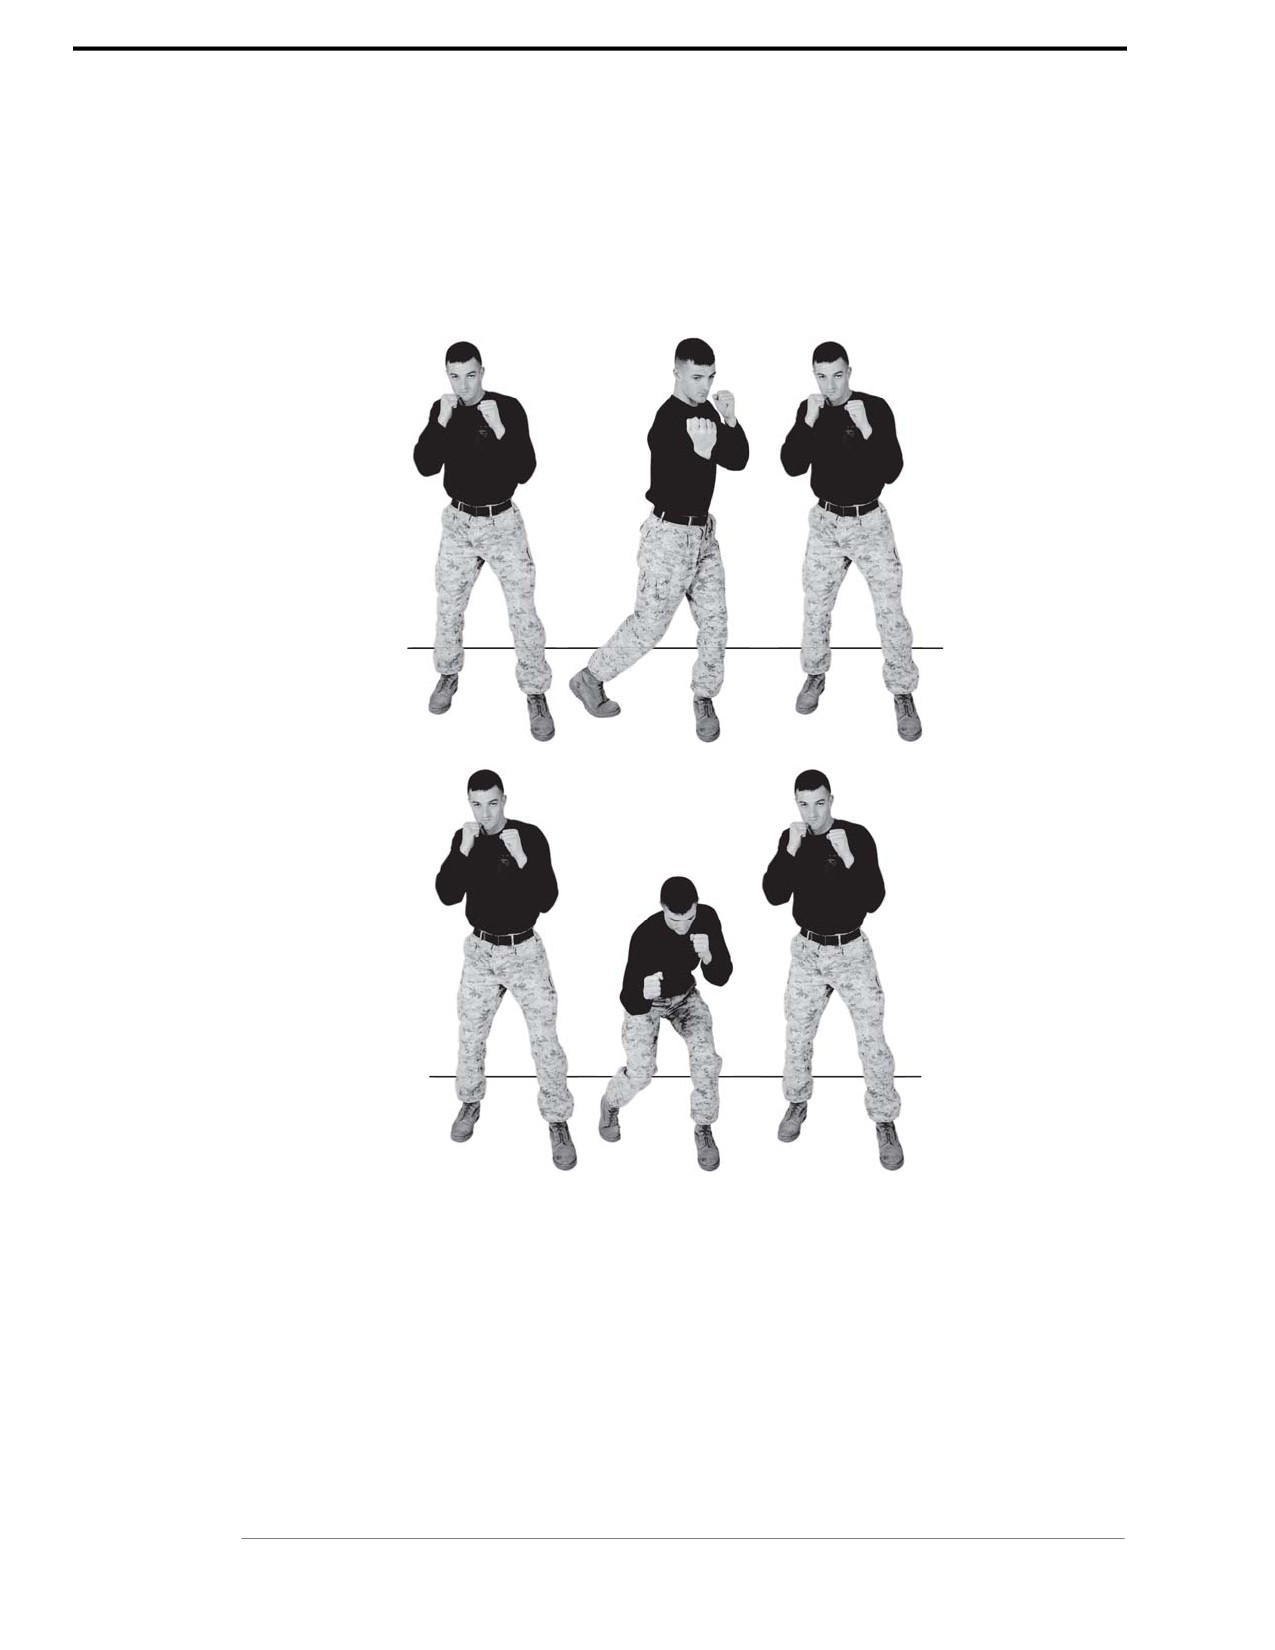
See figure 2-23.
Horizontal
Vertical
Figure 2-23. Hammer Fist.
For Official Use Only
Chapter 2: Tan Belt
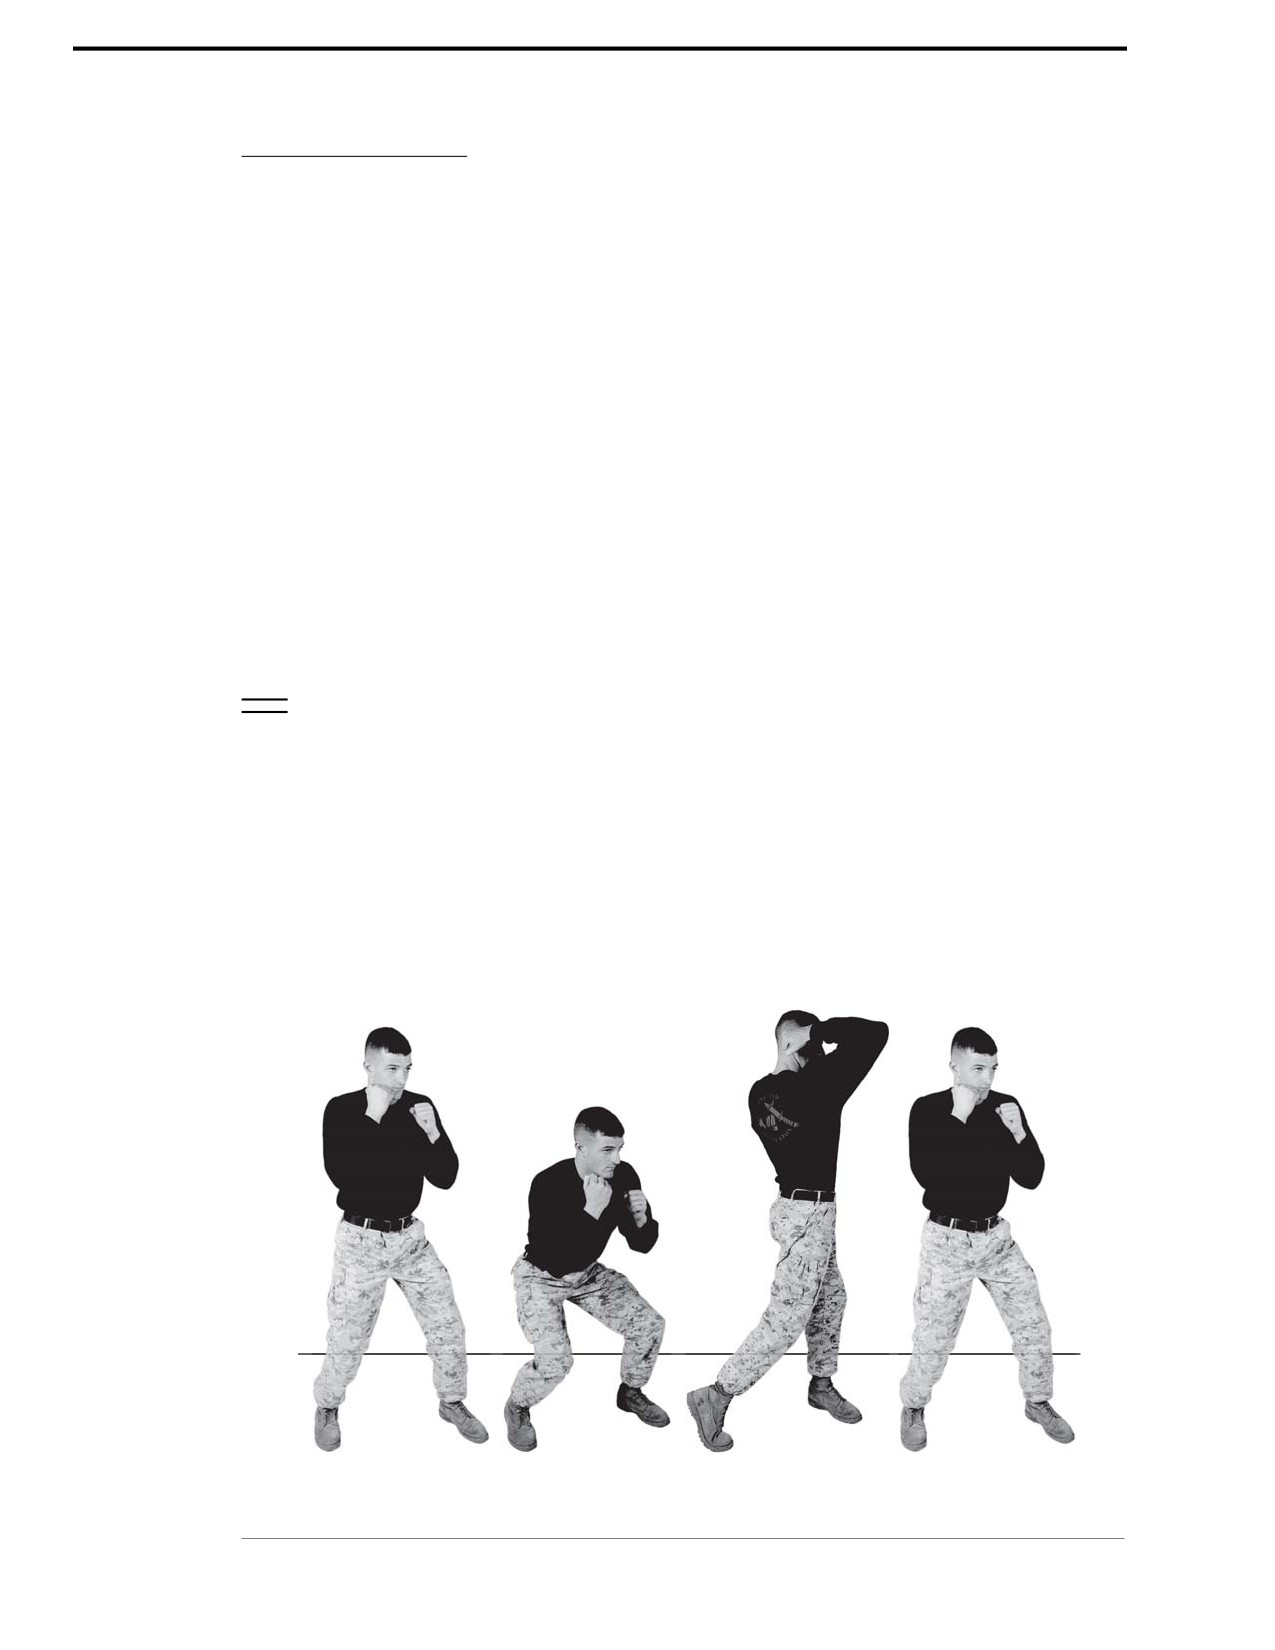
2-32
MCRP 3-02B
Vertical Elbow Strike (Low to High)
Elbow strikes in general are close range weapons that inflict a great amount of damage due to
leverage and the transfer of your body weight.
Striking Surface
The striking surface is two inches above or below the point of the elbow, depending upon your
angle of attack, the aggressor’s attack angle, and the position of the aggressor.
Target Area of the Body
The chin is the primary target of the vertical elbow strike (low to high).
Angles of Attack
Elbow strikes can be performed from a variety of angles: vertically (low to high or high to low)
and horizontally (forward or to the rear).
Technique
~ From the basic warrior stance, bend your right elbow, keeping your fist close to your body.
~ Your fist is at shoulder level and your elbow is next to your torso.
~ Thrust your elbow vertically upward toward the aggressor, keeping your elbow bent
throughout the movement.
~ Rotate your right shoulder and hip forward and drive up with your legs to generate power.
~ Make contact on the aggressor with your right forearm two inches above the point of
the elbow.
~ Return to the basic warrior stance.
See figure 2-25.
Figure 2-25. Vertical Elbow Strike (Low to High).
For Official Use Only
Chapter 2: Tan Belt
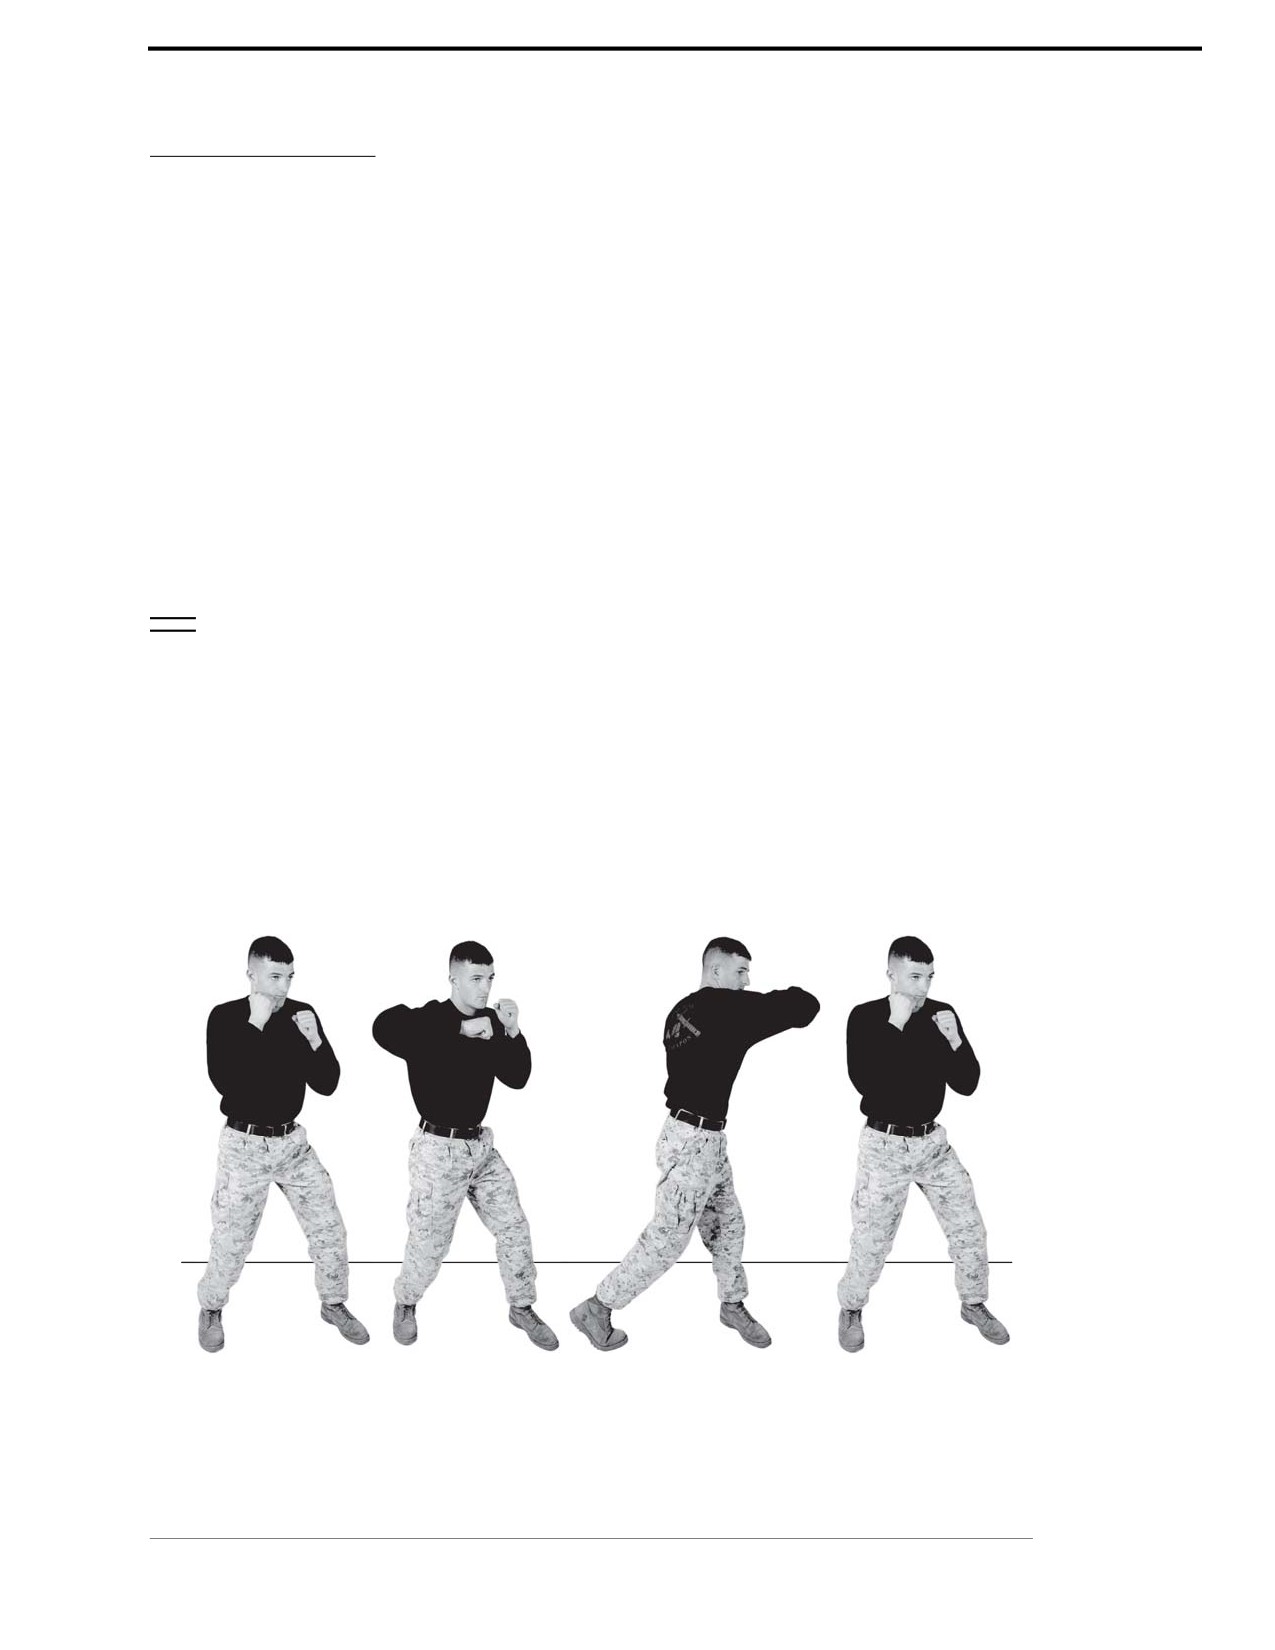
Marine Corps Martial Arts Program
2-33
Forward Horizontal Elbow Strike
Elbow strikes in general are close range weapons that inflict a great amount of damage due to
leverage and the transfer of your body weight.
Target Areas of the Body
The primary target areas are the temple, the spine, the jaw, and the face. By changing the
angle of attack slightly you can target the collarbone and other areas depending on your
body positioning.
Striking Surface
The striking surface is two inches above or below the point of the elbow, depending upon your
angle of attack, the aggressor’s attack angle, and the position of the aggressor.
Technique
~ From the basic warrior stance bring your elbow up and tuck your right fist near your chest
with the palm facing the deck.
~ Thrust your right elbow horizontally forward toward the aggressor, keeping your forearm
parallel to the deck.
~ Keep your fist tucked near your chest with the palm heel facing the deck and your elbow bent
throughout the movement.
~ Rotate your right shoulder and hip forward.
~ Return to the basic warrior stance.
See figure 2-26.
Figure 2-26. Forward Horizontal Elbow Strike.
Chapter 2: Tan Belt
For Official Use Only
2-34
MCRP 3-02B
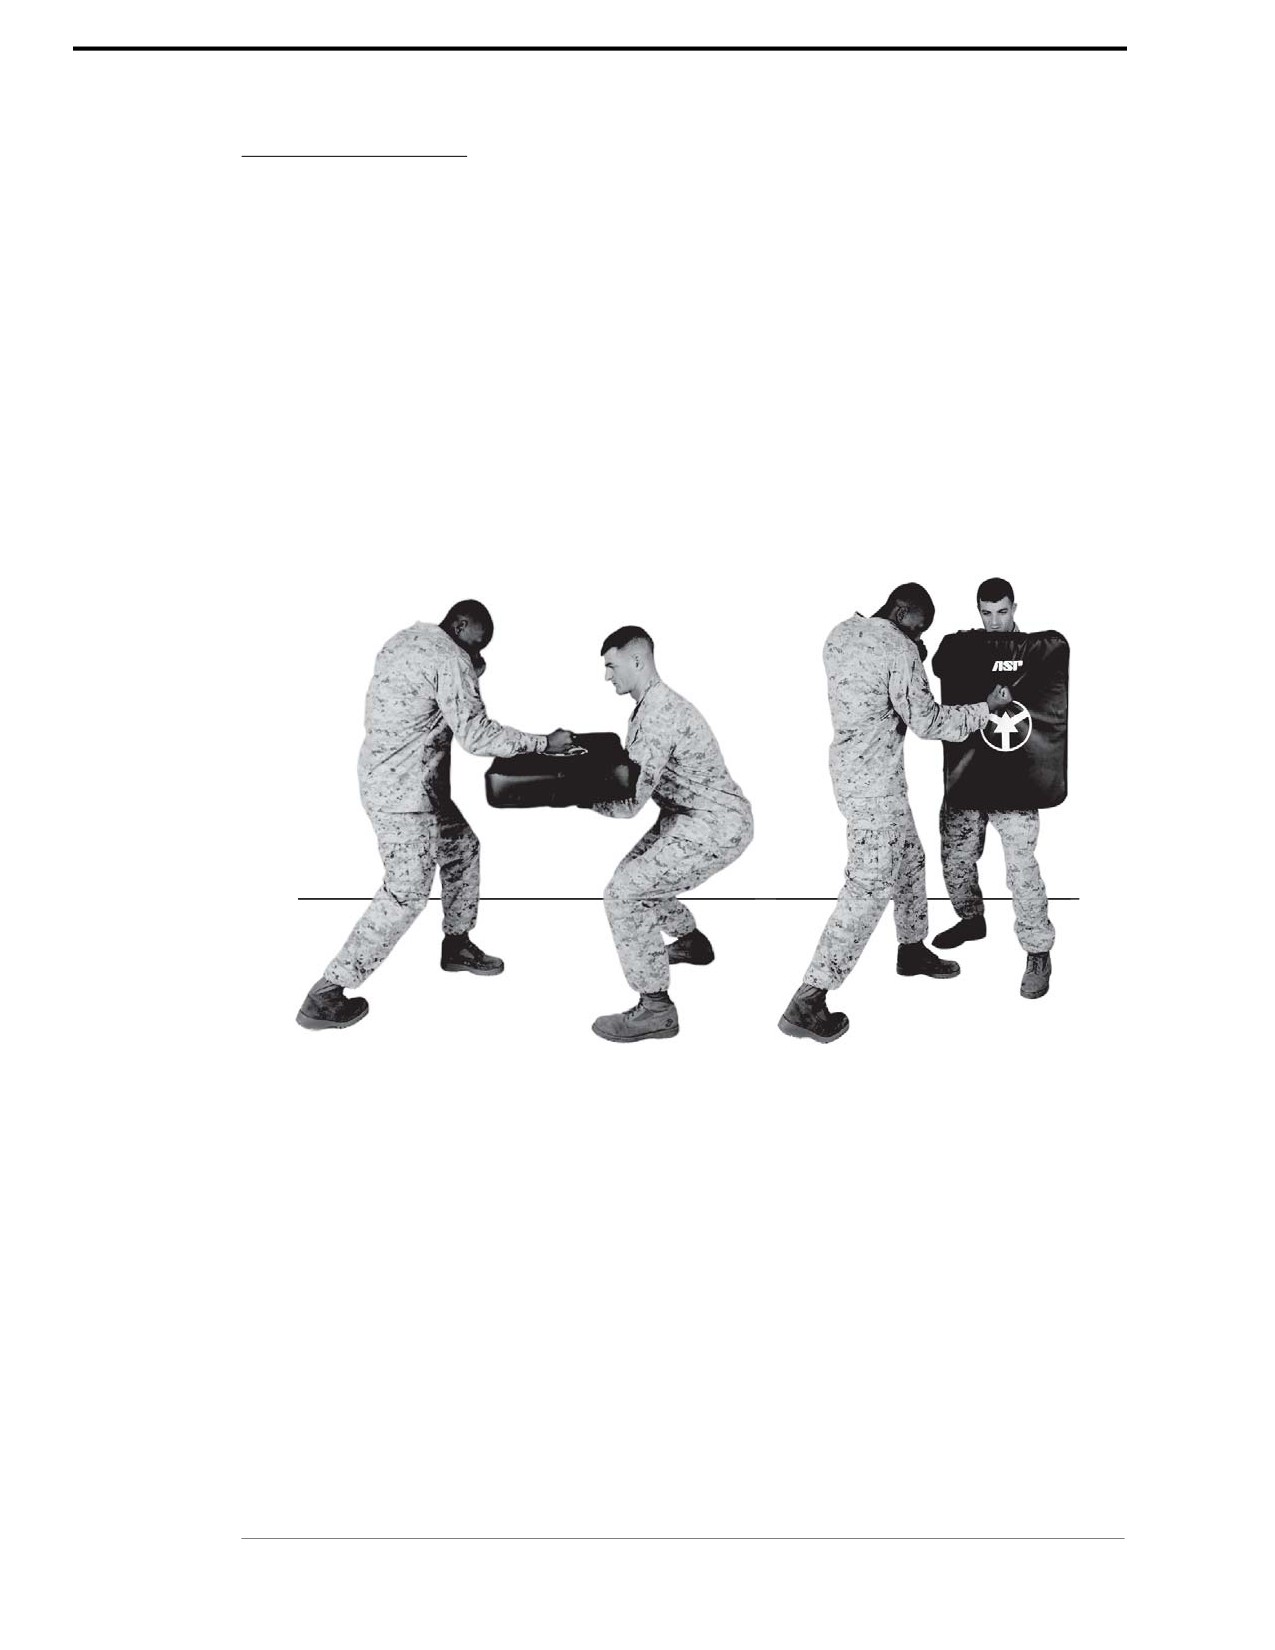
Actions of the Aggressor
The striking pad should always be held in a position so that the person who is performing the
technique connects in the center of the striking pad.
Vertical Hammer Fist
The striking pad is held out in front with both arms out like you are carrying a lunch tray as
shown in figure 2-27. Transfer of the hips/torso into all techniques will generate power.
Horizontal Hammer Fist
The striking pad is held close to the body and the aggressor turns 45- to 90-degree angle to
accommodate the angle of the strike.
Vertical
Horizontal
Figure 2-27. Vertical and Horizontal Hammer Fist.
For Official Use Only
Chapter 2: Tan Belt
Marine Corps Martial Arts Program
2-35
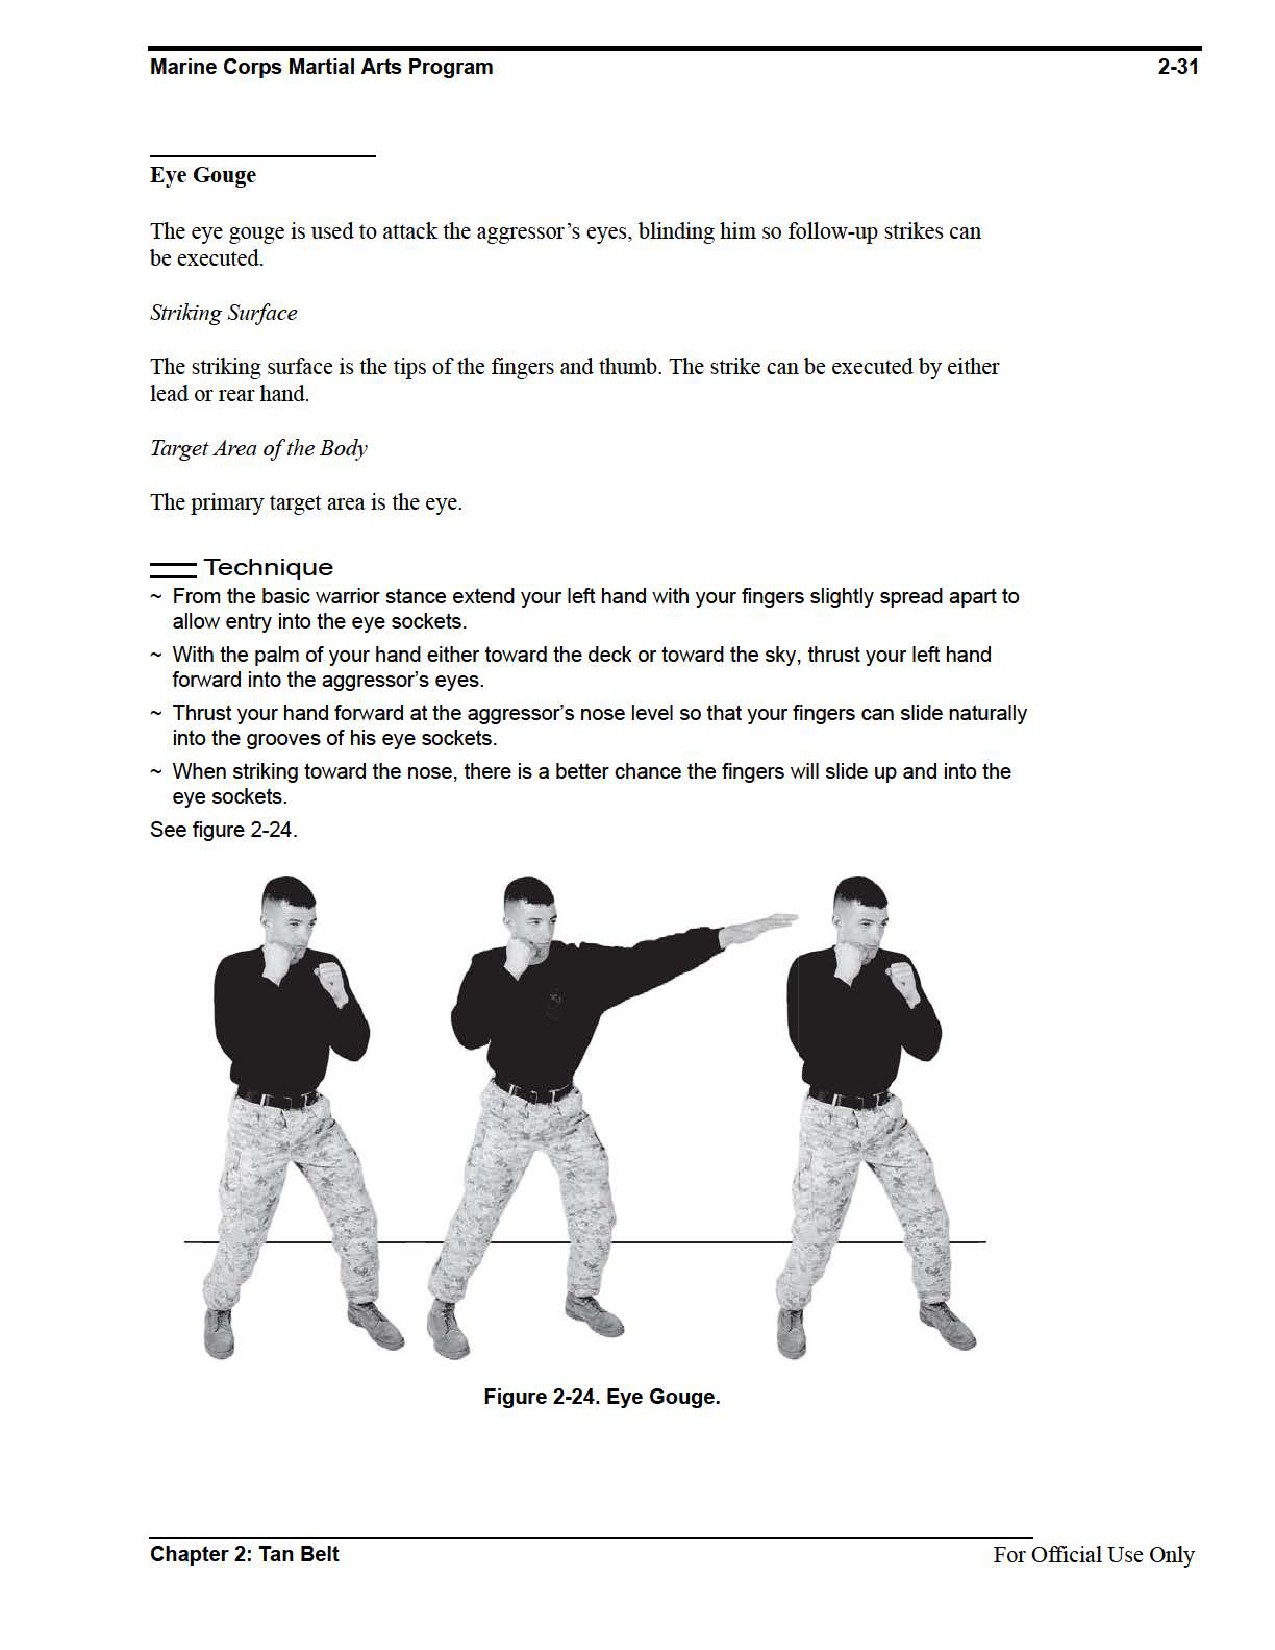
Eye Gouge
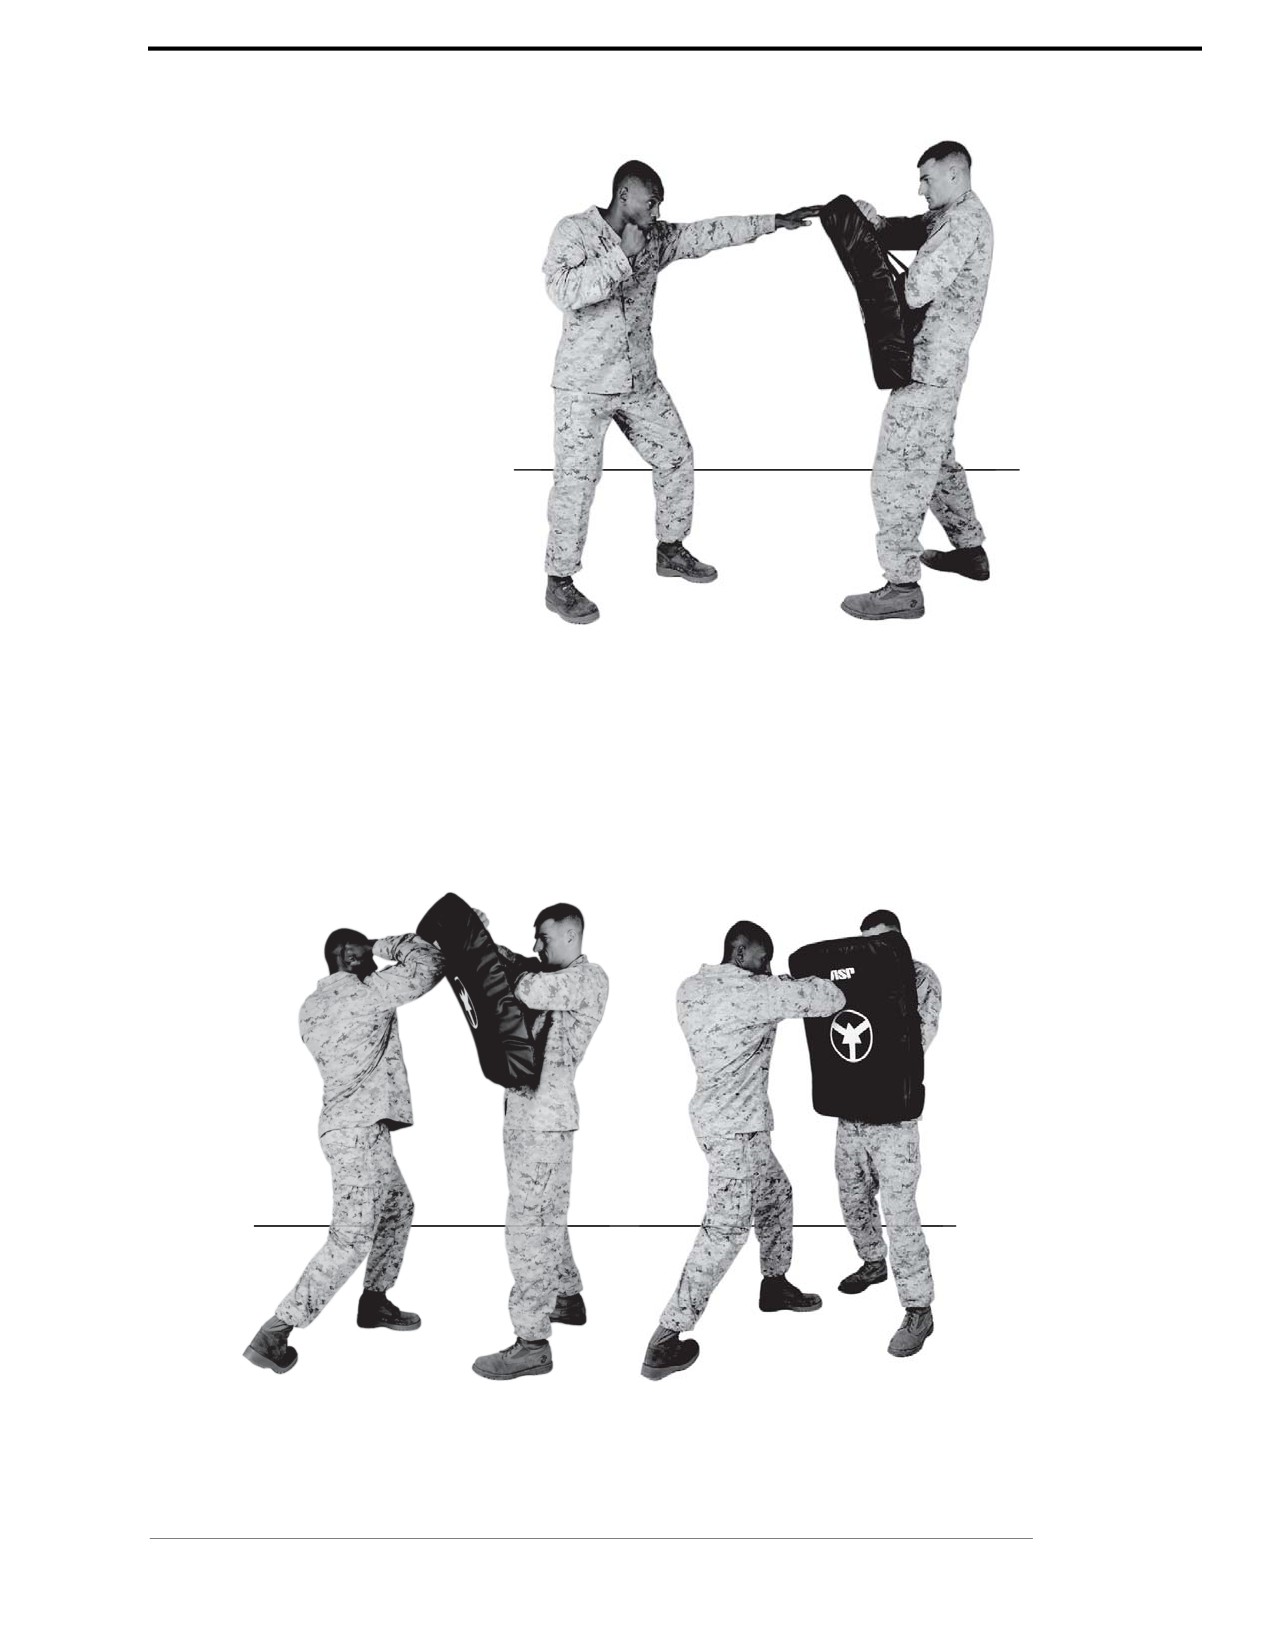
The striking pad is held with both
hands holding the straps. The aggres-
sor extends his top hand allowing
you to execute the technique on the
top corner of the striking pad. You
should never execute this straight
into the striking pad. Take advantage
of the slope of the striking pad to
minimize the chance of jamming a
finger while practicing this tech-
nique. See figure 2-28.
Vertical Elbow Strike (Low to High)
The striking pad is held out like the
eye gouge to create a horizontal
striking surface replicating the
Figure 2-28. Eye Gouge.
aggressor’s chin.
Horizontal Elbow Strike
The striking pad is held with one arm through the center straps as shown in figure 2-29, and the
other arm upholds the top strap to protect the head. The aggressor holding the striking pad stands
directly in front of you, while you execute the elbow strikes. The aggressor can change his angle
to you up to 90-degrees in order to give you different angles of attack.
Vertical
Horizontal
Figure 2-29. Vertical and Horizontal Elbow Strike.
Chapter 2: Tan Belt
For Official Use Only

2-36
MCRP 3-02B
Section VI
Lower Body Strikes
The purpose of lower body strikes is to stop an aggressor’s attack or create an opening in his
defense in order to launch an attack. The vertical knee strike, front kick, round kick, and vertical
stomp are all lower body strikes that can be performed with either the lead or rear leg. Lower
body strikes with the rear leg have greater power because the hips are rotated into the attack.
However, the rear leg is further away from the aggressor allowing him a greater reaction time.
Refer to appendix A for corresponding safeties 1, 2, 3, and 4.
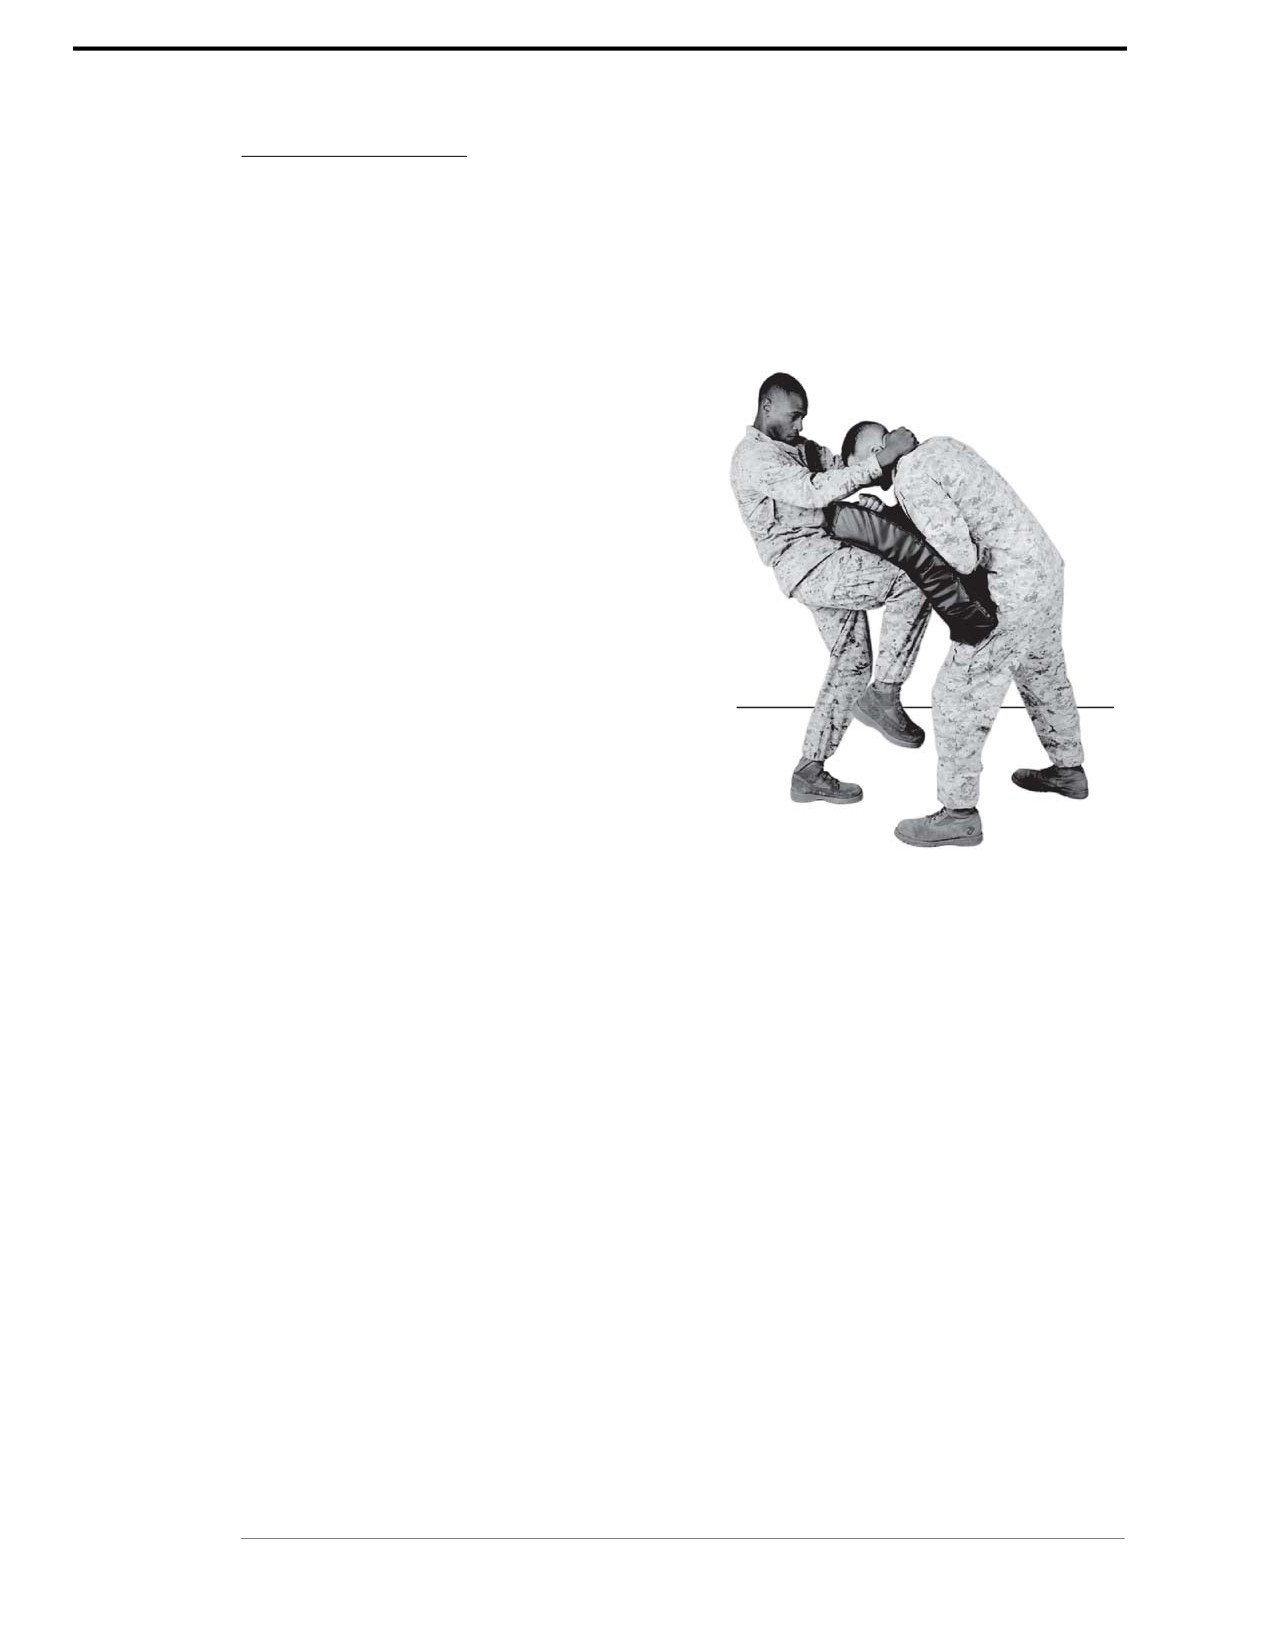
Vertical Knee Strike
Knee strikes are excellent weapons for close range combat and are used to create and maximize
damage to your aggressor.
Striking Surface
The striking surface is from the top of the knee to two inches above it (not the knee cap).
Target Areas of the Body
If the aggressor is upright, the groin is often the primary target area. If the aggressor is bent over,
ideal target areas are the aggressor’s face and sternum.
Technique
~ From the basic warrior stance, grab the aggressor’s neck or gear with both hands, without
interlacing your fingers. If you interlace your fingers, your aggressor can pull back or reach
behind your head and break the fingers.
~ Pull the aggressor down and at the same time raise your right knee driving it up forcefully into
the aggressor. Pulling the aggressor down and thrusting the leg upward with your hips
generates power.
~ Rapidly return to the basic warrior stance.
See figure 2-30.
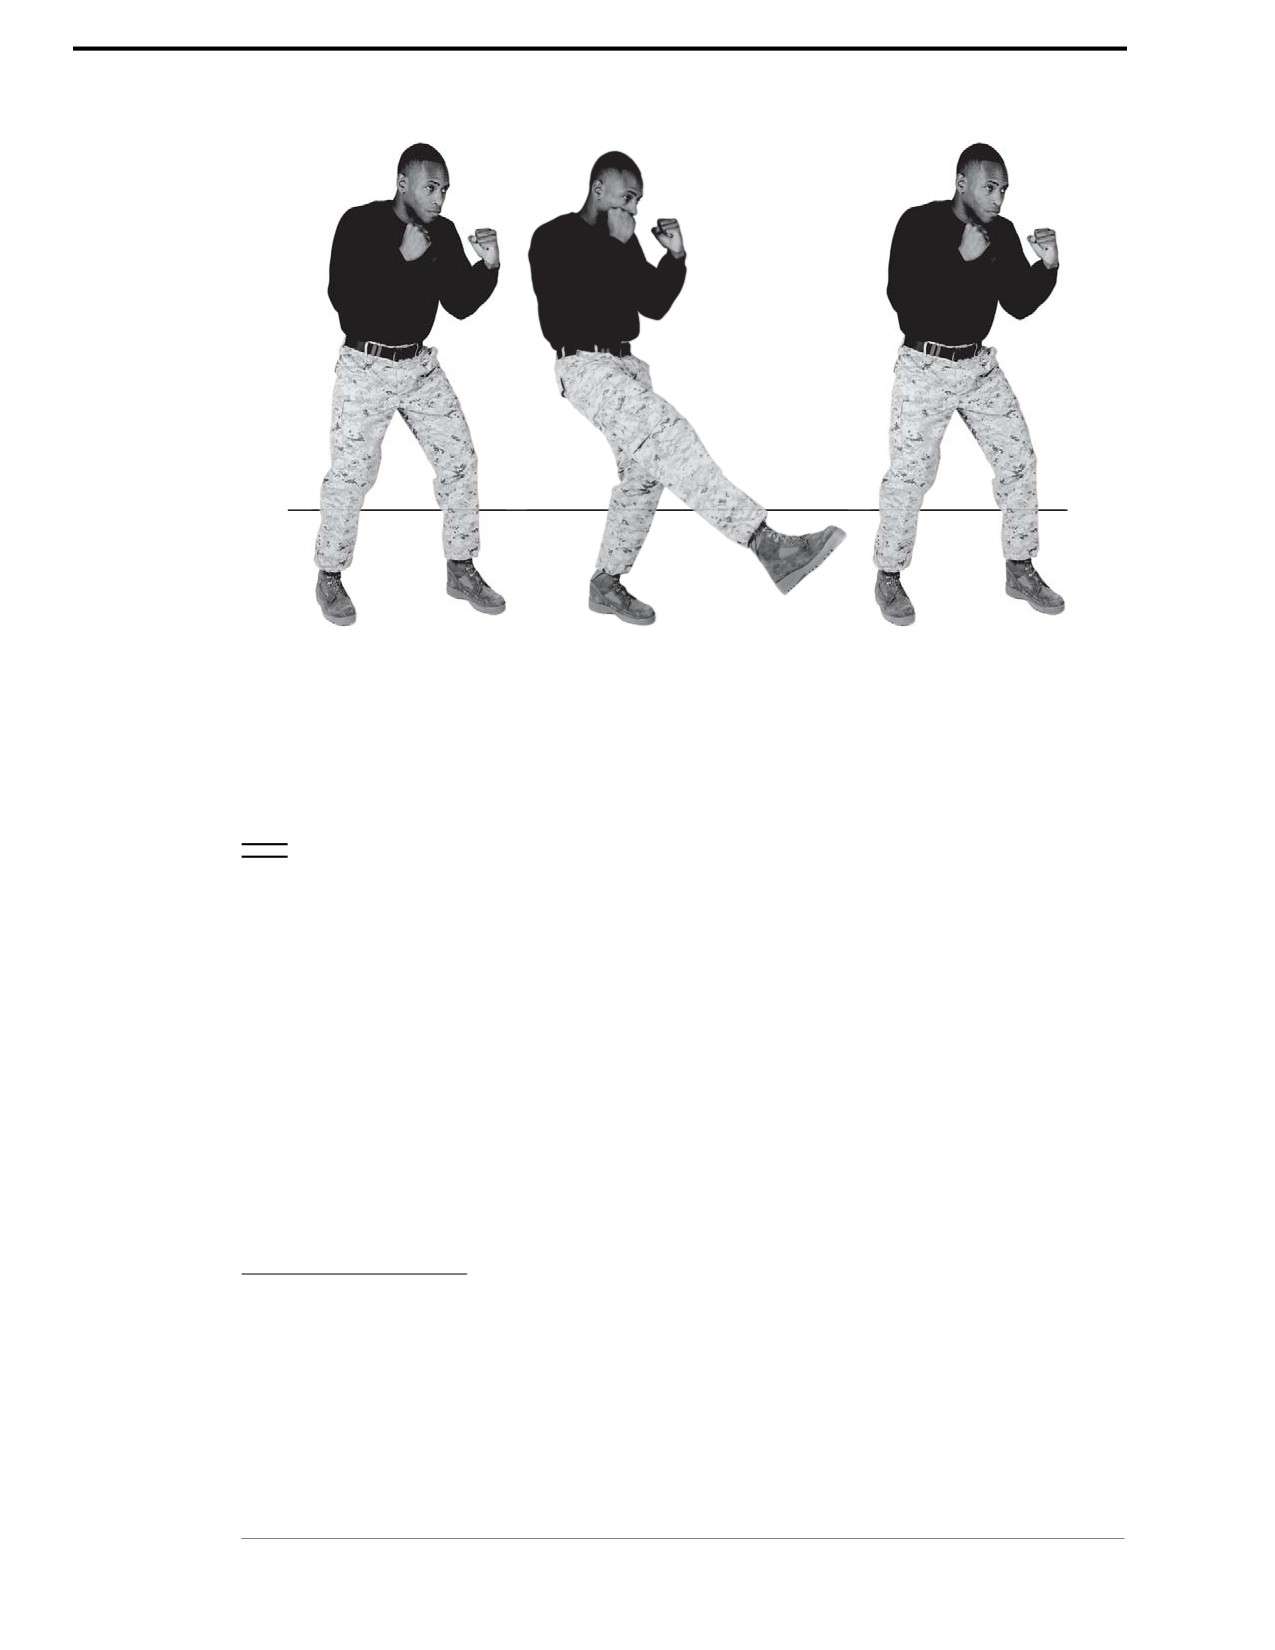
Front Kick
The front kick is used to stop the aggressor’s forward momentum or to set him up for follow-on
techniques when the aggressor is in front of you.
Striking Surface
The striking surfaces are the toe of the boot or the bootlaces, depending on the target area.
For Official Use Only
Chapter 2: Tan Belt
Marine Corps Martial Arts Program
2-37
Figure 2-30. Vertical Knee Strike.
Target Areas of the Body
The primary target areas are the aggressor’s groin, knee, shin, and inside thigh.
Technique
~ From the basic warrior stance, raise your right knee waist high and pivot your hips into the
attack, thrusting your right foot forward toward the aggressor. You may have to shift your
body weight to your left leg to maintain balance.
~ Never extend your foot above waist high because it is difficult to maintain power and it is
easier for the aggressor to counter by blocking or catching your leg. Keep in mind it is difficult
to change the direction of a kick after it is initiated because you have limited movement on
one leg.
~ Make contact on the aggressor with the toe of your right boot or bootlaces.
~ Follow through the primary target area with your foot and leg.
~ Rapidly return to the basic warrior stance.
See figure 2-31 on page 2-38.
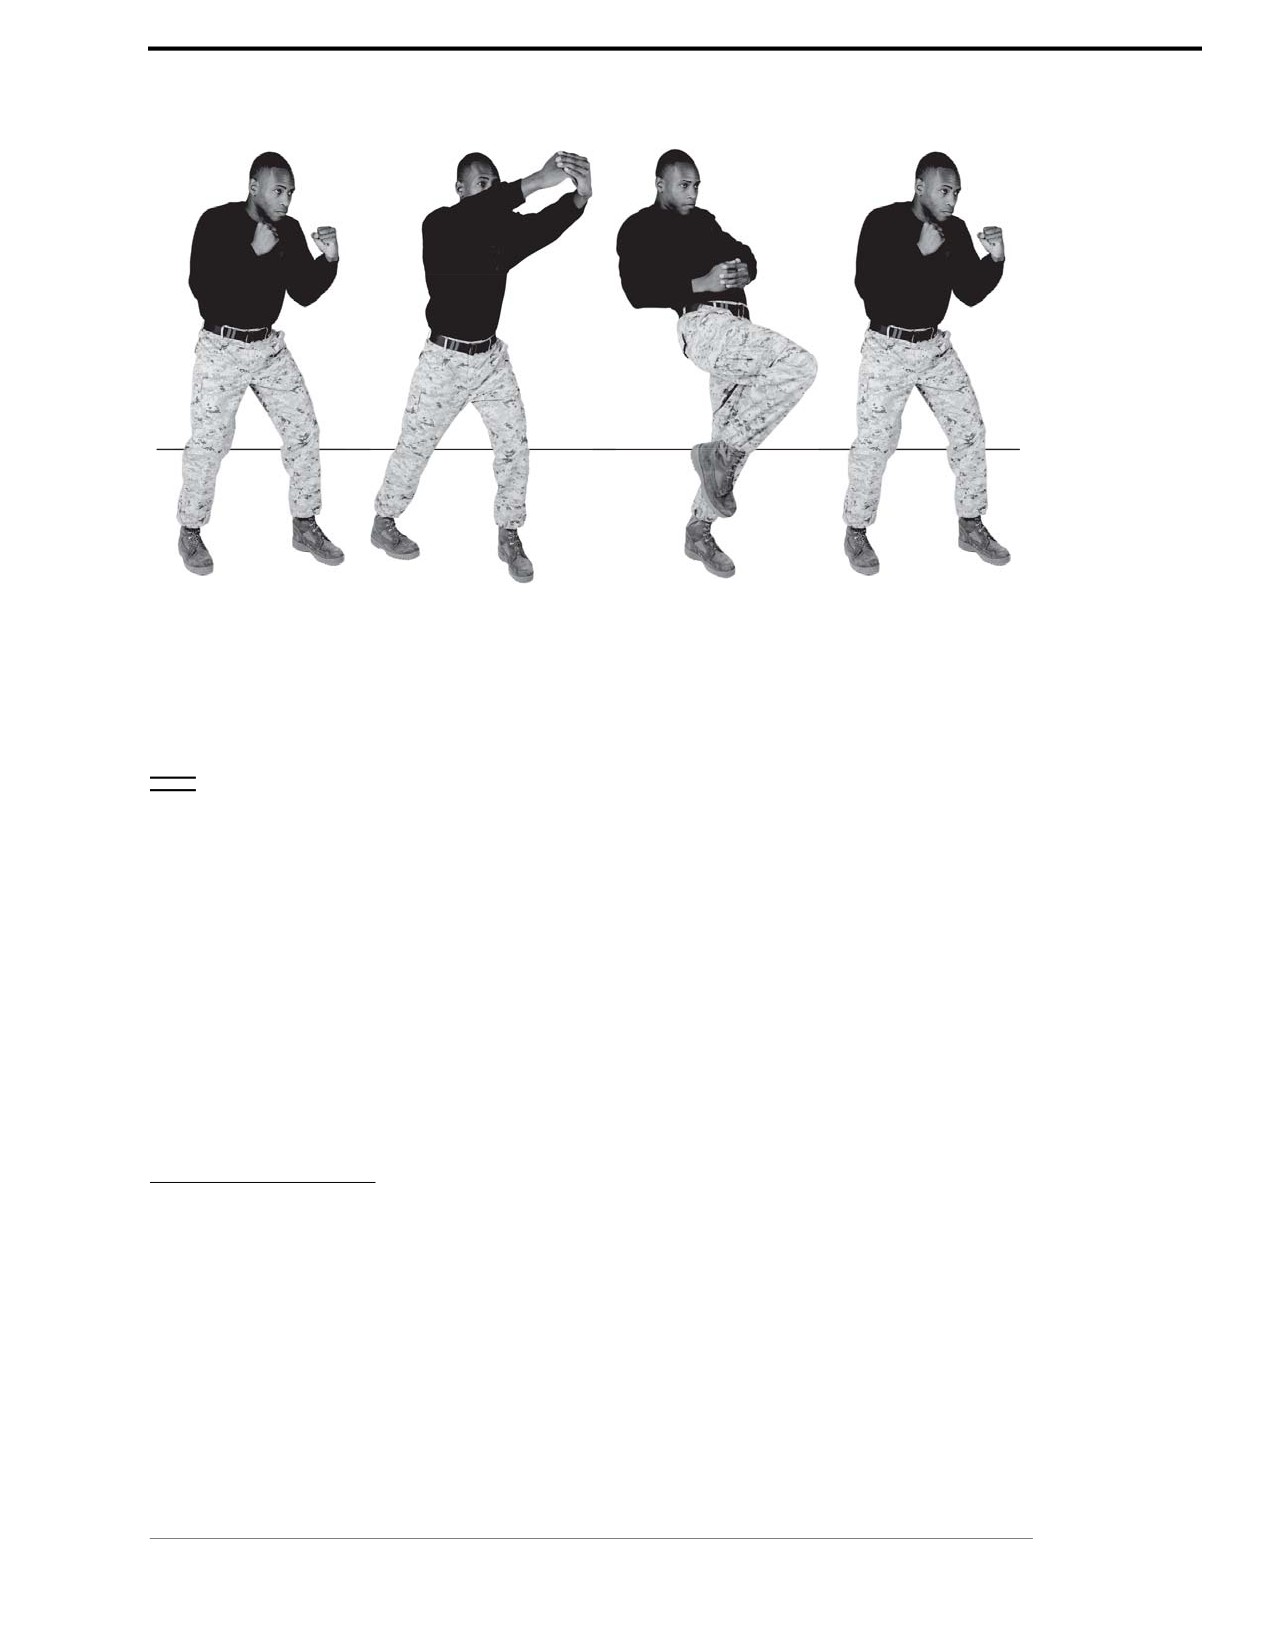
Round Kick
The purpose of the round kick is to cause maximum damage to the knee or to set the aggressor
up for follow-on techniques.
Striking Surface
The striking surface is the bottom half of your shin (slightly above the ankle).
Chapter 2: Tan Belt
For Official Use Only
2-38
MCRP 3-02B
Figure 2-31. Front Kick.
Target Areas of the Body
The primary target areas are the aggressor’s peroneal nerve (outer portion of the leg), femoral
nerve (entire inside of the leg), knee, calf, and Achilles tendon.
Technique
~ Raise your rear leg slightly off of the deck, ensuring that the foot of the lead leg is pointed
45-degrees to the outside of the aggressor. With your knee slightly bent, pivot your hips
and shoulders into the attack. Thrust your rear leg forward in an arcing motion toward
your aggressor.
~ You will have to shift your body weight to your left leg to maintain your balance. Ensure that
the foot of the lead leg is pointing 45-degrees to the outside of the aggressor.
~ With your lead leg slightly bent, extend your rear leg toward your aggressor in an arcing
motion. Thrust your rear hip and shoulder forward to generate additional power.
~ Make contact on the aggressor with the shin of the rear leg or the top of the foot and follow
through the primary target area.
~ Rapidly return to the basic warrior stance.
See figure 2-32.
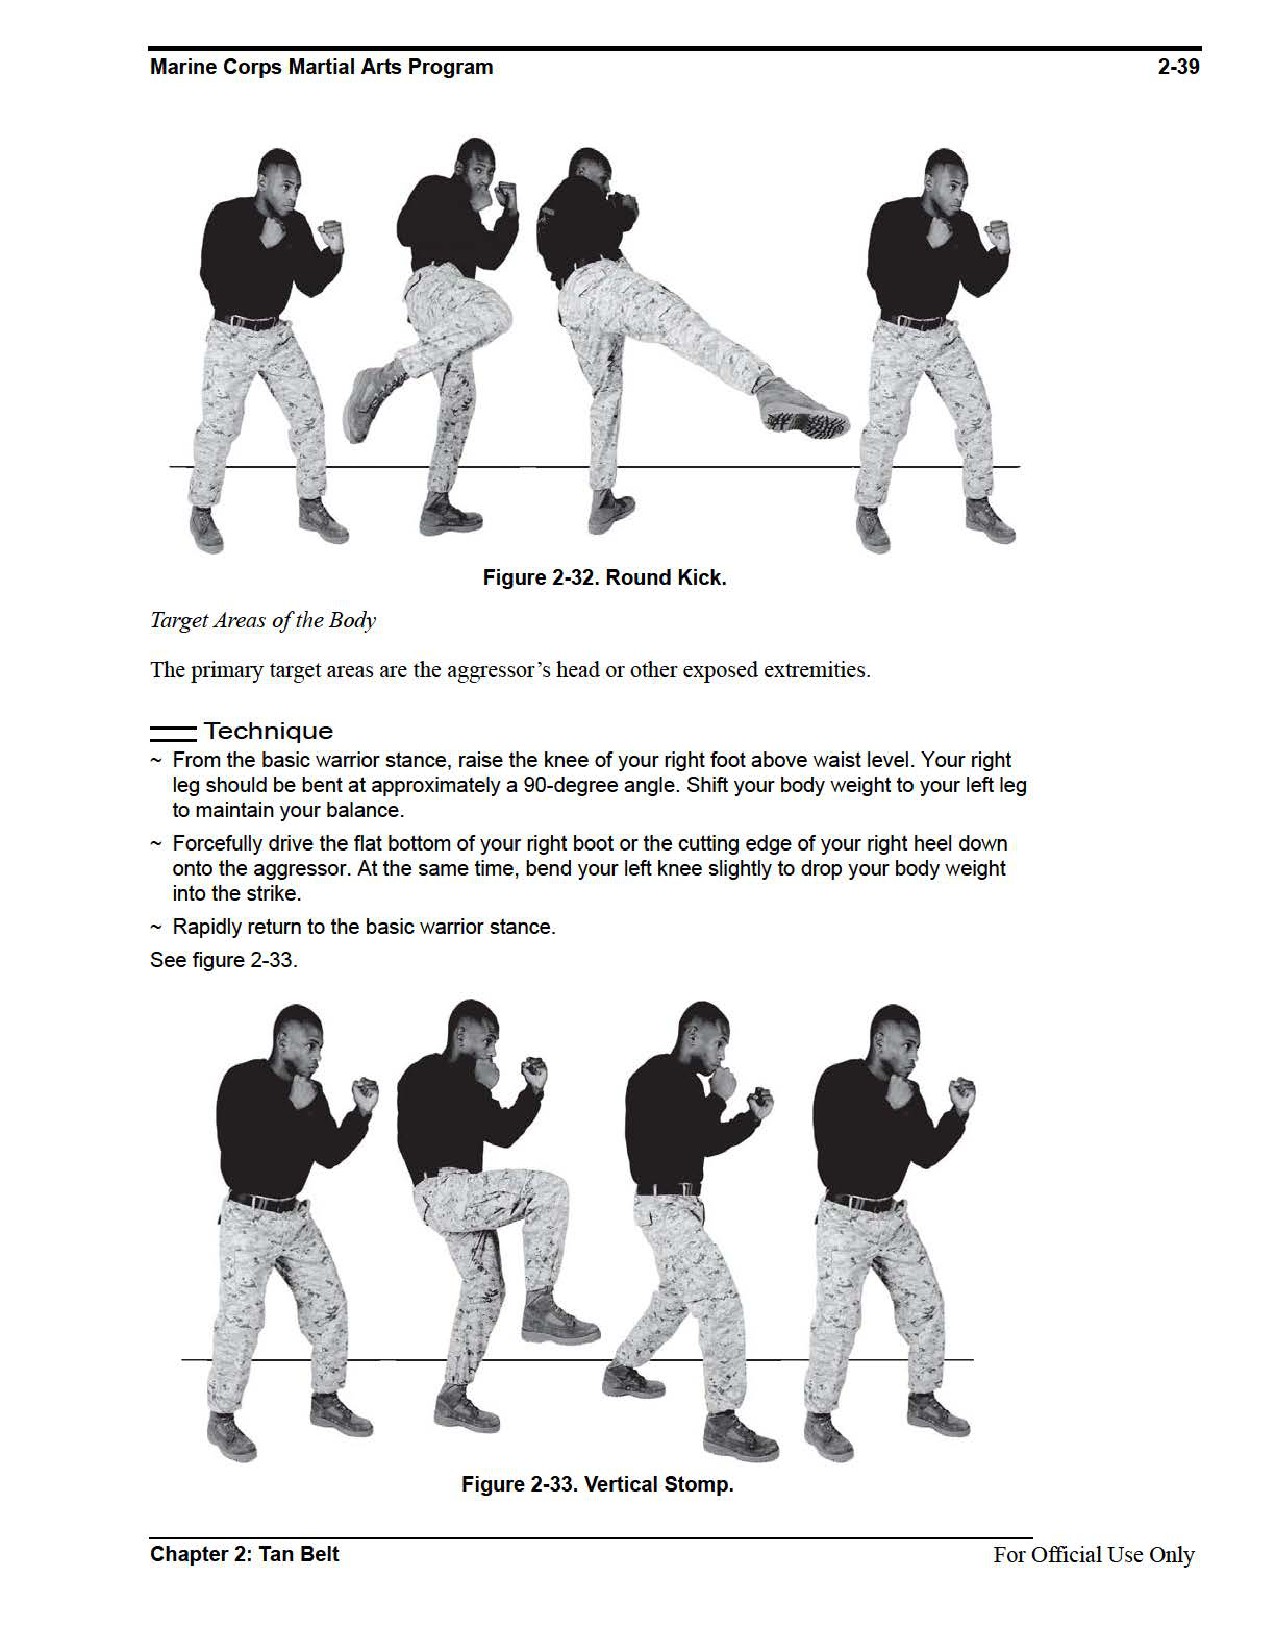
Vertical Stomp
A vertical stomp allows you to remain upright and balanced, in order to rapidly deliver multiple
blows with either foot and to quickly and accurately attack your downed aggressor.
Striking Surface
The striking surface is the flat bottom of your boot or the cutting edge of your heel.
For Official Use Only
Chapter 2: Tan Belt
2-40
MCRP 3-02B
Actions of the Aggressor
The striking pad should always be held in a position so that the Marine who is performing the
technique connects in the center of the striking pad.
Vertical Knee Strike
The striking pad is held with one arm
through the center straps and the other hold-
ing the top strap to protect the head. Hold
the striking pad tight to your body to avoid
injury to your extremities. Keep your top
hand up to your head to protect yourself
with the striking pad. See figure 2-34.
Front and Round Kicks
Use your hand to hold the top strap on the
striking pad. Hold it along the back of your
leg so all impact goes in the direction of
your bent knee. The strikes should never go
against the knee during practice, even with
a striking pad. The angle of attack changes
between the front and round kicks. The
angle of attack for the front kick is verti-
cally forward. The angle of attack for the
Figure 2-34. Vertical Knee Strike.
round kick is horizontally forward.
For Official Use Only
Chapter 2: Tan Belt

Marine Corps Martial Arts Program
2-41
Section VII
Introduction to Chokes
The purpose of chokes is to render your aggressor unconscious or gain control of a close combat
situation through less than lethal force. A choke is performed by either closing off of the airway
to the lungs, thereby preventing oxygen from reaching the heart, or by cutting off of the blood
flow to the brain. Both types of chokes can result in unconsciousness and eventual death for an
aggressor. Chokes are classified in two categories: blood chokes and air chokes.
A blood choke is performed on the carotid artery located on both sides of the neck, which carries
oxygen-enriched blood from the heart to the brain. When executed properly, a blood choke takes
between 8 to 13 seconds for the aggressor to lose consciousness. The blood choke is the pre-
ferred choke because its intended effect can be executed quickly, ending the fight.
An air choke is performed on the windpipe or trachea, cutting off the air to the lungs and heart.
When executed properly, an air choke takes between two and three minutes for the aggressor to
lose consciousness. The air choke is not recommended because of the length of time it takes to
stop the fight.
Refer to appendix A for corresponding safeties 1, 2, 6, 10, 11, and 12.
Rear Choke
The rear choke is a blood choke performed when you are behind the aggressor, the aggressor is
on the deck, or when you are taking the aggressor to the deck. When teaching the rear choke,
do not begin by having students execute the entire technique. Instead, walk the students through
the technique, step by step, beginning from a kneeling position and working up to a
standing position.
Technique
From a Kneeling Position
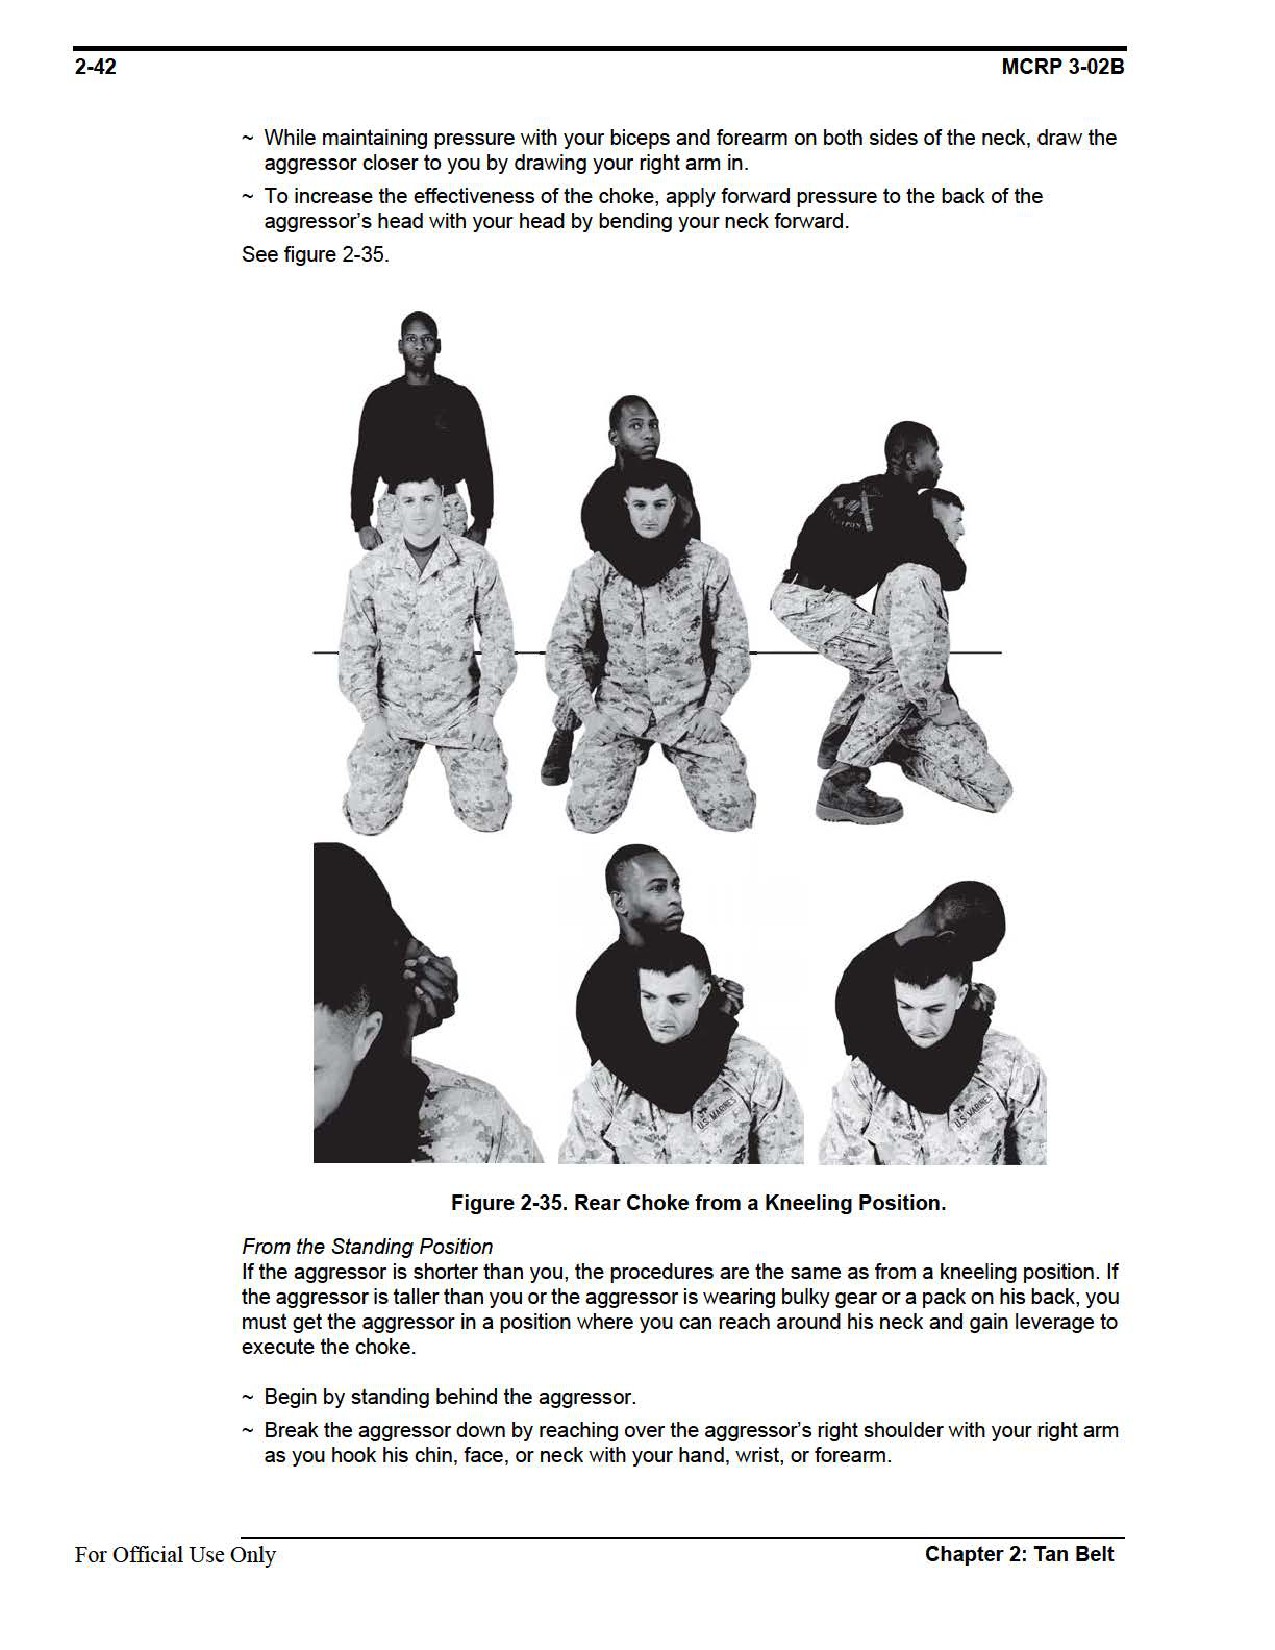
~ Begin with the aggressor kneeling on the deck and you standing behind him.
~ With your right arm, reach over the aggressor’s right shoulder and hook the bend of your arm
around his neck. Ensure the aggressor’s windpipe is positioned within the bend of your arm,
but pressure is not being exerted on his windpipe.
~ Your chest should be against your aggressor’s back.
~ With your left hand, clasp both hands together, palm-on-palm, with your right palm facing
the deck.
~ Exert pressure with your biceps and forearm on both sides of the aggressor’s neck on his
carotid arteries. Pressure should be exerted with the forearm along the radius bone and the
knuckles of the right hand should be facing straight up.
~ Ensure that the aggressor’s windpipe is positioned within the bend of your arm, but pressure
is not being exerted on his windpipe.
Chapter 2: Tan Belt
For Official Use Only
Marine Corps Martial Arts Program
2-43
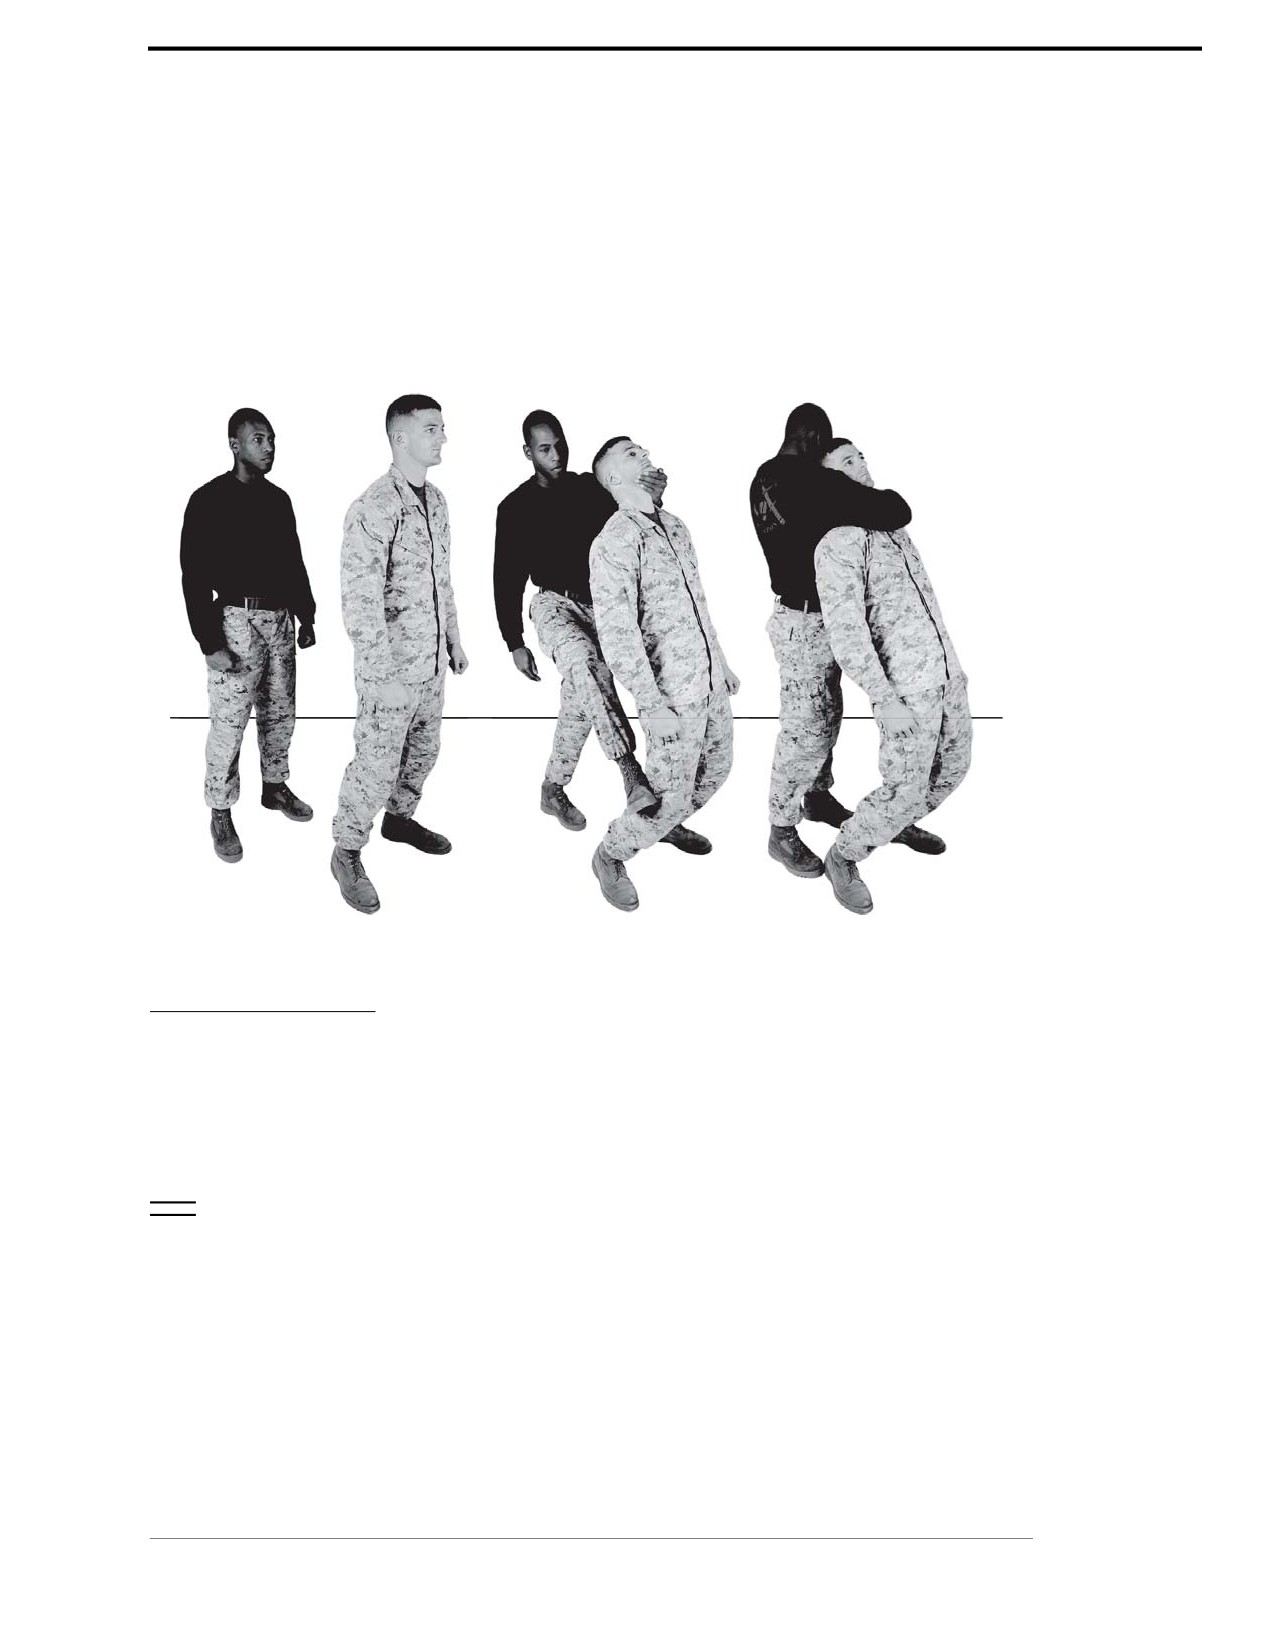
~ Step or push on the area behind the aggressor’s knee with your foot. This will set the
aggressor off balance and cause him to bend at the knees and fall forward.
~ As the aggressor is brought down, pull back on the aggressor’s chin and slide your right
forearm around his neck, hooking the bend of your arm around his neck.
~ You are now in position to execute the choke. The steps are the same as from the
kneeling position.
See figure 2-36.
Figure 2-36. Rear Choke from a Standing Position.
Figure Four Variation
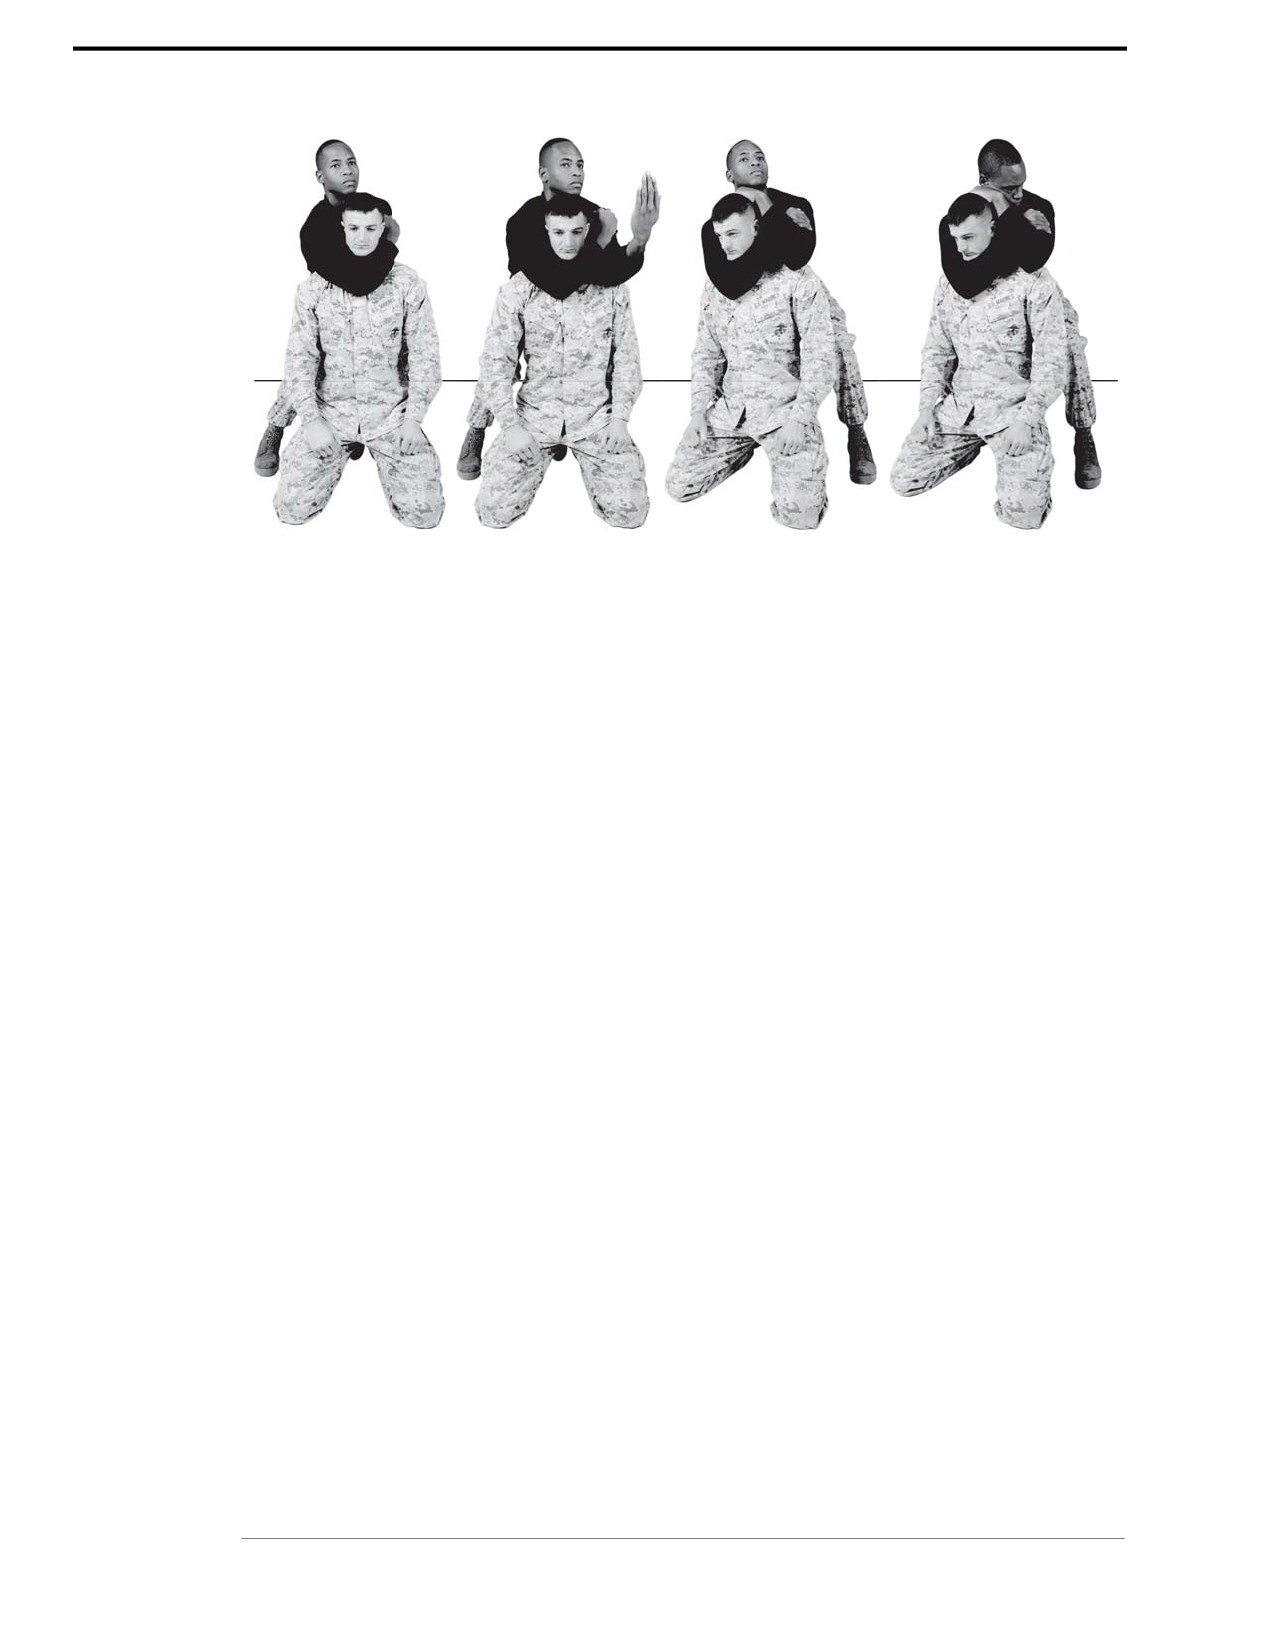
The figure four is a variation of the rear choke, which allows you to gain more leverage on the
rear choke. If you cannot secure the rear choke, you may apply the figure four variation to
increase the pressure of the choke on the aggressor.
Technique
~ Apply a rear choke. Your body should be against the aggressor’s body.
~ Bring your left arm over your aggressor’s left shoulder and grasp your left biceps with your
right hand and place your left hand against the back of the aggressor’s head.
~ With your left hand on the back of your aggressor’s head and your elbows in, push the
aggressor’s head forward and down.
~ Draw your right arm in, maintaining pressure with your biceps and forearm on both sides of
the aggressor’s neck.
See figure 2-37 on page 2-44.
Chapter 2: Tan Belt
For Official Use Only
2-44
MCRP 3-02B
Figure 2-37. Figure-Four Variation.
For Official Use Only
Chapter 2: Tan Belt

Marine Corps Martial Arts Program
2-45
Section VIII
Throws
The purpose of a throw is to bring an aggressor to the deck to gain the tactical advantage in a
fight. Throws apply the principles of balance, leverage, timing, and body position to upset an
aggressor’s balance and to gain control by forcing the aggressor to the deck. When executing a
throw, it is important to maintain control of your own balance while preventing the aggressor
from countering a throw or escaping after he is forced to the deck.
Throw
The throw consists of three parts: entry, off balancing, and execution. The leg sweep is the most
basic type of throw in MCMAP that is introduced at the Tan Belt level.
Entry
The first part of a throw is the entry. You want your entry to be quick and untelegraphed to pre-
vent your aggressor from anticipating your movement and countering your attack. You also want
to make sure that your body positioning is correct in relation to your aggressor to allow for
proper off balancing and execution of the throw.
Off Balancing
The second part of a throw is off balancing. Off balancing techniques are used to control an
aggressor by using the momentum of the aggressor to move or throw him. Off balancing tech-
niques can be used to throw an aggressor to the deck while you remain standing or to put your-
self in a position for a strike or a choke. Off balancing also aids in the execution of throws, as
your aggressor is unable to fight your attack with full strength while off balanced.
Angles of Off Balancing. There are eight angles or directions in which an aggressor can be off
balanced. The angles correspond to your perspective, not the aggressor’s. Imagine the angles at
your feet labeled with forward, rear, right, left, forward-right, forward-left, rear-right, and rear-
left. The following are angles that will off balance an aggressor:
• Forward, rear, right, and left are straight angles.
• Forward-right, forward-left, rear-right, and rear-left are considered quadrants, at a 45-degree
angle in either direction to your front or your rear.
Off Balancing Techniques. You can off balance the aggressor by pushing, pulling, or bumping
him with your hands, arms, or body. Some off balancing techniques are as follows:
• Grabbing an aggressor with your hands and driving him forcefully to one of the rear
quadrants or right or left perform pulling.
• Grabbing the aggressor with your hands and driving him forcefully into one of the front
quadrants or right or left perform pushing.
• Bumping is executed in the same manner as pushing, but without using your hands to grab the
aggressor. Instead, you use other parts of your body such as your shoulders, hips, and legs.
Chapter 2: Tan Belt
For Official Use Only

2-46
MCRP 3-02B
Principles of Off Balancing. Because off balancing techniques rely on the momentum and power
generated by the aggressor, they are particularly effective techniques for men and women who
may be outsized by their aggressor or the lack of strength that the aggressor has. Off balancing
techniques rely on—
• The momentum of the aggressor. For example, if the aggressor is charging at you, you can
pull him to drive him to the deck. If the aggressor is pulling you, you can push him to drive
him to the deck.
• The generated power of the aggressor. In combat, you are often tired and may be outnum-
bered. Depending on the generated energy and momentum of the aggressor, you can employ
these techniques with very little effort and still obtain effective results.
Practical Application for Off Balancing. Practical application of off balancing will allow the
Marine to safely practice off balancing on an aggressor and being off balanced without
completing the throw. Practical application is as follows:
• Begin the practical application with students facing one another. Designate one student as the
aggressor and the other to perform off balancing.
• Direct the students to do the following; with your left hand, grasp the aggressor’s right hand,
with your right hand; grasp the aggressor’s left shoulder.
• Practice each of the eight angles of off balancing. Ensure that the students push or pull just
enough to see that the aggressor is off balanced, not to drive the aggressor to the deck. When
the aggressor takes a step back or forward, he is off balanced and compensating to maintain
his balance.
Execution
The final part of a throw is the execution. During this portion the aggressor is taken to the deck.
This is the defining moment of the throw. Each step before execution is used to set up and assist
this final process (see fig. 2-38 on page 2-48).
Leg Sweep
The leg sweep is the first type of throw taught in MCMAP. This throw is used exclusively from
the standing position.
Technique
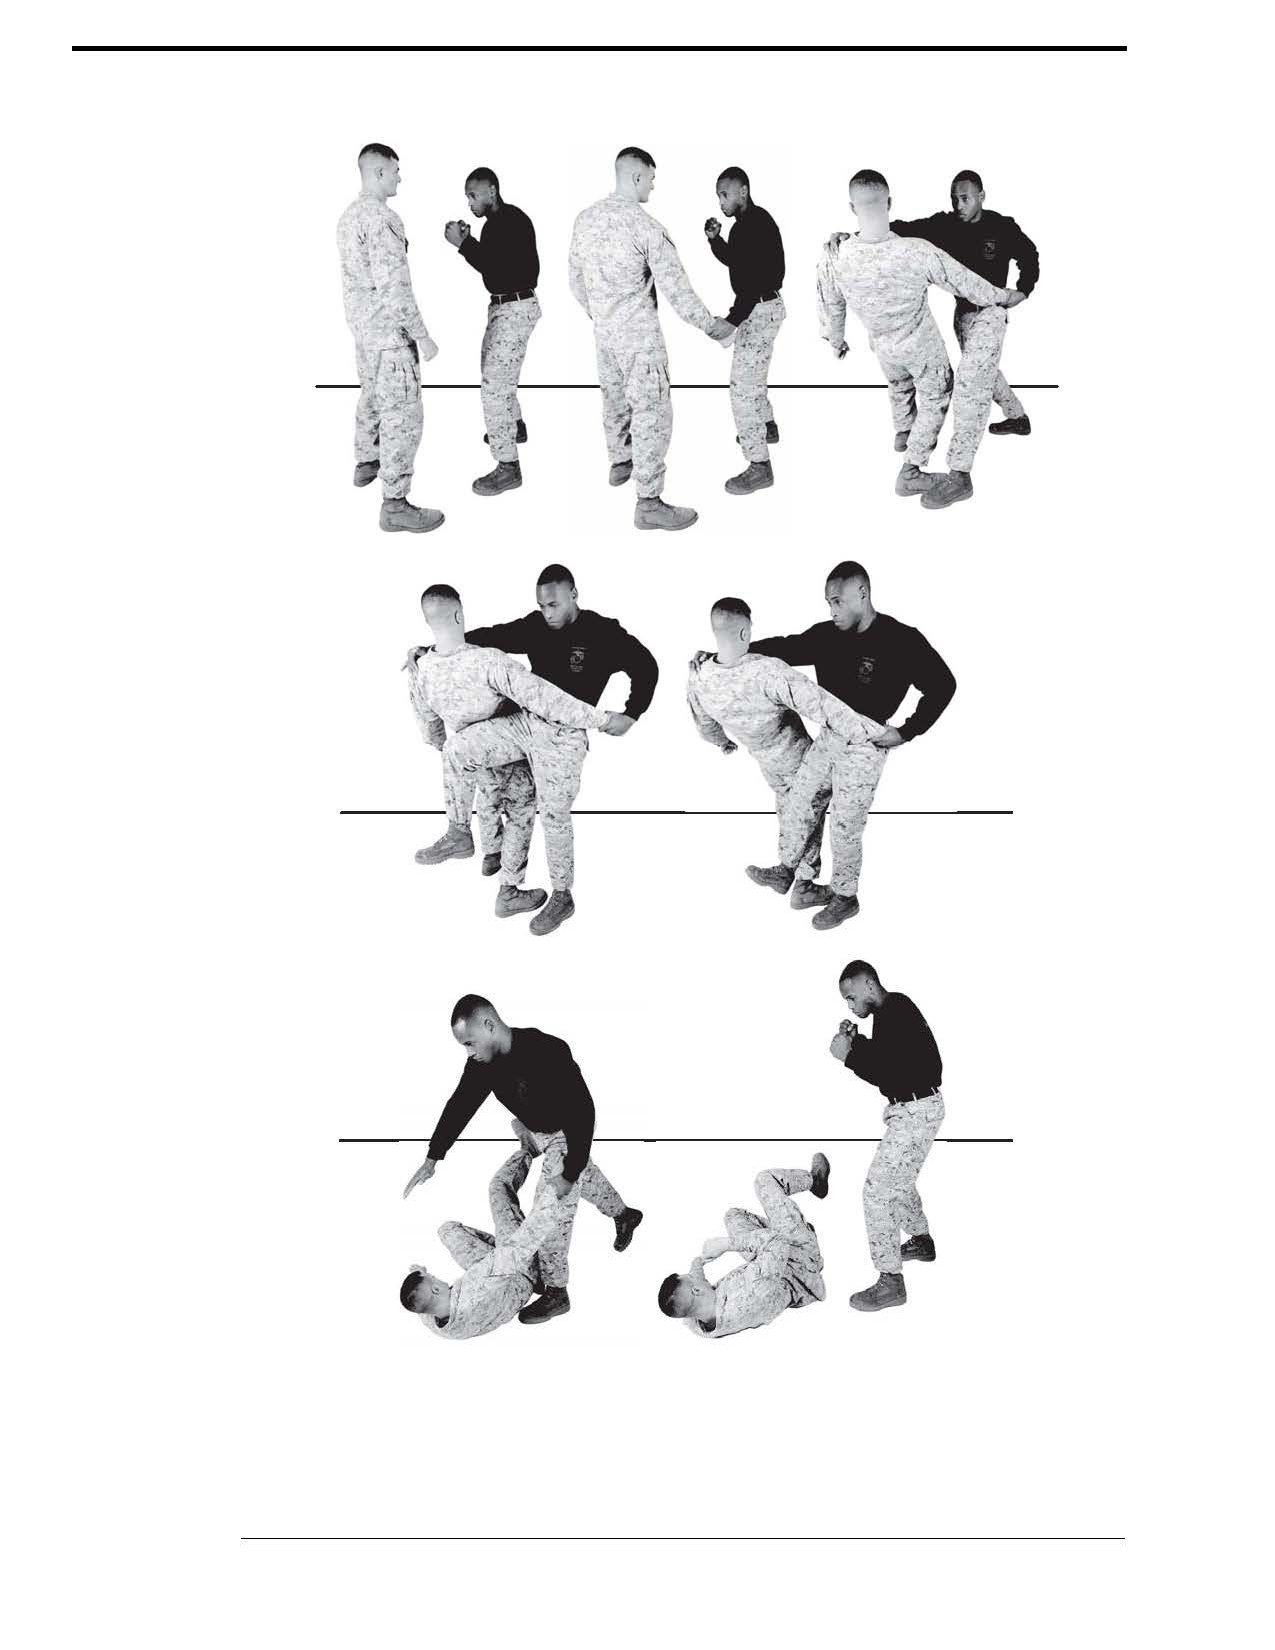
~ Stand facing aggressor in the basic warrior stance.
~ With your left hand, grasp the aggressor’s right wrist.
~ Grab the aggressor’s clothing or gear if you cannot grab his wrist.
~ Step forward with your left foot on the outside of the aggressor’s right foot. At the same time,
with your right hand, grasp your aggressor’s upper right torso area either on gear or flesh.
Your foot should be at least in line or behind the aggressor’s foot.
~ Your foot should be placed outside of the aggressor’s foot, far enough to provide room to
bring the other leg through to execute the sweep.
~ Begin to off balance the aggressor by pulling his wrist downward close to your body and
pushing his shoulder backwards.
For Official Use Only
Chapter 2: Tan Belt

Marine Corps Martial Arts Program
2-47
~ When pulling the aggressor’s hand, be sure to bring the hand down and close to the
trouser pocket.
~ Raise your right knee no higher than waist high and bring your foot behind the aggressor’s
right leg, and stop. The leg should be bent at the knee. This action takes less movement than
straightening the leg prior to the sweep. When your leg is raised you should be balanced and
in a position to easily off balance the aggressor.
~ Sweep through the aggressor’s leg, making contact with your calf on the aggressor’s calf. At
the same time, continue off balancing by pulling the wrist and driving your aggressor back
with your right side shoulder.
~ In a combative engagement contact will be made with the cutting edge of the heel on the
aggressor’s Achilles tendon or the calf.
~ Bending at the waist, continue to drive through the aggressor’s leg as you force him down to
the deck. You have to release your grip on the aggressor’s shoulder in order to maintain
your balance.
~ Rapidly return to the basic warrior stance.
See figure 2-38 on page 2-48.
Actions of the Aggressor
The person being thrown should avoid placing too much weight on the right leg (one being
swept). Placing all of your weight on the right leg causes you to have to use an undue amount of
force to execute the technique that could cause injury to the aggressor. When practicing this tech-
nique, allow the person who is executing it to do so while gradually increasing resistance.
Chapter 2: Tan Belt
For Official Use Only
2-48
MCRP 3-02B
Figure 2-38. Leg Sweep.
For Official Use Only
Chapter 2: Tan Belt

Marine Corps Martial Arts Program
2-49
Section IX
Counters to Strikes
The purpose of counters to strikes is to counter the aggressor’s attack and gain the tactical
advantage. This section will cover the counter to the rear hand punch and the counter to the rear
leg kick.
Refer to appendix A for corresponding safeties 1, 2, 3, 6, 10, 11, 12, 13, and 15.
Counter to Strikes
Regardless of the strike, the counter to a strike requires you to move, block, and strike.
Move
The first step in countering a strike is to move out of the way of the impact of the strike. Move-
ment should both remove you from the point of your aggressor’s strike as well as put you in a
position to attack. Movement is always initiated from the basic warrior stance and movement is
executed at approximately a 45-degree angle to the front or rear. Following movement, return to
the basic warrior stance with the toe of your lead foot pointing toward the aggressor.
Block
Different blocks are executed based on the strike. These will be covered with the indivi-
dual counters.
Strike
Any of the upper body or lower body strikes or combinations of techniques can be executed as a
follow-on attack as part of the counter to an aggressor’s strike. The choice of follow-on strike
depends on your angle to the aggressor, the position of the aggressor, and the available vulnera-
ble target areas that the aggressor has exposed.
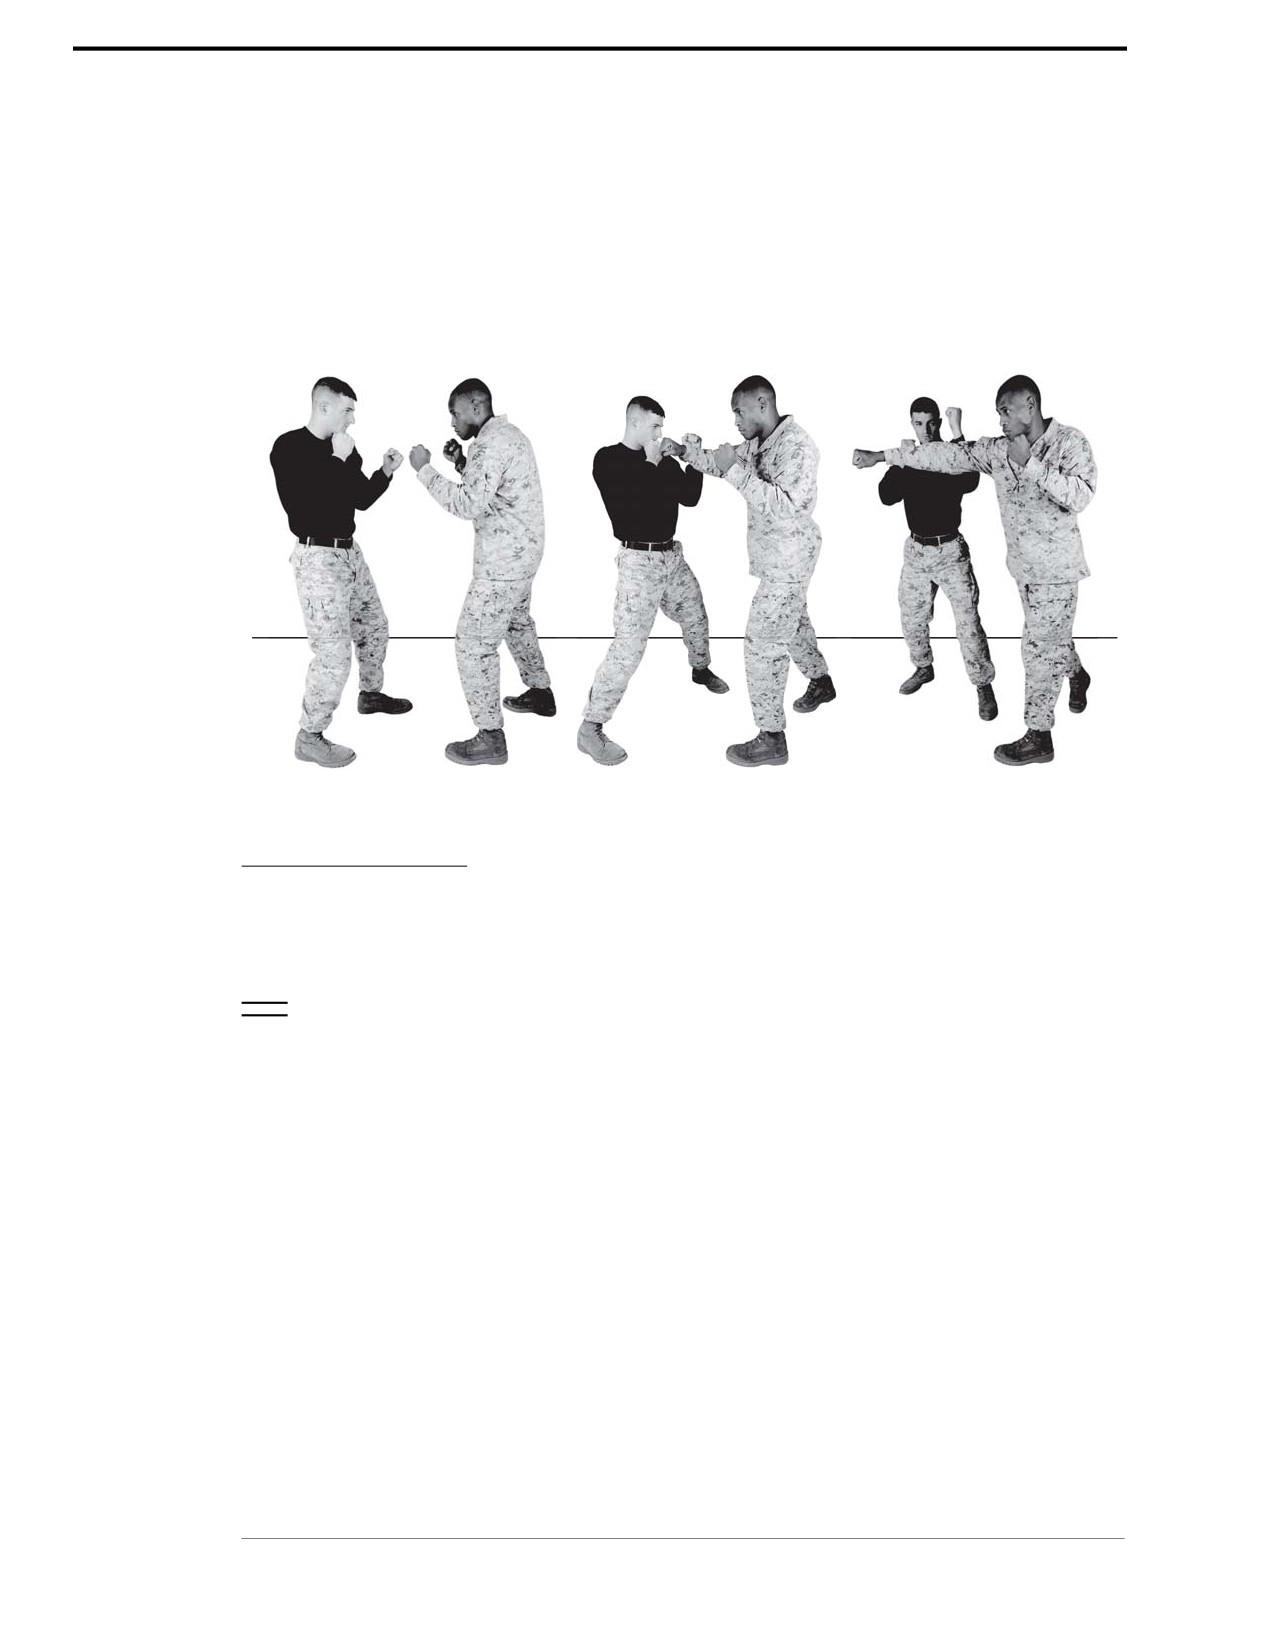
Counter to Rear Hand Punch
Counter to rear hand punch is used when the aggressor throws a rear hand punch.
Technique
~ Begin with the aggressor in the basic warrior stance extending his right hand in a rear
hand punch.
~ Step forward and to the left at approximately a 45-degree angle, moving in toward the
aggressor. At the end of the movement, return to the basic warrior stance with the left foot
forward and the toe pointing toward the aggressor.
~ At the same time, raise your left arm and block or deflect the aggressor’s rear hand. Do not
over extend and reach for the block. Block with the meaty portion of the forearm.
Chapter 2: Tan Belt
For Official Use Only
2-50
MCRP 3-02B
~ Leave your left arm against the aggressor’s right arm while stepping forward and to the right
at approximately a 45-degree angle to close with the aggressor. Follow through by applying
pressure against the aggressor’s arm to redirect the strike and, in the process, throw the
aggressor off balance. Continuing to step forward will position you to strike an exposed area
on the aggressor.
~ Counter with at least three follow-on strikes or techniques to the aggressor’s exposed target
areas and return to the basic warrior stance.
See figure 2-39.
Figure 2-39. Counter to Rear Hand Punch.
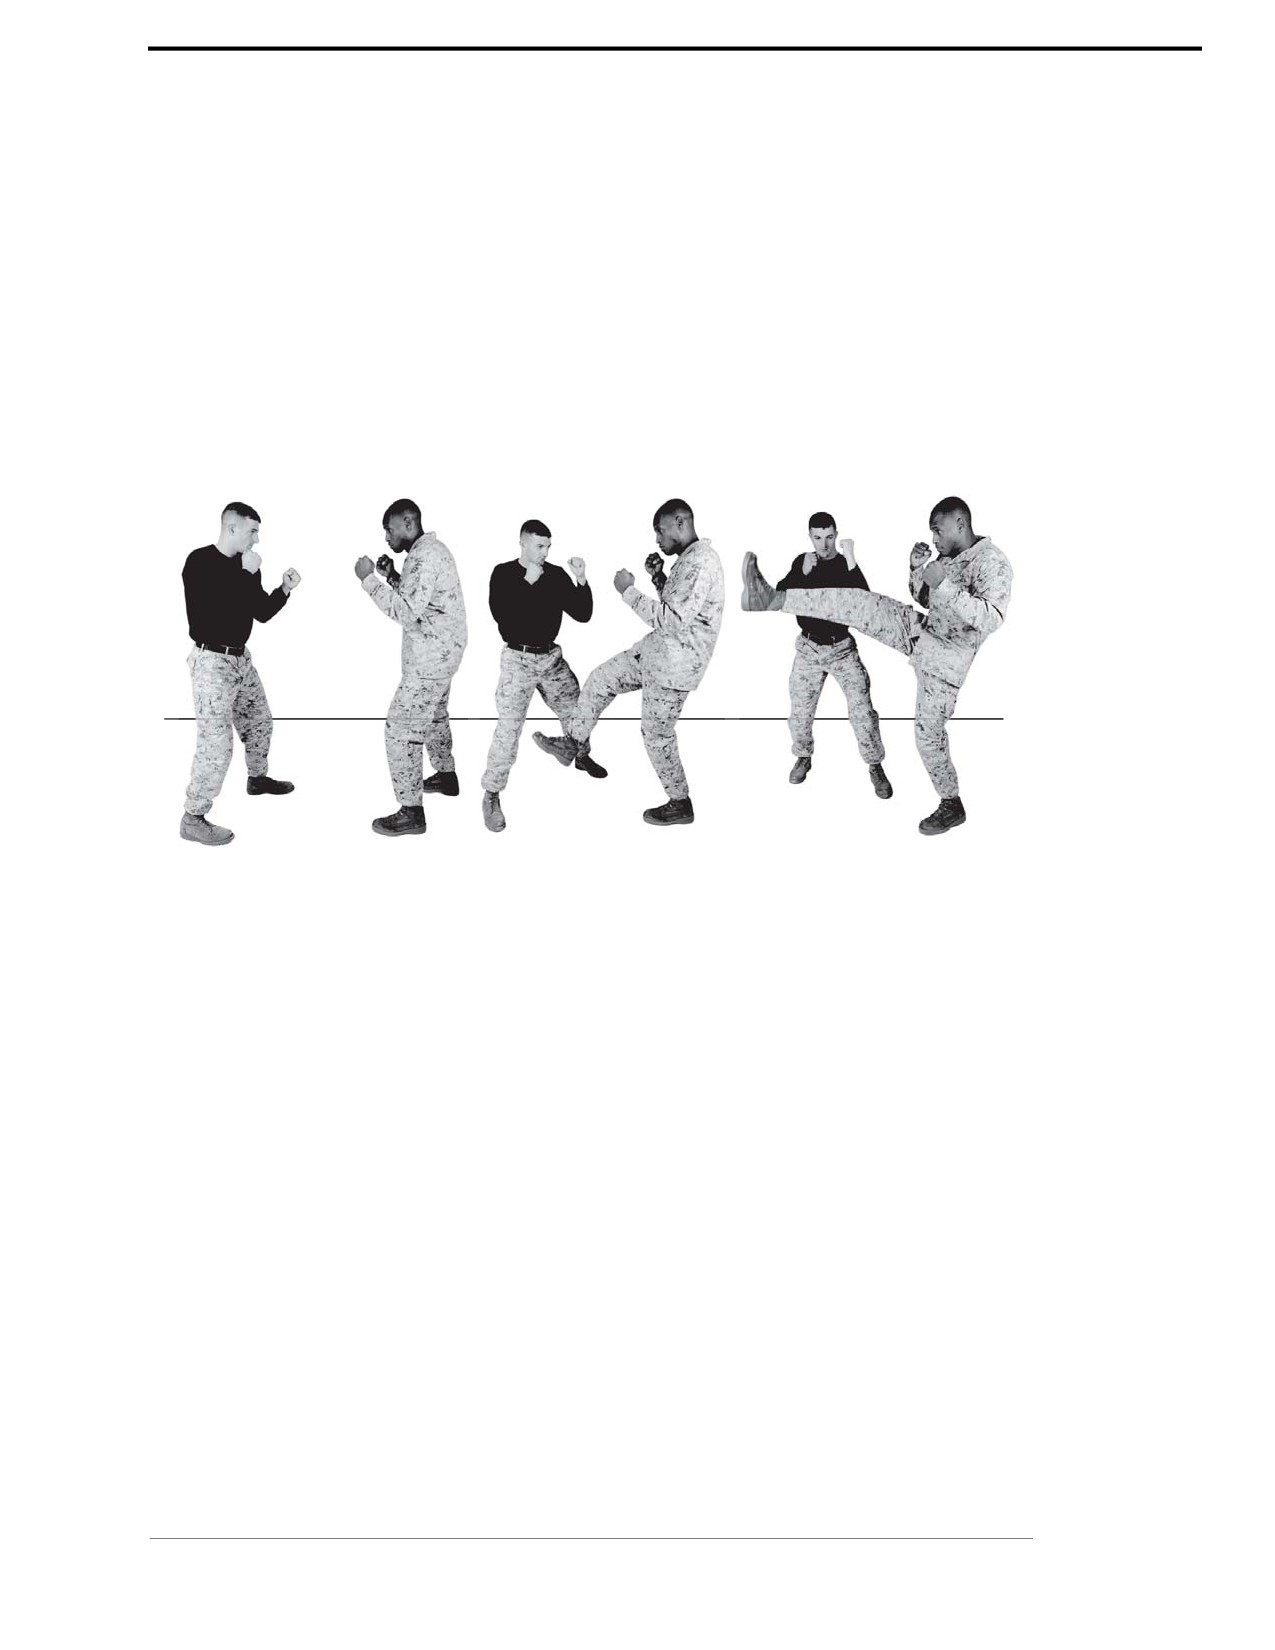
Counter to the Rear Leg Kick
Counter to the rear leg kick is used when the aggressor executes a front kick with his right leg.
Technique
~ From the basic warrior stance, the aggressor should begin by extending his right leg
performing a front kick.
~ Step forward and to the left at approximately a 45-degree angle, moving in toward
the aggressor.
For Official Use Only
Chapter 2: Tan Belt
Marine Corps Martial Arts Program
2-51
~ At the end of the movement, the left foot is forward with the toe pointing toward the
aggressor. At the same time, raise your left arm and block or deflect the aggressor’s leg.
~ Block with the meaty portion of your forearm. Move out of the way of the strike, which is
better than bending down to block the kick.
~ Leave your left arm against the aggressor’s leg while stepping forward and to the right at
approximately a 45-degree angle to close with the aggressor.
~ Follow through by applying pressure against the aggressor’s leg to redirect the strike,
throwing the aggressor off balance. Continuing to step forward will position you so that you
can strike an exposed area on the aggressor.
~ Counter with at least three follow-on techniques to the aggressor’s exposed target areas and
return to the basic warrior stance.
See figure 2-40.
Figure 2-40. Counter to the Rear Leg Kick.
Chapter 2: Tan Belt
For Official Use Only

2-52
MCRP 3-02B
Section X
Counters to Chokes and Holds
If executed properly, the counter to the rear choke, the counter to the rear bear hug, and the
counter to the rear headlock can render your aggressor unconscious quickly. If a choke is
improperly executed it often results in a hold. A hold allows the aggressor control and removes
the ability for an attack. It is important that Marines be able to extract themselves from chokes
and holds so that they can counterattack and regain the tactical advantage.
There are two principal actions that should be taken to counter any choke—clear the airway and
tuck the chin:
• Clear the Airway. A choke can cause unconsciousness in 8 to 13 seconds. Therefore, the first
movement in any counter to a choke is to clear your airway so you can breathe. Distracters
can be used before or after you have attempted to clear the airway. These techniques include
groin strikes, the eye gouge, and foot stomps. Softening techniques are used to loosen an
aggressor’s hold.
• Tuck the Chin. Once your airway is clear, tuck your chin to prevent the aggressor from
re-applying the choke.
Refer to appendix A for corresponding safeties 1, 2, 3, 6, 10, 11, 12, 13, and 15.
Counter to the Rear Choke
The counter to a rear choke is used when the aggressor approaches from the rear and puts his
right arm around your throat.
Technique
~ With both hands grab the aggressor’s wrist and his forearm at the radial nerve, pull down just
enough to clear your airway. Once the airway is clear, tuck your chin to protect your airway
and to prevent the aggressor from re-applying the choke. At the same time, drop your body
weight down, stepping out with your right leg. This places you more to the aggressor’s right
side and also makes space for your left foot to step through.
~ With your left foot, step behind the aggressor’s right leg keeping both of your legs
bent making contact on your aggressor with your left hip placing yourself in almost a
squatting position.
~ It is important to keep your legs bent because this places your hips lower than your
aggressor’s hips so that you can easily off balance him. Bend your legs to the point that you
can still maintain your own balance. Your legs need to be in a squatting position with enough
balance to maintain control.
~ At the same time, turn forcefully to the left, strike and drive your left elbow into the
aggressor’s torso while rotating your hips and pivoting to your left. The aggressor should fall
to his back or side, causing him to lose his grip.
~ Rapidly return to the basic warrior stance, ready for any follow-on techniques.
See figure 2-41.
For Official Use Only
Chapter 2: Tan Belt
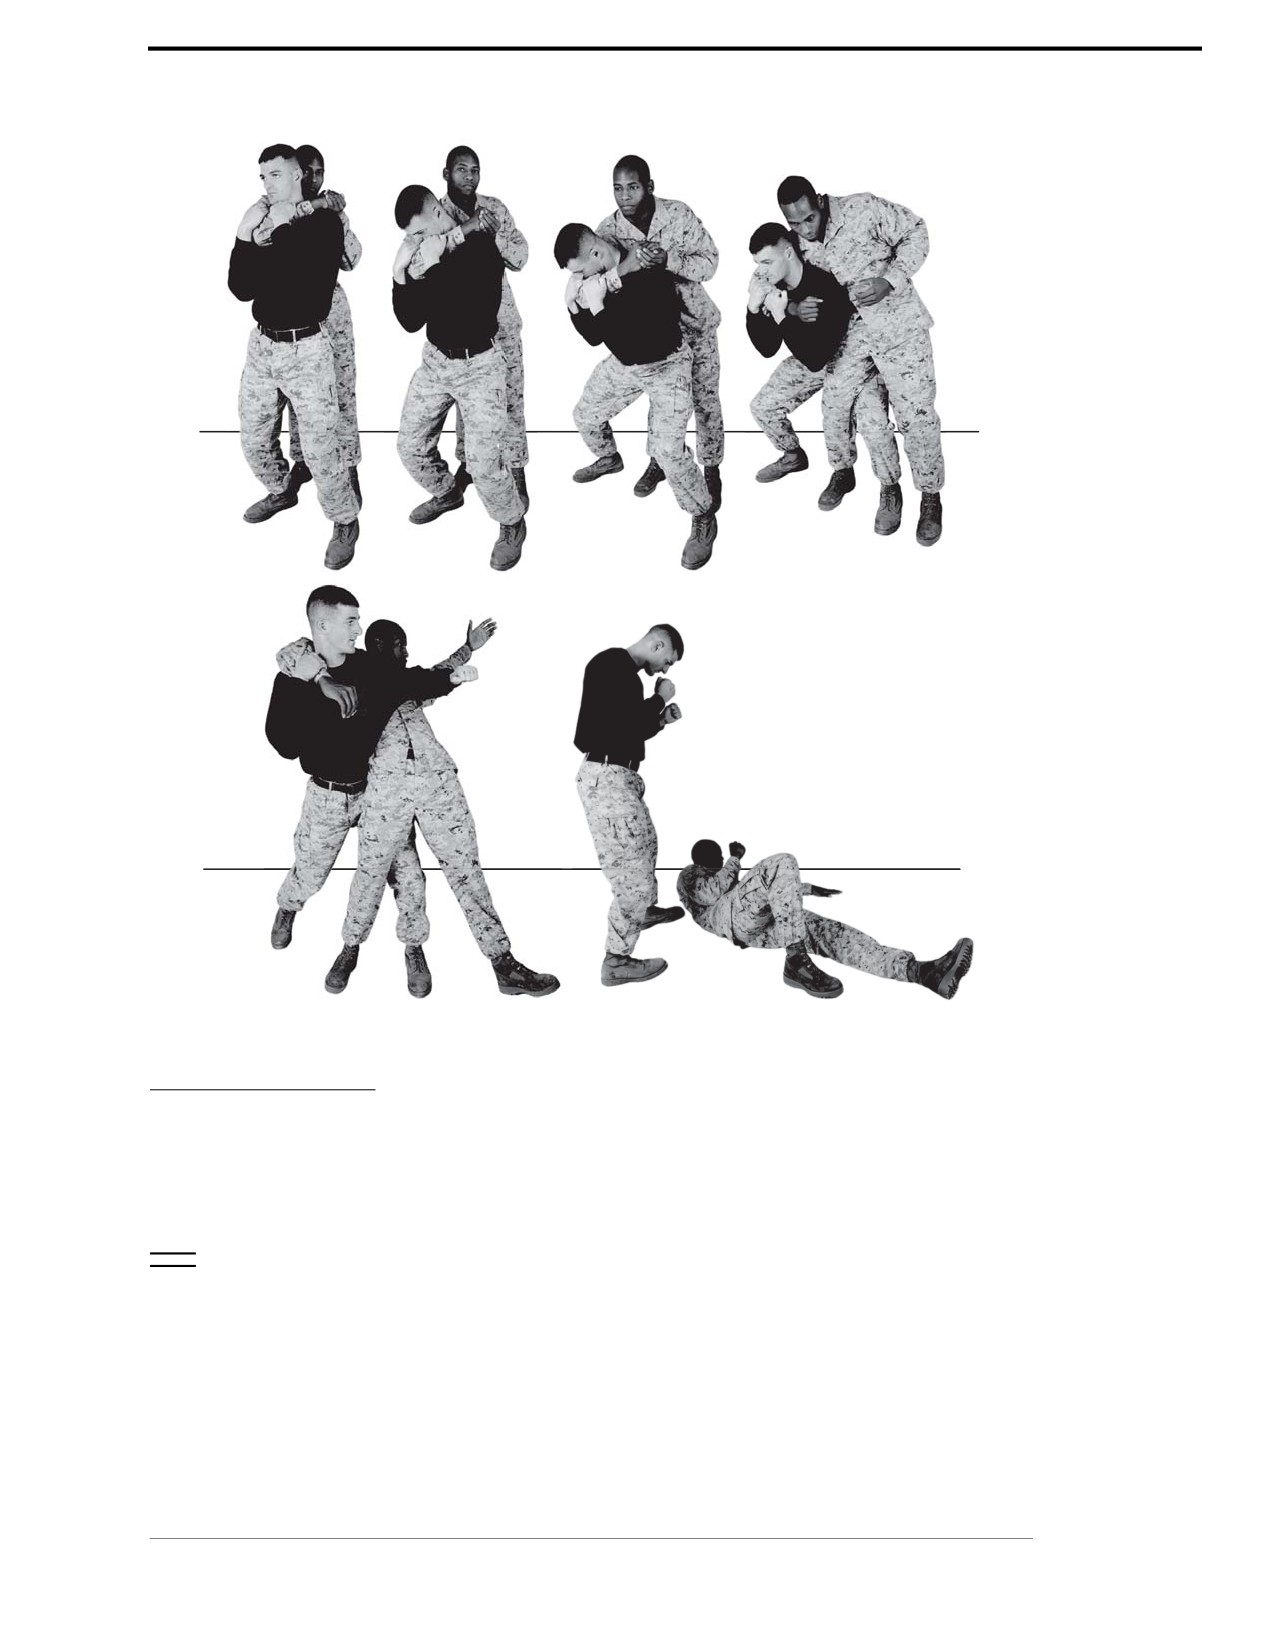
Marine Corps Martial Arts Program
2-53
Figure 2-41. Counter to the Rear Choke.
Counter to the Rear Headlock
The counter to a rear headlock is used when the aggressor approaches from the rear and puts his
right arm around your neck, bending you forward and locking your head against his hip.
Technique
~ Bend forward at the waist. The aggressor faces in the same direction as the student and
places his right arm around the student’s neck and his forearm across the student’s throat.
~ With both hands, grasp the aggressor’s wrist and forearm at the radial nerve and pull down to
clear your airway. Once the airway is clear, tuck your chin to protect your airway and to
prevent the aggressor from re-applying the choke.
Chapter 2: Tan Belt
For Official Use Only
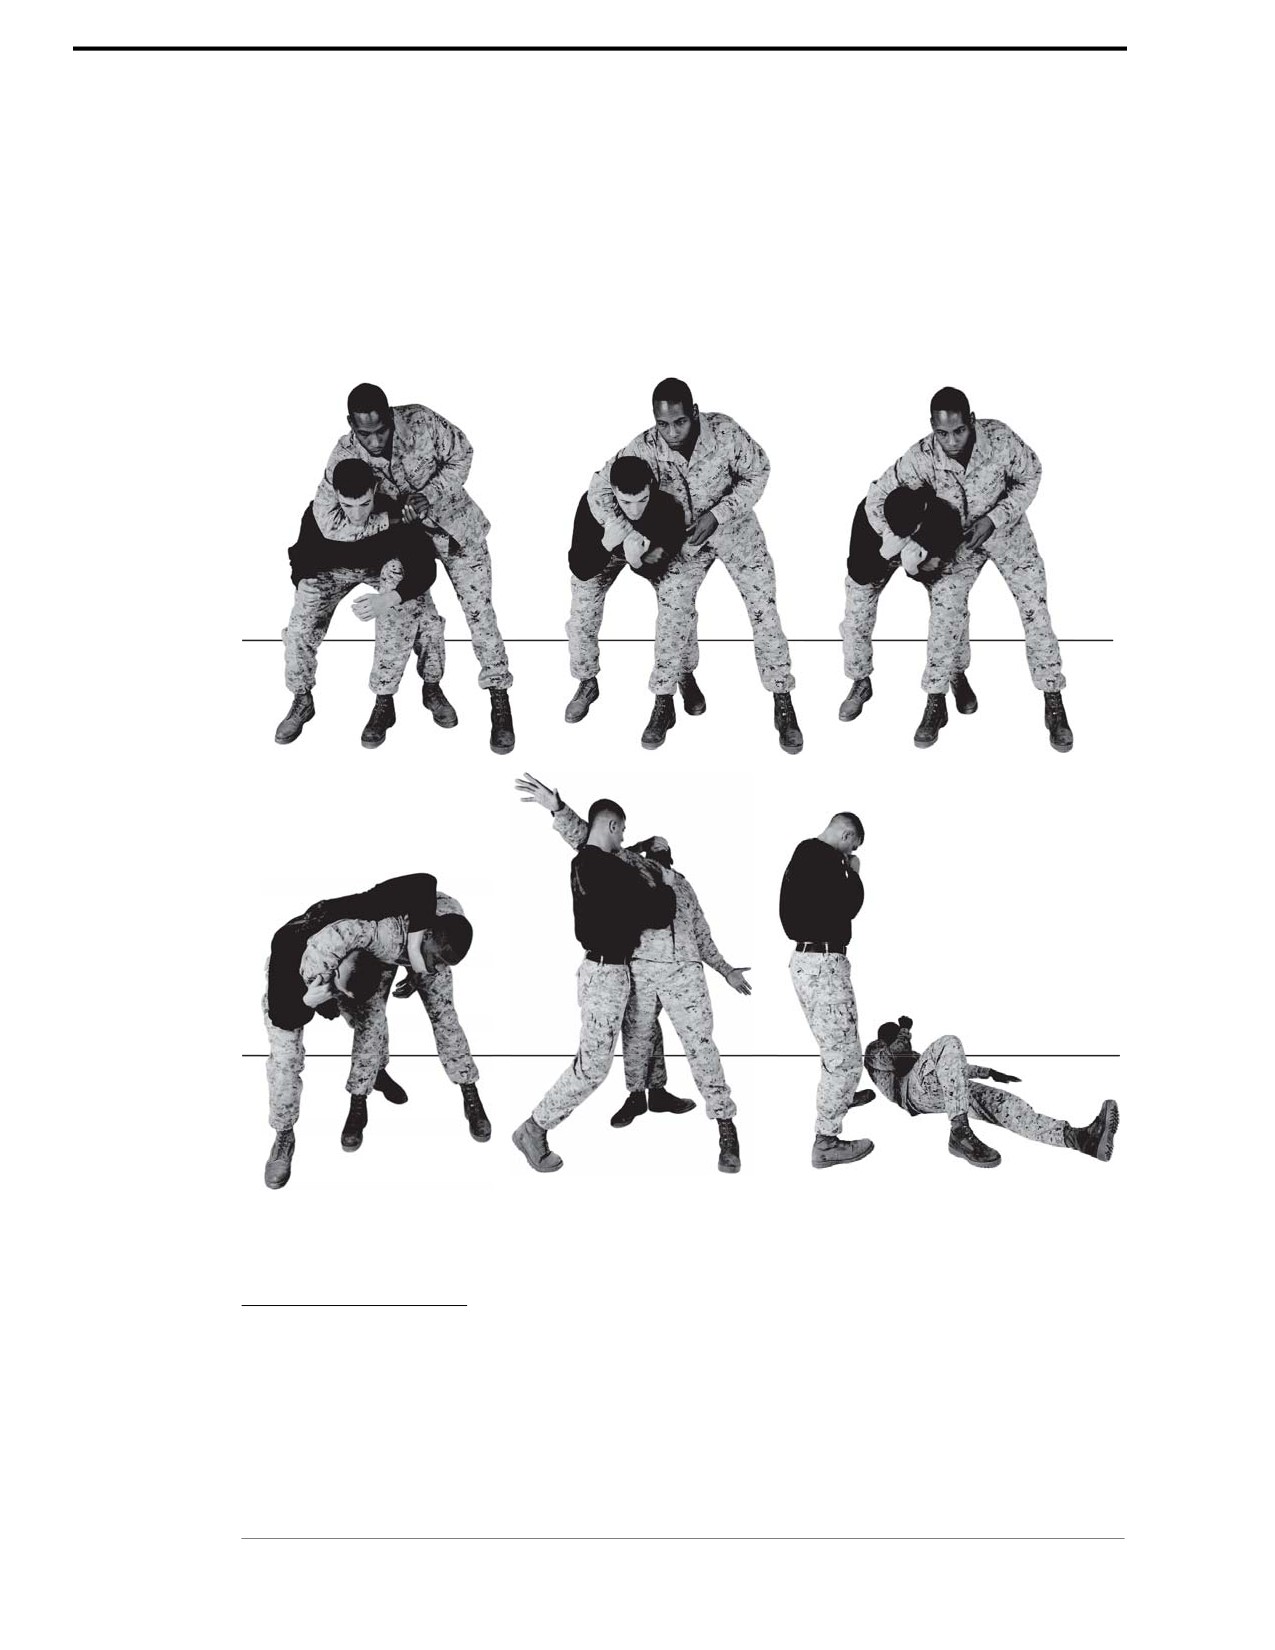
2-54
MCRP 3-02B
~ Take a 12- to 15-inch step forward with your right foot to off balance your aggressor. At the
same time reach over your aggressor’s right shoulder with your left hand. Once off balancing
has been achieved, grab any part of the aggressor’s face with the left hand and pull back
while rising to a standing position.
~ With your right hand, execute a hammer fist to the aggressor’s exposed throat. For safety,
the aggressor should bring his free arm up to protect his throat. In addition, contact can be
made on your aggressor’s chest when executing this technique during practice.
See figure 2-42.
Figure 2-42. Counter to the Rear Headlock.
Counter to the Rear Bear Hug
The counter to the rear bear hug is used when an aggressor approaches from the front or rear. The
aggressor will grasp around the arms so that you end up in a vulnerable position with no use of
your arms.
For Official Use Only
Chapter 2: Tan Belt
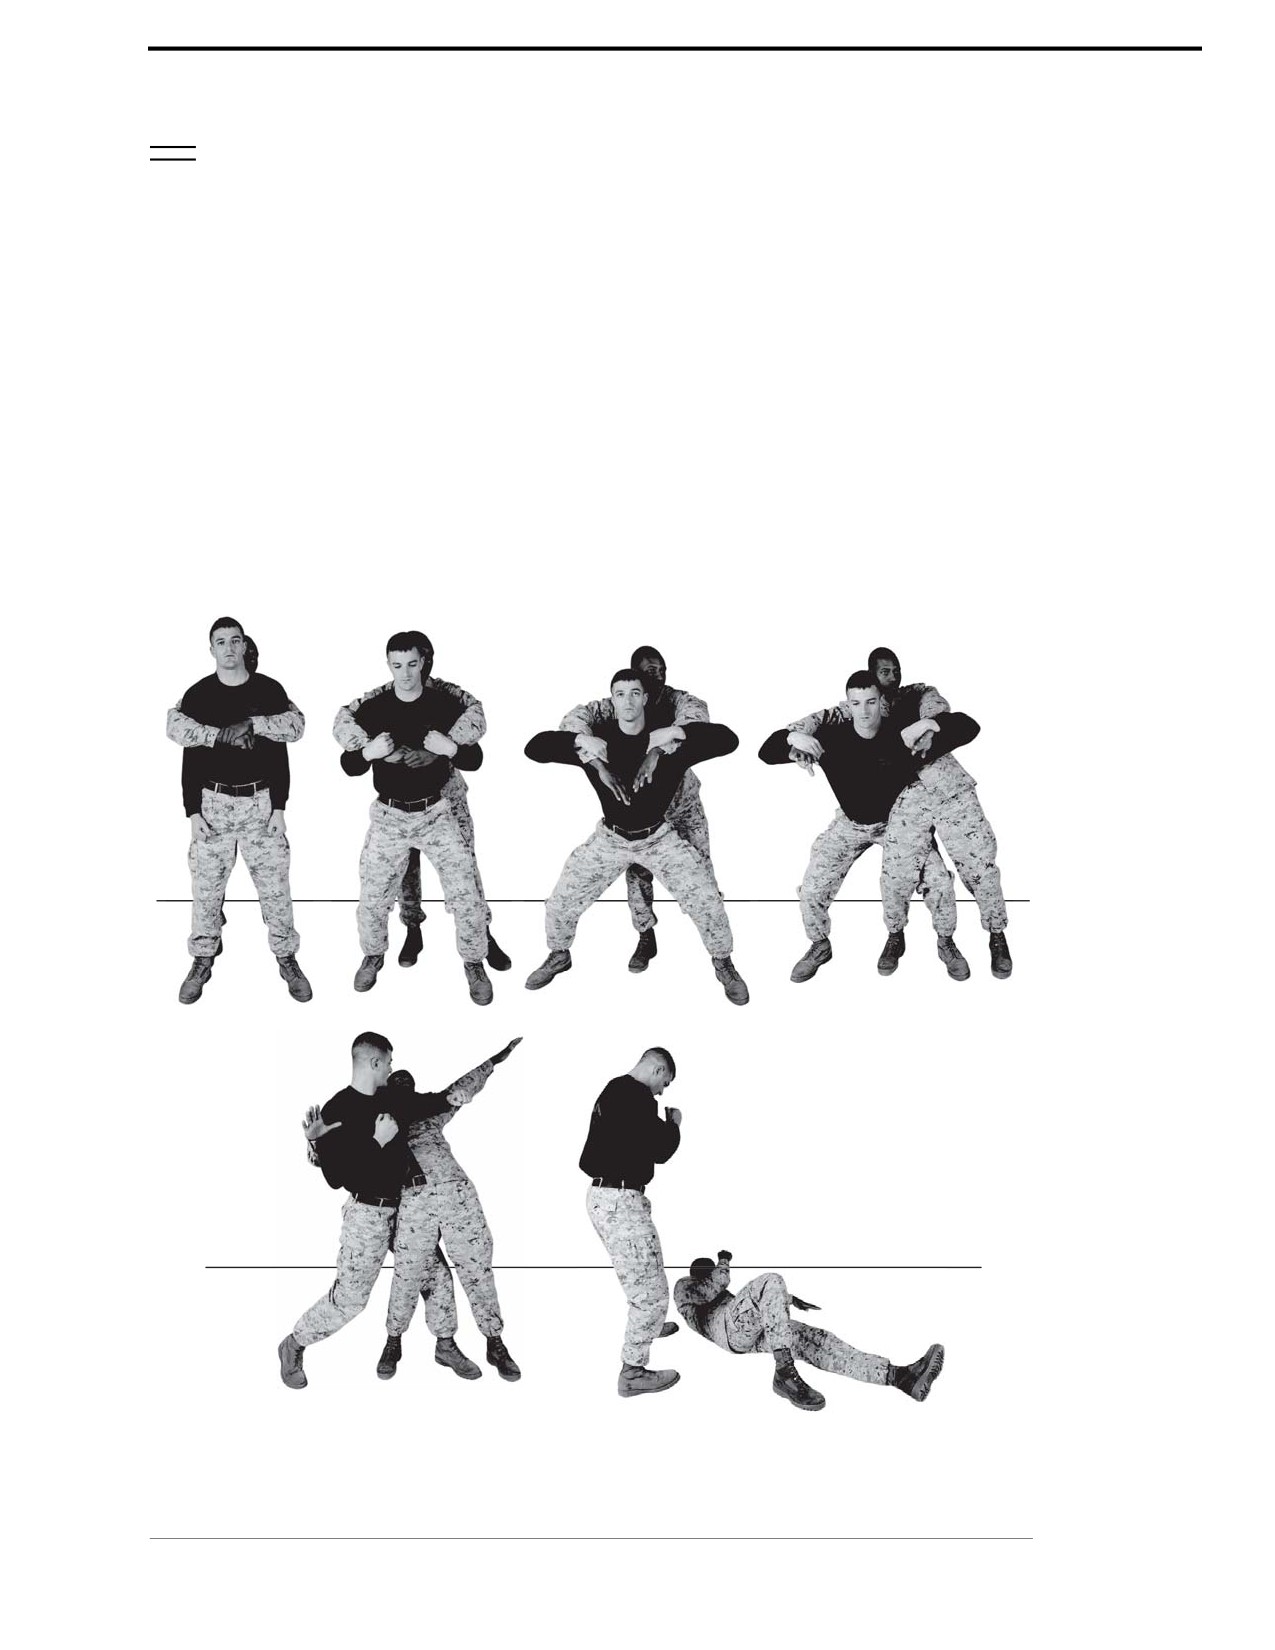
Marine Corps Martial Arts Program
2-55
Technique
~ The aggressor approaches you from behind and applies a bear hug with your arms included
in his grasp.
~ Drop your body weight down, stepping out with your right leg. This places you more to the
aggressor’s right side and also makes space for your left foot to step through. Simultaneously
hook the aggressor’s arms with your hands, slightly flaring your elbows, preventing his arms
from slipping off or up into a choke.
~ Step behind the aggressor’s right leg with your left foot, keeping both legs bent, almost in a
squatting position. The left side of your body should be against the aggressor’s. Your left hip
is in contact with the aggressor’s right thigh/buttock, breaking his balance.
~ While keeping positive control of your aggressor’s arms, turn forcefully to the left, strike and
drive your left elbow into the aggressor’s torso while rotating your hips and pivoting to your
left. The aggressor should fall to his back or side causing him to lose his grip.
~ Rapidly return to the basic warrior stance, ready for any follow-on techniques.
See figure 2-43.
Figure 2-43. Counter to the Rear Bear Hug.
Chapter 2: Tan Belt
For Official Use Only

2-56
MCRP 3-02B
Section XI
Unarmed Manipulation
Marines operate within a continuum of force, particularly in support of peacekeeping- or
humanitarian-type operations. In these situations, Marines must act responsibly, handling situa-
tions without resorting to deadly force. Unarmed restraints and manipulation techniques can be
used to control an aggressor. Joint manipulation is used to initiate pain compliance and gain
control of an aggressor. Unarmed manipulation consists of the basic wristlock takedown, reverse
wristlock, and the armbar takedown. The subject does not actively attack the Marine, but contin-
ues to openly defy the Marine’s verbal commands. Compliance techniques or distracter tech-
niques can be implemented to remedy behaviors (continued refusal to comply with directions,
pulling away, shouting, struggling, locking oneself in a car, or fleeing from the area) that the
Marine could encounter at this level. At this level, the physical threat to the Marine remains low.
Refer to appendix A for corresponding safeties 1, 2, 6, 10, and 13.
Compliance Techniques
Compliance techniques are unarmed manipulation techniques used to physically force a subject
or aggressor to comply. Compliance can be achieved through close combat techniques of pain
compliance using joint manipulation and pressure points. Pain compliance is the initiation of
pain in order to gain compliance on the part of the subject.
Distractor Techniques
If you are having difficulty releasing a subject’s grip, you can use a softening or distraction tech-
nique such as a strike or kick to a pressure point to get the subject to loosen his grip so you can
apply a wristlock:
• Add to the effectiveness of the joint manipulation by striking the joint. The strike is executed
by driving through with the strike to allow the weight of the hand to go through the primary
target area of the body. Strikes do not have to be executed at full force to be effective. The
hammer fist strike is an effective softening technique. The hammer fist strike is used to strike
the thighs (the femoral and peroneal nerves) and the forearm (the radial nerve).
• Distract the subject so joint manipulation pain compliance can be performed.
• Redirect the movement of the subject or break him down. Striking the forearm in a down and
inward movement with a hammer fist strike will cause the subject to bend his elbow so that
his direction can be controlled.
• Executing a knee strike or a kick on the inner or outer portion of the subject’s thigh can knock
a subject off balance or cause him to loosen or weaken his grip. Knee strikes and kicks can be
very effective because the subject may never see them coming. A stomp to the foot can also
serve as a distraction technique.
For Official Use Only
Chapter 2: Tan Belt

Marine Corps Martial Arts Program
2-57
Joint Manipulation
Joint manipulation is used to initiate pain compliance and gain control of a subject. Joint manip-
ulation additionally uses the principle of off balancing. A subject can be better controlled when
he is knocked off balance. Joint manipulation involves the application of pressure on the joints
such as the elbow, wrist, shoulder, knee, ankle, and fingers. Pressure can be applied in two ways:
• In the direction in which the joint will not bend. For example, joints such as the knees and
elbows only bend in one direction and when pressure is applied in the opposite direction, pain
compliance can be achieved.
• Beyond the point where the joint stops naturally in its range of movement. There are
breaking points on each joint. A slow, steady pressure should be applied until pain compli-
ance is reached. Continued pressure will break the joint and may escalate the violence of
the situation.
Wristlocks
A wristlock is a joint manipulation that can be applied in a number of ways to achieve pain com-
pliance. The wrist will rotate in a number of directions; it will bend in a single direction until its
movement stops naturally. In a wristlock, pressure is exerted beyond the wrist’s natural ability to
bend or twist the joint. A wristlock can be executed when someone tries to grab you or is suc-
cessful in grabbing you or your equipment. You can also perform a wristlock when you wish to
initiate control of someone.
Basic Wristlock Takedown
Technique
~ Begin with the aggressor placing his hands on your collar/shoulders.
~ Grab the aggressor’s left hand with your right hand by placing your thumb on the back of his
hand so that your knuckles are facing to your left. Keep the aggressor’s left hand centered on
and close to your own chest.
~ Hook your fingers across the fleshy part of his palm below the thumb. Rotate the aggressor’s
palm so that it is now toward him and the fingers point skyward (keeping his palm close to
your chest).
~ Bring your left hand up to join the right hand; place the left thumb next to the right on the back
of the aggressor’s hand. You may place both thumbs on the back of the aggressor’s hand,
with the thumbs crossed.
~ Hook the fingers of both hands around the fleshy part of the aggressor’s palm on both sides
of his hand.
~ Apply pressure downward on the back of the aggressor’s hand to bend the joint and rotate
the wrist outboard, twisting the joint.
~ Apply downward pressure on the wristlock, pivot on the ball of your left foot, and step back
with the right foot, quickly turning to your right to take the aggressor to the deck. If you have
an aggressor in a wristlock, he can be easily off balanced by pivoting quickly. You can gain
better control of the aggressor once he is knocked off balance.
Chapter 2: Tan Belt
For Official Use Only

2-58
MCRP 3-02B
~ While you turn in a small circle, the aggressor is forced around in a bigger circle and he
cannot move as fast as you and is knocked off balance.
~ Continue to apply pressure on the wrist joint as the aggressor lands on his back with his arm
straight in the air.
~ Slide your lead foot under the aggressor’s shoulder.
~ Apply pressure with your knee against the aggressor’s triceps/elbow while pulling back on his
arm and maintain downward pressure on the wrist until pain compliance is achieved.
See figure 2-44.
Reverse Wristlock Takedown
Technique
~ Begin with the aggressor placing his right hand on your left collar/shoulder.
~ Place the palm of your right hand on the back of the aggressor’s right hand and wrap your
fingers across the fleshy part of his palm below his little finger.
~ Twist the aggressor’s hand to the right while placing that hand against your chest. Bring your
left hand up, to support your right hand by grabbing the aggressor’s hand between both
hands, mimic praying. Apply downward pressure on his hand against your chest. Leave the
aggressor’s hand on the chest to fully control him and to gain leverage. The aggressor’s hand
should be rotated 90-degrees so that his palm is facing left.
~ Step back with your right foot to maintain better balance and lean forward to use body weight
to add additional pressure to the joint.
See figure 2-45 on page 2-60.
Armbar Takedown
The armbar takedown is a joint manipulation in which pressure is applied on a locked elbow, at
or above the joint, in the direction the joint will not bend. An armbar has to be locked in quickly,
but still requires a slow, steady pressure to gain compliance.
Technique
~ Face the aggressor and grab his right wrist with your right hand as you step forward to the
left, which will be to the right side of the aggressor. Set the aggressor off balance by pulling
his wrist to your right hip.
~ Pivot on your left foot and step out with your right foot so that you face the same direction as
the aggressor. Your right foot must be forward of your left foot.
~ Use your left forearm, perpendicular to the aggressor’s arm to apply downward pressure on
the aggressor’s elbow. Maintain control of the aggressor’s wrist by keeping it locked into your
hip. Apply downward pressure on the arm by dropping your body weight to take the
aggressor to the deck. Place your knee onto your aggressor.
See figure 2-46 on page 2-61.
For Official Use Only
Chapter 2: Tan Belt
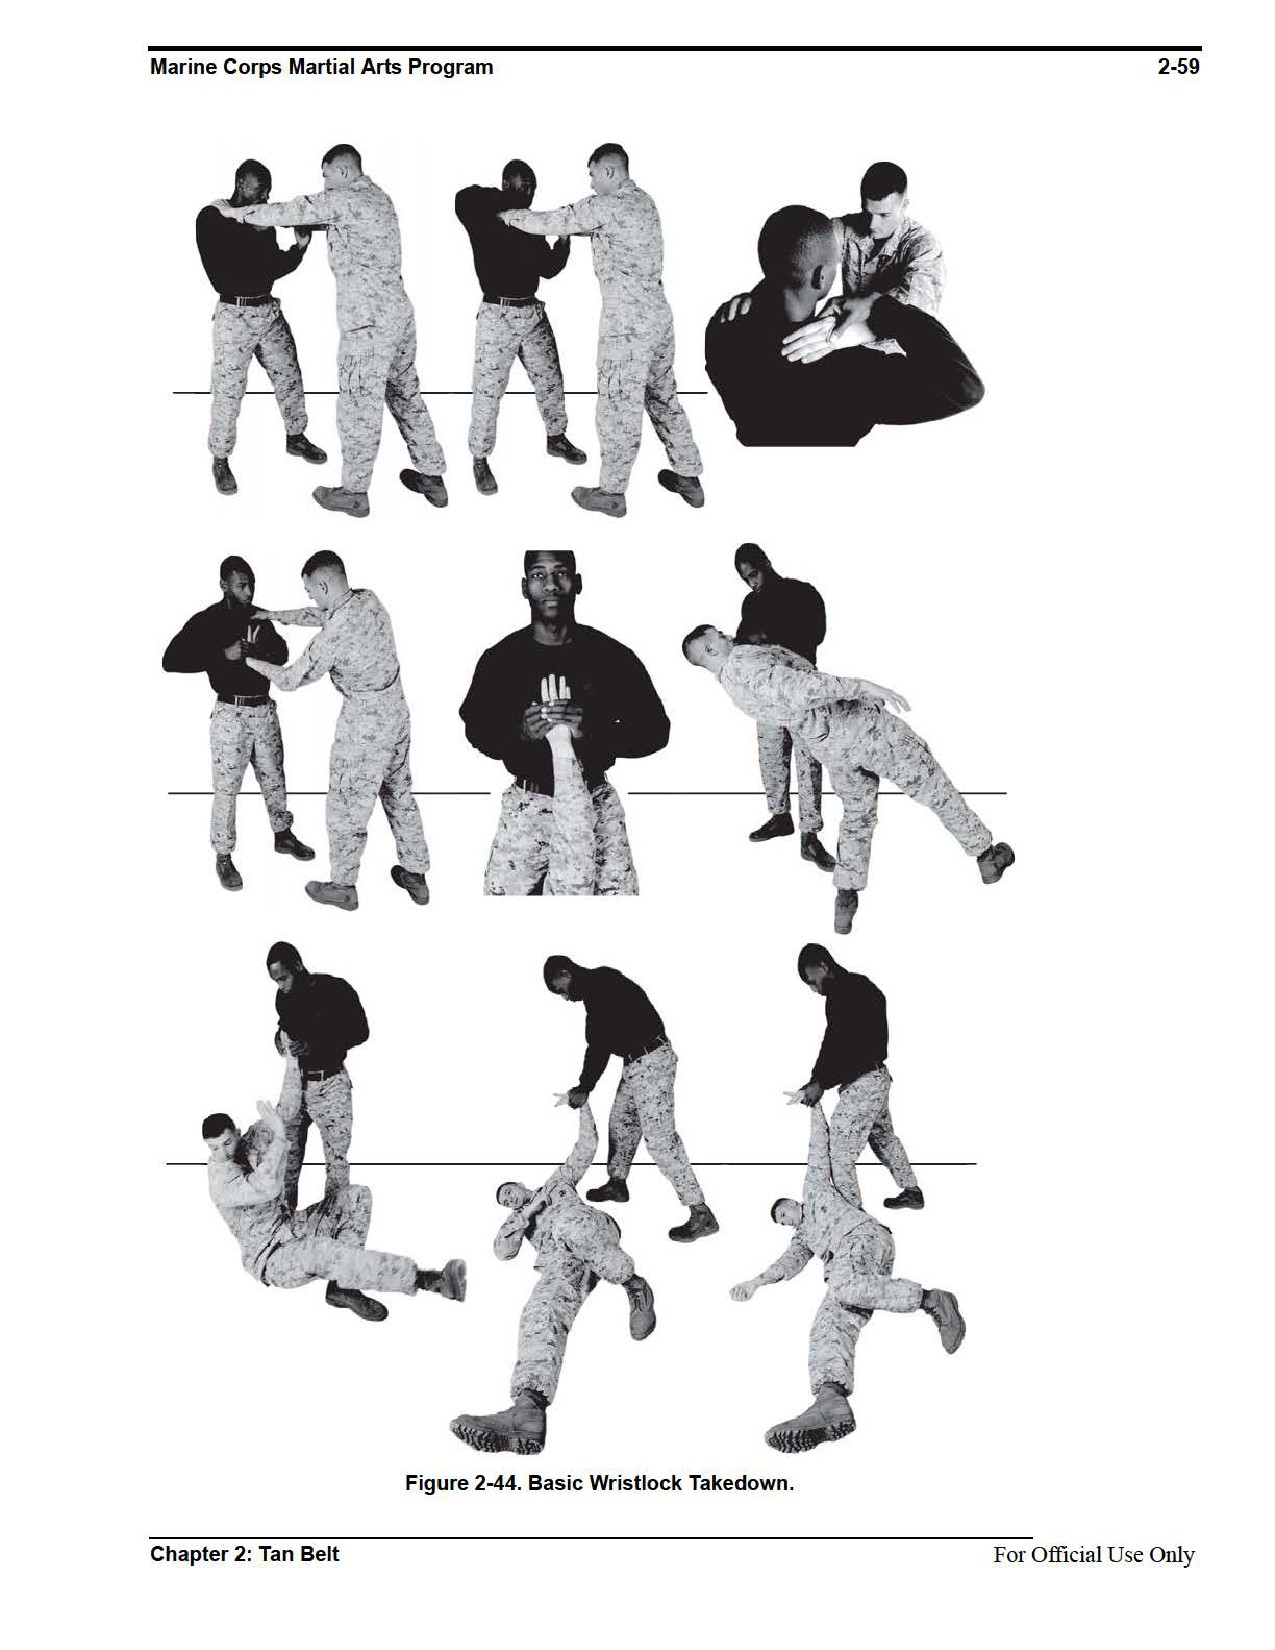
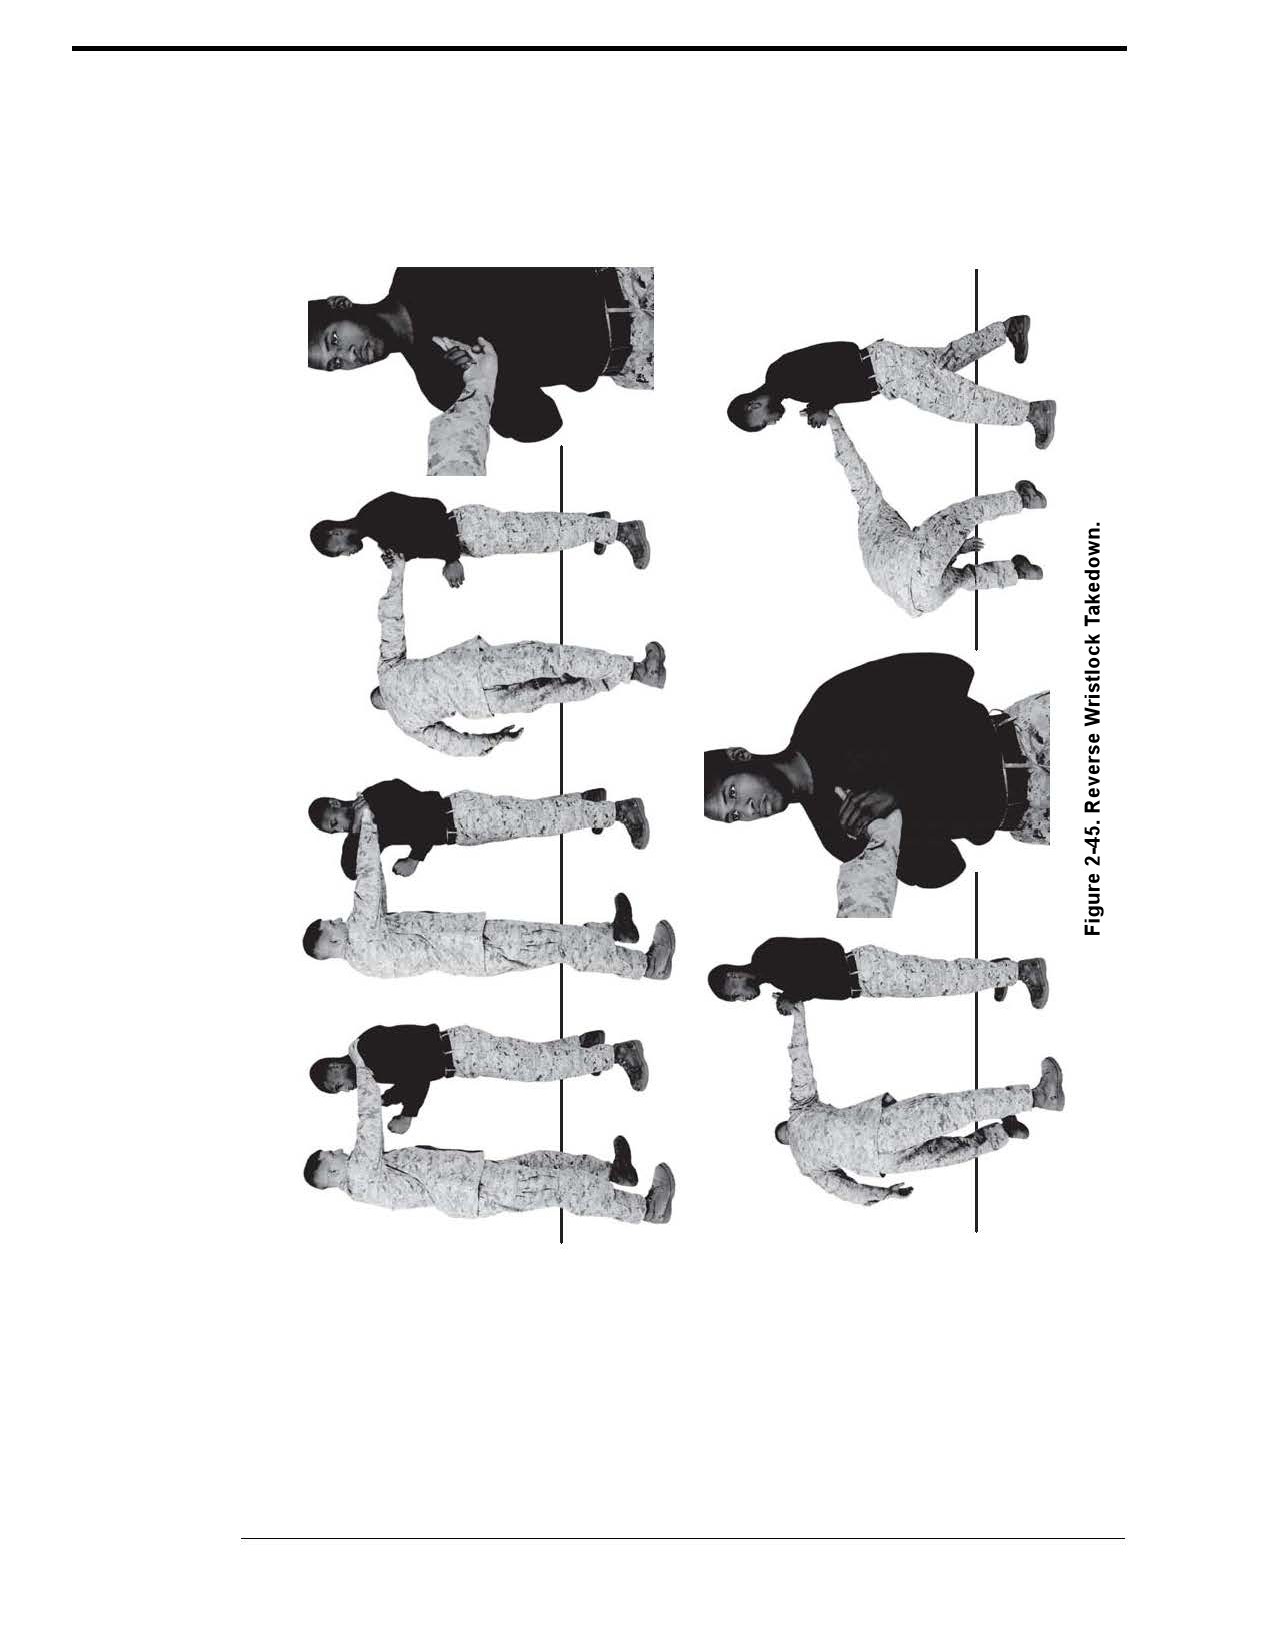
2-60
MCRP 3-02B
For Official Use Only
Chapter 2: Tan Belt
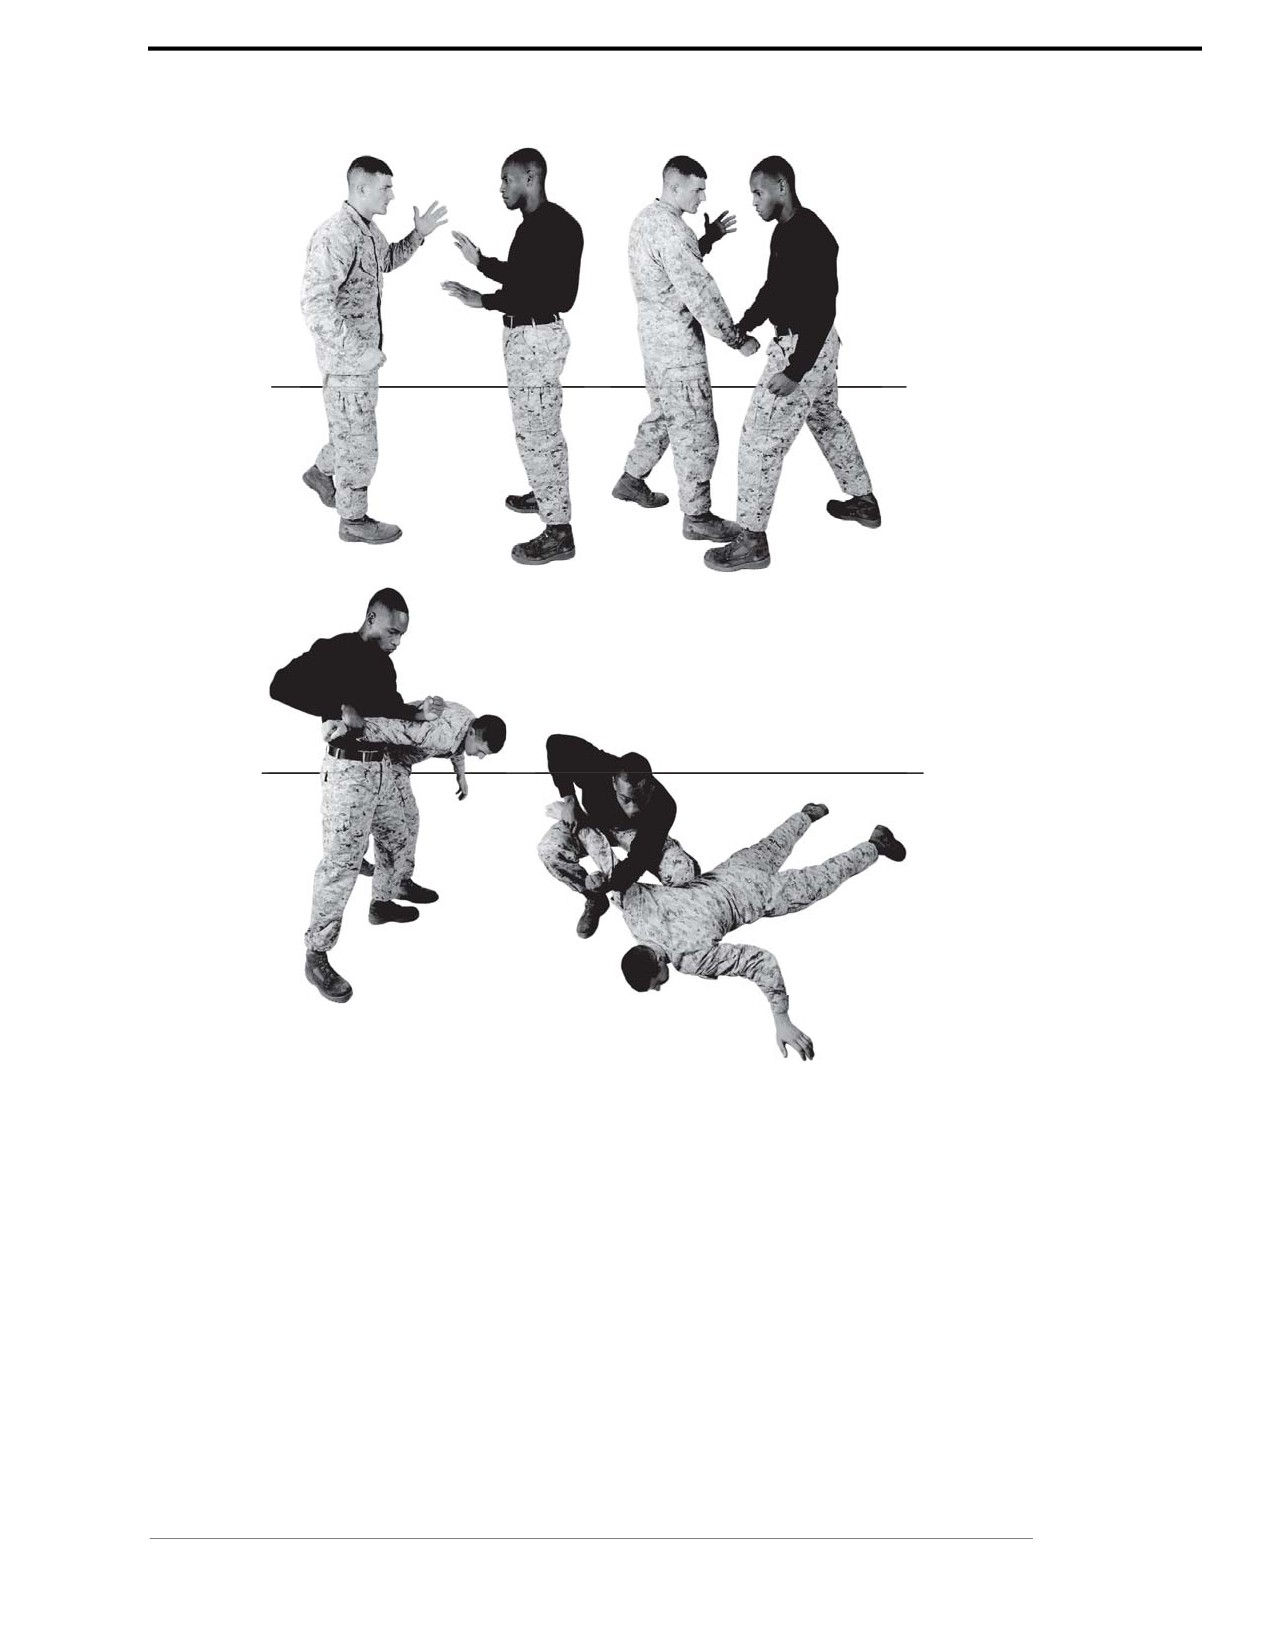
Marine Corps Martial Arts Program
2-61
Figure 2-46. Armbar Takedown.
Chapter 2: Tan Belt
For Official Use Only

2-62
MCRP 3-02B
Section XII
Armed Manipulations
The purpose of armed manipulation is to ensure that Marines operate within the continuum of
force utilizing rifle and shotgun retention techniques. The types of techniques that this section
will cover are techniques to counter the muzzle grab, if the aggressor grabs the weapon over or
underhand, as well as how to use the weapon correctly to block.
Refer to appendix A for corresponding safeties 1, 2, 8, 9.
Rifle and Shotgun Retention Techniques
With the proper training, Marines will be able to apply techniques so that they can retain
their weapons and gain compliance if confronted by individuals who attempts to take away
their weapons.
Counter to the Muzzle Grab
This technique is used when you are at port-arms and an aggressor grabs the muzzle of the rifle.
Technique
~ Assume the port-arms position.
~ Rotate the muzzle in a quick, circular action and then slash downward with the muzzle to
release his grip. Rotating the muzzle against the aggressor’s thumb is the most effective
direction to clear the barrel quickly.
~ Step back with your right foot to increase your leverage and balance.
See figure 2-47.
Aggressor Grabs Your Weapon Over Handed
This technique is used when you are at port-arms and an aggressor grabs the handguards of your
rifle, palms side down.
Technique
~ Assume the port-arm position. The aggressor grabs your handguards with either hand, palm
side down.
~ Rotate the muzzle in a quick, circular action and then slash downward to release his grip.
Rotating the muzzle against the aggressor’s thumb is the most effective direction to clear the
weapon quickly. Additionally, you may need to step back with your right foot to increase your
leverage and balance.
For Official Use Only
Chapter 2: Tan Belt
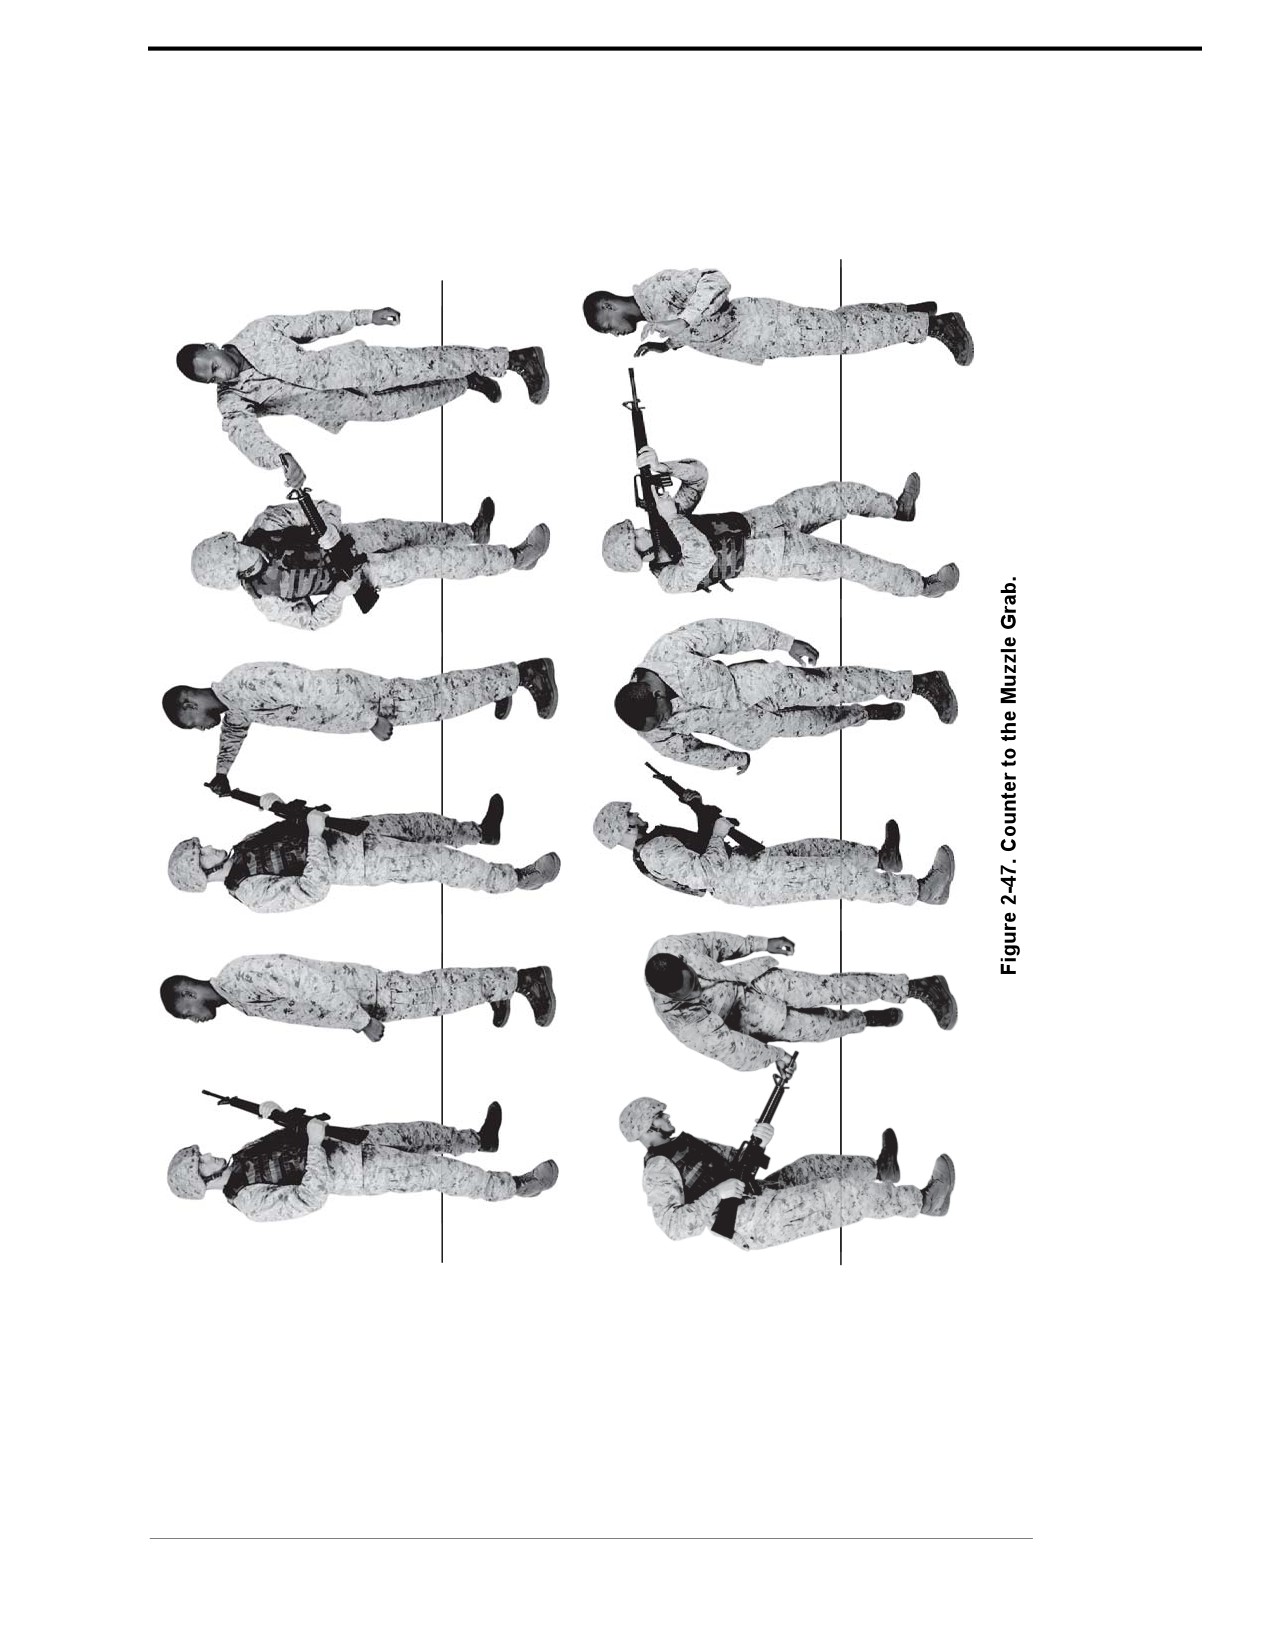
Marine Corps Martial Arts Program
2-63
Chapter 2: Tan Belt
For Official Use Only
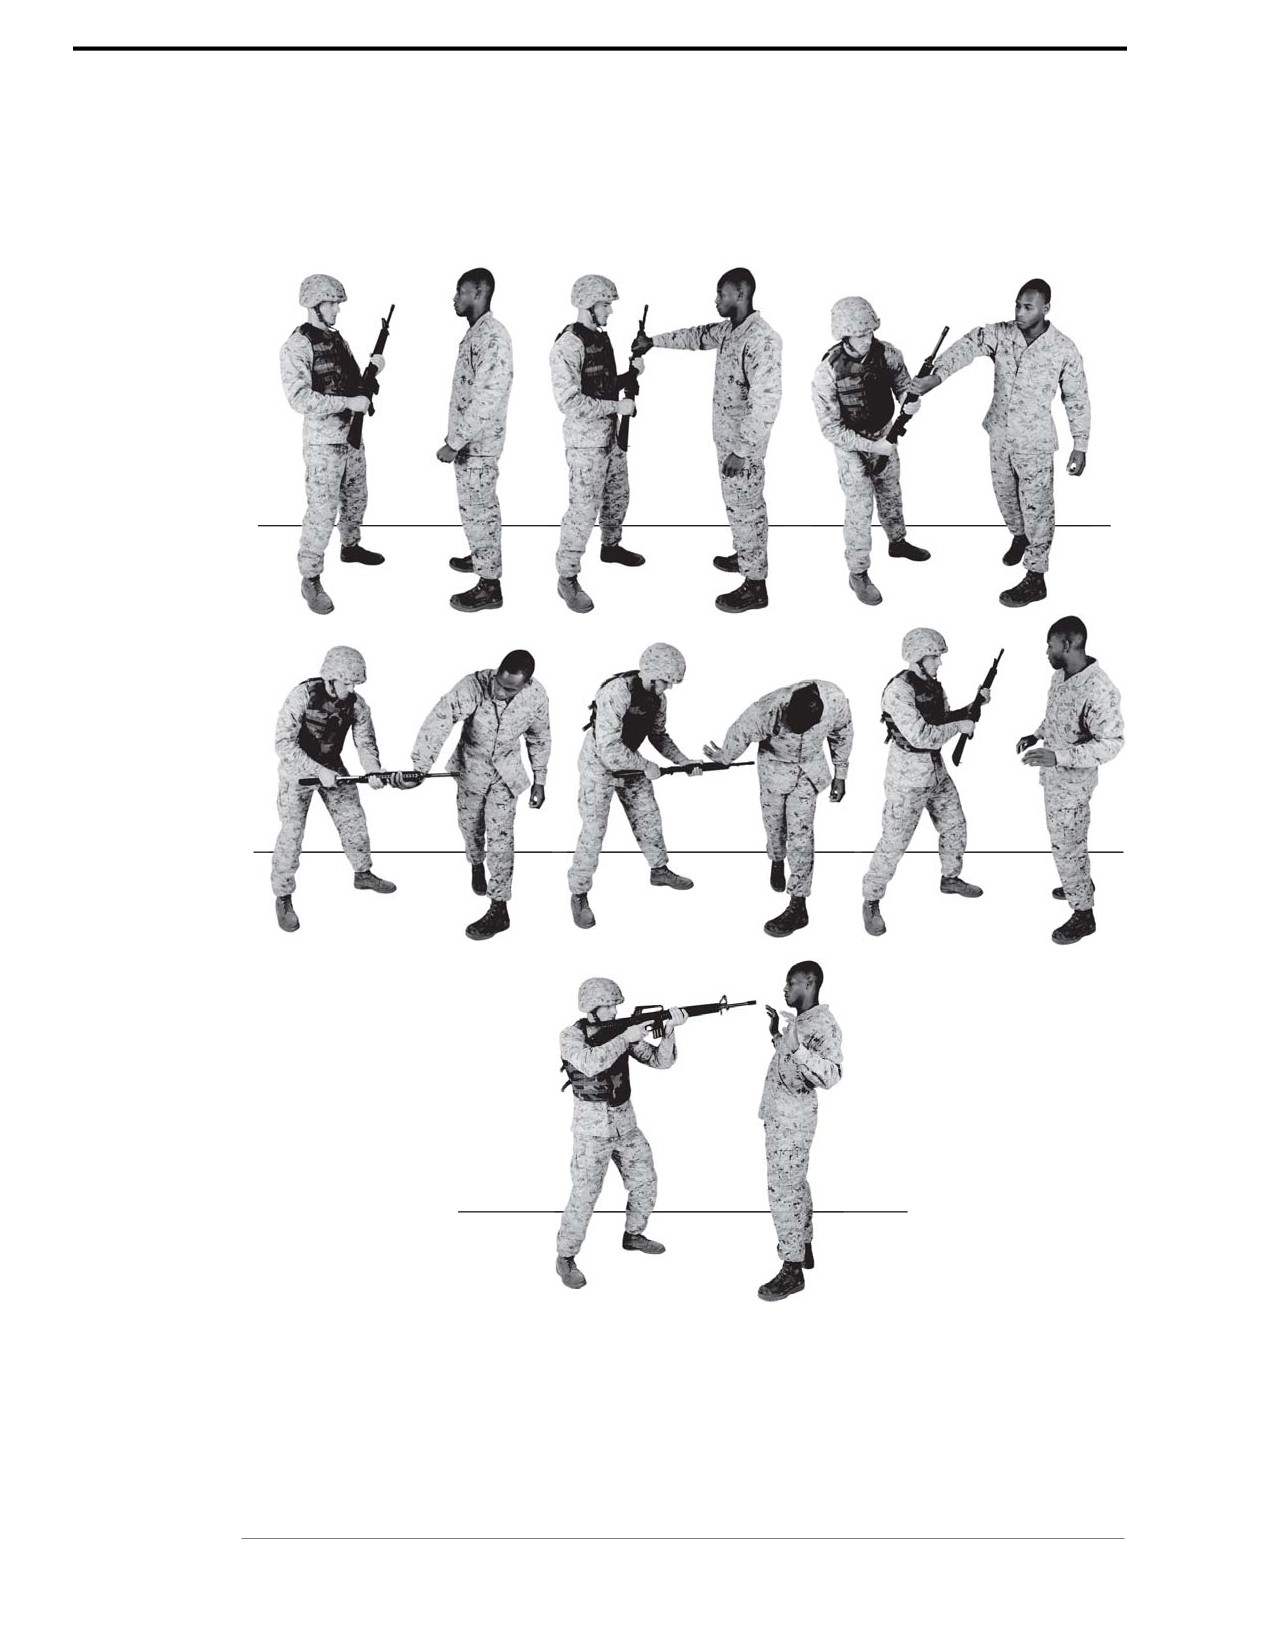
2-64
MCRP 3-02B
~ When the aggressor releases the weapon, step back doubling the distance between you and
the aggressor.
~ Execute the ready weapons carry and aim in on the aggressor.
See figure 2-48.
Figure 2-48. Aggressor Grabs Your Weapon Over Handed.
Aggressor Grabs Your Weapon Under Handed
This technique is used when you are at port-arms and an aggressor grabs the handguards of your
rifle palms side up.
For Official Use Only
Chapter 2: Tan Belt
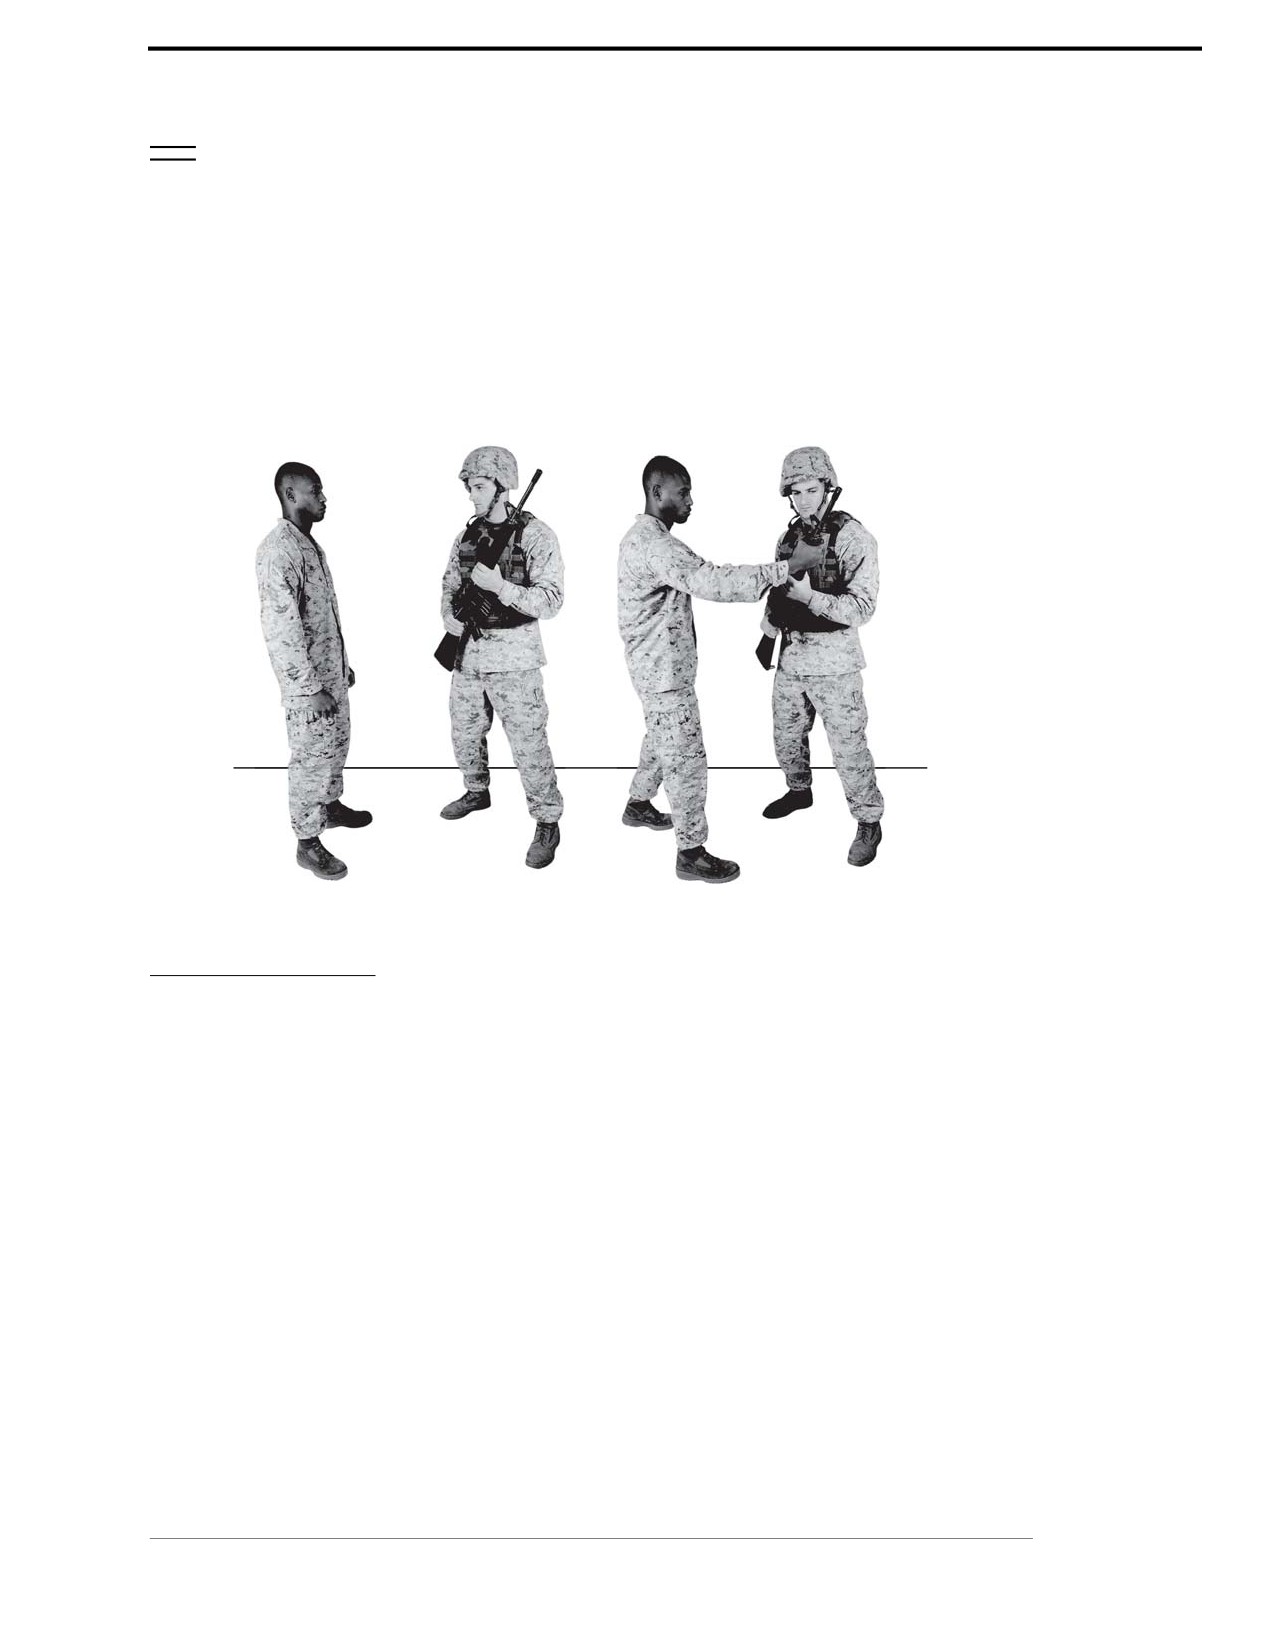
Marine Corps Martial Arts Program
2-65
Technique
~ Assume the port-arms position. The aggressor grabs your handguards with either hand, palm
side up.
~ Rotate the muzzle in a quick, circular action and then slash downward to release the
aggressor’s grip. Rotating the muzzle against the aggressor’s thumb is the most effective
direction to clear the weapon quickly. Additionally, you may need to step back with your right
foot to increase your leverage and balance.
~ When the aggressor releases the weapon, step back doubling the distance between you.
~ Execute the ready weapons carry and aim in on the aggressor.
See figure 2-49.
Figure 2-49. Aggressor Grabs Your Weapon Underhanded.
Blocks
Blocking techniques are normally executed from the basic warrior stance and are used as a
defensive technique to stop an attack. In an engagement, a block can be used if you are out of
position and being attacked by an aggressor. In addition, the high block, low block, mid block,
and left or right block can be used as primary movements when using the rifle during nonlethal
engagements or civil disturbance situations.
The preferred grip for blocks is to hold the weapon at the small of the stock. If the technique is
executed while holding onto the pistol grip the blocking surface of the weapon is reduced and
there is a greater chance of injury to the hand. If the person lunges at or tries to grab you, block
him with your weapon by thrusting it out firmly, with your elbows still bent. Do not try to hit the
person with the rifle; the rifle is used as a barrier between you and the person.
High Block
A high block is executed against a vertical attack coming from high to low.
Chapter 2: Tan Belt
For Official Use Only
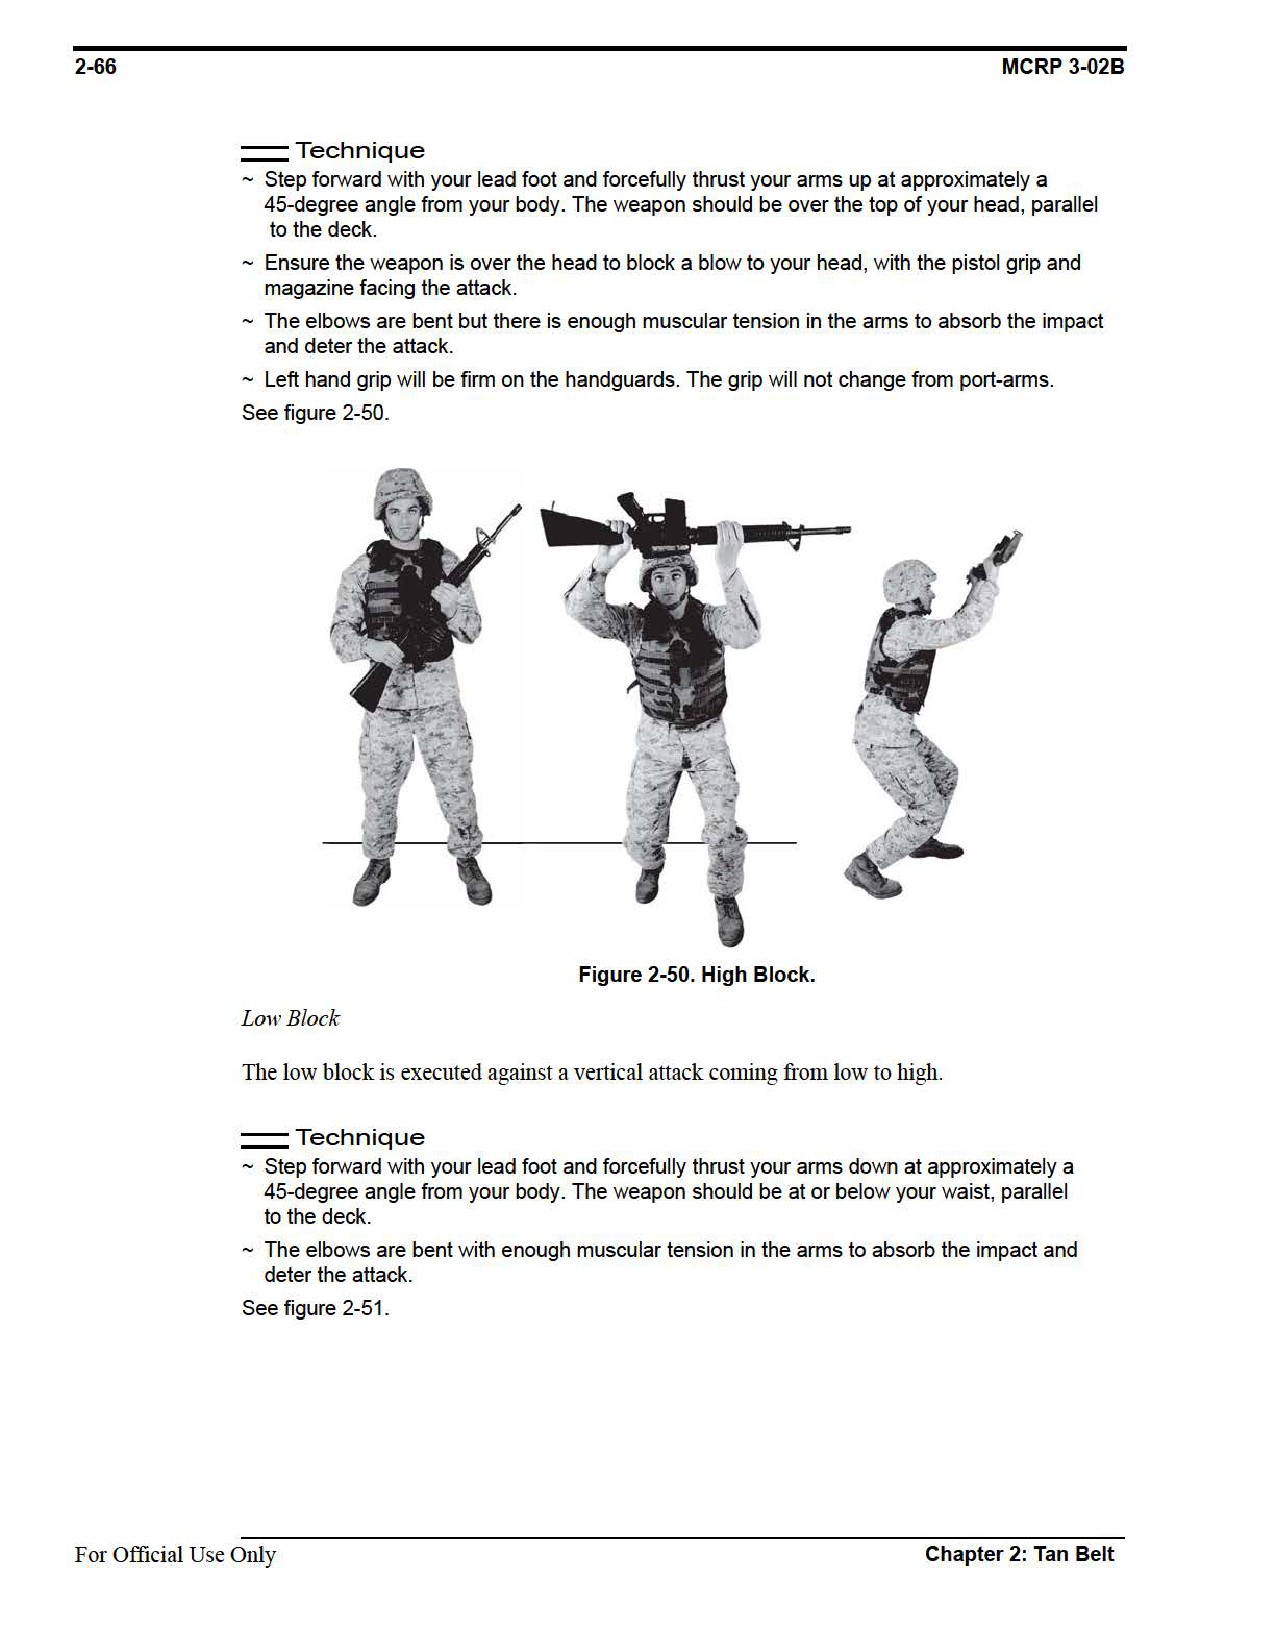
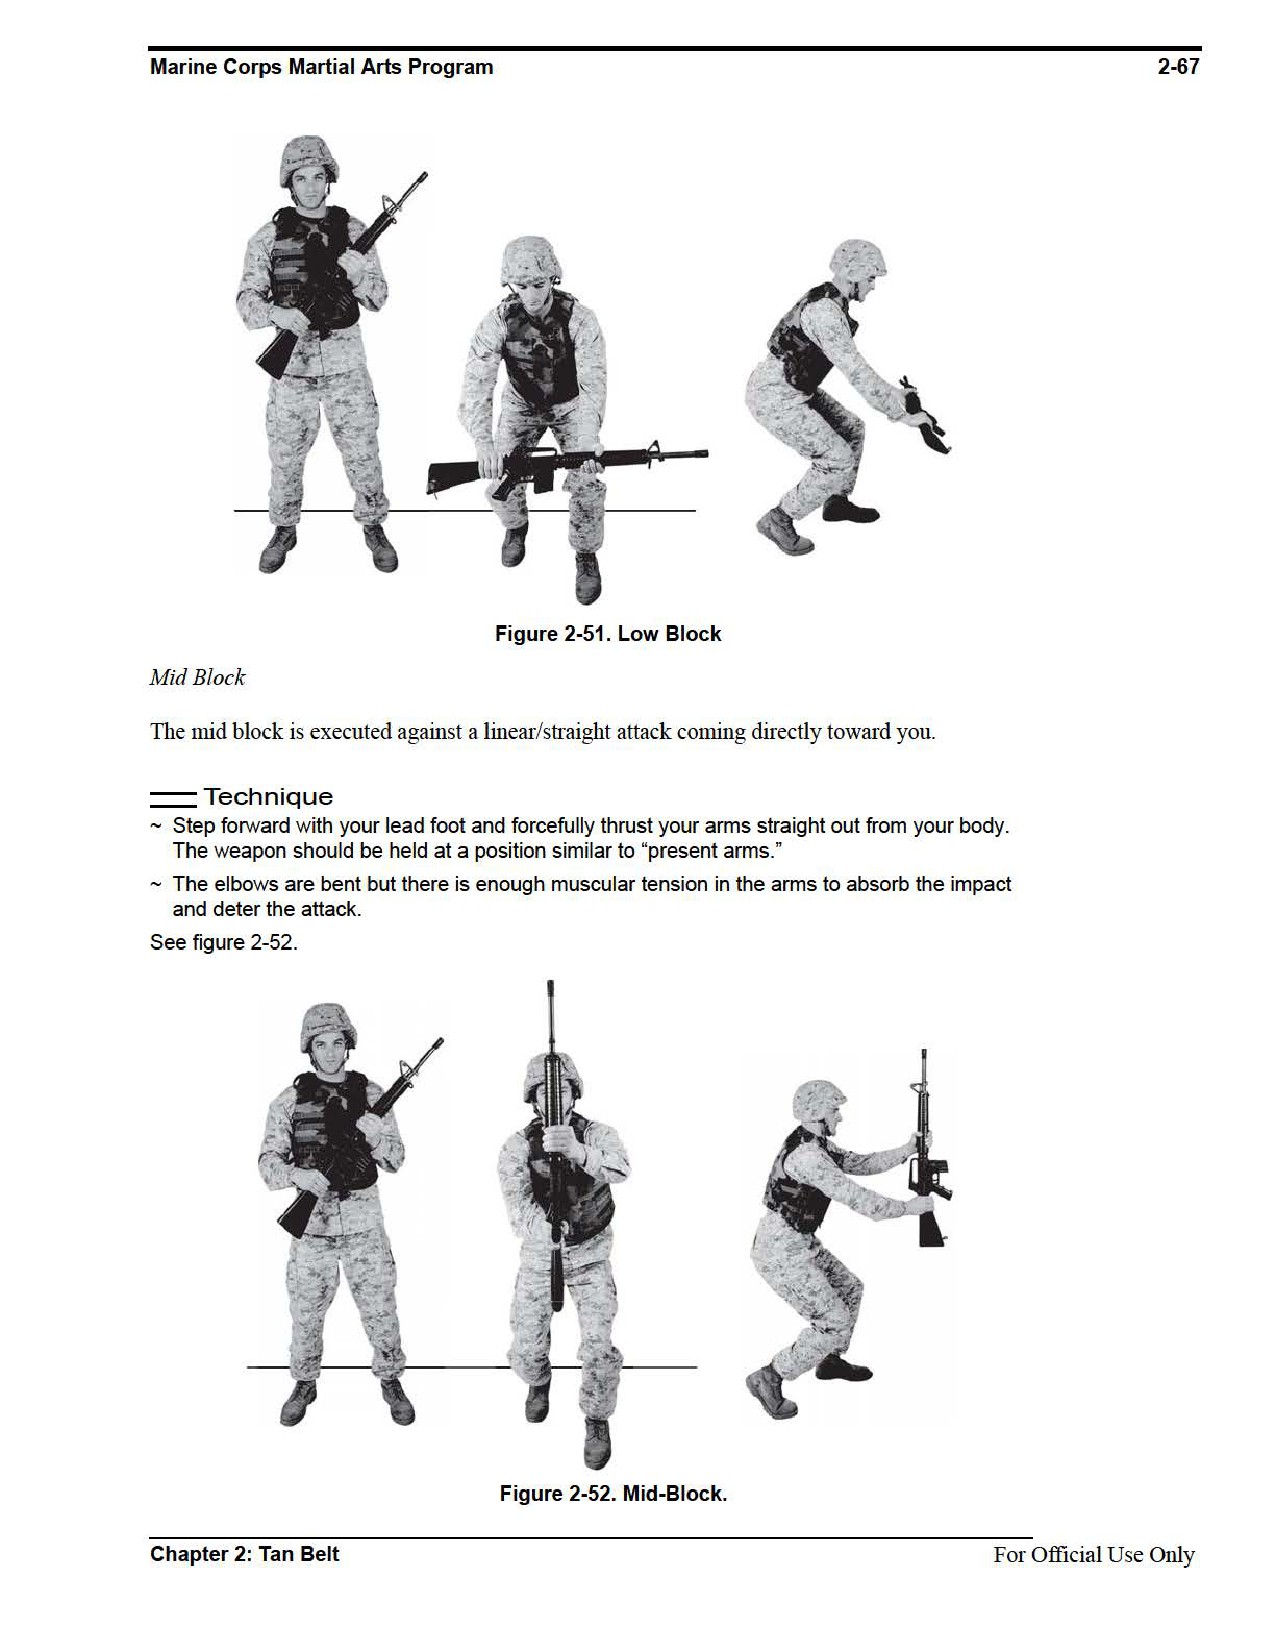
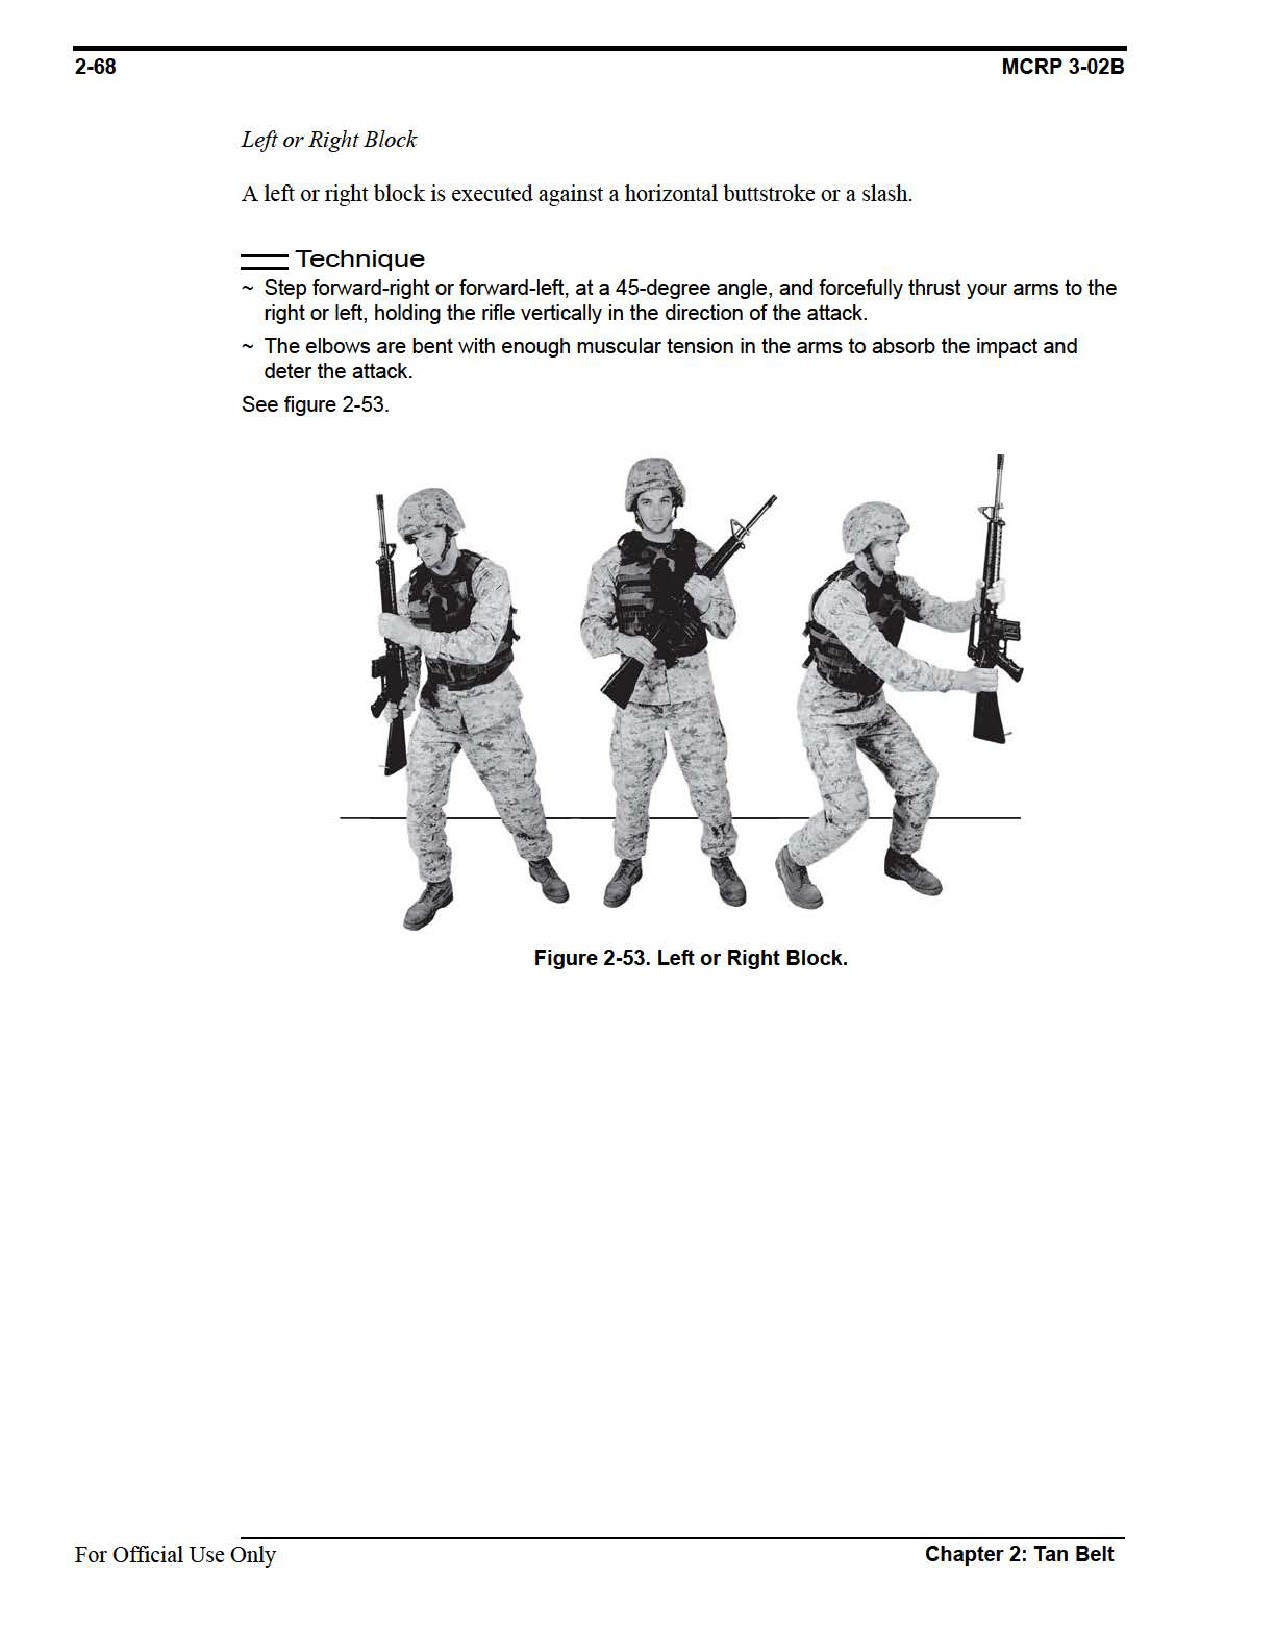

Marine Corps Martial Arts Program
2-69
Section XIII
Knife Fighting
The purpose of knife fighting is to cause massive trauma and damage to an aggressor by
executing the vertical thrust or the vertical slash techniques. In any confrontation, the parts of
the aggressor’s body that are exposed or readily accessible will vary. The goal in a knife fight is
to attack soft body vital targets that are readily accessible such as the face, the sides and front of
the neck, and the lower abdomen or groin. The extremities function as secondary target areas.
Refer to appendix A for corresponding safeties 1, 2, 3, and 14.
Principles of Knife Fighting
When knife fighting, always execute movements with the knife blade within a box, shoulder-
width across from your neck down to your waistline. The aggressor has a greater chance of
blocking your attack if you bring the blade in a wide sweeping movement to the aggressor. Your
attacks should close with the aggressor, coming straight to your target. Always keep the knife’s
blade tip forward and pointed toward the aggressor. In each of the knife techniques, apply full
body weight and power. In preparation for a vertical slash or a vertical thrust, full body weight
should be put into the attack in the direction of the blade’s movement. Applying constant for-
ward pressure with your body and blade will keep the aggressor off balance.
Angles of Attack
There are six angles from which an attack with a knife can be launched:
• Vertical strike coming straight down on the aggressor.
• Forward diagonal strike coming in at a 45-degree angle to the aggressor.
• Reverse diagonal strike coming in at a 45-degree angle to the aggressor.
• Forward horizontal strike coming in parallel to the deck.
• Reverse horizontal strike coming in parallel to the deck.
• Forward thrust coming in a straight linear line to the aggressor.
Target Areas of the Body
The goal in a knife fight is to attack soft body, vital target areas that are readily accessible such as
the face, the sides and front of the neck, and the lower abdomen or groin. In any confrontation,
the parts of the aggressor’s body that are exposed or readily accessible will vary. Vital areas are
as follows:
• Carotid arteries in the neck are good target areas because they are not covered by body armor
or natural protection.
• The lower abdomen and groin region are not covered by body armor.
• The aorta, if not covered by body armor, is an excellent target, which, if struck, can prove
fatal in a matter of seconds or minutes.
Chapter 2: Tan Belt
For Official Use Only

2-70
MCRP 3-02B
The extremities are secondary targets. Secondary target areas are those areas that will sever an
artery and cause severe bleeding. These target areas are not immediately fatal, but will often
become fatal if left unattended. For example—
• The femoral artery, located in the thigh, is a large artery that, when cut, will cause extensive
blood loss.
• Attacks on the brachial artery, located between the biceps and triceps on the inside of the arm,
can cause extensive bleeding and damage.
• Attacks on the radial and ulnar nerves of the arm can cause extensive bleeding and damage.
Movement
You can move anywhere within a 360-degree circle around an aggressor to gain a tactical advan-
tage and make accessible to you different target areas of your aggressor’s body. However, the
worst place to be in a confrontation is directly in front of an aggressor. The aggressor can rely on
his forward momentum and linear power to create a tactical advantage.
When facing an aggressor, movement is made in a 45-degree angle to either side of the aggres-
sor. Moving at a 45-degree angle is the best way to avoid an aggressor’s strike and to put you in
the best position to attack an aggressor.
Knife Placement
When a Marine is issued a rifle he probably has been issued a bayonet. If the Marine has been
issued a pistol then he probably has been issued a fighting knife. In either case, the knife must be
worn where it is easily accessible and where it can best be retained. The specific location of the
knife is as follows:
• It is recommended the knife be worn on the weak side hip, blade down. The fighting knife
should be placed so its blade is facing forward.
• The knife should be placed behind the magazine pouch where it is easily accessible but not
easy for the aggressor to grab.
• Do not place the knife next to something that can cover it like a canteen because the canteen
can slide on the cartridge belt, covering the knife and making it inaccessible.
Grip
Your grip on the knife should be natural. Grasp the knife’s grip with your fingers wrapped
around the grip naturally as it is pulled out of its sheath. This is commonly known as a hammer
grip. From this position, the blade end of the knife is always facing the aggressor.
For Official Use Only
Chapter 2: Tan Belt
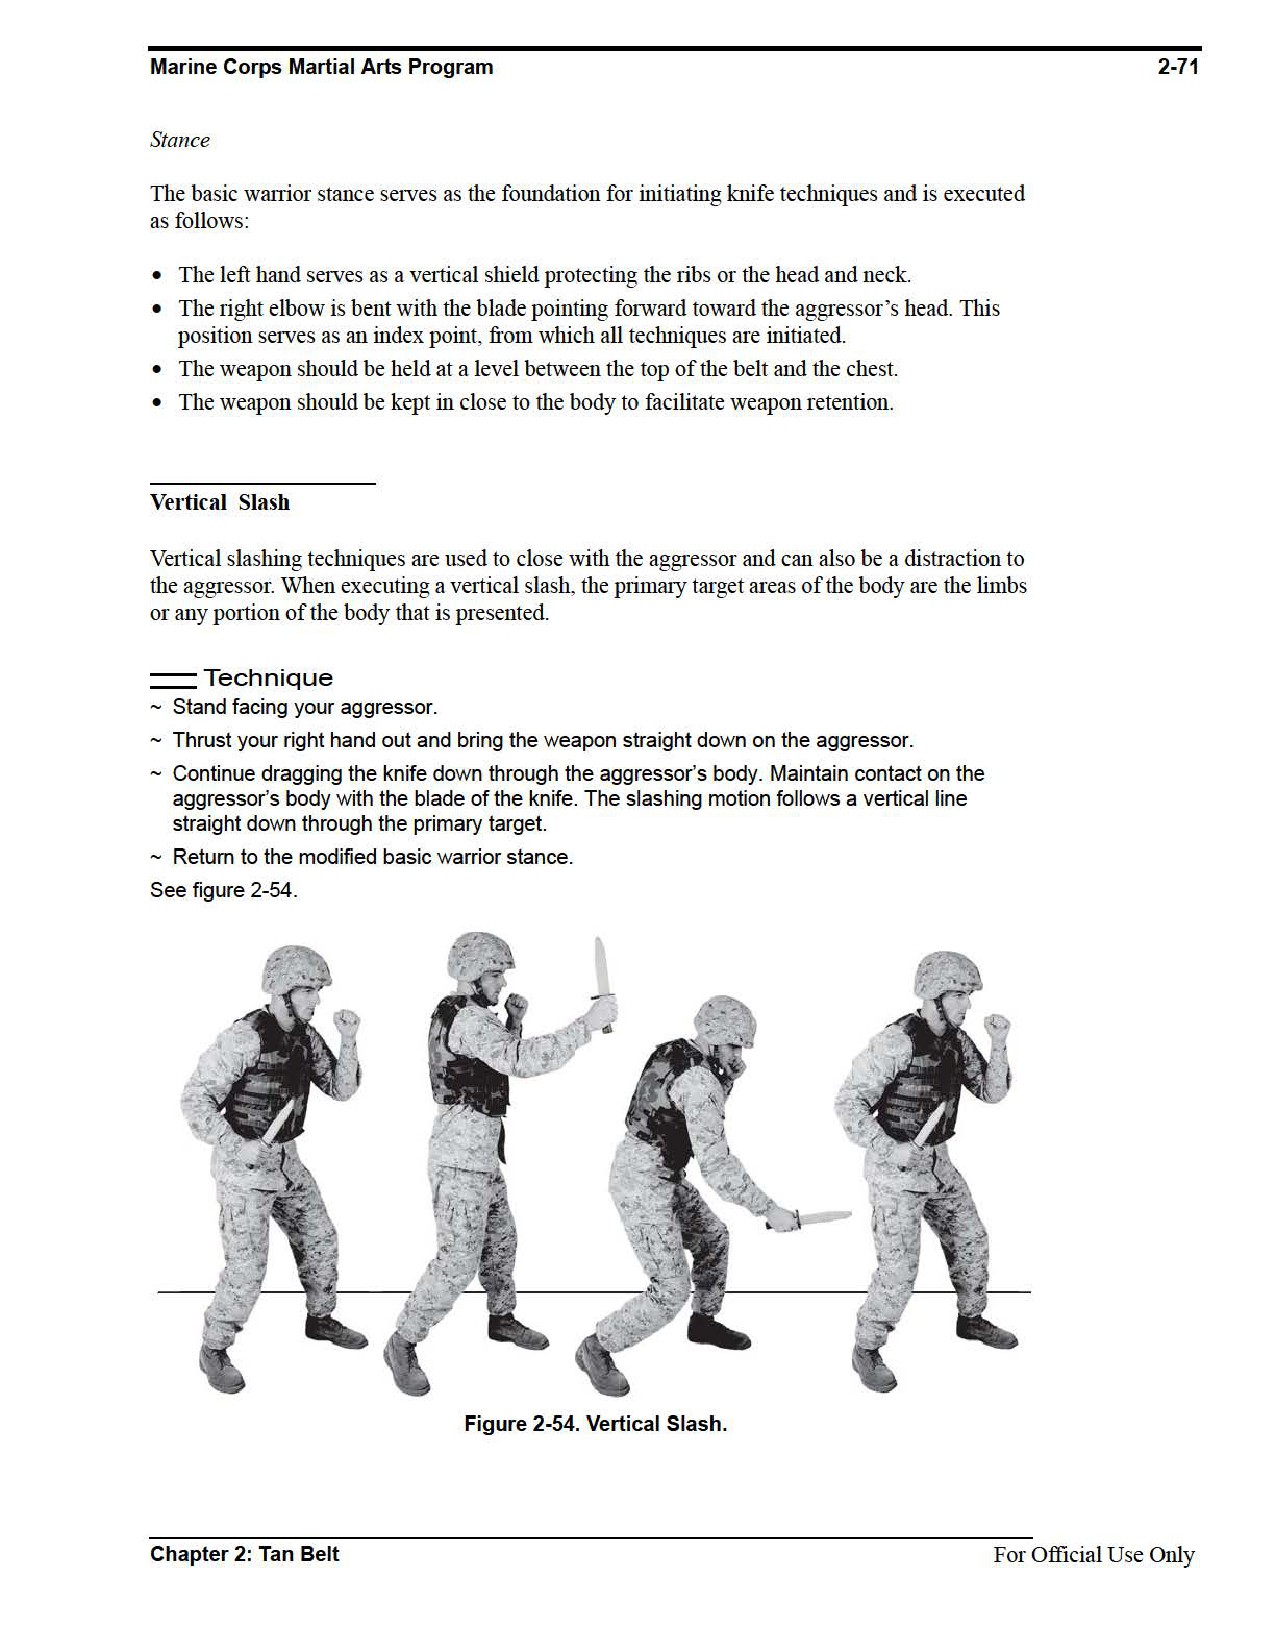
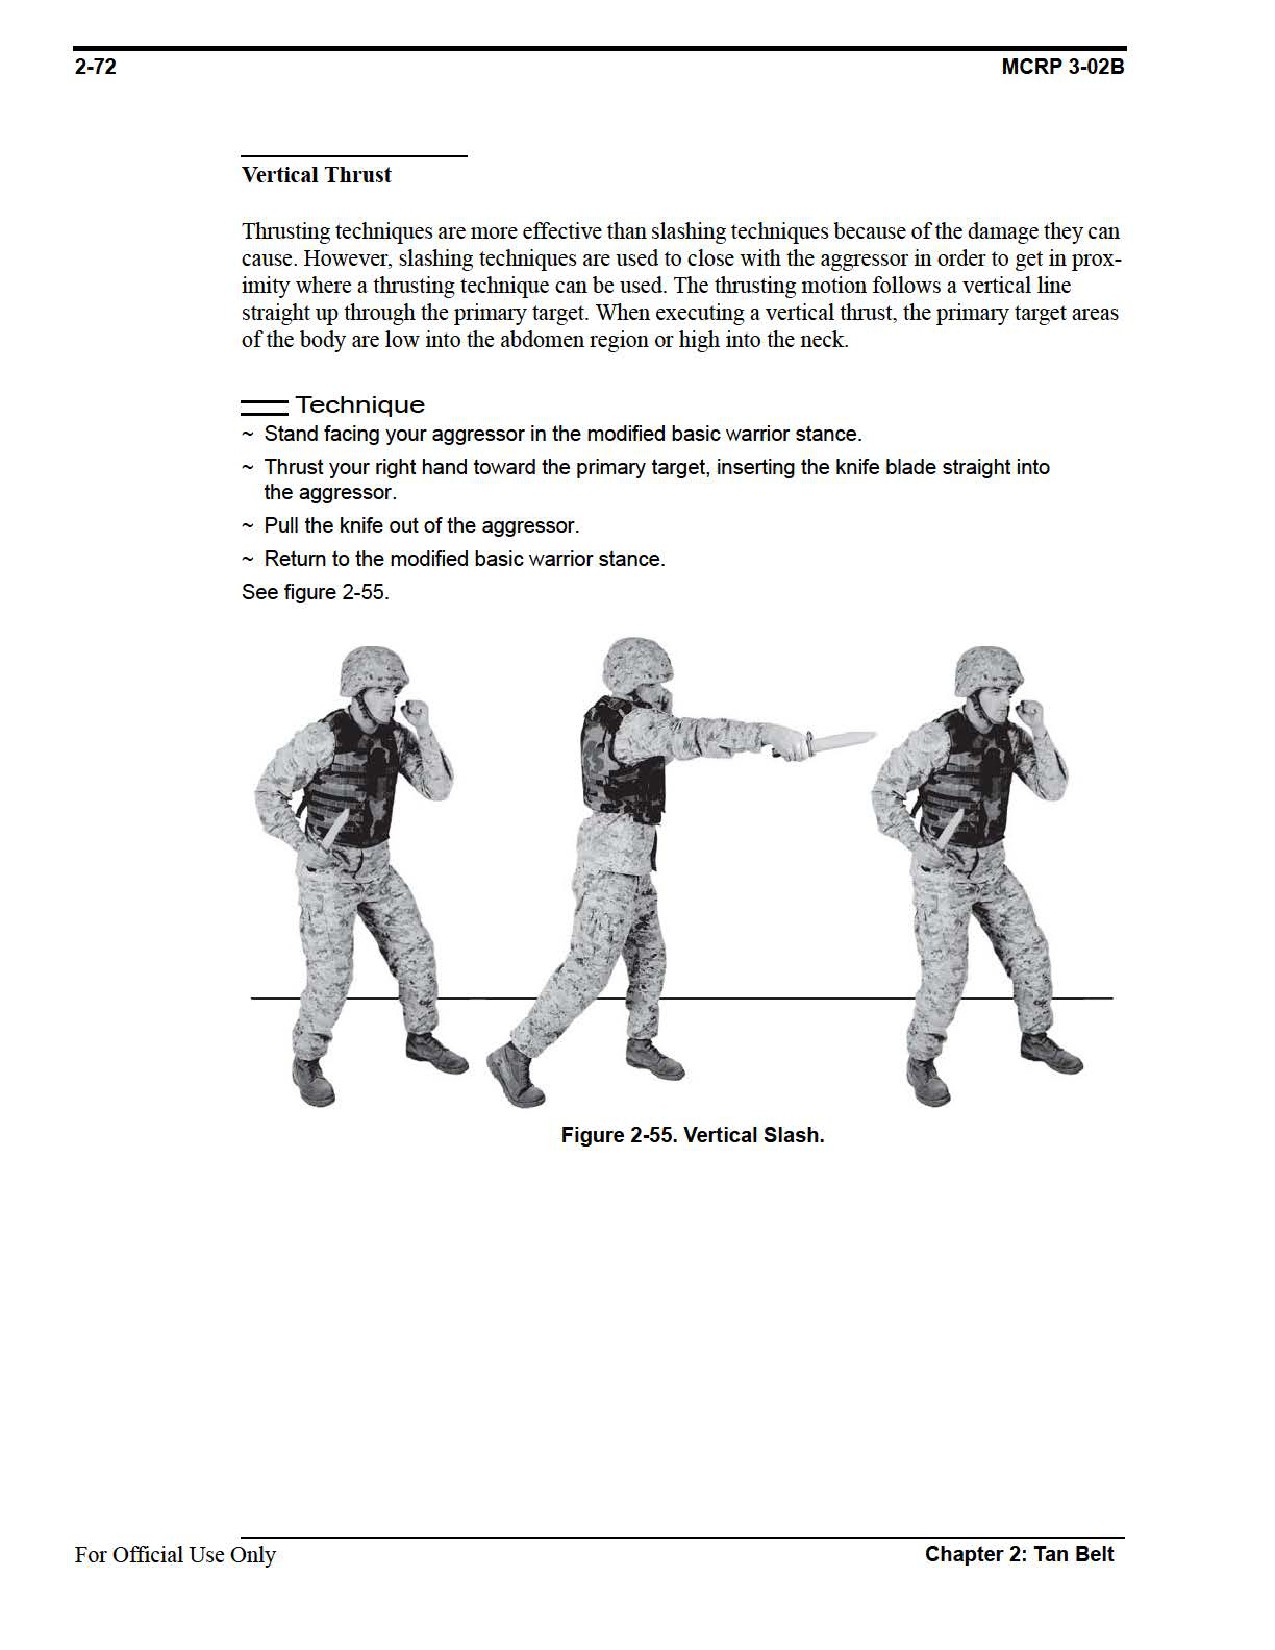

CHAPTER 3
Gray Belt
Gray Belt is the second belt ranking within MCMAP. Within two years of qualifying as a
Tan Belt, all Marines are expected to advance to Gray Belt. Gray Belt includes the comple-
tion of basic fundamentals and introduction to intermediate fundamentals of each discipline
and is the minimum requirement to attend the Martial Arts Instructor Course. The purpose
and principles remain the same as outlined in Tan Belt.
Gray Belt Requirements.
Prerequisites
Recommendation of reporting senior
Complete Tan Belt sustainment and
integration training
Complete MCI [Marine Corps Institute] 0337,
Leading Marines
Training Hours
Minimum of 20 hours of instruction, excluding
remedial practice time and testing
Sustainment
Minimum of 5 hours of sustainment,
Hours
excluding integration training time and
practice time for testing
For Official Use Only
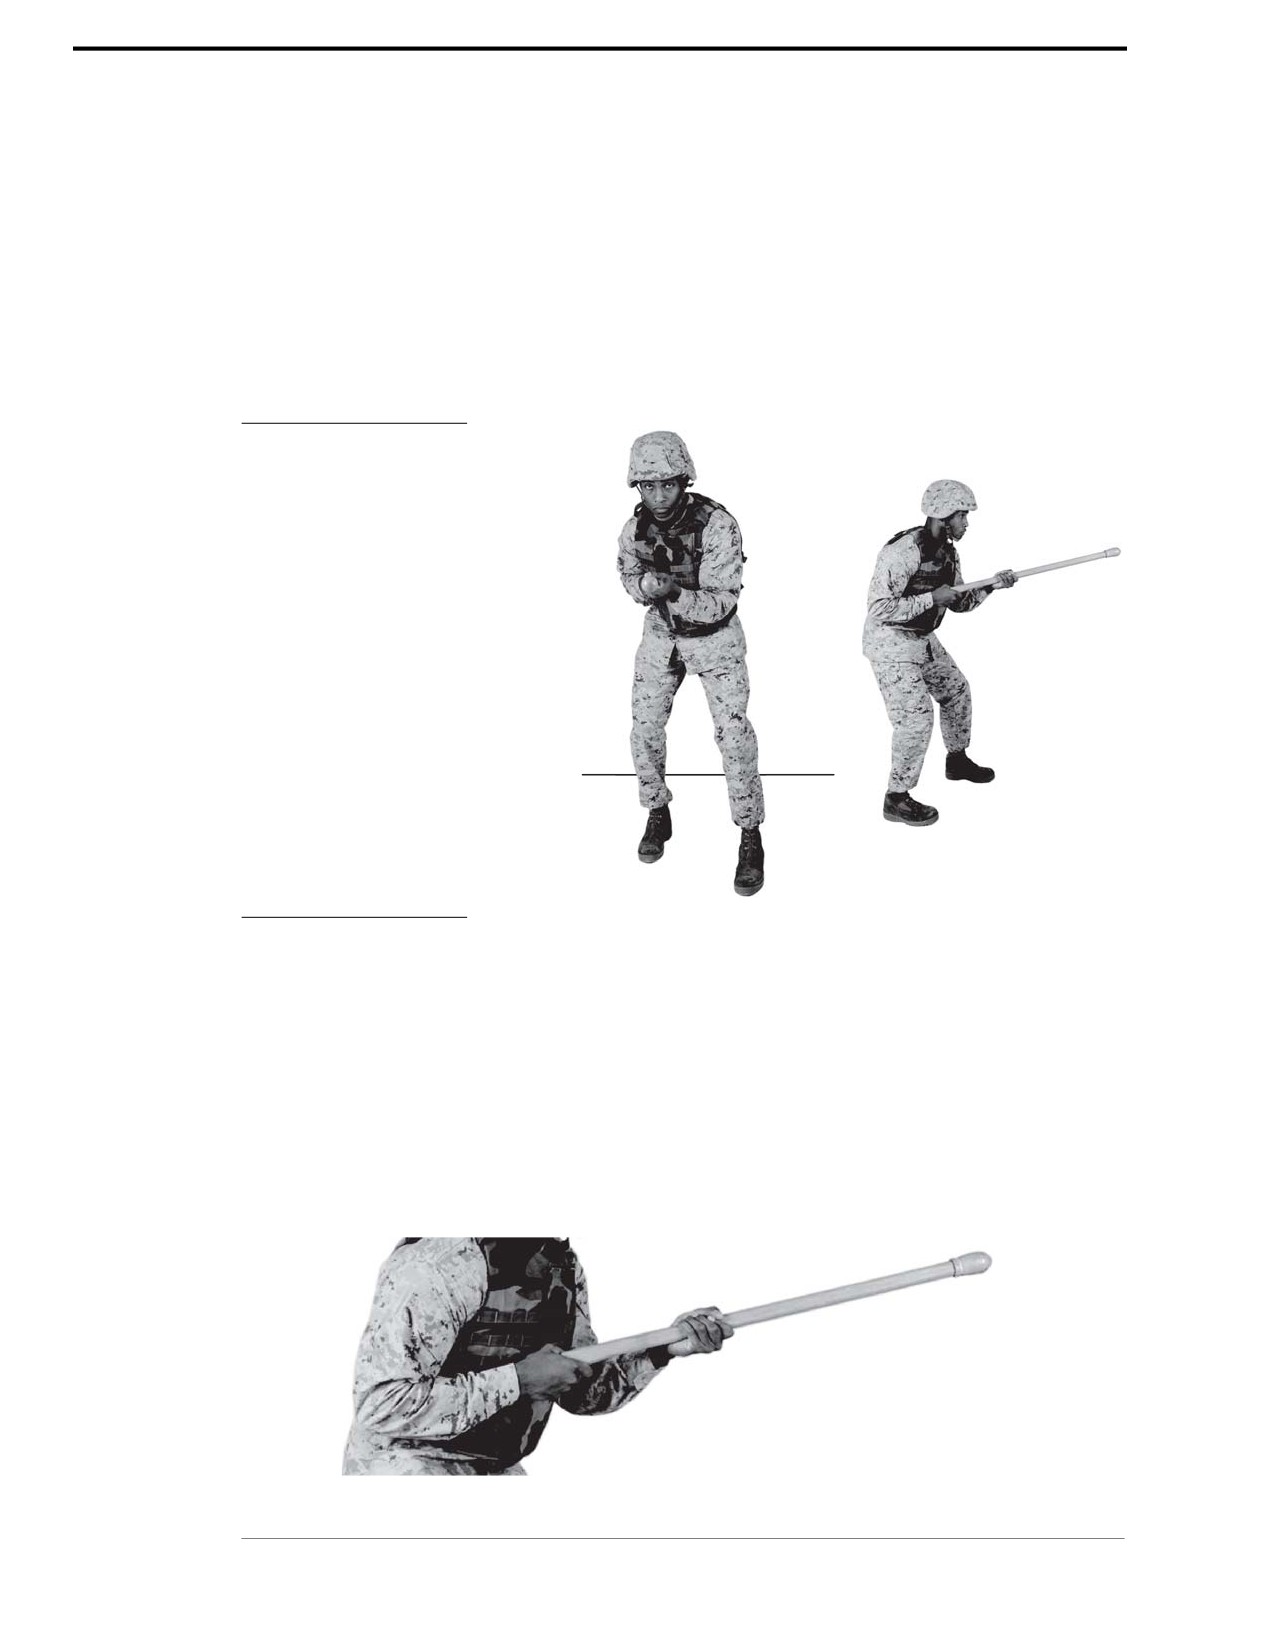
3-2
MCRP 3-02B
Section I
Bayonet
Through proper training, Marines develop the courage and confidence required to effectively use a
bayonet for protection and to destroy the aggressor. While closing on an aggressor, a disrupt or a
thrust can be used with a bayonet.
Refer to appendix A for corresponding safeties 1, 2, 8, 9, and 14.
Execution
Disruption is the technique used to
create an opening for the Marine
when closing with the aggressor.
To create that opening, the Marine
will execute a technique to bring
the aggressor’s weapon offline.
Entry is the movement made to get
inside the aggressor’s defense in
order to execute follow-on tech-
niques. A movement can be a step
forward or a small step to an
oblique to get within striking dis-
tance of the aggressor. Rely on
hips/torso for generating power.
Figure 3-1. Modified Basic Warrior Stance.
Movement
Movement provides a stable attack platform, allowing the Marine to employ his bayonet tech-
niques on, out maneuver, and overwhelm his aggressor. Approaching is used when you have
located an aggressor and you are within 20 to 25 yards from the aggressor. Assume the modified
basic warrior stance (see fig. 3-1). Bend your back so that you are hunched over the weapon and
your chin is tucked to protect your neck, minimizing your own target area. Bend your knees to
have a lower center of gravity and decrease your profile. Moving at a fast pace, walk using your
legs to absorb the impact of your steps, and ensure that your upper body is not bouncing around as
you move. The bayonet must stay locked on the aggressor. Hand placement is crucial for a bayonet
trainer as shown in figure 3-2.
Figure 3-2. Hand Placement.
For Official Use Only
Chapter 3: Gray Belt
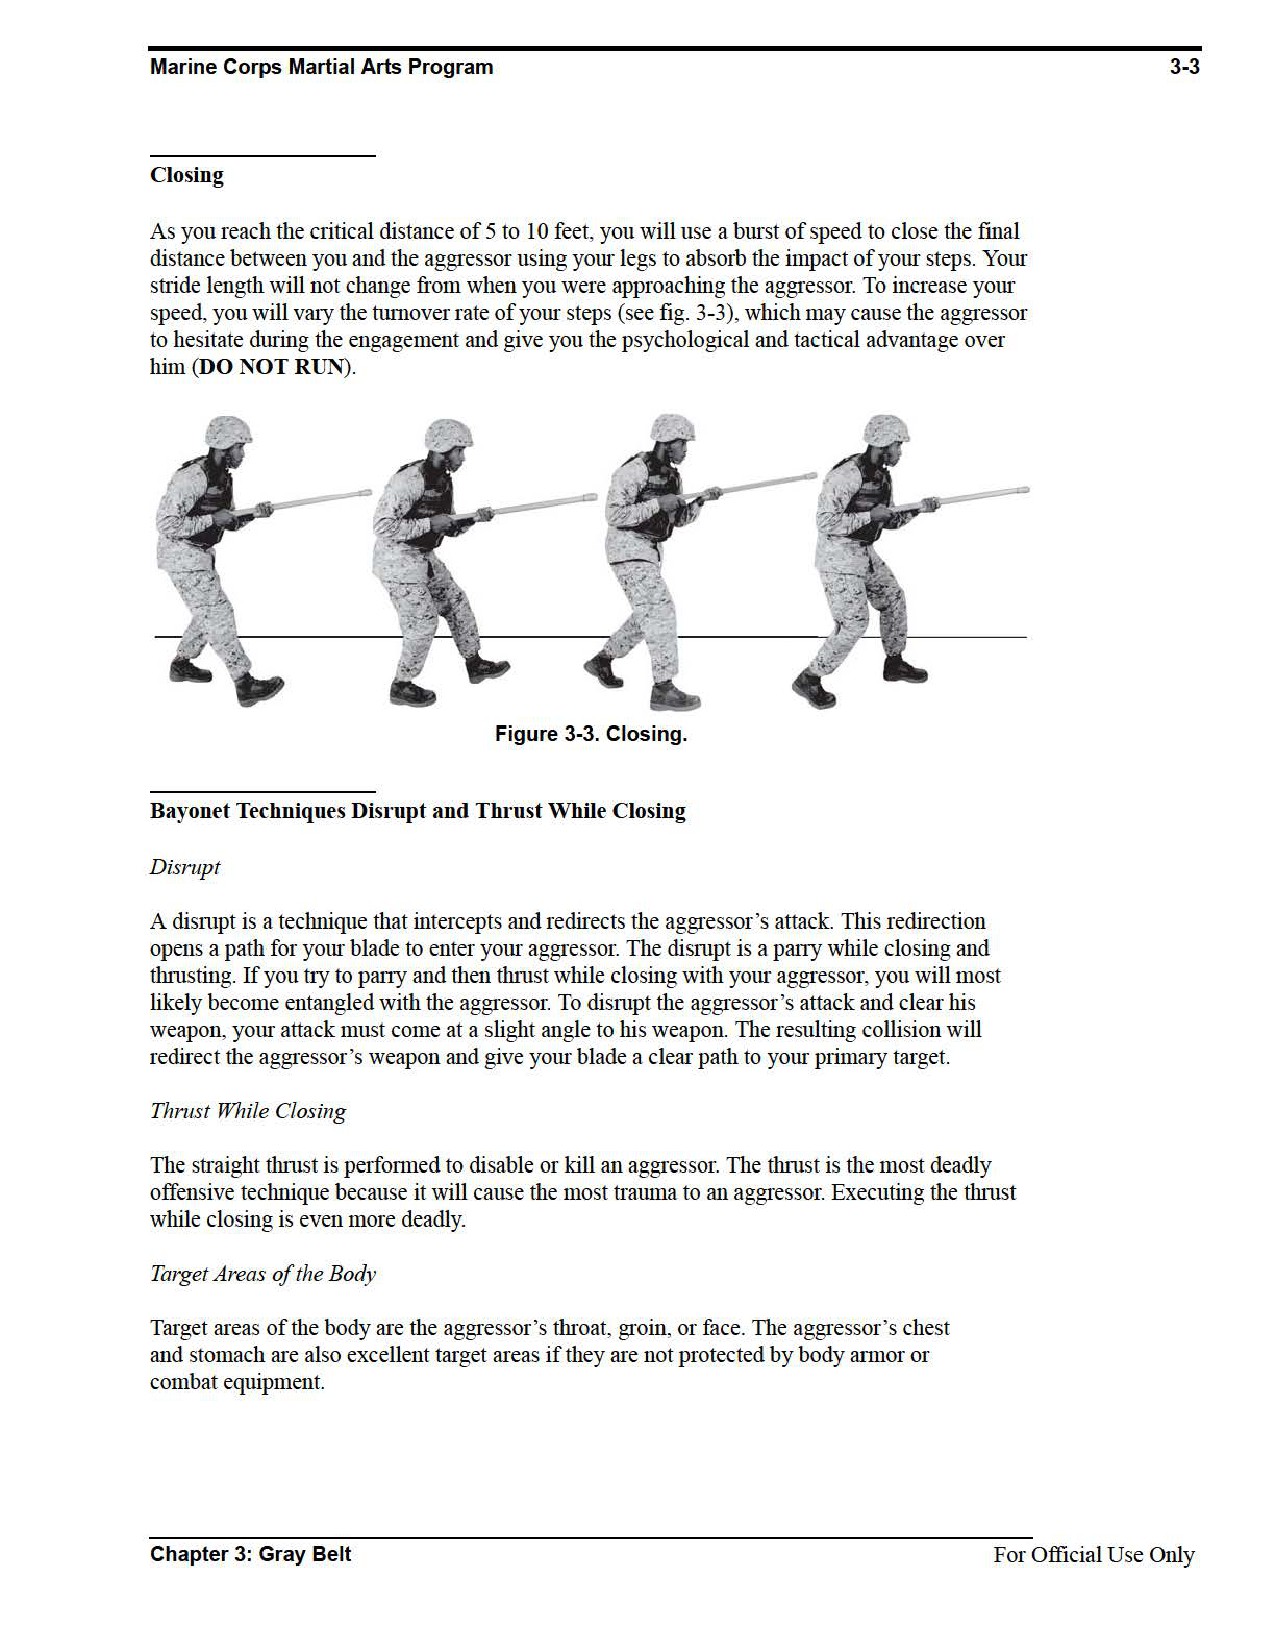

3-4
MCRP 3-02B
Technique
~ As you close on a static aggressor, disrupt the aggressor’s weapon by attacking at a slight
angle. Contact is made with the bayonet end of the rifle against the barrel or bayonet of the
aggressor’s weapon.
~ Redirect or guide the aggressor’s weapon away from your body by exerting pressure
against the aggressor’s weapon with your weapon. It is only necessary to redirect the
aggressor’s weapon a few inches, enough so that the weapon misses your body. This will
give your blade a clear path to your primary target.
~ Thrust the blade end of the weapon directly toward the target by thrusting both
hands forward.
~ Retract the weapon and continue moving forward.
See figure 3-4.
Note: Do not allow students to make contact with one another. See
appendix A, safety 7.
For Official Use Only
Chapter 3: Gray Belt
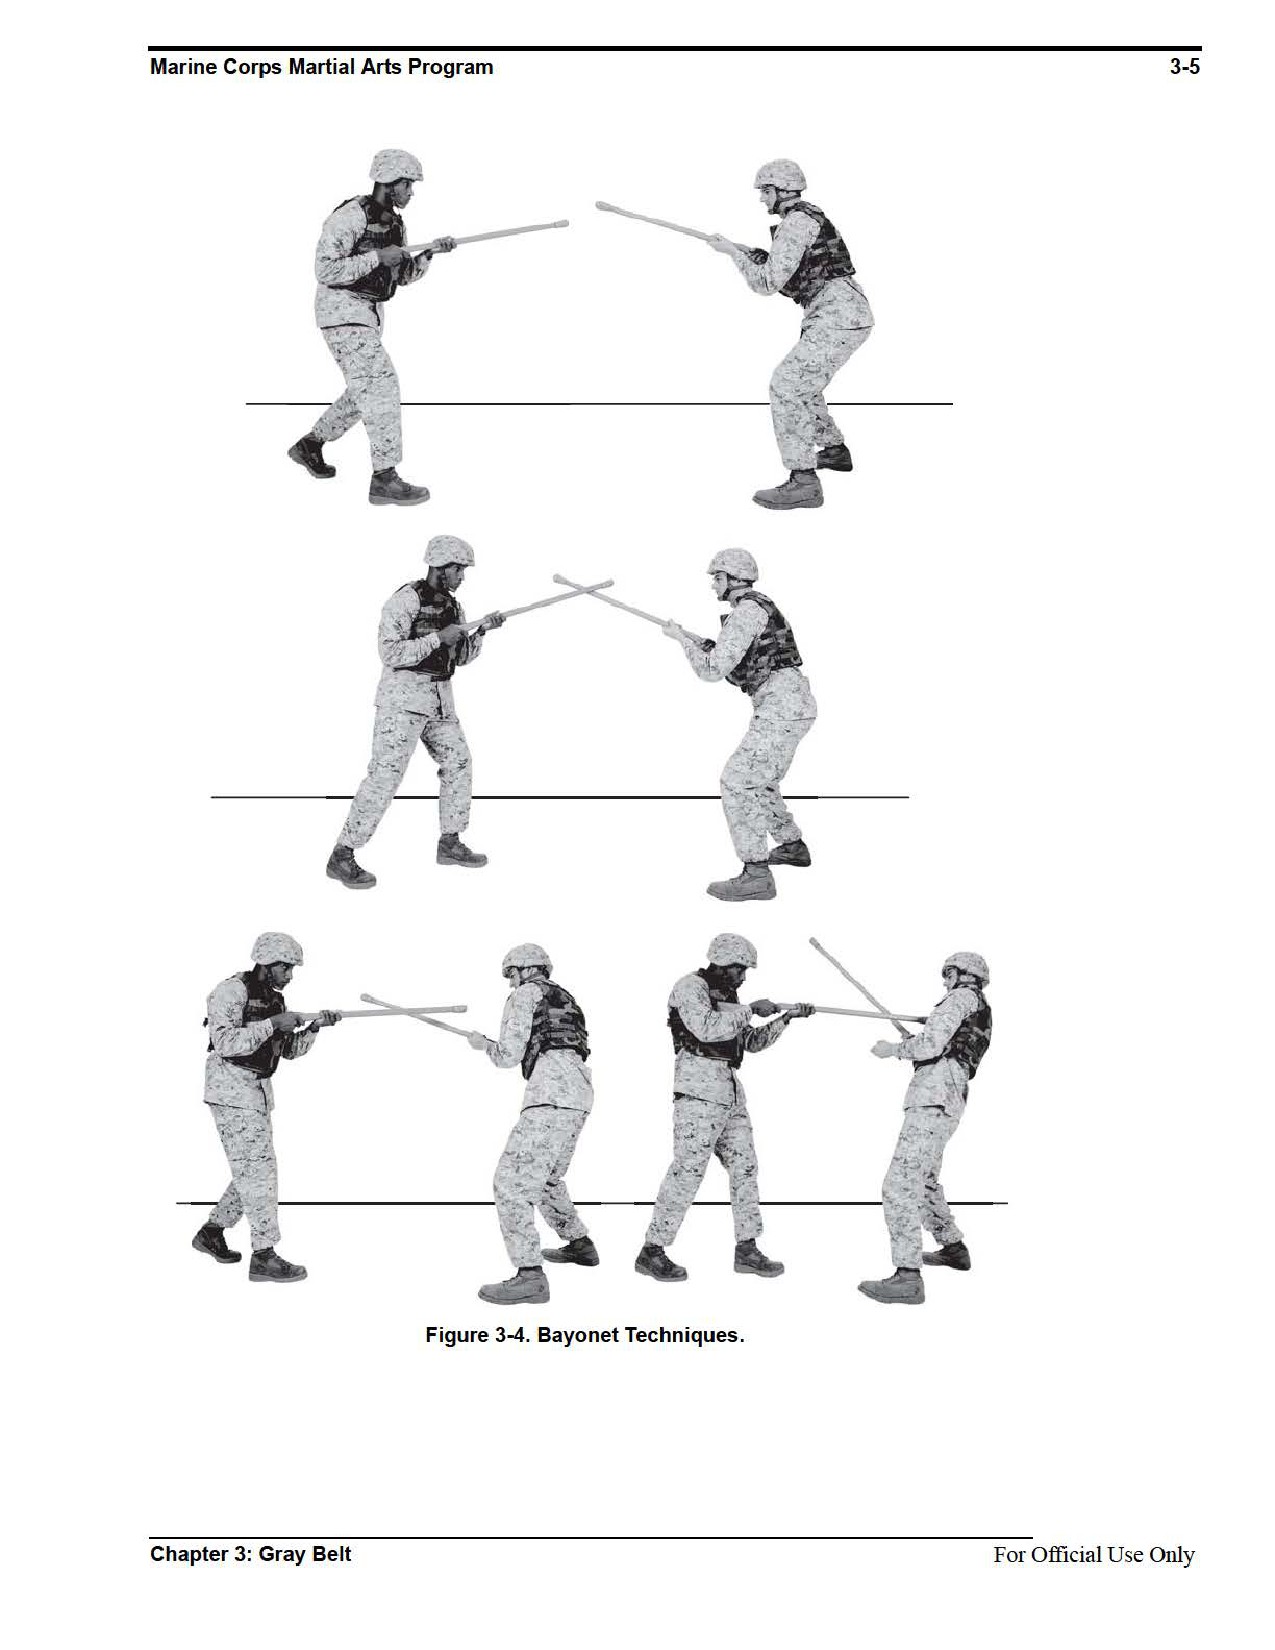

3-6
MCRP 3-02B
Section II
Upper Body Strikes
The upper body strikes stun the aggressor or set him up for follow-on finishing techniques. The
hands, the forearms, and the elbows are the unarmed individual weapons of the arms. These
weapons provide a variety of techniques that can be used in any type of close combat situation.
This section will cover the chin jab/palm heel strike, knife hand strikes, and elbow strikes.
Refer to appendix A for corresponding safeties 1, 2, 3, and 4.
Chin Jab/Palm Heel Strike
The chin jab/palm heel strike can immediately render an aggressor unconscious and cause exten-
sive damage to the neck and spine.
Striking Surface
The striking surface is the palm’s heel of the hand.
Target Area of the Body
The primary target area is the bottom of the aggressor’s chin.
Technique
~ Begin in the basic warrior stance.
~ Bend your right wrist back at a 90-degree angle with your palm facing the aggressor and your
fingers pointing up.
~ Extend your hand into a flat position with your fingers bent and joined at the second knuckle.
~ Keep your right arm bent and close to your body.
~ Move forward, to close with the aggressor. You may have to grab the aggressor’s elbow or
the back of his neck with your left hand to maintain control of him.
~ Keeping your right arm bent and close to your side, thrust the palm of your hand directly up
under the aggressor’s chin.
~ At the same time, rotate your right hip forward to drive your body weight into the attack to
increase the power of the strike.
~ Push off on the ball of the right foot to direct your body weight into the attack from low to high.
~ The attack should travel up the centerline of the aggressor’s chest to his chin. Contact should
be made on the aggressor’s chin with the heel of your palm. Follow through the primary
target area with your hand and body momentum.
~ Rapidly return back to the basic warrior stance.
See figure 3-5.
For Official Use Only
Chapter 3: Gray Belt
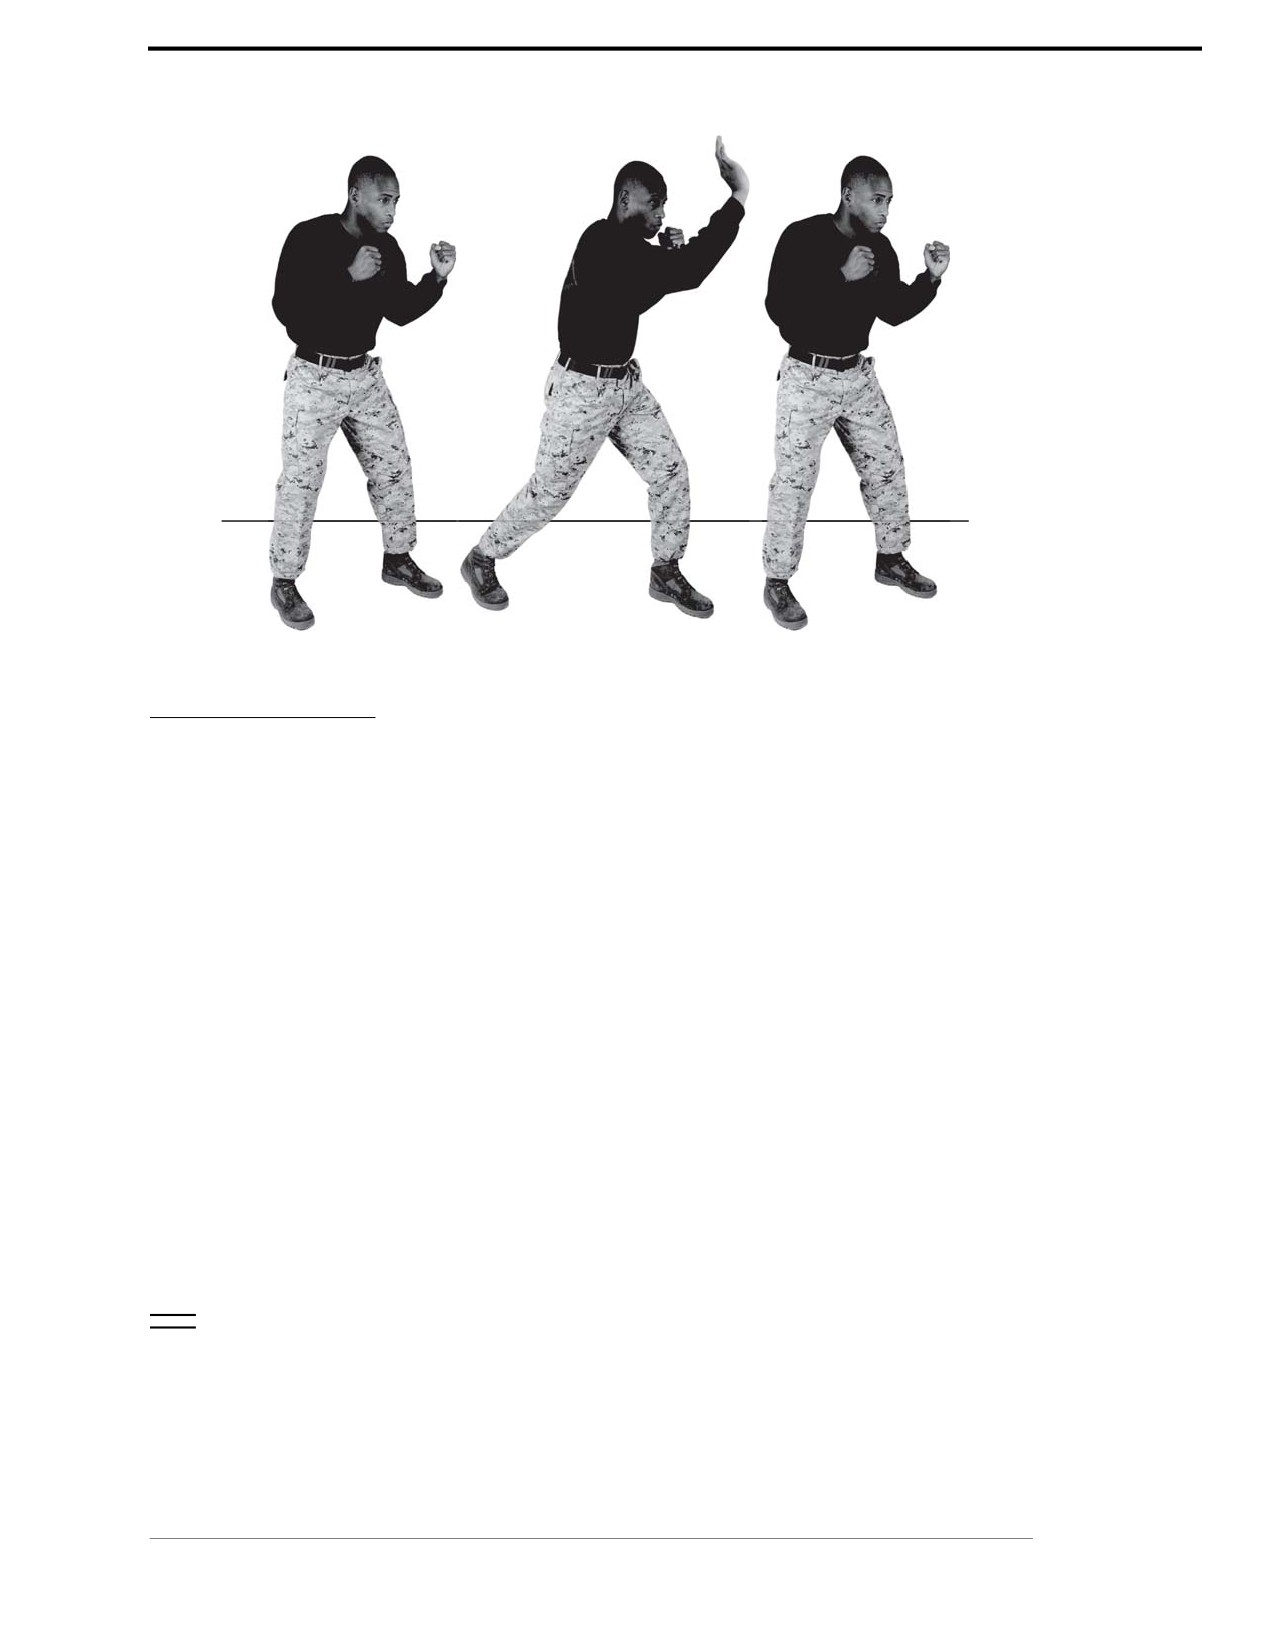
Marine Corps Martial Arts Program
3-7
Figure 3-5. Chin Jab/Palm Heel Strike.
Knife Hand Strikes
Knife hand strikes are used when the primary target area is narrow, for example, to allow for
strikes on the neck between body armor and a helmet. The knife hand strike can be executed
from one of three angles: outside/forward, inside/reverse, and vertical.
Outside/Forward Knife Hand Strike
The outside/forward knife hand strike is used when the primary target area is narrow and to
attack soft target areas of the body such as the sides of the neck. Results of the attack can stun the
aggressor allowing you to conduct follow-on techniques.
Striking Surface
The striking surface is the meaty portion of the hand between the bottom of the little finger and
the wrist.
Target Area of the Body
The primary target area for the knife hand strike is the neck.
Technique
~ Assume the basic warrior stance.
~ Execute a knife hand by extending and joining the fingers of your right hand and placing your
thumb next to your forefinger (like saluting).
~ Bring your right hand back over your right shoulder and rotate your right hip and right
shoulder backwards.
Chapter 3: Gray Belt
For Official Use Only
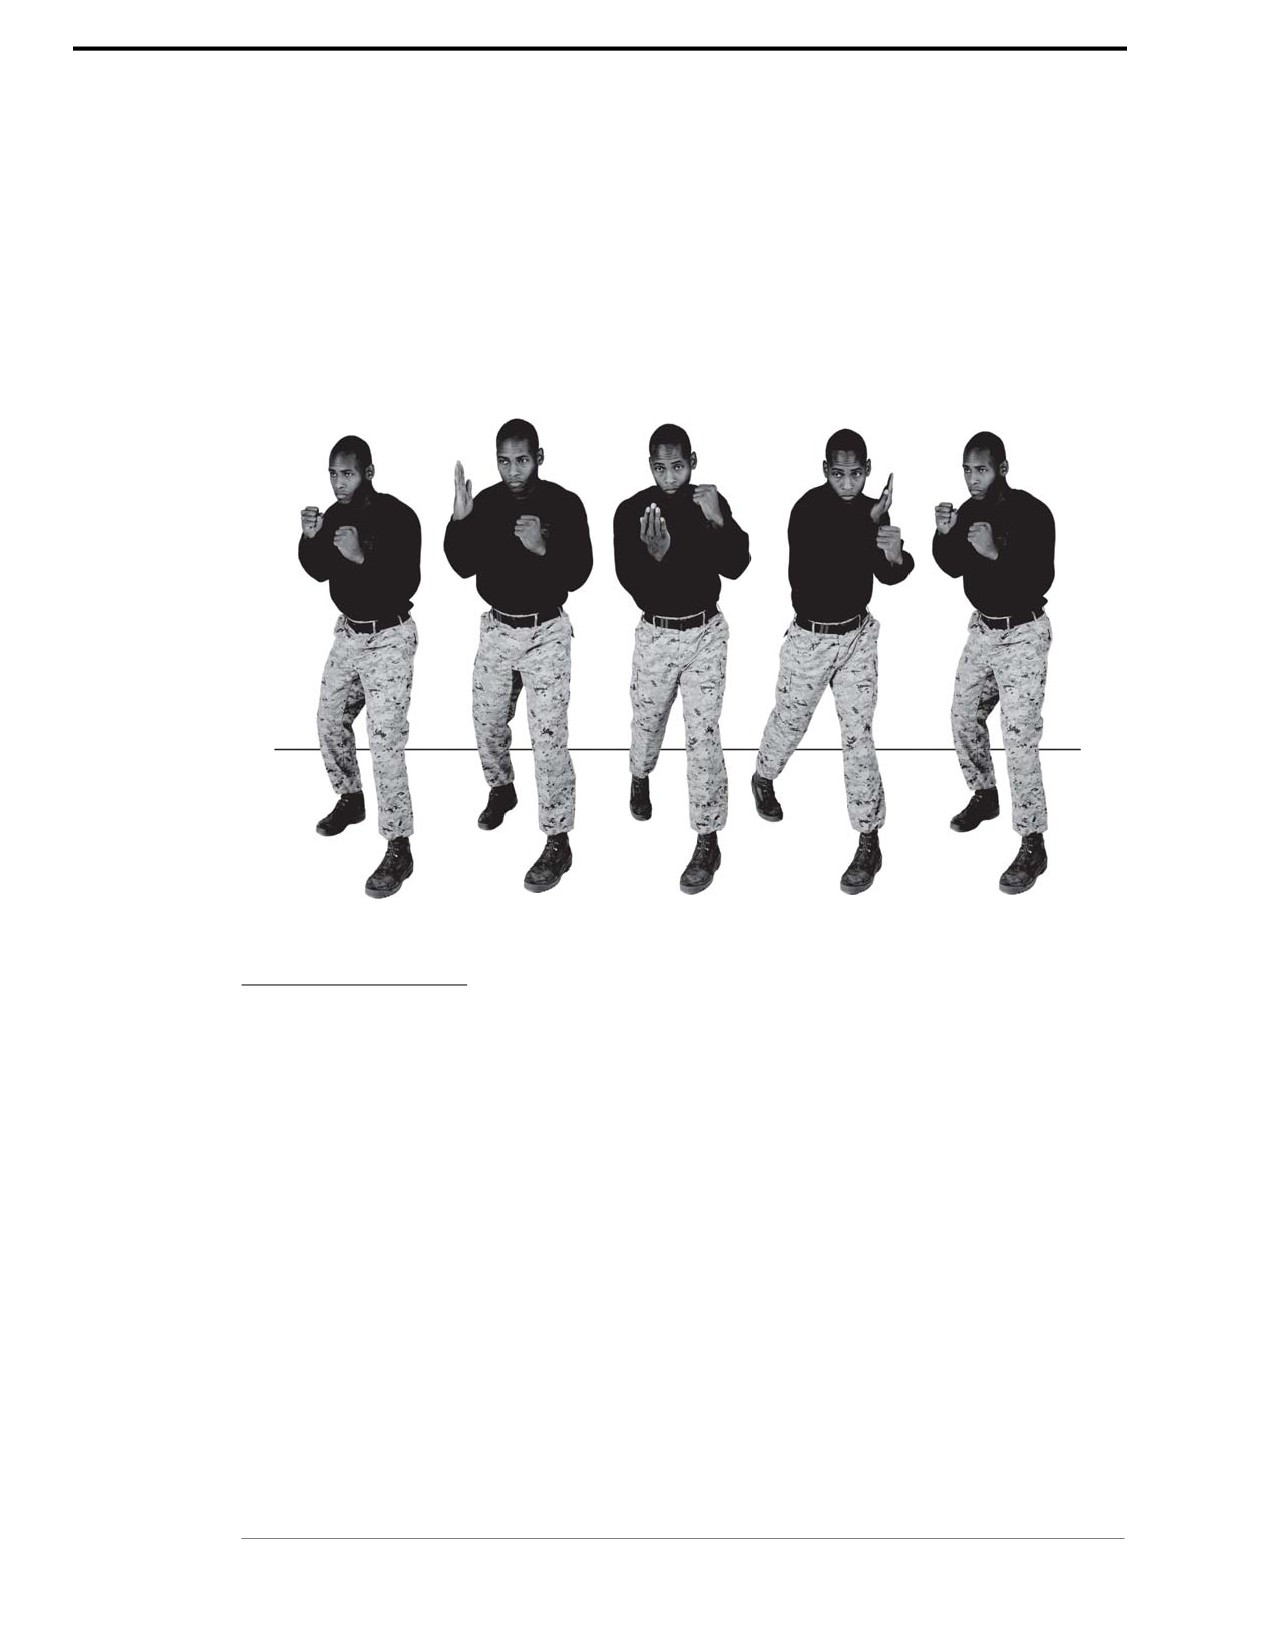
3-8
MCRP 3-02B
~ Your arm is bent at approximately a 45- to 90-degree angle. Your elbow should be lower than
your shoulder.
~ Thrust your knife hand forward (horizontally) into the aggressor while rotating your right hip
and shoulder forward.
~ Rotate your wrist so that your palm is up. Contact should be made on the aggressor with the
knife-edge of the hand.
~ Follow through the primary target area with your hand and rapidly return to the basic
warrior stance.
See figure 3-6.
Figure 3-6. Outside/Forward Knife Hand.
Inside/Reverse Knife Hand Strike
The inside/reverse knife hand strike is primarily used after performing the outside forward knife
strike to attack soft target areas of the body. Results of the attack can stun the aggressor, allowing
you to conduct follow-on techniques. The striking surface is narrow, allowing strikes on the neck
between the body armor and the helmet.
Striking Surface
The striking surface is the cutting edge of the hand, which is the meaty portion of the hand below
the little finger extending to the top of the wrist.
For Official Use Only
Chapter 3: Gray Belt
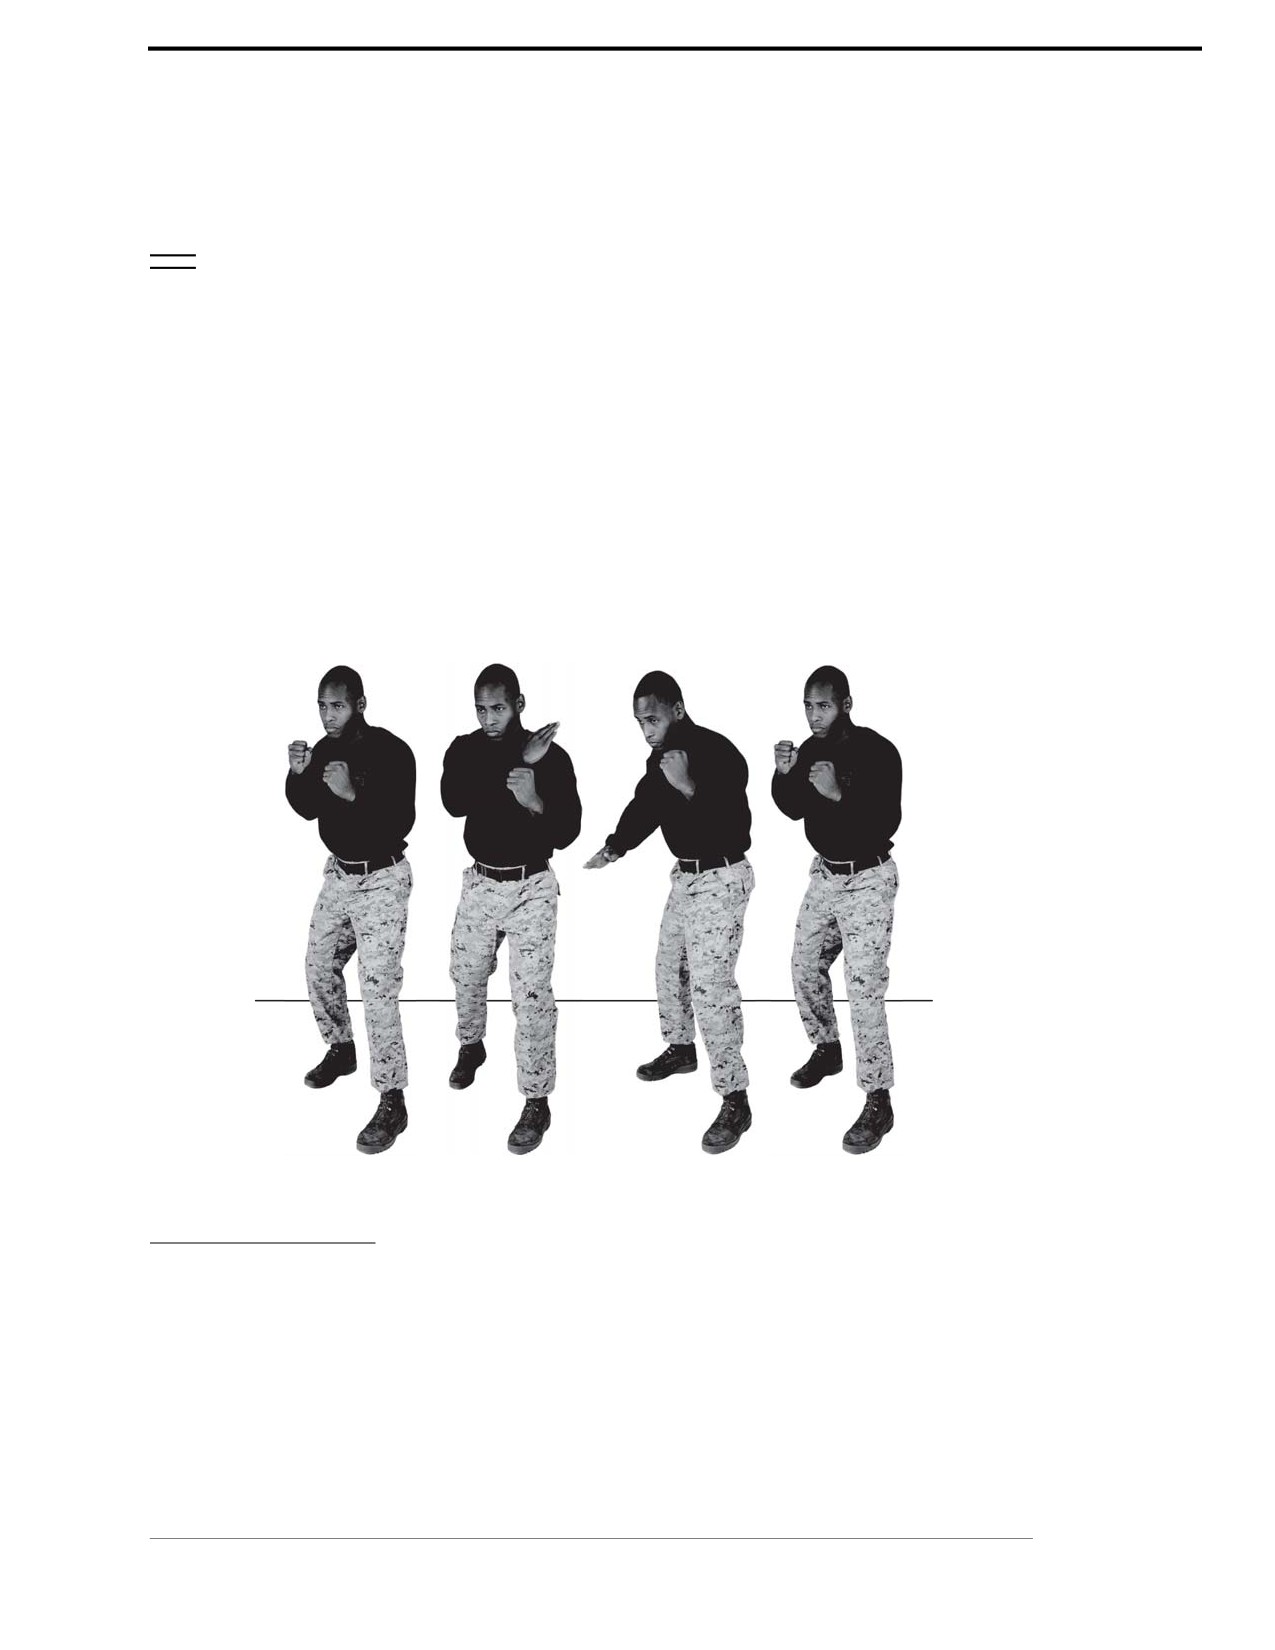
Marine Corps Martial Arts Program
3-9
Target Area of the Body
The primary target area for the knife hand strike is the neck.
Technique
~ Assume the basic warrior stance.
~ Execute a knife hand by extending and joining the fingers of your right hand placing your
thumb next to your forefinger (like saluting).
~ Bring your right hand over your left shoulder. At the same time, rotate your right shoulder and
hip forward.
~ Thrust your knife hand forward (horizontally) onto the aggressor while rotating your right hip
and shoulder backwards.
~ Rotate your wrist so that your palm is down. Contact should be made on the aggressor with
the knife-edge of the hand.
~ Follow through the primary target area with your hand and rapidly return to the basic
warrior stance.
See figure 3-7.
Figure 3-7. Inside/Reverse Knife Hand.
Vertical Knife Hand Strike
The vertical knife hand strike is primarily used to target the back of the neck and attacking soft
tissue areas of the body.
Chapter 3: Gray Belt
For Official Use Only
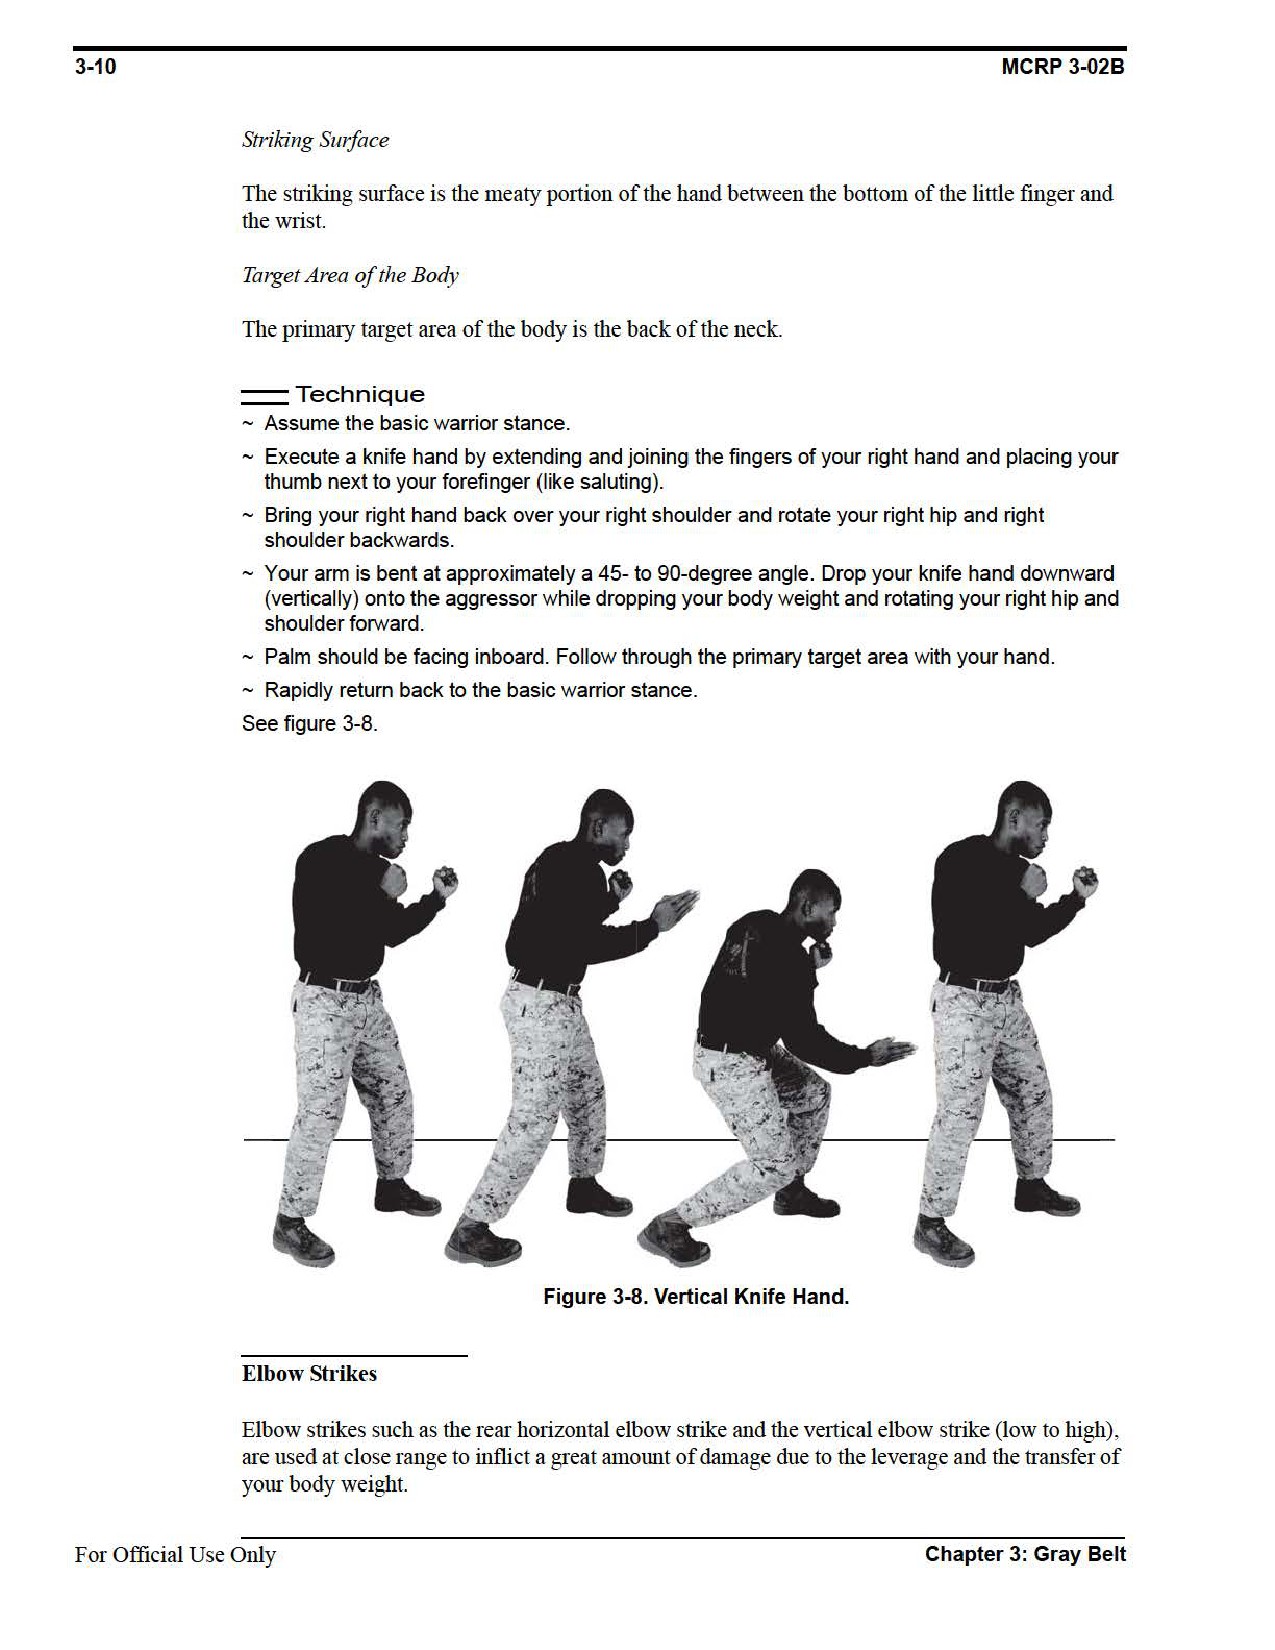
//////////////////////////////////////////