Military reference books and manuals (2009-2023, Volume 6) - page 16

32
AFMAN31-201 17 MAY 2002
Figure 7.7. Position Of Attention With 36” Riot Baton

AFMAN31-201
17 MAY 2002
33
Figure 7.8. Port Position
7.2.5. On-Guard Position. This position is the (most) ready position. Do not keep control force mem-
bers in this position for extended periods because it is tiring. Place the left foot approximately shoul-
der-width forward of the right foot. Feet are spread, knees slightly bent. Place the right hand and grip
end of the baton securely against the right hip. Bend slightly forward at the waist. The left arm is for-
ward, parallel to the ground and provides protection to the throat and neck. The command for this
position is, "On-guard, move!" "On-guard" is the preparatory command. "Move!" is the execution
command. Use the on-guard position when at close quarters with or closing on a crowd. Figure 7.9.
and Figure 7.10. offer front and side views, respectively, for the proper on-guard position.

34
AFMAN31-201 17 MAY 2002
Figure 7.9. On-Guard Front View

AFMAN31-201
17 MAY 2002
35
Figure 7.10. On-Guard Side View
7.3. Offensive Techniques.
7.3.1. There are two basic offensive maneuvers used with the riot baton: the thrust and smash.
7.3.1.1.
“Thrust” with the left end of the baton to attack on a plane of 90 degrees, from a side
thrust to the left to straight in front of the control force member. Execute thrusts from the on-guard
position. To execute this maneuver, take a short sliding step forward with the left foot, keeping the
knees slightly flexed. While stepping, thrust the left tip of the baton sharply forward, aiming at the
upper portion of the rioter’s body. At the same time, the right hand is pulled into the center of the
security force member’s body with the left arm locked in a straight forward position. Drive the tip
of the baton into the rioter’s upper body. The right tip of the baton is brought into the center of the
security force member’s chest and the right elbow is brought into the right side. Once contact is
made, the security force member recovers quickly and sharply to the On-guard position. See Fig-
ure 7.11.
7.3.1.1.1. There are two variations to the basic thrust maneuver: the angled thrust and side
thrust. These are executed with the same basic movements as the straightforward thrust and

36
AFMAN31-201 17 MAY 2002
designed to repel attacks from the oblique or to aid a fellow security force member under
attack on the flank. Because of the hand placement on the riot baton, these maneuvers may
only be executed to the left.
7.3.1.1.2. Areas of the body never hit are the head, spine, throat, heart area or the side of neck,
as blows to these areas may cause permanent injury or death.
Figure 7.11. Straight Forward Thrust, Left Tip
7.3.1.2. Unlike the thrust, a “smash” employs the full length of the baton across the body of a sus-
pect. Security forces members are actually pushing the suspect with the baton. Properly done, this
technique reduces the impact by increasing the amount of the baton over a larger area of the body.
Therefore, it is permissible to execute a smash to a suspect’s torso. Use the smash to move nonvi-
olent suspects back or to the side. Execute all techniques with the baton in one quick, simple
motion to prevent telegraphing and help maintain balance. Again, off-limit “smash” areas include
the head, neck and throat, as blows to these areas may cause death.
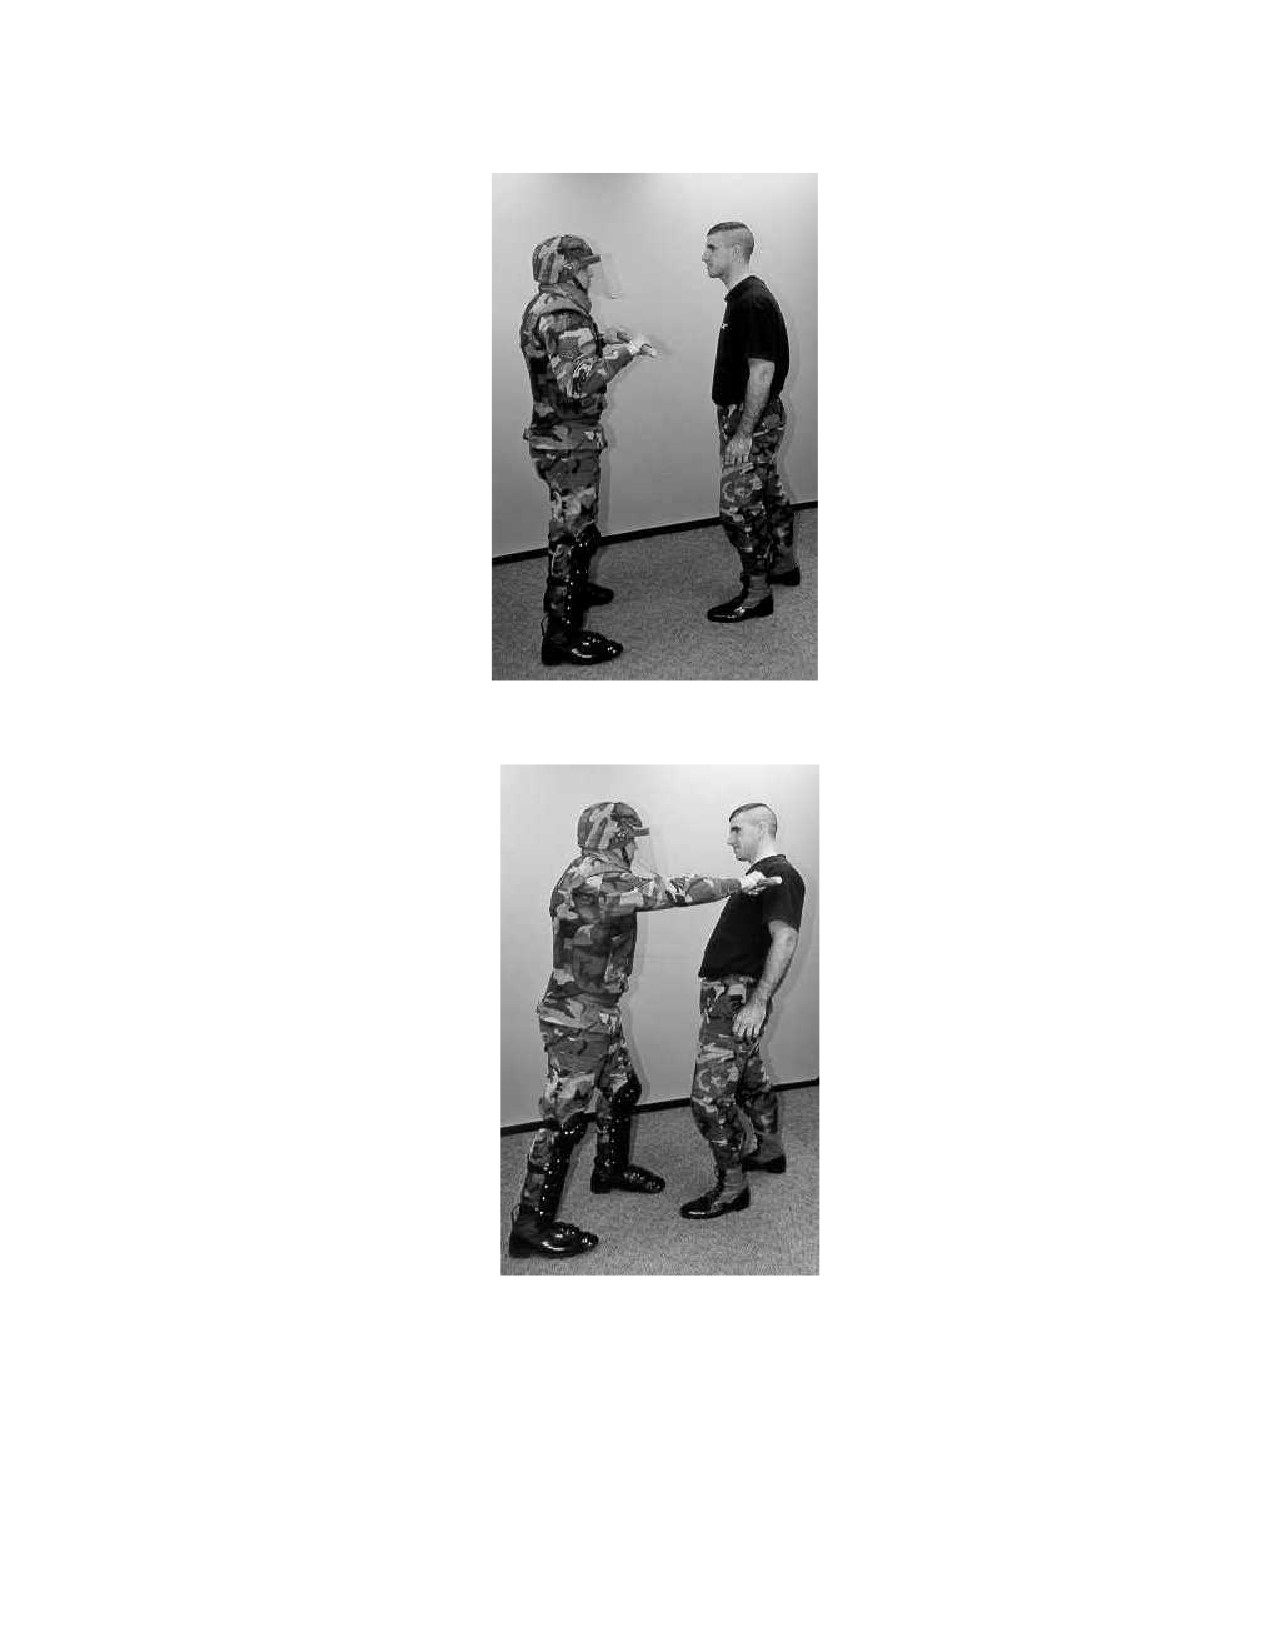
7.3.1.2.1. Baton (straightforward) Smash (Figure 7.12. and Figure 7.13.). The control force
member takes a short sliding step with either foot in between the suspect's legs. Smash the full
length of the baton horizontally across the suspect's chest and drive it forward. Upon comple-
tion of the technique, recover to the ready position quickly and sharply. This technique will
move the suspect straight back.
AFMAN31-201
17 MAY 2002
37
Figure 7.12. Straight Forward Smash Initiation
Figure 7.13. Straight Forward Smash Moment of Contact
7.3.2. Modified Smash (Figure 7.14. through Figure 7.16.). To move the suspect to the left, step
right and push (smash) left with the baton. Execute the same baton movement as initiation described
above, pushing left. Recover quickly and sharply to the ready position. To move suspects to the right,
step left and push (smash) right.

38
AFMAN31-201 17 MAY 2002
Figure 7.14. Modified Smash Initiation
Figure 7.15. Modified Smash Mid-Execution

AFMAN31-201
17 MAY 2002
39
Figure 7.16. Modified Smash Moment of Contact
7.4. Defensive Techniques. Use the defensive “strike” to counter a suspect attack. Use this technique
when suspects attack with a cutting, slicing or striking weapon.
7.4.1. The “strike” is used offensively, for counterattack, from a defensive posture when an individual
attacks with a cutting, slicing or striking weapon. Use the end of the baton (opposite of the grip end)
to attack in any direction on a plane of 180 degrees, executing from the on-guard position. Maintain a
minimum of five feet of separation between the security forces member and all suspects. Since secu-
rity forces rarely use the riot baton and its length proportionally increases the force generated at the
strike end, follow these specific procedures closely. Application of the riot baton is less than deadly
force as long as control force members do not use the baton to strike the head, neck or torso. Strikes to
these areas of the body can cause permanent, grievous injury or death. Therefore, in situations that do
not justify lethal force, strike ONLY the extremities--that is, the arms and legs. There are three types
of strikes.
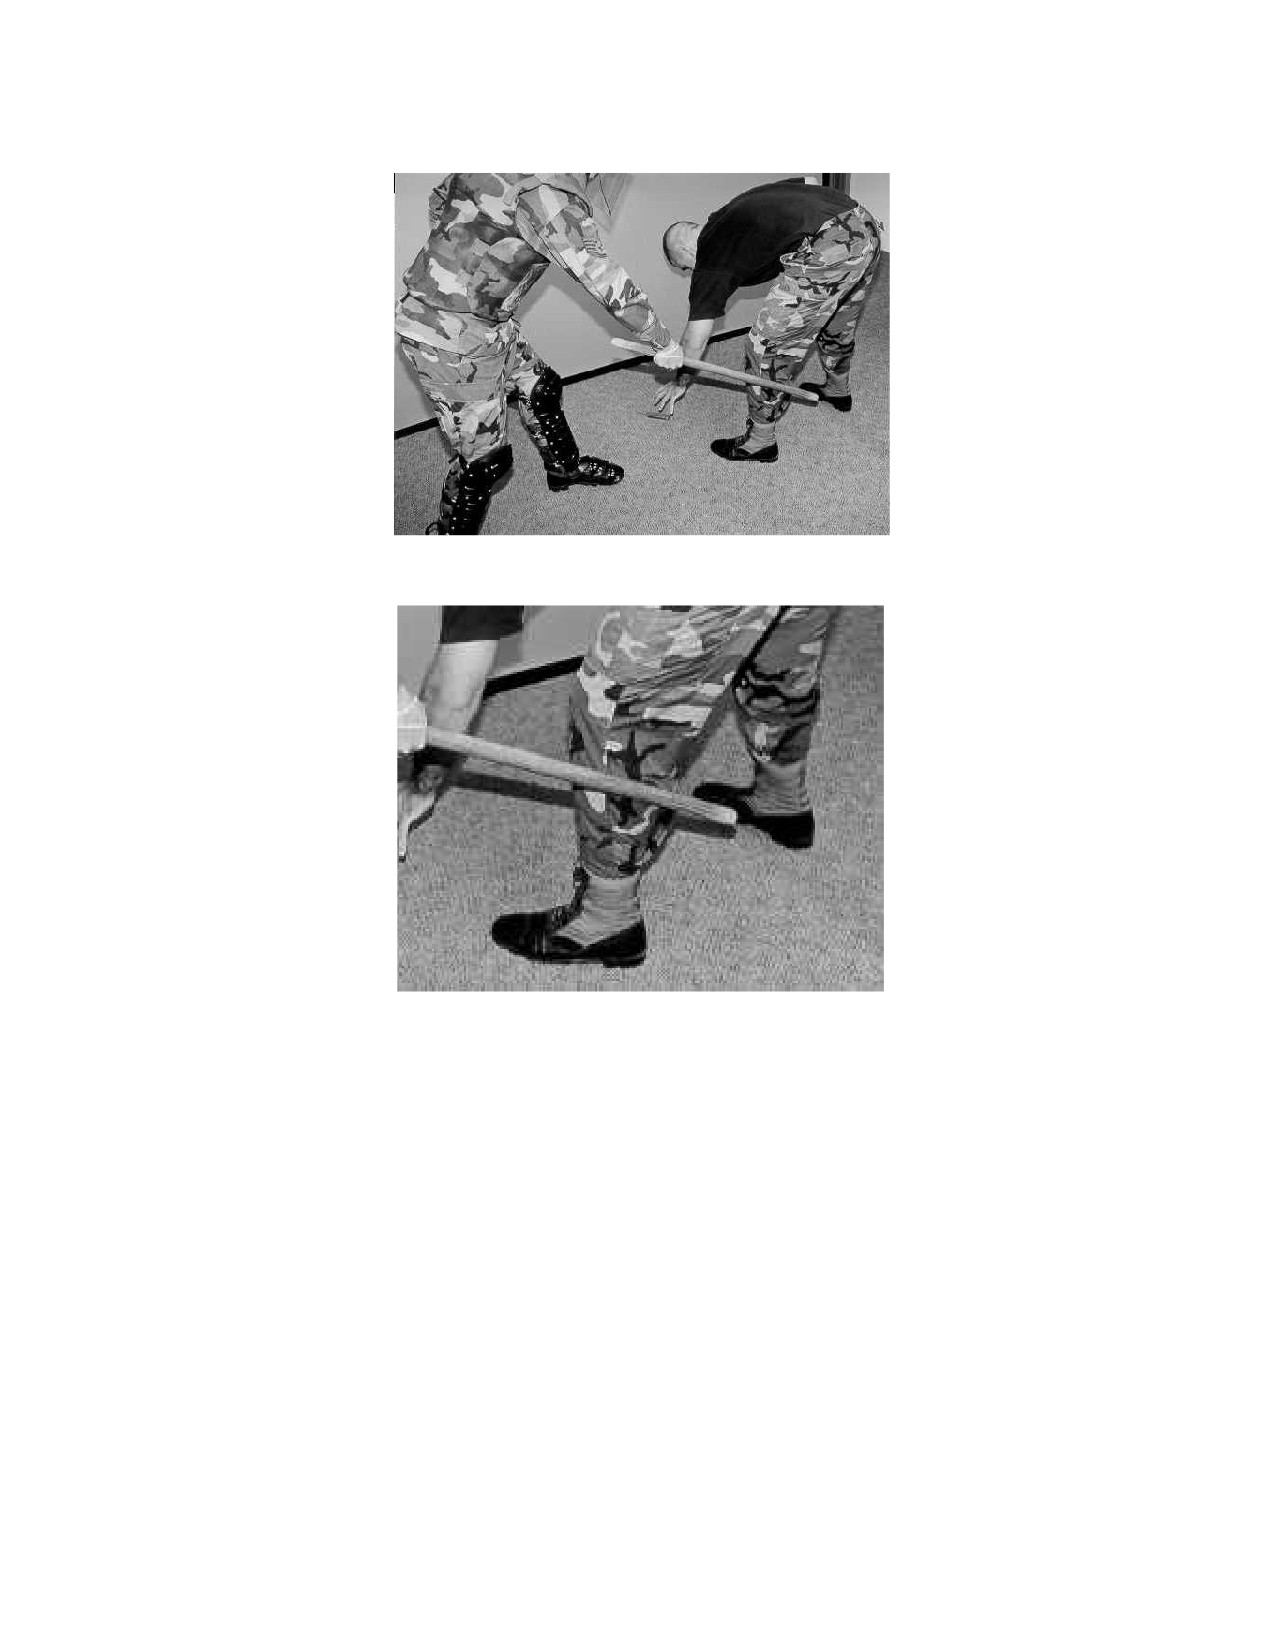
7.4.1.1. Radial/Forearm Strike. The radial nerve runs approximately two inches below the elbow
joint on top of the forearm. When a security forces member strikes this spot hard, with the force
driven toward the center of the suspect’s arm (Figure 7.17. and Figure 7.18.), they will render
his/her hand and arm numb as if the entire arm has gone to sleep. Specifically, the suspect will find
it extremely difficult if not impossible to control their index finger, middle finger and thumb. The
objective behind striking this pressure point is to disarm suspects at close quarters. Apply this
technique when suspects are attempting to strike or are defensively raising their arm. Security
forces should practice this strike from both the port and on-guard positions. From the port posi-
tion, elevate the right hand to level with or above the left shoulder while releasing the left hand.
Step smartly forward with the left foot to power the strike. Keep steps short to maintain firm bal-
ance. Focus on the strike point (radial nerve) while swinging the baton down across the body (left
to right). Drive the striking end of the baton onto the top of the radial nerve, swinging through the
suspect’s arm. Once the strike is completed, return smartly to the ready position. From the

40
AFMAN31-201 17 MAY 2002
on-guard position, rather than swinging across the body, swing the baton straight up and down and
reduce the step off. Focus, swing and recovery are similar.
Figure 7.17. Radial/Forearm Strike
Figure 7.18. Radial Forearm Strike Close-Up
7.4.1.2. Leg Strike. Hit this pressure point correctly and personnel will collapse and temporarily
immobilize the leg that was struck. Often security forces will set off a sympathetic reflex in the
suspect’s other leg, tumbling them to the ground. This strike is ideal for subduing a violent suspect
for the apprehension team. The point of impact should be on the outside rear quadrant of the upper
leg about four inches above the knee. This strike area occurs where the common peroneal nerve
branches from the sciatic nerve. Do not strike knee joints, as this could cause permanent injury.
Keep the baton parallel to the ground as the suspect is struck to prevent a glancing blow. Swing
through the pressure point. Should the mob close quickly, kick this pressure point. It will have
much the same effect--mind-numbing pain. Techniques from port and on-guard positions are iden-

AFMAN31-201
17 MAY 2002
41
tical. Focus the strike onto the side of the suspect’s leg--top portion of the calf. Figure 7.19. offers
a good example of the baton approach and Figure 7.20. a close-up of the strike point.
Figure 7.19. Leg Strike
Figure 7.20. Leg Strike Close-Up
7.4.1.3. Calf Strike. Similar pain can be inflicted causing stunning immobilization, dysfunction
and sympathetic response by striking the suspect’s calf from the back as shown in Figure 7.21.
and Figure 7.22.. Techniques from port and on-guard positions are identical. This strike is ideal
for suspects that approach from the side or the rear. The focus of the strike will be level--back of
the leg, top portion of the calf. The strike will connect with the tibial nerve (lower branch of the
sciatic nerve), which starts just above the back of the knee and runs down through the back of the
leg muscle. Remember to drive the baton sharply through the strike point and return to the ready
position smartly. In all likelihood, a suspect will be knocked to the ground with this maneuver.
Depending on coordinated tactics, the security forces member may step around the suspect, as
long as there is an apprehension team directly behind the element. The apprehension team will
cuff and secure suspects the formation subdues.
42
AFMAN31-201 17 MAY 2002
Figure 7.21. Calf Strike
Figure 7.22. Calf Strike Close-Up
7.4.2. Training/Developmental Techniques. To enhance the efficiency of the JIT training, try this pro-
cedure. Pair control force members. Have each member paste day-glow dots on each strike/pressure
point on their body. Have the teams take turns practicing the confrontation strikes. Using a foam rub-
ber training baton, one member will move about while their partner practices striking the dots from
the port and on-guard positions. Personnel can expand the activity into team/unit drills to provide
practice from various formations. The more practice, the more accurate and effective the strikes will
become--a matter of well-developed eye-hand coordination. Should personnel encounter a suspect
using padding or their upper body strength is waning, execute the strikes with a double-arm swing.
Contacting the described pressure points, though padded, with a double-arm strike will immobilize
the suspect. Security forces personnel must exercise extreme caution in these situations. The dou-
ble-handed swing can be lethal if misapplied. Anytime fatigue is experienced, immediately notify the
team leader for relief.
7.4.3. Defense Response. Personnel must be constantly vigilant to defend themselves and other con-
trol force members against an attack from the suspects being confronted. Should a member of the
team be observed coming under attack, strike the attacker swiftly while their focus is on a partner.
Should an individual be the focus of the attack, the most efficient action is to step away to the back or

AFMAN31-201
17 MAY 2002
43
side, as shown in Figure 7.23.. This is correct for several reasons. First, as was just outlined, help may
already be on the way. Personnel do not want to be the simultaneous target of two strikes--the attack-
ers and your partners. Secondly, the attacker may miss. The attacker’s missed swing will leave them
off balance and open to a counter strike. A third option is to use the baton to block the strike. If the
suspect has already closed the distance between two security forces members, first step back or exe-
cute a smash. Either of these maneuvers creates vital space. Remember, space gives options. The dis-
tance created may prevent the assailant from striking. Space will also provide the opportunity to take
the offensive by providing room to execute a disabling strike (Figure 7.24. and Figure 7.25.). Once
personnel have gained the necessary separation, assess. Has the action dissuaded the attacker? Does
the attacker still pose a threat? Is the threat lethal or non lethal? Personnel must immediately neutral-
ize all lethal threats. If a life-threatening attack is faced, strike the attacker to neutralize their potential
for deadly force. The immediate assessment is vital as personal life and the lives of everyone around
(control force members and suspects alike) may be in danger. NOTE: Anytime personnel strike with
a baton, yell loudly. This technique will have a strong psychological effect on the opponent while
helping build up adrenaline. If the threat is lethal, yell “gun!,” “knife!,” or a pre-designated code word
so the team can execute an immediate action drill to apprehend the assailant.
Figure 7.23. Defensive Response Step Away

44
AFMAN31-201 17 MAY 2002
Figure 7.24. Defensive Response Mid-Execution
Figure 7.25. Defensive Response Moment of Contact
7.5. Come-Along Techniques. Come-along techniques can be used to move resisting offenders.
Come-alongs will ease the apprehension of subdued suspects. The apprehension team must be able to
move the offender quickly and without the use of excessive force. Flexicuffs or handcuffs are placed on
resisters before moving them. This reduces a resister’s ability to fight if they quickly try to do so.
7.5.1. Two-Person Carry.
7.5.1.1. The two-person carry is the best come-along technique if there are enough personnel
available. This carry avoids injuries caused by excessive lifting. It also avoids injuries to an
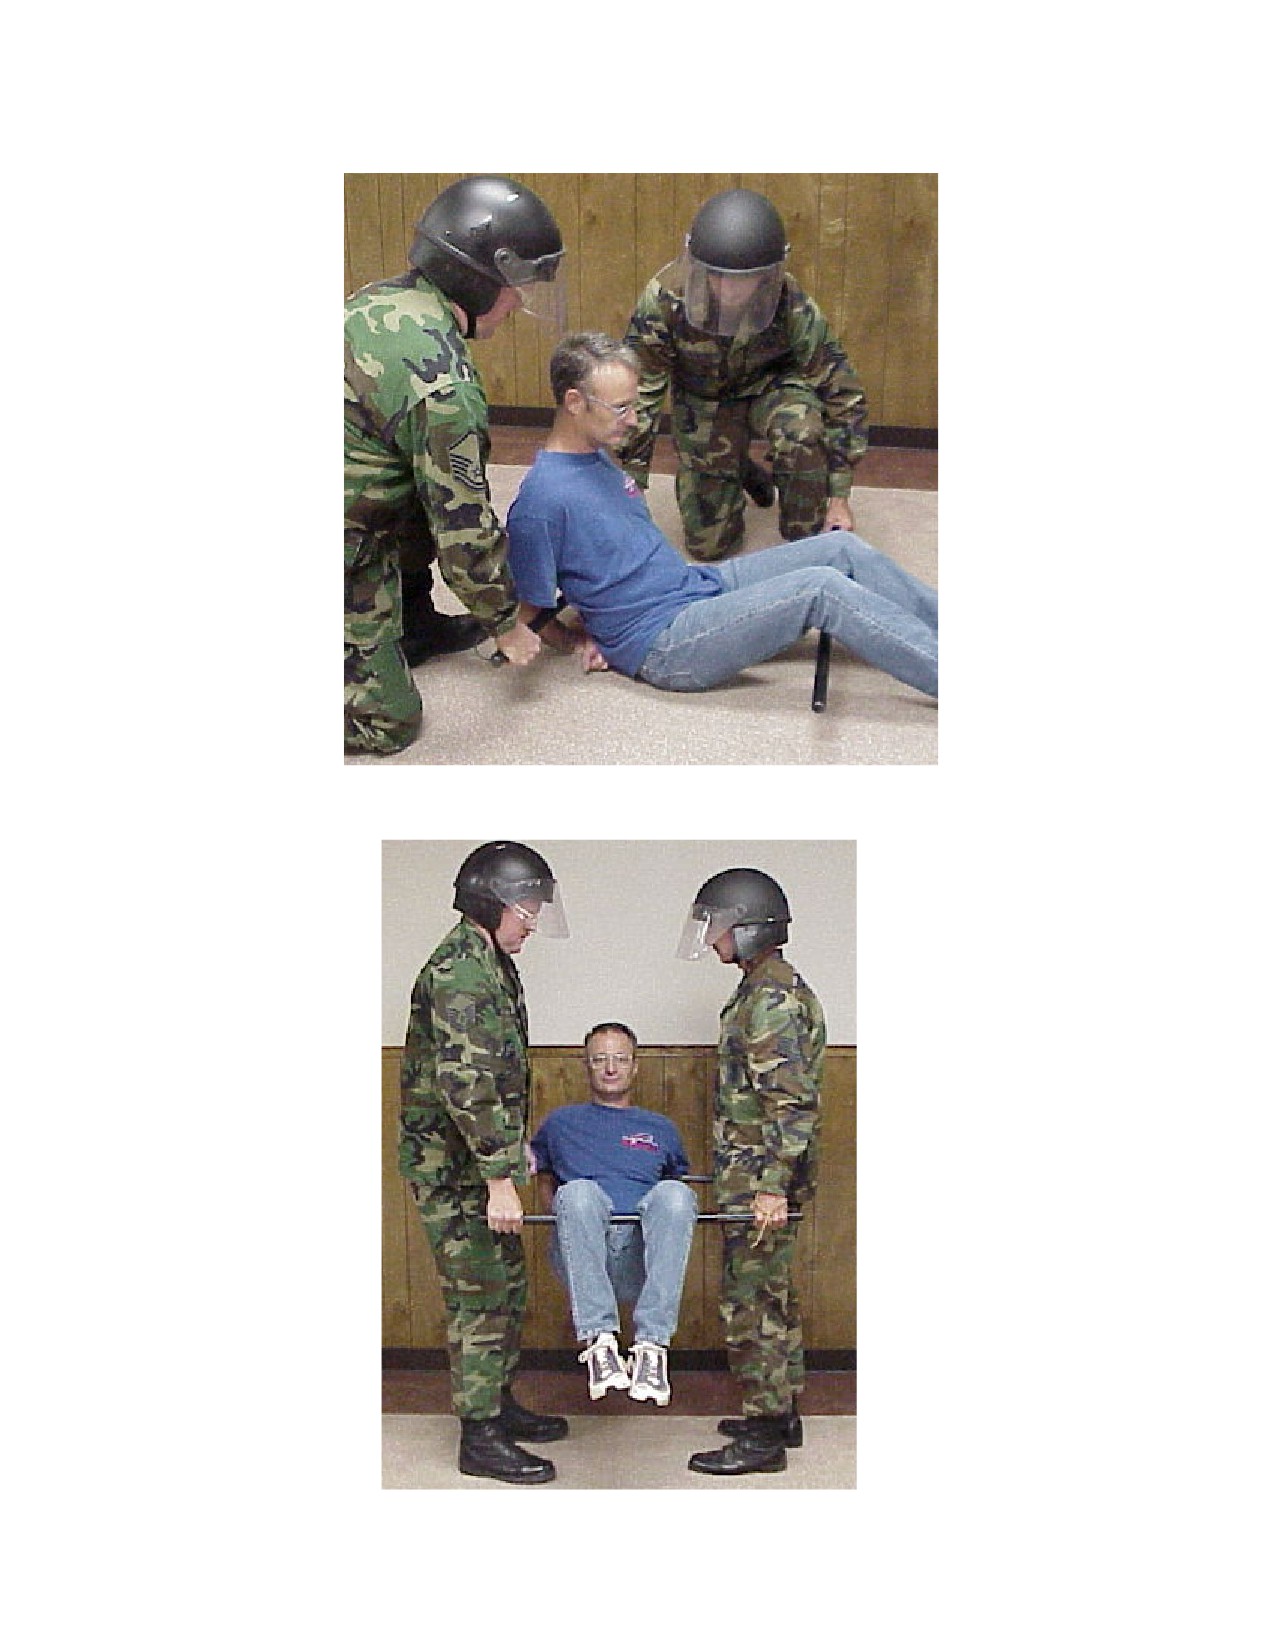
offender. A SF member stands on either side of the offender and grasps them under the legs and
through their arms and around their back. The SF members may grasp each other’s arms to prevent
their hold from slipping. They also can perform this carry using riot batons. The SF members

AFMAN31-201
17 MAY 2002
45
place one baton under the legs and behind the knees and the other baton horizontally across the
back. Both SF members then grasp the batons, forming a cradle.
Figure 7.26. Two-Person Carry
46
AFMAN31-201 17 MAY 2002
Figure 7.27. Two-Person Carry with Batons
Figure 7.28. Two-Person Carry with Batons (lift)

AFMAN31-201
17 MAY 2002
47
7.5.1.2. The offenders may try to resist by stiffening and forcing themselves out of the cradle. To
counteract this resistance, one SF member gets behind the offender and grasps the offender under
the arms. The SF member then locks their hands in front of the offender’s chest for a more secure
hold. The second SF member stands to one side of the offender and encircles the offender’s legs at
the knees with their arms.
Figure 7.29. Two-Person Carry for Person Resisting
Figure 7.30. Two Person Carry for Person Resisting

48
AFMAN31-201 17 MAY 2002
7.5.2. One-Person Carry.
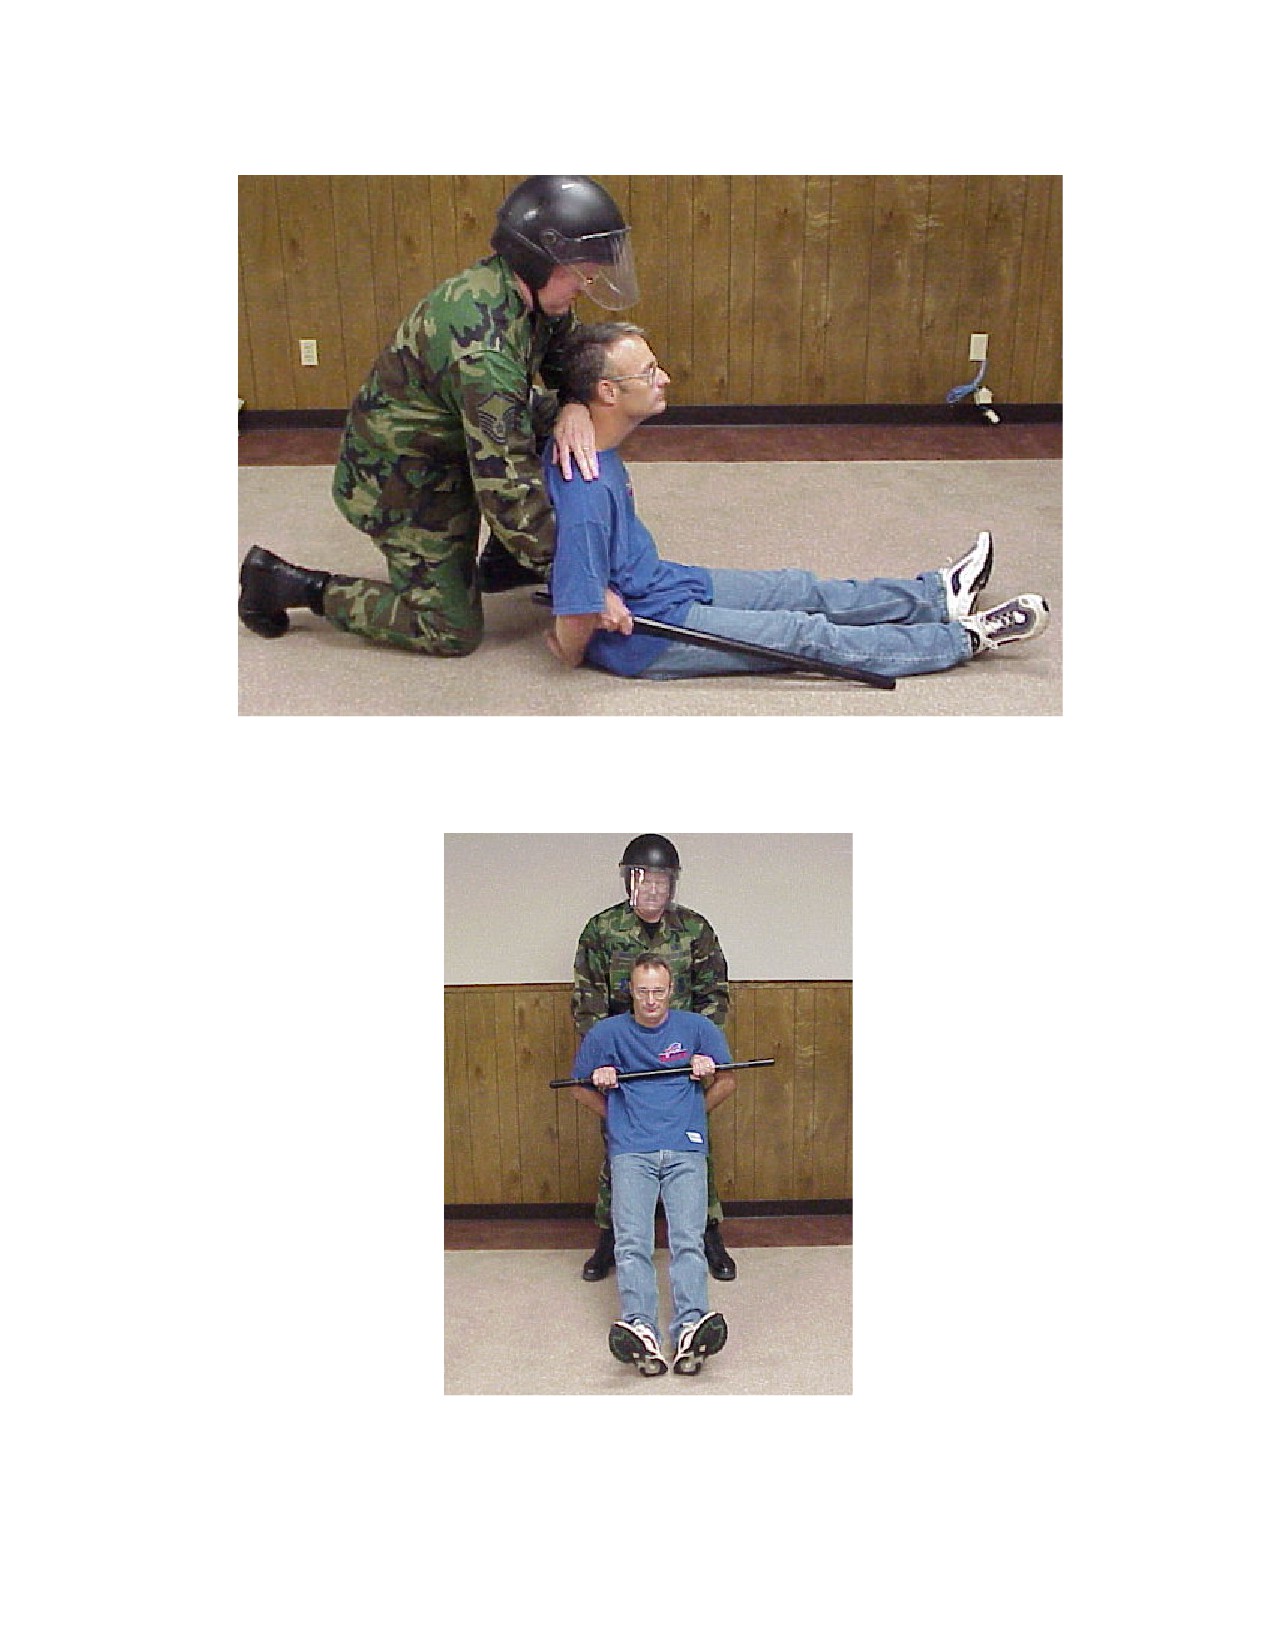
7.5.2.1. The one-person carry has a disadvantage--it involves lifting a considerable amount of
weight. This can tire the carrier quickly or cause a back injury. The SF member lifts the offender
from the rear by grasping them under the arms. The SF member then locks their hands in front of
the offender’s chest. The SF member pulls the offender backward with the offender’s heels drag-
ging the ground. A riot baton may also be used for this technique. The SF member approaches the
offender from behind. The baton is then laid on the side of the offender, slightly behind the
offender’s buttocks. The SF member forces the offender into a sitting position, reaches under the
offender’s arms and picks up the baton. The baton is rotated to the front of the offender’s chest.
The SF member places their free hand under the offender’s arm and grasps the other end of the
baton. The SF member then pulls the offender backward with the offender’s heels dragging the
ground.
Figure 7.31. One-Person Carry
AFMAN31-201
17 MAY 2002
49
Figure 7.32. One-Person Carry with Baton
Figure 7.33. One-Person Carry with Baton
50
AFMAN31-201 17 MAY 2002
7.6. Come-Along Holds. A come-along hold is used to move an unrestrained, unwilling person from one
place to another. It controls the person’s movements without injuring them. A come-along hold puts pres-
sure on a sensitive part of the body and causes discomfort. The hold must be executed quickly and with as
little commotion as possible. Speed is essential in applying these holds. Such holds are used only for short
distances until the offender can be restrained. Each SF member must know which holds are best suited to
their capabilities.
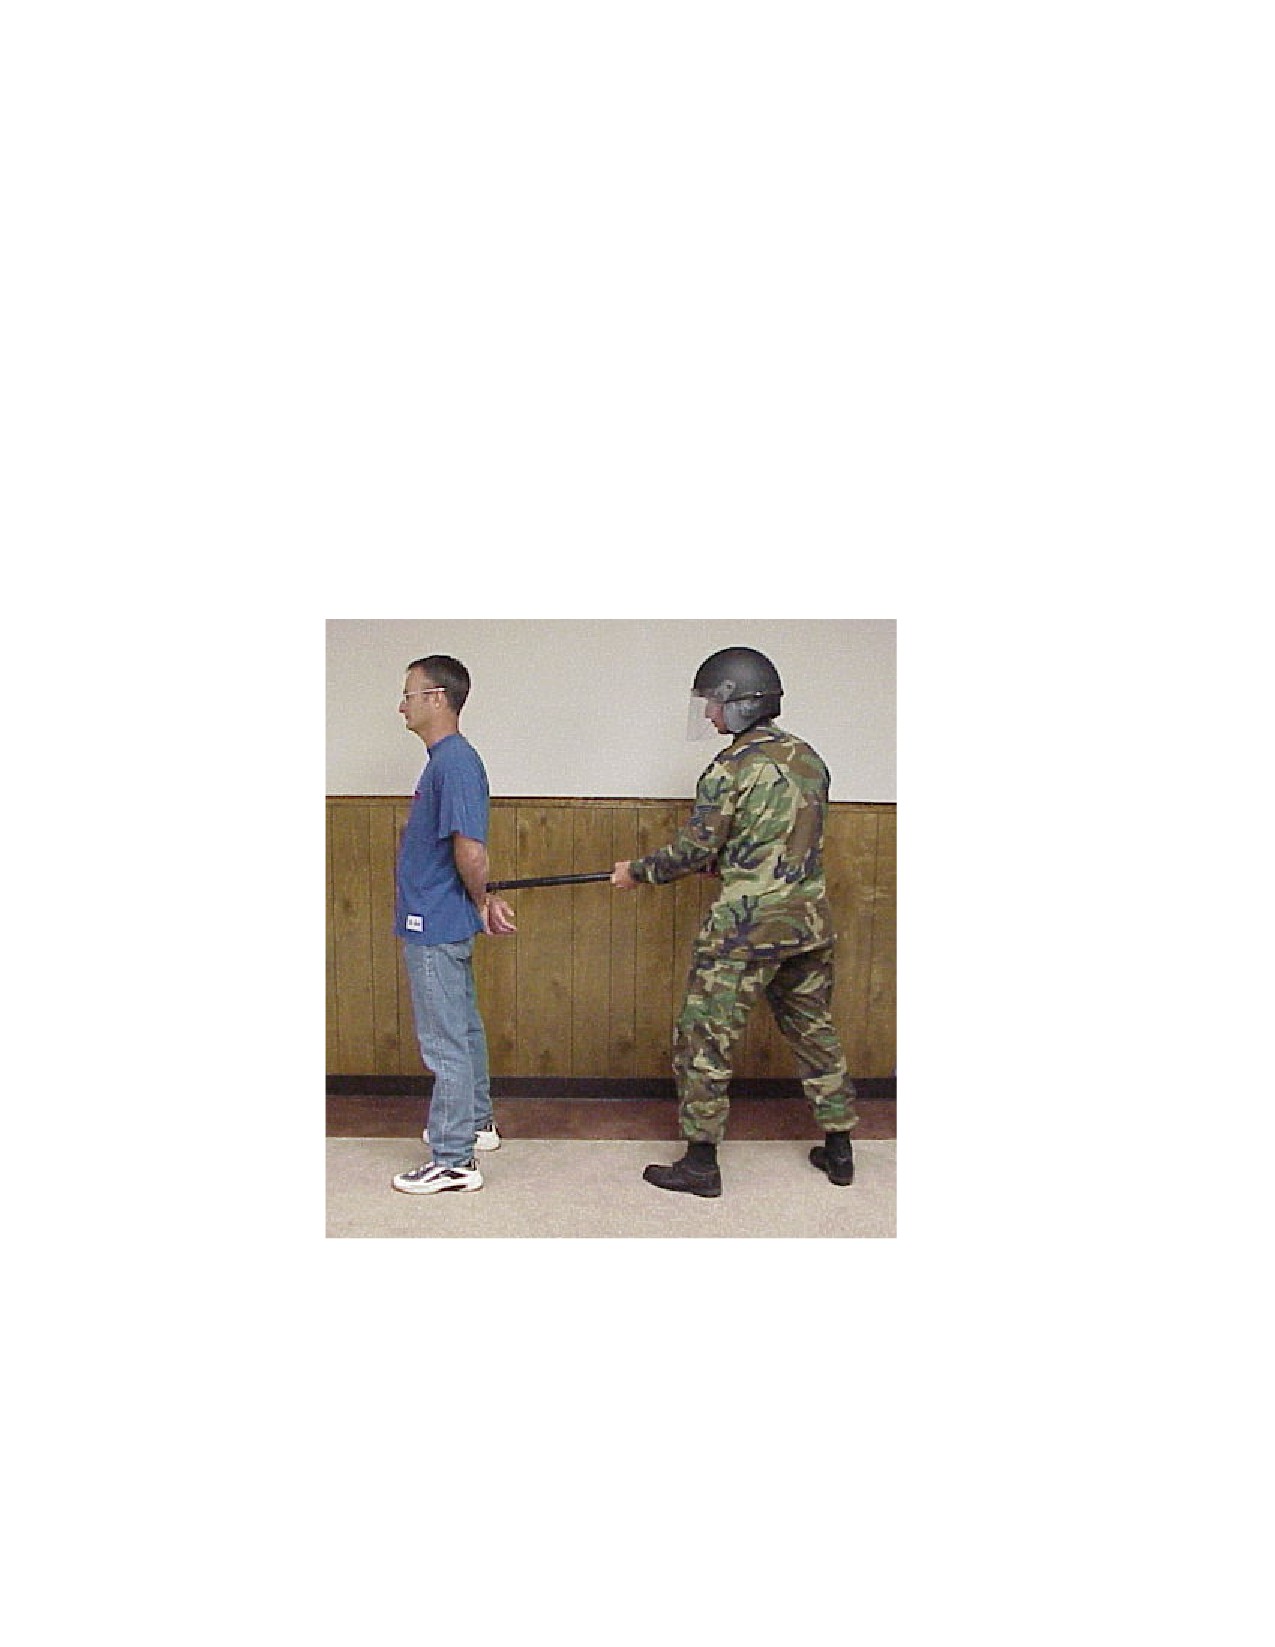
7.6.1. Baton as a Restraint and Come-Along. The riot baton may be used as a restraining device and
come-along hold at the same time. The SF member has the offender cross his hands behind his back.
They then slip the offender’s hand through the baton’s leather thong. The SF member then twists the
baton until the slack in the thong is taken up. The thong can be tightened or loosened depending on the
amount of pressure needed to secure the offender. With his left hand, the SF member grasps the left
shoulder or the clothing over the left shoulder of the offender. The SF member then pulls the offender
slightly backward so the offender cannot pull away from the baton end, which is pressed against the
small of the offender’s back.
Figure 7.34. Riot Baton Used as a Restraint and Come-Along

AFMAN31-201
17 MAY 2002
51
Figure 7.35. Riot Baton Used as a Restraint and Come-Along
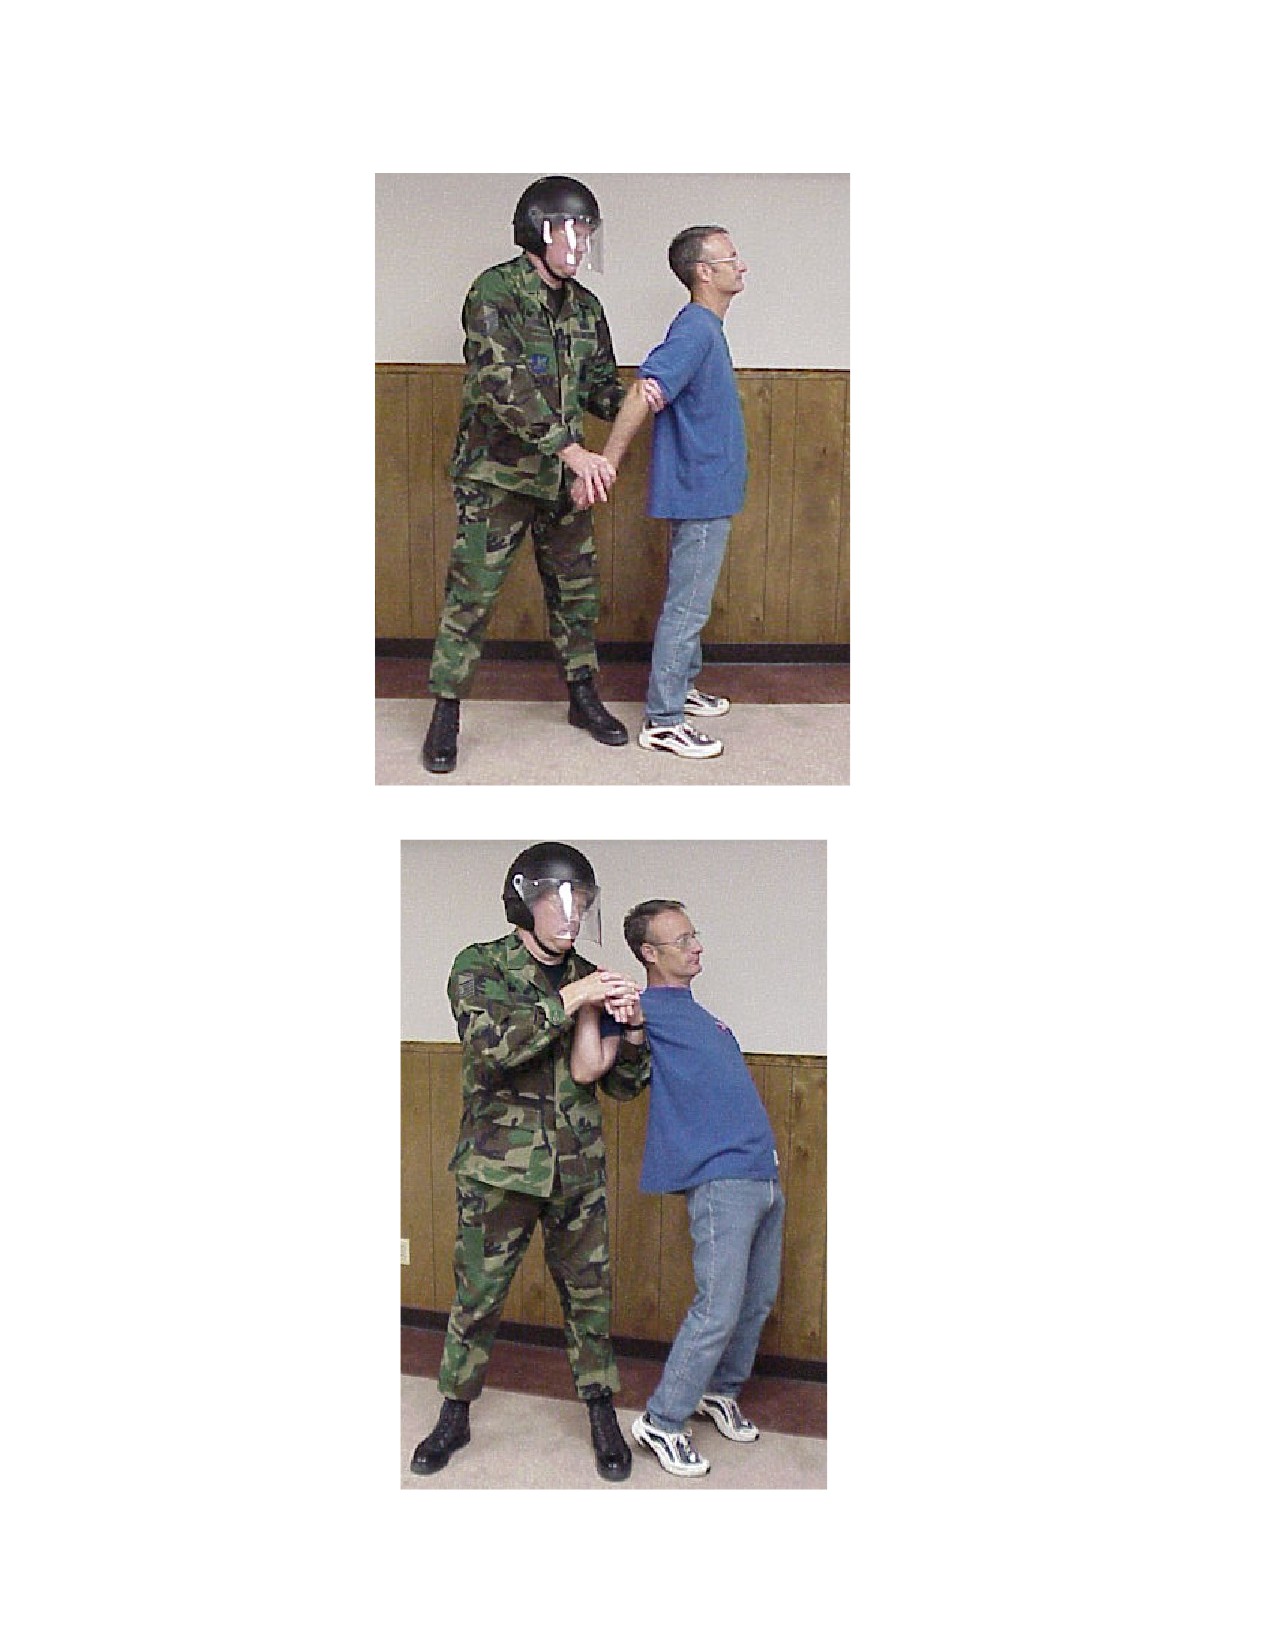
7.6.2. Gooseneck Come-Along. To apply a gooseneck come-along the SF member approaches the
offender from the rear. They step forward with their left foot along the outside of the offender’s right
foot. The SF member then grasps the inside of the offender’s right elbow with their left hand. They
then grasp the offender’s right hand with their right hand, placing their thumb inside the bend of the
offender’s wrist and their fingers across the back of the offender’s right hand. With both hands, the SF
member sharply pulls the offender off balance and to the rear so the offender’s weight falls on the SF
members left shoulder. The SF member then bends the offender’s right arm at the elbow and locks the
offender’s right arm against their chest. They then reinforce their right hand with their left hand, plac-
ing both thumbs inside the bend of the wrist and their fingers across the back of the offender’s hand.
The SF member then locks both elbows tightly to their side and steps up beside the offender. The SF
member then applies pressure as they step up beside the offender. They then press down on the back
of the offender’s hand, bending it under, toward the forearm.
52
AFMAN31-201 17 MAY 2002
Figure 7.36. Gooseneck Come-Along
Figure 7.37. Gooseneck Come-Along

AFMAN31-201
17 MAY 2002
53
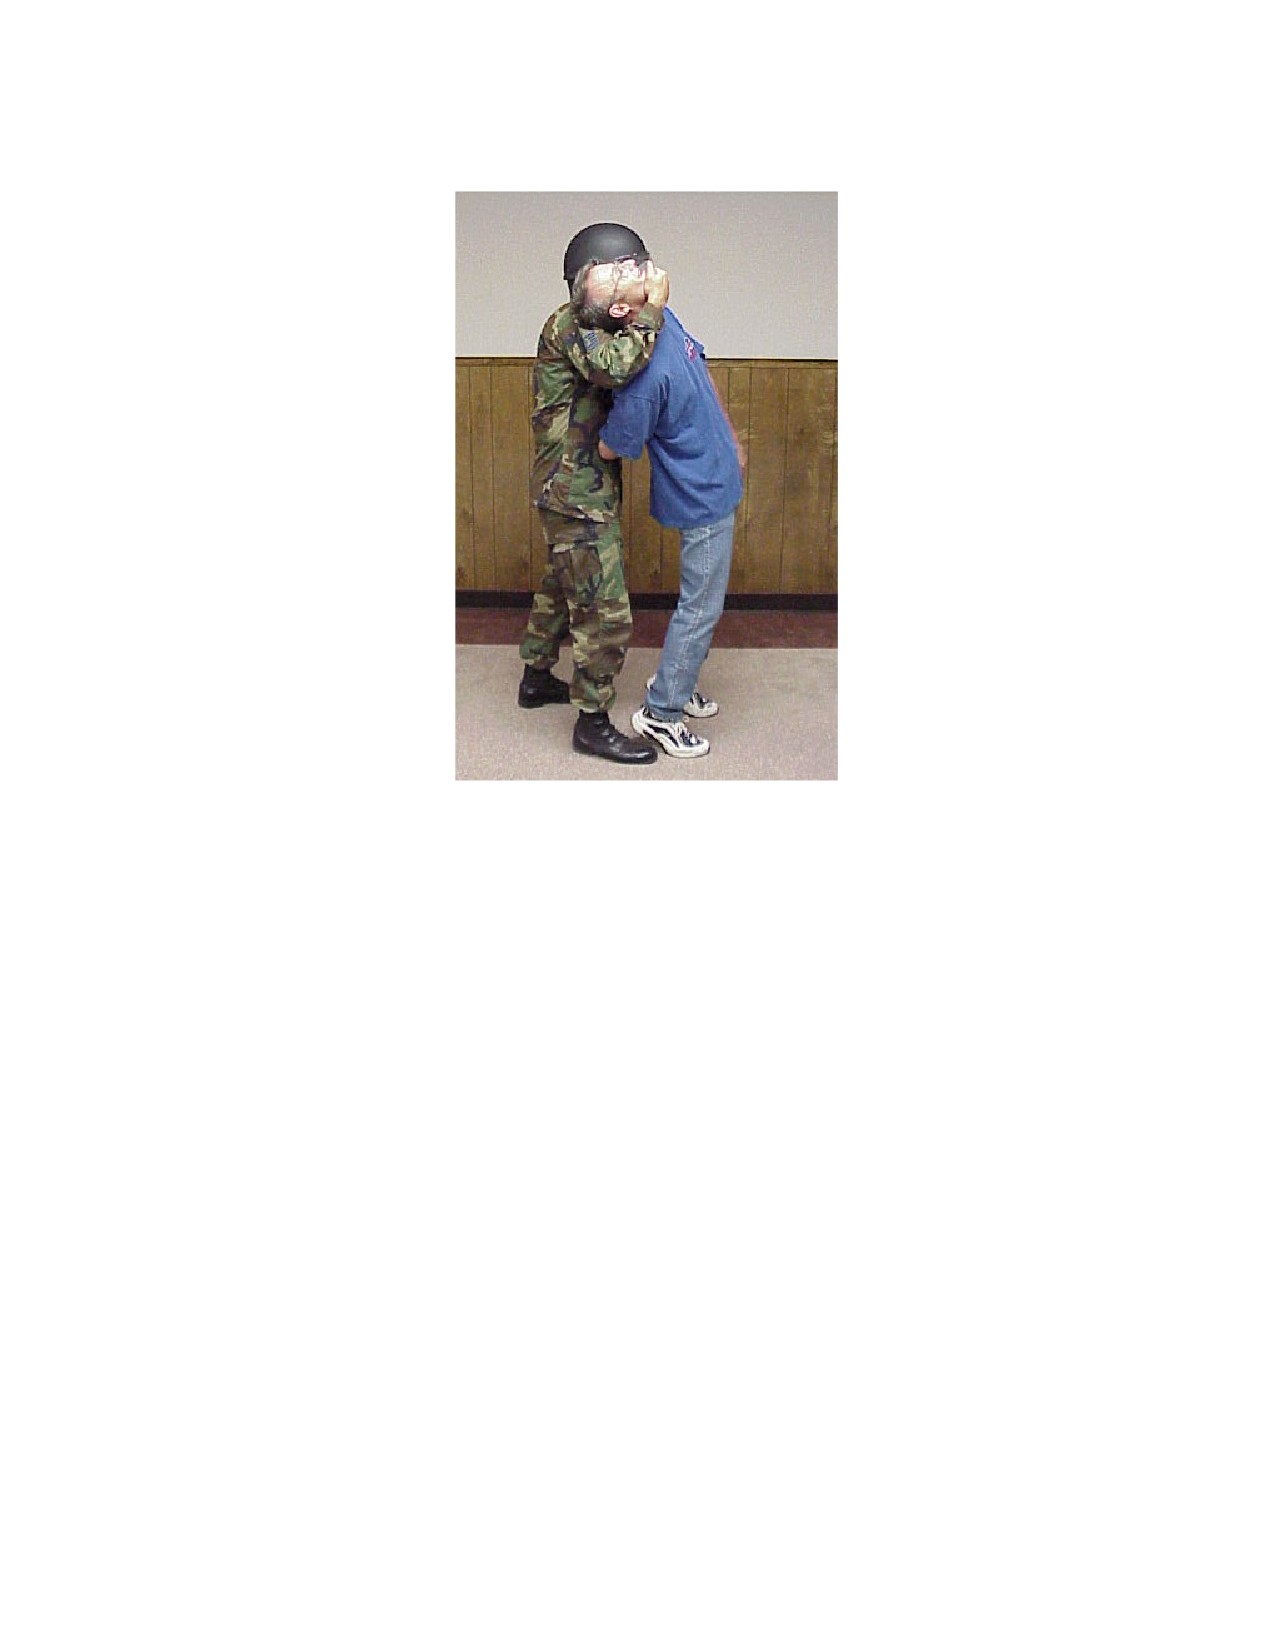
7.6.3. Front Hammerlock. To apply the front hammerlock, the SF member faces the offender. They
step forward with their right foot to the outside of the offender’s right foot. They then grasp the
offender’s right arm at the elbow with the SF member’s right hand palm up. The SF member breaks
the offender’s balance by pulling the offender’s right arm slightly away from the offender’s body. As
they pivot behind the offender, they strike the offender’s right wrist with their left wrist and bend the
offender’s arm to the rear. As the SF member completes the pivot behind the offender, they drive their
left fist straight up until the offender’s right wrist rests in the bend of the SF member’s left arm. They
then rotate their left hand down, grasping the offender’s right elbow. The SF member pulls the
offender’s right elbow tightly against their stomach. The offender may be leaning forward in this posi-
tion. The SF member completes the hold by reaching with his right hand over the offender’s shoulder
and grasping the left side of the offender’s face. The SF member then applies pressure by turning the
offender’s head to the right, pushing down with his left hand and pulling up with their left elbow.
Figure 7.38. Front Hammerlock

54
AFMAN31-201 17 MAY 2002
Figure 7.39. Front Hammerlock
Figure 7.40. Front Hammerlock
AFMAN31-201
17 MAY 2002
55
Figure 7.41. Front Hammerlock
7.6.4. Fingers Come-Along. The fingers come-along is tiring to maintain but extremely useful in
moving an offender for a short distance. The SF member faces the offender, then steps forward with
their right foot to the outside of the offender’s left foot. As they step, they reach with both hands and
grasp the offender’s right wrist with their left hand. They grasp two or three fingers with their right
hand. The SF member then pivots counterclockwise on their right foot until they are standing beside
the offender. The SF member thrusts the offender’s arm straight out in front of him at shoulder height,
maintaining a tight grip on the offender’s wrist with his left hand and bending the offender’s fingers
down with their right hand. The SF member applies pressure by keeping the offender’s arm locked
straight and pulling the offender’s fingers straight back toward the offender’s elbow. This hold can be
applied on either hand.

56
AFMAN31-201 17 MAY 2002
Figure 7.42. Fingers Come-Along
Figure 7.43. Fingers Come-Along

AFMAN31-201
17 MAY 2002
57
7.6.5. Groin Lift. The groin lift is used to remove a resisting offender from a wall or move them
through a doorway. The SF member approaches the offender from the rear. They step forward and
place their left foot next to the offender’s left foot. They then grasp the offender’s left wrist with their
left hand, pulling the offender’s hand sharply down between the offender’s legs. The SF member
grasps the offender’s left hand with their right hand and pulls the offender’s arm up into the offender’s
groin. They reach with their left hand and grab the offender’s shoulder or collar. The SF member can
then move the offender forward or backward by lifting the offender’s arm against the offender’s groin
as they push down on the offender’s shoulder with their left hand.
Figure 7.44. Groin Lift
Figure 7.45. Groin Lift

58
AFMAN31-201 17 MAY 2002
7.6.6. Baton Come-Along. Use the baton come-along to apprehend suspects. Grasp the center of the
baton with the right hand and rotate it into a straight line with the right arm. Grasp the suspect’s cloth-
ing at the front of their left shoulder. Step to the left rear with the left foot, pulling the opponent to the
left, off balance (Figure 7.46.). Insert the baton between suspect’s knees and rotate the baton to a posi-
tion across the suspect’s legs, just above the knees. Pull the baton to the rear while pulling the suspect’s
shoulder to the rear (Figure 7.47.). Release the hold on the suspect’s left (front) shoulder. Grasp the
back of the collar, keep the suspect balanced forward and walk them to a handcuffing team (Figure
7.48.). Reverse these procedures for the right side. The left hand will grasp the baton. Grasp the sus-
pect on the right side. Step to the right rear and complete the maneuver.
Figure 7.46. Baton Come-Along

AFMAN31-201
17 MAY 2002
59
Figure 7.47. Baton Come-Along
Figure 7.48. Baton Come-Along

60
AFMAN31-201 17 MAY 2002
Chapter 8
CORRESPONDING EQUIPMENT AND USE
8.1. Motivation. Suppose a recall notification for mob or riot control occurs. Is the appropriate equip-
ment on hand? Do personnel know how to use it? It is imperative that commanders ensure their control
force has proper equipment in appropriate sizes to outfit the control force as necessary. In this chapter, we
will look at the equipment that complements the riot baton and how it all integrates.
8.2. The Civil Disturbance Crash Helmet (Figure 8.1.). The civil disturbance crash helmet has a
matte-finish outer shell that is scuff-proof and cleans easily with warm soapy water or alcohol. The helmet
design incorporates multiple layers to absorb impact. The helmet has a low filler fiberglass shell capable
of withstanding impacts up to 160 foot pounds from a flat object and 220 foot pounds from a spherical
object. A padded headband, adjustable from 6 5/8 inches to 7 3/4 inches, comes with the helmet. Use the
headband in conjunction with the eight-point suspension system to ensure comfort and proper fit. The hel-
met also incorporates a breakaway chinstrap for safety purposes.
8.2.1. The Face Shield. The helmet design permits the user to attach a face shield, if desired. The
shield construction is high-impact, transparent, distortion-free, polycarbonate plastic, splash shield
and track assemblies. The track keeps the shield in any desired position. For additional protection, a
three-layer neck and ear protector attaches to the helmet.
8.2.2. Adjustments (Figure 8.2.).
8.2.2.1. There are three adjustments for this helmet:
8.2.2.1.1. To adjust the eight-point suspension system, thread the white string through the slot-
ted portion located toward the center of the system. Attach the outer slots of the system to the
brads located on the inside of the helmet.
Figure 8.1. Civil Disturbance Crash Helmet
AFMAN31-201
17 MAY 2002
61
1-Impact-absorbing cushion
2-Hygienic inner liner
3-Perforated padded headband (adjustable to head size)
4-Splash seal
5-Polycarbonate face shield
6-Contoured ventilated chin cup
7-Breakaway chin strap
8-Ear orifice
9-Snap connectors
10-Adjustments (4) to change attitude of helmet in relation to wearer’s head
11-High-count fiberglass shield
12-Scuff-proof outer cover
Figure 8.2. Civil Disturbance Crash Helmet Internal Adjustments
8.2.2.2. Center the apex of the wide "V" of the suspension system to the back of the helmet (Fig-
ure 8.2.). Tighten the white string to establish the necessary depth.
8.2.2.3. To size the helmet, release the yellow and pink snaps on the rear of the headband. Place
the pink snap into the hole indicating the desired head size. Attach the chinstraps to the helmet
with the "A"-shaped strap (two male and three female snaps) on the right side of the helmet with
the snaps. Place the buckle end of the A-shaped strap on the left side of the helmet. Size the helmet
on the head (including the chin straps) to ensure a snug and comfortable fit.
8.2.2.4. Snap the neck and ear guard to the inside rear of the helmet. To attach the face shield,
extend (do not remove), the white stays on the face shield. Place the tracks of the shield on the

62
AFMAN31-201 17 MAY 2002
white plastic guides located on the sides of the helmet and slide the shield down into the desired
position. Push the white stays into position. Figure 8.3. depicts the helmet external components.
Figure 8.3. Civil Disturbance Crash Helmet External Components
8.2.3. Alternative Headgear. The kevlar, ballistic helmet, shown in Figure 8.4., is a suitable alterna-
tive for control force operations. There is a protective faceshield that attaches to this helmet
(Faceshield, Helmet, Riot; NSN 4240-01-182-6406). The shell of this helmet will afford more protec-
tion than the civil disturbance crash helmet. Though much heavier, the suspension system in the bal-
listic helmet does not provide the same support for the wearer. Cut and insert foam rubber inserts for
added protection against (potential) head strikes.
Figure 8.4. Kevlar Helmet with Riot Faceshield
8.3. MCU-2A/P and M17(A1/A2) Gas Masks. These protective masks are made of butyl rubber. They
will provide respiratory, eye and nose protection from chemical agents. The mask filters remove chemical
agent vapors and mists from the air. The one drawback to the new mask, when used in conjunction with
the faceshield for the kevlar helmet, is that it does not permit the faceshield to be lowered in place. An
AFMAN31-201
17 MAY 2002
63
advantage of the older M17 is that it can be worn with the (described) faceshield in the up or down posi-
tion. Do not use these masks in confined spaces. If the oxygen content of the atmosphere is below 18
percent, personnel cannot sustain functional capability. For example, in atmospheres with heavy concen-
trations of ammonia, carbon monoxide or chlorine, these masks would be ineffective. The MCU-2A/P
and M17 are not self-contained breathing apparatus. For task-specific training (i.e., donning, doffing,
inspection, care and maintenance), units should contact their local disaster preparedness office or civil
engineering readiness flight. NOTE: Disaster preparedness will measure each mobility-tasked person and
personally fit the MCU-2A/P mask. Should security forces have personnel that require an extra-small
mask, they will receive the M17. Additional information on the various masks can be found in AFMAN
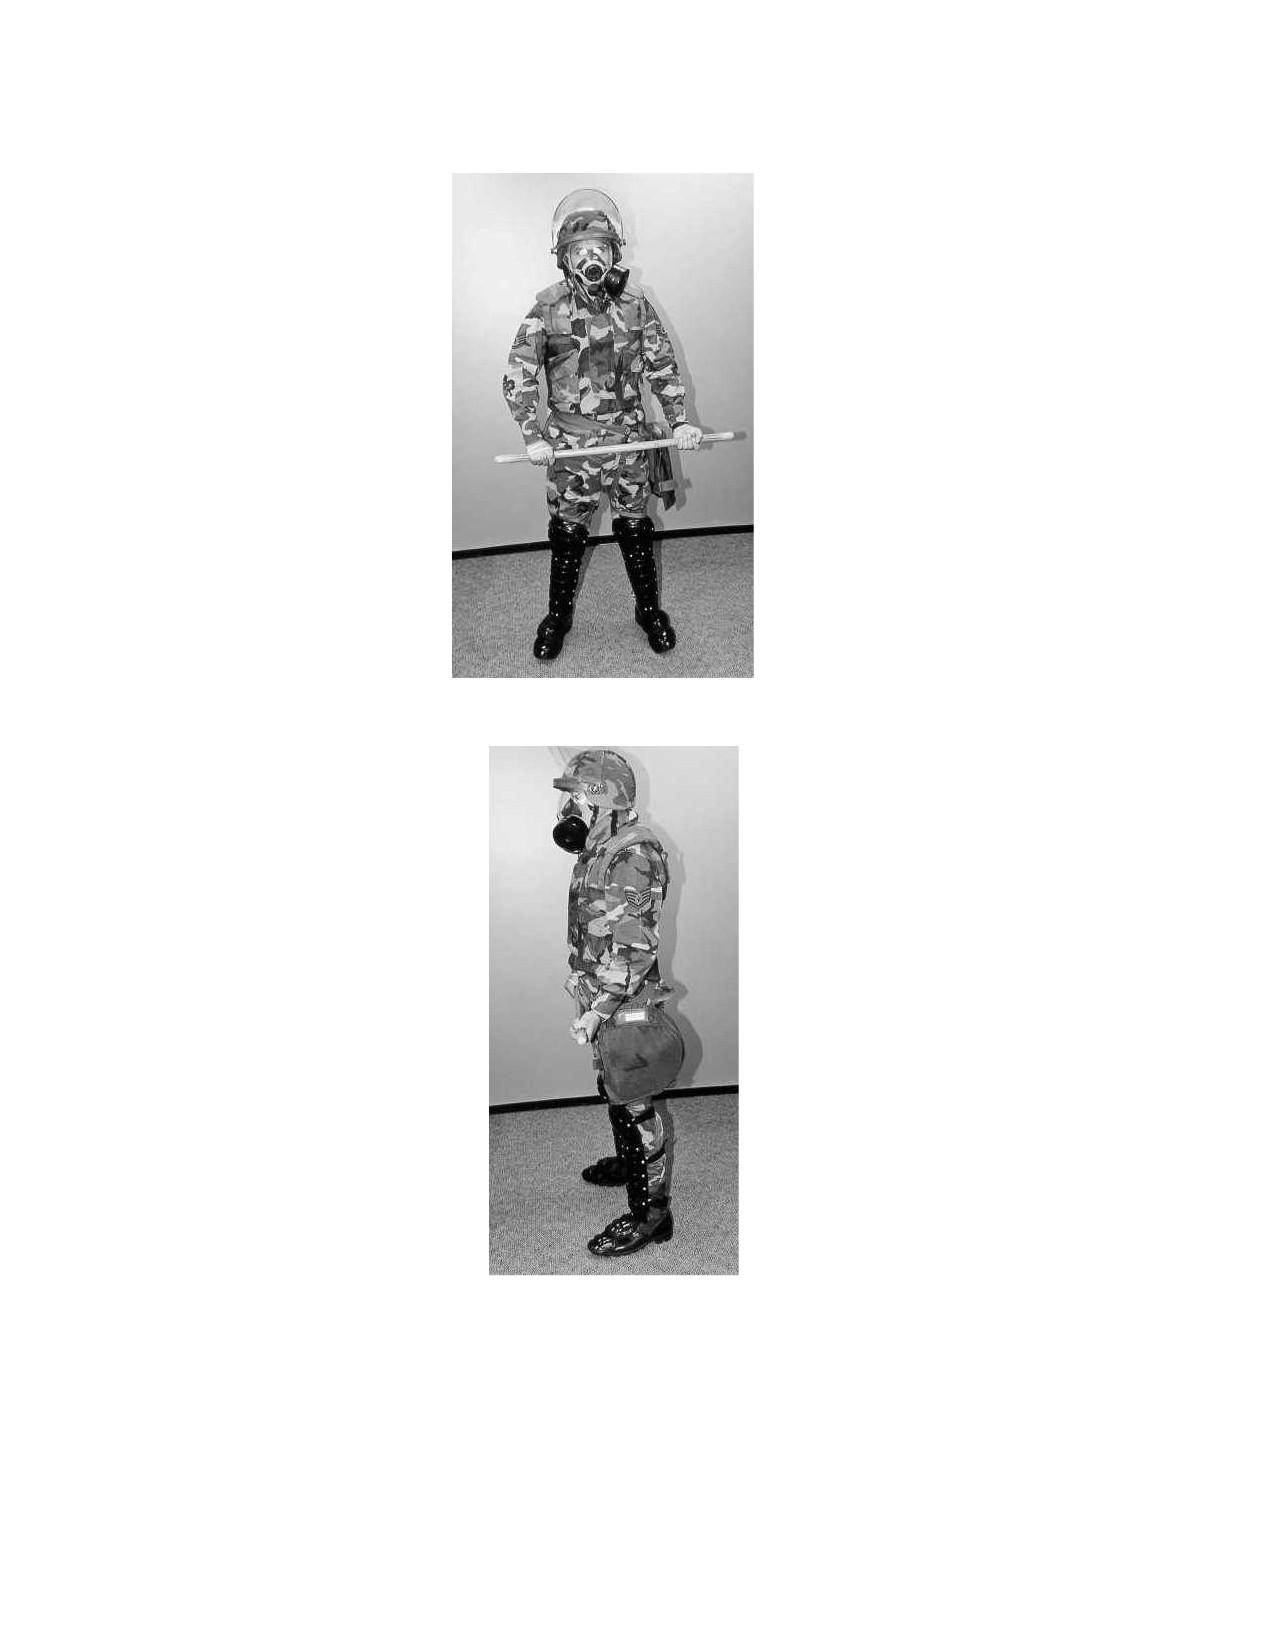
10-100, Airman’s Manual. The MCU-2A/P mask is shown in Figure 8.5. and Figure 8.6.. The carry
method for both masks is shown in Figure 8.7. Anytime defects are discovered, turn the mask(s) in for
repair or replacement.
64
AFMAN31-201 17 MAY 2002
Figure 8.5. MCU-2A/P Gas Mask Front View
Figure 8.6. MCU-2A/P Gas Mask Side View

AFMAN31-201
17 MAY 2002
65
Figure 8.7. M17 And MCU-2A/P Carry
8.4. The Fragmentation Protective Body Armor. This vest offers layered protection consisting of a
ballistic filler of water repellent treated ballistic aramid and an inner and outer shell of water repellent
treated ballistic nylon. The outer shell is camouflage printed. Stitching or adhesives bind the cloth layers
together. These layers form the protective component of the vest and must be kept dry to maintain the pro-
tection capability. NOTE: Units may utilize suitable substitutes IAW applicable directives.
8.4.1. Vest Wear.
8.4.1.1. The vest has a front closure consisting of a touch-and-close fastener strip and ¾ collar for
fragmentation protection to the neck and throat areas. At the sides, are self-adjusting elastic web-
bings on the outside to provide flexibility during movement and cloth stops on the inside to pre-
vent the elastic webbing from stretching too far. Make sure to fix the front closure on the vest.
Bunched filler will decrease the protection capability of the vest. When not in use, lay the vest flat
to keep the filler from bunching. When the vest is received, ensure:
8.4.1.1.1. The ballistic filler is flat (not bunched).
8.4.1.1.2. The vest is in a serviceable condition.
8.4.1.1.3. There is one front panel and one rear panel, and they are connected securely.
66
AFMAN31-201 17 MAY 2002
8.4.1.1.4. It is the proper size.
Small Chest--to 37 inches
NSN: 8470-01-092-8498
Medium Chest--37 inches to 41 inches
NSN: 8470-01-092-8499
Large chest--41 inches to 45 inches and
NSN: 8470-01-092-8500
Extra Large Chest-45 inches or more.
NSN: 8470-01-092-8501
8.4.1.1.5. The fit is snug and comfortable.
8.4.1.1.6. The vest is large enough to wear over the field shirt and under any additional layers
of clothing, such as parkas or rain gear. Should the armor vest sustain a projectile hit, replace
the vest as soon as possible and complete and mail the preaddressed form from the manufac-
turer.
8.4.2. Care and Cleaning. Keep the vest as clean as possible. Remove loose dirt from the outer layer
with a cloth or soft to medium brush. If wiping or brushing does not adequately clean the vest, wet the
vest in a shower or immerse it in water. Always use warm, NOT HOT, water. Wash the soiled or
stained areas with a solution of soap or detergent dissolved in warm water and scrub with a soft to
medium brush. Heavy grease or oil stains may be prespotted with a dry cleaning solvent or detergent
mixture and scrubbed with a brush. Rinse thoroughly and air dry by hanging the vest using a pole or
stick through the armholes.
8.4.3. Protection. The vest provides protection from low-velocity projectiles and fragments from
mines, mortar shells, grenades and artillery shells.
8.5. Body Shields. Body shields provide protection that complements protective vests. They may replace
the flak vest altogether. Body shields are very effective protection against thrown objects. When pushing
back a crowd, body shields reduce the possibility of being grabbed by demonstrators. When body shields
are used in groups or formations, they provide a protective wall for rescue forces and can have strong psy-
chological effects on the crowd.

AFMAN31-201
17 MAY 2002
67
Figure 8.8. Use of Body Shields in a Crowd Control Formation
8.6. CS Riot Control Hand Grenades. The hand grenade is extremely effective, versatile and easily
carried.
8.6.1. CS Riot Control Hand Grenade Employment.
8.6.1.1. The grenadier’s role (primary, back up, offensive, defensive) and proximity to the crowd
determines hand grenade placement. Wind velocity is also a prime factor when deciding how to
employ these hand grenades. The wind speed should not be higher than 20 kilometers per hour nor
be blowing towards the grenadier or main body of the control force. The grenadier may post in
front of the formation, to the rear or to the sides. Greater freedom of movement and CS agent dis-
persion is possible when the grenadier is posted to the sides or in front of the control formation.
Additionally, when in this position, the formation receives less exposure to the agent. If these gre-
nades are being held in reserve, post the grenadier several feet to the rear of the center of the for-
mation. From the rear location, the command element can employ the grenadier quickly to the
front of the formation to throw the grenades. The distance of the agent release line or point from
the target area will range from a minimum of 50 feet (about 15 meters) to as far as several hundred
feet (maximum of approximately 100 meters)--depending on the wind velocity. When not in use,
the grenadier moves behind the formation for protection from thrown objects and close to the
command element for immediate deployment as necessary. The grenadier should work under the
immediate control and direction of an officer or NCO. Release agent only upon the direct order of
the commander. Assign an officer or NCO qualified in the characteristics and employment of riot
control munitions to advise the commander.
8.6.2. Effectiveness. Chemical irritants are not completely effective on all persons. Intoxicated indi-
viduals (alcohol or drugs) or mentally disturbed people may not react to the chemical irritant or they
may overreact.
8.6.3. Effects of CS Irritant Agent. The physiological effects include:
8.6.3.1. Extreme burning of the eyes accompanied by copious tearing.
68
AFMAN31-201 17 MAY 2002
8.6.3.2. Irritation of the lower respiratory tract with a resulting feeling of suffocation, coughing
and chest pains.
8.6.3.3. Irritation of the nose and throat, and stinging sensation of the skin.
8.6.3.4. The respiratory effects will disappear within a few minutes once the affected individual is
moved to an agent-free atmosphere.
8.6.3.5. Prolonged exposure to CS solution may make the skin very sensitive for hours or days
when rubbed or washed.
8.6.3.6. CS agent is also persistent in the environment and on clothes.
8.6.3.7. It causes no residual damage to the eyes, skin or respiratory system on single or repeated
applications.
8.6.3.8. CS has no systemic toxicity nor does it penetrate the skin.
8.6.3.9. Do not discharge dispensers in the immediate vicinity of infants as their respiratory sys-
tems are especially sensitive to irritating vapors.
8.6.4. Safety Procedures. Wear the protective mask when using hand grenades with riot control
agents. Do not throw hand grenades in the direction of friendly personnel or into the wind.
8.6.5. Emergency Treatment. The use of the irritant under the following conditions requires the indi-
vidual be taken to a hospital for emergency treatment.
8.6.5.1. Prolonged discharge at any effective distance into the face of an already incapacitated
person or a person not responding to normal applications of the irritant formula.
8.6.5.2. Discharge of large quantities in a confined space such as a small room or an enclosed
automobile.
8.6.6. Legal Implications. AFI 31-207 categorizes chemical irritants as less than deadly force. Use
chemical irritant projectors only when a lesser means of controlling a violent individual(s) is ineffec-
tive. Chemical irritants will be used off an installation according to existing police directives, com-
mand and base guidance.
8.6.7. Types of Riot Control Hand Grenades
8.6.7.1. The ABC-M7A2 and ABC-M7A3 riot control hand grenades (Figure 8.9.) contain only
CS as filler. They differ only in the amount of filler and the form of the CS they contain. Currently,
only the ABC-M7A3 (NSN 1330-00-965-0802) is in the Air Force munitions inventory. Nomen-
clature:
8.6.7.1.1. Body-- the bodies of both grenades are sheet metal with four emission holes at the
top and one at the bottom.
8.6.7.1.2. Filler--5.5 ounces of burning mixture and 3.5 ounces in gelatin capsules in the
ABC-M7A2 grenade, and 7.5 ounces of burning mixture and 4.5 ounces of pelletized CS agent
in the ABC-M7A3 grenade.
8.6.7.1.3. Fuze--M201A1.
8.6.7.1.4. Weight--approximately 15.5 ounces.
8.6.7.1.5. Safety clip--no.

AFMAN31-201
17 MAY 2002
69
8.6.7.1.6. Capabilities--can be thrown 40 meters by average security forces member. Both
grenades produce a cloud of irritant agent for 15 to 35 seconds.
8.6.7.1.7. Color/markings--gray body with a red band and red markings.
Figure 8.9. ABC-M7A2 and ABC-M7A3 Riot Control Grenades
8.6.7.2. ABC-25A2 Riot Control Hand Grenade (NSN: 1330-00-645-6211). The ABC-M25A2
(Figure 8.10.) riot control hand grenade is a bursting munition with an integral fuse. The M25A2
grenade is an improved version of the M25A1 grenade. The two grenades differ primarily in body
construction. Nomenclature:
8.6.7.2.1. Body--compressed fiber or plastic.
8.6.7.2.2. Filler--CS1 varies in weight and composition according to the type of agent con-
tained in the grenade. All fillers are mixed with silica aerogel for increased dissemination effi-
ciency.
8.6.7.2.3. Fuse--integral.
8.6.7.2.4. Weight--8 ounces.
8.6.7.2.5. Safety clip--no.
8.6.7.2.6. Capabilities--can be thrown 50 meters by an average security forces member. The
burst radius (visible cloud agent) is about 5 meters, but grenade fragments may project as far
as 25 meters.
8.6.7.2.7. Color/markings--Gray body with red band and red markings.

70
AFMAN31-201 17 MAY 2002
Figure 8.10. ABC-M25A2 Riot Control Grenade
8.6.7.3. For further information concerning the fundamentals of hand grenades, refer to Army
Field Manual 23-30, Grenades and Pyrotechnic Signals.
8.6.8. Hand Grenade Use.
8.6.8.1. Hand Grenade Gripping. The importance of properly gripping the hand grenade cannot be
overemphasized.
8.6.8.1.1. Safety and throwing efficiency are obtained when the grenade is held in the throw-
ing hand with the safety lever placed between the first and second joints of the thumb (Figure
8.11.).
8.6.8.1.2. For right-handed personnel, the grenade is held upright with the pull ring away from
the palm of the throwing hand so that it can be easily removed by the index finger or middle
finger of the free hand (Figure 8.11.).
8.6.8.1.3. For left-handed personnel, the grenade is inverted with the fingers and thumb of the
throwing hand positioned in the same manner as by right-handed personnel (Figure 8.12.).
Figure 8.11. Hand Grenade Grip (Right-handed)

AFMAN31-201
17 MAY 2002
71
Figure 8.12. Hand Grenade Grip (Left-handed)
8.6.8.2. Hand Grenade Throwing. Practice will develop throwing proficiency. The following
method for throwing grenades is recommended.
8.6.8.2.1. Observe the target to mentally establish the distance between the throwing position
and target area.
8.6.8.2.2. Properly grip the grenade in the throwing hand.
8.6.8.2.3. Grasp the pull ring with the index or middle finger of the non-throwing hand.
Remove the safety pin with a pulling, twisting motion.
8.6.8.2.4. Look at the target and throw the grenade using the overhand method so that the gre-
nade arcs, landing near the target.
8.6.8.2.5. Allow the motion of the throwing arm to continue naturally once the grenade is
released. This follow through improves distance and accuracy, and relieves the strain on the
throwing arm.
8.6.8.3. Basic Grenade Throwing Positions. In training, throwing positions are used for unifor-
mity and control and to familiarize personnel with the proper manner of throwing grenades if the
situation allows.
8.6.8.3.1. Standing (Figure 8.13.). This position is the most desirable and natural one from
which to throw grenades. It allows an individual to obtain the greatest possible throwing dis-
tance. The standing position is normally used when occupying a fighting position or during
operations in fortified positions or urban terrain. Throwing from this position is accomplished
as follows:
8.6.8.3.1.1. Assume a natural stance with weight balanced equally on both feet. Using the
proper grip, hold the grenade shoulder high.
8.6.8.3.1.2. Throw the grenade with a natural motion, using the procedure described
above.

72
AFMAN31-201 17 MAY 2002
Figure 8.13. Throwing the Hand Grenade From the Standing Position
8.6.8.3.2. Kneeling (Figure 8.14.). This position reduces the distance that a grenade can be
thrown. Throwing from this position is accomplished as follows:
8.6.8.3.3. Using the proper grip and with the grenade held shoulder height, kneel in the most
comfortable manner.
8.6.8.3.3.1. Throw the grenade with a natural following motion. Push off with the trailing
foot to give added force to the throw.
Figure 8.14. Throwing the Hand Grenade From the Kneeling Position
8.6.8.3.3.2. Prone (Figure 8.15.). This position reduces both distance and accuracy. It is
only used when an individual is pinned down by hostile fire and is unable to rise to engage
their target. There are four steps in the process of throwing from the prone position.

AFMAN31-201
17 MAY 2002
73
Figure 8.15. Throwing the Hand Grenade From the Prone Position
8.6.8.3.3.3. Personnel lie on their back with their body perpendicular to the grenade’s
intended line of flight. Hold the grenade at shoulder level as in the standing position.
8.6.8.3.3.4. Cock the right leg (left leg for a left-handed thrower) with the foot braced
firmly against the ground. After removal of the safety pin, hold the grenade away from the
body with the arm cocked for throwing. With a free hand, grasp any object that is capable
of giving added leverage to increase the throwing distance. In throwing the grenade, push
off with the rearward foot to give added power to the throw.
8.6.8.3.3.5. After throwing the grenade, roll over on the stomach and press the body flat
against the ground.
8.6.8.4. For further information concerning the utilization of hand grenades, refer to Army Field
Manual 23-30.
WARNING: FRIENDLY FORCES SHOULD PUT ON PROTECTIVE MASKS BEFORE
THROWING RIOT CONTROL CS GRENADES.
8.7. CAP-STUN ® Pepper Spray (NSN: 1365-01-438-5694). Thorough training in the use of pepper
spray is critical. Training enhances the (spray’s) application effectiveness, protects both security forces
and the Air Force against liability and ensures the safety of the security forces and subject. Comprehen-
74
AFMAN31-201 17 MAY 2002
sive training should go beyond the technical application, to include physiological reactions, legal issues
(use of force guidelines), tactical issues and applications. Document all pepper spray training. Refer to
AFMAN 31-222 for further guidance.
8.8. Non-Lethal Weapons.
8.8.1. A variety of non-lethal weapons (NLW), to include munitions, are under development. As they
become available in the Air Force inventory, they will provide commanders flexible tools for dealing
with confrontation management and crowd control situations throughout the entire use of force con-
tinuum. They will allow the commander to tailor the amount of force to the specific situation.
8.8.2. Due to DoD directives, status of forces agreements, existing rules of engagement and local and
international law, commanders must coordinate plans to employ NLW with their appropriate legal and
medical offices.
8.8.3. Commanders must ensure personnel are trained and certified on applicable NLW in accordance
with governing directives prior to employing them.
AFMAN31-201
17 MAY 2002
75
Chapter 9
FORMATIONS AND TACTICS
9.1. Overview. The formations described are one of the most practical methods for crowd control when
properly employed and executed against crowds of limited size. The riot baton is typically the primary
weapon of choice for the control force in formation. As situations become more violent, commanders may
consider employing a mix of rifles, batons, marksmen and/or large-scale dispersers, if available. How-
ever, commanders must recognize that formations are not the proper response to all civil disturbance situ-
ations. Do not subject control force members to unnecessary danger (e.g., sniper fire) to dissuade a crowd
by a show of force. Likewise, formations cannot contain or control small violent mobs rampaging in an
area.
9.1.1. Employment. Use formations to disperse, contain or block a crowd. Formations are extremely
effective to split crowds into smaller segments. Once a crowd disperses, do not assume they have
yielded and will return to peaceful behavior. Small groups may continue engaging in acts of violence
and destruction. Hence, formations are only part of the crowd control effort. Should a crowd refuse to
move, the control force may have to employ riot control agents, water cannon or affect apprehensions.
Additional control measures that complement formations include aggressive patrolling (using
four-person teams), building searches and saturation patrolling (numerous patrols in small/confined
areas of intense violence).
9.1.2. Additional Considerations. Carefully evaluate the threat and use analysis to tailor the control
force mission and formations required. Leaders and planners must consider the following questions, at
a minimum, to prepare for an effective operation. Is the control force to disperse the crowd? Block an
advancing mob? Apprehend mob leadership? Contain a crowd that has become agitated towards vio-
lence?
9.1.2.1. Secure rooftops to prevent sniper fire before employing control force members in forma-
tion(s).
9.1.2.2. Station control force members on rooftops (or the highest rooftop) as observers and to
preclude sniping.
9.1.2.3. Use helicopters to visually check structure roofs. It is imperative to brief all control force
members on the location and purpose of members stationed in buildings and on rooftops to avoid
mistaking friendly forces as hostile.
9.1.2.4. Whenever troops employ in formation, control force members must understand the need
to maintain the formation. Lone control force members are far more vulnerable to attack (e.g.,
leaving the formation to chase after a rioter). Control force members who break ranks place them-
selves in danger and threaten the integrity of the formation, as well as all the personnel that remain
in the formation.
9.2. Crowd Control Formations. Experience has shown that the line, echelon and wedge are the most
effective troop formations for crowd control situations. The line formation (Figure 9.2.) is used most
often because it offers both offensive and defensive applications. As an offensive formation, the line can
push crowds straight back, across open areas or up a city street. Defensively the line can stop a rioting
crowd or deny access to restricted areas. The echelon (Figure 9.3. and Figure 9.4.) is an offensive forma-
76
AFMAN31-201 17 MAY 2002
tion that enables commanders to turn or divert mobs in open or built-up areas. Echelon formations are
ideal for moving crowds away from fixed structures like buildings, fences and walls. Use the wedge (Fig-
ure 9.5.) offensively to penetrate and split crowds. The wedge can easily be transformed into a diamond
to (offensively) enter a crowd and apprehend agitators or serve as an immediate-action drill (defensively)
when all-around security is needed. NOTE: Regardless of the formation, provide large crowds open ave-
nues of escape.
Figure 9.1. Crowd Control Formation Key
Fireteam Leader
Flight Leader
Radio/Telephone Operator (RTO)
Flight Sergeant
Marksman
Squad Leader
Disperser
9.2.1. Manual Format.
9.2.1.1. This manual details the three basic formations (line, echelon and wedge). Commands,
movements and reform orders correspond with Army commands. Formation size is the only dif-
ference in the text. Army Field Manual 19-15 outlines employment at the platoon level, consisting
of four 12-person squads. This manual addresses the Air Force’s equivalent, the flight, which con-
sists of three 13-person squads in which:
9.2.1.1.1. The first and third squads form the lead element in all formations in which one
squad provides general or lateral support.
9.2.1.1.2. The second squad is the base squad (i.e., the squad that establishes the formation) in
a flight line when all three squads are committed to the lead flight.
9.2.1.1.3. The support squad, usually the second squad, is commonly held in general support
(behind the formation's leadership element) in single column or in column of twos. Should the
second squad receive a tasking, flight leadership must designate which of the two remaining
squads (usually the first) will serve as the base squad.
9.2.1.2. For joint/large-scale operations, Air Force echelons--whether a fire team, squad or
flight--could readily assimilate into most operational schemes. The actions required of the airmen
AFMAN31-201
17 MAY 2002
77
on line are identical to those of their Army counterpart--follow the person to the front. Element
and squad leadership must be attuned to the precise command and movement directives.
9.2.2. Flight Formation. The flight column formation is ideal as a show of force particularly while
command authorities read a proclamation (to disperse, protest peacefully, etc.). Use this formation to
move into (form) or out of (reform) other formations. Issue instructions while troops are in this forma-
tion standing at the ready position.
9.3. Flight Organization. The primary echelon for countering unruly crowds is the crowd control flight.
Forty-four airmen comprise the flight. Train members on their roles and specific duty within the flight.
9.3.1. Chain of Command. The flight leader is in charge. The flight has three, 13-member squads. The
squad leader is responsible to control each squad member and relay commands. Additionally, the
squad leader should ensure squad members maintain their dress, cover and step.
9.3.2. Equipment. Assign all control force members a minimum issue that includes BDUs to function
as identification (woodland/desert pattern) or concealment. Units may local purchase black/olive
BDUs for emergency services team (EST)/tactical squads, which will enhance identification and coor-
dination. Add an SF brassard, which is an extremely effective identifier. The uniform should provide
comfort and freedom of movement. Additional items might include:
9.3.2.1. Foul weather gear, as needed.
9.3.2.2. Sturdy boots to protect the feet and ankles (shin guards increase the protection measure).
9.3.2.3. Other protective gear (not mentioned in Chapter 8) includes eyeglasses with safety
lenses and gas mask optical inserts.
9.3.2.4. Standardized load bearing equipment to include suspenders, web belt, two first aid
pouches, two ammunition pouches, two 1-quart canteens with covers, collapsible baton and car-
rier, plus CAP-STUN® and carrier.
9.3.2.5. Accessory gear as determined by the chief of security forces CSF such as pencils, paper,
flashlight or penlight, knife (small, folding), watches, compass, flex cuffs, whistle, pocket mirror
or periscope, black electrical tape, personal first aid kit and face camouflage.
9.3.3. Tactical Squad (TAC Squad). Thirteen security forces personnel comprise the TAC Squad
which has aggressive patrolling functions, to include disbanding fragmentary groups, anti-looting
patrol and mobile reserve response. Each TAC Squad consists of 1 officer and 12 airmen or NCOs.
Equip the TAC Squad leader and two team members with M-16 rifles and scopes for counter sniper
purposes. M-16 rifles used in confrontation management duty will be equipped with a lock plate to
prevent automatic firing of the weapon. Have at least one team member carry smoke grenades.
NOTE: The TAC Squad is a dynamic unit designed to be less restrictive and more versatile than the
crowd control element. The CSF must consider the scope of the confrontation when deciding to recall,
deploy and employ any tactical squad. In other words, use of the TAC Squad is based on the situation.
9.3.4. Headquarters (HQ) Section Organization and Responsibilities.
9.3.4.1. The HQ section consists of the following five positions:
9.3.4.1.1. Flight leader.
9.3.4.1.2. Flight sergeant.
78
AFMAN31-201 17 MAY 2002
9.3.4.1.3. Radio/telephone operator.
9.3.4.1.4. Marksman.
9.3.4.1.5. Disperser.
9.3.4.2. When directed by higher competent authority, other positions such as messengers, fire-
fighters and apprehension specialists/teams may augment the headquarters section. In crowd con-
trol formations, the leadership element will take positions where they can best direct and control
their units. The following diagrams outline the most common and effective positions for leader-
ship elements. Typically, the flight leader faces the formation (usually of three squads). Number
the members of each squad 1 through 13 starting with the squad leader as number one. The num-
ber two individual should be directly to the left of the squad leader. Consecutively number all
other squad members on line and position them to the left of the squad leader. The assistant squad
leader maintains the last position in the squad as the number 13 position. Sequentially number the
squads one through three, front to back. Assign the biggest people to the second squad (Reminder:
In most circumstances, the second squad will be the base squad for all formations.) To prepare the
flight to execute various formations, the flight leader places the flight into a column formation by
executing a right facing movement. Do not to try to make contact with the crowd while the flight
is in column formation.
9.3.5. Commands. Issue commands orally, with hand and arm signals or preferably both. Give the
commands for baton positions and flight formations in two count-preparatory and execution.
9.3.5.1. March the unit a safe distance from the mob, but within full view for psychological
impact. The commander will choose the formation appropriate for the situation. The formation
assembles once the column halts. On command, team members will move at double time to their
position. Team members will march, form and reform with the baton held at port-arms. Once in
position, the unit will keep the baton at the port position until commanded to do otherwise based
on the mob threat. Support elements (e.g., squad held in reserve) will automatically assume the
parade rest position once formed and in place.
9.3.6. Cadence. Cadence for moving troops into and out of crowd control formations is double time
(120 steps per minute). When the unit has formed and is moving on a mob, the usual cadence is nor-
mal time or 60 steps per minute. For psychological effect, troops moving on a mob may accentuate
each left-foot step with a stomp. The commander may increase or decrease cadence, depending on the
situation. As an example, the commander may order quick-time to keep pressure on a withdrawing
crowd.
9.3.7. Interval and Distance. Interval is the lateral space between elements. Distance is the space
between elements in a column. The common interval and distance for any crowd control formation are
one pace or approximately 30 inches. Again, the situation will dictate interval and distance. Increasing
the interval makes members in formation less vulnerable to thrown objects.
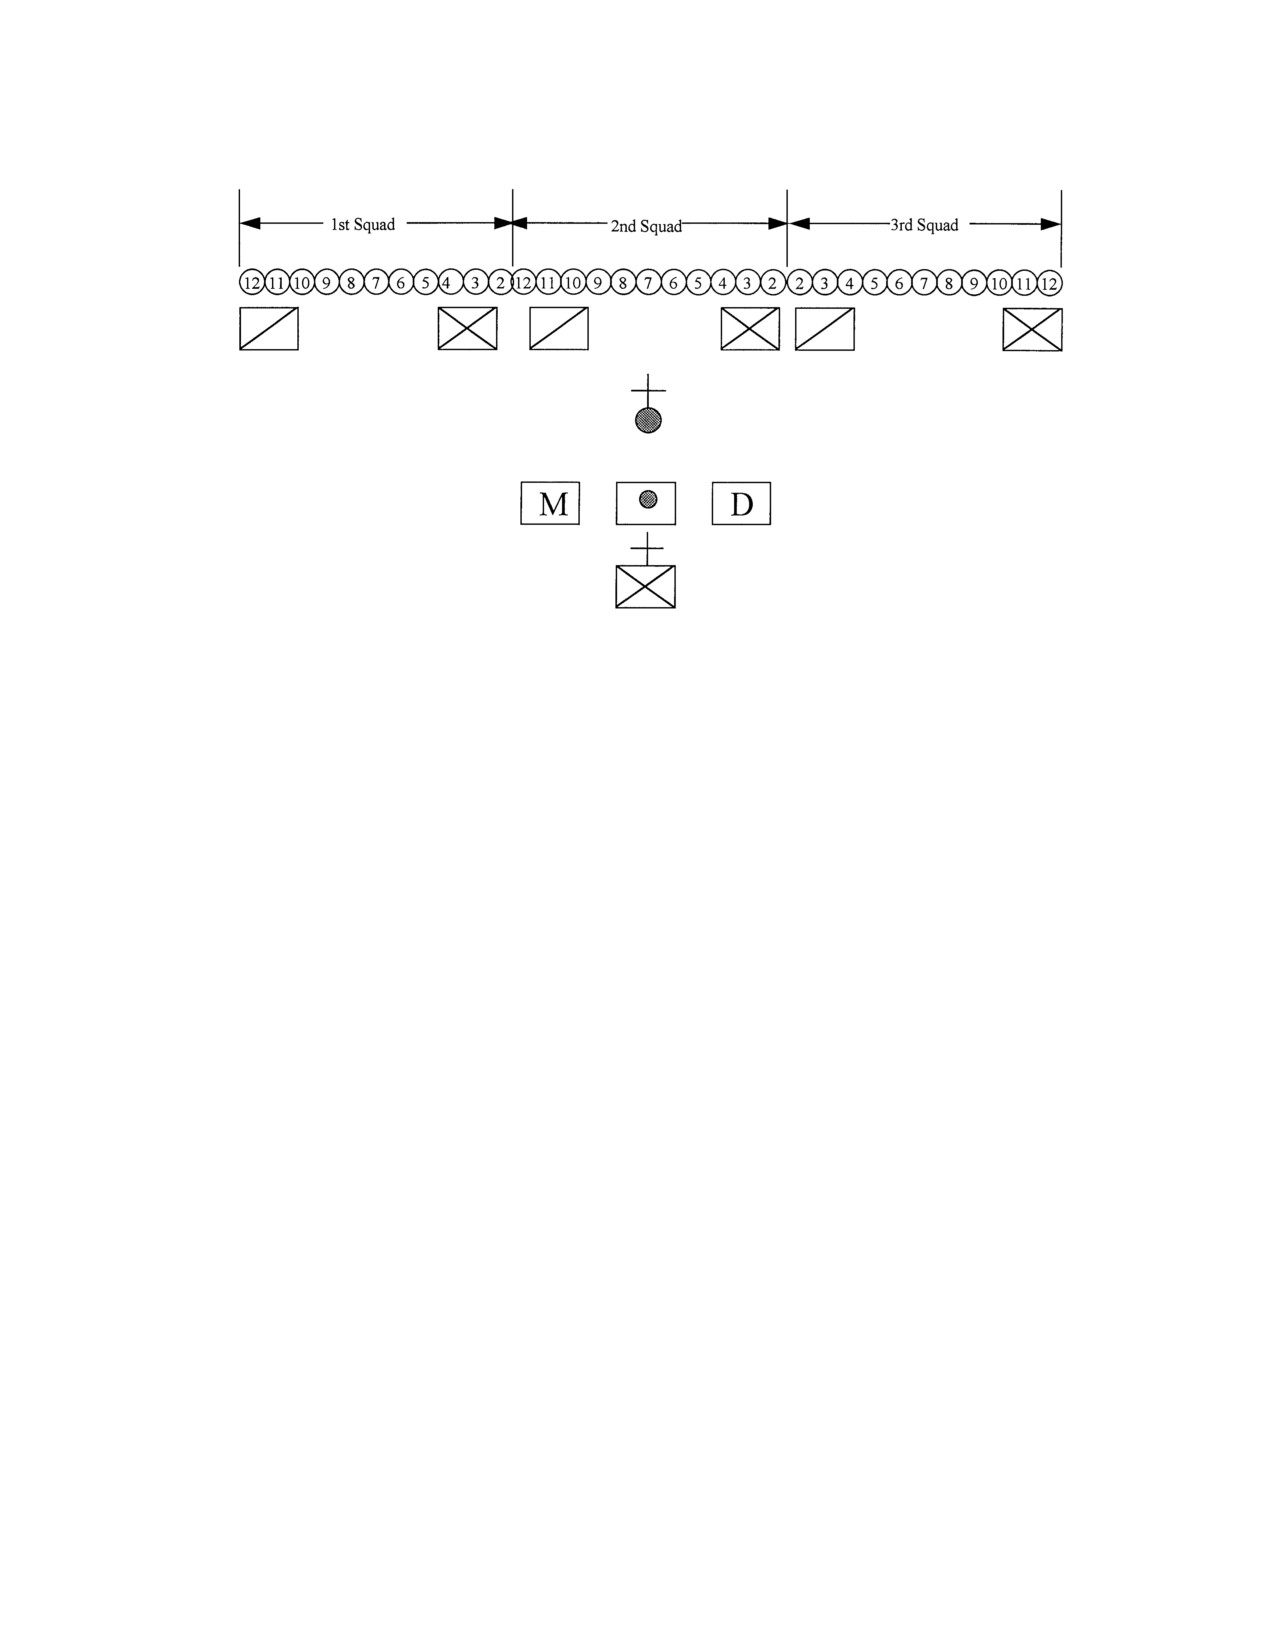
9.4. Skirmisher’s Line (Figure 9.2.). Form all crowd control formations from the column formation.
The flight leader gives the hand and arm signal (Figure 9.7.) simultaneously with the preparatory com-
mand. On the execution command “Move,” the flight leader points to the approximate location where the
flight is to form. The flight leader will pause between the preparatory command and execution command
to allow each squad leader to issue a squad preparatory command. The preparatory command for forming
a flight into a line formation is, “Flight as skirmishers.” Immediately following the flight leader’s prepa-
AFMAN31-201
17 MAY 2002
79
ratory command, the second squad leader commands, “Follow me,” while the first and third squad leaders
command, “Stand fast.” On the flight leader’s execution command, “Move,” the second squad moves for-
ward in single file to the point designated by the flight leader. The number two person of the second squad
establishes the base for the formation with their squad forming to the left. After the second squad has
cleared the flight, the first and third squad leaders command, “Follow me.” The first squad forms a line to
the left of the second squad while the third squad forms to the right of the second squad. Both squads dress
on the second squad. If there is a tactical squad, the tactical squad leader should give the command, "TAC
Squad, move." The tactical squad then moves out and forms 15 paces to the rear of the formation in a sin-
gle column or column of twos. Should the tactical squad need to provide lateral support or extend the
existing formation, even-numbered control force members move to their right, odd-numbered control
force members move to their left. The tactical squad leader usually commands the even-numbered troops,
while the assistant squad leader commands the odd-numbered troops.
9.4.1. When reforming the flight from the line formation, the HQ section will establish a position to
the rear of the flight providing sufficient room for the maneuver. The flight leader will give the prepa-
ratory command, “Flight rear facing, column formation” simultaneously with the rally hand and arm
signal (raise right arm above the head with a counterclockwise circular motion). Control force mem-
bers assume the port arms position. Squad leaders post on their number two control force members
and do an about-face (face the HQ section). All number two control force members execute an
about-face. All other control force members execute a facing movement toward their respective num-
ber two member. As the flight leader executes the command “Move!” he/she points to the assembly
spot. The third squad leader commands “Follow me,” and posts to the position indicated by the flight
leader while the remaining squad leaders command, “Stand fast.” In turn, as each squad clears the line
formation, the second and then first squad leaders command, “Follow me” and post to the left of the
preceding squad, dressing right. All squads halt automatically behind the HQ section and align right.
The flight may then march away from the confrontation site. Should the flight leader wish to march
the flight back in the direction of the confrontation scene, post the HQ section. The flight commander
then commands, “Counter, march!” Refer to AFMAN 36-2203, Drill and Ceremonies, paragraph
4.16, for specific information.
80
AFMAN31-201 17 MAY 2002
Figure 9.2. Skirmisher’s Line
9.5. Flight Echelon Right (Figure 9.3.). The command for forming a flight echelon is, “Flight, echelon
right, move.” Immediately following the flight leader’s preparatory command, the first squad leader com-
mands, “Follow me,” while the second and third squad leaders command, “Stand fast.” On the flight
leader’s command, “Move,” the first squad moves forward in single file forming a right echelon at the
point designated by the flight leader. Once the first squad has cleared the flight, the second and third squad
leaders respectively command, “Follow me.” The squads extend the echelon established by the first squad
left to right; number 2 control force member dresses off the number 12 control force member of the pre-
ceding squad. The disposition of a tactical support squad and reforming the flight are the same as for the
skirmisher’s line formation.

AFMAN31-201
17 MAY 2002
81
Figure 9.3. Flight Echelon Right
9.6. Flight Echelon Left. The command for forming a flight echelon is “Flight, echelon left, move.” The
element forms in the same manner as the echelon right, but in reverse order. The third squad is the base
squad and the remaining squads extend the echelon right to left. The disposition of a tactical support
squad and reforming the flight is the same as for the skirmisher’s line formation

82
AFMAN31-201 17 MAY 2002
Figure 9.4. Flight Echelon Left
9.7. Flight Wedge. The command for forming the flight wedge is, “Flight, wedge, move.” After the
flight leader’s preparatory command, the second squad leader commands, “Follow me.” On the flight
leader’s execution command, the second squad moves out and executes a squad wedge (even numbered
control force members align to the right, odd numbers to the left). The first and third squads extend the
echelons left and right, respectively. The disposition of a tactical support squad and reforming the flight is
the same as for the skirmisher’s line formation.

AFMAN31-201
17 MAY 2002
83
Figure 9.5. Flight Wedge
9.8. Flight Response to Riot Control Agents.
9.8.1. The flight may have to protect itself against the effects of chemicals, gas or pepper spray. If
necessary, the commands and actions include:
9.8.1.1. Flight Leader: "Odd numbers, prepare for gas." The flight should halt.
9.8.1.2. Squad Leaders repeat: "Odd numbers."
9.8.1.3. Flight Leader: "Move."
9.8.2. Flight Response. Odd numbered control force members should take two steps to the rear, place
their baton under their right foot and kneel on their left knee. From this position, don the gas mask,
pick up the baton and recover to the original position. After the odd numbered control force members
have recovered, the flight leader will give the command for the even-numbered members to prepare
for gas. The HQ/command section is the last to don and first to doff gas masks. Figure 9.7. through
Figure 9.11. portray the response to gas sequence.
9.8.3. Recover from Gas. To recover from gas, the element leader commands, "Recover from gas."
Reverse the procedure with the odd numbered members first (i.e., those that have been in the mask the
longest).

84
AFMAN31-201 17 MAY 2002
Figure 9.6. Formation Hand and Arm Signals
Figure 9.7. Flight Initial Response to Gas

AFMAN31-201
17 MAY 2002
85
Figure 9.8. Control Force Member Initial Response to Gas
Figure 9.9. Control Force Member Donning M17 Gas Mask

86
AFMAN31-201 17 MAY 2002
Figure 9.10. Control Force Member Prepared for Chemical Dispersions
Figure 9.11. Skirmisher’s Line Prepared for Chemical Dispersions—Quick Reaction Complete
9.9. Sniper Fire Immediate Actions. Should the flight receive sniper fire, any control force member
detecting that fire will immediately command, "Sniper, sniper, sniper." All members of the flight will exe-
cute an immediate action drill: assume the prone position, face outward with heels flat on the ground,
head to the side and baton under the chest (Figure 9.12.). The squad leaders should draw their handguns
and attempt to suppress any hostile fire. As a last resort, employ designated marksmen to counteract
snipers. Deadly force is authorized only if all other nonlethal means will not work and the require-

AFMAN31-201
17 MAY 2002
87
ments of AFI 31-207 are met. The designated marksman (or EST members) with scoped M-16 rifles pro-
vide cover fire for the flight from a position of cover to engage and neutralize the threat. Any control force
member who can positively identify the threat should instantly communicate distance, clock position (12
o’clock being the formation’s direction of travel) and a position reference to the command section (e.g.,
“sniper, 75 meters, two o’clock, second floor balcony”). This information will enable command to
quickly neutralize the hostile weapons fire. When the danger is over, the flight leader will command the
flight to recover. Flight members assume their original position.
Figure 9.12. Flight Countersniper Reaction
88
AFMAN31-201 17 MAY 2002
Chapter 10
MILITARY WORKING DOG EMPLOYMENT
10.1. Prologue.
10.1.1. Given the diverse nature of operations other than war, the MWD asset can be an unparalleled
force multiplier. Properly employed, qualified canines offer:
10.1.1.1. Another nonlethal means to affect apprehensions.
10.1.1.2. Early detection of intruders.
10.1.1.3. Unparalleled means to control subjects resisting apprehension.
10.1.1.4. Improved search and clear capabilities (buildings, large open areas, and small confined
spaces).
10.1.1.5. Focused tracking capabilities of fleeing or lost persons (limited*).
10.1.1.6. Scent detection of narcotics and explosives.
10.1.1.7. Strong visual deterrence of many criminal acts.
*The DoD Dog Training Center no longer teaches tracking. Units may identify canines with track-
ing potential and advance the training on a one-by-one basis, but it is no longer a required task
item.
10.1.2. It is critical to remember the responsibilities that come with the deployment of MWDs. Ade-
quate kennel facilities are imperative to maintain health, sanitation and comfort of the dogs. Veteri-
nary support should be coordinated. Likewise, handlers complete the MWD team. Dogs perform at
their optimum with a handler who has worked with them. Training is most critical for civil disturbance
operations. MWD teams, even more so than the control force, must receive constant, consistent, spe-
cialized training. Note: Civil disturbances may range from small peaceful demonstrations at a
CONUS base main gate to large-scale migrant resettlement operations combating riots. The MWD is
a valuable resource having tremendous utility.
10.2. MWD Types And Characteristics. The table below documents the general strengths and adapta-
tions of the different MWDs.
AFMAN31-201
17 MAY 2002
89
Table 10.1. Attributes of Military Working Dogs
MWD TYPE
ATTRIBUTES
Patrol Dog
Controllable
Attacks on command or to protect the handler
Drug Detector Dog
Dual role (drug and patrol)
Detects marijuana, hashish, heroin, cocaine,
methamphetamine and related substances
Explosive Detector Dog
Dual role (explosive and patrol)
Detects various explosives
10.3. Civil Disturbance Operations. MWD teams provide a significant psychological advantage in
mob situations. Typically, the presence of MWDs mitigates heightened tensions and dissuades mob lead-
ers from planned violence or actual outbreaks. Employ MWD teams on the perimeter, in lateral support
and attached to TAC squads in riot control situations. In most instances, MWDs provide a strong visual
deterrent. Commanders involved in civil disturbance should request intelligence to determine the cultural
and ethnic perceptions of canines and specific beliefs about MWDs. Informed commanders may use this
information to adapt the MWD to the fullest potential. For example, in some migrant camps, our security
force members discovered the strong psychological advantage derived from the MWD apparently was
based on the migrants’ belief that our MWDs were like the extremely aggressive sentry dogs common to
their native country’s armed forces.
10.4. Tracking Ability. Kennelmasters should advise element leaders/sergeants about MWDs with
tracking abilities. When a tracking situation arises, on-scene personnel should immediately cordon off the
area. A secure cordon will eliminate area contamination of extraneous and confusing scents. Take the dog
to the last known location of the person to be tracked and allow the MWD to smell the area to identify the
proper scent. Carry articles touched or worn by the individual(s) being tracked to occasionally reinforce
the odor. To eliminate further track contamination, the MWD team always precedes the search party.
While tracking, the dog may locate discarded items of evidence. There are other factors that may help or
hinder tracking:
10.4.1. Time. Initiate tracking as soon as possible as success depends on available scent.
10.4.2. Ground Surface. An MWD will usually be more successful when tracking in grass and brush.
Human scent adheres well to these surfaces. Paved and gravel areas along with overpowering scents
like fertilizer, burned grass or spilled oil or gasoline impede a dog’s ability to track.
10.4.3. Human Scent. Human scent remains longer on cool moist ground. Direct sunlight, extremely
dry ground or excessive rain dissipate scents rapidly and makes tracking difficult.
10.5. Riots and Crowd Control.
10.5.1. Normally, MWDs are not used for direct confrontation with demonstrators. The presence of
MWDs could aggravate a peaceful demonstration. During peaceful demonstrations, hold MWD teams
in reserve and out of sight of the crowd. If the situation deteriorates, move MWD teams up to within
90
AFMAN31-201 17 MAY 2002
sight of the crowd but still well away from the front lines. Give consideration to employing MWD
teams only when actual physical confrontation erupts. Once committed, use MWD teams as follows:
10.5.1.1. As a back-up/reserve force.
10.5.1.2. Integrated on the perimeter or dedicated laterally to channel protesters away from an
area or resource.
10.5.1.3. To assist search and apprehension teams.
10.5.2. Employment.
10.5.2.1. When engaged in direct confrontation, keep MWDs on their leashes and allow biting
only under specific circumstances authorized by the on-scene commander. Position other control
force members at least 15 feet from MWDs. Do not release MWDs into the crowd. The frantic
nature of a mob might confuse an MWD to:
10.5.2.1.1. Randomly bite multiple persons; or,
10.5.2.1.2. Aggressively bite the nearest, most active individual, which could be a control
force member.
10.5.2.2. Positive control over every MWD in a civil disturbance setting is required.
10.5.3. Riot Control Agents. In an open area, chemical riot control agents should not adversely affect
an MWD’s capability to act as a psychological or physical deterrent. However, handlers must watch
their dogs closely under such conditions. If an MWD shows any signs of distress, remove the canine
immediately from the area and have it examined by a veterinarian as soon as possible.
10.5.4. Support Duties. In large areas such as open fields, position MWD teams on the outer perime-
ter to contain the crowd while control forces move dissidents, make apprehensions or disband crowds.
Post MWDs around holding areas and processing centers to deter the escape or liberation of prisoners.
Use MWD teams to assist teams in apprehending and removing specific individuals within a group of
demonstrators. In this role, use the MWD team to protect members of the apprehension team, not to
effect the apprehension. Exercise extreme caution in these situations. The MWD could become
extremely excited and agitated, and could mistakenly bite a member of the apprehension team.
AFMAN31-201
17 MAY 2002
91
Chapter 11
COMMAND AND SUPPORT FUNCTIONS
11.1. Leadership. Civil disturbance operations tax the individuals and leadership of the control force.
The very complex nature of disturbances, coupled with the fact we simply do not deal with these situa-
tions on a day-to-day basis, requires specialized, precise training. Unit commanders must be aware of
these challenges and provide thorough leadership training. Review basic military leadership as a starting
point.
11.2. Span Of Control. The primary objective in any control force operation is disciplined, controlled
application of the minimal force necessary to maintain law and order and protect life and resources vital
to national security. Sound leadership is key to meeting this objective. Unlike day-to-day missions,
including base defense, the psychological stress and intensity of physical, hand-to-hand fighting reduce
effective leadership in proportion to the size and intensity of mob violence. As violence escalates, every
subordinate element commander’s span of control will diminish. Close supervision is imperative as dis-
turbances escalate. Common indications of over-extended leadership (i.e., losing span of control) include
poor decisions that may manifest into improper or worse yet, criminal conduct on the part of control force
members. Left unchecked, element discipline could deteriorate to collapse--this is when illegal control
force acts begin to occur. Commanders must preplan. Prepare contingency plans to radically increase ele-
ment leadership and supervision as the size and scope of violence increases. Leadership factors effecting
span of control include:
11.2.1. Experience and training of the leader.
11.2.2. Experience and training of the subordinates.
11.2.3. Effective communication between leaders and subordinates.
11.2.4. Time available for the element to interpret and put the leader’s decisions into actions.
11.2.5. Distance separating leader and subordinates.
11.2.6. Complexity of the operation.
11.2.7. Physical and mental preparedness of the leader and team.
11.2.8. Operating climate, environment and terrain.
11.3. Rules Of Engagement. Rules of engagement (ROE) are established so individual airmen have a
precise concept of what they can and cannot do under specific circumstances. Whether at home station or
deployed, security forces are subject to numerous laws, codes or agreements that may affect the conduct
of a given mission. Each area of responsibility has unique requirements. Planners and commanders must
ensure they are aware of all legal limitations affecting forces and what plans address and alter these legal
limitations. ROE identify these changes. For example, federal forces deployed within the US or its terri-
tories are restricted from enforcing civil law due to the Posse Comitatus Act, except under martial law. US
forces deployed to a foreign nation are subject to the law of that nation, international law, as well as the
Uniform Code of Military Justice. These limitations may involve everything from the number of troops
allowed in country (troop ceiling) to authorization to operate a motor vehicle. Status of forces agreements
may preclude certain forces or weapons because of population density or host nation forces already in
place with similar missions assigned. For example, military alliances such as NATO have agreements that
92
AFMAN31-201 17 MAY 2002
specify standard operating procedures for all alliance partners. The United Nations provides specific char-
ters for operations sanctioned by them. Planners must be intimately familiar with all these factors when
developing plans. Insist on specific ROE from the chain of command. Remember, Air Force intelligence
obtains classified ROE that pertain to pilots, so when requesting ROE ensure to ask specifically for
ground ROE. The impact of effective planning will be immediate. Peacetime or contingency operations
require flexibility when planning how and where to use control forces. Civil disturbance situations may
arise quickly and require swift response. Deployment location, support availability and specific mission
may have to be determined as the situation unfolds. In summary, the US military has the potential to per-
form a myriad of roles outside the parameters of war, i.e., operations other than war, which are often mod-
ified by ROE. Under the best circumstances, ROE can be challenging. Lack of planning may make certain
operations impossible.
11.4. The Mobile Support Force (MSF). The MSF provides on-scene resupply, subject identification, a
processing unit and an emergency holding facility so control force teams, particularly apprehension
teams, can quickly return to their duties. Establish this unit out of view of the crowd, but close to the
scene. The MSF may incorporate or colocate with the on-scene command post (CP) provided there is no
disruption of the CP functions. Design mobility into the MSF to permit relocation if the disturbance shifts
to another location.
11.5. Logistics.
11.5.1. Restrict personnel and the kinds and amount of equipment on hand to what is necessary. Mis-
sion preplanning is essential. Front-line law enforcement agencies that have considerable experience
with response planning have adopted flowcharts and equipment lists for a full spectrum of civil distur-
bance situations. Commanders must convene, well in advance, a panel of subject matter experts in the
areas of law enforcement, security and corrections to ascertain:
11.5.1.1. What situations are likely at base/location X? And for each situation:
11.5.1.1.1. How many apprehensions are expected?
11.5.1.1.2. What are the best and worst case apprehension, threat and violence scenarios?
11.5.1.1.3. How many troops are needed per subject for crowd control, mob violence and
apprehension?
11.5.1.1.4. What is the likely duration of the situation?
11.5.1.1.5. What coordination/support will local law enforcement provide (if applicable)?
11.5.1.1.6. What other base agencies will be involved and/or provide sustainment support?
11.5.1.1.7. What directives from the installation commander must be incorporated into the
plans and flowcharts?
11.5.1.1.8. Has Staff Judge Advocate (SJA) prepared/approved interim or specific barment
letters approved by the installation commander?
11.5.1.1.9. What will the apprehension process involve? Will detainees be debarred and
released or formally charged and released to civil law enforcement authorities?
11.5.1.1.10. Based on a thorough planning process, what resources are necessary to ensure an
effective operation?
AFMAN31-201
17 MAY 2002
93
11.5.2. Personnel. Minimize the personnel composing the MSF. The team should include:
11.5.2.1. An armed OIC for squadron-size employments or larger; otherwise, an armed NCOIC.
11.5.2.2. One armed security person for every ten detainees in a secure holding area or one armed
security person for every five detainees in a non secure area.
11.5.2.3. One administrative person for every ten detainees.
11.5.2.4. A still/video camera person.
11.5.2.5. One driver for every 44-person flight deployed.
11.5.3. Equipment. Basic equipment should consist of a step van or similar vehicle that would ade-
quately hold:
11.5.3.1. A variety of cutting tools (to free demonstrators that have chained/cabled themselves to
an asset).
11.5.3.2. Forced-entry equipment.
11.5.3.3. Spare helmets, body armor, face shields, and body shields.
11.5.3.4. Spare batons.
11.5.3.5. Spare pepper spray canisters.
11.5.3.6. Spare munitions (e.g., smoke and M-9/M-16/M-870 ammunition).
11.5.3.7. Portable/mobile radios, spare batteries and operating charger(s).
11.5.3.8. Battery-operated illumination.
11.5.3.9. Restraining devices (like flex-cuffs) and cutters for removing the cuffs.
11.5.3.10. Instant developing camera.
11.5.3.11. Hand-operated ferrous and nonferrous metal detectors.
11.5.3.12. Laptop/portable computer loaded with appropriate software to process detainees.
11.5.3.13. Administrative materials (interim barment letters, incident reports or appropriate work-
sheets).
11.5.3.14. Administrative supplies.
11.5.3.15. Evidence collection kits.
11.5.3.16. Video camera
11.5.3.17. First aid kit.
11.5.3.18. Secure storage lockers for weapons and munitions.
11.6. Processing Actions.
11.6.1. Conduct a simple frisk when a subject is turned over to the MSF and confiscate all contraband.
Place all weapons or contraband in a sealed, marked evidence container. Process all contraband as evi-
dence and maintain the chain of custody. If contraband is later needed as evidence, it may be inadmis-
sible in court if the chain of custody has been broken. Complete a subject identification sheet and
94
AFMAN31-201 17 MAY 2002
place this sheet into the evidence containers with the contraband. Tag all items for complete identifi-
cation. Sound identification practices ensure the correct people receive their property upon release.
Photograph each detained subject and staple the photograph to the identification information sheet.
Place both in the evidence container. Use this documentation later for full reports. Administrative per-
sonnel will complete the AF Form 3545, Incident Report, or a locally devised worksheet enabling per-
sonnel to complete the AF Form 3545 at a later time. Transport the subject to and secure in the
detention area. The detention facility must include:
11.6.1.1. Search areas.
11.6.1.2. Separate incoming holding areas for men and women.
11.6.1.3. A processing area.
11.6.1.4. Separate holding areas for men and women who have committed misdemeanors.
11.6.1.5. Separate holding areas for men and women who have committed felonies or are violent.
11.6.1.6. A secure property/evidence room.
11.6.1.7. An administrative records area.
11.6.1.8. A medical unit.
11.6.1.9. Latrine facilities.
11.6.2. Facility operation plans must, at a minimum, address medical, sanitation and sustained opera-
tions. Emergency plans need to address fire, internal disturbances, facility external defense and inter-
nal security. As the situation grows, so shall the number and kinds of operating plans. A commander’s
best resource is trained corrections personnel to set up and run a detention facility.
11.6.3. Photography. There are many sound reasons for photographing (still and video) individuals
and actions at the scene. Photography provides a specific time reference to document actions in pre-
cise detail. Pictures also help refine training techniques, identify disturbance leaders or agitators and
provide evidence to support prosecution. Photographing often deters some people from violent acts
and/or outrageous behavior. Take photographs of both rioters and control force members for later use
in court. Have the photographer keep a detailed log of all pictures taken. The log should include who,
what, when, where, why and how.
11.6.4. Communications. The capability to effectively communicate is essential to all operations
involved in controlling crowds, and especially quelling disturbances. Effective communication
between the scene, MSF and operations headquarters is vital. Situations may require an on-scene
command post. Establish a firm chain of command and allow information to flow through that chain
for action and coordination.
11.6.5. Written Procedures. Establish written procedures (e.g., checklists, flowcharts, grid maps,
proclamations, references, response plans and operations orders) for all potential operations. Identify
and prioritize potential threat areas. Use the 5-paragraph format contained in AFH 31-302, Air Base
Defense Collective Skills, when developing operations orders, modified as necessary to meet civil dis-
turbance requirements. When preparing a civil disturbance plan, draft a dispersal proclamation to read
to the group, informing the crowd about avenues of escape and a specific time to disperse. Make the
time limit realistic to the situation and avoid granting extensions. Have the SJA review and approve
all proclamations before use.
AFMAN31-201
17 MAY 2002
95
11.7. Medical Services.
11.7.1. Emergency medical attention must be available for military and civilians. However, medical
support for civilians should be provided by civilian medical facilities. Civilians may use military med-
ical facilities only to prevent undue suffering or loss of life or limb. Plans must provide for qualified
medical personnel, air and ground ambulance service, medical facilities, medical supplies, medical
evacuations and casualty reporting. Factors to consider for medical facilities include location, sources
of power and water, and sanitation facilities. Existing medical facilities, military and civilian, can be
used whenever practical. Consider establishing an memorandum of understanding/memorandum of
agreement with local medical facilities, when necessary, to ensure medical support is available as
needed.
11.8. Media Relations.
11.8.1. Normally, whenever federal forces respond to a disorder, media interest is generated. In a dis-
turbance area, the public is directly affected by actions taken individually and collectively by military
personnel. Similarly, the public outside the area has an intense interest in events taking place within
the area. Press interest in most cases will be high. Unless timely, accurate information is furnished, the
press will be forced to rely on speculation and rumor.
11.8.2. The responsibilities of all military personnel with regard to media contact must be made clear.
Military personnel must be informed that they must treat media members with courtesy and respect.
They must also be cautioned to not make any comments concerning upcoming or active civil distur-
bances and unit missions, even if told their remarks will be “off the record.” When approached, ser-
vice members should refer inquiries to the public affairs officer (PAO).
11.8.3. The commander must anticipate media contact. Plans must include the clearance of all news
releases through the Assistant Secretary of Defense for Public Affairs, the on-site public affairs chief
or a higher authority, whichever is appropriate. Procedures must be established for confiscating film
and videotape of prohibited areas. Both the PAO and the SJA must review the procedures to ensure the
ability of the media to gather and report news is not unduly restricted.
11.8.4. To help media relations, plans must also include:
11.8.4.1. Procedures for furnishing authorized media members with press passes to facilitate their
passage through police lines and military checkpoints. News media members must be allowed
freedom of movement as long as they do not interfere with control force operations.
11.8.4.2. Standard operating procedures for coordinating press requests to cover operations in the
disturbance area, including furnishing military escorts.
11.8.4.3. Establishment of a newsroom by the task force PAO. The newsroom can be used for
periodic press briefings and furnishing the media with fact sheets and other backg1round data con-
cerning the operation.
11.8.4.4. Regular news conferences and periodic briefings. They should be held so senior civilian
and military officials can provide timely, accurate information and the media has an opportunity to
question senior commanders. When it is practical, the commander should consider allowing the
media to accompany senior officials on tours of the affected area.
11.8.4.5. News releases concerning civil disturbance operations and instructions for public coop-
eration.
96
AFMAN31-201 17 MAY 2002
11.8.4.6. Liaison and coordination with local civilian public affairs officials and information
agencies. This simplifies the exchange of information, ensures the information’s accuracy and
generally aids the newsgathering effort.
11.8.4.7. Setting up a rumor control center. A rumor control center helps reduce the adverse
effects of misinformation.
11.8.5. Appropriate operating procedures and command guidance must be issued in writing to prevent
the release of information that is potentially harmful to the military mission. Members of the news
media must be clearly informed of the location of prohibited areas that may not be photographed or
videotaped and restricted areas where they must have proper escort. If security force personnel must
detain or apprehend members of the media for entering restricted areas without proper authorization
or for trying to film or videotape prohibited areas, they must notify their leaders immediately. Operat-
ing procedures should include the locations of newsrooms and the access control procedures for
restricted areas. In most instances, the media will not be furnished communications or transportation,
nor will a press center be set up in the disturbance area. However, a newsroom should be set up. The
media should be afforded the use of tables, chairs, typewriters and other equipment associated with a
newsroom operation when this does not interfere with control force operations. If the military is the
only source capable of providing communications support, such support will be provided, if possible.
However, prior arrangements must be made for reimbursement.
CHARLES F. WALD, Lt General, USAF
DCS, Air and Space Operations
AFMAN31-201
17 MAY 2002
97
Attachment 1
GLOSSARY OF REFERENCES AND SUPPORTING INFORMATION
References
AFI 10-802, Military Support to Civil Authorities
AFI 31-101, The Air Force Installation Security Program
AFI 31-207, Arming and Use of Force By Air Force Personnel
AFMAN 10-100, Airman’s Manual
AFMAN 31-222, Security Forces Use of Force Manual
AFMAN 36-2203, Drill and Ceremonies
AFH 31-302, Air Base Defense Collective Skills
AFH 31-305, Security Police Deployment Planning
DODD 3025.12, Military Assistance for Civil Disturbances
DODD 3025.15, Military Assistance to Civil Authorities
Posse Commitatis Act
Army FM 23-30, Grenades And Pyrotechnic Signals
Army FM 100-5, Operations
Army FM 19-15, Civil Disturbances
USC, Title 10
USC, Title 32
C-5210-41M, Nuclear Weapons Security Manual/Air Force Supplement
18 U.S.C. 1385
10 U.S.C. 371 et seq
Civil Disorders Act of 1968
AF Form 3545, Incident Report
Abbreviations and Acronyms
AFI—Air Force Instruction
AFH—Air Force Handbook
AFMAN—Air Force Manual
AFOSI—Air Force Office of Special Investigations
AFSFC—Air Force Security Forces Center, Lackland AFB, TX
CP—Command Post
98
AFMAN31-201 17 MAY 2002
CSF—Chief of Security Forces
DoD—Department of Defense
FM—Field Manual
EST —Emergency Services Team
HQ—Headquarters
JIT—Just In Time
MOOTW—Military Operations Other Than War
MSF—Mobile Support Force
MWD—Military Working Dog
NATO—North Atlantic Treaty Organization
NEO—Noncombatant Evacuation Operation
NLW—Non-lethal Weapons
NSN—National Stock Number
PAO—Public Affairs Office
ROE —Rules of Engagement
ROTC—Reserve Officer Training Corps
SF—Security Forces
SJA—Staff Judge Advocate
TAC—Tactical
U.S.C.—United States Code
UTC—Unit Type Code
FOR OFFICIAL USE ONLY
United States Air Force
Scientific Advisory Board
Report on
Operating Next-Generation
Remotely Piloted Aircraft
for Irregular Warfare
SAB-TR-10-03
April 2011
DISTRIBUTION AUTHORIZED
In accordance with AFI
61-204 and DODD 5230.24, Distribution Statement D, Critical
Technologies, to the Department of Defense and U.S. DOD contractors, June 2008. Other
requests for this document shall be referred to the Department of the Air Force, HQ USAF/SB,
AF/SB 1602 California Avenue, Suite #251, Andrews AFB, MD 20762, 301-981-9985.
FOR OFFICIAL USE ONLY
FOR OFFICIAL USE ONLY
This report is a product of the United States Air Force Scientific Advisory
Board FY10 Summer Study on Operating Next-Generation Remotely Piloted
Aircraft for Irregular Warfare.
Statements, opinions, findings,
recommendations and conclusions contained in this report are those of the
Study Committee and do not necessarily represent the official position of the
United States Air Force or the United States Department of Defense.
FOR OFFICIAL USE ONLY