DB2 Server for VSE. Operations Guide / Handbooks (2004-2007) - page 34
1ARI0801I DBS Utility started: 07/18/89 16:10:31.
◄────────────▌1▐
AUTOCOMMIT = OFF ERRORMODE = OFF
◄────┬────▌2▐
ISOLATION LEVEL = REPEATABLE READ
◄────┘
0──────► SELECT * FROM SQLDBA.DEPARTMENT;
◄────────────▌3▐
1SELECT * FROM SQLDBA.DEPARTMENT
PAGE
1
0DEPTNO DEPTNAME
MGRNO ADMRDEPT
───┐
────── ───────────────────────────── ────── ────────
│
A00
SPIFFY COMPUTER SERVICE DIV.
000010 A00
│
B01
PLANNING
000020 A00
│
C01
INFORMATION CENTER
000030 A00
│
D01
DEVELOPMENT CENTER
A00
├─────▌4▐
D11
MANUFACTURING SYSTEMS
000060 D01
│
D21
ADMINISTRATION SYSTEMS
000070 D01
│
E01
SUPPORT SERVICES
000050 A00
│
E11
OPERATIONS
000090 E01
│
E21
SOFTWARE SUPPORT
000100 E01
│
0ARI0850I SQL SELECT processing successful: Rowcount = 9
───┘
1──────► SELECT * FROM SQLDBA.PROJECT;
◄────────────▌5▐
1SELECT * FROM SQLDBA.PROJECT
PAGE
2
0PROJNO PROJNAME
DEPTNO RESPEMP PRSTAFF PRSTDATE
PRENDATE
──┐
────── ─────────────────── ────── ─────── ─────── ──────────
──────────
│
AD3100 ADMIN SERVICES
A00
000010
6.50 1982─01─01
1983─02─01
│
MA2100 WELD LINE AUTOMATIO D01
000010
12.00 1982─01─01
1983─02─01
│
AD3111 PAYROLL PROGRAMMING B01
000020
2.00 1982─01─01
1983─02─01
│
PL2100 WELD LINE PLANNING B01
000020
1.00 1982─01─01
1982─09─15
│
IF1000 QUERY SERVICES
C01
000030
2.00 1982─01─01
1983─02─01
│
IF2000 USER EDUCATION
C01
000030
1.00 1982─01─01
1983─02─01
│
OP1000 OPERATION SUPPORT
E01
000050
6.00 1982─01─01
1983─02─01
│
OP2000 GEN SYSTEMS SERVICE E01
000050
5.00 1982─01─01
1983─02─01
│
MA2110 W L PROGRAMMING
D11
000060
9.00 1982─01─01
1983─02─01
│
AD3110 GENERAL AD SYSTEMS
E11
000090
6.00 1982─01─01
1983─02─01
│
OP1010 OPERATION
E11
000090
5.00 1982─01─01
1983─02─01
├──▌6▐
OP2010 SYSTEMS SUPPORT
E21
000100
4.00 1982─01─01
1983─02─01
│
MA2112 W L ROBOT DESIGN
D11
000150
3.00 1982─01─01
1982─12─01
│
MA2113 W L PROD CONT PROGS D11
000160
3.00 1982─02─15
1982─12─01
│
MA2111 W L PROGRAM DESIGN D11
000220
2.00 1982─01─01
1982─12─01
│
AD3112 PERSONNEL PROGRAMMG D21
000250
1.00 1982─01─01
1983─02─01
│
AD3113 ACCOUNT.PROGRAMMING D21
000270
2.00 1982─01─01
1983─02─01
│
OP2011 SCP SYSTEMS SUPPORT E21
000320
1.00 1982─01─01
1983─02─01
│
OP2012 APPLICATIONS SUPPOR E21
000330
1.00 1982─01─01
1983─02─01
│
OP2013 DB/DC SUPPORT
E21
000340
1.00 1982─01─01
1983─02─01
│
0ARI0850I SQL SELECT processing successful: Rowcount = 20
──┘
1ARI0802I End of command file input.
◄────────────▌7▐
ARI8997I ...Begin COMMIT processing.
──────┐
ARI0811I ...COMMIT of any database changes successful.
│
ARI0809I ...No error(s) occurred during command processing.
├──────▌8▐
ARI0808I DBS processing completed: 07/18/89 16:10:33.
──────┘
Figure 8. Database Services Utility: Sample Message File Output
Notes for Figure 8:
▌1▐
The Database Services Utility start message.
▌2▐
The Database Services Utility default values. See Set-Item Commands in
Chapter 8, “Command Reference” for details on changing these defaults.
▌3▐
The first SELECT statement that the Database Services Utility processes.
▌4▐
Results of the Database Services Utility processing the SELECT statement
show the rows retrieved from the table, a message indicating that the
SELECT statement was successful, and the number of rows retrieved.
18
Database Services Utility
▌5▐
The next SELECT statement that the Database Services Utility processes.
▌6▐
Results of the Database Services Utility processing the SELECT statement
show the rows retrieved from the table, a message indicating that the
SELECT statement was successful, and the number of rows retrieved.
▌7▐
Database Services Utility has processed all commands in the control file.
▌8▐
Database Services Utility completion messages.
Using the Database Services Utility on Remote Application Servers
Which Support DRDA Flow
With the implementation of the Distributed Relational Database Architecture
(DRDA), you can use the Database Services Utility on remote application servers
which support the DRDA flow. Before you can use the Database Services Utility on
an unlike application server, the Utility must be preprocessed on the application
server using the ERROR preprocessing option, and the table
SQLDBA.DBSOPTIONS must also exist on the unlike application server. Refer to
the DB2 Server for VM System Administration or the DB2 Server for VSE System
Administration manual for more information on using the Database Services Utility
on an unlike application server using DRDA flow.
To access a non-DB2 Server for VM application server, a VM DBSU user can use
the SQLINIT EXEC with the PROTOCOL options set to AUTO or DRDA. (You can
also access a DB2 Server for VM application server with the protocol option set to
DRDA). In VSE, the Database Services Utility can only access a remote DRDA
application server if the remote DRDA application server is specified in the
DBNAME directory as a remote server.
Only the following Database Services Utility commands are supported when
DRDA flow is used:
v DATAUNLOAD
v DATALOAD
v RELOAD PACKAGE
v SET commands except SET ISOLATION and SET UPDATE STATISTICS.
The ISOLATION level is always assumed to be CS when DRDA flow is used. If an
ISOLATION level other than CS is requested, the command will have no effect and
the following message will be displayed:
ARI2906I - The only valid isolation level is CS when the DRDA
protocol is used. Isolation level CS is now in effect.
Using SQL Statements within the Database Services Utility
Figure 9 on page 20 is a sample Database Services Utility file that executes SQL
statements. It illustrates some of the principles described so far.
Note: You must always end SQL statements with a semicolon.
Chapter 1. Getting Started
19
┌────────────────────────────────────────────────────────────────────────────────┐
│ 1
┌───────────────┐
col 72
80 │
│ │─────────────────────
│ INPUT RECORDS │
──────────────────────────│
│ │
│ │
└───────────────┘
│
│ │
│ ø
ø
ø │
│ CONNECT MICHAEL IDENTIFIED BY MFB2901;
MFB001 │
│ SELECT * FROM PROJECT ORDER BY PROJNO;
MFB002 │
│
INSERT INTO PROJECT
(PROJNO, PROJNAME,
MFB003 │
│
DEPTNO) VALUES
MFB004 │
│
(’AD3101’,’PERSONNEL SERVICES’,’D01’);
MFB005 │
│
INSERT INTO PROJECT
(PROJNO, PROJNAME,
MFB006 │
│
DEPTNO) VALUES (’OP3000’,’USER SUPPORT’, MFB007 │
│
’E01’);
MFB008 │
│ SELECT EMPNO,WORKDEPT,EDLEVEL
MFB009 │
│ FROM EMPLOYEE
MFB010 │
│ WHERE EDLEVEL ► 12
MFB011 │
│ ORDER BY WORKDEPT;
MFB012 │
└────────────────────────────────────────────────────────────────────────────────┘
Figure 9. Database Services Utility Example File
CONNECT
The Database Services Utility supports the SQL CONNECT statement so that you
can:
v Identify yourself as an SQL user
v Identify and switch to another application server
Identifying Yourself as a Particular SQL User
You can use the CONNECT statement to identify yourself as a particular DB2
Server for VSE & VM user for the current application server. To identify yourself to
the database manager, enter the following:
CONNECT authorization-id IDENTIFIED BY password;
where authorization-id is either your SQL identifier (if you have one) or your user
ID, and password is your database-access password.
The ID specified in the last CONNECT statement processed by the database
manager is the user ID on which the database manager bases its authorization
checking for all subsequent Database Services Utility processing.
You can use the CONNECT statement to identify yourself as a user of another
application server. To do so, use:
CONNECT authorization-id IDENTIFIED BY password TO server-name;
where authorization-id is your SQL identifier, password is your database-access
password, and server-name is the name of the target application server.
20
Database Services Utility
CONNECT Information Shown in Message Files
The authorization ID specified in the last CONNECT statement processed by
the database manager is the authorization ID on which the database manager
bases its authorization checking for subsequent Database Services Utility
processing. When the Database Services Utility displays the CONNECT
statement in the message file, the password is suppressed. The authorization
ID is shown in double quotation marks ("); for example:
CONNECT "ANNETTE" IDENTIFIED BY ********
If the Database Services Utility detects an error in the CONNECT statement,
the original input line is not displayed. Instead, the Database Services Utility
displays the following in the message file:
CONNECT ? IDENTIFIED BY ?
Note that you must supply an SQL CONNECT statement in the DB2 Server for
VSE input control card file before any other SQL or Database Services Utility
command, unless you invoke the Database Services Utility from an application
program that has already executed an SQL CONNECT. ( “Using the Database
Services Utility from Programming Languages” on page 112 describes how to
invoke the Database Services Utility from an application program.) Refer to the
DB2 Server for VSE & VM Database Administration manual for additional
information on SQL CONNECT processing.
Suppose you have ACTIVITY tables in two databases, RDB1 and RDB2. To query
both of them, type in your control file:
CONNECT TO RDB1;
SELECT * FROM ACTIVITY;
COMMIT;
CONNECT authorization-id IDENTIFIED BY
password TO RDB2;
SELECT * FROM ACTIVITY;
You would replace authorization-id with your SQL identifier and replace password
with your database-access password.
Identifying and Switching to Another Application Server
To use the SQL CONNECT statement to switch to another application server, type:
CONNECT TO server-name;
where server-name is the name of the application server to which you want to
connect.
DB2 Server for VSE
If the CONNECT statement is issued without the identify clause (for example,
CONNECT TO RDB1), and the previous LUW ends with a COMMIT or
ROLLBACK statement, you are connected to the application server with the
same user ID and password that was used in the previous LUW.
Chapter 1. Getting Started
21
DB2 Server for VM
If a CONNECT is not explicitly issued, or is issued without the identify
clause (for example, CONNECT TO RDB1), the DB2 Server for VM
application requester does an implicit connection when you execute your first
SQL statement. The database manager uses the entry in the CMS
communications directory file (COMDIR) to give you connect authorization to
the application server. If the authorization ID is not resolved from the CMS
COMDIR, the database manager uses the VM user ID. In some situations, the
user ID received at the target application server is different from your VM
user ID. For example, an entry in the CMS COMDIR might change the user
ID, or the target system might change it. Refer to the DB2 Server for VSE &
VM Database Administration for additional information on SQL CONNECT
processing.
Identifying the Current User ID and Application Server
When you do not specify options with the CONNECT statement, the system
displays the current SQL user ID and application server name. This is a null
CONNECT. To enter a null CONNECT, use:
CONNECT;
If a null CONNECT is issued before a server connection is established by a
previous CONNECT statement, a blank user ID and a blank application
server-name is returned. If a null CONNECT is issued before a valid user ID is
established by a previous CONNECT statement, a blank user ID and the connected
server-name is returned.
For further information on the CONNECT statement, refer to the DB2 Server for
VSE & VM SQL Reference.
SELECT
Output of Query Results
The Database Services Utility writes the results of an SQL SELECT statement (an
SQL query) to the DB2 Server for VSE report (SYSLST) or the DB2 Server for VM
message file (SYSPRINT).
Specifying a Multiple-Row Query
The use of the SQL SELECT statement is often called a query because SELECT
statements are the means of extracting information from a database.
The Database Services Utility automatically handles multiple-row query results;
you do not have to declare a cursor. Figure 10 on page 23 is an example of
pseudocode showing how a query is coded in an application program to return
many rows using a cursor. Figure 11 on page 23 shows how the Database Services
Utility handles the same multiple-row query.
22
Database Services Utility

EXEC SQL DECLARE C1 CURSOR FOR
SELECT PROJNO,PROJNAME
FROM PROJECT WHERE DEPTNO = ’E21’
ORDER BY PROJNO
EXEC SQL OPEN C1
EXEC SQL FETCH C1 INTO :NUMBER, :NAME
DO WHILE (SQLCODE=0)
DISPLAY (NUMBER, NAME)
EXEC SQL FETCH C1 INTO :NUMBER, :NAME
END-DO
EXEC SQL CLOSE C1
Figure 10. Sample Multiple-Row Query in an Application Program
SELECT PROJNO,PROJNAME
FROM PROJECT WHERE PROJNO = ’E21’
ORDER BY PROJNO;
õ
│
├───────────────────────────────┐
│Required delimiter for
│
│the Database Services Utility
│
└───────────────────────────────┘
Figure 11. Multiple-Row Query
Specifying a Single Value Query
The Database Services Utility does not support INTO clauses. Figure 12 shows how
an application program uses the INTO clause to return a single value. Figure 13
shows how to specify the same single value query in the Database Services Utility.
SELECT AVG(BONUS)
INTO :EXTRA
FROM EMPLOYEE
WHERE JOB = ’MANAGER’
Figure 12. Sample Single Value Query in an Application Program
SELECT AVG(BONUS)
FROM EMPLOYEE
WHERE JOB = ’MANAGER’;
Figure 13. Single Value Query
SELECT Output Is Identified by Column Name
Column data appearing in SELECT output produced by Database Services
Utility processing is identified by column name. Column labels are ignored
by Database Services Utility processing.
Chapter 1. Getting Started
23
COMMIT
The Database Services Utility handles logical units of work in almost the same way
as application programs. Most Database Services Utility commands or SQL
statements implicitly begin a logical unit of work. The following commands and
statements, however, do not:
Database Services Utility Commands
SQL Statements
COMMENT
CONNECT
SET AUTOCOMMIT
COMMIT [RELEASE]
SET ERRORMODE
ROLLBACK [RELEASE]
SET FORMAT
SET ISOLATION
SET LINECOUNT
SET LINEWIDTH
SET UPDATE STATISTICS
A logical unit of work continues until you issue an SQL COMMIT statement or a
ROLLBACK statement. After the COMMIT or ROLLBACK is processed, another
Database Services Utility command or SQL statement begins a new logical unit of
work.
If you do not include a COMMIT statement or a ROLLBACK statement, the
Database Services Utility treats all the control commands as a single logical unit of
work. If all processing is error-free during this single logical unit of work, the
changes are committed to the database; if errors occurred, no changes are
committed to the database.
Committing Logical Units of Work
The Database Services Utility provides the command SET AUTOCOMMIT ON or
OFF. When AUTOCOMMIT is on, the utility performs a COMMIT operation after
the successful execution of each command that accesses the database. When
AUTOCOMMIT is off (the default mode of processing) or is not specified in your
(input) control file, logical units of work are processed as described previously in
“COMMIT”.
If you want the utility to commit logical units of work, include the following in
your (input) control file:
SET AUTOCOMMIT ON;
Using SQL Comments
SQL comments can be included within SQL statements used in the Database
Services Utility and within Database Services Utility commands wherever a
separator is valid, as long as the existing Database Services Utility syntax rules are
followed. SQL comments are identified by two consecutive hyphens (--) on the
same line. The hyphens must not be separated by a space. SQL comments must not
be part of a literal, double-byte character set (DBCS) string or quoted identifier.
Each SQL comment must be contained on a single line. In the Database Services
Utility, an SQL statement must be terminated by a semicolon (;). If a semicolon
appears in an SQL comment, however, it does not end the SQL statement. For
example,
SELECT * FROM T1 --this does not end the SQL statement;
SELECT * FROM T1; -- this ends the SQL statement
The following restrictions apply when using SQL comments within Database
Services Utility commands:
24
Database Services Utility
v SQL comments are not supported in the data portion of a Database Services
Utility command. SQL comments that are used improperly are treated as part of
the data.
v SQL comments are not allowed in the Database Services Utility COMMENT
command or in the ENDDATA subcommand of the DATALOAD command.
Note: The ENDDATA subcommand of the DATALOAD command should not
contain any other information.
Querying the Current Status in DB2 Server for VM
To query the current status of a job that is running, use the CMS immediate
command SQLQRY by typing #SQLQRY directly from the terminal. The SQLQRY
command cannot be used from a Database Services Utility control file.
You can use SQLQRY to determine the application server you are currently
connected to. The output you receive from SQLQRY will be similar to that shown
in Figure 14. For more information on the SQLQRY command, see the DB2 Server
for VSE & VM Database Administration manual.
Note: The output from SQLQRY varies depending on the operating environment.
15:54:48 * MSG FROM SQLUSER6: Status of Database Conversations on 1999-06-30
15:54:48 * MSG FROM SQLUSER6: EXTNAME = SQLUSER6.1
15:54:48 * MSG FROM SQLUSER6: RDBMS
= SQLRDB1
SQLDS/VM V3.3.0
15:54:48 * MSG FROM SQLUSER6: STATUS = COMM TIME = 1999-06-30.15:54:38
15:54:48 * MSG FROM SQLUSER6: LUWID
= IBMNET01.*IDENT.45F2ABCD236D42
15:54:48 * MSG FROM SQLUSER6:
15:54:48 * MSG FROM SQLUSER6: EXTNAME = SQLUSER6.2
15:54:48 * MSG FROM SQLUSER6: RDBMS
= IBMSTLDB2
DB2
V2.3.0
15:54:48 * MSG FROM SQLUSER6: STATUS = APPL TIME = 1999-06-30.15:30:25
15:54:48 * MSG FROM SQLUSER6: LUWID
= IBMNET01.TORLU001.45F2ABCD236DFE
15:54:48 * MSG FROM SQLUSER6: LU
= STLMVS04
15:54:48 * MSG FROM SQLUSER6: TPN
= "6DB
(X’07F6C4C2’)
15:54:48 * MSG FROM SQLUSER6:
15:54:48 * MSG FROM SQLUSER6: EXTNAME = SQLUSER6.2
15:54:48 * MSG FROM SQLUSER6: RDBMS
= SQLMACGM
DB2/VM n/a
15:54:48 * MSG FROM SQLUSER6: STATUS = VRA
TIME = 1999-06-30.15:30:25
15:54:48 * MSG FROM SQLUSER6: TCP/IP = 9.21.4.194
PORT 6100
Figure 14. Sample Output from SQLQRY
Canceling a DB2 Server for VM Command
In interactive mode, you can cancel a command before it is completed by typing:
SQLHX
For example, you can cancel a query that is running and has not returned a query
result. The SQLHX command drops the connection to the application server, thus
canceling the current command and rolling back the current logical unit of work. If
you issued an explicit CONNECT before the SQLHX command, the authorization
ID and the name of the application server revert back to those defined by an
implicit CONNECT: your VM ID and default application server.
Note: If you are using synchronous APPC/VM communications with the
application server (by specifying the SYNCHRONOUS (YES) option when
invoking the SQLINIT EXEC), the SQLHX command does not cancel the
Database Services Utility command that is running.
Chapter 1. Getting Started
25
Exiting from the Database Services Utility
In DB2 Server for VSE, you exit from the utility automatically after all the
commands in the input control card file have been processed.
In DB2 Server for VM, if you use the Database Services Utility and supply a
control file with the SYSIN option, you exit from the utility automatically after all
the commands in the control file have been processed. If you use the utility by
typing SQLDBSU and do not supply a control file, you are using the utility
interactively. To exit, type the command EXIT. Any uncommitted work is
committed, and you exit from the utility. You then return to CMS.
26
Database Services Utility
Chapter 2. Loading Data with the Database Services Utility
This chapter explains how to load data into a DB2 Server for VSE & VM table with
the DATALOAD command. The data you are loading can be separate from the
DATALOAD command or embedded in the command. You can also load data of
different formats, such as DECIMAL, GRAPHIC, or CHARACTER.
This chapter also describes general loading procedures, such as how to load null
values or special register values. Moreover, you can work more efficiently by
loading data into multiple tables, combining records to load several table rows, or
committing work while loading data. If an error stops the DATALOAD processing,
you can restart the loading process. Finally, this chapter describes how statistics are
collected during or after the utility has loaded the data.
DATALOAD Command Components
The DATALOAD command allows you to load rows into existing DB2 Server for
VSE & VM tables from data contained in a sequential input file that was created
by processing external to the database manager or by the Database Services
Utility’s DATAUNLOAD processing. You can load data into DB2 Server for VSE &
VM application servers, as well as into other application servers that support
DRDA flow.
In general, each input data record used for DATALOAD processing contains data
for a row of a table. Input data records can reside in a sequential file or can be
embedded within the (input) control file. The DB2 Server for VM input data file is
typically a CMS file, but it can be a virtual reader file or any tape or DASD file
supported by CMS OS/QSAM.
Note: You should not use a sequential access method (SAM) file produced by
Database Services Utility UNLOAD processing as input to DATALOAD
processing. An error condition can result. Use the RELOAD command
instead to load a file produced by the UNLOAD command.
The DATALOAD command and its subcommands can:
v Identify the tables to be loaded
v Describe the data fields in the input records
v Relate table column names to the input record data fields
v Identify the source of the input records.
You must complete the DATALOAD command on a single record; do not continue
it on a second input record. The record immediately following a DATALOAD
command must contain a Table Column Identification (TCI) subcommand. If, for
example, you want to load data into 10 columns of a table, the first input record
would contain the DATALOAD command, and the next 10 input records would
contain TCI subcommands.
The other subcommands used with the DATALOAD command are INFILE and
ENDDATA. The INFILE subcommand identifies the input data file or, when
followed by an asterisk (*), identifies that the data is in the (input) control file and
immediately follows the subcommand. You use the ENDDATA command to signal
the end of user-supplied data; you do not need it if the input data is in a separate
file.
27
Figure 15 illustrates a DATALOAD command followed by three TCI subcommands
and an INFILE subcommand. Because the input data is contained in the file
NEWACT, the ENDDATA command is not used in this example.
┌──────────────────┐
DATALOAD TABLE (ACTIVITY)
<─────┤ DATALOAD Command |
ACTNO
1-3
└──────────────────┘┌───────────────┐
ACTKWD
7-12
◄─────────────────────────┤ TCI Subcommand |
ACTDESC
18-37
┌───────────────────┐ └───────────────┘
INFILE (NEWACT) ◄───────────────┤ INFILE Subcommand │
└───────────────────┘
Figure 15. DATALOAD Command with Subcommands
The DATALOAD command identifies the table that you want to load the data into
(ACTIVITY). This table is sometimes referred to as the target table.
The next three records identify the names of the columns in the ACTIVITY table
into which you want to insert data. These records are TCI subcommands. The
numbers in the subcommands represent the positions where the data exists on the
input records (that is, they identify the input data fields).
Note: If you are not loading data into the column to the extreme right of the table,
add a TCI subcommand for that column and set it to null. By identifying the
last table column, you avoid space problems in the future when you update
the rows loaded into the table. Enough space is allocated in the table to
include the column farthest to the right that you specified with the TCI
subcommands.
INFILE identifies the file where the input data is located (NEWACT). Figure 16 on
page 29 and Figure 17 on page 30 illustrate how the above DATALOAD command
sequence relates to the target table and the input file.
28
Database Services Utility
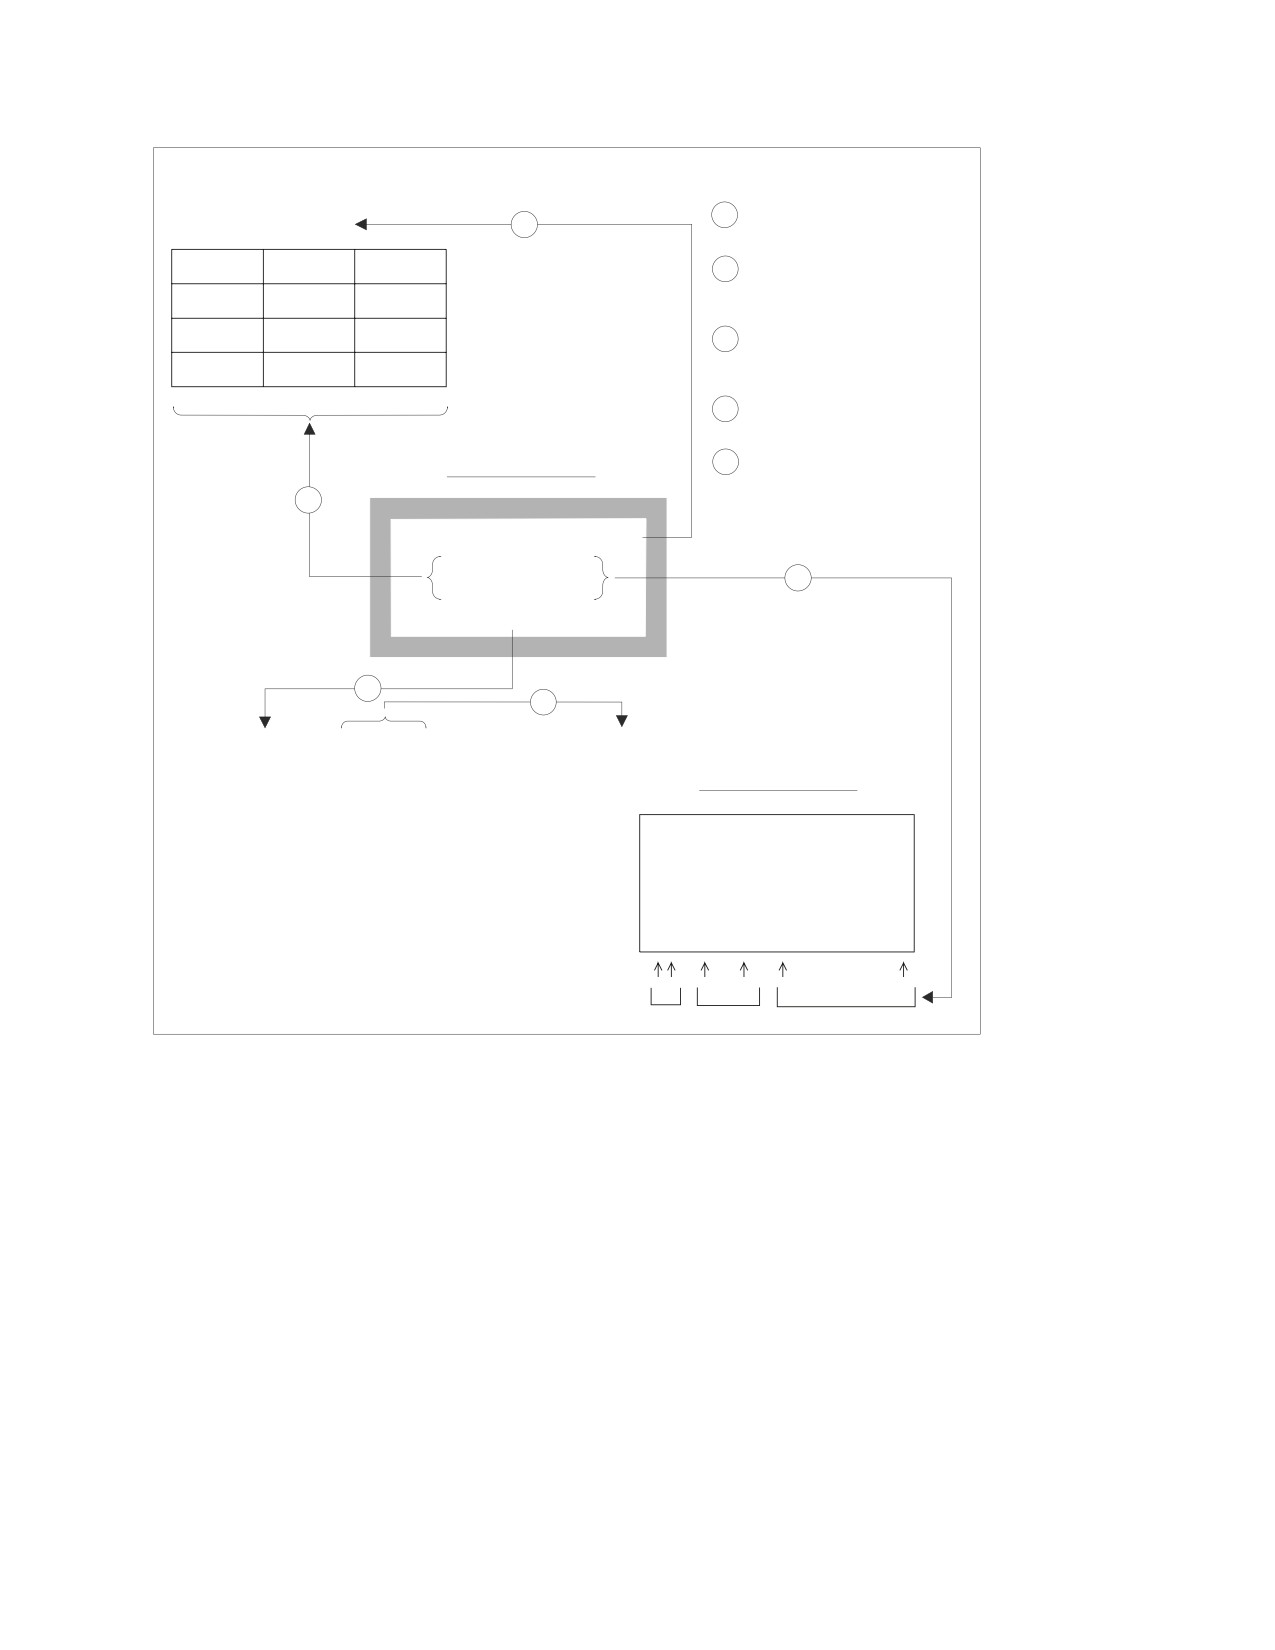
Table to be loaded
Notes:
DATALOAD command
1
ACTIVITY
1
identifies the table to be loaded
ACTNO
ACTKWD
ACTDESC
2
DATALOAD subcommands
identify the names of the table
columns to be loaded
DATALOAD subcommands
3
identify the location of the data
on the records of the input file
INFILE subcommand
4
specifies the input file
5
Identifies the input file
Input Control Card File
2
DATALOAD TABLE (SMITH.ACTIVITY)
ACTNO
1-3
ACTKWD
7-12
3
ACTDESC
18-37
INFILE (NEWACT)
4
5
// TLBL NEWACT, 'ACTIVITY.DATA', 0
ACTIVITY.DATA
Input file of data to load
190
MARKET
MARKETING
200
CUSTOM
CUSTOMER SUPPORT
25
RSRCH
RESEARCH
55
TRAIN
TRAINING
Record Position:
13
7
12
18
37
Figure 16. Schematic Representation of the DB2 Server for VSE DATALOAD Command
Chapter 2. Loading Data with the Database Services Utility
29
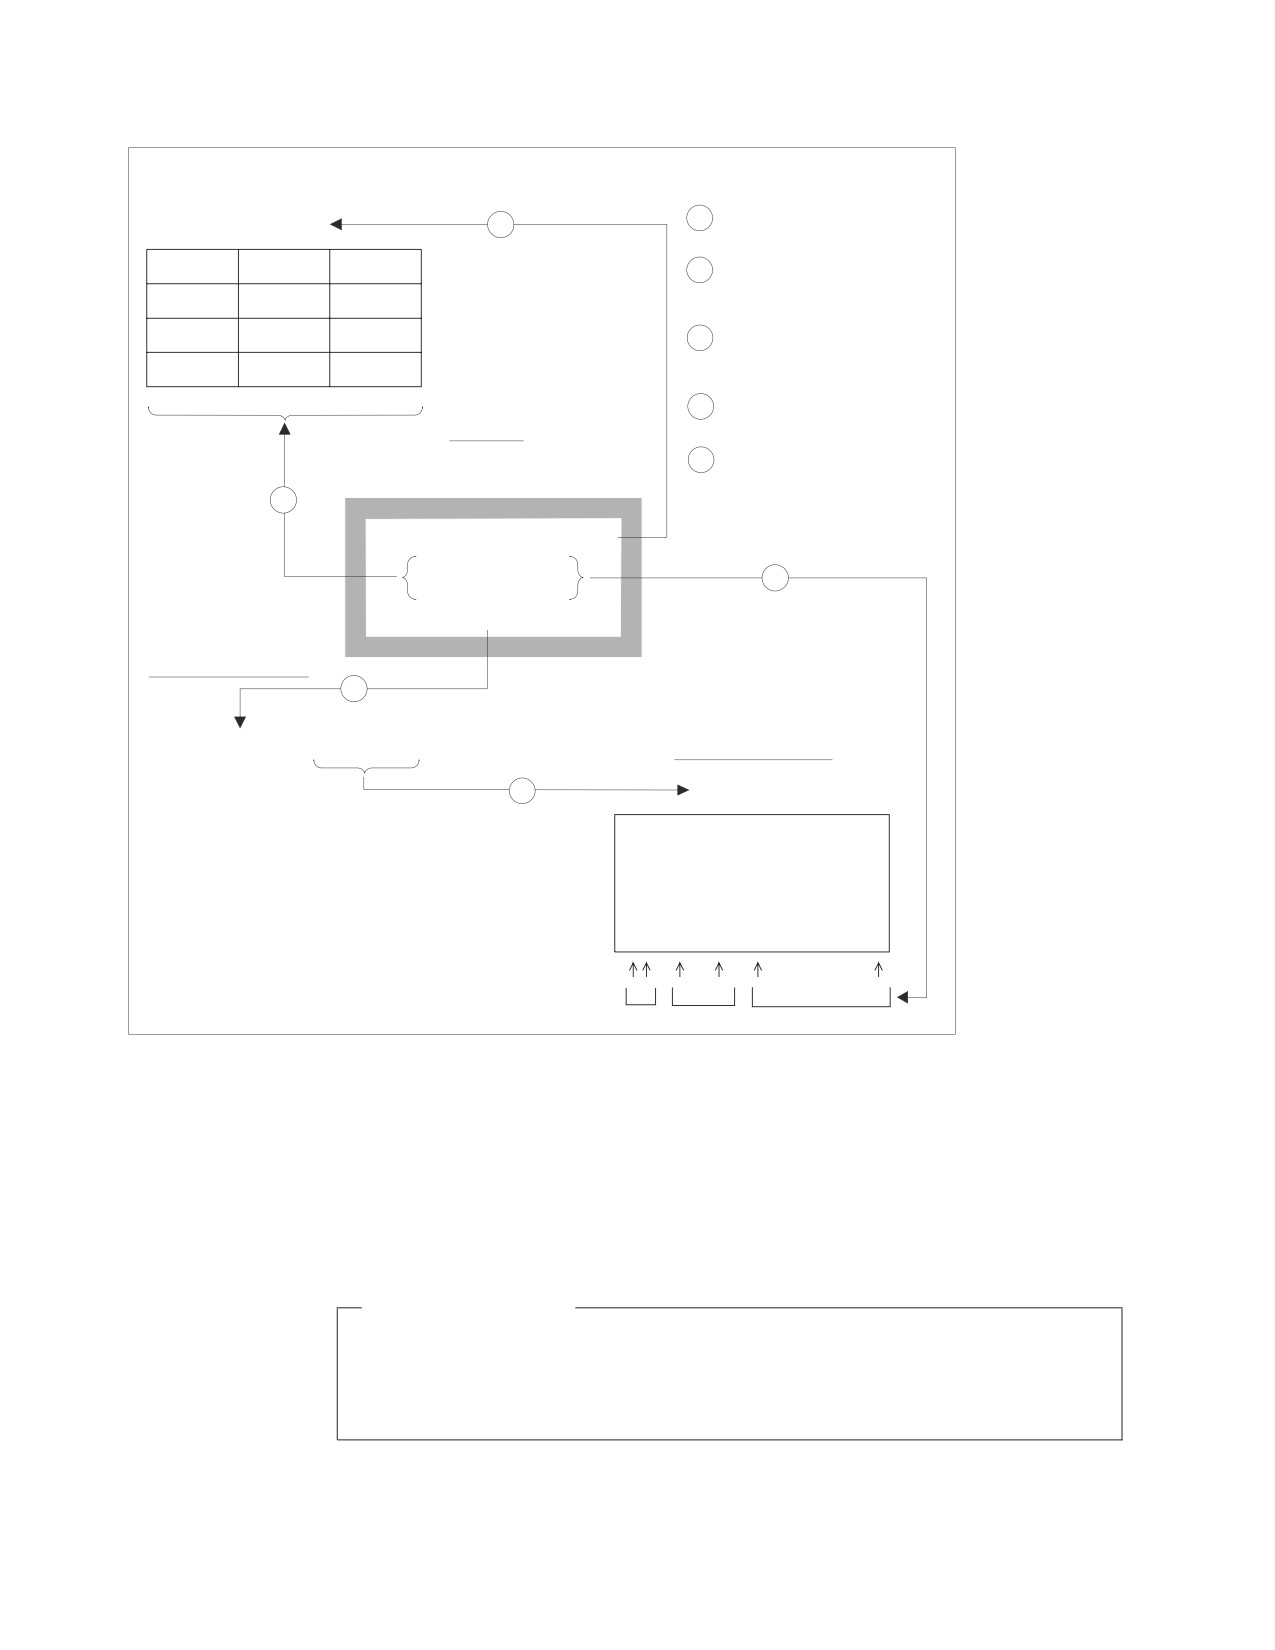
Table to be loaded
Notes:
DATALOAD command
1
ACTIVITY
1
identifies the table to be loaded
ACTNO
ACTKWD
ACTDESC
2
DATALOAD subcommands
identify the names of the table
columns to be loaded
3
DATALOAD subcommands
identify the location of the data
on the records of the input file
4
INFILE subcommand
specifies the input file
Control File
CMS FILEDEF
5
CONTROL DBSINPUT A1
fully identifies the input file
2
DATALOAD TABLE (SMITH.ACTIVITY)
ACTNO
1-3
ACTKWD
7-12
3
ACTDESC
18-37
INFILE (NEWACT)
CMS FILEDEF Command
4
FILEDEF NEWACT DISK ACTIVITY DATA A (RECFM F LRECL 80
Input file of data to load
5
ACTIVITY DATA A1
190
MARKET
MARKETING
200
CUSTOM
CUSTOMER SUPPORT
25
RSRCH
RESEARCH
55
TRAIN
TRAINING
Record Position:
13
7
12
18
37
Figure 17. Schematic Representation of the DB2 Server for VM DATALOAD Command
As with SQL INSERT statements, all columns of a table do not have to be specified
for DATALOAD processing. Specifying the last column of a table is recommended
to avoid problems when updating the rows in the future. If a table column is
omitted, however, the column must be defined to permit nulls. If this rule is
violated, SQL and Database Services Utility error messages are generated, and
DATALOAD processing is not performed.
DB2 Server for VSE
NEWACT is a tape file, because that is the default device type. You must
specify INFILE (NEWACT PDEV(DASD) BLKSZ(2048)) if NEWACT is located
on a direct access storage device (DASD).
30
Database Services Utility
DATALOAD Procedures
You cannot mix other Database Services Utility commands or SQL statements
within the DATALOAD command and its subcommands. The input data file for
this utility is a general-use programming interface. See “Programming Interface
Information” on page 257 for a definition of general-use programming interfaces.
Authorization
DB2 Server for VSE & VM authorization checking prevents you from loading
a table if you do not have proper authority. You must have INSERT and
SELECT privileges on the tables affected by the DATALOAD command.
Using the DATALOAD Command with a Separate Data Input
File
(Input) Control File and Separate Data File
Use the following procedure as a standard method of constructing and
implementing the DATALOAD command. Variations on this procedure appear
throughout this chapter.
Assume that you have a separate (input) control file and data file. Your sequential
access method (SAM) data file exists already, but you want to issue a DATALOAD
command to insert rows into a certain table.
Proceed as follows for DB2 Server for VSE:
1. Provide the following Database Services Utility command:
DATALOAD TABLE (table-name)
where table-name is the name of the table that you want to load with data.
2. Put a TCI subcommand on the next record:
column-name startpos-endpos data-type
where column-name is the name of the table column, startpos is the first
character position in the input record, endpos is the last position in the input
record, and data-type is the data format of the input values. The default data
type is character (CHAR).
3. Repeat the preceding step for each table column into which data is to be
inserted. Any table column that you are not loading data into must allow null
values.
4. On the next record, put:
INFILE (ddname)
where ddname identifies the input file. Use the same ddname in a TLBL or DLBL
statement, depending on whether the data is stored on tape or in a DASD file.
5. Submit the job to run.
Proceed as follows for DB2 Server for VM:
1. Issue the SQLINIT command to initialize the user machine. If you have already
done this, proceed to Step 2.
Chapter 2. Loading Data with the Database Services Utility
31
2.
Create a control file to contain the DATALOAD command, which you construct
in the following steps. See “Working with a Control File in DB2 Server for VM”
on page 13 for detailed information on creating a control file.
3.
Type the command name:
DATALOAD TABLE (table-name)
where table-name is the name of the table.
4.
Enter the first TCI subcommand. On a new line, type:
column-name startpos-endpos data-type
where column-name is the name of the table column, startpos is the first
character position in the input record, endpos is the last position in the input
record, and data-type is the data format of the input values. The default data
type is character (CHAR).
5.
Repeat the preceding step for each table column into which data is to be
inserted. Any table column that you are not loading data into must allow null
values.
6.
On a new line, type:
INFILE (ddname)
where ddname identifies the input file.
7.
Store the control file.
8.
In CMS, specify the necessary FILEDEF statements. When you specify the
FILEDEF statement for the input data file, use the same ddname that you assign
to the INFILE in this procedure. For general information about FILEDEFs, see
“Using File Definitions” on page 14. For command-specific information, see
“Using File Definitions with the DB2 Server for VM DATALOAD Command”
on page 35.
9.
Issue the SQLDBSU EXEC command to run the Database Services Utility. If you
did not specify FILEDEFs for the control and message files, use the default
values in the SQLDBSU EXEC. For more information on the SQLDBSU EXEC,
see “Using the SQLDBSU EXEC” on page 15.
Using a Workstation as a DB2 Server for VM Control File: You can also insert
rows into a table by using your workstation as a control file. To do so, follow the
standard procedure given in “(Input) Control File and Separate Data File” on page
31 for constructing a DATALOAD command, but enter the information in the
following order:
1. In CMS, specify the necessary FILEDEFs.
2. Specify an SQLDBSU EXEC statement that defines SYSIN as T.
3. When the DB2 Server for VSE & VM command entry panel appears, enter the
DATALOAD command, TCI subcommands, and INFILE subcommand.
Using the DATALOAD Command with Embedded Data
(Input) Control File with Embedded Data
The data to load need not be in a separate file; you can include it with the
Database Services Utility commands in the (input) control file. Figure 18 on page
33 shows a DATALOAD command with data following the INFILE subcommand.
32
Database Services Utility
DATALOAD TABLE (ACTIVITY)
ACTNO
1-3
ACTKWD
5-10
ACTDESC
12-31
INFILE (*)
190 MARKET MARKETING
200 CUSTOM CUSTOMER SUPPORT
25
RSRCH RESEARCH
55
TRAIN TRAINING
ENDDATA
Figure 18. DATALOAD Command with Embedded Data
The asterisk parameter (*) of the INFILE subcommand indicates that input data
immediately follows. When such input data is included with a DATALOAD
command, mark the end of it with an ENDDATA subcommand.
The ENDDATA subcommand is valid only when the previous Database Services
Utility command statement processed is INFILE (*).
Match TCI and Data Positions
Enter records following an INFILE(*) subcommand so that the character
positions of the data correspond to the startpos and endpos parameter
specifications of the applicable TCI subcommand.
The following example shows that data inserted in the ACTNO column is
specified as occupying positions 1 through 3 of the input data records.
Because INFILE begins at position 1, you can align position 1 of each data
record under the I of INFILE. The INFILE does not have to begin in position
1, but because it does in this example, you can use it as a guide to position
your data records.
┌───────────┐
DATALOAD TABLE (ACTIVITY)
┌───────────────────────┐
│ TCI
│
│ ACTNO
1-3
│
│ STARTPOS and ENDPOS
│
│Subcommands├─────►│ ACTKWD
5-10 │◄────┤ parameters show where │
└───────────┘
│ ACTDESC
12-31 │
│ ACTIVITY data is
│
INFILE (*)
│ located in the input
│
õ
│ records.
│
│
└───────────────────────┘
┌┴──────────────────────────────┐
│This character marks position 1│
│of the following input records:│
└┬──────────────────────────────┘
│
ø
190 MARKET MARKETING
200 CUSTOM CUSTOMER SUPPORT
25
RSRCH RESEARCH
55
TRAIN TRAINING ┌──────────────────────────────┐
ENDDATA ◄───────────┤The ENDDATA subcommand follows|
|the last embedded data record.|
└──────────────────────────────┘
Use a column scale or ruler when entering DB2 Server for VM embedded
data to align data fields.
Chapter 2. Loading Data with the Database Services Utility
33
To load embedded data, follow the standard procedure in “(Input) Control File and
Separate Data File” on page 31, but construct the INFILE subcommand as follows:
1. On a new (VSE) record or (VM) line, type:
INFILE (*)
where (*) indicates that data follows immediately.
2. On the next record or line, enter the first data record. Align the character
positions to match the positions of the startpos-endpos values. Repeat this step
for each succeeding data record.
3. When you have finished providing data records, type the following on a new
record or line:
ENDDATA
Data Format Support
You can store data in sequential files in different data formats. A file created using
a file editor is usually stored in CHARACTER data format. When a file is
produced by a program, it is possible for the program to store data in one or more
of the following data formats: DECIMAL, FIXED, FLOAT, ZONED, CHARACTER,
DATE, TIME, TIMESTAMP, or GRAPHIC data formats.
The Database Services Utility supports data stored in any of the previously
mentioned data formats. When loading data, the utility automatically converts the
input data to the data type of the particular column of the target table.
Sometimes, rather than using character data, an application program generates
fixed-point binary, floating-point binary, or packed decimal data. You still use the
utility to load the data into a table, but you need to specify that the input data is
no longer CHAR data type. The TCI subcommand has the optional data type
parameter for this purpose. The following example illustrates the use of the TCI
subcommand’s data type parameter FIXED, which indicates that the input data
type is fixed-point binary.
DATALOAD TABLE (ACTIVITY)
ACTNO
1-3
FIXED
ACTKWD
4-9
ACTDESC
10-29
INFILE (NEWACT PDEV(DASD) BLKSZ)
<------DB2 Server for VSE
INFILE (NEWACT)
<------DB2 Server for VM
DATALOAD converts the fixed-point binary data in columns 1-3 to SMALLINT
data type in the table because the corresponding column is defined as SMALLINT.
The data you are loading can be only one or 2 bytes; DATALOAD cannot convert
4-byte fixed data to SMALLINT. If you have 4-byte data, the table column you
load has to be defined as INTEGER.
For further qualifying information, see “DATALOAD Data Conversion Summary”
on page 165.
JCL for the DB2 Server for VSE DATALOAD Command
When you use a separate data input file with the DATALOAD command, you
need to define that file through JCL statements. Use the information in this section
when you construct a job for a Database Services Utility command that requires a
data definition name (ddname). See Figure 19 on page 35 for an example of JCL
statements that define an input data file.
34
Database Services Utility
// JOB DBS Utility Dataload Example
// EXEC PROC=ARIS75PL
// DLBL NEWACT, ’ACT.DATA’,0
// EXTENT SYS006,SQLWK1,1,0,57,76
// ASSGN SYS006,150
// EXEC PGM=ARIDBS,SIZE=AUTO
DATALOAD TABLE (ACTIVITY)
ACTNO
1-3
FIXED
ACTKWD
4-9
ACTDESC
10-29
INFILE (NEWACT PDEV(DASD) BLKSZ)
/*
/&
Figure 19. Example of JCL Statements to Define an Input Data File
The DATALOAD command uses the ddname NEWACT, which refers to the input
data file ACT.DATA in the DLBL statement.
Using File Definitions with the DB2 Server for VM DATALOAD
Command
When you use a separate data input file with the DATALOAD command, you
need to define that file with a FILEDEF statement. Even if you want to type in a
few rows of data from your terminal, you must use the FILEDEF statement to
specify that the input is coming from your terminal. If the data is in a virtual
reader file, you can use the FILEDEF to specify the spooled reader. The only
situation where you do not need a supplementary FILEDEF statement is if the
input data is in the control file.
Use the information in the following section when you construct the FILEDEF
statement for the input data file.
FILEDEFs Supporting DATALOAD Command Processing
In the CMS FILEDEF command that defines the Database Services Utility’s
DATALOAD command input data file, all record format specifications are
supported except for carriage-control characters and undefined format. (Do not use
A, M, or U in your RECFM specification.) If you define CMS input files as VS or
VBS, DATALOAD processing changes the record format to VB.
If you define CMS input files with variable-length spanned records (RECFM=VS or
VBS), you must use the file mode number 4. For example:
FILEDEF ddname DISK filename filetype A4 (options
If the DATALOAD input data file contains records with more than 32 760 positions
of data, you can do one of the following:
1. Use VS or VBS records. Specify as options only the RECFM and Block size
(BLOCK or BLKSIZE) parameters in the FILEDEF command defining the data
file. (The LRECL specification does not apply and would not be overridden if
specified.)
2. Use F or V records if you are running under CMS 15 or later and the
DATALOAD input data file contains records with less than 65 536 positions of
data.
A sample FILEDEF command defining a CMS file for DATALOAD command
processing is:
FILEDEF DBSFILE DISK DBSFILE DATA A (RECFM F LRECL 80
Chapter 2. Loading Data with the Database Services Utility
35
where DBSFILE is the name of the data input file as it is referred to in your
program. For more information on FILEDEF parameters and options, see
Appendix B, “FILEDEF Command Syntax and Notes,” on page 249.
Use the Same File Definition for DATALOAD as for DATAUNLOAD
If the input data file was created by DATAUNLOAD processing, then the
CMS FILEDEF command that defines the DATALOAD input data file should
be identical to the information in the FILEDEF command used when the file
was created by DATAUNLOAD processing.
General Loading Procedures
Comparison Operators
In the procedures that follow, you specify a comparison operator. The following
comparison operators are supported by the Database Services Utility:
Comparison Operators
=
Equal to
¬=
Not equal to
<>
Not equal to
>
Greater than
>=
Greater than or equal to
<
Less than
<=
Less than or equal to
Loading Null Values
Suppose that you are loading data to a table named DEPARTMENT in columns
DEPTNO, DEPTNAME, MGRNO, and ADMRDEPT, but you do not have a
manager for every department. You still want to insert the DEPTNO, DEPTNAME,
and ADMRDEPT into the database. For those departments that do not have a
manager, you want to insert a null value. Use the TCI subcommand’s
null-current-clause. Figure 20 illustrates one way to code the MGRNO TCI to load
null values.
DATALOAD TABLE (DEPARTMENT)
DEPTNO
1-3
DEPTNAME
5-40
MGRNO
42-47
NULL IF POS (42-47)=’
’
<——6 blanks.
ADMRDEPT
49-51
INFILE (NEWDEPT)
Figure 20. TCI Subcommand with a Null Clause
A translation of this clause is: make the corresponding table field null if
input-record positions 42 through 47 are blank.
To specify a null condition in the TCI subcommand, do the following:
1. Leave one or more spaces after the TCI subcommand’s endpos (or data type)
parameter, and include:
NULL IF POS (startpos-endpos) operator constant
where startpos is the first character position in the input record that contains the
comparison string, endpos is the last position of the string, constant is the value
36
Database Services Utility
against which the string at position startpos-endpos is to be compared, and
operator is a comparison operator. (See “Comparison Operators” on page 36 for
a list of comparison operators.) Do not put spaces within the brackets.
2. Proceed to the next DATALOAD subcommand.
Note: The positions checked for the null value need not be in the same positions
occupied by the data field for the column. You can assign the null value to a
column depending on any convention you choose. For example, to set the
MGRNO column to NULL whenever a blank exists in position 11 of the
DEPTNAME column, code the MGRNO TCI as follows:
MGRNO 42-47 NULL IF POS (11) = ' '
However, if the positions of the data fields and the positions specified by the
startpos and endpos in the subcommand’s null-current-clause overlap, your data
may be overlaid. For more information on the null-current-clause, see page 155.
Alternative Method
Another way to insert null values into the database for new rows is by
omitting a TCI subcommand for that column:
DATALOAD TABLE (DEPARTMENT)
DEPTNO
1-3
DEPTNAME
5-40
ADMRDEPT
49-51
INFILE (NEWDEPT)
In the above example, there is no TCI subcommand for the MGRNO column
of the DEPARTMENT table. For each new row inserted, the MGRNO field is
null. The columns that the utility loads null values into must permit nulls.
Loading CURRENT DATE, CURRENT TIME, and CURRENT
TIMESTAMP Values
The database manager supports the following date and time formats: International
Standards Organization (ISO) form, IBM Standard for Europe form (EUR), IBM
Standard for the U.S. form (USA), Japanese Industrial Standard Christian Era form
(JIS), and an installation-defined form (LOCAL).
Suppose that someone created the following table with the SQL CREATE TABLE
statement and you want to load data into the table.
CREATE TABLE PAYABLE
(COMPANY
CHAR(20),
PAYMENT_DUE DATE,
AMOUNT
DEC(9,2));
Some of the companies in the PAYABLE table are in arrears with their payments.
For these organizations, you want the payment due date to be today’s date. Use
the TCI subcommand’s null-current-clause. Figure 21 on page 38 shows one way to
code the TCI subcommand PAYMENT_DUE to load the current date. (This
example does not use the sample tables; therefore, do not attempt to process it.)
Chapter 2. Loading Data with the Database Services Utility
37
DATALOAD TABLE (PAYABLE)
COMPANY
1-20
PAYMENT_DUE
22-31 CURRENT DATE IF POS(22-30) = ’IMMEDIATE’
AMOUNT
35-45
INFILE(*)
VESUVIUS, INC.
2000-05-01
5000.00
ATLANTIS CO.
28.05.1999
3820.00
TITANIC LTD.
IMMEDIATE
7250.00
SKY INC.
05/22/1999
300.00
ENDDATA
Figure 21. TCI Subcommand with a Current-Date Clause
A translation of the current date clause is: load the corresponding table field with
the current date if input-record positions 22 through 30 contain the string
IMMEDIATE.
To specify a current date in the TCI subcommand, proceed as follows:
1. Leave one or more spaces after the TCI subcommand’s ENDPOS (or
DATATYPE) parameter, and include:
CURRENT DATE IF POS (startpos-endpos) operator constant
where startpos is the first character position in the input record that contains the
comparison string, endpos is the last position of that string, constant is the value
against which the string startpos-endpos is to be compared, and operator is a
comparison operator. See “Comparison Operators” on page 36 for a list of
comparison operators.
2. Proceed to the next DATALOAD subcommand.
To load current times and timestamps, replace CURRENT DATE with CURRENT
TIME or CURRENT TIMESTAMP in Step 1 of this procedure. For example, in
Figure 21 on page 38, you could replace CURRENT DATE with CURRENT TIME if
the PAYMENT_DUE column were TIME data type.
Note: The current date, current time, and current timestamp value is acquired by
Database Services Utility at the start of the DATALOAD command
processing, and will not change throughout the DATALOAD command
processing.
Loading Data into Multiple Tables
You can load the same data records into more than one table, or load different data
records in the same input file into their respective tables. When you are loading
data into more than one table, the Database Services Utility automatically performs
an UPDATE STATISTICS (unless a SET UPDATE STATISTICS OFF command has
been issued) after the DATALOAD command processing is completed successfully.
Loading Mixed INFILE Records into the Correct Tables
If you had to load data into two tables, you would probably prepare two
DATALOAD commands that could be run either separately or consecutively in the
same (input) control file. This is shown in Figure 22 on page 39.
38
Database Services Utility
DATALOAD TABLE (ACTIVITY)
ACTNO
1-3
ACTKWD
5-10
ACTDESC
12-31
INFILE (*)
190 MARKET MARKETING
200 CUSTOM CUSTOMER SUPPORT
25
RSRCH RESEARCH
55
TRAIN TRAINING
ENDDATA
DATALOAD TABLE (DEPARTMENT)
DEPTNO
1-3
DEPTNAME
5-23
MGRNO
25-30
ADMRDEPT
32-34
INFILE (*)
F01 PERSONNEL
000110 A00
G01 MARKETING AND SALES 000120 A00
ENDDATA
Figure 22. Separate DATALOAD Commands Run Successively
If, for some reason, the input data records for two tables were mixed in one data
group, you could run the single data group against multiple DATALOAD
commands. This is possible with the use of the DATALOAD statement’s
input-record-id clause. Figure 23 shows two DATALOAD commands that share one
INFILE(*) subcommand. Both DATALOAD commands have input-record-id clauses
that specify the records that belong to each table.
DATALOAD TABLE (ACTIVITY) IF POS (54)=’1’
ACTNO
1-3
───────┬───────
ACTKWD
5-10
│
ACTDESC
12-31
└────────────────────┐
DATALOAD TABLE (DEPARTMENT) IF POS (54)=’2’
│
DEPTNO
1-3
───────┬───────
┌───────┴───────┐
DEPTNAME
5-23
└──────────┤INPUT-RECORD-ID│
MGRNO
25-30
│
Clauses
│
ADMRDEPT
32-34
└───────────────┘
INFILE (*)
190 MARKET MARKETING
1
F01 PERSONNEL
000110 A00
2
200 CUSTOM CUSTOMER SUPPORT
1
G01 MARKETING AND SALES 000120 A00
2
25
RSRCH RESEARCH
1
55
TRAIN TRAINING
1
ENDDATA
õ
│
┌─────────────┐
│
│Column 54,
├────┘
│Control Field│
└─────────────┘
Figure 23. DATALOAD Commands Sharing a Data File
Translations of the input-record-id clauses are:
v ACTIVITY Table. If position 54 of an input data record contains a
1, load the
ACTIVITY table with that record.
Chapter 2. Loading Data with the Database Services Utility
39
v DEPARTMENT Table. If position 54 of an input data record contains a 2, load
the DEPARTMENT table with that record.
To load separate tables with mixed input data from a single file, proceed as
follows:
1. Leave one or more spaces after the DATALOAD command’s table-name
parameter, and include:
IF POS (startpos-endpos) operator constant
where startpos is the first character position in the control field, endpos is the last
position in that field, constant is the value against which the string
startpos-endpos is to be compared, and operator is a comparison operator. See
“Comparison Operators” on page 36 for a list of comparison operators.
2. Enter each TCI subcommand on a new line by including:
column-name startpos-endpos data-type
where column-name is the name of the table column; startpos is the starting
position of the input record; endpos is the last position in the input record; and
data-type is the data format of the column values. If the data type is character
(CHAR), you can omit it.
3. Repeat the previous two steps for each table to be loaded (that is, for each
DATALOAD command).
4. Continue with command and data entry.
Note: Ensure that the control field occupies the same position or positions in each
of the data records of the input file.
Loading a Single Record into Several Tables
When the Database Services Utility loads records from a mixed input file into
multiple tables, each data record is inserted into a particular table only. You can
also write DATALOAD commands so that a single input data record can be a
source of rows in more than one table. For example, suppose that you want to
expand your activities for each project. Each activity number added to the
ACTIVITY table has a corresponding activity number added to the PROJ_ACT
table. To use a single input data record to make entries in these two tables, you
could code utility commands as shown in Figure 24.
DATALOAD TABLE(ACTIVITY)
ACTNO
1-3
ACTKWD
5-10
ACTDESC
12-27
DATALOAD TABLE(PROJ_ACT)
PROJNO
29-34
ACTNO
36-38
ACSTAFF
40-43
ACSTDATE
45-54
ACENDATE
56-65
INFILE (*)
190 MARKET MARKETING
AD3100 190 0.50 1999-01-02 1999-04-30
200 CUSTOM CUSTOMER SUPPORT OP2000 200 1.50 1998-03-01 1999-12-31
55
TRAIN TRAINING
IF2000 55
1.00 1999-02-01 1999-09-05
ENDDATA
Figure 24. Individual Records Supplying the Same Activity Number to Two Tables
In Figure 24, each DATALOAD command has its own set of TCI subcommands
that point to unique positions on the same input record.
40
Database Services Utility
Sixteen DATALOADs Sharing One INFILE
When more than one DATALOAD command (without input-record-id
clauses) precedes an INFILE subcommand, the input data identified by the
INFILE subcommand is used for all tables identified in the DATALOAD
commands. A maximum of 16 DATALOAD commands can precede an
INFILE subcommand. You can load 16 tables at the same time.
In Figure 24, the activity number is repeated twice (once for the ACTIVITY table
and once for the PROJ_ACT table) in each input data record. Eliminate the need
for duplicate fields by using TCI subcommands for each of the tables that point to
the same physical location in the input record, as shown in Figure 25.
DATALOAD TABLE(ACTIVITY)
┌────────────────────────┐
ACTNO
1-3
◄────────│
│
ACTKWD
5-10
│ These two subcommands
│
ACTDESC
12-27
│ point to the same
│
DATALOAD TABLE(PROJ_ACT)
│ physical location in
│
PROJNO
29-34
│ the input data records.│
ACTNO
1-3
◄────────│
│
ACSTAFF
40-43
└────────────────────────┘
ACSTDATE
45-54
ACENDATE
56-65
INFILE (*)
190 MARKET MARKETING
AD3100
0.50 1989-01-02 1989-04-30
200 CUSTOM CUSTOMER SUPPORT OP2000
1.50 1989-03-01 1995-12-31
55
TRAIN TRAINING
IF2000
1.00 1989-02-01 1989-09-05
ENDDATA
Figure 25. TCIs in Individual DATALOADs That Point to the Same Location
To use similar TCI subcommands in multiple DATALOAD TABLE commands,
proceed as follows:
1. Find the correct startpos-endpos value for each TCI subcommand that is common
to more than one table.
2. Include the TCI statement in each affected DATALOAD command, and give the
same startpos-endpos value for each.
Combining Records to Load Multiple Table Rows
Usually, one input data record provides information for one table row. This is
illustrated in Figure 26 on page 42.
Chapter 2. Loading Data with the Database Services Utility
41
DATALOAD TABLE(ACTIVITY)
ACTNO
1-3
ACTKWD
5-10
ACTDESC
12-27
INFILE (*)
190 MARKET MARKETING
200 CUSTOM CUSTOMER SUPPORT
25
RSRCH RESEARCH
55
TRAIN TRAINING
ENDDATA
Figure 26. Normal Relationship: One Record for One Row
Using multiple DATALOAD commands, however, you can load more than one
table row with each input data record. Figure 27 presents a way of using multiple
DATALOAD statements to load combined records into the same table.
DATALOAD TABLE(ACTIVITY)
ACTNO
1-3
ACTKWD
5-10
ACTDESC
12-27
DATALOAD TABLE(ACTIVITY)
ACTNO
29-31
ACTKWD
33-38
ACTDESC
40-55
INFILE(*)
190 MARKET MARKETING
200 CUSTOM CUSTOMER SUPPORT
25
RSRCH RESEARCH
55
TRAIN TRAINING
ENDDATA
Figure 27. Combined Records: Each for Two Rows
In the above example, two rows are inserted into the ACTIVITY table for each data
record that is read.
To load combined records into the same table, proceed as follows:
1. Decide how many simple data records the combined record should contain; this
is the number of DATALOAD statements needed. Provide the required number
of DATALOAD TABLE commands, each with the same table name.
2. Provide each DATALOAD TABLE command with a set of identical TCI
subcommands.
3. Determine the correct startpos-endpos values for each DATALOAD command
set; provide the appropriate value to each TCI statement.
4. In VSE, provide the INFILE(*) data as combined records. In VM, enter the
INFILE(*) data as combined records—with each record on a separate line.
Ensure that this data is positioned to correspond to the startpos-endpos values in
the TCI subcommands.
Processing Data That Spans More Than One Input Record
You can load data that is continued onto the next physical record. Figure 28 on
page 43 illustrates the command sequence necessary to load data from 80-byte
input data records into the columns ACTNO and ACTDESC in the table named
SQLDBA.ACTIONS where:
v The column ACTNO is defined with the data type CHAR(10).
v The column ACTDESC is defined with the data type VARCHAR(100).
42
Database Services Utility
┌─────────────────────────┐
│Activity description that│
DATALOAD TABLE(SQLDBA.ACTIONS)
│is 77 positions long and │
ACTNO
1─10
│cannot fit on one record.│
ACTDESC
11─110
└─────────────────────┬───┘
INFILE(* CONTINUED(YES))
│
C1234567890THIS ACTIVITY DESCRIPTION FILLS IN THE ENTIRE LOGICAL RECORD LENGTH│◄──────┘
AND MORE
│
C1234567891THIS DESCRIPTION DOES NOT USE THE WHOLE RECORD│◄───────────────────────────┐
│
│
õ
│
│
┌─────────────────────┴───┐
│
│Activity description that│
│
│is 46 positions long.
│
│
┌────────────────────────┐
│The next record is blank │
│
│ Position 1 of the input│
│to fill in the rest of
│
└─────────────────────┤ data record contains a │
│the 100 positions.
│
│ continuation character.│
└─────────────────────────┘
└────────────────────────┘
ENDDATA
Figure 28. Specifying Continued Input Records
The CONTINUED parameter of the INFILE subcommand indicates that continued
records are in the input data. If position 1 of an input data record contains a
character, the input data is continued onto the next physical input data record. The
above example uses a C as a continuation character, but you can use any character.
The first position of each input file data record is not included in the actual input
data, so character positions begin numbering from the second position. Therefore,
the physical position 2 of an input data record is referred to as position 1 in the
TCI subcommand.
If position 1 of the input data record is blank, the input data is contained on a
single logical input record, or it is the terminating row of a continued record. All
actual input data records must be at least as long as the highest end-position value
specified in a TCI subcommand. In this situation, the ACTDESC field must be 100
characters in length. Therefore, a second physical input line containing all blanks is
necessary to extend the ACTDESC field of the second logical input record
(beginning with ACTNO=1234567891) to the maximum length value of 100.
If the highest TCI endpos value exceeds the input record length, you need to use
continued input records. To construct a Database Services Utility command to load
continued physical input records into a table, proceed as follows:
For DB2 Server for VSE
1. Define the DATALOAD TABLE and TCI statements in the usual way.
2. Put the INFILE statement with the CONTINUED parameter on the next record:
INFILE (* CONTINUED(YES))
The CONTINUED parameter must be on the same record as INFILE.
3. Provide the data records:
C ...data...
where C can be the character C or any other character, and ...data... is the actual
input-record data to a maximum of 79 characters.
Chapter 2. Loading Data with the Database Services Utility
43
4. Depending on the length of the physical input record, do one of the following:
v If the physical record length exceeds the logical record length (LRECL=80),
continue entering the data, beginning in position 2 of the following input
record. Do not put a continuation character on the second record.
v If the physical record length is less than the logical record length
(LRECL=80), leave the following input record blank.
If you have to enter more than two records for a physical input record, put a
continuation character at the beginning of each record except the last one. The
blank in position 1 terminates that input record.
5. For each data record, repeat the preceding two steps.
6. Indicate the end of input data. On a new record, put:
ENDDATA
For DB2 Server for VM
1.
Define the DATALOAD TABLE and TCI statements in the usual way.
2.
Type the INFILE statement as far as the asterisk:
INFILE (*
3.
Enter the CONTINUED parameter. On the same line, leave one space; then
type:
CONTINUED(YES))
4.
Enter the data records. Type:
C ...data...
where C can be the character C or any other character, and ...data... is the actual
input-record data to a maximum of 79 characters.
5.
Depending on the length of the physical input record, do one of the following:
v If the physical record length exceeds the logical record length (LRECL=80),
continue entering the data, beginning in position 2 of the following input
line. Do not put a continuation character on the second line.
v If the physical record length is less than the logical record length
(LRECL=80), leave the following input line blank.
If you have to enter more than two lines for a physical input record, put a
continuation character at the beginning of each line except the last one. The
blank in position 1 terminates that input record.
6.
For each data record, repeat the preceding two steps.
7.
Indicate the end of input data. On a new line, type:
ENDDATA
Committing Work While Loading Data
If the SET AUTOCOMMIT ON command has been issued, the DATALOAD
command can specify that the utility issue SQL COMMIT statements periodically
during processing. The interval is specified in terms of a specific number of input
records processed by DATALOAD. A record is considered to be processed by
DATALOAD when it is read and appropriate action is taken. The action is one of
the following:
v Skip the record because input record selection criteria are not met
v Insert data from the record into one or more tables.
You indicate the number of records by specifying the COMMITCOUNT(ccount)
parameter on the INFILE subcommand. Each time that COMMIT processing is to
begin, a message (ARI0800I) is written to the message file containing the number
44
Database Services Utility
of input records processed up to this point. The message is written as a result of
COMMITCOUNT processing. You also receive a message (ARI0811I) to inform you
that the changes were committed successfully.
When to Use the COMMITCOUNT Parameter
You can use COMMITCOUNT to minimize lock interface with other users of a
dbspace or a table. If you set the value of ccount low enough, escalation is avoided.
The COMMITCOUNT parameter also helps reduce log space requirements during
execution with multiple user mode.
To cause the Database Services Utility to commit work during processing, proceed
as follows:
1. On the same record as the INFILE subcommand, leave one or more spaces,
then include:
COMMITCOUNT(ccount)
where ccount is a number from 1 to 2,147,483,647.
2. Specify the rest of the DATALOAD TABLE command set.
Specifying a COMMITCOUNT value commits that number of input records to the
database as soon as the Database Services Utility has processed them.
Error-Processing Example
Assume that an error occurs in a job for which a COMMITCOUNT value of
1000 has been specified. If the error occurs during the processing of record
99 501 in a 100 000-record file, a ROLLBACK (implicit) command is processed
only for the database row inserts performed for the last 500 records (records
99 001 to 99 500).
If any INSERT commands are processed during DATALOAD processing of
the first 99 000 records, they have already been committed to the database.
Specifying a COMMITCOUNT of 1000 causes COMMIT processing to be
done after every 1000 input data records are processed. The last messages in
the (VSE) report or (VM) message file are:
ARI0800I ...Begin COMMIT. Input Record Count = 99000
ARI0811I ...COMMIT of any database changes was successful.
Determining the Number of Records Processed
During DATALOAD processing of files containing more than 15,000 data records, a
message (ARI8995I) is written to either the VSE operator console or your VM
terminal after every 15,000 records to let you know that the job is running
normally and that n input records have been processed. These messages appear
unless:
v You used the INFILE subcommand’s COMMITCOUNT parameter and assigned
the report or message file to your terminal.
v The number of records is fewer than 15,000.
Skipping Bad Records
A bad data record is one that:
v Contains a data field that cannot be converted to the data type of its target
column
Chapter 2. Loading Data with the Database Services Utility
45
v Contains a data value that causes an SQL INSERT data-conversion or a
nonunique-column-value error.
If the COMMITCOUNT parameter is specified with AUTOCOMMIT ON, and
ERRORMODE CONTINUE processing is in effect, DATALOAD processing skips
bad data records. Processing continues under the following circumstances:
v An error identified by ARI0866E occurs.
v An SQL INSERT error identified by SQLCODE -405, -424, -530, -802, or -803
occurs followed by message ARI0862E, and insert blocking is not in effect.
Insert blocking is not in effect under the following conditions:
v Database Services Utility is running with single user mode.
v Database Services Utility is running with multiple user mode but was
preprocessed with the NOBLOCK option.
v Insert blocking is suppressed by the database manager.
A bad data record is not skipped, and DATALOAD processing is terminated under
the following conditions:
v The first 256 records of data are bad.
v Multiple DATALOAD commands are used preceding an INFILE subcommand
when an insert error occurs, and the record or a portion of the record has
already been used for a successful insert by any of the DATALOAD commands.
v An error, other than an SQL INSERT error identified by SQLCODE -405, -424,
-530, -802, or -803, occurs.
Tables in Nonrecoverable Storage Pools
A nonrecoverable storage pool is a pooled storage area for which there is no
automatic recovery action to restore data to the condition it was in before a
system failure or a failed operation. The message:
ARI8990I The table tablename is in a
nonrecoverable storage pool.
is written before DATALOAD table insert processing begins if one of the
tables you are loading resides in a nonrecoverable storage pool. This message
indicates that changes made to this table by the DATALOAD command are
not deleted by a ROLLBACK statement if an error occurs.
Restarting the Loading Process
The Database Services Utility is designed to run despite minor errors. If, however,
an error is serious enough to halt the utility, you must rerun your particular
Database Services Utility command and reprocess all your files; you cannot simply
restart the Database Services Utility from the point of failure.
The COMMITCOUNT parameter, introduced in the preceding section, saves
processed data at intervals that you specify. This saves you processing time
because, although you must rerun jobs from the beginning, you do not have to
reprocess data that has already been committed to the database. The part of the
DATALOAD TABLE command that lets you bypass records is the
RESTARTCOUNT parameter.
46
Database Services Utility
In general, you want to skip any records that have been successfully processed and
also any bad input records. To run a job that has errors, proceed as follows:
1. Prepare the DB2 Server for VSE job and commands for the Database Services
Utility and submit the job to run; or prepare the necessary DB2 Server for VM
files and invoke the Database Services Utility.
2. When the job cancels (in VSE) or halts (in VM) with an error, determine (from
the messages sent) the number of records, if any, committed and the number of
records processed up to the start of the error condition.
Note: If you were running the Database Services Utility without SET
AUTOCOMMIT protection, or with too high a COMMITCOUNT value,
you could rerun the job with SET AUTOCOMMIT ON and an
appropriately low COMMITCOUNT value to save the successfully
processed records. If you choose this course of action, return to step 1.
3. Before rerunning the job, add the following parameter to the DATALOAD
TABLE command:
RESTARTCOUNT(rcount)
where rcount specifies the number of input records to be skipped. In general,
start processing from the last COMMIT action.
4. Remove the error condition, if possible.
5. Rerun the job.
If a DATALOAD job is canceled or halted repeatedly by errors, or if bad records
are causing the errors, consider using the following:
1. Specify as the RESTARTCOUNT value the input record count of the last
ARI0800I message. A sample ARI0800I message looks like this:
ARI0800I ...Begin COMMIT. Input Record Count = 100
2. Specify the COMMITCOUNT value again to equal the number of records
between the value found in the preceding step and the bad record.
3. Rerun DATALOAD up to the point of failure. This skips the previously
committed records and commits the remainder up to the bad record.
4. Specify as a new RESTARTCOUNT value the input record count of the latest
ARI0800I message plus n, where n is the number of bad records. (You can also
specify the COMMITCOUNT parameter again to its original value.)
5. Rerun the job. DATALOAD processing begins at a point beyond the bad
records and the previously committed work.
If you were running a DATALOAD job with the COMMITCOUNT set to 100, but
the job was unsuccessful at record 151, you could run DATALOAD again with a
new COMMITCOUNT value and restart after the number of records that were
committed:
DATALOAD TABLE(SMITH.DEPARTMENT)
IF POS (50) = ’X’
INFILE(SOMEDEPT) COMMITCOUNT(50) RESTARTCOUNT(100)
Now you have committed all the records up to the bad record. To skip the bad
record, change the RESTARTCOUNT value, and restore the COMMITCOUNT
parameter to its original value:
DATALOAD TABLE(SMITH.DEPARTMENT)
IF POS (50) = ’X’
INFILE(SOMEDEPT) COMMITCOUNT(100) RESTARTCOUNT(151)
Chapter 2. Loading Data with the Database Services Utility
47
Alternative Method
You can specify that the Database Services Utility ignore certain error
conditions and continue processing records:
1. Immediately before the DATALOAD command set in the (input) control
file, include:
SET ERRORMODE CONTINUE
2. On the same line as INFILE, add:
COMMITCOUNT(ccount)
where ccount is the number of input records to be processed before a
COMMIT action is taken.
3. Run the job.
Although this procedure skips bad records, it does not pinpoint them. After a
job is finished, compare the loaded table with source input documents to
locate missing table rows.
For more information on Database Services Utility’s error handling, see
Chapter 9, “Error Handling and Debugging,” on page 223.
Statistics Collection
The database manager generates table statistics while loading the data and
calculates index statistics while creating an index. This method of creating statistics
avoids doing a dbspace scan and a separate scan of the index pages, which are
done when you issue an UPDATE STATISTICS statement.
The database manager generates table statistics while the Database Services Utility
DATALOAD, RELOAD TABLE, and RELOAD DBSPACE commands are loading
data only if the SET UPDATE STATISTICS command is set to ON. Other rules that
must be met if statistics are to be collected for DATALOAD processing are:
v The DATALOAD command is loading data into only one table.
v No indexes exist on the table. If indexes do exist, the Database Services Utility
issues an UPDATE STATISTICS after the load is complete to generate index and
table statistics.
v The table being loaded currently contains no data; statistics are accumulated
only for rows that are being loaded. If the table already contains data and
statistics are generated when more rows are loaded, the statistics would not
accurately describe the entire table. For example, to load 5000 rows into a
500000-row table, and have the table’s statistics describe only the 5000 rows that
were loaded, would not be accurate. For this reason, statistics are not generated
when you specify the RESTARTCOUNT option. The use of RESTARTCOUNT
implies that a DATALOAD with the COMMITCOUNT option had already
loaded rows into the table, a failure occurred, and the DATALOAD is being
restarted at the point of the most recent COMMIT. Clearly, there are already
rows in the table.
The database manager determines that rows are already in the table when the
ROWCOUNT column of the SYSCATALOG table is a positive number for the
table you are loading. Generally, a positive number in the ROWCOUNT column
indicates that the table contains rows, but if you delete all the data from the
48
Database Services Utility
table without updating the statistics, ROWCOUNT still contains a positive
number. You must update the statistics to set the ROWCOUNT to zero before
loading data into that table.
If, for any of the above reasons, table statistics were not generated while data was
being loaded, the Database Services Utility executes an SQL UPDATE STATISTICS
statement for each table loaded after DATALOAD or RELOAD command
processing successfully ends. Statistics are neither updated automatically nor is an
UPDATE STATISTICS statement executed under either one of the following
conditions:
v A SET UPDATE STATISTICS OFF command was issued before the DATALOAD
or RELOAD command.
v A view name was specified instead of a table name.
Chapter 2. Loading Data with the Database Services Utility
49
50
Database Services Utility
Chapter 3. Unloading Data with the Database Services Utility
This chapter describes the DATAUNLOAD command first, and then describes the
UNLOAD commands, beginning with “UNLOAD Procedures” on page 63.
To selectively unload data from tables and views, use the DATAUNLOAD
command. The DATAUNLOAD command creates a sequential file of data that you
can modify and reload into a table with the DATALOAD command.
If you want to create a backup for specific dbspaces or tables, use the UNLOAD
command. The UNLOAD command also allows you to move data in units of
tables (one table or all the tables in a dbspace) to another database manager. If you
want to reclaim fragmented disk space or reorder data records to match indexes,
use the UNLOAD command followed by the RELOAD command.
Refer to the appropriate sections of the earlier chapters for details about invoking
the Database Services Utility and defining files.
DATAUNLOAD Procedures
Database Services Utility DATAUNLOAD processing enables you to unload data
from tables and views to a user-defined sequential access method (SAM) file record
format. You can also unload data from remote application servers that support the
DRDA flow. The data to be unloaded is selected from the database with an SQL
SELECT statement that you supply. The output data file for this utility is a
general-use programming interface. See “Programming Interface Information” on
page 257 for a definition of general-use programming interfaces.
In general, each output record resulting from DATAUNLOAD processing contains
data for a row of a table. These output data records reside in a sequential file. In a
VM system, you must define this file using the CMS FILEDEF command.
The sequential output file can contain fixed, variable-length, or
variable-length-spanned records. The records can be blocked or unblocked. A
standard SELECT statement in its SQL syntax is used in the DATAUNLOAD
command set as a mandatory subcommand. The DATAUNLOAD command and
its subcommands can:
v Identify the tables to be unloaded
v Describe the data fields in the output records
v Relate table column names to output record data fields
v Identify the source of the output records.
A DATAUNLOAD command contains four elements, as shown in Figure 29 on
page 52.
51
┌─────────────────┐
│The DATAUNLOAD
│
│command statement├─────────► DATAUNLOAD
└─────────────────┘
│ SELECT EMPNO,PROJNO,ACTNO,EMPTIME
┌─────────────┐
│ FROM EMP-ACT
│An SQL SELECT├────────────►│ WHERE EMPTIME>0.5
│statement
│
│ ORDER BY ACTNO;
└─────────────┘
┌──────────────┐
│ EMPNO 1-6
│DATA FIELD
│
│ PROJNO 8-14 CHAR
│IDENTIFICATION├───────────►│ ACTNO 16-18 INTEGER
│subcommands
│
│ EMPTIME 20-25 DECIMAL
└──────────────┘
┌──────────────────┐
│OUTFILE subcommand├────────► OUTFILE(INVOUT)
└──────────────────┘
Figure 29. DATAUNLOAD Command Sequence
The DATAUNLOAD command statement consists of a single word and occupies
the first record of the command set in the Database Services Utility (input) control
file.
The SQL statement, the second element in the command set, occupies one or more
control file input records. Its syntax and sequence of keywords are the same as
they would be if used outside the Database Services Utility.
Entering Commands from a Workstation
Most Database Services Utility commands and all SQL statements must end
with a semicolon (;) when the control file is assigned to TERMINAL. In
general, use a semicolon to terminate all commands entered through your
workstation.
Data Field Identification (DFI) subcommands, element three of DATAUNLOAD
commands, identify the location in the output records for the data of columns
specified in the select-list parameter. DFI subcommands are optional; if they are
omitted, the resulting output data fields are sequenced according to system
defaults. See “Unloading Data in System-Defined Format” for more information. If
DFI subcommands are included, each must occupy a single record of the DB2
Server for VSE input control card file or DB2 Server for VM command-file input
record.
The OUTFILE subcommand, the final element in the DATAUNLOAD command
set, identifies the sequential output file that is to contain the data unloaded by the
preceding DATAUNLOAD command sequence. It tells the Database Services
Utility to start unloading data to the file identified by the corresponding ddname
parameter. In a VM system, this parameter is defined in the FILEDEF command.
Unloading Data in System-Defined Format
The DATAUNLOAD command and subcommands are contained on more than one
input record. If you want to unload all the data from a table in a
52
Database Services Utility
system-determined sequence and with the default output data field format, the
three parts of the Database Services Utility command are:
v The DATAUNLOAD command
v An SQL SELECT statement ended with a semicolon
v An OUTFILE subcommand.
Default Output Data Field Formats
If you do not supply DFI subcommands in a DATAUNLOAD command set
and if the source table column contains double-byte character set (DBCS)
data, the default data type for the output data fields is CHARACTER or
GRAPHIC data type. The overall format of the output data depends on the
data type and length (actual or maximum) of the column from which the data
is taken. Figure 30 and Figure 31 show the default output data field sequence.
If you do not supply DFI subcommands, the data fields appear in the output
records in the order of occurrence of columns in the SELECT statement’s select-list
parameter. Each field is separated from the next by a blank position (hex 40).
For fixed-length output records, the data field associated with the first select-list
column starts in position 1 of the record, as shown in Figure 30.
┌─────────────┬───────┬──────────────┬───────┬───────┬──────────────┐
│ data from
│ blank │ data from
│ blank │ ...
│ data from
│
│ select-list │
│ select-list │
│ ...
│ select-list
│
│ column 1
│
│ column 2
│
│ ...
│ column n
│
└─────────────┴───────┴──────────────┴───────┴───────┴──────────────┘
Position 1
Figure 30. Default Data Field Sequence—Fixed-Length Output Records
For variable-length output records, the data field associated with the select-list
column starts in position 5 of the record because the first 4 bytes are the record
length control field. Figure 31 on page 54 shows the data fields for variable-length
output records.
Chapter 3. Unloading Data with the Database Services Utility
53
┌──────────┬─────────────┬───────┬─────────────┬────────┬─────┬───────┬─────────────┐
│ Record
│ data from
│ blank │ data from
│ blank
│ ... │ blank │ data from
│
│ Length
│ select-list │
│ select-list │
│ ... │
│ select-list │
│ Control
│ column 1
│
│ column 2
│
│ ... │
│ column n
│
│ Field
│
│
│
│
│
│
│
│
└──────────┴─────────────┴───────┴─────────────┴────────┴─────┴───────┴─────────────┘
Position 5
Position 1
Figure 31. Default Data Field Sequence—Variable-Length Output Records
In DB2 Server for VSE, proceed as follows to unload data in the default
output-field format.
1. Provide the following Database Services Utility command:
DATAUNLOAD
2. Put an SQL SELECT statement on the next record. (SQL statement syntax is
beyond the scope of this manual. See the DB2 Server for VSE & VM SQL
Reference for information about SQL statement syntax.) Figure 33 shows a
sample DATAUNLOAD command that uses system formatting defaults.
DATAUNLOAD
SELECT EMP_ACT.EMPNO,PROJNO,EMPTIME
FROM EMP_ACT,EMPLOYEE
WHERE EMP_ACT.EMPNO=EMPLOYEE.EMPNO
ORDER BY EMP_ACT.EMPNO;
OUTFILE(OUTPUT1)
Figure 32. DATAUNLOAD Command without DFI Subcommands
3. To cause default formatting of data fields, do not supply DFI subcommands.
4. On the next record, put:
OUTFILE (ddname)
where ddname identifies the output file. Use the same ddname in a TLBL or
DLBL statement, depending on whether you want to store the data on tape or
in a DASD file.
5. Submit the job for processing.
In DB2 Server for VM, proceed as follows to unload data in the default
output-field format.
1. Issue the SQLINIT command to initialize the user machine. If you have already
done this, proceed to Step 2.
2. Create a control file to contain the command you construct in the following
steps. See “Working with a Control File in DB2 Server for VM” on page 13 for
detailed information on creating a control file.
3. Enter the command name. Type:
DATAUNLOAD
54
Database Services Utility
4. On a new line, enter the SQL SELECT statement. (SQL statement syntax is
beyond the scope of this manual. See the DB2 Server for VSE & VM SQL
Reference for information about SQL statement syntax.) Figure 33 shows a
sample DATAUNLOAD command that uses system formatting defaults.
DATAUNLOAD
SELECT EMP_ACT.EMPNO,PROJNO,EMPTIME
FROM EMP_ACT,EMPLOYEE
WHERE EMP_ACT.EMPNO=EMPLOYEE.EMPNO
ORDER BY EMP_ACT.EMPNO;
OUTFILE(OUTPUT1)
Figure 33. DATAUNLOAD Command without DFI Subcommands
5. To cause default formatting of data fields, do not supply DFI subcommands.
6. Enter the OUTFILE subcommand. On a new line, type:
OUTFILE(ddname)
where ddname identifies the output data file. You need to use the same ddname
when you specify the FILEDEF statement for the output file.
7. Store the control file.
8. In CMS, specify the necessary FILEDEF statements. For general information
about FILEDEF statements, see “Using File Definitions” on page 14. For
command-specific information, see “Using File Definitions with the DB2 Server
for VM DATAUNLOAD Command” on page 62.
9. Issue the SQLDBSU command to run the Database Services Utility. If you did
not specify FILEDEFs for the control and message files, use the default values
in the SQLDBSU EXEC. For more information on the SQLDBSU EXEC, see
“Using the SQLDBSU EXEC” on page 15.
As the DATAUNLOAD command is executed, the actual command sequence, the
default data-field sequence, and messages are written to the report or message file.
Figure 34 on page 56 and Figure 35 on page 56 show output that results from
running the DATAUNLOAD command shown in Figure 33.
Chapter 3. Unloading Data with the Database Services Utility
55
ARI0801I DBS Utility started: 07/24/89 10:26:44.
AUTOCOMMIT = OFF ERRORMODE = OFF
ISOLATION LEVEL = REPEATABLE READ
-------> CONNECT "SQLDBA " IDENTIFIED BY ********;
ARI8004I User SQLDBA connected to database SQLDBA.
ARI0500I SQL processing was successful.
ARI0505I SQLCODE = 0
SQLSTATE = 00000
ROWCOUNT = 0
------->
-------> DATAUNLOAD
-------> SELECT EMP_ACT.EMPNO,PROJNO,EMPTIME
-------> FROM EMP_ACT,EMPLOYEE
-------> WHERE EMP_ACT.EMPNO=EMPLOYEE.EMPNO
-------> ORDER BY EMP_ACT.EMPNO;
-------> OUTFILE(OUTPUT1)
ARI0852I DATAUNLOAD processing started.
ARI0868I DNAME=OUTPUT1 RECFM=F RECSZ=80 BLKSIZE=80
<— See Note
ARI0836I Default output record data field positions:
ARI0837I EMPNO 1-6
ARI0837I PROJNO 8-13
ARI0837I EMPTIME 15-21
ARI0835I 74 record(s) written to the output data file.
ARI0855I DATAUNLOAD processing successful.
ARI0802I End of command file input.
ARI8997I ...Begin COMMIT processing.
ARI0811I ...COMMIT of any database changes successful.
ARI0809I ...No error(s) occurred during command processing.
ARI0808I DBS processing completed: 07/24/89 10:26:45.
Figure 34. Database Services Utility DB2 Server for VSE Report Output: Default Data Fields
1ARI0801I DBS Utility started: 07/24/89 10:26:44.
AUTOCOMMIT = OFF ERRORMODE = OFF
ISOLATION LEVEL = REPEATABLE READ
0------> DATAUNLOAD
-------> SELECT EMP_ACT.EMPNO,PROJNO,EMPTIME
-------> FROM EMP_ACT,EMPLOYEE
-------> WHERE EMP_ACT.EMPNO=EMPLOYEE.EMPNO
-------> ORDER BY EMP_ACT.EMPNO;
-------> OUTFILE(OUTPUT1)
ARI0852I DATAUNLOAD processing started.
ARI0868I DNAME=OUTPUT1 RECFM=F RECSZ=80 BLKSIZE=80
<— See Note
ARI0836I Default output record data field positions:
ARI0837I EMPNO 1-6
ARI0837I PROJNO 8-13
ARI0837I EMPTIME 15-21
ARI0835I 74 record(s) written to the output data file.
ARI0855I DATAUNLOAD processing successful.
ARI0802I End of command file input.
ARI8997I ...Begin COMMIT processing.
ARI0811I ...COMMIT of any database changes successful.
ARI0809I ...No error(s) occurred during command processing.
ARI0808I DBS processing completed: 07/24/89 10:26:45.
Figure 35. Database Services Utility DB2 Server for VM Message File Output: Default Data
Fields
Note: The RECFM, RECSZ, and BLKSIZE information displayed in the message
ARI0868I depends on either the JCL data definition statement or the CMS
FILEDEF command specifications for the output file with
ddname=OUTPUT1.
56
Database Services Utility

The records in the output data file are formatted according to system-determined
(default) criteria. Table 1 shows the data field format resulting from the
DATAUNLOAD command specification given in Figure 33 on page 55.
Table 1. Output Record Format That is System Determined
Data Value Source
(Column or
Record Position
Other)
Output Record Field Data Type
1-6
EMPNO
CHAR
7
(blank)
CHAR
8-13
PROJNO
CHAR
14
(blank)
CHAR
15-21
EMPTIME
CHAR
Unloading Data in User-Specified Format
If you want to unload all the data from a table in a specific sequence and with
user-specified output data record field formats, the four parts of the Database
Services Utility command are:
v The DATAUNLOAD command
v An SQL SELECT statement ended with a semicolon
v DFI subcommands for each column to be unloaded
v The OUTFILE subcommand.
The data for a DFI-referenced column is in the same positions in all the output
data records.
Provide DFIs for All Table Columns—or None
A DFI subcommand identifies the location in the output record where you
want to place the unloaded data. For example, suppose TABLE1 has five
columns and you enter the following SELECT statement:
SELECT * FROM TABLE1
or
SELECT colname1,colname2,colname3,colname4,colname5 FROM TABLE1
If you supply only three DFI subcommands, the Database Services Utility
only unloads the three table columns identified in the subcommands. If you
want to unload data for all five columns and you want to specify your own
output record format for any of the columns, you must supply five DFI
subcommands.
The difference between unloading data in system-defined and user-defined format
is the presence of DFI subcommands. A DFI subcommand identifies the location in
the output records where the data for a column specified in the select-list
parameter should be placed. The DFI also identifies the data type of its data field
in the output record.
Whereas the DATAUNLOAD default output field sequence uses the order of
presentation in the select-list parameter, you choose the order of fields in the
output records when you supply DFI subcommands. In choosing positions for the
output data-record fields, you should leave a blank position between each field for
Chapter 3. Unloading Data with the Database Services Utility
57