DB2 Server for VSE System Administration (Version 7 Release 5) - page 5
failure. Whatever the cause, because the dbspace is nonrecoverable, some of the
rows are modified in the database, and some are not.
Data That Can be Placed in Nonrecoverable Storage Pools
When you are considering placing application data in a nonrecoverable storage
pool, you must determine whether the user will be able to recover it in a
reasonable and relatively simple manner. If so, then the table is a candidate for a
nonrecoverable storage pool.
Some examples of such data follow, along with descriptions of how to recover it,
based on the rules in the previous section.
Example 1
Some applications use data that is retrieved from a source outside the database,
such as VSAM data, data from another DB2 Server for VSE database, or data from
a sequential file. Such tables are candidates for nonrecoverable storage pools if the
following are true:
1. The data, after being loaded into database tables, is used only for read-only
applications.
2. The data from the outside source is the only data in the tables. (That is, the
data was not added to existing tables.)
If the application that loads the data into the database tables fails (does not
COMMIT) for any reason, you can recover in either of the following ways:
v If the failing LUW included one or more CREATE TABLE statements for the
tables being loaded, rerun the application. Because this statement is recorded in
the log, any failure to commit would cause it to be rolled back. The table and
any rows that were inserted into it would be dropped.
v If the failing LUW did not contain any CREATE TABLE statements, delete all the
rows from the tables; then rerun the application step that loads the data into the
tables.
If, after successfully loading the data, you restore the database from a database
archive that was created before the data was loaded, the rows you loaded no
longer exist in the database. You can recover as follows:
1. Bypass any steps that delete all rows from the tables or that drop and recreate
the tables.
These steps are not necessary because the database manager always records
DROP and CREATE table statements in the log, even for nonrecoverable
dbspaces.
2. Rerun the steps that load the data into the tables.
You must redo the data manipulation statements (in this situation, INSERT and
PUT) because they are not recorded in the log. (The restore defined the tables
in the database, but did not insert any data.)
These recovery rules apply only to data that is imported and loaded once and is
discarded when no longer needed. Each time the data is loaded, it completely
replaces the previous version.
The key point is that the source data must exist so that it can be used to recover
the read-only database version.
Chapter 9. Special Topics in Recovery Design
181
Example 2
Data that is retrieved from an outside source and added to existing data can also
be stored in a nonrecoverable dbspace.
The data can be from any of the sources described in Example 1 above. To add it
to an existing table, you could use the DBS utility DATALOAD command or an
application program to perform a mass INSERT operation.
You can recover the data if each batch of added rows has a unique value in a
column that identifies rows of the batch. You would need an application program
that generates a unique batch identifier and places it into each record (or into each
row, if the application loads the rows into a table).
If the application that loads the data fails (does not commit the work) for any
reason, you can recover as follows:
1. Specify the unique values that identify the rows added to the tables.
2. Delete all the rows in tables that have these unique identifier values. These
rows were inserted before the system failed.
3. Rerun the step that loads the added data into the tables.
Note: Although it is tempting to commit work frequently during loading to avoid
potential recovery problems, keep in mind that the commit operations cause
checkpoints, which can adversely affect overall performance.
If you restore the database using a database archive that was created before one or
more of the load operations, all rows loaded since that archive no longer exist in
the database.
To recover those lost rows, either:
1. Query the tables to determine the last batch of rows inserted that still exist in
the database.
2. Rerun the steps that added all subsequent batches of rows to the tables.
Alternatively:
1. Delete all the rows that were loaded before the database archive was taken of
the tables.
2. Reload all of the rows from the original source.
Both methods of recovery assume that the loaded data still exists somewhere
outside the database, and that each batch of rows has a unique identifier.
Example 3
Read-only data that is created by one or more INSERT via subselect statements can
also be stored in a nonrecoverable dbspace. For recovery to be possible, the data
must be inserted into empty tables.
If the loading of the table fails to be committed, you can recover the data as
follows:
1. If the LUW created the table:
a. Recreate the table. (Because CREATE TABLE statements are always
recoverable, the table is dropped when the LUW fails.)
b. Rerun the INSERT via subselect statements to load the data.
2. If the table already exists:
182
System Administration
a. Delete all the rows from the table, since they reflect an incomplete update.
b. Rerun the INSERT via subselect statements to load the data.
If you restore the database from a database archive that was created before the
data was loaded, the data that was loaded is not in the database. The table is not
dropped, however, even if it was created after the archive, because CREATE
TABLE statements are always logged. To restore the data that was eliminated by
the database restore operation:
1. If the table was created (or recreated) after the database archive, rerun the
INSERT via subselect statements.
2. If the table was created before the database archive, some rows may also exist
in the table. It may be impossible to identify the INSERT via subselect
statements that put these rows in the table. Even if you determine the INSERT
responsible for a row, it is difficult to tell if all rows originally inserted by the
statement still exist. (The statement may have been in progress at the time the
database archive was taken.) For this situation:
a. Delete all rows in the table.
b. Rerun the INSERT via subselect statements.
Avoid loading (or otherwise updating) nonrecoverable dbspaces if an online
database archive could occur at the same time, because such archives typically
contain changes made by incomplete LUWs. For recoverable data, this is not a
problem because the log contains the rest of the changes, so when you do a
restore, the archive and the log are used together to reconstruct a consistent copy
of the database. For nonrecoverable data however, changes are not recorded in the
log, so data can be incomplete or inconsistent because no log records are available
to complete the restoration of the database.
You should also not update nonrecoverable data when an online log archive can
occur, because the database manager waits until all LUWs end before creating the
log archive. Because LUWs that update nonrecoverable data are usually
long-running, the log archive is forced to wait. If the log fills to the SLOGCUSH
point, log overflow processing will be started: this involves rolling back the
longest-running LUW, which is usually the one that is updating nonrecoverable
data. (For a description of the SLOGCUSH parameter, see “SLOGCUSH” on page
63.)
Data That Should Not Be Placed in Nonrecoverable Dbspaces
Any data that would be difficult or impossible for a user to recover should not be
put in nonrecoverable dbspaces. Some examples are:
v Data that cannot be recreated
This includes data whose source is destroyed after the data is loaded, and data
that is manually entered into tables (with the ISQL INPUT command, for
example).
v Data that is modified by application programs or terminal users after it is loaded
into the database
If the owner of the table keeps an audit trail of the updates made, you can put
this kind of data in a nonrecoverable dbspace, and have the owner use the audit
trail to do recovery. However, this is practical only if the number of updates
made is small.
v Tables that are linked with referential constraints (referential integrity) to tables
in recoverable dbspaces.
v Tables that are managed by DB2 Server for VSE components:
Chapter 9. Special Topics in Recovery Design
183
- ISQL-stored query tables
- ISQL-stored routine tables
- Extract facility catalog tables
- Other IBM-supplied tables.
v Tables with small amounts of data
Here, recovery is not a problem. Rather, there is just not enough logging done
for the data to justify the added complexity of user recovery. Let the database
manager do the logging and recovery.
v Large tables where small numbers of rows are periodically added
Here again, there is not enough logging to justify user recovery.
Setting Up Nonrecoverable Storage Pools and Dbspaces
If you want the data for a particular application to reside in a nonrecoverable
storage pool, do the following:
1. Determine the dbspace requirements (size, type, and number).
2. Design a recovery scheme to use in case an LUW fails while the nonrecoverable
dbspaces are being updated.
3. Design a recovery scheme to use in case restoring the database from an archive
should be necessary.
4. Allocate the nonrecoverable storage pool. You can do this either during
database generation, or when adding a dbextent. In either situation, use the
POOL control statement (see “Adding Dbextents to a Storage Pool” on page
133).
Attention: Once a storage pool is defined, either by adding dbextents to it or
by POOL(NOLOG), you must not change it from recoverable to
nonrecoverable, or the reverse.
5. Define dbspaces in this storage pool, either during database generation or
when adding dbspaces (see “Adding Dbspaces to the Database” on page 125).
On your control statements defining the dbspaces, specify the number of the
storage pool.
6. Acquire the dbspaces you want by using the ACQUIRE DBSPACE statement.
You must specify the number of the storage pool you want with the
STORPOOL parameter; otherwise, the database manager will not select a
dbspace from a nonrecoverable storage pool.
7. Create tables in these dbspaces. To do this, you must specify the dbspace name
in the CREATE TABLE statement; otherwise, the database manager will not
place a table in a nonrecoverable dbspace.
Remember to perform your recovery procedures whenever there is a LUW failure
or when you must restore the database from an archive.
Querying for Nonrecoverable Storage Pools and Dbspaces
To determine whether a storage pool is nonrecoverable, issue the SHOW DBEXTENT
operator command. The POOL NO. column shows the number of the pool. If it is
positive, the storage pool is recoverable; if negative, it is nonrecoverable. For
example, if the number displayed is -32, storage pool 32 is nonrecoverable; if it is
32, this storage pool is recoverable.
To determine what dbspaces are in nonrecoverable storage pools, look at the POOL
column in the SYSTEM.SYSDBSPACES catalog table. If this value is positive, the
184
System Administration
pool where the dbspace is assigned is recoverable; if it is negative, the pool is
nonrecoverable. Again, the absolute value of the number is the storage pool
number.
Following are some sample queries you can use to determine the status of
nonrecoverable storage pools and dbspaces:
v
To determine which storage pools are nonrecoverable and have dbspaces
assigned to them, issue:
SELECT DISTINCT POOL -
FROM SYSTEM.SYSDBSPACES -
WHERE POOL > 999
Because the data type of the POOL column is DBAHW, you specify POOL > 999
instead of POOL < 0 to retrieve the nonrecoverable (that is, negative) storage
pools. The DBAHW fields do not sort the same way that SMALLINT fields do.
(See the DB2 Server for VSE & VM SQL Reference manual for description of data
types.)
v
To determine how many of the public dbspaces allocated to nonrecoverable
storage pool number 7 are not yet acquired, and the number of pages in each of
the dbspaces, issue:
SELECT NPAGES FROM SYSTEM.SYSDBSPACES -
WHERE DBSPACETYPE=1 AND POOL=-7 AND OWNER=’
’
The blank OWNER column indicates that the dbspace is not yet acquired.
To find the same information for private dbspaces, change the DBSPACETYPE
value in the statement from 1 to 2.
v
To determine how many storage pools remain to be defined in the database, first
issue the SHOW DBCONFIG command to see the value of the MAXPOOLS
parameter. This value, which was set during database generation, determines the
maximum number of storage pools allowed.
Next, issue SHOW DBEXTENT to determine the number of storage pools that are in
use. Storage pools are in use only if dbextents are assigned to them. The
difference between this number and MAXPOOLS is the number of pools that
remain to be defined. You can define storage pools by adding extents to new
pool numbers until you reach the MAXPOOLS limit.
Alternatively, the SHOW SQLDBGEN operator command will display the
current database definition, including MAXPOOLS and the assignment of
dbextents to storage pools.
v
To determine whether a specific table is in a nonrecoverable dbspace, issue:
SELECT DBSPACENO FROM SYSTEM.SYSCATALOG -
WHERE TNAME=table_name AND CREATOR=userid
If the DBSPACENO value is 0, the table is actually a view, and you have to
query the SYSTEM.SYSVIEWS catalog table to obtain the name of the underlying
table. If the DBSPACENO value is not 0, use the value in this SELECT statement:
SELECT POOL FROM SYSTEM.SYSDBSPACES WHERE DBSPACENO=n
If the returned POOL value is negative, the dbspace is nonrecoverable; if it is
positive, the dbspace is recoverable.
Chapter 9. Special Topics in Recovery Design
185
186
System Administration
Chapter 10. Using the Accounting Facility
The accounting facility records how resources are consumed on the database
manager. Resources are consumed both by individual users, and by processes that
cannot be attributed to a single user, such as startup, shutdown, checkpoints, and
archives. This information is collected in fixed-length records, 80 bytes long, that
describe who or what consumed resources.
The records include up to 16 bytes for installation-dependent data, where you can
supply information such as account numbers or project numbers. These 16 bytes
can come from:
v VSE applications, provided an accounting exit has been installed as described in
section “Supplying Account Numbers for Users” on page 263.
v Applications on platforms other than VM or VSE that use the DRDA protocol to
connect to DB2 Server for VSE servers. In this case, 16 bytes of user supplied data
are recorded into database manager USER accounting records. Examples of such
DRDA requesters are: DB2 for OS/390 and DB2 Connect.
If you already have routines to process other accounting records, you can modify
them to handle the DB2 Server for VSE records. You can also use the database
manager itself to store your accounting data, and use ISQL to easily manipulate
the data and generate reports.
Preparing to Use the Accounting Facility
To use the accounting facility, you must first set up the operating system, then set
up the job control statements for the accounting files.
Setting Up Your System
1. IPL the VSE operating system with the JA=YES option specified on the IPL SYS
command. For more information, see VSE/ESA System Control Statements.
2. If you have CICS, you must generate it with the restart resynchronization
capability. (If accounting is active but restart resynchronization is not installed,
the online support cannot be started; the CIRB transaction fails, and you receive
an error message.) For a description of the CICS table entries required for
restart resynchronization, see the DB2 Server for VSE Program Directory.
Setting Up a Job Control for the Accounting Files
When the VSE operating system is set up to use accounting, you need to set up a
job control for the accounting files, within the job control that identifies your
database. This job control must identify either one or two accounting files. It is
recommended that you define two, so that you can use the alternate accounting file
support.
If only one accounting file is used, you must shut down the database manager to
process this file. With alternate accounting file support, you can switch from the
current file to a second one while the database manager is running, which enables
you to process the information in the first file without interrupting users. You can
also use the alternate file support if there is a write error on the active file; or if
you are accounting to DASD files, you can switch to the alternate file when the
active file reaches the end of the extent.
187
If you switch to a second accounting file, you should process the closed file as
soon as possible to prevent yourself from accidentally overlaying the previous
session’s accounting information.
The accounting files must be sequential files, and they can reside on either tape or
DASD. If you define two, they must both be on the same storage medium: you
cannot define one on tape and the other on DASD. If the files are on DASD, they
can be native SAM files, VSE/VSAM ESDS files, or files managed by the
VSE/VSAM space management for SAM feature. It is recommended that you
define your accounting files on DASD as VSE/VSAM ESDS files.
Regardless of whether you use DASD or tape, you must specify the file name
ARIACC1 for the first file on either the DLBL or TLBL statement. If you use two
accounting files, the second file name must be ARIACC2. The database manager
always opens ARIACC1 when it is started with the accounting facility active.
When the database manager ends (either normally or abnormally), it attempts to
close the accounting file. If this file cannot be closed, accounting data may be lost.
Managing DASD Accounting Files
To use DASD sequential files for your accounting data, first determine the
potential size of the accounting data set. Initially, you should overestimate it; then
adjust it based on your experience.
To get a general idea of how many accounting records are likely to be generated,
start the application server for normal multiple user mode access, and at the end
of the day, issue the COUNTER BEGINLUW and COUNTER CHKPOINT operator
commands. The number of accounting records generated at your installation will
be smaller than, but proportional to, these values. The database manager writes an
accounting record for each user on some ends of logical units of work, and on all
checkpoints. Three more accounting records are written for each run: one for
startup, one for operation, and one for shutdown: you can ignore these three
records when making your estimate.
For example, assume your counters show that your installation does 2000 logical
units of work and 200 checkpoints a day. On average, this can result in 1000
accounting records generated for users and 200 records generated for checkpoints.
For environments with heavy ISQL usage, the number of records generated for
users would probably be lower, while for preplanned transaction environments, it
would probably be higher, so you should overestimate the number of records
needed.
To get an initial estimate for the size of your accounting files, multiply your
estimate of the number of records by 80 to get the approximate number of bytes.
For help in determining the file size that you need, see “Storage Capacities of IBM
DASD Devices” on page 341.
When you have gained experience using accounting, you can adjust your file sizes.
Files Managed by VSE/VSAM Space Management for SAM Feature: If you have
the VSE/VSAM space management for SAM (sequential access method) feature,
you should use it to manage your accounting files on DASD. This feature provides
the following advantages:
File extendibility
It allows files to be extended by the use of the DISP=(OLD) parameter on
the DLBL statement. This prevents the database manager from overlaying
188
System Administration
the accounting records generated during its previous run. Otherwise, you
would have to update EXTENT job control statements over multiple runs
of the database manager
Secondary allocations
It gets up to 15 additional extents when the primary allocation is
exhausted. This reduces the risk of filling the accounting file, which causes
a loss of accounting data.
Monitor status
You can monitor the status of the accounting file using the access method
services LISTCAT command. You can do this without interrupting
processing.
No symbolic device collision
You do not need to worry about symbolic device address collisions, which
can occur
v when the output of both the trace and accounting facilities are directed
to DASD files managed by native SAM
v when, (in single user mode) the output of the DBS utility or the
preprocessor is directed to DASD files managed by native SAM
The collisions must be resolved in the job control statements, as described
on page 191.
Figure 74 shows sample job control statements for two accounting files managed
by the VSE/VSAM space management for SAM feature.
// DLBL ARIACC1,’ACCTFIL1’,0,VSAM,DISP=(OLD,KEEP),RECORDS=(x,y),
C
RECSIZE=80,CAT=SQLWK1C
// EXTENT ,SQLWK1
// DLBL ARIACC2,’ACCTFIL2’,0,VSAM,DISP=(OLD,KEEP),RECORDS=(x,y),
C
RECSIZE=80,CAT=SQLWK1C
// EXTENT ,SQLWK1
Figure 74. Job Control for DASD Accounting Files (VSAM Space Management)
Notes:
1. The DLBL file name for the primary accounting file must be ARIACC1, and for
the secondary file ARIACC2.
2. The DLBL parameter VSAM indicates that these are VSAM managed files.
3. The example assumes that the files are implicitly defined to VSAM the first
time they are opened.
4. Every time the application server is started, it directs output to the file
identified by file name ARIACC1 (even if you are using two accounting files).
To avoid having the accounting information from the previous run of the
database manager erased, specify the DISP=(OLD,KEEP) option on the DLBL
statement for the accounting file to indicate that the files are not to be reset at
OPEN time (OLD), and are not to be deleted at CLOSE time (KEEP). This
allows you to implicitly define the files the first time they are used, and to
extend them (add records to them) in subsequent runs.
If you run the database manager continually, it is advantageous to specify
DISP=(NEW,KEEP) to have the accounting file erased every time it is opened.
Here, you would be switching between the two accounting files, using the
ALTACCT command, so that you can process the current file. If you specified
DISP=(OLD,KEEP), the files would never be erased; they would keep growing.
Chapter 10. Using the Accounting Facility
189
If you do specify DISP=(NEW,KEEP), be sure to process the accounting file
immediately after you close it. If you do not, the accounting data will be
erased the next time you switch accounting files.
5.
When implicitly defining the files, VSAM uses the RECSIZE and RECORDS
parameters to determine how much primary and secondary space to allocate
for the files.
Set RECSIZE to 80, because that is the size of an accounting record.
For RECORDS=(x,y), set x to the number of accounting records you expect to
be generated during your accounting period. The value you specify for x is
multiplied by 80 (the RECSIZE) by VSAM to determine the size of the primary
space allocation. For example, if you have determined that you expect 500
accounting records to be generated for each accounting period, set x equal to
500. The number of bytes set by VSAM for the primary space allocation is
40000
(500 x 80). The value you specify for y determines the size of the
secondary allocation. If you set y to 100, VSAM allocates 8000 bytes (100 x 80).
If the primary allocation is full, VSE/VSAM gets up to 15 additional extents.
The VSAM catalog must own sufficient unallocated space on the specified
volume to satisfy the space allocation requirements for the file.
Note: If you use an explicit definition for the VSAM clusters, then specify a
maximum record size of 2000 on the RECORDSIZE parameter of the
IDCAMS utility DEFINE CLUSTER command.
6.
For an implicit file definition, an EXTENT statement with a volume serial
number (SQLWK1 in the example) is required.
7.
An ASSGN statement is not required for VSE/VSAM-managed files.
Files Managed by SAM: If you use native SAM, which cannot extend files, to
manage accounting files on DASD, you must devise operating procedures to avoid
overlaying the accounting information from the previous run of the database
manager. This can be done by updating your job control EXTENT statements every
time you start the application server, or by using two sets of job control with
different EXTENT statements. When starting the application server, you would
alternate between the two sets of job control statements.
If you use this approach, be certain to process the accounting file as soon as you
close it; otherwise it will be overlaid the next time you start the application server
by using the job control that identifies the file. If you load your accounting data
into tables, consider prefixing your normal start-up job control with a DBS utility
job that runs in single user mode (with ACCOUNT=N specified). This job would
run the DBS utility to load accounting data from the previous session into tables to
prevent it from being overlaid by the next job.
Figure 75 shows sample job control statements for native SAM accounting files.
// DLBL ARIACC1,’ACCTFIL1’
// EXTENT ,SQLWK1,1,0,57,38
// DLBL ARIACC2,’ACCTFIL2’
// EXTENT ,SQLWK1,1,0,95,30
// ASSGN SYS007,DISK,VOL=SQLWK1,SHR
Figure 75. Job Control for DASD Accounting Files (Native SAM)
Notes:
190
System Administration
1. The DLBL file name for the primary accounting file must be ARIACC1; that for
the secondary file must be ARIACC2.
2. In this example, the DASD allocation for the primary accounting file is 38
tracks on SQLWK1. The 38 tracks start at relative track 57. The secondary
accounting file has an allocation of 30 tracks on the same volume starting at
relative track 95.
3. If you are only using one accounting file, you must specify a new DASD
allocation every time you start the application server. Otherwise, you will write
over the old file. (You should also specify a different file-id.)
Even if you are using alternate accounting files, you would have to change the
extents unless you ensure that the accounting data from the previous run is
processed before it is overlaid.
4. This example uses the DB2 Server for VSE default symbolic unit for DASD
output (SYS007). If you do not want the default, specify the symbolic unit of
your choice as the first EXTENT parameter. Also specify it in the ASSGN
statement. If you are also using DB2 Server for VSE tracing with output
directed to DASD, either the trace or accounting output must be directed to a
symbolic unit other than SYS007. In single user mode, DBS utility output or
trace output to DASD causes the same problem. You must ensure that the
output from only one of the facilities is directed to SYS007.
Files Managed by VSE/VSAM ESDS: It is recommended that you define your
accounting files on DASD as VSE/VSAM ESDS files because they handle the
End-of-Extent situation better than VSE/VSAM managed by SAM files. All
advantages of using VSE/VSAM files still remain for VSE/VSAM ESDS files,
except that the files will have to be defined explicitly. Figure 76 shows sample
IDCAMS commands to define two VSE/VSAM ESDS accounting files. See
“Converting VSAM ESDS Accounting File Records into VSAM Managed SAM
Feature Records” on page 208 for related consideration of loading the accounting
records using VSE/VSAM ESDS accounting files.
// EXEC IDCAMS,SIZE=AUTO
DEFINE CLUSTER (NAME(ACCTFIL1) -
VOLUMES(SQLWK1) -
ORDERED -
REUSE -
RECORDS(x y) -
RECORDSIZE(80 80) -
NOINDEXED) -
DATA(NAME(ACCT.FILE1.DATA))
DEFINE CLUSTER (NAME(ACCTFIL2) -
VOLUMES(SQLWK1) -
ORDERED -
REUSE -
RECORDS(x y) -
RECORDSIZE(80 80) -
NOINDEXED) -
DATA(NAME(ACCT.FILE2.DATA))
/*
Figure 76. IDCAMS Commands to Define VSE/VSAM ESDS DASD Accounting Files
Note:
Chapter 10. Using the Accounting Facility
191
1. Set RECORDSIZE to (80 80) because that is the size of an accounting
record.
2. For RECORDS=(x y), set x to the number of accounting records you
expect to be generated during your accounting period. The value of y
determines the size of the secondary allocation.
Figure 77 shows sample job control statements for two VSE/VSAM ESDS
accounting files.
// DLBL ARIACC1,’ACCTFIL1’,0,VSAM,
C
CAT=SQLWK1,DISP=(OLD,KEEP)
// DLBL ARIACC2,’ACCTFIL2’,0,VSAM,
C
CAT=SQLWK1,DISP=(OLD,KEEP)
Figure 77. Job Control for DASD Accounting Files (VSE/VSAM ESDS)
Note:
1. The DLBL file name for the primary accounting file must be ARIACC1,
and the secondary file name is ARIACC2.
2. The DLBL parameter VSAM indicates that these are VSAM managed
files.
3. The example assumes that the files are explicitly defined using the
sample IDCAMS commands illustrated in Figure 76 on page 191.
4. Every time the application server is started, it directs output to the file
identified by file name ARIACC1 (even if you are using two accounting
files). To avoid having the accounting information from the previous run
of the database manager erased, specify the DISP=(OLD,KEEP) options
on the DLBL statement for the accounting file to indicate that the files
are not to be reset at OPEN time (OLD), and are not to be deleted as
CLOSE time (KEEP).
5. If the RECSIZE parameter is specified in the DLBL statement, its value
should be set to 80.
Managing Tape Accounting Files
To write accounting records to a tape file, specify a TLBL statement in your
database job control. The file name on the TLBL statement must be ARIACC1. If
you will be using alternate accounting files, specify a TLBL statement for a second
accounting file, and call the file ARIACC2.
When accounting to tape, the database manager uses the VSE dynamic tape
ASSIGN macro. The operator is prompted for the address (cuu) of the tape drive.
If you switch the output to the alternate file, the cuu of the first accounting file is
unassigned by the VSE dynamic tape ASSIGN macro, and becomes available for
use for any purpose, including reuse for the alternate file. Figure 78 shows an
example of job control statements for two accounting files.
// TLBL ARIACC1,’ACCTFIL1’
// TLBL ARIACC2,’ACCTFIL2’
Figure 78. Example Job Control for Accounting Files on Tape
192
System Administration
To avoid overlaying accounting information from the previous session, the
database manager does not rewind the accounting tape at OPEN or CLOSE time.
Therefore, when the application server is next started, another accounting file is
written starting after the file from the previous session.
A block size of 2000 is used for the tape file. This provides efficient performance,
and minimizes the amount of accounting data lost due to a system failure or a
write error on the tape.
While it is unlikely that you will reach end-of-volume for a tape accounting file,
multivolume tape support is provided. You must use only IBM standard label tape
files.
Starting the Accounting Facility
To start the accounting facility, set the ACCOUNT initialization parameter to D or
E to write records to disk, or T to write them to tape. If you do not want
accounting, specify N (the default).
Figure 79 shows an example of a job control to start the application server in
multiple use mode and to direct accounting output to DASD using VSE/VSAM
ESDS accounting files. The example assumes that you have supplied appropriate
job control statements for the accounting files in the database identification
procedure ARIS75DB
// JOB SQL START
// EXEC PROC=ARIS75DB
// EXEC PROC=ARIS75PL
// EXEC PGM=ARISQLDS,SIZE=AUTO,PARM=’ACCOUNT=E,PARMID=WARM1’
Figure 79. Example Job Control to Start with Accounting Enabled
The database manager can also generate accounting records in single user mode
for user programs, the DBS utility, and the preprocessors. Accounting records are
not generated for:
v Log reconfigurations (STARTUP=L)
v Database generations (STARTUP=C)
v Adding dbextents (STARTUP=E)
v Adding dbspaces (STARTUP=S)
v Catalog index reorganizations (STARTUP=I)
v Releasing empty pages (STARTUP=P)
v Catalog migrations (STARTUP=M)
v PROGNAME=ARISEGB, which is the catalog update phase of an ADD
DBSPACE operation.
If you specify ACCOUNT=D, E, or T in these situations, the database manager
displays a warning message and ignores the ACCOUNT parameter.
To generate accounting records for single user mode programs, specify
ACCOUNT=D, E, or T as you would for multiple user mode.
Chapter 10. Using the Accounting Facility
193
When the database manager ends, it closes the accounting files. You should
immediately process the files to reduce the chance of overlaying them during the
next run.
Operating the Accounting Facility
Little operator intervention is required to use the accounting facility. If the
accounting files are on tape, the operator will be prompted to mount the tape and
give the cuu of its drive. If they are on DASD, intervention is usually not required
at all: the database manager simply opens ARIACC1, wherever it may be, and
continues operation.
If you have defined two accounting files, the operator must issue the ALTACCT to
close ARIACC1 and open ARIACC2 (or vise versa). If you are accounting to tape,
the cuu for ARIACC1 becomes unassigned and available for other use, including
for the alternate file; the operator is now prompted for the cuu of the tape drive of
the alternate file. If you are accounting to DASD, the ALTACCT command does not
require further operator action.
ALTACCT can be issued any number of times during a single run of the database
manager. Each time, the file that is currently open is closed, and the alternate file is
opened.
If the accounting file fills or a write error occurs, operator intervention is required.
The operator is prompted as to whether the database manager should switch to an
alternate file (if available), continue with accounting disabled, or end. If an
alternate file has been defined, the operator should switch to it; if not, consider
shutting down the database manager to avoid losing more accounting data. (In this
situation, the accounting data in the buffer has already been lost.) The operator
will need to know how to respond to this error message in advance. Other users
must wait until the operator replies.
When the database manager ends (either normally or abnormally), it attempts to
close the accounting file. If it cannot, some accounting data may be lost. Also, if
the tape file cannot be closed, its tape mark is not written. In this situation, the
operator should manually write a tape mark using the VSE WTM command. (For
information on this command, see VSE/ESA System Control Statements.)
Whenever an accounting file is closed (either by shutting down the database
manager or by switching to the alternate file), the operator should immediately
process it, to reduce the risk of its being overlaid the next time the application
server is started. If the file is being written to tape, overlaying can easily happen --
the database manager does not rewind the tape, but there is nothing to stop the
operator from manually doing so. For DASD files, a simple job control error for
VSAM-managed files can cause the error: specifying DISP=(KEEP) instead of
DISP=(OLD,KEEP). For SAM-managed DASD files, it is even easier to overlay the
file, as no SAM provisions exist for extending files. Thus, if the same job control is
used two days in a row, the ARIACC1 file will certainly be overlaid. All of these
problems can easily be avoided if the operator makes it a practice to process the
file whenever it is closed.
For examples of operating procedures used in accounting, see the DB2 Server for
VSE & VM Operation manual.
194
System Administration
Generation of Accounting Records
Accounting records are written when one of the following occurs:
v
For guest sharing, when an IUCV or APPC/VM SEVER occurs:
- When the RELEASE option of an SQL COMMIT or ROLLBACK command is
specified in multiple user mode
- When the user ID abends
- When the DB2 Server for VSE operator issues an SQL FORCE for the
authorization id
v
A user reconnects without explicitly releasing the previous session.
For example, suppose user ID USER1 uses ISQL to implicitly connect to the
database manager, does some work, and then explicitly connects as
authorization ID SQLDBA to do tasks requiring DBA authority. When USER1
changes authorization IDs, the database manager writes an accounting record for
authorization ID USER1 and begins a new session for authorization ID SQLDBA,
even though USER1 did not explicitly release the first connection.
v
The internal DB2 Server for VSE resource threshold is met or exceeded. This is
checked at the end of a logical unit of work.
For example, suppose USER1 uses ISQL with AUTOCOMMIT ON, and never
issues a COMMIT or ROLLBACK WORK RELEASE. The session therefore lasts
until this user reconnects or leaves ISQL. If this user works on ISQL for hours
and processes many logical units of work during this long session, he or she
exceeds the resource threshold a number of times. Every time this happens, an
accounting record is written. Now suppose the database manager abends. The
only accounting information lost is for work that USER1 did after last exceeding
the threshold. If the internal threshold were not used, all accounting information
about USER1’s session would have been lost, which represents a significant
amount of work.
v
The connection between the user ID and the database manager is ended by:
- An SQLEND QUICK command
- A DB2 Server for VSE FORCE command
- A CICS transaction ending.
The database manager does not write an accounting record for every logical unit of
work, because too many records would be generated, resulting in high system
overhead. Because most ISQL users use AUTOCOMMIT ON, practically every SQL
statement issued would cause a new LUW.
Using DRDA Accounting
When a remote application requester establishes a connection with an application
server, it must pass along information to uniquely identify the originating user, so
that the database manager can generate proper accounting records. This passed
information is the LUWID.
The format of the LUWID is shown below.
NETID.LUNAME.INSTANCE_NUMBER.SEQUENCE_NUMBER
Figure 80. DRDA LUWID
Chapter 10. Using the Accounting Facility
195
Within the VSE operating system, tracing usage to a user of local resources for
billing purposes is easy because the user identification is unique. With the
expansion into the SNA network, accounting poses the issue of unique site and
user identification. Two pieces of information supplied by the application requester
form a unique identification of a remote user:
v Access user ID of requesting application
v LUWID associated with each conversation
This information is supplied by the application requester to the application server
in the SNA control structure FMH5.
Two accounting record types are used to track resource consumption of remote
users using the DRDA option:
v The remote user accounting record resembles the format of an ordinary user
accounting record, with certain record fields having different meaning
v The DRDA accounting record is written each time a remote user accounting
record is generated
For the purpose of correlating the two records, the access user ID, DB2 Server for
VSE user ID, and date/time stamp in the remote user record are duplicated in the
associated DRDA record.
Supplying Accounting Data from DRDA Applications
Remote DRDA application requesters have the opportunity to send accounting
information to DRDA servers using a general purpose unarchitected DRDA
parameter. DB2 for MVS (Version 2 Release 3 or later) and DDCS (Version 2
Release 1) have implemented this approach for sending accounting data. Similar
support was enabled for VM requesters in Version 3 Release 5.
If the database manager determines that a DRDA requester has supplied
accounting data, 16 bytes of user supplied data is recorded into database manager
USER accounting records as “installation-dependent” data. For DB2 for MVS
applications, user supplied data corresponds to the MVS accounting string
associated with the DB2 SQL application’s MVS address space.
For DDCS applications and DB2 CONNECT applications, user supplied data
corresponds to one of the following:
v The value specified by an application with the sqlesact() API
v The value of the DB2ACCOUNT environment variable
v The value of the DFT_ACCOUNT_STR (default accounting string) configuration
parameter.
If the DRDA protocol is used to connect VM applications to VSE servers (or any
other DRDA server), user supplied data corresponds to data supplied by the
ARIUXIT accounting exit described in the DB2 Server for VM System Administration
manual.
If the database manager determines that a DRDA requester has supplied
accounting data but the requester is not DB2 for MVS, DDCS or DB2 CONNECT
or DB2 for VM, it inserts the string “pppvvrrm UNKNOWN” into USER accounting
records. pppvvrrm is the product id (prdid) of the DRDA requester.
Note: When you are using the DRDA protocol, the installation-dependent data
should conform to the following:
196
System Administration
1. The accounting string data is converted to CCSID 500 before being sent
to the DRDA server. To ensure that all characters in the string data can
be represented in CCSID 500, only the characters A-Z, 0-9 and ’_’
(underscore) be used. If characters other than these recommended ones
are used, then those characters may not translate properly when the
DRDA server writes out accounting records.
2. The user-specified portion of the accounting string can be at most 16
bytes. This is true for DB2 Server for VM applications sending
accounting data (which is set up in the ARIUXIT user exit) and for
non-DB2 for VM DRDA requesters sending accounting data to servers.
Formats of the Accounting Records
There are four kinds of accounting records generated for users:
User records
are generated for users on VSE who access an application server on VSE.
Remote User Records
are generated for remote users accessing the database manager using the
DRDA protocol.
DRDA records
are generated for remote users accessing the database manager using the
DRDA protocol. The database manager generates DRDA records and
Remote User records for these users.
VSE guest user records
are generated for users on VSE who access an application server on a VM
operating systems. For more information, see the DB2 Server for VM System
Administration manual.
Accounting records are also generated for system processes that cannot be
attributed to a single user:
An initialization
record is written when the application server is started. This record
describes the resources consumed by the operator, checkpoint, and
ready/recovery agents during the startup process.
A checkpoint
record is written for the checkpoint agent after a checkpoint occurs. For the
checkpoint that immediately follows an archive, this record reflects the
resources consumed in doing the archive as well as the checkpoint.
An operation
record is written during shutdown for the processing that the operator
agent has done during the current session. (This accounting record is
written only for multiple user mode, as operator communications are not
possible in single user mode.)
A termination
record is written that summarizes the resources consumed during the
current session.
Note: Internal resource thresholds are not used for system processes.
Chapter 10. Using the Accounting Facility
197

Initialization Records
Columns:
1
9
17
25
41
53
57
61
65
69 73 75
79
|
|
|
|
|
|
|
|
|
|
|
|
|
SQLDBA SQL/DS
INIT
051389182005
19 ISQL
Column
Data Type
Description
1-8
CHAR (8)
Jobname of the database partition
9-16
CHAR (8)
“SQL/DS
”
17-24
CHAR (8)
“INIT
”
25-40
CHAR (16)
Reserved (blanks)
41-52
CHAR (12)
Date and time of the accounting record (MMDDYYHHMMSS). This format may
also be DDMMYYHHMMSS. The format is controlled by the DATE parameter of
the VSE STDOPT job control command or statement
53-56
CHAR (4)
Blank
57-60
CHAR (4)
Blank
61-64
INTEGER
Duration of the startup process (in seconds)
65-68
INTEGER
Processor time used by the startup process (in 300ths of a second)
69-72
INTEGER
Number of times the database manager looked at a page buffer during startup
(equivalent to issuing COUNTER LPAGBUFF immediately after startup)
73-74
CHAR (2)
Century number of Date (’19’ or ’20’)
75-78
CHAR (4)
The xSQL record identifier, where x = I for Initialization
79-80
CHAR (2)
Reserved (blanks)
Operator and Checkpoint Records
Columns:
1
9
17
25
41
53
57
61
65
69
73 75
79
|
|
|
|
|
|
|
|
|
|
|
|
|
SQLDBA SQL/DS SYSTEM
051389182005
0083032819 CSQL
Column
Data Type
Description
1-8
CHAR (8)
Jobname of the database partition
9-16
CHAR (8)
“SQL/DS
”
17-24
CHAR (8)
“SYSTEM
”
25-40
CHAR (16)
Reserved (blanks)
41-52
CHAR (12)
Date and time of the accounting record (MMDDYYHHMMSS). This format may
also be DDMMYYHHMMSS. The format is controlled by the DATE parameter of
the VSE STDOPT job control command or statement.
53-56
CHAR (4)
Blank
57-60
CHAR (4)
Blank
61-64
INTEGER
Binary zero
65-68
INTEGER
Processor time used (in 300ths of a second)
198
System Administration

Column
Data Type
Description
69-72
INTEGER
Number of times this agent looked at a page buffer (equivalent to issuing
COUNTER LPAGBUFF for only this agent)
73-74
CHAR (2)
Century number of Date (’19’ or ’20’)
75-78
CHAR (4)
The xSQL record identifier, where x = C for Checkpoint or O for Operator).
79-80
CHAR (2)
Reserved (blank)
Termination Records
Columns:
1
9
17
25
41
53
57
61
65
69 73 75
79
|
|
|
|
|
|
|
|
|
|
|
|
|
SQLDBA SQL/DS TERM
051389182005
19 TSQL
Column
Data Type
Description
1-8
CHAR (8)
Jobname of the database partition
9-16
CHAR (8)
“SQL/DS
”
17-24
CHAR (8)
“TERM
”
25-40
CHAR (16)
Reserved (blanks)
41-52
CHAR (12)
Date and time of the accounting record (MMDDYYHHMMSS). This format may
also be DDMMYYHHMMSS. The format is controlled by the DATE parameter of
the VSE STDOPT job control command or statement.
53-56
CHAR (4)
Blank
57-60
CHAR (4)
Blank
61-64
INTEGER
Time, in seconds, from startup to shutdown
Note: The following are totals for the entire run of the database manager that are extracted from the data that is
used by the COUNTER command.
65-68
INTEGER
DASDIO - Total number of DASD I/Os
69-72
INTEGER
LPAGBUFF - Number of times the database manager looked at a page buffer
73-74
CHAR (2)
Century number of Date (’19’ or ’20’)
75-78
CHAR (4)
The xSQL record identifier, where x = T for Termination
79-80
CHAR (2)
Reserved (character blanks)
User Records
Columns:
1
9
17
25
41
53
57
61
65
69 73 75
79
|
|
|
|
|
|
|
|
|
|
|
|
|
SQLDBA JOB1
MYID
USER DATA HERE
051389182005BADDEBTS
19 USQL
Column
Data Type
Description
1-8
CHAR (8)
Jobname of the database partition
Chapter 10. Using the Accounting Facility
199
Column
Data Type
Description
9-16
CHAR (8)
For batch and VSE/ICCF environments: the jobname of the user partition. For
online environments: blanks. (The example record above is for batch
environments.)
17-24
CHAR (8)
DB2 Server for VSE authorization ID that was established, implicitly or explicitly,
using the connect process
25-40
CHAR (16)
If you wrote your own ARIUXIT exit to generate installation-supplied data, this
data is placed here for batch/ICCF and CICS applications.
If you did not write such an exit, this contains character blanks for batch/ICCF
applications. For CICS applications, the following information is put in the field:
25-28
CICS transaction ID
29-36
CICS signon ID (if available)
37-40
CICS terminal ID (if available)
41-52
CHAR (12)
Date and time of the accounting record (MMDDYYHHMMSS). The format can
also be DDMMYYHHMMSS. The format is controlled by the DATE parameter of
the VSE STDOPT job control command or statement.
53-60
CHAR (8)
The name of the package that was last active for the application
Note:
The following are totals for the agent. They show values accumulated for a user.
61-64
INTEGER
Active time (that is, time that the user was connected to an agent) in seconds
65-68
INTEGER
Processor time used (in 300ths of a second)
69-72
INTEGER
Number of times this agent looked at a page buffer (this value is equivalent to
the LPAGBUFF counter value for an individual user)
73-74
CHAR (2)
Century number of Date (’19’ or ’20’)
75-78
CHAR (4)
The xSQL record identifier, where x = U for User
79-80
CHAR (2)
Reserved (character blanks)
Remote User Records
Columns:
1
9
17
25
41
53
57
61
65
69 73 75
79
|
|
|
|
|
|
|
|
|
|
|
|
|
SQLDBA
JOB1
MYID
USER DATA HERE
051389182005BADDEBTS
19USQL
Column
Data Type
Description
1-8
CHAR (8)
Jobname of the database partition (application server)
9-16
CHAR (8)
Access user ID of the application or interactive user (application requester)
17-24
CHAR (8)
DB2 Server for VSE authorization ID that was established, implicitly or explicitly,
using the connect process
25-40
CHAR (16)
If your installation has an accounting exit that uses these bytes, this area is filled
with installation-supplied data. For more information, see “Supplying
Accounting Data from DRDA Applications” on page 196.
41-52
CHAR (12)
Date and time of the accounting record (MMDDYYHHMMSS)
53-60
CHAR (8)
The name of the package that was last active for the application
Note: The following are totals for the agent. They show values accumulated for a user.
61-64
INTEGER
Active time (that is, time that the user was connected to an agent) in seconds
65-68
INTEGER
Processor time used (in 300ths of a second)
200
System Administration

Column
Data Type
Description
69-72
INTEGER
Number of times this agent looked at a page buffer (this value is equivalent to
the LPAGBUFF counter value for an individual user)
73-74
CHAR (2)
Century number of Date ('19' or '20')
75-78
CHAR (4)
The xSQL record identifier, where x = U for User
79-80
CHAR (2)
Reserved (character blanks)
DRDA Records
Columns:
1
9
17
25
37
64
73 75
79
|
|
|
|
|
|
| |
|
SQLDBA
JOB1
MYID
051389182005nnTORONET.SP6AGATnnnnnnnn
19RSQLC0
Column
Data Type
Description
1-8
CHAR (8)
Jobname of the database partition (application server)
9-16
CHAR (8)
Access user ID of the application or interactive user (application requester)
accessing the application server
17-24
CHAR (8)
DB2 Server for VSE authorization ID that was established, implicitly or explicitly,
using the connect process
25-36
CHAR (12)
Date and time of the accounting record (MMDDYYHHMMSS)
37-63
CHAR(27)
LU 6.2 LUWID. This field is composed of the following subfields:
37-37
Length of the entire LUWID: a 1-byte binary integer
38-38
Length of the qualified LUNAME: a 1-byte binary integer
39-n
Qualified LUNAME (NETID.LUNAME): a character subfield in which n
depends on the length value in column 38
(n+1)-(n+6)
Instance number: a bit data field
(n+7)-(n+8)
Sequence number: a bit data field
If the LUWID is less than 25 bytes, the remaining columns are padded with
blanks
64-72
Reserved
73-74
CHAR (2)
Century number of Date ('19' or '20')
75-78
CHAR (4)
The xSQL identifier to separate the DB2 Server for VSE accounting records from
other VSE accounting records, where x = R for remote user
79-80
CHAR (2)
Reserved (character blanks)
Notes:
1. DB2
Server for VSE does not provide any data on costs incurred in
communications.
2. The remote user accounting record column 9-16 has the remote application
requesters access user ID. For a local batch job, this field contains the jobname.
3. The remote user accounting record column 25-40 may contain system
dependant information for the application requester. For a local batch job, this
field contains data retrieved from the accounting exit.
Chapter 10. Using the Accounting Facility
201

VSE Guest User Records
Columns:
1
9
17
25
41
53
57
61
65
69 73 75
79
|
|
|
|
|
|
|
|
|
| |
|
SQLDBA
VSEMCH1
MYID
USER DATA HERE
051389182005DEBTS
19USQLC0
Column
Data Type
Description
1-8
CHAR (8)
VM user ID of the database machine (fixed by CP)
9-16
CHAR (8)
For batch and VSE/ICCF environments, the jobname of the user partition. For
online environments, the VM user ID of the VSE machine. (The example record
above is for online environments.)
17-24
CHAR (8)
DB2 Server for VSE connected authorization ID that was established using the
connect process (this can be an explicit or implicit connection)
25-40
CHAR (16)
Installation-supplied data. If you are in a batch or VSE/ICCF environment, and
have not coded an accounting exit that supplies information to this field, the
database manager leaves character blanks. In an online environment, if you have
not coded an accounting exit to supply the information, the following is put in
the field:
25-28
CICS transaction ID
29-31
CICS terminal operator ID (if available)
32-35
CICS terminal ID (if available)
36-39
This field contains character blanks, unless you have coded your own
cancel exit. For information on cancel exits in VSE, see the DB2 Server
for VSE & VM Diagnosis Guide and Reference manual.
40
Blank
41-52
CHAR (12)
Date and time of the accounting record (MMDDYYHHMMSS)
53-60
CHAR (8)
The name of the package that was last active for the application (also referred to
as prepname or program name)
Note:
The following are totals for the agent. They show values accumulated for a user.
61-64
INTEGER
Active time (the time that the user was connected to an agent) in seconds
65-68
INTEGER
Processor time used (in milliseconds). In the VSE guest user accounting record
passed to VM/ESA, processor time is recorded in thousandths of a second
(milliseconds).
69-72
INTEGER
Number of times this agent looked at a page buffer (equivalent to the
LPAGBUFF counter value for an individual user)
73-74
CHAR (2)
Century number of Date (’19’ or ’20’)
75-78
CHAR (4)
The xSQL identifier to separate DB2 Server for VSE accounting records from
other VM accounting records, where x = U for User.
79-80
CHAR (2)
Record identifier (character X'C0') fixed by CP
Maintaining Accounting Data
Accounting data, like any other data, can be loaded into tables and maintained by
any DB2 Server for VSE facility. The following sections describe how to set up
dbspaces to hold accounting records and present an example. You will have to
modify the example tables to meet your own installation’s requirements.
Setting up a database for accounting data involves the same activities that would
be done for any data application:
202
System Administration
1. Adding and acquiring a dbspace
2. Creating tables for the accounting data
3. Creating views on those tables
4. Creating indexes on those tables.
Considerations for an Accounting Dbspace
Because accounting data is usually read-only, it is most suited for a private
dbspace. When it is in a private dbspace, multiple users are able to read it as long
as the tables are not being loaded. (If they are being loaded, users get an
immediate notification that a load is taking place in the form of a negative
SQLCODE).
Also, because the data is read-only and because its source is a sequential file, it is a
candidate for a nonrecoverable dbspace. For information on the advantages and
disadvantages of this type of storage, see “Nonrecoverable Storage Pools” on page
177.
The size of the dbspace depends on a number of factors. The key considerations
are:
v The number of accounting records you want to keep online
v The row length of the records
v The index space requirements.
When you have determined these factors, you can estimate the size of the dbspace
needed by using the formulas in Appendix B, “Estimating Database Storage,” on
page 341.
To estimate the rate at which your installation generates accounting records, use
the accounting facility for a trial period (a day or a week). Or, you can try to make
an initial estimate using the method shown on page 188.
Tables to Hold Accounting Data
One approach to organizing accounting records is to place them in four separate
tables:
v One to hold the termination records, which summarize the resources consumed
during an entire session of the database manager.
v One to hold the initialization, operator, and checkpoint records, which describe
the overhead resources consumed by the database manager processes.
v One to hold user records, which describe the resources consumed by individual
users.
v One to hold remote access records, which contain the LUWID. The records also
contain the user ID and datetime value that can be used to match with the
regular user records.
Figure 81 shows the statements you could issue to create these three tables, here
named SQLDETAIL (for termination records), SYSDETAIL (for initialization,
operator and checkpoint records), and USERDETAIL (for user records).
Chapter 10. Using the Accounting Facility
203
CREATE TABLE SQLDETAIL(SQLNAME CHAR(8),
DATE
CHAR(6),
TIME
CHAR(6),
RUNTIME
INTEGER,
DASDIO
INTEGER,
LPAGBUFF INTEGER,
CENTURY CHAR(2) ) IN SQLDBA.ACCTNG;
Figure 81. Example of DBS Utility Commands to Create Accounting Tables (Part 1 of 4)
CREATE TABLE SYSDETAIL(SQLNAME CHAR(8),
TYPE
CHAR(8),
DATE
CHAR(6),
TIME
CHAR(6),
RUNTIME
INTEGER,
CPUTIME
INTEGER,
LPAGBUFF INTEGER,
CENTURY CHAR(2) ) IN SQLDBA.ACCTNG;
Figure 81. Example of DBS Utility Commands to Create Accounting Tables (Part 2 of 4)
CREATE TABLE USERDETAIL(SQLNAME CHAR(8),
USERPART CHAR(8),
SQLUSER CHAR(8),
USERDATA CHAR(16),
DATE
CHAR(6),
TIME
CHAR(6),
PNAME
CHAR(8),
ATIME
INTEGER,
CPUTIME
INTEGER,
ULPAGBUF INTEGER,
CENTURY CHAR(2) ) IN SQLDBA.ACCTNG;
Figure 81. Example of DBS Utility Commands to Create Accounting Tables (Part 3 of 4)
CREATE TABLE DRDADETAIL(SQLNAME CHAR(8),
ACCUSRID CHAR(8),
SQLUSER CHAR(8),
DATE
CHAR(6),
TIME
CHAR(6),
LUWID
VARCHAR(27),
CENTURY
CHAR(2)) IN SQLDBA.ACCTNG;
Figure 81. Example of DBS Utility Commands to Create Accounting Tables (Part 4 of 4)
Note: If you have accounting tables defined from an earlier release, you can use
the ALTER TABLE statement to add the CENTURY column to your existing
tables.
The information for all the columns in the tables is loaded directly from the
accounting records. These tables are described in detail below.
204
System Administration
SQLDETAIL Table
Each row of the SQLDETAIL table contains selected data from one termination
accounting record, and represents one session of the database manager. The
following information is inserted into the SQLDETAIL columns:
SQLNAME The jobname of the database partition
DATE
The dates from the termination records
TIME
The times from the termination records
RUNTIME The time, in seconds, from startup to shutdown
DASDIO
The total number of DASD I/Os for the database manager session
LPAGBUFF The total number of times that the database manager looked at a
page buffer
CENTURY The century numbers of the dates from the termination records.
SYSDETAIL Table
Each row of the SYSDETAIL table contains selected data from one initialization,
operator or checkpoint accounting record. The following information is inserted
into its columns:
SQLNAME The jobname of the database partition
TYPE
INIT is inserted if the row describes an initialization record, and
SYSTEM is inserted if the row describes an operator or checkpoint
record
DATE
The dates from the operator/checkpoint or initialization records
TIME
The times from the operator/checkpoint or initialization records
RUNTIME If the value in TYPE is INIT, this value shows the amount of time
for the initialization process to finish (in seconds); if the value in
TYPE is SYSTEM, this value contains binary zeros
CPUTIME
The processor time used (in 300ths of a second)
LPAGBUFF The number of times the agent (represented by the accounting
record) looked into a page buffer
CENTURY The century numbers of the dates from the initialization records.
USERDETAIL Table
Each row of the USERDETAIL table contains selected data from one user
accounting record, either from a local or a remote processor. The following
information is inserted into its columns:
SQLNAME The jobname of the database partition
USERPART The jobname of the user partition for batch/ICCF (for rows that
describe the accounting information for online users, USERPART is
blank)
SQLUSER
The authorization ID that was established, explicitly or implicitly,
during the connect process
USERDATA The installation-supplied accounting data. If you have not coded
an accounting exit, this column contains blanks for rows that
contain accounting data for batch/ICCF users; for online users,
other information is displayed. For more information, see the
description of the user accounting records on page 199.
Chapter 10. Using the Accounting Facility
205
DATE
The dates from the user records
TIME
The times from the user records
PNAME
The name of the package that was last active for the application
ATIME
The active time (that is, the time that the user was connected to an
agent) in seconds
CPUTIME
The processor time used (in 300ths of a second)
ULPAGBUF The number of times the agent looked into a page buffer.
CENTURY The century numbers of the dates from the user records.
DRDADETAIL Table
Each row of the DRDADETAIL table contains selected data from DRDA accounting
records. The columns are described as follows:
SQLNAME The jobname of the data partition (application server)
ACCUSRID The access user ID of the application or interactive user
(application requester) accessing the application server
SQLUSER
The authorization ID that was established, explicitly or implicitly,
during the connect process
DATE
The dates from the DRDA accounting records
TIME
The times from the DRDA accounting records
LUWID
The qualified LUNAME, the sequence number, and the instance
number
CENTURY The century numbers of the dates from the DRDA accounting
records.
Loading the Accounting Data
If you have created the tables described above, you can use the DBS utility to load
the accounting records into the tables. For example, the commands shown below
load the tables and list their contents. (The example shows ARIACC1 as the input
file. Use ARIACC2 if you are loading records from the alternate accounting file.)
206
System Administration
CONNECT SQLDBA IDENTIFIED BY SQLDBAPW;
SET ERRORMODE CONTINUE;
DATALOAD TABLE(SQLDETAIL) IF POS(75-78)=’TSQL’
SQLNAME
1-8
CHAR
DATE
41-46 CHAR
TIME
47-52 CHAR
RUNTIME
61-64 FIXED
DASDIO
65-68 FIXED
LPAGBUFF 69-72 FIXED
CENTURY
73-74 CHAR NULL IF POS(73-74) = 0
DATALOAD TABLE(SYSDETAIL) IF POS(75-78)=’ISQL’
SQLNAME
1-8
CHAR
TYPE
17-24 CHAR
DATE
41-46 CHAR
TIME
47-52 CHAR
RUNTIME
61-64 FIXED
CPUTIME
65-68 FIXED
LPAGBUFF 69-72 FIXED
CENTURY
73-74 CHAR NULL IF POS(73-74) = 0
DATALOAD TABLE(SYSDETAIL) IF POS(75-78)=’OSQL’
SQLNAME
1-8
CHAR
TYPE
17-24 CHAR
DATE
41-46 CHAR
TIME
47-52 CHAR
RUNTIME
61-64 FIXED
CPUTIME
65-68 FIXED
LPAGBUFF 69-72 FIXED
CENTURY
73-74 CHAR NULL IF POS(73-74) = 0
DATALOAD TABLE(SYSDETAIL) IF POS(75-78)=’CSQL’
SQLNAME
1-8
CHAR
TYPE
17-24 CHAR
DATE
41-46 CHAR
TIME
47-52 CHAR
RUNTIME
61-64 FIXED
CPUTIME
65-68 FIXED
LPAGBUFF 69-72 FIXED
CENTURY
73-74 CHAR NULL IF POS(73-74) = 0
Figure 82. Example DBS Utility Commands to Load Accounting Tables (Part
1
of
2)
Chapter 10. Using the Accounting Facility
207

DATALOAD TABLE(USERDETAIL) IF POS(75-78)=’USQL’
SQLNAME
1-8
CHAR
USERPART
9-16 CHAR
SQLUSER
17-24 CHAR
USERDATA 25-40 CHAR
DATE
41-46 CHAR
TIME
47-52 CHAR
PNAME
53-60 CHAR
ATIME
61-64 FIXED
CPUTIME
65-68 FIXED
ULPAGBUF 69-72 FIXED
CENTURY
73-74 CHAR NULL IF POS(73-74) = 0
DATALOAD TABLE (DRDADETAIL) IF POS (75-78) = ’RSQL’
SQLNAME
1-8
CHAR
ACCUSRID
9-16
CHAR
SQLUSER
17-24
CHAR
DATE
25-30
CHAR
TIME
31-36
CHAR
LUWID
37-63
CHAR
CENTURY
73-74
CHAR NULL IF POS(73-74) = 0
INFILE(ARIACC1 RECFM(FB) RECSZ(80) BLKSZ(2000) PDEV(DASD))
COMMIT WORK;
SELECT * FROM SQLDETAIL;
SELECT * FROM SYSDETAIL;
SELECT * FROM USERDETAIL;
Figure 82. Example DBS Utility Commands to Load Accounting Tables (Part 2 of 2)
Converting VSAM ESDS Accounting File Records into VSAM
Managed SAM Feature Records
If VSE/VSAM ESDS files are used to collect your accounting records, you will
have to convert the records into VSAM managed SAM feature records before you
load them into the tables. This is because for the DBSU DATALOAD function, only
a local SAM file or VSAM managed SAM file can be processed as a DASD input
file. Figure 83 shows sample JCL statements for converting VSAM ESDS accounting
file records into VSAM managed SAM file records.
// DLBL ARIACT1,’ACCTFIL1’,0,VSAM,CAT=SQLWK1,DISP=(OLD,KEEP)
// DLBL ARIACT2,’ACCTFIL2’,0,VSAM,CAT=SQLWK1,DISP=(OLD,KEEP)
// DLBL ARIACC1,’ACCT.SAM.FILE1’,0,VSAM,CAT=SQLWK1,
C
RECSIZE=80,RECORDS=(X,Y),DISP=(NEW,KEEP)
// DLBL ARIACC2,’ACCT.SAM.FILE2’,0,VSAM,CAT=SQLWK1,
C
RECSIZE=80,RECORDS=(X,Y),DISP=(NEW,KEEP)
// EXEC IDCAMS,SIZE=AUTO
REPRO INFILE(ARIACT1) -
OUTFILE(ARIACC1 ENV(RECFM(FB) BLKSZ(2000) RECSZ(80))
REPRO INFILE(ARIACT2) -
OUTFILE(ARIACC2 ENV(RECFM(FB) BLKSZ(2000) RECSZ(80))
/*
Figure 83. Job Control for Converting VSAM ESDS File Records to VSAM Managed SAM
File Records
Note:
1.
’ACCTFIL1’ and ’ACCTFIL2’ are the file ids of the VSAM ESDS
accounting files used to collect accounting records.
208
System Administration
2. ARIACC1 and ARIACC2 should be specified as the file name of the
VSAM managed SAM file to be used as the IDCAMS REPRO command
output files. After the conversion, by using the same set of DLBL
statements, these files can be used as input files to the DBSU
DATALOAD job control.
3. Set RECSZ to 80 and BLKSZ to 2000, they are the expected values for
DBSU DATALOAD.
4. The example assumes that the VSAM managed SAM files ARIACC1 and
ARIACC2 are implicitly defined to VSAM the first time they are opened.
5. DISP=(NEW,KEEP) indicates that the files will be reset at OPEN time. If
there are still existing records in either ARIACC1 or ARIACC2 that are
not yet processed, DATALOAD the records first before any new
conversion.
Chapter 10. Using the Accounting Facility
209
210
System Administration
Chapter 11. Generating Additional Databases
Initially, you set up database partition with one database: then, depending on your
needs, you can add additional databases or database partitions. Your initial
database is generated at the time of installation; you generate additional ones later.
This chapter describes how to generate a database. It assumes that you are familiar
with the terminology discussed in Figure 5 on page 7 and have reviewed
Chapter 2, “Planning for Database Generation,” on page 13. The database is
specified when application server is started. This is done through the use of job
control statements that reference the required database.
Learning about Configuration Concepts
Reasons for Adding a Database Partition
Initially, there is one database partition which is called SQLDS. As your installation
grows, you can add more database partitions. The primary reason for doing so
would be to permit multiple user mode access to more than one database at the
same time, or multiple database operation.
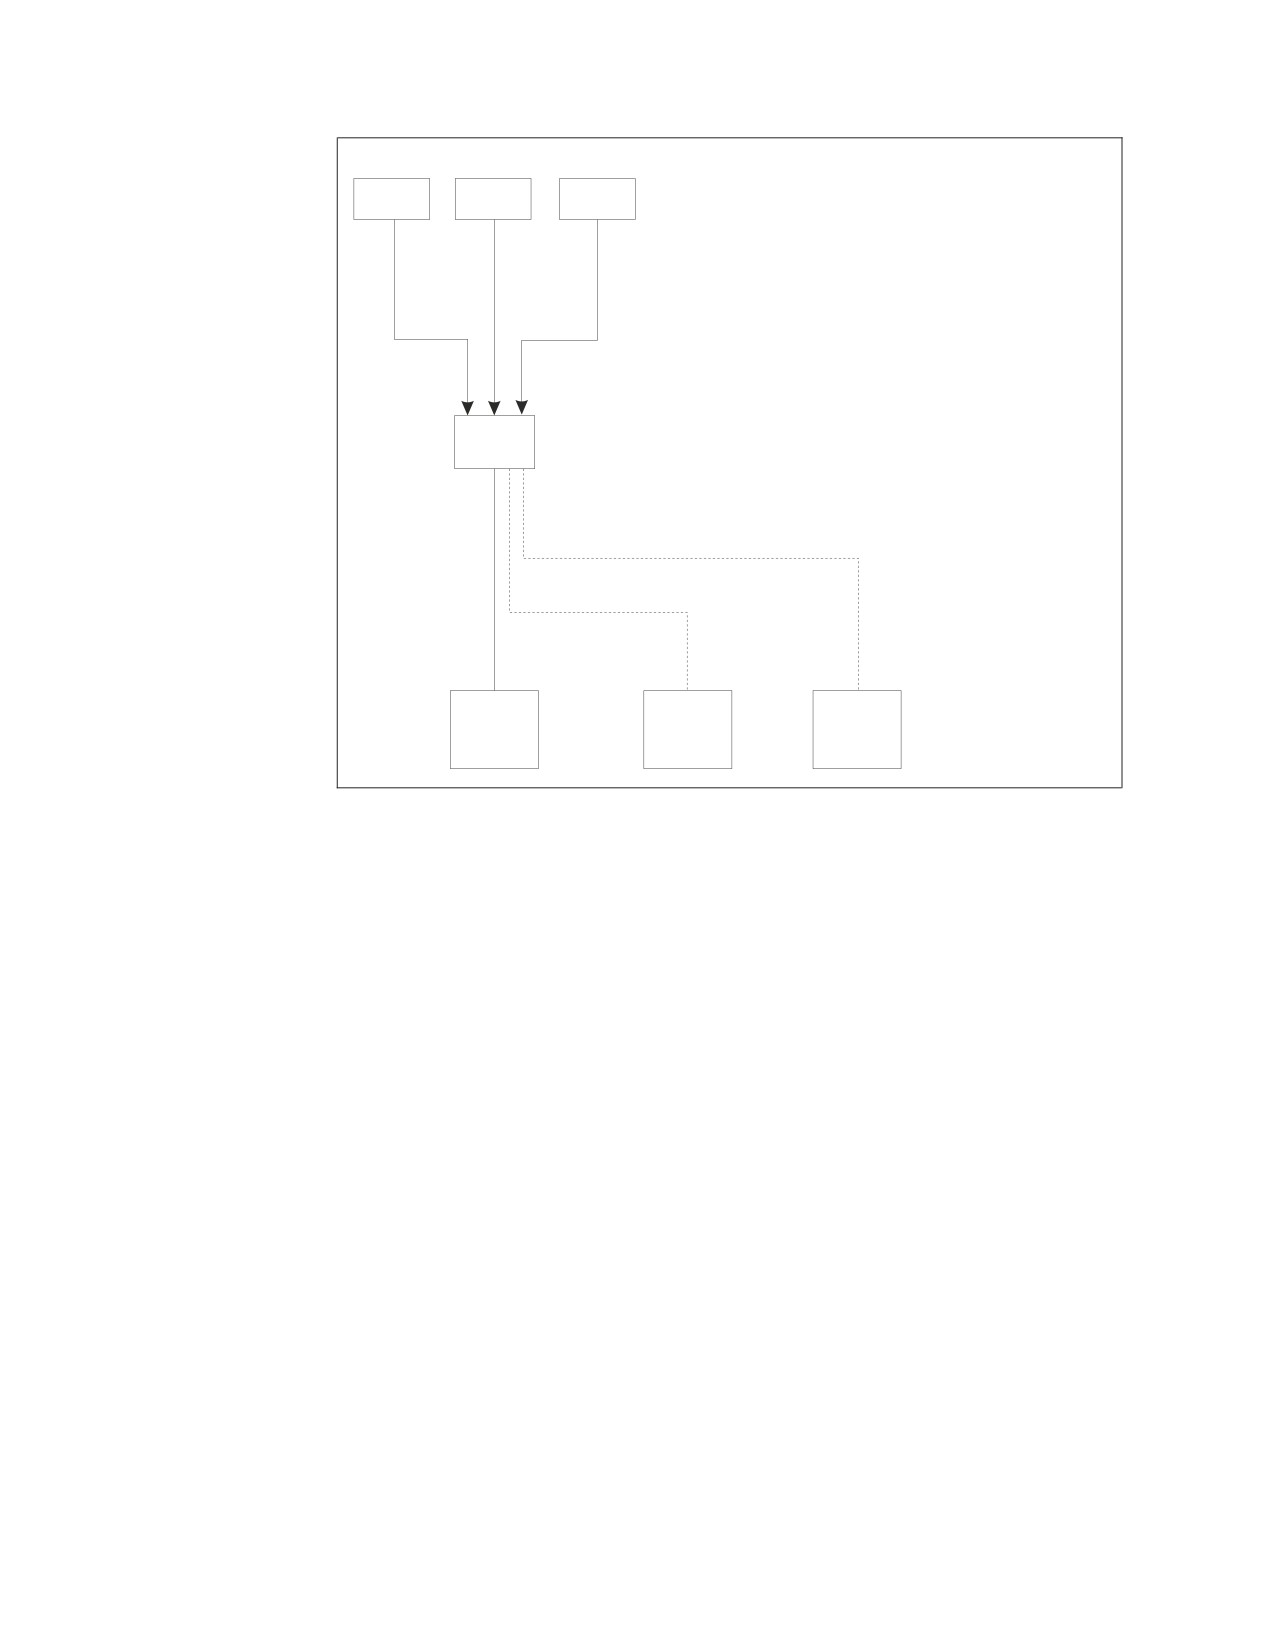
Consider, for example, an installation having one database partition (SQLDS) and
three databases (SQLDBA, DATA1, and DATA2). A database partition can manage
only one database at a time. Thus, as Figure 84 on page 212 shows, while the
database partition is accessing one database in multiple user mode, the other
databases are inactive.
211
MIKE
JIM
CINDY
SQLDS
SQLDBA
DATA1
DATA2
Figure 84. One Database Partition Accessing One Database
Users could access the remaining databases (DATA1 and DATA2) in single user
mode if their partitions are properly prepared; however, it is not recommended
that the database manager be used this way.
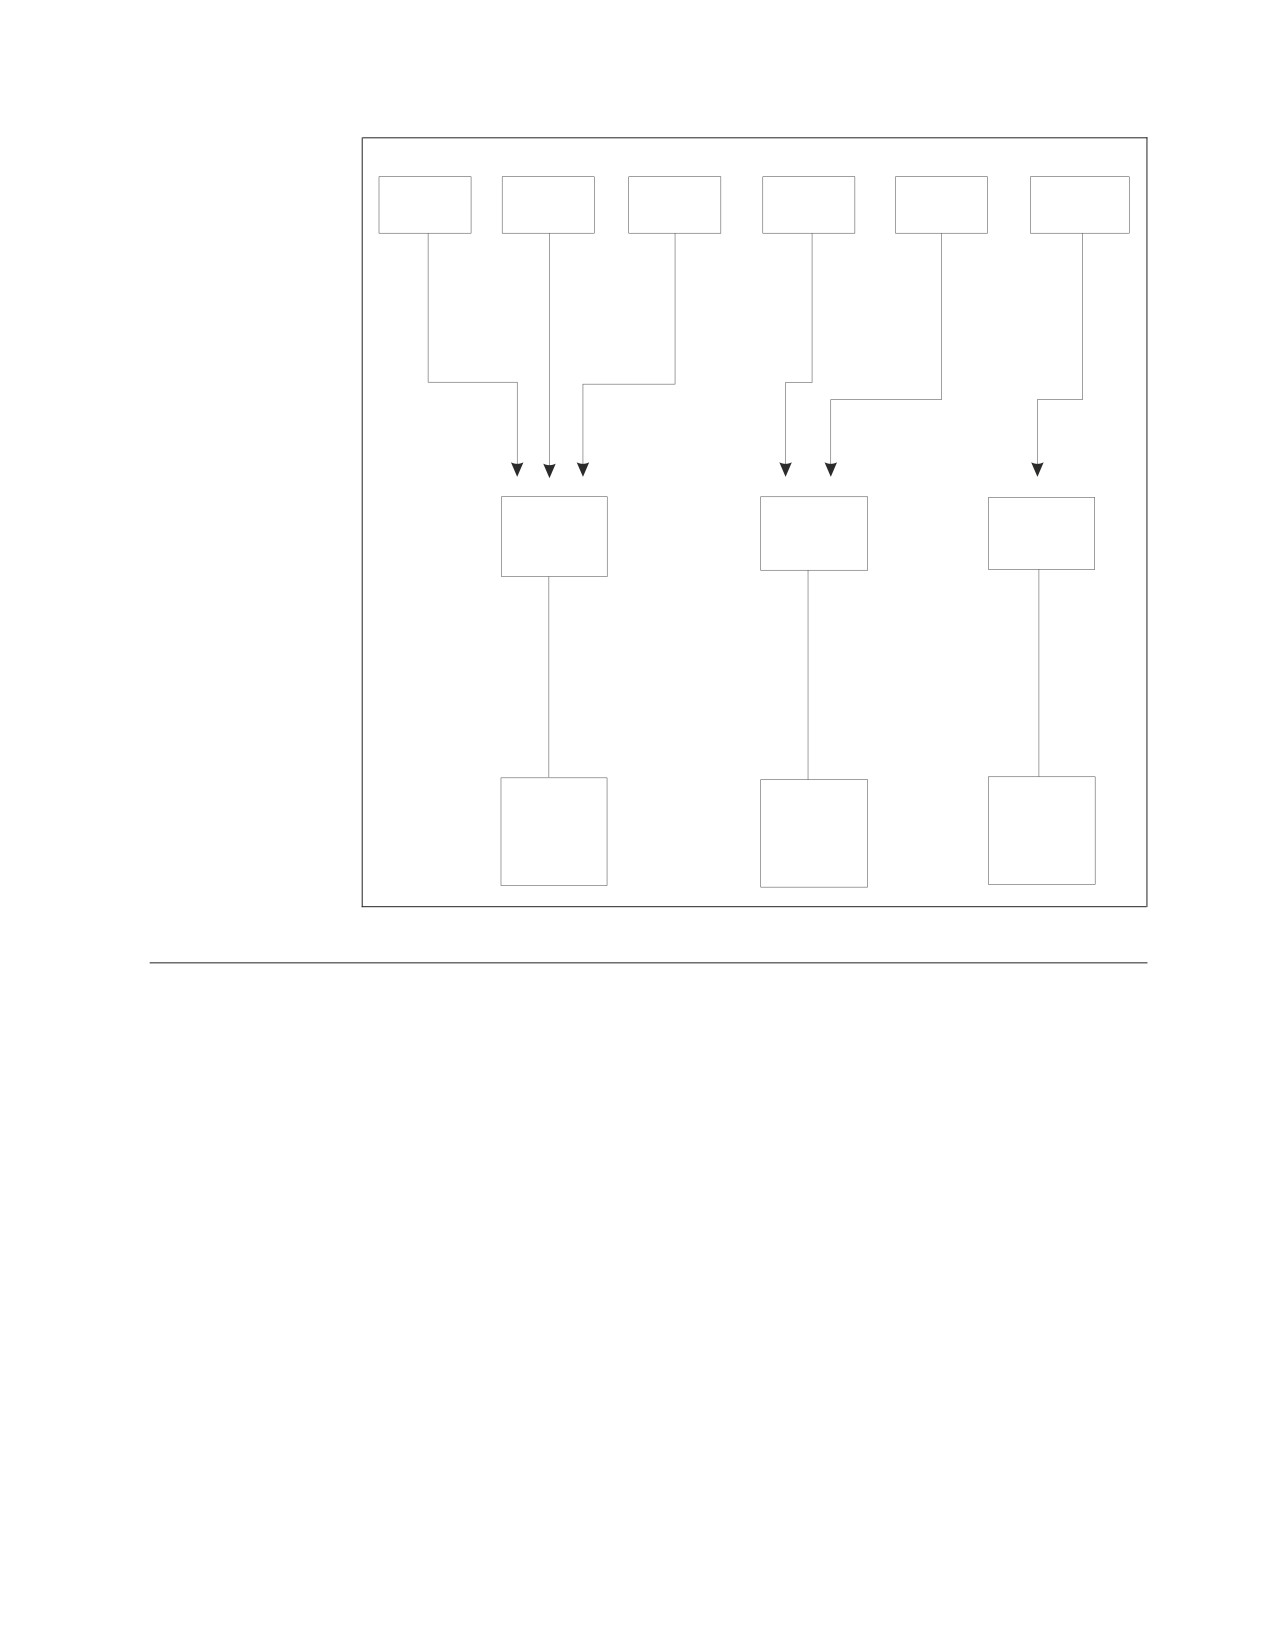
If you define two more database partitions, multiple user access to all three
databases is possible at the same time. Figure 85 on page 213 shows a multiple
database configuration. In this case, two more database partitions are defined
(SQLMFB and SQLJDS). Each partition owns one database, and operates
independently of the others.
212
System Administration
MIKE
JIM
CINDY
MARY
BOB
EDWARD
SQLDS
SQLMFB
SQLJDS
SQLDBA
DATA1
DATA2
Figure 85. Multiple Users Accessing Multiple Databases
Database Generation Process
The steps for generating a database are as follows:
1. Update the DBNAME Directory for the new database.
2. Define the VSAM data sets for the database, by running the VSAM IDCAMS
program with the appropriate set of DEFINE commands.
3. Set up the job control statements for generating the database.
4. Modify and run a job control to generate a database. The job control does the
following:
v Formats the database components and constructs the catalog tables
v Installs the DBS utility
v Runs the DBS utility to complete the installation of the database.
This involves tasks such as creating views, granting access to DB2 Server
for VSE facilities, and acquiring dbspaces for system use.
Once the database is generated, you can do the following:
5. Install the desired components into the database, such as ISQL, online
support, and HELP text.
6. Optionally change the application server default CHARNAME.
7. Optionally change the application server default character subtype.
Chapter 11. Generating Additional Databases
213
8. Optionally set the DBCS option to YES.
9. Change the password of authorization ID SQLDBA in the database to one of
your own choosing.
10. Optionally install the DRDA code.
11. Optionally load phases into the SVA.
These steps are all described in detail below.
Step
1: Update the DBNAME Directory
Update your DBNAME directory to add the new database. See “Setting Up the
DBNAME Directory” on page 23.
Step
2: Defining the Database Data Sets
To define the VSAM data sets for the new database, run the VSAM utility program
IDCAMS. The specific DEFINEs will depend on your requirements. At a minimum,
however, you must define data sets for:
v A directory (sometimes called a BDISK)
v One, two, or four logs
v At least one dbextent (at least one data set).
The ARIS75CD procedure shown in Figure 86 on page 215 provides an example of
the job control statements to define a VSAM user catalog and data sets for a
database. This database has one directory, one log, and one dbextent. In the
example, they will reside on an IBM 3380 DASD device.
Note: The VSAM keywords shown here are only the basic ones that the database
manager requires. Other keywords and options that you can use are
described in the Using VSE/VSAM Commands and Macros manual.
214
System Administration
//
JOB ARIS75CD
DB2 for VSE STARTER
DATABASE VSAM DEFINITIONS
//
LIBDEF PROC,SEARCH=(PRD2.DB2730)
//
EXEC PROC=ARIS75DB
*-- SQL/DS DATABASE ID PROC
//
EXEC IDCAMS,SIZE=AUTO
DEFINE UCAT
/* DEFINE USER CATALOG
*/ -
( NAME (SQLCAT)
-
CYL (1)
-
ORIGIN (NNNN)
-
VOL (XXXXXX)
)
DEFINE SPACE
/* DEFINE DB2
DATABASE SPACE */ -
( ORIGIN (NNNN)
-
CYL
(119)
-
VOL
(XXXXXX)
) -
CAT
(SQLCAT)
DEFINE CLUSTER
/* DEFINE DB2
DATABASE DIRECTORY */ -
( NAME
(SQL.BDISK.STARTER.DB) -
CNVSZ (512)
-
CYL
(34)
-
NONINDEXED
-
VOL
(XXXXXX)
-
RECSZ (505 505)
-
REUSE
-
SHR
(2)
) -
CAT
(SQLCAT)
DEFINE CLUSTER
/* DEFINE DB2
DATABASE LOG */ -
( NAME
(SQL.LOGDSK1.STARTER.DB) -
CNVSZ (4096)
-
CYL
(08)
-
NONINDEXED
-
VOL
(XXXXXX)
-
RECSZ (4089 4089)
-
REUSE
-
SHR
(2)
) -
CAT
(SQLCAT)
DEFINE CLUSTER
/* DEFINE DB2
DATABASE DATA EXTENT
1
*/
-
( NAME
(SQL.DDSK1.STARTER.DB) -
CNVSZ (4096)
-
CYL
(77)
-
NONINDEXED
-
VOL
(XXXXXX)
-
RECSZ (4089 4089)
-
REUSE
-
SHR
(2)
) -
CAT
(SQLCAT)
/*
/&
Figure 86. Job ARIS75CD (Defining VSAM Data Sets for the Database)
Notes:
1
Change the NAME keyword to the name of the application server you
want to access.
2
Change all occurrences of VOLUME (XXXXXX) and ORIGIN (NNNN) to
reflect the volume serial number and origin allocation for the VSAM
components that make up your new database. (The origin value is the
beginning track number or block number.)
3
If you are allocating the database to a 3380 DASD device, you do not need
to modify the CYL space allocations. If a fixed-block architecture (FBA)
3370/9332/9335 DASD device is being used for the database, replace the
CYL allocations with the equivalent BLOCK allocations. For all other types
Chapter 11. Generating Additional Databases
215
of DASD devices, refer to Appendix B, “Estimating Database Storage,” on
page 341. Minimum space allocation values are shown in Table 41 on page
342.
4
If the user catalog for the database will not be identified by the file-id
SQLCAT, then:
v Alter the file_id in the DLBL statement identifying the VSAM user
catalog for the database, and
v Alter the CAT specification in the IDCAMS DEFINE SPACE and
DEFINE CLUSTER commands.
We recommend that you use a VSAM user catalog for the new database. If
you choose not to, you must do the following:
v Remove the DLBL statement identifying the VSAM user catalog
v Remove the DEFINE UCAT command and the DEFINE SPACE
command
v Remove the CAT specification from the IDCAMS DEFINE CLUSTER
commands.
You may also wish to password-protect your database with the VSAM password
protection facility. See “Protecting VSAM Data Sets” on page 119.
The directory for the database is defined as part of a VSAM services job that
creates the initial set of database data sets. Figure 87 shows another example of
defining a directory data set. Figure 86 on page 215 shows the complete job.
DEFINE CLUSTER
(NAME (SQL.BDISK.DBNAME01.DB) -
CNVSZ (512) -
CYL (6) -
NONINDEXED -
VOL (volid1) -
RECSZ (505 505) -
REUSE -
SHR (2) ) -
CAT (SQLCAT01)
Figure 87. Defining the Directory Data Set
Notes:
1. The directory data set is defined by the DEFINE CLUSTER command. You can
give it any name you like. To avoid confusion, however, you should retain
BDISK as part of the name; then give it a qualifier to distinguish it from
directories on other databases.
2. You must use the CNVSZ and RECSZ values shown. The directory must have
512-byte control intervals.
3. Set the directory size based on potential database size. Specify it with either
CYL(nn) or TRK(nn) for count-key-data devices, or with BLOCKS(nnnn) for
fixed block devices.
4. The SHR(2) parameter must be used to allow archiving.
5. You may wish to password-protect your database with the VSAM password
protection facility. See “Protecting VSAM Data Sets” on page 119.
216
System Administration
Step
3: Setting Up Your Database Job Control
Each time the database manager (program ARISQLDS) is run, the following job
controls are needed:
v DLBL statements, which identify the database being accessed (the directory, the
log or logs, and the data dbextents)
v LIBDEF statements, which define the DB2 Server for VM libraries and any other
needed libraries
v Trace facility statements
v Database archive and log archive statements
v Accounting facility statements.
During the initial installation of the database manager, two procedures are defined
that contain the needed LIBDEF statements:
ARIS75PL
runs LIBDEF statements to define the production
libraries, which are required for the day-to-day use
of the database manager.
ARIS75SL
runs LIBDEF statements to define libraries that are
required for database generation and for code link
edits.
It is recommended that you also use catalogued procedures for the other job
controls, to avoid having to maintain multiple copies of them. Because procedures
for the libraries are cataloged during installation, you only need to catalog the
DLBL statements that identify the new database. You also should catalog the job
control statements needed for the trace, database archive, log archive, and
accounting facilities.
Database archiving and log archiving can be directed only to tape, so for these
activities, you must use TLBL statements. Trace output and accounting output can
be directed to either DASD or tape. For information on specifying job control
statements for the trace output file, see the DB2 Server for VSE & VM Operation
manual; for information on accounting job control statements, see “Setting Up a
Job Control for the Accounting Files” on page 187.
Figure 88 on page 218 shows an example of the job control statements needed for
cataloging the database.
Chapter 11. Generating Additional Databases
217
// JOB CATALOG DATABASE JOB CONTROL
// EXEC LIBR
ACCESS SUBLIB=PRD2.DB2730
CATALOG DBNAME01.PROC
// DLBL IJSYSUC,’SQLCAT01’,,VSAM
// DLBL BDISK,’SQL.BDISK.DBNAME01.DB’,,VSAM
// DLBL LOGDSK1,’SQL.LOGDSK1.DBNAME01.DB’,,VSAM
// DLBL LOGDSK2,’SQL.LOGDSK2.DBNAME01.DB’,,VSAM
// DLBL ALTLGD1,’SQL.ALTLGD1.DBNAME01.DB’,,VSAM
// DLBL ALTLGD2,’SQL.ALTLGD2.DBNAME01.DB’,,VSAM
// DLBL DDSK1,’SQL.DDSK1.DBNAME01.DB’,,VSAM
// DLBL DDSK2,’SQL.DDSK2.DBNAME01.DB’,,VSAM
// TLBL ARITRAC,...
// TLBL ARIARCH,...
// TLBL ARILARC,...
// TLBL ARILALT,...
// DLBL ARIACC1,...
// EXTENT...
// DLBL ARIACC2,...
// EXTENT...
/+
/*
/&
Figure 88. Job for Cataloging Database Job Control
Notes:
1.
Specify the sublibrary into which your procedure is to be cataloged. In the
above example, PRD2.DB2730 is used.
2.
The file names on the DLBL and TLBL statements must be as shown in the
example.
3.
The data set names on the DLBL and TLBL statements must match those on
the DEFINE CLUSTER commands that defined the data sets for the database.
4.
You need a DLBL statement for the directory (BDISK).
5.
You need a DLBL statement for each log data set (LOGDISK1, LOGDISK2,
ALTLGD1, ALTLGD2).
6.
You need one DLBL statement for each defined dbextent data set (DDSK1,
DDSK2).
7.
If you plan to use tracing, you need job control for the trace output file. The
file name must be ARITRAC. This example shows a TLBL statement; trace
output can be directed to disk as well.
8.
If you will be running with LOGMODE=A or L, you need a TLBL statement
for archiving the database. The file name must be ARIARCH.
9.
If you will be running with LOGMODE=L, you also need a TLBL statement
for archiving the log. The file name must be ARILARC. If you use alternate
logging, you also need a TLBL for the inactive log. The file name must be
ARILALT.
It is recommended that you do not specify any VOLID parameter on the TLBL
statements for log archiving. Because multiple files can be created or read
during the same run of the database manager, you would want different
VOLIDs for the different files.
10.
If you are including job control statements for the accounting file facility, the
file name of the first accounting file must be ARIACC1, and that of the second
file, if you choose to have it, must be ARIACC2. Only one file is required, but
it is recommended that you use two.
218
System Administration
Step 4: Generating the Database
To generate a database, modify and run the job control shown in Figure 89 in
single user mode (SYSMODE=S). This will run IBM-supplied procedures to do the
following:
1. Create the package for the DBS utility using the Assembler preprocessor
2. Finish the database generation process using the DBS utility.
// JOB GENERATE A DATABASE NAMED DBNAME01
// EXEC PROC=ARIS75SL
*-- SERVICE/PRODUCTION LIBRARY ID PROC
// EXEC PROC=DBNAME01
*-- DATABASE ID PROC
// EXEC ARISQLDS,SIZE=AUTO,PARM=’SYSMODE=S,STARTUP=C’
CUREXTNT=2
MAXEXTNT=200
The meanings of these
MAXDBSPC=1000
parameters are described
END
in the paragraphs that
POOL 2 NOLOG
follow this figure.
1 1
2 2
END
PUBLIC
12800
1
PUBLIC
2048
1
PUBLIC
8192
1
PUBLIC
1024
1
PUBLIC
512
1
PUBLIC
512
1
PUBLIC
512
1
PUBLIC
512
2
PUBLIC
512
2
PRIVATE
128
1
PRIVATE
128
1
PRIVATE
512
1
PRIVATE
128
2
PRIVATE
128
2
PRIVATE
512
2
INTERNAL
80
1024 1
END
/*
// EXEC PROC=ARIS040D
*-- PREP DBS UTILITY
// EXEC PROC=ARIS050D
*-- PERFORM REQUIRED DATABASE SET UP
// EXEC PROC=ARISDBSD
*-- LOAD SAMPLE TABLES AND ROUTINES
READ MEMBER ARISAMDB
READ MEMBER ARISAMPI
/*
/&
Figure 89. Example of a Job Control for Generating Your Own Database
Notes:
1. The ARIS75SL procedure is cataloged during initial installation. It contains job
control statements that identify the appropriate set of service libraries.
2. The DBNAME01 cataloged procedure refers to the job control (DLBL and
LIBDEF) statements for the database being generated. You define and create
this procedure as explained in “Step 3: Setting Up Your Database Job Control”
on page 217.
3. Running the database manager (PGM=ARISQLDS) in single user mode
(SYSMODE=S) with STARTUP=C calls the database generation program. This
program reads the SYSIPT input control cards that specify how the database is
to be generated. These statements are described later. Program ARISQLDS also
Chapter 11. Generating Additional Databases
219
reads the A-type source member ARISCAT. The contents of this member remain
constant for all databases and should not be changed.
4.
The ARIS040D procedure should be used without modification. It preprocesses
the DBS utility, and references DB2 Server for VSE source members.
5.
Procedure ARIS050D uses the DBS utility to process the SQL statements that
finish generating the database. Do not change this procedure or the A-type
source member it reads (ARISDBU), because you may want to use them to
install and generate additional databases in the future. If you want to allocate
larger dbspaces for the HELP text, ISQL-stored queries, or sample tables than
those defined in ARISDBU, copy and rename both ARIS050D and ARISDBU;
then increase the number of pages in the ACQUIRE PUBLIC DBSPACE
statements in the renamed member, and update the renamed procedure to use
the renamed member as input.
The member ARISDBU enables you to perform the following:
v Grant RUN authority to PUBLIC for the DBS utility package
SQLDBA.ARIDSQL
v Acquire the standard database public dbspaces for HELPTEXT, ISQL, and
SAMPLE
v Create the HELP text tables SQLDBA.SYSTEXT1, SQLDBA.SYSTEXT2, and
SQLDBA.SYSLANGUAGE
v Create indexes SQLDBA.SYSTEXT1INDEX, SQLDBA.SYSTEXT2INDEX, and
SQLDBA.SYSLANGINDEX on the HELP text tables
v Create the ISQL sample routine table EXAMPLE.ROUTINE and its index
EXAMPLE.RINDEX
v Create the SYSUSERLIST catalog view and grant access to PUBLIC
v Grant access to PUBLIC on all catalog tables except
SYSTEM.SYSUSERAUTH.
Note: You should not drop the dbspaces or tables that are acquired and created
above, even if you are not installing the corresponding facilities. Certain
database maintenance operations assume that these tables and dbspaces
exist in the database.
6.
The procedure ARISDBSD runs the DBS utility in single user mode.
7.
The A-type source members ARISAMDB and ARISAMPI contain SQL
statements to be run by the DBS utility to build and load the sample tables and
routines.
The input (SYSIPT) control statements for the database generation program are
divided into three sets of input records, separated by END delimiter control
statements. These specify:
v Database generation keyword control statements, which define the number of
dbextents to be prepared during the database generation process (CUREXTNT),
and establish certain maximum values for the database (MAXPOOLS,
MAXEXTNT, and MAXDBSPC). Each statement can be specified on its own
input record (card), or multiple statements can be specified on one input record.
An END delimiter control statement must be specified after all the keyword
control statements. The CUREXTNT control statement must be specified; all the
others have default values.
v Initial storage pool and dbextent definitions, which identify the initial set of
nonrecoverable storage pools and define the initial set of dbextents. Any
dbextent defined here must have a corresponding DLBL statement in your
database job control (DBNAME01). You must specify at least one dbextent for
220
System Administration
each storage pool that is referenced by the initial dbspace definitions. The POOL
control statements that define nonrecoverable storage pools must precede the
statements that define the dbextents.
v Initial dbspace definitions, which define the initial set of dbspaces, including public
dbspaces required by the database manager (system dbspaces), any user public
and private dbspaces you need initially, and the internal dbspace allocations for
the database. You must specify at least five public dbspaces: first two for the
database catalog and package storage, and three more for the HELP text, ISQL
tables, and the sample tables. In Figure 89 on page 219 the first five dbspace
keyword control statements define these five dbspaces. The remainder of the
public and private dbspaces shown in Figure 89 on page 219 are user dbspaces
of various sizes and storage pool assignments.
You must also specify the internal dbspaces for the database. You can change the
specification of internal dbspaces on any ADD DBSPACE operation. For
information, see “Adding Dbspaces to the Database” on page 125.
The details of specifying these database generation control statements are described
below.
Specifying Keyword Control Statements
The format for specifying the database generation keyword control statements is:
►►
CUREXTNT=nnn
END
►◄
MAXPOOLS=nnn
MAXEXTNT=nnn
MAXDBSPC=nnn
CUREXTNT
CUREXTNT specifies the number of dbextents being defined in the database
generation. You must specify it; it has no default value. Its value can be from 1 to
999, and must match the number of dbextent definition control statements. You
must also have DLBL statements for all the dbextents being defined (in your
DBNAME01 procedure). In the example shown in Figure 89 on page 219,
CUREXTNT=2 indicates that two dbextents are being defined.
MAXPOOLS
MAXPOOLS specifies the maximum number of storage pools that can ever be
defined for the database. Its value can range from 1 to 999. The default is 32. In the
example in Figure 89 on page 219, the default is used.
MAXEXTNT
MAXEXTNT specifies the maximum number of dbextents that can ever be defined
for the database. Its value can range from 1 to 999. The default is 64. In the
example in Figure 89 on page 219, it is set to 200.
MAXDBSPC
MAXDBSPC specifies the maximum number of dbspaces that can ever be defined
for the database. Its value can range from the number you specify in your database
generation control statements to 32000. The default is 1000. In the example in
Figure 89 on page 219, it is explicitly set to 1000.
Chapter 11. Generating Additional Databases
221
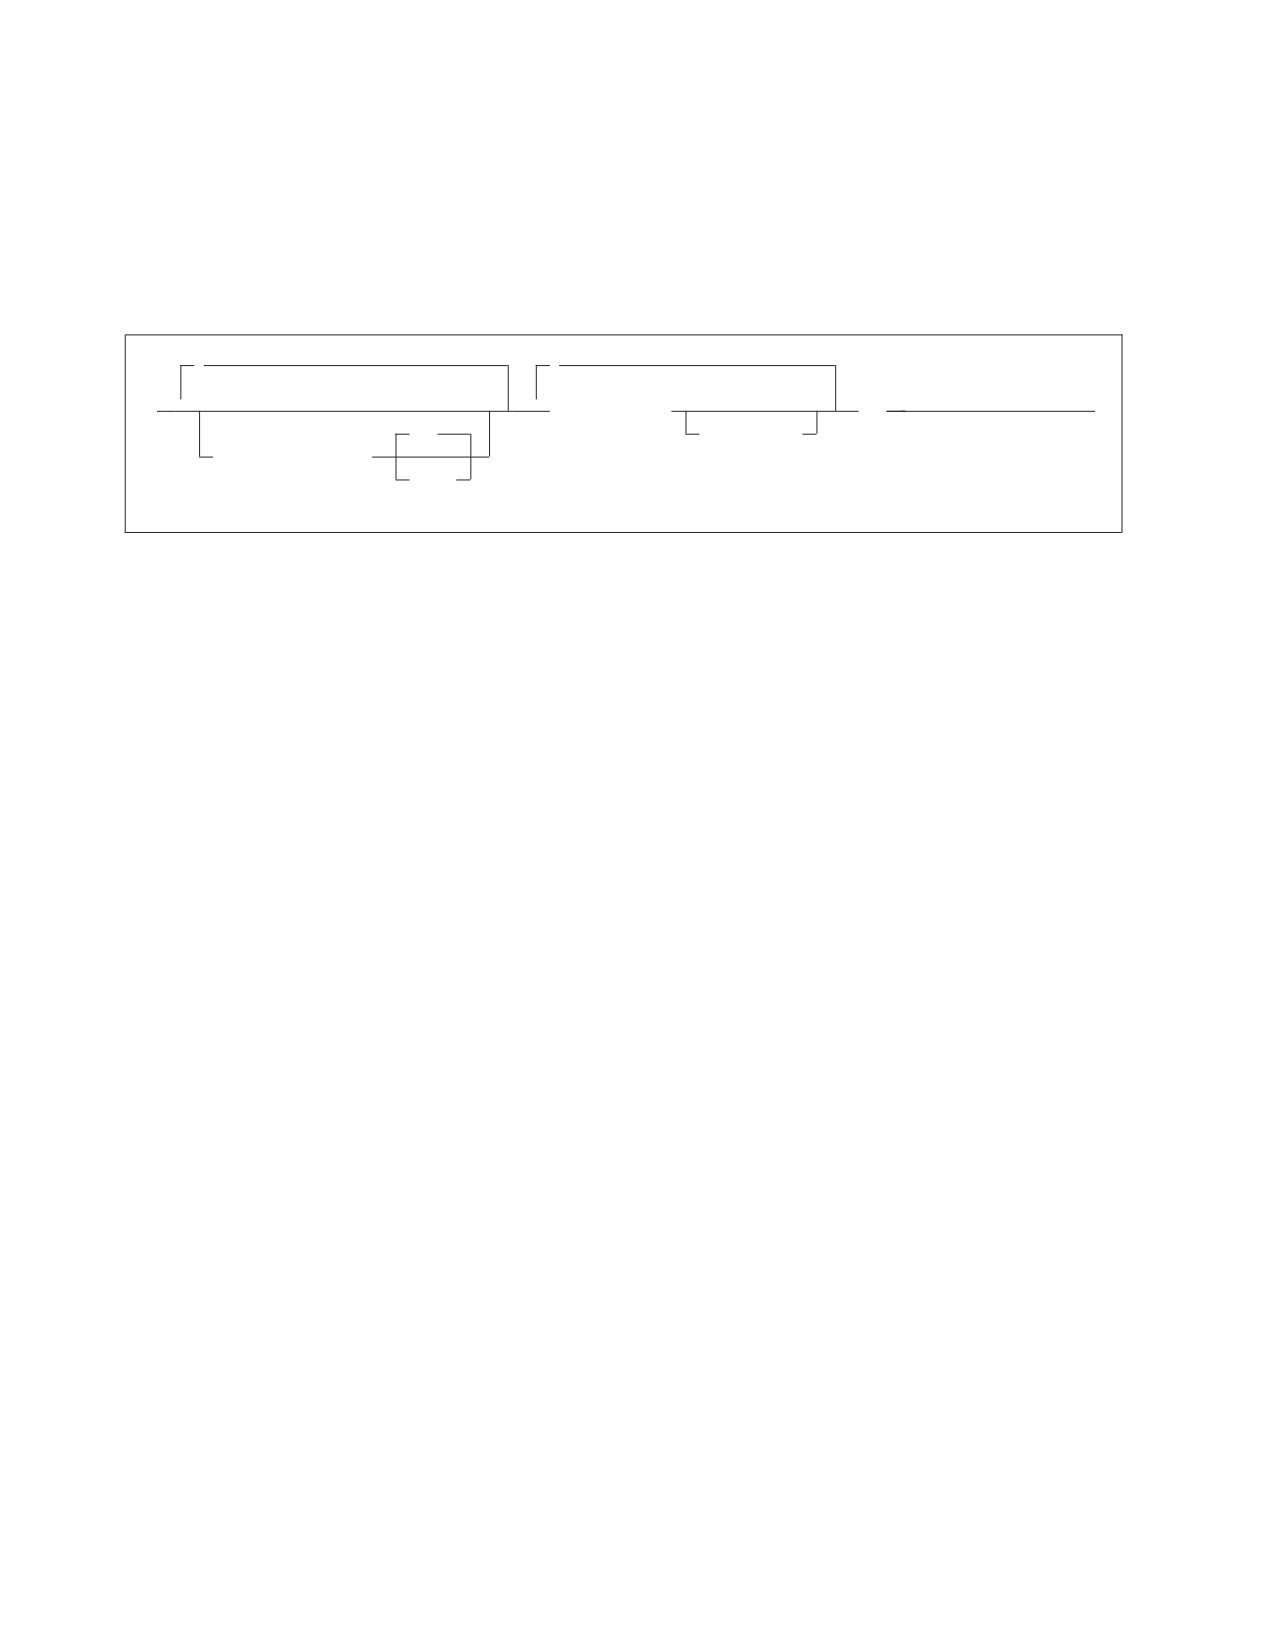
The keyword control statements must be coded in columns 1-71. Column 72 is a
continuation column, and columns 73-80 are ignored. If you specify more than one
keyword control statement on a single input record, separate them with blanks.
Specifying Initial Storage Pools and Dbextents
The control statement format for specifying the initial storage pools and dbextents
is:
,
►►
▼
▼
extent_number
END
►◄
LOG
pool_number
POOL pool_number
NOLOG
POOL
Include the POOL control statement only for those storage pools you want to
define as nonrecoverable: if you omit it, the pool will be defined as recoverable.
You can specify as many nonrecoverable storage pools as you want, up to the
MAXPOOLS value. For more information, see “Nonrecoverable Storage Pools” on
page 177.
pool_number
The value for pool_number is the number of the storage pool. You cannot specify 1
because storage pool 1 is the default storage pool for dbspaces, so it cannot be
defined as nonrecoverable.
LOG
The LOG option, which indicates that the storage pool is to be recoverable, is the
default. Specify the NOLOG option if the storage pool is to be nonrecoverable.
extent_number/pool_number
The dbextent definition control statements follow the POOL statements. They
define an initial set of dbextents (by number), and the storage pool assignment for
each.
The first number in the pair is the extent number, which corresponds to the suffix
number in the file name of the dbextent data sets (DDSKn). You must use stylized
file names on the DLBL statements describing the dbextents. The file name is
DDSKn, where n is the extent number used in the dbextent definition record. You
must define the dbextents in consecutive (numeric) order by extent number.
The second number, which must be separated from the first by at least one blank,
is the storage pool number. If you do not specify the storage pool number, it
defaults to 1.
Note: You cannot assign a dbspace to a storage pool until a dbextent has been
assigned to it.
222
System Administration
Each extent number/storage pool number pair must be entered on a separate input
record. You can put comments on the dbextent control statements, by specifying
the storage pool number and separating the comment from the number by at least
one blank. A comment must be contained in the one input record for the dbextent:
it cannot be continued on the next input record, which is interpreted as the next
dbextent definition.
In the example in Figure 89 on page 219, dbextent number 1 (DDSK1) is assigned
to storage pool number 1, and dbextent number 2 (DDSK2) is assigned to storage
pool number 2.
Specifying Initial Dbspaces
The format is:
1
►►
PUBLIC
number_of_pages
►◄
storage_pool_number
PRIVATE
The number_of_pages value is the number of logical pages in the dbspace, rounded
up to the next higher multiple of 128. The storage_pool_number value must
correspond to a pool that already has a dbextent defined for it, as defined by the
dbextent control statements.
You must define five public dbspaces for system use: the catalog dbspace, package,
HELP text, ISQL tables, and sample tables dbspaces. In the example shown in
Figure 89 on page 219, all are assigned to storage pool 1, but you can assign them
elsewhere. The catalog and package dbspaces must always be assigned to a
recoverable storage pool. In the example in Figure 89 on page 219, the first five
dbspace control statements specify:
v
12800 pages for the catalog dbspace (SYS0001)
v
2048 pages for the package dbspace (SYS0002)
v
8192 pages for the HELPTEXT dbspace
v
1024 pages for the ISQL dbspace
v
512 pages for the SAMPLE dbspace.
The general format for specifying the initial internal dbspace control statement is:
1
►► INTERNAL number_of_dbspaces number_of_pages
►◄
storage_pool_number
This statement specifies the number (number_of_dbspaces) of equal size
(number_of_pages) temporary dbspaces that the database manager can use for
internal sorting and index creation. The storage_pool_number must correspond to a
pool that already has a dbextent in it, as defined by the dbextent control
statements. You must not delete the last dbextent from the storage pool that
contains the internal dbspaces. The storage pool to which you assign the internal
dbspaces can be either recoverable or nonrecoverable: if you do not specify the
storage pool number, it defaults to 1.
Chapter 11. Generating Additional Databases
223
This internal dbspace keyword control statement must be the last dbspace
definition input record before the END delimiter control statement. Separate the
values you specify in this statement by at least one blank.
In the example in Figure 89 on page 219, 80 internal dbspaces of 1024 pages each
are defined and assigned to storage pool 1.
Note: Because the catalog and package dbspaces are assigned to storage pool 1,
performance is improved if you assign the internal dbspaces to some other
recoverable storage pool. In this example, they are assigned to storage pool
1, just to keep things simple.
Generally speaking, your input records for initial dbspace definitions would follow
this pattern:
PUBLIC nnnn n
this adds and acquires SYS001
PUBLIC nnnn n
this adds and acquires SYS002
PUBLIC nnnn n
this adds a dbspace for PUBLIC.HELPTEXT
PUBLIC nnnn n
this adds a dbspace for PUBLIC.ISQL
PUBLIC nnnn n
this adds a dbspace for PUBLIC. SAMPLE
PUBLIC nnnn n
these add your initial set of
public dbspaces
PRIVATE nnn n
these add your initial set of
private dbspaces
INTERNAL nn n
this is your initial
END
specification of internal dbspaces
Figure 90. Input Records for Initial Dbspace Definitions
The first two dbspaces are public dbspaces: PUBLIC.SYS0001 and PUBLIC.SYS0002,
which are both defined and acquired by the generation process for the catalog
tables and for the packages, respectively. You are advised to change these control
statements only if you want to define and allocate a larger dbspace for the catalog
tables or for the package dbspace, respectively. To do this, increase the
number_of_pages value in the control statement.
The third, fourth, and fifth dbspaces are public dbspaces that are added by the
generation process. They are later acquired when procedure ARIS050D calls the
DBS utility to complete the generation of the database. As shown in Figure 89 on
page 219, procedure ARIS050D must be called whenever you generate a database.
Note: The fifth dbspace, PUBLIC.SAMPLE, is also added by the generation
process. It is used to hold the IBM-supplied sample data tables. These tables
are created and loaded during the last run of the DBS utility, when the
A-type members ARISAMDB and ARISAMPI are processed. Details of
ARISAMDB and ARISAMPI are provided in the DB2 Server for VSE Program
Directory manual. The data in the sample tables is manipulated by sample
application programs, which are called by the IBM-supplied job control
members. There is one sample program for each programming language that
224
System Administration
the database manager supports. Details of these programs are in the DB2
Server for VSE & VM Application Programming manual.
You must specify database generation control statements for all five of these
dbspaces. If you omit one, the database generation may fail.
Code the dbspace values in columns 1-71. Columns 72-80 are ignored. You can put
comments on the dbspace statements by specifying the storage pool number and
separating the comment from this number by at least one blank.
Step
5: Installing the Database Components
After the database is generated, you can install these three components into it:
v HELP text
v Online support
v ISQL.
All of these components are optional; which ones you should install depends on
your usage environment. For example, in a query/report writing environment, you
should install all three.
Regardless of whether you use these components, you can still install all of them
into the database for possible future use. Figure 91 shows job control statements
that install all the optional components into the DBNAME01 database. Modify the
job control and run it to install the components into your database. (The database
manager must be running in single user mode.)
// JOB TO INSTALL DATABASE COMPONENTS
// EXEC PROC=ARIS75SL
*--SERVICE/PRODUCTION LIBRARY ID PROC
// EXEC PROC=DBNAME01
*--DATABASE ID PROC
// EXEC PROC=ARIS380D,LANG=AME,HELP=ONLY,CUU=xxx
// EXEC PROC=ARIS080D
*--INSTALL ONLINE SUPPORT
// EXEC PROC=ARIS110D
*--INSTALL ISQL
// EXEC PROC=ARIS120D
*--INSTALL ISQL
// EXEC PROC=ARIS130D
*--INSTALL ISQL
/&
Figure 91. Job Control to Install Optional Database Components
Notes:
1. Procedure ARIS380D loads the English version of the DB2 Server for VSE HELP
text into the database. About 40000 rows are inserted, and the job normally
takes 10 to 15 minutes. The dbspace PUBLIC.HELPTEXT must exist for this
procedure to be run. If you do not want the English version of the HELP text,
you can omit the job control statement for this procedure.
HELP text is loaded from the Help Text Tape, which must be mounted on the
tape drive identified by the value assigned to the cuu parameter.
HELP text is available in other languages as well. To load HELP text for a
language other than American English, replace the value for the LANG
parameter in the PROC ARIS380D with one of the following values.
AMENG
American English
UCENG
Uppercase English
FRANC
French
GER
German
Chapter 11. Generating Additional Databases
225
KANJI
Kanji (Japanese)
HANZI
Simplified Chinese
Refer to the installation instructions in the DB2 Server for VSE Program Directory
manual.
2. Procedure ARIS080D installs the online support into the database, and grants
CONNECT authority to ALLUSERS. This allows the online support to
implicitly connect users. For information on implicit CONNECT, see the DB2
Server for VSE & VM Database Administration manual.
If the online support is not required for your database, omit the job control
statements for procedures ARIS080D, ARIS110D, ARIS120D, and ARIS130D.
3. Procedures ARIS110D, ARIS120D, and ARIS130D install ISQL support into the
database. If you do not want to install the ISQL support, omit the job control
statements for these procedures. You may also omit the job control statement
for procedure ARIS060D.
After making the necessary job control modifications, submit the job for
processing. All steps should end with a return code of 0 or 4. If any step fails to
run, remove the EXEC PROC statements for all job steps that completed, and rerun
the job. However, do not remove the database identification procedure or the
library definition procedure (DBNAME01 and ARIS75SL). For example, if the step
EXEC PROC=ARIS130D did not complete successfully, you can rerun the step by
running the job control shown in Figure 92:
// JOB RESTART
// EXEC PROC=DBNAME01
*--YOUR DATABASE IDENTIFICATION PROCEDURE
// EXEC PROC=ARIS75SL
*--SERVICE/PRODUCTION LIBRARY ID
// EXEC PROC=ARIS130D
*--INSTALL ISQL
/&
Figure 92. Job Restart for Installing Optional Components
Step 6: Reload CCSID-Related Packages
The database manager and online resource manager use CCSID-related phases for
validating and folding characters in SQL statements. The programs used to create
these phases depend on packages residing in the database. The job control in
Figure 93 can be used to load the package in the new database.
// JOB RELOAD CCSID-RELATED PHASES PACKAGE
// EXEC PROC=ARIS75SL
*--SERVICE/PRODUCTION LIBRARY ID
// EXEC PROC=DBNAME01
*--YOUR DATABASE IDENTIFICATION PROCEDURE
// EXEC PROC=ARIS175D
*--RELOAD CCSID-RELATED PHASES PACKAGE
/&
Figure 93. Job Reload for Loading CCSID-Related Phases Package
Step 7: Optionally Changing the Application Server Default
CHARNAME
The application server default CHARNAME value on a newly installed database
manager is INTERNATIONAL (CCSID=500). On a migrated database manager, the
default is ENGLISH (CCSID=37). To change the application server default
226
System Administration
CHARNAME (and with it the application server default CCSID, classification
tables, and translation tables), specify the new CHARNAME initialization
parameter.
For information on creating a new CHARNAME, CCSID, and character set, see
Chapter 12, “Choosing a National Language and Defining Character Sets,” on page
231.
Step 8: Optionally Changing the Application Server Default
Character Subtype
If you use mixed character data (which contains DBCS and SBCS characters), you
may want to change the application server default character subtype (CHARSUB)
to mixed. The application server default character subtype is the value used for
new columns when the character subtype is not explicitly defined by the CREATE
TABLE or ALTER TABLE statements, or supplied as a package option. The
character subtype value is also used to determine whether the results of the
CHAR, DIGITS, and HEX scalar functions and the character representation of date,
time, or timestamp values, or special registers should be interpreted either as
mixed data or as SBCS data.
The application server default character subtype is initially set to SBCS.
For information on changing the default character subtype, see “Setting the
Application Server Default Character Subtype” on page 253.
Step
9: Optionally Setting the DBCS Option to YES
If you are using a double-byte character set (DBCS), you should enable the DBCS
option, which allows the database manager to correctly interpret SQL statements
that contain DBCS strings. As a default, the DBCS option is not enabled. For
information, see “Using Double-Byte Character Set (DBCS)” on page 243.
Step
10: Changing the Password of Authorization ID SQLDBA
One final task you should not omit is to change the password for the authorization
ID SQLDBA in your new database. The authorization ID SQLDBA is defined in all
databases to have DBA authority. The password is set to SQLDBAPW during
database generation. Because this default password for SQLDBA is common
knowledge (it is in many product manuals), you should change it immediately
after database generation. To do so, use ISQL, an application program, or the DBS
utility to connect to the database manager as SQLDBA with the following
statement:
CONNECT SQLDBA IDENTIFIED BY SQLDBAPW
Then change the password to one of your own choosing with the following
statement:
GRANT CONNECT TO SQLDBA IDENTIFIED BY newpw
Step
11: Optionally Install the DRDA Code
A DRDA environment provides the application server capability for remote unit of
work access to data that is distributed across different installations. For more
information on installing this code, see Chapter 14, “Using a DRDA Environment,”
on page 313.
Chapter 11. Generating Additional Databases
227

Step
12: Optionally Load Phases into SVA
The VSE shared virtual area (SVA) allows the DB2 Server for VSE code to be
shared. This sharing can reduce the amount of storage required by the database
partitions, and reduces the amount of paging done by the system. You can load the
eligible phases into the shared virtual area.
Table 18 shows the phases that are eligible to be loaded into the shared virtual
area.
Table 18. Phases Eligible for SVA
Component
Phase
DBSS
ARISQLDS
RDS
ARIXRDS
DBSU
ARIDBS
Batch Resource Adapter
ARIRBARM
DBNAME Directory
ARICDIRD
Assembler Preprocessor
ARIPRPA
COBOL Preprocessor
ARIPRPC
FORTRAN Preprocessor
ARIPRPF
PL/I Preprocessor
ARIPRPP
Notes:
1. If you load all of the eligible phases, allocate an additional 4.1 megabytes of
storage to the shared virtual area.
2. The DBSS component contains the code for the following components:
v DBSS
v DSC
3. The RDS component contains the code for the following components:
v RDS
v WUM
v DRRM
v CONV
The DRRM and WUM components are only applicable if the DRDA code is
installed.
4. If loaded, the DBSS and RDS components must both be loaded together in the
SVA.
|
5. Batch Resource Adapter phase or any other phase that uses socket macro calls,
|
cannot be loaded in SVA while using CSI assembler interface for TCP/IP.
Phases can be loaded into the shared virtual area in the following ways:
1. During VSE system IPL, add the SET SDL command into the IPL PROC.
2. After IPL, a separate job control with the SET SDL command can be run
anytime after IPL.
The SET SDL command must always be issued from the background partition.
Once the phases have been loaded, they cannot be purged until the next VSE
system IPL.
The following is a sample job control to load both the DBSS and RDS phase into
the shared virtual area:
228
System Administration
// JOB LOADSVA
// LIBDEF PHASE,SEARCH=(IJSYSRS.SYSLIB,PRD2.DB2730)
SET SDL
ARISQLDS,SVA
ARIXRDS,SVA
/*
/&
For more information on the shared virtual area, see the IBM VSE/ESA System
Control Statements manual.
Chapter 11. Generating Additional Databases
229
230
System Administration