Volvo S60 (2018 year). Manual - part 5


  Index      Volvo     Volvo S60 - service manual 2018 year in english


Search            


Content   ..  3  4  5  6   ..


Volvo S60 (2018 year). Manual - part 5


||

INSTRUMENTS AND CONTROLS

80

The center head restraint should be adjusted
according to the passenger's height. The
restraint should be carefully adjusted to support
the occupant's head.

Pull the head restraint up as required.

To lower, press the button at the base of the
head restraint’s left support while pressing
the head restrain down carefully.

WARNING

The center rear seat head restraint should
only be in its lowest position when this seat is
NOT occupied. When the center seat is occu-
pied, the head restraint must be correctly
adjusted to the passenger’s height so that, if
possible, the entire back of the head is cov-
ered.

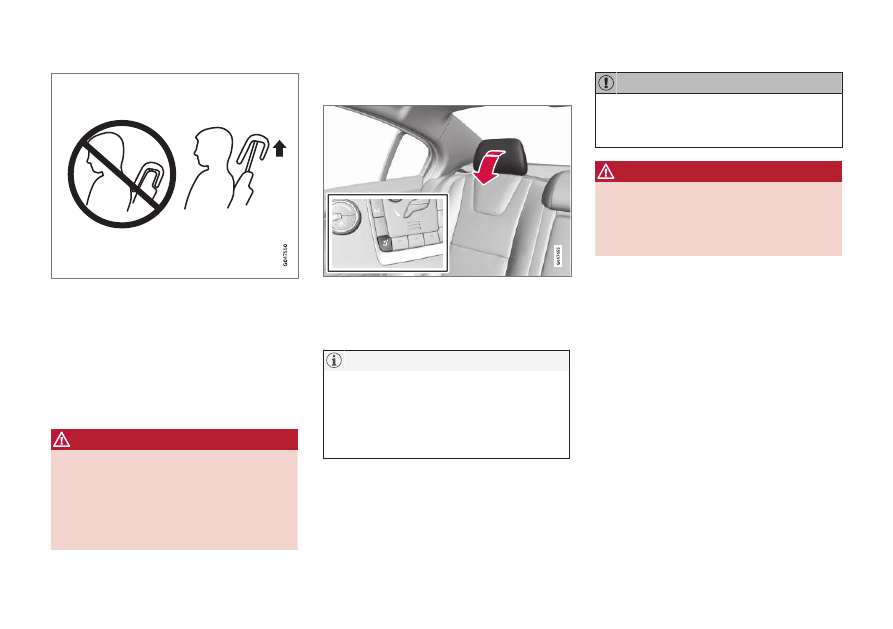
Automatically folding down the rear
seat’s outboard head restraints

1. The ignition must be in mode II.

2. Press the button to lower the rear head

restraints for improved visibility.

NOTE

The head restraint must be returned to
the upright position manually.

The outboard head restraints cannot be
folded down on models that are not
equipped with this button.

CAUTION

The rear head restraints should not be kept
folded down for prolonged periods. This could
result in pressure marks in leather upholstery.

WARNING

For safety reasons, no one should be allowed
to sit in the outboard rear seat positions if the
head restraints are folded down. If these posi-
tions are occupied, the head restraints should
be in the upright (fixed) position.

Related information

Front seats (p. 75)

Front seats – power seat (p. 76)

Rear seats – head restraints (p. 79)

INSTRUMENTS AND CONTROLS

81

Rear seats – folding backrest

The rear seat head restraints and backrests can
be folded down. The center head restraint can
be raised/lowered according to the passenger's
height.

Folding down the rear seat backrests

The rear seat backrests are split and can be folded
down together or separately

1. Pull the release control handle(s).

2. Fold the backrest forward. Adjust the center

seat head restraint if necessary.

NOTE

When the backrests are folded down, move
the outboard head restraints forward slightly
so that they do not press on the seat cushion.

CAUTION

To help avoid damage to the upholstery, there
should be no objects on the rear seat and the
seat belt should not be buckled when the
backrest is folded down.

WARNING

Keep vehicle doors and trunk locked and
keep keys out of a child’s reach. Unsuper-
vised children could lock themselves in an
open trunk and risk injury. Children should
be taught not to play in vehicles.

On hot days, the temperature in the trunk
or vehicle interior can rise very quickly.
Exposure of people to these high temper-
atures for even a short period of time can
cause heat-related injury or death. Small
children are particularly at risk.

WARNING

When one or more sections of the back-
rest is returned to the upright position,
check that it is properly locked in place by
pushing and pulling it.

Return the outboard head restraints to
the upright position.

Long loads should always be securely
anchored to help avoid injury in the event
of a sudden stop.

Always turn the engine off and apply the
parking brake when loading/unloading
the vehicle.

Place the transmission in the Park (P)
position to help prevent inadvertent
movement of the gear selector.

On hot days, the temperature in the vehi-
cle interior can rise very quickly. Exposure
of people to these high temperatures for
even a short period of time can cause
heat-related injury or death. Small chil-
dren are particularly at risk.

Related information

Front seats (p. 75)

Front seats – power seat (p. 76)

Rear seats – head restraints (p. 79)

INSTRUMENTS AND CONTROLS

* Option/accessory.

82

Steering wheel

The steering wheel can be adjusted to various
positions and has controls for the horn, cruise
control

*, menus, the infotainment system and

Bluetooth

®

-connected cell phone.

Adjusting

G021138

Adjusting the steering wheel

Lever for releasing/locking the steering
wheel
Possible positions

To adjust the steering wheel's height and reach:

1. Pull the lever toward you to release the

steering wheel.

2. Adjust the steering wheel to the position that

suits you.

3. Push back the lever to lock the steering

wheel in place. If the lever is difficult to push
into place, press the steering wheel lightly at
the same time as you push the lever.

WARNING

Never adjust the steering wheel while driving.

Keypads and steering wheel paddles

*

Steering wheel keypads and paddles

*

Cruise control, see Cruise control (CC) –
introduction (p. 172). Adaptive cruise con-
trol

*, see Adaptive Cruise Control – introduc-

tion (p. 175).
Paddles for manually shifting gears (Gear-
tronic), see Transmission – Geartronic
(p. 257).
Infotainment system controls, see Sensus
Infotainment supplement.

Horn

Horn

Press the steering wheel hub to sound the
horn.

Related information

Electrically heated

* steering wheel (p. 83)

INSTRUMENTS AND CONTROLS

}}

* Option/accessory.

83

Electrically heated* steering wheel

The steering wheel can be heated electrically.

Button for steering wheel heating

With the engine running, press this button once
to begin warming the steering wheel (press again
to switch off). The indicator light in the button will
illuminate when the function is active.

This function can also be started automatically
(the setting can be activated/deactivated in the
MY CAR menu) if the vehicle is cold and the
ambient temperature is below approximately 50°
F (10° C).

Lighting panel

The lighting panel is used to control the daytime
running lights, parking lights, etc., and to adjust
the instrument panel lighting and "theater" light-
ing (p. 88).

Lighting panel overview

Thumb wheel for adjusting display, instru-
ment and "theater" lighting (see Instrument
and "theater" lighting (p. 88))
Rear fog lights (see Rear fog lights (p. 89))

Headlight switch

Volvo recommends using the 

 position

whenever possible.

Headlight switch positions

Daytime running lights function as follows:

With the headlight switch in the 

 posi-

tion:

In the US: the daytime running lights will be
off

In Canada: the daytime running lights will be
on

With the headlight switch in the 

12

 posi-

tion and the ignition in mode II or if the
engine is running (see Ignition modes (p. 74))

In the US: the daytime running lights will be
off

In Canada: the daytime running lights will be
on

With the headlight switch in the 

 posi-

tion:

The daytime running lights will be on (the
low beam headlights will automatically switch
on in dark conditions)

US models only: The daytime running lights in

 mode can be switched on or off in the

MY CAR menu system under 

Settings

Car

settings

Light settings

Daytime running

lights

.

12

The parking lights will be on in this position, even if the ignition is switched off.

INSTRUMENTS AND CONTROLS

* Option/accessory.

84

NOTE

Volvo recommends the use of Daytime Run-
ning Lights in the United States. The use of
these lights is mandatory in Canada.

With the headlight switch in the 

 posi-

tion:

The daytime running lights will be off and the
low beam headlights will be on

High/low beam headlights

When the engine is started, the low beams are
activated automatically if the headlight control is
in position 

.

Headlight switch and steering wheel lever

High beam flash

Toggle between high and low beams

Continuous high beam headlights

With the headlight switch in the 

 (in dark

conditions only, when the daytime running lights
have automatically switched off and the low beam
headlights have switched on) or 

 position:

Pull the lever toward the steering wheel to
position 2 and release it to toggle between
low and high beams.

High beam flash

Pull the lever toward the steering wheel to posi-
tion 1. The high beams come on until the lever is
released.

Related information

Active Bending Lights (ABL)

* (p. 86)

Active high beams (AHB)

* (p. 85)

Lighting panel (p. 83)

Tunnel detection (models with the rain sen-
sor

* only) (p. 86)

INSTRUMENTS AND CONTROLS

}}

}}

* Option/accessory.

85

Active high beams (AHB)*

AHB uses a camera at the upper edge of the
windshield to detect the headlights of oncoming
vehicles or the taillights of a vehicle directly
ahead. When this happens, the headlights will
automatically switch from high beams to low
beams. When the camera no longer detects the
headlights/taillights of other vehicles, your head-
lights will switch back to high beams after sev-
eral seconds.

To activate AHB:

Turn the headlight control to the 

 posi-

tion.

The feature will begin functioning if the engine
has been running for at least 20 seconds and the
vehicle's speed is at least 12 mph (20 km/h).

Headlight switch in the AUTO position

Switch AHB on or off by pulling the left steering
wheel lever rearward (toward the steering wheel)
as far as possible and releasing it. If AHB is
switched off while the high beams are on, the
headlights will change to low beams.

Models with an analog instrument panel

When AHB is activated, the 

 symbol will

illuminate in the instrument panel. The high beam
indicator (

) in the instrument panel will also

illuminate when the high beams are on.

Models with a digital instrument panel

When AHB is activated, 

 will illuminate as a

white symbol in the instrument panel. When the
high beams are on, the symbol will change to
blue.

NOTE

Keep the windshield in front of the cam-
era free of ice, snow, dirt, etc.

Do not mount or in any way attach any-
thing on the windshield that could
obstruct the camera.

If 

Active high beam Temporary unavailable

Switch manually

 is displayed in the instrument

panel, switching between high and low beams will
have to be done manually. However, the light
switch can remain in the 

 position. The

same applies if 

Windscreen Sensors blocked

is displayed and the 

 symbol is displayed.

The 

 symbol will go out when these mes-

sages are displayed.

AHB may be temporarily unavailable (e.g., in
heavy fog or rain). When AHB becomes active
again or if the sensors in the windshield are no
longer obscured, the messages will disappear
and the 

 symbol will illuminate.

CAUTION

In the following situations, it may be neces-
sary to switch between high and low beams
manually:

In heavy fog or rain

In blowing snow or slush

||

INSTRUMENTS AND CONTROLS

* Option/accessory.

86

In bright moonlight

In freezing rain

In areas with dim street lighting

When oncoming vehicles have dim front
lighting

If there are pedestrians on or near the
road

If there are reflective objects, such as
signs, near the road

When oncoming vehicles' lights are
obscured by e.g., fences, bushes, etc.

When there are vehicles on connecting
roads

At the top of hills or in dips in the road

In sharp curves

See The camera’s limitations (p. 209) for more
information about the camera's limitations.

Related information

High/low beam headlights (p. 84)

Lighting panel (p. 83)

Tunnel detection (models with the

rain sensor* only)

For models without automatic low beams, tunnel
detection activates the low beams when the
vehicle enters a tunnel. The low beams are
switched off approx. 20 seconds after the vehi-
cle leaves the tunnel.

The rain sensor reacts to the change in lighting
conditions when, for example, the vehicle enters
a tunnel and the tunnel detection feature will
then activate the low beam headlights. The low
beams will be switched off approx. 20 seconds
after the vehicle leaves the tunnel.

The rain sensor does not have to be activated for
tunnel detection to function.

Related information

Lighting panel (p. 83)

High/low beam headlights (p. 84)

Active Bending Lights (ABL)*

With ABL activated, the headlight beams adjust
laterally to help light up a curve according to
movements of the steering wheel (see the right-
pointing beam in the following illustration).

Headlight pattern with the Active Bending Light function
deactivated (left) and activated (right)

ABL is activated automatically

13

 when the engine

is started.

The function can be deactivated/reactivated in
the MY CAR menu system under 

My S60

Active Bending Lights

 or under 

Settings

Car settings

Light settings

Active

Bending Lights

.

See My Car – introduction (p. 71) for a descrip-
tion of the menu system.

13

The factory default setting is on.

INSTRUMENTS AND CONTROLS

* Option/accessory.

87

NOTE

This function is only active in twilight or dark
conditions, and only when the vehicle is in
motion.

If a fault should occur in the system, the symbol
will illuminate and a message will be displayed as
shown in the table.

Symbol

Display

Explanation

Headlamp
failure
Service
required

The system is not
functioning properly
and should be
inspected/repaired
by a trained and
qualified Volvo serv-
ice technician.

Cornering lights

14

Models equipped with ABL also have front cor-
nering lights that temporarily provide extra light to
the front left or right of the vehicle at low speeds
when making a sharp turn (for example, when
turning into a parking space) or when the turn
signals are used.

This feature is activated when:

High or low beam headlights are on

and

The vehicle's speed is below 20 mph
(30 km/h)

The feature is also activated when the vehicle is
backing up.

The cornering lights are deactivated when the
vehicle's speed exceeds approx. 25 mph
(40 km/h).

Related information

Lighting panel (p. 83)

High/low beam headlights (p. 84)

Active high beams (AHB)

* (p. 85)

Auxiliary lights*

If the vehicle is fitted with auxiliary lights, the
driver can use the 

MY CAR menu system to

choose to deactivate and turn these lights on
and off along with the high beam headlights.

The auxiliary lights must be connected to the
vehicle's electrical system, which should only be
done by a trained and authorized Volvo service
technician. See My Car – introduction (p. 71) for
more information about the menu system.

14

Certain models only

INSTRUMENTS AND CONTROLS

88

Instrument and "theater" lighting

Instrument lighting

Illumination of the display and instrument lights
will vary, depending on ignition mode.

The display lighting is automatically subdued in
darkness and the sensitivity is set with the thumb
wheel.

The intensity of the instrument lighting is
adjusted with the thumb wheel.

"Theater" lighting

When the overhead courtesy lighting has gone
out and the engine is running, several LEDs
located near the roof console illuminate to pro-
vide faint lighting for the occupants of the front
seats. This lighting goes out just after the over-
head courtesy lighting when the vehicle is locked.

Related information

Lighting panel (p. 83)

Front interior lighting (p. 91)

Rear interior lighting (p. 92)

Ignition modes (p. 74)

Parking lights

Turn the headlight switch to the 

 position

(the license plate lighting comes on at the same
time).

Headlight switch in the parking light position

Canadian models: If the ignition is in position II
or the engine is running, the daytime running
lights will also be on.

With the headlight switch in this position, the
parking lights will remain on even when the igni-
tion is switched off.

In dark ambient lighting conditions, the rear park-
ing lights also illuminate when the trunk is
opened to alert anyone traveling behind your
vehicle. This happens regardless of the position
that the headlight control is in or which mode the
ignition is in.

Related information

Lighting panel (p. 83)

INSTRUMENTS AND CONTROLS

}}

89

Rear fog lights

The rear fog lights are considerably brighter than
the normal taillights and should be used only
when conditions such as fog, rain, snow, smoke
or dust reduce visibility for other vehicles to less
than 500 ft. (150 meters).

The rear fog lights will only function in combina-
tion with the high/low beam headlights.

Press the button to switch the rear fog lights
on/off.
> The rear fog light indicator symbol 

on the instrument panel and the light in
the button illuminate when the rear fog
lights are switched on.

NOTE

The rear fog lights are considerably
brighter than the normal taillights and
should be used only when conditions
such as fog, rain, snow, smoke or dust
reduce visibility for other vehicles to less
than 500 ft. (150 meters).

Condensation may form temporarily on
the inside of the lenses of exterior lights
such as headlights, fog lights, or taillights.
This is normal and the lights are
designed to withstand moisture. Normally,
condensation will dissipate after the
lights have been on for a short time.

Related information

Lighting panel (p. 83)

Hazard warning flashers

The hazard warning flasher should be used to
indicate that the vehicle has become a traffic
hazard.

When the function is activated, both turn signal
indicators in the instrument panel will flash.

Location of the hazard warning flasher button

To activate the flashers, press the button in
the center dash. Press the button again to
turn off the flashers.

NOTE

Regulations regarding the use of the haz-
ard warning flasher may vary, depending
on where you live.

The hazard warning flashers will be acti-
vated automatically if an airbag deploys.

||

INSTRUMENTS AND CONTROLS

90

Related information

Turn signals (p. 90)

Turn signals

The turn signals are controlled by the left steer-
ing wheel lever.

Turn signals

When changing lanes

 The driver can automatically flash the turn

signals 3 times by moving the turn signal lever up
or down to the first position and releasing it.

NOTE

This automatic flashing sequence can be
interrupted by immediately moving the
lever in the opposite direction.

If the turn signal indicator flashes faster
than normal, check for a burned-out turn
signal bulb.

When turning

 Move the lever as far up or down as possible

to start the turn signals. The turn signals will be
cancelled automatically by the movement of the
steering wheel, or the lever can be returned to its
initial position by hand.

Related information

Hazard warning flashers (p. 89)

INSTRUMENTS AND CONTROLS

* Option/accessory.

91

Front interior lighting

The lighting in the front part of the passenger
compartment is controlled with the buttons in
the ceiling console.

G021149

Light switches, front roof lighting

Drivers side front reading light, on/off

Passenger's side front reading light, on/off

Overhead courtesy lighting.

Switch (3) has three positions for all passenger
compartment lighting:

Off: right side depressed, automatic lighting
off.

Neutral position: automatic lighting is on.

On – left side depressed, passenger com-
partment lighting on.

Overhead courtesy lighting

The passenger compartment lighting is switched
on and off automatically when button (3) is in the
neutral position.

The lighting comes on and remains on for
30 seconds if:

the vehicle is unlocked from the outside with
the key or remote control

the engine is switched off and the ignition is
in mode 0.

The lighting switches off when:

the engine is started

the vehicle is locked from the outside.

The lighting comes on and remains on for two
minutes if one of the doors is open.

The passenger compartment lighting can be
switched on and off manually within 30 minutes
after the vehicle has been unlocked.

If the lighting is switched on manually and the
vehicle is locked, the courtesy lighting will switch
off automatically after one minute.

Courtesy lights/door step lighting*

The courtesy lights/door step lighting switch
on/off automatically when one of the front doors
is opened/closed.

Glove compartment lighting

The glove compartment lighting switches on/off
automatically when the lid is opened/closed.

Related information

Rear interior lighting (p. 92)

INSTRUMENTS AND CONTROLS

92

Rear interior lighting

The lights are switched on or off by pressing
each respective button.

G021150

Rear reading lights

Trunk lighting

The trunk lighting comes on automatically when
the trunk lid is opened.

Related information

Front interior lighting (p. 91)

Home safe lighting

When you leave your vehicle at night, you can
make use of the home safe lighting function to
illuminate the area in front of the vehicle.

This function illuminates the headlights, parking
lights, lights in the door mirrors and license plate
lights. These lights will remain on for 30 

15

, 60 or

90 seconds. The time interval can be set in
MY CAR under 

Settings

Car settings

Light settings

Home safe light duration

.

See My Car – introduction (p. 71) for a descrip-
tion of the menu system.

1. Remove the key from the ignition slot to put

the ignition in mode 0 (see Ignition modes
(p. 74) for information about the ignition
modes).

2. Pull the turn signal lever as far as possible

towards the steering wheel and release it.

3. Exit the vehicle and lock the doors.

Related information

Approach lighting (p. 92)

Approach lighting

Approach lighting activates the parking lights,
door mirror lights, license plate lighting, dome
lighting and door step lighting when you
approach the vehicle.

This function is activated by pressing the
approach light button on the remote key (see the
illustration in Remote key – functions (p. 147)).

The time interval for this lighting can be set by
pressing MY CAR and going to 

Car settings

Light settings

Approach light duration

. See

My Car – introduction (p. 71) for a description of
the menu system.

Related information

Home safe lighting (p. 92)

15

Factory setting

INSTRUMENTS AND CONTROLS

* Option/accessory.

93

Windshield wipers

Move the lever toward the steering wheel to start
the windshield and headlight washers. After the
lever is released the wipers make several extra
sweeps.

Windshield wipers and washers

Rain sensor

* on/off

Thumb wheel sensitivity/frequency

CAUTION

Use ample washer fluid when washing
the windshield. The windshield should be
thoroughly wet when the wipers are in
operation.

Before using the wipers, ice and snow
should be removed from the windshield/
rear window. Be sure the wiper blades
are not frozen in place.

Windshield wipers off

Move the lever to position 0 to switch
off the windshield wipers.

Single sweep

Move the lever upward from position 0
to sweep the windshield one stroke at
a time for as long as the lever is held

up.

Intermittent wiping

With the lever in this position, you can
set the wiper interval by twisting the
thumb wheel upward to increase wiper

speed or downward to decrease the speed.

Continuous wiping

The wipers operate at normal speed.

The wipers operate at high speed.

Windshield wiper service position

The windshield wipers must be in the service
position before the wiper blades can be cleaned
or replaced. See Wiper blades – service position
(p. 342) for additional information.

Related information

Engine compartment – washer fluid (p. 344)

INSTRUMENTS AND CONTROLS

* Option/accessory.

94

Rain sensor*

The rain sensor automatically regulates wiper
speed according to the amount of water on the
windshield.

The sensitivity of the rain sensor can be adjusted
moving the thumb wheel up (the wipers will
sweep the windshield more frequently) or down
(the wipers will sweep the windshield less fre-
quently).

NOTE

The wipers will make an extra sweep each
time the thumb wheel is adjusted upward.

When the rain sensor is activated, the symbol

 will illuminate in the instrument panel.

Activating and setting the sensitivity

When activating the rain sensor, the vehicle must
be running or in ignition mode II and the wind-
shield wiper lever must be in position 0 or in the
single sweep position.

Activate the rain sensor by pressing the button

. The windshield wipers will make one

sweep.

Press the lever up for the wipers to make an
extra sweep. The rain sensor returns to active
mode when the stalk is released back to position
0.

Deactivating

Deactivate the rain sensor by pressing the button

 or press the lever down to another wiper

position.

The rain sensor is automatically deactivated when
the key is removed from the ignition slot or five
minutes after the ignition has been switched off.

CAUTION

The rain sensor should be deactivated when
washing the car in an automatic car wash, etc.
If the rain sensor function is left on, the wip-
ers will start inadvertently in the car wash and
could be damaged.

Windshield washer

Move the lever toward the steering wheel to start
the windshield and headlight washers. After the
lever is released the wipers make several extra
sweeps.

Washing function

Heated washer nozzles

*

The washer nozzles are heated automatically in
cold weather to help prevent the washer fluid
from freezing.

High-pressure headlight washing

*

High-pressure headlight washing consumes a
large quantity of washer fluid. To save fluid, the
headlights are washed using two alternatives:

Low/high beam headlights on. The head-
lights will be washed the first time the wind-
shield is washed. Thereafter, the headlights
will only be washed once for every five times

INSTRUMENTS AND CONTROLS

95

the windshield is washed within a 10-minute
period.

Parking lights on. Optional Active Bending
Lights will be washed once for every five
times the windshield is washed. Normal halo-
gen headlights will not be washed.

CAUTION

Use ample washer fluid when washing
the windshield. The windshield should be
thoroughly wet when the wipers are in
operation.

When approx. 1 US quart (1 liter) of
washer fluid remains in the reservoir, the
headlights will no longer be washed. A
text message will also be displayed to
remind the driver to fill the washer fluid
reservoir.

Related information

Engine compartment – washer fluid (p. 344)

Tailgate wiper/washer

The tailgate wiper operates at two speeds: inter-
mittent and continuous.

NOTE

The rear wiper is equipped with a cut-off
function, which means that it will not operate
if its electric motor overheats. The wiper will
function again after a cool-down period
(30 seconds or longer, depending on the heat
of the motor and ambient temperature condi-
tions).

Tailgate wiper and reverse gear

If the windshield wipers are on and the transmis-
sion is put into reverse gear, the tailgate wiper
will go into intermittent wiping function

16

. This

function is deactivated when a different gear is
selected.

NOTE

On vehicles with the optional rain sensor, the
tailgate wiper will be activated when reverse
is selected, if the rain sensor is activated and
it is raining.

If the tailgate wiper is in the normal (continuous)
wiping mode, selecting different gears will not
affect its function.

Related information

Engine compartment – washer fluid (p. 344)

16

Consult your Volvo retailer if you would like to have this function deactivated.


Content   ..  3  4  5  6   ..