Ford Focus RS (2011 year). Manual - part 115


  Index      Ford     Ford Focus RS - service repair manual (2011 year) in english


Search            


Content   ..  113  114  115  116   ..


Ford Focus RS (2011 year). Manual - part 115


NOTE: A large quantity of water flows through the
water tank. If there are leaks in this area, it is
essential to ensure that the water drainage
mechanisms function correctly. Drainage openings
may not be blocked or stuck. Leaves and other dirt
must be removed before troubleshooting.

Corrective action

Before the actual repair, make sure that the water
drains are not blocked or stuck.

Remove the heater housing / ventilation and fit a
new Butyl sealing strip. Damaged sealing surfaces
must first be adjusted. A trapped carpet must be
removed.

Seal welds

PU sealing beads are applied to welded or riveted
connections Arrows to seal the interior of the
vehicle. Incorrectly applied or damaged seal welds
can allow moisture to penetrate into the interior of
the vehicle. It is also possible that sealing beads
whose shape and size appear to be intact actually
have poor adhesion.

Corrective action

Incomplete seal welds must be supplemented with
PU sealing compound. Damaged seal welds must

be removed and re-applied properly. Make sure
that any residual moisture is effectively removed
before a new seal is applied.

Attached parts

The add-on parts include:

• Exterior mirros, handles, controls.

• Mouldings, roof mouldings, lettering.

• Roof aerial, roof rack or connections for roof

rack systems.

• Bumper mountings.

• Injection nozzles, door contact switches, bump

stop rubber.

• Control unit seals.

• Tail lamps.

• All kind of screwed connections (pedal block,

door and tailgate hinges)

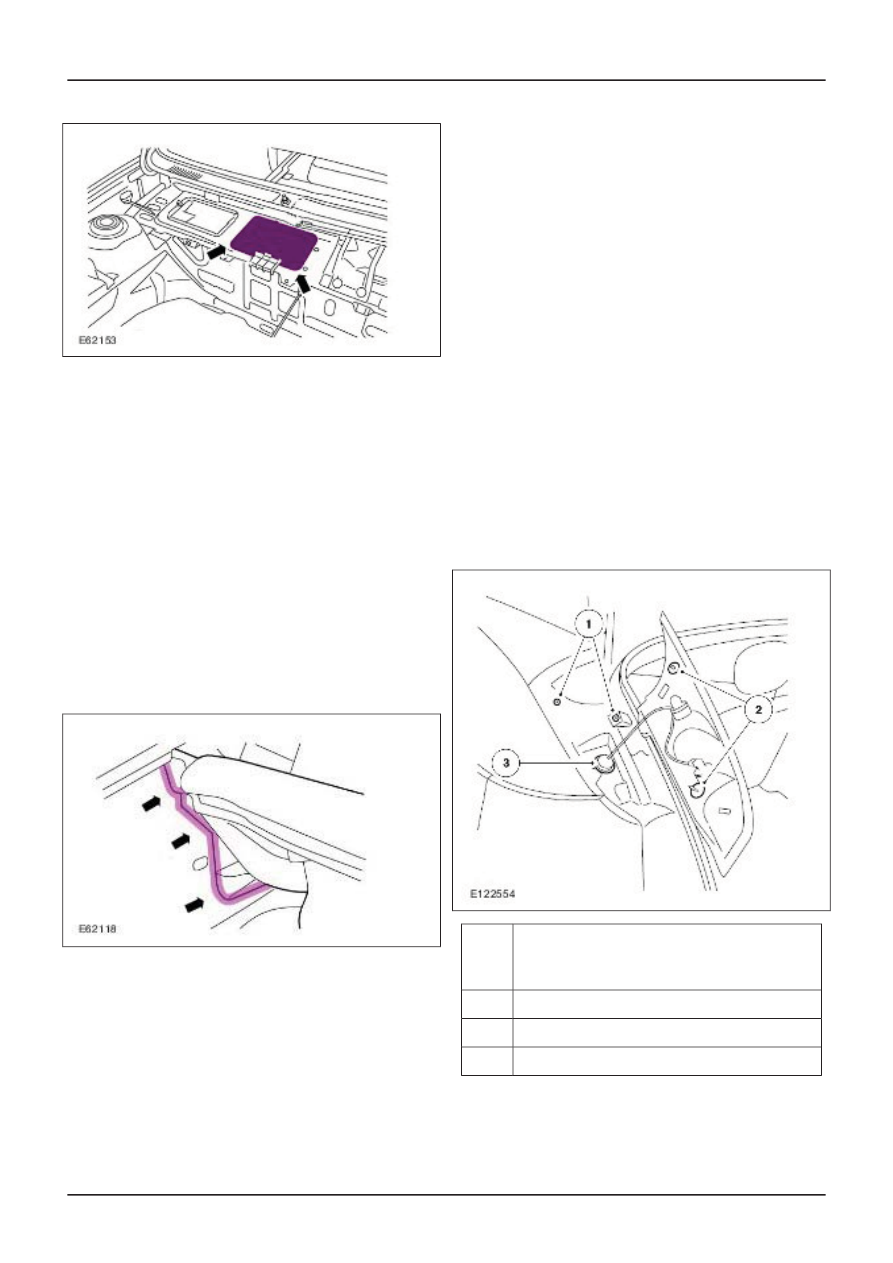
Example: Possible water entry points at the
rear lamp

Description

Des

cript

ion

Clips

1

Gaskets.

2

Rubber grommet

3

Add-on body parts must be fitted with seals,
grommets or sealing compound to prevent water
entry. However, even when a sealing system is
fitted, the screw thread may still cause leaks.

G468074en

501-25-

75

Body Repairs - General Information

501-25-

75

DESCRIPTION AND OPERATION

Corrective action

Seals must be tested and, if necessary, replaced.
Check contact surface and adjust if necessary.
Points sealed with sealing compound must be
thoroughly cleaned and the seal replaced. Check
grommets and replace if necessary. At all screwed
connections, seal the thread with an appropriate
sealing material.

G468074en

501-25-

76

Body Repairs - General Information

501-25-

76

DESCRIPTION AND OPERATION

Wind Noise

Wind noises as well as other general noises are
dealt with under Noise, Vibration and Harshness
(NVH).

NOTE: Basic and in-depth training is offered on
the following topics. You will find an overview of
the complete range of courses in the Training
Brochure issued by the Ford Service Organization.

Due to the continuous reduction in drivetrain
noises, wind noises have come to the fore in the
vehicle and are perceived to a greater extent by
the customer.

There are various causes of wind noises. They can
be due to the design of the vehicle, or they can
occur after a repair. They are mostly caused by
poorly mounted components, which must be
located and installed in the correct position.

General information

In order to carry out targeted diagnosis, it is
important to know the basics of noise formation
and sound transmission.

Potential areas of wind noises

Description

Item

Wiper arms

1

Windscreen seal

2

Antenna/antenna base

3

Sun roof/roof rail

4

Tailgate

5

Door handles

6

Exterior Rear View Mirror

7

Description

Item

Door seals

8

Headlamps

9

Radiator grille.

10

Noises are categorized according to their type and
formation as follows:

"Normal" air flow noises:

Normal air flow noises are caused by air blowing
against even, flat vehicle surfaces, such as the

G468075en

501-25-

77

Body Repairs - General Information

501-25-

77

DESCRIPTION AND OPERATION

roof, doors and side windows. When the vehicle is
moving fast, air layers (turbulence) form, which
cause variations in air pressure. These variations
in air pressure spread in the form of sound waves
and are transferred to the vehicle interior via the
side windows and seals.

Noises caused by deviations in air flow and
circulation around separate components:

If air flows over an edge on a vehicle, the air flow
cannot follow the shape of the surface, but
separates at the edge. Eddies are formed, which
collapse again after a certain time or distance. The
associated fluctuations in air pressure create a
corresponding sound wave which is noticeable by
for instance a rushing noise at the A-pillar or the
outside mirror.

Turbulence and the associated radiation of noise
can also occur at the vehicle underbody. Air
circulation around small components and also flow
through small gaps (e.g. the radiator grille) cause
the rushing noise to change to a whistling, which
rises and becomes louder as the vehicle speed
increases.

Noises caused by vibrating seals:

Seals which do not make firm contact at the door
or window area can be made to vibrate by pressure
variations outside the vehicle, which in turn mean
noise radiating into the interior of the vehicle.

Noises caused by air flowing out:

Noises caused by air flowing out are created by
leaks at the vehicle interior sealing system, when
stationary air mixes with flowing air. As a result,
the noise increases as the speed of the air flowing
out increases. Example: Letting air out of a tire.

Cavity noises:

Cavity noises are those created when the air
volumes found in bodywork cavities are caused to
vibrate by an opening located in the airflow. The
frequency of the tone does not vary with the vehicle
speed but depends on the volume of the cavity and
the size of the opening. Example: Blowing across
the top of a bottle.

Wind noises overview:

Workshop diagnosis

Place of origin

Type of wind

noises

Assessm

ent

Roof, side

windows

"Normal" wind

noises

Normal

A-pillars, outside

mirrors,

antennas

Noises caused

partly by

changes in the

direction of air

flow and by air

flow around

separate

components

Normal

Door gaps too

large, door/

window seals not

making firm

contact

Noises caused

by vibrating

seals

Serious

Leaks in the

bodywork/

sealing system

Air escape and

air passage

noises

Serious

Unsealed body-

work cavities

Cavity noises

Serious

Those noises listed under "Serious" indicate a
possible source of the fault.

Workshop diagnosis

There are two ways that the level of noise in the
vehicle interior can be reduced and the character
of the noise can be improved through assessment
and diagnosis in the service department:

• Reducing the intensity of the noise sources.

• Reducing the noise transfer routes.

Before carrying out repair work, a visual inspection
of the vehicle must be carried out. The gaps in the
doors, the sunroof and at all other body parts must
be checked in particular.

When the doors are adjusted to fit exactly,
development of wind noises at high speeds can
often be eliminated (lifting of doors off the seals).
Furthermore, the following points should be noted:

• The windows and doors must be fully closed.

• The air guides and air grilles must be correctly

seated.

• All of the trim strips and plastic components

must be firmly fixed down without gaps.

• All blanking plugs present.

G468075en

501-25-

78

Body Repairs - General Information

501-25-

78

DESCRIPTION AND OPERATION

Test method

The test procedures given in the chapter Noise,
Vibration and Harshness can also be used to
diagnose wind noises.

Road tests

Wind noises can usually only be localized by road
tests

NOTE: There should always be two people present
during road tests to find noises. A driver who
reconstructs the situation causing the noise, and
a person to carry out the checks.

The following points should be taken into account
for such road tests:

• Check that the tire pressure is correct.

• Remove non-standard ancillary components

from the vehicle.

• Choose a dry, flat road with as little traffic as

possible.

• Carry out the road test in all speed ranges. Use

a high gear so that the engine noise is low.

• Do not perform a road test near any sound

reflecting objects.

If it is difficult to detect the noise sources, the
search can be made easier by masking potential
areas.

Chalk/powder test

This test checks the contact surfaces of seals on
doors, hatches and lids.

Process using a door seal as an example:

To do this, the door seal is coated with powder or
brushed with chalk. A thin layer of grease is applied
to the surface against which the seal makes
contact. The door must then be slowly closed and
reopened. The width and continuity of the imprint
can now be checked on the seal.

Smoke test

Flow checking device

Description

Item

Test pipe

1

Test pipe opener

2

Puffer ball

3

Mode of operation:

The flow checking device is a set made up of a
flow-testing pipe, a test pipe opener, puffer ball
and closing-off caps for the pipe.

The test pipe contains a filling layer which is
impregnated with fuming sulfuric acid. When air is
blown through the pipe by the puffer ball, sulfuric

acid aerosol is emitted in the form of a white
smoke.

NOTE: Pay attention to the instructions for use and
the safety directions issued by the manufacturer.
The smoke test can only be performed in a
draft-free environment.

This test can be used to detect leaks visually.

Procedure:

• Break off both tips of the pipe in the pipe opener,

in exceptional cases in the top of the packaging.

• Insert the pipe into the puffer ball so there are

no leaks.

G468075en

501-25-

79

Body Repairs - General Information

501-25-

79

DESCRIPTION AND OPERATION

• Close the hole in the puffer ball with your thumb

and press the air contained in the ball through
the pipe.

• Set the ventilation blower in the passenger

compartment to the highest setting.

• Close all doors so that a slight overpressure can

build up in the passenger compartment.

• Move the smoke pipe along the outside of the

body to the areas to be checked. Leaks can be
detected through the irregular movement of the
smoke.

Ultrasonic test

This test searches for leaks in the system of seals
or rather acoustic bridges. When an ultrasonic
transmitter is placed inside the vehicle, it sends
out ultrasonic waves. A leak is located by running
a detector along the suspected area. The position
with the loudest reception of the escaping
ultrasonic waves indicates places where noises
occur.

Ultrasonic test device

Procedure:

• Place the ultrasonic transmitter in the vehicle.

• Completely close the vehicle.

• Search the exterior of the vehicle using the

detector.

• The detector provides a simple indication of a

leak.

Stethoscope test

Stethoscope

Diagnosis

Wind noises often have similar causes as the
general NVH noises. For instance, a windshield
which is incorrectly bonded in position can cause
normal driving noises to become more noticeable.

Asking the customer detailed questions and a road
test together with the customer are the
requirements for a targeted diagnosis.

NOTE: Take the customer concern seriously. But
do not confirm that a noise is a problem until you
are sure that it is something which is not normal
for the vehicle series.

Possible questions:

• How long has the noise been there?

• Has any work been done on the vehicle?

• Where does the noise come from?

• In which driving situation does the noise

appear?

• Is there any special situation in which the noise

appears?

Remember that a noise is often more or less
noticeable depending on where you are sitting in
the vehicle.

G468075en

501-25-

80

Body Repairs - General Information

501-25-

80

DESCRIPTION AND OPERATION

Reference or

Action

Res

ult

to test

Sta

ge

Step 2.

Yes

Road test the

vehicle with the

customer. First

let the customer

drive to demon-

strate the noise,

before you drive

the vehicle your-

self. Check that

the concern is

justified. Is this a

noise which

gives cause for

concern?

1st

Explain the noise

and tell the

customer what is

causing it.

Possibly offer a

comparable

vehicle for a road

test.

No

Eliminate the

noise or carry

out a repair as

the case may be.

Check whether

the measures

have been

successful.

Yes

Visually inspect

the vehicle. Look

for loose,

damaged or

missing compon-

ents. Check that

the vehicle is to

standard produc-

tion series

specification. In

particular, check

for any after-

market compon-

ents which may

have been

installed.

Depending on

the type of noise,

check the

suspected area.

Could a cause of

the noise be

found?

2nd

Step 3.

No

Reference or

Action

Res

ult

to test

Sta

ge

Take the action

specified in the

Oasis or TSB

information.

Check whether

the measures

have been

successful.

Yes

Before starting

any further work,

use the VIN to

look for model-

specific informa-

tion in eTIS.

Perform Oasis

query and check

TSBs. Can a

cause for the

noise be determ-

ined based on

the information

available?

3rd

Step 4.

No

Step 5.

Yes

Localize the

noise. In doing

so, check

whether it is an

unusual noise or

if it is a usual

driving noise that

is more notice-

able because of

inadequate

sealing. Is it an

unusual noise?

4th

Step 7.

No

Eliminate the

noise or carry

out a repair as

the case may be.

Check whether

the measures

have been

successful.

Yes

Determine the

source of the

noise. Can the

cause be

determined?

5th

Step 6.

No

Eliminate the

noise or carry

out a repair as

the case may be.

Check whether

the measures

have been

successful.

Yes

Determine the

path of the noise
using the stetho-
scope. By way of

a trial, mask the

suspected area

or components

or remove them.

Can the cause

be determined?

6th

Step 7.

No

G468075en

501-25-

81

Body Repairs - General Information

501-25-

81

DESCRIPTION AND OPERATION

Reference or

Action

Res

ult

to test

Sta

ge

Renew the seal

or perform the

appropriate

repair as neces-

sary. Check
whether the

measures have

been successful.

Yes

Check the

vehicle for inad-

equate or

damaged seals.

The sealing of a

vehicle can be
checked using

the stethoscope,

the powder test,

the smoke test

and the ultra-

sonic detector.

(See under test
method.) Could

a leak be

detected?

7th

Step 8.

No

Under certain

circumstances

there may be a

constructional

problem which is

not yet known

about. Record

the problem in

an Express

Service Report

and send it on by

the usual

method.

8th

Possible concerns with corrective
measures

NOTE: Instructions on general noise are
summarized separately in the Noise, Vibration and
Harshness section. These can be useful when
searching for the causes of wind noises.

There follows an outline of the possible concerns
relating to wind noises. Selected examples are
given showing the causes of wind noises and the
ways in which they can be eliminated. They are
intended to provide troubleshooting tips and
suggestions for the user but do not represent an
exhaustive faults list. The topics are subdivided by
the different groups of components.

The test procedures described in the Noise,
Vibration and Harshness section can be used when
troubleshooting.

Seals

In general, seals are very important when
eliminating wind noises. Special attention should
always be paid here to the possible causes of wind
noises.

Take the following points into account:

• Seals age, i.e. they become porous and with

time they lose their original elasticity. If the
vehicle is relatively old and there are already
visible signs of distortion or damage to a seal,
then it should be replaced.

• At high speeds the doors or hatches may lift

slightly from the seal surfaces because of
variations in air pressure. Wind noises are
caused when the preload on the sealing surface
is not sufficient. The preload depends on the
installation position of the components, the
elasticity of the seal and the location of the
sealing flange.

• The contact surface of the seal must be

sufficient. This can be checked using the chalk
test. If the specifed width of the contact surface
is not known, you must determine it on another
component of identical construction.

• A bulging seal carrier indicates that the sheet

metal of the retaining flange is uneven.

G468075en

501-25-

82

Body Repairs - General Information

501-25-

82

DESCRIPTION AND OPERATION


Content   ..  113  114  115  116   ..