Ford Focus RS (2011 year). Manual - part 113
 

  Index      Ford     Ford Focus RS - service repair manual (2011 year) in english


Search            


Content   ..  111  112  113  114   ..


Ford Focus RS (2011 year). Manual - part 113


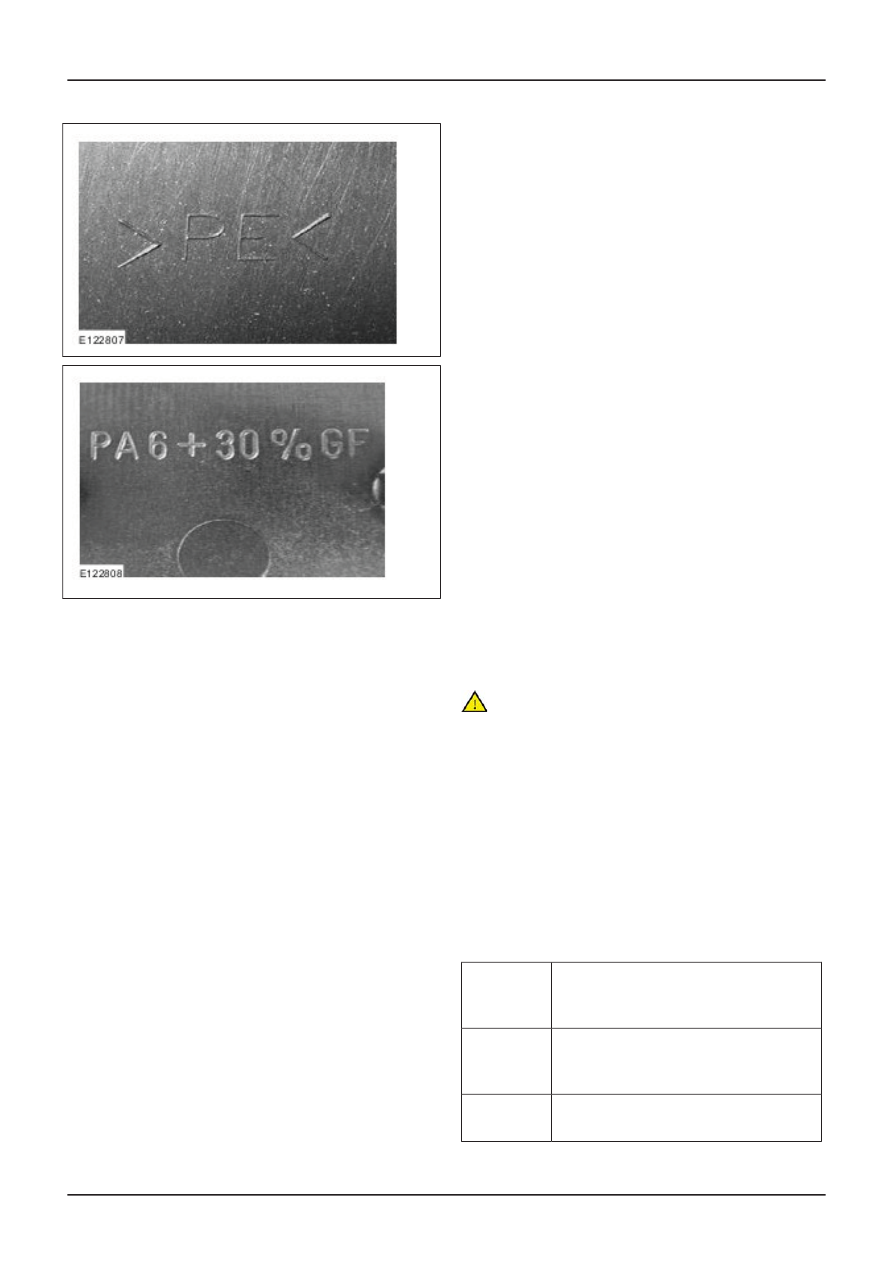
NOTE: The identification of the type of plastic is
necessary for the plastic welding process in order
to determine the correct welding rod (welding
material) to use.

If an identifier is missing or cannot be made out,
the following easy to perform tests will help:

Visual Inspection

Visual inspections mainly serve to identify PUR
and GRP materials. Thermoplastic components
are often painted and are therefore difficult to
identify.

Identification characteristics:

• When PUR cracks or similar damage occurs,

pores of foam can be seen.

• GRP can be recognized by the glass fiber

structure on the inside.

Mechanical test:

The plastic group can be determined by a sound
test:

• Degree of hardness - the higher-pitched the

sound, the harder the plastic.

• Elasticity - the more muffled the sound, the

higher the elasticity of the plastic.

Sanding test

In this a place is chosen which will not be visible
later, and the finger belt sander is used to sand the
plastic.

The plastic group can be determined using the
pattern of the dust:

• Thermosets produce a white dust.

• Thermoplastics smear and do not produce dust.

Float test in water:

Take a small piece of plastic from the component
to be repaired and test whether it floats on water
(PP-EPDM, HD-PE, PP) or sinks (PVC/U, PVC/P,
ABC, PC).

Nature of the surface

The surface of plastics can be categorized as rigid
(PVC-U, PVC-P) and waxy (PP/EPDM, HD/PE,
PP).

Adherence test using welding rod

Heat a welding rod that is identified with the type
of material and the plastic component using the
hot air gun. Press the welding rod onto the plastic
component to be welded. When the welding rod
cools down, if it remains stuck to the component
or can only be removed with great difficulty, then
it can be assumed that the two are made of the
same plastic. When pulling away from PP/EPDM,
HD/PE and PP, this can lead to strings.

CAUTION: Danger of poisoning! When
burned, most plastics release vapors
harmful to health. Ventilate the room well
and use respiratory protection. Where
possible work using an extraction system.

Burning test

Every plastic has a characteristic behavior and
smell when burned. Using a knife, cut off a small
piece from the component to be repaired, remove
any dirt and paint residues and set light to the small
chip. Now observe the burning behavior. Compare
the color, type and smell of the smoke with the
results from the following table.

Plastic recognition using a

burning test

Short

descrip-

tion

Blackish smoke, the material drips

like a candle when burning and

smells like wax.

ABS

No smoke, draws filaments, smells

like burnt horn.

PA

G506663en

501-25-

59

Body Repairs - General Information

501-25-

59

DESCRIPTION AND OPERATION

Plastic recognition using a

burning test

Short

descrip-

tion

Yellowish, sooty smoke. Smells

sweetish.

PC

No smoke, the material drips like a

candle when burning and smells like

burnt oil.

PP

No smoke, the material drips like a

candle when burning and smells like

burnt oil.

PP/EDM

Hard and shiny, burns yellow, fluffy

soot.

PC/PBT

Blackish smoke and acrid smell.

Hard PVC
/ soft PVC

Safety instructions

In addition to the general safety instructions, the
relevant regulations and accident prevention
legislation must be observed.

NOTE: Without exception, before starting work you
must read the safety and warning instructions in
the chapter "Safety Instructions". In addition, pay
attention to the warning instructions of the particular
equipment manufacturer.

Information sheets, safety notices and guidelines
for the processing of adhesives containing
isocyanate, polyester resin, adhesives, solvent and
thinners provide more details on their use.

The following instructions must always be followed:

• Polyester resin, adhesive, solvents and thinners

are inflammable and must not be used near
naked fire or flames.

• Sawing and grinding operations must only be

carried out in rooms equipped with extraction
systems.

• If no rooms with extraction systems are

available, only use tools with extraction
equipment.

• Protective equipment such as gloves, protective

goggles, aprons and breathing masks are
essential.

Because of the various compositions of plastics,
repair work to plastic parts involves a variety of
repair methods.

The following methods are used:

• Thermoplastic straightening.

• Plastic welding.

• Plastic adhesive bonding.

• Plastic lamination techniques.

Thermoplastic straightening

Damage to thermoplastics can be rectified by
heating using the hot air gun (temperature about
100°C) while the deformation is pressed out until
the shape is regained.

Plastic welding

Splits formed in plastic bumpers are typical
possible plastic repairs.

NOTE: Do not carry out plastic welding in the area
of fixed foam backing. The foam backing will
usually be destroyed and the function of the
component is then no longer guaranteed.

If repair using adhesive methods is not possible
because of unfavorable conditions at the rear of
the repair location, plastic welding is a possible
repair process.

There are two methods of welding: hot air draw
welding and hot air fanning welding.

Plastic welding set

Description

Item

Various welding rods

1

Scraper (heart-shaped)

2

Hot air blower (approx. 1500 W)

3

Clamps

4

Welding nozzles

5

In addition to the components listed, plastic welding
requires tools already found in the workshop such
as scrapers, sanders, face cutters etc.

G506663en

501-25-

60

Body Repairs - General Information

501-25-

60

DESCRIPTION AND OPERATION

As with all other welding processes, only certain
material combinations can be joined together using
plastic welding.

NOTE: Basic and in-depth training is offered on
the following topics. You will find an overview of
the complete range listed in the Training brochure
published by the Ford Service Organization.

NOTE: The manufacturer's data must be taken into
account when choosing welding materials and the
correct temperature setting of the hot air gun.

Repair sequence during plastic welding:

• To prepare the location for welding, remove

paint residues and sand the weld area.

• If parts of the material have been pushed in by

an impact, the damaged area can be brought
back to shape by heating.

• Drill out the ends of the split to stop it spreading

further. Machine the location of the weld into a
90° V-shaped groove, to accept the welding rod.

• Lay the welding rod in the groove.

• Perform the welding. Hot air draw welding or

hot air fanning welding.

• Rework the weld seam. After cooling, sand the

raised weld seam.

• Clean the sanded repair surface using plastic

cleaner. Apply plastic primer thinly to the repair
surface and paint it.

Despite good preparation and the correct choice
of welding materials, weld faults may occur.

The following points must be noted when welding
plastic:

• Weld together like with like:

– With very few exceptions, only the same

materials can be welded together, e.g. PP
with PP.

• Correct temperature:

– The correct choice of temperature is

important for the success of the repair. The
plastic must be warmed until it plasticizes
(dough-like, soft).

Guideline values for welding temperature:

Temperat

ure

Plastic

Brief

descrip-

tion

360°

Acrylonitrile butadiene

styrene copolymer

ABS

400°

Polyamide

PA

Temperat

ure

Plastic

Brief

descrip-

tion

370°

Polycarbonate

PC

280°

Polypropylene

PP

280°

Polypropylene/ethylene

propylene diene

copolymer

PP/EPDM

300°

Polyurethane

PUR

340°

Polyvinylchloride

Hard PVC

370°

Polyvinylchloride

Soft PVC

• Even pressure:

– When rod welding, the pressure is applied

by pressing on the welding rod.

• Steady speed:

– To achieve a good weld, care must be taken

that the working speed is steady.

Possible causes of weld faults:

• Deformation caused by overheating of the repair

area or tensions in the material while welding
the component.

• Plastic material too thin.

• Poor weld joint because the weld temperature

was too low or the welding speed was too fast.

• Welding different materials together.

• Weld seam dropped because the split gap was

too wide or the welding temperature was too
high.

A good weld is recognized by a slightly raised,
smooth and even weld bead on the surface of the
component.

The weld bead must only be worked once it has
fully cooled down.

Plastic adhesive bonding

Adhesive bonding of plastics has some advantages
over welding methods:

• Within the group of thermoelastic plastics, all

semi-rigid ancillary components (such as
bumpers, front grilles, etc.) can be repaired
without identification.

• A two-component polyurethane based adhesive

is used for all thermoplastic parts.

• Reinforcement strips can be attached behind

splits (split length up to max. 100mm) and

G506663en

501-25-

61

Body Repairs - General Information

501-25-

61

DESCRIPTION AND OPERATION

openings to ensure the original strength
properties.

Tools and equipment also familiar from paint
repairs can be used in making adhesive repairs to
thermoplastic components.

Angle grinders and belt sanders can be used to
grind out scratches and splits. Orbital sanders with
extractors are used for fine sanding.

The infrared heater is used to provide fast and
certain drying throughout.

Plastic adhesive set

Description

Item

2-component adhesive

1

Cartridge gun

2

Mixing tube

3

Apart from the components shown, other materials
may be needed to bond plastics, depending on the
repair position.

For large scale repairs, it may be necessary to
insert reinforcement panel strips and reinforcement
matting as fixing aids.

Repair sequence during plastic adhesive bonding:

NOTE: Follow the manufacturer's guidelines when
using adhesives.

• Prepare the location of the bond. Remove paint

residues and sand the area to be bonded. Drill
out the ends of the split to stop it spreading
further. Prepare the bond location into a
V-shape and clean it with plastic cleaner.

• Apply the adhesive. The two-component

adhesive is applied to the cleaned and primed
repair location using a hand gun. Spread and
smooth the adhesive using a flexible plastic
spatula.

• Rework the bond location. After cooling, sand

the raised adhesive. Clean the sanded repair

surface using plastic cleaner. Apply plastic
primer thinly to the repair surface. Apply paint.

GRP repairs

GRP material is hard and brittle in its strength
properties. Because of these material properties,
splits and openings often result in cases of serious
damage.

The stability of GRP parts is impaired if the glass
fiber reinforcement is cracked. The component
must be replaced in cases of serious damage that
affect the structure.

Minor damage (such as abrasion, splits up to
80mm, holes up to approx. 60mm diameter, etc.)
can be repaired to a technically and visually perfect
standard, provided that the damage does not occur
in heavily used or hard-to-reach areas.

To ensure perfect repair results, observe the
following points:

• The room temperature should be at least 15°C

and the air should be as dry as possible.

• The repair location must be thoroughly dry and

clean.

• Before the repair, the GRP part being repaired

must be dried using an infrared heater or in a
drying oven.

• In cases of large splits and fractures, the

strength of the outer skin can be re-established
by backing with a reinforcement material.

Tools and equipment from the paint shop can be
used to carry out repairs to GRP parts. Angle
grinders and belt sanders can be used to grind out
scratches and splits. Orbital sanders with extractors
are used for fine sanding.

GRP repair set

G506663en

501-25-

62

Body Repairs - General Information

501-25-

62

DESCRIPTION AND OPERATION

Description

Item

Polyester resin

1

Glass fiber mats

2

Hardener

3

Scissors, paintbrush and cleaning materials are
other materials which will be needed to perform a
GRP repair.

NOTE: Follow the manufacturer's instructions when
using the repair materials.

The repair process for a GRP repair is as follows:

• Prepare the repair location. Remove paint

residues and sand the repair area.

• Drill out the ends of the split to stop it spreading

further.

• The repair location must be sanded by hand. If

machine working is attempted, the resin will be
heated so much that the surface structure will
be changed. The result is inadequate adhesion.

• Perform the GRP repair. Apply polyester resin

thinly to the repair location. Lay the glass fiber
mat in place and apply polyester resin over it
again.

• Rework the location of the repair. Sand away

any polyester resin which stands proud after it
has hardened.

• Clean the sanded repair surface using plastic

cleaner. Apply plastic primer thinly to the repair
surface and after it has dried apply the paint
finish.

G506663en

501-25-

63

Body Repairs - General Information

501-25-

63

DESCRIPTION AND OPERATION

Special Repair Techniques

Cabriolet vehicles

The body of a cabriolet vehicle is different to the
self-supporting body of a saloon car because of

the special roof construction (folding top). The
stability requirements must therefore be ensured
by construction changes within the body structure.

These are for instance:

• Longitudinal and torsional reinforcing

components which compensate for the lack of
the roof.

• Reinforcements to the floor assembly,

particularly in the rocker panel area.

• Reinforcements in the pillar areas.

• High-strength and ultra-high-strength steel

panels with single panel thicknesses of up to
2.5 mm, which in combination can become up
to 6mm thick (e.g. reinforcements in the floor
area, rocker panels).

If deformation to load carrying components occurs,
the stability of the whole body shell can be
adversely affected.

On a cabriolet, accident damage repair to the
components mentioned above is considerably
different in certain aspects compared with the usual
repairs (closed body construction):

• A model specific alignment angle system must

always be used during straightening and repair

work, securing using clamps at the rocker panel
area is not always adequate for the cabriolet.

• To avoid damage to the doors, they must always

be open during straightening work. In the case
of more severe damage, additional tension and
compression spindles must be used to stabilize
the door cut-outs (between the A- and B-pillars).

• In load bearing areas such as the rocker panels,

side members and floor pan, increased
straightening forces are necessary due to the
additional reinforcements.

• NOTE: Additional information on welding can

be found in the section Welding Equipment and
Joining Techniques.

High-power welding equipment for panel
thicknesses in overall combination of up to 6
mm total material thickness.

• The fitting accuracy and longitudinal rigidity of

the affected component is especially important
to ensure that the doors, door windows and the
roof fit and close correctly.

Liquefied gas vehicles

Alternative fuel vehicles often require special
handling in the workshop area. Above all, assembly
operations to some extent require particular

G506664en

501-25-

64

Body Repairs - General Information

501-25-

64

DESCRIPTION AND OPERATION

knowledge when dealing with the special
technology and the safety regulations.

NOTE: Only fully trained personnel are permitted
to work on alternative fuel vehicles.

These special requirements must be understood
and taken into account in the body shop as well.

CAUTION: Danger of fire and explosion.
The safety instructions must always be
followed when performing service work on
fuel/gas systems. Failure to follow these
instructions may result in personal injury.

NOTE: You will find further information about
working on liquefied gas vehicles in the section
Health and Safety Information.

Refrigerated conversion vehicles

Apart from the special materials used in building
the structure of the refrigerated compartment, such
vehicles have special energy and refrigeration
systems which require special handling during
repair.

CAUTION: Danger of injury. Work on the
230<SP>volt system of the refrigeration
equipment must only be carried out by
trained specialist personnel.

NOTE: Work on the refrigerant circuit may only be
performed by persons who have a relevant
certificate of competence.

Vehicles with a refrigerated compartment are often
used to transport foodstuffs. For this reason,
additional hygiene regulations must be complied
with during repair work.

Aluminum and plastic are used to construct the
two different types of compartment found on
refrigerated vehicles.

The aluminum conversion is a very stable and
technically perfect variant. However, against this
the relatively high production costs and a lower
payload must be taken into account, because of
the weight of the aluminum conversion itself.

NOTE: Basic and in-depth training is offered on
the following topics. You will find an overview of
the complete range listed in the Training brochure
published by the Ford Service Organization.

The plastic conversion has developed into a light,
clean and economical alternative because of
constant further development of materials and
working techniques.

NOTE: The material combinations, the
workmanship and the working methods must
comply with the current food hygiene regulations.
For this reason, service and repair work on the
refrigerated conversion may only be performed by
authorized and specially trained technicians.

Refrigerated compartment constructions are often
made using both materials. The floor pan is made
of structured, slip-proof aluminum panels and the
wall and ceiling cladding is made of smooth
surfaced plastic elements.

CAUTION: PUR hard foam is flammable. If
PUR hard foam is overheated, it will burn
on its own with a brilliant yellowish flame.
It produces unpleasant choking and toxic
fumes. Special measures must be taken
when welding the vehicle body.

Polyurethane wall and ceiling elements are
manufactured using a sandwich principle. An
insulating polyurethane core is coated with food
grade ABS plastic on one side.

PUR hard foam does not decompose, is rot
resistant and is odorless. These properties make
it suitable for use as insulation.

Because of its closed cell structure, water uptake
by PUR hard foam is for the most part only a
problem at edges. Cut edges or other mechanically
worked surfaces must however be sealed with the
greatest care.

The conversion to a refrigerated vehicle is
performed as made-to-order production. The large
surfaces of the wall and ceiling cladding can be
changed and are particularly easy to repair.

If access to the back of a body panel section is
needed because of body straightening work, in
some circumstances it is cheaper to perform a
cut-out repair instead of removing an element.

The repair process is fully described in the Student
Information booklet Refrigeration System
Technology, Transit 2000.5 Freshline.

NOTE: You will find further information about
working on vehicles with a refrigerated
compartment in the section Health and Safety
Information.

G506664en

501-25-

65

Body Repairs - General Information

501-25-

65

DESCRIPTION AND OPERATION

Impact of Insufficient Repair Quality

Body repairs usually require a significant level of
intervention in the existing body shell structure.
The corrosion protection, seals and NVH
components are destroyed and must be replaced.

To prevent the vehicle quality from being reduced
due to a poor quality repair, all repairs carried out
in all repair sections must be inspected during and
after the accident repair.

Simply checking the vehicle at the time of delivery
is not sufficient to guarantee the repair quality.
Rather, continuous checking of the work carried
out is recommended.

NOTE: Logs of the acceptance of individual
operations are a useful tool for quality assurance.
A comprehensive final inspection can be carried
out based on a final acceptance log.

In the process, the entire repair sequence must be
split into meaningful sections, with the creation of
check points to which particular attention must be
paid.

The following are some possible sections:

• During and after body work.

• Final assembly, ancillary components, functional

tests.

• Vehicle delivery.

NOTE: The following points offer an indication of
possible test logs. They can be combined and
supplemented differently, depending on the
individual operating procedures.

During and after body work the following areas
should be checked:

After completion of the body repairs, the following
areas should be checked:

• Manufacturing inspection for functionality and

originality in the accident area.

• Check snug fitting of metal panel parts (welding

and screw connections).

• Check snug fitting of ancillary components

(doors, hoods, glazing).

• Check surface condition of the welded seams.

• Check seals, blanking plugs, NVH components.

• Check corrosion prevention measures

• Check that the repair work is in the correct

condition for painting.

Final assembly, ancillary components, functional
tests

After final assembly, not only a visual inspection
is required, but also the functionality of many
components must be checked:

• Check repair area for originality.

• Check ancillary components for correct

installation.

• Check precision fitting of all parts.

• Check that the doors and flaps are working

correctly.

• Check that all mechanical parts, such as the

window winder are working correctly.

• Check for leaks in the repair area.

Vehicle delivery

Vehicle delivery again offers the opportunity of
checking the repair quality. In the process, the
following points are to be checked again:

• Corrosion protection, sound damping matting

and rubber seals.

• Check for traces of leftover paint.

• Check the cleanliness of the vehicle.

• Functional check of the mechanical and

electrical components.

• Road test the vehicle.

• Check for noise, vibration and harshness (NVH).

• Check for wind noises.

After repair work on the body and vehicle, not only
the visual restoration of the damaged vehicle, but
also the functional restoration must be guaranteed.

Customers are making increasingly high demands
of vehicles, particularly in terms of driving comfort.
Customers find noise, vibrations and harshness
(NVH) as well as squeaking and rattling annoying,
particularly after repair work. It is therefore
important that the condition of the vehicle at the
time of production be restored after an accident
repair.

After body repairs, the entire repair area must be
checked for any water leaks. It is crucial that a leak
test be carried out as part of the final inspection so
that water leaks can be detected and eliminated
even before delivery of the vehicle to the customer.

The requirements of the vehicle manufacturer are
to be taken into consideration during all
inspections. Only in this way can it be guaranteed

G506665en

501-25-

66

Body Repairs - General Information

501-25-

66

DESCRIPTION AND OPERATION


Content   ..  111  112  113  114   ..