Volkswagen e-Golf (2015 year). Manual - part 17


  Index      Volkswagen     Volkswagen e-Golf - service manual 2015 year in english


Search            copyright infringement  


Content   ..  15  16  17  18   ..


Volkswagen e-Golf (2015 year). Manual - part 17


Preparing to charge the high-voltage battery 

 Please first read and note the introductory information and heed the WARNINGS 


Always deactivate the electric drive before the charging procedure and leave it switched off during the 
charging procedure. If the electric drive is not deactivated before charging, it will be deactivated auto-
matically when you insert the charging connector into the charging socket and can only be reactivated 
after the charging connector has been disconnected. 

Checklist 

The following activities should be performed before you start the charging process: 

  Move the selector lever to P  

  Switch on the electronic parking brake  

  Deactivate the electric drive  

  Connect the charging cable  

  Never switch on the motor and ignition during the charging process. 
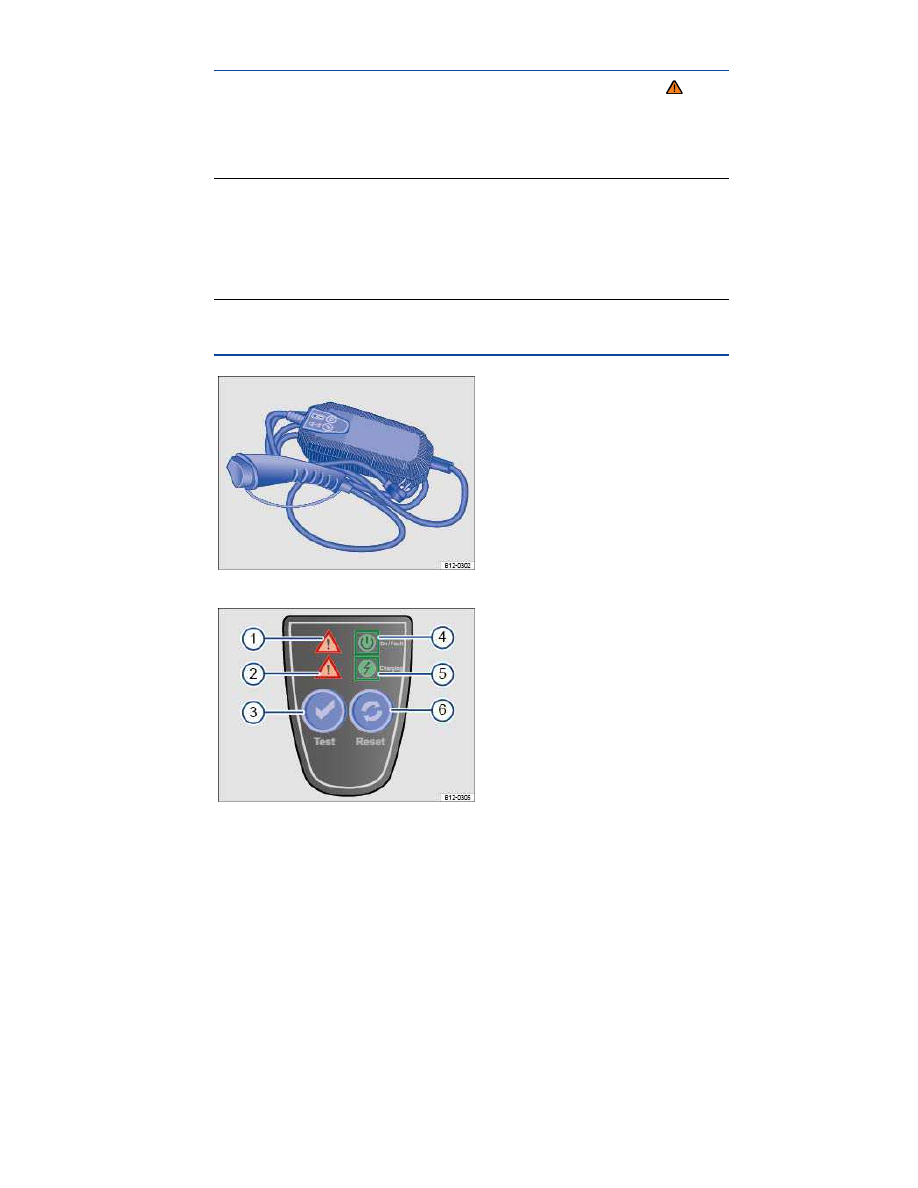
 

Charging cable 


Fig. 135 Charging cable 


Fig. 136 Control module on charging cable 


 Please first read and note the introductory information and heed the WARNINGS 


The vehicle may be supplied with a charging cable for 110 Volt GFI outlets 

⇒ 

fig. 135

Depending on the vehicle, a charging cable for charging on charging stations may also be included 
with the vehicle. 

Charging cable for 110 Volt GFI outlets 

The charging cable increases the electrical safety when charging on 110 Volt outlets. Before using the 
charging cable, please carefully read and heed the information and safety notices on the charging 
cable label as well as the information about the procedure for charging with an alternating current (AC 
charging)  

Charging may be limited if the vehicle is charged in direct proximity to high-voltage cables using the 
charging cable for 110 Volt outlets. 

Key to 

⇒ 

fig. 136


(1)


Malfunction warning light 

(2)


Charging error warning light 

(3)


Test button 

(4)


Voltage indicator light 

(5)


Charging process indicator light 

(6)


Reset button 

When the charging cable for mains sockets is connected to the socket and the vehicle, the protection 
unit will automatically perform a self-test. 

(2)

(4)

(5)

 and 

(6)

 will light up red and green or yellow for 

about 3 seconds during the test. The self-test is repeated automatically every 4 hours during charging. 


Control module display 

⇒ 

fig. 136

:  

No.  

Display  

Meaning  

Proper re-

sponse  

(4)


Lights up  

Charging cable 

is properly con-

nected to an 

outlet and ready 

to charge.  

Start the charg-

ing process  

(4)


(5)


Lights up  

Charging cable 

is ready to 

charge and in 

stand-by mode. 

Vehicle is ready 

to charge, charg-

ing process has 

not yet started.  

-  

(4)


Lights up  

Charging cable 

-  


Control module display 

⇒ 

fig. 136

:  

No.  

Display  

Meaning  

Proper re-

sponse  

(5)


Flashes  

is connected to 

the vehicle. 

High-voltage 

battery is being 

charged.  

(1)


(4)


Flashes  

The charging 

cable is con-

nected to an 

outlet without a 

Ground Fault 

Circuit (GFI). 

The high-voltage 

battery is not 

being charged.  

Connect charg-

ing cable to a 

110 Volt outlet 

with a Ground 

Fault Circuit 

(GFI).  

Lights up  

Charging cable 

is connected to a 

110 Volt outlet, 

but an error was 

detected by the 
control module. 

The high-voltage 

battery is not 

being charged.  

Disconnect the 

charging cable 

from the 110 Volt 

outlet and plug it 

back in. If the 

error comes 

back again, get 

expert assis-

tance from a 

qualified electri-

cal installation 

specialist.  


Control module display 

⇒ 

fig. 136

:  

No.  

Display  

Meaning  

Proper re-

sponse  

(1)


(2)


(4)


Lights up  

During the 

charging pro-

cess: The con-

trol unit detected 

a residual cur-

rent, the charg-

ing process is 

interrupted.  

Dangerous con-

tact voltage 

damaged isola-
tion detected at 

the voltage 

source. High-

voltage battery is 

not being 

charged. 

Or: Damaged 

isolation detect-

ed in the vehi-

cle’s high-

voltage system. 

Get expert assis-

tance from a 

qualified electri-

cal installation 

specialist.  

During the test-

ing of the 

Ground Fault 

Circuit (GFI): 

The test button 

(3)

 was pressed 

for longer than 3 

seconds. The 

high-voltage 

battery is not 

being charged.  

Press the reset 

button 

(6)

 for at 

least 3 seconds.  

(1)


(2)


Flashes  

Charging cable 

Have charging 


Control module display 

⇒ 

fig. 136

:  

No.  

Display  

Meaning  

Proper re-

sponse  

(4)


Lights up  

is connected to a 

110 Volt outlet, 

but an error was 

detected by the 
control module. 

The high-voltage 

battery is not 

being charged.  

cable checked 

by a qualified 

electrical special-

ist. Go to an 

authorized 

Volkswagen 

dealer or 

Volkswagen 

service facility for 

assistance.  

(2)


(4)


Lights up  

The vehicle’s 

system detected 

an error in the 

connected 

charging cable. 

The high-voltage 

battery is not 

being charged.  

Disconnect the 

charging cable 

from the 110 Volt 

outlet and the 

vehicle and plug 

it back in. Should 

the error occur 

again, get expert 

assistance from 
a qualified elec-

trical installation 

specialist.  

(1)


(2)


Lights up  

An overheating 

- Let the charg-


Control module display 

⇒ 

fig. 136

:  

No.  

Display  

Meaning  

Proper re-

sponse  

(4)


Flashes  

of the charging 

cable was de-

tected. The high-
voltage battery is 

not being 

charged. An 

overheating can 

be caused by: 

- A damaged 110 

Volt outlet 

- Ambient tem-

perature above 

113 °F (45 °C) 

- A damaged 

charging cable  

ing cable cool 

down. 

- Should the 

error occur 

again, have 

charging cable 

checked by a 

qualified electri-

cal specialist. Go 

to an authorized 

Volkswagen 

dealer or 

Volkswagen 

service facility for 

assistance.  

(1)


Lights up  

The system de-

tected fluctua-

tions in the volt-

age. The high-

voltage battery is 

not being 

charged  

- The charging 

process will con-

tinue automati-

cally once the 

voltage is stable 

again. 

- If necessary try 

connecting the 

cable to another 

110 Volt outlet. 

- Should the 

error occur 

again, get expert 

assistance from 
a qualified elec-

trical installation 

specialist.  

(4)


Flashes  

(2)


Flashes  

Excess voltage 

- Disconnect the 


Control module display 

⇒ 

fig. 136

:  

No.  

Display  

Meaning  

Proper re-

sponse  

(4)


Lights up  

was detected by 

the control unit. 

The high-voltage 

battery is not 

being charged.  

charging cable 

from the 110 Volt 

outlet and the 

vehicle and plug 

it back in. 

- If necessary try 

connecting the 

cable to another 

110 Volt outlet. 

- Should the 

error occur 

again, have 

charging cable 

checked by a 

qualified electri-

cal specialist. Go 

to an authorized 

Volkswagen 

dealer or 

Volkswagen 

service facility for 

assistance.  


Enabling the charging process 

After a successful self-test, press the button 

(1)

 to set the protection unit to ready and enable the 

charging process. The LED in the protection unit symbol 

(2)

 lights up green. 

Ending the charging process 

If you want to interrupt the high-voltage battery charging process before charging is completed, the 
charging process must be interrupted or ended on the vehicle  

Checking the Ground Fault Circuit (GFI) of the 110 Volt outlet 

The GFI should be checked once a month. Carry out this procedure with the charging cable connected 
to the 110 Volt outlet and the vehicle. The charging process has to be deactivated

  Press the test button 

(3)

 on the control unit of the charging cable for at about 3 seconds. 

  If the test was successful, the warning lights 

(1)

 and 

(2)

 will light up. Should these warning lights 

not light up or other lights should light up or flash, an error occurred while testing. 

  After a successful test and if error occurred, you can start the charging process by pressing the 

rest button 

(6)

 for at least 3 seconds. 


Temperature monitoring 

During the charging process the charging cable can become slightly warmer. This is normal and no 
cause for concern 

If the control unit or the charging cable becomes too hot, the charging current will automatically be 
reduced If the control unit or the charging cable continues to get hot even at the lowest charging 
current, the protection unit will be switched off, and will remain switched off until it has cooled down 
sufficiently. 

If no other sources of heat, such as direct sunlight, can be identified as relevant, have the outlet 
checked by properly qualified and trained experts. 

Charging cable for charging at charging stations (if equipped) 

Keep the charging cable for charging at a charging station safely in its bag in the luggage compart-
ment. Follow the operating manual for the charging station. Before using the charging cable, read the 
procedure for charging with alternating current  

  WARNING 

Charging the high-voltage battery improperly, using improper or damaged outlets and charg-
ing cables, improper handling of the high-voltage battery or failure to follow safe charging 
procedures can cause short circuits, electric shock, explosions, fire, burns, injuries and 
death. 

  Always connect the charging cable to a properly functioning 110 Volt Ground Fault Circuit 

(GFI) wall outlet. The outlet must be properly protected from water, moisture and other fluids. 

  Always check the fuse protection of the GFI outlet before connecting the charging cable. 
  Never connect the charging cable to a conventional power outlet, regardless of whether 

the outlet is protected or not. 

  Never use the charging cable with an extension cord of any kind. 
  Never let plugs or connectors come into contact with water, moisture, or any other fluids. 
  Never use any charging cable if it is damaged and never use the charging cable with a 

damaged GFI outlet. 

  Never attempt to alter or repair cables or other electrical components. 
  Never let anybody stay in the vehicle while the high-voltage battery is charging. 
  Never do any kind of work on the outside or inside of the vehicle while the high-voltage 

battery is charging. 

  Always disconnect the charging cable completely from the vehicle before starting the 

motor. 


  WARNING 

If you are not familiar with the outlet or the electrical installation or it has not been checked 
by qualified experts, never use it for charging. Even very low charging currents can cause 
serious damage and in particular fires if the socket or electrical installation is in bad condi-
tion. If necessary, get expert assistance from a qualified electrical installation specialist. 


  WARNING 

If a 110 Volt outlet is being used for charging, never charge 2 or more vehicles on outlets of 
the same fuse at the same time. Use a different fuse circuit for charging another vehicle. Al-
ways comply with the maximum load for the fuse circuit used. If necessary, get expert assis-
tance. 


  NOTICE 

The supplied charging cable for 110 Volt outlets should always be carried in the vehicle. 


  NOTICE 

Always follow the manufacturer's information and instructions on using the charging station. 


  NOTICE 

The supplied charging cable for 110 Volt outlets has been developed and approved for this 
vehicle. Do not use the charging cable to charge other vehicles. This applies in particular for 
vehicles that do not have DC residual current protection.


  NOTICE 

Always end the charging process before disconnecting the charging cable. 


  NOTICE 

Always connect the charging cable directly to a 110 Volt outlet. Never use the charging cable 
together with an extension cable, a cable reel, a multiple socket outlet or an adapter such as a 
regional adapter or timer.
 

  If the charging cable is connected to a 110 Volt outlet with other electrical consumers on the 

same electrical circuit, the fuse in the electrical circuit can be triggered. If this happens the high-
voltage battery will not be charged. Switch off other consumers on the electrical circuit or choose 
another electrical circuit. If necessary, have the electrical installation checked by qualified experts. 

  Protect the control unit on the charging cable and the connector from heat, especially from 

sunlight, during charging. 

  If the vehicle is close to high-voltage cables during charging, charging may be restricted. 

Charging with alternating current (AC charging) 

 Please first read and note the introductory information and heed the WARNINGS 


The vehicle comes with a charging cable for 110 Volt outlets. When using the supplied charging cable, 
always follow the information and safety instructions for the charging cable. Depending on the vehicle, 
a charging cable for charging on charging stations may also be included with the vehicle. 

Please carefully read and heed the general information on charging the high-voltage battery and on 
preparing to charge the high voltage battery  

Connecting the charging cable 

Connect the charging cable as follows 

⇒ 

 in Charging cable  


  Unlock the vehicle with the remote control vehicle key or press the central locking button   on the 

driver door to unlock the vehicle from the inside  

  Press on the rear of the charging socket flap and open it. 
  If necessary, take the supplied charging cable from the luggage compartment. 
  Connect the connector on the supplied charging cable 110 Volt outlets to a suitable outlet. 
  OR: Connect the charging cable for charging on a charging station to the charging station. 
  OR: Take the charging cable from the charging station. 
  OR: Take the charging cable from the home-charging station (Wallbox). 
  Insert the charging connector on the charging cable into the charging socket on the vehicle 

⇒ 

fig. 134

. Once the charging connector has been detected, the charging process indicator will light up 

yellow and the indicator lamp   will light up in the instrument cluster display. 

  In addition, the charging connector is locked so that it cannot be removed from the charging sock-

et. If the charging connector cannot be locked by the vehicle, the charging process indicator will light 
up red after approximately 10 seconds  and the high-voltage battery will not be charged. Pull out the 
charging connector and insert it into the charging socket again. If necessary, go to an authorized 
Volkswagen dealer or authorized Volkswagen service facility and have the charging socket checked. 

The charging process always starts automatically. Alternatively the charging process can be started 

immediately by pressing the immediate charging button   

⇒ 

fig. 139

. When the charging process is 

active, the charging process indicator 

⇒ 

fig. 137


(1)

 pulses green and the indicator light   in the 

instrument cluster flashes yellow. The remaining charging time is also shown in the instrument cluster 
display. 

Ending the charging process 

Pressing the immediate charging button   

⇒ 

fig. 139

 during charging ends the charging process 

without unlocking the charging connector. The charging process can be restarted by pressing the 
immediate charging button again. 

When the vehicle is unlocked using the   button on the vehicle key or the   button in the driver door, 
the charging connector is also unlocked and the charging process is interrupted for about 30 seconds. 
The charging process is ended when the charging connector is removed from the charging socket 
within this time. If the vehicle has been unlocked, the charging connector can be removed from the 
charging socket as follows. 

  Remove the charging connector from the charging socket 

⇒ 

fig. 134

  Disconnect the charging cable from the 110 Volt outlet or from the charging station or put the 

charging cable back in the charging station. 

  If necessary stow the charging cable away securely in the luggage compartment. 
  Close the charging socket flap. 

If the charging connector is not removed from the charging socket within 30 seconds of the vehicle 
being unlocked, the charging connector will be locked again and the charging process continues. If 

you ended the charging process by pressing the immediate charging button   

⇒ 

fig. 139

 it can be 

continued by pressing the button again. 

If you cannot remove the charging connector after the charging process has been completed, manual-
ly unlock the charging connector and remove it. If the charging connector cannot be removed after 
manual unlocking, get expert assistance. 

  NOTICE 

Always follow the manufacturer's information and instructions on using the charging station. 


Charging with direct current (DC charging) 

 Please first read and note the introductory information and heed the WARNINGS 


The vehicle can be charged with a direct current on a corresponding DC charging station. 

Please carefully read and heed the general information on charging the high-voltage battery  and on 
preparing to charge the high-voltage battery  

Connecting the charging cable 

Connect the charging cable as follows 

⇒ 

 in Charging cable  

  Unlock the vehicle with the remote control vehicle key or press the central locking button   on the 

driver door to unlock the vehicle from the inside  

  Press on the rear of the charging socket flap and open it. 

  Remove the charging socket cap on the lower part of the charging socket 

⇒ 

fig. 134


(B)

  Take the charging cable from the charging station. 
  Insert the charging connector on the charging cable into the charging socket on the vehicle 

⇒ 

fig. 134

. Once the charging connector has been detected, the charging process indicator will light up 

yellow and the indicator lamp   will light up in the instrument cluster display. 

  In addition, the charging connector is locked so that it cannot be removed from the charging sock-

et. If the charging connector cannot be locked by the vehicle, the charging process indicator will light 
up red after approximately 10 seconds  and the high-voltage battery will not be charged. Pull out the 
charging connector and insert it into the charging socket again. If necessary, go to an authorized 
Volkswagen dealer or authorized Volkswagen service facility and have the charging socket checked. 

Depending on the charging station, it may be necessary to enable the charging station before starting 
charging. Follow the corresponding instructions on the charging station. 

The charging process is generally automatically started by the vehicle. Further steps may be needed 
on some charging stations. The charging process may start with a slight delay. If the charging process 
is interrupted during this period, the charging connector can only be removed from the charging socket 

after a short delay. When the charging process is active, the charging process indicator 

⇒ 

fig. 137


(1)


pulses green and the indicator light   in the instrument cluster flashes yellow. The remaining charging 
time is also shown in the instrument cluster display. 

Ending the charging process 

End the charging process by pressing the immediate charging button   or end it on the charging 
station. Unlock the vehicle with the   button on the vehicle key or with the   button in the driver door. 

The charging connector can then be removed from the charging socket as follows 

⇒ 

 in Charging 

cable

  Remove the charging connector from the charging socket 

⇒ 

fig. 134

  Put the charging cable back in the charging station. 

  Place the charging socket cap back on the lower part of the charging socket 

⇒ 

fig. 134


(B)

  Close the charging socket flap. 

If you cannot remove the charging connector after the charging process has been completed, manual-
ly unlock the charging connector and remove it. If the charging connector cannot be removed after 
manual unlocking, get expert assistance. 

Continuing the charging process 

Once interrupted, the DC charging process using direct current cannot be continued by pressing the 
immediate charging button  . If you want to continue the charging process after an interruption, the 
charging cable must be disconnected from the vehicle and connected again or the charging process 

restarted on the charging station 

⇒ 


  NOTICE 

Always follow the manufacturer's information and instructions on using the charging station. 

Charging process indicator 


Fig. 137 In the high-voltage battery charge port: Charging process indicator light 1 and information label 2 


Fig. 138 Charging process information label 

 Please first read and note the introductory information and heed the WARNINGS 


An active charging process is indicated in the instrument cluster by the yellow flashing indicator light   

together with the remaining charging time in the instrument cluster display 

⇒ 

fig. 9

The current charging status is displayed directly on the charging socket while the high-voltage battery 

is being charged 

⇒ 

fig. 137


(1)

. Different states are indicated by different colors. 


Key to 

⇒ 

fig. 138

:  


Charging pro-

cess indicator 

light 

⇒ 

fig. 137


(1)


Meaning  

Proper re-

sponse  

(1)


Lights up green 

permanently.  

High-voltage 

battery charging 

process has 

been completed. 

Disconnect the 

charging con-

nector and close 

the charging 

socket flap.  

(2)


Flashes green 

permanently.  

High-voltage 

battery is being 

charged.  

-  

(3)


Lights up yellow 

briefly.  

Charging cable 

is connected and 

has been detect-

ed by the vehi-

cle.  

-  

Lights up yellow 

permanently.  

The charging 

cable is con-

nected but there 

is no current.  

Have the power 

supply or the 

outlet checked. If 

necessary, seek 

expert help.  

OR: The vehicle 

has automatical-

ly unlocked the 

charging cable 

connector.  

Remove the 

charging cable 

connector.  

(4)


Flashes yellow. 

The selector 

lever is not in 

position P (Park). 

Place the selec-
tor lever in posi-

tion P (Park)  


Key to 

⇒ 

fig. 138

:  


Charging pro-

cess indicator 

light 

⇒ 

fig. 137


(1)


Meaning  

Proper re-

sponse  

(5)


Lights up red.  

Charging cable 

connector could 

not be locked 

properly in the 

charging socket 

of the vehicle.  

Check whether 

the charging 

connector is 

plugged in cor-

rectly. Pull out 

the charging 

cable connector 
and insert it into 

the charging 

socket again. 

Get expert assis-

tance if neces-

sary.  

Flashes red.  

Error in charging 

system. The 
high-voltage 

battery cannot 

be charged.  

Get expert assis-

tance.  


Immediate charging 


Fig. 139 In the high-voltage battery charge port: Immediate charging button 1. 

 Please first read and note the introductory information and heed the WARNINGS 


The immediate charging button can be used to start the charging process manually, or to interrupt or 
end the charging process, if needed. 

Depending on the charging process, the button can be used in different ways (see Charging with 

alternating current (AC charging) or 

⇒  Charging with direct current (DC charging)). 


Cruise control 

 Introduction 

In this section you’ll find information about: 

Indicator lights


Cruise control operation


The cruise control helps maintain an individually stored constant speed when driving above about 
15 mph (20 km/h). 

Cruise control slows down the vehicle only by reducing the flow of power to the electric motor, not by 

braking 

⇒ 

More information: 

  Shifting  
  Parts, accessories, repairs, and modifications  

  WARNING 

Using the cruise control when it is not possible to drive safely at a constant speed can be 
dangerous and can lead to an accident and serious personal injuries. 

  Never use cruise control when driving in heavy or varying traffic or when you cannot keep 

a safe distance between you and the vehicles ahead of you. 

  Never use cruise control on steep, winding, or slippery roads (such gravel roads, wet 

roads, or snowy or icy roads) or on roads with standing water. 

  Never use cruise control when driving off-road or on unpaved roads. 
  Always adjust your speed and the distance you keep between you and the vehicles ahead 

of you to the road, traffic, weather, and visibility conditions. 

  To help prevent unintended operation of cruise control, switch the system off when it is 

not being used. 

  It is dangerous to use the Resume feature when the previously set speed is too high for 

the existing road, traffic, or weather conditions. 

  When going downhill, the cruise control may not be able to maintain a constant speed. 

The vehicle will speed up because of its own weight. Downshift and/or use the foot brake to 
slow the vehicle. 


Content   ..  15  16  17  18   ..