Volkswagen Golf / Golf GTI / Golf Variant. Service manual - part 606


  Index      Volkswagen     Volkswagen Golf / Golf GTI / Golf Variant - service and repair manual 2013 year


Search            copyright infringement  


Content   ..  604  605  606  607   ..


Volkswagen Golf / Golf GTI / Golf Variant. Service manual - part 606


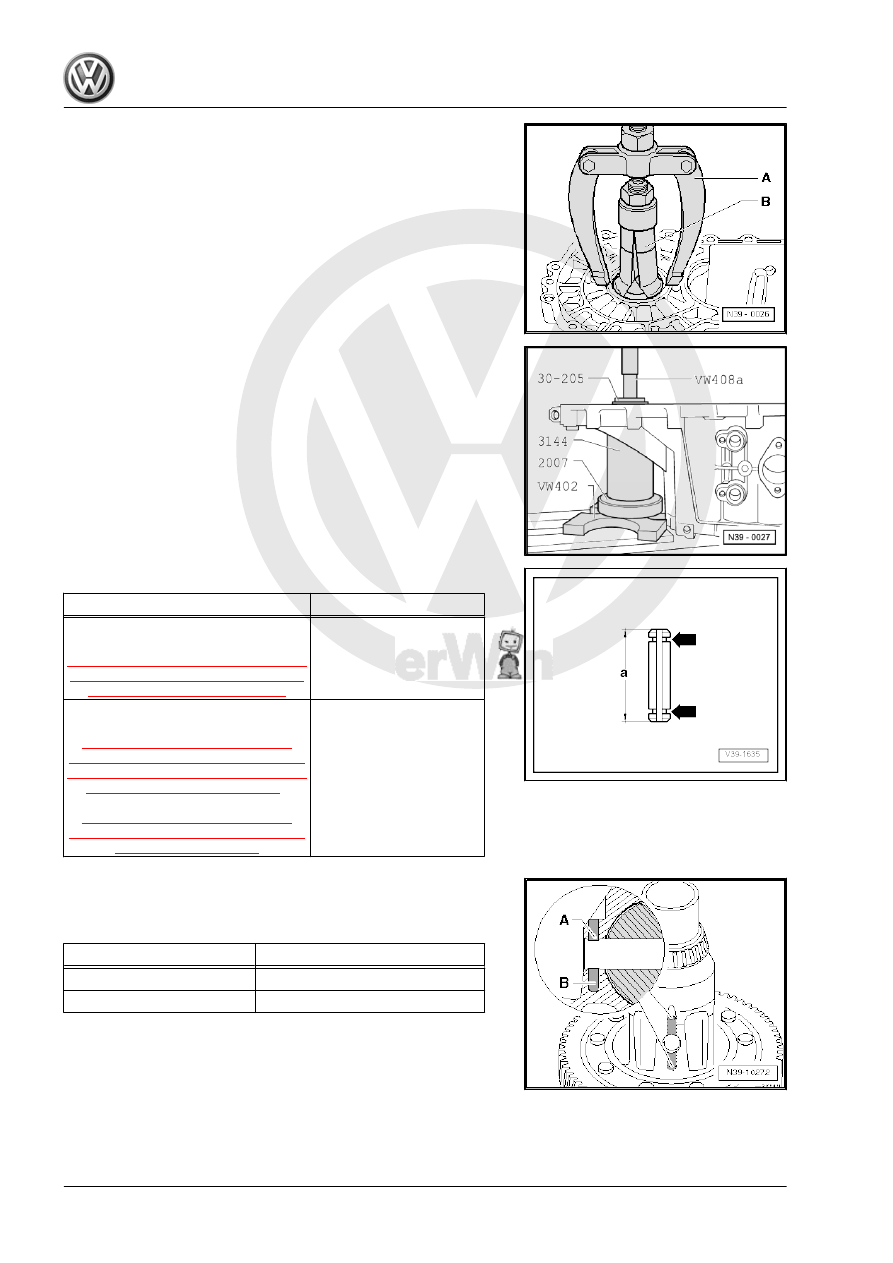
Removing the Outer Race/Tapered Roller Bearing from the

Transmission Housing
A - Counter Support , for example, Puller - Kukko Counterstay -

22/2-
B - Internal Puller 46 to 58 mm , for example, Puller - Kukko In‐

ternal - 46-56mm - 21/7-

Installing the Outer Race/Tapered Roller Bearing Into the Trans‐

mission Housing.
– Install the adjusting shim under the outer race.
– Support the transmission housing with the Bearing Installer -

Wheel Bearing - 3144- directly under the bearing mount.

Differentiating the Spring Pins

Dimension “a” mm

Identifying Feature

28.5 (short tension sleeve),

removing and installing. Refer to

⇒ Fig. ““Spring Pin with Surrounding

Groove (Short Spring Pin): Remov‐

ing and Installing”“ , page 193

Groove all the way

around -arrows-

36.0 (long spring pin),

removing. Refer to

⇒ Fig. ““Spring Pin Without Sur‐

rounding Groove (Long Spring Pin),

Removing: Press Out the Differential

Bevel Gear Axle”“ , page 193

 ,

installing. Refer to

⇒ Fig. ““Spring Pin Without Sur‐

rounding Groove (Long Spring Pin),

Installing”“ , page 193

no surrounding groove

Allocation, Differential Housing
The hole in the differential housing was modified due to the longer

spring pin.

Hole

Spring Pin Length (mm)

-A-

28.5 (short spring pin)

-A- and -B-

36.0 (long spring pin)

Spring Pin with Surrounding Groove (Short Spring Pin): Remov‐

ing and Installing
Removing
– Cover the inner race/tapered roller bearing in order to prevent

possible damage and entry of shavings.

– Remove the adapter sleeve using a chisel.
Installing
– Drive into the differential housing up to the stop.

Spring Pin Without Surrounding Groove (Long Spring Pin), Re‐

moving: Press Out the Differential Bevel Gear Axle
Spring pin is sheared off when it is removed.
– Drive remaining part of roller pin out of differential housing.

Spring Pin Without Surrounding Groove (Long Spring Pin), In‐

stalling
– Align the hole in the differential bevel gear axle to the hole in

the differential housing.

– Install the new adapter sleeve to dimension -a- = 3.0 mm using

a mandrel -1-.

• The spring pin must not come in contact with the transmission

when the differential housing is installed.

On Some Transmissions, the Thrust Washer Union Has a Ridge

-A-.
Also, the differential housing has a groove -B- all the way around

it.
– Insert thrust washer union with transmission fluid.
– Install the thrust washer union so that it fits into the groove

-B- in the differential housing.

Installing the Differential Planetary Gears and Differential Bevel

Gear Axle
– Insert thrust washer union with transmission fluid.
– Install and secure both large differential planetary gears, for

example, with a flange shaft.

– Insert the small differential planetary gears 180° offset and

pivot them into position.

– Press the differential bevel gear axle -arrow A- up to the first

small differential bevel gear.

– Insert threaded pieces -arrow B- into the large differential

planetary gears.

Installed position: shoulder faces the differential bevel gear
– Install the differential bevel gear axle up the end position and

secure it with a new spring pin.

Installed Position: Tapered Ring Thrust Washer -1-
The collar -arrow- faces the pressure spring -B-.
Some transmissions are not equipped with ridges -A-.
The ridges -A- face the tapered ring -1-.

2.3

Differential, Adjusting

Special tools and workshop equipment required
♦ Dial Gauge Holder - VW387-
♦ Measuring Set - Magnetic Plate - 50mm - VW385/17-
♦ Press Piece - Rod - VW407-
♦ Press Piece - Multiple Use - 30-205-
♦ Torque Wrench 1331 5-50Nm - VAG1331-
♦ -1- Puller - Kukko Internal - 46-56mm - 21/7-
♦ -4- Puller - Kukko Counterstay - 22/2-
♦ Dial Gauge
A new differential adjustment is required when the following com‐

ponents have been replaced:
♦ Transmission Housing
♦ Clutch Housing
♦ Differential Housing
or the

♦ Differential tapered roller bearing
Adjustment Overview. Refer to

⇒ “3 Adjustment Overview”, page 198

 .

– Press tapered roller bearing outer race into transmission hous‐

ing without shim, using Press Piece - Multiple Use - 30-205- .

Refer to

⇒ Fig. ““Installing the Outer Race/Tapered Roller Bearing Into

the Transmission Housing.”“ , page 192

 .

Note

Bearing inner race and outer race of tapered roller bearing are

paired. Do not interchange them.

– Press tapered roller bearing outer race into clutch housing,

using Press Piece - Multiple Use - 30-205- . Refer to

⇒ Fig. ““Installing Outer Race/Tapered Roller Bearing Into the

Clutch Housing”“ , page 191

 .

– Insert differential into clutch housing.
– Position the transmission housing and tighten the 5 bolts to

the tightening specification.


Content   ..  604  605  606  607   ..