Volkswagen Golf / Golf GTI / Golf Variant. Service manual - part 473


  Index      Volkswagen     Volkswagen Golf / Golf GTI / Golf Variant - service and repair manual 2013 year


Search            copyright infringement  


Content   ..  471  472  473  474   ..


Volkswagen Golf / Golf GTI / Golf Variant. Service manual - part 473


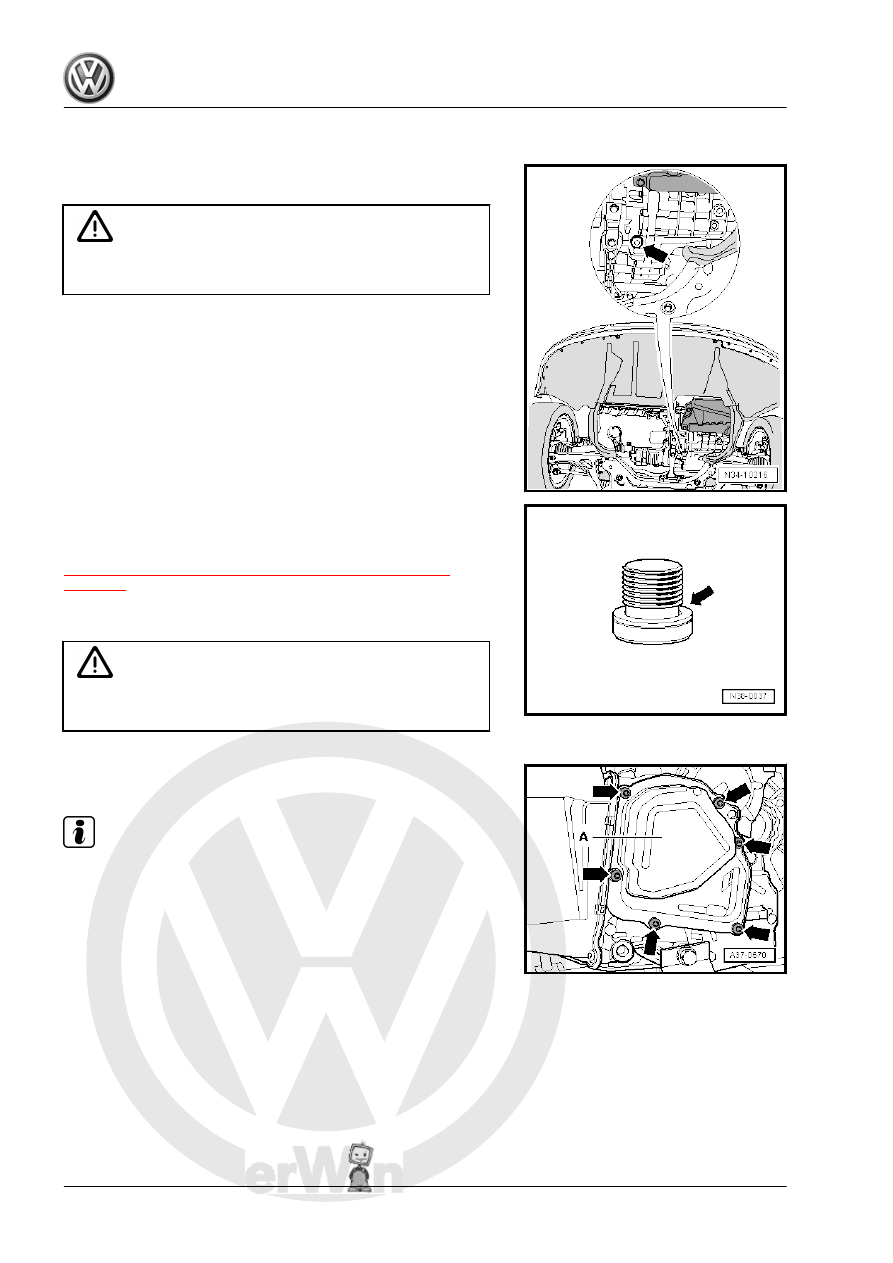
– Place the Used Oil Collection and Extraction Unit -

SMN372500- or Drip Tray under the transmission.

– Remove the Transmission fluid drain- and check plugs

-arrow- and drain the transmission fluid.

Caution

Do not start the engine if there is no transmission fluid in the

transmission.

A plastic overflow pipe is located in this hole (with 8 mm hex

socket head). Its length determines the fluid level in the trans‐

mission.
– Remove this overflow pipe and drain the remaining transmis‐

sion fluid.

– Reinstall the overflow pipe.

– Replace the bolt seal -arrow-.
In regard to »contaminated fluid«, also read the information on

changing the oil filter. Refer to

⇒ “8.3 Transmission Fluid Filter, Removing and Installing”,

page 110

 .

– The Used Oil Collection and Extraction Unit - SMN372500- or

a Drip Tray remains under the transmission.

Caution

Fluid will leak out of the cover when the bolts are removed. Risk

of injury due to hot transmission fluid.

– The bolts -arrows- and remove the transmission fluid pump

cover -A-.

Note

Always replace the cover and the transmission fluid pump bolts

after removing.

– Remove the bolts -arrows-. Remove the transmission fluid

pump -1- from the alignment pin and the input shaft.

Remove the top bolt with the Wrench - Pump/Injector Long Reach

- T10054- .
Installing

– Install the transmission fluid pump input shaft -A- all the way

into the transmission. Turn the input shaft while doing this.

– Always use a new metal seal -B-.
• The two alignment pins -C- must be inside the transmission

housing.

– When positioning the transmission fluid pump, pay attention

to the driveshaft splines -A- and the correct seating on the

alignment pins -C-.

Different Transmission Fluid Pump Bolts -1-
All Four Bolts -arrows- with Flat Heads
Replace the bolts after removing them.
Tightening Specification
♦ 5 Nm + +90° (

1

/4 turn)

3 Bolts with Flat Head, Top Bolt -arrow- with Countersunk Head
Replace the bolts after removing them.
Tightening Specification
♦ Countersunk head bolt: 8 Nm without tightening angle (tighten

with the Wrench - Pump/Injector Long Reach - T10054- )

♦ Flat head screws: 8 Nm + 90° (

1

/4 turn)

– Mount the new transmission fluid pump cover -A-. Install the

new bolts -arrows- and tighten in a diagonal sequence in

stages.

Transmission does not have oil. »New« oil must now be added

and adjust to the correct oil level. Refer to

⇒ “9 Transmission Fluid”, page 113

 .

– Install the left front wheel housing liner. Refer to ⇒  Body Ex‐

terior; Rep. Gr.  66 ; Wheel Housing Liner; Overview - Front

Wheel Housing Liner .

– Install the noise insulation. Refer to ⇒  Body Exterior; Rep. Gr. 

66 ; Noise Insulation; Overview - Noise Insulation .

– Install the wheel. Refer to ⇒  Suspension, Wheels, Steering;

Rep. Gr.  44 ; Wheels, Tires; Wheel Bolts, Tightening Speci‐

fications .

Tightening Specifications
♦ Refer to 

⇒ “1.1 Overview - Mechatronic”, page 28

♦ Transmission fluid pump to the transmission housing. Refer to

⇒ page 109

 .

♦ Transmission fluid pump cover to transmission housing. Refer

to

⇒ Fig. ““Tightening Specification and Sequence of the Trans‐

mission Fluid Pump Cover -A-.”“ , page 30

 .

8.3

Transmission Fluid Filter, Removing

and Installing

When to Change Transmission Fluid Filter
The transmission fluid filter does not need to be changed in every

case.
Do Not Replace the Filter If:
♦ The transmission fluid cooler or its O-rings were replaced and

no coolants has gotten into the transmission fluid.

♦ The selector shaft sealing ring was replaced.
♦ The flange seal was replaced.
♦ Leaking Mechatronic covers, DSG

®

 clutch or transmission flu‐

id pump were replaced.

The Filter Must be Replaced If:
♦ The 60,000 km maintenance interval was reached.
♦ Coolant has entered the fluid.
♦ Metal shavings were found in the fluid.

♦ The clutch is burned or has a mechanical fault.

Note

General repair instructions. Refer to

⇒ “3 Repair Information”, page 5

 .

Caution

This procedure contains mandatory replaceable parts. Refer

to component overview prior to starting procedure.

Mandatory Replacement Parts
♦ Filter - Transmission Fluid Filter
♦ O-ring - Filter Housing
Removing
– Move the selector lever into “P”.
– Remove the complete air filter housing:
♦ Vehicles with a gasoline engine. Refer to ⇒  Engine Mechan‐

ical, Fuel Injection and Ignition; Rep. Gr.  24 ; Air Filter; Air

Filter Housing, Removing and Installing

♦ Vehicles with a diesel engine. Refer to ⇒  Rep. Gr.  23 ; Air

Filter; Air Filter Housing, Removing and Installing

– Remove the battery with the battery tray. Refer to ⇒  Electrical

Equipment; Rep. Gr.  27 ; Battery; Battery Tray, Removing and

Installing .

Note

A little bit of fluid remains inside the filter. This will drain out

once the filter is removed.

Lay some cloths down near the filter before removing it.


Content   ..  471  472  473  474   ..