Volkswagen Golf / Golf GTI / Golf Variant. Service manual - part 404


  Index      Volkswagen     Volkswagen Golf / Golf GTI / Golf Variant - service and repair manual 2013 year


Search            copyright infringement  


Content   ..  402  403  404  405   ..


Volkswagen Golf / Golf GTI / Golf Variant. Service manual - part 404


Installing

Note

Check all the fasteners for damage and replace if necessary.

Remove any remaining clips in the body mounting points -2-

using the Omega Clip Tool - T40280- . To install, insert into

the C-pillar trim panel.

Make sure that the C-pillar trim panel is inside the door seal

molding after installing.

Install in reverse order of removal.

5.15

D-Pillar Trim Panel, Removing and In‐

stalling

Note

The following describes the removing and installing on the left

side of the vehicle. Removing and installing on the right side is

identical.

Special tools and workshop equipment required
♦ Pry Lever - 80-200-
Removing
– Remove the roof end strip. Refer to

⇒ “7.2 Roof End Strip, Removing and Installing”, page 299

 .

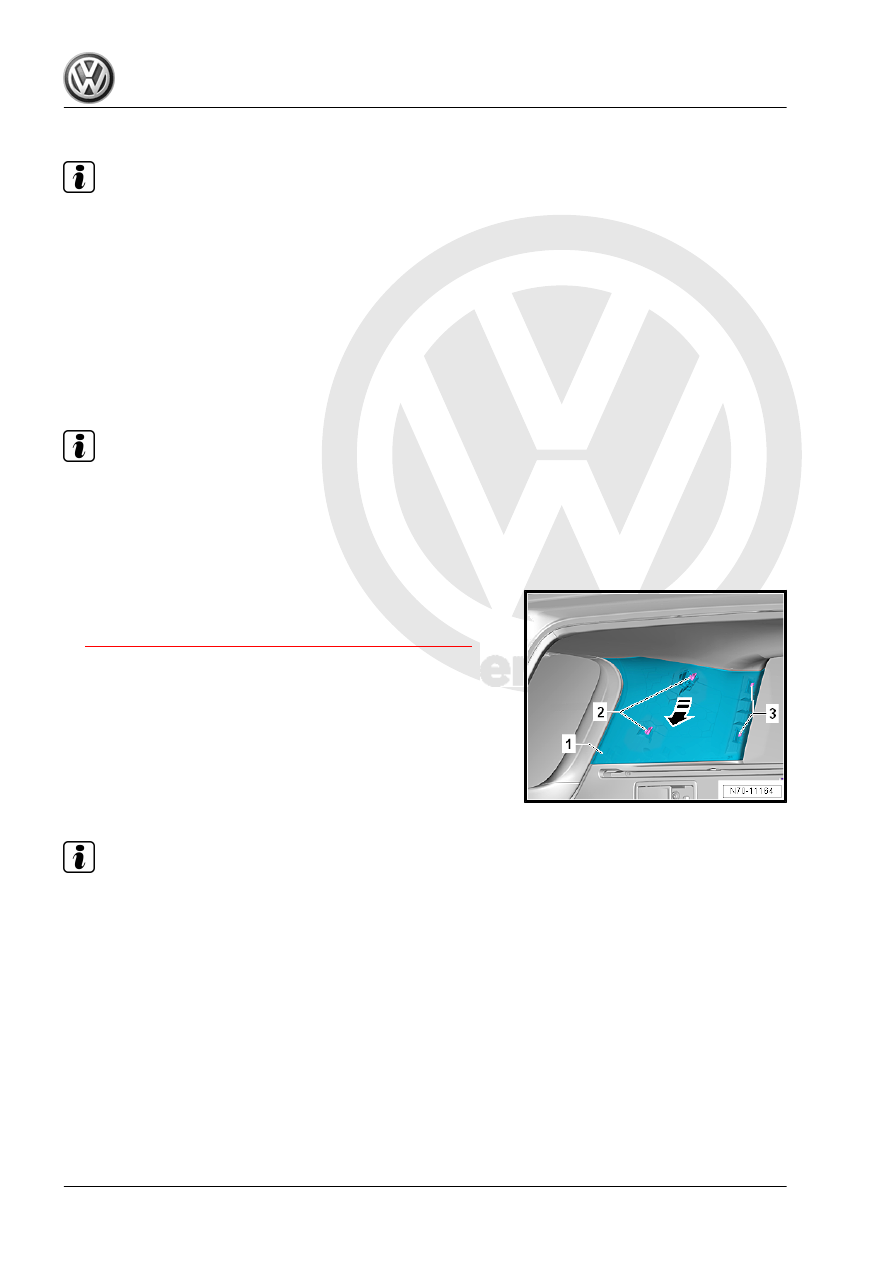
– Loosen the D-pillar trim panel -1- near the clips -2- from the

body mounts using the Pry Lever - 80-200- .

– Loosen the D-pillar trim panel -1- from the luggage compart‐

ment side trim panel.

– Unclip the D-pillar trim panel from the clips -3-.
– Pull the D-pillar trim panel -1- downward out of the headliner

in direction of -arrow- and remove it.

Installing

Note

Check all the fasteners for damage and replace if necessary.

Remove any remaining clips in the body mounting points -2-

using the Omega Clip Tool - T40280- . To install, insert into

the D-pillar trim panel.

Make sure that the D-pillar trim panel is inside the rear lid seal

molding after it is installed.

Install in reverse order of removal.

5.16

Side Trim Panel, Removing and Instal‐

ling

Note

The following describes the removing and installing on the left

side of the vehicle. Removing and installing on the right side is

identical.

Special tools and workshop equipment required
♦ Wedge Set - T10383-
Removing
– Remove the rear seat backrest. Refer to

⇒ “3.8 Rear Seat Backrest, Removing and Installing”,

page 384

 .

– Remove the sill panel. Refer to

⇒ “5.10.1 Sill Panel Strip, Removing and Installing, 2-Door

Sedan”, page 249

 .

– Unclip the side trim panel -1- at the upper B-pillar trim panel

and C-pillar trim panel -2-.

– Starting at the front, loosen the side trim panel -1- near the

clips from the body mounts using the Wedge Set - T10383- in

direction of -arrows-.

– If equipped, disconnect the connector from the Interior Moni‐

toring and Vehicle Inclination Deactivation Button - E616- and

remove the side trim panel -1-.

Installing

Note

Check all the fasteners for damage and replace if necessary.

Make sure that the side trim panel is inside the door seal

molding after installing.

Install in reverse order of removal while paying attention to the

following:
– Insert the clips into the side trim panel.

Caution

Before  installing  the  side  trim  panel,  make  sure  the  locking

mechanisms on all clip connections are in the -1 position-.
It is not possible to install the side trim panel correctly if the

clips are in the -2 position-!

5.17

Wheel Housing Trim Panel, Removing

and Installing

⇒ “5.17.1 Wheel Housing Trim Panel, Removing and Installing,

Sedan”, page 267
⇒ “5.17.2 Wheel Housing Trim Panel, Removing and Installing,

Wagon”, page 269

5.17.1

Wheel Housing Trim Panel, Removing

and Installing, Sedan

Note

The following describes the removing and installing on the left

side of the vehicle. Removing and installing on the right side is

identical.

Special tools and workshop equipment required
♦ Wedge Set - T10383-
♦ Torque Wrench 1783 - 2-10Nm - VAG1783-


Content   ..  402  403  404  405   ..