Volkswagen Golf / Golf GTI / Golf Variant. Service manual - part 398


  Index      Volkswagen     Volkswagen Golf / Golf GTI / Golf Variant - service and repair manual 2013 year


Search            copyright infringement  


Content   ..  396  397  398  399   ..


Volkswagen Golf / Golf GTI / Golf Variant. Service manual - part 398


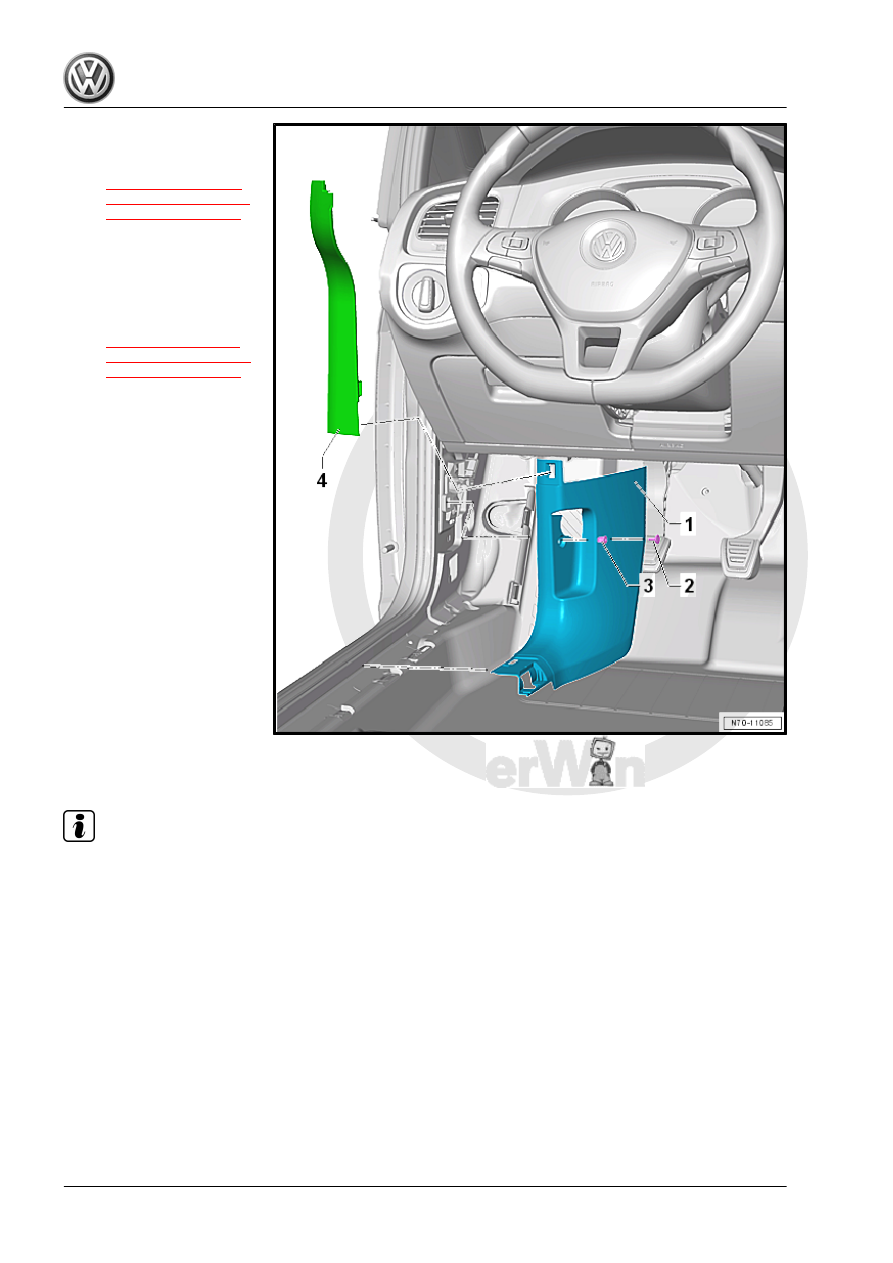
1 - A-Pillar Lower Trim Panel

❑ Removing and instal‐

ling. Refer to

⇒ “5.12 A-Pillar Trim

Panel, Removing and

Installing”, page 252

 .

2 - Expanding Clip
3 - Spreader Plug
4 - A-Pillar Gap Cover

❑ Removing and instal‐

ling. Refer to

⇒ “5.11 A-Pillar Gap

Cover, Removing and

Installing”, page 251

 .

5.4

Overview - B-Pillar Trim Panel

Note

The illustrations show the B-pillar trim panels on the left side. The right side is similar.

B-Pillar Upper Trim Panel
I: Upper B-Pillar Trim Panel, 4-Door
II: Upper B-Pillar Trim Panel, 2-Door

1 - B-Pillar Upper Trim Panel

❑ Removing and instal‐

ling. Refer to

⇒ “5.13 B-Pillar Trim

Panel, Removing and

Installing”, page 256

 .

2 - Clip

❑ Insert into the upper B-

pillar trim panel

❑ Replace damaged or

deformed retaining clips

3 - Screw

❑ 1.8 Nm

4 - Cap

❑ With the “Airbag” sym‐

bol

5 - Clip

❑ Insert in the B-pillars
❑ Replace damaged or

deformed retaining clips

B-Pillar Lower Trim Panel

1 - B-Pillar Lower Trim Panel

❑ Removing and instal‐

ling. Refer to

⇒ “5.13 B-Pillar Trim

Panel, Removing and

Installing”, page 256

 .

2 - Interior Monitoring and Ve‐

hicle Inclination Deactivation

Button - E616-

❑ Removing and instal‐

ling. Refer to ⇒  Electri‐

cal Equipment; Rep. Gr. 

96 ; Anti-Theft Alarm

System; Overview - In‐

terior Monitoring .

3 - Clip

❑ Insert in the trim panel
❑ Remove the clips that

are still in the mounting

points on the body using

the Omega Clip Tool -

T40280-

❑ Replace damaged or

deformed retaining clips

5.5

Overview - C-Pillar Trim Panel

⇒ “5.5.1 Overview - C-Pillar Trim Panel, Sedan”, page 242
⇒ “5.5.2 Overview - C-Pillar Trim Panel, Wagon”, page 244

5.5.1

Overview - C-Pillar Trim Panel, Sedan

Note

The illustration shows the C-pillar trim panel on the left side. The right side is similar.

I: C-Pillar Trim Panel, 2-Door
II: C-Pillar Trim Panel, 4-Door

1 - C-Pillar Trim Panel

❑ Removing and instal‐

ling. Refer to

⇒ “5.14 C-Pillar Trim

Panel, Removing and

Installing”, page 261

 .

2 - Clip

❑ Insert in the trim panel
❑ Remove the clips that

are still in the mounting

points on the body using

the Omega Clip Tool -

T40280-

❑ Replace damaged or

deformed retaining clips

3 - C-Pillar Trim Panel

❑ Removing and instal‐

ling. Refer to

⇒ “5.14 C-Pillar Trim

Panel, Removing and

Installing”, page 261

 .

4 - Clip

❑ Insert in the trim panel
❑ Remove the clips that

are still in the mounting

points on the body using

the Omega Clip Tool -

T40280-

❑ Replace damaged or

deformed retaining clips


Content   ..  396  397  398  399   ..