Volkswagen Golf / Golf GTI / Golf Variant. Service manual - part 332


  Index      Volkswagen     Volkswagen Golf / Golf GTI / Golf Variant - service and repair manual 2013 year


Search            copyright infringement  


Content   ..  330  331  332  333   ..


Volkswagen Golf / Golf GTI / Golf Variant. Service manual - part 332


10.1.2

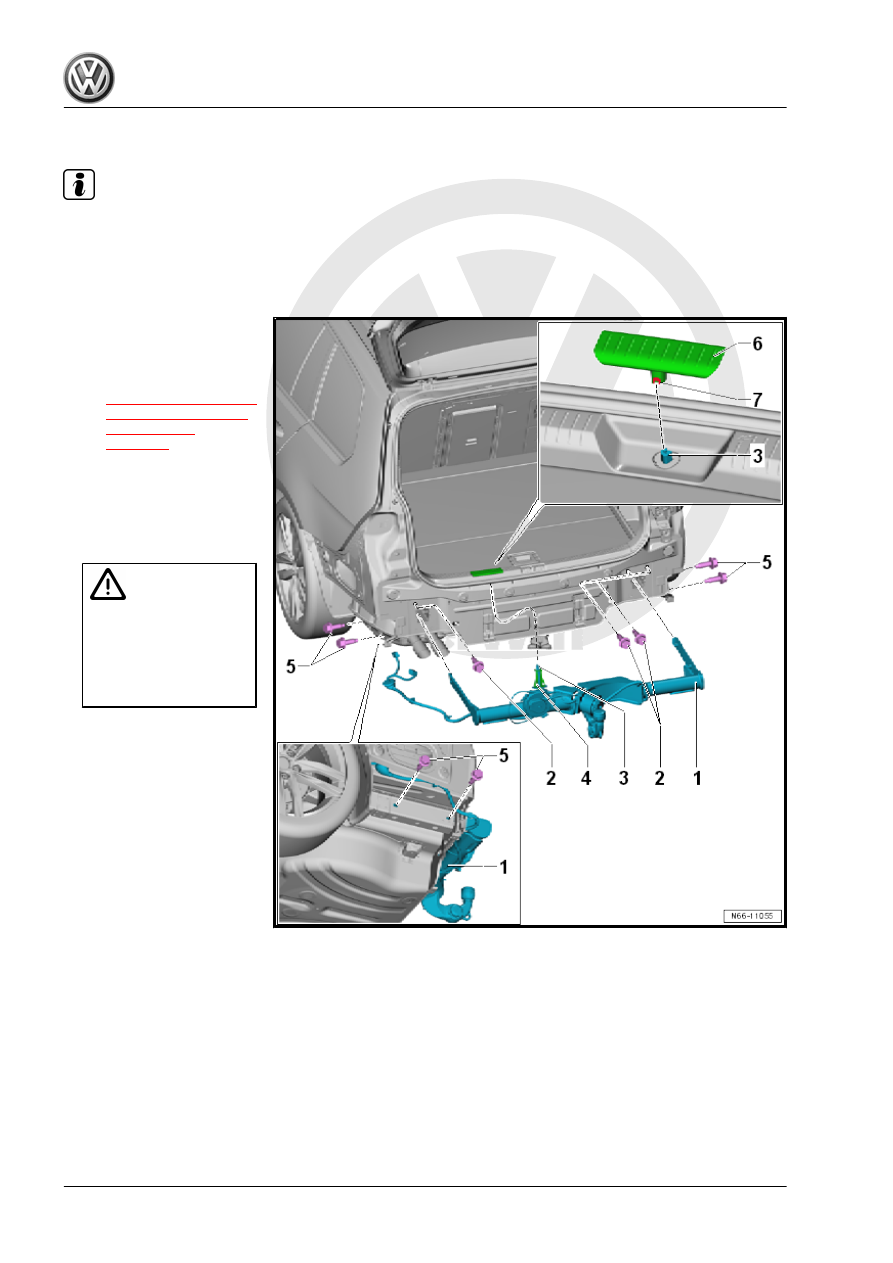
Overview - Trailer Hitch, Wagon

Note

Depending on the version, slight deviations must be considered.

The tightening specifications only apply to factory-installed trailer hitches.

If a different trailer hitch is installed, ask the manufacturer for the tightening specifications.

1 - Trailer Hitch

❑ Swiveling trailer hitch
❑ Removing and instal‐

ling. Refer to

⇒ “10.3.2 Trailer Hitch,

Removing and Instal‐

ling, Wagon”,

page 464

 .

2 - Bolt

❑ 20 Nm + 90°
❑ Gas-tight sealing threa‐

ded connections

❑ Quantity: 3

DANGER!

The  bolts  are  actually

sealing  threaded  con‐

nections and seal off the

vehicle  interior  from  ex‐

haust gas. They must al‐

ways be installed.

3 - Release Cable

❑ With profile

4 - Release Cable Bracket

❑ Component of the re‐

lease cable

5 - Bolt

❑ 50 Nm + 90°
❑ Always replace bolts af‐

ter loosening them

❑ Quantity: 2 on each side

6 - Release Lever
7 - Locking Mechanism

❑ to secure the release cable on the release lever

10.2

Overview - Release Cable

1 - Release Lever

❑ In the vehicle interior

2 - Frame

❑ In the lock carrier trim

panel.

3 - Grommet

❑ In the back panel.

4 - Release Cable

❑ From the transmission

to the release lever

❑ One component of the

transmission and can‐

not be replaced individ‐

ually.

5 - Hex Nut

❑ 5 Nm
❑ Replace after removing

6 - Gear Mechanism

❑ If the release cable is

damaged, replace the

entire gear mechanism

with both release ca‐

bles.

7 - Washer

❑ Replace after removing

8 - Bolt

❑ 5 Nm
❑ Replace after removing

9 - Cover

❑ Replace after removing

10 - Bolts

❑ 3 Nm
❑ Replace after removing

11 - Cap
12 - Release Cable

❑ From the transmission to the ball head turntable
❑ One component of the transmission and cannot be replaced individually.

13 - Diverting Piece

❑ Installed in the vehicle interior on the cross panel.

10.3

Trailer Hitch, Removing and Installing

⇒ “10.3.1 Trailer Hitch, Removing and Installing, Sedan”,

page 462
⇒ “10.3.2 Trailer Hitch, Removing and Installing, Wagon”,

page 464

10.3.1

Trailer Hitch, Removing and Installing,

Sedan

Caution

This procedure contains mandatory replaceable parts. Refer

to component overview prior to starting procedure.

Mandatory Replacement Parts
♦ Bolt - Trailer Hitch to Body (Always replace after loosening)

Note

Depending on the version, slight deviations must be considered.

Removing

– Remove the rear bumper cover. Refer to

⇒ “2.5.1 Bumper Cover, Removing and Installing, Sedan”,

page 337

 .

– Remove the locking mechanism -7- from the release lever

-6- in direction of -arrow a-.

– Remove the release lever -6- from the release cable -2- in di‐

rection of -arrow b-.

– Pry out the release cable -2- from the lock carrier trim panel.
– Remove the lock carrier trim panel. Refer to ⇒  Body Interior;

Rep. Gr.  70 ; Luggage Compartment Trim Panels; Lock Car‐

rier Trim Panel, Removing and Installing .

– Guide the release cable -2- out of the diverting piece -8- in

direction of -arrow c-.

– Remove the release cable with the grommet -3- from the ve‐

hicle.

– Remove the left and right bolts -5-.
– Remove the trailer hitch -1- parallel from the longitudinal mem‐

bers.

Installing


Content   ..  330  331  332  333   ..