Volkswagen Golf / Golf GTI / Golf Variant. Service manual - part 243


  Index      Volkswagen     Volkswagen Golf / Golf GTI / Golf Variant - service and repair manual 2013 year


Search            copyright infringement  


Content   ..  241  242  243  244   ..


Volkswagen Golf / Golf GTI / Golf Variant. Service manual - part 243


– Install the door window. Refer to

⇒ “5.4 Front Door Window, Removing and Installing”,

page 382

 .

– Install the front door trim panel. Refer to ⇒  Body Interior; Rep.

Gr.  70 ; Front Door Trim Panels; Front Door Trim Panel, Re‐

moving and Installing .

Tightening Specifications

2.6

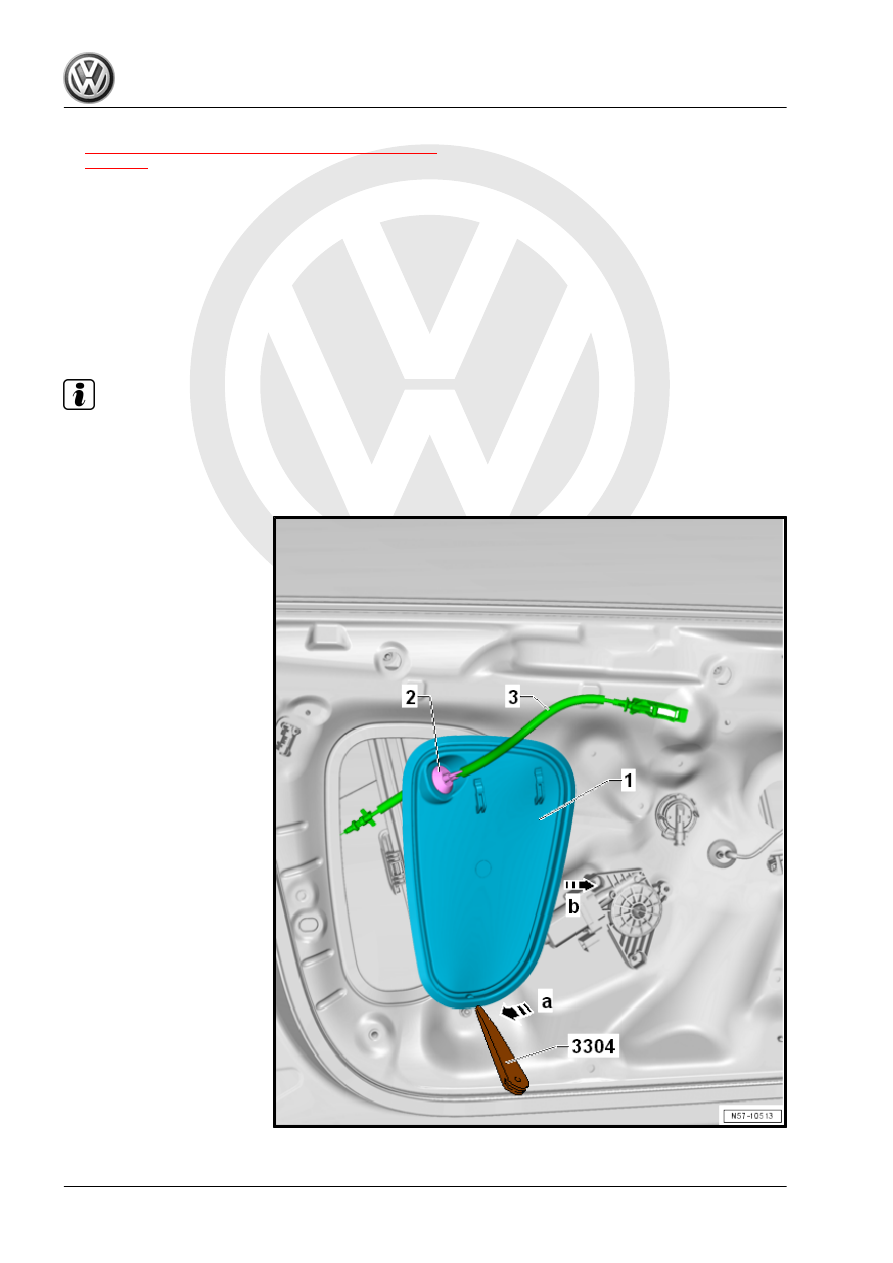
Door Inner Cover, Removing and Instal‐

ling

Special tools and workshop equipment required
♦ Trim Removal Wedge - 3409-

Note

The following describes removing and installing the left cover only on a 4-door vehicle. The right side and 2-

door vehicles are identical.

Removing

– Remove the front door trim panel. Refer to ⇒  Body Interior;

Rep. Gr.  70 ; Front Door Trim Panels; Front Door Trim Panel,

Removing and Installing .

– If necessary, remove the wire from the cover -1-.
– Lift the cover -1- at the bottom in direction of -arrow a-.
– Remove the cover -1- forward out of the door in direction of

-arrow b-.

Note

If it is necessary for the following work steps, remove the release cable -3- with the grommet -2- from the cover

-1-. If equipped, disconnect the connector from the grommet.

Installing

– Guide the release cable -3- with the grommet -2- into the cover

-1-.

– Install the grommet -2- into the cover -1-.
– Install the cover -1- in the door in direction of -arrow a-.
– Engage the cover -1- all around in direction of -arrow b-.

Note

Check the cover by running one's fingers along the edge.

– If equipped, install the wire on the cover -1-.
– Install the front door trim panel. Refer to ⇒  Body Interior; Rep.

Gr.  70 ; Front Door Trim Panels; Front Door Trim Panel, Re‐

moving and Installing .

2.7

Catch, Removing and Installing

Special tools and workshop equipment required
♦ Torque Wrench 1331 5-50Nm - VAG1331-
♦ Cylinder Head Bolt Socket - 3410-

Note

The following describes the removal and installation of the right

catch. The left side is identical.

Removing
– Remove the bolts -2- and the catch -1-.

Installing

Note

A catch with a curve must be installed.

– Place the catch -1- with the curve facing inward on the B-pillar

-3-. Tighten the bolts -2-.

– Adjust the catch. Refer to 

⇒ “1.6 Catch, Adjusting”, page 91

 .

Tightening Specifications

Component

Tightening Specification

Striker pin to the body

20 Nm

2.8

Lock Cylinder Cap, Removing and Installing

Note

When removing the lock cylinder cap, do not turn the screwdriver and do not use prying motions.

The lock cylinder and lock cylinder cap are only installed on the driver side.

Removing

– Remove the door handle from the door.
– Gently push a small screwdriver -3- in direction of -arrow a-

into the opening on the bottom of the lock cylinder cap.

– Using the screwdriver, gently remove the lock cylinder cap

-1- from the door in direction of -arrow b- at the bottom.

– Push the cap -1- upward from the lock cylinder -2-.
Installing


Content   ..  241  242  243  244   ..