Volkswagen Golf / Golf GTI / Golf Variant. Service manual - part 241
 

  Index      Volkswagen     Volkswagen Golf / Golf GTI / Golf Variant - service and repair manual 2013 year


Search            copyright infringement  


Content   ..  239  240  241  242   ..


Volkswagen Golf / Golf GTI / Golf Variant. Service manual - part 241


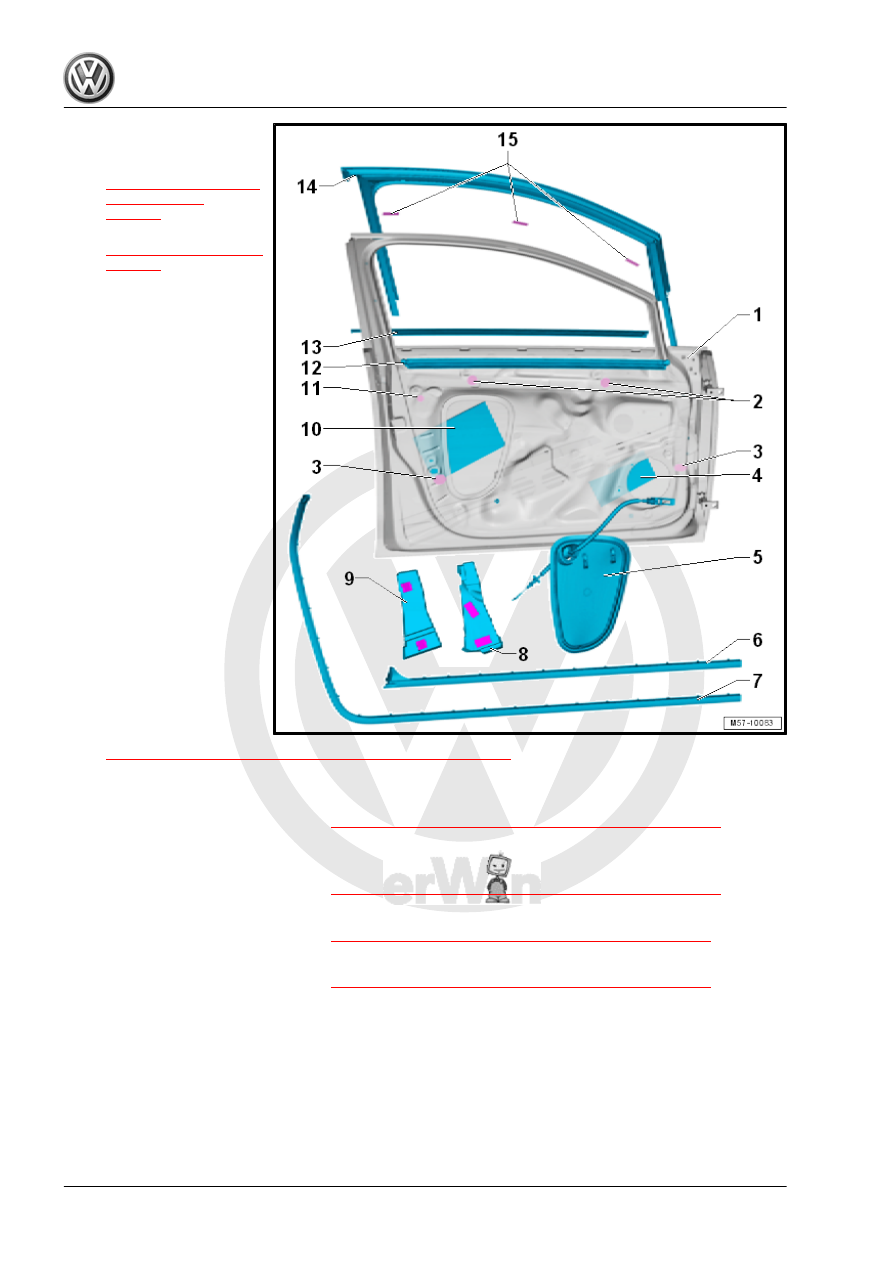
1 - Front Door

❑ Removing and instal‐

ling. Refer to

⇒ “1.4 Door, Removing

and Installing”,

page 86

 .

❑ Adjusting. Refer to

⇒ “1.5 Door, Adjusting”,

page 89

 .

2 - Sticker

❑ 28 mm diameter
❑ Use commercially avail‐

able duct tape if needed

3 - Sticker

❑ 32 mm diameter
❑ Use commercially avail‐

able duct tape if needed

4 - Insulation

❑ Self-adhesive
❑ Installing:
– Cut to size if necessary,

200 mm x 100 mm. Po‐

sition as shown in the il‐

lustration.

– Warm using the Wiring

Harness Repair Set -

Hot Air Blower -

VAS1978/14A- and

then press firmly onto

the outer door panel.

5 - Door Inner Cover

❑ Removing and instal‐

ling. Refer to

⇒ “2.6 Door Inner Cover, Removing and Installing”, page 104

 .

6 - Outer Door Seal

❑ For 4-door
❑ Removing and installing. Refer to 

⇒ “1.3 Outer Door Seal, Removing and Installing”, page 84

 .

7 - Outer Door Seal

❑ For 2-door
❑ Removing and installing. Refer to 

⇒ “1.3 Outer Door Seal, Removing and Installing”, page 84

 .

8 - Inner Outer Cover

❑ Removing and installing. Refer to 

⇒ “2.17 Outer Cover, Removing and Installing”, page 130

 .

9 - Outer External Cushion

❑ Removing and installing. Refer to 

⇒ “2.17 Outer Cover, Removing and Installing”, page 130

 .

10 - Insulation

❑ Self-adhesive
❑ Installing:
– Cut to size if necessary, 250 mm x 160 mm. Position as shown in the illustration.

– Warm using the Wiring Harness Repair Set - Hot Air Blower - VAS1978/14A- and then press firmly onto

the outer door panel.

11 - Sticker

❑ 19 mm diameter
❑ Use commercially available duct tape if needed

12 - Inner Window Shaft Strip

❑ Removing and installing. Refer to

⇒ “2.16 Inner Window Shaft Strip, Removing and Installing”, page 129

 .

13 - Outer Window Shaft Strip

❑ Removing and installing. Refer to

⇒ “2.15 Outer Window Shaft Strip, Removing and Installing”, page 126

 .

14 - Window Guide

❑ Removing and installing. Refer to 

⇒ “2.14 Window Guide, Removing and Installing”, page 124

 .

15 - Sticker

❑ Quantity: 3 for 4-door
❑ Quantity: 4 for 2-door
❑ 15 mm x 50 mm
❑ Use commercially available duct tape if needed

2.2

Overview - Window Regulator

1 - Front Door
2 - Nut

❑ 6 Nm
❑ Quantity: 5

3 - Window Regulator

❑ Removing and instal‐

ling. Refer to

⇒ “2.5 Window Regula‐

tor, Removing and In‐

stalling”, page 101

 .

4 - Screw

❑ 3 Nm
❑ Quantity: 3

5 - Driver Window Regulator

Motor - V147- / Front Passen‐

ger Window Regulator Motor -

V148-

❑ Removing and instal‐

ling. Refer to

⇒ “2.4 Window Regula‐

tor Motor, Removing

and Installing”,

page 99

 .

6 - Clip

2.3

Overview - Door Handle and Door Lock

Note

The illustration shows the left side. The right side is identical.

1 - Door Lock

❑ Removing and instal‐

ling. Refer to

⇒ “2.13 Door Lock, Re‐

moving and Installing”,

page 119

 .

2 - Screw

❑ 3.5 Nm

3 - Bracket

❑ Removing and instal‐

ling. Refer to

⇒ “2.12 Bracket, Re‐

moving and Installing”,

page 116

 .

4 - Lock Cylinder

❑ Removing and instal‐

ling. Refer to

⇒ “2.10 Lock Cylinder,

Removing and Instal‐

ling”, page 112

 .

❑ Is only installed on the

driver door.

5 - Backing Plate
6 - Cap

❑ For the lock cylinder, re‐

moving and installing.

Refer to

⇒ “2.8 Lock Cylinder

Cap, Removing and In‐

stalling”, page 106

 .

❑ Without the lock cylin‐

der, removing and in‐

stalling. Refer to

⇒ “2.9 Cap without Lock

Cylinder, Removing and

Installing”, page 108

 .

7 - Door Handle

❑ Removing and installing. Refer to 

⇒ “2.11 Door Handle, Removing and Installing”, page 114

 .

8 - Screw

❑ 1.5 Nm
❑ Loosening this bolt loosens the bracket from the door.

9 - Release Cable

❑ From the door lock -1- to the bracket -3-

10 - Release Cable

❑ From the interior door mechanism to the door lock -1-
❑ With a grommet for the pass through on the cover

11 - Bolt

❑ 18 Nm
❑ Quantity: 2

12 - Cap

2.4

Window Regulator Motor, Removing

and Installing

Special tools and workshop equipment required
♦ Torque Wrench 1783 - 2-10Nm - VAG1783-

Note

The following describes the removal and installation of the left window regulator motor. Removing and in‐

stalling the right window regulator motor is identical.

The Driver Door Control Module - J386- / Front Passenger Door Control Module - J387- -4- is separated

from the Driver Window Regulator Motor - V147- / Front Passenger Window Regulator Motor - V148- -1-.

The Driver Door Control Module - J386- / Front Passenger Door Control Module - J387- is clipped in the

door. Refer to

⇒ “3.2  Driver Door Control Module J386 and Front Passenger Door Control Module J387 , Removing and

Installing”, page 137

 for removing and installing.


Content   ..  239  240  241  242   ..