Volkswagen Golf / Golf GTI / Golf Variant. Service manual - part 219


  Index      Volkswagen     Volkswagen Golf / Golf GTI / Golf Variant - service and repair manual 2013 year


Search            copyright infringement  


Content   ..  217  218  219  220   ..


Volkswagen Golf / Golf GTI / Golf Variant. Service manual - part 219


– Remove the front bumper cover. Refer to

⇒ “1.5 Bumper Cover, Removing and Installing”, page 317

 .

– Remove the headlamps. Refer to ⇒  Electrical Equipment;

Rep. Gr.  94 ; Headlamp; Headlamp, Removing and Installing .

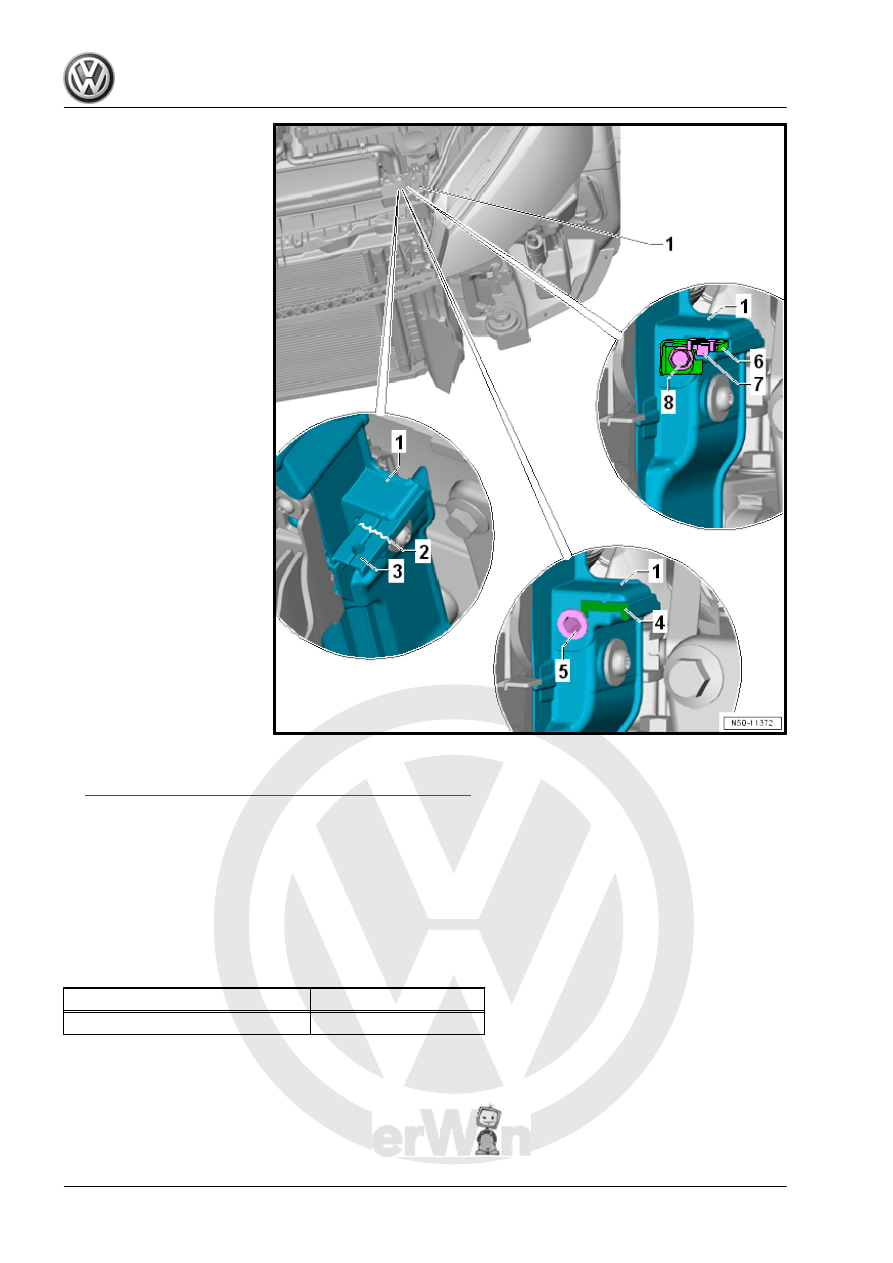
– Cut or saw the headlamp mount -4- evenly off the lock carrier

-1-.

– Position the rivet -5-.
– Position the new bracket -6- with the spring nut -7-.
– Tighten the bolt -8-.
Tightening Specifications

Component

Tightening Specification

Lock carrier bracket

5 Nm

1.4.2

Right Headlamp Mount

Note

The line -3- shows a possible crack.

– Remove the front bumper cover. Refer to

⇒ “1.5 Bumper Cover, Removing and Installing”, page 317

 .

– Remove the headlamps. Refer to ⇒  Electrical Equipment;

Rep. Gr.  94 ; Headlamp; Headlamp, Removing and Installing .

– Cut or saw the headlamp mount -2- evenly off the lock carrier

-1-.

– Install the new bracket -4- with the spring nut -6-.
– Install the pop rivets -5-.

2

Fender

⇒ “2.1 Overview - Fender”, page 10
⇒ “2.2 Overview - Deformation Element”, page 11
⇒ “2.3 Fender, Removing and Installing”, page 11
⇒ “2.4 Fender Brace, Removing and Installing”, page 14

2.1

Overview - Fender

Note

The illustration shows the left side. The right side is identical.

1 - Fender

❑ Removing and instal‐

ling. Refer to

⇒ “2.3 Fender, Remov‐

ing and Installing”, page

11

 .

2 - Bolt

❑ 6 Nm
❑ Quantity: 2, A-pillar

3 - Bolt

❑ 6 Nm
❑ Quantity: 2, side sill

4 - Brace Insulation

❑ Inserted between the

fender and A-pillar.

5 - Fender Insulation

❑ Inserted between the

fender and the upper

wheel housing longitudi‐

nal member.

6 - Hex Nut

❑ Quantity: 2
❑ Tightening specification

-item 3-

⇒ Item 3 (page 317)

 .

7 - Guide

❑ Removing:
– Remove the front bump‐

er cover. Refer to

⇒ “1.5 Bumper Cover,

Removing and Instal‐

ling”, page 317

 .

– Remove the hex nut -6-.
❑ There are different versions. Refer to the Parts Catalog for the allocation.

8 - Double Bolt

❑ 6 Nm
❑ Fender brace, quantity 2

9 - Fender Brace

❑ Removing and installing. Refer to 

⇒ “2.4 Fender Brace, Removing and Installing”, page 14

 .

10 - Bolt

❑ 6 Nm
❑ Fender connecting piece, quantity 3

11 - Deformation Element

❑ Front and rear. Refer to 

⇒ “2.2 Overview - Deformation Element”, page 11

 .

2.2

Overview - Deformation Element

1 - Front Deformation Element
2 - Bolt

❑ 6 Nm

3 - Rear Deformation Element
4 - Bolt

❑ 6 Nm

2.3

Fender, Removing and Installing

Special tools and workshop equipment required
♦ Torque Wrench 1783 - 2-10Nm - VAG1783-


Content   ..  217  218  219  220   ..