Toyota 4Runner (2022 year). Manual in english - page 6

4-2. Driving procedures
207
Engine (ignition) switch (vehicles without a
smart key system)
Starting the engine
1
Check that the parking brake is set.
2
Check that the shift lever is set in P.
3
Firmly depress the brake pedal.
Turn the engine switch to the “START” position to start the engine.
4
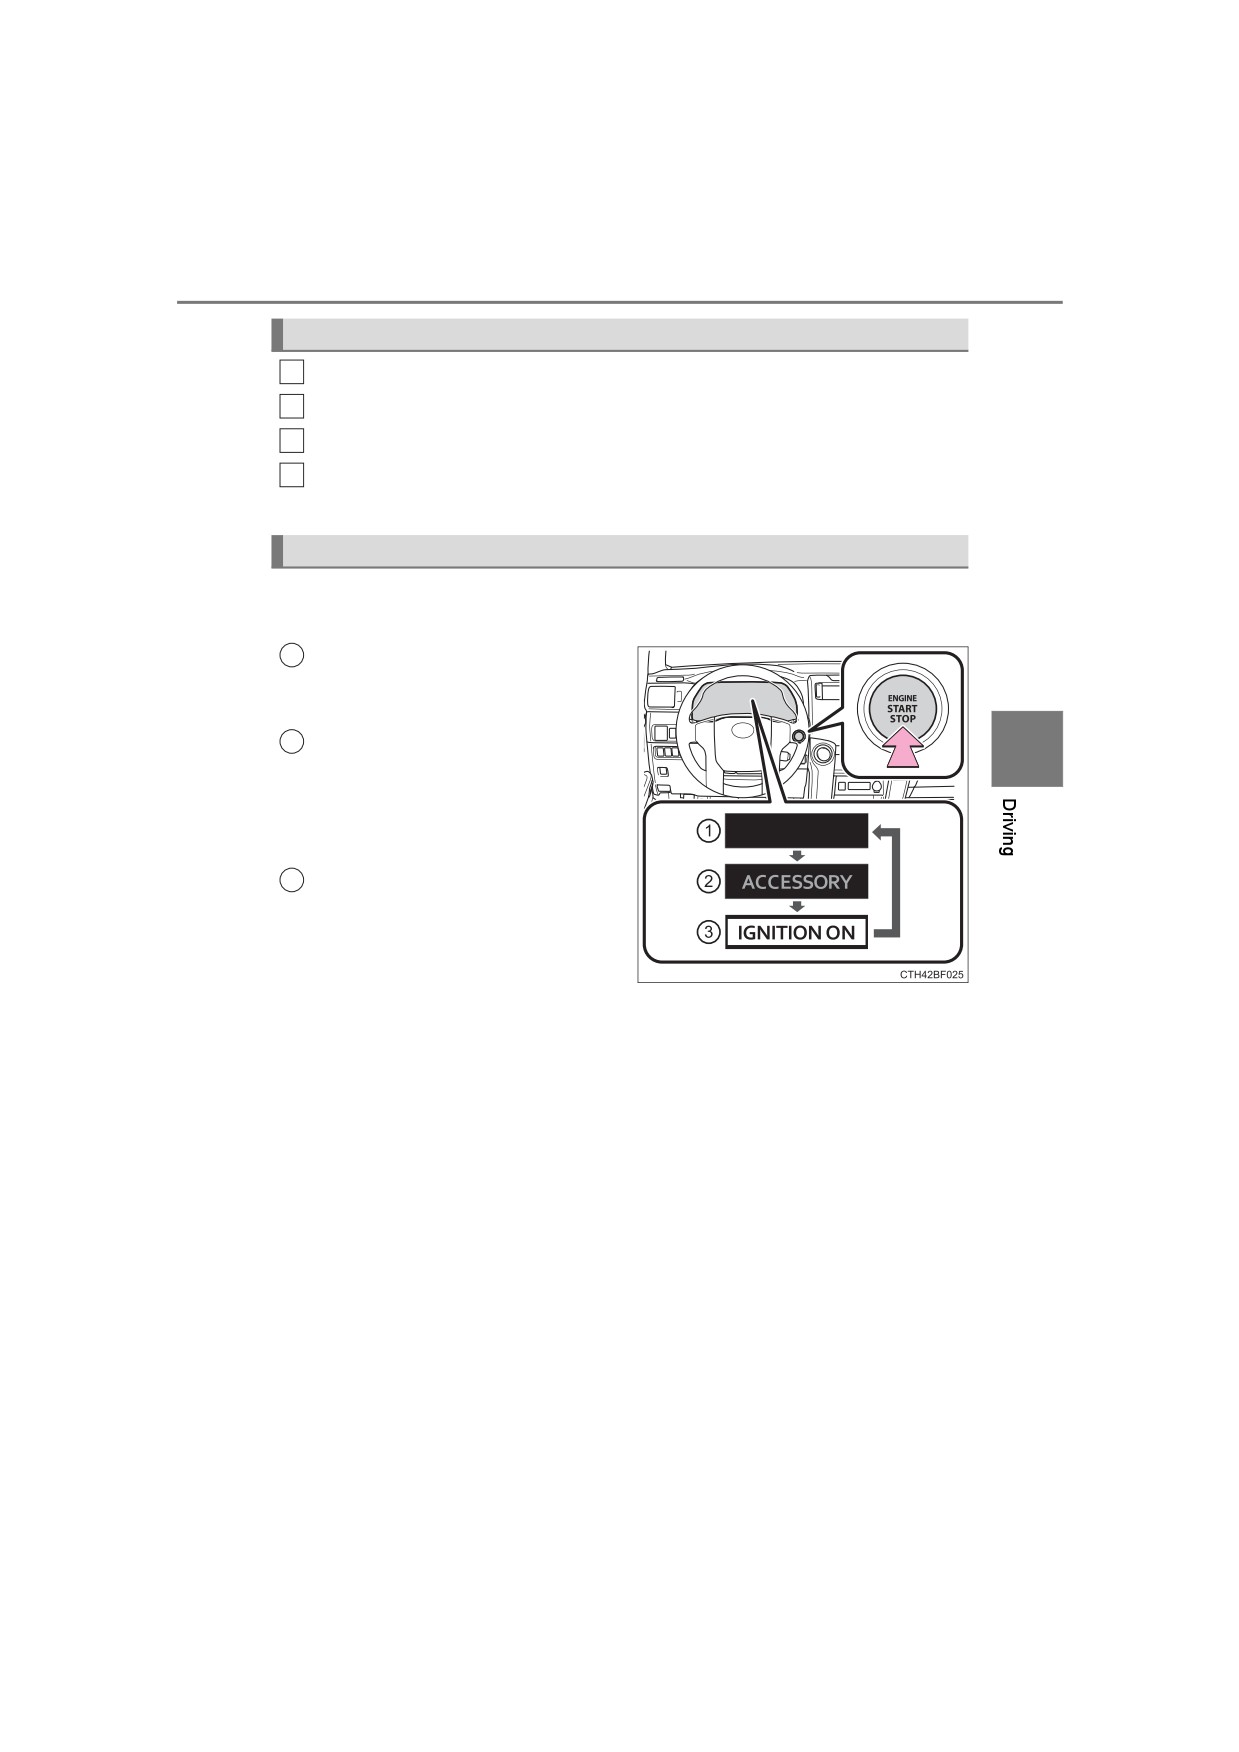
Changing the engine switch positions
1
“LOCK”
The steering wheel is locked and
the key can be removed. (The key
4
can be removed only when the
shift lever is in P.)
2
“ACC”
Some electrical components such
as the audio system can be used.
3
“ON”
All electrical components can be used.
4
“START”
For starting the engine.

208
4-2. Driving procedures
■ Turning the key from “ACC” to “LOCK”
1
Shift the shift lever to P.
2
Push in the key and turn to the “LOCK”
position.
■ If the engine does not start
The engine immobilizer system may not have been deactivated. (P. 78)
Contact your Toyota dealer.
■ When the steering lock cannot be released
When starting the engine, the engine
switch may seem stuck in the “LOCK”
position. To free it, turn the key while turn-
ing the steering wheel slightly left and
right.
■Key reminder function
A buzzer sounds if the driver’s door is opened, while the engine switch is in
the “LOCK” or “ACC” position to remind you to remove the key.

4-2. Driving procedures
209
WARNING
■ When starting the engine
Always start the engine while sitting in the driver's seat. Do not depress the
accelerator pedal while starting the engine under any circumstances.
Doing so may cause an accident resulting in death or serious injury.
■Caution when driving
Do not turn the engine switch to the “LOCK” position while driving. If, in an
emergency, you must turn the engine off while the vehicle is moving, turn
the engine switch only to the “ACC” position to stop the engine. An accident
may result if the engine is stopped while driving.
NOTICE
■ To prevent battery discharge
Do not leave the engine switch in the “ACC” or “ON” position for long peri-
ods of time without the engine running.
4
■ When starting the engine
● Do not crank the engine for more than 30 seconds at a time. This may
overheat the starter and wiring systems.
● Do not race a cold engine.
● If the engine becomes difficult to start or stalls frequently, have the engine
checked immediately.

210
4-2. Driving procedures
Engine (ignition) switch (vehicles with a
smart key system)
Performing the following operations when carrying the elec-
tronic key on your person starts the engine or changes engine
switch modes.
Starting the engine
1
Check that the parking brake is set.
2
Check that the shift lever is set in P.
3
Firmly depress the brake pedal.
and a message will be displayed on the multi-information display.
If it is not displayed, the engine cannot be started.
Press the engine switch shortly
4
and firmly.
When operating the engine switch,
one short, firm press is enough. It
is not necessary to press and hold
the switch.
The engine will crank until it starts
or for up to 30 seconds, whichever
is less.
Continue depressing the brake
pedal until the engine is completely
started.
The engine can be started from
any engine switch mode.
4-2. Driving procedures
211
Stopping the engine
1
Stop the vehicle.
2
Set the parking brake (P. 222), and shift the shift lever to P.
3
Press the engine switch.
Release the brake pedal and check that “ACCESSORY” or “IGNI-
4
TION ON” is not shown on the meter.
Changing engine switch modes
Modes can be changed by pressing the engine switch with brake
pedal released. (The mode changes each time the switch is pressed.)
1
Off*
The emergency flashers can be
used.
2
ACCESSORY mode
4
Some electrical components such
as the audio system can be used.
“ACCESSORY” will be displayed
on the multi-information display.
IGNITION ON mode
3
All electrical components can be
used.
“IGNITION ON” will be displayed
on the multi-information display.
*: If the shift lever is in a position other than P when turning off the engine,
the engine switch will be turned to ACCESSORY mode, not to off.

212
4-2. Driving procedures
When stopping the engine with the shift lever in a position other
than P
If the engine is stopped with the shift lever in a position other than P,
the engine switch will not be turned off but instead be turned to
ACCESSORY mode. Perform the following procedure to turn the
switch off:
1
Check that the parking brake is set.
2
Shift the shift lever to P.
3
Check that “Turn Power Off” is displayed on the multi-information
display and then press the engine switch once.
4
Check that “Turn Power Off” on the multi-information display is
turned off.
■ Auto power off function
If the vehicle is left in ACCESSORY mode for more than 20 minutes or IGNI-
TION ON mode (the engine is not running) for more than an hour with the
shift lever in P, the engine switch will automatically turn off. However, this
function cannot entirely prevent battery discharge. Do not leave the vehicle
with the engine switch in ACCESSORY or IGNITION ON mode for long peri-
ods of time when the engine is not running.
■ Automatic engine shut off feature
● The vehicle is equipped with a feature that automatically shuts off the
engine when the shift lever is in P with the engine running for an extended
period.
● The engine will automatically shut off after approximately 1 hour if it has
been left running while the shift lever is in P.
● The timer for the automatic engine shut off feature will reset if the brake
pedal is depressed or if the shift lever is in a position other than P.
● After the vehicle is parked, if the door is locked with the door lock switch
(P. 113) from the inside or the mechanical key (P. 520) from the outside,
the automatic engine shut off feature will be disabled. The timer for the auto-
matic engine shut off feature will be re-enabled if the driver’s door is
opened.
■ Electronic key battery depletion
P. 108
■ Conditions affecting operation
P. 123
■Notes for the entry function
P. 124

4-2. Driving procedures
213
■ If the engine does not start
● The engine immobilizer system may not have been deactivated. (P. 78)
Contact your Toyota dealer.
● Check that the shift lever is securely set in P. The engine may not start if the
shift lever is displaced out of P.
■ Steering lock
After turning the engine switch off and opening and closing the doors, the
steering wheel will be locked due to the steering lock function. Operating the
engine switch again automatically cancels the steering lock.
■ When the steering lock cannot be released
When the steering lock cannot be
released, “Push the engine switch while
turning the steering wheel in either direc-
tion” will be displayed on the multi-infor-
mation display.
Press the engine switch shortly and firmly
while turning the steering wheel left and
4
right.
■ Steering lock motor overheating prevention
To prevent the steering lock motor from overheating, the motor may be sus-
pended if the engine is turned on and off repeatedly in a short period of time.
In this case, refrain from operating the engine. After about 10 seconds, the
steering lock motor will resume functioning.
■ When a message requesting the smart key system be inspected is dis-
played on the multi-information display
The system may be malfunctioning. Have the vehicle inspected by your
Toyota dealer immediately.
■ If the electronic key battery is depleted
P. 455
■ Operation of the engine switch
If the switch is not pressed shortly and firmly, the engine switch mode may
not change or the engine may not start.
214
4-2. Driving procedures
WARNING
■ When starting the engine
Always start the engine while sitting in the driver’s seat. Do not depress the
accelerator pedal while starting the engine under any circumstances.
Doing so may cause an accident resulting in death or serious injury.
■Caution while driving
If engine failure occurs while the vehicle is moving, do not lock or open the
doors until the vehicle reaches a safe and complete stop. Activation of the
steering lock in this circumstance may lead to an accident, resulting in
death or serious injury.
■Stopping the engine in an emergency
● If you want to stop the engine in an emergency while driving the vehicle,
press and hold the engine switch for more than 2 seconds, or press it
briefly 3 times or more in succession. (P. 475)
However, do not touch the engine switch while driving except in an emer-
gency. Turning the engine off while driving will not cause loss of steering or
braking control, but the power assist to these systems will be lost. This will
make it more difficult to steer and brake, so you should pull over and stop
the vehicle as soon as it is safe to do so.
● If the engine switch is operated while the vehicle is running, a warning
message will be shown on the multi-information display and a buzzer
sounds.
■When parking
Exhaust gases include harmful carbon monoxide (CO), which is colorless
and odorless. Observe the following precautions.
Failure to do so may cause exhaust gases to enter the vehicle and may
lead to an accident caused by light-headedness, or may lead to death or a
serious health hazard.
● If the vehicle is in a poorly ventilated area or a closed area, such as a
garage, stop the engine.
● Do not leave the vehicle with the engine running for a long time. If such a
situation cannot be avoided, park the vehicle in an open space and ensure
that exhaust fumes do not enter the vehicle interior.
● Do not leave the engine running in an area with snow build-up, or where it
is snowing. If snowbanks build up around the vehicle while the engine is
running, exhaust gases may collect and enter the vehicle.

4-2. Driving procedures
215
NOTICE
■ To prevent battery discharge
● Do not leave the engine switch in ACCESSORY or IGNITION ON mode
for long periods of time without the engine running.
● If “ACCESSORY” or “IGNITION ON” is displayed on the multi-information
display, the engine switch is not off. Exit the vehicle after turning the
engine switch off.
● Do not stop the engine when the shift lever is in a position other than P. If
the engine is stopped in another shift lever position, the engine switch will
not be turned off but instead be turned to ACCESSORY mode. If the vehi-
cle is left in ACCESSORY mode, battery discharge may occur.
■ When starting the engine
● Do not race a cold engine.
● If the engine becomes difficult to start or stalls frequently, have your vehi-
cle checked by your Toyota dealer immediately.
■ Symptoms indicating a malfunction with the engine switch
4
If the engine switch seems to be operating somewhat differently than usual,
such as the switch sticking slightly, there may be a malfunction. Contact
your Toyota dealer immediately.

216
4-2. Driving procedures
Automatic transmission
Shifting the shift lever
Vehicles without a smart key system
While the engine switch is in the “ON” position, move the shift
lever with the brake pedal depressed.
When shifting the shift lever between P and D, make sure that the
vehicle is completely stopped.
Vehicles with a smart key system
While the engine switch is in IGNITION ON mode, move the
shift lever with the brake pedal depressed.
When shifting the shift lever between P and D, make sure that the
vehicle is completely stopped.

4-2. Driving procedures
217
Shift position purpose
Shift position
Objective or function
P
Parking the vehicle/starting the engine
R
Reversing
N
Neutral
D
Normal driving*1
S
S mode driving*2
*1: To improve fuel efficiency and reduce noises, set the shift lever in the D
position for normal driving.
*2: Selecting shift ranges using S mode restricts the upper limit of the possible
gear ranges, controls engine braking forces, and prevents unnecessary
upshifting
4
Changing shift ranges in S mode
When the shift lever is in the S position, the shift lever can be oper-
ated as follows:
1
Upshifting
2
Downshifting
The initial shift range in S mode is set automatically to “4” according to
vehicle speed. However, the initial shift range may be set to “3” if AI-
SHIFT has operated while the shift lever was in the D position.
(P. 218)
■ Shift ranges and their functions
You can choose from 5 levels of engine braking force.
A lower shift range will provide greater engine braking force than a
higher shift range, and the engine speed will also increase.
218
4-2. Driving procedures
■S mode
When the shift range is “3” or lower, holding the shift lever toward “+” sets the
shift range to “5”.
■ AI-SHIFT
AI-SHIFT automatically selects the optimal gear according to driver perfor-
mance and driving conditions.
AI-SHIFT automatically operates when the shift lever is in the D position.
(Shifting the shift lever to the S position or paddle shifting cancels the func-
tion.)
The engine speed may remain high after releasing the accelerator pedal. This
does not indicate a malfunction.
■ When driving with Dynamic radar cruise control system
Engine braking will not occur in S mode, even when downshifting to “3”.
(P. 268)
■Restraining sudden start (Drive-start Control)
P. 175
■ Shift lock system
The shift lock system is a system to prevent accidental operation of the shift
lever in starting.
The shift lever can be shifted from P only when the engine switch is in the
“ON” position (vehicles without a smart key system) or IGNITION ON mode
(vehicles with a smart key system) and the brake pedal is being depressed.

4-2. Driving procedures
219
■ If the shift lever cannot be shifted from P
First, check whether the brake pedal is being depressed.
If the shift lever cannot be shifted with your foot on the brake pedal, there may
be a problem with the shift lock system. Have the vehicle inspected by your
Toyota dealer immediately.
The following steps may be used as an emergency measure to ensure that
the shift lever can be shifted.
Releasing the shift lock:
1
Set the parking brake.
2
Vehicles without a smart key system: Turn the engine switch to the “LOCK”
position.
Vehicles with a smart key system: Turn the engine switch is off.
3
Depress the brake pedal.
4
Pry the cover up with a flathead screw-
driver or equivalent tool.
To prevent damage to the cover, cover
4
the tip of the screwdriver with a rag.
Press the shift lock override button.
5
The shift lever can be shifted while the
button is pressed.
■ If the “S” indicator does not come on even after shifting the shift lever to
S
This may indicate a malfunction in the automatic transmission system. Have
the vehicle inspected by your Toyota dealer immediately.
(In this situation, the transmission will operate in the same manner as when
the shift lever is in D.)
■ Downshift restriction warning buzzer (S mode)
To help ensure safety and driving performance, downshifting operation may
sometimes be restricted. In some circumstances, downshifting may not be
possible even when the shift lever is operated. (A buzzer will sound twice.)
220
4-2. Driving procedures
WARNING
■ When driving on slippery road surfaces
Be careful of downshifting and sudden acceleration, as this could result in
the vehicle skidding to the side or spinning.
■ To prevent an accident when releasing the shift lock
Before pressing the shift lock override button, make sure to set the parking
brake and depress the brake pedal.
If the accelerator pedal is accidentally depressed instead of the brake pedal
when the shift lock override button is pressed and the shift lever is shifted
out of P, the vehicle may suddenly start, possibly leading to an accident
resulting in death or serious injury.

4-2. Driving procedures
221
Turn signal lever
Operating instructions
The lever will return to its original position after operation.
1
Right turn
2
Lane change to the right (push
and hold the lever partway)
The right hand signals will flash
until you release the lever.
Lane change to the left (push
3
and hold the lever partway)
The left hand signals will flash until
you release the lever.
4
Left turn
4
■ Turn signals can be operated when
Vehicles without a smart key system
The engine switch is in the “ON” position.
Vehicles with a smart key system
The engine switch is in IGNITION ON mode.
■ If the indicator flashes faster than usual
Check that a light bulb in the front or rear turn signal lights has not burned
out.

222
4-2. Driving procedures
Parking brake
To set the parking brake, fully
depress the parking brake pedal
U.S.A. Canada
with your left foot while depress-
ing the brake pedal with your right
foot.
(Depressing the pedal again
releases the parking brake.)
■ Parking the vehicle
P. 174
■ Usage in winter time
P. 343
NOTICE
■Before driving
Fully release the parking brake.
Driving the vehicle with the parking brake set will lead to brake components
overheating, which may affect braking performance and increase brake
wear.

4-3. Operating the lights and wipers
223
Headlight switch
The headlights can be operated manually or automatically.
Operating instructions
Operating the
switch turns on the lights as follows:
Type A
1
The daytime running
lights turn on. (P. 226)
2
The side marker, park-
ing, tail, license plate,
instrument panel lights,
and daytime running
4
lights (P. 226) turn on.
3
The headlights and all
the lights listed above
(except daytime running
lights) turn on.
4
The daytime running
lights turn off.

224
4-3. Operating the lights and wipers
Type B
1
The headlights, parking
lights, daytime running
lights (P. 226) and so
on turn on and off auto-
matically
(when the
engine switch is in IGNI-
TION ON mode).
2
The side marker, park-
ing, tail, license plate,
instrument panel lights,
and daytime running
lights (P. 226) turn on.
3
The headlights and all
the lights listed above
(except daytime running
lights) turn on.
4
The daytime running
lights turn off.

4-3. Operating the lights and wipers
225
Type C
1
The headlights, parking
lights, daytime running
lights (P. 226) and so
on turn on and off auto-
matically
(when the
engine switch is in IGNI-
TION ON mode).
2
The side marker, park-
ing, tail, license plate,
instrument panel lights,
and daytime running
lights (P. 226) turn on.
3
The headlights and all
the lights listed above
4
turn on.
Turning on the high beam headlights
With the headlights on, push
1
the lever away from you to turn
on the high beams.
Pull the lever toward you to the
center position to turn the high
beams off.
Pull the lever toward you and
2
release it to flash the high
beams once.
You can flash the high beams with the headlights on or off.

226
4-3. Operating the lights and wipers
■ Daytime running light system
● Vehicles with a headlight high beam/daytime running lights: The daytime
running lights illuminate using the same lights as the headlight high beam
and illuminate dimmer than the headlight high beam.
● To make your vehicle more visible to other drivers during daytime driving,
the daytime running lights turn on automatically when all of the following
conditions are met. (The daytime running lights are not designed for use at
night.)
• The engine is running
• The parking brake is released
• The headlight switch is in the
,
(type A only),
* (type B
and C) position
*: When the surroundings are bright
The daytime running lights remain on after they illuminate, even if the park-
ing brake is set again.
Type A and B: Daytime running lights can be turned off by operating the
switch.
● Compared to turning on the headlights, the daytime running light system
offers greater durability and consumes less electricity, so it can help improve
fuel economy.
■ Headlight control sensor (if equipped)
The sensor may not function properly if an
object is placed on the sensor, or anything
that blocks the sensor is affixed to the
windshield.
Doing so interferes with the sensor
detecting the level of ambient light and
may cause the automatic headlight sys-
tem to malfunction.

4-3. Operating the lights and wipers
227
■ Automatic light off system (if equipped)
Vehicles without a smart key system
● When the headlights come on: The headlights and tail lights turn off 30 sec-
onds after a door is opened and closed if the engine switch is turned to the
“ACC” or “LOCK” position. (The lights turn off immediately if
on the
key is pressed after all the doors are locked.)
● When only the tail lights come on: The tail lights turn off automatically if the
engine switch is turned to the “ACC” or “LOCK” position and the driver’s
door is opened.
To turn the lights on again, turn the engine switch to the “ON” position, or turn
the lights off and then back to
or
Vehicles with a smart key system
● When the headlights come on: The headlights and tail lights turn off 30 sec-
onds after a door is opened and closed if the engine switch is turned to
ACCESSORY mode or turned off. (The lights turn off immediately if
on the key is pressed after all the doors are locked.)
● When only the tail lights come on: The tail lights turn off automatically if the
4
engine switch is turned off and the driver’s door is opened.
To turn the lights on again, turn the engine switch to IGNITION ON mode, or
turn the light switch off and then back to
or
■ Customization
Settings (e.g. light sensor sensitivity) can be changed.
(Customizable features: P. 557)
NOTICE
■ To prevent battery discharge
Do not leave the lights on longer than necessary when the engine is not
running.

228
4-3. Operating the lights and wipers
AHB (Automatic High Beam)
The Automatic High Beam uses a camera sensor located behind
the upper portion of the windshield to assess the brightness of
the lights of vehicles ahead, streetlights, etc., and automatically
turns the high beams on or off as necessary.
WARNING
■Limitations of the Automatic High Beam
Do not overly rely on the Automatic High Beam. Always drive safely, taking
care to observe your surroundings and turning the high beams on or off
manually if necessary.
■ To prevent incorrect operation of the Automatic High Beam system
Do not overload the vehicle.
Activating the Automatic High Beam
1
Push the lever away from you
with the headlight switch in the
or
position.
2
Press the Automatic High
Beam switch.
The Automatic High Beam indica-
tor will come on when the system
is operating.

4-3. Operating the lights and wipers
229
Turning the high beam on/off manually
■ Switching to low beam
Pull the lever to the original
position.
The Automatic High Beam indi-
cator will turn off.
Push the lever away from you to
activate the Automatic High
Beam system again.
■ Switching to high beam
Press the Automatic High
Beam switch.
The Automatic High Beam indi-
4
cator will turn off and the high
beam indicator will turn on.
Press the switch to activate the
Automatic High Beam system
again.
230
4-3. Operating the lights and wipers
■ Conditions to turn the high beams on/off automatically
● When all of the following conditions are met, the high beams will be turned
on automatically (after approximately 1 second):
• The vehicle speed is approximately 21 mph (34 km/h) or more.
• The area ahead of the vehicle is dark.
• There are no vehicles ahead with headlights or tail lights turned on.
• There are few streetlights on the road ahead.
● If any of the following conditions is met, the high beams will turn off automat-
ically:
• The vehicle speed is below approximately 17 mph (27 km/h).
• The area ahead of the vehicle is not dark.
• Vehicles ahead have their headlights or tail lights turned on.
• There are many streetlights on the road ahead.
■ Camera sensor detection information
● The high beams may not be automatically turned off in the following situa-
tions:
• When a vehicle suddenly appears from around a curve
• When the vehicle is cut in front of by another vehicle
• When vehicles ahead cannot be detected due to repeated curves, road
dividers or roadside trees
• When vehicles ahead appear in a faraway lane on a wide road
• When the lights of vehicles ahead are not on
● The high beams may be turned off if a vehicle ahead that is using fog lights
without its headlights turned on is detected.
● House lights, street lights, traffic signals, and illuminated billboards or signs
and other reflective objects may cause the high beams to change to the low
beams, or the low beams to remain on.
● The following factors may affect the amount of time taken for the high
beams to turn on or off:
• The brightness of the headlights, fog lights, and tail lights of vehicles
ahead
• The movement and direction of vehicles ahead
• When a vehicle ahead only has operational lights on one side
• When a vehicle ahead is a two-wheeled vehicle
• The condition of the road (gradient, curve, condition of the road surface,
etc.)
• The number of passengers and amount of luggage in the vehicle
● The high beams may turn on or off unexpectedly.
● Bicycles or similar vehicles may not be detected.
● In the following situations the system may not be able to correctly detect the
surrounding brightness level. This may cause the low beams to remain on
or the high beams to flash or dazzle pedestrians or vehicles ahead. In such
a case, it is necessary to manually switch between the high and low beams.

4-3. Operating the lights and wipers
231
•
When driving in inclement weather (heavy rain, snow, fog, sandstorms,
etc.)
•
When the windshield is obscured by fog, mist, ice, dirt, etc.
•
When the windshield is cracked or damaged
•
When the camera sensor is deformed or dirty
•
When the temperature of the camera sensor is extremely high
•
When the surrounding brightness level is equal to that of headlights, tail
lights or fog lights
•
When headlights or tail lights of vehicles ahead are turned off, dirty,
changing color, or not aimed properly
•
When the vehicle is hit by water, snow, dust, etc. from a preceding vehi-
cle
•
When driving through an area of intermittently changing brightness and
darkness
•
When frequently and repeatedly driving ascending/descending roads, or
roads with rough, bumpy or uneven surfaces (such as stone-paved
roads, gravel roads, etc.)
•
When frequently and repeatedly taking curves or driving on a winding
road
4
•
When there is a highly reflective object ahead of the vehicle, such as a
sign or mirror
•
When the back of a preceding vehicle is highly reflective, such as a con-
tainer on a truck
•
When the vehicle's headlights are damaged or dirty, or are not aimed
properly
•
When the vehicle is listing or titling due to a flat tire, a trailer being towed,
etc.
•
When the headlights are changed between the high beams and low
beams repeatedly in an abnormal manner
•
When the driver believes that the high beams may be flashing or dazzling
pedestrians or other drivers
■ Temporarily lowering sensor sensitivity
The sensitivity of the sensor can be temporarily lowered.
1
Turn the engine switch off while the following conditions are met.
• The headlight switch is in
or
• The headlight switch lever is in the high beam position.
• Automatic High Beam switch is on.
Turn the engine switch to the “ON” position (vehicles without a smart key
2
system) or IGNITION ON mode (vehicles with a smart key system).
3
Within 60 seconds after
2
, repeat pulling the headlight switch lever to the
original position then pushing it to the high beam position quickly 10 times,
then leave the lever in the high beam position.
4
If the sensitivity is changed, the Automatic High Beam indicator will turn on
and off 3 times.
Automatic High Beam (headlights) may turn on even when the vehicle is
stopped.

232
4-3. Operating the lights and wipers
Fog light switch
The fog lights secure excellent visibility in difficult driving con-
ditions, such as in rain and fog.
Type A
1
Turns the front fog lights
off
2
Turns the front fog lights
on

4-3. Operating the lights and wipers
233
Type B
1
Turns the front fog lights
off
2
Turns the front fog lights
on
4
■ Fog lights can be used when
The headlights are on in low beam.
234
4-3. Operating the lights and wipers
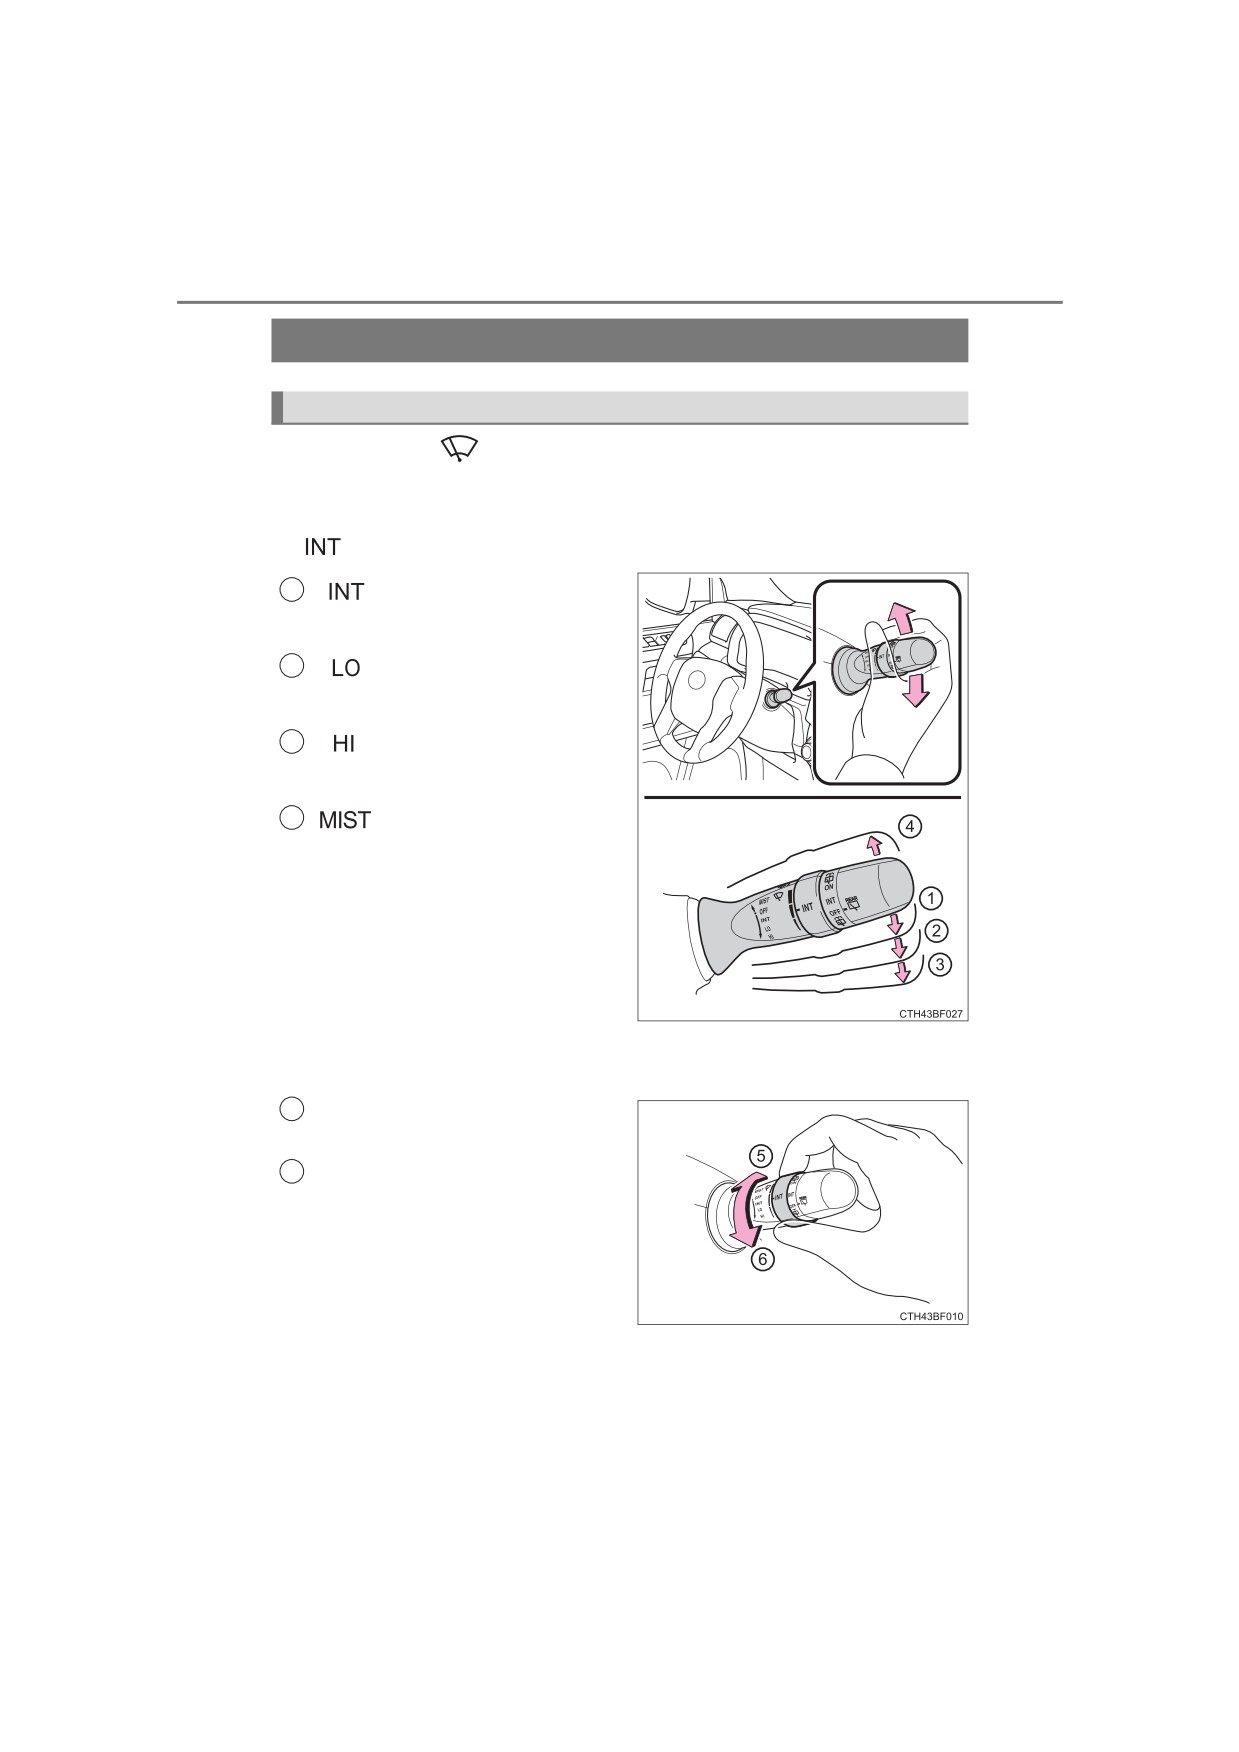
Windshield wipers and washer
Operating the wiper lever
Operating the
lever operates the wipers or washer as follows:
Type A
Wiper intervals can be adjusted for intermittent operation
(when
is selected).
1
Intermittent windshield
wiper operation
2
Low speed windshield
wiper operation
3
High speed windshield
wiper operation
4
Temporary operation
Wiper intervals can be adjusted when intermittent operation is
selected.
Increases the intermittent wind-
5
shield wiper frequency
Decreases the intermittent
6
windshield wiper frequency

4-3. Operating the lights and wipers
235
Type B
Wiper intervals can be adjusted for intermittent operation
(when
is selected).
1
Intermittent windshield
wiper operation
2
Low speed windshield
wiper operation
3
High speed windshield
wiper operation
4
Temporary operation
4
Wiper intervals can be adjusted when intermittent operation is
selected.
Increases the intermittent wind-
5
shield wiper frequency
Decreases the intermittent
6
windshield wiper frequency
■
Washer/wiper dual operation
Pulling the lever operates the
wipers and washer.
Wipers will automatically oper-
ate a couple of times after the
washer squirts.

236
4-3. Operating the lights and wipers
■ The windshield wiper and washer can be operated when
Vehicles without a smart key system
The engine switch is in the “ON” position.
Vehicles with a smart key system
The engine switch is in IGNITION ON mode.
■ If no windshield washer fluid sprays
Check that the washer nozzles are not blocked if there is washer fluid in the
washer fluid reservoir.
WARNING
■ Caution regarding the use of washer fluid
When it is cold, do not use the washer fluid until the windshield becomes
warm. The fluid may freeze on the windshield and cause low visibility. This
may lead to an accident, resulting in death or serious injury.
NOTICE
■ When the windshield is dry
Do not use the wipers, as they may damage the windshield.
■ When the washer fluid tank is empty
Do not operate the switch continually as the washer fluid pump may over-
heat.
■ When a nozzle becomes blocked
In this case, contact your Toyota dealer.
Do not try to clear it with a pin or other object. The nozzle will be damaged.

4-3. Operating the lights and wipers
237
Rear window wiper and washer
Before operating the rear window wiper and washer switch,
make sure the back window is completely closed. (P. 165)
Operating instructions
Operating the
switch operates the rear wiper or washer as fol-
lows:
Type A
1
Off
2
Intermittent
window
wiper operation
4
3
Normal window wiper
operation
4
Washer/wiper dual oper-
ation
5
Washer/wiper dual oper-
ation
The wiper will automatically
operate a couple of times after
the washer squirts.
(After operating several times,
the wiper operates one more
time after a short delay to pre-
vent dripping.)

238
4-3. Operating the lights and wipers
Type B
1
Off
2
Intermittent
window
wiper operation
3
Normal window wiper
operation
4
Washer/wiper dual oper-
ation
5
Washer/wiper dual oper-
ation
The wiper will automatically
operate a couple of times after
the washer squirts.
(After operating several times,
the wiper operates one more
time after a short delay to pre-
vent dripping.)
■ The rear window wiper and washer can be operated when
● Vehicles without a smart key system: The engine switch is in the “ON” posi-
tion.
Vehicles with a smart key system: The engine switch is in IGNITION ON
mode.
● The back window is completely closed.
■ Intermittent window wiper operation
● When intermittent window wiper operation mode is selected, the wiper will
operate a couple of times and then switch to intermittent operation.
● During intermittent operation, the wiper stops temporarily at the reversing
position.

4-3. Operating the lights and wipers
239
■ When the rear window wiper and washer switch is turned off
The rear wiper will stop operation, and return to the retracted position after
approximately 3 seconds.
However, if the engine switch is turned to the “ACC” or “LOCK” position (vehi-
cles without a smart key system) or the engine switch is turned to ACCES-
SORY mode or turned off (vehicles with a smart key system) while the rear
wiper is operating, the rear wiper will stop at that position and will not return to
the retracted position.
■ If no washer fluid sprays
Check that the washer nozzle is not blocked if there is washer fluid in the
washer fluid reservoir.
■ Customization
Settings (e.g. drip prevention function) can be changed.
(Customizable features P. 557)
NOTICE
■ When the rear window is dry
4
Do not use the wiper, as it may damage the rear window.
■ When the washer fluid tank is empty
Do not operate the switch continually as the washer fluid pump may over-
heat.
■ When a nozzle becomes blocked
In this case, contact your Toyota dealer.
Do not try to clear it with a pin or other object. The nozzle will be damaged.
240
4-4. Refueling
Opening the fuel tank cap
Perform the following steps to open the fuel tank cap:
Before refueling the vehicle
● Turn the engine switch to the “LOCK” position and ensure that all
the doors and windows are closed.
● Confirm the type of fuel.
■Fuel types
P. 542
■ Fuel tank opening for unleaded gasoline
To help prevent incorrect fueling, your vehicle has a fuel tank opening that
only accommodates the special nozzle on unleaded fuel pumps.
■If the malfunction indicator lamp illuminates
The malfunction indicator lamp may illuminate erroneously if refueling is per-
formed repeatedly when the fuel tank is nearly full.

4-4. Refueling
241
WARNING
■ When refueling the vehicle
Observe the following precautions while refueling the vehicle. Failure to do
so may result in death or serious injury.
● After exiting the vehicle and before opening the fuel door, touch an
unpainted metal surface to discharge any static electricity. It is important to
discharge static electricity before refueling because sparks resulting from
static electricity can cause fuel vapors to ignite while refueling.
● Always hold the grips on the fuel tank cap and turn it slowly to remove it.
A whooshing sound may be heard when the fuel tank cap is loosened.
Wait until the sound cannot be heard before fully removing the cap. In hot
weather, pressurized fuel may spray out the filler neck and cause injury.
● Do not allow anyone that has not discharged static electricity from their
body to come close to an open fuel tank.
● Do not inhale vaporized fuel.
Fuel contains substances that are harmful if inhaled.
4
● Do not smoke while refueling the vehicle.
Doing so may cause the fuel to ignite and cause a fire.
● Do not return to the vehicle or touch any person or object that is statically
charged.
This may cause static electricity to build up, resulting in a possible ignition
hazard.
■ When refueling
Observe the following precautions to prevent fuel overflowing from the fuel
tank:
● Securely insert the fuel nozzle into the fuel filler neck.
● Stop filling the tank after the fuel nozzle automatically clicks off.
● Do not top off the fuel tank.
NOTICE
■Refueling
Do not spill fuel during refueling.
Doing so may damage the vehicle, such as causing the emission control
system to operate abnormally or damaging fuel system components or the
vehicle’s painted surface.

242
4-4. Refueling
Opening the fuel tank cap
1
Open the fuel filler door.
Turn the fuel tank cap slowly to
2
open. Hang the fuel tank cap on
the back of the fuel filler door.
Closing the fuel tank cap
After refueling, turn the fuel tank
cap until you hear a click. Once
the cap is released, it will turn
slightly in the opposite direction.
WARNING
■ When replacing the fuel tank cap
Do not use anything but a genuine Toyota fuel tank cap designed for your
vehicle. Doing so may cause a fire or other incident which may result in
death or serious injury.

4-5. Using the driving support systems
243
Toyota Safety Sense P
The Toyota Safety Sense P consists of the following drive assist
systems and contributes to a safe and comfortable driving expe-
rience:
Driving assist system
◆ PCS (Pre-Collision System)
P. 250
◆ LDA (Lane Departure Alert)
P. 260
◆ AHB (Automatic High Beam)
4
P. 228
◆ Dynamic radar cruise control
P. 268
WARNING
■ Toyota Safety Sense P
The Toyota Safety Sense P is designed to operate under the assumption
that the driver will drive safely, and is designed to help reduce the impact to
the occupants and the vehicle in the case of a collision or assist the driver in
normal driving conditions.
As there is a limit to the degree of recognition accuracy and control perfor-
mance that this system can provide, do not overly rely on this system. The
driver is always responsible for paying attention to the vehicle's surround-
ings and driving safely.
244
4-5. Using the driving support systems
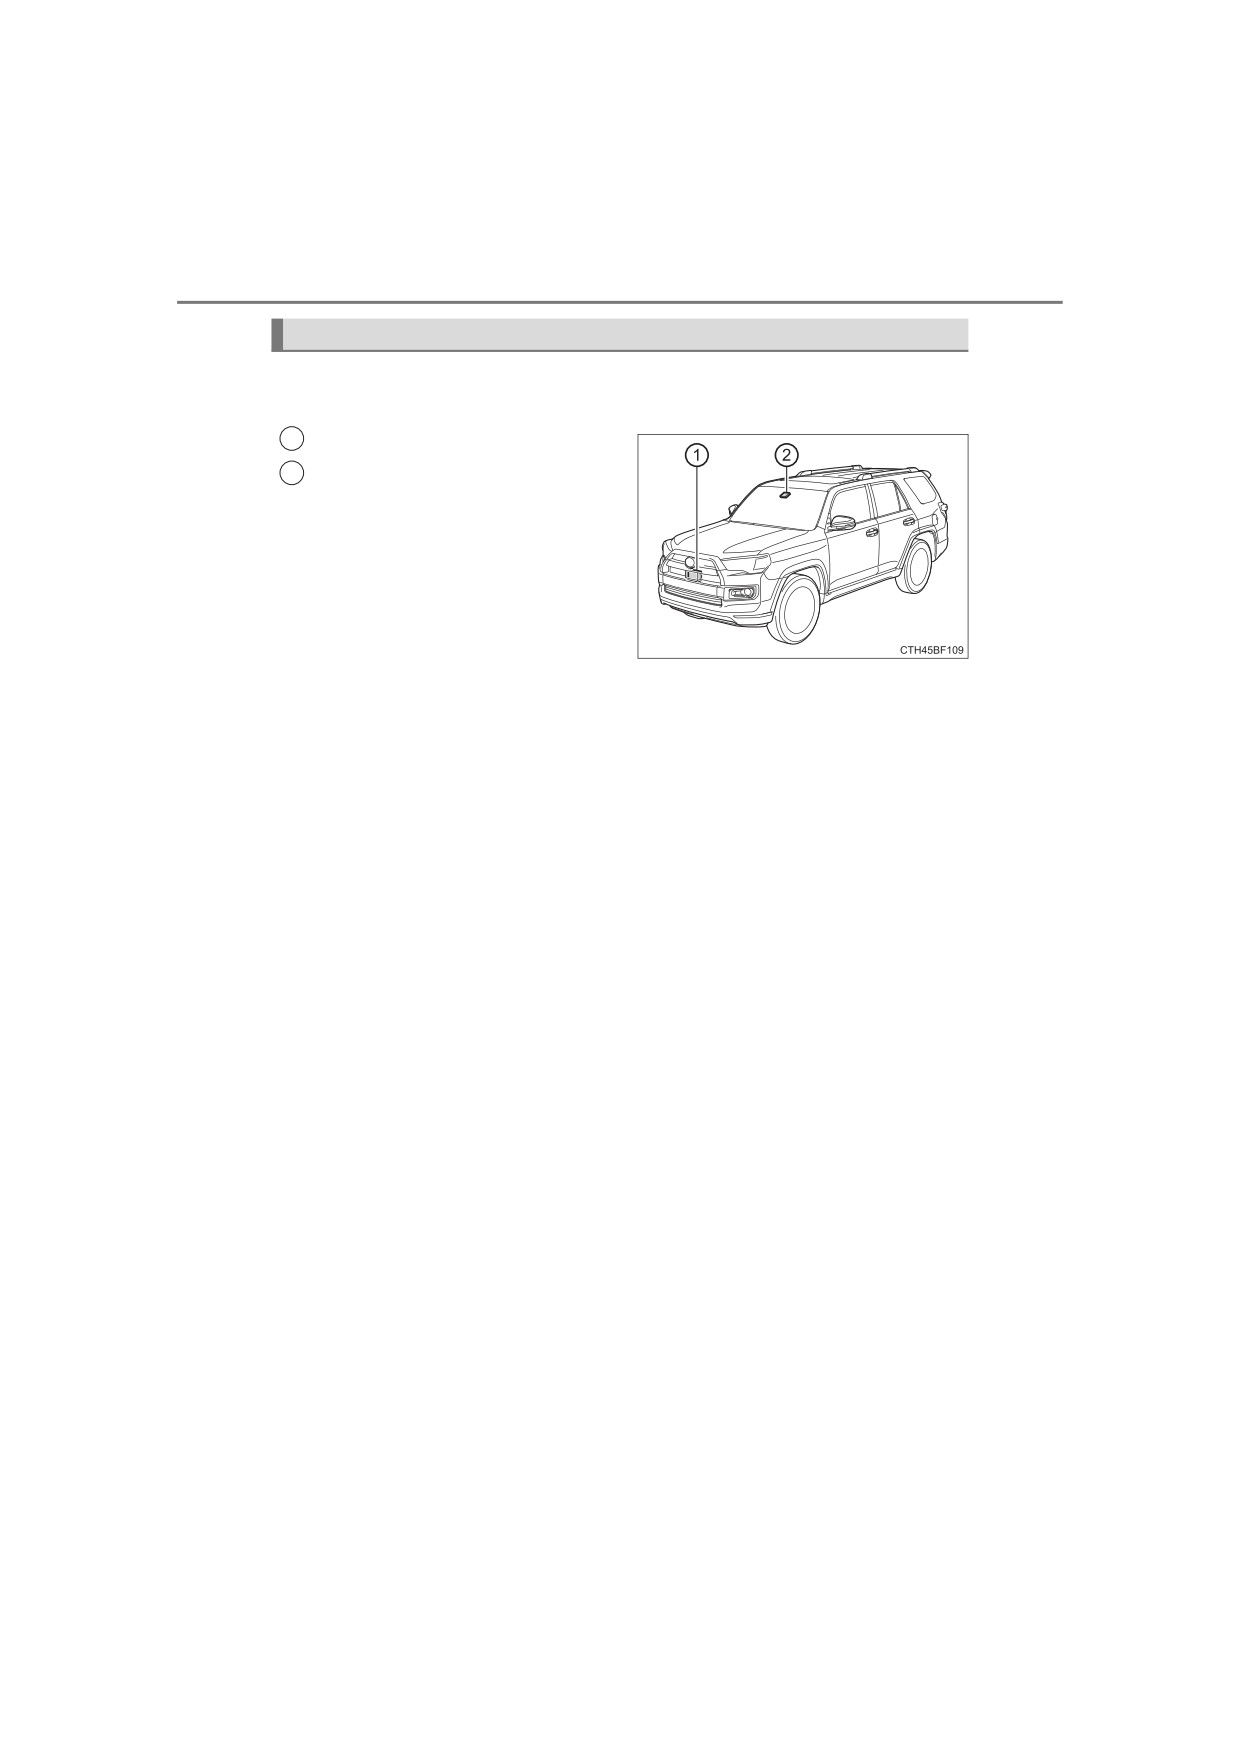
Sensors
Two types of sensors, located behind the front grille and windshield,
detect information necessary to operate the drive assist systems.
1
Radar sensor
2
Front camera

4-5. Using the driving support systems
245
WARNING
■ To avoid malfunction of the radar sensor
Observe the following precautions.
Otherwise, the radar sensor may not operate properly, possibly leading to
an accident resulting in death or serious injury.
● Keep the radar sensor and the radar sensor cover clean at all times.
1
Radar sensor
2
Radar sensor cover
If the front of the radar sensor or the
front or back of the radar sensor cover
is dirty or covered with water droplets,
snow, etc., clean it.
Clean the radar sensor and radar sen-
sor cover with a soft cloth to avoid
damaging them.
4
● Do not attach accessories, stickers (including transparent stickers) or
other items to the radar sensor, radar sensor cover or surrounding area.
● Do not subject the radar sensor or its surrounding area to a strong impact.
If the radar sensor, front grille, or front bumper has been subjected to a
strong impact, have the vehicle inspected by your Toyota dealer.
● Do not disassemble the radar sensor.
● Do not modify or paint the radar sensor or radar sensor cover.
● In the following cases, the radar sensor must be recalibrated. Contact your
Toyota dealer for details.
• When the radar sensor or front grille are removed and installed, or
replaced
• When the front bumper is replaced

246
4-5. Using the driving support systems
WARNING
■ To avoid malfunction of the front camera
Observe the following precautions.
Otherwise, the front camera may not operate properly, possibly leading to
an accident resulting in death or serious injury.
● Keep the windshield clean at all times.
• If the windshield is dirty or covered with an oily film, water droplets,
snow, etc., clean the windshield.
• If a glass coating agent is applied to the windshield, it will still be neces-
sary to use the windshield wipers to remove water droplets, etc. from
the area of the windshield in front of the front camera.
• If the inner side of the windshield where the front camera is installed is
dirty, contact your Toyota dealer.
● Do not attach objects, such as stickers,
transparent stickers, etc., to the outer
side of the windshield in front of the
front camera (shaded area in the illus-
tration).
A: From the top of the windshield to
approximately 0.4 in. (1 cm) below the
bottom of the front camera
B: Approximately
7.9 in.
(20 cm)
(Approximately 4.0 in. [10 cm] to the
right and left from the center of the
front camera)
● If the part of the windshield in front of the front camera is fogged up or cov-
ered with condensation or ice, use the windshield defogger to remove the
fog, condensation or ice. (P. 354)
● If water droplets cannot be properly removed from the area of the wind-
shield in front of the front camera by the windshield wipers, replace the
wiper insert or wiper blade.
● Do not attach window tint to the windshield.
● Replace the windshield if it is damaged or cracked.
After replacing the windshield, the front camera must be recalibrated. Con-
tact your Toyota dealer for details.
● Do not allow liquids to contact the front camera.
● Do not allow bright lights to shine into the front camera.