Toyota 4Runner (2022 year). Manual in english - page 2

1-1. For safe use
47
■ When to contact your Toyota dealer
In the following cases, the vehicle will require inspection and/or repair. Con-
tact your Toyota dealer as soon as possible.
● Any of the SRS airbags have been inflated.
● The front of the vehicle is damaged or
deformed, or was involved in an acci-
dent that was not severe enough to
1
cause the SRS front airbags to inflate.
● A portion of a door or its surrounding
area is damaged or deformed, or the
vehicle was involved in an accident that
was not severe enough to cause the
SRS side and curtain shield airbags to
inflate.
● The pad section of the steering wheel,
dashboard near the front passenger air-
bag or lower portion of the instrument
panel is scratched, cracked, or other-
wise damaged.
● The surface of the seats with the SRS
side airbag is scratched, cracked, or oth-
erwise damaged.
● The portion of the front pillars, rear pil-
lars or roof side rail garnishes (padding)
containing the SRS curtain shield air-
bags inside is scratched, cracked, or
otherwise damaged.
48
1-1. For safe use
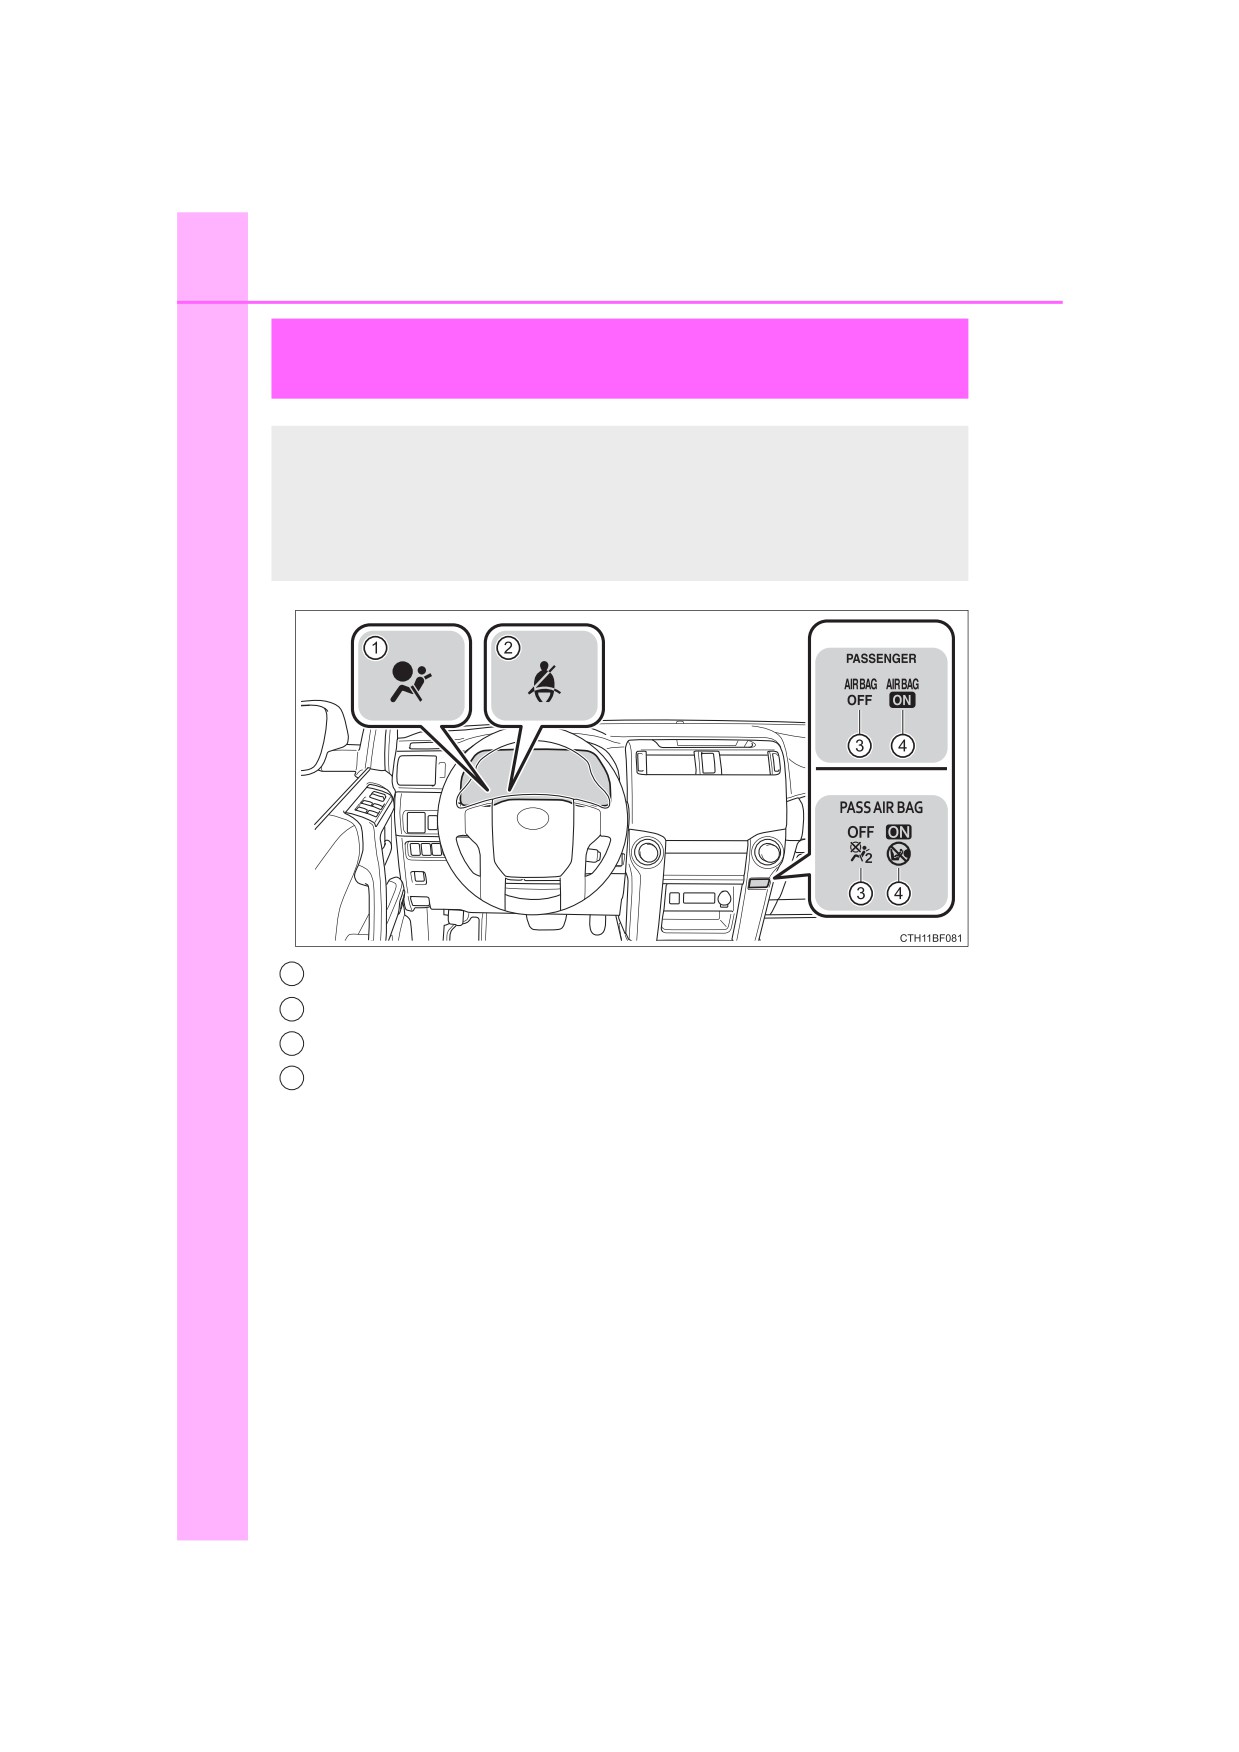
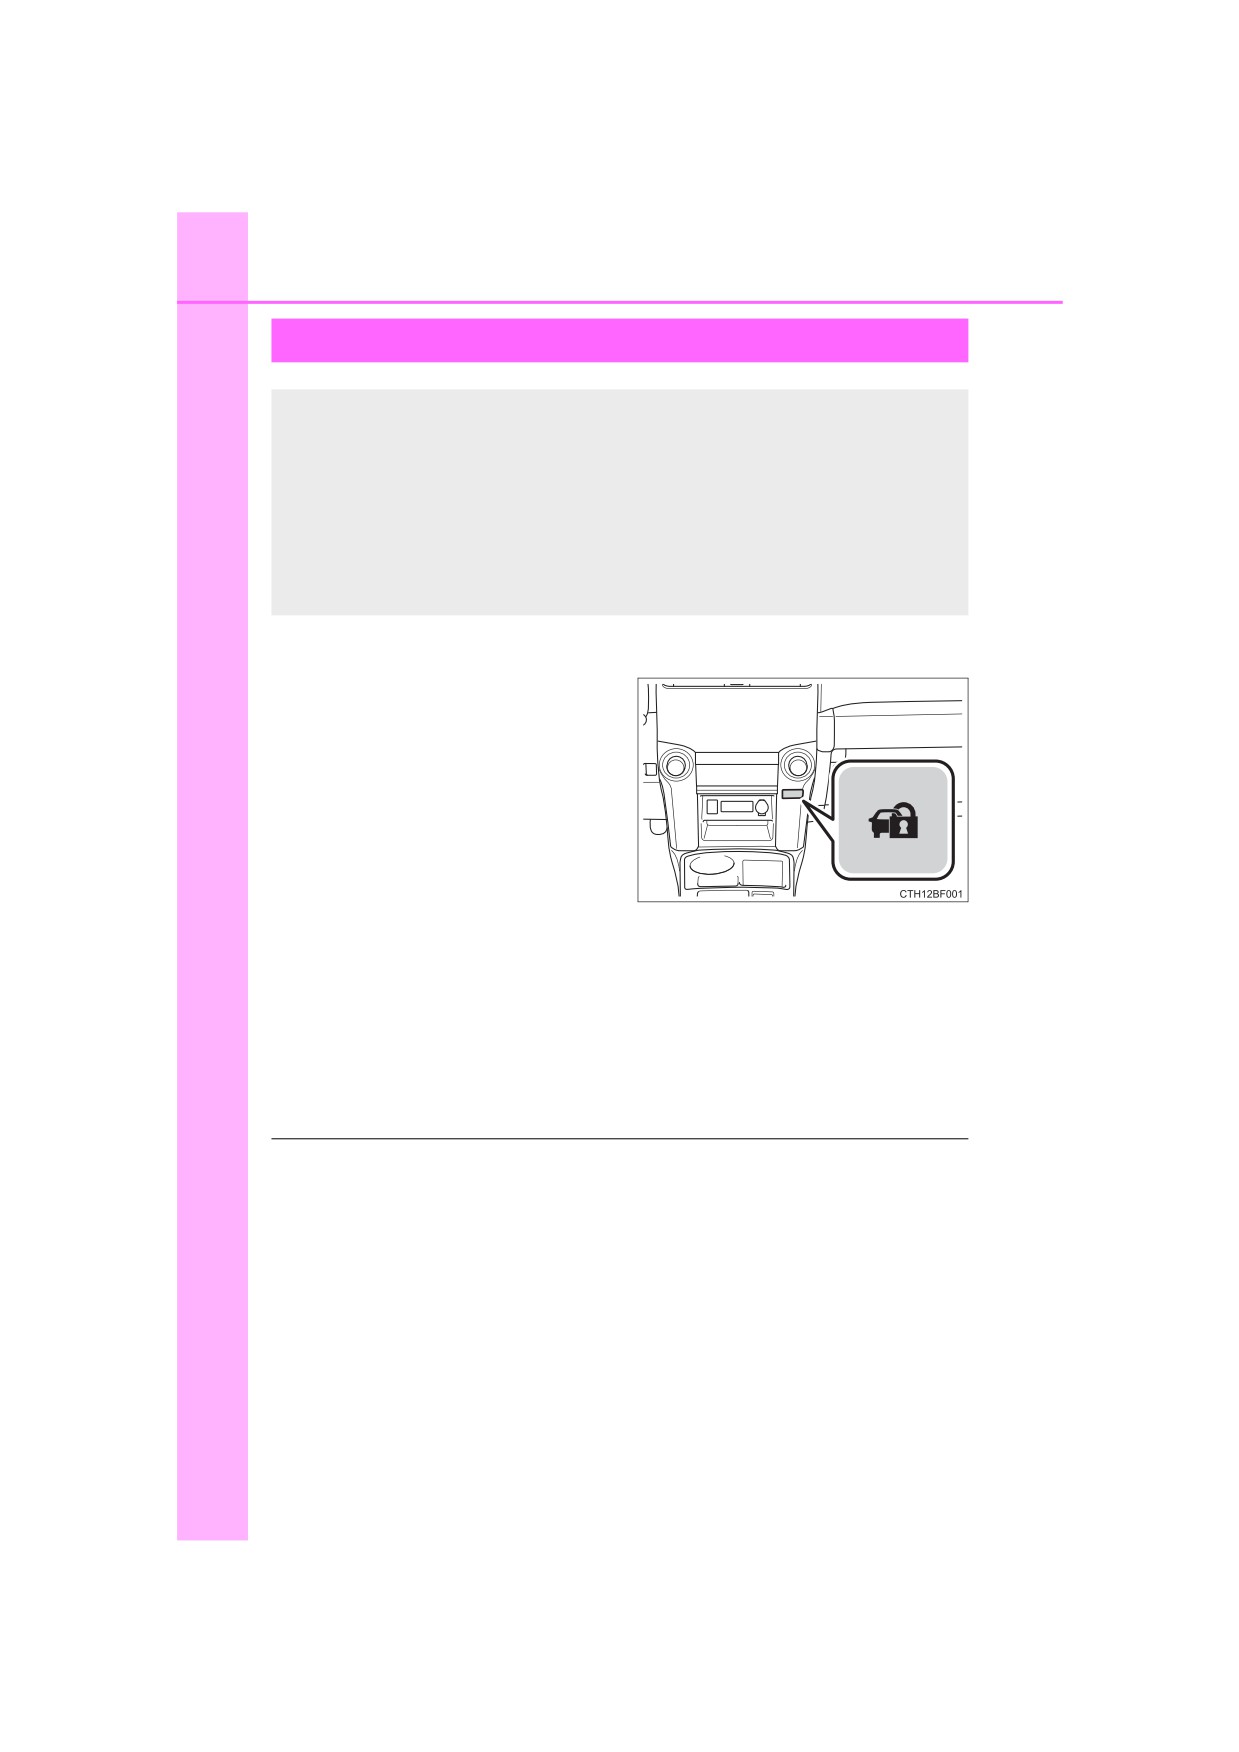
Front passenger occupant classification
system
Your vehicle is equipped with a front passenger occupant classi-
fication system. This system detects the conditions of the front
passenger seat and activates or deactivates the front passenger
airbag, front passenger knee airbag, and front passenger's seat
belt pretensioner.
U.S.A.
Canada
1
SRS warning
light
2
Seat belt
reminder light
3
“AIR BAG OFF” indicator light
4
“AIR BAG ON” indicator light

1-1. For safe use
49
Condition and operation in the front passenger occupant classi-
fication system
■ Adult*1
“AIR BAG ON” and “AIR BAG OFF”
“AIR BAG ON”
indicator lights
Indicator/
1
SRS warning light
Off
warning light
Off*2 or
Seat belt reminder light
flashing*3
Front passenger airbag
Devices
Front passenger knee airbag
Activated
Front passenger's seat belt pretensioner
■ Child*4 or child restraint system*5
“AIR BAG ON” and “AIR BAG OFF”
“AIR BAG
indicator lights
OFF”*6
Indicator/
warning light
SRS warning light
Off
Seat belt reminder light
Flashing*3
Front passenger airbag
Deactivated
Devices
Front passenger knee airbag
Front passenger's seat belt pretensioner
Activated

50
1-1. For safe use
■ Unoccupied
“AIR BAG ON” and “AIR BAG OFF”
Not illuminated
indicator lights
Indicator/
warning light
SRS warning light
Off
Seat belt reminder light
Front passenger airbag
Deactivated
Front passenger knee airbag
Devices
Activated*7
Front passenger's seat belt pretensioner
or
deactivated*8
1-1. For safe use
51
■ There is a malfunction in the system
“AIR BAG ON” and “AIR BAG OFF”
“AIR BAG OFF”
indicator lights
Indicator/
warning light
SRS warning light
On
Seat belt reminder light
On or flashing
1
Front passenger airbag
Deactivated
Devices
Front passenger knee airbag
Front passenger's seat belt pretensioner
Activated
*1: The system judges a person of adult size as an adult. When a smaller
adult sits in the front passenger seat, the system may recognize him/her
as a child depending on his/her physique and posture.
*2: In the event the front passenger is wearing a seat belt.
*3: In the event the front passenger does not wear a seat belt.
*4: When a larger child who has outgrown a child restraint system sits in the
front passenger seat, the system may recognize him/her as an adult
depending on his/her physique or posture.
*5: Never install a rear-facing child restraint system on the front passenger
seat. A forward-facing child restraint system should only be installed on
the front passenger seat when it is unavoidable.
(P. 55)
*6: In case the indicator light is not illuminated, consult this manual on how
to install the child restraint system properly. (P. 59)
*7: In the event of a side collision.
*8: In the event of a frontal collision or rollover.
52
1-1. For safe use
WARNING
■ Front passenger occupant classification system precautions
Observe the following precautions regarding the front passenger occupant
classification system.
Failure to do so may cause death or serious injury.
● Wear the seat belt properly.
● Make sure the front passenger’s seat belt plate has not been left inserted
into the buckle before someone sits in the front passenger seat.
● Make sure the “AIR BAG OFF” indicator light is not illuminated when using
the seat belt extender for the front passenger seat. If the “AIR BAG OFF”
indicator light is illuminated, disconnect the extender tongue from the seat
belt buckle, and reconnect the seat belt. Reconnect the seat belt extender
after making sure the “AIR BAG ON” indicator light is illuminated. If you
use the seat belt extender while the “AIR BAG OFF” indicator light is illumi-
nated, the SRS airbags for the front passenger will not activate, which
could cause death or serious injury in the event of a collision.
● Do not apply a heavy load to the front passenger seat or equipment.
● Do not put weight on the front passenger seat by putting your hands or
feet on the front passenger seat seatback from the rear passenger seat.
● Do not let a rear passenger lift the front passenger seat with their feet or
press on the seatback with their legs.
● Do not put objects under the front passenger seat.
1-1. For safe use
53
WARNING
■ Front passenger occupant classification system precautions
● Do not recline the front passenger seatback so far that it touches a rear
seat. This may cause the “AIR BAG OFF” indicator light to be illuminated,
which indicates that the SRS airbags for the front passenger will not
deploy in the event of a severe accident. If the seatback touches the rear
1
seat, return the seatback to a position where it does not touch the rear
seat. Keep the front passenger seatback as upright as possible when the
vehicle is moving. Reclining the seatback excessively may lessen the
effectiveness of the seat belt system.
● If an adult sits in the front passenger seat, the “AIR BAG ON” indicator
light is illuminated. If the “AIR BAG OFF” indicator is illuminated, ask the
passenger to sit up straight, well back in the seat, feet on the floor, and
with the seat belt worn correctly. If the “AIR BAG OFF” indicator still
remains illuminated, either ask the passenger to move to the rear seat, or
if that is not possible, move the front passenger seat fully rearward.
● When it is unavoidable to install a forward-facing child restraint system on
the front passenger seat, install the child restraint system on the front pas-
senger seat in the proper order. (P. 59)
● Do not modify or remove the front seats.
● Do not kick the front passenger seat or subject it to severe impact. Other-
wise, the SRS warning light may come on to indicate a malfunction of the
front passenger occupant classification system. In this case, contact your
Toyota dealer immediately.
● Child restraint systems installed on the second seat should not contact the
front seatbacks.
● Do not use a seat accessory, such as a cushion and seat cover, that cov-
ers the seat cushion surface.
● Do not modify or replace the upholstery of the front seat.
54
1-1. For safe use
Safety information for children
Observe the following precautions when children are in the vehi-
cle.
Use a child restraint system appropriate for the child, until the
child becomes large enough to properly wear the vehicle’s seat
belt.
● It is recommended that children sit in the rear seats to avoid acci-
dental contact with the shift lever, wiper switch etc.
● Use the rear door child-protector lock or the window lock switch to
avoid children opening the door while driving or operating the
power window accidentally.
● Do not let small children operate equipment which may catch or
pinch body parts, such as the power window, hood, back door,
seats etc.
WARNING
Never leave children unattended in the vehicle, and never allow children to
have or use the key.
Children may be able to start the vehicle or shift the vehicle into neutral.
There is also a danger that children may injure themselves by playing with
the windows, the moon roof or other features of the vehicle. In addition, heat
build-up or extremely cold temperatures inside the vehicle can be fatal to
children.
1-1. For safe use
55
Child restraint systems
A child restraint system for a small child or baby must itself be
properly restrained on the seat with the LATCH anchors or the
lap portion of the lap/shoulder belt.
The laws of all 50 states of the U.S.A. and Canada now require
1
the use of child restraint systems.
Points to remember
Studies have shown that installing a child restraint on a rear seat is
much safer than installing one on the front passenger seat.
● Choose a child restraint system that suits your vehicle and is appro-
priate to the age and size of the child.
● For installation details, follow the instructions provided with the child
restraint system.
General installation instructions are provided in this manual.
(P. 59)
56
1-1. For safe use
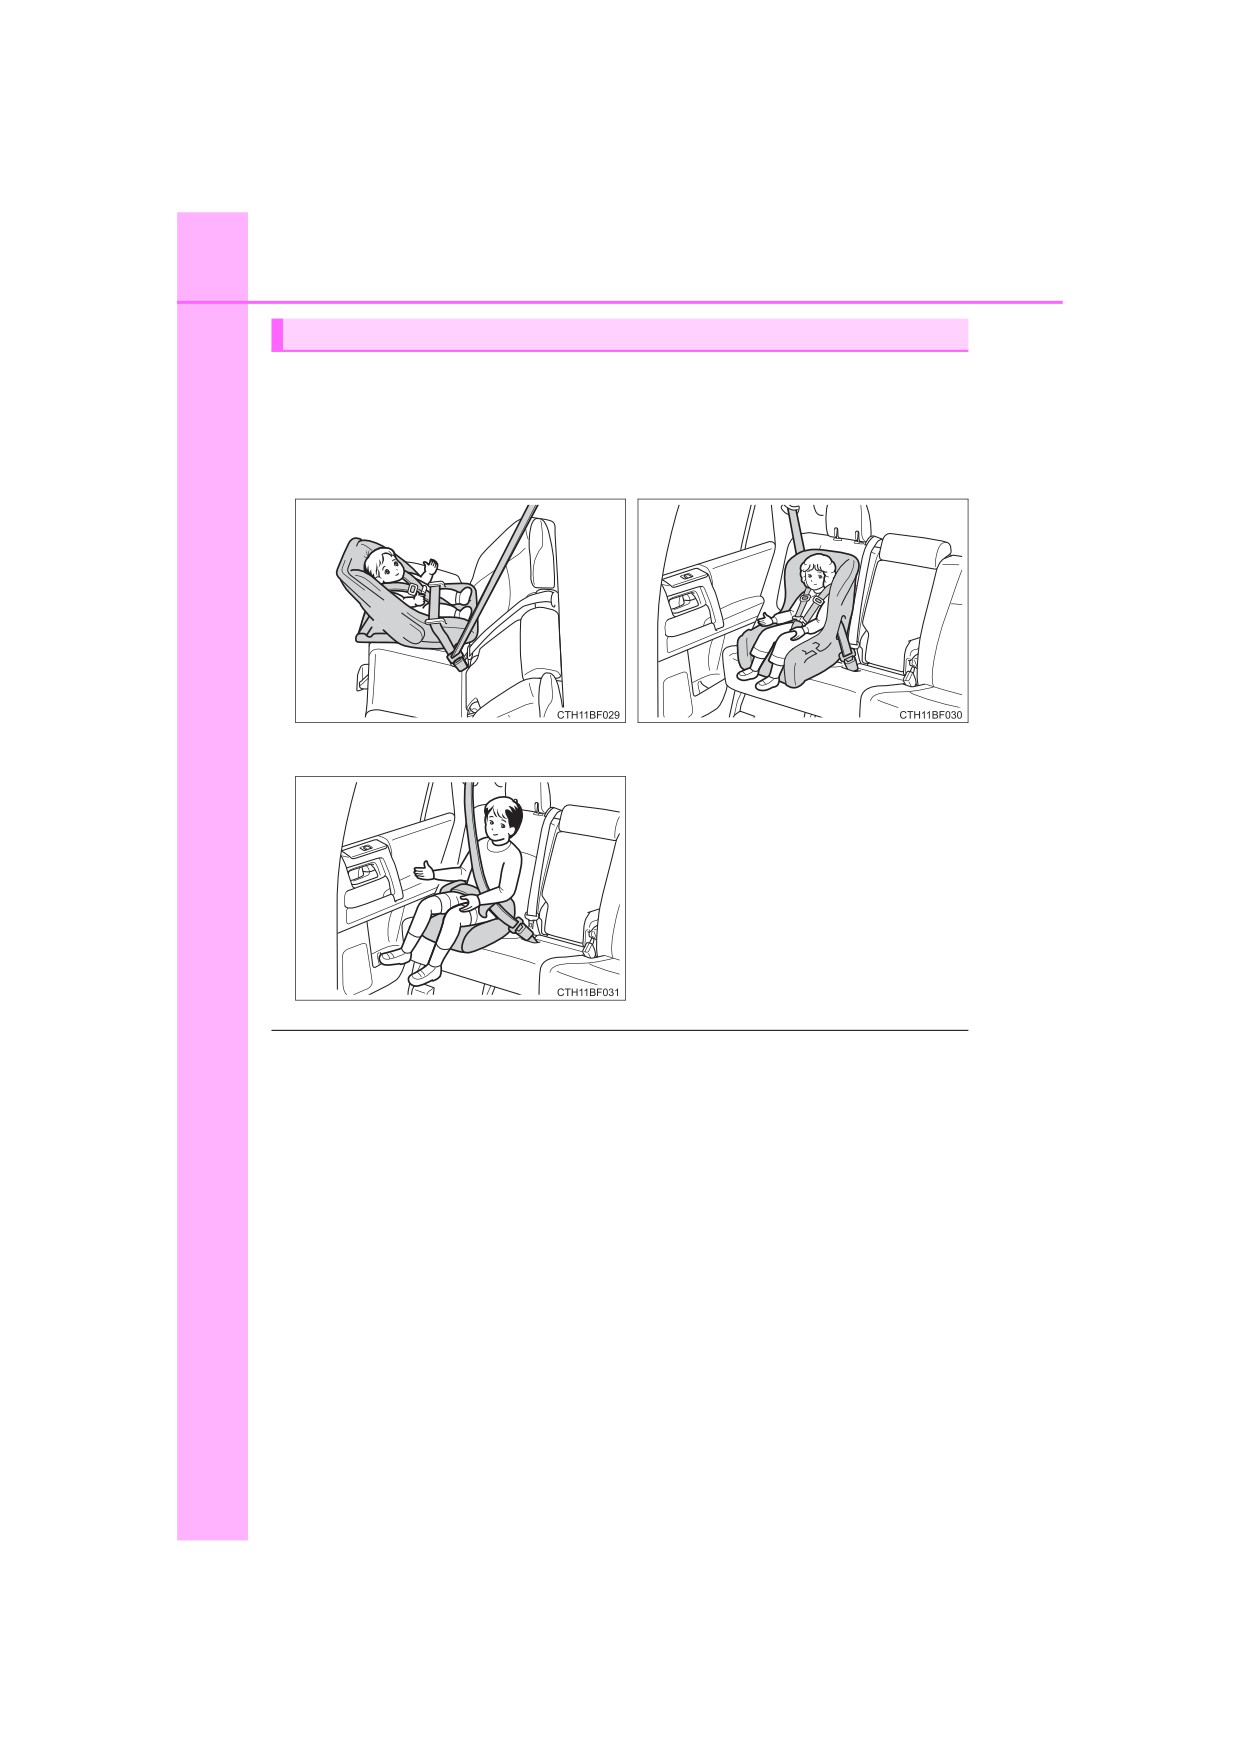
Types of child restraints
Child restraint systems are classified into the following
3 types
according to the age and size of the child:
Rear facing Infant seat/con-
Forward facing Convertible
vertible seat
seat
Booster seat
■ Selecting an appropriate child restraint system
● Use a child restraint system appropriate for the child until the child becomes
large enough to properly wear the vehicle’s seat belt.
● If the child is too large for a child restraint system, sit the child on a rear seat
and use the vehicle’s seat belt. (P. 32)
1-1. For safe use
57
WARNING
■ Child restraint precautions
● For effective protection in automobile accidents and sudden stops, a child
must be properly restrained, using a seat belt or child restraint system
depending on the age and size of the child. Holding a child in your arms is
not a substitute for a child restraint system. In an accident, the child can be
1
crushed against the windshield, or between you and the vehicle’s interior.
● Toyota strongly urges the use of a proper child restraint system that con-
forms to the size of the child, installed on the rear seat. According to acci-
dent statistics, the child is safer when properly restrained in the rear seat
than in the front seat.
● Never install a rear-facing child restraint system on the front passenger
seat even if the “AIR BAG OFF” indicator light is illuminated.
In the event of an accident, the force of the rapid inflation of the front pas-
senger airbag can cause death or serious injury to the child if the rear-fac-
ing child restraint system is installed on the front passenger seat.
● A forward-facing child restraint system may be installed on the front pas-
senger seat only when it is unavoidable. A child restraint system that
requires a top tether strap should not be used in the front passenger seat
since there is no top tether strap anchor for the front passenger seat.
Adjust the seatback as upright as possible and always move the seat as
far back as possible even if the “AIR BAG OFF” indicator light is illumi-
nated, because the front passenger airbag could inflate with considerable
speed and force. Otherwise, the child may be killed or seriously injured.
● Do not use the seat belt extender when installing a child restraint system
on the front or rear passenger seat. If installing a child restraint system
with the seat belt extender connected to the seat belt, the seat belt will not
securely hold the child restraint system, which could cause death or seri-
ous injury to the child or other passengers in the event of an accident.
● Do not allow the child to lean his/her head or any part of his/her body
against the door or the area of the seat, front and rear pillars or roof side
rails from which the SRS side airbags or SRS curtain shield airbags deploy
even if the child is seated in the child restraint system. It is dangerous if
the SRS side airbags and curtain shield airbags inflate, and the impact
could cause death or serious injury to the child.
● Make sure you have complied with all installation instructions provided by
the child restraint manufacturer and that the system is properly secured. If
it is not secured properly, it may cause death or serious injury to the child
in the event of a sudden stop, sudden swerve or accident.
58
1-1. For safe use
WARNING
■ When children are in the vehicle
Do not allow children to play with the seat belt. If the seat belt becomes
twisted around a child’s neck, it may lead to choking or other serious injuries
that could result in death.
If this occurs and the buckle cannot be unfastened, scissors should be used
to cut the belt.
■ When the child restraint system is not in use
● Keep the child restraint system properly secured on the seat even if it is
not in use. Do not store the child restraint system unsecured in the pas-
senger compartment.
● If it is necessary to detach the child restraint system, remove it from the
vehicle or store it securely in the luggage compartment. This will prevent it
from injuring passengers in the event of a sudden stop, sudden swerve or
accident.
1-1. For safe use
59
Installing child restraints
Follow the child restraint system manufacturer’s instructions.
Firmly secure child restraints to the seats using the LATCH
(Lower Anchors and Tethers for Children) anchors or a seat belt.
Attach the top tether strap when installing a child restraint.
1
The lap/shoulder belt can be used if your child restraint system
is not compatible with the LATCH system.
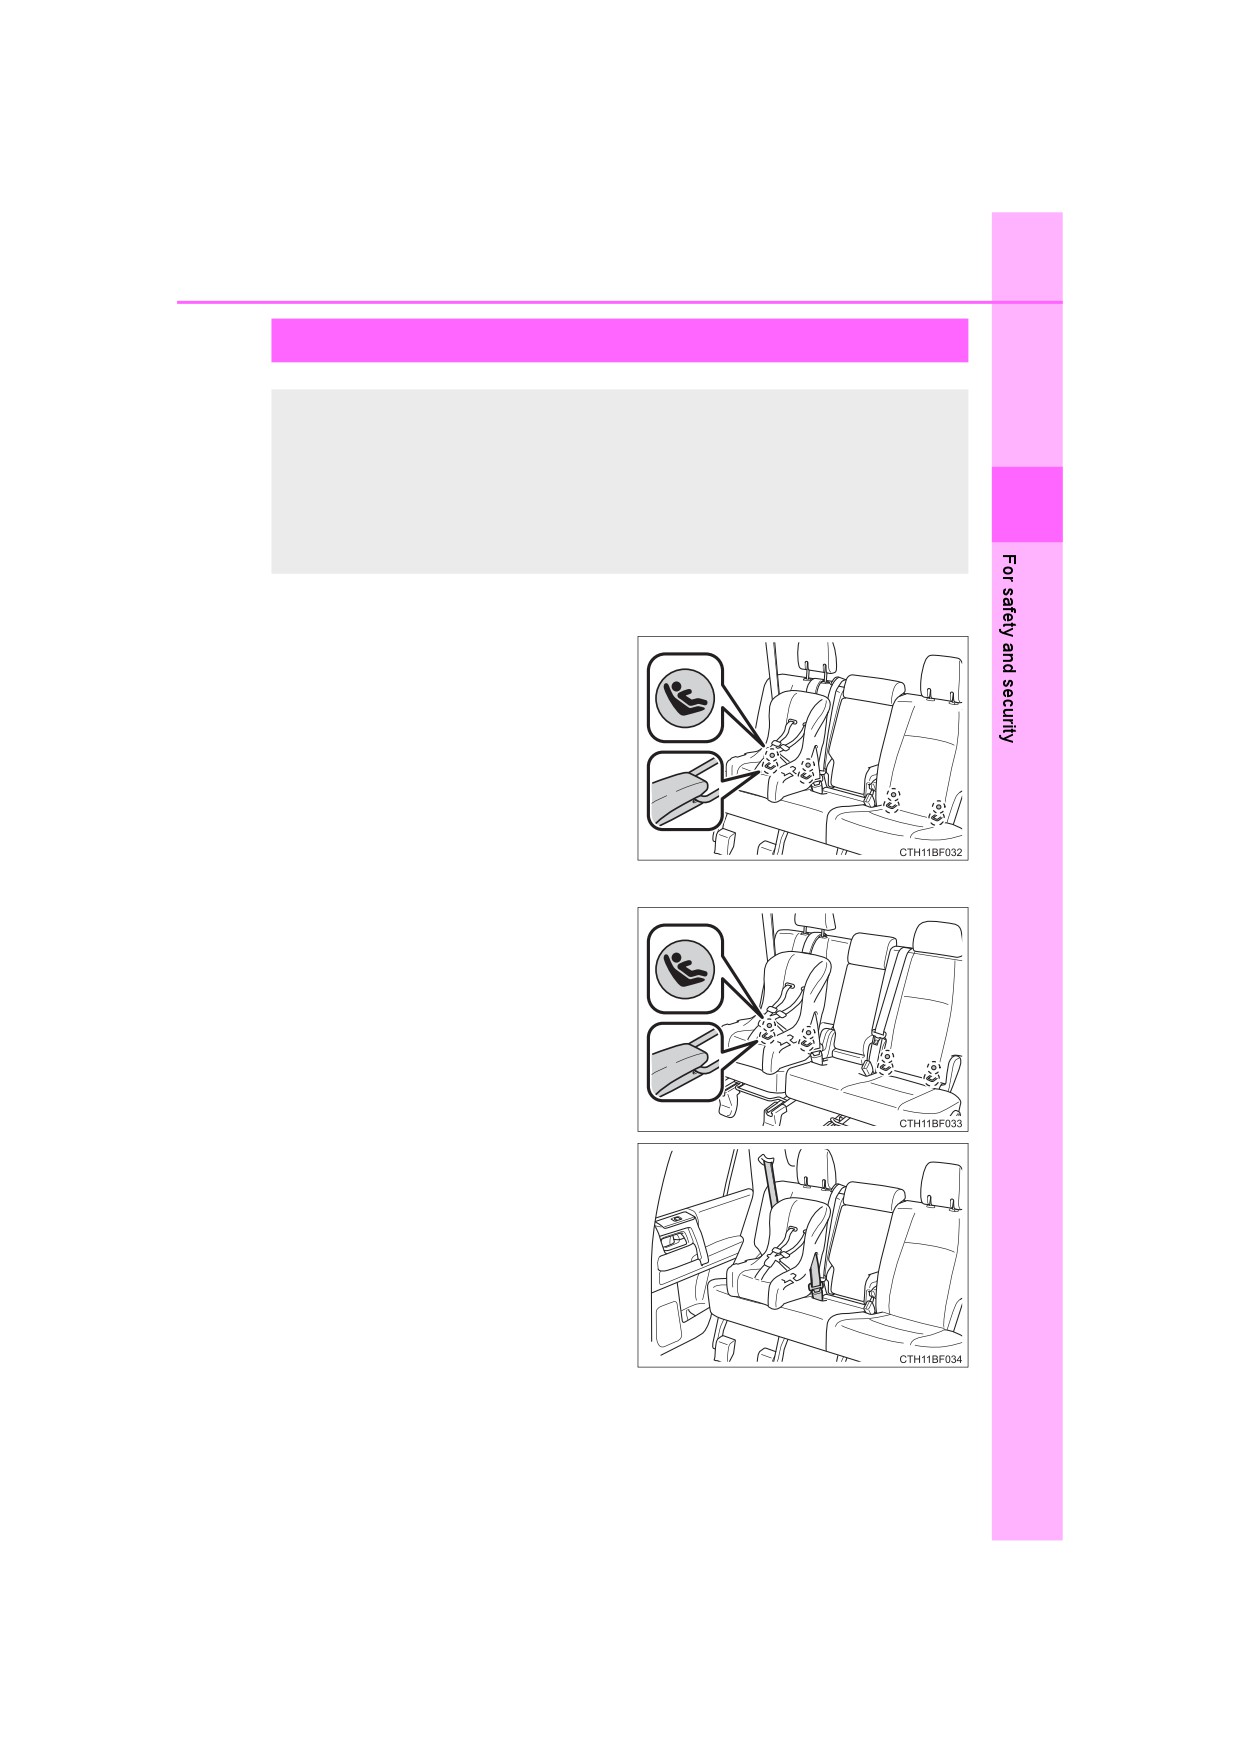
Vehicles without third row seats
Child restraint LATCH anchors
LATCH anchors are provided for
the outboard rear seats. (Buttons
displaying the location of the
anchors are attached to the seats.)
Vehicles with third row seats
Child restraint LATCH anchors
LATCH anchors are provided for
the outboard second row seats.
(Buttons displaying the location of
the anchors are attached to the
seats.)
Seat belts equipped with a child
restraint
locking
mechanism
(ALR/ELR belts except driver’s
seat belt) (P. 33)

60
1-1. For safe use
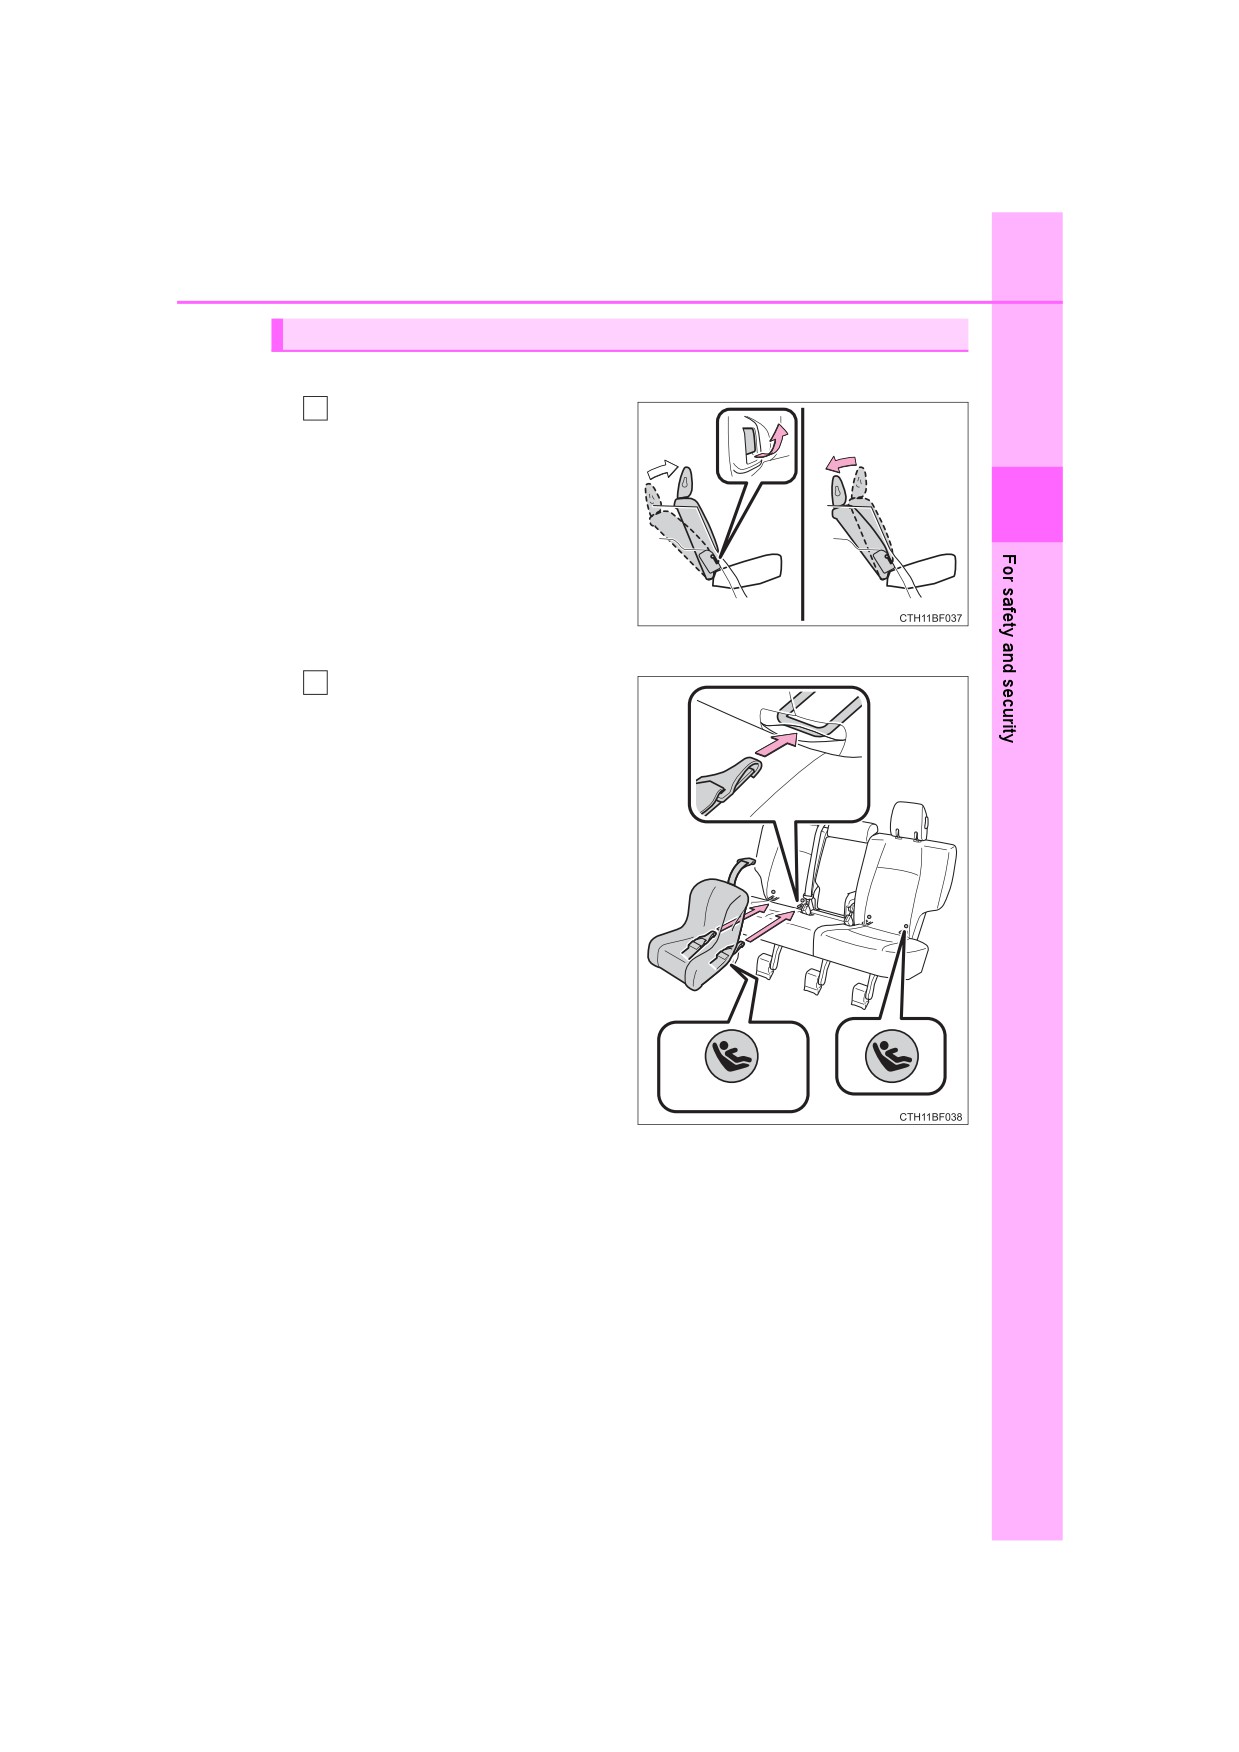
Vehicles without third row seats
Anchor brackets
(for top tether
strap)
An anchor bracket is provided for
each rear seat.
Vehicles with third row seats
Anchor brackets
(for top tether
strap)
An anchor bracket is provided for
each second row seat.
1-1. For safe use
61
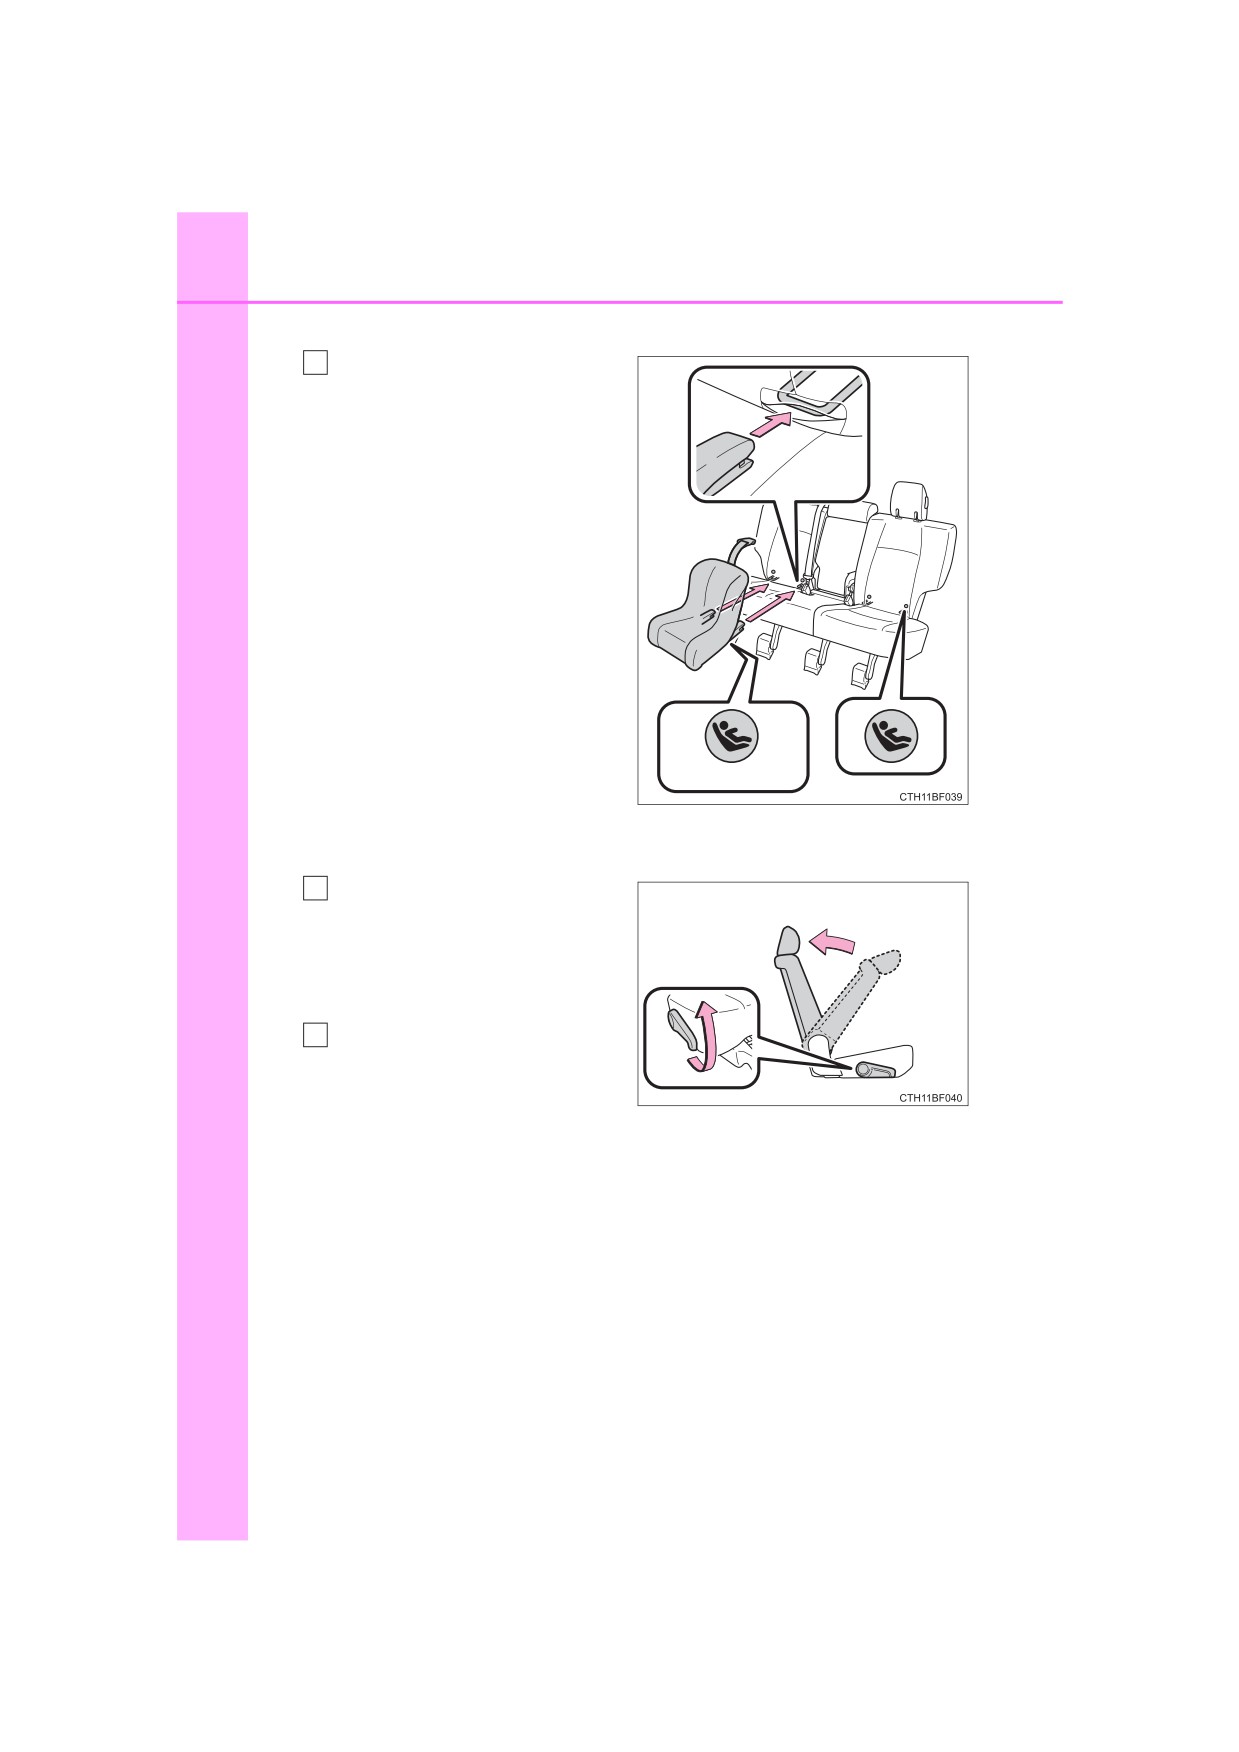
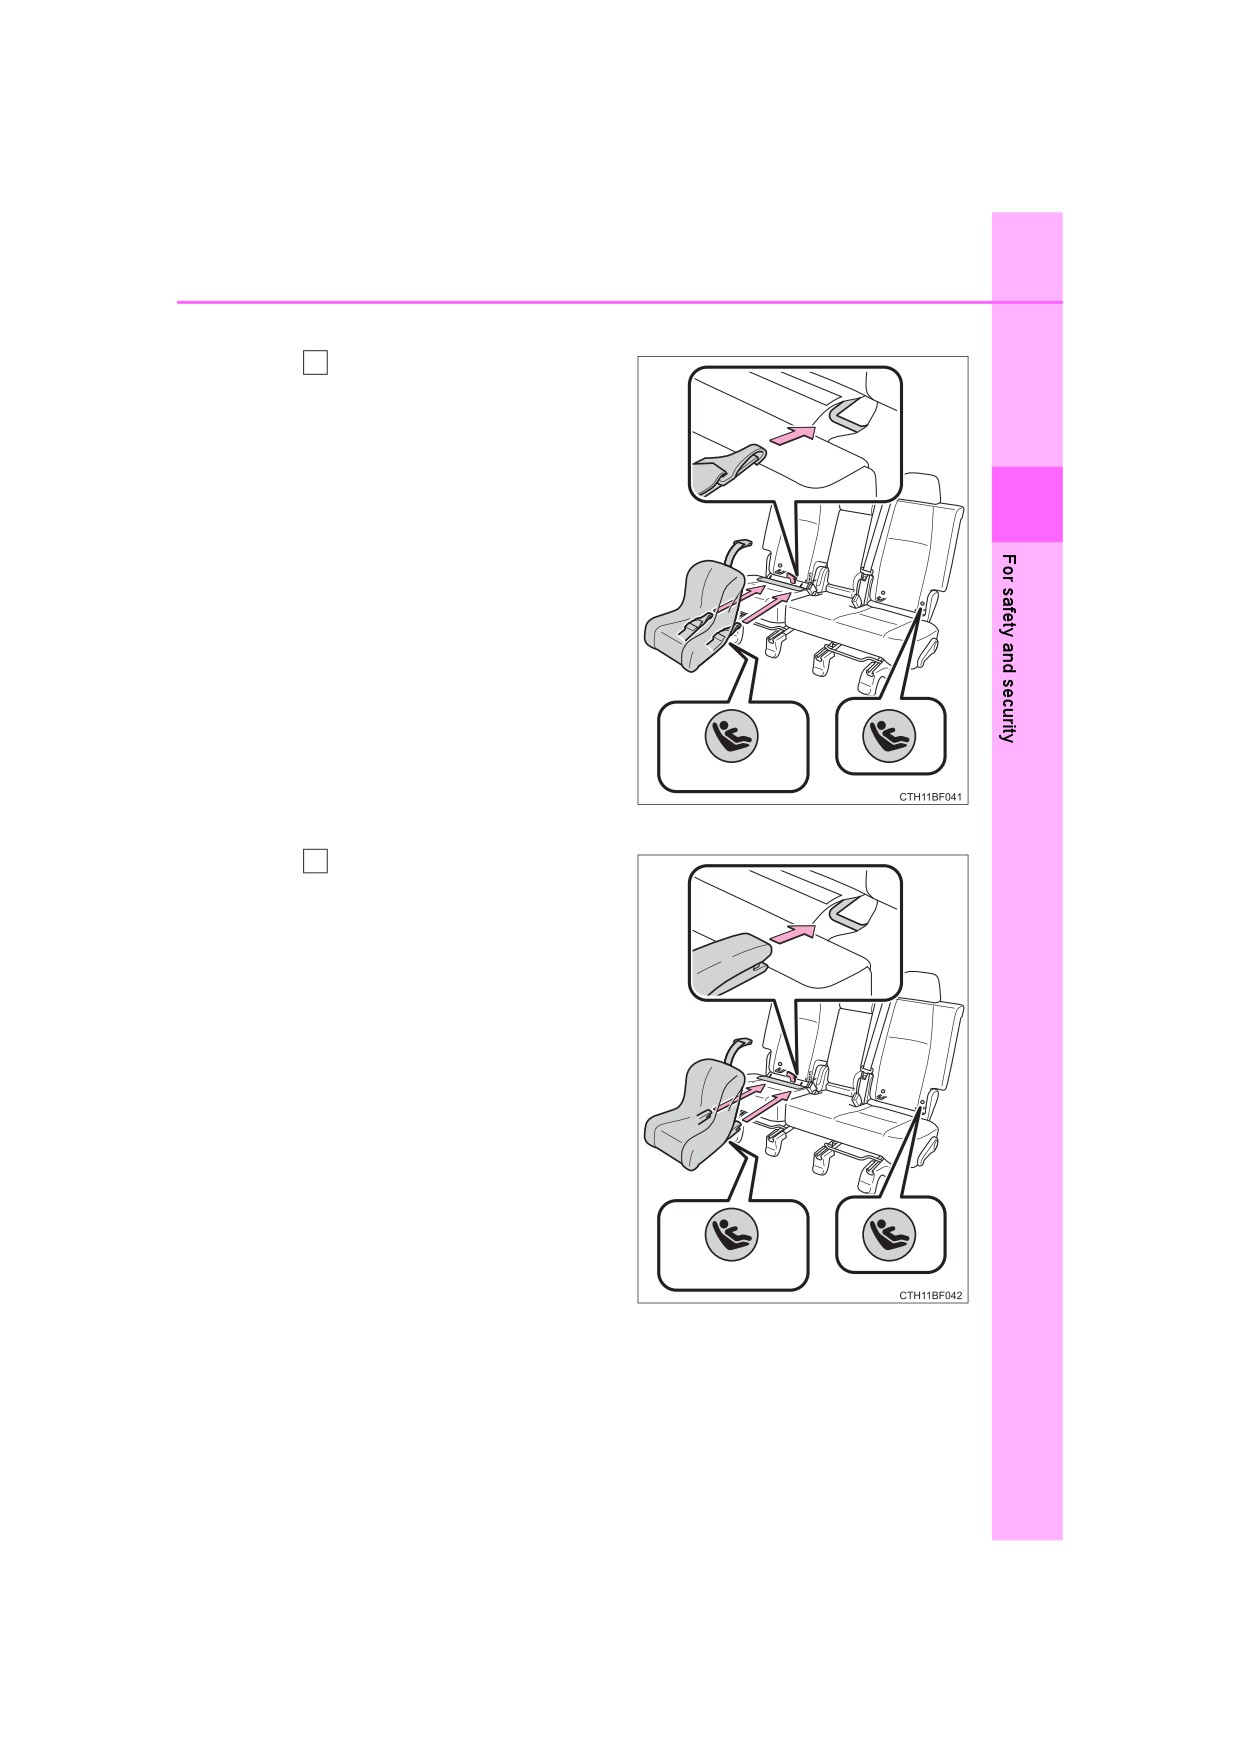
Installation with LATCH system (rear/second row seats only)
■ Installing on the rear seats (vehicles without third row seats)
Fold the seatback while pull-
1
ing the seatback angle
adjustment lever. Return the
seatback and secure it at the
1
first lock position. (P. 138)
Type A
Latch the hooks of the lower
2
straps onto the LATCH
anchors. If the child restraint
has a top tether strap, the top
tether strap should be
latched onto the top tether
strap anchor.
For owners in Canada:
The symbol on a child
restraint system indicates the
presence of a lower connec-
tor system.
Canada only
62
1-1. For safe use
Type B
Latch the buckles onto the
2
LATCH anchors. If the child
restraint has a top tether
strap, the top tether strap
should be latched onto the
top tether strap anchor.
For owners in Canada:
The symbol on a child
restraint system indicates the
presence of a lower connec-
tor system.
Canada only
■ Installing on the second row seats (vehicles with third row
seats)
Fold the seatback while pull-
1
ing the seatback angle
adjustment lever. Return the
seatback and secure it at the
first lock position. (P. 138)
2
Flip the cover.
1-1. For safe use
63
Type A
Latch the hooks of the lower
3
straps onto the LATCH
anchors. If the child restraint
has a top tether strap, the top
tether strap should be
1
latched onto the top tether
strap anchor.
For owners in Canada:
The symbol on a child
restraint system indicates the
presence of a lower connec-
tor system.
Canada only
Type B
Latch the buckles onto the
3
LATCH anchors. If the child
restraint has a top tether
strap, the top tether strap
should be latched onto the
top tether strap anchor.
For owners in Canada:
The symbol on a child
restraint system indicates the
presence of a lower connec-
tor system.
Canada only
64
1-1. For safe use
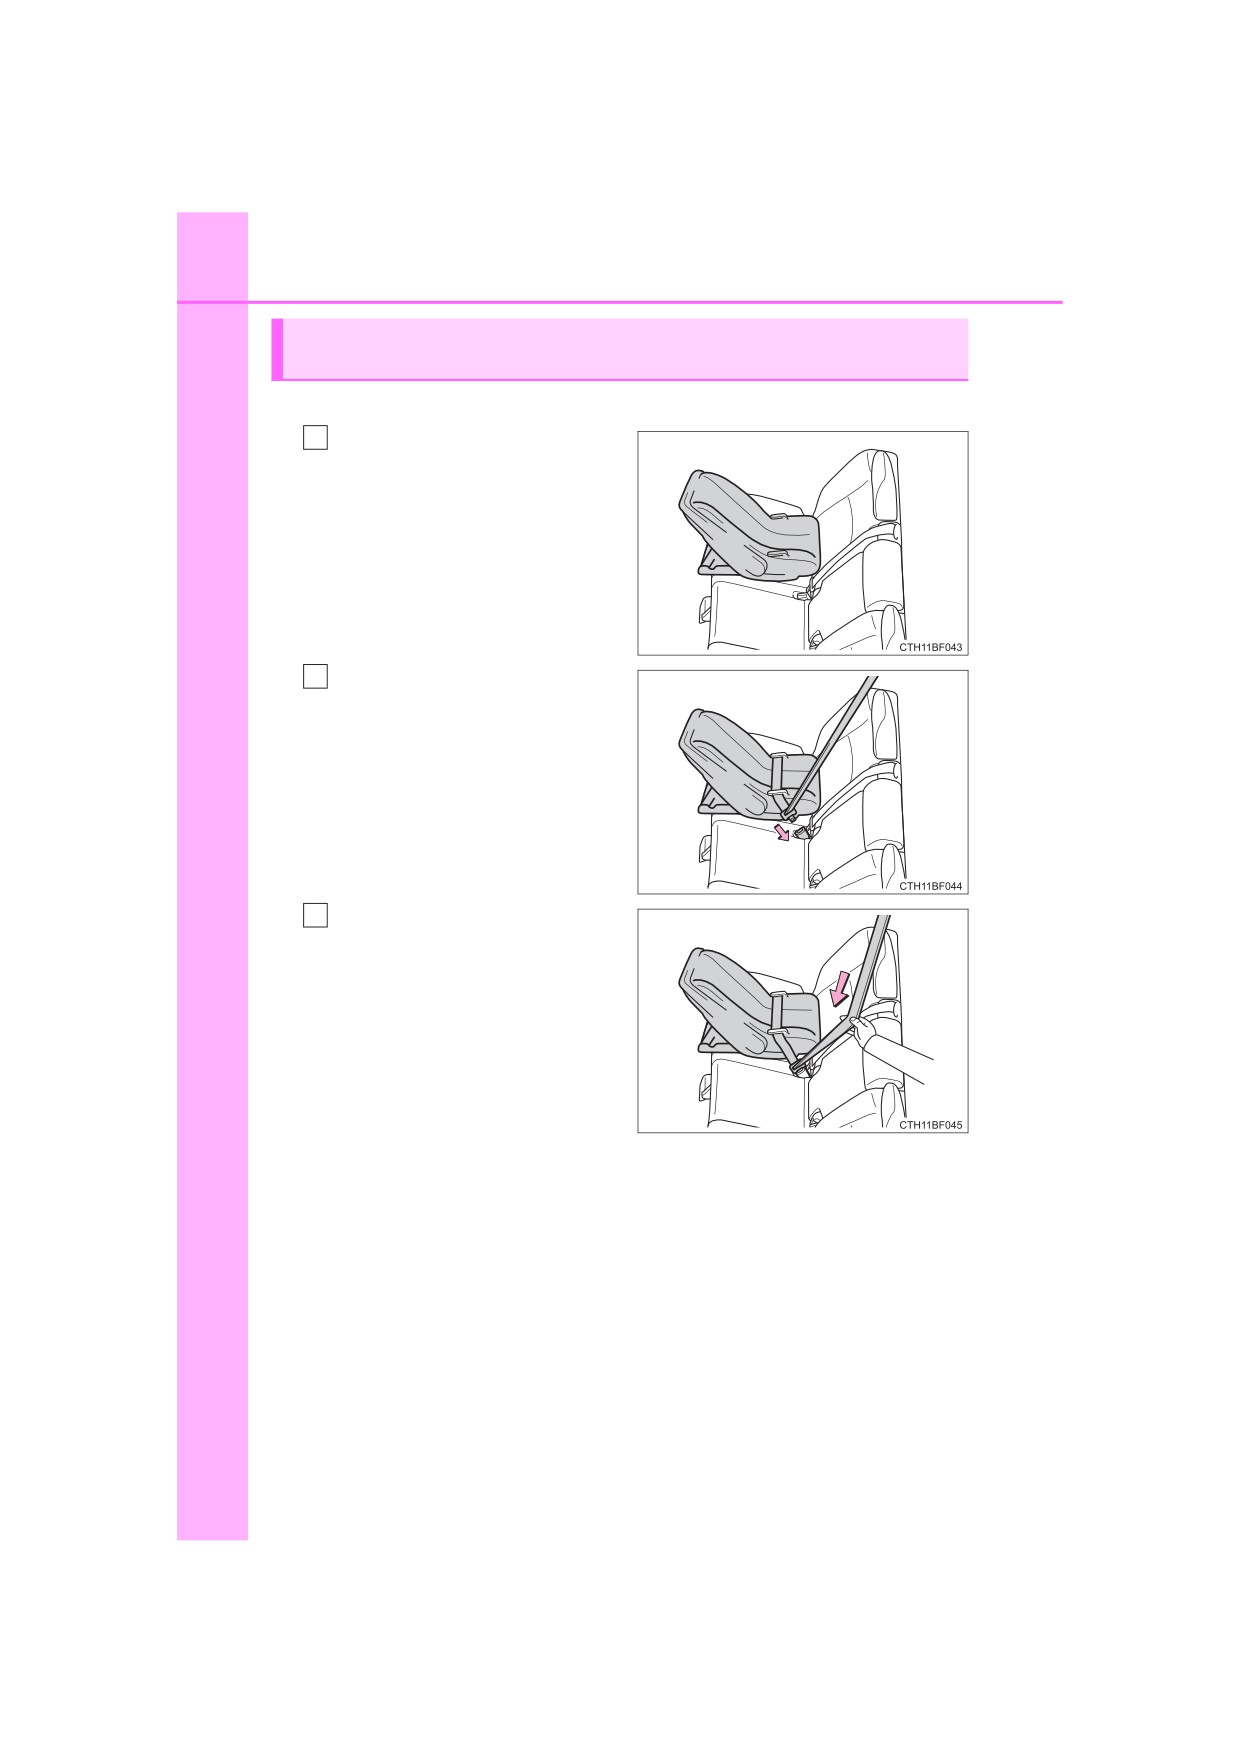
Installing child restraints using a seat belt (child restraint lock
function belt)
■ Rear-facing Infant seat/convertible seat
Place the child restraint sys-
1
tem on the rear seat facing
the rear of the vehicle.
Run the seat belt through the
2
child restraint system and
insert the plate into the
buckle. Make sure that the
belt is not twisted.
Fully extend the shoulder belt
3
and allow it to retract to put it
in lock mode. In lock mode,
the belt cannot be extended.

1-1. For safe use
65
4
While pushing the child
restraint system down into
the rear seat, allow the
shoulder belt to retract until
the child restraint system is
securely in place.
After the shoulder belt has
1
retracted to a point where there
is no slack in the belt, pull the
belt to check that it cannot be
extended.
■ Forward-facing Convertible seat
Place the child restraint sys-
1
tem on the seat facing the
front of the vehicle.
Run the seat belt through the
2
child restraint system and
insert the plate into the
buckle. Make sure that the
belt is not twisted.

66
1-1. For safe use
3
Fully extend the shoulder belt
and allow it to retract to put it
in lock mode. In lock mode,
the belt cannot be extended.
While pushing the child
4
restraint system into the rear
seat, allow the shoulder belt
to retract until the child
restraint system is securely
in place.
After the shoulder belt has
retracted to a point where there
is no slack in the belt, pull the
belt to check that it cannot be
extended.
If the child restraint has a top tether strap, the top tether strap
5
should be latched onto the top tether strap anchor. (P. 68)

1-1. For safe use
67
■ Booster seat
Place the child restraint sys-
1
tem on the seat facing the
front of the vehicle.
1
Sit the child in the child
2
restraint system. Fit the seat
belt to the child restraint sys-
tem according to the manu-
facturer’s instructions and
insert the plate into the
buckle. Make sure that the
belt is not twisted.
Check that the shoulder belt is correctly positioned over the child’s
shoulder and that the lap belt is as low as possible. (P. 32)
Removing a child restraint installed with a seat belt
Push the buckle release button
and fully retract the seat belt.
68
1-1. For safe use
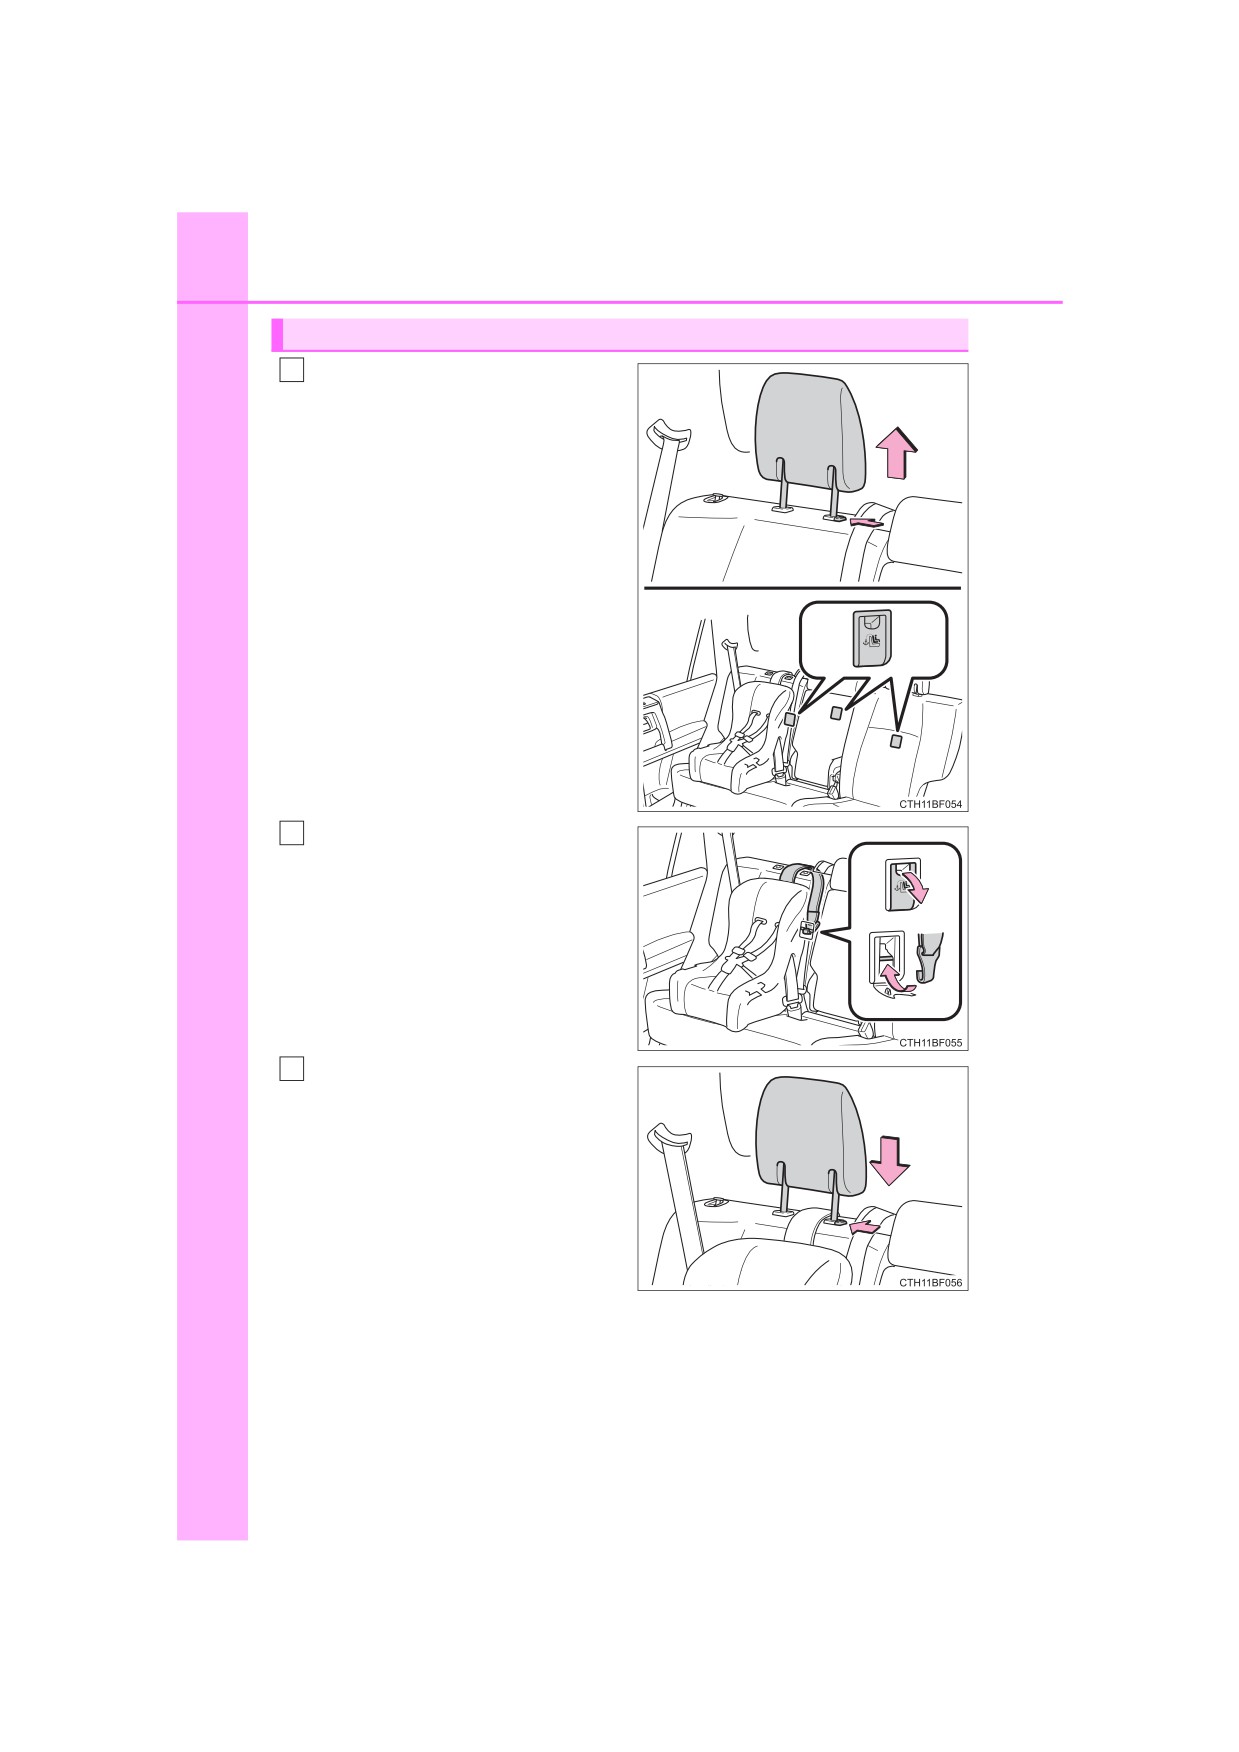
Child restraint systems with a top tether strap
Secure the child restraint sys-
1
tem using the seat belt or the
lower anchors, and remove the
head restraint.
Open the anchor bracket cover,
2
latch the hook onto the anchor
bracket and tighten the top
tether strap.
Make sure the top tether strap is
securely latched.
Replace the head restraint.
3
1-1. For safe use
69
■Laws and regulations pertaining to anchorages
The LATCH system conforms to FMVSS225 or CMVSS210.2.
Child restraint systems conforming to FMVSS213 or CMVSS213 specifica-
tions can be used.
This vehicle is designed to conform to the SAE J1819.
WARNING
1
■ When installing a booster seat
To prevent the belt from going into ALR lock mode, do not fully extend the
shoulder belt. ALR mode causes the belt to tighten only. This could cause
injury or discomfort to the child. (P. 33)
■ When installing a child restraint system
Follow the directions given in the child restraint system installation manual
and fix the child restraint system securely in place.
If the child restraint system is not correctly fixed in place, the child or other
passengers may be seriously injured or even killed in the event of a sudden
braking or an accident.
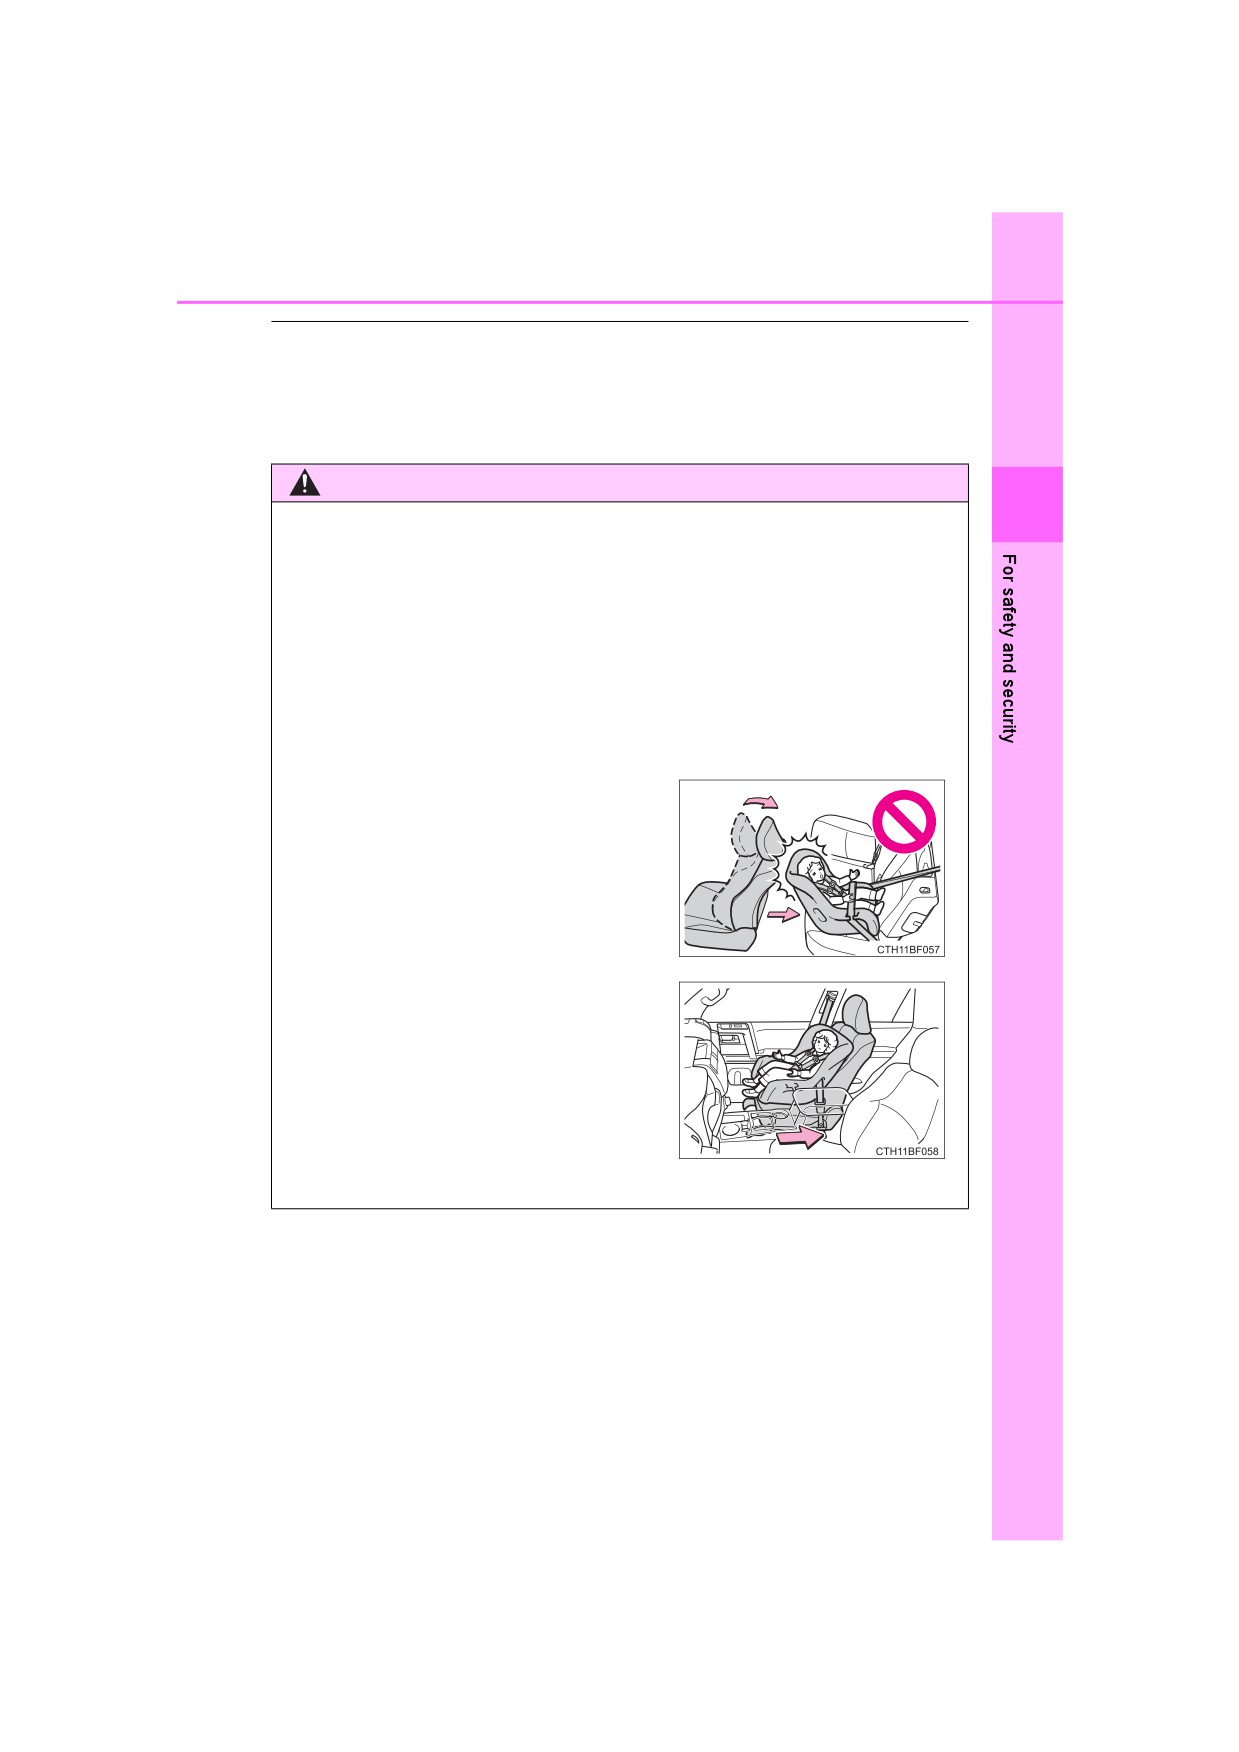
● If the driver’s seat interferes with the
child restraint system and prevents it
from being attached correctly, attach the
child restraint system to the right-hand
rear seat.
● Adjust the front passenger seat so that
it does not interfere with the child
restraint system.
● Only put a forward-facing child restraint
system on the front seat when unavoid-
able. When installing a forward-facing
child restraint system on the front pas-
senger seat, move the seat as far back
as possible even if the “AIR BAG OFF”
indicator light is illuminated. Failure to
do so may result in death or serious
injury if the airbags deploy (inflate).
70
1-1. For safe use
WARNING
■ When installing a child restraint system
● Vehicles with third row seats: When using the LATCH anchors for a child
restraint system, move the seat as far back as possible, with the seatback
close to the child restraint system.
● When a booster seat is installed, always ensure that the shoulder belt is
positioned across the center of the child’s shoulder. The belt should be
kept away from the child’s neck, but not so that it could fall off the child’s
shoulder. Failing to do so may result in death or serious injury in the event
of an accident or a sudden braking.
● Ensure that the belt and plate are securely locked and the seat belt is not
twisted.
● Shake the child restraint system left and right, and forward and backward
to ensure that it has been securely installed.
● After securing a child restraint system, never adjust the seat.
● Follow all installation instructions provided by the child restraint system
manufacturer.
●When securing some types of child restraint systems in second or third
row seats, it may not be possible to properly use the seat belts in positions
next to the child restraint without interfering with it or affecting seat belt
effectiveness. Be sure your seat belt fits snugly across your shoulder and
low on your hips. If it does not, or if it interferes with the child restraint,
move to a different position. Failure to do so may result in death or serious
injury.
■ Do not use a seat belt extender
If a seat belt extender is used when installing a child restraint system, the
seat belt will not securely hold the child restraint system, which could cause
death or serious injury to the child or other passengers in the event of a sud-
den braking, sudden swerving or an accident.
■ To correctly attach a child restraint system to the anchors
When using the LATCH anchors, be sure that there are no foreign objects
around the anchors and that the seat belt is not caught behind the child
restraint system. Make sure the child restraint system is securely attached,
or it may cause death or serious injury to the child or other passengers in
the event of a sudden braking or an accident.
1-1. For safe use
71
Exhaust gas precautions
Harmful substance to the human body is included in exhaust
gases if inhale.
WARNING
1
Exhaust gases include harmful carbon monoxide (CO), which is colorless and
odorless. Observe the following precautions.
Failure to do so may cause exhaust gases enter the vehicle and may lead to
an accident caused by light-headedness, or may lead to death or a serious
health hazard.
■ Important points while driving
● Keep the back door closed.
● If you smell exhaust gases in the vehicle even when the back door is
closed, open the windows and have the vehicle inspected at your Toyota
dealer as soon as possible.
■When parking
● If the vehicle is in a poorly ventilated area or a closed area, such as a
garage, stop the engine.
● Do not leave the vehicle with the engine on for a long time.
If such a situation cannot be avoided, park the vehicle in an open space
and ensure that exhaust fumes do not enter the vehicle interior.
● Do not leave the engine running in an area with snow build-up, or where it
is snowing. If snowbanks build up around the vehicle while the engine is
running, exhaust gases may collect and enter the vehicle.
■Exhaust pipe
The exhaust system needs to be checked periodically. If there is a hole or
crack caused by corrosion, damage to a joint or abnormal exhaust noise, be
sure to have the vehicle inspected and repaired by your Toyota dealer.
72
1-2. Emergency assistance
Safety Connect
Safety Connect is a subscription-based telematics service that
uses Global Positioning System (GPS) data and embedded cel-
lular technology to provide safety and security features to sub-
scribers. Safety Connect is supported by Toyota’s designated
response center, which operates 24 hours per day, 7 days per
week.
Safety Connect service is available by subscription on select,
telematics hardware-equipped vehicles.
By using the Safety Connect service, you are agreeing to be
bound by the Telematics Subscription Service Agreement and
its Terms and Conditions, as in effect and amended from time to
time, a current copy of which is available at Toyota.com in the
United States, Toyotapr.com in Puerto Rico and Toyota.ca in
Canada. All use of the Safety Connect service is subject to such
then-applicable Terms and Conditions.
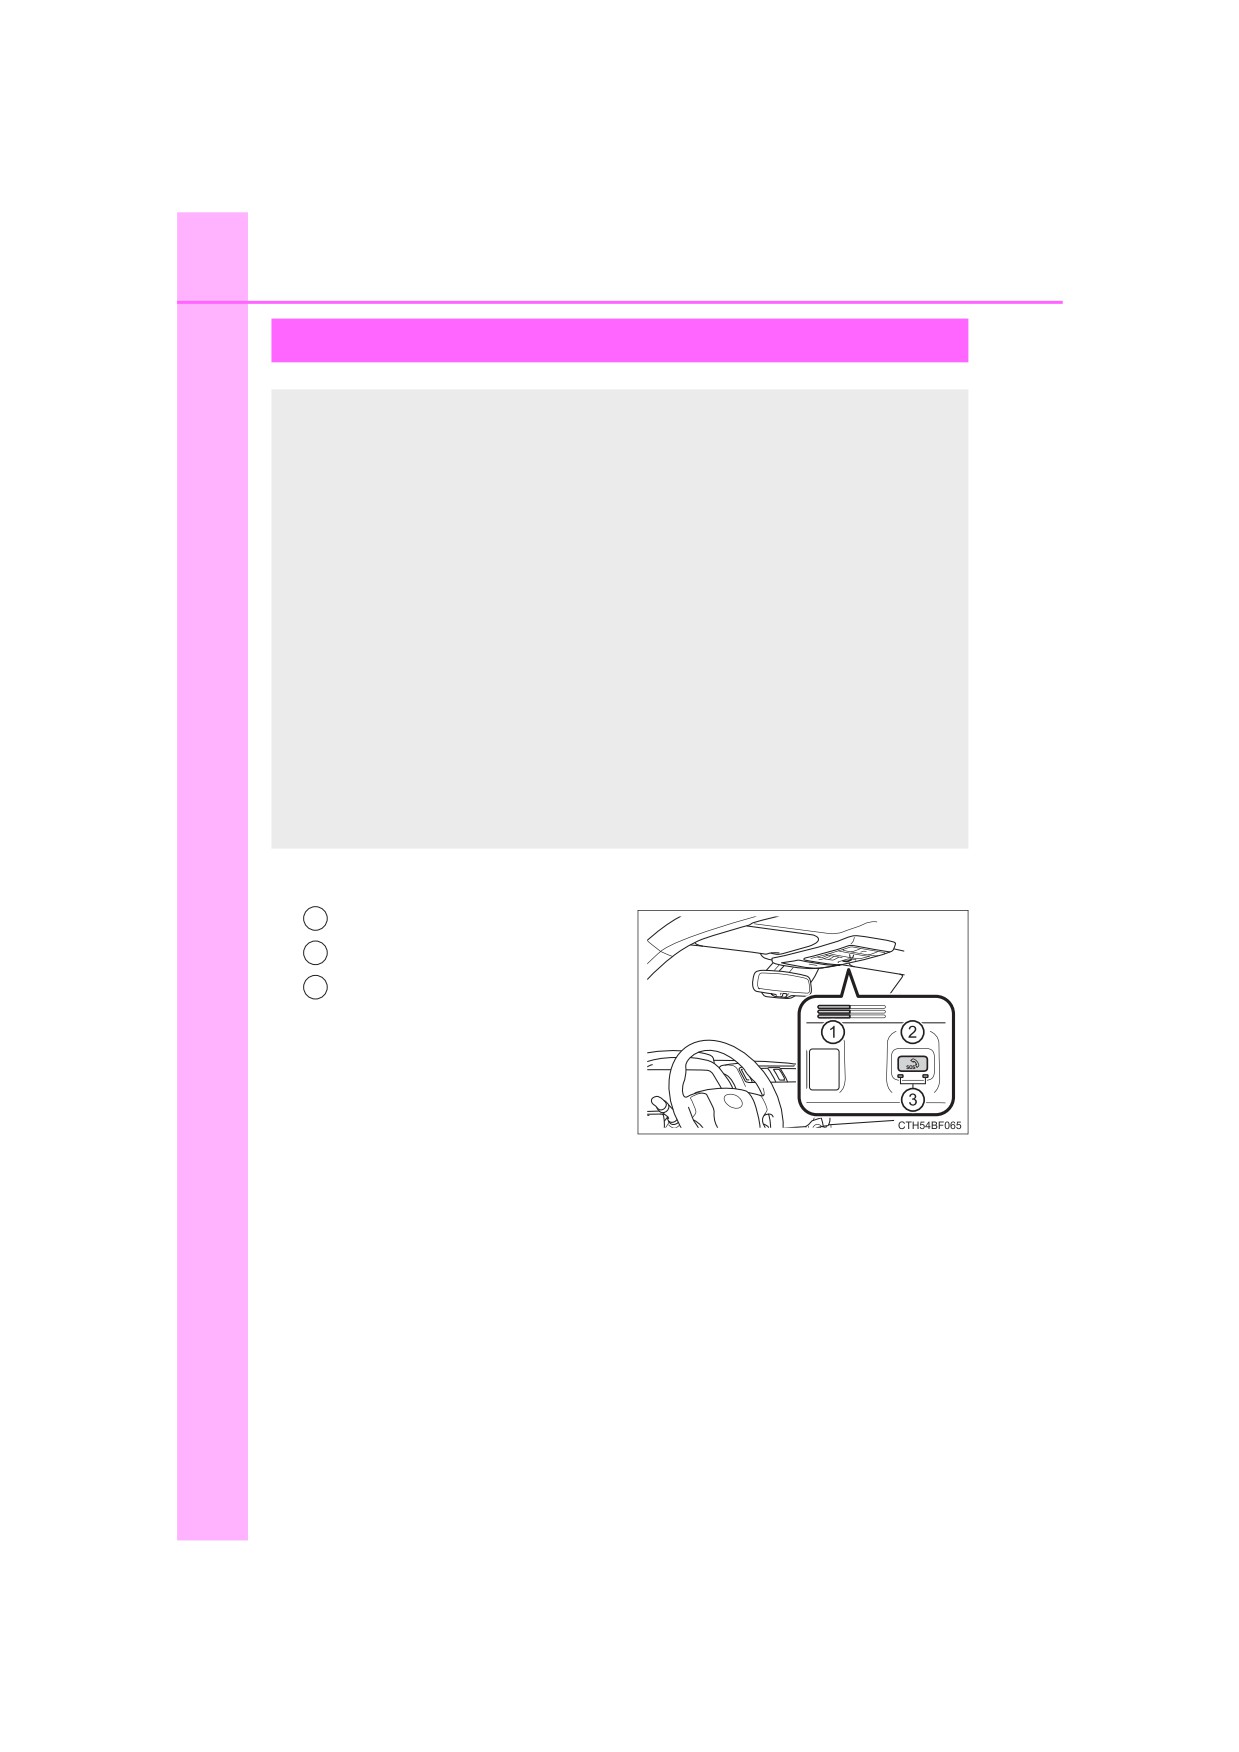
■ System components
1
Microphone
2
“SOS” button
3
LED light indicators
: If equipped
1-2. Emergency assistance
73
■ Services
Subscribers have the following Safety Connect services available:
● Automatic Collision Notification*
Helps drivers receive necessary response from emergency ser-
vice providers. (P. 75)
*: U.S. Patent No. 7,508,298 B2
1
● Stolen Vehicle Location
Helps drivers in the event of vehicle theft. (P. 75)
● Emergency Assistance Button (“SOS”)
Connects drivers to response-center support. (P. 75)
● Enhanced Roadside Assistance
Provides drivers various on-road assistance. (P. 76)
■ Subscription
After you have signed the Telematics Subscription Service Agree-
ment and are enrolled, you can begin receiving services.
A variety of subscription terms are available for purchase. Contact
your Toyota dealer, call the following appropriate Customer Experi-
ence Center or push the “SOS” button in your vehicle for further
subscription details.
• The United States
1-800-331-4331
• Canada
1-888-869-6828
• Puerto Rico
1-877-855-8377

74
1-2. Emergency assistance
■Safety Connect Services Information
● Phone calls using the vehicles Bluetooth® technology will not be possible
when Safety Connect is active and in use.
● Safety Connect is available beginning Fall 2009 on select Toyota models (in
the contiguous United States only). Contact with the Safety Connect
response center is dependent upon the telematics device being in operative
condition, cellular connection availability, and GPS satellite signal reception,
which can limit the ability to reach the response center or receive emer-
gency service support. Enrollment and Telematics Subscription Service
Agreement required. A variety of subscription terms is available; charges
vary by subscription term selected and location.
● Automatic Collision Notification, Emergency Assistance and Stolen Vehicle
Location are available in the United States, including Hawaii and Alaska,
Puerto Rico and Canada, and Enhanced Roadside Assistance are available
in the United States, Puerto Rico and Canada.
● Automatic Collision Notification, Emergency Assistance, Stolen Vehicle and
Enhanced Road Assistance are not available in the U.S. Virgin Islands.
For vehicles first sold in the U.S. Virgin Islands, no Safety Connect services
will function in or outside the U.S. Virgin Islands.
● Safety Connect services are not subject to section 255 of the Telecommuni-
cations Act and the device is not TTY compatible.
■Languages
The Safety Connect response center will offer support in multiple languages.
The Safety Connect system will offer voice prompts in English, Spanish, and
French. Please indicate your language of choice when enrolling.
■ When contacting the response center
You may be unable to contact the response center if the network is busy.
Safety Connect LED light Indicators
When the engine switch is turned to the “ON” position (vehicles with-
out a smart key system) or the engine switch is turned to IGNITION
ON mode (vehicles with a smart key system), the red indicator light
comes on for 2 seconds then turns off. Afterward, the green indicator
light comes on, indicating that the service is active.
The following indicator light patterns indicate specific system usage
conditions:
● Green indicator light on = Active service
● Green indicator light flashing = Safety Connect call in process
● Red indicator light (except at vehicle start-up) = System malfunction
(contact your Toyota dealer)
● No indicator light (off) = Safety Connect service not active
1-2. Emergency assistance
75
Safety Connect services
■ Automatic Collision Notification
In case of either airbag deployment or severe rear-end collision, the
system is designed to automatically call the response center. The
responding agent receives the vehicle’s location and attempts to
speak with the vehicle occupants to assess the level of emergency.
1
If the occupants are unable to communicate, the agent automati-
cally treats the call as an emergency, contacts the nearest emer-
gency services provider to describe the situation, and requests that
assistance be sent to the location.
■ Stolen Vehicle Location
If your vehicle is stolen, Safety Connect can work with local author-
ities to assist them in locating and recovering the vehicle. After filing
a police report, call the Customer Experience Center at 1-800-331-
4331 in the United States, 1-877-855-8377 in Puerto Rico or 1-888-
869-6828 in Canada, and follow the prompts for Safety Connect to
initiate this service.
In addition to assisting law enforcement with recovery of a stolen
vehicle, Safety-Connect-equipped vehicle location data may, under
certain circumstances, be shared with third parties to locate your
vehicle. Further information is available at Toyota.com in the United
States, Toyotapr.com in Puerto Rico and Toyota.ca in Canada.
■ Emergency Assistance Button (“SOS”)
In the event of an emergency on the road, push the “SOS” button to
reach the Safety Connect response center. The answering agent
will determine your vehicle’s location, assess the emergency, and
dispatch the necessary assistance required.
If you accidentally press the “SOS” button, tell the response-center
agent that you are not experiencing an emergency.
76
1-2. Emergency assistance
■ Enhanced Roadside Assistance
Enhanced Roadside Assistance adds GPS data to the already
included warranty-based Toyota roadside service.
Subscribers can press the “SOS” button to reach a Safety Connect
response-center agent, who can help with a wide range of needs,
such as: towing, flat tire, fuel delivery, etc. For a description of the
Enhanced Roadside Assistance services and their limitations,
please see the Safety Connect Terms and Conditions, which are
available at Toyota.com in the United States, Toyotapr.com in
Puerto Rico and Toyota.ca in Canada.
Safety information for Safety Connect
Important! Read this information before using Safety Connect.
■ Exposure to radio frequency signals
The Safety Connect system installed in your vehicle is a low-power
radio transmitter and receiver. It receives and also sends out radio
frequency (RF) signals.
In August 1996, the Federal Communications Commission (FCC)
adopted RF exposure guidelines with safety levels for mobile wire-
less phones. Those guidelines are consistent with the safety stan-
dards previously set by the following U.S. and international
standards bodies.
● ANSI (American National Standards Institute) C95.1 [1992]
● NCRP (National Council on Radiation Protection and Measure-
ment) Report 86 [1986]
● ICNIRP (International Commission on Non-Ionizing Radiation
Protection) [1996]
Those standards were based on comprehensive and periodic eval-
uations of the relevant scientific literature. Over 120 scientists, engi-
neers, and physicians from universities, and government health
agencies and industries reviewed the available body of research to
develop the ANSI Standard (C95.1).
The design of Safety Connect complies with the FCC guidelines in
addition to those standards.

1-2. Emergency assistance
77
■Certification for Safety Connect
1
78
1-3. Theft deterrent system
Engine immobilizer system
The vehicle’s keys have built-in transponder chips that prevent
the engine from starting if a key has not been previously regis-
tered in the vehicle’s on-board computer.
Never leave the keys inside the vehicle when you leave the vehi-
cle.
This system is designed to help prevent vehicle theft but does
not guarantee absolute security against all vehicle thefts.
Vehicles without a smart key system
The indicator light flashes after
the key has been removed from
the engine switch to indicate that
the system is operating.
The indicator light stops flashing
after the registered key has been
inserted into the engine switch to
indicate that the system has been
canceled.
Vehicles with a smart key system
The indicator light flashes after the engine switch has been turned off
to indicate that the system is operating.
The indicator light stops flashing after the engine switch has been
turned to ACCESSORY or IGNITION ON mode to indicate that the
system has been canceled.
■ System maintenance
The vehicle has a maintenance-free type engine immobilizer system.
■ Conditions that may cause the system to malfunction
● If the grip portion of the key is in contact with a metallic object
● If the key is in close proximity to or touching a key to the security system
(key with a built-in transponder chip) of another vehicle
1-3. Theft deterrent system
79
WARNING
■ Certifications for the engine immobilizer system
Changes or modifications not expressly approved by the party responsible
for compliance could void the user’s authority to operate the equipment.
NOTICE
1
■ To ensure the system operates correctly
Do not modify or remove the system. If modified or removed, the proper
operation of the system cannot be guaranteed.
80
1-3. Theft deterrent system
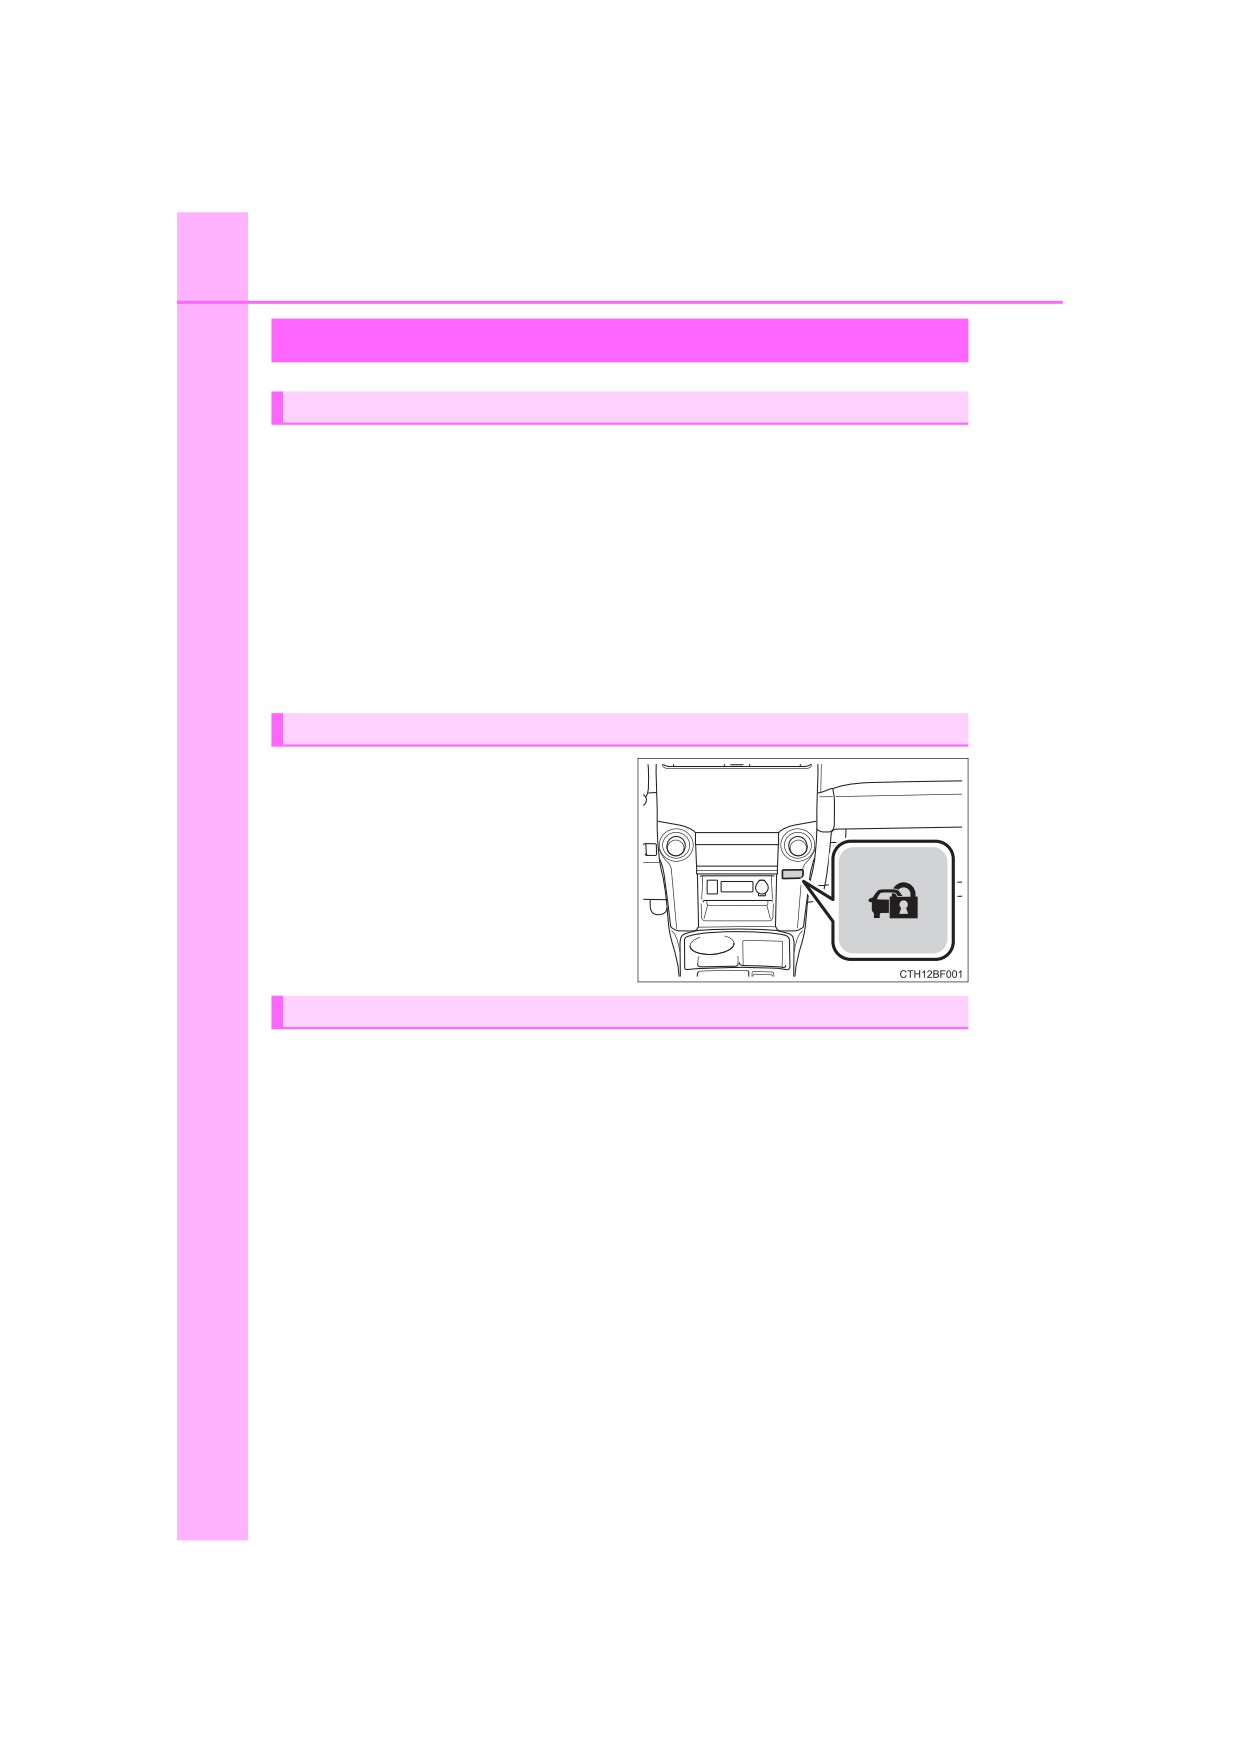
Alarm
The alarm
The alarm uses light and sound to give an alert when an intrusion is
detected.
The alarm is triggered in the following situations when the alarm is
set:
● A locked door is unlocked or opened in any way other than using
the entry function, wireless remote control or mechanical key. (The
doors will lock again automatically.)
● The hood is opened.
● The battery is reconnected.
Setting the alarm system
Close the doors and hood, and
lock all the doors. The system will
be set automatically after 30 sec-
onds.
The indicator light changes from
being on to flashing when the sys-
tem is set.
Deactivating or stopping the alarm
Do one of the following to deactivate or stopping the alarms:
● Unlock the doors.
● Vehicles without a smart key system: Turn the engine switch to
“ACC” or “ON” position, or start the engine. (The alarm will be deac-
tivated or stopped after a few seconds.)
● Vehicles with a smart key system: Turn the engine switch is in
ACCESSORY or IGNITION ON mode, or start the engine. (The
alarm will be deactivated or stopped after a few seconds.)
: If equipped
1-3. Theft deterrent system
81
■ System maintenance
The vehicle has a maintenance-free type alarm system.
■ Items to check before locking the vehicle
To prevent unexpected triggering of the alarm and vehicle theft, make sure of
the following:
● Nobody is in the vehicle.
1
● The windows and moon roof are closed before the alarm is set.
● No valuables or other personal items are left in the vehicle.
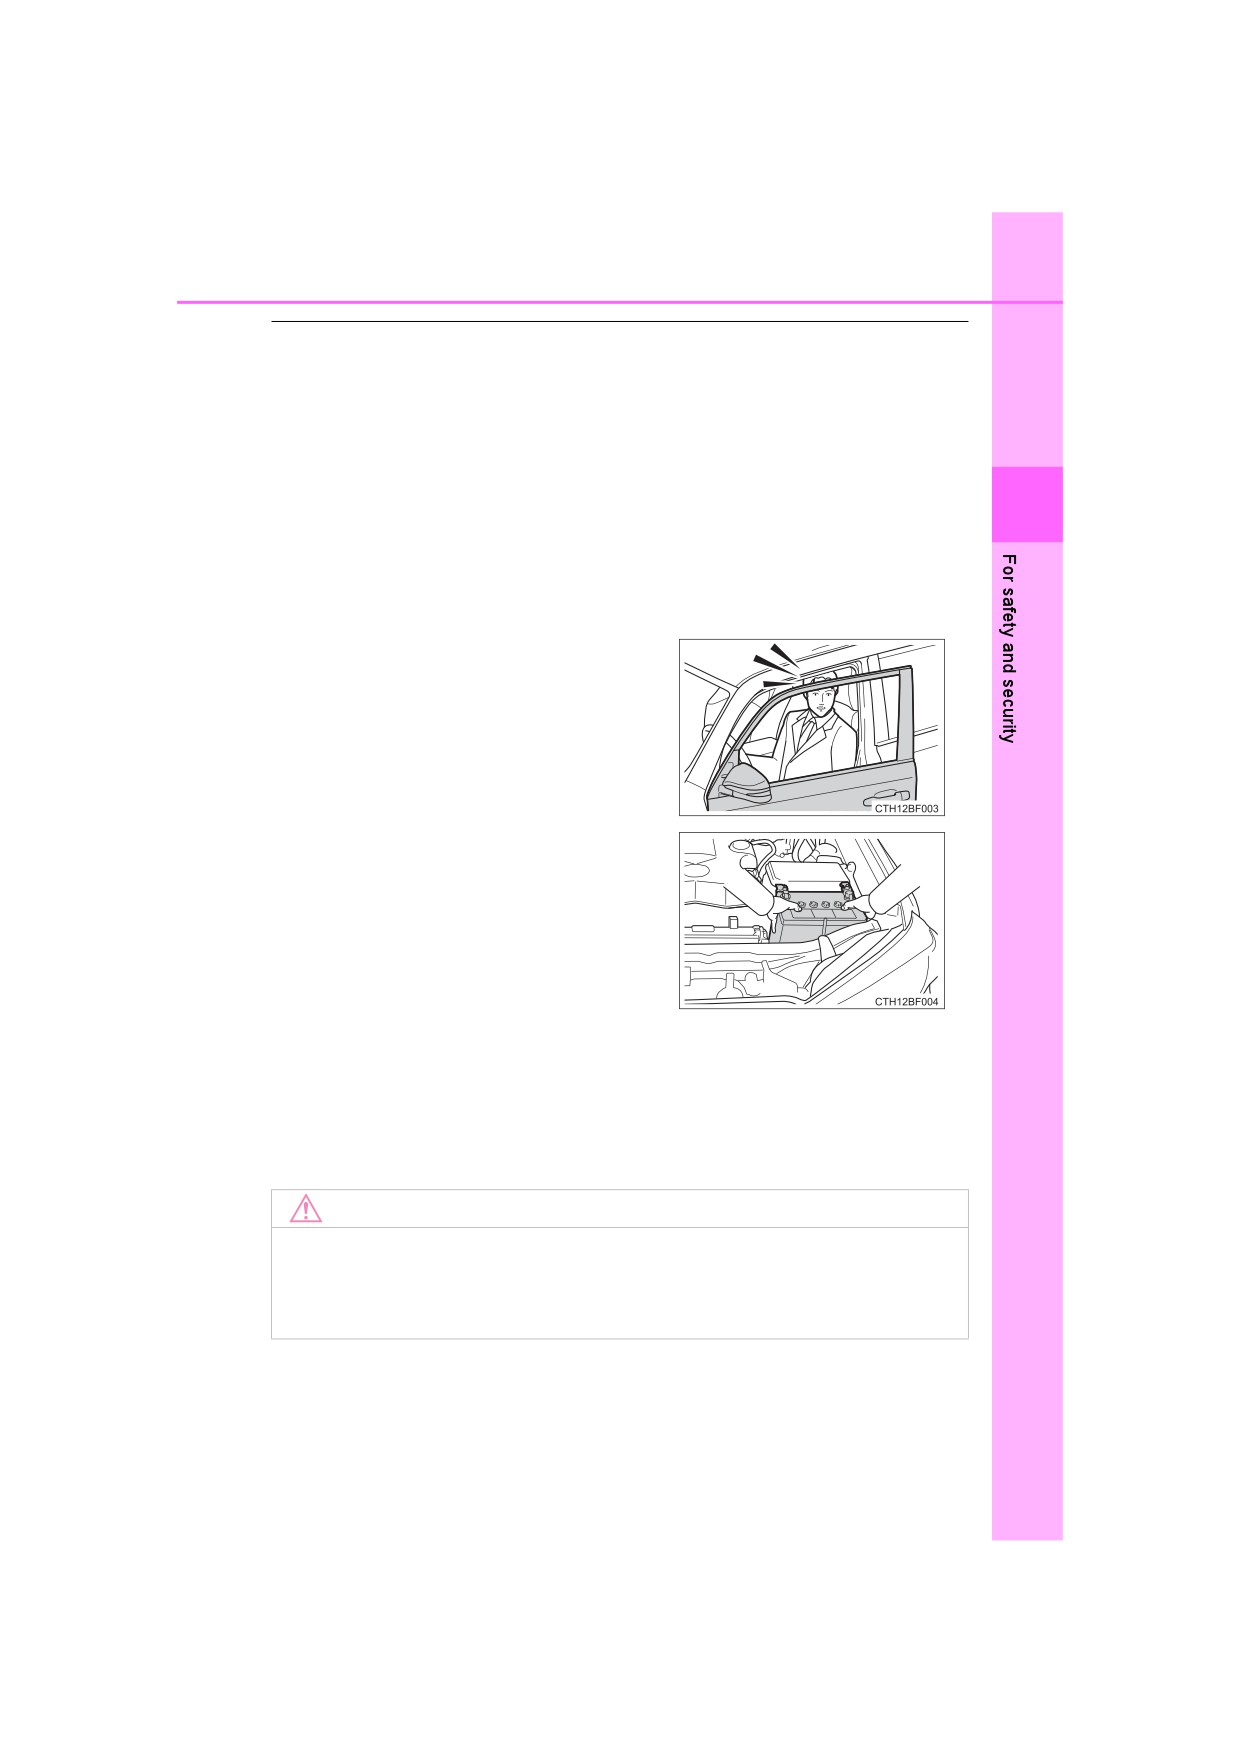
■ Triggering of the alarm
The alarm may be triggered in the following situations:
(Stopping the alarm deactivates the alarm system.)
● A person inside the vehicle opens a door
or the hood.
● The battery is recharged or replaced
when the vehicle is locked.
■ Alarm-operated door lock
● When the alarm is operating, the doors are locked automatically to prevent
intruders.
● Do not leave the key inside the vehicle when the alarm is operating, and
make sure the key is not inside the vehicle when recharging or replacing the
battery.
NOTICE
■ To ensure the system operates correctly
Do not modify or remove the system. If modified or removed, the proper
operation of the system cannot be guaranteed.
82
1-3. Theft deterrent system
83
Instrument cluster
2
2.
Instrument cluster
Warning lights and
indicators
84
Gauges and meters
90
Multi-information display
92

84
2. Instrument cluster
Warning lights and indicators
The warning lights and indicators on the instrument cluster and
center panel inform the driver of the status of the vehicle’s vari-
ous systems.
For the purpose of explanation, the following illustration dis-
plays all warning lights and indicators illuminated.
The units used on the speedometer and some indicators may differ
depending on where the vehicle is sold.

2. Instrument cluster
85
Warning lights
Warning lights inform the driver of malfunctions in the indicated vehi-
cle’s systems.
*1
*1
Brake system warning
Slip indicator (P. 487)
light (P. 486)
(U.S.A.)
*1
*3
Brake system warning
Four-wheel drive indica-
2
light (P. 486)
tor light (P. 488)
(Canada)
(if equipped)
*5
*3
High coolant tempera-
Low speed four-wheel
ture warning light
drive indicator light
(P. 486)
(P. 488)
(if equipped)
*1
*3
Charging system warn-
Rear differential lock
ing light (P. 486)
indicator light (P. 487)
(if equipped)
*1
*3
Malfunction
indicator
Center differential lock
lamp (P. 487)
indicator light (P. 488)
(U.S.A.)
(if equipped)
*1
*2, 4, 5
Malfunction
indicator
Multi-terrain Select indi-
lamp (P. 487)
cator light (P. 488)
(Canada)
(if equipped)
*1
*5
Brake Override System/
SRS warning light
Drive-Start
Control/
(P. 487)
warning light (P. 489)
*1
ABS warning light
Parking brake indicator
(P. 487)
(P. 489)
(U.S.A.)
(U.S.A.)
*1
ABS warning light
Parking brake indicator
(P. 487)
(P. 489)
(Canada)
(Canada)
86
2. Instrument cluster
*1
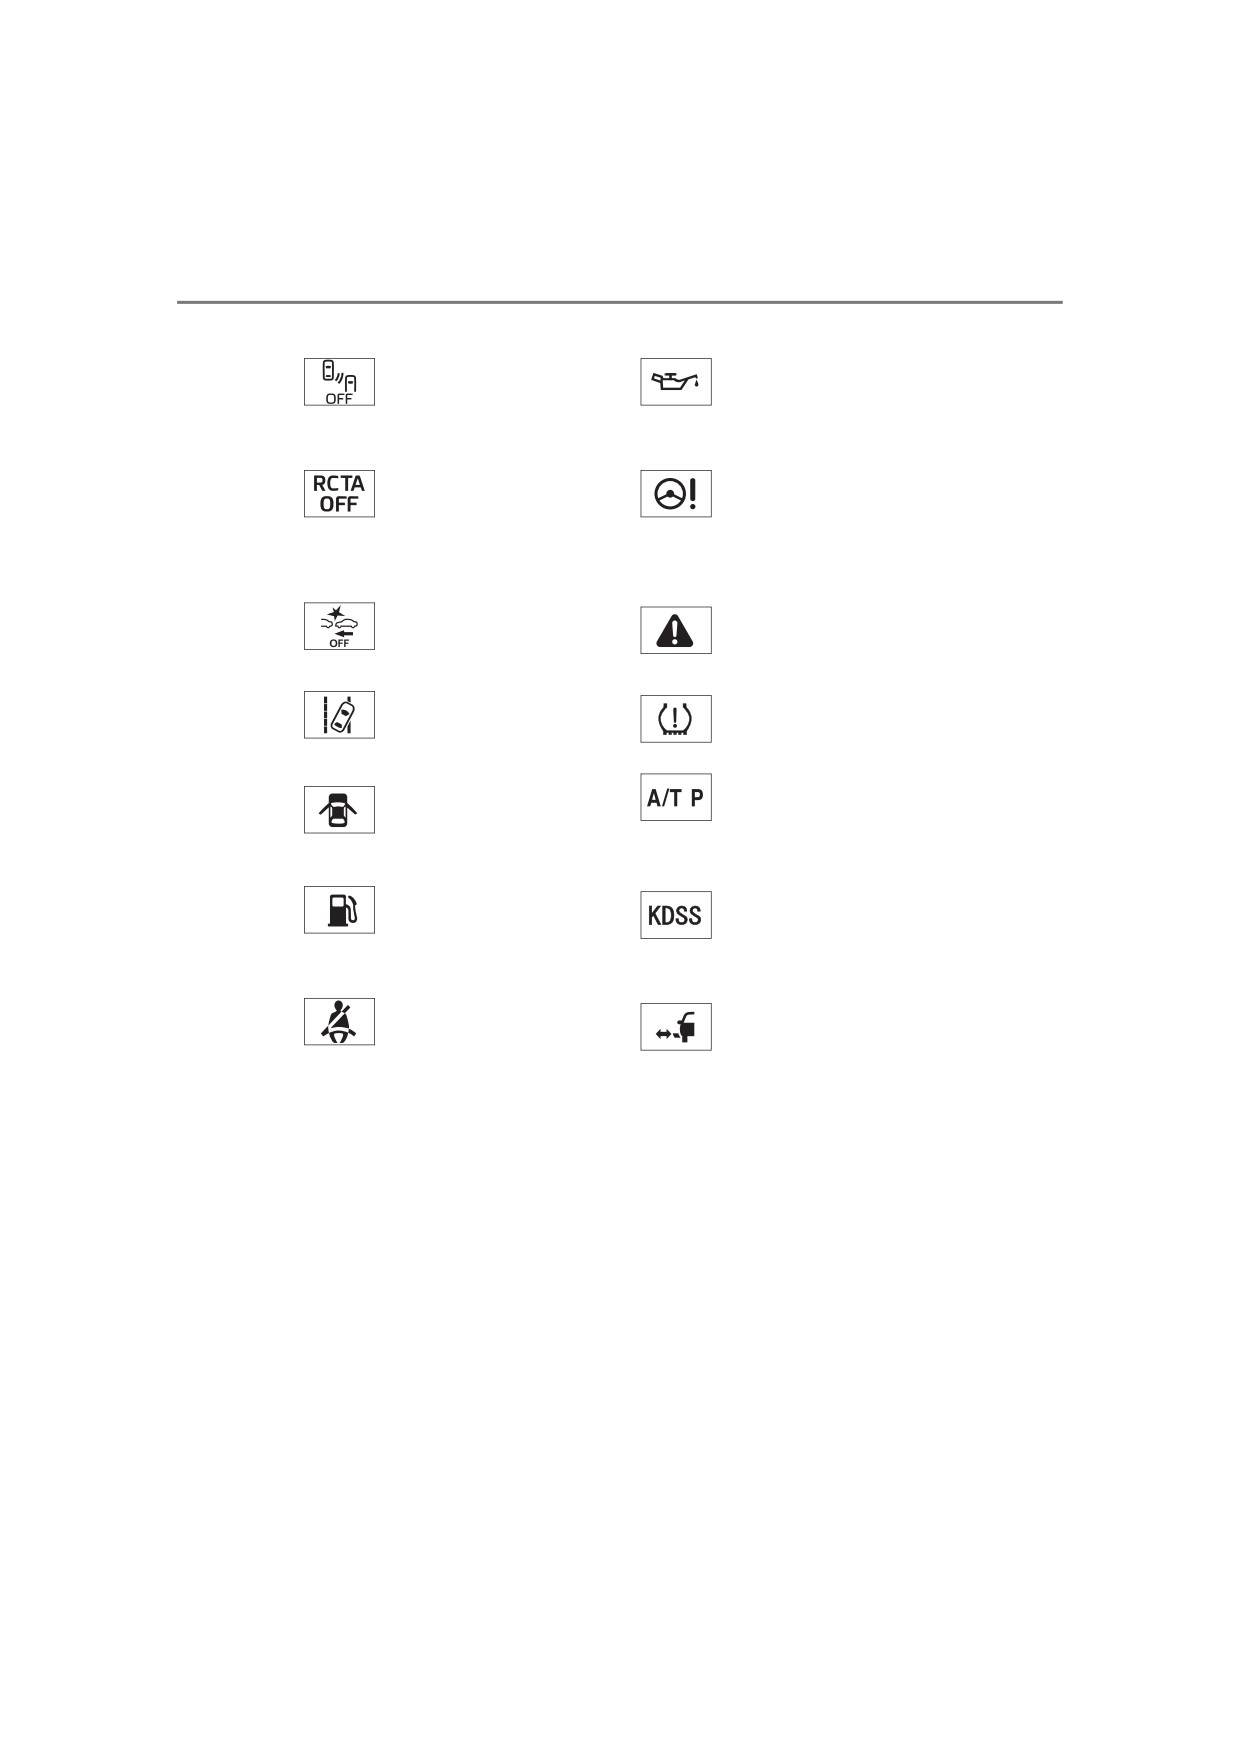
*5
BSM OFF (Blind Spot
Low engine oil pressure
Monitor) indicator
warning light (P. 486)
(P. 491)
(if equipped)
*1
*1
RCTA OFF (Rear Cross
Power steering warning
Traffic Alert) indicator
light (P. 488)
(P. 491)
(Flashes)
(if equipped)
*1, 6
*1
PCS warning light
Master warning light
(P. 490)
(P. 497)
*5
*1
Tire pressure warning
LDA indicator (P. 490)
light (P. 490)
(Amber)
Open door warning light
Unengaged “Park” warn-
(P. 488)
ing light (P. 488)
(if equipped)
*1
Low fuel level warning
KDSS warning light
light (P. 489)
(P. 488)
(if equipped)
*1, 2
Automatic
running
Seat belt reminder light
boards indicator light
(P. 489)
(P. 488)
(if equipped)
1: These lights turn on when the engine switch is turned to IGNITION ON
mode (vehicles with a smart key system) or the engine switch is turned to
the “ON” position (vehicles without a smart key system) to indicate that a
system check is being performed. They will turn off after the engine is
started, or after a few seconds. There may be a malfunction in a system if
the lights do not come on, or do not turn off. Have the vehicle inspected by
your Toyota dealer.
*2: This light flashes to indicate a malfunction.
*3: This light flashes rapidly to indicate a malfunction.
*4: This light flashes continuously to indicate a malfunction.
*5: This light illuminates on the multi-information display.
*6: This light flashes or illuminates to indicate a malfunction.