Subaru XV Crosstrek (2016 year). Instruction - part 21
& CD
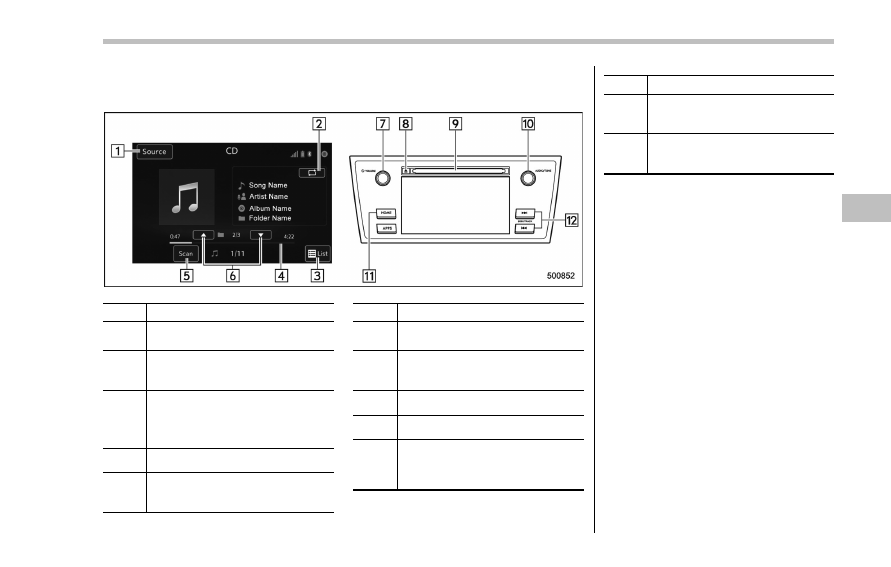
! Control screen and audio panel
No.
Function
&
1
Select to display the audio source
selection screen.
&
2
Select to display the play mode
currently selected. Refer to
“Select
play mode
” F5-54.
&
3
Audio CD:
Select to display a track list.
MP3/WMA/AAC disc:
Select to display a folder list.
&
4
Shows progress.
&
5
The tracks in the disc are played
back for 10 seconds each from the
beginning of the track.
No.
Function
&
6
MP3/WMA/AAC disc:
Select to choose a folder.
&
7
Turn to adjust volume.
Press to turn the audio system on/
off.
&
8
Press to eject a disc.
&
9
Disc slot
&
10
Turn to select a track/file.
Press to select an audio source.
Refer to
“Selecting an audio source”
F5-18.
No.
Function
&
11
Press to display the sound setting
screen. Refer to
“Unit settings” F5-
19.
&
12
Press to select a track/file.
Press and hold to fast forward/re-
wind.
NOTE
. Depending on the compression data
format of the inserted CD, some keys
may not be displayed on the screen.
. If a disc contains CD-DA files and
MP3/WMA/AAC files, only the CD-DA
files can be played back.
. If a CD-TEXT disc is inserted, the
title of the disc and track will be
displayed. Up to 32 characters can be
displayed.
. If the disc contains no CD-TEXT,
only the track number would be dis-
played on the screen.
Audio/Audio set
– CONTINUED –
5-53