SsangYong Rexton. Service manual - part 607


  Index      SsangYong     SsangYong Rexton - service and repair manual


Search            


Content   ..  605  606  607  608   ..


SsangYong Rexton. Service manual - part 607


SSANGYONG  Y200

5D2-76  TRANSFER CASE - TOD

03E-019

YAD5D370

YAD5D380

YAD5D390

DISASSEMBLY PROCEDURE

1. Disconnect transfer case from vehicle

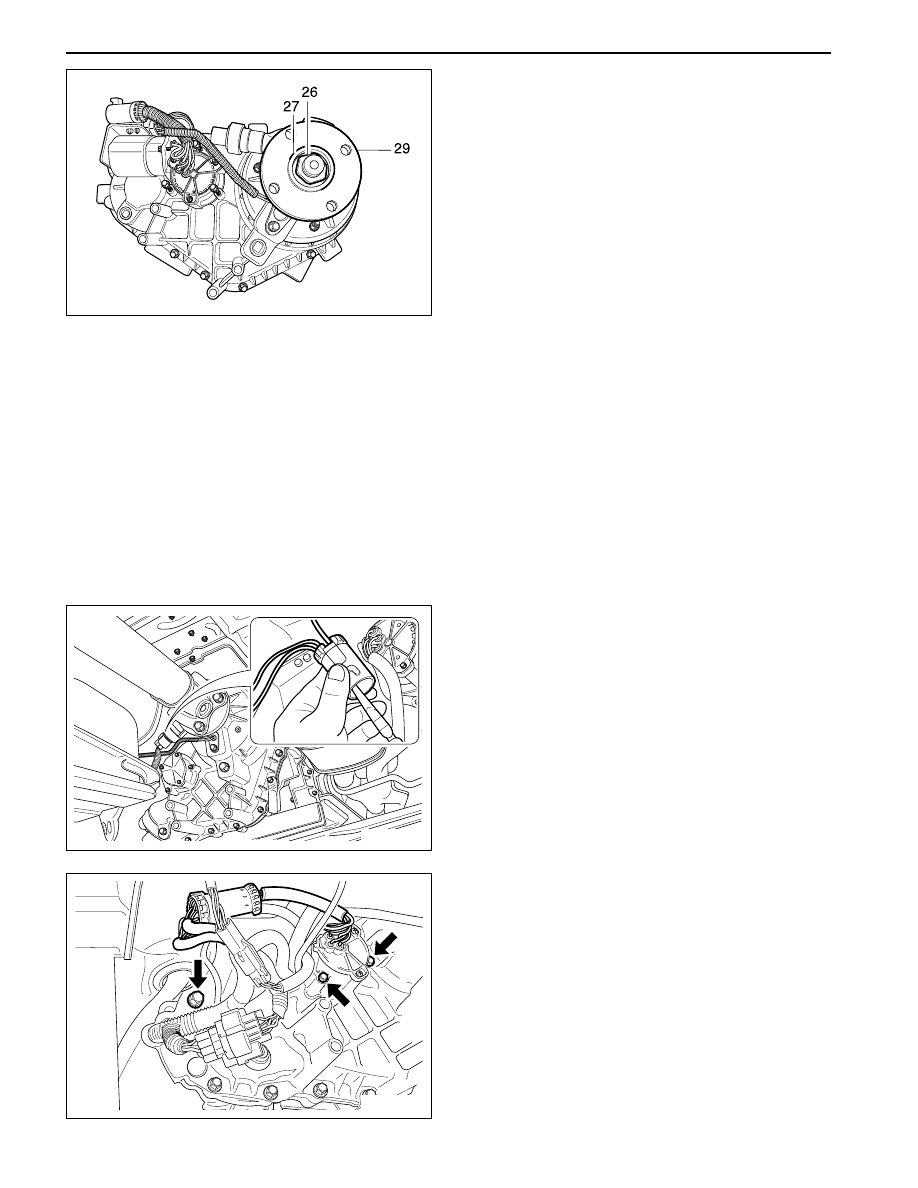
2. Using a 30 mm thin-wall socket, first remove the

rear output nut, output shaft yoke washer, oil seal
then the case flange.

3. Disconnect shift motor/clutch coil connector and

speed sensor connector from upper bracket of
transfer case.

N o t i c e :   W h e n   d i s c o n n e c t   c o n n e c t o r ,   p u l l
forwards grasping connector housing.

4. Remove outer tube on speed sensor connector.

5. Remove wire supporting cape back side of speed

sensor connector.

7. Remove shift motor.

Notice: When remove shift motor, pay attention
to the location of triangular slot and shaft in transfer
case inside motor.

6. Disconnect pin of clutch coil wire (yellow) from

speed sensor connector (7 pin) using long-nose
plier.

TRANSFER CASE - TOD  5D2-77

SSANGYONG  Y200

8. Disconnect front and rear speed sensor as

needed.

9. Remove the 17 bolts that retain the front case to

the rear case.

17. Remove the three nuts and washers retaining the

clutch coil assembly to the rear case.

18. Pull the assembly, along with the O-ring and wire,

from the case.

10. Make sure that the front case is facing downward

so that the rear cover is facing upwards.

11. Remove the rear front case from the rear case.

12. Remove all traces of gasket sealant from the

mating surfaces of the front case and rear case.

13. If the speedometer drive gear is to be replaced,

first remove the flange seal by prying and pulling
the curved-up lip of the flange seal.

Notice: Be careful not to damage the bearing,
bearing cage or case. Remove and discard the
flange seal.

14. Remove the speedometer drive gear and upper

tone wheel.

15. If the rear output shaft bearing requires replacing,

remove the internal snap ring that retains the
bearing in the bore.

16. From the outside of the case, drive out the bearing

using the driver.

YAD5D400

YAD5D410

YAD5D420

SSANGYONG  Y200

5D2-78  TRANSFER CASE - TOD

YAD5D430

YAD5D440

YAD5D450

YAD5D460

19. Remove bearing assembly from output shaft.

20. Remove the clutch housing from the output shaft.

26. Remove the magnet from the slot in the front of the

case bottom.

27. Remove the output shaft and oil pump as an

assembly.

28. If required, to remove the pump from the output

shaft, rotate the pump to align.

29. Pull out the shift rail.

30. Remove the helical cam from the front case.

31. If required, remove the helical cam, torsion spring

and sleeve from the shaft.

24. Remove the chain, driven sprocket and drive

sprocket as an assembly.

25. Remove thrust washer from output shaft.

21. Remove the balls and apply cam and wave

washer from the output shaft.

22. Remove snap ring from output shaft.

23. Remove clutch pack assembly from output shaft.

TRANSFER CASE - TOD  5D2-79

SSANGYONG  Y200

YAD5D470

YAD5D480

YAD5D490

42. Inspect the bushing and needle bearing in the end

of the input shaft for wear or damage.

Notice: Under normal use, the needle bearing
and bushing should not require replacement. If
replacement is required, the bushing and needle
bearing must be replaced as a set.

32. Remove the high-low range shift fork and collar

as an assembly.

33. Expand the tangs of the large snap ring in the

case.

34. With the input shaft against a bench, push the case

down and slide the main drive gear bearing
retainer off the bearing.

35. Lift the input shaft and front planet from the case.

36. If required, remove the oil seal from the case by

prying and pulling on the curved-up lip of the oil
seal.

Notice: Be careful not to damage the bearing,
bearing cage or case.

40. Place the input shaft in a vise and remove the

bearing.

41. Remove the thrust washer, thrust plate and the sun

gear off the input shaft.

37. Remove the internal snap ring from the planetary

carrier.

38. Separate the front planet from the input shaft.

39. Remove the external snap ring from the input shaft.


Content   ..  605  606  607  608   ..