Renault Megane Sport Tourer (2016 year). Manual - part 9


  Index      Renault     Renault Megane Sport Tourer - service manual 2016 year in english


Search            


Content   ..  7  8  9  10   ..


Renault Megane Sport Tourer (2016 year). Manual - part 9


2.40

When the vehicle is being driven at 

a speed below approximately 6 mph 

(10 km/h), certain noises (motorcy-

cle, lorry, pneumatic drill, etc.) may 

trigger the beeping sound.

PARKING DISTANCE CONTROL 

(4/4)

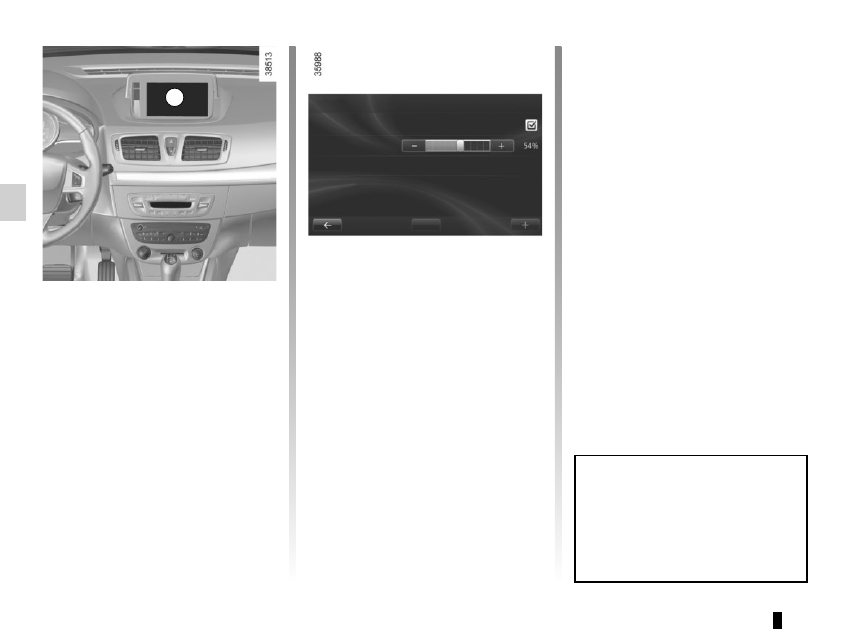
Adjusting the parking 

distance control volume

From the multimedia display
Certain settings can be adjusted from 

the multimedia display A. Please see 

the equipment instructions for further 

information.
Select “menu”, “Settings”, “Park Assist”, 

then adjust the parking distance con-

trol volume by pressing + or -.

Deactivating the system

From the multimedia display
You can deactivate the parking distance 

control from the multimedia display.
Select “menu”, “Settings”, “Park Assist” 

then “Rear parking sensor” or “Front 

parking sensor”. Activate or deactivate 

the parking distance control and con-

firm your choice by selecting “Done”.

Done  

Park Assist  

Rear parking sensor 

Volume 

Image settings 

Rear camera view settings  

Operating faults

When the system detects an operating 

fault, a beep sounds for approximately 

3 seconds each time reverse gear is se-

lected and is accompanied by the mes-

sage “Check parking sensor” shown on 

the instrument panel. Please consult an 

authorised dealer.

Special features

Ensure that the ultrasonic sensors are 

not obscured (by dirt, mud, snow, etc.).

A

2.41

REVERSING CAMERA 

(1/2)

1

3

C

B

A

4

This gauge remains fixed and indicates 

the vehicle trajectory if the wheels are 

in line with the vehicle.

Special feature

Make sure that the camera is not ob-

scured (by dirt, mud, snow, etc.).

3 moving guide line:
This is shown in blue on screen 2. It in-

dicates the vehicle trajectory according 

to the position of the steering wheel.

Fixed gauge 4
The fixed clearance gauge comprises 

coloured markers AB and C, indicat-

ing the distance behind the vehicle:
–  A (red) approximately 30 centime-

tres from the vehicle;

–  B (yellow) approximately 70 centi-

metres from the vehicle;

–  C (green) approximately 150 centi-

metres from the vehicle.

Operation

Moving into reverse gear, the camera 1 

located near the number plate lights 

provides a view of the area behind the 

vehicle on the multimedia display 2

accompanied by two moving or fixed 

guide lines 3 and 4.
This system is initially used with the aid 

of several gauges (mobile for trajectory 

and fixed for distance). When the red 

zone is reached, use the bumper image 

to stop accurately.

2

2.42

REVERSING CAMERA 

(2/2)

Park Assist  

Rear parking sensor 

Volume 

Image settings 

Rear camera view settings  

You can also adjust the camera image 

settings (brightness, contrast, etc.)

The screen shows a reverse image.
The frames are a representation 

projected onto flat ground; this in-

formation must not be taken into 

account when superimposed on a 

vertical object or an object on the 

ground.
Objects which appear on the edge 

of the screen may be deformed.
In very bright light (snow, vehicle in 

sunshine etc.), the camera vision 

may be adversely affected.
If the boot is open or poorly closed, 

the message “Boot open” appears 

and the camera display disappears.

This function is an additional aid. It cannot, therefore, under any circum-

stances replace the vigilance or the responsibility of the driver.

The driver should always pay attention to sudden incidents during driv-

ing: always ensure that there are no moving obstacles (such as a child, 

animal, pram, bicycle, etc.) or small, narrow objects such as stones or posts in 

your path when manoeuvring.

Activating, deactivating the 

reversing camera

From the multimedia display 2, select 

“menu”, “Settings”, “Park Assist” then 

“Rear camera view settings”. Activate 

or deactivate the reversing camera and 

confirm your choice by selecting 

“Done”.

2

Done  

2.43

Selector lever 1

Display 3 on the instrument panel 

shows the mode and gear selected.
4:   P: park
5:    R: reverse gear
6:    N: neutral
7:    D: automatic mode
:   manual mode
9    zone displaying gearbox mode or 

gear engaged in manual mode

Operation

With the gear lever 1 in position P

switch on the ignition.
To move out of position P, you must de-

press the brake pedal before pressing 

unlocking button 2.
With the foot on the brake pedal (warn-
ing light 

c

 on the display 3 goes out), 

move the lever out of position P.
Only engage D or R when the vehi-

cle is stopped, with your foot on the 

brake and the accelerator pedal re-

leased.

AUTOMATIC TRANSMISSION 

(1/3)

Driving in automatic mode

Select position D. In most traffic con-

ditions, you will not have to touch the 

gear selector lever again: the gears will 

change automatically at the right time 

and at the most suitable engine speed 

because the automatic system takes 

into account the vehicle load and road 

contour and adjusts itself to the particu-

lar driving style you have chosen.

Economical driving

When driving, always leave the lever 

in position D, keeping the accelerator 

pedal lightly depressed to ensure auto-

matic gear changes at a lower engine 

speed.

Accelerating and overtaking

Depress the accelerator pedal firmly 

and fully (so that it goes beyond the 

kickdown point).
This will enable you to change down 

to the optimum gear within the 

engine range.

3

2

1

4

5
6

7

8

9

2.44

Parking the vehicle

When the vehicle is stopped, move the 

lever to position P while keeping your 

foot on the brake pedal: the gearbox is 

in neutral and the drive wheels are me-

chanically locked by the driveshaft.
Apply the handbrake or, depending 

on the vehicle, ensure that the elec-

tronic parking brake is applied.

Special circumstances

–  If the road contours and bends 

do not allow you to stay in auto-

matic mode (e.g.: in the mountains), 

we recommend that you change to 

manual mode.

This will prevent the automatic gear-

box from changing gears repeatedly 

when climbing, and permit engine 

braking on long descents.

  In cold weather, to prevent the 

engine from stalling, wait a few mo-

ments before shifting the selector 

lever from position P or N and en-

gaging D or R.

Driving in manual mode

With the selector lever in position D

move the lever to the left. Shifting the 

lever repeatedly allows you to change 

gears manually:
–  To move down through the gears, 

push the lever backwards;

–  To move up through the gears, push 

the lever forwards.

The gear selected is displayed on the 

instrument panel.

Special cases

Under certain driving conditions (e.g. 

engine protection, or electronic stabil-

ity program (ESP) operational etc.): the 

automatic system may change gear au-

tomatically.
Likewise, to prevent incorrect manoeu-

vres, a gear change may be refused by 

the automatic system: in this case the 

gear display flashes for a few seconds 

as a warning.

AUTOMATIC TRANSMISSION 

(2/3)

In very cold weather, the system 

may prevent the gears from being 

shifted in manual mode until the 

gearbox reaches the right tempera-

ture.

An impact to the under-

side of the vehicle while 

manoeuvring (e.g.: strik-

ing a post, raised kerb or 

other street furniture) may result in 

damage to the vehicle (e.g.: defor-

mation of an axle).
To avoid any risk of accident, have 

your vehicle checked by an ap-

proved Dealer.

2.45

When setting off, if the lever is locked 

in position P even though you are de-

pressing the brake pedal and pressing 

unlocking button 2, the lever can be re-

leased manually. To do this, press the 

button by inserting an object into the 

hole 10 and simultaneously press un-

locking button 2 located on the lever.

AUTOMATIC TRANSMISSION 

(3/3)

Operating faults

  When driving, if the “Check auto 

gearbox” message appears on the 

instrument panel, it indicates a fault.
Contact your approved Dealer as 

soon as possible.

  When driving, if the message “Auto 

gearbox overheating” appears on 

the instrument panel, stop the ve-

hicle to allow the gearbox to cool 

down.
Contact your approved Dealer as 

soon as possible.

  If a vehicle with an automatic 

gearbox breaks down, refer to the 

information on “Towing” in Section 5.

10

2

2.46

3.1

Section 3: Your comfort

Air Vents  . . . . . . . . . . . . . . . . . . . . . . . . . . . . . . . . . . . . . . . . . . . . . . . . . . . . . . . . . . . . . . . . . . . . . .  

3.2

Manual air conditioning . . . . . . . . . . . . . . . . . . . . . . . . . . . . . . . . . . . . . . . . . . . . . . . . . . . . . . . . . . .  

3.4

Automatic climate control  . . . . . . . . . . . . . . . . . . . . . . . . . . . . . . . . . . . . . . . . . . . . . . . . . . . . . . . . .  

3.6

Air conditioning: information and advice on use . . . . . . . . . . . . . . . . . . . . . . . . . . . . . . . . . . . . . . . .  3.11

Electric windows/Electric sunroof  . . . . . . . . . . . . . . . . . . . . . . . . . . . . . . . . . . . . . . . . . . . . . . . . . . .   3.12

Manual window winders - Sun visor  . . . . . . . . . . . . . . . . . . . . . . . . . . . . . . . . . . . . . . . . . . . . . . . . .   3.15

Interior lighting . . . . . . . . . . . . . . . . . . . . . . . . . . . . . . . . . . . . . . . . . . . . . . . . . . . . . . . . . . . . . . . . . .   3.16

Passenger compartment storage/fittings . . . . . . . . . . . . . . . . . . . . . . . . . . . . . . . . . . . . . . . . . . . . . .   3.18

Accessories socket . . . . . . . . . . . . . . . . . . . . . . . . . . . . . . . . . . . . . . . . . . . . . . . . . . . . . . . . . . . . . .   3.22

Ashtray – Cigarette lighter . . . . . . . . . . . . . . . . . . . . . . . . . . . . . . . . . . . . . . . . . . . . . . . . . . . . . . . . .   3.22

Rear bench seat  . . . . . . . . . . . . . . . . . . . . . . . . . . . . . . . . . . . . . . . . . . . . . . . . . . . . . . . . . . . . . . . .   3.23

Luggage compartment. . . . . . . . . . . . . . . . . . . . . . . . . . . . . . . . . . . . . . . . . . . . . . . . . . . . . . . . . . . .   3.25

Rear parcel shelf . . . . . . . . . . . . . . . . . . . . . . . . . . . . . . . . . . . . . . . . . . . . . . . . . . . . . . . . . . . . . . . .   3.26

Luggage compartment cover: sport tourer versions . . . . . . . . . . . . . . . . . . . . . . . . . . . . . . . . . . . . .   3.27

Luggage compartment storage space/fittings . . . . . . . . . . . . . . . . . . . . . . . . . . . . . . . . . . . . . . . . . .   3.28

Transporting objects in the luggage compartment  . . . . . . . . . . . . . . . . . . . . . . . . . . . . . . . . . . . . . .   3.31

Transporting objects: . . . . . . . . . . . . . . . . . . . . . . . . . . . . . . . . . . . . . . . . . . . . . . . . . . . . . . . . . . . . .   3.32

equipment  . . . . . . . . . . . . . . . . . . . . . . . . . . . . . . . . . . . . . . . . . . . . . . . . . . . . . . . . . . . . . . . 

3.32

Luggage net. . . . . . . . . . . . . . . . . . . . . . . . . . . . . . . . . . . . . . . . . . . . . . . . . . . . . . . . . . . . . . . . . . . .   3.33

Roof bars . . . . . . . . . . . . . . . . . . . . . . . . . . . . . . . . . . . . . . . . . . . . . . . . . . . . . . . . . . . . . . . . . . . . . .   3.35

Multimedia equipment . . . . . . . . . . . . . . . . . . . . . . . . . . . . . . . . . . . . . . . . . . . . . . . . . . . . . . . . . . . .   3.36

3.2

AIR VENTS: air outlets 

(1/2)

Depending on the vehicle:
1
  left-hand side air vent
2 left-hand side window demister 

outlet

3  windscreen demister outlets
4  centre air vents
5  right-hand side air vent
6 right-hand side window demister 

outlet

7  passenger footwell heater outlets
8  centre console air vents
9  air conditioning control panel

1

2

3

5

6

7

7

9

8

4

3.3

AIR VENTS: air outlets 

(2/2)

Air flow

Turn control knob 1 (beyond the point 

of resistance).
Up: maximum air flow.
Down: closed.
Turn control knob 3 (beyond the point 

of resistance).
To the right: maximum air flow.
To the left: closed.

Direction

Right/left: move tabs 2 to the right or 

left.
Up/down: lower or raise tabs 2.

2

3

1

2

1

2

Depending on the vehicle, the air 

vents 4 may be replaced by a stor-

age compartment; refer to Section 

3 “Passenger compartment storage/

fittings”.

4

To remove bad odours from your ve-

hicles, only use the systems designed 

for this purpose. Consult an approved 

Dealer.

Do not add anything to the 

vehicle’s ventilation circuit 

(for example, to remove 

bad odours).

There is a risk of damage or of 

fire.

3.4

MANUAL AIR CONDITIONING 

(1/2)

1

2

3

4

5

6

The controls

1  Adjusting the air temperature
2  Adjusting the ventilation speed
3 Air conditioning.
4  Distribution of air in the passenger 

compartment.

5  De-icing/demisting of the rear screen 

and, depending on the vehicle, the 

door mirrors.

6 Air recirculation.

Switching air conditioning on 

or off

The air conditioning is switched on (in-

dicator light on) or off (indicator light off) 

using button 3.

The air conditioning system is used 

for:
  lowering the temperature inside the 

passenger compartment;

– eliminating condensation more 

quickly.

Distribution of air in the 

passenger compartment

There are five air distribution options. 

Turn control 4 to choose the distribution 

option.

W

The air flow is directed to the 

windscreen and the front side 

window demisting vents.

i

The air flow is distributed 

between all the air vents, the 

front side window demisting vents, the 

windscreen demisting vents and the 

footwells.

ó

The air flow is directed mainly 

towards the footwells.

G

The air flow is directed towards 

the dashboard vents and the 

footwells.

J

All the air flow is directed to the 

dashboard vents.

3.5

Adjusting the ventilation 

speed

Turn control 2 clockwise to increase the 

air flow in the passenger compartment.

The passenger compartment is ven-

tilated by blown air. The blower deter-

mines how much air enters but vehicle 

speed has a slight effect on this.

Switching the air 

recirculation on

Press button 6: the integrated indicator 

light comes on.

Under these conditions, air is taken 

from the passenger compartment and 

is recirculated, with no air being taken 

from outside the vehicle.

Air recirculation is for:

–  isolating the vehicle from the exter-

nal atmosphere (driving in polluted 

areas, etc.);

– lowering the passenger compart-

ment temperature as quickly as pos-

sible.

“OFF" position:

the system is deactivated: the ventila-

tion speed for the passenger compart-

ment air is zero (vehicle stationary), 

you can however still feel a slight flow 

of air when the vehicle is moving.

Recommended demisting option:

Turn controls 12 and 4 to the 

W


position.

This is the quickest option for de-icing 

and demisting the side windows and 

the windscreen.

MANUAL AIR CONDITIONING 

(2/2)

Prolonged use of air recirculation 

can lead to condensation forming 

on the side windows and winds-

creen, and discomfort due to the 

use of non-renewed air in the pas-

senger compartment.

We therefore advise you to return to 

normal mode (external air) as soon 

as the air recirculation function is 

no longer required, by pressing the 

button 6 again.

The de-icing function cannot be used with the air recirculation mode to avoid any risk of condensation forming on the wind-

screen and triggers the air conditioning and the integrated indicator light 3 to come on.

1

2

3

4

6

3.6

AUTOMATIC CLIMATE CONTROL 

(1/5)

Automatic mode

The automatic climate control system 

guarantees comfort in the passen-

ger compartment and good visibility 

(except in the event of extreme condi-

tions), whilst optimising consumption. 

The system controls the ventilation 

speed, air distribution, air recircula-

tion, and starting and stopping the air 

conditioning and air temperature. This 

mode consists of a choice of three pro-

grammes:
AUTO: allows the selected comfort 

level to be best attained, depending on 

the exterior conditions. Press button 3.
SOFT: gently brings the temperature to 

the desired comfort level. The comfort 

level is then maintained gently and si-

lently. Press button 2.
FAST: increases the operation of the 

system to reach the desired comfort 

level more quickly. Use this programme 

when you have passengers in the rear. 

Press button 4.

13

4

9   De-icing/demisting of the rear screen 

and, depending on the vehicle, the 

door mirrors.

10  “Clear View” function.
11  Air  recirculation.
12   Display.
13  Fan speed.

6

7

8

9

10

11

3

2

The controls

1 and 6 Air temperature.
23 and 4 Automatic programmes.
5  Distribution of air in the passenger 

compartment.

7 Off button.
8 Air conditioning.

12

5

1

3.7

AUTOMATIC CLIMATE CONTROL 

(2/5)

Varying the ventilation speed

In automatic mode, the system uses 

the most suitable amount of air to reach 

and maintain the desired comfort level.
You can still adjust the fan speed by 

pressing the buttons 13 to increase or 

reduce the fan speed.
In this case, the fan speed, which is 

no longer controlled automatically, ap-

pears in zone A on the display 12.

Some buttons have an operating 

tell-tale which indicates the opera-

ting status.

1

3

Temperature adjustment

Press button 1 or 6 to raise or lower the 

left-hand 1 or right-hand 6 temperature. 

Pressing button 3 for more than two se-

conds sets the passenger temperature 

to the driver’s temperature.
Special note: The highest and lowest 

settings allow the system to produce 

maximum hot or cold temperature 

levels (“LO” and “HI” indicated on the 

multimedia display 12).

6

12

Clear View function

Press button 10: the integrated indica-

tor light comes on.
This function quickly demists and de-

ices the windscreen, the rear screen, 

the front side windows, and the door 

mirrors (depending on the vehicle). The 

air conditioning and rear screen de-

icing functions must be activated.
Press button 9 to stop the heated rear 

screen operating; the integrated indica-

tor goes out.
You can change the fan speed: press 

the button 13.
To exit this function, press:
– the 10 button again;
–  one of either button 23 or 4.

10

9

2

4

A

13

3.8

The displayed temperature values 

show a comfort level.
When starting the engine, in-

creasing or decreasing the value 

displayed will not allow the com-

fort level to be reached any more 

quickly. The system will always op-

timise the temperature increase or 

decrease (the ventilation system 

does not start instantly at maximum 

speed: it gradually increases). This 

may take several minutes.
Generally speaking, unless there is 

a particular reason not to, the dash-

board air vents should remain open.

You are recommended to use automatic mode by selecting one of the auto-

matic programmes AUTO, SOFT or FAST.
In automatic mode (indicator light for button 3 on), all heating and air conditioning 

functions are controlled by the system.
You can also change the system selection. In this case, the indicator light on the 

button 3 will go out and the changed function, which is no longer controlled by the 

system, will be shown on the display 12.
To return to automatic mode, press one of the AUTOSOFT or FAST programmes.

AUTOMATIC CLIMATE CONTROL 

(3/5)

Switching air conditioning on 

or off

In automatic mode, the system switches 

the air conditioning system on or off, 

depending on the climate conditions.
Press switch 8 to switch off the air 

conditioning; the integrated indicator 

comes on and “A/C OFF” is shown on 

display 12.

3

8

12

3.9

AUTOMATIC CLIMATE CONTROL 

(4/5)

Rear screen de-icing/

demisting

Press button 9: the integrated indica-

tor light comes on. This function per-

mits rapid demisting/de-icing of the rear 

screen and de-icing of the door mirrors 

(on equipped vehicles).
To exit this function, press button 9 

again. Demisting automatically stops 

by default.

Ø

The air flow is directed to the 

windscreen and the front side 

window demisting vents.

×

The air flow is distributed be-

tween front side window de-

misting vents, the windscreen demist-

ing vents and the footwells.

¿

The air flow is directed mainly 

towards the footwells.

¾

The air flow is directed towards 

the dashboard vents and the 

footwells.

½

All the air flow is directed to the 

dashboard vents.

In this situation, the distribution of air in 

the passenger compartment, which is 

no longer automatically controlled, ap-

pears on the display.

9

Adjusting the distribution 

of air in the passenger 

compartment

There are five air distribution options. 

Press the switch 5 to scroll through 

them. The arrows located in zone B on 

the display 12 combine to show you the 

distribution selected:

5

B

12

13


Content   ..  7  8  9  10   ..