Renault Megane Sport Tourer (2016 year). Manual - part 4


  Index      Renault     Renault Megane Sport Tourer - service manual 2016 year in english


Search            


Content   ..  2  3  4  5   ..


Renault Megane Sport Tourer (2016 year). Manual - part 4


1.50

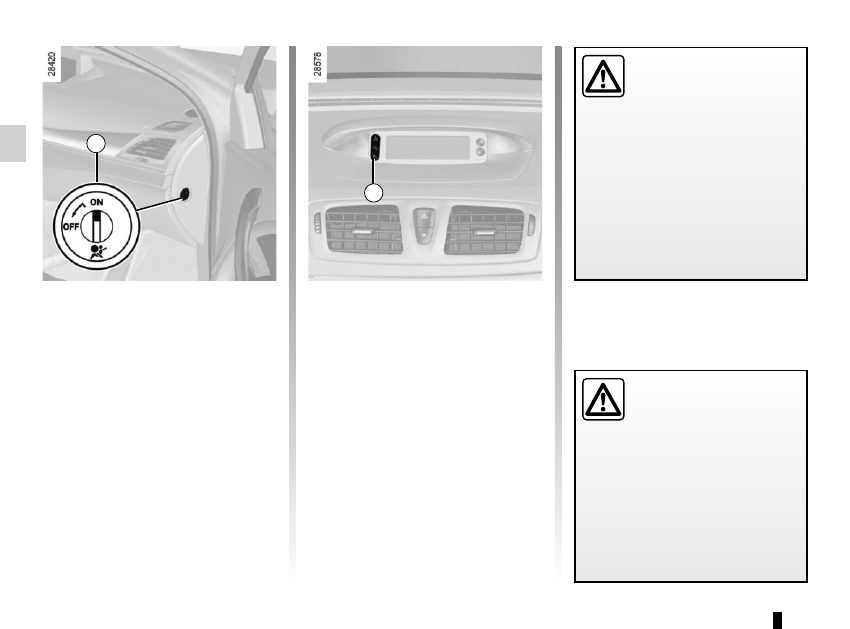
CHILD SAFETY: deactivating/activating the front passenger air bag 

(3/3)

4

Operating faults

It is prohibited to fit a rear-facing child 

seat to the front passenger seat if the 

front passenger airbags activation/

deactivation system shows a fault.
Allowing any other passenger to sit in 

that seat is not recommended.

If warning lights 

 and 

¹

 are 

lit at the same time.
Contact your approved dealer as soon 

as possible.

Activating the front 

passenger airbags

You should reactivate the airbags as 

soon as you remove the child seat from 

the front passenger seat to ensure the 

protection of the front passenger in the 

event of an impact.
To reactivate the  airbags : when the 

vehicle is stationary, push and turn 

lock 1 to position ON.
With the ignition on, it is essential to 

check that warning light 4 

 is lit 

on the central display, and that it goes 

out after a few seconds.

1

The passenger airbag must 

only be deactivated or acti-

vated when the vehicle is 

stationary.

If it is interfered with when the vehi-

cle is being driven, indicator lights 

å

 and 

©

 will come on.

Switch the ignition off then on again 

to reset the airbag in accordance 

with the lock position.

DANGER
Since operation of the front 

passenger airbag is not 

compatible with the position 

of a rear-facing child seat, NEVER 

fit a restraint system for a rear-fac-

ing child in a seat protected by an 

ACTIVATED front AIRBAG. This 

can cause the CHILD’S DEATH or 

SERIOUS INJURY.

1.51

Operating faults
The steering may become stiff when 

driving or when the steering wheel is 

turned repeatedly. This is due to the 

power assistance overheating. In this 

case, it must be allowed to cool down.

Power-assisted steering

Variable power-assisted steering
The variable power-assisted steering 

system is equipped with an electronic 

control system which alters the level of 

assistance to suit the vehicle speed.
Steering is made easier during parking 

manoeuvres (for added comfort) whilst 

the force needed to steer increases 

progressively as the speed rises (for 

enhanced safety at high speeds).

STEERING WHEEL/POWER-ASSISTED STEERING

Height and reach adjustment

Pull lever 1 and move the steering 

wheel to the required position.
Then, push the lever back fully, beyond 

the point of resistance to lock the steer-

ing wheel.
Make sure that the steering wheel is 

correctly locked.

For safety reasons, only 

adjust the steering wheel 

when the vehicle is station-

ary.

Never leave the steering wheel at 

full lock while stationary.

1

Never switch off the igni-

tion when travelling down-

hill, and avoid doing so in 

normal driving (assistance 

is not provided).

With the engine switched off, or if 

there is a system fault, it is still pos-

sible to turn the steering wheel. The 

force required will be greater.

1.52

DRIVING POSITION: LEFT-HAND DRIVE 

(1/2)

1

2

3

4

5

6

7

8

9

10 11

12

13

14

15

16

17

18

19

20

21

22

24

25

23

1.53

DRIVING POSITION: LEFT-HAND DRIVE 

(2/2)

1  Side air vent.
2  Side window demister outlet.
3  Stalk for:

–  direction indicator lights;
– exterior lights;
–  front fog lights;
–  rear fog light.

4  Instrument panel.
5  Driver’s air bag and horn location.
6 –   

Steering column stalk for wind-

screen and rear screen wash/

wipe;

–  

On-board computer information 

read-out control and vehicle set-

tings customisation menu.

7  Centre air vents.

The equipment fitted, described below, DEPENDS ON THE VERSION AND COUNTRY.

19  Gear lever.
20  Engine start/stop button and 

RENAULT card reader.

21  Central door locking/unlocking con-

trols and hazard warning lights 

switch.

22  Cruise control/speed limiter controls.
23  Control for adjusting steering wheel 

height and reach.

24  Bonnet release control.
25  Controls for:

–  

headlight beam height remote ad-

justment;

–  

lighting rheostat for control instru-

ments;

–  

activation/deactivation of the trac-

tion control;

–  

activation/deactivation of the 

function Stop and Start.

8 –   

Display of time, temperature, 

radio information, navigation 

system information, etc.

–  

Driver and front passenger seat 

belt reminder warning light and 

front passenger airbag activated/

deactivated warning lights.

9  Location for passenger air bag.
10  Side window demister outlet.
11  Side air vent.
12  Glove box.
13  Heating and ventilation controls.
14  Location for radio, navigation 

system, etc.

15  Accessories socket.
16  Control for some multimedia equip-

ment.

17  Cruise control/speed limiter main 

control.

18  Electronic parking brake or manual 

parking brake control.

1.54

DRIVING POSITION: RIGHT-HAND DRIVE 

(1/2)

2

3

7

8

17

11

23

6

10

15

16

12

25

20

9

24

13

5

4

14

22

1

21

18

19

17

1.55

DRIVING POSITION: RIGHT-HAND DRIVE 

(2/2)

The equipment fitted, described below, DEPENDS ON THE VERSION AND COUNTRY.

1  Side air vent.
2  Side window demister outlet.
3  Location for passenger air bag.
4 –   

Display (depending on the vehi-

cle) of time, temperature, radio 

information, navigation system in-

formation, etc.

–  

Driver and front passenger seat 

belt unfastened and passenger 

airbag deactivated warning lights.

5  Centre air vents.
6 Stalk for:

–  direction indicator lights;
– exterior lights;
–  front fog lights;
–  rear fog light.

7 Location for driver’s air bag and 

horn.

8  Instrument panel.

9 –   

Steering column stalk for winds-

creen and rear screen wash/wipe;

–  

On-board computer information 

read-out control and vehicle set-

tings customisation menu.

10  Side window demister outlet.
11  Side air vent.
12  Controls for:

–  

headlight beam height remote ad-

justment;

–  

lighting rheostat for control instru-

ments;

–  

activation/deactivation of the trac-

tion control;

–  

activation/deactivation of the 

function Stop and Start.

13  Cruise control/speed limiter controls.
14  Control for adjusting steering wheel 

height and reach.

15  Central door locking/unlocking 

controls and hazard warning lights 

switch.

16  Air-conditioning control.
17  Control for some multimedia equip-

ment.

18  Cruise control/speed limiter main 

control.

19  Electronic parking brake or manual 

parking brake control.

20  Gear lever.
21  Accessories socket.
22  Engine start/stop control and card 

reader RENAULT.

23  Location for radio, navigation 

system, etc.

24  Glove box.
25   Bonnet release control.

1.56

WARNING LIGHTS 

(1/4)

The warning light 

©

 means 

you should drive very carefully to 

an authorised dealer as soon as 

possible. If you fail to follow this re-

commendation, you risk damaging 

your vehicle.

A


Automatic main beam 

headlight indicator light

Please refer to the information 

on “External signals and lights” in 

Section 1.

c

Left-hand direction indicator 

tell-tale light

b

Right-hand direction indica-

tor tell-tale light

}

Handbrake “on” or electro-

nic parking brake warning 

light

Refer to the information on the 

“Handbrake” or “Electronic parking 

brake” in Section 2.

u

Side light tell-tale light 


á

Main beam headlight tell-tale 

light  

k

Dipped beam headlight tell-

tale light

g

Front fog light tell-tale light 

f

Rear fog light tell-tale light

If no lights or sounds are 

apparent, this indicates 

a fault in the instrument 

panel. This indicates that 

it is essential to stop immediately 

(as soon as traffic conditions allow). 

Ensure that the vehicle is correctly 

immobilised and contact an appro-

ved Dealer.

Warning light 

®

 re-

quires you to stop imme-

diately, for your own safety, 

as soon as traffic conditions allow. 

Switch off the engine and do not res-

tart it. Contact an approved Dealer.

1

The instrument panel A lights up 

when the ignition is switched on. You 

can adjust the brightness of the instru-

ment panel by turning control knob 1.

In some cases, the appearance of a 

warning light is accompanied by a mes-

sage.

The presence and operation of the warning lights DEPEND ON THE EQUIPMENT AND COUNTRY.

1.57

WARNING LIGHTS 

(2/4)

A

x

Anti-lock braking warning 

light

This lights up when the ignition is 

switched on and goes out after a few 

seconds.
If it does not go out after the ignition is 

switched on, or lights up when driving, 

there is a fault with the ABS. Braking 

will then be as normal, without the ABS. 

Contact an approved Dealer as soon as 

possible.

Ä

Toxic Fume Filter System 

Warning Light

This lights up when the ignition is 

switched on and goes out when the 

engine is started.

–  If it lights up continuously, consult 

your approved Dealer as soon as 

possible;

–  if it flashes, reduce the engine speed 

until the light stops flashing. Contact 

your approved Dealer as soon as 

possible.

Please refer to the information on 

"Driving advice, ECO-driving" in 

Section 2.

©

Warning light

This lights up when the ignition 

is switched on and goes out as soon as 

the engine is started. It can light up in 

conjunction with other indicator lights 

and/or messages on the instrument 

panel.

It means you should drive very care-

fully to an authorised dealer as soon 

as possible. If you fail to follow this re-

commendation, you risk damaging your 

vehicle.

å

Air bag warning light

This comes on when the igni-

tion is switched on and goes out after a 

few seconds.

If it does not light up when the ignition 

is switched on, or comes on when the 

engine is running, there is a fault in the 

system.

Contact your approved Dealer as soon 

as possible.

É

Preheating warning light 

(diesel version)

This should come on when the igni-

tion is switched on. It indicates that the 

heater plugs are in operation. This goes 

out as soon as the engine starts.

Î

Speed limiter and cruise 

control warning light

See the information on the “Speed limi-

ter” and “Cruise control” in Section 2.

\[

Gear change indicator

This lights up to advise 

you to change to a higher gear (up 

arrow) or lower gear (down arrow).

The presence and operation of the warning lights DEPEND ON THE EQUIPMENT AND COUNTRY.

1.58

WARNING LIGHTS 

(3/4)

A

À

Oil pressure warning light
If it comes on on the road, ac-

companied by the 

®

 warning light 

and a beep, stop immediately and cut 

the ignition. Check the oil level (please 

refer to the information on the “Engine 

oil level” in Section 4). If the level is cor-

rect, the light has come on for another 

reason: contact an approved dealer.

D

Brake circuit fault warning 

light

If it comes on during braking and is ac-
companied by the 

®

 warning light 

and a beep, it indicates that the fluid 

level in the circuit is low or that there is 

a braking system fault. Stop as soon as 

traffic conditions allow and consult an 

approved dealer.

®

STOP light

This lights up when the ignition 

is switched on and goes out as soon as 

the engine is started. It comes on with 

other warning lights and/or messages, 

and is accompanied by a beep.
It requires you to stop immediately, 

for your own safety, as soon as traffic 

conditions allow. Switch off the engine 

and do not restart it.
Contact an approved Dealer.

Ô

Engine coolant temperature 

warning light

This lights up when the ignition is 

switched on and goes out when the 

engine is started. If it comes on on the 
road, accompanied by the 

®

 war-

ning light and a beep, stop immediately 

and cut the ignition.
Check the coolant level (refer to the in-

formation on “Levels” in Section 4). If 

the level is correct, the light has come 

on for another reason; consult an ap-

proved dealer.

The presence and operation of the warning lights DEPEND ON THE EQUIPMENT AND COUNTRY.

1.59

ß

Front seat belt reminder 

warning light

This lights up on the central display 

when starting the engine then, if the dri-

ver’s or front passenger’s seat belt (if 

this seat is occupied) is not fastened 

and the vehicle has reached approxi-

mately 12 mph (20 km/h), it flashes 

and a bleep sounds for around 120 se-

conds.

Note: an object placed on the passen-

ger seat base may activate the warning 

light in some cases.
Rear seat belt reminder (depending 

on vehicle)

Warning light 

ß

 lights up on the 

central display, accompanied by a mes-

sage on the instrument panel, indica-

ting the number of seat belts buckled 

for approximately 30 seconds each:

–  the vehicle is started;

–  a door is opened;

–  a rear seat belt is fastened or unfas-

tened.

Check that the rear passengers are 

wearing seat belts and that the number 

of seat belt shown as fastened corres-

ponds to the number of rear bench seat 

places occupied.

WARNING LIGHTS 

(4/4)

L

Low fuel level warning light

This lights up when the igni-

tion is switched on and goes out after 

a few seconds. If it comes on when dri-

ving and is accompanied by a beep, fill 

up with fuel as soon as possible. There 

is only approximately 30 miles (50 km) 

worth of fuel left after the warning light 

first comes on.


Driving correction device 

warning light

Refer to information on “Driver correc-

tion devices and aids” in Section 2.


Lane departure system war-

ning light

Please refer to the information on “Lane 

departure warning” in Section 2.

Ü

Not used

The presence and operation of the warning lights DEPEND ON THE EQUIPMENT AND COUNTRY.


Tyre pressure monitoring 

system

Refer to the information on the “Tyre 

pressure monitoring system” in 

Section 2.

1.60

DISPLAYS AND INDICATORS 

(1/2)

Rev counter 1 (rpm × 1 000)

Fuel level gauge 5

If the minimum level is reached, in-

dicator light 6 comes on and a beep 

sounds. Fill up as soon as possible. 

There is only approximately 30 miles 

(50 km) worth of fuel left after the warn-

ing light first comes on.

Coolant temperature indicator 4

In normal use, indicator 4 should be 

before area a. Under severe condi-

tions, the needle may enter this area. 
This is not serious unless the 

®


warning light comes on, accompanied 

by a message on the instrument panel 

and a beep.
Trip computer and warning system
Refer to the information on the “Trip 

computer and warning system” in 

Section 1.

Engine oil level low warning
When the engine is started, display 3 

alerts the driver when the oil level is 

at its minimum. Refer to Section 4: 

“Engine oil level”.
The first time the alert appears, it can 

be cleared by pressing one of the but-

tons on the end of stalk 2.
Subsequent warnings will disappear 

automatically after 30 seconds.

1

2

5

6

4

a

3

1.61

Instrument panel in miles

(option to switch to km/h)
–  With the ignition off, press one of the 

buttons 9 or 10 at the end of stalk 2 

and start button 8;

– the speedometer unit indicator 

flashes for approximately ten sec-

onds, then the new unit is displayed: 

release button 9 or 10 when the unit 

stops flashing.

To return to the previous mode, repeat 

the same operation.
Note: once the battery is switched off, 

the trip computer and warning system 

automatically returns to the original unit 

of measurement.

DISPLAYS AND INDICATORS 

(2/2)

9

10

2

2

8

Speedometer 7 (mph or km/h)

Overspeed buzzer

Depending on the vehicle and coun-

try, a buzzer sounds for approximately 

10 seconds every 40 seconds, as long 

as the vehicle is travelling in excess of 

72 mph (120 km/h).

7

1.62

Trip computer and warning 

system 1

Depending on the vehicle, this includes 

the following functions:
– distance travelled;
– journey parameters;
– information messages;
– operating fault messages (con-

nected to the warning light 

©

);

–  warning messages (connected to the 

®

 warning light);

–  vehicle settings customisation menu.
All these functions are described on the 

following pages.

Display selection keys 2 

and 3

Scroll through the following informa-

tion upwards (button 2) or downwards 

(button 3) by pressing briefly and suc-

cessively (the display depends on the 

vehicle equipment and country).
a)  total mileage and trip mileage re-

corder;

b) journey parameters:

– fuel used;

–  average fuel consumption;

–  

current fuel consumption;

– estimated range;

– distance travelled;

– average speed;

1

2

3

c) mileage before service;
d) tyre pressure reset;
e) vehicle settings customisation menu;
f)  trip log, operating faults and informa-

tion message readout.

TRIP COMPUTER:  general information 

(1/2)

1.63

Trip mileage resetting

With “trip mileage recorder” selected on 

the display, press button 2 or 3 until the 

mileage recorder resets to zero.

Resetting the journey 

parameters (reset button)

With one of the journey parameters se-

lected on the display, press button 2 

or 3 until the display resets.

Interpreting some of the 

values displayed after 

resetting

The values showing average fuel con-

sumption, range and average speed 

will become more stable and reliable 

the further you travel after pressing the 

reset button.
For the first few miles after pressing 

the reset key you will notice that the 

range increases as you travel. This 

range takes into account the average 

fuel consumption since the last time the 

reset button was pressed. Therefore, 

the average fuel consumption may de-

crease when:
–  

the vehicle stops accelerating;

–  

the engine reaches its operating 

temperature (if the engine was cold 

when the reset key was pressed);

–  

when driving from an urban area 

onto the open road.

3

2

Automatic resetting of the 

journey parameters

Resetting occurs automatically when 

the maximum value of any of the pa-

rameters is exceeded.

TRIP COMPUTER:  general information 

(2/2)

1.64

The display of information shown below DEPENDS ON THE VEHICLE EQUIPMENT AND COUNTRY.

Examples of selections

Interpreting the display selected

101668 KM

  112. 4 KM

a) Total mileage and trip mileage recorder.

Fuel used 

Fuel used 

b) Journey parameters.

Fuel used.

Fuel consumed since the last reset.

8.5 L

20 L

Average 

Average 

Average fuel consumption since the last reset.
The value is displayed after having travelled at least 

400 metres since the last reset.

7.2 L/100

7.2 L/100

ON-BOARD COMPUTER: trip settings 

(1/6)

1.65

ON-BOARD COMPUTER: trip settings 

(2/6)

The display of information shown below DEPENDS ON THE VEHICLE EQUIPMENT AND COUNTRY.

Examples of selections

Interpreting the display selected

Current 

Current 

Current fuel consumption.

This value is displayed above a speed of approximately 

18 mph (30 km/h).

7.4 L/100

7.4 L/100

Estimated range with remaining fuel.

This range takes into account the average fuel consumption 

since the last time the reset button was pressed. The value 

is displayed after driving 400 metres.

Range

Range 

541 km

541 km

Distance travelled since the last reset.

Distance 

Distance 

52.2 km

359 km

Average speed since the last reset.

The value is displayed after driving 400 metres.

Average 

Average 

89.6 km/h

89.6 km/h


Content   ..  2  3  4  5   ..