Peugeot 4007 (2012 year). Manual - part 5


  Index      Peugeot     Peugeot 4007 - service manual 2012 year in english


Search            copyright infringement  


Content   ..  3  4  5  6   ..


Peugeot 4007 (2012 year). Manual - part 5


2

COMFORT

EERING WHEEL MANUAL

STEERING WHEEL MANUA

HEIGHT ADJUSTMENT

EIGHT ADJUSTMENT

    )  Pull the locking lever downwards 

(position  

B ) while supporting the 

steering wheel. 

  )   Adjust the steering wheel to the re-

quired height. 

  )   Lock the steering wheel adjustment 

by pushing the lever upwards (posi-

tion  A ).  

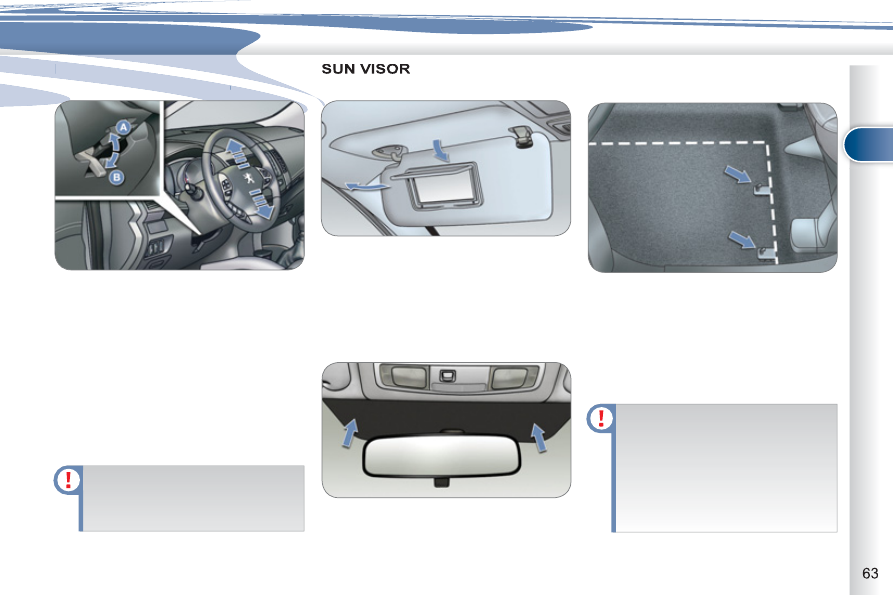
 The sun visors fold forwards, and to the 

side when they are unhooked. 
 They are fi tted with a courtesy mirror 

and a ticket holder. 

 As a safety precaution, these op-

erations must only be carried out 

while the vehicle is stationary.  

AREAS FOR TOLL CARDS/CAR 
PARK TICKETS 

  The athermic windscreen has a non-

refl ective zone located above the base 

of the rear view mirror. 
 It is intended for affi xing toll cards and/

or car park tickets.  

MAT

  When removing the mat on the driver's 

side, move back the seat as far as pos-

sible and remove the fi xings. 
 When refi tting, position the mat cor-

rectly on the pins and clip the fi xings. 

Check that the mat is secured fi rmly. 

 To prevent any risk of jamming 

under the pedals: 
   -   only use mats suited to the 

fi xings already present in the 

vehicle; it is imperative that 

these fi xings are used. 

  -  never 

fi t one mat on top of 

another.   

2

COMFORT

FRONT INTERIOR FITTINGS 

FRONT INTERIOR FITTINGS 

    1.  Spectacles storage. 

  2.   Cooled upper glove box. 

  3.   Lockable lower glove box. 

  4.   12 V socket (120 W max). 

  5.   Armrest with storage compartments  
 

12 V socket (120 W max). 

  6.  Cup holder. 

  7.  Removable ashtray. 

  8.  Bottle holder. 

  9.   Enclosed storage compartment. 

  10.  Cup  holder.   

2

COMFORT

        Cooled upper glove box 

 Press button  A  on the lid to open it. 
 To close it, push the lid up. 
 It is fi tted with a ventilation nozzle which 

can be closed by means of a dial, dis-

tributing conditioned air at the same 

temperature as the vents in the passen-

ger compartment. 
 In cold weather, it is advisable to close 

this vent to conserve the ambient air in-

side the passenger compartment.     

   Spectacles storage 

 Press the cover to open it. 
 To close it, push the cover until it locks.   

   Lower glove box 

 This is fi tted with a lock. 
 To unlock it, turn the key to the left. 
 To open it, pull the handle  A . 
 To close it, push the lid up. 
 To lock it, turn the key to the right. 
 It is fi tted with a pen holder and a card 

holder. 
 It is illuminated on opening when the 

vehicle lighting is on.   

2

COMFORT

  Upper storage compartment 
 Pull the right-hand lever to open the 

storage compartment lid, which serves 

as an armrest. 
 To close, fold down the lid until it locks.  

  Lower storage compartment 

          12 V socket (120 W max) 

           Armrest with storage compartments  

12 V socket (120 W max)  

 This is operational when the ignition 

switch is in the "LOCK", "ON" or "ACC" 

position. 
 Check that the electrical equipment op-

erates on 12 volts and that its electrical 

power is 120 W maximum. 

 The prolonged use of electrical 

equipment without running the en-

gine may discharge the battery.   

 Pull the left-hand lever to open the lid. 
 To close, fold down the lid until it locks.   

2

COMFORT

        Removable ashtray 

 Pull the cover to open the ashtray. 
 To empty, remove the ashtray by pulling 

it upwards.   

        12 V socket (120 W max) 

 This operates when the ignition switch is 

in the "LOCK", "ACC" or "ON" position. 
 Open the cover to gain access to the 

socket. 

 Check that the electrical equip-

ment operates on 12 V and that 

its maximum electrical power is 

120 W. 
 When you use the two sockets 

at the same time, ensure that 

the two items of equipment to-

gether operate on 12 V and that 

their combined electrical power 

is 120 W maximum. 
 The prolonged use of electrical 

equipment without running the en-

gine may discharge the battery.   

2

COMFORT

        Cup holder 

 There is a cup holder fi tted in the dash-

board on the driver's side. 
 Press on the centre of the cover to ex-

tract the plate. 
 Pull it fully to use it. 
 Push it fully to store it. 

 Two further cup holders are available in 

front of the front armrest.   

   Enclosed storage compartment 

 Pull the storage compartment lid to 

open it.   

2

COMFORT

AR INTERIOR FITTINGS

REAR INTERIOR FITTINGS

  Rear armrest 

 Pull the armrest forwards to lower it.  

  Cup holder 

 Open the cover  A  located at the end of the 

armrest holding the side with your hand.  

  Bottle holder 

 There is a bottle holder in each rear door.  

  Grab handle 

 Pull the handle downwards to lower it.  

  Coat hook 

 The rear left grab handle is fi tted with a 

coat hook.   

2

COMFORT

BOOT

BOOT FITTINGS 

    1.   12 V socket (120 W max). 

  2.   Open storage compartment. 

  3.   Right-hand side enclosed storage 

compartment. 

  4.   Storage compartment in the fl oor * . 

  5.  Stowing rings. 

  6.   Left-hand side storage compartment 

or audio equipment. 

  7.   Load space cover.   

  *   5-seat version only.  

2

COMFORT

        Stowing rings 

 There are four stowing rings in the boot 

for securing luggage: 
   -   two rings are located on the boot 

fl oor, 

  -   two rings are located on the rear 

side pillars.    

*   On 5-seat version only.

 Raise the boot fl oor to gain access to 

this compartment.   

   Right-hand side enclosed storage 

compartment 
 This storage compartment contains the 

tools for changing a wheel.   

   Storage compartment in the fl oor *  

        12 V socket (120 W max) 

 This operates when the ignition switch 

is in the "ON" or "ACC" position. 
 Lift the cover to gain access to the 

socket. 

 Check that the electrical equip-

ment operates on 12 V and that 

its maximum electrical power is 

120 W. 
 The prolonged use of electrical 

equipment without running the 

engine may discharge the bat-

tery.   

2

COMFORT

        Load space cover 

 Unroll the load space cover and install it 

in the housing  A . 
 To store the load space cover, release it 

from the housing, it reels in to its initial 

position.  

  Second installation position. 
 The load space cover can be secured 

in two different positions  B , so that the 

row 2 seat backs can be tilted. 
   1.   Reel in the load space cover. 
  2.   Move one of the slides  C   towards 

the inside of the vehicle and insert 

the tab  D  in the installation hole to 

be used.  


Move the opposite slide in the same 

way. 

  3.   After changing the position, check 

that the load space cover is secured 

correctly.   

  Removing the load space cover. 
   1.   Reel in the load space cover. 
  2.   Move one of the slides  C  towards the 

inside of the vehicle and raise it.  


Release the opposite slide in the 

same way.  

 To put the load space cover in place, 

carry out the operations in reverse order. 

 Take care not to place heavy 

objects on the load space cover 

when it is unfolded. 

 The load space cover can be 

stored along the lower tailgate, un-

less audio equipment is present.   

3

ACCESS

  Unfolding the key 
   )  First press button  

A  to unfold the 

key.   

  Unlocking the vehicle 

   )   Press the open padlock to 

unlock the vehicle.  

  Unlocking using the remote control 

REMOTE CO

ONTROL KEY 

 System which permits central unlock-

ing or locking of the vehicle using the 

lock or from a distance. It also folds and 

unfolds the mirrors, closes the electric 

windows and starts the vehicle, as well 

as providing protection against theft. 

  Locking the vehicle 

  Unlocking using the key 
   )   Turn the key to the right in the  driver's 

door  lock to unlock the vehicle.    

   )   Press the closed padlock to 

lock the vehicle.  

 If one of the doors or the tailgate 

is still open, the central locking 

will not take place.  

 Unlocking is confi rmed by the interior 

lighting which comes on for approxi-

mately 15 seconds and the direction 

indicators which fl ash  twice . 
 If you press the open padlock  twice in 

succession  within 30 seconds after 

unlocking the vehicle, the door mirrors 

unfold.  

  Normal locking using the key 
   )   Turn the key to the left in the  driver's 

door  lock to lock the vehicle.  

 Locking is confi rmed by the direction in-

dicators which come on  once . 
 If you press the closed padlock  twice 

in succession  within 30 seconds af-

ter locking the vehicle, the door mirrors 

fold. 
  An extended press  on the closed pad-

lock within 30 seconds after locking the 

vehicle closes the windows automati-

cally.  

  Normal locking using the remote 

control 

3

ACCESS

 The vehicle will relock automati-

cally after thirty seconds unless 

a door or the tailgate is opened. 

This function prevents inadver-

tent unlocking. 
 The duration which precedes 

the automatic relocking of the 

vehicle can be confi gured  via 

the colour screen "Equipment" 

menu.   

  Folding the key 
   )   First press button  A  to fold the key.  

  Electronic engine immobiliser 
 The key contains an electronic chip 

which has a special code. When the ig-

nition is switched on, this code must be 

recognised to permit starting. 
 This electronic engine immobiliser locks 

the engine management system a few 

moments after the ignition is switched 

off and prevents starting of the engine 

by anyone who does not have the key. 

       Anti-theft protection 

 In the event of a malfunction and if your ve-

hicle does not start, contact a PEUGEOT 

dealer as soon as possible.   

3

ACCESS

          Starting the vehicle 

   )   Insert the key in the ignition switch. 
  )   Operate the starter by turning the 

key to position  4 (START) . 

  )   When the engine turns over, release 

the key. The ignition switch is placed 

in position  3 (ON)  automatically.   

  Switching the vehicle off 

   )   Park the vehicle. 
  )   While pressing the key, turn it to-

wards you to position  1 (LOCK) . 

  )   Remove the key from the ignition 

switch.   

   Changing the battery 

 Battery reference: CR1616/3 volts. 

   )   Unclip the casing using a coin at the 

notch. 

  )  Slide the fl at battery out of its housing. 
  )   Slide the new battery into its housing 

observing the original direction. 

  )   Clip the casing.    

       Key in ignition 

 A buzzer sounds on opening the 

driver's door, if the key has been 

left in the ignition.  

3

ACCESS

                Keys 

 Make a careful note of the number of each key. This number is coded on the label attached to the key. 
 If the keys are lost, a PEUGEOT dealer can supply you with new keys.  

         Do not throw the remote control batteries away, they contain metals which are harmful to the environment. 
 Take them to an approved collection point. 

  Remote control 

 The high frequency remote control is a sensitive system; do not operate it while it is in your pocket as there is a 

possibility that it may unlock the vehicle, without you being aware of it. 
 Do not repeatedly press the buttons of your remote control out of range and out of sight of your vehicle. You run the 

risk of stopping it from working. 
 The remote control does not operate when the key is in the ignition, even when the ignition is switched off.  

  Locking the vehicle 

 Driving with the doors locked may make access to the passenger compartment by the emergency services more 

diffi cult in an emergency. 
 As a safety precaution (with children on board), remove the key from the ignition when you leave the vehicle, even for a short time.  

  Anti-theft protection 

 Do not make any modifi cations to the electronic engine immobiliser system, this could cause malfunctions.  

  When purchasing a second-hand vehicle 

 Have the key codes memorised by a PEUGEOT dealer, to ensure that the keys in your possession are the only ones 

which can start the vehicle.  

3

ACCESS

 The electric window switches 

can be confi gured via the colour 

screen "Equipment" menu. 
 The electric window switches 

remain operational for approxi-

mately 30 seconds after the 

ignition is switched off and the 

switch on the driver's door re-

mains operational for a further 

30 seconds when the door is 

opened. 
 The windows can no longer be 

opened or closed after the driver's 

door is closed. 
 The rear windows do not lower 

fully. 

WINDOWS

   1.    Driver's electric window switch.  
  2.    Passenger's electric window 

switch.  

  3.    Rear right electric window 

switch.  

  4.    Rear left electric window switch.  
  5.    Deactivating   the passenger and 

rear electric window switches.    

 In the event of unwanted open-

ing of the window on closing (for 

example in the presence of frost), 

reinitialise the electric windows 

(refer to the corresponding para-

graph).  

  Safety anti-pinch 
 In automatic mode, when the window 

rises and meets an obstacle, it stops 

and lowers again. 

  Operation 

 With the ignition on, you have two op-

tions: 

   -  

 manual mode  

   )  Press the switch gently to open or 

pull it gently to close. The window 

stops as soon as the switch is re-

leased.   

   -  

 automatic mode  

   )  Press the switch fully to open or 

pull it fully to close. The window 

opens or closes completely when 

the switch is released. 

  )  Pressing the switch again stops 

the movement of the window.   

  System which opens or closes a win-

dow manually or automatically. It is 

fi tted with a system which provides 

protection if an obstacle is detected on 

one-touch models and a deactivation 

system to prevent misuse of the rear 

controls. 

3

ACCESS

  Deactivating the passenger and rear 

electric window switches 

  Reinitialising the electric windows 

 Following reconnection of the battery or 

after the safety anti-pinch has been trig-

gered three times in succession, you 

must reinitialise the safety anti-pinch 

function: 
   )   with the door closed, lower the win-

dow completely then raise it again, it 

will rise in steps of a few centimetres 

each time the switch is pressed, re-

peat the operation until the window 

is fully closed, 

  )   continue to press the switch for at 

least one second after reaching the 

window closed position.  

 Always remove the key from the 

ignition when leaving the vehicle, 

even for a short time. 
 In the event of contact during 

operation of the windows, you 

must reverse the movement of 

the window. To do this, press the 

switch concerned. 
 When the driver operates the 

passenger electric window 

switches, they must ensure that 

no one is preventing correct 

closing of the windows. 
 The driver must ensure that 

passengers use the electric win-

dows correctly. 
 Be aware of children when oper-

ating the windows.  

   )   For the safety of your children, press 

switch 5 to prevent operation of the 

passenger and rear electric windows 

irrespective of their position.  

 When the button is pressed down, the 

switches are deactivated. 
 When the button is raised, the switches 

are activated. 

 When the button is pressed down, 

you can open or close all of the 

windows using the switches on 

the driver's door.   

  The safety   anti  -  pinch   function is not 

active during these operations.  


Content   ..  3  4  5  6   ..