Nissan Rogue Select (2015 year). Manual - part 5


  Index      Nissan     Nissan Rogue Select - service manual 2015 year in english


Search            copyright infringement  


Content   ..  3  4  5  6   ..


Nissan Rogue Select (2015 year). Manual - part 5


and guide the buyer to the appropriate sections
in this Owner’s Manual.

SSS0521

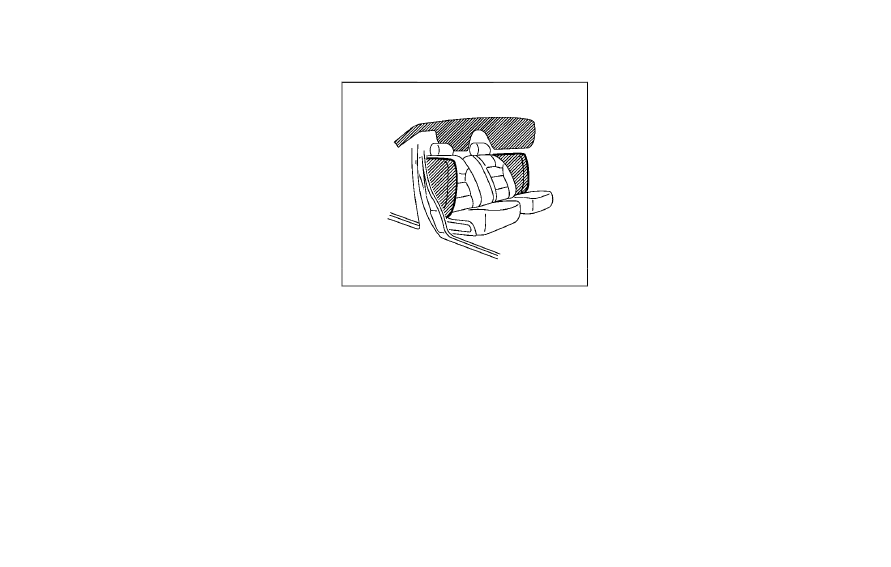
FRONT SEAT-MOUNTED SIDE-IM-
PACT SUPPLEMENTAL AIR BAG AND
ROOF-MOUNTED CURTAIN SIDE-IM-
PACT AND ROLLOVER SUPPLEMEN-
TAL AIR BAG SYSTEMS

The side air bags are located in the outside of
the seatback of the front seats. The curtain air
bags are located in the side roof rails. All of the
information, cautions and warnings in this
manual apply and must be followed. 
The
side air bags and curtain air bags are designed
to inflate in higher severity side collisions,
although they may inflate if the forces in another
type of collision are similar to those of a higher
severity side impact. They are designed to inflate

on the side where the vehicle is impacted. They
may not inflate in certain side collisions on the
side where the vehicle is impacted. Curtain air
bags are also designed to inflate in certain types
of rollover collisions or near rollovers.

Vehicle damage (or lack of it) is not always an
indication of proper side air bag and curtain air
bag operation.

When the side air bags and curtain air bags
inflate, a fairly loud noise may be heard, followed
by release of smoke. This smoke is not harmful
and does not indicate a fire. Care should be
taken not to inhale it, as it may cause irritation
and choking. Those with a history of a breathing
condition should get fresh air promptly.

Side air bags, along with the use of seat belts,
help to cushion the impact force on the chest
and pelvic area of the front occupants. Curtain
air bags help to cushion the impact force to the
head of occupants in the front and rear outboard
seating positions. They can help save lives and
reduce serious injuries. However, side air bags
and curtain air bags may cause abrasions or
other injuries. Side air bags and curtain air bags
do not provide restraint to the lower body.

The seat belts should be correctly worn and the
driver and passenger seated upright as far as
practical away from the side air bags. Rear seat
passengers should be seated as far away as

Safety — Seats, seat belts and supplemental restraint system

1-51

1-52

Safety — Seats, seat belts and supplemental restraint system

practical from the door finishers and side roof
rails. The side air bags and curtain air bags
inflate quickly in order to help protect the
occupants in the outboard seating positions.
Because of this, the force of the side air bags
and curtain air bags inflating can increase the
risk of injury if the occupant is too close to, or is
against, these air bag modules during inflation.
In a rollover, the curtain air bags on both sides
are designed to inflate. Under both side-impact
and rollover situations, the curtain air bags will
remain inflated for a short period of time.

The side air bags and curtain air bags
operate only when the ignition switch is in
the ON position.

After turning the ignition switch to the ON
position, the supplemental air bag warning
light illuminates. The supplemental air bag
warning light will turn off after about 7
seconds if the systems are operational.

WARNING

Do not place any objects near the

seatback of the front seats. Also, do
not place any objects (an umbrella,
bag, etc.) between the front door
finisher and the front seat. Such
objects may become dangerous

projectiles and cause injury if a side
air bag inflates.

Right after inflation, several side air

bag and curtain air bag system
components will be hot. Do not
touch them; you may severely burn
yourself.

No unauthorized changes should be

made to any components or wiring
of the side air bag and curtain air
bag systems. This is to prevent
damage to or accidental inflation
of the side air bag and curtain air
bag systems.

Do not make unauthorized changes

to your vehicle’s electrical system,
suspension system or side panel.
This could affect proper operation
of the side air bag and curtain air
bag systems.

Tampering with the side air bag

system may result in serious perso-
nal injury. For example, do not
change the front seats by placing
material near the seatbacks or by
installing additional trim material,
such as seat covers, around the side
air bag.

Work around and on the side air bag

and curtain air bag systems should
be done by a NISSAN dealer. In-
stallation of electrical equipment
should also be done by a NISSAN
dealer. The Supplemental Restraint
System (SRS) wiring harnesses*
should not be modified or discon-
nected. Unauthorized electrical test
equipment and probing devices
should not be used on the side air
bag and curtain supplemental air
bag systems.

*

The SRS wiring harness connectors are
yellow and orange for easy identification.

When selling your vehicle, we request that you
inform the buyer about the side air bag and
curtain air bag systems and guide the buyer to
the appropriate sections in this Owner’s Manual.

SEAT BELTS WITH PRETENSIONERS
(front seats)

WARNING

The pretensioners cannot be reused

after activation. They must be re-
placed together with the retractor
and buckle as a unit.

If the vehicle becomes involved in a

collision but a pretensioner is not
activated, be sure to have the pre-
tensioner system checked and, if
necessary, replaced by a NISSAN
dealer.

No unauthorized changes should be

made to any components or wiring
of the pretensioner system. This is
to prevent damage to or accidental
activation of the pretensioners.
Tampering with the pretensioner
system may result in serious perso-
nal injury.

Work around and on the preten-

sioner system should be done by a
NISSAN dealer. Installation of elec-
trical equipment should also be
done by a NISSAN dealer. Un-
authorized electrical test equipment
and probing devices should not be
used on the pretensioner system.

If you need to dispose of a preten-

sioner or scrap the vehicle, contact a
NISSAN dealer. Correct preten-
sioner disposal procedures are set
forth in the appropriate NISSAN
Service Manual. Incorrect disposal
procedures could cause personal

injury.

The pretensioner system may activate with the
supplemental air bag system in certain types of
collisions. Working with the seat belt retractor, it
helps tighten the seat belt when the vehicle
becomes involved in certain types of collisions,
helping to restrain front seat occupants.

The pretensioner is encased with the seat belt
retractor. These seat belts are used the same
way as conventional seat belts.

When a pretensioner activates, smoke is re-
leased and a loud noise may be heard. The
smoke is not harmful and does not indicate a
fire. Care should be taken not to inhale it, as it
may cause irritation and choking. Those with a
history of a breathing condition should get fresh
air promptly.

After pretensioner activation, load limiters allow
the seat belt to release webbing (if necessary) to
reduce forces against the chest.

The supplemental air bag warning light

is

used to indicate malfunctions in the pretensioner
system. (See “Supplemental air bag warning
light” (P.1-54) for more details.) If the supple-
mental air bag warning light indicates there is a
malfunction, have the system checked by a
NISSAN dealer.

When selling your vehicle, we request that you
inform the buyer about the pretensioner system
and guide the buyer to the appropriate sections
in this Owner’s Manual.

Safety — Seats, seat belts and supplemental restraint system

1-53

1-54

Safety — Seats, seat belts and supplemental restraint system

SSS1020

SUPPLEMENTAL AIR BAG WARNING
LABELS

Warning labels about the supplemental front-
impact air bag systems are placed in the vehicle
as shown in the illustration.

*

1

SRS air bag

The warning labels are located on the surface of
the sun visors.

SPA1097

SUPPLEMENTAL AIR BAG WARNING
LIGHT

The supplemental air bag warning light, display-
ing

in the instrument panel, monitors the

circuits for the air bag systems, pretensioners
and all related writing.

When the ignition switch is in the ON position,
the supplemental air bag warning light illumi-
nates for about 7 seconds and then turns off.
This means the system is operational.

If any of the following conditions occur, the air
bag and/or pretensioner systems.
. The supplemental air bag warning light

remains on after approximately 7 seconds.

. The supplemental air bag warning light

flashes intermittently.

. The supplemental air bag warning light does

not come on at all.

Under these conditions, the air bag and/or
pretensioner systems may not operate properly.
They must be checked and repaired. Take your
vehicle to the nearest NISSAN dealer.

WARNING

If the supplemental air bag warning
light is on, it could mean that the front
air bag, side air bag, curtain air bag
and/or pretensioner systems will not
operate in an accident. To help avoid
injury to yourself or others, have your
vehicle checked by a NISSAN dealer as
soon as possible.

REPAIR AND REPLACEMENT PRO-
CEDURE

The front air bags, side air bags, curtain air bags
and pretensioners are designed to activate on a
one-time-only basis. As a reminder, unless it is
damaged, the supplemental air bag warning light
will remain illuminated after inflation has oc-
curred. Repair and replacement of these sys-
tems should be done only by a NISSAN dealer.

When maintenance work is required on the
vehicle, the front air bags, side air bags, curtain
air bags and pretensioners and related parts
should be pointed out to the person performing
the maintenance. The ignition switch should
always be in the LOCK position when working
under the hood or inside the vehicle.

WARNING

Once a front air bag, side air bag or

curtain air bag has inflated, the air
bag module will not function again
and must be replaced. Additionally,
the activated pretensioners must
also be replaced. The air bag mod-
ule and pretensioner system should
be replaced by a NISSAN dealer.
The air bag modules and preten-
sioner system cannot be repaired.

The front air bag, side air bag and

curtain air bag systems, and preten-
sioner system should be inspected
by a NISSAN dealer if there is any
damage to the front end or side
portion of the vehicle.

If you need to dispose of a supple-

mental air bag or pretensioner, or
scrap the vehicle, contact a NISSAN

dealer. Correct supplemental air
bag and pretensioner system dis-
posal procedures are set forth in the
appropriate NISSAN Service Man-
ual. Incorrect disposal procedures
could cause personal injury.

Safety — Seats, seat belts and supplemental restraint system

1-55

1-56

Safety — Seats, seat belts and supplemental restraint system

MEMO

2 Instruments and controls

Instrument panel ........................................................................ 2-3
Meters and gauges ................................................................... 2-4

Speedometer ........................................................................ 2-5
Odometer/twin trip odometer .......................................... 2-5
Tachometer ........................................................................... 2-6
Engine coolant temperature gauge ................................ 2-6
Fuel gauge ............................................................................ 2-7
Instrument brightness control .......................................... 2-8

Warning/indicator lights and audible reminders ............... 2-9

Checking bulbs ................................................................. 2-10
Warning lights ................................................................... 2-10
Indicator lights ................................................................... 2-14
Audible reminders ............................................................ 2-16

Vehicle information display .................................................. 2-17

Outside air temperature .................................................. 2-17
Indicators for operation ................................................... 2-19
Indicators for maintenance ............................................. 2-20
Trip computer .................................................................... 2-21
Continuously Variable Transmission (CVT)
position indicator .............................................................. 2-24

Security systems .................................................................... 2-24

Vehicle Security System ................................................. 2-24
NISSAN Vehicle Immobilizer System .......................... 2-26

Windshield wiper and washer switch .............................. 2-27
Rear window wiper and washer switch .......................... 2-28
Rear window defroster switch ........................................... 2-29
Headlight and turn signal switch ....................................... 2-29

Headlight switch ............................................................ 2-29
Turn signal switch .......................................................... 2-30

Horn .......................................................................................... 2-31
Vehicle Dynamic Control (VDC) OFF switch ................. 2-31
Power outlet ............................................................................ 2-31
Storage .................................................................................... 2-32

Cup holders ..................................................................... 2-32
Sunglasses holder ......................................................... 2-33
Glove box ......................................................................... 2-34
Console box .................................................................... 2-35
Luggage floor box (if so equipped) .......................... 2-35
Luggage side box .......................................................... 2-36
Cargo cover (if so equipped) ..................................... 2-36
Luggage hooks ............................................................... 2-37
Coat hooks ...................................................................... 2-38
Utility hook ....................................................................... 2-38
Roof rack (if so equipped) .......................................... 2-38

Windows ................................................................................. 2-39

Power windows .............................................................. 2-39

!

JVC0578X

1.

Side ventilator

2.

Headlight and turn signal switch

3.

Steering-wheel-mounted controls (left side) (if
so equipped)

— Audio control
— Bluetooth

Š

Hands-Free Phone system con-

trol

4.

Steering wheel
— Horn
— Driver supplemental air bag

5.

Meters and gauges

6.

Steering-wheel-mounted controls (right side)
— Cruise control switches (if so equipped)

7.

Wiper and washer switch

8.

Center ventilator

9.

Hazard warning flasher switch

10.

Audio system
— Clock
— RearView Monitor (if so equipped)

11.

Front passenger supplemental air bag

12.

Outside remote mirror control switch

13.

All-Wheel Drive (AWD) LOCK switch (if so
equipped)

14.

Fuse box cover

15.

Vehicle Dynamic Control (VDC) OFF switch

16.

Hood release handle

17.

Tilting steering wheel lever

18.

Parking brake

19.

Ignition switch

20.

Sport mode switch

21.

Power outlet

22.

Heater/air conditioner control

23.

Shift lever

24.

Front passenger air bag status light

25.

Rear window defroster switch

26.

Glove box

Instruments and controls

2-3

INSTRUMENT PANEL

2-4

Instruments and controls

JVC0301X

1.

Tachometer

2.

Warning/indicator lights

3.

Vehicle information display

4.

Speedometer

5.

Engine coolant temperature gauge

6.

switch (twin trip odometer control and

brightness control)

7.

switch (settings control and trip computer

control)

8.

Fuel gauge

The needle indicators may move slightly
after the ignition switch is turned to the
LOCK position. This is not a malfunction.

CAUTION

For cleaning, use a soft cloth, dam-

pened with water. Never use a rough
cloth, alcohol, benzine, thinner or
any kind of solvent or paper towel
with a chemical cleaning agent.
They will scratch or cause discolora-
tion to the lens.

Do not spray any liquid such as

water on the meter lens. Spraying
liquid may cause the system to
malfunction.

METERS AND GAUGES

SIC4534

SPEEDOMETER

Speedometer

The speedometer indicates vehicle speed in
miles per hour (MPH) and kilometers per hour
(km/h).

SIC4575

ODOMETER/TWIN TRIP ODOMETER

The odometer and twin trip odometer are
displayed on the vehicle information display
when the ignition switch is in the ON position.

Odometer

The odometer

*

A

records the total distance the

vehicle has been driven.

Twin trip odometer

The twin trip odometer

*

B

records the distance

of 2 individual trips (TRIP A and TRIP B).

Changing the display:

Briefly push the

switch

*

C

to change the

display as follows.

TRIP A

? TRIP B ? TRIP A

Resetting the trip odometer:

Push and hold the

switch for approximately

1 second to reset the selected trip (TRIP A or
TRIP B).

Instruments and controls

2-5

2-6

Instruments and controls

SIC4535

TACHOMETER

The tachometer indicates engine speed in
revolutions per minute (RPM). Do not rev the
engine into the red zone

*

1

.

CAUTION

When engine speed approaches the red
zone, shift to a higher gear or reduce
engine speed. Operating the engine in
the red zone may cause serious engine
damage.

SIC4513

ENGINE COOLANT TEMPERATURE
GAUGE

The gauge

*

A

indicates the engine coolant

temperature.

The engine coolant temperature is within the
normal range when the gauge is within the zone

*

B

shown in the illustration.

The engine coolant temperature varies with the
outside air temperature and driving conditions.

CAUTION

If the gauge indicates engine coolant
temperature near the hot (H) end of the

normal range, reduce vehicle speed to
decrease temperature. If the gauge is
over the normal range, stop the vehicle
as soon as safely possible. If the engine
is overheated, continued operation of
the vehicle may seriously damage the
engine. See “If your vehicle overheats”
(P.6-11) for immediate action required.

SIC4511

FUEL GAUGE

The gauge

*

A

indicates the approximate fuel

level in the tank.

The gauge may move slightly during braking,
turning, acceleration, or going up or down hills.

Refill the fuel tank before the gauge
registers 0.

The low fuel warning light

illuminates and

low fuel warning appears on the vehicle
information display when the fuel tank is getting
low. Refuel as soon as it is convenient,
preferably before the gauge reaches the empty
(0) position. There is a small reserve of fuel in the
tank when the fuel gauge reaches the empty (0)

position.

The

indicates that the fuel-filler door is

located on the passenger’s side of the vehicle.

CAUTION

If the vehicle runs out of fuel, the

malfunction indicator light (MIL)

may come on. Refuel as soon as
possible. After a few driving trips,
the

light should turn off. If the

light remains on after a few driving
trips, have the vehicle inspected by
a NISSAN dealer.

For additional information, see

“Malfunction Indicator Light (MIL)”
(P.2-15).

SIC4596

JVI1225X

Instruments and controls

2-7

2-8

Instruments and controls

INSTRUMENT BRIGHTNESS CON-
TROL

The instrument brightness control operates
when the headlight switch is in the

or

position.

Turn the control

*

A

to adjust the brightness of

the meter panel and the instrument panel lights.
The brightness indicator

*

B

will be shown

briefly in the vehicle information display when
the control is turned.

When the brightness level reaches the maximum
or minimum, a beep will sound.

When the brightness level reaches the minimum,
the meter panel and the instrument panel lights
will be turned off.

After the ignition switch is turned to the OFF
position, the brightness indicator

*

B

is dis-

played for 30 seconds.

All-Wheel Drive (AWD) warning light (AWD
models) (if so equipped)

Master warning light

Malfunction Indicator Light (MIL)

Anti-lock Braking System (ABS) warning
light

Seat belt warning light

Overdrive off indicator light

Brake warning light

Supplemental air bag warning light

Security indicator light

Charge warning light

Vehicle Dynamic Control (VDC) warning light

SPORT mode indicator light

Electric power steering warning light

All-Wheel Drive (AWD) LOCK indicator light
(AWD models) (if so equipped)

Turn signal/hazard indicator lights

Engine oil pressure warning light

Exterior light indicator

Vehicle Dynamic Control (VDC) off indicator
light

Low fuel warning light

Front passenger air bag status light

Low tire pressure warning light

High beam indicator light

Instruments and controls

2-9

WARNING/INDICATOR LIGHTS AND
AUDIBLE REMINDERS

2-10

Instruments and controls

CHECKING BULBS

With all doors closed, apply the parking brake
and turn the ignition switch to the ON position
without starting the engine. The following lights
will come on:

,

,

,

,

,

,

The following lights come on briefly and then go
off (if so equipped):

,

,

,

,

,

,

If any light does not come on, it may indicate a
burned-out bulb or an open circuit in the
electrical system. Have the system checked by
a NISSAN dealer.

Some indicators and warnings are also dis-
played on the vehicle information display be-
tween the speedometer and tachometer. (See
“Vehicle information display” (P.2-17).)

WARNING LIGHTS

All-Wheel Drive (AWD) warning

light (AWD models)

The light illuminates when the ignition switch is
turned to the ON position. It turns off after the
engine is started.

If the All-Wheel Drive (AWD) system malfunc-
tions, or the diameter of the front and the rear
wheels are different, the warning light will either
remain illuminated or blink. (See “All-Wheel
Drive (AWD)” (P.5-20).)

CAUTION

If the warning light comes on while

driving there may be a malfunction
in the AWD system. Reduce the
vehicle speed and have your vehicle
checked by a NISSAN dealer as
soon as possible.

If the AWD warning light blinks

while driving:

— blinks rapidly (about twice a

second):

Pull off the road in a safe area,
and idle the engine. The driving
mode will change to 2WD to

prevent the AWD system from
malfunctioning. If the warning
light turns off, you can drive
again.

— blinks slowly (about once every

2 seconds):

Pull off the road in a safe area,
and idle the engine. Check that
all tire sizes are the same, tire
pressure is correct and tires are
not worn.

If the warning light is still on after

the above operations, have your
vehicle checked by a NISSAN dealer
as soon as possible.

Anti-lock Braking System (ABS)

warning light

When the ignition switch is in the ON position,
the Anti-lock Braking System (ABS) warning
light illuminates and then turns off. This indicates
the ABS is operational.

If the ABS warning light illuminates while the
engine is running, or while driving, it may
indicate the ABS is not functioning properly.
Have the system checked by a NISSAN dealer.

If an ABS malfunction occurs, the anti-lock


Content   ..  3  4  5  6   ..