Nissan NV200 Taxi (2017 year). Manual - part 15


  Index      Nissan     Nissan NV200 Taxi - service manual 2017 year in english


Search            copyright infringement  


Content   ..  13  14  15  16   ..


Nissan NV200 Taxi (2017 year). Manual - part 15


2. Open the lid of the air compressor, take out

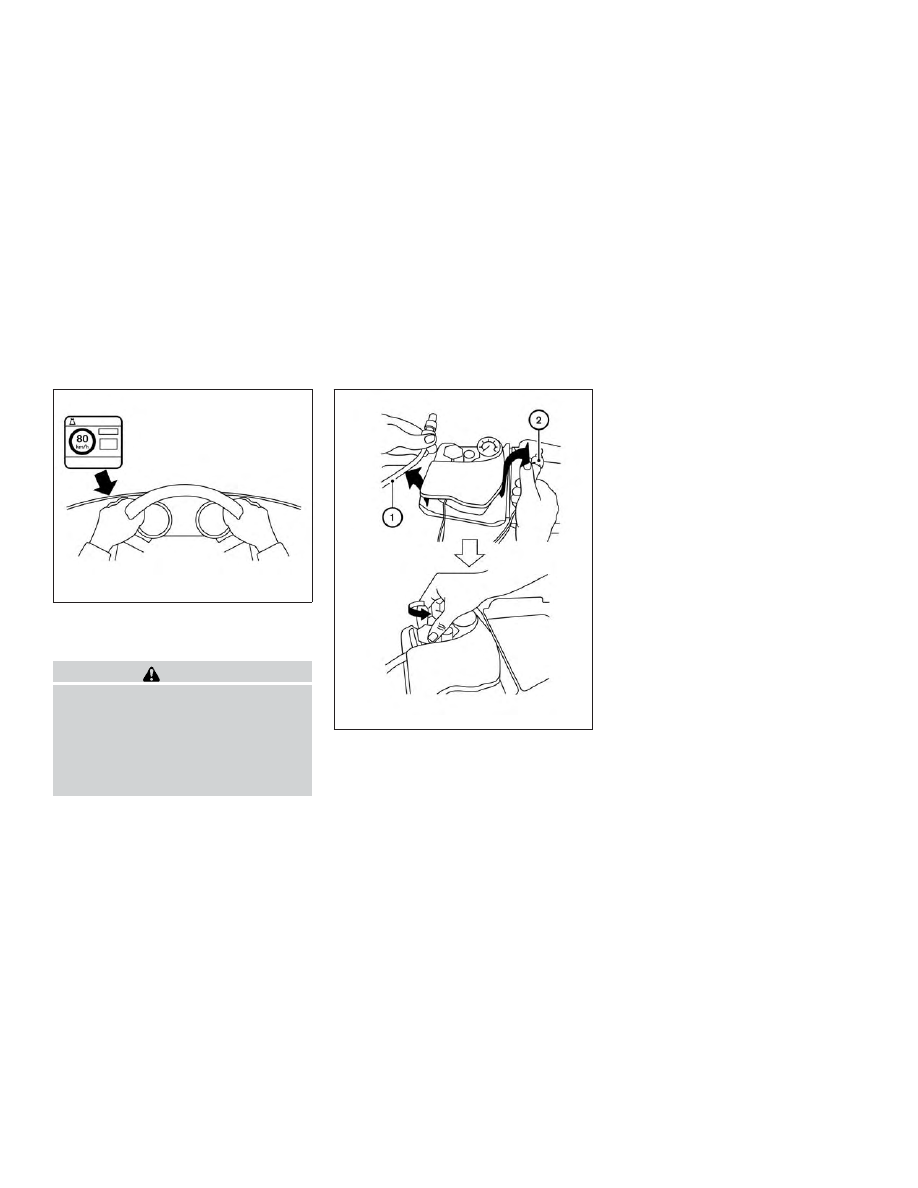
the speed restriction sticker, and put it in a
location where the driver can see it driving.

WARNING

● Do not apply the label to the center of

the steering wheel pad, as this can pre-
vent the air bag from properly function-
ing and cause serious injury.

● Avoid applying the label where it can

obstruct the view of the speedometer
and warning indicators.

3. Take the hose

1

and the power plug

2

out

of the air compressor. Remove the cap of the
bottle holder from the air compressor.

4. Remove the cap from the tire sealant bottle

and screw the bottle clockwise into the
bottle holder. Leave the bottle seal intact.
Screwing the bottle into the bottle holder will
pierce the seal of the bottle.

LCE2056

LCE2057

In case of emergency

6-5

5. Remove the cap from the tire valve on the flat

tire.

6. Remove the protective cap

A

of the hose

and screw the hose securely into the tire
valve. Make sure that the pressure release
valve

B

is securely tightened.

7. Make sure that the air compressor switch is

in the off position

1

, then insert the power

plug into the power outlet of the vehicle.

8. Turn the ignition switch to the ACC position.

Push the compressor switch to the ON po-
sition

2

and inflate the tire to the pressure

that is specified on the Tire and Loading
Information label that is affixed to the driver’s
side center pillar if possible, or to the mini-
mum of 26 psi (180 kPa). Turn the air com-
pressor off briefly in order to check the tire
pressure with the tire pressure gauge.

LCE2053

LCE2054

LCE2055

6-6

In case of emergency

If the tire is inflated to higher than the specified
pressure, lower the tire pressure by releasing air
with the pressure release valve.

WARNING

The ring on the end of the air compressor
hose may become hot after use so take
care to avoid burns.

CAUTION

Operating the air compressor for an ex-
tended period of time can result in dam-
age to the compressor and will not allow
you to fill the tire to the required air pres-
sure. Avoid continuous operation of the
compressor exceeding 10 minutes.

NOTE:

The compressor tire pressure gauge may
show a pressure reading of 87 psi (600 kPa)
for about 30 seconds while inflating the
tire. The pressure gauge is indicating the
pressure inside the sealant can. When the
sealant has been injected into the tire the
pressure gauge will drop and indicate ac-
tual tire pressure.

WARNING

● To avoid serious personal injury while

using the emergency tire repair kit:

– Securely tighten the air compressor

hose to the tire valve. Failure to do so
can cause the sealant to spray into
the air and get into your eyes or on
the skin.

– Do not stand directly beside the dam-

aged tire while it is being inflated
because of the risk of rupture. If
there are any cracks or bumps, turn
the air compressor off immediately.

● To avoid serious injury when stowing

the emergency tire repair kit:

– Keep the sealant bottle screwed into

the compressor. Failure to do so can
cause the sealant to spray into the air
and get into your eyes or on the skin.

If the tire pressure does not increase to 26 psi
(180 kPa) within 10 minutes, 
the tire may be
seriously damaged and the tire cannot be re-
paired with this tire repair kit. 
Under this
circumstance, contact a professional towing ser-
vice for assistance.

9. When the tire pressure is at the specified

pressure, turn the air compressor off. If the

tire cannot be inflated to the specified pres-
sure, the air compressor can be turned of at
the minumum 26 psi (180 kPa). Remove the
power plug from the outlet and quickly re-
move the hose from the tire valve. Attach the
protective cap and valve cap. Properly stow
the emergency tire repair kit in the cargo
area.

10. Immediately drive the vehicle for 10 minutes

or 2 miles (3 km) at a speed below 50 mph
(80 km/h).

11. After driving, make sure that the air com-

pressor switch is in the OFF position, then
screw the hose into the tire valve. Check the
pressure with the pressure gauge. Tempo-
rary repair is complete if the tire pressure
does not drop.

Make sure that the tire pressure is adjusted to the
pressure that is specified on the Tire and Loading
Information label before driving.

CAUTION

If tire pressure falls below 18 psi (130 kPa)
and remains low, even after repeating
steps 5-11, the tire is not repairable using
the tire emergency repair kit. Stop driving
the vehicle and contact a professional
towing service.

In case of emergency

6-7

● It is recommended to replace the repaired

tire with a new tire.

● Although the wheel can be reused by remov-

ing the repair compound, the tire valve must
be replaced.

● The remaining repair compound is not us-

able and must be replaced.

● When attempting to repair the punctured tire

at a later time the puncture may not be
detectable. It is important to carefully moni-
tor the tire pressure of the repaired tire. If the
tire should continually lose air pressure you
will need to have the tire replaced.

After tire repair

It is recommended that you visit a NISSAN dealer
for tire repair or replacement as soon as possible.

WARNING

● After using Emergency Tire Sealant to

repair a minor tire puncture, do not
drive the vehicle at speeds faster than
80 km/h (50 mph).

● Immediately after using Emergency Tire

Sealant to repair a minor tire puncture,
repair or replace the tire. It is recom-
mended that you visit a NISSAN dealer
for these services. The Emergency Tire
Sealant cannot permanently seal a
punctured tire. Continuing operation of
the vehicle without a permanent tire
repair can lead to a crash.

● If you used Emergency Tire Sealant to

repair a minor tire puncture, the TPMS
sensor will also need to be replaced in
addition to repairing or replacing the
tire. It is recommended that you visit a
NISSAN dealer for these services.

● NISSAN

recommends

using

only

NISSAN Genuine Emergency Tire Seal-
ant provided with your vehicle. Other
tire sealants may damage the valve
stem seal which can cause the tire to
lose air pressure.

To start your engine with a booster battery, the
instructions and precautions below must be fol-
lowed.

WARNING

● If done incorrectly, jump starting can

lead to a battery explosion, resulting in
severe injury or death. It could also
damage your vehicle.

● Explosive hydrogen gas is always pres-

ent in the vicinity of the battery. Keep all
sparks and flames away from the
battery.

● Do not allow battery fluid to come into

contact with eyes, skin, clothing or
painted surfaces. Battery fluid is a cor-
rosive sulfuric acid solution which can
cause severe burns. If the fluid should
come into contact with anything, imme-
diately flush the contacted area with
water.

● Keep battery out of the reach of

children.

● The booster battery must be rated at

12 volts. Use of an improperly rated
battery can damage your vehicle.

JUMP STARTING

6-8

In case of emergency

● Whenever working on or near a battery,

always wear suitable eye protectors (for
example, goggles or industrial safety
spectacles) and remove rings, metal
bands, or any other jewelry. Do not lean
over the battery when jump starting.

● Do not attempt to jump start a frozen

battery. It could explode and cause se-
rious injury.

WARNING

Always follow the instructions below. Fail-
ure to do so could result in damage to the
charging

system

and

cause

personal

injury.

1. If the booster battery is in another vehicle,

position the two vehicles to bring their bat-
teries near each other.

Do not allow the two vehicles to touch.

2. Apply the parking brake. Move the shift lever

to P (Park). Switch off all unnecessary elec-
trical systems (lights, heater, air conditioner,
etc.).

3. Ensure the vent caps are level and tight.

4. Connect jumper cables in the sequence il-

lustrated (

A

,

B

,

C

,

D

).

CAUTION

● Always connect positive () to positive

(

) and negative () to body ground (for

example, strut mounting bolt, engine
lift bracket, etc.) — not to the battery.

● Make sure the jumper cables do not

touch moving parts in the engine com-
partment and that the cable clamps do
not contact any other metal.

LCE2223

In case of emergency

6-9

5. Start the engine of the booster vehicle and

let it run for a few minutes.

6. Keep the engine speed of the booster ve-

hicle at about 2,000 rpm, and start the en-
gine of the vehicle being jump started.

CAUTION

Do not keep the starter motor engaged for
more than 10 seconds. If the engine does
not start right away, turn the key off and
wait 3 to 4 seconds before trying again.

7. After starting the engine, carefully discon-

nect the negative cable and then the positive
cable.

CAUTION

● Do not push start this vehicle. The

three-way catalyst may be damaged.

● Continuously Variable Transmission

(CVT) models cannot be push-started or
tow-started. Attempting to do so may
cause transmission damage.

WARNING

● Do not continue to drive if your vehicle

overheats. Doing so could cause engine
damage or a vehicle fire.

● To avoid the danger of being scalded,

never remove the radiator or coolant
reservoir cap while the engine is still
hot. When the radiator or coolant reser-
voir cap is removed, pressurized hot
water will spurt out, possibly causing
serious injury.

● Do not open the hood if steam is com-

ing out.

● Overheating can result in reduced en-

gine power and vehicle speed. The re-
duced speed may be lower than other
traffic, which could increase the chance
of a collision. Be especially careful
when driving. If the vehicle cannot
maintain a safe driving speed, pull to
the side of the road in a safe area. Allow
the engine to cool and return to normal
operation.

If your vehicle is overheating (indicated by the
illumination of the engine oil pressure/engine
coolant temperature high indicator light), or if you
feel a lack of engine power, detect abnormal
noise, etc., take the following steps.

PUSH STARTING

IF YOUR VEHICLE OVERHEATS

6-10

In case of emergency

1. Move the vehicle safely off the road, apply

the parking brake and move the shift lever to
P (Park).

Do not stop the engine.

2. Turn off the air conditioner. Open all the

windows, move the heater or air conditioner
temperature control to maximum hot and fan
control to high speed.

3. Get out of the vehicle. Look and listen for

steam or coolant escaping from the radiator
before opening the hood. If steam or coolant
is escaping, turn off the engine. Do not open
the hood further until no steam or coolant
can be seen.

4. Open the engine hood.

WARNING

If steam or water is coming from the en-
gine,

stand

clear

to

prevent

getting

burned.

5. Visually check drive belts for damage or

looseness. Also check if the cooling fan is
running. The radiator hoses and radiator
should not leak water. If coolant is leaking,
the water pump belt is missing or loose, or
the cooling fan does not run, stop the en-
gine.

WARNING

Be careful not to allow your hands, hair,
jewelry or clothing to come into contact
with, or get caught in, engine belts or the
engine cooling fan. The engine cooling fan
can start at any time.

6. After the engine cools down, check the cool-

ant level in the engine coolant reservoir tank
with the engine running. Add coolant to the
engine coolant reservoir tank if necessary. It
is recommended that you visit a NISSAN
dealer for this service.

When towing your vehicle, all state and local
regulations for towing must be followed. Incor-
rect towing equipment could damage your ve-
hicle. Towing instructions are available from a
NISSAN dealer. Local service operators are gen-
erally familiar with the applicable laws and proce-
dures for towing. To assure proper towing and to
prevent accidental damage to your vehicle,
NISSAN recommends having a service operator
tow your vehicle. It is advisable to have the ser-
vice operator carefully read the following precau-
tions:

WARNING

● Never ride in a vehicle that is being

towed.

● Never get under your vehicle after it has

been lifted by a tow truck.

CAUTION

● When towing, make sure that the trans-

mission, axles, steering system and
powertrain are in working condition. If
any of these conditions apply, dollies or
a flatbed tow truck must be used.

● Always attach safety chains before

towing.

TOWING YOUR VEHICLE

In case of emergency

6-11

For additional information about towing your ve-
hicle behind a recreational vehicle (RV), refer to
“Flat towing” in the “Technical and consumer
information” section of this manual.

TOWING RECOMMENDED BY
NISSAN

NISSAN recommends that your vehicle be towed
with the driving (front) wheels off the ground or
place the vehicle on a flat bed truck as illustrated.

LCE2210

6-12

In case of emergency

CAUTION

● Never tow Continuously Variable Trans-

mission (CVT) models with the front
wheels on the ground or four wheels on
the ground (forward or backward), as
this may cause serious and expensive
damage to the transmission. If it is nec-
essary to tow the vehicle with the rear
wheels raised always use towing dollies
under the front wheels.

● When towing Continuously Variable

Transmission (CVT) models with the
front wheels on towing dollies:

– Place the ignition switch in the OFF

position, and secure the steering
wheel in a straight-ahead position
with a rope or similar device.

– Move the shift lever to the N (Neutral)

position.

● When towing Continuously Variable

Transmission (CVT) models with the
rear wheels on the ground (if you do not
use towing dollies): Always release the
parking brake.

VEHICLE RECOVERY (freeing a stuck
vehicle)

There are two options to recover a stuck vehicle:
pulling and rocking. For additional information
regarding these options, please refer to the fol-
lowing sections.

Pulling a stuck vehicle

WARNING

To avoid vehicle damage, serious personal
injury or death when recovering a stuck
vehicle:

● Contact a professional towing service

to recover the vehicle if you have any
questions

regarding

the

recovery

procedure.

● Attach recovery devices only to main

structural members of the vehicle or the
recovery hooks.

● Do not use the vehicle tie-downs to tow

or free a stuck vehicle.

● Only use devices specifically designed

for vehicle recovery and follow the
manufacturer’s instructions.

● Always pull the recovery device straight

out from the front of the vehicle. Never
pull at an angle.

● Route recovery devices so they do not

touch any part of the vehicle except the
attachment point.

If your vehicle is stuck in sand, snow, mud, etc.,
use a tow strap or other device designed specifi-
cally for vehicle recovery. Always follow the
manufacturer’s instructions for the recovery de-
vice.

NOTE:

Do not use the tie-down hooks for towing
or vehicle recovery.

Rocking a stuck vehicle

WARNING

● Stand clear of a stuck vehicle.
● Do not spin your tires at high speed.

This could cause them to explode and
result in serious injury. Parts of your
vehicle could also overheat and be
damaged.

If your vehicle is stuck in sand, snow, mud, etc.,
use the following procedure:

In case of emergency

6-13

1. Turn off the Vehicle Dynamic Control (VDC)

System .

2. Make sure the area in front and behind the

vehicle is clear of obstructions.

3. Turn the steering wheel right and left to clear

an area around the front tires.

4. Slowly rock the vehicle forward and back-

ward.

● Shift back and forth between R (Reverse)

and D (Drive).

● Apply the accelerator as little as possible

to maintain the rocking motion.

● Release the accelerator pedal before

shifting between R (Reverse) and D
(Drive).

● Do not spin the tires above 34 mph

(55 km/h).

5. If the vehicle cannot be freed after a few

tries, contact a professional towing service
to remove the vehicle.

6-14

In case of emergency

7 Appearance and care

Cleaning exterior . . . . . . . . . . . . . . . . . . . . . . . . . . . . . . . . . . 7-2

Washing . . . . . . . . . . . . . . . . . . . . . . . . . . . . . . . . . . . . . . 7-2
Waxing . . . . . . . . . . . . . . . . . . . . . . . . . . . . . . . . . . . . . . . . 7-2
Removing spots . . . . . . . . . . . . . . . . . . . . . . . . . . . . . . . . 7-3
Underbody . . . . . . . . . . . . . . . . . . . . . . . . . . . . . . . . . . . . 7-3
Glass . . . . . . . . . . . . . . . . . . . . . . . . . . . . . . . . . . . . . . . . . 7-3
Aluminum alloy wheels (if so equipped) . . . . . . . . . . . 7-3
Chrome parts . . . . . . . . . . . . . . . . . . . . . . . . . . . . . . . . . . 7-3
Tire dressings . . . . . . . . . . . . . . . . . . . . . . . . . . . . . . . . . . 7-3

Cleaning interior. . . . . . . . . . . . . . . . . . . . . . . . . . . . . . . . . . . 7-4

Air fresheners . . . . . . . . . . . . . . . . . . . . . . . . . . . . . . . . . . 7-4
Floor mats . . . . . . . . . . . . . . . . . . . . . . . . . . . . . . . . . . . . . 7-4
Seat belts . . . . . . . . . . . . . . . . . . . . . . . . . . . . . . . . . . . . . 7-5

Corrosion protection . . . . . . . . . . . . . . . . . . . . . . . . . . . . . . . 7-6

Most common factors contributing to vehicle
corrosion . . . . . . . . . . . . . . . . . . . . . . . . . . . . . . . . . . . . . . 7-6
Environmental factors influence the rate of
corrosion . . . . . . . . . . . . . . . . . . . . . . . . . . . . . . . . . . . . . . 7-6
Protect your vehicle from corrosion . . . . . . . . . . . . . . . 7-6

In order to maintain the appearance of your ve-
hicle, it is important to take proper care of it.

To protect the paint surfaces, please wash your
vehicle as soon as you can:

● After a rainfall to prevent possible damage

from acid rain.

● After driving on coastal roads.
● When contaminants such as soot, bird drop-

pings, tree sap, metal particles or bugs get
on the paint surface.

● When dust or mud builds up on the surface.

Whenever possible, store or park your vehicle
inside a garage or in a covered area.

When it is necessary to park outside, park in a
shady area or protect the vehicle with a body
cover.

Be careful not to scratch the paint surface
when putting on or removing the body
cover.

WASHING

Wash dirt off with a wet sponge and plenty of
water. Clean the vehicle thoroughly using a mild
soap, a special vehicle soap or general purpose
dishwashing liquid mixed with clean, lukewarm
(never hot) water.

CAUTION

● Do not use car washes that use acid in

the detergent. Some car washes, espe-
cially brushless ones, use some acid for
cleaning. The acid may react with some
plastic vehicle components, causing
them to crack. This could affect their
appearance, and also could cause them
not to function properly. Always check
with your car wash to confirm that acid
is not used.

● Do not wash the vehicle with strong

household soap, strong chemical deter-
gents, gasoline or solvents.

● Do not wash the vehicle in direct sun-

light or while the vehicle body is hot, as
the surface may become water-spotted.

● Avoid using tight-napped or rough

cloths, such as washing mitts. Care
must

be

taken

when

removing

caked-on dirt or other foreign sub-
stances so the paint surface is not
scratched or damaged.

Rinse the vehicle thoroughly with plenty of clean
water.

Inside edges, seams and folds on the doors,
hatches and hood are particularly vulnerable to

the effects of road salt. Therefore, these areas
must be cleaned regularly. Take care that the
drain holes in the lower edge of the door are
open. Spray water under the body and in the
wheel wells to loosen the dirt and wash away
road salt.

A damp chamois can be used to dry the vehicle to
avoid water spots.

WAXING

Regular waxing protects the paint surface and
helps retain new vehicle appearance. Polishing is
recommended to remove built-up wax residue
and to avoid a weathered appearance before
re-applying wax.

A NISSAN dealer can assist you in choosing the
proper product.

● Wax your vehicle only after a thorough wash-

ing. Follow the instructions supplied with the
wax.

● Do not use a wax containing any abrasives,

cutting compounds or cleaners that may
damage the vehicle finish.

Machine compounding or aggressive polishing
on a base coat/clear coat paint finish may dull the
finish or leave swirl marks.

CLEANING EXTERIOR

7-2

Appearance and care

REMOVING SPOTS

Remove tar and oil spots, industrial dust, insects,
and tree sap as quickly as possible from the
surface of the paint to avoid lasting damage or
staining. Special cleaning products are available
at a NISSAN dealer or any automotive accessory
store. It is recommended that you visit a NISSAN
dealer for these products.

UNDERBODY

In areas where road salt is used in winter, it is
necessary to clean the underbody regularly in
order to prevent dirt and salt from building up and
causing the acceleration of corrosion on the un-
derbody and suspension. Before the winter pe-
riod and again in the spring, the underseal must
be checked and, if necessary, re-treated.

GLASS

Use glass cleaner to remove smoke and dust film
from the glass surfaces. It is normal for glass to
become coated with a film after the vehicle is
parked in the hot sun. Glass cleaner and a soft
cloth will easily remove this film.

CAUTION

When cleaning the inside of the windows,
do not use sharp-edged tools, abrasive
cleaners or chlorine-based disinfectant
cleaners. They could damage the electrical
conductors, radio antenna elements or
rear window defroster elements.

ALUMINUM ALLOY WHEELS (if so
equipped)

Wash the wheels regularly with a sponge damp-
ened in a mild soap solution, especially during
winter months in areas where road salt is used. If
not removed, road salt can discolor the wheels.

CAUTION

Follow the directions below to avoid
staining or discoloring the wheels:

● Do not use a cleaner that uses strong acid

or alkali contents to clean the wheels.

● Do not apply wheel cleaners to the

wheels when they are hot. The wheel
temperature should be the same as am-
bient temperature.

● Rinse the wheel to completely remove

the cleaner within 15 minutes after the
cleaner is applied.

CHROME PARTS

Clean all chrome parts regularly with a non-
abrasive chrome polish to maintain the finish.

TIRE DRESSINGS

NISSAN does not recommend the use of tire
dressings. Tire manufacturers apply a coating to
the tires to help reduce discoloration of the rub-
ber. If a tire dressing is applied to the tires, it may
react with the coating and form a compound. This
compound may come off the tire while driving and
stain the vehicle paint.

If you choose to use a tire dressing, take the
following precautions:

● Use a water-based tire dressing. The coat-

ing on the tire dissolves more easily than
with an oil-based tire dressing.

● Apply a light coat of tire dressing to help

prevent

it

from

entering

the

tire

tread/grooves (where it would be difficult to
remove).

● Wipe off excess tire dressing using a dry

towel. Make sure the tire dressing is com-
pletely removed from the tire tread/grooves.

● Allow the tire dressing to dry as recom-

mended by the tire dressing manufacturer.

Appearance and care

7-3

Occasionally remove loose dust from the interior
trim, plastic parts and seats using a vacuum
cleaner or soft bristled brush. Wipe the vinyl
surfaces with a clean, soft cloth dampened in
mild soap solution, then wipe clean with a dry,
soft cloth. Gently dab or tap soiled cloth areas
with a moist, soft cloth. Before using any fabric
protector, read the manufacturer’s recommenda-
tions. Some fabric protectors contain chemicals
that may stain or bleach the seat material.

Immediately clean spills on water repellent sur-
faces by wiping with soft, dry cloth.

Use a cloth dampened only with water to clean
the meter and gauge lens.

WARNING

Do not use water or acidic cleaners (hot
steam cleaners on the seat. This can dam-
age the seat or occupant classification
sensor (weight sensor). This can also af-
fect the operation of the air bag system
and result in serious personal injury.

CAUTION

● Never use benzine, thinner or any simi-

lar material.

● Never use fabric protectors unless rec-

ommended by the manufacturer.

● Do not use glass or plastic cleaner on

meter or gauge lens covers. It may dam-
age the lens cover.

AIR FRESHENERS

Most air fresheners use a solvent that could affect
the vehicle interior. If you use an air freshener,
take the following precautions:

● Hanging-type air fresheners can cause per-

manent discoloration when they contact ve-
hicle interior surfaces. Place the air fresh-
ener in a location that allows it to hang free
and not contact an interior surface.

● Liquid-type air fresheners typically clip on

the vents. These products can cause imme-
diate damage and discoloration when
spilled on interior surfaces.

Carefully read and follow the manufacturer’s in-
structions before using the air fresheners.

FLOOR MATS

WARNING

To avoid potential pedal interference that
may result in a collision, injury or death:

● NEVER place a floor mat on top of an-

other floor mat in the driver front posi-
tion or install them upside down or
backwards.

● Use only Genuine NISSAN floor mats, or

equivalent floor mats, that are specifi-
cally designed for use in your vehicle
model and model year.

LAI2005

CLEANING INTERIOR

7-4

Appearance and care

● Properly position the mats in the floor-

well using the floor mat positioning
hook. For additional information, refer
to

Floor mat installationⴖ in this

section.

● Make sure the floor mat does not inter-

fere with pedal operation.

● Periodically check the floor mats to

make sure they are properly installed.

● After cleaning the vehicle interior,

check the floor mats to make sure they
are properly installed.

The use of Genuine NISSAN floor mats can
extend the life of your vehicle carpet and make it
easier to clean the interior. Mats should be main-
tained with regular cleaning and replaced if they
become excessively worn.

Floor mat installation

Your vehicle is equipped with floor mat position-
ing hook(s). The number and shape of the floor
mat positioning hooks for each seating position
varies depending on the vehicle.

When installing Genuine NISSAN floor mats,
follow the installation instructions provided with
the mat and the following:

1. Position the floor mat in the floorwell so that

the floor mat grommet holes are aligned with
the hook(s).

2. Secure the grommet holes into the hook(s)

and ensure that the floor mat is properly
positioned.

3. Make sure the floor mat does not interfere

with pedal operation. With the ignition in the
OFF position, the selector lever in the P
(Park) position (Automatic Transmission
models) or the shift lever in the N (Neutral)
position (Manual Transmission models) fully
apply and release all pedals. The floor mat
must not interfere with pedal operation or
prevent the pedal from returning to its nor-
mal position.

It is recommended that you visit a NISSAN dealer
for details about installing the floor mats in your
vehicle.

The illustration shows the location of the floor mat
positioning hooks.

SEAT BELTS

The seat belts can be cleaned by wiping them
with a sponge dampened in a mild soap solution.
Allow the belts to dry completely in the shade
before using them. For additional information,
refer to “Seat belt maintenance” in the “Safety-
–Seats, seat belts and supplemental restraint
system” section of this manual.

Positioning hooks

LAI2049

Appearance and care

7-5

WARNING

Do not allow wet seat belts to roll up in the
retractor. NEVER use bleach, dye or
chemical solvents to clean the seat belts,
since

these

materials

may

severely

weaken the seat belt webbing.

MOST COMMON FACTORS
CONTRIBUTING TO VEHICLE
CORROSION

Most vehicle corrosion is caused by:

● The accumulation of moisture-retaining dirt

and debris in body panel sections, cavities,
and other areas.

● Damage to paint and other protective coat-

ings caused by gravel and stone chips or
minor traffic collisions.

ENVIRONMENTAL FACTORS
INFLUENCE THE RATE OF
CORROSION

Moisture

Accumulation of sand, dirt and water on the ve-
hicle body underside can accelerate corrosion.
Wet floor coverings will not dry completely inside
the vehicle and should be removed for drying to
avoid floor panel corrosion.

Relative humidity

Corrosion will be accelerated in areas of high
relative humidity, especially those areas where
the temperatures stay above freezing and where
atmospheric pollution exists and road salt is
used.

Temperature

High temperatures accelerate the rate of corro-
sion to those parts which are not well ventilated.

Air pollution

Industrial pollution, the presence of salt in the air
in coastal areas, or heavy road salt use acceler-
ates the corrosion process. Road salt also accel-
erates the disintegration of paint surfaces.

PROTECT YOUR VEHICLE FROM
CORROSION

● Wash and wax your vehicle often to keep the

vehicle clean.

● Always check for minor damage to the paint

and repair it as soon as possible.

● Keep drain holes at the bottom of the doors

open to avoid water accumulation.

● Check the underbody for accumulation of

sand, dirt or salt. If present, wash with water
as soon as possible.

CORROSION PROTECTION

7-6

Appearance and care


Content   ..  13  14  15  16   ..