Nissan Versa Sedan. Instruction - part 721
 

  Index      Nissan     Nissan Versa Sedan (2014 year) - Service and Repair Instruction


Search            copyright infringement  


Content   ..  719  720  721  722   ..


Nissan Versa Sedan. Instruction - part 721


COLLISION DIAGNOSIS

SR-9

< BASIC INSPECTION >

C

D

E

F

G

I

J

K

L

M

A

B

SR

N

O

P

4. After the work is completed, perform self-diagnosis to check that no malfunction is detected. Refer to

SRC-15, "Trouble Diagnosis without CONSULT"

.

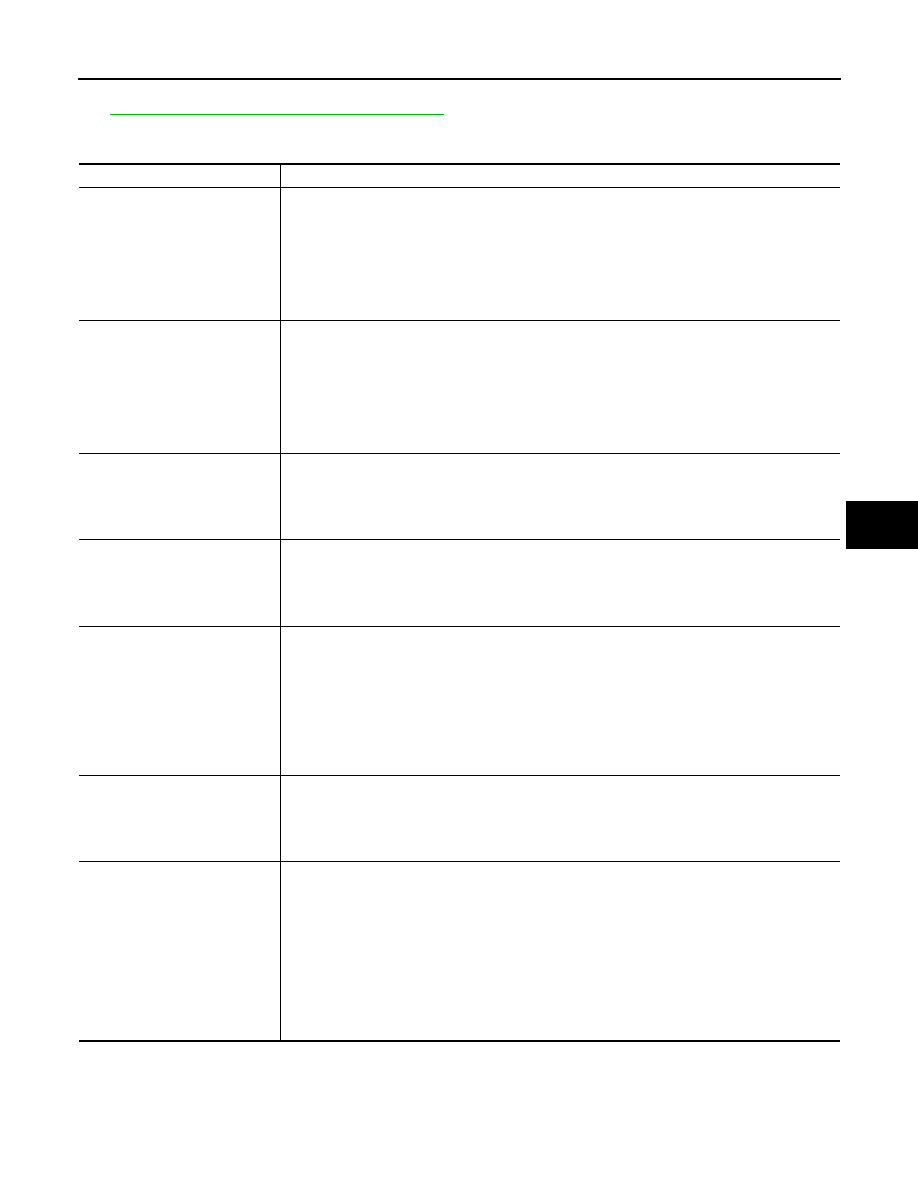
SRS INSPECTION (FOR SIDE AND ROLLOVER COLLISION)

Part

Inspection

Side curtain air bag module LH

If the side curtain air bag LH has NOT deployed:
1.

Check for visible signs of damage (dents, tears, deformation) of the center pillar on the colli-
sion side.

2.

If damaged - Remove the side curtain air bag module LH.

3.

Check for visible signs of damage (tears etc.) of the side curtain air bag module LH.

4.

Check harness and connectors for damage, and terminals for deformities.

5.

If no damage is found, reinstall the side curtain air bag module LH with new fasteners.

6.

If damaged — REPLACE the side curtain air bag module LH with new fasteners. 

Side curtain air bag module RH

If the side curtain air bag RH has NOT deployed:
1.

Check for visible signs of damage (dents, tears, deformation) of the center pillar on the colli-
sion side.

2.

If damaged - Remove the side curtain air bag module RH.

3.

Check for visible signs of damage (tears etc.) of the side curtain air bag module RH.

4.

Check harness and connectors for damage, and terminals for deformities.

5.

If no damage is found, reinstall the side curtain air bag module RH with new fasteners.

6.

If damaged — REPLACE the side curtain air bag module RH with new fasteners. 

Front side air bag module LH

If the front LH side air bag has NOT deployed: 
1.

Check for visible signs of damage (dents, tears, deformation) of the seat back on the collision 
side.

2.

Check harness and connectors for damage, and terminals for deformities.

3.

If damaged — REPLACE the front seatback assembly LH. 

Front side air bag module RH

If the front side air bag RH has NOT deployed:
1.

Check for visible signs of damage (dents, tears, deformation) of the seat back on the collision 
side.

2.

Check harness and connectors for damage, and terminals for deformities.

3.

If damaged — REPLACE the front seatback assembly RH. 

Side air bag (satellite) sensor (LH 
or RH) 

If none of the SRS components have been activated:
1.

Remove the side air bag (satellite) sensor (LH or RH) on the collision side. Check harness 
connectors for damage, terminals for deformities, and harness for binding.

2.

Check for visible signs of damage (dents, cracks, deformation) of the side air bag (satellite) 
sensor (LH or RH).

3.

Install the side air bag (satellite) sensor (LH or RH) to check fit.

4.

If no damage is found, reinstall the side sir bag (satellite) sensor (LH or RH) with new fasten-
ers.

5.

If damaged — REPLACE the side air bag (satellite) sensor (LH or RH) with new fasteners.

Diagnosis sensor unit

If none of the SRS components have been activated:
1.

Check case and bracket for dents, cracks or deformities.

2.

Check connectors for damage, and terminals for deformities.

3.

If no damage is found, reinstall the diagnosis sensor unit with new fasteners.

4.

If damaged — REPLACE the diagnosis sensor unit with new fasteners.

Seat belt pre-tensioner assem-
blies
(All applicable locations: buckle, 
retractor, lap outer)

If the pre-tensioners have NOT been activated:
1.

Remove seat belt pre-tensioners.
Check harness cover and connectors for damage, terminals for deformities, and harness for 
binding.

2.

Check belts for damage and anchors for loose mounting.

3.

Check retractor for smooth operation.

4.

Check seat belt adjuster for damage.

5.

Check for deformities of the center pillar inner.

6.

If the center pillar inner has no damage, REPLACE the seat belt pre-tensioner assembly.

7.

If no damage is found, reinstall seat belt pre-tensioner assembly.

8.

If damaged —REPLACE. Install the seat belt pre-tensioners with new fasteners. 

SR-10

< BASIC INSPECTION >

COLLISION DIAGNOSIS

Seat (with front side air bag)

If the front LH or front RH side air bag modules have NOT deployed: 
1.

Visually check the seat on the collision side.

2.

Remove the seat on the collision side and check the following for damage and deformities.

-

Harness, connectors and terminals

-

Frame and recliner (for front and rear seat), and also adjuster and slides (for front seat)

3.

If no damage is found, reinstall the seat.

4.

If damaged— REPLACE the damaged seat parts using new fasteners. If the front seat back 
is damaged, the front seat back assembly must be replaced.

Center inner pillar

1.

Check the center inner pillar on the collision side for damage (dents, cracks, deformation, 
etc.).

2.

If damaged - REPAIR the center inner pillar.

Trim/headlining

1.

Check for visible signs of damage (dents, cracks, deformation, etc.) of the interior trim on the 
collision side.

2.

If damaged - REPLACE the damaged trim parts.

Door-mounted curtain air bag 
module LH

If the door-mounted curtain air bag LH has NOT deployed:
1.

Check for visible signs of damage (dents, tears, deformation, etc.) of the door finisher on the 
collision side.

2.

If damaged - REPLACE the door finisher LH with new fasteners.

3.

Check for visible signs of damage (tears etc.) of the door-mounted curtain air bag module LH.

4.

Check harness and connectors for damage, and terminals for deformities.

5.

If no damage is found, reinstall door finisher.

CAUTION:

When removing door mounted curtain air bag module from door finisher, do not reuse 
door finisher.

6.

If damaged - REPLACE the door finisher LH and door-mounted curtain air bag module LH 
with new fasteners.

Door-mounted curtain air bag 
module RH

If the door-mounted curtain air bag RH has NOT deployed:
1.

Check for visible signs of damage (dents, tears, deformation, etc.) of the door finisher on the 
collision side.

2.

If damaged - REPLACE the door finisher RH with new fasteners.

3.

Check for visible signs of damage (tears etc.) of the door-mounted curtain air bag module RH.

4.

Check harness and connectors for damage, and terminals for deformities.

5.

If no damage is found, reinstall door finisher.

CAUTION:

When removing door mounted curtain air bag module from door finisher, do not reuse 
door finisher.

6.

If damaged - REPLACE the door finisher RH and door-mounted curtain air bag module RH 
with new fasteners.

Pop-up roll bar

If the pop-up roll bar NOT deployed:
1.

Check for visible signs of damage (dents, tears, deformation, etc.) of the pop-up roll bar.

2.

If damaged - REPLACE the pop-up roll bar with new fasteners.

3.

Check harness and connectors for damage, and terminals for deformities.

4.

If no damage is found, reinstall the pop-up roll bar with new fasteners.

5.

Check for visible signs of damage (dents, cracks, deformation, etc.) of the seatback support 
brace assembly.

6.

If damaged - REPAIR the seatback support brace assembly.

Part

Inspection

DRIVER AIR BAG MODULE

SR-11

< REMOVAL AND INSTALLATION >

C

D

E

F

G

I

J

K

L

M

A

B

SR

N

O

P

REMOVAL AND INSTALLATION

DRIVER AIR BAG MODULE

Exploded View

INFOID:0000000009266921

Removal and Installation

INFOID:0000000009266922

WARNING:

Always observe the following items for preventing accidental activation.

• Before servicing, turn ignition switch OFF, disconnect both battery terminals, then wait at least three

minutes or more.

• Always work from the side of air bag module. Do not work in front of it.

• Do not use the air tools or electric tools for servicing.

• Always place air bag module with pad side facing upward.

• Do not cause impact to the air bag module by dropping etc. Replace the air bag module if it has been

dropped or sustained an impact.

REMOVAL

1. Disconnect the negative and positive battery terminals, then wait at least three minutes. Refer to 

PG-63,

"Removal and Installation"

.

1.

Driver air bag module

2.

Steering wheel

ALHIA0341GB

SR-12

< REMOVAL AND INSTALLATION >

DRIVER AIR BAG MODULE

2. Locate retaining clip access hole (LH/RH) and insert a 5.0 mm

(0.20 in) diameter suitable tool (A).

3. Insert suitable tool (A) inward and make sure the tool contacts

torsion spring (1) as shown. While pressing on the torsion spring

(1), the driver air bag module LH and RH pawls will disengage.

4. After both the LH and RH pawls release, gently roll the top edge

of driver air bag module downward to release the center lower

pawl, then pull out the driver air bag module assembly enough to

set aside.

5. Disconnect the harness connectors from the driver air bag module.

CAUTION:

• For installing/removing the driver air bag module harness

connector, insert thin screwdriver wrapped in tape into

notch, lift lock and remove connector.

• Install the connector with lock raised, and push lock into

the connector.

• After installing the connector, check that the lock is

pushed securely into it.

6. Remove the driver air bag module.

CAUTION:

• Always place the driver air bag module with pad side fac-

ing upward.

: Upward

JMHIA1525ZZ

AWHIA0342ZZ

PHIA0953J

JMHIA1026ZZ


Content   ..  719  720  721  722   ..