Nissan Versa Sedan. Instruction - part 214


  Index      Nissan     Nissan Versa Sedan (2014 year) - Service and Repair Instruction


Search            copyright infringement  


Content   ..  212  213  214  215   ..


Nissan Versa Sedan. Instruction - part 214


DLK-174

< REMOVAL AND INSTALLATION >

[WITH INTELLIGENT KEY SYSTEM]

REAR DOOR LOCK

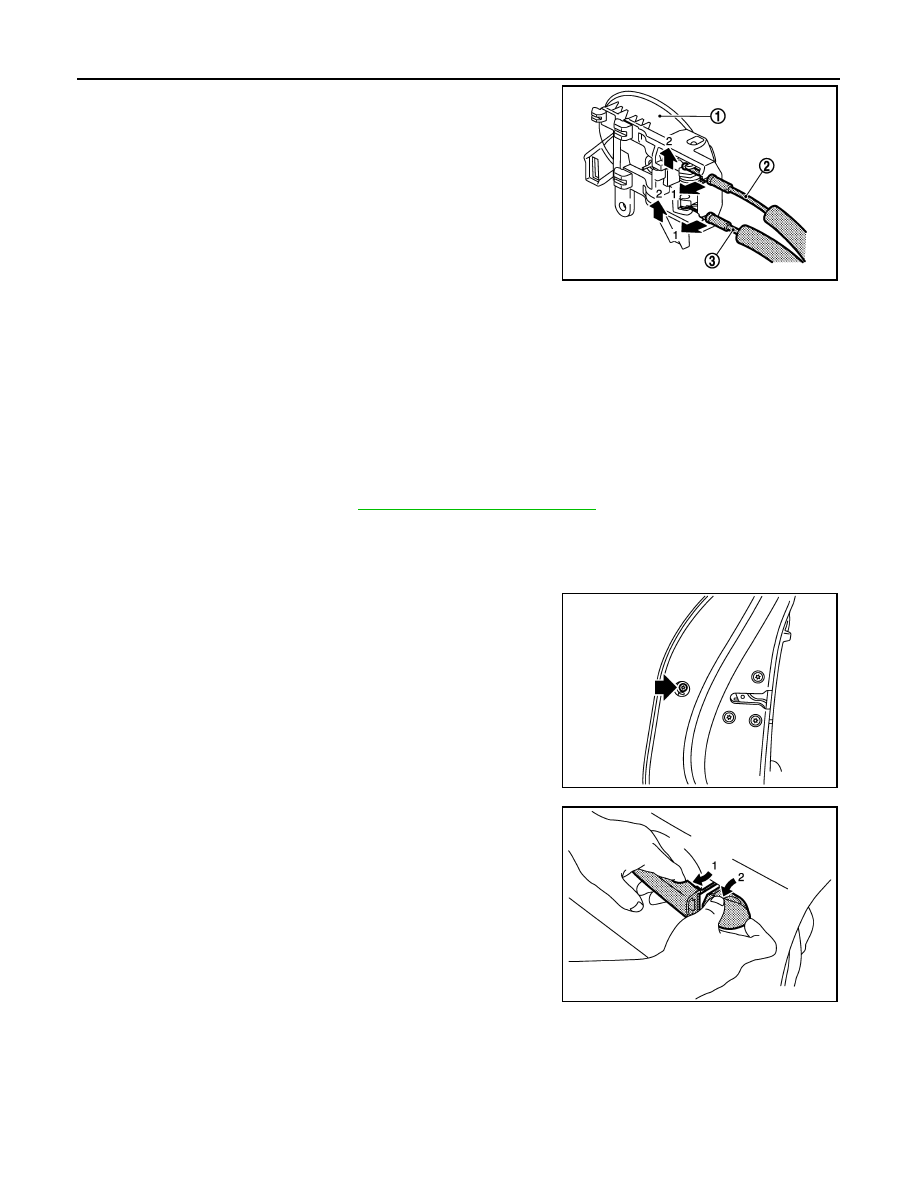
6. Disengage inside handle cable (3) and lock knob cable (2), and

then remove inside handle (1).

INSTALLATION

Installation is in the reverse order of removal.

CAUTION:

After installation, check door open/close, lock/unlock operation. 

OUTSIDE HANDLE
OUTSIDE HANDLE : Removal and Installation

INFOID:0000000009268874

REMOVAL

1. Fully close rear door glass.
2. Remove rear door finisher. Refer to 

INT-17, "Removal and Installation"

.

3. Remove sealing screen. 

NOTE:

Cut the butyl tape so that some parts of the butyl tape remain on the sealing screen, if the sealing screen

is reused.

4. Remove door side grommet, and loosen bolt from grommet

hole.

5. While pulling outside handle, remove outside handle escutch-

eon.

JMKIA5885ZZ

JMKIA1467ZZ

JMKIA5342ZZ

REAR DOOR LOCK

DLK-175

< REMOVAL AND INSTALLATION >

[WITH INTELLIGENT KEY SYSTEM]

C

D

E

F

G

H

I

J

L

M

A

B

DLK

N

O

P

6. Pull outside handle (1) rearward and outward to remove.

7. Remove front gasket (1) and rear gasket (2).

: Front

8. Slide outside handle bracket toward rear of vehicle to remove.

: Front

9. Disconnect outside handle cable (1) from outside handle bracket

(2) as shown.

INSTALLATION

Installation is in the reverse order of removal.

CAUTION:

• After installation, check door open/close, lock/unlock operation. 

• Check door lock cable is properly engaged with outside handle bracket.

JMKIA0524ZZ

JMKIA5889ZZ

JMKIA5890ZZ

JMKIA5891ZZ

DLK-176

< REMOVAL AND INSTALLATION >

[WITH INTELLIGENT KEY SYSTEM]

TRUNK LID LOCK

TRUNK LID LOCK

Exploded View

INFOID:0000000009268875

TRUNK LID LOCK
TRUNK LID LOCK : Removal and Installation

INFOID:0000000009268876

REMOVAL

1. Remove trunk lid finisher (if equipped). Refer to 

INT-35, "Removal and Installation"

.

2. Release rod holder (1) by lifting upward, and then separate trunk

lid lock rod (3) from trunk lid lock assembly (2).

3. Remove trunk lid lock assembly bolts.

1.

Trunk lid opener handle

2.

Trunk lid opener cable

3.

Cable protector

4.

Trunk lid striker

5.

Trunk lid lock assembly

6.

Key rod

7.

Trunk key cylinder

JMKIA8173GB

JMKIA8131ZZ

TRUNK LID LOCK

DLK-177

< REMOVAL AND INSTALLATION >

[WITH INTELLIGENT KEY SYSTEM]

C

D

E

F

G

H

I

J

L

M

A

B

DLK

N

O

P

4. Disconnect harness connector and then remove trunk lid lock

assembly (1).

INSTALLATION

Installation is in the reverse order of removal.

CAUTION:

• After installation, check trunk lid open/close, lock/unlock operation. 

• Check trunk lid lock assembly for poor lubrication. Apply a

suitable multi-purpose grease to trunk lid lock if necessary.

TRUNK LID OPENER HANDLE
TRUNK LID OPENER HANDLE : Removal and Installation

INFOID:0000000009268877

REMOVAL

1. Remove front kicking plate (LH). Refer to 

INT-20, "KICKING PLATE INNER : Removal and Installation"

.

2. Disengage pawl using a suitable tool (A) and open the harness

clip.

: Pawl

3. Position floor carpet aside as necessary to access the trunk lid opener handle bolts.
4. Remove the trunk lid opener handle bolts.
5. Remove trunk lid opener cable from trunk lid opener handle.

INSTALLATION

Installation is in the reverse order of removal.

CAUTION:

• After installation, check rear door open/close, lock/unlock operation.

• After installation, perform the rear door adjustment procedure. Refer to 

DLK-150, "DOOR ASSEMBLY

: Adjustment"

.

TRUNK LID OPENER CABLE

JMKIA8132ZZ

JMKIA8133ZZ

AWJIA0737ZZ


Content   ..  212  213  214  215   ..