Nissan Murano Hybrid (2016 year). Manual - part 11


  Index      Nissan     Nissan Murano Hybrid - service manual 2016 year in english


Search            copyright infringement  


Content   ..  9  10  11  12   ..


Nissan Murano Hybrid (2016 year). Manual - part 11


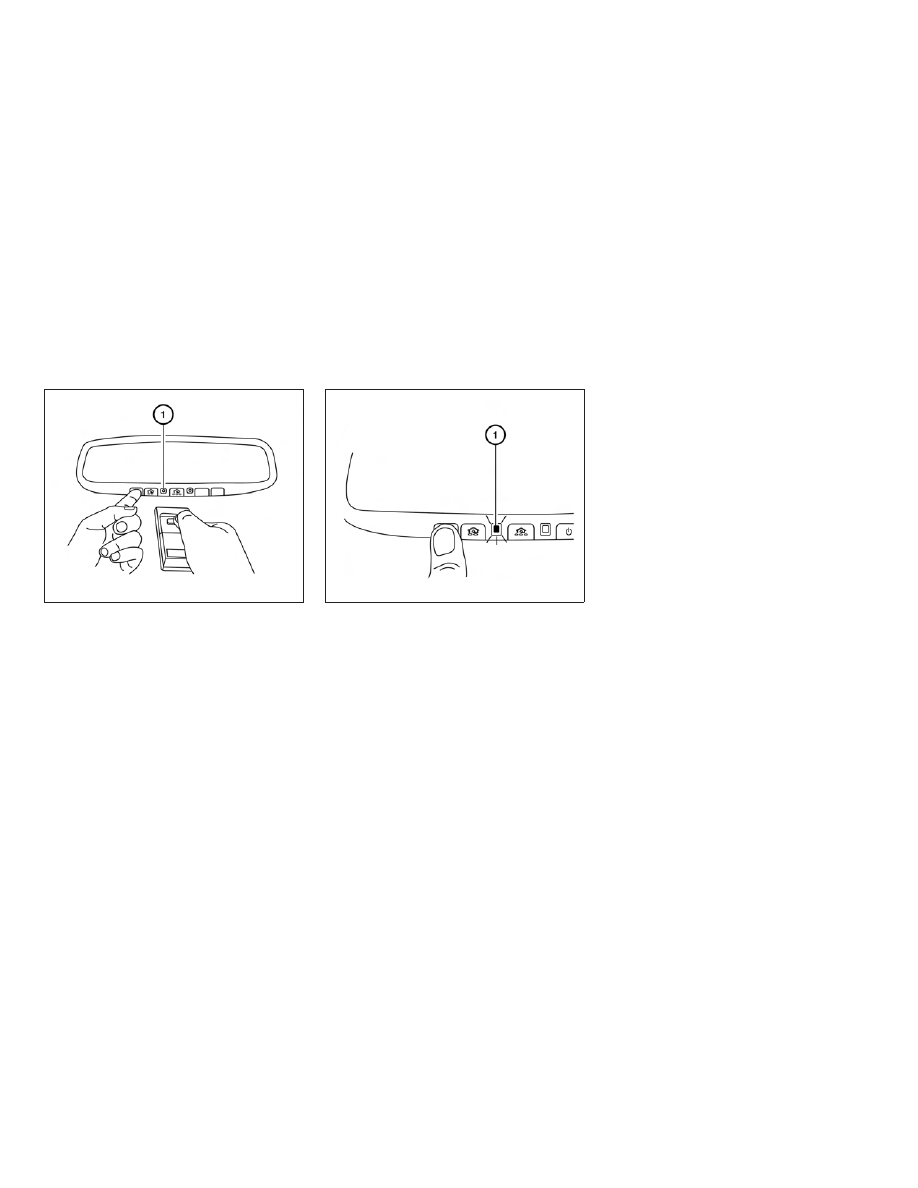
1. Position the end of your hand-held transmit-

ter 1–3 in (2–8 cm) away from the
HomeLink®

surface,

keeping

the

HomeLink® indicator light

1

in view.

2. Using both hands, simultaneously press and

hold the desired HomeLink® button and
hand-held transmitter button. DO NOT re-
lease until the HomeLink® indicator light

1

flashes slowly and then rapidly. When the
indicator light flashes rapidly, both buttons
may be released. (The rapid flashing indi-
cates successful programming.)

NOTE:

Some devices may require you to replace
Step 2 with the cycling procedure noted in
“Programming HomeLink® for Canadian
customers and gate openers” in this section.

3. Press

and

hold

the

programmed

HomeLink® button and observe the indica-
tor light.

● If

the

indicator

light

1

is

solid/continuous, programming is
complete 
and your device should acti-
vate when the HomeLink® button is
pressed and released.

● If the indicator light

1

blinks rapidly for

2 seconds and then turns to a
solid/continuous

light,

continue

with Steps 4-6 for a rolling code device.
A second person may make the following
steps easier. Use a ladder or other device.
Do not stand on your vehicle to perform
the next steps.

4. At the receiver located on the garage door

opener motor in the garage, locate the
“learn” or “smart” button (the name and color
of the button may vary by manufacturer but it
is usually located near where the hanging
antenna wire is attached to the unit). If there
is difficulty locating the button, reference the
garage door opener’s manual.

5. Press and release the “learn” or “smart” but-

ton.

LIC2365

LIC2366

2-64

Instruments and controls

6. Return to the vehicle and firmly press and

hold the trained HomeLink® button for
2

seconds

and

release.

Repeat

the

“press/hold/release” sequence up to three
times to complete the training process.
HomeLink® should now activate your rolling
code equipped device.

7. If you have any questions or are having diffi-

culty programming your HomeLink® but-
tons, refer to the HomeLink® web site at:
www.homelink.com

or

call

1-800-355-

3515.

PROGRAMMING HOMELINK® FOR
CANADIAN CUSTOMERS AND
GATE OPENERS

Canadian radio-frequency laws require transmit-
ter signals to “time-out” (or quit) after several
seconds of transmission – which may not be long
enough for HomeLink® to pick up the signal
during training. Similar to this Canadian law,
some U.S. gate operators are designed to “tim-
eout” in the same manner.

If you live in Canada or you are having difficulties
training a gate operator or garage door opener
by using the “Training” procedures, replace
“Programming HomeLink®” Step 2 with the fol-
lowing:

NOTE:

When programming a garage door opener,
etc., unplug the device during the “cycling”
process to prevent possible damage to the
garage door opener components.

1. For additional information, refer to “Program-

ming HomeLink®” step 1 in this section.

2. Using both hands, simultaneously press and

hold the desired HomeLink® button and the
hand-held transmitter button. During train-
ing, your hand-held transmitter may auto-
matically stop transmitting. Continue to
press and hold the desired HomeLink® but-
ton while you press and re-press (“cycle”)
your hand-held transmitter every 2 seconds
until the frequency signal has been learned.
The HomeLink® indicator light will flash
slowly and then rapidly after several seconds
upon successful training. DO NOT release
until the HomeLink® indicator light flashes
slowly and then rapidly. When the indicator
light flashes rapidly, both buttons may be
released. The rapid flashing indicates suc-
cessful training.
Proceed with “Programming HomeLink®”
step 3 to complete.
If the device was unplugged during the pro-
gramming procedure, remember to plug it
back in when programming is completed.

OPERATING THE HOMELINK®
UNIVERSAL TRANSCEIVER

The HomeLink® Universal Transceiver, after it is
programmed, can be used to activate the pro-
grammed device. To operate, simply press and
release

the

appropriate

programmed

HomeLink® Universal Transceiver button. The
amber indicator light will illuminate while the sig-
nal is being transmitted.

For convenience, the hand-held transmitter of the
device may also be used at any time.

PROGRAMMING TROUBLE-
DIAGNOSIS

If the HomeLink® does not quickly learn the
hand-held transmitter information:

● replace the hand-held transmitter batteries

with new batteries.

● position the hand-held transmitter with its

battery

area

facing

away

from

the

HomeLink® surface.

● press and hold both the HomeLink® and

hand-held transmitter buttons without inter-
ruption.

Instruments and controls

2-65

● position the hand-held transmitter 1 - 3 in

(26 - 76 mm) away from the HomeLink®
surface. Hold the transmitter in that position
for up to 15 seconds. If HomeLink® is not
programmed within that time, try holding the
transmitter in another position – keeping the
indicator light in view at all times.

If you have any questions or are having difficulty
programming your HomeLink® buttons, refer to
the HomeLink® web site at: www.homelink.com
or call 1-800-355-3515.

CLEARING THE PROGRAMMED
INFORMATION

The following procedure clears the programmed
information from both buttons. Individual buttons
cannot be cleared. However, individual buttons
can be reprogrammed. For additional informa-
tion,

refer

to

“Reprogramming

a

single

HomeLink® button” in this section.

To clear all programming:

1. Press and hold the two outer HomeLink®

buttons until the indicator light begins to
flash in approximately 10 seconds. Do not
hold for longer than 20 seconds.

2. Release both buttons.

HomeLink® is now in the programming mode
and can be programmed at any time beginning
with “Programming HomeLink®” - Step 1.

REPROGRAMMING A SINGLE
HOMELINK® BUTTON

To reprogram a HomeLink® Universal Trans-
ceiver button, complete the following:

1. Press and hold the desired HomeLink® but-

ton. DO NOT release the button.

2. The indicator light will begin to flash after

20

seconds.

Without

releasing

the

HomeLink® button, proceed with “Pro-
gramming HomeLink®” - Step 1.

For questions or comments, contact HomeLink®
at: www.homelink.com or 1–800–355–3515
(except Mexico).

The HomeLink® Universal Transceiver button
has now been reprogrammed. The new device
can be activated by pushing the HomeLink®
button that was just programmed. This procedure
will not affect any other programmed HomeLink®
buttons.

IF YOUR VEHICLE IS STOLEN

If your vehicle is stolen, you should change the
codes of any non-rolling code device that has
been programmed into HomeLink®. Consult the
Owner’s Manual of each device or call the manu-
facturer or dealer of those devices for additional
information.

When your vehicle is recovered, you will
need to reprogram the HomeLink® Univer-
sal Transceiver with your new transmitter
information.

FCC Notice:

For USA:

This device complies with Part 15 of the
FCC Rules. Operation is subject to the fol-
lowing two conditions: (1) This device may
not cause harmful interference, and (2) this
device must accept any interference re-
ceived, including interference that may
cause undesired operation.

NOTE:

Changes or modifications not expressly ap-
proved by the party responsible for compli-
ance could void the user’s authority to op-
erate the equipment.

2-66

Instruments and controls

For Canada:

This device complies with Industry Canada
license-exempt RSS standard(s). Opera-
tion is subject to the following two condi-
tions: (1) this device may not cause inter-
ference, and (2) this device must accept any
received, including interference that may
cause undesired operation of the device.

Instruments and controls

2-67

MEMO

2-68

Instruments and controls

3 Pre-driving checks and adjustments

Keys . . . . . . . . . . . . . . . . . . . . . . . . . . . . . . . . . . . . . . . . . . . . . 3-2

NISSAN Intelligent Key® . . . . . . . . . . . . . . . . . . . . . . . . 3-2
NISSAN Vehicle Immobilizer System keys . . . . . . . . . 3-3

Doors . . . . . . . . . . . . . . . . . . . . . . . . . . . . . . . . . . . . . . . . . . . . 3-4

Locking with key. . . . . . . . . . . . . . . . . . . . . . . . . . . . . . . . 3-4
Locking with inside lock knob . . . . . . . . . . . . . . . . . . . . 3-5
Locking with power door lock switch . . . . . . . . . . . . . 3-6
Automatic door locks . . . . . . . . . . . . . . . . . . . . . . . . . . . 3-6
Child safety rear door lock . . . . . . . . . . . . . . . . . . . . . . . 3-6

NISSAN Intelligent Key® . . . . . . . . . . . . . . . . . . . . . . . . . . . 3-7

Operating range. . . . . . . . . . . . . . . . . . . . . . . . . . . . . . . . 3-8
Door locks/unlocks precaution . . . . . . . . . . . . . . . . . . . 3-8
NISSAN Intelligent Key® Operation . . . . . . . . . . . . . . 3-9
How to use the remote keyless entry
function . . . . . . . . . . . . . . . . . . . . . . . . . . . . . . . . . . . . . . 3-12
Warning signals . . . . . . . . . . . . . . . . . . . . . . . . . . . . . . . 3-16
Troubleshooting guide . . . . . . . . . . . . . . . . . . . . . . . . . 3-16

Remote Engine Start. . . . . . . . . . . . . . . . . . . . . . . . . . . . . . 3-18

Remote engine start operating range . . . . . . . . . . . . 3-18
Remote starting the vehicle . . . . . . . . . . . . . . . . . . . . . 3-18
Extending engine run time . . . . . . . . . . . . . . . . . . . . . . 3-19
Canceling a remote start . . . . . . . . . . . . . . . . . . . . . . . 3-19
Conditions the remote start will not work . . . . . . . . . 3-19

Hood . . . . . . . . . . . . . . . . . . . . . . . . . . . . . . . . . . . . . . . . . . . 3-20
Liftgate . . . . . . . . . . . . . . . . . . . . . . . . . . . . . . . . . . . . . . . . . . 3-21

Operating the power liftgate . . . . . . . . . . . . . . . . . . . . 3-21
Power liftgate main switch . . . . . . . . . . . . . . . . . . . . . . 3-24
Liftgate release. . . . . . . . . . . . . . . . . . . . . . . . . . . . . . . . 3-25
Liftgate position setting . . . . . . . . . . . . . . . . . . . . . . . . 3-26

Fuel-filler door . . . . . . . . . . . . . . . . . . . . . . . . . . . . . . . . . . . 3-26

Opener operation. . . . . . . . . . . . . . . . . . . . . . . . . . . . . . 3-26
Fuel-filler cap . . . . . . . . . . . . . . . . . . . . . . . . . . . . . . . . . 3-26

Steering wheel . . . . . . . . . . . . . . . . . . . . . . . . . . . . . . . . . . . 3-29

Manual operation (if so equipped) . . . . . . . . . . . . . . . 3-29
Automatic operation (if so equipped). . . . . . . . . . . . . 3-29

Sun visors . . . . . . . . . . . . . . . . . . . . . . . . . . . . . . . . . . . . . . . 3-30

Vanity mirrors . . . . . . . . . . . . . . . . . . . . . . . . . . . . . . . . . 3-31
Card holder . . . . . . . . . . . . . . . . . . . . . . . . . . . . . . . . . . . 3-31

Mirrors . . . . . . . . . . . . . . . . . . . . . . . . . . . . . . . . . . . . . . . . . . 3-32

Automatic Anti-glare rearview mirror . . . . . . . . . . . . . 3-32
Outside mirrors . . . . . . . . . . . . . . . . . . . . . . . . . . . . . . . 3-32

Automatic drive positioner . . . . . . . . . . . . . . . . . . . . . . . . . 3-34

Memory Storage Function (Key-Link) . . . . . . . . . . . . 3-34
Memory storage function (Switch) . . . . . . . . . . . . . . . 3-35
Entry/exit function . . . . . . . . . . . . . . . . . . . . . . . . . . . . . 3-35
System operation. . . . . . . . . . . . . . . . . . . . . . . . . . . . . . 3-36

1.

Intelligent Key (two sets)

2.

Mechanical key

3.

Key number plate (one plate)

NISSAN INTELLIGENT KEY®

Your vehicle can only be driven with the Intelligent
Keys which are registered to your vehicle’s Intel-
ligent Key system components and NISSAN Ve-
hicle Immobilizer System components. As many
as four Intelligent Keys can be registered and
used with one vehicle. The new keys must be
registered by a NISSAN dealer prior to use with
the Intelligent Key system and NISSAN Vehicle
Immobilizer System of your vehicle. Since the
registration process requires erasing all memory

in the Intelligent Key components when register-
ing new keys, be sure to take all Intelligent Keys
that you have to the NISSAN dealer.

A key number plate is supplied with your keys.
Record the key number and keep it in a safe place
(such as your wallet), not in the vehicle. If you lose
your keys, see a NISSAN dealer for duplicates by
using the key number. NISSAN does not record
key numbers so it is very important to keep track
of your key number plate.

A key number is only necessary when you have
lost all keys and do not have one to duplicate
from. If you still have a key, a NISSAN dealer can
duplicate it.

CAUTION

Listed below are conditions or occur-
rences which will damage the Intelligent
Key:

● Do not allow the Intelligent Key, which

contains

electrical

components,

to

come into contact with water or salt
water. This could affect the system
function.

● Do not drop the Intelligent Key.
● Do not strike the Intelligent Key sharply

against another object.

● Do not change or modify the Intelligent

Key.

● Wetting may damage the Intelligent

Key. If the Intelligent Key gets wet, im-
mediately wipe until it is completely dry.

● Do not place the Intelligent Key for an

extended period in an area where tem-
peratures exceed 60°C (140°F).

● Do not attach the Intelligent Key with a

key holder that contains a magnet.

● Do not place the Intelligent Key near

equipment that produces a magnetic
field, such as a TV, audio equipment and
personal computers.

If an Intelligent Key is lost or stolen, NISSAN
recommends erasing the ID code of that Intelli-
gent Key from the vehicle. This may prevent the
unauthorized use of the Intelligent Key to operate
the vehicle. For information regarding the erasing
procedure, it is recommended you visit a
NISSAN dealer.

LPD2052

KEYS

3-2

Pre-driving checks and adjustments

Mechanical key

The Intelligent Key contains the mechanical key.

To remove the mechanical key, release the lock
knob on the back of the Intelligent Key.

To install the mechanical key, firmly insert it into
the Intelligent Key until the lock knob returns to
the lock position.

Use the mechanical key to lock or unlock the
driver’s door.

CAUTION

Always carry the mechanical key installed
in the Intelligent Key slot.

For additional information, refer to “Doors” in this
section.

Valet hand-off

When you have to leave a key with a valet, give
them the Intelligent Key itself and keep the me-
chanical key with you to protect your belongings.

To prevent the glove box from being opened
during valet hand-off, follow the procedure be-
low.

1. Remove the mechanical key from the Intelli-

gent Key.

2. Lock the glove box with the mechanical key.

3. Hand the Intelligent Key to the valet and

keep the mechanical key with you.

For additional information, refer to “Storage” in
the “Instruments and controls” section of this
manual.

NISSAN VEHICLE IMMOBILIZER
SYSTEM KEYS

You can only drive your vehicle using the Intelli-
gent Keys which are registered to the NISSAN
Vehicle Immobilizer System components in your
vehicle.

The mechanical key can be used for all the locks.

Never leave the keys in the vehicle.

Additional or replacement keys:

If you still have a key, the key number is not
necessary when you need extra NISSAN Vehicle
Immobilizer System keys. Your existing key can
be duplicated without knowing the key number.
As many as four NISSAN Vehicle Immobilizer
System keys can be used with one vehicle. You
should bring all NISSAN Vehicle Immobilizer Sys-
tem keys that you have to the NISSAN dealer for
registration. This is because the registration pro-
cess will erase the memory of all key codes
previously registered into the NISSAN Vehicle
Immobilizer System. After the registration pro-
cess, these components will only recognize keys
coded into the NISSAN Vehicle Immobilizer Sys-
tem during registration. Any key that is not given
to the dealer at the time of registration will no
longer be able to start your vehicle.

SPA1951

Pre-driving checks and adjustments

3-3

CAUTION

Do not allow the immobilizer system key,
which contains an electrical transponder,
to come into contact with water or salt
water. This could affect system function.

When the doors are locked using one of the
following methods, the doors cannot be opened
using the inside or outside door handles. The
doors must be unlocked to open the doors.

WARNING

● Before opening any door, always look

for and avoid oncoming traffic.

● Do not leave children or adults who

would normally require the assistance
of others alone in your vehicle. Pets
should also not be left alone. They
could accidentally injure themselves or
others through inadvertent operation of
the vehicle. Also, on hot, sunny days,
temperatures in a closed vehicle could
quickly become high enough to cause
severe or possibly fatal injuries to
people or animals.

LOCKING WITH KEY

To lock or unlock the vehicle, turn the key as
shown.

Manual

To lock a door, turn the key toward the front of the
vehicle

1

. To unlock, turn the key toward the rear

2

.

Driver’s side

LPD2129

DOORS

3-4

Pre-driving checks and adjustments

Power

The power door lock system allows you to lock or
unlock all doors at the same time.

Turning the key toward the front

1

of the vehicle

locks all doors.

Turning the key one time toward the rear

2

of the

vehicle unlocks that door. From that position,
returning the key to neutral

3

(where the key can

only be removed and inserted) and turning it
toward the rear again

4

within 45 seconds

unlocks all doors.

Opening and closing windows

The driver’s door key operation allows you to
open and close windows equipped with auto-
matic operation at the same time.

● To open the windows, turn the driver’s door

key toward the rear of the vehicle for longer
than 1 second 
after the door is unlocked.

● To close the windows, turn the driver’s door

key toward the front of the vehicle for longer
than 1 second 
after the door is locked.

Windows stop when the key cylinder is released.

LOCKING WITH INSIDE LOCK
KNOB

To lock the door without the key, move the inside
lock knob to the lock position

1

, then close the

door.

To unlock the door without the key, move the
inside lock knob to the unlock position

2

.

Driver’s side

LPD0461

Inside lock

LPD2092

Pre-driving checks and adjustments

3-5

LOCKING WITH POWER DOOR
LOCK SWITCH

To lock all the doors without a key, push the door
lock switch (driver’s or front passenger’s side) to
the lock position

1

. When locking the door this

way, be certain not to leave the key inside the
vehicle.

To unlock all the doors without a key, push the
door lock switch (driver’s or front passenger’s
side) to the unlock position

2

.

AUTOMATIC DOOR LOCKS

● All doors lock automatically when the vehicle

speed reaches 15 mph (24 km/h).

● All doors unlock automatically when the ig-

nition is placed in the OFF position.

CHILD SAFETY REAR DOOR LOCK

Child safety locks help prevent the rear doors
from being opened accidentally, especially when
small children are in the vehicle.

The child safety lock levers are located on the
edge of the rear doors.

When the lever is in the LOCK position, the
door can be opened only from the outside.

LPD2093

LPD0420

3-6

Pre-driving checks and adjustments

WARNING

● Radio waves could adversely affect

electric medical equipment. Those who
use a pacemaker should contact the
electric medical equipment manufac-
turer for the possible influences before
use.

● The Intelligent Key transmits radio

waves when the buttons are pressed.
The FAA advises the radio waves may
affect aircraft navigation and communi-
cation systems. Do not operate the In-
telligent Key while on an airplane. Make
sure the buttons are not operated unin-
tentionally when the unit is stored for a
flight.

● Never leave the Intelligent Key in the

vehicle when you leave the vehicle.

The Intelligent Key system can operate all the
door locks using the remote control function or
pushing the request switch on the vehicle without
taking the key out from a pocket or purse. The
operating environment and/or conditions may af-
fect the Intelligent Key system operation.

Be sure to read the following before using the
Intelligent Key system.

CAUTION

Be sure to carry the Intelligent Key with
you when operating the vehicle.

The Intelligent Key is capable of receiving and
transmitting radio waves. The Intelligent Key sys-
tem transmits weak radio waves from various
distances. Environmental conditions may inter-
fere with the operation of the Intelligent Key sys-
tem under the following operating conditions:

● When operating near a location where

strong radio waves are transmitted, such as
a TV tower, power station and broadcasting
station.

● When in possession of wireless equipment,

such as a cellular telephone, transceiver or a
CB radio.

● When the Intelligent Key is in contact with or

covered by metallic materials.

● When any type of radio wave remote control

is used nearby.

● When the Intelligent Key is placed near an

electric appliance such as a personal com-
puter.

● When the vehicle is parked near a parking

meter.

In such cases, correct the operating conditions
before using the Intelligent Key function or use
the mechanical key.

Although the life of the battery varies depending
on the operating conditions, the battery’s life is
approximately two years. If the battery is dis-
charged, replace it with a new one.

When the Intelligent Key battery is low, an indi-
cator illuminates in the vehicle information dis-
play. For additional information, refer to “Vehicle
information display” in the “Instruments and con-
trols” section of this manual.

Since the Intelligent Key is capable of receiving
radio waves, if the key is left near equipment
which transmits strong radio waves, such as sig-
nals from a TV and personal computer, the bat-
tery life may become shorter.

For additional information, refer to “Battery re-
placement” in the “Maintenance and do-it-
yourself” section of this manual.

As many as four Intelligent Keys can be regis-
tered and used with one vehicle. For information
about the purchase and use of additional Intelli-
gent Keys, it is recommended you visit a NISSAN
dealer.

NISSAN INTELLIGENT KEY®

Pre-driving checks and adjustments

3-7

OPERATING RANGE

The Intelligent Key functions can only be used
when the Intelligent Key is within the specified
operating range from the request switch

1

.

When the Intelligent Key battery is discharged or
strong radio waves are present near the operat-
ing location, the Intelligent Key operating range
becomes narrower, and the Intelligent Key may
not function properly.

The operating range is within 31.5 in (80 cm)
from each request switch

1

.

If the Intelligent Key is too close to the door glass,
handle or rear bumper, the request switches may
not function.

When the Intelligent Key is within the operating
range, it is possible for anyone, even someone
who does not carry the Intelligent Key, to push the
request switch to lock/unlock the doors.

DOOR LOCKS/UNLOCKS
PRECAUTION

● Do not push the door handle request switch

with the Intelligent Key held in your hand as
illustrated. The close distance to the door
handle will cause the Intelligent Key system
to have difficulty recognizing that the Intelli-
gent Key is outside the vehicle.

● After locking with the door handle request

switch, verify the doors are securely locked
by testing them.

LPD2286

WPD0375

3-8

Pre-driving checks and adjustments

● To prevent the Intelligent Key from being left

inside the vehicle, make sure you carry the
Intelligent Key with you and then lock the
doors.

● Do not pull the door handle before pushing

the door handle request switch. The door
will be unlocked but will not open. Release
the door handle once and pull it again to
open the door.

NISSAN INTELLIGENT KEY®
OPERATION

You can lock or unlock the doors without taking
the Intelligent Key out of your pocket or bag.

When you carry the Intelligent Key with you, you
can lock or unlock all doors by pushing the door
handle request switch within the range of opera-
tion.

Locking doors

1. Move the shift lever to the P (Park) position,

place the ignition switch in the LOCK posi-
tion and make sure you carry the Intelligent
Key with you.

2. Close all doors.

3. Push any door handle request switch while

carrying the Intelligent Key with you.

4. All doors and the rear liftgate will lock.

5. The hazard warning lights flash twice, the

outside buzzer sounds twice, and the front
and tail lights will turn on for 10 seconds.

LPD2301

LPD2412

Pre-driving checks and adjustments

3-9

NOTE:

● Request switches for all doors and lift-

gate can be deactivated when the Intel-
ligent

Key

Door

Lock

setting

is

switched to OFF in the Vehicle Settings
of the vehicle information display. For
additional information, refer to “Ve-
hicle information display” in the “In-
struments and controls” section of this
manual.

● Doors lock with the door handle request

switch while the ignition switch is not in the
LOCK position.

● Doors do not lock by pushing the door

handle request switch while any door is
open. However, doors lock with the me-
chanical key even if any door is open.

● Doors do not lock with the door handle

request switch with the Intelligent Key inside
the vehicle and a beep sounds to warn you.
However, when an Intelligent Key is inside
the vehicle, doors can be locked with an-
other Intelligent Key.

CAUTION

● After locking the doors using the re-

quest switch, make sure that the doors
have been securely locked by operating
the door handles or the rear liftgate
opener switch.

● When locking the doors using the re-

quest switch, make sure to have the
Intelligent Key in your possession be-
fore operating the request switch to
prevent the Intelligent Key from being
left in the vehicle.

● The request switch is operational only

when the Intelligent Key has been de-
tected by the Intelligent Key system.

Lockout protection

To prevent the Intelligent Key from being acci-
dentally locked in the vehicle, lockout protection
is equipped with the Intelligent Key system.

When any door is open, the doors are locked,
and then the Intelligent Key is put inside the
vehicle and all the doors are closed; a chime will
sound and the lock will automatically unlock.

NOTE:

The doors may not lock when the Intelli-
gent Key is in the same hand that is oper-
ating the request switch to lock the door.
Put the Intelligent Key in a purse, pocket or
your other hand.

CAUTION

The lockout protection may not function
under the following conditions:

● When the Intelligent Key is placed on

top of the instrument panel.

● When the Intelligent Key is placed in-

side the glove box or a storage bin.

● When the Intelligent Key is placed in-

side the door pockets.

● When the Intelligent Key is placed in-

side or near metallic materials.

LPD2278

3-10

Pre-driving checks and adjustments

Unlocking doors

1. Carry the Intelligent Key.

2. Push the door handle request switch.

3. The door on which the request switch was

pressed will unlock and the hazard warning
lights flash once, the outside buzzer sounds
once, and the front and tail lights will turn on
for 30 seconds.

4. Push the door handle request switch again

within one minute to unlock the remaining
doors.

NOTE:

If Selective Unlock is turned off in the Ve-
hicle Settings, all doors will unlock upon
first request switch press.

For power liftgate opening:

1. Carry the Intelligent Key.

2. Press the power liftgate request switch.

NOTE:

Request switches for all doors and liftgate
can be deactivated when the Intelligent Key
Door Lock setting is switched to OFF in the
Vehicle Settings of the vehicle information
display. For additional information, refer to
“Vehicle information display” in the “In-
struments and controls” section of this
manual.

If a door handle is pulled while unlocking the
doors, that door may not be unlocked. Returning
the door handle to its original position will unlock
the door. If the door does not unlock after return-
ing the door handle, push the door handle re-
quest switch to unlock the door.

All doors will be locked automatically unless one
of the following operations is performed within
one minute after pushing the request switch.

● Opening any door.
● Pushing the ignition switch.

The interior light timer illuminates for a period of
time when a door is unlocked and the room light
switch is in the DOOR position.

LPD2412

LPD2278

Pre-driving checks and adjustments

3-11


Content   ..  9  10  11  12   ..