Mazda CX-3 (2019 year). Manual - part 31


  Index      Mazda     Mazda CX-3 - service manual 2019 year in english


Search            


Content   ..  29  30  31  32   ..


Mazda CX-3 (2019 year). Manual - part 31


To secure the jack

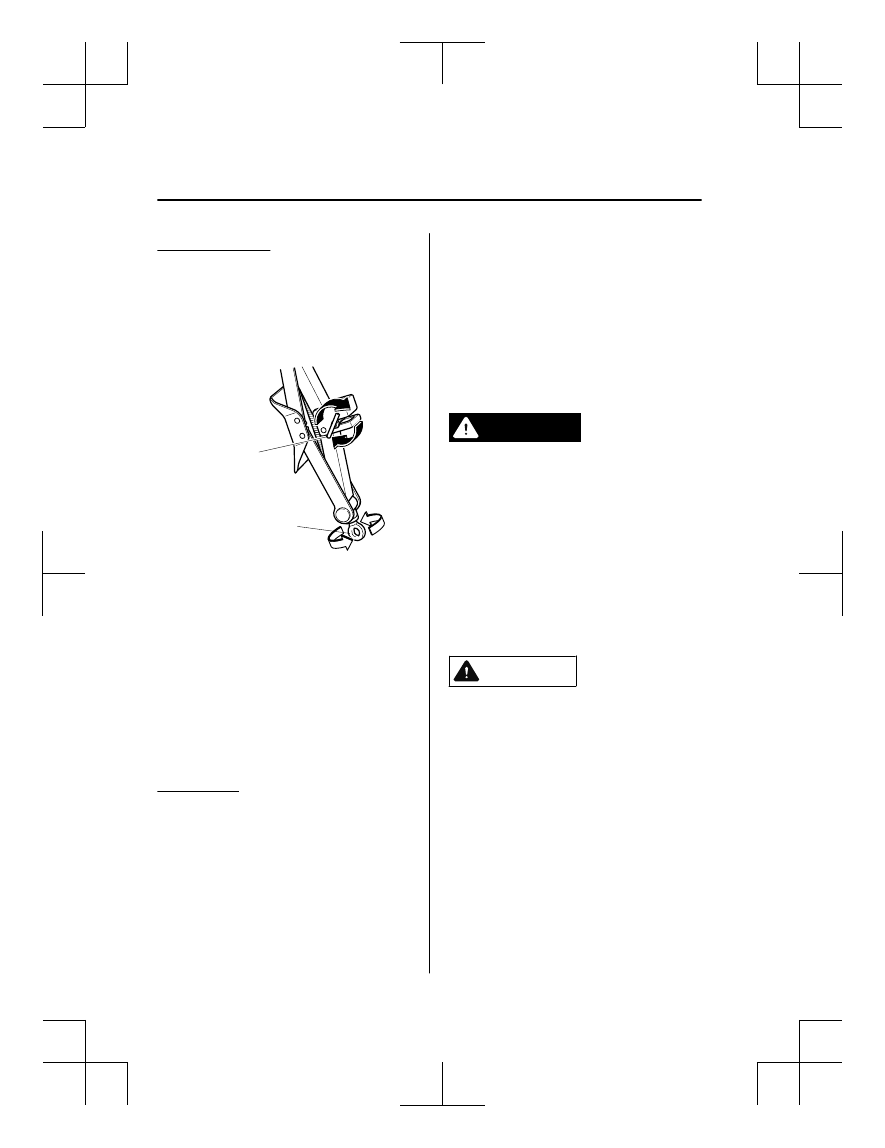
1. Insert the wing bolt into the jack with

the jack screw pointing down and turn
the wing bolt clockwise to temporarily
tighten it.

2. Turn the jack screw in the direction

shown in the figure.

Wing bolt

Jack screw

3. Turn the wing bolt completely to

secure the jack.

NOTE
If the jack is not completely secured, it
could rattle while driving. Make sure
the jack screw is sufficiently tightened.

4. Insert the cover tabs and install the

cover.

NOTE
Verify that the cover is securely
installed.

Maintenance

Always keep the jack clean.

Make sure the moving parts are kept
free from dirt or rust.

Make sure the screw thread is
adequately lubricated.

▼ Spare Tire

Your Mazda has a temporary spare tire.
The temporary spare tire is lighter and
smaller than a conventional tire, and is
designed only for emergency use and
should be used only for VERY short
periods. Temporary spare tires should
NEVER be used for long drives or
extended periods.

WARNING

Do not install the temporary spare tire on
the front wheels (driving wheels):
Driving with the temporary spare tire on
one of the front driving wheels is
dangerous. Handling will be affected. You
could lose control of the vehicle, especially
on ice or snow bound roads, and have an
accident. Move a regular tire to the front
wheel and install the temporary spare tire
to the rear.

CAUTION

When using the temporary spare tire,

driving stability may decrease compared
to when using only the conventional tire.
Drive carefully.

To avoid damage to the temporary spare

tire or to the vehicle, observe the
following precautions:

Do not exceed 80 km/h (50 mph).
Avoid driving over obstacles. Also, do

not drive through an automatic car
wash. This tire's diameter is smaller
than a conventional tire, so the ground
clearance is reduced.

If Trouble Arises

Flat Tire

7-6

CX-3_8GR7-EA-18B_Edition1

2017-12-20 16:18:14

Do not use a tire chain on this tire

because it will not fit properly.

Do not use your temporary spare tire

on any other vehicle, it has been
designed only for your Mazda.

Use only one temporary spare tire on

your vehicle at the same time.

To remove the spare tire

1. (With luggage board)

Lift up the luggage board.

2. (With luggage board)

Pull the luggage board outward a little
and insert the opposite end into the
holders so that the luggage board
stands.
 

Luggage board

Holders

3. Lift the luggage mat.


Luggage mat

4. For vehicles equipped with a

sub-woofer, uncouple the connector.
 

Connector

NOTE
Extra strength may be required to
uncouple the connector. Be sure to
squeeze the tab firmly.

If Trouble Arises

Flat Tire

7-7

CX-3_8GR7-EA-18B_Edition1

2017-12-20 16:18:14

5. For vehicles equipped with a

sub-woofer, loosen the hold-down bolt
and remove the woofer and spare tire.
 

For vehicles not equipped with a
sub-woofer, turn the spare tire
hold-down bolt counterclockwise and
remove the spare tire.
 

Spare tire hold-down bolt

To secure the spare tire

Store the spare tire in the reverse order of
removal. After storing, verify that the
spare tire is stored securely.

Changing a Flat Tire

NOTE
If the following occurs while driving, it
could indicate a flat tire.

Steering becomes difficult.

The vehicle begins to vibrate
excessively.

The vehicle pulls in one direction.

If you have a flat tire, drive slowly to a
level spot that is well off the road and out
of the way of traffic to change the tire.
Stopping in traffic or on the shoulder of a
busy road is dangerous.

WARNING

Be sure to follow the directions for
changing a tire:
Changing a tire is dangerous if not done
properly. The vehicle can slip off the jack
and seriously injure someone.
No person should place any portion of their
body under a vehicle that is supported by a
jack.

Never allow anyone inside a vehicle
supported by a jack:
Allowing someone to remain in a vehicle
supported by a jack is dangerous. The
occupant could cause the vehicle to fall
resulting in serious injury.

If Trouble Arises

Flat Tire

7-8

CX-3_8GR7-EA-18B_Edition1

2017-12-20 16:18:14

NOTE
Make sure the jack is well lubricated
before using it.

1. Park on a hard, level surface off the

right-of-way and firmly set the parking
brake.

2. Put a vehicle with an automatic

transaxle in Park (P), a manual
transaxle in Reverse (R) or 1, and turn
off the engine.

3. Turn on the hazard warning flasher.
4. Have everyone get out of the vehicle

and away from the vehicle and traffic.

5. Remove the jack, tool, and spare tire

(page 7-3).

6. Block the wheel diagonally opposite

the flat tire. When blocking a wheel,
place a tire block both in front and
behind the tire.

NOTE
When blocking a tire, use rocks or
wood blocks of sufficient size if
possible to hold the tire in place.

▼ Removing a Flat Tire

WARNING

When jacking-up a vehicle, always shift the
shift lever to 1st or R position (manual
transaxle vehicle) or shift the selector lever
to P position (automatic transaxle vehicle),
apply the parking brake, and place wheel
blocks in the position diagonally opposed
to the jack:
Changing a flat tire without using wheel
blocks is dangerous because the vehicle
may move and fall off the jack even with
the shift lever in 1st or R position, or the
selector lever is in P position, which could
result in an accident.

1. If your vehicle is equipped with a

wheel cover, pry off the wheel cover
with the beveled end of the jack lever.
 

NOTE
Force the end of the jack lever firmly
between wheel and cover, or removal
will be difficult.

If Trouble Arises

Flat Tire

7-9

CX-3_8GR7-EA-18B_Edition1

2017-12-20 16:18:14

CAUTION

Align the notch on the wheel cover with
the valve stem when installing it.
 

Tire valve

Notch

Damage could occur during
installation if the wheel cover is not
properly aligned.

2. Loosen the lug nuts by turning them

counterclockwise one turn each, but do
not remove any lug nuts until the tire
has been raised off the ground.
 

3. Place the jack on the ground.

4. Turn the jack screw in the direction

shown in the figure and adjust the jack
head so that it is close to the jack-up
position.
 

Jack head

5. Place the jack under the jack-up

position closest to the tire being
changed with the jack head squarely
under the jack-up point.
 

Jacking position

If Trouble Arises

Flat Tire

7-10

CX-3_8GR7-EA-18B_Edition1

2017-12-20 16:18:14

6. Continue raising the jack head

gradually by rotating the screw with
your hand until the jack head is
inserted into the jack-up position.
 

Tire blocks

Jacking position

WARNING

Use only the front and rear jacking
positions recommended in this manual:
Attempting to jack the vehicle in
positions other than those
recommended in this manual is
dangerous. The vehicle could slip off
the jack and seriously injure or even kill
someone. Use only the front and rear
jacking positions recommended in this
manual.

Do not jack up the vehicle in a position
other than the designated jack-up
position or place any objects on or
under the jack:
Jacking up the vehicle in a position
other than the designated jack-up
position or placing objects on or under
the jack is dangerous as it could deform
the vehicle body or the vehicle could fall
off the jack resulting in an accident.

Use only the jack provided with your
Mazda:
Using a jack that is not designed for
your Mazda is dangerous. The vehicle
could slip off the jack and seriously
injure someone.

Never place objects under the jack:
Jacking the vehicle with an object
under the jack is dangerous. The jack
could slip and someone could be
seriously injured by the jack or the
falling vehicle.

7. Insert the jack lever and attach the lug

wrench to tire jack.
 

If Trouble Arises

Flat Tire

7-11

CX-3_8GR7-EA-18B_Edition1

2017-12-20 16:18:14

8. Turn the jack handle clockwise and

raise the vehicle high enough so that
the spare tire can be installed. Before
removing the lug nuts, make sure your
Mazda is firmly in position and that it
cannot slip or move.
 

WARNING

Do not jack up the vehicle higher than
is necessary:
Jacking up the vehicle higher than is
necessary is dangerous as it could
destabilize the vehicle resulting in an
accident.

Do not start the engine or shake the
vehicle while it is jacked up:
Starting the engine or shaking the
vehicle while it is jacked up is
dangerous as it could cause the vehicle
to fall off the jack resulting in an
accident.

Never go under the vehicle while it is
jacked up:
Going under the vehicle while it is
jacked up is dangerous as it could result
in death or serious injury if the vehicle
were to fall off the jack.

9. Remove the lug nuts by turning them

counterclockwise; then remove the
wheel and center cap.

▼ Locking Lug Nuts

*

If your vehicle has Mazda optional
antitheft wheel lug nuts, each wheel will
have one locking lug nut that locks the
wheel and tire, and you must use a special
key to unlock the locking lug nut. This key
is stored in the glove compartment.
Register the key and lug nuts with the lock
manufacturer by filling out the card
provided in the glove compartment and
mailing it in the accompanying envelope.
If you lose this key, consult an Authorized
Mazda Dealer or use the lock
manufacturer's order form, which is with
the registration card.
Accessory wheel locks cannot be used on
steel wheels. This includes situations when
the spare tire is installed. If the spare tire is
installed, one of the original lug nuts
(which should still be in the vehicle) must
be installed in place of the wheel lock.

Special key

Antitheft lug nut

If Trouble Arises

Flat Tire

7-12

*Some models.

CX-3_8GR7-EA-18B_Edition1

2017-12-20 16:18:14

To remove an antitheft lug nut

1. Obtain the special key for the antitheft

lug nut.

2. Place the special key on top of the

antitheft lug nut, and be sure to hold
the key square to it. If you hold the key
at an angle, you may damage both key
and nut. Do not use a power impact
wrench.

3. Place the lug wrench on top of the key

and apply pressure. Turn the wrench
counterclockwise.

To install the antitheft lug nut

1. Place the special key on top of the nut,

and be sure to hold the key square to it.
If you hold the key at an angle, you
may damage both key and nut. Do not
use a power impact wrench.

2. Place the lug wrench on top of the

special key, apply pressure, and turn it
clockwise.

Nut tightening torque

N·m (kgf·m, ft·lbf)

108―147 (12―14,

80―108)

▼ Mounting the Spare Tire

1. Remove dirt and grime from the

mounting surfaces of the wheel and
hub, including the hub bolts, with a
cloth.
 

WARNING

Make sure the mounting surfaces of the
wheel, hub and lug nuts are clean
before changing or replacing tires:
When changing or replacing a tire, not
removing dirt and grime from the
mounting surfaces of the wheel, hub
and hub bolts is dangerous. The lug
nuts could loosen while driving and
cause the tire to come off, resulting in
an accident.

2. Mount the spare tire.

If Trouble Arises

Flat Tire

7-13

CX-3_8GR7-EA-18B_Edition1

2017-12-20 16:18:14

3. Install the lug nuts with the beveled

edge inward; tighten them by hand.
 

WARNING

Do not apply oil or grease to lug nuts
and bolts and do not tighten the lug
nuts beyond the recommended
tightening torque:
Applying oil or grease to lug nuts and
bolts is dangerous. The lug nuts could
loosen while driving and cause the tire
to come off, resulting in an accident. In
addition, lug nuts and bolts could be
damaged if tightened more than
necessary.

4. Turn the lug wrench counterclockwise

and lower the vehicle.

5. Use the lug wrench to tighten the nuts

in the order shown.
 

If you are unsure of how tight the nuts
should be, have them inspected at an
Authorized Mazda Dealer.

Nut tightening torque

N·m (kgf·m, ft·lbf)

108―147 (12―14,

80―108)

WARNING

Always securely and correctly tighten
the lug nuts:
Improperly or loosely tightened lug
nuts are dangerous. The wheel could
wobble or come off. This could result in
loss of vehicle control and cause a
serious accident.

Be sure to reinstall the same nuts you
removed or replace them with metric
nuts of the same configuration:
Because the wheel studs and lug nuts
on your Mazda have metric threads,
using a non-metric nut is dangerous.
On a metric stud, it would not secure
the wheel and would damage the stud,
which could cause the wheel to slip off
and cause an accident.

If Trouble Arises

Flat Tire

7-14

CX-3_8GR7-EA-18B_Edition1

2017-12-20 16:18:14

6. (Without flat tire belt)

Store the damaged tire in the luggage
compartment.
(With flat tire belt)
Remove the luggage compartment
cover (if equipped).
Refer to Luggage Compartment on
page 3-22.
 

Strap


Pin

Pin

7. Remove the belt for securing the flat

tire.

8. (With luggage board)

Pull the luggage board outward and
place it on top of the luggage mat.
 

Luggage board

Luggage mat


Luggage mat

Luggage board

9. Remove the center cap by tapping it

with the lug wrench.

If Trouble Arises

Flat Tire

7-15

CX-3_8GR7-EA-18B_Edition1

2017-12-20 16:18:14

10. Thread the belt through the rear seat as

shown in the figure.


11. Place the flat tire in the luggage

compartment.
 

12. Thread the buckle through the wheel as

shown in the figure.
 

13. Thread the belt through the buckle

while pressing the tire to the seatback.
 

14. Pull the belt end to secure the flat tire.


If Trouble Arises

Flat Tire

7-16

CX-3_8GR7-EA-18B_Edition1

2017-12-20 16:18:14

15. Insert the luggage compartment cover

from the top of the luggage
compartment opening with the cloth
side of the cover facing outward, and
slide it between the flat tire and the
inside perimeter of the luggage
compartment opening.
 

16. Check the tire inflation pressure.

Refer to the specification charts on
page 9-7.

17. Have the flat tire repaired or replaced

as soon as possible.

WARNING

Do not drive with any tires that have
incorrect air pressure:
Driving on tires with incorrect air pressure
is dangerous. Tires with incorrect pressure
could affect handling and result in an
accident. When you check the regular tires'
air pressure, check the spare tire, too.

NOTE
To prevent the jack and tool from rattling,
store them properly.

If Trouble Arises

Flat Tire

7-17

CX-3_8GR7-EA-18B_Edition1

2017-12-20 16:18:14

Jump-Starting

Jump-starting is dangerous if done incorrectly. So follow the procedure carefully. If you feel
unsure about jump-starting, we strongly recommend that you have a competent service
technician do the work.

WARNING

 Follow These Precautions Carefully:

To ensure safe and correct handling of the battery, read the following precautions carefully
before using the battery or inspecting it.

 Keep flames and sparks away from open battery cells and do not allow metal tools to

contact the positive ( ) or negative ( ) terminal of the battery when working near a battery.
Do not allow the positive ( ) terminal to contact the vehicle body:
Flames and sparks near open battery cells are dangerous. Hydrogen gas, produced during
normal battery operation, could ignite and cause the battery to explode. An exploding battery
can cause serious burns and injuries. Keep all flames including cigarettes and sparks away
from open battery cells.

 Keep all flames and sparks away from open battery cells because hydrogen gas is

produced from open battery cells while charging the battery or adding battery fluid:
Flames and sparks near open battery cells are dangerous. Hydrogen gas, produced during
normal battery operation, could ignite and cause the battery to explode. An exploding battery
can cause serious burns and injuries. Keep all flames including cigarettes and sparks away
from open battery cells.

Do not jump-start a frozen battery or one with a low fluid level:
Jump-starting a frozen battery or one with a low fluid level is dangerous. It may rupture or
explode, causing serious injury.

Connect the negative cable to a good ground point away from the battery:
Connecting the end of the second jumper cable to the negative ( ) terminal of the discharged
battery is dangerous.
A spark could cause the gas around the battery to explode and injure someone.

If Trouble Arises

Battery Runs Out

7-18

CX-3_8GR7-EA-18B_Edition1

2017-12-20 16:18:14

Route the jumper cables away from parts that will be moving:
Connecting a jumper cable near or to moving parts (cooling fans, belts) is dangerous. The
cable could get caught when the engine starts and cause serious injury.

CAUTION

Use only a 12 V booster system. You can damage a 12 V starter, ignition system, and other
electrical parts beyond repair with a 24 V power supply (two 12 V batteries in series or a 24 V
motor generator set).


Jumper cables

Discharged battery

Booster battery

1. Remove the battery cover.


2. Make sure the booster battery is 12 V

and that its negative terminal is
grounded.

3. If the booster battery is in another

vehicle, do not allow both vehicles to
touch. Turn off the engine of the
vehicle with the booster battery and all
unnecessary electrical loads in both
vehicles.

4. Connect the jumper cables in the exact

sequence as in the illustration.

If Trouble Arises

Battery Runs Out

7-19

CX-3_8GR7-EA-18B_Edition1

2017-12-20 16:18:14

Connect one end of a cable to the
positive terminal on the discharged
battery (1).

Attach the other end to the positive
terminal on the booster battery (2).

Connect one end of the other cable
to the negative terminal of the
booster battery (3).

Connect the other end to the ground
point indicated in the illustration
away from the discharged battery
(4).

5. Start the engine of the booster vehicle

and run it a few minutes. Then start the
engine of the other vehicle.

6. When finished, carefully disconnect

the cables in the reverse order
described in the illustration.

7. If the battery cover has been removed,

install it in the reverse order of
removal.

NOTE
Verify that the covers are securely
installed.

If Trouble Arises

Battery Runs Out

7-20

CX-3_8GR7-EA-18B_Edition1

2017-12-20 16:18:14

Starting a Flooded Engine

If the engine fails to start, it may be
flooded (excessive fuel in the engine).
 
Follow this procedure:
 
1. If the engine does not start within 5

seconds on the first try, wait 10
seconds and try again.

2. Make sure the parking brake is on.
3. Depress the accelerator all the way and

hold it there.

4. Depress the clutch pedal (Manual

transaxle) or the brake pedal
(Automatic transaxle), then press the
push button start. If the engine starts,
release the accelerator immediately
because the engine will suddenly rev
up.

5. If the engine fails to start, crank it

without depressing the accelerator.

 
If the engine still does not start using the
previous procedure, have your vehicle
inspected by an Authorized Mazda Dealer.

Push-Starting

Do not push-start your Mazda.

WARNING

Never tow a vehicle to start it:
Towing a vehicle to start it is dangerous.
The vehicle being towed could surge
forward when its engine starts, causing the
2 vehicles to collide. The occupants could
be injured.

CAUTION

Do not push-start a vehicle that has a
manual transaxle. It can damage the
emission control system.

NOTE
You cannot start a vehicle with an
automatic transaxle by pushing it.

If Trouble Arises

Emergency Starting

7-21

CX-3_8GR7-EA-18B_Edition1

2017-12-20 16:18:14


Content   ..  29  30  31  32   ..