Mazda CX-3 (2019 year). Manual - part 19


  Index      Mazda     Mazda CX-3 - service manual 2019 year in english


Search            


Content   ..  17  18  19  20   ..


Mazda CX-3 (2019 year). Manual - part 19


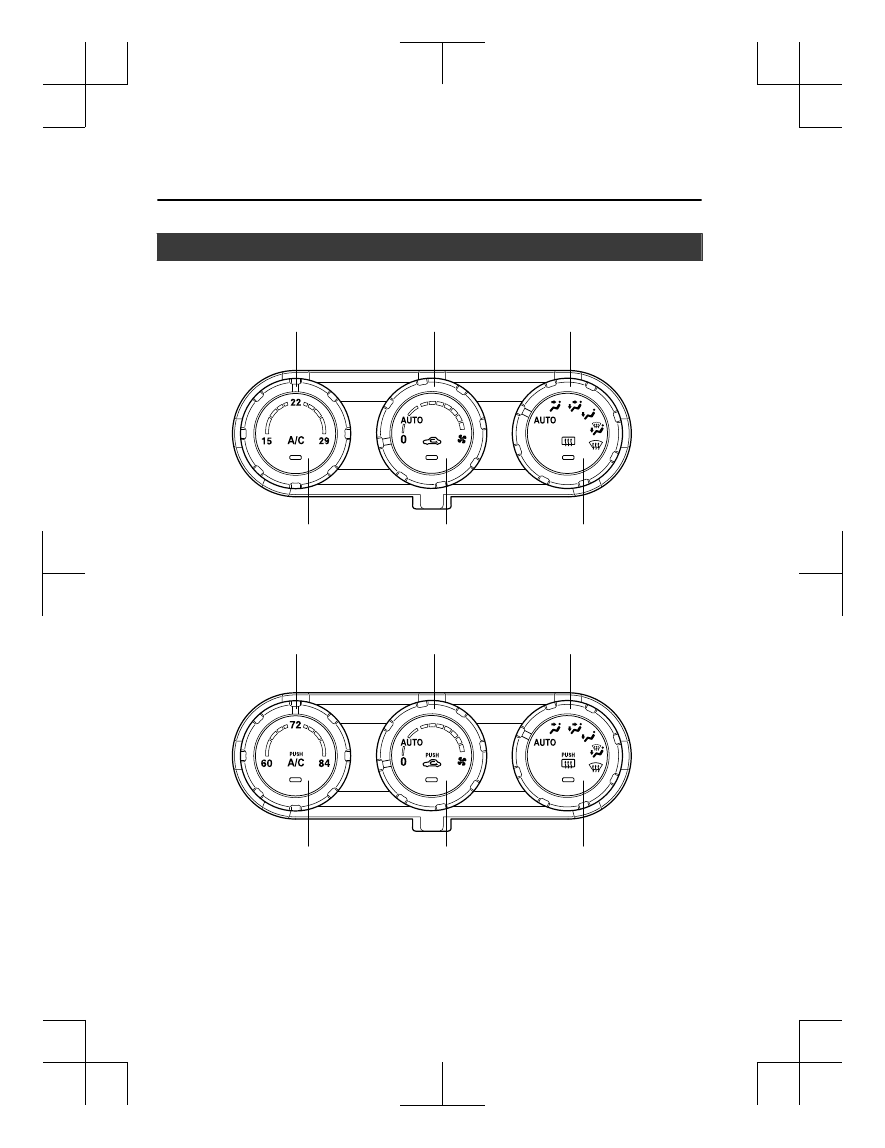
Fully Automatic Type

Temperature control dial

Fan control dial

Mode selector dial

A/C switch

Air intake selector switch

Rear window defogger switch

Type A

Type B

Temperature control dial

Fan control dial

Mode selector dial

A/C switch

Air intake selector switch

Rear window defogger switch

Interior Features

Climate Control System

5-12

CX-3_8GR7-EA-18B_Edition1

2017-12-20 16:18:14

▼ Control Switches

Temperature control dial

This dial controls temperature. Turn it
clockwise for hot and counterclockwise
for cold.

Fan control dial

The fan has seven speeds.

AUTO position

The amount of airflow will be
automatically controlled in accordance
with the set temperature.

Except AUTO position

The airflow amount can be adjusted to the
desired level by turning the dial.

0 position

To turn off the system, set the dial to 0
position.

Mode selector dial

Turn the mode selector dial to select
airflow mode (page 5-6).

AUTO position

The airflow mode automatically adjusts to
the selected temperature.

Except AUTO position

The desired airflow position can be
selected by turning the dial.

NOTE

With the airflow mode set to the 
position and the temperature control
dial set at a medium temperature,
heated air is directed to the feet and air
at a comparably lower temperature will
flow through the central, left and right
vents.

When the fan control dial is ON, and the
mode selector dial is in the   or 
position, the air conditioner is
automatically turned on and the outside
air position is automatically selected to
defrost the windshield. In the   or 
position, the outside air position cannot
be changed to the recirculated air
position.

A/C switch

The air conditioner (cooling/
dehumidifying functions) can be turned on
or off by pressing the switch while the fan
control dial is at a position other than 0.
The indicator light turns on while the air
conditioner is operating.

NOTE
The air conditioner may not function when
the outside temperature approaches 0 °C
(32 °F).

Air intake selector

Outside or recirculated air positions can be
selected. Press the switch to select outside/
recirculated air positions.

Recirculated air position (indicator light
illuminated)

Outside air is shut off. Use this position
when going through tunnels, driving in
congested traffic (high engine exhaust
areas) or when quick cooling is desired.

Interior Features

Climate Control System

5-13

CX-3_8GR7-EA-18B_Edition1

2017-12-20 16:18:14

Outside air position (indicator light
turned off)

Outside air is allowed to enter the cabin.
Use this mode for ventilation or
windshield defrosting.

WARNING

Do not use the 

 position in cold or rainy

weather:
Using the 

 position in cold or rainy

weather is dangerous as it will cause the
windows to fog up. Your vision will be
hampered, which could lead to a serious
accident.

Rear window defogger switch

Press the rear window defogger switch to
defrost the rear window.
Refer to Rear Window Defogger on page
4-53.

▼ Operation of Automatic Air

Conditioner

1. Set the mode selector dial to the

AUTO position.

2. Set the air intake selector to the outside

air position (indicator light turned off).

NOTE
If the recirculated air position is used
for long periods in cold weather or
high humidity, the windshield may fog
up more easily.

3. Set the fan control dial to the AUTO

position.

4. Press the A/C switch to operate the air

conditioner (turn indicator light on).

5. Set the temperature control dial to the

desired position.

6. To turn off the system, set the fan

control dial to the 0 position.

NOTE

Setting the temperature to maximum hot
or cold will not provide the desired
temperature at a faster rate.

When selecting heat, the system will
restrict airflow until it has warmed to
prevent cold air from blowing out of the
vents.

▼ Windshield Defrosting and

Defogging

Set the mode selector dial to the 
position and turn the fan control dial to the
desired speed.
In this position, the outside air position is
automatically selected, and when the fan
control dial is ON, the air conditioner
automatically turns on. The air conditioner
will directly dehumidify the air to the front
windshield and side windows (page 5-6).
Airflow amount will be increased.

WARNING

Set the temperature control to the hot or
warm position when defogging (
position):
Using the 

 position with the temperature

control set to the cold position is
dangerous as it will cause the outside of the
windshield to fog up. Your vision will be
hampered, which could lead to a serious
accident.

NOTE
Use the temperature control dial to
increase the air flow temperature and
defog the windshield more quickly.

Interior Features

Climate Control System

5-14

CX-3_8GR7-EA-18B_Edition1

2017-12-20 16:18:14

▼ Sunlight/Temperature Sensor

Sunlight sensor

Do not place objects on the sunlight
sensor. Otherwise, the interior temperature
may not adjust correctly.

Sunlight sensor

Interior temperature sensor

Do not cover the interior temperature
sensor. Otherwise, the interior temperature
may not adjust correctly.

Interior temperature sensor

Interior Features

Climate Control System

5-15

CX-3_8GR7-EA-18B_Edition1

2017-12-20 16:18:14

Audio Control Switch

▼ Adjusting the Volume

To increase the volume, press up the
volume switch ( ).
To decrease the volume, press down the
volume switch ( ).

▼ Seek Switch

AM/FM radio

Press the seek switch ( ,  ). The radio
switches to the next/previous stored
station in the order that it was stored.
Press and hold the seek switch ( ,  ) to
seek all usable stations at a higher or lower
frequency whether programmed or not.
 

Radio stations which have been previously
stored in the auto memory tuning (Type A)/
favorite radio (Type B) can be called up by
pressing the seek switch ( ,  ) while any
radio station stored in the auto memory
tuning (Type A)/favorite radio (Type B) is
being received. Radio stations can be called
up in the order they were stored with each
press of the switch ( ,  ).
 

USB Audio/Bluetooth

®

 Audio

Press the seek switch ( ) to skip forward
to the beginning of the next track.
Press the seek switch ( ) within a few
seconds after playback begins to track
down to the beginning of the previous
track.
Press the seek switch ( ) after a few
seconds have elapsed to start playback
from the beginning of the current track.
Press and hold the seek switch ( ,  ) to
continuously switch the tracks up or down.

Pandora

®

/Aha™/Stitcher™ Radio

(Type B)

Press the seek switch ( ) to skip forward
to the beginning of the next track.
Press and hold the seek switch ( ) to
evaluate the playback of the current song
as “Like”.
Press and hold the seek switch ( ) to
evaluate the playback of the current song
as “Dislike”.

Interior Features

Before Using the Audio System

5-16

CX-3_8GR7-EA-18B_Edition1

2017-12-20 16:18:14

AUX/USB mode

Audio can be heard from the vehicle's
speakers by connecting a
commercially-available portable audio
unit to the auxiliary jack.
A commercially-available, non-impedance
(3.5 ) stereo mini plug cable is required.
Contact an Authorized Mazda Dealer for
details.
In addition, audio can be played from the
vehicle audio device by connecting a USB
device to the USB port.

NOTE
(Type B)
The SD card slot is for the navigation
system. For vehicles with the navigation
system, the SD card (Mazda genuine) with
stored map data is inserted into the SD
card slot and used.

Type A
 

Auxiliary jack/USB port

Type B
 

USB port

Auxiliary jack

How to use AUX mode (Type A)
............................................... page 5-24

How to use USB mode (Type A)
............................................... page 5-25

How to use iPod mode (Type A)
............................................... page 5-28

How to use AUX mode (Type B)
............................................... page 5-78

How to use USB mode (Type B)
............................................... page 5-79

WARNING

Do not adjust the portable audio unit or a
similar product while driving the vehicle:
Adjusting the portable audio unit or a
similar product while driving the vehicle is
dangerous as it could distract your
attention from the vehicle operation which
could lead to a serious accident. Always
adjust the portable audio unit or a similar
product while the vehicle is stopped.

Interior Features

Before Using the Audio System

5-17

CX-3_8GR7-EA-18B_Edition1

2017-12-20 16:18:14

CAUTION

Depending on the portable audio device,
noise may occur when the device is
connected to the vehicle accessory socket.
(If noise occurs, do not use the accessory
socket.)

NOTE

This mode may not be usable depending
on the portable audio device to be
connected.

Before using the auxiliary jack/USB
port, refer to the instruction manual for
the portable audio device.

Use a commercially-available,
non-impedance (3.5 ) stereo mini plug
for connecting the portable audio unit to
the auxiliary jack. Before using the
auxiliary jack, read the manufacturer's
instructions for connecting a portable
audio unit to the auxiliary jack.

To prevent discharging of the battery, do
not use the auxiliary input for long
periods with the engine off or idling.

When connecting a device to the
auxiliary jack or USB port, noise may
occur depending on the connected
device. If the device is connected to the
vehicle's accessory socket, the noise can
be reduced by unplugging it from the
accessory socket.

▼ How to connect USB port/Auxiliary

jack

Type A
 

USB port Auxiliary jack

Type B
 

USB port

Auxiliary jack

Connecting a device

1. If there is a cover on the AUX jack or

USB port, remove the cover.

2. Connect the connector on the device to

the USB port.

Connecting with a connector cable

1. If there is a cover on the AUX jack or

USB port, remove the cover.

2. Connect the device plug/connector

cable to the auxiliary jack/USB port.

Interior Features

Before Using the Audio System

5-18

CX-3_8GR7-EA-18B_Edition1

2017-12-20 16:18:14

WARNING

Do not allow the connection plug cord to
get tangled with the parking brake or the
shift lever (manual transaxle)/selector lever
(automatic transaxle):
Allowing the plug cord to become tangled
with the parking brake or the shift lever
(manual transaxle)/selector lever
(automatic transaxle) is dangerous as it
could interfere with driving, resulting in an
accident.

CAUTION

Do not place objects or apply force to the
auxiliary jack/USB port with the plug
connected.

NOTE

Insert the plug into the auxiliary
jack/USB port securely.

Insert or pull out the plug with the plug
perpendicular to the auxiliary jack/USB
port hole.

Insert or remove the plug by holding its
base.

Antenna

Antenna

Interior Features

Before Using the Audio System

5-19

CX-3_8GR7-EA-18B_Edition1

2017-12-20 16:18:14

Power/Volume/Sound Controls

Power/Volume/Audio control dial

Menu button

Audio display

▼ Power ON/OFF

Switch the ignition to ACC or ON. Press
the power/volume dial to turn the audio
system on. Press the power/volume dial
again to turn the audio system off.

▼ Volume adjustment

To adjust the volume, turn the power/
volume dial. Turn the power/volume dial
clockwise to increase volume,
counterclockwise to decrease it.

▼ Audio sound adjustment

1. Press the menu button (

) to

select the function. The selected
function will be indicated.

2. Turn the audio control dial to adjust

the selected functions as follows:

Indication

Setting value

Turn

Counter-

clockwise

Turn

Clockwise

ALC

(Automatic volume ad-

justment)

Level de-

crease

Level in-

crease

BASS

(Low pitch sound)

Decrease

bass

Increase

bass

Indication

Setting value

Turn

Counter-

clockwise

Turn

Clockwise

TREB

(Treble sound)

Decrease

treble

Increase

treble

FADE

(Front/back volume bal-

ance)

Shift the
sound to
the front

Shift the
sound to

the rear

BAL

(Left/right volume bal-

ance)

Shift the
sound to

the left

Shift the
sound to
the right

BEEP

(Audio operation sound)

Off

On

BT SETUP

Select mode

12Hr 

 24Hr

(12 Hr/24 Hr time ad-

justment)

12Hr

(Flashing)

24Hr

(Flashing)

NOTE
If not operated for several seconds, the
display returns to the previous display. To
reset bass, treble, fade, and balance, press
the menu button (

) for 2 seconds.

The unit will beep and “CLEAR” will be
displayed.

Interior Features

Audio Set [Type A (non-touchscreen)]

5-20

CX-3_8GR7-EA-18B_Edition1

2017-12-20 16:18:14

ALC (Automatic volume adjustment)

The automatic level control (ALC)
changes the audio volume automatically
according to the vehicle speed. The faster
the vehicle speed, the higher the volume
increases. ALC has ALC OFF and ALC
LEVEL 1 to 7 modes. At ALC LEVEL 7,
the amount that the volume can increase is
at the maximum. Select the mode
according to the driving conditions.

BEEP (Audio operation sound)

The setting for the operation sound when
pressing and holding a button can be
changed. The initial setting is ON. Set to
OFF to mute the operation sound.

BT SETUP mode

Music and other audio such as voice data
recorded on portable audio devices and
mobile phones available on the market
which are equipped with the Bluetooth

®

transmission function can be listened to
via wireless transmission over the
vehicle's speakers. Using the BT SETUP
mode, these devices can be programmed
to the Bluetooth

®

 unit or changed (page

5-34).

12Hr 

 24Hr (12 Hr/24 Hr time

adjustment)

Rotating the audio control dial switches
the display between 12 and 24-hour clock
time (page 5-22).

Interior Features

Audio Set [Type A (non-touchscreen)]

5-21

CX-3_8GR7-EA-18B_Edition1

2017-12-20 16:18:14

Clock

Audio display

Audio control dial

Hour/Minute set switch

:00 button

Menu button

Clock button

▼ Setting the time

The clock can be set at any time when the
ignition is switched to ACC or ON.
1. To adjust the time, press the clock

button (

) for about 2 seconds

until a beep is heard.

2. The clock's current time will flash.

Time adjustment

To adjust the time, press the hour/
minute set button ( ,  ) while the
clock's current time is flashing.

The hours advance while the hour
set button ( ) is pressed. The
minutes advance while the minute
set button ( ) is pressed.

3. Press the clock button (

) again to

start the clock.

▼ Time resetting

1. Press the clock button (

) for

about 2 seconds until a beep is heard.

2. Press the :00 button (1).
3. When the button is pressed, the time

will be reset as follows:
(Example)
12:01―12:29→12:00
12:30―12:59→1:00

NOTE

When the :00 button (1) is pressed, the
seconds will start at “00”.

Switching between 12 and 24-hour clock
time:
Press the menu button (

) several

times until 12 and 24-hour clock time
are displayed. Turn the audio control
dial in either direction, select the
desired clock setting while the preferred
clock time is flashing.

Interior Features

Audio Set [Type A (non-touchscreen)]

5-22

CX-3_8GR7-EA-18B_Edition1

2017-12-20 16:18:14

Operating the Radio

Band selector button

Channel preset buttons

Scan button

Auto memory button

Tuning button

Audio display

▼ Radio ON

Press a band selector button (

) to

turn the radio on.

▼ Band selection

Successively pressing the band selector
button (

) switches the bands as

follows: FM1→FM2→AM.
 
The selected mode will be indicated.

NOTE
If the FM broadcast signal becomes weak,
reception automatically changes from
STEREO to MONO for reduced noise.

▼ Tuning

The radio has the following tuning
methods: Manual, Seek, Scan, Preset
channel, and Auto memory tuning. The
easiest way to tune stations is to set them
on preset channels.

Manual tuning

Select the station by pressing the tuning
button ( ,  ) lightly.

Seek tuning

Automatic search for radio stations starts
when the tuning button ( ,  ) is pressed
until a beep sound is heard. The search
stops when a station is found.

NOTE
If you continue to press and hold the
button, the frequency will continue
changing without stopping.

Scan tuning

Press and hold the scan button (

) to

automatically sample strong stations.
Scanning stops at each station for about 5
seconds. To hold a station, press and hold
the scan button (

) again during this

interval.

Preset channel tuning

The 6 preset channels can be used to store
6 AM and 12 FM stations.
1. To set a channel first select AM, FM1,

or FM2. Tune to the desired station.

2. Press a channel preset button for about

2 seconds until a beep is heard. The
preset channel number or station
frequency will be displayed. The
station is now held in the memory.

Interior Features

Audio Set [Type A (non-touchscreen)]

5-23

CX-3_8GR7-EA-18B_Edition1

2017-12-20 16:18:14

3. Repeat this operation for the other

stations and bands you want to store.
To tune one in the memory, select AM,
FM1, or FM2 and then press its
channel preset button. The station
frequency or the channel number will
be displayed.

Auto memory tuning

This is especially useful when driving in
an area where the local stations are not
known.
 
Press and hold the auto memory button
(

) for about 2 seconds until a beep

is heard; the system will automatically
scan and temporarily store up to 6 stations
with the strongest frequencies in each
selected band in that area.
 
After scanning is completed, the station
with the strongest frequency will be tuned
and its frequency displayed. Press and
release the auto memory button (

)

to recall stations from the auto-stored
stations. One stored station will be
selected each time and its frequency and
channel number will be displayed.

NOTE
If no stations can be tuned after scanning
operations, “A” will be displayed.

How to use AUX mode

1. Switch the ignition to ACC or ON.
2. Press the power/volume dial to turn the

audio system on.

3. Press the media button (

) of the

audio unit to change to the AUX mode.

NOTE

When the device is not connected to the
auxiliary jack, the mode does not switch
to the AUX mode.

Adjust the audio volume using the
portable audio device or audio unit.

Audio adjustments other than audio
volume can only be done using the
portable audio device.

If the connection plug is pulled out from
the auxiliary jack while in AUX mode,
noise may occur.

Interior Features

Audio Set [Type A (non-touchscreen)]

5-24

CX-3_8GR7-EA-18B_Edition1

2017-12-20 16:18:14

How to use USB mode

Media/Scan button

Folder down button

Folder up button

Play/Pause button

Random button

Repeat button

Audio display

Text button

Track down/Reverse button
Track up/Fast-forward button

Type

Playable data

USB mode

MP3/WMA/AAC file

This unit does not support a USB 3.0
device. In addition, other devices may not
be supported depending on the model or
OS version.

▼ Playback

1. Switch the ignition to ACC or ON.
2. Press the power/volume dial to turn the

audio system on.

3. Press the media button (

) to

switch to the USB mode and start
playback.

NOTE

Some devices such as smart phones may
require a setting change to allow
operation using a USB connection.

When the USB device is not connected,
the mode does not switch to USB mode.

When there is no playable data in the
USB device, “NO CONTENTS” is
flashed.

Playback of the USB device is in the
order of the folder numbers. Folders
which have no MP3/WMA/AAC files are
skipped.

Do not remove the USB device while in
the USB mode. The data may be
damaged.

Pause

To stop playback, press the play/pause
button (4).
Press the button again to resume playback.

Fast-forward/Reverse

Press and hold the fast-forward button ( )
to advance through a track at high speed.
Press and hold the reverse button ( ) to
reverse through a track at high speed.

Track search

Press the track up button ( ) once to skip
forward to the beginning of the next track.
Press the track down button ( ) within a
few seconds after playback begins to track
down to the beginning of the previous
track.
Press the track down button ( ) after a
few seconds have elapsed to start playback
from the beginning of the current track.

Interior Features

Audio Set [Type A (non-touchscreen)]

5-25

CX-3_8GR7-EA-18B_Edition1

2017-12-20 16:18:14

Folder search

To change to the previous folder, press the
folder down button ( ), or press the folder
up button ( ) to advance to the next
folder.

Music scan

This function scans the titles in a folder
currently being played and plays 10
seconds of each song to aid you in finding
a song you want to listen to.
Press and hold the scan button (

)

during playback to start the scan play
operation (the track number will flash).
Press and hold the scan button (

)

again to cancel scan playback.

NOTE
If the unit is left in scan, normal playback
will resume where scan was selected.

Repeat playback

Track repeat

1. Press the repeat button (1) during

playback to play the current track
repeatedly. “TRACK RPT” is
displayed (  is displayed next to RPT
at the bottom of the display area).

2. To cancel the repeat playback, press

the button again after 3 seconds.

Folder repeat

1. Press the repeat button (1) during

playback, and then press the button
again within 3 seconds to play the
tracks in the current folder repeatedly.
“FOLDER RPT” is displayed (  is
displayed next to RPT at the bottom of
the display area).

2. Press the button again to cancel the

repeat playback.

Random playback

Tracks are randomly selected and played.

Folder random

1. Press the random button (2) during

playback to play the tracks in the
folder randomly. “FOLDER RDM” is
displayed (  is displayed next to
RDM at the bottom of the display
area).

2. To cancel the random playback, press

the button again after 3 seconds.

All random

1. Press the random button (2) during

playback, and then press the button
again within 3 seconds to play the
tracks in the USB device randomly.
“ALL RDM” is displayed (  is
displayed next to RDM at the bottom
of the display area).

2. Press the button again to cancel the

random playback.

▼ Switching the display

The information displayed on the audio
display changes as follows each time the
text button (3) is pressed during playback.

Button

Information displayed

on audio display

File number/Elapsed

time

Folder number/File num-

ber

File name

Folder name

Album name

Song name

Artist name

Interior Features

Audio Set [Type A (non-touchscreen)]

5-26

CX-3_8GR7-EA-18B_Edition1

2017-12-20 16:18:14

NOTE

The information (artist name, music
name) is displayed only when the USB
device information in the USB device
has information which can be displayed
on the screen.

This unit cannot display some
characters. Characters which cannot be
displayed are indicated by an asterisk
( ).

Display scroll

Only 13 characters can be displayed at 1
time. To display the rest of the characters
of a long title, press and hold the text
button (3). The display scrolls the next 13
characters. Press and hold the text button
(3) again after the last 13 characters have
been displayed to return to the beginning
of the title.

NOTE
The number of characters which can be
displayed is restricted.

Interior Features

Audio Set [Type A (non-touchscreen)]

5-27

CX-3_8GR7-EA-18B_Edition1

2017-12-20 16:18:14


Content   ..  17  18  19  20   ..