Mazda 3 Hatchback (2018 year). Manual - part 11


  Index      Mazda     Mazda 3 Hatchback - service manual 2018 year in english


Search            


Content   ..  9  10  11  12   ..


Mazda 3 Hatchback (2018 year). Manual - part 11


The headlights turn off if the lever is
pulled again while the headlights are
illuminated.

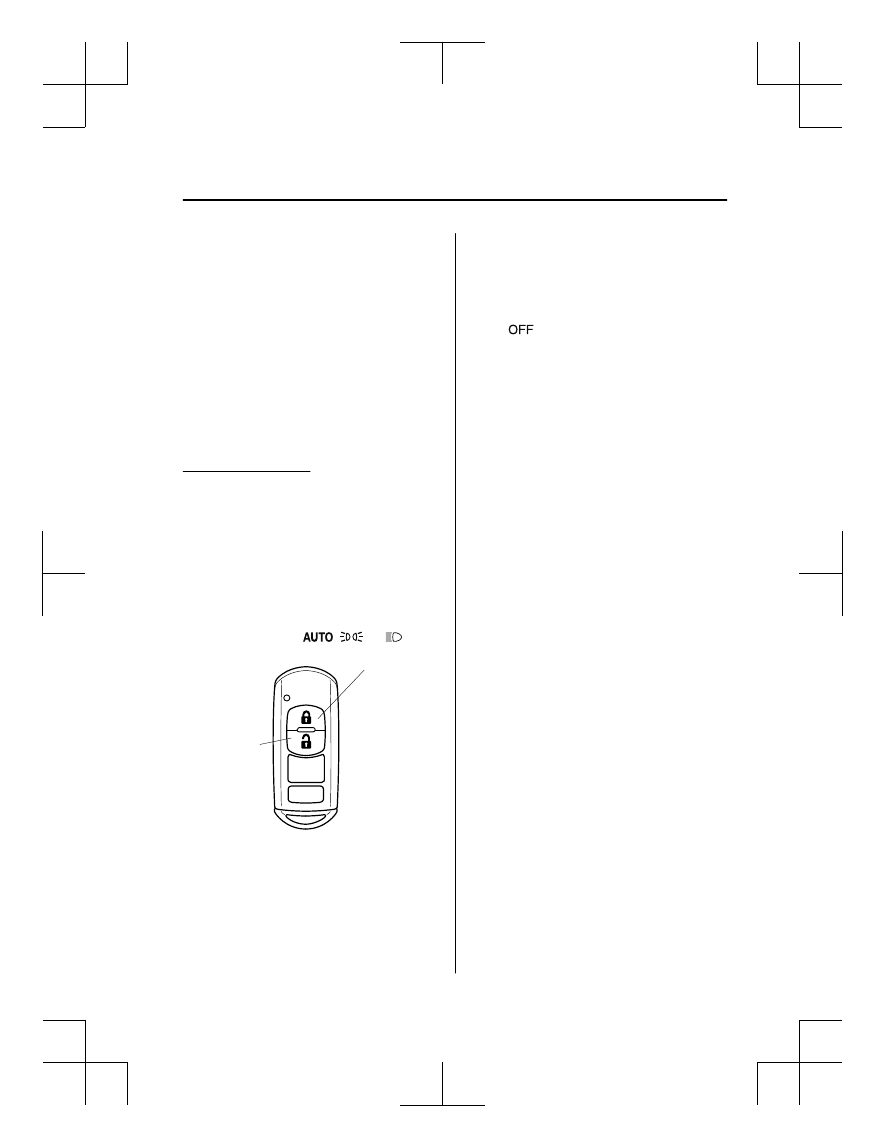
▼ Leaving Home Light

The leaving home light turns on the lights
when the transmitter unlock button is
pressed while away from the vehicle.
The following lights turn on when the
leaving home light is operated.
Low beams, Parking lights, Taillights,
License plate lights.

To turn on the lights

When the ignition switch and the headlight
switch are in the following conditions, the
headlights will illuminate when the
transmitter unlock button is pressed and
the vehicle receives the transmitter signal.
The headlights turn off after a certain
period of time has elapsed (30 seconds).

Ignition switch: off

Headlight switch: 

, or 

Lock button

Unlock 
button

NOTE

Operation of the leaving home light can
be turned on or off.
Refer to Personalization Features on
page 9-12.

When the transmitter lock button is
pressed and the vehicle receives the
transmitter signal, the headlights turn
off.

When the headlight switch is turned to
the 

 position, the headlights turn off.

▼ Headlight Leveling

*

The number of passengers and weight of
cargo in the luggage compartment change
the angle of the headlights.
 
The angle of the headlights will be
automatically adjusted when turning on
the headlights.

▼ Daytime Running Lights

Some countries require moving vehicles to
have their lights on (daytime running
lights) during the daytime.
 
The daytime running lights turn on
automatically when the vehicle starts
moving.
They turn off when the parking brake is
operated or the shift lever is shifted to the
P position (automatic transaxle vehicle).

NOTE
(Except Canada)
The daytime running lights can be
deactivated.
Refer to Personalization Features on page
9-12
.

When Driving

Switches and Controls

*Some models.

4-47

Mazda3_8GE4-EA-17F_Edition1

2017-4-7 11:59:21

Fog Lights

*

The fog lights can be used when the
ignition is switched ON.
Use this switch to turn on the fog lights.
The fog lights will improve visibility at
night and during foggy conditions.
 
To turn the fog lights on, rotate the fog
light switch to the   position.
 

Fog light switch

The headlight switch must be in the 
position before turning on the fog lights.
To turn the fog lights off, do any of the
following:

Rotate the fog light switch to the 
position.

Turn the headlight switch to the 

 or

 position.

Switch the ignition to a position other
than ON.

NOTE

The fog lights will turn off when the
headlights are set at high beams.

(With auto-light control)
If the fog light switch is in the 
position and the headlight switch is in
the 

 position, the fog lights will turn

on when the headlights, the exterior
lights and dashboard illumination turn
on.

Turn and Lane-Change

Signals

The ignition must be switched ON to use
the turn and lane-change signals.

▼ Turn Signals

Move the signal lever down (for a left
turn) or up (for a right turn) to the stop
position. The signal will self-cancel after
the turn is completed.
 
If the indicator light continues to flash
after a turn, manually return the lever to its
original position.

Right turn

Left turn

Right lane change

Left lane change

OFF

The turn signal indicators in the
instrument cluster flash according to the
operation of the turn signal lever to show
which signal is working.
 

When Driving

Switches and Controls

4-48

*Some models.

Mazda3_8GE4-EA-17F_Edition1

2017-4-7 11:59:21

NOTE

If an indicator light stays on without
flashing or if it flashes abnormally, one
of the turn signal bulbs may be burned
out.

A personalized function is available to
change the turn indicator sound volume.
(page 9-12)

▼ Lane-Change Signals

Move the lever halfway toward the
direction of the lane change―until the
indicator flashes― and hold it there. It
will return to the off position when
released.

▼ Three-Flash Turn Signal

After releasing the turn signal lever, the
turn signal indicator flashes three times.
The operation can be cancelled by moving
the lever in the direction opposite to which
it was operated.

NOTE
The three-flash turn signal function can be
switched to operable/inoperable using the
personalization function.
Refer to Personalization Features on page
9-12.

Windshield Wipers and

Washer

The ignition must be switched ON to use
the wipers.

WARNING

Use only windshield washer fluid or plain
water in the reservoir:
Using radiator antifreeze as washer fluid is
dangerous. If sprayed on the windshield, it
will dirty the windshield, affect your
visibility, and could result in an accident.

Only use windshield washer fluid mixed
with anti-freeze protection in freezing
weather conditions:
Using windshield washer fluid without
anti-freeze protection in freezing weather
conditions is dangerous as it could freeze
on the windshield and block your vision
which could cause an accident. In addition,
make sure the windshield is sufficiently
warmed using the defroster before
spraying the washer fluid.

When Driving

Switches and Controls

4-49

Mazda3_8GE4-EA-17F_Edition1

2017-4-7 11:59:21

NOTE
If the windshield wipers are operated
under cold weather conditions or during
snowfall, they could stop due to
accumulated snow on the windshield. If
the windshield wipers stop due to
accumulated snow on the windshield, park
the vehicle in a safe place, turn the wiper
switch off, and then remove the
accumulated snow. If the wiper switch is
turned to another position other than OFF,
the wipers will operate. If the wipers do
not operate even though the wiper switch
is turned to a position other than OFF,
consult an Authorized Mazda Dealer as
soon as possible.

▼ Windshield Wipers

Turn the wipers on by pressing the lever
up or down.
With intermittent wiper
 

Switch Posi-

tion

Wiper operation

Operation while pulling up lever
Stop
Intermittent
Low speed
High speed

Variable-speed intermittent wipers

Set the lever to the intermittent position
and choose the interval timing by rotating
the ring.
 

INT ring

Fast

Slow

With auto-wiper control
 

Switch Posi-

tion

Wiper operation

Operation while pulling up lever
Stop
Auto control
Low speed
High speed

When Driving

Switches and Controls

4-50

Mazda3_8GE4-EA-17F_Edition1

2017-4-7 11:59:21

Auto-wiper control

When the wiper lever is in the 
position, the rain sensor senses the amount
of rainfall on the windshield and turns the
wipers on or off automatically
(off―intermittent―low speed―high
speed).
 
The sensitivity of the rain sensor can be
adjusted by turning the switch on the
wiper lever.
From the center position (normal), rotate
the switch upward for higher sensitivity
(faster response) or rotate it downward for
less sensitivity (slower response).
 

Higher sensitivity

Less sensitivity

Switch

Center 
position

CAUTION

Do not shade the rain sensor by adhering

a sticker or a label on the windshield.
Otherwise the rain sensor will not
operate correctly.

When the wiper lever is in the 

position and the ignition is switched ON,
the wipers may move automatically in
the following cases:

If the windshield above the rain sensor

is touched or wiped with a cloth.

If the windshield is struck with a hand

or other object from either outside or
inside the vehicle.

Keep hands and scrapers clear of the
windshield when the wiper lever is in the

 position and the ignition is

switched ON as fingers could be pinched
or the wipers and wiper blades damaged
when the wipers activate automatically.
If you are going to clean the windshield,
be sure the wipers are turned off
completely (when it is most likely that the
engine is left running) this is particularly
important when clearing ice and snow.

NOTE

Switching the auto-wiper lever from the

 to the 

 position while driving

activates the windshield wipers once,
after which they operate according to
the rainfall amount.

The auto-wiper control may not operate
when the rain sensor temperature is
about 

10 °C (14 °F) or lower, or

about 85 °C (185 °F) or higher.

If the windshield is coated with water
repellent, the rain sensor may not be
able to sense the amount of rainfall
correctly and the auto-wiper control
may not operate properly.

When Driving

Switches and Controls

4-51

Mazda3_8GE4-EA-17F_Edition1

2017-4-7 11:59:21

If dirt or foreign matter (such as ice or
matter containing salt water) adheres to
the windshield above the rain sensor, or
if the windshield is iced, it could cause
the wipers to move automatically.
However, if the wipers cannot remove
this ice, dirt or foreign matter, the
auto-wiper control will stop operation.
In this case, set the wiper lever to the
low speed position or high speed
position for manual operation, or
remove the ice, dirt or foreign matter by
hand to restore the auto-wiper
operation.

If the auto-wiper lever is left in the 
position, the wipers could operate
automatically from the effect of strong
light sources, electromagnetic waves, or
infrared light because the rain sensor
uses an optical sensor. It is
recommended that the auto-wiper lever
be switched to the 

 position other

than when driving the vehicle under
rainy conditions.

The auto-wiper control functions can be
turned off. Refer to Personalization
Features on page 9-12.

▼ Windshield Washer

Pull the lever toward you and hold it to
spray washer fluid.
 

Washer

OFF

NOTE
If the windshield washer is turned on when
the windshield wipers are not operating,
the windshield wipers operate a few times.

If the washer does not work, inspect the
fluid level (page 6-27). If the fluid level
is normal, consult an Authorized Mazda
Dealer.

When Driving

Switches and Controls

4-52

Mazda3_8GE4-EA-17F_Edition1

2017-4-7 11:59:21

Rear Window Wiper and

Washer

*

The ignition must be switched ON to use
the wiper.

▼ Rear Window Wiper

Turn the wiper on by turning the rear
wiper/washer switch.

Switch Posi-

tion

Wiper operation

Stop
Intermittent
Normal

▼ Rear Window Washer

To spray washer fluid, turn the rear wiper/
washer switch to either of the   position.
After the switch is released, the washer
will stop.
If the washer does not work, inspect the
fluid level (page 6-27). If the fluid level
is normal and the washer still does not
work, consult an Authorized Mazda
Dealer.

Rear Window Defogger

The rear window defogger clears fog from
the rear window.
 
The ignition must be switched ON to use
the defogger.
 
Press the switch to turn on the rear
window defogger. The rear window
defogger operates for about 15 minutes
and then turns off automatically.
The indicator light illuminates when the
defogger is operating.
 
To turn off the rear window defogger
before the 15 minutes has elapsed, press
the switch again.
Manual Climate Control

Indicator light

Automatic Climate Control

Indicator light

When Driving

Switches and Controls

*Some models.

4-53

Mazda3_8GE4-EA-17F_Edition1

2017-4-7 11:59:21

Dual-Zone Automatic Climate Control

Indicator light

CAUTION

Do not use sharp instruments or window

cleaners with abrasives to clean the
inside of the rear window surface. They
may damage the defogger grid inside the
window.

NOTE

This defogger is not designed for
melting snow. If there is an
accumulation of snow on the rear
window, remove it before using the
defogger.

The rear window defogger setting can
be changed. After changing the setting,
the rear window defogger stops
automatically after 15 minutes have
elapsed and when the ambient
temperature is high. When the ambient
temperature is low, it continues to
operate until the switch is pressed
again.
Refer to Personalization Features on
page 9-12.

▼ Mirror Defogger

*

The mirror defoggers defrost the outside
mirrors.
 
The mirror defoggers operate in
conjunction with the rear window
defogger.
To turn on the mirror defoggers, switch the
ignition ON and press the rear window
defogger switch (page 4-53).
Manual Climate Control

Indicator light

Automatic Climate Control

Indicator light

When Driving

Switches and Controls

4-54

*Some models.

Mazda3_8GE4-EA-17F_Edition1

2017-4-7 11:59:21

Dual-Zone Automatic Climate Control

Indicator light

Horn

To sound the horn, press the   mark on
the steering wheel.

When Driving

Switches and Controls

4-55

Mazda3_8GE4-EA-17F_Edition1

2017-4-7 11:59:21

Hazard Warning Flasher

The hazard warning lights should always
be used when you stop on or near a
roadway in an emergency.
 

The hazard warning lights warn other
drivers that your vehicle is a traffic hazard
and that they must take extreme caution
when near it.
 

Depress the hazard warning flasher and all
the turn signals will flash. The hazard
warning indicator lights in the instrument
cluster flash simultaneously.

NOTE

The turn signals do not work when the
hazard warning lights are on.

Check local regulations about the use of
hazard warning lights while the vehicle
is being towed to verify that it is not in
violation of the law.

HomeLink Wireless

Control System

*

NOTE
HomeLink and HomeLink house icon are
registered trademarks of Gentex
Corporation.

The HomeLink system replaces up to 3
hand-held transmitters with a single
built-in component in the auto-dimming
mirror. Pressing the HomeLink button on
the auto-dimming mirror activates garage
doors, gates and other devices surrounding
your home.
 

HomeLink button

Indicator light

When Driving

Switches and Controls

4-56

*Some models.

Mazda3_8GE4-EA-17F_Edition1

2017-4-7 11:59:21

WARNING

Do not use the HomeLink system with any
garage door opener that lacks the safety
stop and reverse feature:
Using the HomeLink system with any
garage door opener that lacks the safety
stop and reverse feature as required by
federal safety standards is dangerous. (This
includes garage doors manufactured
before April 1, 1982.)
Using these garage door openers can
increase the risk of serious injury or death.
For further information, contact HomeLink
at 1-800-355-3515 or www.homelink.com
or an Authorized Mazda Dealer.

Always check the areas surrounding
garage doors and gates for people or
obstructions before programming or
during operation of the HomeLink system:
Programming or operating the HomeLink
system without verifying the safety of areas
surrounding garage doors and gates is
dangerous and could result in an
unexpected accident and serious injury if
someone were to be hit.

NOTE
The programming will not be erased even
if the battery is disconnected.

▼ Pre-programming the HomeLink

System

NOTE
It is recommended that a new battery be
placed in the hand-held transmitter of the
device being programmed to HomeLink
for quicker training and accurate
transmission of the radio-frequency signal.

Verify that there is a remote control
transmitter available for the device you
would like to program.

Disconnect the power to the device.

▼ Programming the HomeLink

System

CAUTION

When programming a garage door opener
or a gate, disconnect the power to these
devices before performing programming.
Continuous operation of the devices could
damage the motor.

The HomeLink system provides 3 buttons
which can be individually selected and
programmed using the transmitters for
current, on-market devices as follows:
1. Disconnect the power to the garage

door opener or gate programmed to the
hand-held transmitter.

2. Position the end of your hand-held

transmitter 2.5―7.5 cm (1―3 inches)
away from the HomeLink button you
wish to program while keeping the
indicator light in view.

When Driving

Switches and Controls

4-57

Mazda3_8GE4-EA-17F_Edition1

2017-4-7 11:59:21

3. Simultaneously press and hold both the

chosen HomeLink and hand-held
transmitter buttons. Do not release the
buttons until step 3 has been
completed.

NOTE
Some gate operators and garage door
openers may require you to replace
this Programming Step 2 with
procedures noted in the “Gate
Operator/Canadian Programming”
section.

4. After the HomeLink indicator light

changes from a slow to a rapidly
blinking light, release both the
HomeLink and hand-held transmitter
buttons.

NOTE
If the HomeLink indicator light does
not change to a rapidly blinking light,
contact HomeLink at
www.homelink.com or call
1-800-355-3515 for assistance.

5. Connect the power to the garage door

opener or gate programmed to the
hand-held transmitter.

6. Firmly press and hold the programmed

HomeLink button for five seconds, and
then release it. Perform this operation
two times to activate the door or gate.
If the door or gate does not activate,
press and hold the just-trained
HomeLink button and observe the
indicator light.
If the indicator light stays on
constantly, programming is complete
and your device should activate when
the HomeLink button is pressed and
released.

NOTE
To program the remaining two
HomeLink buttons, begin with
“Programming”― step 1

If the indicator light blinks rapidly for
two seconds and then turns to a
constant light, continue with
“Programming” steps 7―9
 to
complete the programming of a rolling
code equipped device (most commonly
a garage door opener).

7. At the garage door opener receiver

(motor-head unit) in the garage, locate
the “learn” or “smart” button. This can
usually be found where the hanging
antenna wire is attached to the
motor-head unit.

8. Firmly press and release the “learn” or

“smart” button. (The name and color
of the button may vary by
manufacturer.)

NOTE
Complete the programming within 30
seconds.

9. Return to the vehicle and firmly press,

hold for two seconds and release the
programmed HomeLink button. Repeat
the “press/hold/release” sequence a
second time, and, depending on the
brand of the garage door opener (or
other rolling code equipped device),
repeat this sequence a third time to
complete the programming process.

HomeLink should now activate your
rolling code equipped device.

When Driving

Switches and Controls

4-58

Mazda3_8GE4-EA-17F_Edition1

2017-4-7 11:59:21

NOTE
To program the remaining two HomeLink
buttons, begin with “Programming”
step 1

For questions or comments, please contact
HomeLink at www.homelink.com or
1-800-355-3515.

▼ Gate operator/Canadian

Programming

Canadian radio-frequency laws require
transmitter signals to “time-out” (or quit)
after several seconds of transmission ―
which may not be long enough for
HomeLink to pick up the signal during
programming. Similar to this Canadian
law, some U.S. gate operators are designed
to “time-out” in the same manner.
 
If you live in Canada or you are having
difficulties programming a gate operator
by using the “Programming” procedures
(regardless of where you live), replace
“Programming HomeLink” step 3
 with
the following:

NOTE
If programming a garage door opener or
gate operator, it is advised to unplug the
device during the “cycling” process to
prevent possible overheating.

Continue to press and hold the HomeLink
button while you press and release ―
every two seconds
 (“cycle”) your
hand-held transmitter until the frequency
signal has successfully been accepted by
HomeLink. (The indicator light will flash
slowly and then rapidly.)
Proceed with “Programming” step 4 to
complete.

▼ Operating the HomeLink System

Press the programmed HomeLink button
to operate a programmed device. The code
will continue being transmitted for a
maximum of 20 seconds.

▼ Reprogramming the HomeLink

system

To program a device to HomeLink using a
HomeLink button previously trained,
follow these steps:
1. Press and hold the desired HomeLink

button. DO NOT release the button.

2. The indicator light will begin to flash

after 20 seconds. Without releasing the
HomeLink button, proceed with
“Programming” - step 1.

▼ Erasing Programmed HomeLink

Buttons

To erase the existing programming from
all three operating channels, press and
hold the two outside buttons (

) on

the auto-dimming mirror until the
HomeLink indicator light begins to flash
after approximately 10 seconds.
Verify that the programming has been
erased when you resell the vehicle.

When Driving

Switches and Controls

4-59

Mazda3_8GE4-EA-17F_Edition1

2017-4-7 11:59:21

Brake System

▼ Foot Brake

This vehicle has power-assisted brakes
that adjust automatically through normal
use.
 
Should power-assist fail, you can stop by
applying greater force than normal to the
brake pedal. But the distance required to
stop will be greater than usual.

WARNING

Do not coast with the engine stalled or
turned off, find a safe place to stop:
Coasting with the engine stalled or turned
off is dangerous. Braking will require more
effort, and the brake's power-assist could
be depleted if you pump the brake. This will
cause longer stopping distances or even an
accident.

Shift to a lower gear when going down
steep hills:
Driving with your foot continuously on the
brake pedal or steadily applying the brakes
for long distances is dangerous. This causes
overheated brakes, resulting in longer
stopping distances or even total brake
failure. This could cause loss of vehicle
control and a serious accident. Avoid
continuous application of the brakes.

Dry off brakes that have become wet by
driving slowly, releasing the accelerator
pedal and lightly applying the brakes
several times until the brake performance
returns to normal:
Driving with wet brakes is dangerous.
Increased stopping distance or the vehicle
pulling to one side when braking could
result in a serious accident. Light braking
will indicate whether the brakes have been
affected.

CAUTION

Do not drive with your foot held on the

clutch pedal or brake pedal, or hold the
clutch pedal depressed halfway
unnecessarily. Doing so could result in
the following:

The clutch and brake parts will wear

out more quickly.

The brakes can overheat and adversely

affect brake performance.

Always depress the brake pedal with the

right foot. Applying the brakes with the
unaccustomed left foot could slow your
reaction time to an emergency situation
resulting in insufficient braking
operation.

When Driving

Brake

4-60

Mazda3_8GE4-EA-17F_Edition1

2017-4-7 11:59:21

Wear shoes appropriate for driving in

order to avoid your shoe contacting the
brake pedal when depressing the
accelerator pedal.

▼ Parking Brake

CAUTION

Driving with the parking brake on will
cause excessive wear of the brake parts.

NOTE
For parking in snow, refer to Winter
Driving (page 3-48
) regarding parking
brake use.

Setting the parking brake

Depress the brake pedal and then firmly
pull the parking brake lever fully upwards
with sufficient force to hold the vehicle in
a stationary position.

Releasing the parking brake

Depress the brake pedal and pull the
parking brake lever upwards, then press
the release button. While holding the
button, lower the parking brake lever all
the way down to the released position.

▼ Electric Parking Brake (EPB)

The EPB equipment applies the parking
brake using an electric motor. When the
EPB is applied, the EPB switch indicator
light turns on.

Indicator light

When Driving

Brake

4-61

Mazda3_8GE4-EA-17F_Edition1

2017-4-7 11:59:21

WARNING

Do not drive the vehicle with the EPB
applied:
If the vehicle is driven with the parking
brake applied, the brake parts may
generate heat and the brake system may
not operate, leading to an accident.
Before driving, release the EPB and verify
that the brake system warning light is
turned off.

NOTE

The EPB cannot be applied or released
while the vehicle battery is dead.

An operation sound occurs when
applying or releasing the EPB, however,
this does not indicate a malfunction.

If the EPB is not used for long periods,
an automatic inspection of the system is
performed while the vehicle is parked.
An operation sound can be heard,
however, this does not indicate a
problem.

When the EPB is applied and the
ignition is switched OFF, an operation
sound can be heard, however, this does
not indicate a problem.

The brake pedal may move while the
EPB is being applied or released,
however, this does not indicate a
problem.

If the EPB switch is continually pulled
while driving the vehicle, the EPB will
be applied and the EPB warning beep
will be activated. When the switch is
released, the EPB is released and the
beep stops.

If the EPB is applied with the ignition
switched off or in ACC, the brake system
warning light in the instrument cluster
and the indicator light in the switch may
turn on for 15 seconds.

When running the vehicle through an
automatic car wash, it may be necessary
to switch the ignition off with the
parking brake released depending on
the type of automatic car wash.

When applying the EPB

The EPB can be applied regardless of the
ignition switch position.
Securely depress the brake pedal and pull
up the EPB switch.
The EPB is applied and the brake system
warning light and the EPB switch
indicator light turn on.
Refer to Warning/Indicator Lights on page
4-23.

When releasing the EPB

The EPB can be released while the
ignition is switched ON or the engine is
running. When the EPB is released, the
brake system warning light and the EPB
switch indicator light turn off.

When Driving

Brake

4-62

Mazda3_8GE4-EA-17F_Edition1

2017-4-7 11:59:21


Content   ..  9  10  11  12   ..